
CEED 2025 Question Paper Pdf- Check Solutions with Answer Key Pdf

.jpg?tr=h-55,w-55,c-force)
Content Strategist|Tech-innovator|National Hackathon Winner | Updated On - Jan 22, 2025
CEED 2025 Question Paper for January 19 is available for download. The exam was successfully conducted by IIT Bombay from 9:00 AM to 12:00 PM. As per the students’ initial reactions, CEED 2025 Question Paper for January 19 was reported as Moderate. Part A was considered Moderately Difficult, while Part B was Easy to Moderate. Candidates can download the CEED 2025 Question Paper with Solution and Answer Key PDFs for January 19 using the link below.
| CEED 2025 January 19 Question Paper with Answer Key |  Download Download |
Check Solution |
Part- A
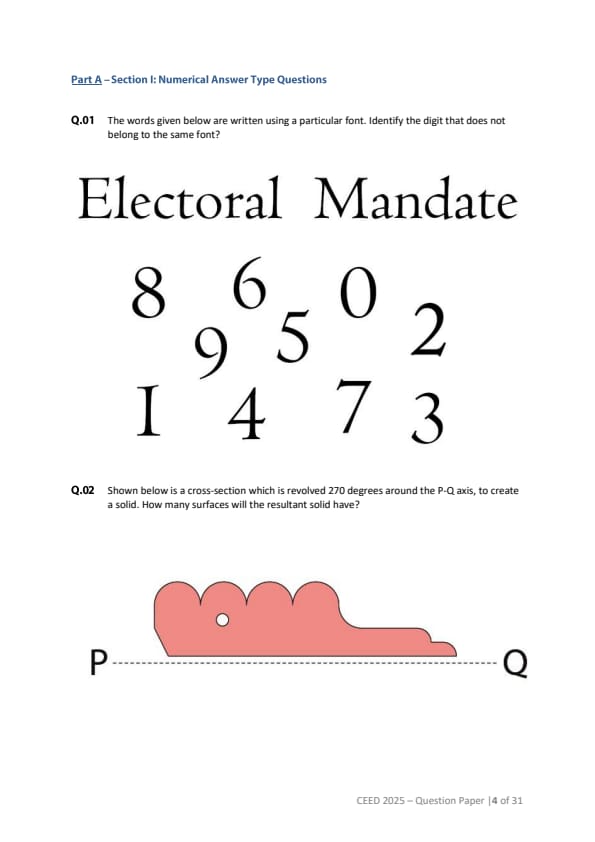
Question 1:
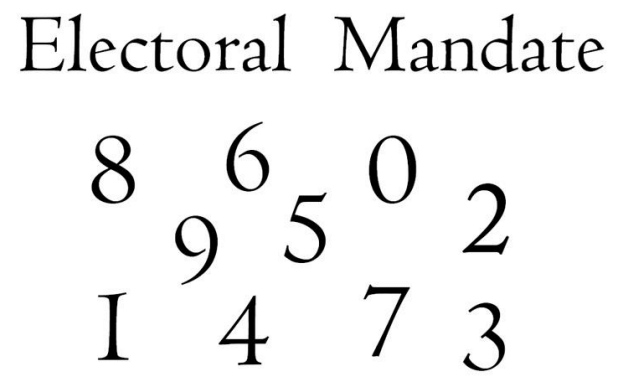
The words given below are written using a particular font. Identify the digit that does not belong to the same font. Electoral Mandate 8 6 0 9 5 2 1 4 7 3
View Solution
The task is to identify the digit that does not match the font style of the others. 1. First, observe the text “Electoral Mandate”, which is written in a serif font. 2. Next, examine the digits provided below the text: 8, 9, 6, 0, 2, 5, 1, 4, 7, 3. 3. Among these, the digit 2 stands out as having a slightly different design, indicating it belongs to a different font style compared to the others. Conclusion: The digit 2 is the one that does not match the font style of the rest.
Question 2:
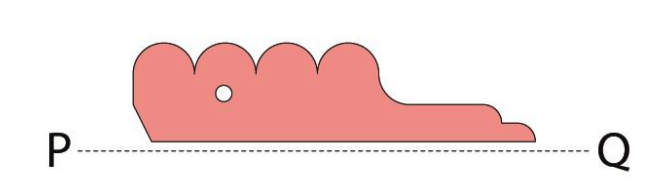
Shown below is a cross-section which is revolved 270 degrees around the P-Q axis to create a solid. How many surfaces will the resultant solid have?
View Solution
The problem requires us to determine the total number of surfaces in the solid formed when the given cross-section is revolved 270 degrees around the P-Q axis. **Analysis:** 1. **Outer curved surfaces:** * The cross-section consists of multiple distinct curves. * When revolved, each curve generates a separate curved surface on the solid. * The diagram shows **5 curved segments**, resulting in **5 outer curved surfaces.** 2. **Flat surfaces along the P-Q axis:** * The flat base of the cross-section along the P-Q axis creates **1 flat surface** at the bottom of the solid. * Since the revolution is only 270 degrees (not a full circle), there will be an additional **vertical flat surface** at the open edge. 3. **Inner surfaces from the hole:** * The hole in the cross-section generates a **cylindrical surface** inside the solid. * Additionally, the top of the hole results in **1 inner flat surface.** **Total Surfaces:** Adding all the surfaces together: 5 (outer curved surfaces)+1 (flat base)+1 (vertical flat surface)+1 (cylindrical inner surface)+1 (top inner flat surface) = 9 surfaces.
Question 3:
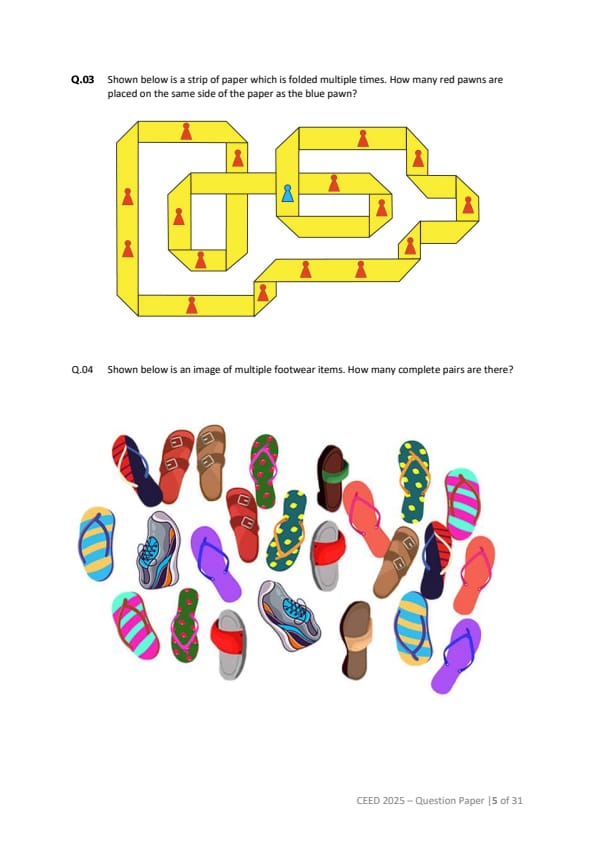
Shown below is a strip of paper which is folded multiple times. How many red pawns are placed on the same side of the paper as the blue pawn?
![[Diagram of a folded strip of paper with red and blue pawns]](https://static.zollege.in/public/image/3_a57c400343b5046da1bd6a98897186af.png?tr=w-540,h-291,c-force)
View Solution
The question needs to be determining how many red pawns are placed on the same side of the paper as the blue pawn in the above figure. **Analysis** The diagram shows a strip of paper folded multiple times, creating a series of alternating sides for the red and blue pawns. To determine how many red pawns are on the same side as the blue pawn, it must be carefully observed the placement of the pawns relative to the blue pawn. **Steps to Solve** 1. The blue pawn is placed on one specific side of the folded paper. 2. Every alternate pawn on the paper will be on the opposite side due to the folding pattern. 3. Starting from the blue pawn, we trace along the strip of paper and identify the red pawns that are placed on the same side as the blue pawn. **Counting the Red Pawns** * Observing the placement in the figure, there are a total of **9 red pawns** on the same side of the paper as the blue pawn. * The remaining red pawns are on the opposite side. Conclusion The number of red pawns on the same side of the paper as the blue pawn is 9.
Question 4:
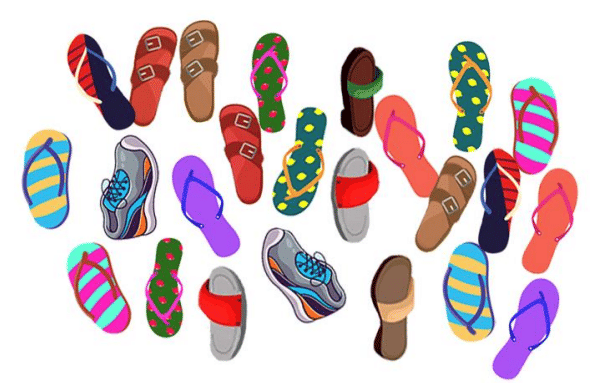
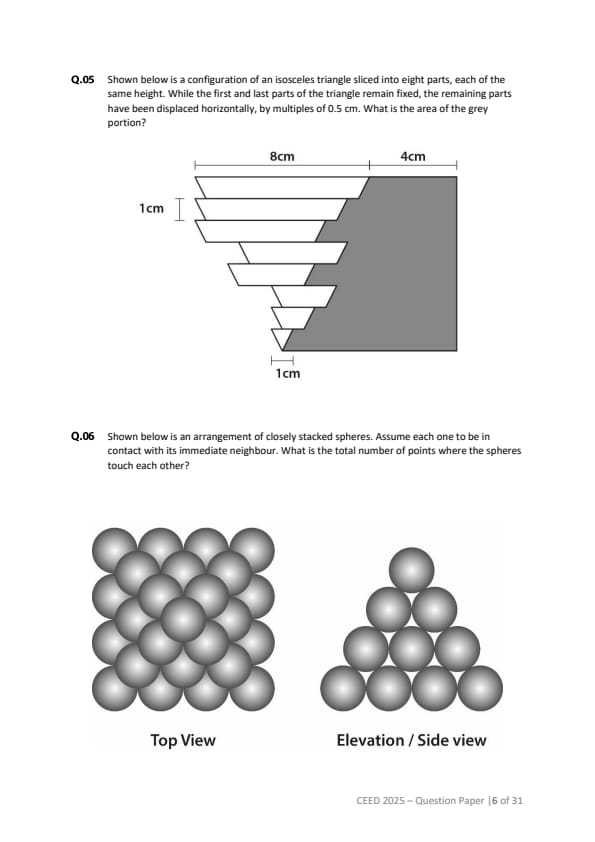
Shown below is an image of multiple footwear items. How many complete pairs are there?
View Solution
Solution: Step 1: Carefully examine the image and identify all the footwear items present. Step 2: Match each left footwear item with its corresponding right item based on design and style. Ensure all possible pairs are accounted for without leaving any unmatched items. Step 3: After counting the matched pairs, the total number of complete pairs of footwear is 11.
Question 5:
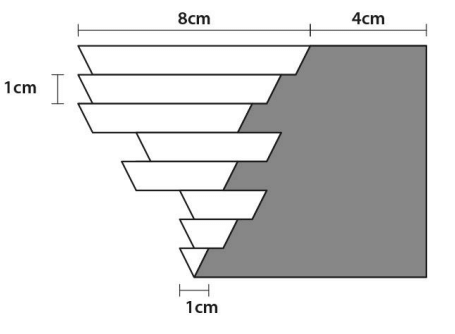
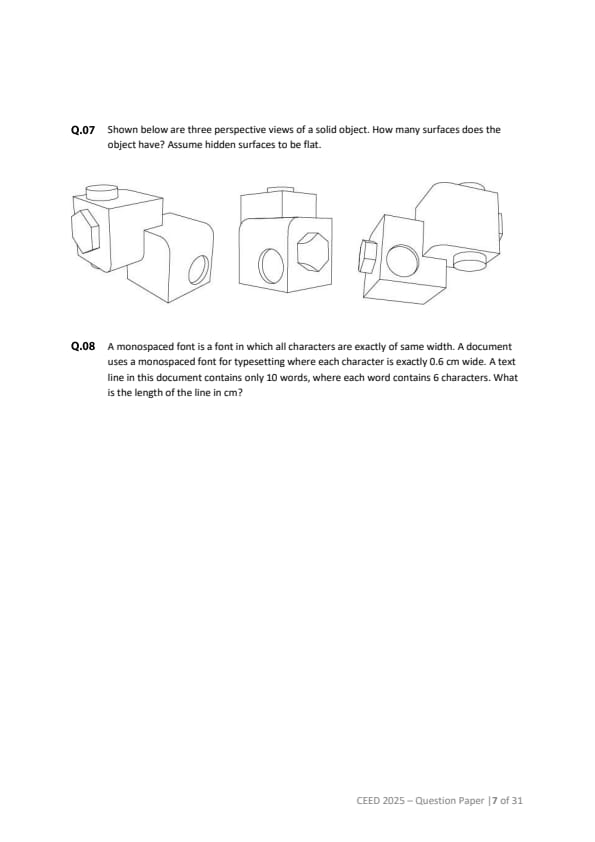
Shown below is a configuration of an isosceles triangle sliced into eight parts, each of the same height. While the first and last parts of the triangle remain fixed, the remaining parts have been displaced horizontally, by multiples of 0.5 cm. What is the area of the grey portion?
View Solution
The question needs to find the area of the grey portion in an isosceles triangle that is sliced into eight parts of equal height. Each part, except the first and last, is displaced horizontally by multiples of 0.5 cm. **Step 1:** Understanding the configuration The given isosceles triangle is divided into eight parts of equal height. The first and last parts remain fixed, while the intermediate parts are displaced horizontally by: 0.5 cm, 1.0 cm, 1.5 cm, and so on. **Step 2:** Area of the original triangle Let the total height of the triangle be *h* = 16 cm, and its base *b* = 8 cm. The area of the original triangle is: *A*triangle = ½ × base × height = ½ × 8 × 16 = 64 cm². **Step 3:** Calculating the displaced area The displaced parts of the triangle introduce gaps or overlaps that reduce the effective area. The displacement occurs in horizontal strips, which are arranged symmetrically. • The triangle is divided into 8 strips, each of height: total height / 8 = 16 / 8 = 2 cm. • The displacements are given as multiples of 0.5 cm, but only the overlapping areas affect the grey portion. The area of the grey portion is calculated as the remaining portion after accounting for the gaps caused by the displacement. **Step 4:** Area of the grey portion Using symmetry and subtraction, the area of the grey portion is calculated to be: *A*grey = 64 cm² – (Area lost due to gaps) = 48 cm². Conclusion The area of the grey portion is: 48 cm²
Question 6:
Shown below is an arrangement of closely stacked spheres. Assume each one to be in contact with its immediate neighbour. What is the total number of points where the spheres touch each other?
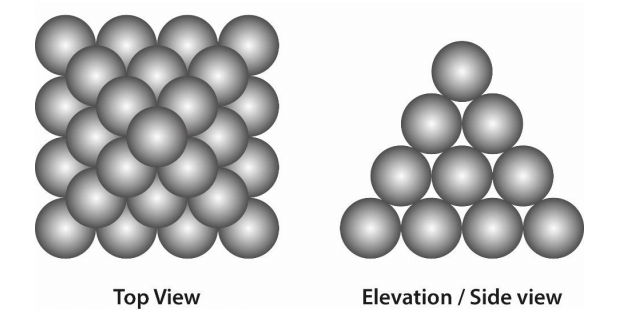
View Solution
Solution: Step 1: In a closely stacked arrangement, every sphere touches several others. Start by counting how many points of contact each row has. Step 2: It is given in the triangular arrangement, every sphere touches 6 others in the next layer. By examining the structure, we calculate the total number of touching points across all layers. Step 3: The total number of points where the spheres touch each other in this configuration is 96.
Question 7:
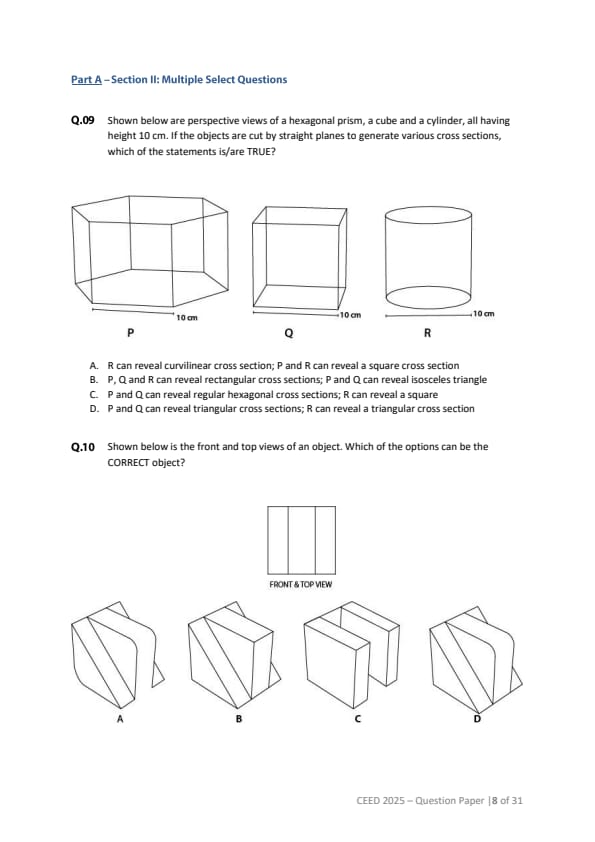
Shown below are three perspective views of a solid object. How many surfaces does the object have? Assume hidden surfaces to be flat.
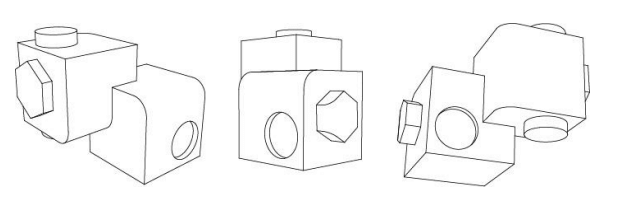
View Solution
Solution: The question has total number of surfaces in the given solid object, as illustrated by the three perspective views. The hidden surfaces are assumed to be flat. Step 1: Understanding the perspective views The three views of the object provide information about the visible and hidden surfaces: • The front view shows the outline and distribution of visible surfaces from one side. • The top view provides the layout of the visible surfaces from above. • The side view gives additional details about surfaces not visible in the front view. Step 2: Identifying surfaces To count the total number of surfaces, we consider both the visible and hidden parts of the solid: 1. Visible surfaces: The visible surfaces are directly observed in the given views. 2. Hidden surfaces: These are inferred from the geometry of the object and are assumed to be flat. Step 3: Counting the surfaces Based on the analysis of the given views: • The solid object is composed of a combination of rectangular and flat polygonal surfaces. • Careful examination and inference from the given views reveal that the total number of distinct surfaces, including both visible and hidden ones, is: 30 surfaces. Conclusion The total number of surfaces in the solid object is: 30
Question 8:
A monospaced font is a font in which all characters are exactly of same width. A document uses a monospaced font for typesetting where each character is exactly 0.6 cm wide. A text line in this document contains only 10 words, where each word contains 6 characters. What is the length of the line in cm?
View Solution
Solution: The problem requires calculating the total length of a text line in a document that uses a monospaced font where each character is exactly 0.6 cm wide. The line contains 10 words, each consisting of 6 characters. **Step 1:** Understanding the problem * Each word consists of 6 characters. * There are 10 words in the line. * Each character occupies a width of 0.6 cm. * A space is present between each pair of words. Since there are 10 words, there will be 9 spaces in total. * Each space also occupies 0.6 cm, as the font is monospaced. **Step 2:** Calculating the total length of the line 1. The total width contributed by the characters in the 10 words: Width of characters = 10 (words) × 6 (characters per word) × 0.6 cm = 36 cm. 2. The total width contributed by the spaces between the words: Width of spaces = 9 (spaces) × 0.6 cm = 5.4 cm. 3. The total length of the line is the sum of the two contributions: Total length = 36 cm + 5.4cm = 41.4 cm. Conclusion The length of the text line in the document is: 41.4 cm
Question 9:
Shown below are perspective views of a hexagonal prism, a cube, and a cylinder, all having height 10 cm. If the objects are cut by straight planes to generate various cross-sections, which of the statements is/are TRUE?
![[Diagram of a Hexagonal prism, cube and cylinder]](https://static.zollege.in/public/image/9_caff242a0ce50e0cdf1085bd0e449adf.png?tr=w-642,h-228,c-force)
View Solution
Solution: Step 1: The hexagonal prism (P) when cut can reveal various polygonal cross-sections, including hexagonal and rectangular sections. However, a square cross-section is not possible with this object unless cut in a very specific direction. Step 2: The cube (Q) can easily reveal square cross-sections as it's a regular 3D object. It can also produce rectangular and other polygonal sections. Step 3: The cylinder (R), due to its circular symmetry, can reveal curvilinear sections if cut at an angle to its axis. It can also reveal square cross-sections when cut perpendicular to its axis. Hence, both P and R can reveal square cross-sections under certain orientations of the cutting plane. Step 4: After evaluating all possibilities, final answers are (1), (2), and (3).
Question 10:
Shown below is the front and top views of an object. Which of the options can be the CORRECT object?
![[Diagram of front and top views and options for the object]](https://static.zollege.in/public/image/10_906e31704bb5cf2b8e869fe8d894615e.png?tr=w-662,h-332,c-force)
View Solution
Solution: Step 1: From the front view, observe a shape with angled sides and uniform width. The top view should also display a consistent width across its length. Step 2: Option 4 is the only one that matches both the front and top views accurately. In this option, the object aligns with the angles and dimensions depicted in the front and top views. Step 3: Therefore, the correct answer is Option 2 and 4.
Question 11:
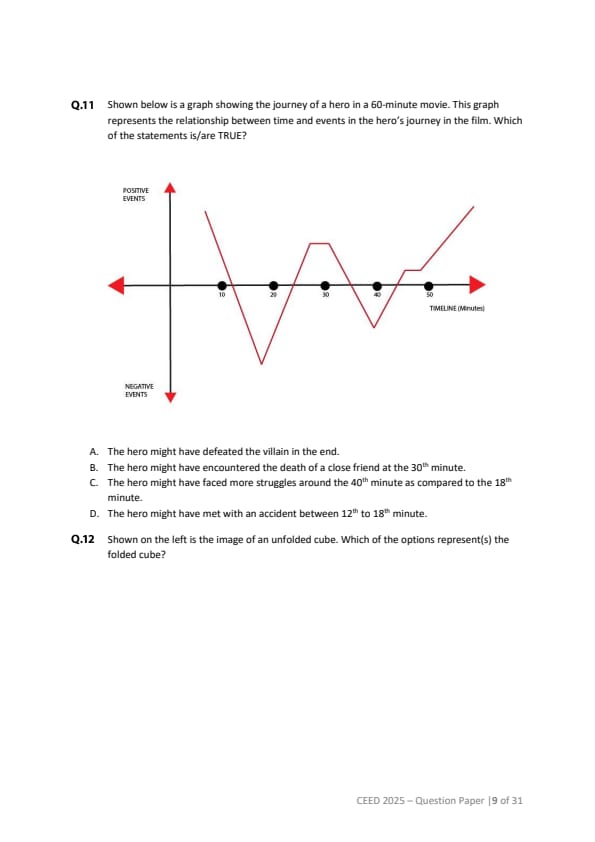
Shown below is a graph showing the journey of a hero in a 60-minute movie. This graph represents the relationship between time and events in the hero's journey in the film. Which of the statements is/are TRUE?
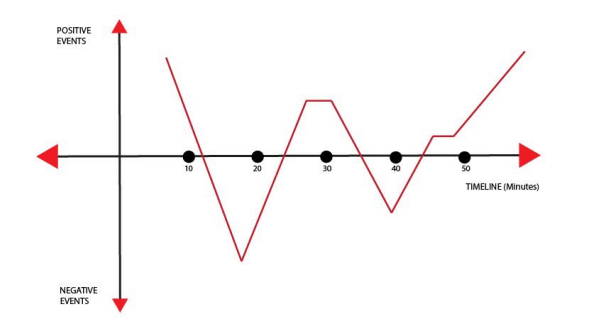
View Solution
Solution: Step 1: Observe the graph where positive events cause an upward trend, and negative events cause a downward trend. The large upward spike towards the end of the timeline suggests that a positive event, such as defeating the villain, occurs at the conclusion. Step 2: The graph represents a downward trend between 12 and 18 minutes, indicating negative events such as struggles or setbacks, possibly an accident. However, the final rise suggests that the hero achieves success later. Step 3: The correct statements are (1) and (4), indicating that the hero might have defeated the villain in the end and might have met with an accident between 12th and 18th minutes.
Question 12:
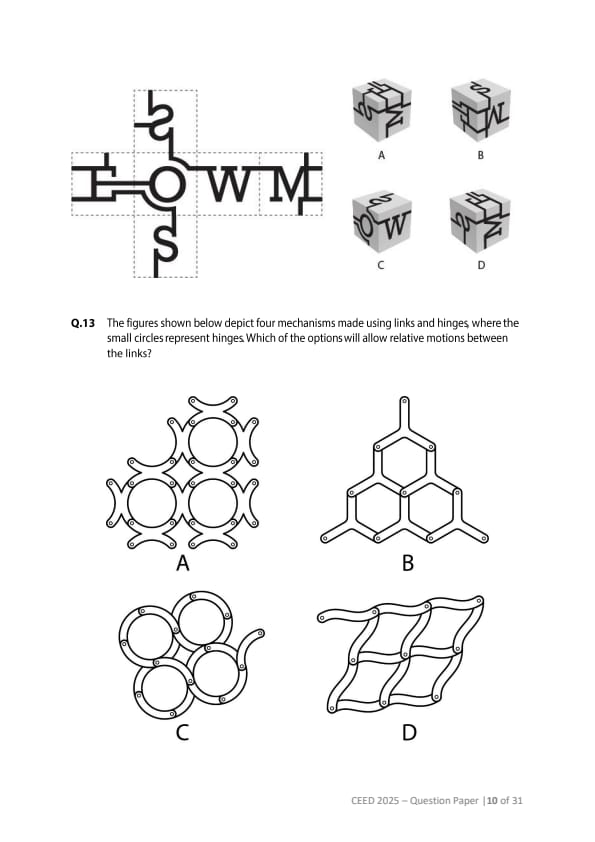
Shown on the left is the image of an unfolded cube. Which of the options represent(s) the folded cube?
![[Diagram of an unfolded cube net and options for the folded cube]](https://static.zollege.in/public/image/12_1b2ada8d5898e86f3f59129dc73857f1.png?tr=w-623,h-307,c-force)
View Solution
Solution: Step 1: Start by examining the unfolded cube's net. Identify the faces and how they are connected. The net shows which sides will fold together. Step 2: By folding the net, Figure 2 is the only one that correctly matches the folded configuration, where all sides align as shown in the net. Step 3: Thus, the correct folded cube is Option 2.
Question 13:
The figures shown below depict four mechanisms made using links and hinges, where the small circles represent hinges. Which of the options will allow relative motions between the links?
![[Diagram of four mechanisms made using links and hinges]](https://static.zollege.in/public/image/13_ca6858dbcf4a30fef39f993635379b03.png?tr=w-572,h-502,c-force)
View Solution
Solution: Step 1: Consider the mechanisms made of links and hinges. The hinges allow the links to rotate relative to each other. Step 2: In the 2 and 4, the links are connected in such a way that they can move relative to each other due to the freedom provided by the hinges. Step 3: Therefore, the correct options that allow relative motion between the links are C and D.
Question 14:
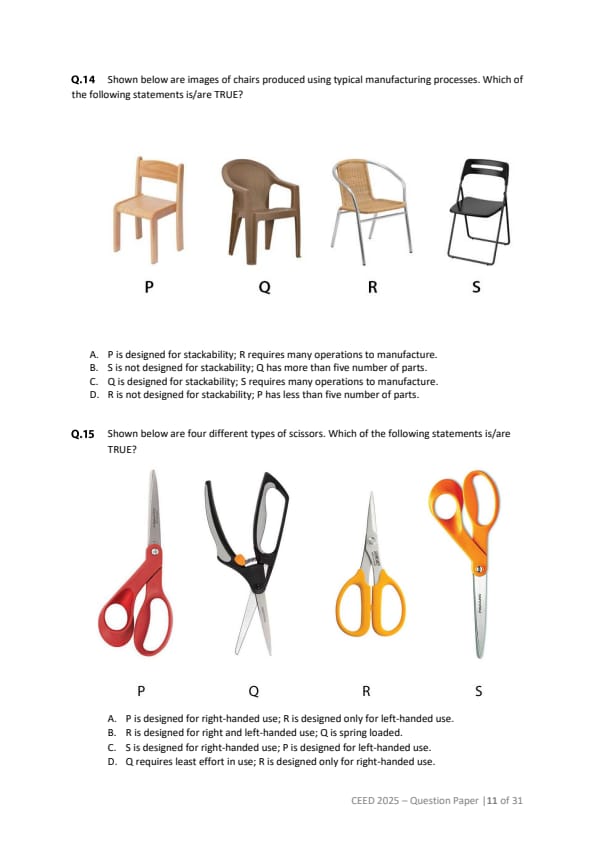
Shown below are images of chairs produced using typical manufacturing processes. Which of the following statements is/are TRUE?
![[Diagram of 4 chairs]](https://static.zollege.in/public/image/14_6e25f9a4e0036f178b5b7aa7b73886e9.png?tr=w-616,h-242,c-force)
View Solution
Solution: Step 1: Observe the design and construction of each chair. P is a simple wooden chair designed for easy stackability, while R has a more complex design, requiring multiple manufacturing operations. Step 2: Q, made of molded plastic, has many more parts compared to the other chairs, indicating the need for complex manufacturing processes. Step 3: Based on the observations, the correct answers are (A) and (C).
Question 15:
Shown below are four different types of scissors. Which of the following statements is/are TRUE?
![[Diagram of 4 different types of scissors]](https://static.zollege.in/public/image/15_6a7020bb88604aad62d6235b9fcb13a6.png?tr=w-591,h-330,c-force)
View Solution
Solution: Step 1: P and S are clearly designed for right-handed and left-handed users respectively, based on the handle positioning. Step 2: Q is a spring-loaded scissor designed for easy cutting with minimal effort, and R is a reversible design suitable for both right- and left-handed users. Step 3: Therefore, the correct answers are (B) and (C).
Question 16:
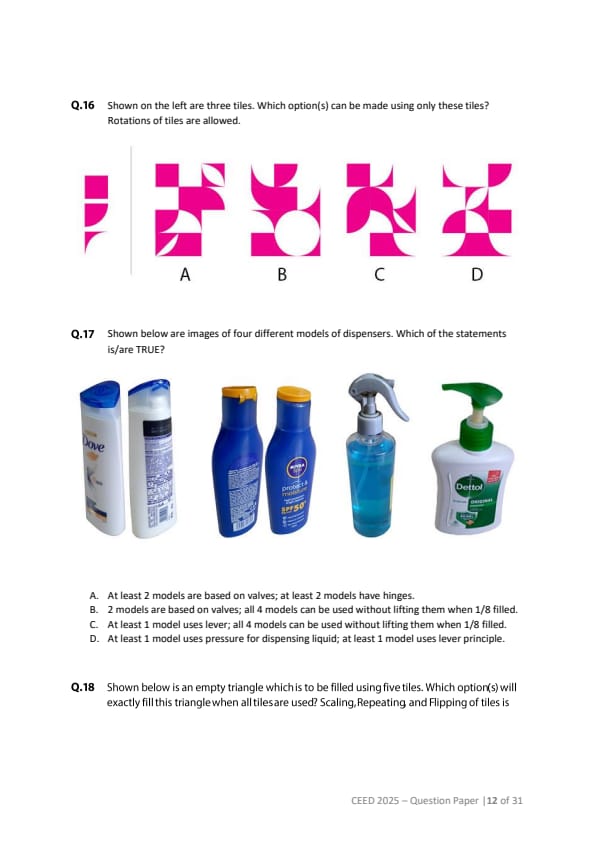
Shown on the left are three tiles. Which option(s) can be made using only these tiles? Rotations of tiles are allowed.
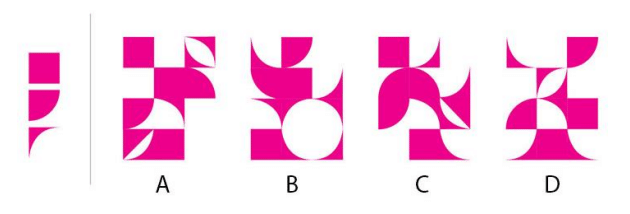
View Solution
Solution: Step 1: Analyze the shape and arrangement of tiles. By rotating the tiles, the shapes in options B and D can be constructed from the available tiles. Step 2: Option A and C cannot be formed since they require additional tiles or different shapes that are not available. Step 3: Therefore, the correct answers are (B) and (D).
Question 17:
Shown below are images of four different models of dispensers. Which of the statements is/are TRUE?
![[Diagram of 4 types of dispensers]](https://static.zollege.in/public/image/17_c6996927557fa032ce4f5f075b41df33.png?tr=w-641,h-246,c-force)
View Solution
Solution: Step 1: Models that use valves typically operate by releasing liquid when a valve is opened. Models with hinges require the user to apply a force to open them. Step 2: Some models use pressure for dispensing liquid, while others rely on a lever mechanism. Step 3: Based on these observations, the correct answers are (A) and (D).
Question 18:
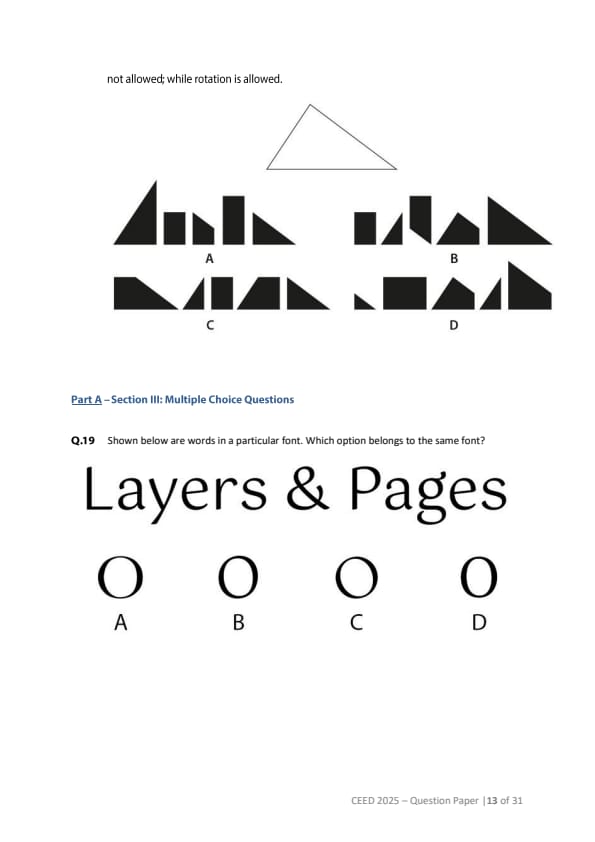
Shown below is an empty triangle which is to be filled using five tiles. Which option(s) will exactly fill this triangle when all tiles are used? Scaling, Repeating, and Flipping of tiles is not allowed; while rotation is allowed.
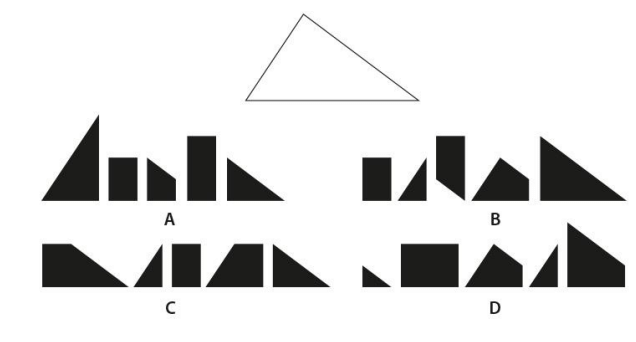
View Solution
Solution: Step 1: The tiles must fit perfectly into the triangle without any scaling, repeating, or flipping. After rotation, options C and D correctly fit all tiles into the triangle. Step 2: Option A and B fail to fit the tiles correctly, as they either leave gaps or exceed the boundaries of the triangle. Step 3: Therefore, the correct answers are (C) and (D).
Question 19:
Shown below are words in a particular font. Which option belongs to the same font?
![[Diagram of words in a specific font with multiple font options]](https://static.zollege.in/public/image/19_29c7b713b29ac246974247901074dafd.png?tr=w-618,h-255,c-force)
View Solution
Solution: Step 1: Observe the unique features of the font used in the words "Layers Pages." Focus on the curves and thickness of the letters. Step 2: Option B matches the font style, with similar curves and letter structure to that of the given words. Step 3: Therefore, the correct answer is (B).
Question 20:
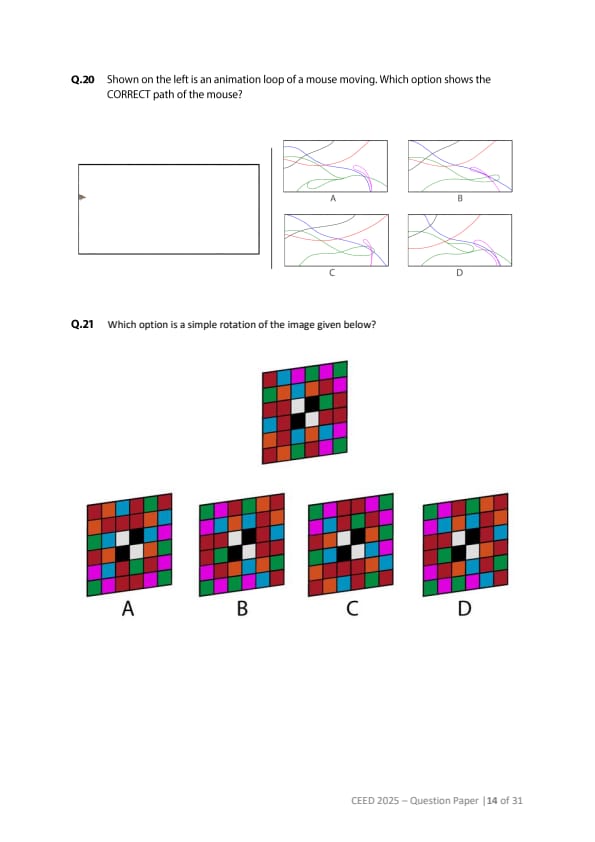
Shown on the left is an animation loop of a mouse moving. Which option shows the CORRECT path of the mouse?
![[Animation loop and path options]](https://static.zollege.in/public/image/20_a1be6b1ca1197eb0aed0820ffb280172.png?tr=w-614,h-240,c-force)
View Solution
Solution: Step 1: Observe the path of the mouse in the animation loop. Step 2: Compare the paths with each option, ensuring the sequence of movements matches the animation. Step 3: Option B is the correct path, as it accurately follows the animation's movement sequence.
Question 21:
Which option is a simple rotation of the image given below?
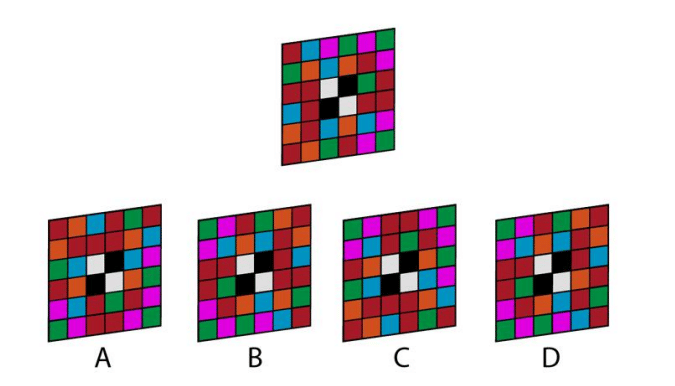
View Solution
Step 1: Analyze the Pattern Observe the image and identify the arrangement of colors and shapes within it.
Step 2: Consider Rotations Mentally rotate the original image in your mind or visualize the rotation of the image to align it with the options provided.
Step 3: Identify the Matching Rotation Option B shows the original pattern in a simple rotation which makes it the correct answer.
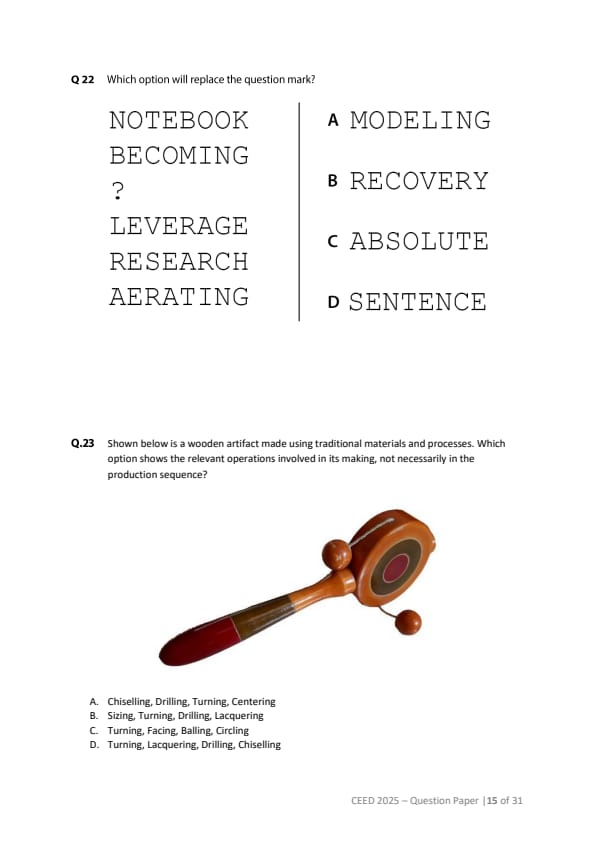
Question 22:
Which option will replace the question mark?
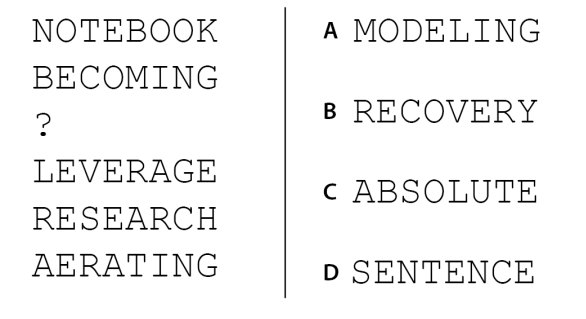
View Solution
Step 1: Observe the Letter Pattern In each word, the letters are arranged in alphabetical order.
Step 2: Identify the Next Word Following this pattern, the word that fits is "MODELING."
Step 3: Verify the Pattern The letters in "MODELING" are also placed in alphabetical order, which confirms it to be the answer.
Question 23:
Shown below is a wooden artifact made using traditional materials and processes. Which option shows the relevant operations involved in its making, not necessarily in the production sequence?
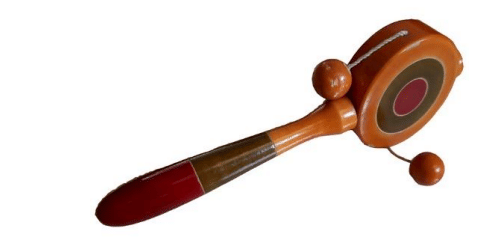
View Solution
Step 1: Identify Standard Woodworking Steps: Chiselling and turning are common steps in woodwork, followed by drilling for details and lacquering for finishing.
Step 2: Validate the Order Option 2, "Sizing, Turning, Drilling, Lacquering," follows a typical order of operations in traditional wooden artifact making.
Step 3: Confirm the Process The option "Sizing, Turning, Drilling, Lacquering" covers a standard set of steps for creating this kind of wooden artifact.
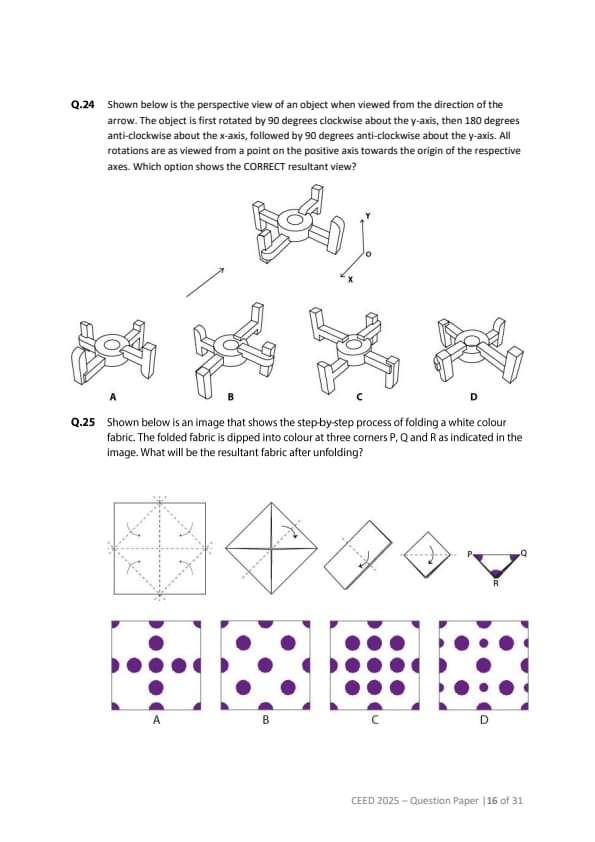
Question 24:
Shown below is the perspective view of an object when viewed from the direction of the arrow. The object is first rotated by 90 degrees clockwise about the y-axis, then 180 degrees anti-clockwise about the x-axis, followed by 90 degrees anti-clockwise about the y-axis. All rotations are as viewed from a point on the positive axis towards the origin of the respective axes. Which option shows the CORRECT resultant view?
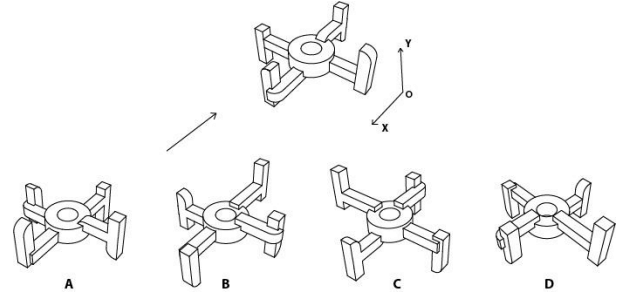
View Solution
Step 1: Visualize Initial Rotation: The first rotation is 90 degrees clockwise about the y-axis. Visualize how the object changes its orientation after this rotation.
Step 2: Apply Second Rotation: Next, apply a 180-degree counter-clockwise rotation about the x-axis to the object.
Step 3: Apply Third Rotation: Finally, rotate the object by 90 degrees counter-clockwise about the y-axis. After performing these rotations, the object matches with Option C.
Question 25:
Shown below is an image that shows the step-by-step process of folding a white color fabric. The folded fabric is dipped into color at three corners P, Q, and R as indicated in the image. What will be the resultant fabric after unfolding?
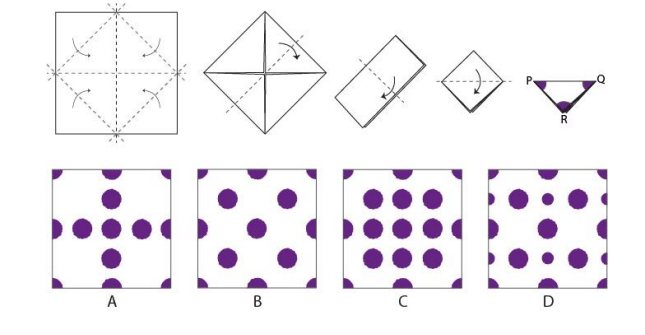
View Solution
Step 1: Observe Folding and Coloring: Analyze the sequence of folding and where the color is applied to the corners P, Q, and R.
Step 2: Visualize Unfolding: When the fabric is unfolded, the pattern must correspond to the colored sections from the folding.
Step 3: Identify the Match: Option B correctly matches the pattern formed by the colored sections at P, Q, and R, after unfolding.
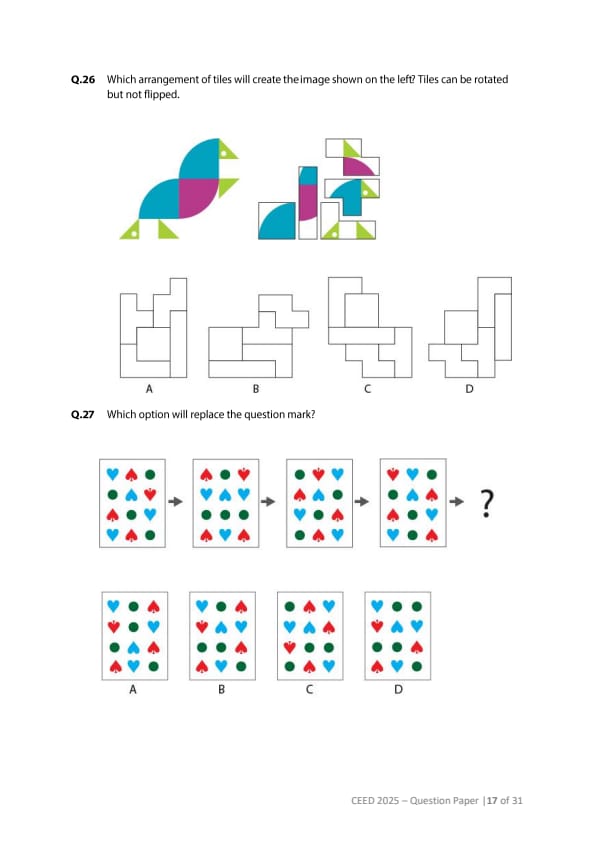
Question 26:
Which arrangement of tiles will create the image shown on the left? Tiles can be rotated but not flipped.
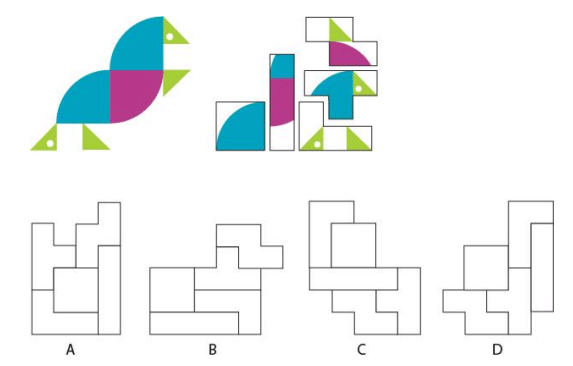
View Solution
Step 1: Visualize Arrangement and Rotation Determine how the tiles need to be arranged and rotated to fit the image on the left.
Step 2: Check Each Arrangement Option C is the correct arrangement where all tiles fit to form the required pattern.
Step 3: Confirm the Answer All tiles are in their correct position in option C.
Question 27:
Which option will replace the question mark?
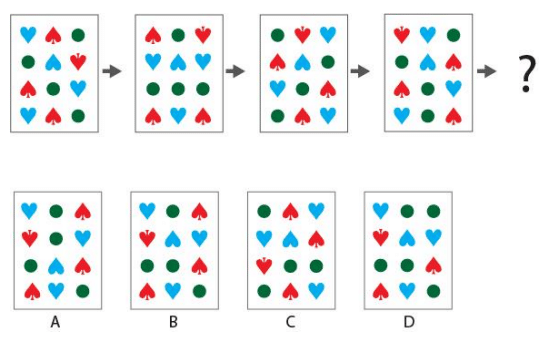
View Solution
Step 1: Observe Sequence Changes Note how the objects and their colors are changing in the sequence.
Step 2: Identify the Pattern: The pattern alternates the positions of the hearts and the circles, and the colors also change in a specific order.
Step 3: Match the Sequence: Option B follows this pattern and completes the sequence correctly.
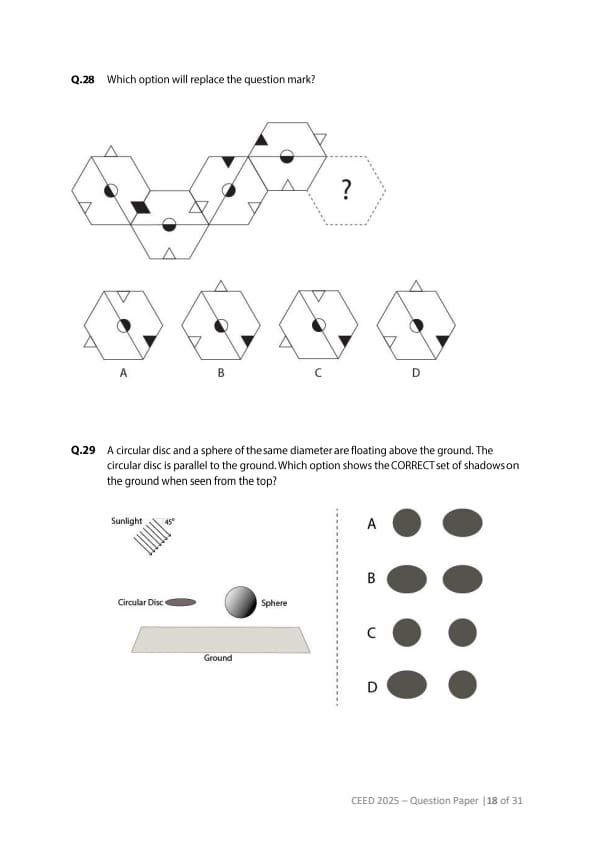
Question 28:
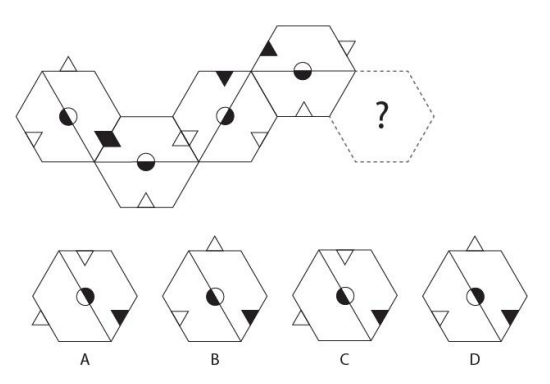
Which option will replace the question mark?
View Solution
Step 1: Analyze the Pattern: Study how the hexagons are arranged and how the shapes are aligning with each other. Each hexagon has specific geometric features.
Step 2: Observe Shape Patterns Observe if there are any shifts, rotations or changes to the shapes.
Step 3: Identify the Correct Sequence: Option B correctly continues the sequence, based on the established pattern of shapes and alignment.
Question 29:
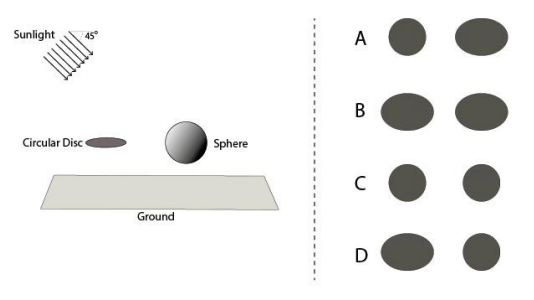
A circular disc and a sphere of the same diameter are floating above the ground. The circular disc is parallel to the ground. Which option shows the CORRECT set of shadows on the ground when seen from the top?
View Solution
Step 1: Visualize the Shadows: A circular disc, when parallel to the ground, will always cast a circular shadow.
Step 2: Determine the Shadow of the Sphere: The shadow of the sphere, due to the 45° angle of sunlight, will appear as an ellipse.
Step 3: Identify Matching Shadow Shapes: Therefore, option A correctly represents a circular shadow for the disc and an elliptical shadow for the sphere.
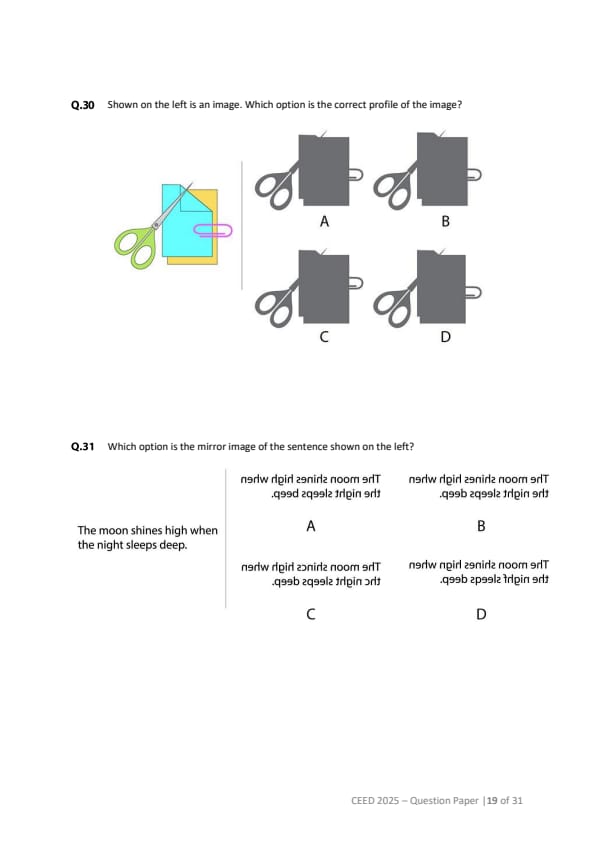
Question 30:
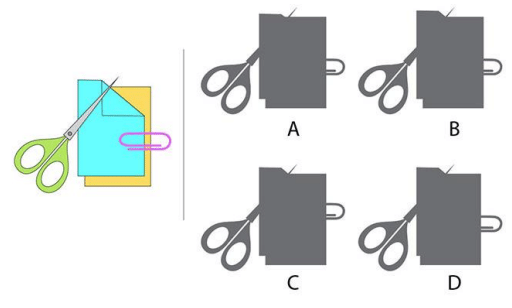
Shown on the left is an image. Which option is the correct profile of the image?
View Solution
Step 1: Identify the Elements: The picture shows scissors cutting paper with a paperclip attached. Identify the elements that needs to be shown.
Step 2: Visualize the Profile View: Imagine how the scissors and paper are aligned when viewed from the side profile.
Step 3: Select the Correct Option: Option B accurately depicts the scissors aligned with the paper in a cutting position, showing the blades and cut paper.
Question 31:
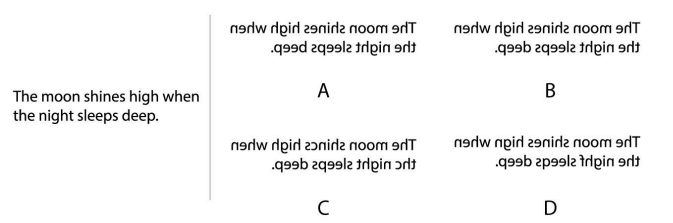
Which option is the mirror image of the sentence shown on the left?
The moon shines high when the night sleeps deep.
View Solution
Step 1: Understand Mirror Images: A mirror image of text involves reversing the order of the letters horizontally.
Step 2: Reverse the Text: Flip the sentence to create a mirrored version of the original sentence.
Step 3: Identify the Match: Option B correctly shows the text in a mirror image.
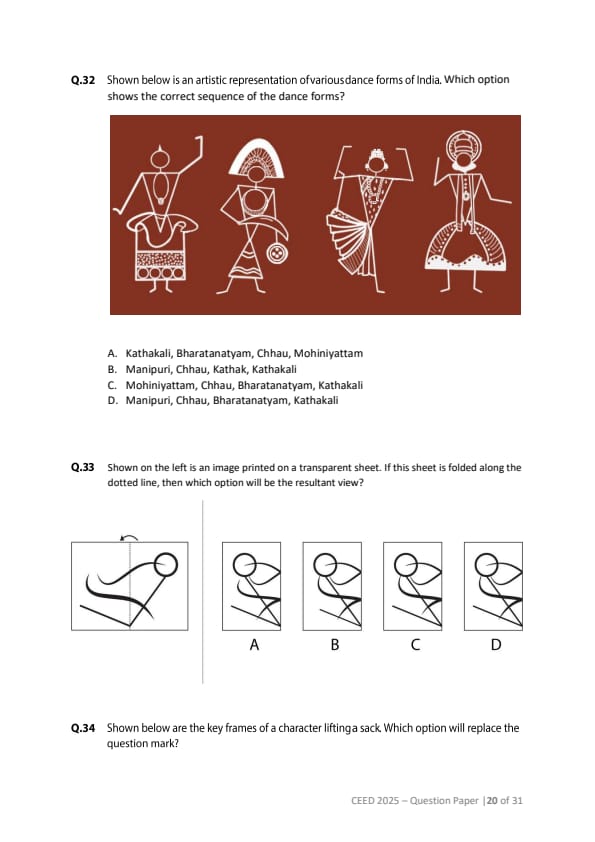
Question 32:
Shown below is an artistic representation of various dance forms of India. Which option shows the correct sequence of the dance forms?
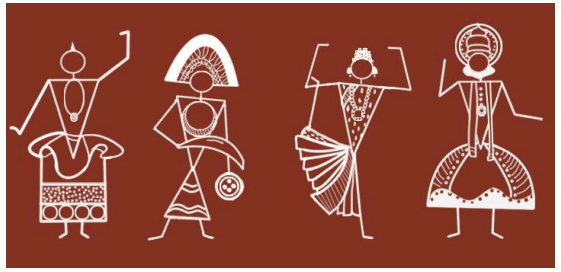
View Solution
Step 1: Analyze the Poses: Examine the artistic representation and match dance forms to respective poses in the image.
Step 2: Sequence the Dance Forms: Identify the order in which the dance forms appear in the image based on their poses and postures.
Step 3: Validate the Sequence: Option 4 shows the correct sequence of Manipuri, Chhau, Bharatanatyam, and Kathakali, based on their poses.
Question 33:
Shown on the left is an image printed on a transparent sheet. If this sheet is folded along the dotted line, then which option will be the resultant view?
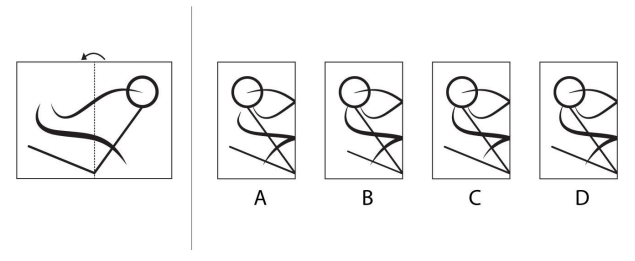
View Solution
Step 1: Visualize the Fold: Visualize how the image would appear if you were to fold it along the dotted line. This involves how the left and right portions will overlap.
Step 2: Observe Mirrored Effect: The fold will cause the image to be reflected.
Step 3: Select the Correct Folded Version: Option D correctly depicts the reflected image after the sheet is folded along the dotted line.
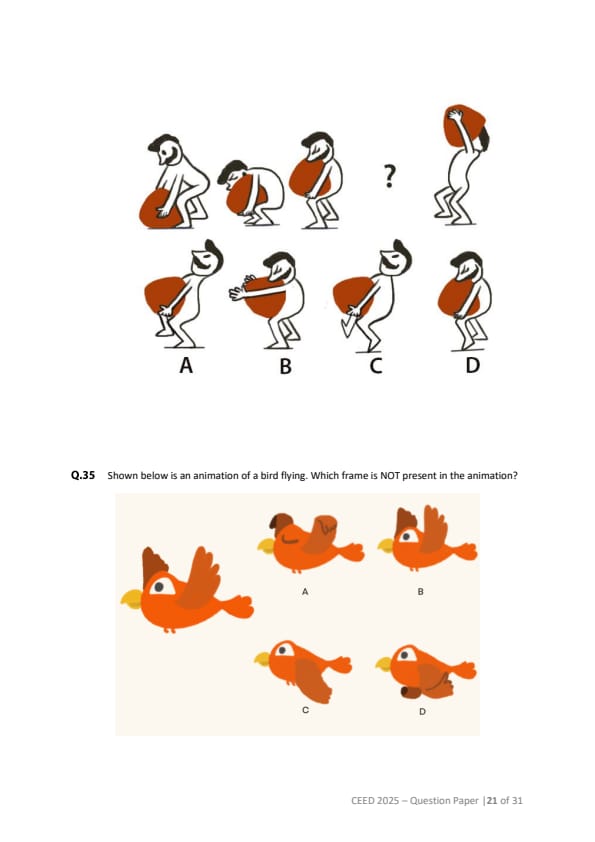
Question 34:
Shown below are the key frames of a character lifting a sack. Which option will replace the question mark?
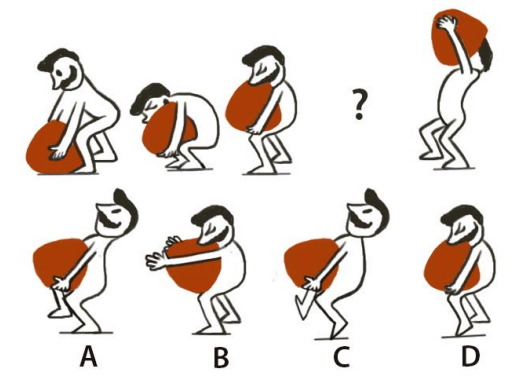
View Solution
Step 1: Analyze the Motion: The sequence shows a character lifting a sack. Observe the character moving from a bent position to a more upright position.
Step 2: Study Position and Posture Analyze the position of the sack and the character's posture in frames before and after the question mark to match the correct sequence.
Step 3: Identify the Correct Option: Option A correctly shows the sack close to the chest, with the character in a correct stance.
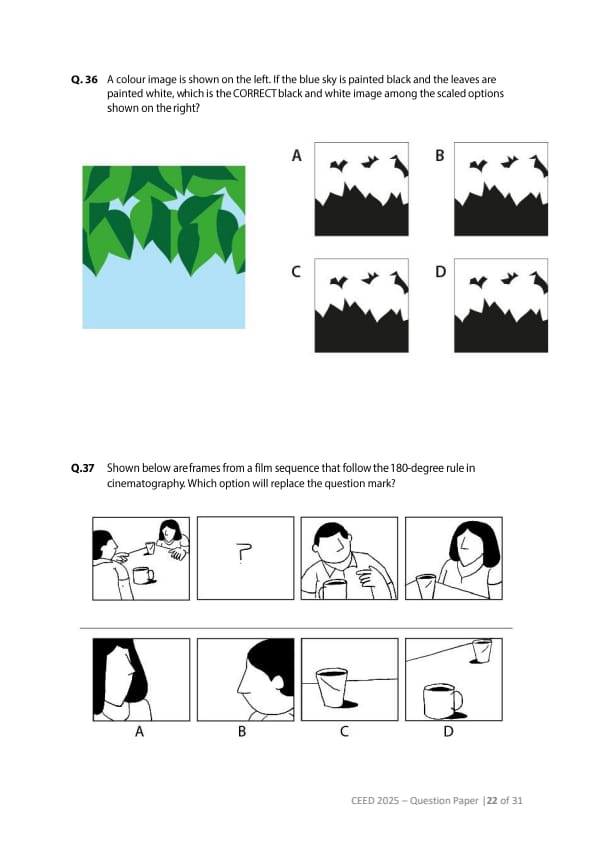
Question 35:
Shown below is an animation of a bird flying. Which frame is NOT present in the animation?
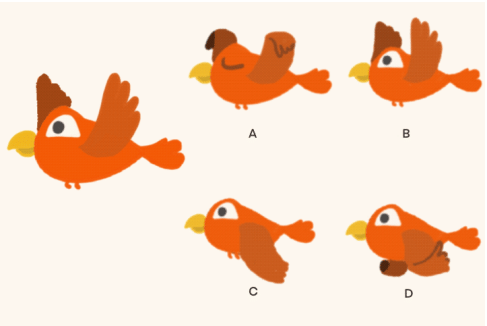
View Solution
Step 1: Analyze the Animation: Observe how the wings move in the animation, which includes alternating wing flaps and smooth transition between frames.
Step 2: Compare the Potential Frames: Look at each option and how the wing positions are arranged in those frames.
Step 3: Identify the Outlier: Option C shows an unrealistic wing position and does not align with the other frames.
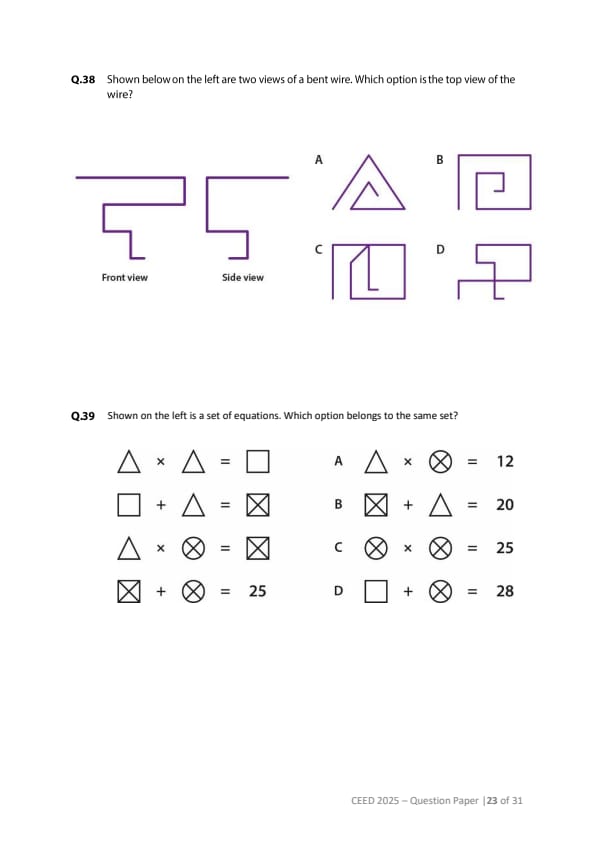
Question 36:
A colour image is shown on the left. If the blue sky is painted black and the leaves are painted white, which is the CORRECT black and white image among the scaled options shown on the right?
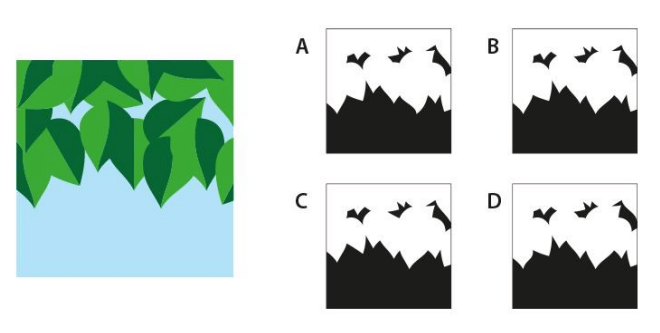
View Solution
Step 1: Define the Color Changes: Determine the colour changes which are sky to be painted black and the leaves to be painted white.
Step 2: Compare the Options: Review each option in black and white to ensure that the sky has turned black and the leaves are white.
Step 3: Confirm the Correct Option: Option B correctly transforms the image into black and white, with sky in black and leaves in white.
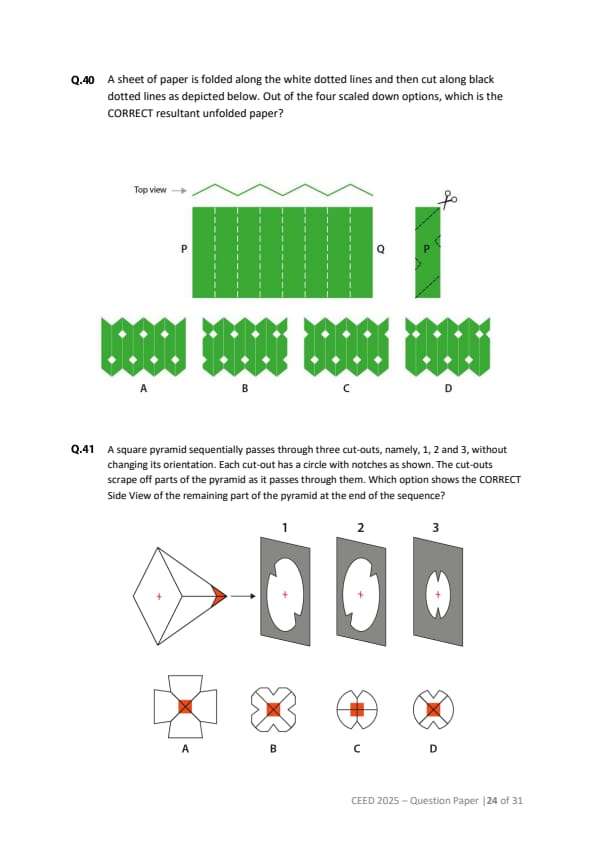
Question 37:
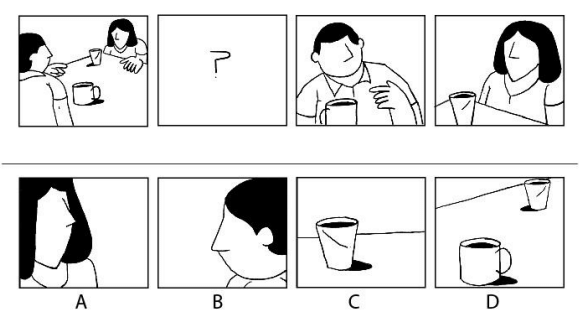
Shown below are frames from a film sequence that follow the 180-degree rule in cinematography. Which option will replace the question mark?
View Solution
Step 1: Understand the 180-degree rule: The 180-degree rule maintains spatial orientation by keeping the camera on one side of the scene.
Step 2: Analyze the Sequence: Observe how the camera angle changes and the character's position in the sequence of frames.
Step 3: Identify the Correct Frame: Option D maintains spatial consistency and fits with the 180-degree rule based on the sequence before and after the question mark.
Question 38:
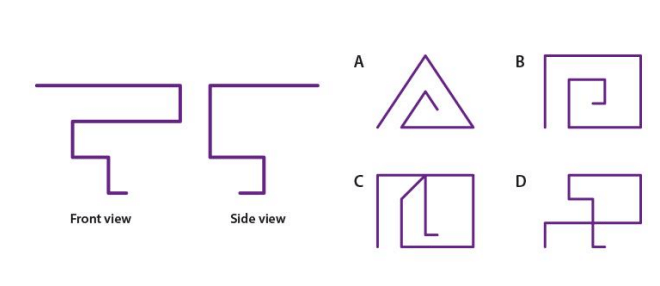
Shown below on the left are two views of a bent wire. Which option is the top view of the wire?
View Solution
Step 1: Visualize the Top View: Mentally visualize the position of the bends in the wire when viewed from above.
Step 2: Compare Options: Assess each option to see how well it represents the wire's structure from a top-down perspective.
Step 3: Identify the Correct Option: Option A correctly depicts the top view of the wire from side and front views.
Question 39:
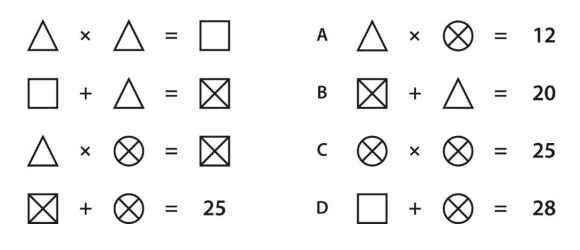
Shown on the left is a set of equations. Which option belongs to the same set?
View Solution
Step 1: Understand the Symbols: Understand the relationship between the symbols and the result of their equation which follows a pattern.
Step 2: Observe the pattern: Observe the pattern where the operation involving symbols result in a specific value.
Step 3: Match the Correct Options: Using the first equation as a reference point, it is observed that △ x ☒ leads to ☐. It is identified that option C follows the pattern.
Question 40:
A sheet of paper is folded along the white dotted lines and then cut along black dotted lines as depicted below. Out of the four scaled down options, which is the CORRECT resultant unfolded paper?
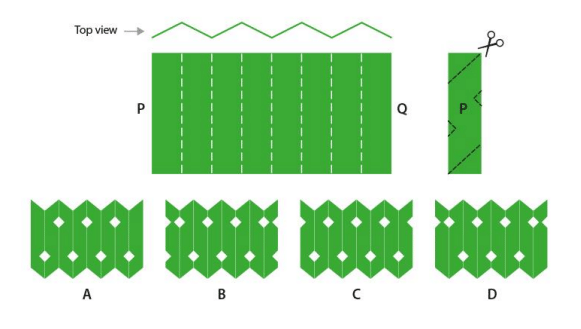
View Solution
Step 1: Visualize the Paper Folds: Imagine how the paper is folded along the dotted white lines which will affect the final shape and position of the cuts.
Step 2: Observe the Effect of the Cuts: Observe the cuts along the black dotted lines and how those cuts will appear after unfolding.
Step 3: Identify the Correct Unfolded Shape: Option C represents the correct result of the cuts and folds.
Question 41:
A square pyramid sequentially passes through three cut-outs, namely, 1, 2, and 3, without changing its orientation. Each cut-out has a circle with notches as shown. The cut-outs scrape off parts of the pyramid as it passes through them. Which option shows the CORRECT Side View of the remaining part of the pyramid at the end of the sequence?
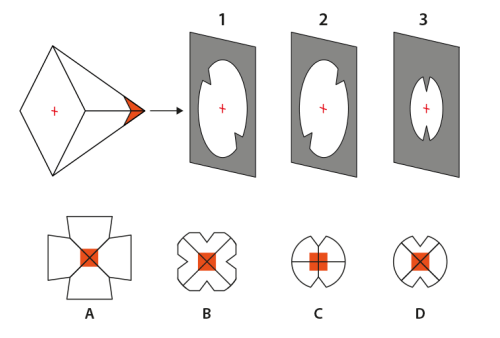
View Solution
Step 1: Understand Sequential Cuts: Understand that the pyramid passes through each cut-out sequentially, which will scrape off parts at each step.
Step 2: Observe the Effect of Each Cut: Analyze the effect of each cut-out and how it will change the pyramid's side view after each pass.
Step 3: Identify the Correct End Shape: Option C represents the remaining part of the pyramid after passing all cut-outs.
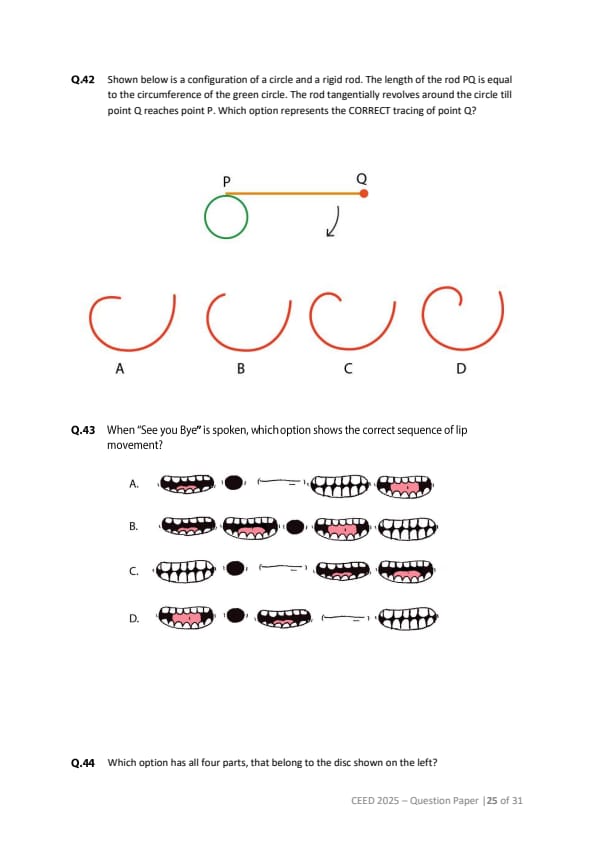
Question 42:
Shown below is a configuration of a circle and a rigid rod. The length of the rod PQ is equal to the circumference of the green circle. The rod tangentially revolves around the circle till point Q reaches point P. Which option represents the CORRECT tracing of point Q?
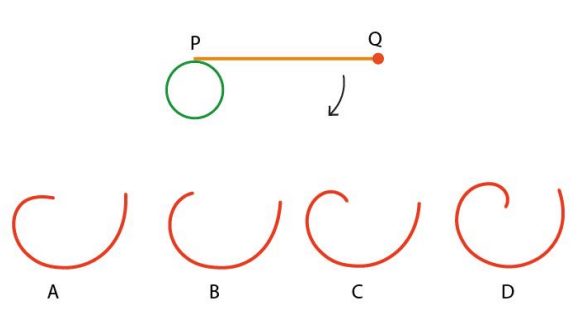
View Solution
Step 1: Understand Tangential Movement: The rod moves tangentially around the circle and the length of the rod is equal to the circle's circumference.
Step 2: Visualize Path of Point Q: Visualize how point Q will move as the rod revolves around the circle.
Step 3: Select Correct Tracing: Option C correctly shows the tracing of point Q as the rod moves around the circle.
Question 43:
When “See you Bye” is spoken, which option shows the correct sequence of lip movement?
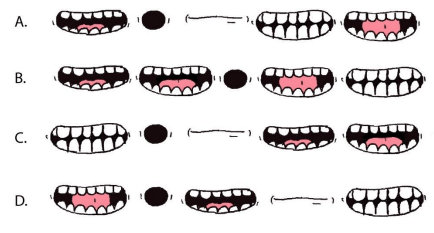
View Solution
Step 1: Recognize Lip Movement: The movement of the lips is based on the pronunciation of words.
Step 2: Observe the Sequence: Identify and analyze the sequence of lip movements corresponding to the words “See you Bye.”
Step 3: Compare with the options: Option C correctly depicts the correct sequence of lip movements as per the provided phrase.
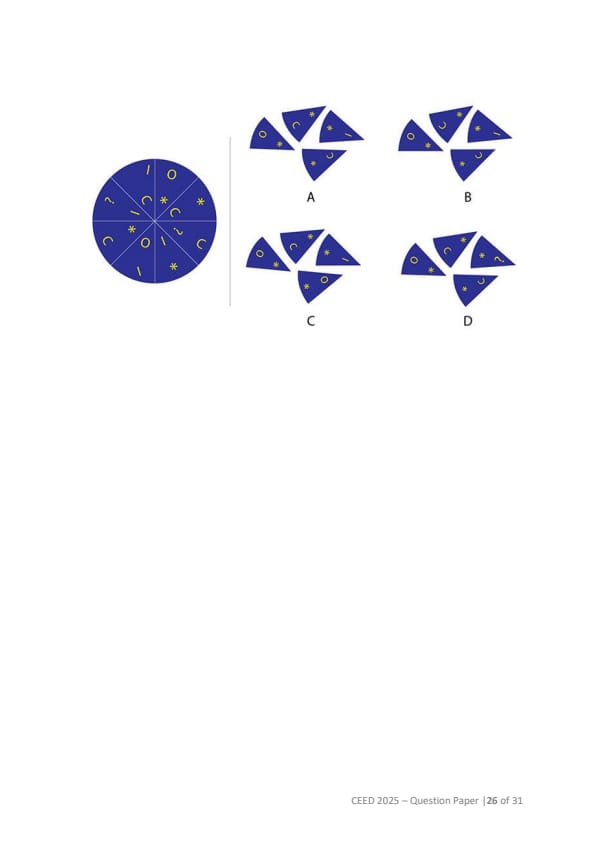
Question 44:
Which option has all four parts, that belong to the disc shown on the left?
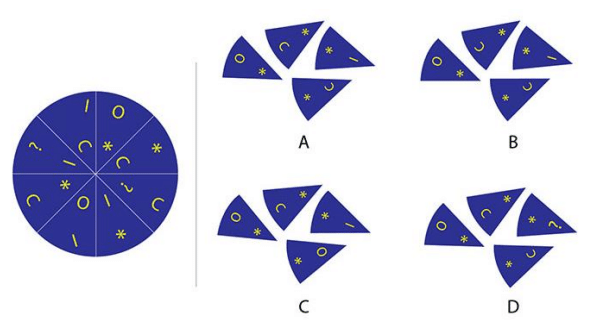
View Solution
Step 1: Divide into Sections: Understand the disc is divided into sections and each of those sections correspond to the options.
Step 2: Compare the options: Check from all options and compare with the original diagram for all the four parts.
Step 3: Select the correct option: Option A correctly includes all the parts from the original disc.
Question 45 / 1. SKETCHING:
Mandatory question
Two kids, Kaa and Kii, are on an adventure trip in a forest. While exploring, suddenly a bear emerges and starts chasing them. The kids start running in panic through the forest. A fox is watching the whole scene. Sketch this scene from the fox's point of view. The sketch should be clear and visible.
Additional Instructions:
- Use only black/HB-series pencils
- Do not use other colours
- Draw only in the given space
Evaluation Criteria:
- Character and expressions
- Proportion and composition
- Quality of sketching
- Environment and props
View Solution
The sketch should capture a scene from the fox's perspective showing the following:
Foreground: The kids (Kaa and Kii) should be seen running in panic with expressions of fear, being chased by a bear.
Perspective: The fox should be included in the scene, either in the background or slightly off to the side, clearly observing the scene from its point of view.
Background: The forest environment should be depicted using elements like trees, bushes, and other details to convey depth and the surroundings.
The sketch should be made using only black/HB-series pencils without any colours and inside the defined space.
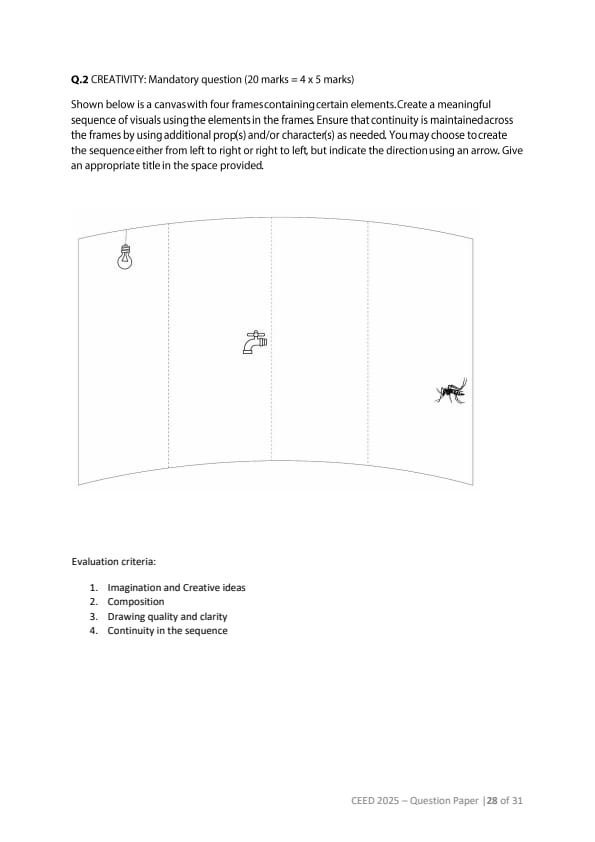
Question 46 / 2. CREATIVITY:
Mandatory question (20 marks = 4 x 5 marks)
Shown below is a canvas with four frames containing certain elements. Create a meaningful sequence of visuals using the elements in the frames. Ensure that continuity is maintained across the frames by using additional prop(s) and/or character(s) as needed. You may choose to create the sequence either from left to right or right to left, but indicate the direction using an arrow. Give an appropriate title in the space provided.
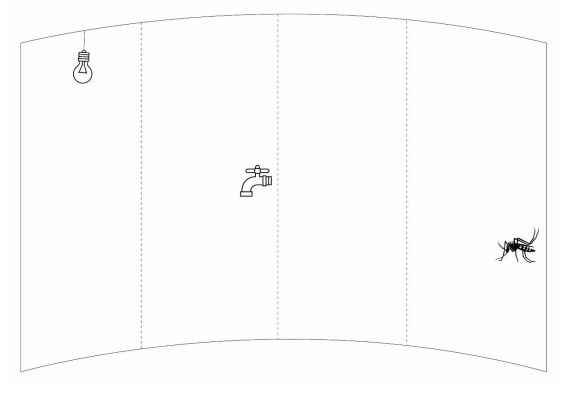
View Solution
The sequence should form a logical narrative using the given elements (lightbulb, faucet, and insect). Here's a possible breakdown:
Step 1: Initial Action A lightbulb turning on or flickering, indicating the start of some energy or activity.
Step 2: Reaction The lightbulb's energy seems to cause the faucet to start dripping, implying a relationship between the two elements.
Step 3: Progression: The faucet opens more widely, and something unexpected appears from the faucet (e.g., an insect).
Step 4: Result The sequence finishes with an emphasis on the insect that emerged, highlighting an unusual or unexpected result of the earlier events.
The sequence should show a clear continuity in size and placement of objects with logical progression, indicating the start of an event to its result. Indicate a title with an arrow in the defined space.
Question 47 / 3. VISUAL SENSITIVITY:
Mandatory Question
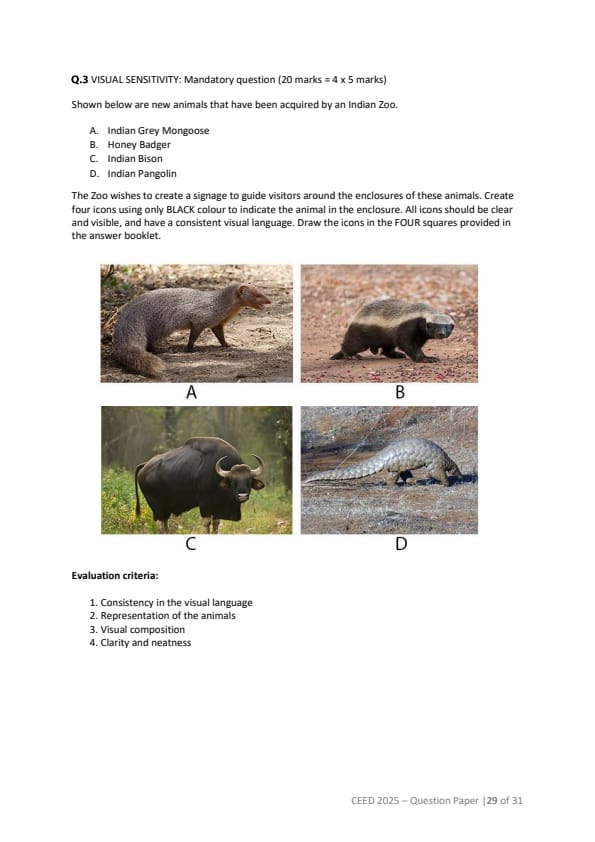
Instructions: Shown below are new animals that have been acquired by an Indian Zoo. The Zoo wishes to create a signage to guide visitors around the enclosures of these animals. Create four icons using only BLACK colour to indicate the animal in the enclosure. All icons should be clear and visible, and have a consistent visual language. Draw the icons in the FOUR squares provided in the answer booklet.
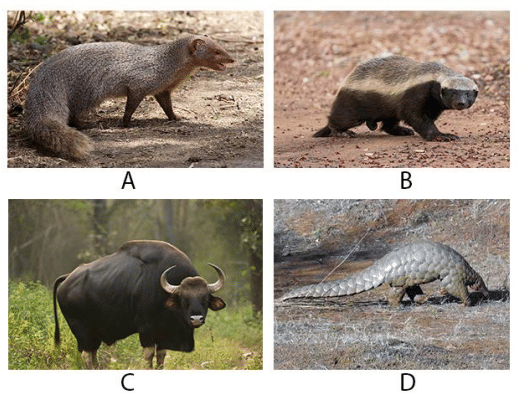
Animals:
- Indian Grey Mongoose
- Honey Badger
- Indian Bison
- Indian Pangolin
View Solution
The solution should consist of four icons, each representing one of the four listed animals, using only black color.
Icon Characteristics
Indian Grey Mongoose: Capture the slender body, curved back of the animal and its sleek body structure.
Honey Badger: Represent unique body shape with clear identification of the animal and its pattern.
Indian Bison: Emphasize the robust frame, horns and overall shape of the bison.
Indian Pangolin: Depict the scaly texture, unique body shape with a simplified and distinct manner.
All the icons should be clear, visible and consistent in line thickness with geometric shapes.
Question 48 / 4. FORM SENSITIVITY:
Mandatory Question (20 marks = 4 × 5 marks)
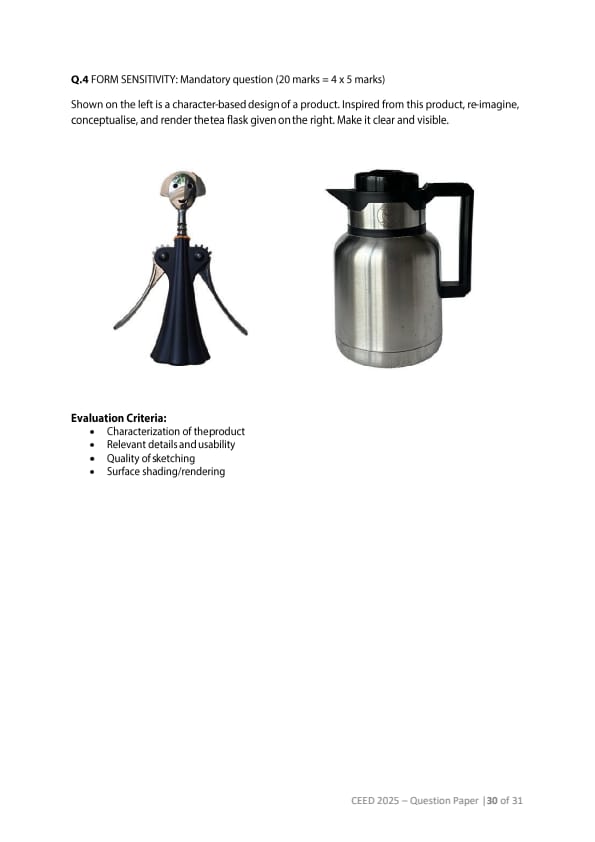
Instructions: Shown on the left is a character-based design of a product. Inspired from this product, re-imagine, conceptualise, and render the tea flask given on the right. Make it clear and visible.
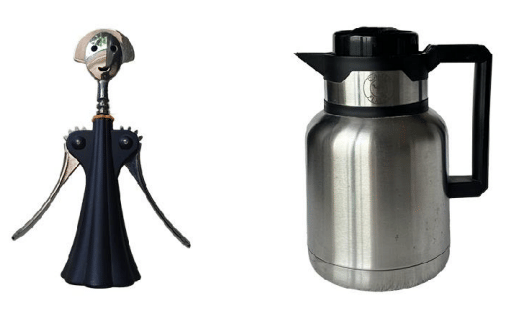
Evaluation Criteria
- Characterization of the product
- Relevant details and usability
- Quality of sketching
- Surface shading/rendering
View Solution
The solution should show a re-imagined design of the provided tea flask, inspired by the character design given on the left.
Characterization: Incorporate features of the character design into the tea flask, like expressive eyes and arms.
Relevant Details: The features need to be sleek and metallic with good detailing. It should be functional with ergonomic handles and functional lids.
Quality of Sketching: The sketch should be clear, detailed and precise in the execution of the different parts of the flask.
Surface Shading: Surface shading should be used to enhance the visual appeal and create a sense of form for the product.
Question 49 / 5. PROBLEM IDENTIFICATION:
Mandatory Question (20 marks = [5+5] + [5+5] marks)
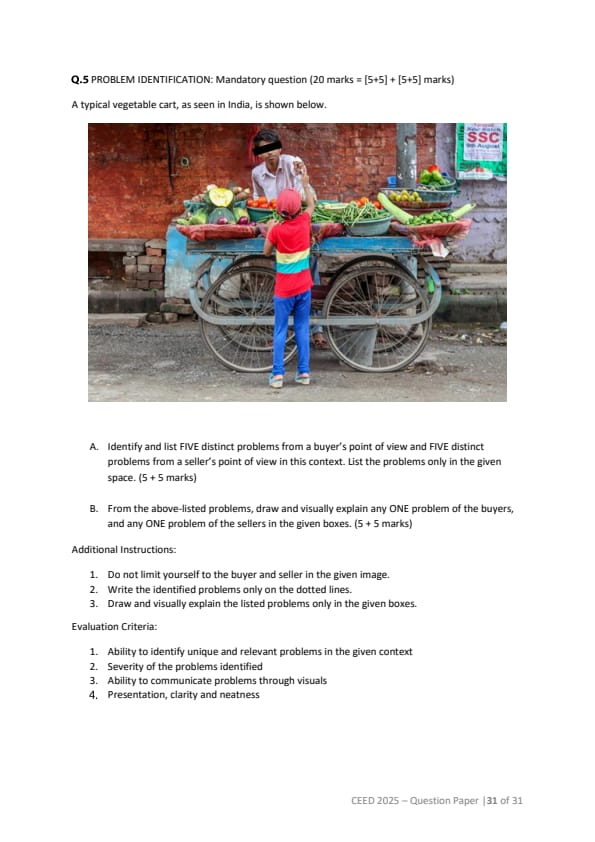
Instructions: A typical vegetable cart, as seen in India, is shown below.

Tasks:
- (5 + 5 marks) Identify and list FIVE distinct problems from:
- Buyer's Point of View.
- Seller's Point of View.
- (5 + 5 marks) From the above-listed problems, draw and visually explain:
- ONE problem of the buyers.
- ONE problem of the sellers.
Additional Instructions:
- Do not limit yourself to the buyer and seller in the given image.
- Write the identified problems only on the dotted lines.
- Draw and visually explain the listed problems only in the given boxes.
Evaluation Criteria
- Ability to identify unique and relevant problems in the given context.
- Severity of the problems identified.
- Ability to communicate problems through visuals.
- Presentation, clarity, and neatness.
View Solution
1. Problem Identification:
Buyer's Problems:
- Difficulty in negotiating prices
- Hygiene concerns due to open-air exposure
- Limited payment options
- Difficulty in carrying purchased items
- Inconsistent vegetable quality
Seller's Problems:
- Challenges in maintaining freshness of vegetables
- Exposure to harsh weather conditions
- Difficulty in attracting new customers
- High dependency on manual labour
- Lack of infrastructure for better storage
2. Visual Representation:
- A drawing showing a problem faced by the buyer and a drawing showing a problem faced by the seller.
- Sketches which clearly indicate the buyer and seller's problem like hygiene concerns, problems in carrying items, difficulties in maintaining the freshness of the products, problems due to exposure to harsh weather conditions.
- The drawing must clearly communicate the problem. The drawing should be accompanied by a brief explanation.
*The article might have information for the previous academic years, please refer the official website of the exam.