
UCEED 2022 Question Paper with Solution PDF (January 23)


Content Writer | Updated On - Jan 17, 2026
UCEED Question Papers are the most important study material for effective exam preparation. We at Zollege have provided all UCEED Previous Year Papers with Solution PDFs here. UCEED 2022 exam was conducted successfully on January 23 by IIT Bombay.
Students can freely download the UCEED previous year's question paper PDFs along with their solutions here. We strongly encourage UCEED aspirants to scan through all the UCEED Question Paper to know the overall difficulty level, UCEED Syllabus and understand the changes in UCEED Exam Pattern over the years.
UCEED 2022 Question Paper with Solution PDF
| UCEED 2022 Question Paper PDF | UCEED 2022 Solution PDF |
|---|---|
| Download PDF | Check Solutions |

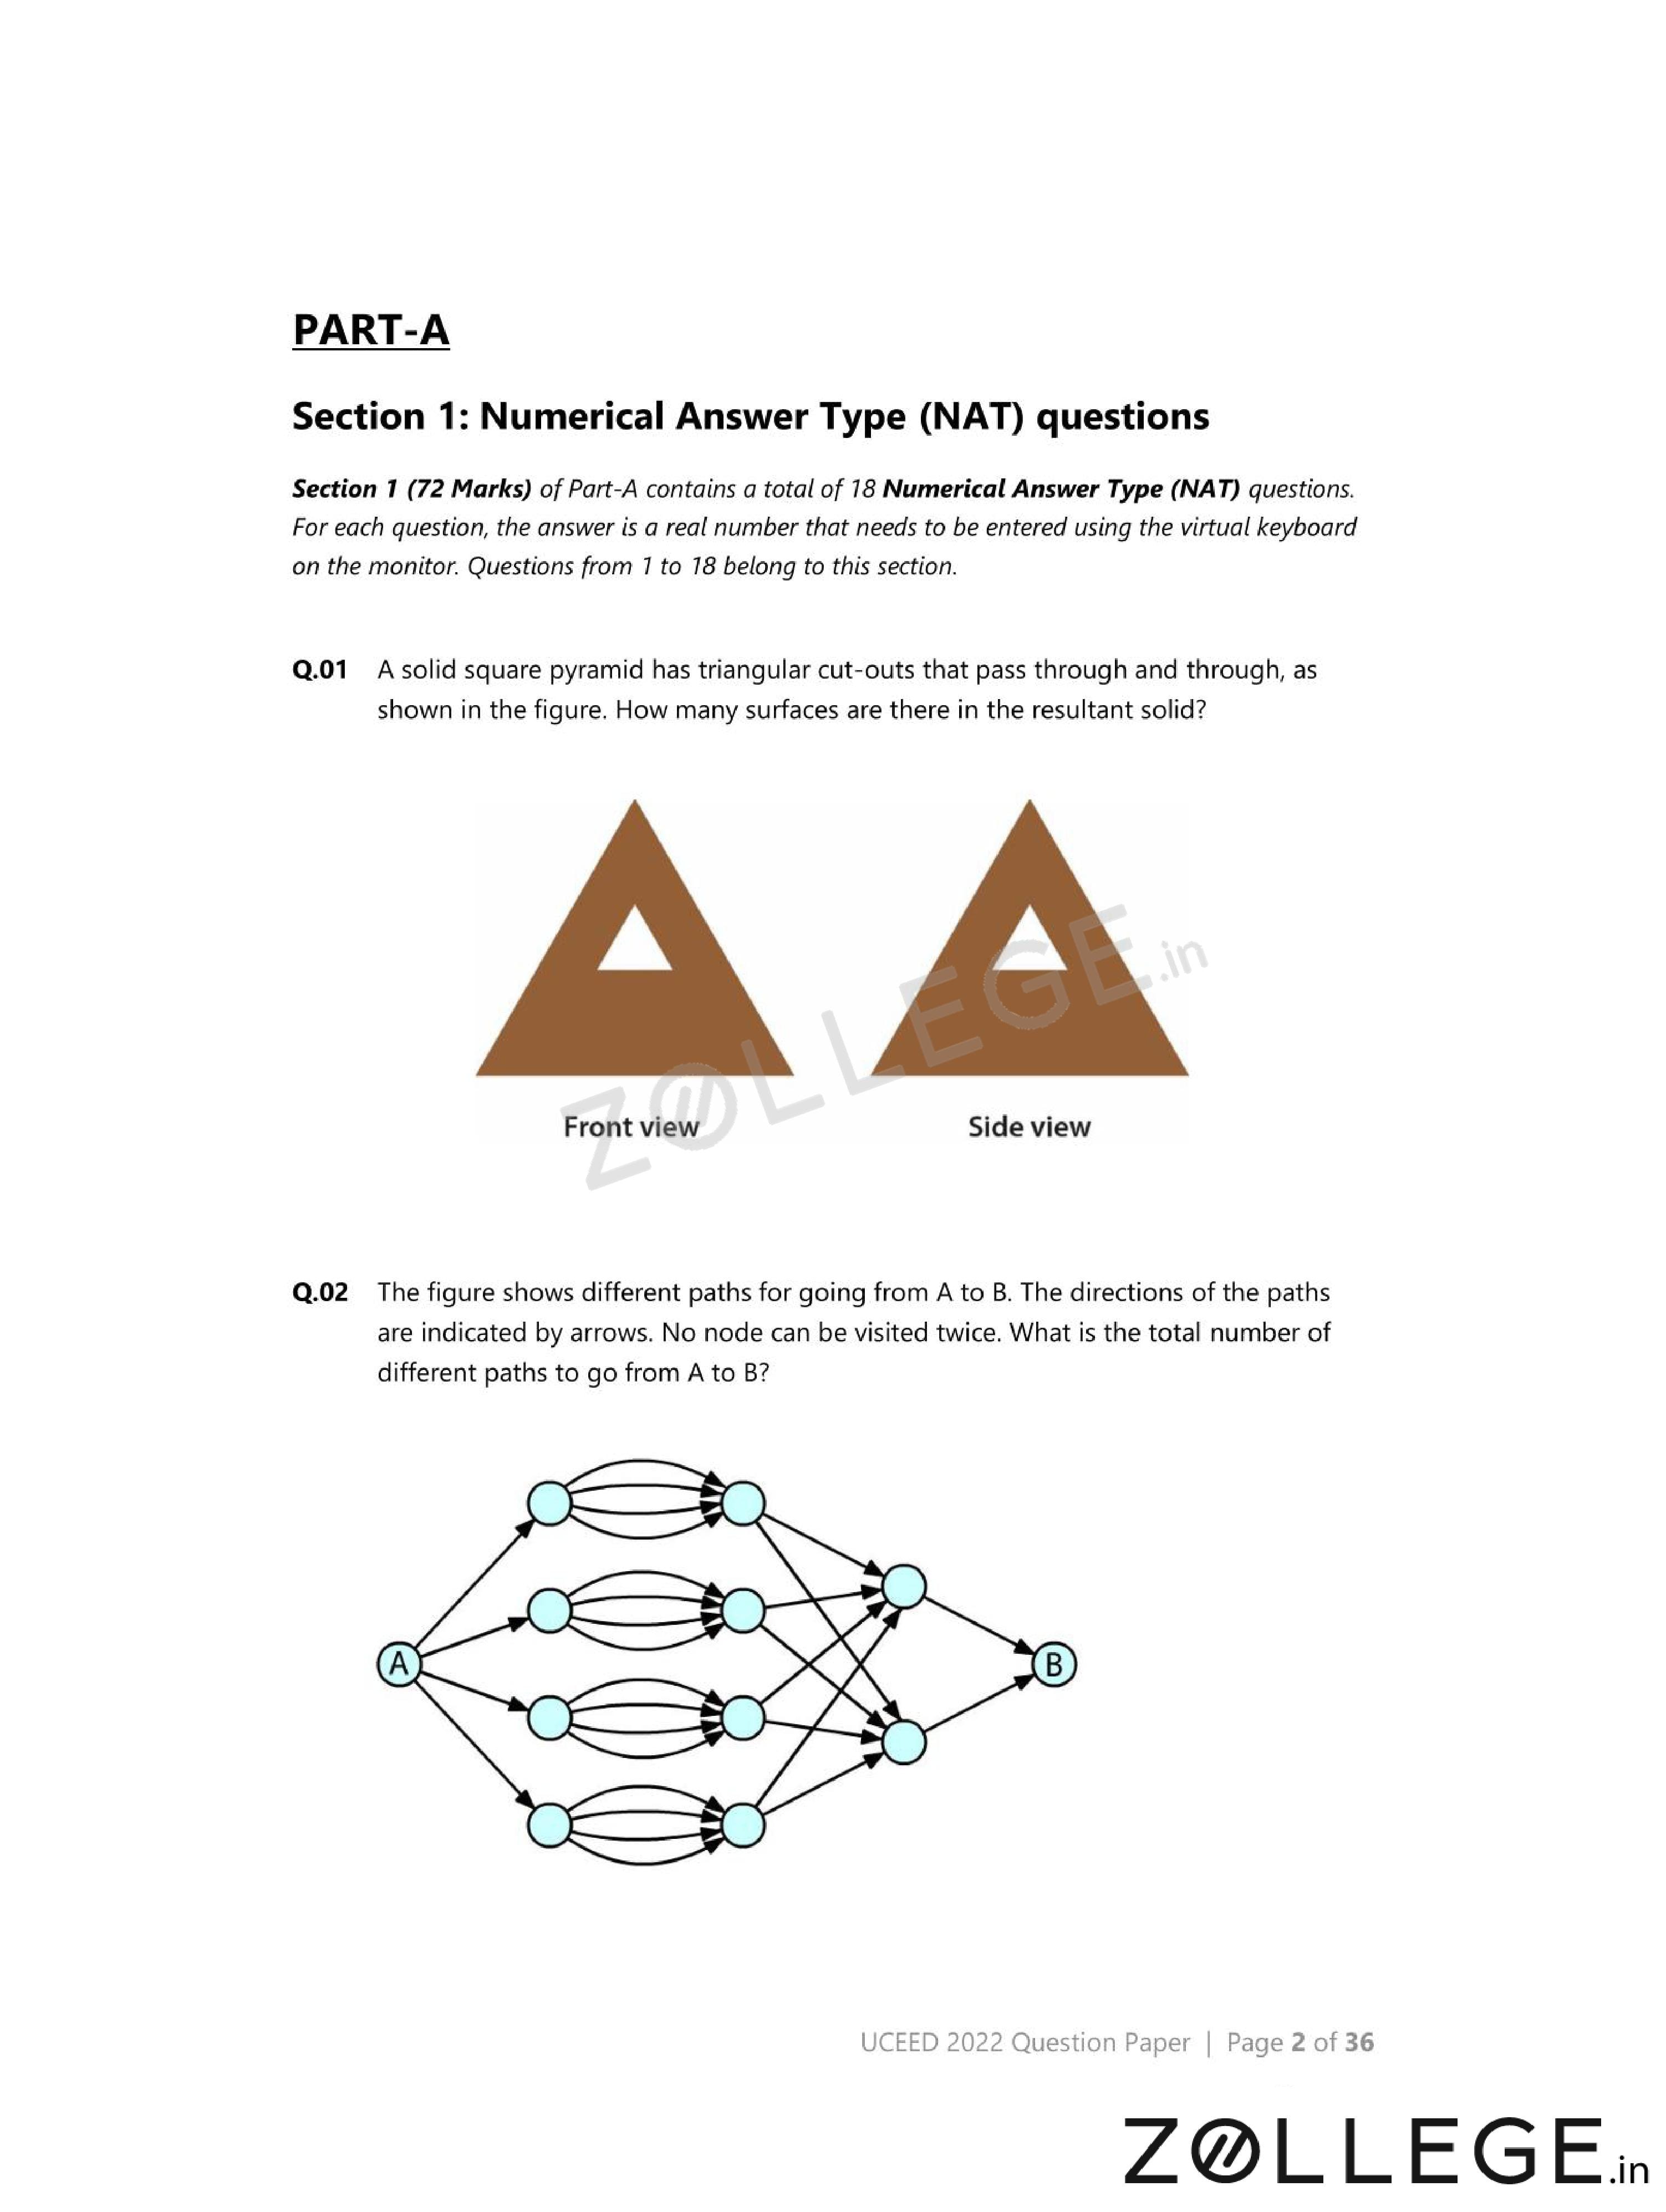
A solid square pyramid has triangular cut-outs that pass through and through, as shown in the figure. How many surfaces are there in the resultant solid?

View Solution
Step 1: Understanding the Concept:
A square pyramid is a three-dimensional solid consisting of flat polygonal faces.
When material is removed using through cut-outs, additional internal faces are created.
Step 2: Key Approach:
Count the original faces of the pyramid and then add the number of new faces produced by the cut-outs.
Step 3: Detailed Explanation:
A solid square pyramid has: \[ 1 square base + 4 triangular side faces = 5 faces. \]
Each triangular cut-out passes completely through the solid.
Such a cut-out exposes \(3\) new surfaces.
There are \(3\) identical triangular cut-outs.
Hence, total additional faces: \[ 3 \times 3 = 9. \]
Total number of surfaces: \[ 5 + 9 = 14. \]
Step 4: Final Answer:
The total number of surfaces in the resultant solid is \(\mathbf{14}\).
Quick Tip: For solids with holes or cut-outs, always include the newly exposed internal faces in surface counting.
The figure shows different paths for going from A to B. The directions of the paths are indicated by arrows. No node can be visited twice. What is the total number of different paths to go from A to B?

View Solution
Step 1: Understanding the Concept:
This problem involves counting all valid directed paths in a network.
Each path must strictly follow the arrows, and no node can be revisited.
Step 2: Key Approach:
Count the number of choices available at each stage and combine them systematically.
Step 3: Detailed Explanation:
From point A, there are \(4\) distinct outgoing paths.
Each of these leads to a middle layer where further branching occurs.
From the middle nodes, paths merge and finally lead to B without revisiting any node.
By counting all unique, non-repeating directed routes from A to B, the total number of valid paths is \(20\).
Step 4: Final Answer:
The total number of different paths from A to B is \(\mathbf{20}\).
Quick Tip: In path-counting questions, trace routes layer by layer and ensure no node is counted twice.
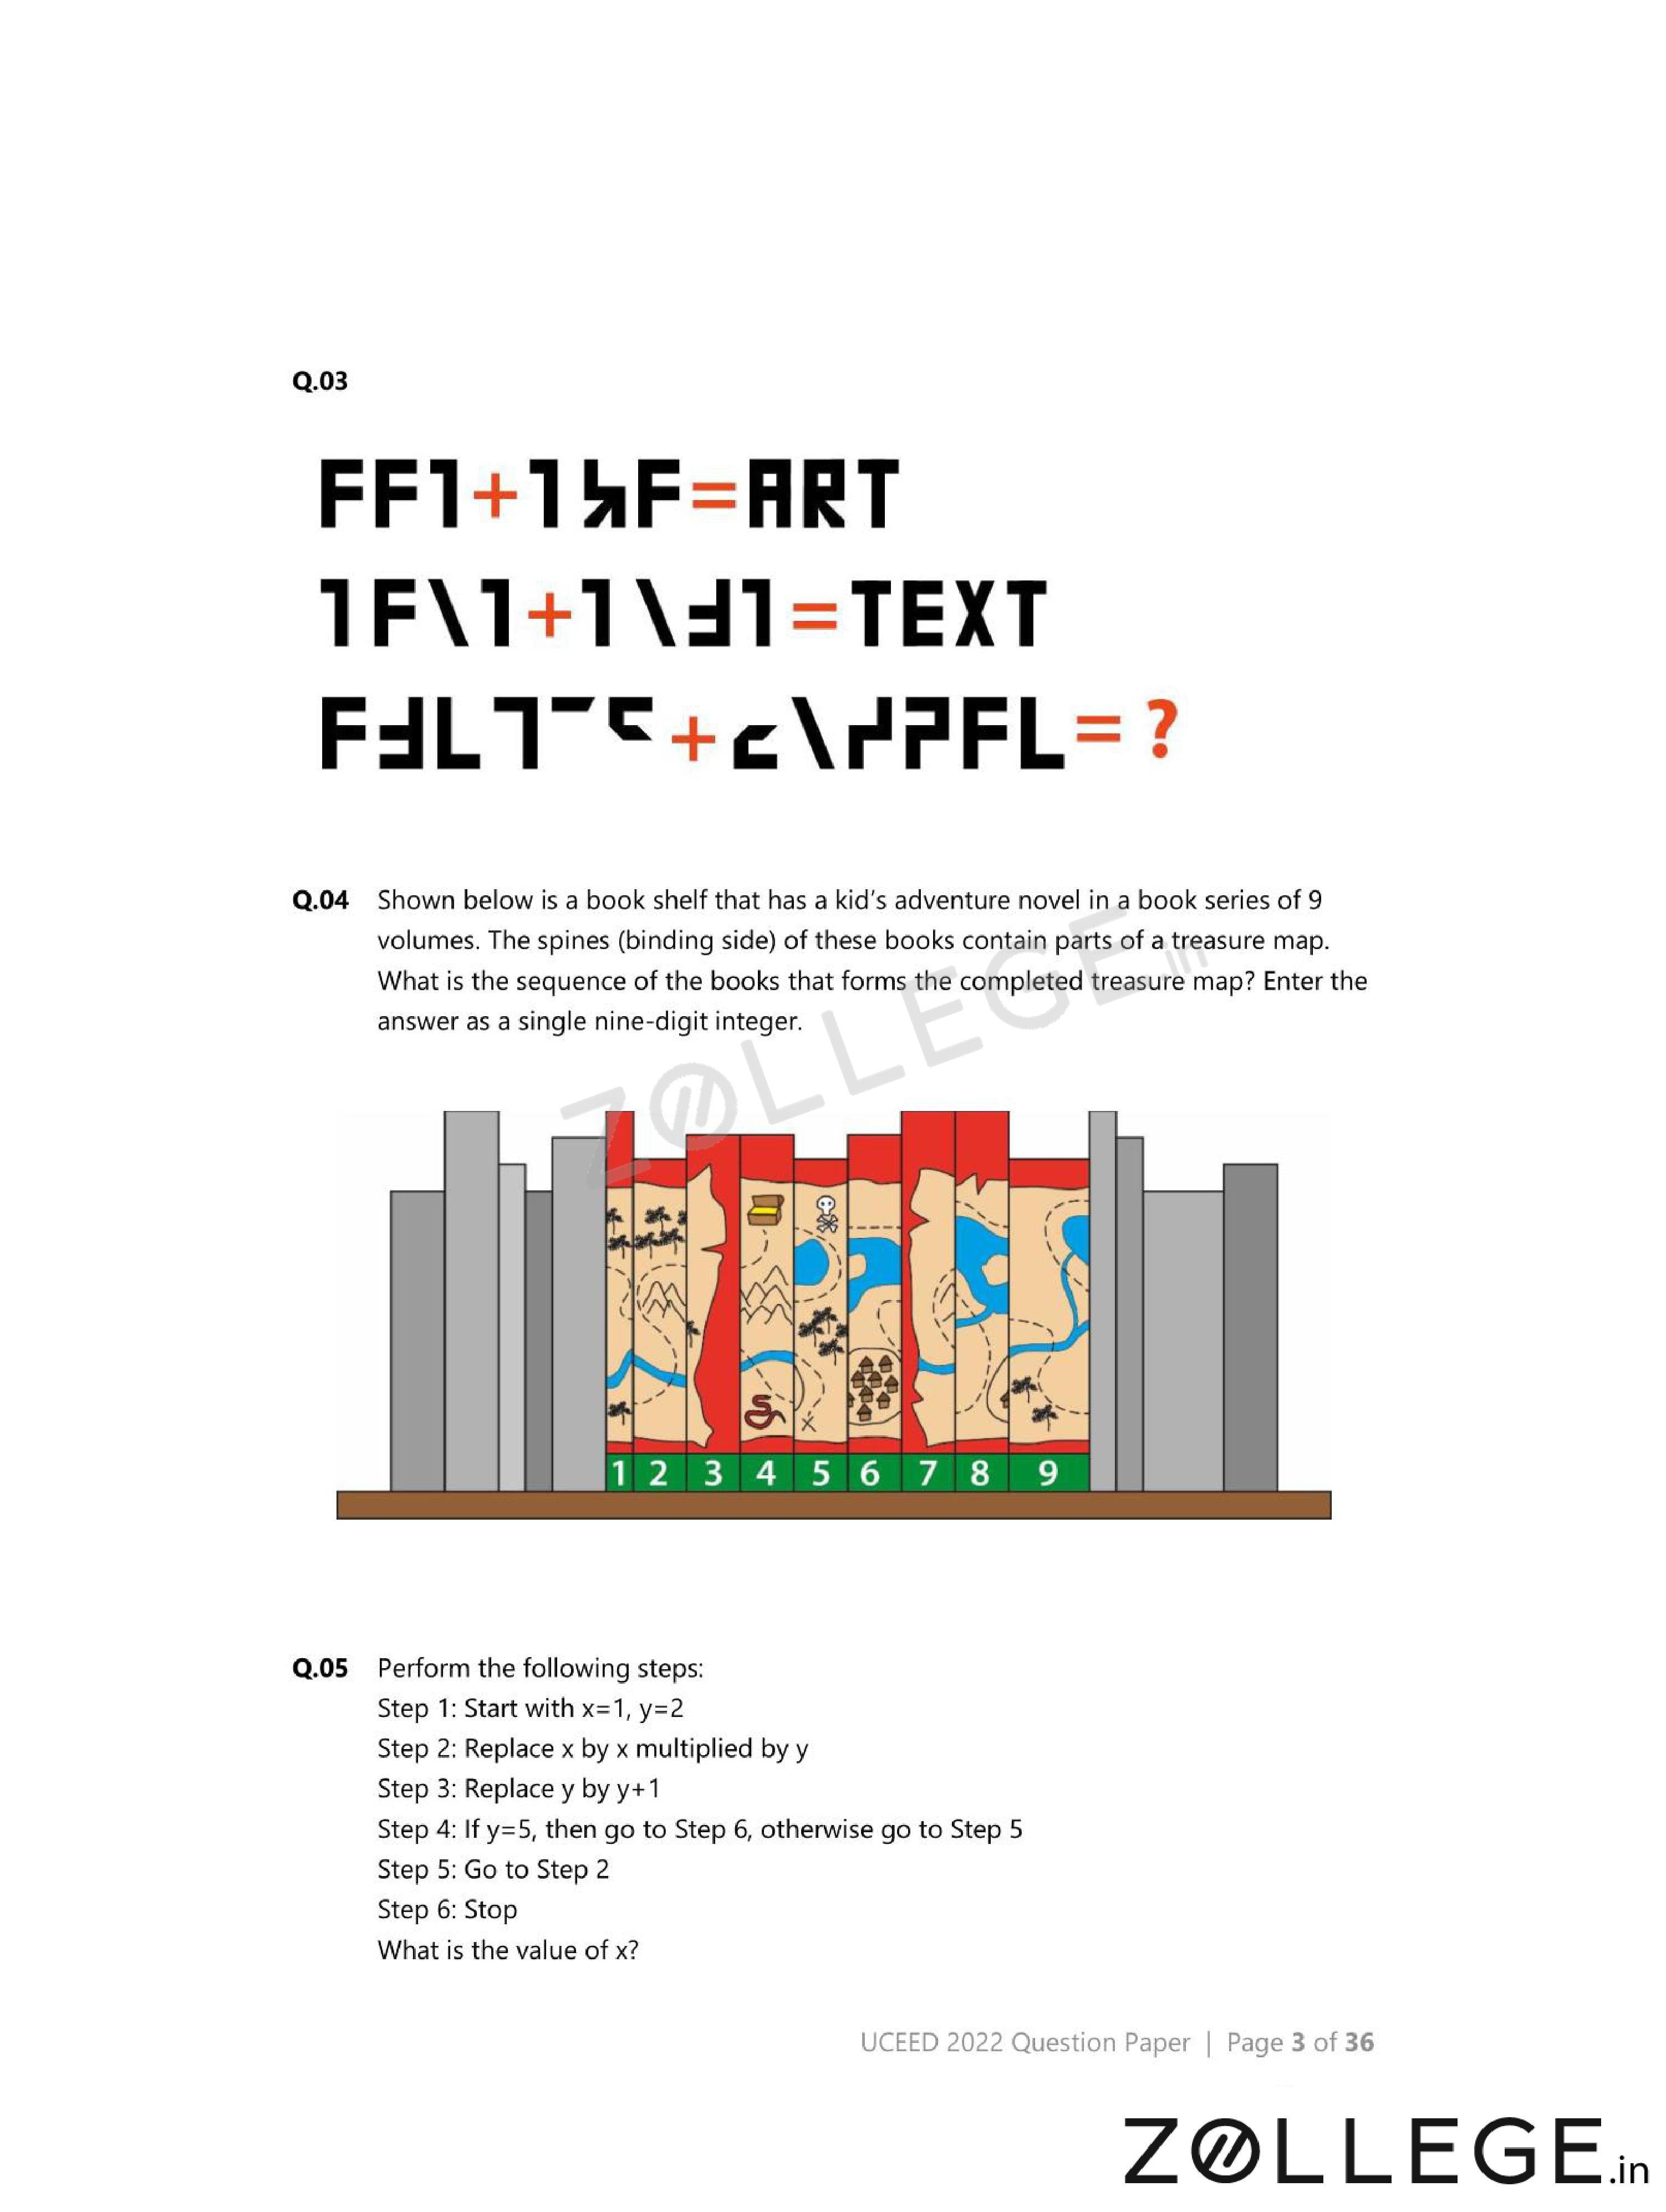
FF1 + 1W = ART,\quad TFV1 + 1V1 = TEXT,\quad FJL7 - C\textbackslash V7FL = ?

View Solution
Step 1: Understanding the Concept:
The symbols represent stylized or rotated fragments of English letters.
Each expression visually encodes a meaningful word.
Step 2: Key Approach:
Decode each symbol by observing orientation, symmetry, and resemblance to alphabets.
Step 3: Detailed Explanation:
In the first expression, the symbols visually combine to form the word ART.
In the second expression, the symbols combine to form the word TEXT.
Applying the same decoding logic to the third expression results in the same readable word.
Step 4: Final Answer:
The decoded word is \(\mathbf{TEXT}\).
Quick Tip: For symbol-based questions, rely on visual similarity and consistency across examples rather than arithmetic operations.
Shown below is a book shelf that has a kid’s adventure novel in a book series of 9 volumes. The spines of these books contain parts of a treasure map. What is the sequence of the books that forms the completed treasure map? Enter the answer as a single nine-digit integer.

View Solution
Step 1: Understanding the Concept:
Each book spine shows a fragment of a continuous treasure map.
The correct sequence is obtained when all fragments align seamlessly.
Step 2: Key Approach:
Observe continuity of lines such as rivers, paths, and landmarks across adjacent spines.
Step 3: Detailed Explanation:
By rearranging the books and matching the map edges, only one arrangement forms a smooth, uninterrupted map.
That arrangement corresponds to the order \(2 \rightarrow 3 \rightarrow 1 \rightarrow 4 \rightarrow 5 \rightarrow 6 \rightarrow 7 \rightarrow 8 \rightarrow 9\).
Step 4: Final Answer:
The correct sequence is \(\mathbf{231456789}\).
Quick Tip: In visual continuity problems, focus on matching edges and flow rather than book numbering.
Perform the following steps:
Step 1: Start with \(x=1, y=2\).
Step 2: Replace \(x\) by \(x\) multiplied by \(y\).
Step 3: Replace \(y\) by \(y+1\).
Step 4: If \(y=5\), then go to Step 6, otherwise go to Step 5.
Step 5: Go to Step 2.
Step 6: Stop.
What is the value of \(x\)?
View Solution
Step 1: Understanding the Concept:
The steps describe an iterative multiplication process controlled by a loop.
Step 2: Key Approach:
Track the values of \(x\) and \(y\) at each iteration until the stopping condition is reached.
Step 3: Detailed Explanation:
Initially, \(x=1\) and \(y=2\).
Iteration-wise updates: \[ x = 1 \times 2 = 2,\quad y=3 \] \[ x = 2 \times 3 = 6,\quad y=4 \] \[ x = 6 \times 4 = 24,\quad y=5 \] \[ x = 24 \times 5 = 120 \]
Now \(y=5\), so the process stops.
Step 4: Final Answer:
The final value of \(x\) is \(\mathbf{120}\).
Quick Tip: For algorithmic questions, write down each iteration explicitly to avoid missing a step.
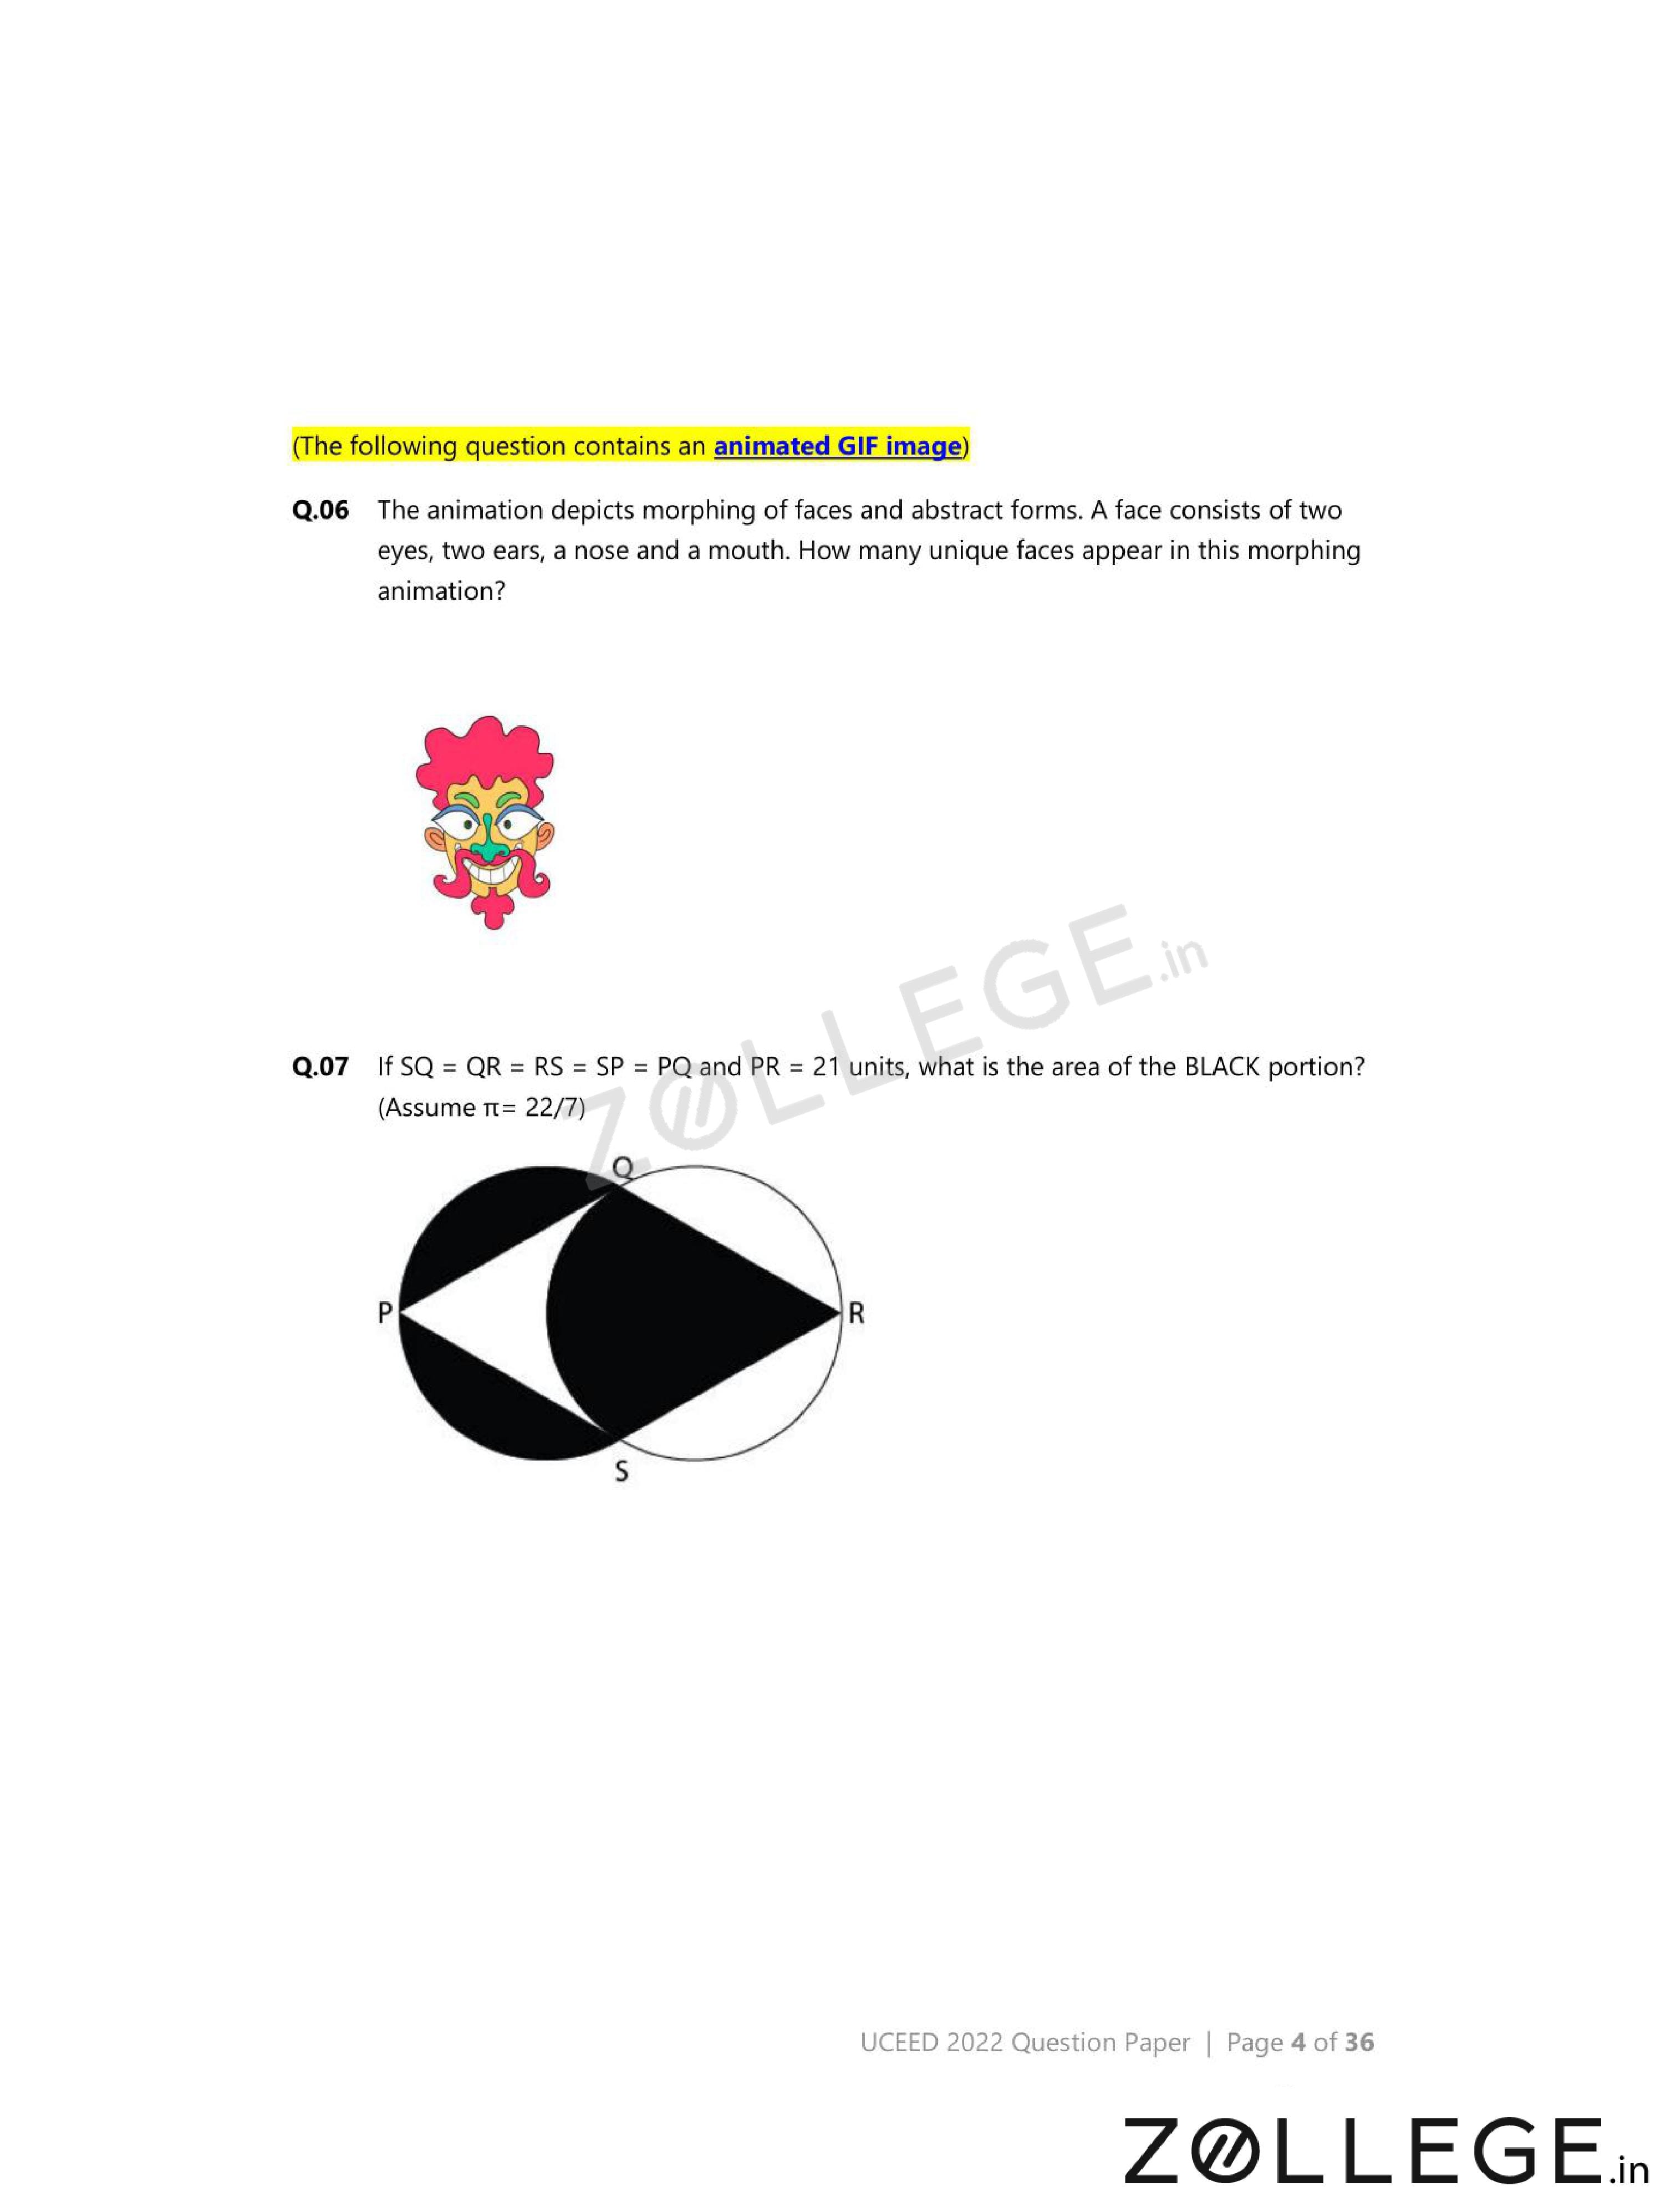
The animation depicts morphing of faces and abstract forms. A face consists of two eyes, two ears, a nose and a mouth. How many unique faces appear in this morphing animation?

View Solution
Step 1: Understanding the Concept:
A valid face must contain all five required facial features.
Partial or abstract shapes are not counted as faces.
Step 2: Key Approach:
Observe the animation frame by frame and count only those frames where all facial features are present together.
Step 3: Detailed Explanation:
During the morphing process, some frames show incomplete faces where one or more features are missing.
Only frames where two eyes, two ears, one nose, and one mouth are clearly visible are considered.
Careful observation shows exactly \(7\) distinct such frames.
Step 4: Final Answer:
The total number of unique faces is \(\mathbf{7}\).
Quick Tip: In animation-based questions, count only stable frames with complete required features.
If \(SQ = QR = RS = SP = PQ\) and \(PR = 21\) units, what is the area of the BLACK portion? (Assume \(\pi = \frac{22}{7}\)).

View Solution
Step 1: Understanding the Concept:
The figure consists of two identical semicircles formed on diameter \(PR\).
The black region is formed by overlapping curved regions and triangles.
Step 2: Key Formula or Approach:
Use the area formula of a circle: \[ Area = \pi r^2. \]
Step 3: Detailed Explanation:
Given \(PR = 21\), the radius is: \[ r = \frac{21}{2} = 10.5. \]
Area of the full circle: \[ \frac{22}{7} \times (10.5)^2 = 346.5. \]
From the symmetry of the figure, the black region occupies exactly \(\frac{2}{3}\) of this area.
\[ Black area = \frac{2}{3} \times 346.5 = 231. \]
Step 4: Final Answer:
The area of the black portion is \(\mathbf{231}\) square units.
Quick Tip: Exploit symmetry in curved figures to avoid unnecessary calculations.
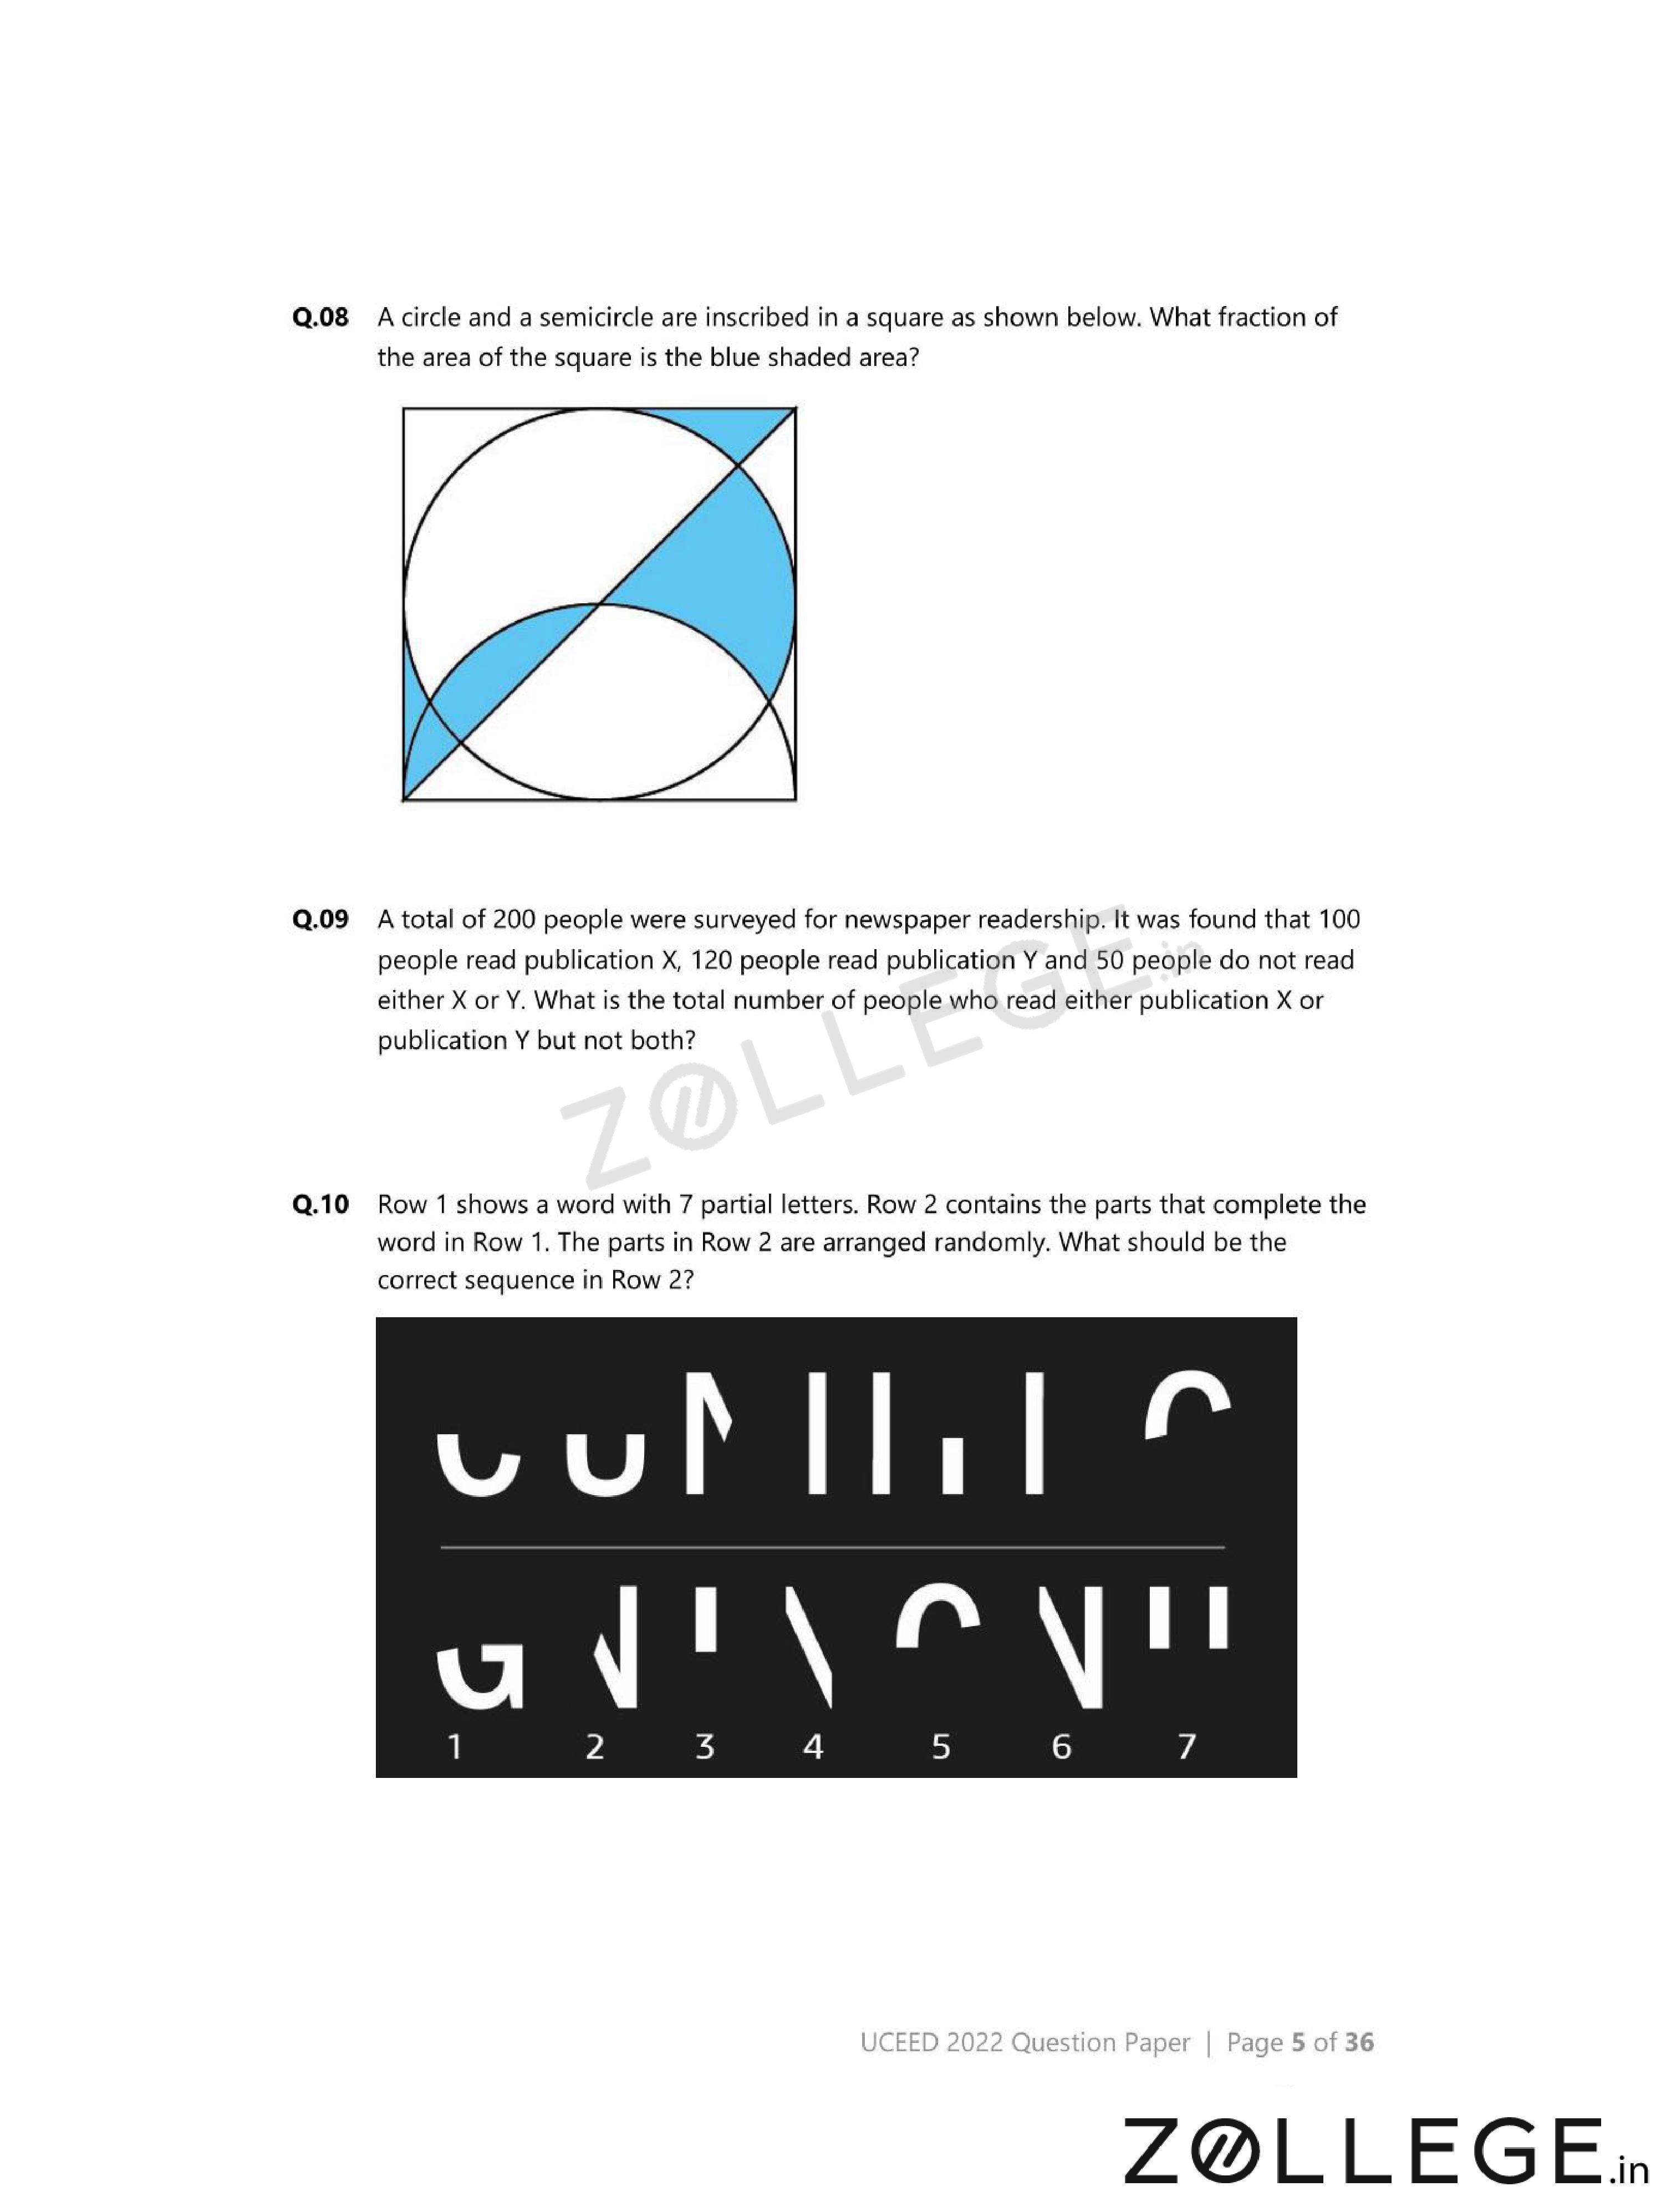
A circle and a semicircle are inscribed in a square as shown below. What fraction of the area of the square is the blue shaded area?

View Solution
Step 1: Understanding the Concept:
The shaded region is formed by overlapping portions of a circle and a semicircle inside a square.
Step 2: Key Formula or Approach:
Compare areas using symmetry instead of direct numerical substitution.
Step 3: Detailed Explanation:
The circle and semicircle are perfectly inscribed, dividing the square into symmetric regions.
The unshaded regions together occupy \(\frac{2}{3}\) of the square.
Hence, the shaded region occupies the remaining \(\frac{1}{3}\).
Step 4: Final Answer:
The fraction of the square that is shaded blue is \(\mathbf{\frac{1}{3}}\).
Quick Tip: Area-fraction questions often simplify using symmetry rather than full calculations.
A total of 200 people were surveyed for newspaper readership. It was found that 100 people read publication X, 120 people read publication Y and 50 people do not read either X or Y. What is the total number of people who read either publication X or publication Y but not both?
View Solution
Step 1: Understanding the Concept:
This is a standard two-set problem involving union and intersection.
Step 2: Key Formula or Approach:
\[ n(X \cup Y) = n(X) + n(Y) - n(X \cap Y). \]
Step 3: Detailed Explanation:
People reading at least one paper: \[ 200 - 50 = 150. \]
Substitute values: \[ 150 = 100 + 120 - n(X \cap Y). \] \[ n(X \cap Y) = 70. \]
People reading only one publication: \[ (100 - 70) + (120 - 70) = 70. \]
Step 4: Final Answer:
The required number of people is \(\mathbf{70}\).
Quick Tip: Always find the intersection first before calculating exclusive members.
Row 1 shows a word with 7 partial letters. Row 2 contains the parts that complete the word in Row 1. The parts in Row 2 are arranged randomly. What should be the correct sequence in Row 2?

View Solution
Step 1: Understanding the Concept:
Each partial segment completes a specific missing portion of a letter.
Step 2: Key Approach:
Match curvature, stroke direction, and alignment of segments with Row 1.
Step 3: Detailed Explanation:
Placing part \(3\) first completes the initial letter shape.
Parts \(1\), \(4\), and \(2\) complete the next incomplete characters sequentially.
The remaining parts \(5,6,7\) fit unambiguously at the end.
Only this sequence forms a valid readable word.
Step 4: Final Answer:
The correct sequence is \(\mathbf{3\,1\,4\,2\,5\,6\,7}\).
Quick Tip: In letter-completion problems, align endpoints and curvature before fixing the order.
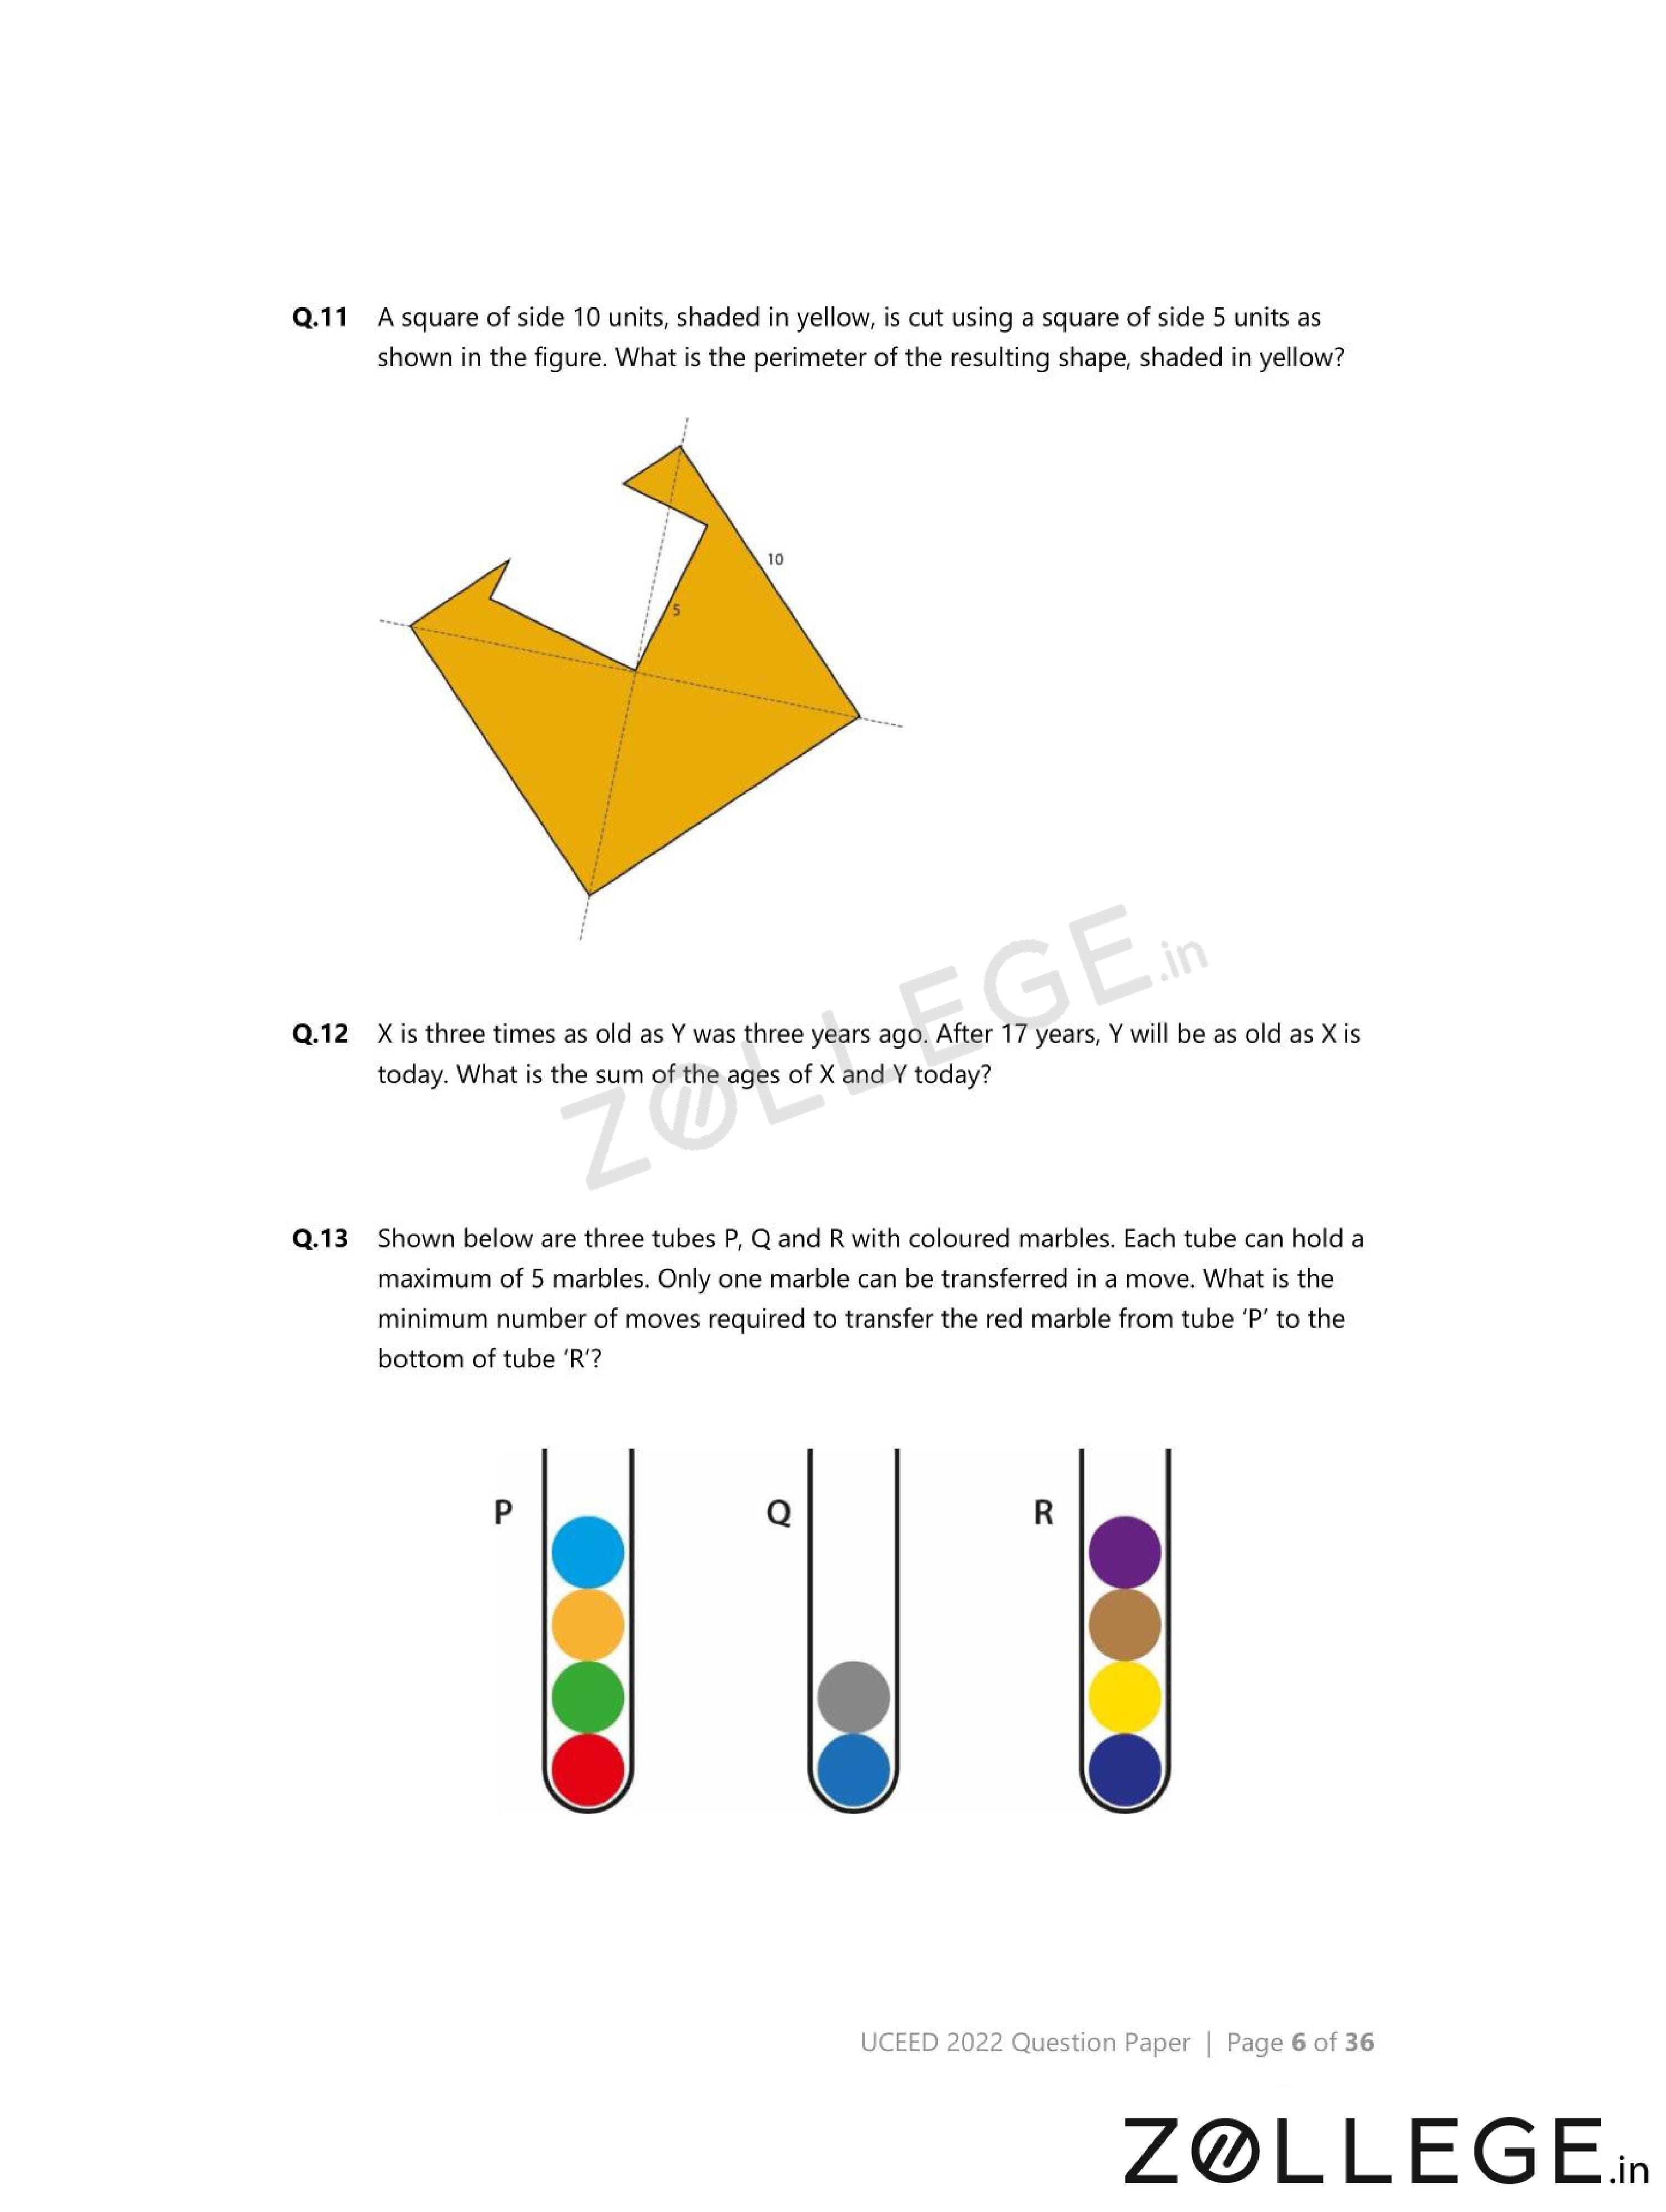
A square of side 10 units, shaded in yellow, is cut using a square of side 5 units as shown in the figure. What is the perimeter of the resulting shape, shaded in yellow?

View Solution
Step 1: Understanding the Concept:
A smaller square is removed from a larger square, changing the boundary shape.
The perimeter must be calculated along the new outer boundary only.
Step 2: Key Approach:
Trace the entire outline of the remaining yellow shape and add lengths of all exposed edges.
Step 3: Detailed Explanation:
Original square side \(=10\), so original perimeter \(=40\).
After cutting a square of side \(5\), some edges are removed but new edges of equal total length appear.
The cut introduces four new edges of length \(5\).
Net increase in perimeter: \[ 40 + 4 \times 5 = 60. \]
Step 4: Final Answer:
The perimeter of the shaded shape is \(\mathbf{60}\) units.
Quick Tip: When shapes are cut out, always redraw the final boundary before calculating perimeter.
X is three times as old as Y was three years ago. After 17 years, Y will be as old as X is today. What is the sum of the ages of X and Y today?
View Solution
Step 1: Understanding the Concept:
This is an age problem involving linear equations based on time shifts.
Step 2: Key Formula or Approach:
Translate each statement into an algebraic equation.
Step 3: Detailed Explanation:
Let present ages be \(X=x\) and \(Y=y\).
Given: \[ x = 3(y-3). \]
After 17 years: \[ y+17 = x. \]
Substitute \(x=y+17\) into first equation: \[ y+17 = 3(y-3). \] \[ y+17 = 3y-9 \Rightarrow 2y=26 \Rightarrow y=13. \]
Then: \[ x = y+17 = 30. \]
Sum of present ages: \[ 30 + 13 = 43. \]
Step 4: Final Answer:
The sum of their present ages is \(\mathbf{43}\).
Quick Tip: In age problems, always define present age variables first and stick to them consistently.
Shown below are three tubes P, Q and R with coloured marbles. Each tube can hold a maximum of 5 marbles. Only one marble can be transferred in a move. What is the minimum number of moves required to transfer the red marble from tube P to the bottom of tube R?

View Solution
Step 1: Understanding the Concept:
Only the top marble of any tube can be moved at one time.
The red marble must finally be at the bottom of tube R.
Step 2: Key Approach:
Temporarily clear marbles above the red marble and create space in tube R.
Step 3: Detailed Explanation:
First, remove marbles above the red marble in tube P using tube Q as a buffer.
Then shift marbles from tube R to free its bottom position.
Finally, place the red marble into tube R and restore other marbles on top.
Following the optimal sequence requires a minimum of \(7\) moves.
Step 4: Final Answer:
The minimum number of moves required is \(\mathbf{7}\).
Quick Tip: Use the empty or least-filled tube as a temporary buffer to minimize moves.
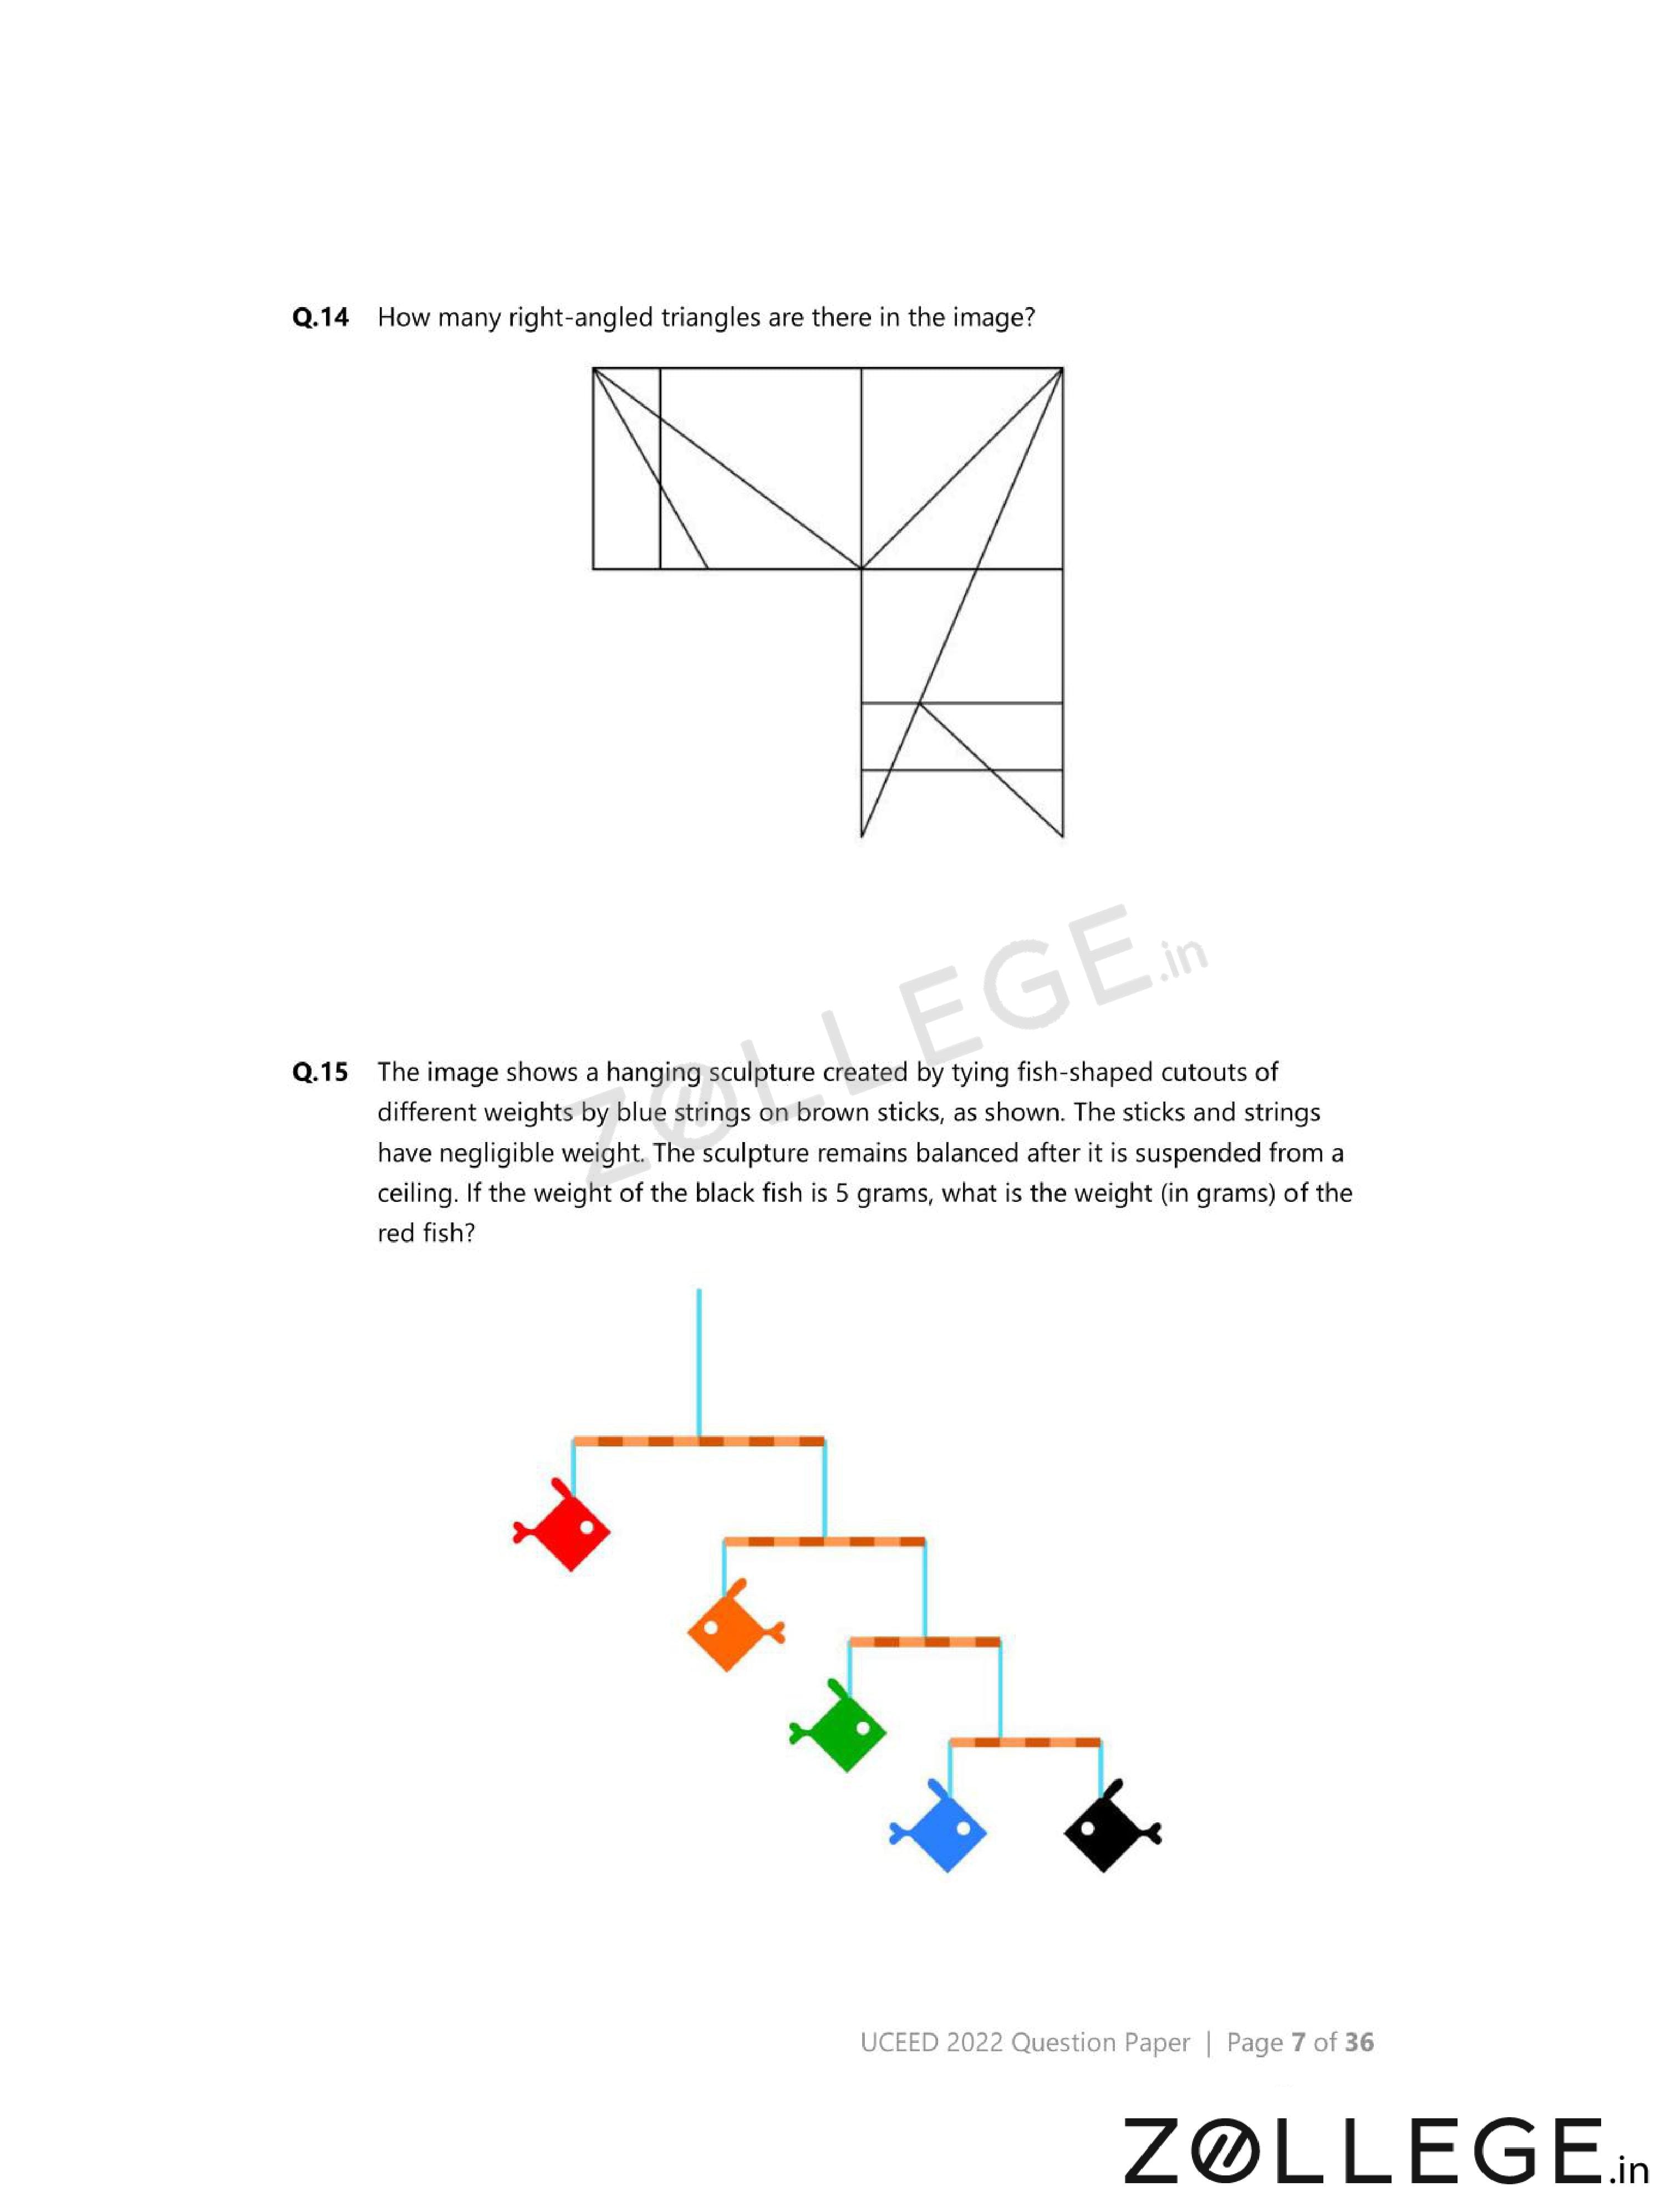
How many right-angled triangles are there in the image?

View Solution
Step 1: Understanding the Concept:
A right-angled triangle must have one angle exactly \(90^\circ\).
Step 2: Key Approach:
Identify all horizontal and vertical line intersections forming right angles.
Step 3: Detailed Explanation:
Count all smallest right triangles first.
Then count larger right triangles formed by combining smaller ones.
Include triangles of different orientations but having a right angle.
Total count obtained after systematic enumeration is \(16\).
Step 4: Final Answer:
The total number of right-angled triangles is \(\mathbf{16}\).
Quick Tip: Always count triangles size-wise: smallest first, then combined larger ones.
The image shows a hanging sculpture created by tying fish-shaped cutouts of different weights by blue strings on brown sticks. The sculpture remains balanced. If the weight of the black fish is 5 grams, what is the weight (in grams) of the red fish?

View Solution
Step 1: Understanding the Concept:
Each horizontal stick is balanced about its suspension point.
Moments (weight \(\times\) distance) on both sides must be equal.
Step 2: Key Formula or Approach:
\[ Clockwise moment = Anticlockwise moment. \]
Step 3: Detailed Explanation:
Starting from the lowest stick, balance conditions give relative weights of fish.
The black fish weighs \(5\) grams.
Using balance ratios at each level and moving upward, the red fish is found to be twice as heavy as the black fish.
Step 4: Final Answer:
The weight of the red fish is \(\mathbf{10}\) grams.
Quick Tip: In balance problems, always solve from the lowest level upward.
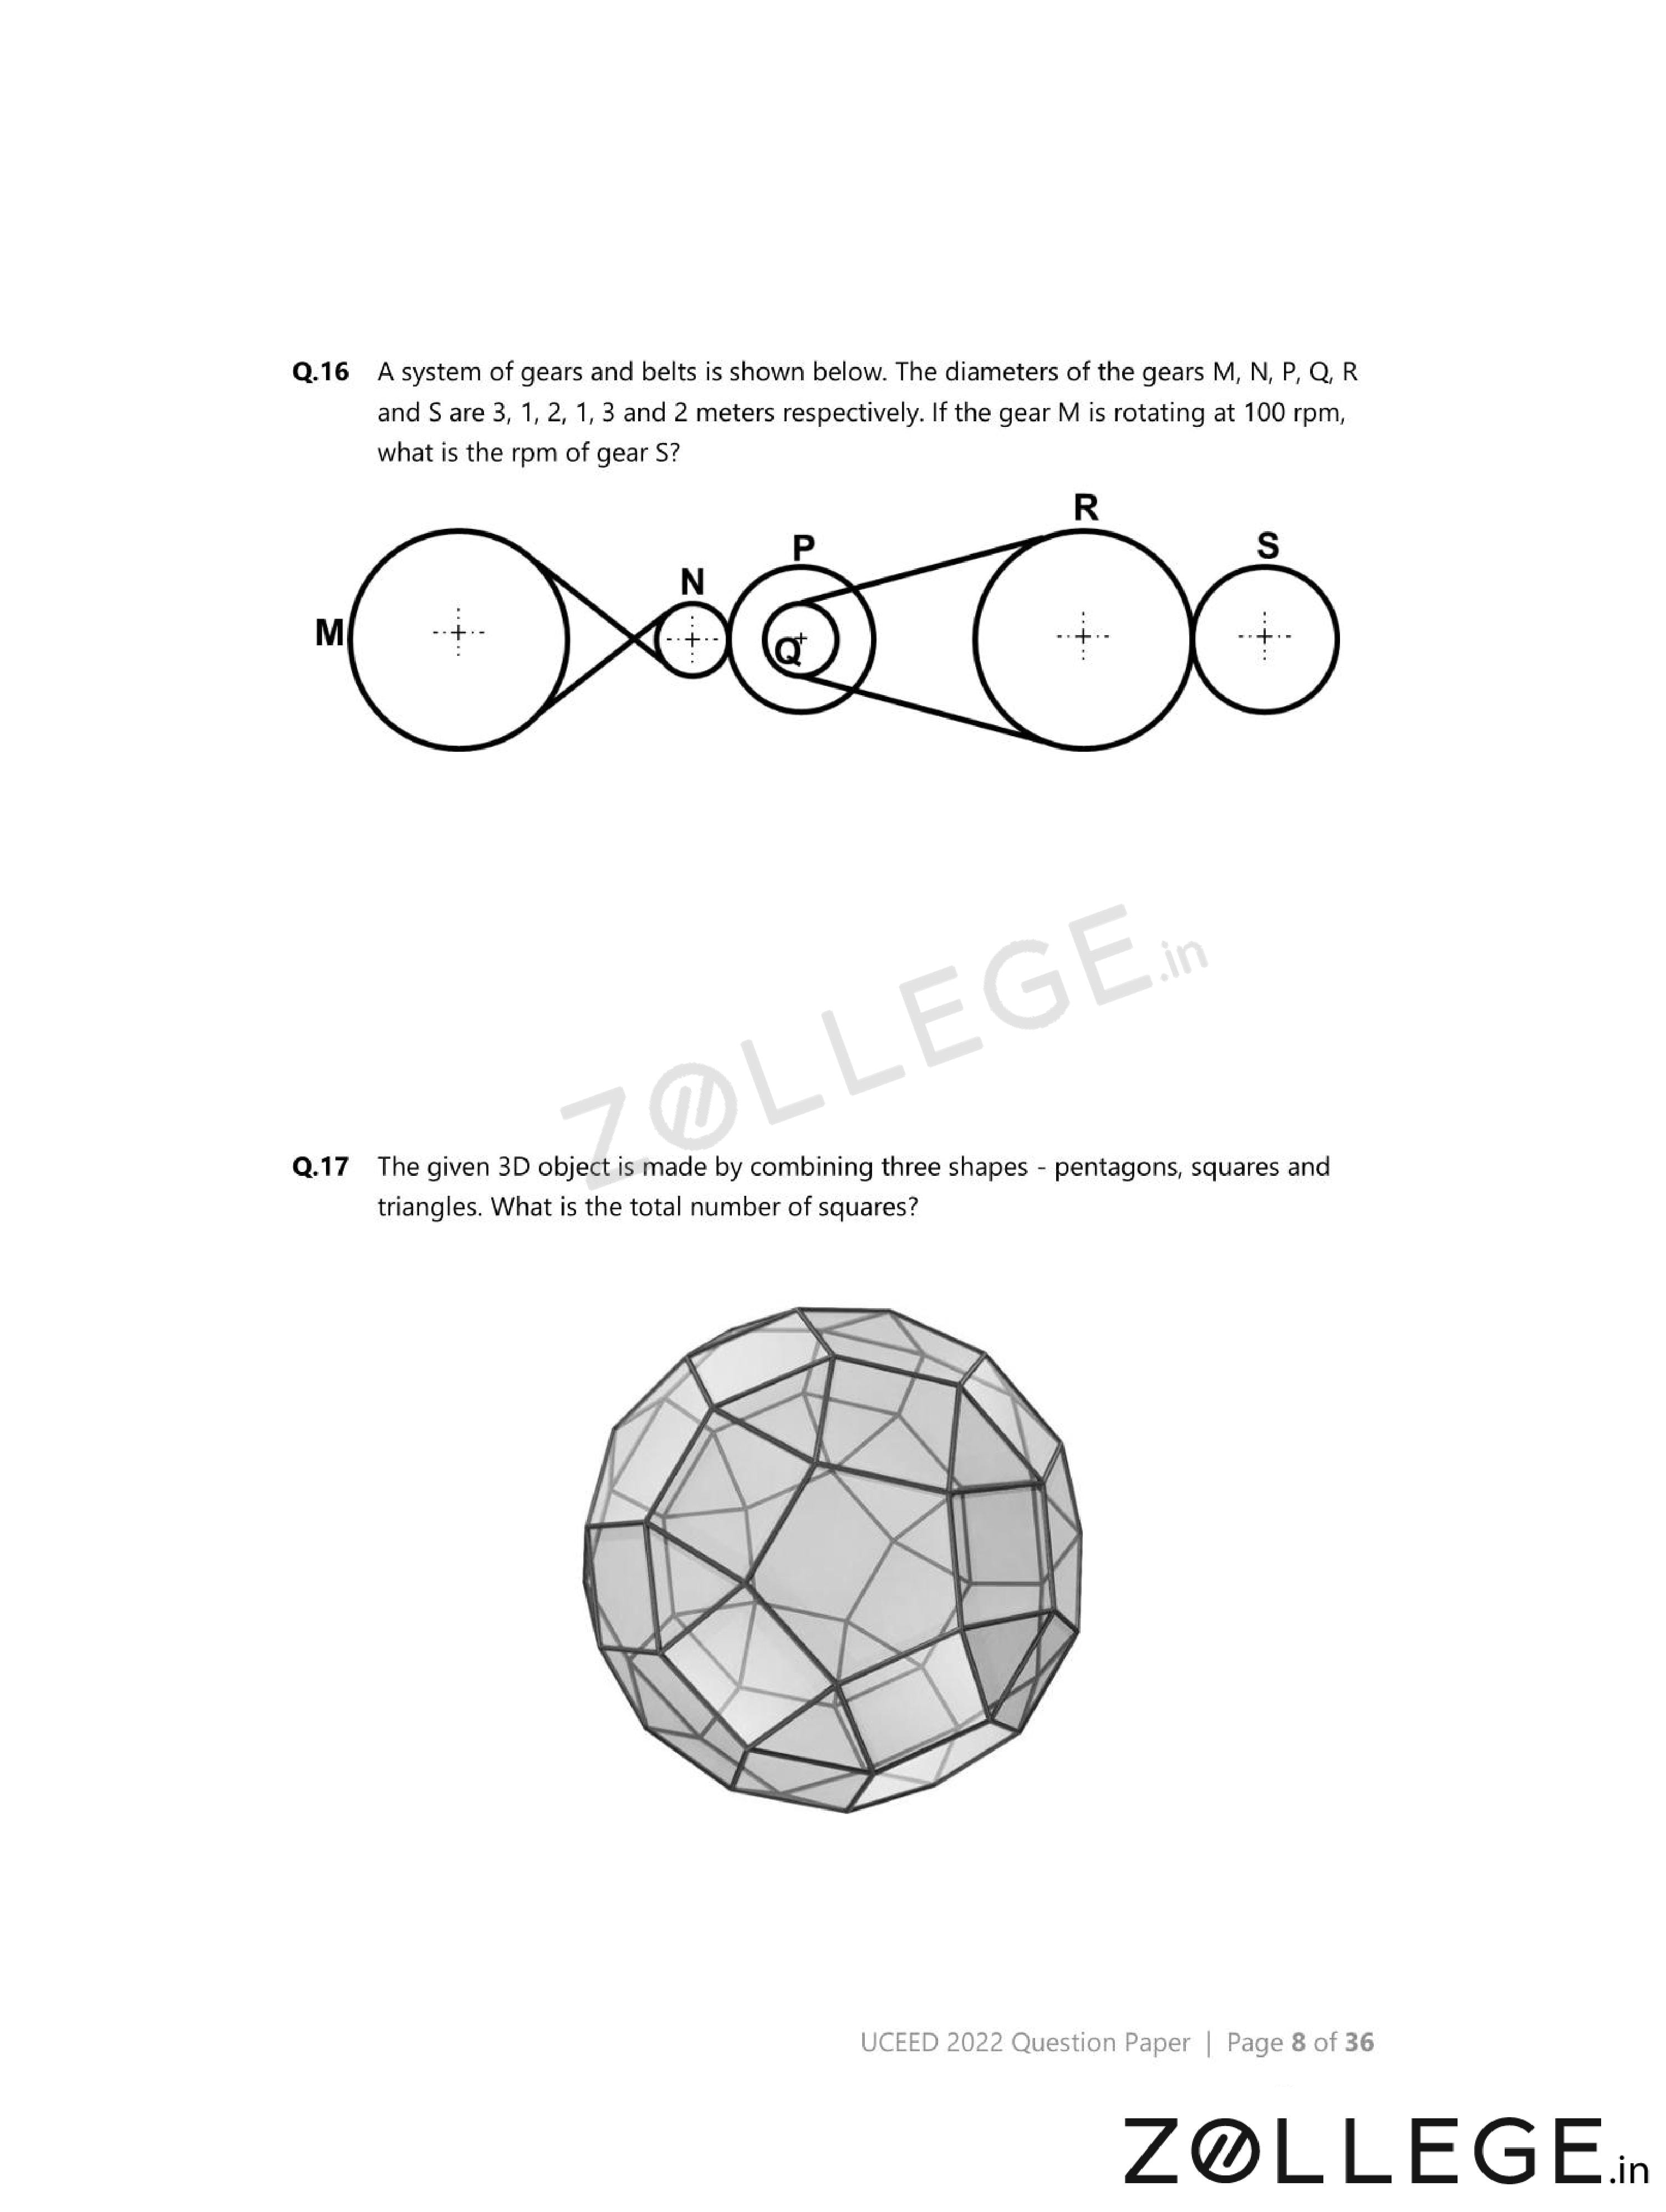
A system of gears and belts is shown below. The diameters of the gears \(M, N, P, Q, R\) and \(S\) are \(3, 1, 2, 1, 3\) and \(2\) meters respectively. If the gear \(M\) is rotating at \(100\) rpm, what is the rpm of gear \(S\)?

View Solution
Step 1: Understanding the Concept:
In gear and belt systems, angular speed is inversely proportional to diameter.
Belts transfer speed without changing direction, while meshed gears reverse direction.
Step 2: Key Formula or Approach:
For connected gears or belts: \[ N_1 D_1 = N_2 D_2 \]
where \(N\) is rpm and \(D\) is diameter.
Step 3: Detailed Explanation:
Gear \(M\) (diameter \(3\)) drives \(N\) (diameter \(1\)): \[ 100 \times 3 = N_N \times 1 \Rightarrow N_N = 300. \]
Gear \(N\) drives \(P\) (diameter \(2\)): \[ 300 \times 1 = N_P \times 2 \Rightarrow N_P = 150. \]
Gear \(P\) is connected by belt to \(Q\) (diameter \(1\)): \[ 150 \times 2 = N_Q \times 1 \Rightarrow N_Q = 300. \]
Gear \(Q\) drives \(R\) (diameter \(3\)): \[ 300 \times 1 = N_R \times 3 \Rightarrow N_R = 100. \]
Gear \(R\) drives \(S\) (diameter \(2\)): \[ 100 \times 3 = N_S \times 2 \Rightarrow N_S = 150. \]
Step 4: Final Answer:
The rotational speed of gear \(S\) is \(\mathbf{150}\) rpm.
Quick Tip: Always apply the rpm--diameter relation step by step for each gear connection.
The given 3D object is made by combining three shapes – pentagons, squares and triangles. What is the total number of squares?

View Solution
Step 1: Understanding the Concept:
The object is a composite polyhedron with multiple polygonal faces.
Only faces that are perfect squares should be counted.
Step 2: Key Approach:
Identify one repeating unit of the solid and count square faces on it.
Step 3: Detailed Explanation:
From the figure, the object consists of two identical halves joined together.
Each half contains \(5\) square faces.
Therefore, total number of square faces: \[ 2 \times 5 = 10. \]
Step 4: Final Answer:
The total number of square faces is \(\mathbf{10}\).
Quick Tip: In 3D face-counting questions, look for symmetry and repeated units to simplify counting.
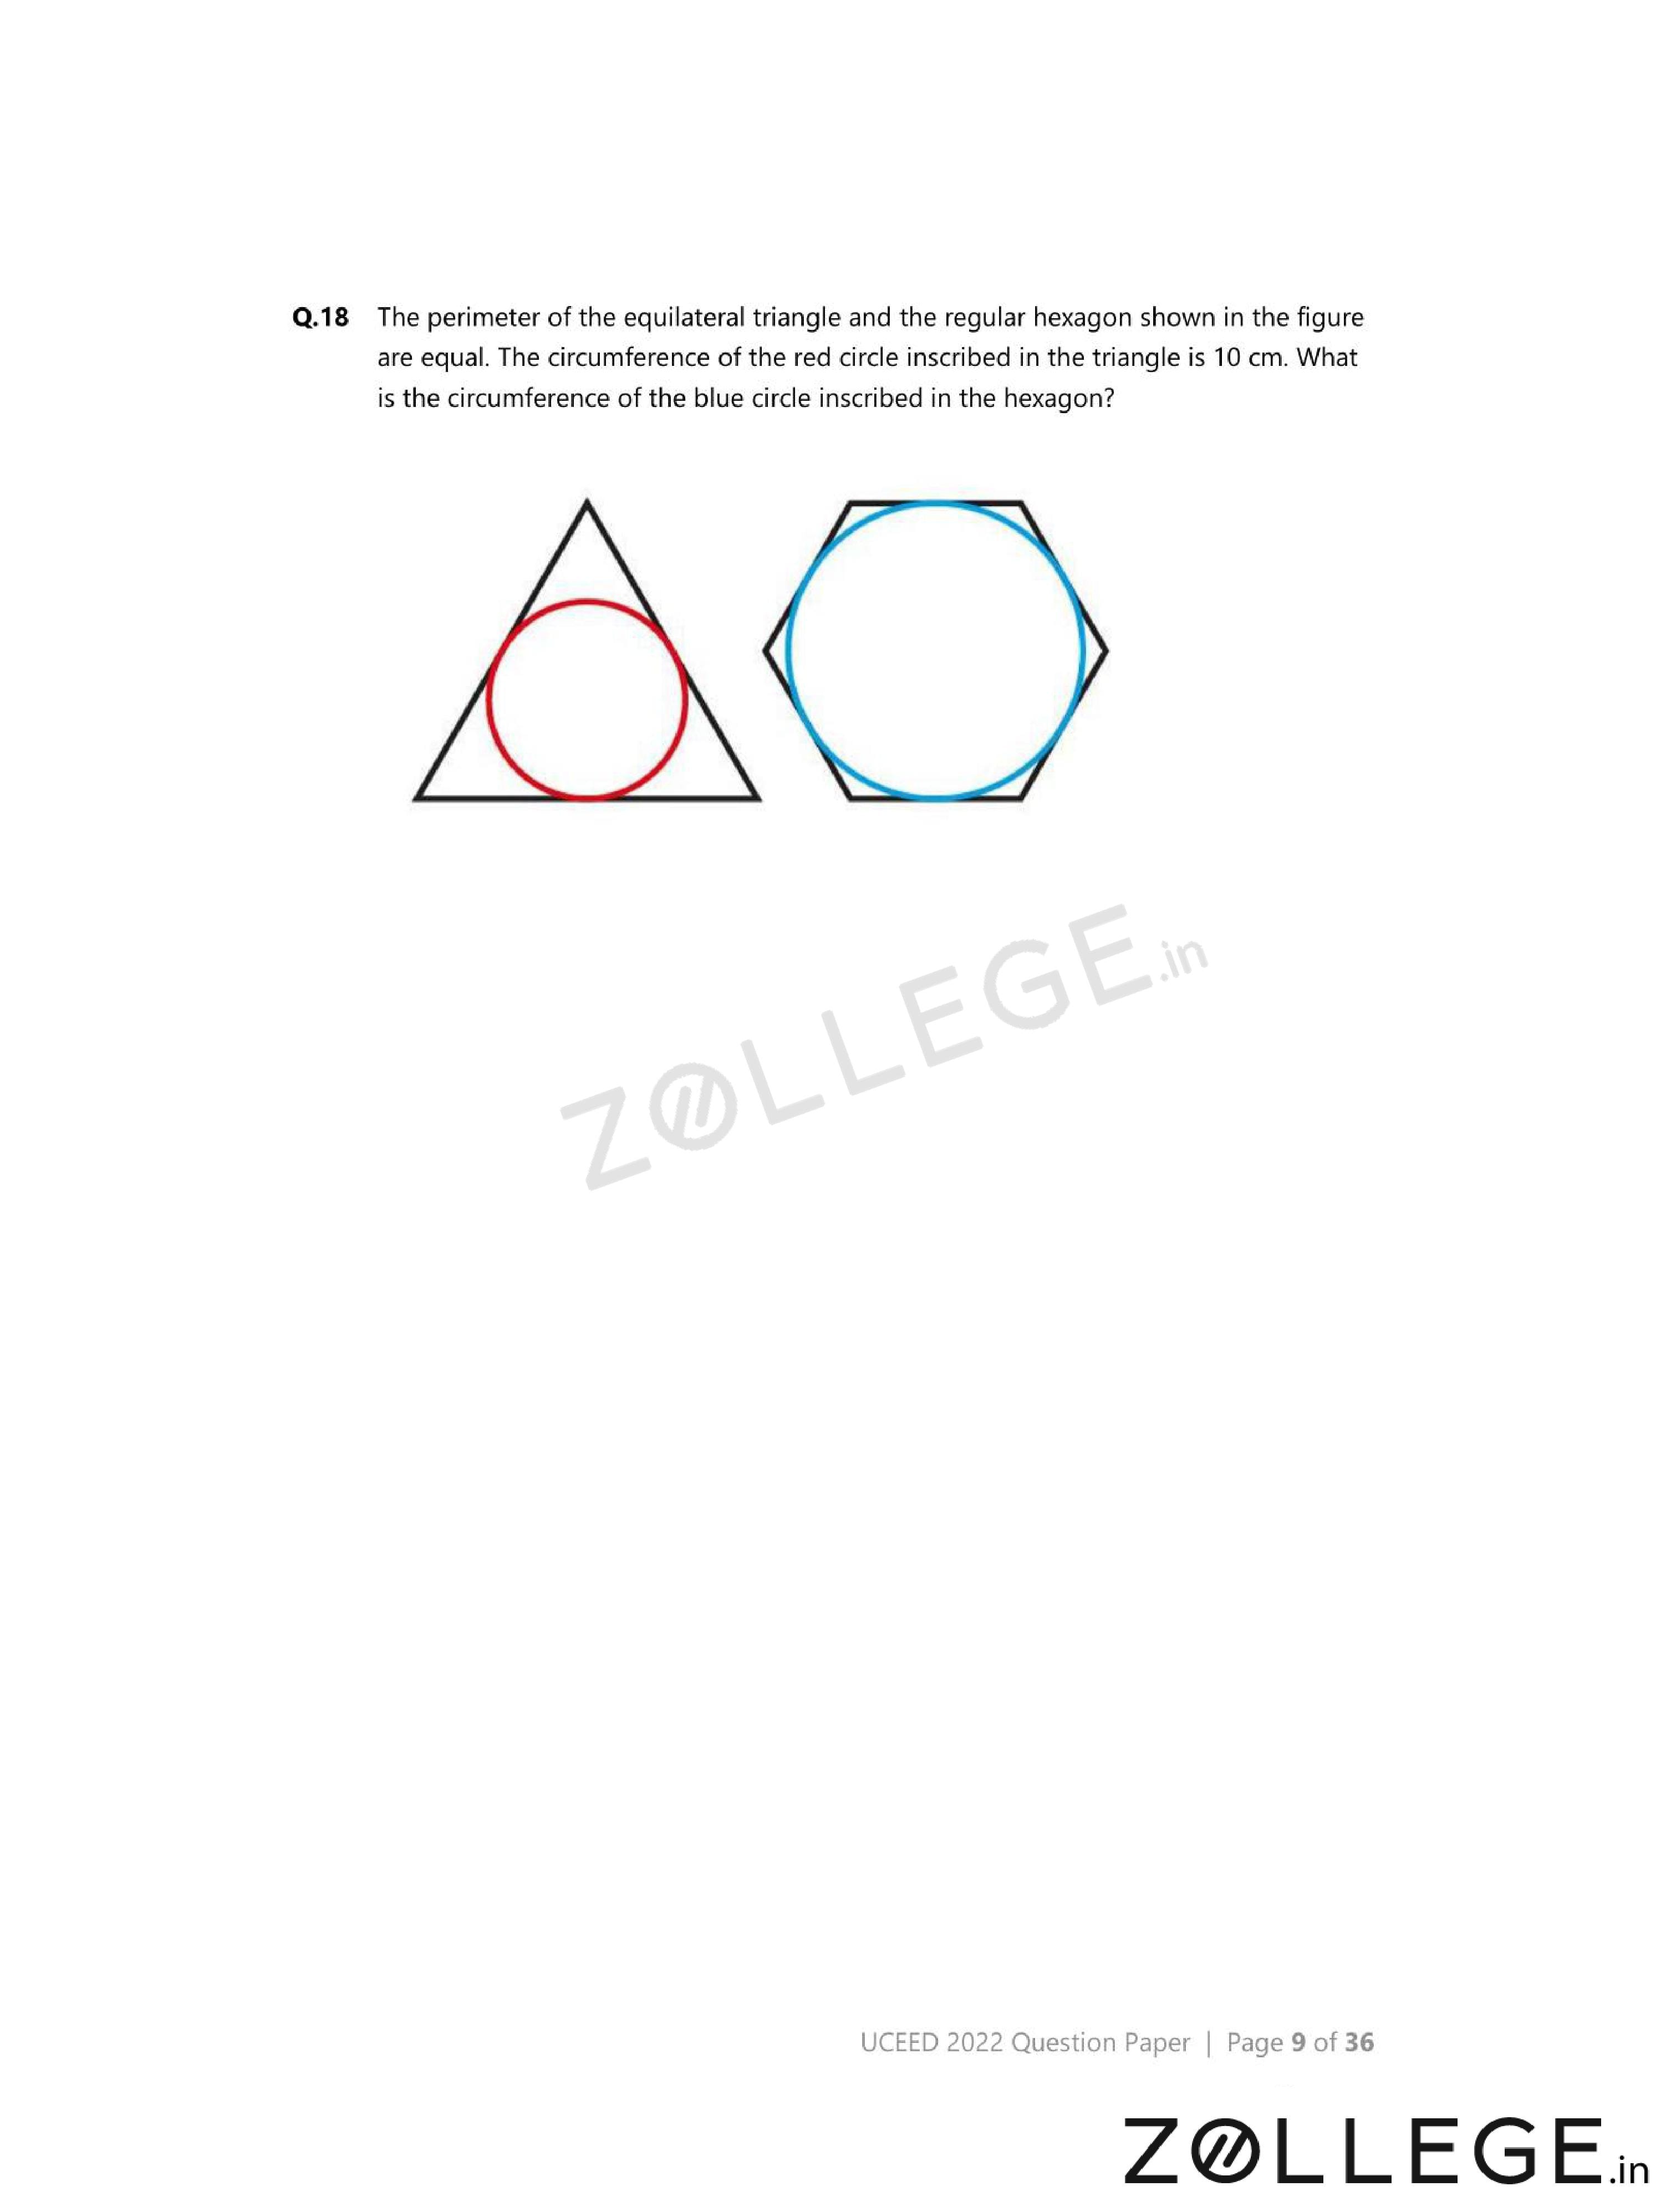
The perimeter of the equilateral triangle and the regular hexagon shown in the figure are equal. The circumference of the red circle inscribed in the triangle is \(10\) cm. What is the circumference of the blue circle inscribed in the hexagon?

View Solution
Step 1: Understanding the Concept:
Both polygons have equal perimeters.
The radius of an inscribed circle depends on the side length of the polygon.
Step 2: Key Formula or Approach:
For an equilateral triangle of side \(a\): \[ r = \frac{a\sqrt{3}}{6} \]
For a regular hexagon of side \(a\): \[ r = \frac{\sqrt{3}}{2}a \]
Step 3: Detailed Explanation:
Let the side of the triangle be \(a\).
Its incircle circumference is: \[ 2\pi r = 10 \Rightarrow r = \frac{5}{\pi}. \]
Using \(r = \frac{a\sqrt{3}}{6}\): \[ a = \frac{6r}{\sqrt{3}}. \]
Perimeter of triangle: \[ 3a. \]
Let side of hexagon be \(b\).
Since perimeters are equal: \[ 3a = 6b \Rightarrow b = \frac{a}{2}. \]
Radius of incircle of hexagon: \[ r_h = \frac{\sqrt{3}}{2}b = \frac{\sqrt{3}}{2} \cdot \frac{a}{2}. \]
Substituting \(a\) from above gives: \[ r_h = 2r. \]
Hence, circumference of blue circle: \[ 2\pi (2r) = 2 \times 10 = 20. \]
Step 4: Final Answer:
The circumference of the blue circle is \(\mathbf{20}\) cm.
Quick Tip: When perimeters are equal, relate side lengths first before comparing inscribed circles.
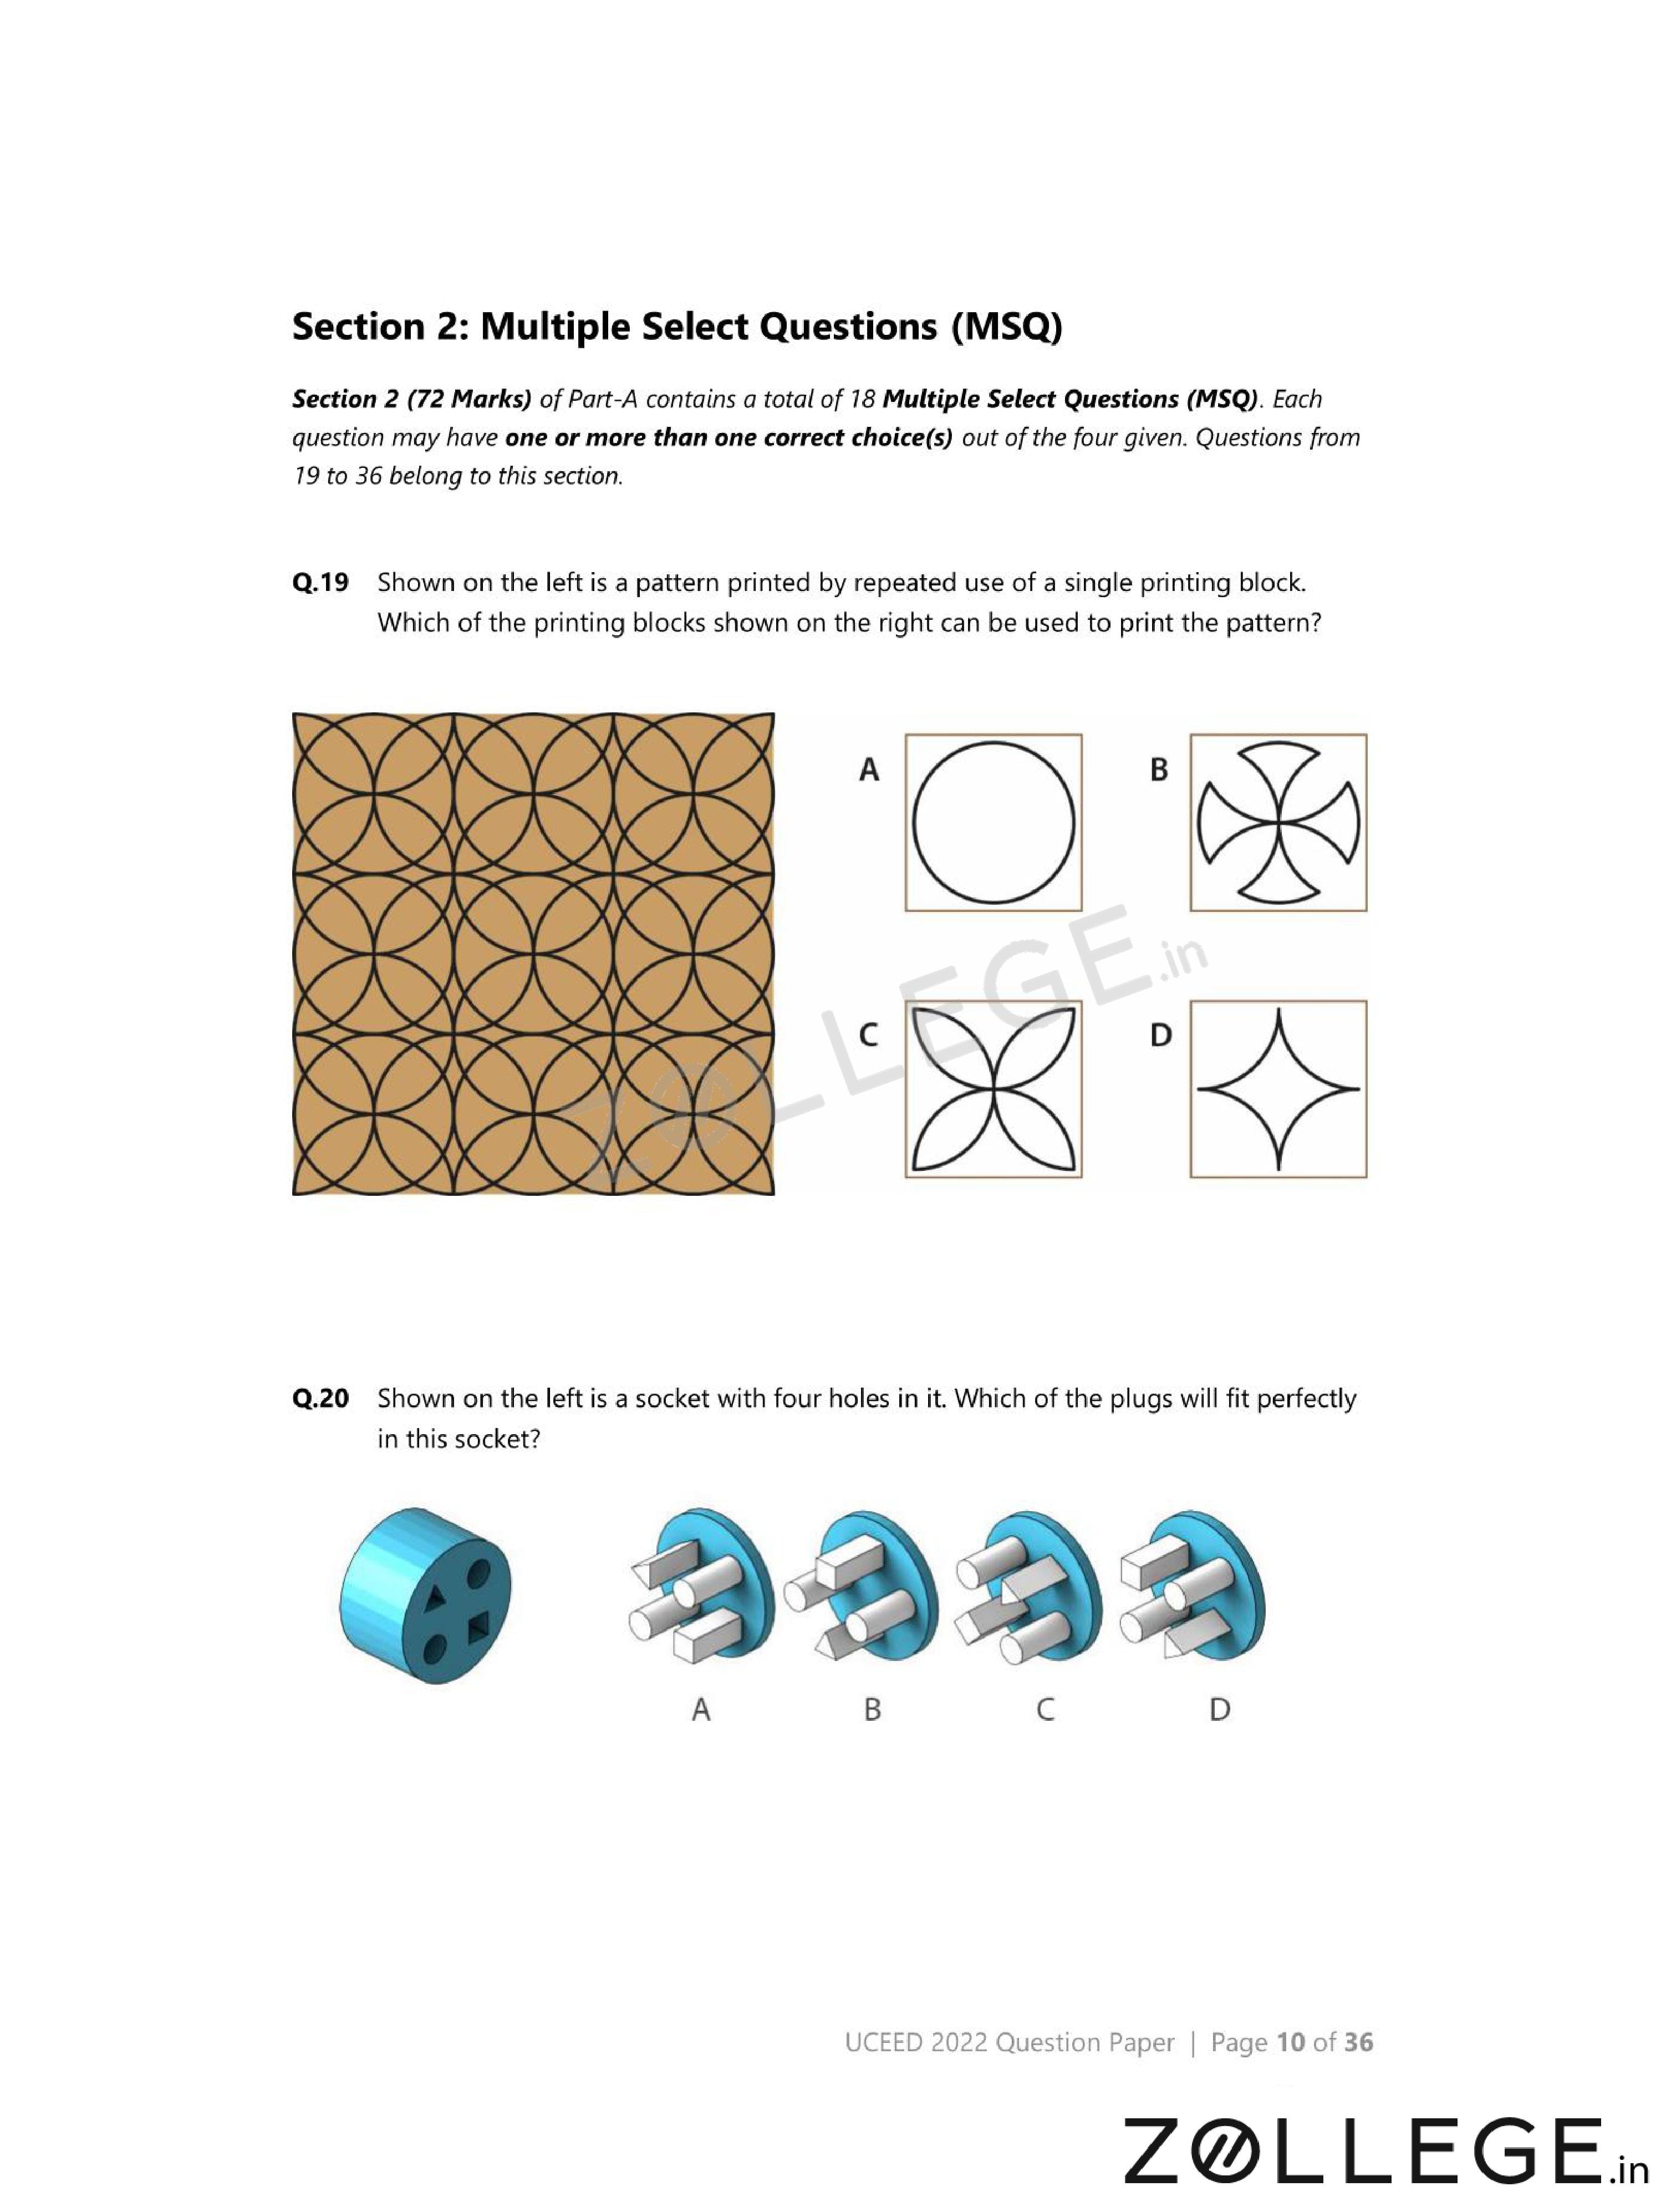
Shown on the left is a pattern printed by repeated use of a single printing block. Which of the printing blocks shown on the right can be used to print the pattern?

- (A) {
![]() }
} - (B) {
![]() }
} - (C) {
![]() }
} - (D) {
![]() }
}
 }
} }
} }
} }
}View Solution
Step 1: Understanding the Concept:
The pattern is generated by repeating a single block using rotation and translation.
Step 2: Key Approach:
Check whether each block can reproduce all orientations seen in the pattern.
Step 3: Detailed Explanation:
Option (A) matches the basic motif and reproduces the pattern under rotation.
Option (C) also generates the same tessellation when flipped and rotated.
Options (B) and (D) fail to match edge continuity.
Step 4: Final Answer:
The correct blocks are \(\mathbf{(A)\;and\;(C)}\).
Quick Tip: In block-print questions, focus on edge continuity and rotational symmetry.
Shown on the left is a socket with four holes in it. Which of the plugs will fit perfectly in this socket?

- (A) {
![]() }
} - (B) {
![]() }
} - (C) {
![]() }
} - (D) {
![]() }
}
 }
} }
} }
} }
}View Solution
Step 1: Understanding the Concept:
The plug must match the number, orientation, and spacing of holes.
Step 2: Key Approach:
Compare relative distances and angular positions of pins.
Step 3: Detailed Explanation:
Only option (B) aligns perfectly with all four holes simultaneously.
Other options mismatch either spacing or orientation.
Step 4: Final Answer:
The correct plug is \(\mathbf{(B)}\).
Quick Tip: Mentally rotate the plug instead of the socket for faster elimination.
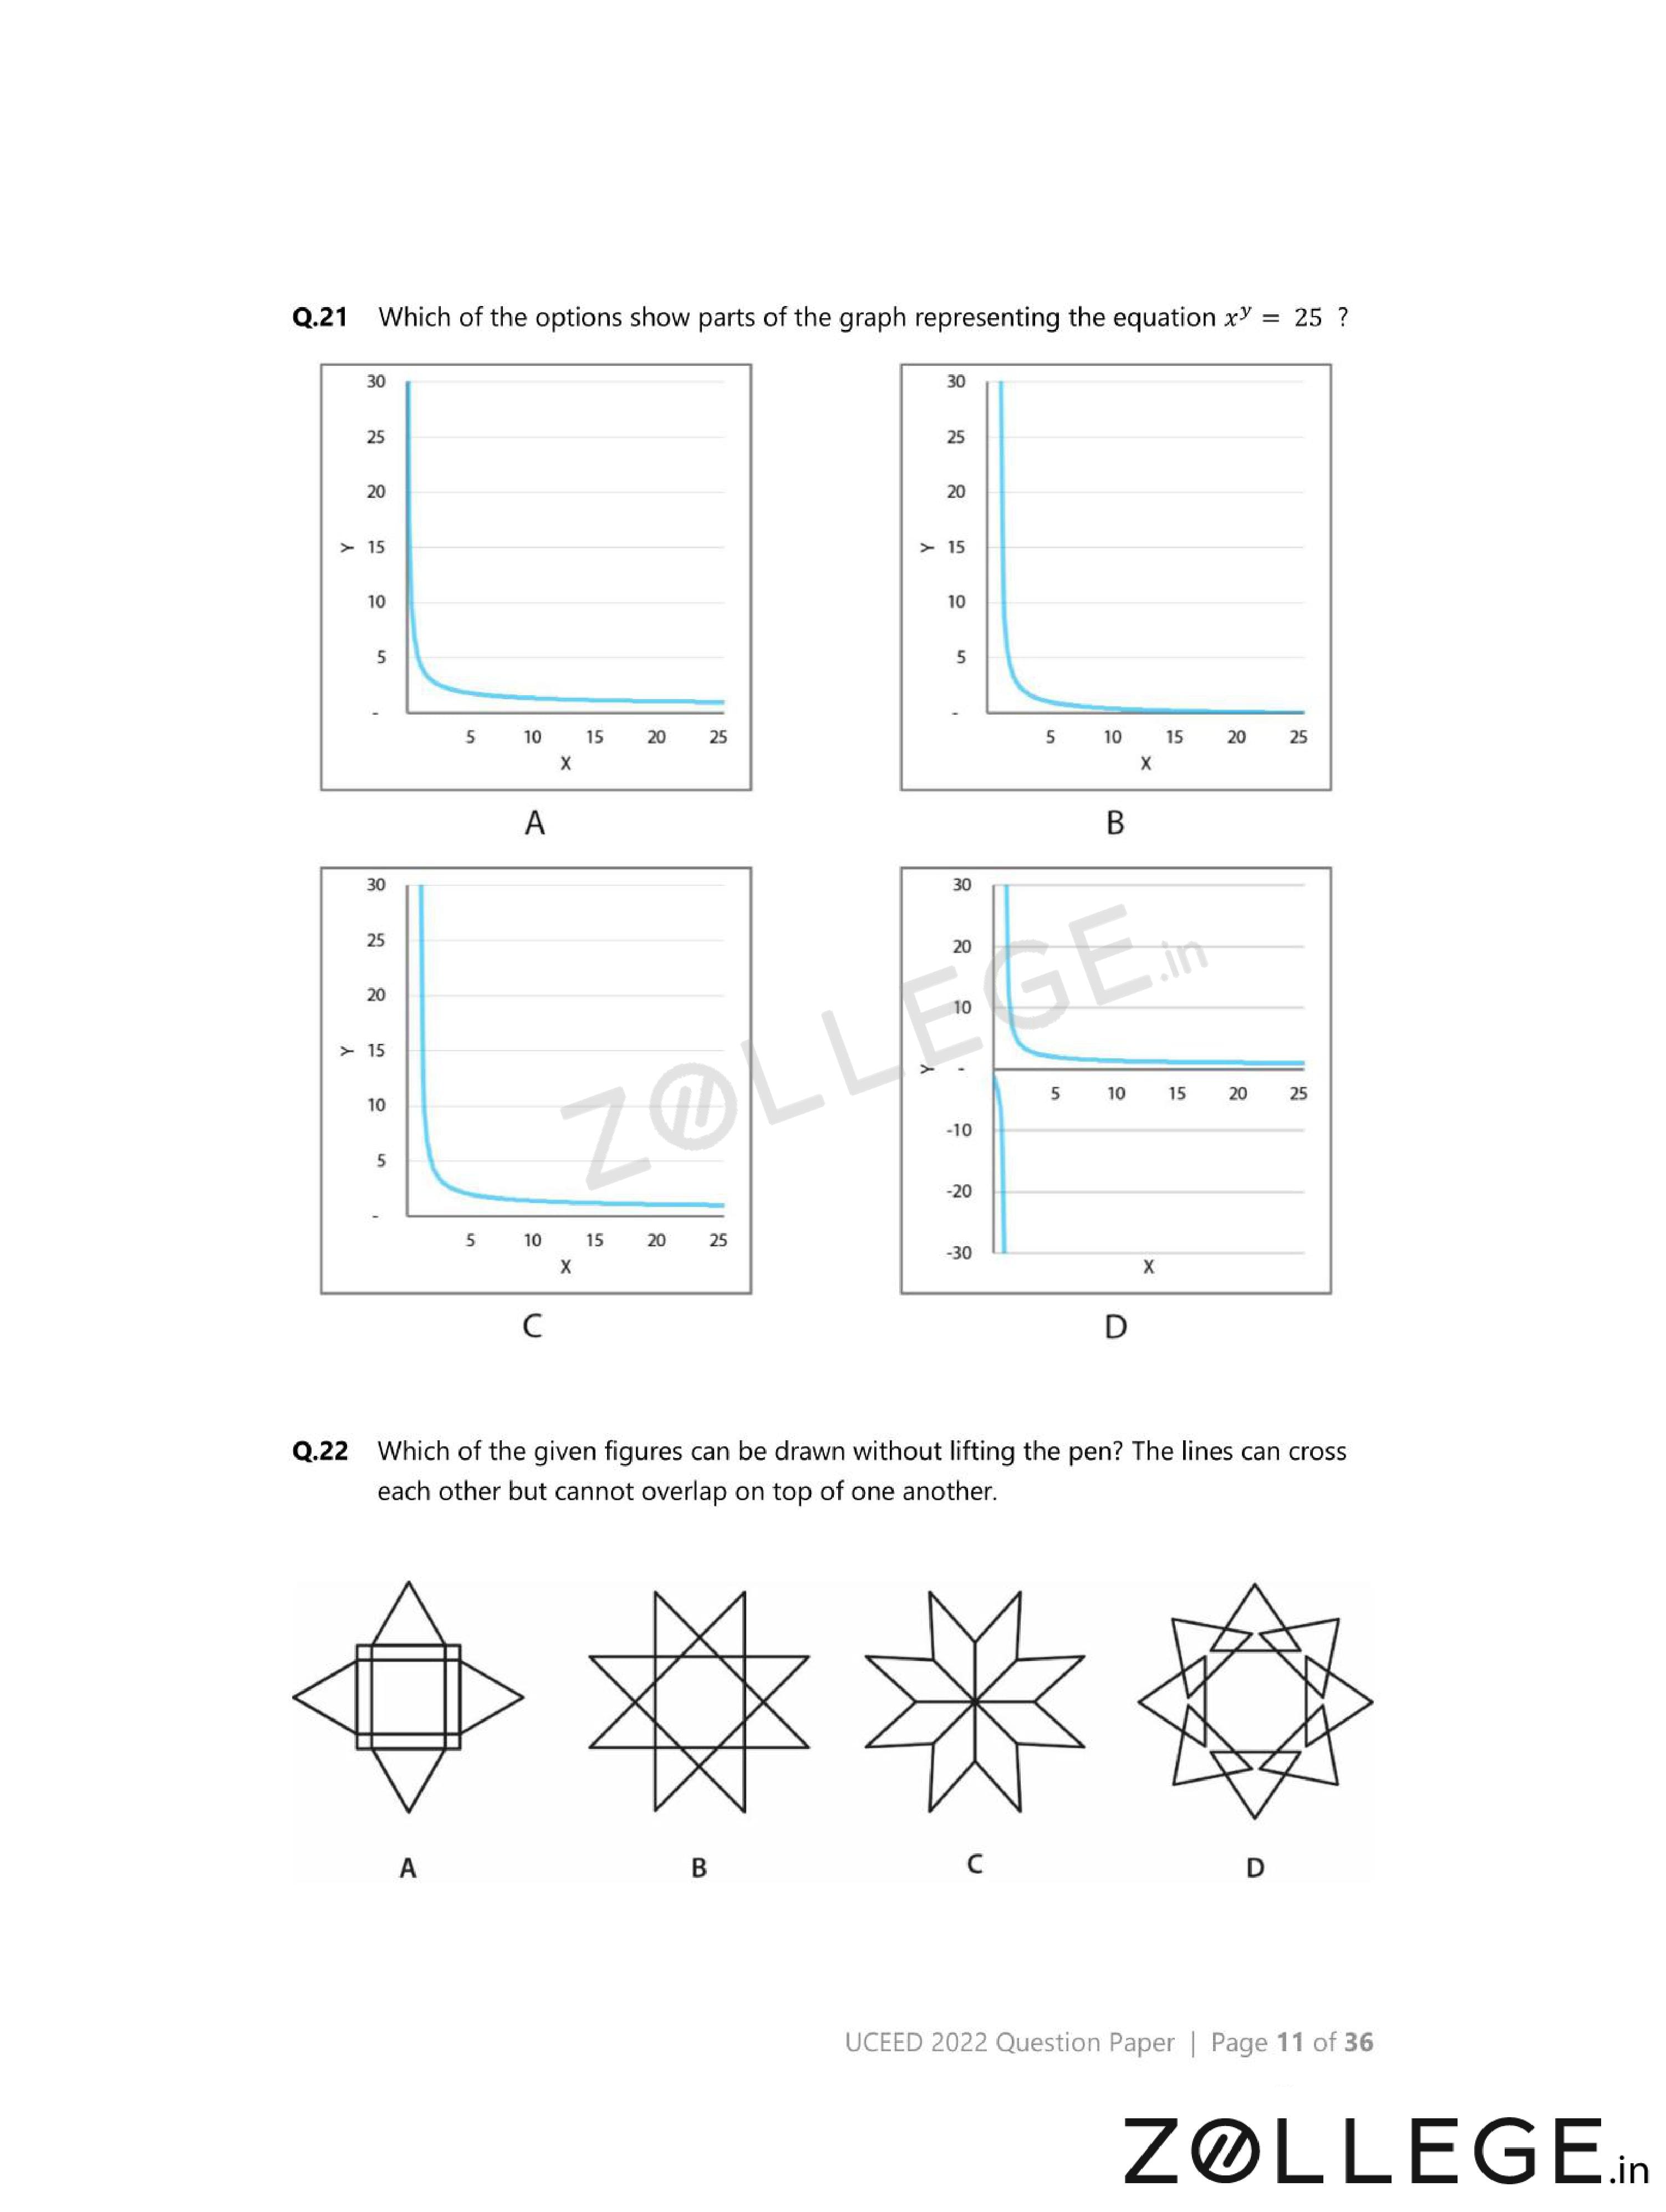
Which of the options show parts of the graph representing the equation \(xy = 25\)?
- (A) {
![]() }
} - (B) {
![]() }
} - (C) {
![]() }
} - (D) {
![]() }
}
 }
} }
} }
} }
}View Solution
Step 1: Understanding the Concept:
The equation \(xy=25\) represents a rectangular hyperbola.
Step 2: Key Formula or Approach:
The curve lies in first and third quadrants only.
Step 3: Detailed Explanation:
Options (A) and (D) correctly show decreasing curves in required quadrants.
Other options violate sign conditions.
Step 4: Final Answer:
The correct options are \(\mathbf{(A)\;and\;(D)}\).
Quick Tip: For equations like \(xy = c\), always check quadrant behavior first.
Which of the given figures can be drawn without lifting the pen? The lines can cross but cannot overlap.
- (A) {
![]() }
} - (B) {
![]() }
} - (C) {
![]() }
} - (D) {
![]() }
}
 }
} }
} }
} }
}View Solution
Step 1: Understanding the Concept:
A figure is drawable in one stroke if it has at most two odd-degree vertices.
Step 2: Key Approach:
Count odd-degree junctions in each figure.
Step 3: Detailed Explanation:
Figures (A) and (C) satisfy Euler’s path condition.
Others have more than two odd-degree nodes.
Step 4: Final Answer:
The correct figures are \(\mathbf{(A)\;and\;(C)}\).
Quick Tip: Use Euler’s rule instead of trial drawing to save time.
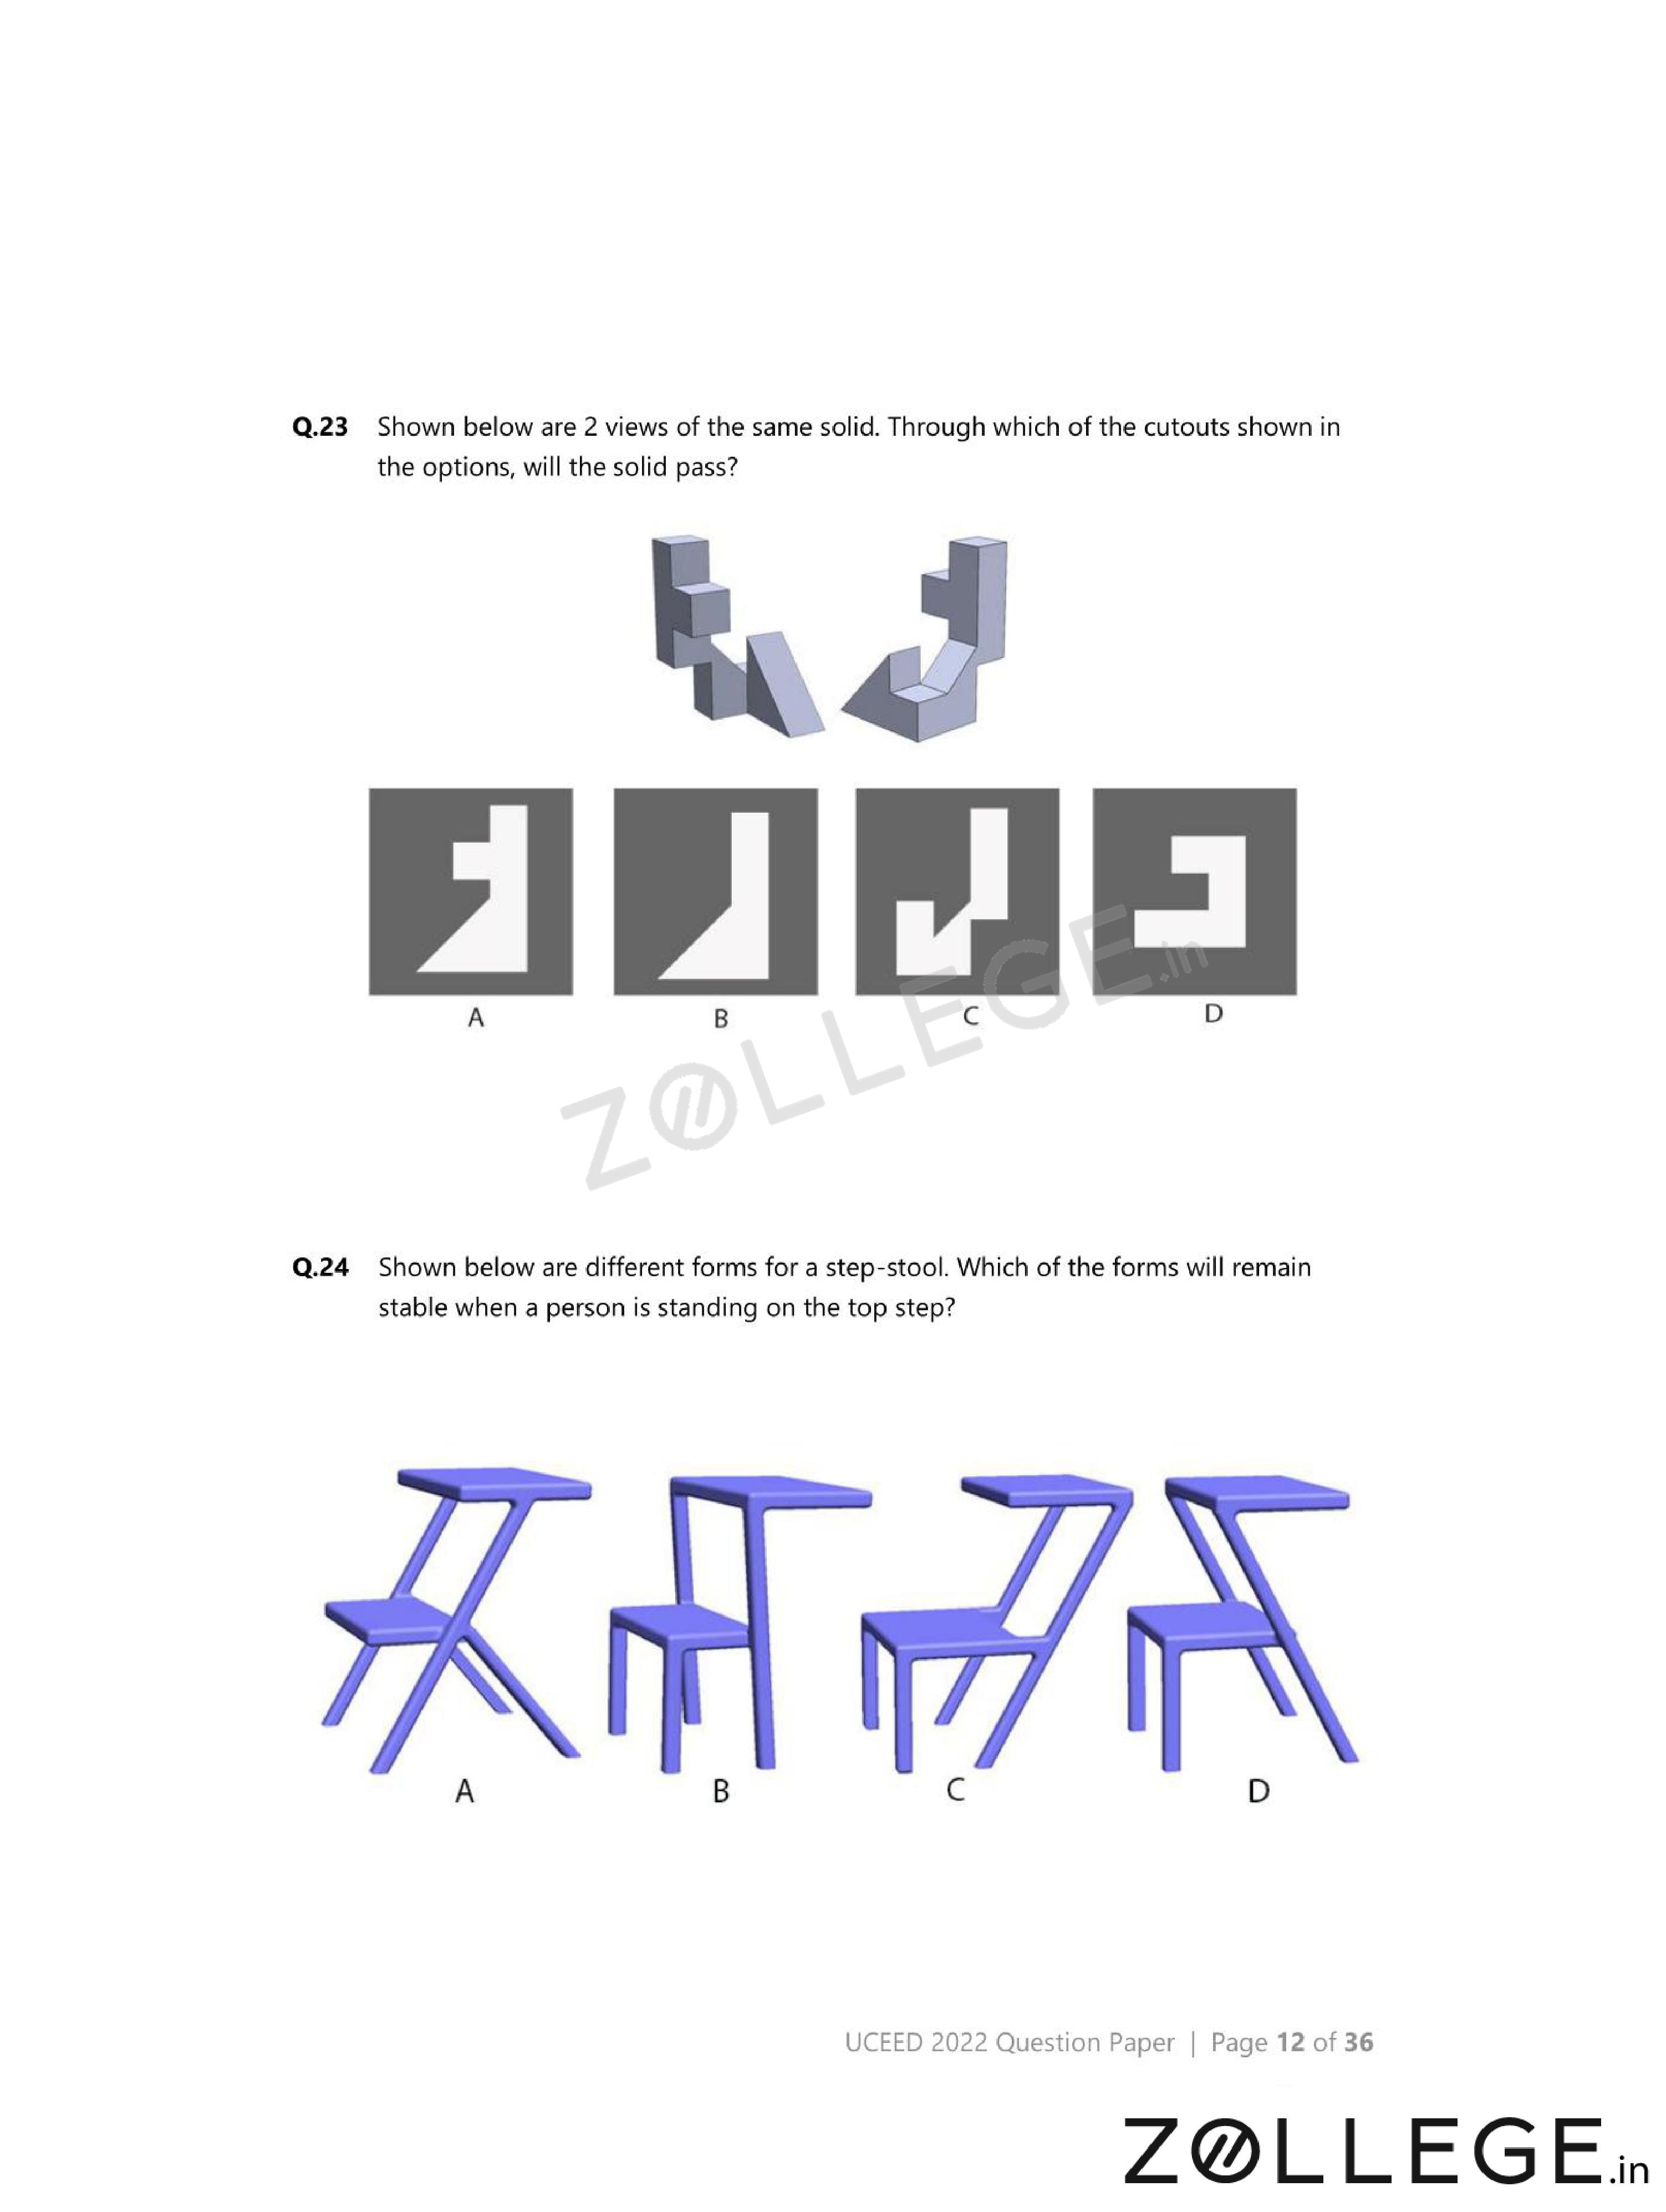
Shown below are two views of the same solid. Through which of the cutouts shown in the options will the solid pass?

- (A) {
![]() }
} - (B) {
![]() }
} - (C) {
![]() }
} - (D) {
![]() }
}
 }
} }
} }
} }
}View Solution
Step 1: Understanding the Concept:
The solid must pass through the cutout without deformation.
Step 2: Key Approach:
Match cross-sectional silhouettes from given views.
Step 3: Detailed Explanation:
Options (B) and (D) match both projections correctly.
Other cutouts mismatch at least one view.
Step 4: Final Answer:
The correct cutouts are \(\mathbf{(B)\;and\;(D)}\).
Quick Tip: Always check compatibility with all given views, not just one.
Shown below are different forms for a step-stool. Which of the forms will remain stable when a person is standing on the top step?
- (A) {
![]() }
} - (B) {
![]() }
} - (C) {
![]() }
} - (D) {
![]() }
}
 }
} }
} }
} }
}View Solution
Step 1: Understanding the Concept:
Stability depends on whether the center of mass lies within the base area.
Step 2: Key Approach:
Check base width and symmetry under load.
Step 3: Detailed Explanation:
Options (A) and (D) have sufficiently wide bases.
Others topple when weight is applied on top.
Step 4: Final Answer:
The stable forms are \(\mathbf{(A)\;and\;(D)}\).
Quick Tip: For stability questions, always visualize the center of mass projection.
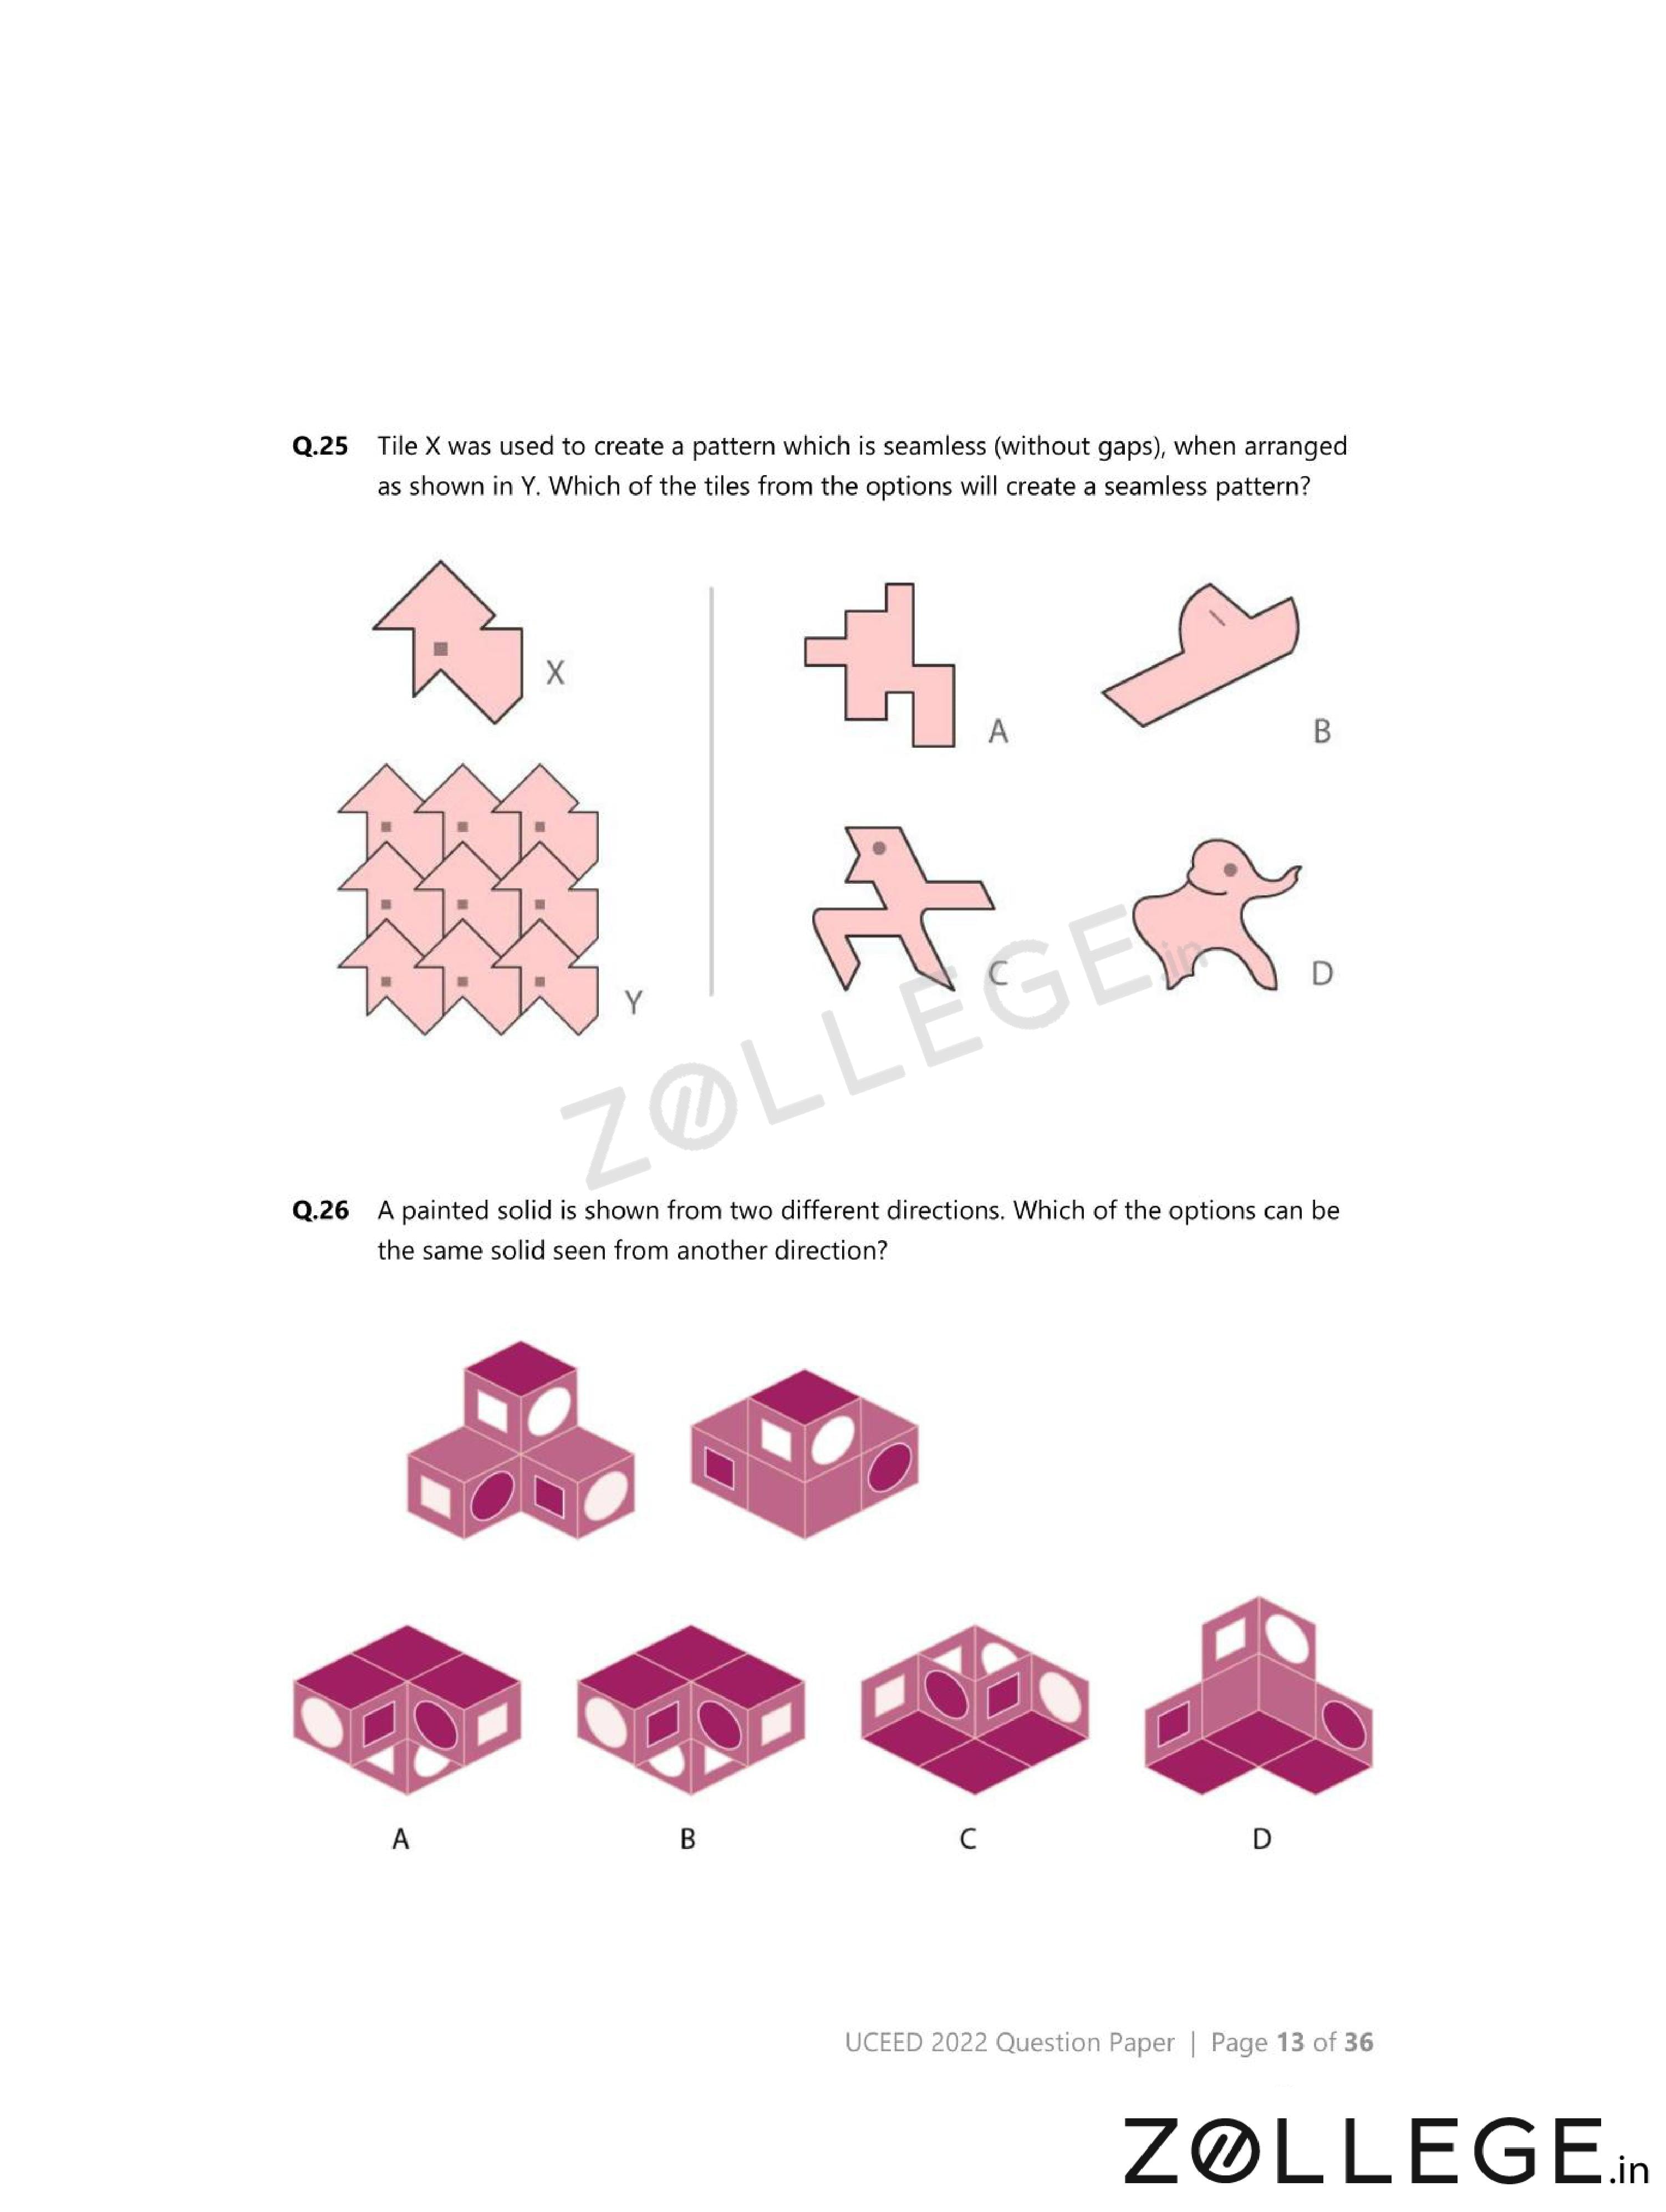
Tile X was used to create a seamless pattern Y. Which of the tiles from the options will create a seamless pattern?

- (A) {
![]() }
} - (B) {
![]() }
} - (C) {
![]() }
} - (D) {
![]() }
}
 }
} }
} }
} }
}View Solution
Step 1: Understanding the Concept:
A seamless pattern has no gaps or overlaps at tile boundaries.
Step 2: Key Approach:
Check edge compatibility under rotation and translation.
Step 3: Detailed Explanation:
Tiles (B) and (C) tessellate perfectly without breaking continuity.
Other options leave gaps or mismatched edges.
Step 4: Final Answer:
The correct tiles are \(\mathbf{(B)\;and\;(C)}\).
Quick Tip: Always match opposite edges when testing tessellation.
A painted solid is shown from two different directions. Which of the options can be the same solid seen from another direction?

- (A) {
![]() }
} - (B) {
![]() }
} - (C) {
![]() }
} - (D) {
![]() }
}
 }
} }
} }
} }
}View Solution
Step 1: Understanding the Concept:
The same 3D solid will preserve adjacency and relative orientation of painted faces under rotation.
Step 2: Key Approach:
Mentally rotate the given solid and track the colored faces.
Step 3: Detailed Explanation:
Option (A) shows the same set of colored faces meeting at the same vertex.
Option (C) also preserves face adjacency after rotation.
Options (B) and (D) violate relative face positioning.
Step 4: Final Answer:
The correct options are \(\mathbf{(A)\;and\;(C)}\).
Quick Tip: Focus on which faces touch each other rather than exact orientation.
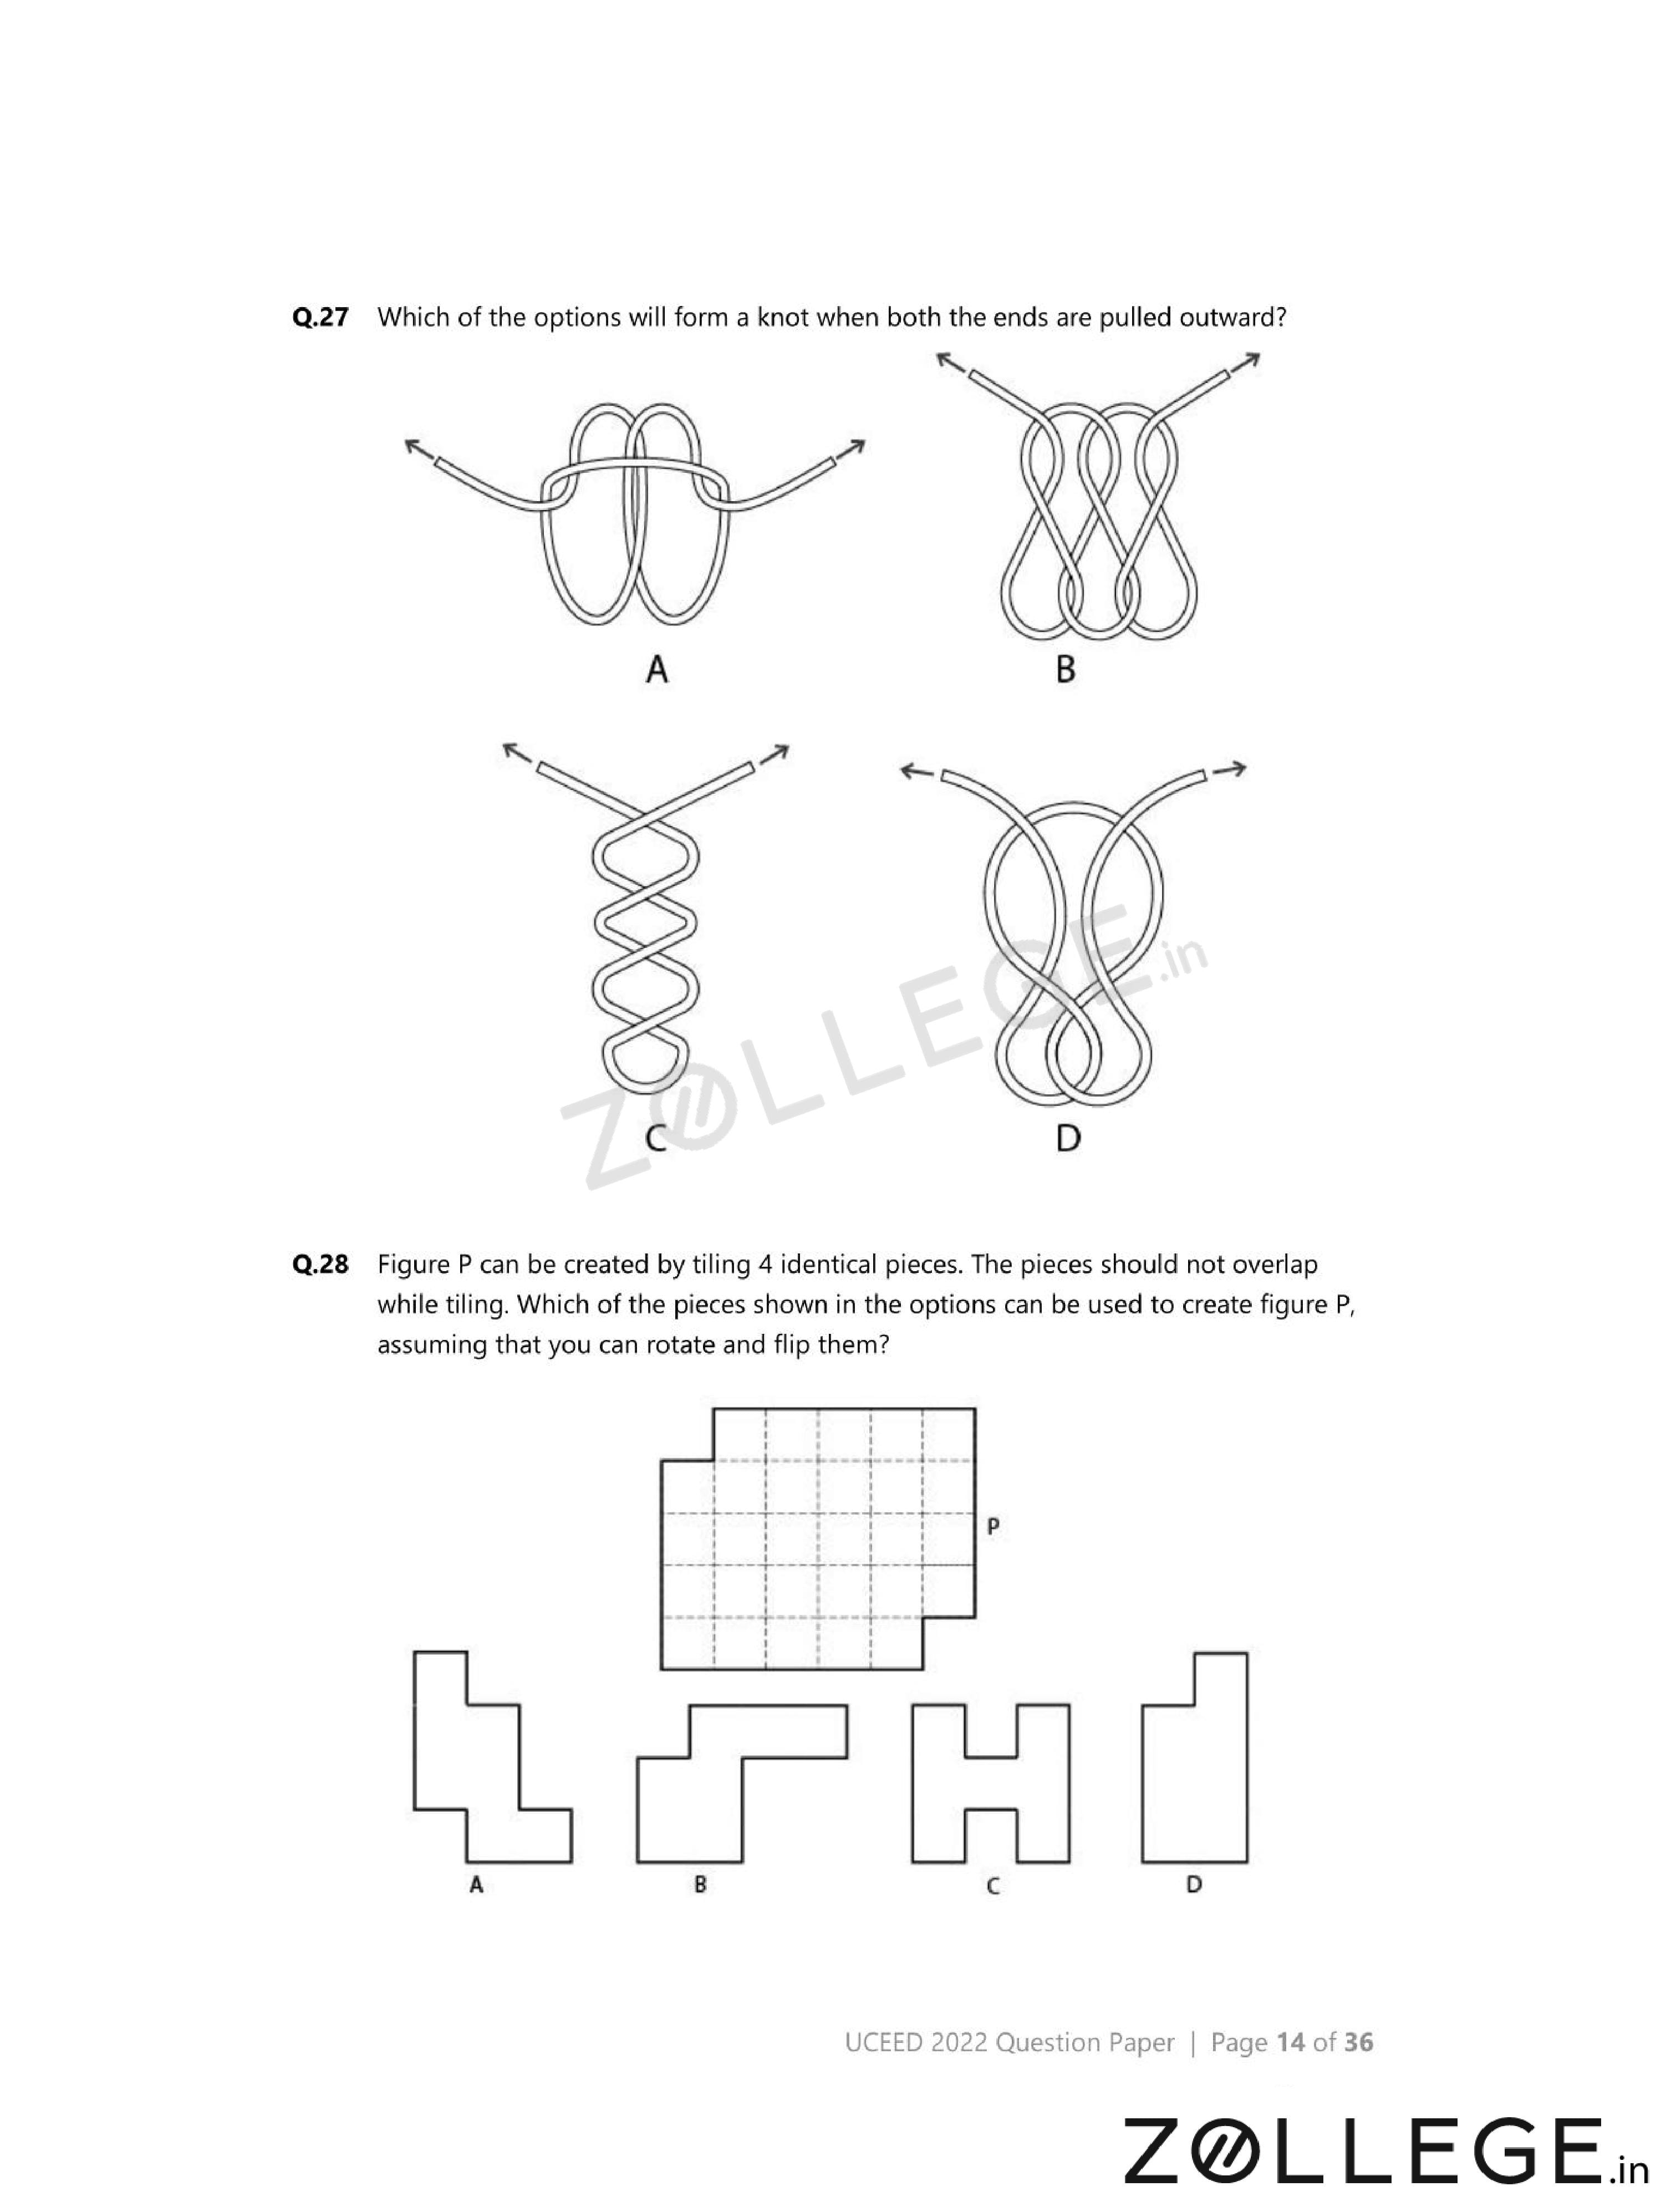
Which of the options will form a knot when both the ends are pulled outward?
- (A) {
![]() }
} - (B) {
![]() }
} - (C) {
![]() }
} - (D) {
![]() }
}
 }
} }
} }
} }
}View Solution
Step 1: Understanding the Concept:
A knot forms only if loops interlock in a non-slippable manner.
Step 2: Key Approach:
Trace the path of the string and observe crossings.
Step 3: Detailed Explanation:
Option (B) has interlinked loops that tighten when pulled.
Other options straighten out without forming a knot.
Step 4: Final Answer:
The correct option is \(\mathbf{(B)}\).
Quick Tip: Check whether loops can slip free when tension is applied.
Figure P can be created by tiling 4 identical pieces. Which of the pieces shown in the options can be used to create figure P? (Rotation and flipping allowed.)

- (A) {
![]() }
} - (B) {
![]() }
} - (C) {
![]() }
} - (D) {
![]() }
}
 }
} }
} }
} }
}View Solution
Step 1: Understanding the Concept:
The chosen piece must exactly fill the target shape using four copies.
Step 2: Key Approach:
Test edge matching and area consistency.
Step 3: Detailed Explanation:
Options (A) and (D) tessellate perfectly without overlap or gaps.
Other pieces fail to fill corners properly.
Step 4: Final Answer:
The correct pieces are \(\mathbf{(A)\;and\;(D)}\).
Quick Tip: Always verify both shape outline and internal edge alignment.
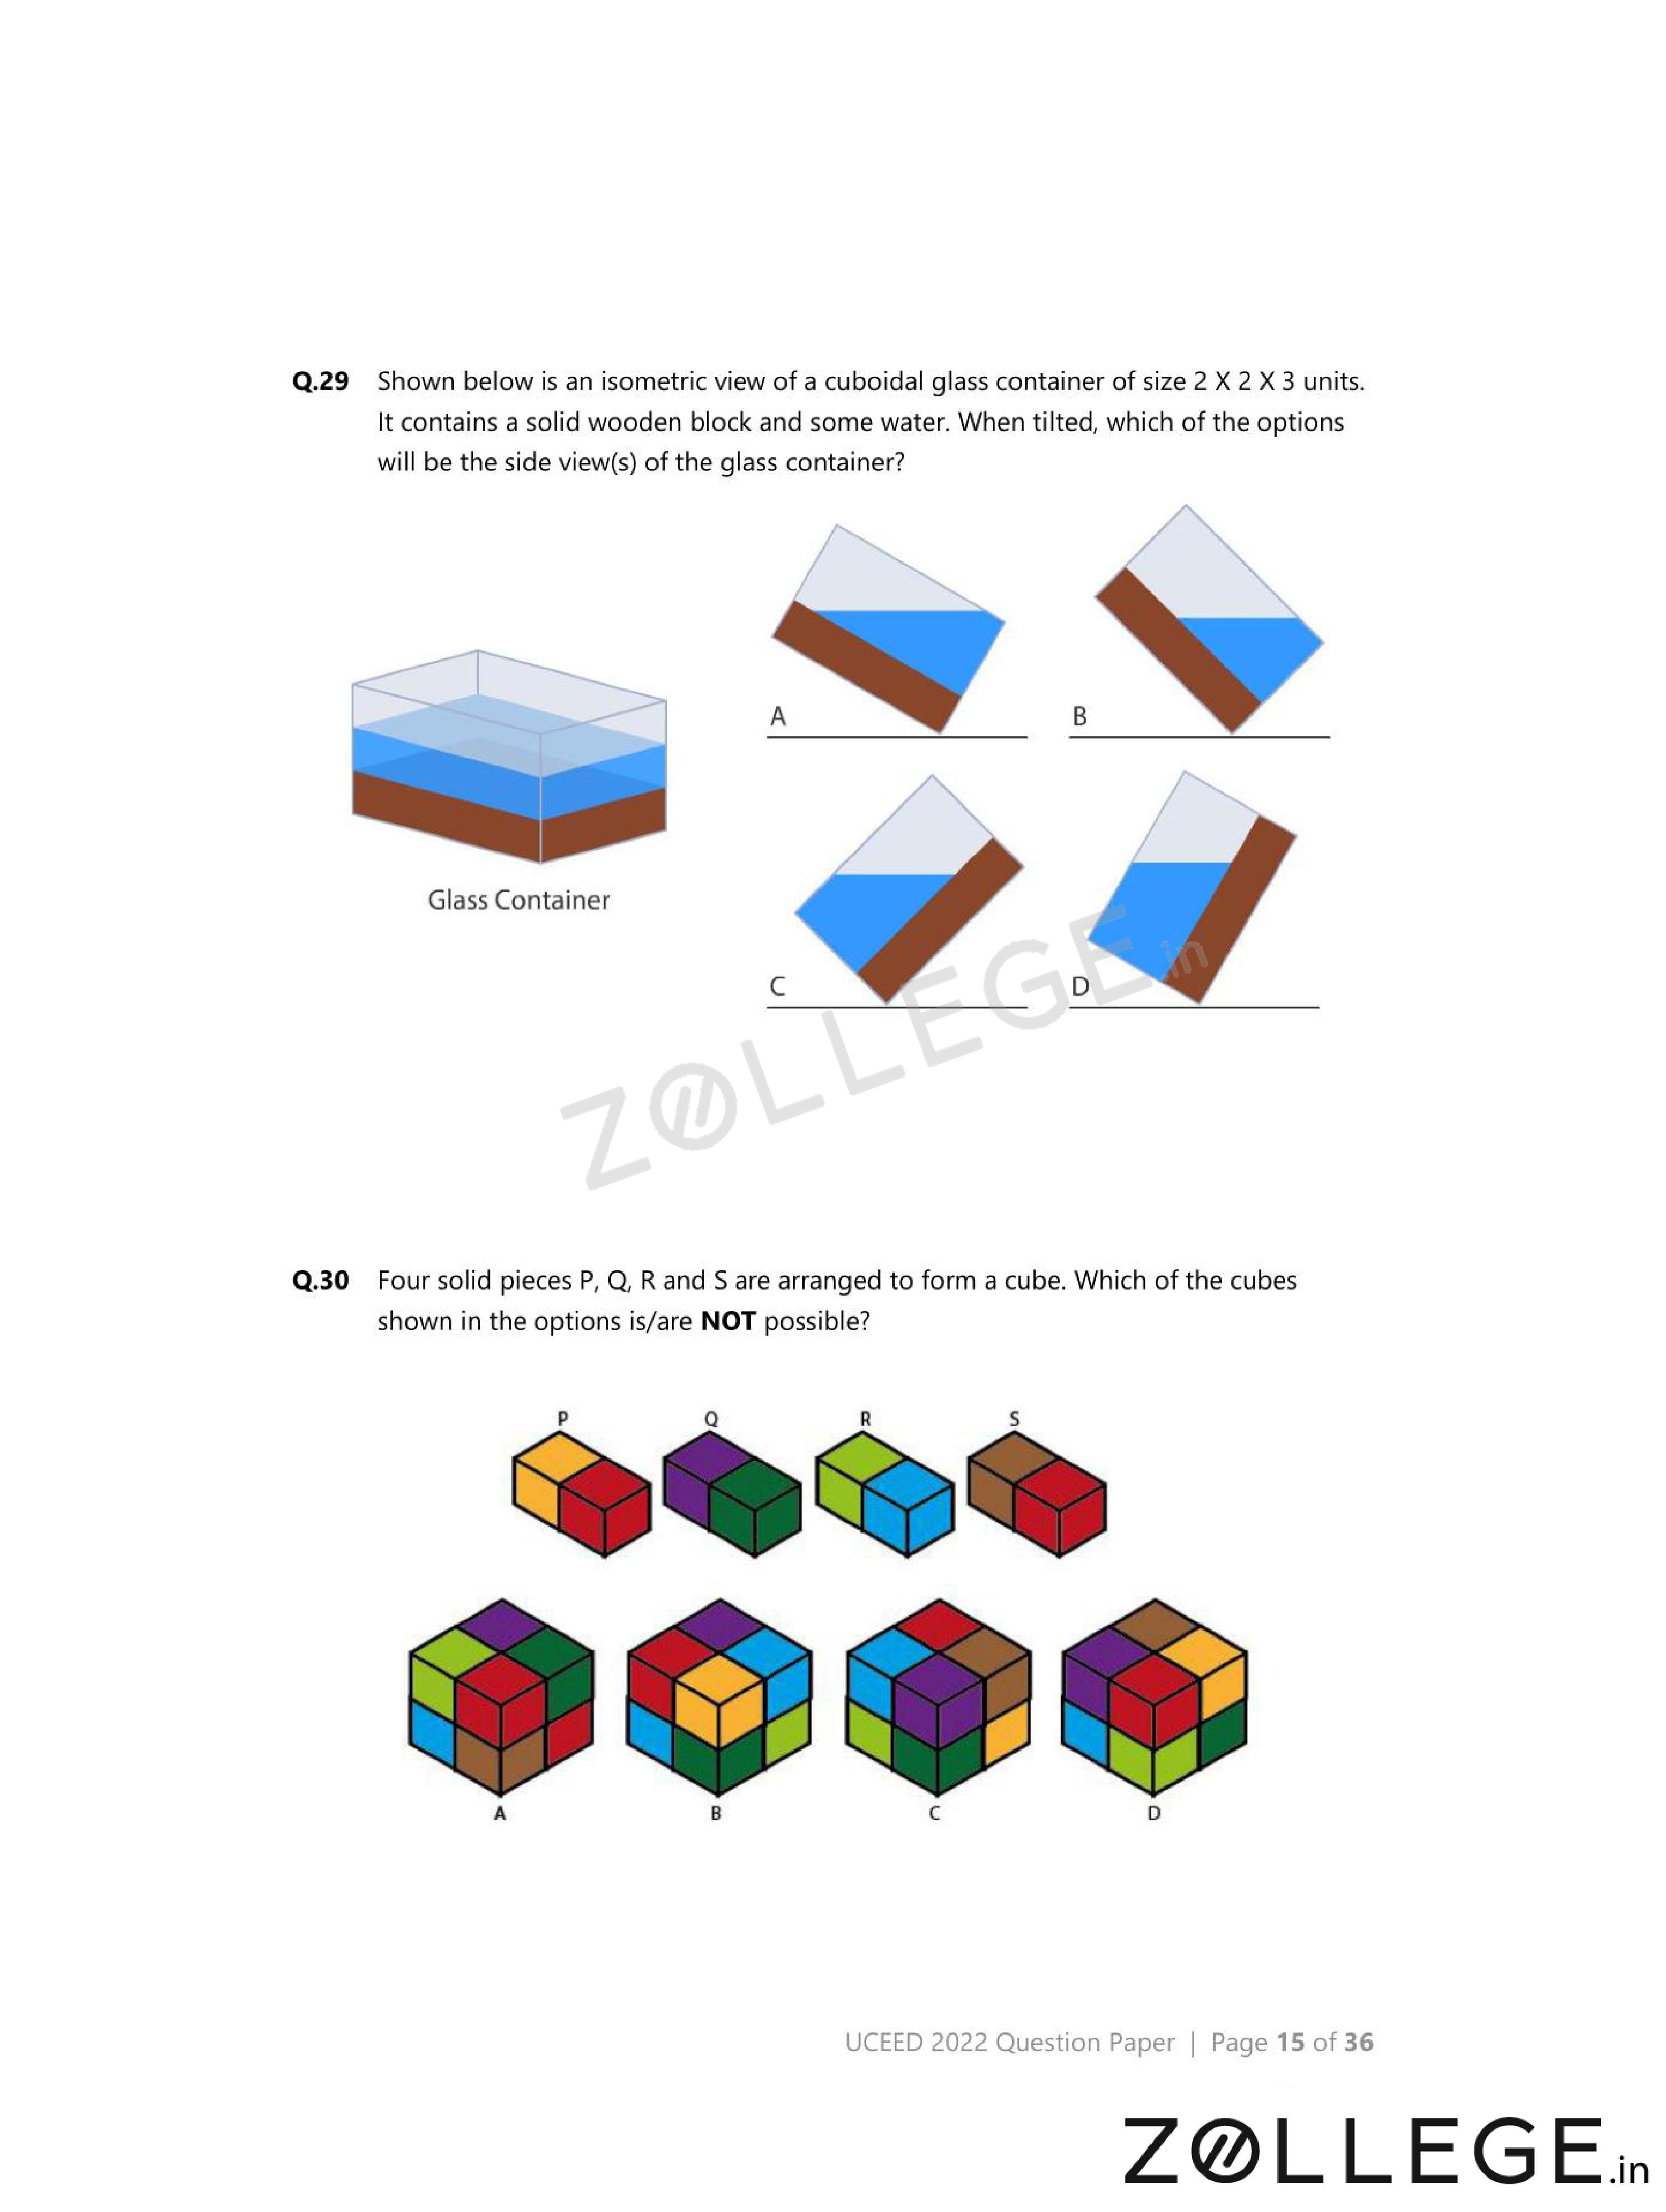
Shown below is an isometric view of a cuboidal glass container of size \(2 \times 2 \times 3\) units. It contains a solid wooden block and some water. When tilted, which of the options will be the side view(s) of the glass container?

- (A) {
![]() }
} - (B) {
![]() }
} - (C) {
![]() }
} - (D) {
![]() }
}
 }
} }
} }
} }
}View Solution
Step 1: Understanding the Concept:
Water always remains horizontal when the container is tilted.
Step 2: Key Approach:
Identify options where the water surface is level.
Step 3: Detailed Explanation:
Options (A) and (C) correctly show a horizontal water surface.
Other options violate basic fluid behavior.
Step 4: Final Answer:
The correct side views are \(\mathbf{(A)\;and\;(C)}\).
Quick Tip: In liquid problems, the water surface is always horizontal, regardless of container tilt.
Four solid pieces P, Q, R and S are arranged to form a cube. Which of the cubes shown in the options is/are NOT possible?

- (A) {
![]() }
} - (B) {
![]() }
} - (C) {
![]() }
} - (D) {
![]() }
}
 }
} }
} }
} }
}View Solution
Step 1: Understanding the Concept:
All pieces must fit together without overlap to form a perfect cube.
Step 2: Key Approach:
Check face adjacency and volume consistency.
Step 3: Detailed Explanation:
Options (B) and (D) create overlaps or leave gaps.
Options (A) and (C) form valid cubes.
Step 4: Final Answer:
The NOT possible cubes are \(\mathbf{(B)\;and\;(D)}\).
Quick Tip: Visualize internal structure, not just the outer shape.
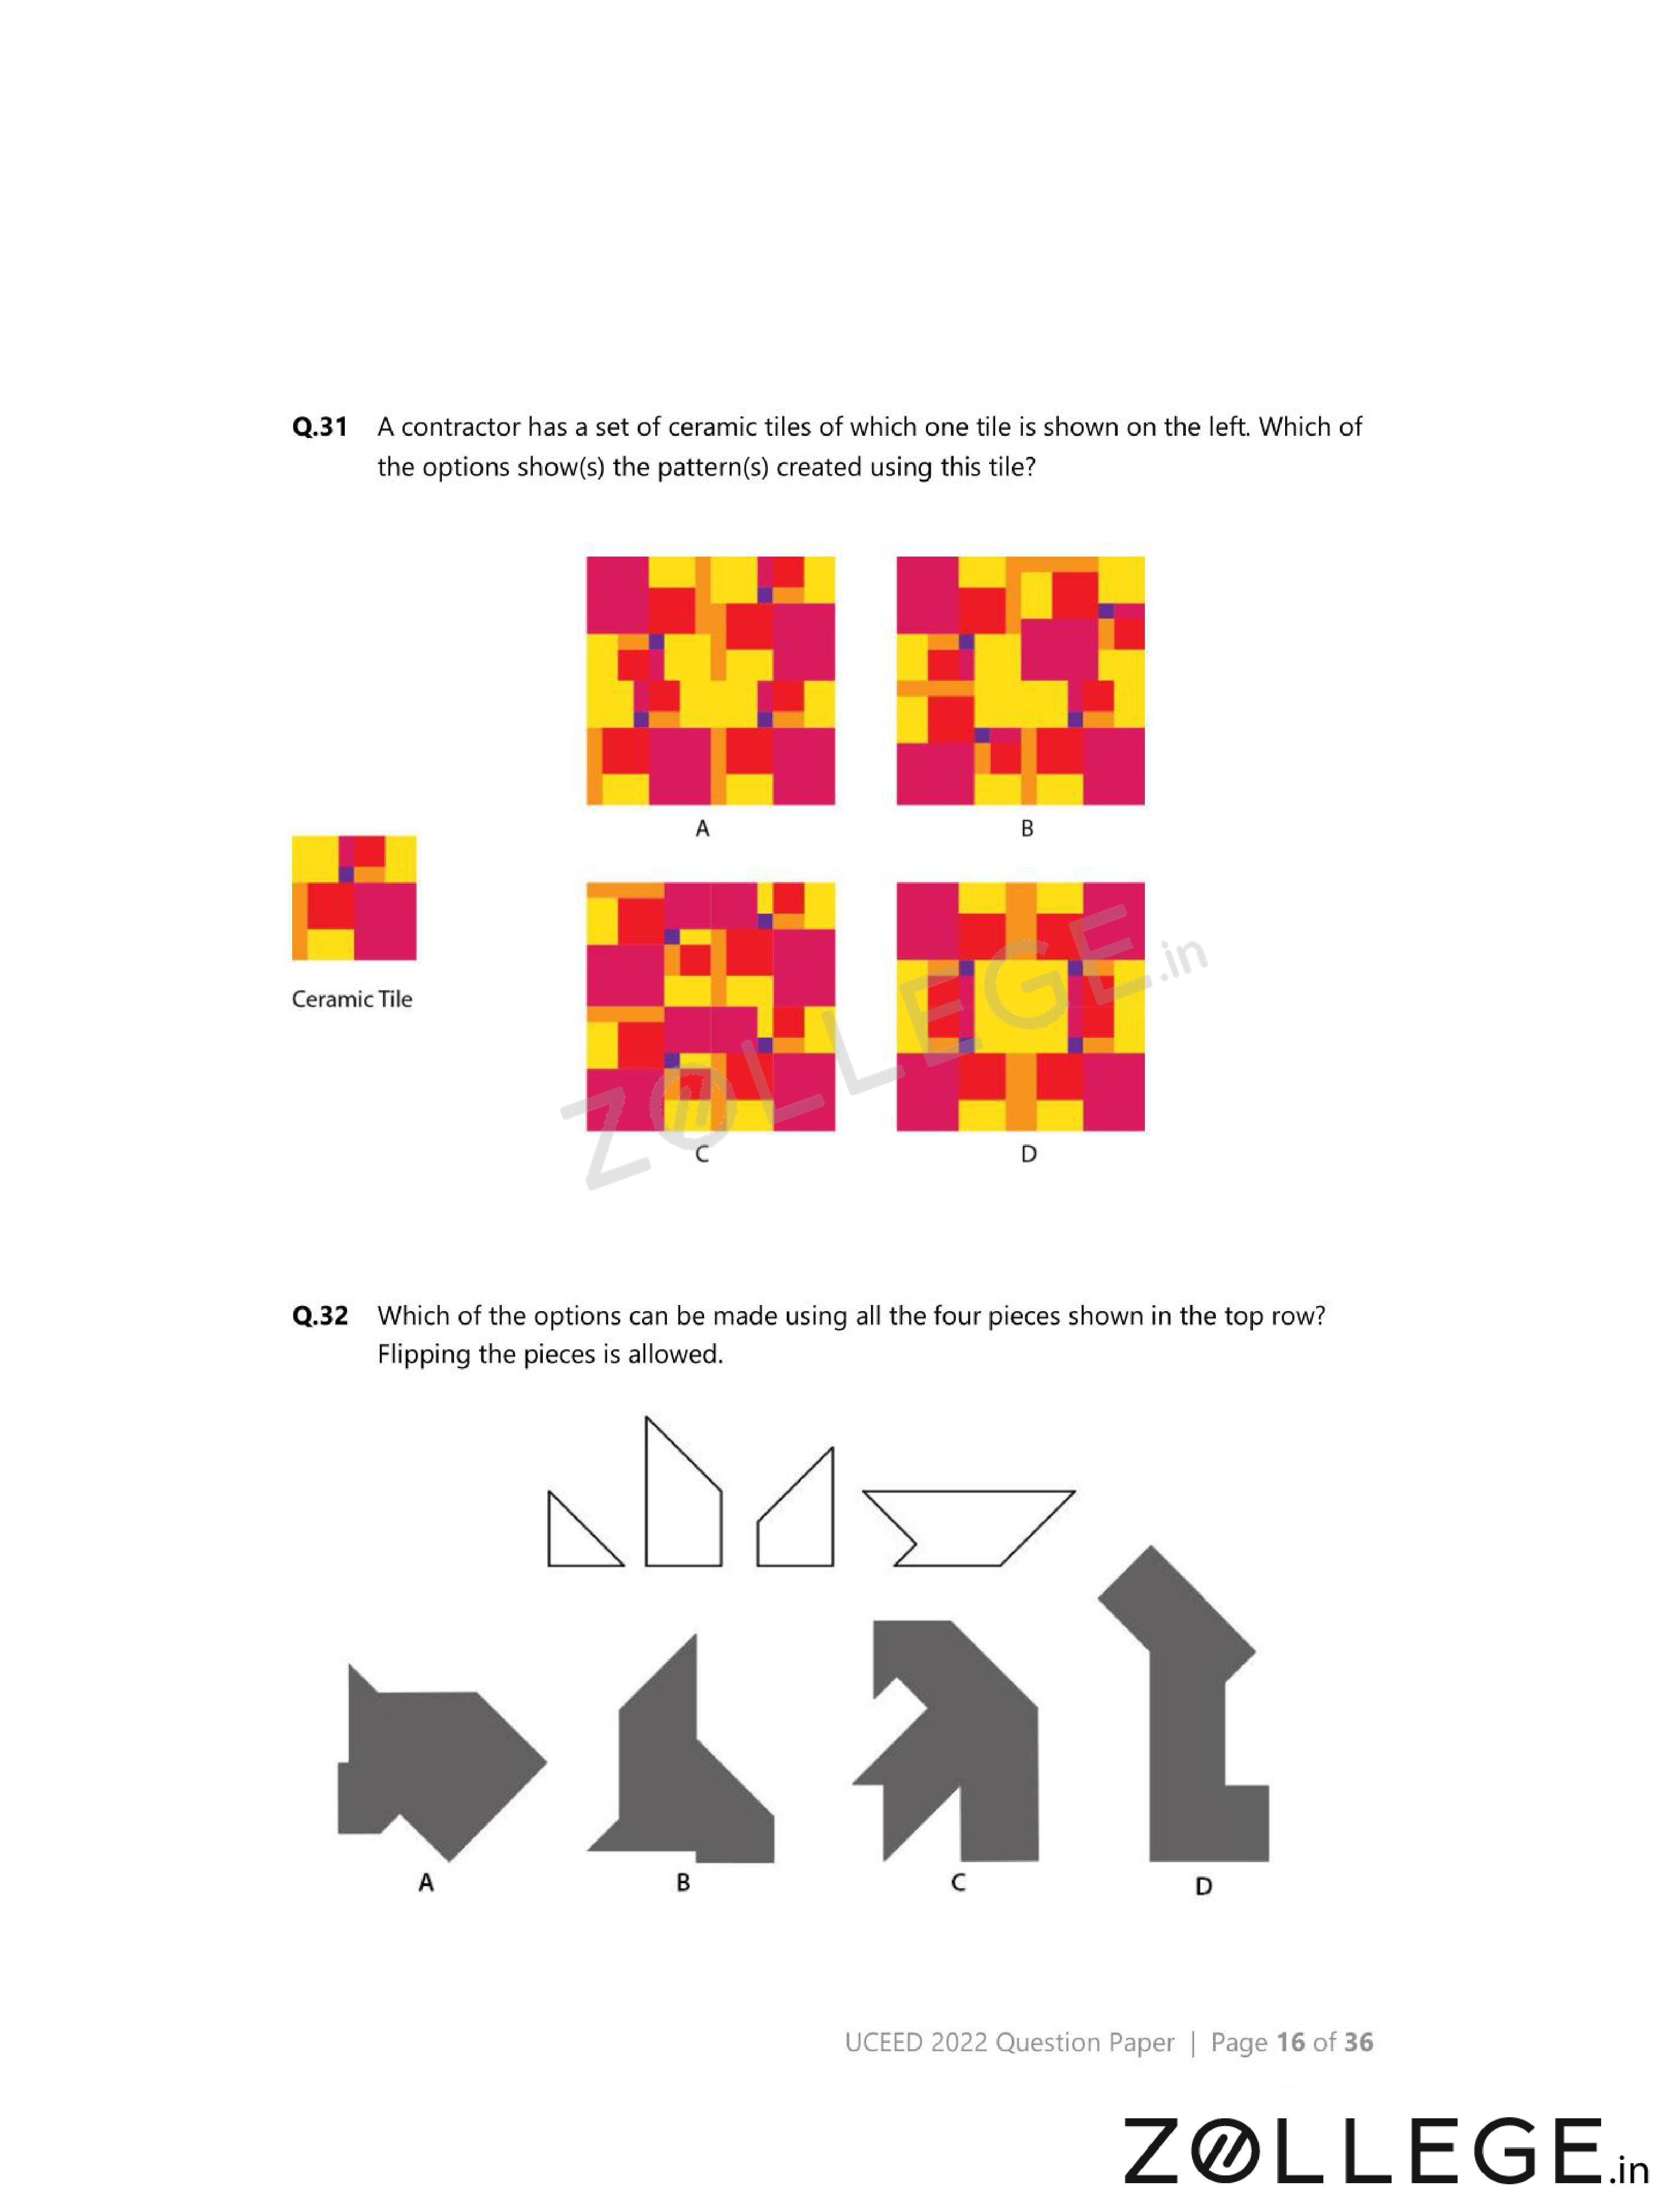
A contractor has a set of ceramic tiles of which one tile is shown on the left. Which of the options show(s) the pattern(s) created using this tile?

- (A) {
![]() }
} - (B) {
![]() }
} - (C) {
![]() }
} - (D) {
![]() }
}
 }
} }
} }
} }
}View Solution
Step 1: Understanding the Concept:
A valid pattern must be formed using only the given tile, allowing rotation and repetition.
No gaps or overlaps are permitted in the final pattern.
Step 2: Key Approach:
Check whether the edges of the tile align seamlessly with copies of itself when rotated or translated.
Step 3: Detailed Explanation:
In option (A), the tile edges match perfectly after rotation, forming a continuous repeating pattern.
Option (C) also satisfies edge compatibility and creates a uniform tessellation.
Options (B) and (D) fail because their edges leave visible gaps or mismatched joints.
Step 4: Final Answer:
The correct patterns are formed in options \(\mathbf{(A)}\) and \(\mathbf{(C)}\).
Quick Tip: In tiling problems, always test whether opposite edges are complementary under rotation.
Which of the options can be made using all the four pieces shown in the top row? Flipping the pieces is allowed.

- (A) {
![]() }
} - (B) {
![]() }
} - (C) {
![]() }
} - (D) {
![]() }
}
 }
} }
} }
} }
}View Solution
Step 1: Understanding the Concept:
All four given pieces must be used exactly once to form the target shape.
Rotation and flipping are allowed, but overlapping is not permitted.
Step 2: Key Approach:
Compare the total area of the four pieces with the target shape and test edge fitting.
Step 3: Detailed Explanation:
Option (B) accommodates all four pieces perfectly, matching both area and boundary shape.
Each piece fits without leaving gaps or causing overlap.
Other options either leave unused space or require bending of pieces, which is not allowed.
Step 4: Final Answer:
The correct option is \(\mathbf{(B)}\).
Quick Tip: Check total area first; if areas do not match, the option can be eliminated immediately.
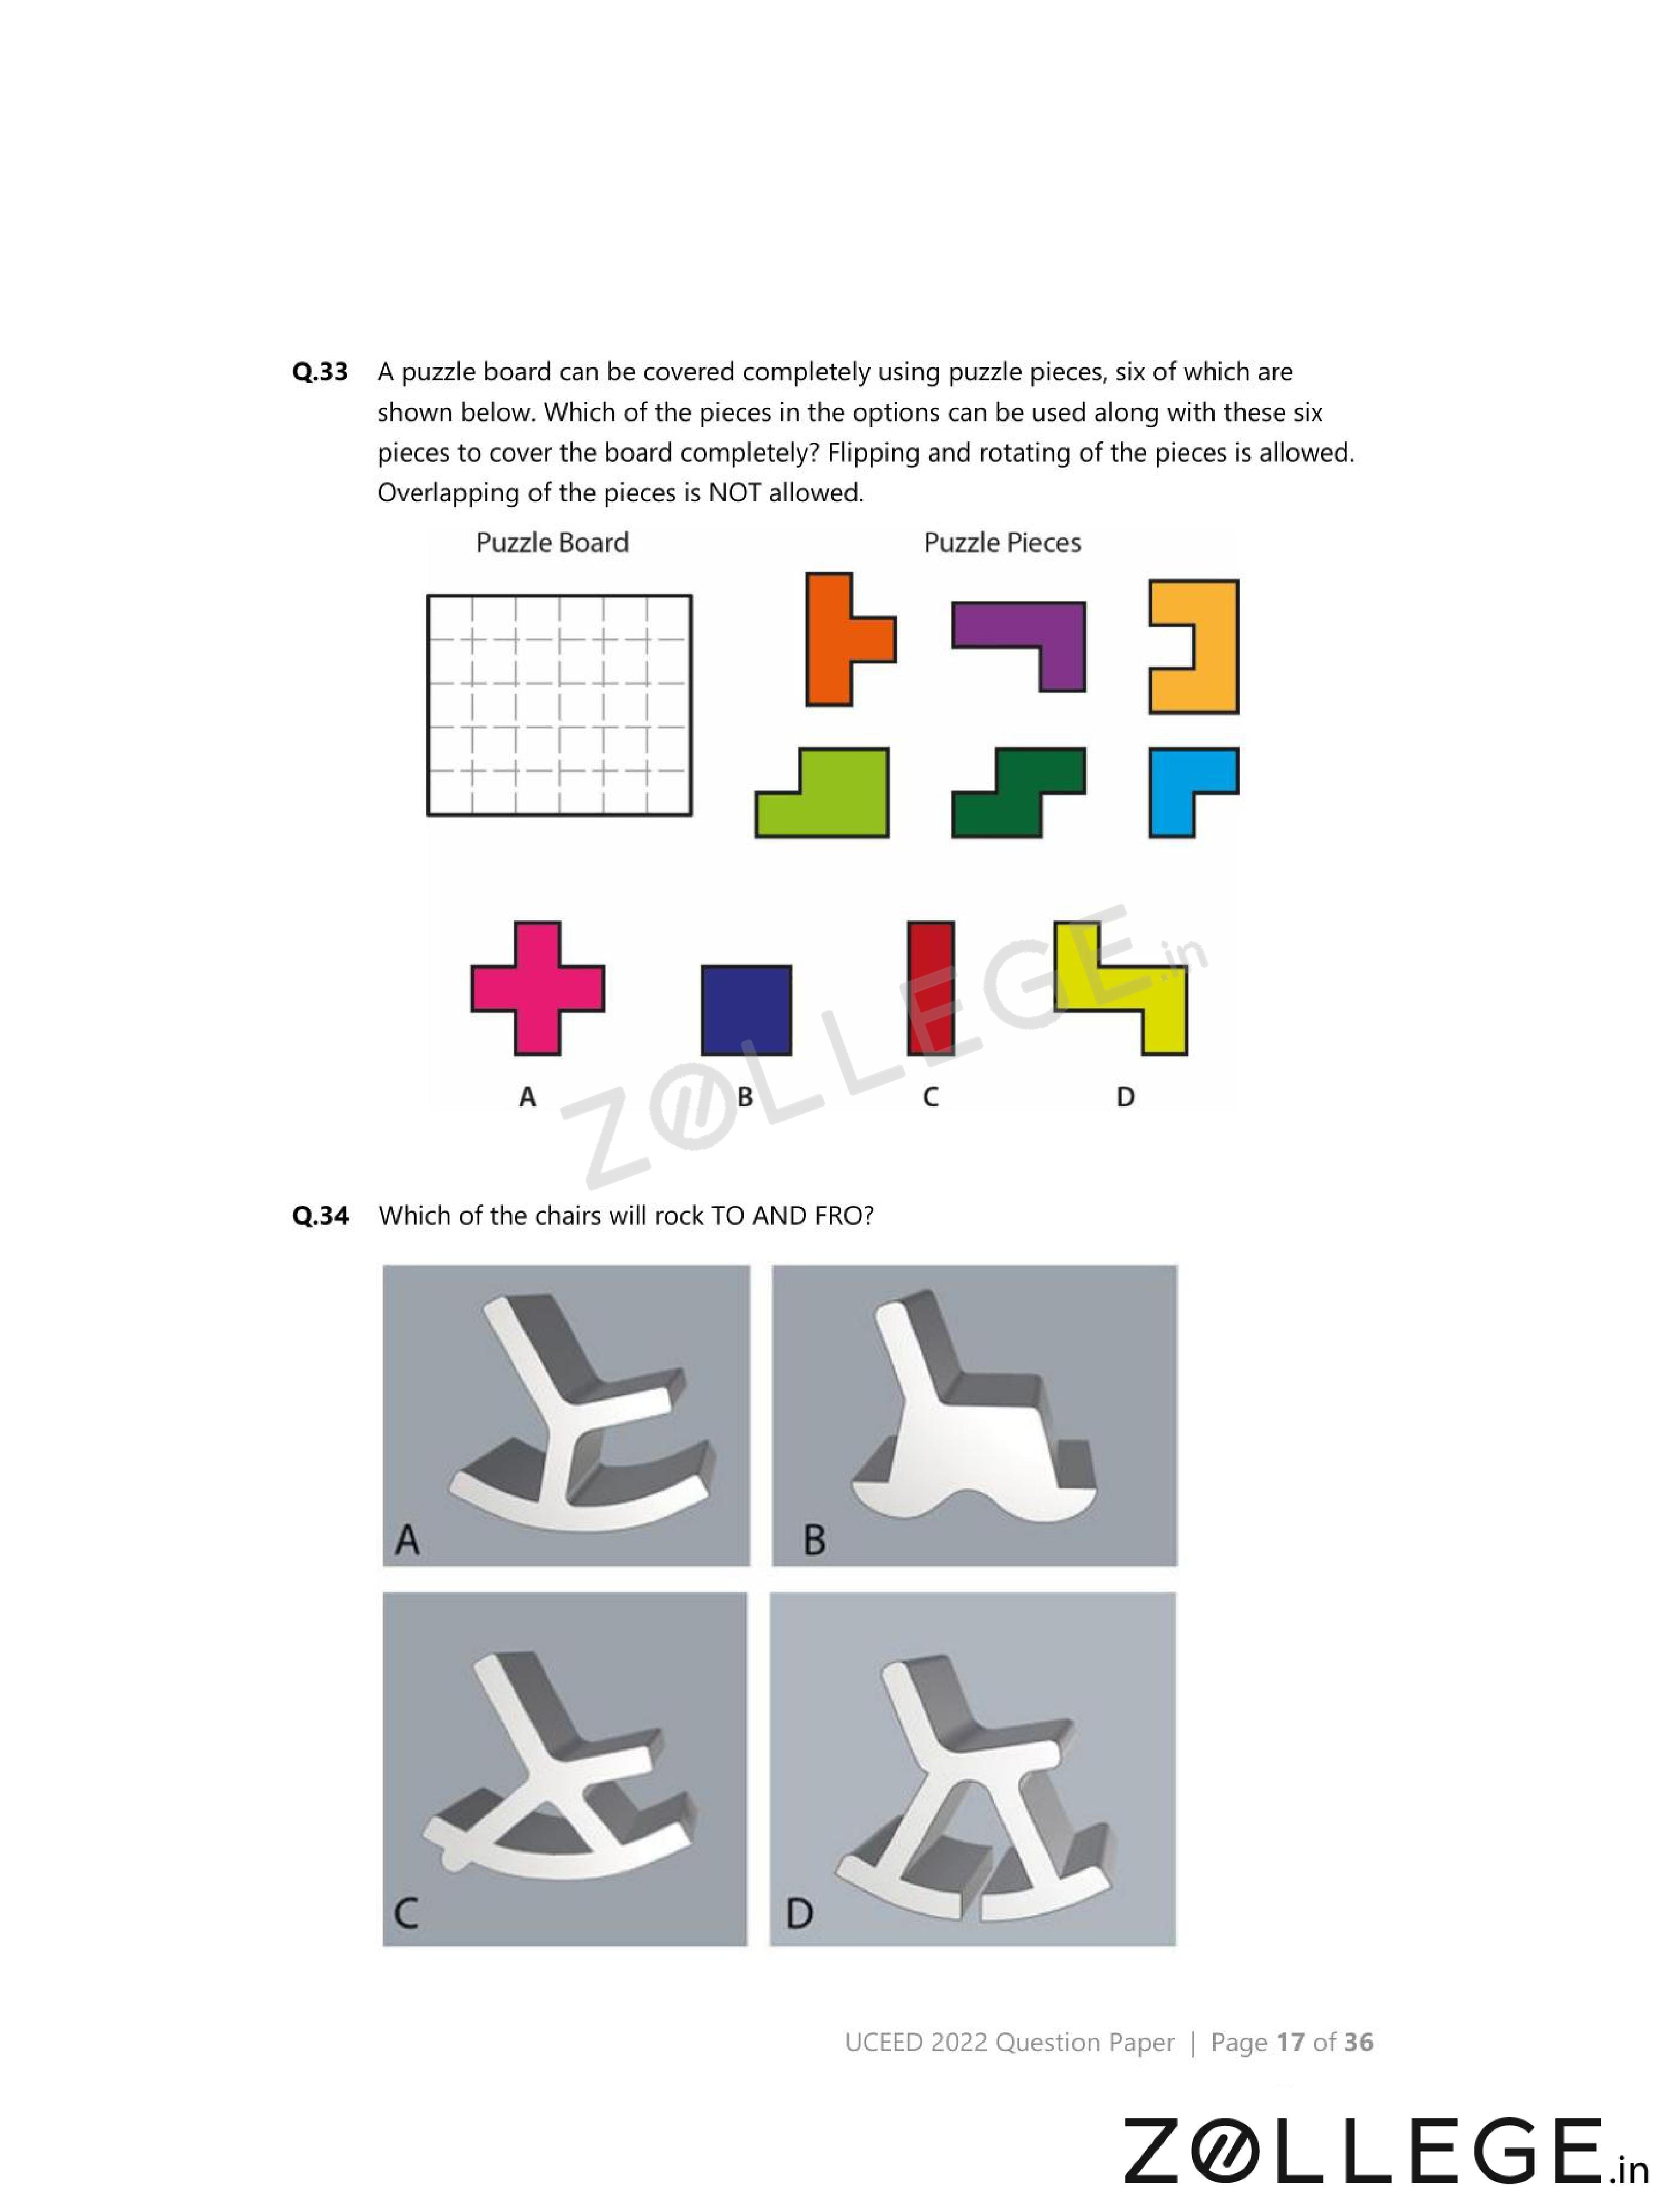
A puzzle board can be covered completely using puzzle pieces, six of which are shown below. Which of the pieces in the options can be used along with these six pieces to cover the board completely?

- (A) {
![]() }
} - (B) {
![]() }
} - (C) {
![]() }
} - (D) {
![]() }
}
 }
} }
} }
} }
}View Solution
Step 1: Understanding the Concept:
The puzzle board must be completely filled without gaps or overlaps.
Rotation and flipping of pieces are allowed.
Step 2: Key Approach:
Determine the missing area after placing the six given pieces.
Step 3: Detailed Explanation:
After arranging the six pieces, the remaining empty region has a unique outline.
Only option (C) matches this outline exactly when rotated appropriately.
Other options either exceed the available space or fail to cover it fully.
Step 4: Final Answer:
The required additional piece is \(\mathbf{(C)}\).
Quick Tip: Always visualize the negative space left by existing pieces to identify the missing one.
Which of the chairs will rock TO AND FRO?
- (A) {
![]() }
} - (B) {
![]() }
} - (C) {
![]() }
} - (D) {
![]() }
}
 }
} }
} }
} }
}View Solution
Step 1: Understanding the Concept:
A chair rocks to and fro if its base has a curved contact with the ground.
Step 2: Key Approach:
Observe the shape of the base touching the floor in each option.
Step 3: Detailed Explanation:
Options (A) and (D) have curved or rounded base edges.
When force is applied, the contact point shifts, causing rocking motion.
Options (B) and (C) have flat bases, which remain stable and do not rock.
Step 4: Final Answer:
The chairs that will rock are \(\mathbf{(A)}\) and \(\mathbf{(D)}\).
Quick Tip: Rocking occurs when the center of mass moves over a curved base.
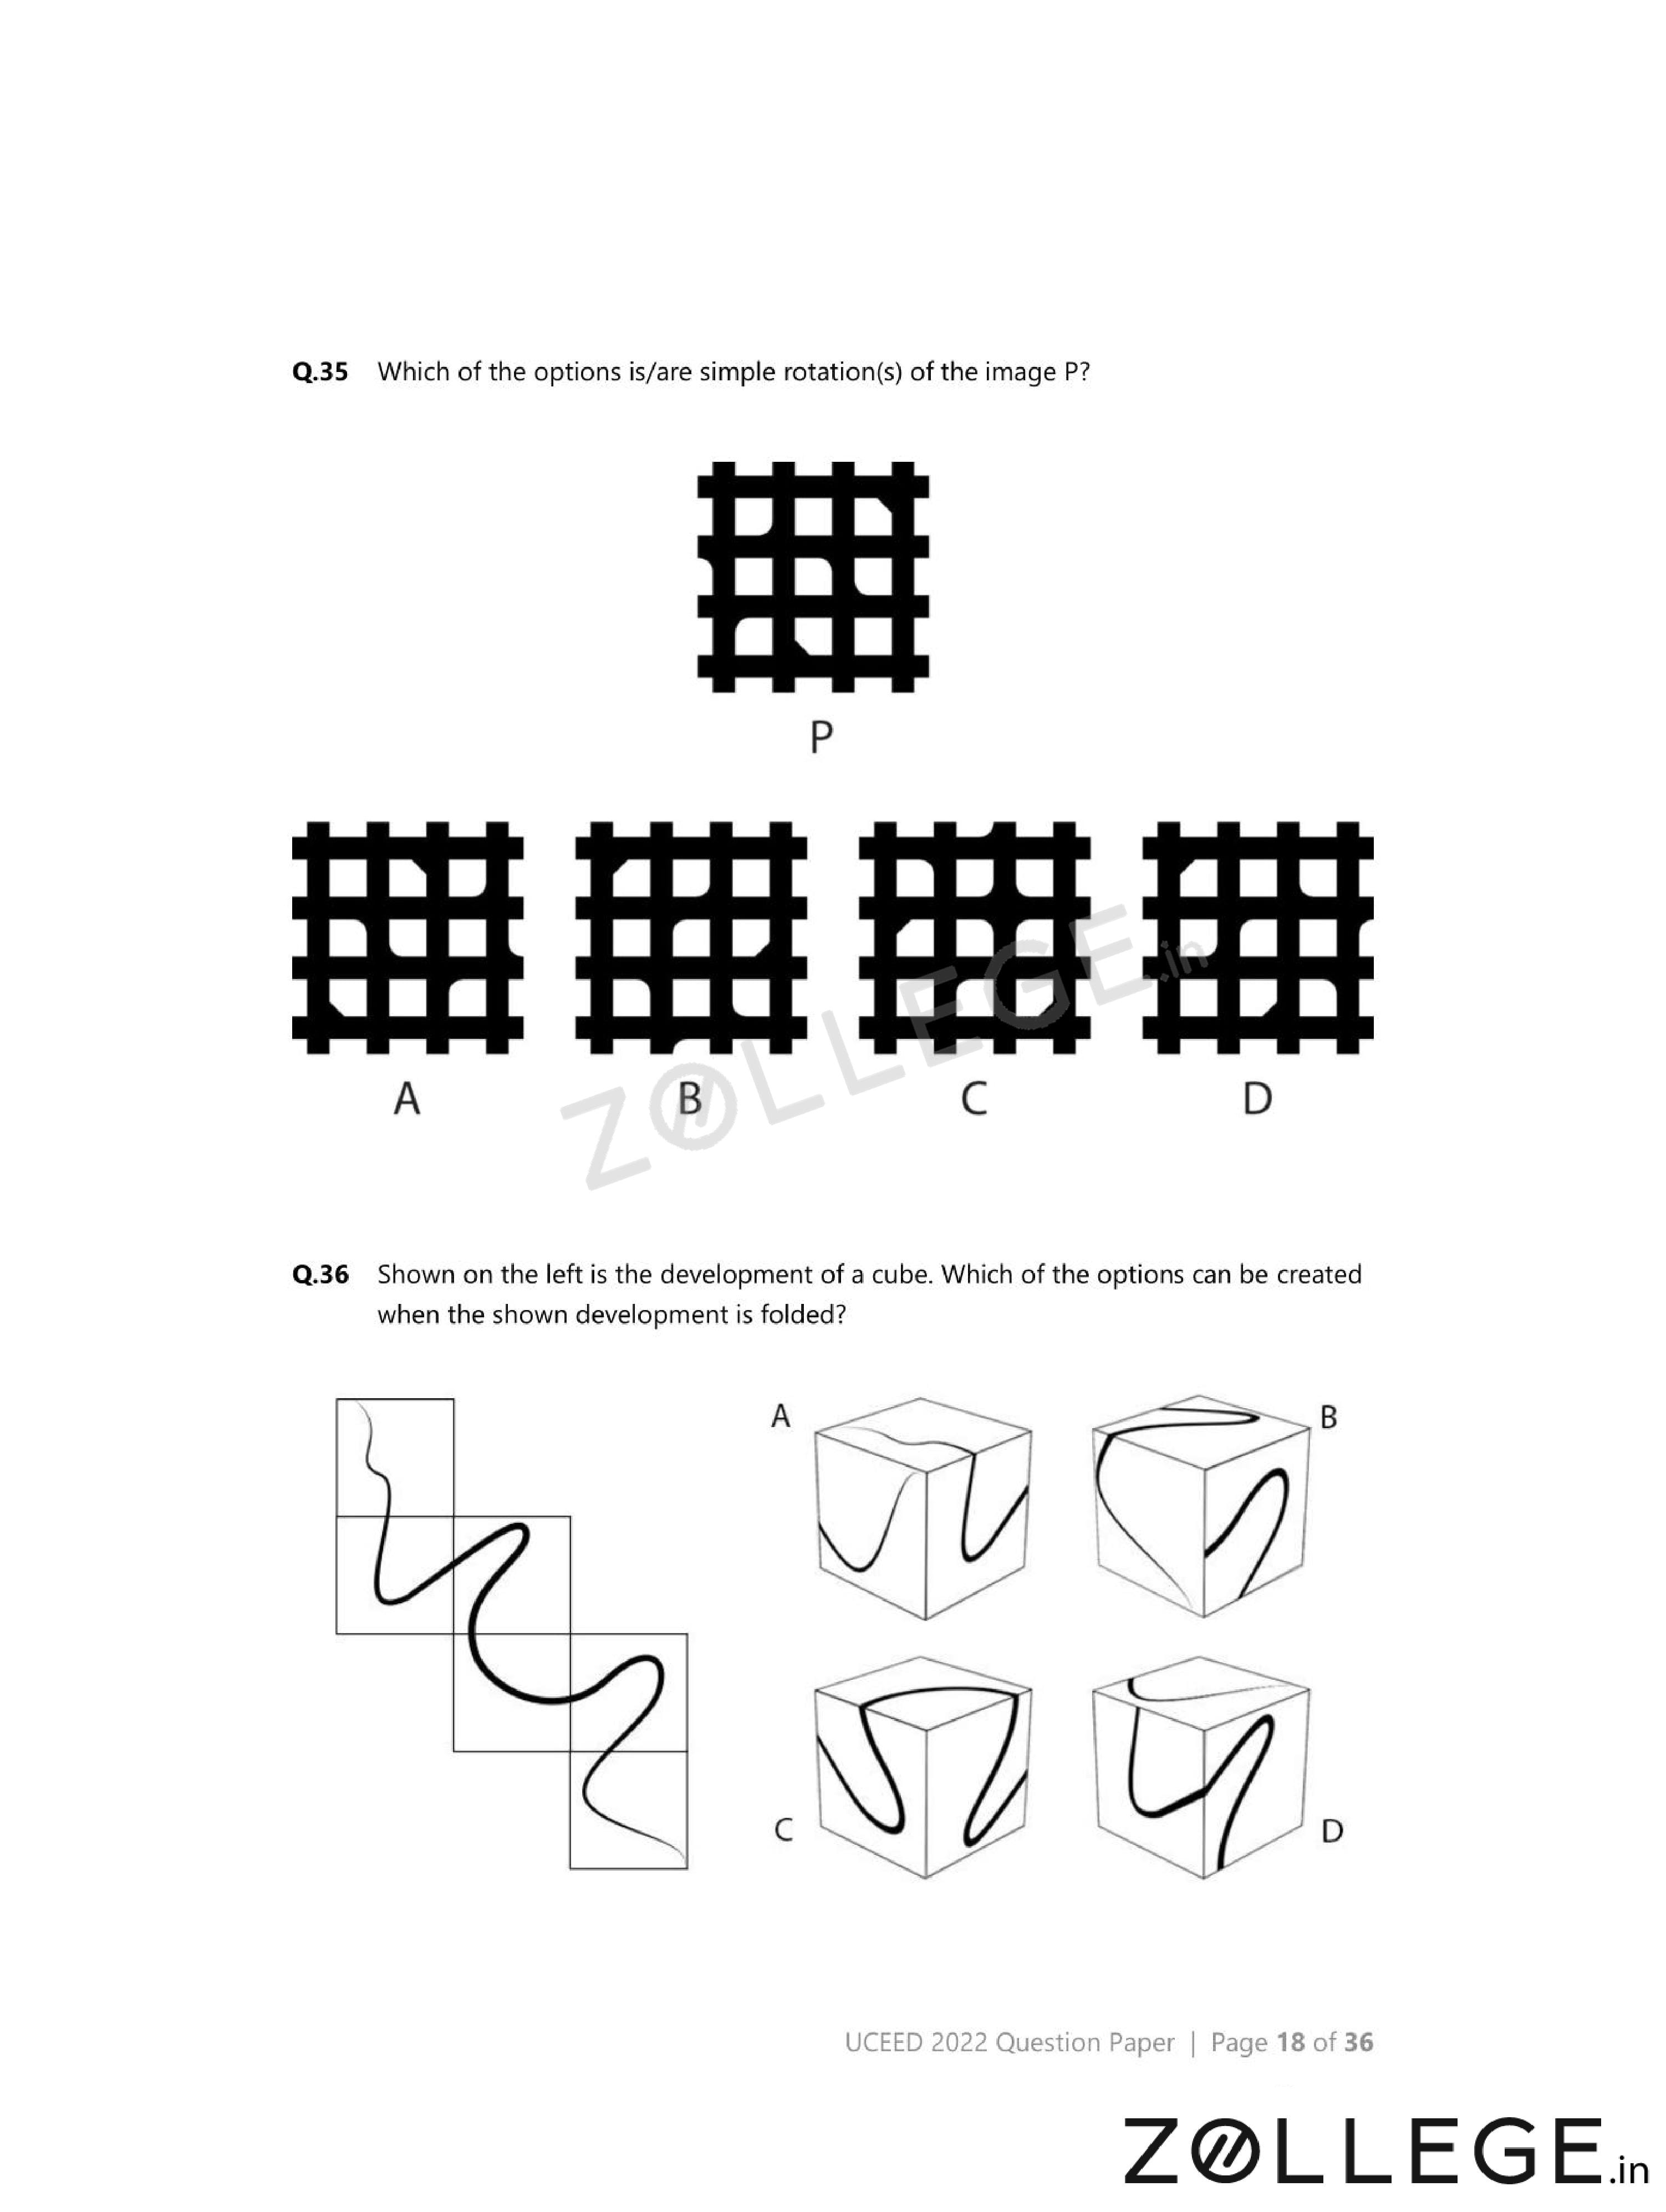
Which of the options is/are simple rotation(s) of the image P?

- (A) {
![]() }
} - (B) {
![]() }
} - (C) {
![]() }
} - (D) {
![]() }
}
 }
} }
} }
} }
}View Solution
Step 1: Understanding the Concept:
A simple rotation changes orientation but not mirror symmetry.
No flipping is allowed in pure rotation.
Step 2: Key Approach:
Check whether the relative positions of features remain consistent.
Step 3: Detailed Explanation:
Options (A) and (C) can be obtained by rotating image P through fixed angles.
Options (B) and (D) require reflection, not rotation.
Step 4: Final Answer:
The correct options are \(\mathbf{(A)}\) and \(\mathbf{(C)}\).
Quick Tip: If left and right features swap positions, the figure is reflected, not rotated.
Shown on the left is the development of a cube. Which of the options can be created when the shown development is folded?

- (A) {
![]() }
} - (B) {
![]() }
} - (C) {
![]() }
} - (D) {
![]() }
}
 }
} }
} }
} }
}View Solution
Step 1: Understanding the Concept:
A cube net folds into a cube only if adjacent faces remain adjacent after folding.
Opposite faces in the net must not touch each other in the folded cube.
Step 2: Key Approach:
Identify opposite faces in the given development and track their relative positions after folding.
Step 3: Detailed Explanation:
When the net is folded, the central square becomes the base.
The four surrounding squares form the side faces, and the remaining square becomes the top face.
Options (B) and (C) correctly preserve face adjacency and opposite-face relationships.
Options (A) and (D) place faces adjacent that should be opposite, which is not possible.
Step 4: Final Answer:
The cube representations that can be formed are \(\mathbf{(B)}\) and \(\mathbf{(C)}\).
Quick Tip: In cube-net questions, first identify which faces become opposite after folding.
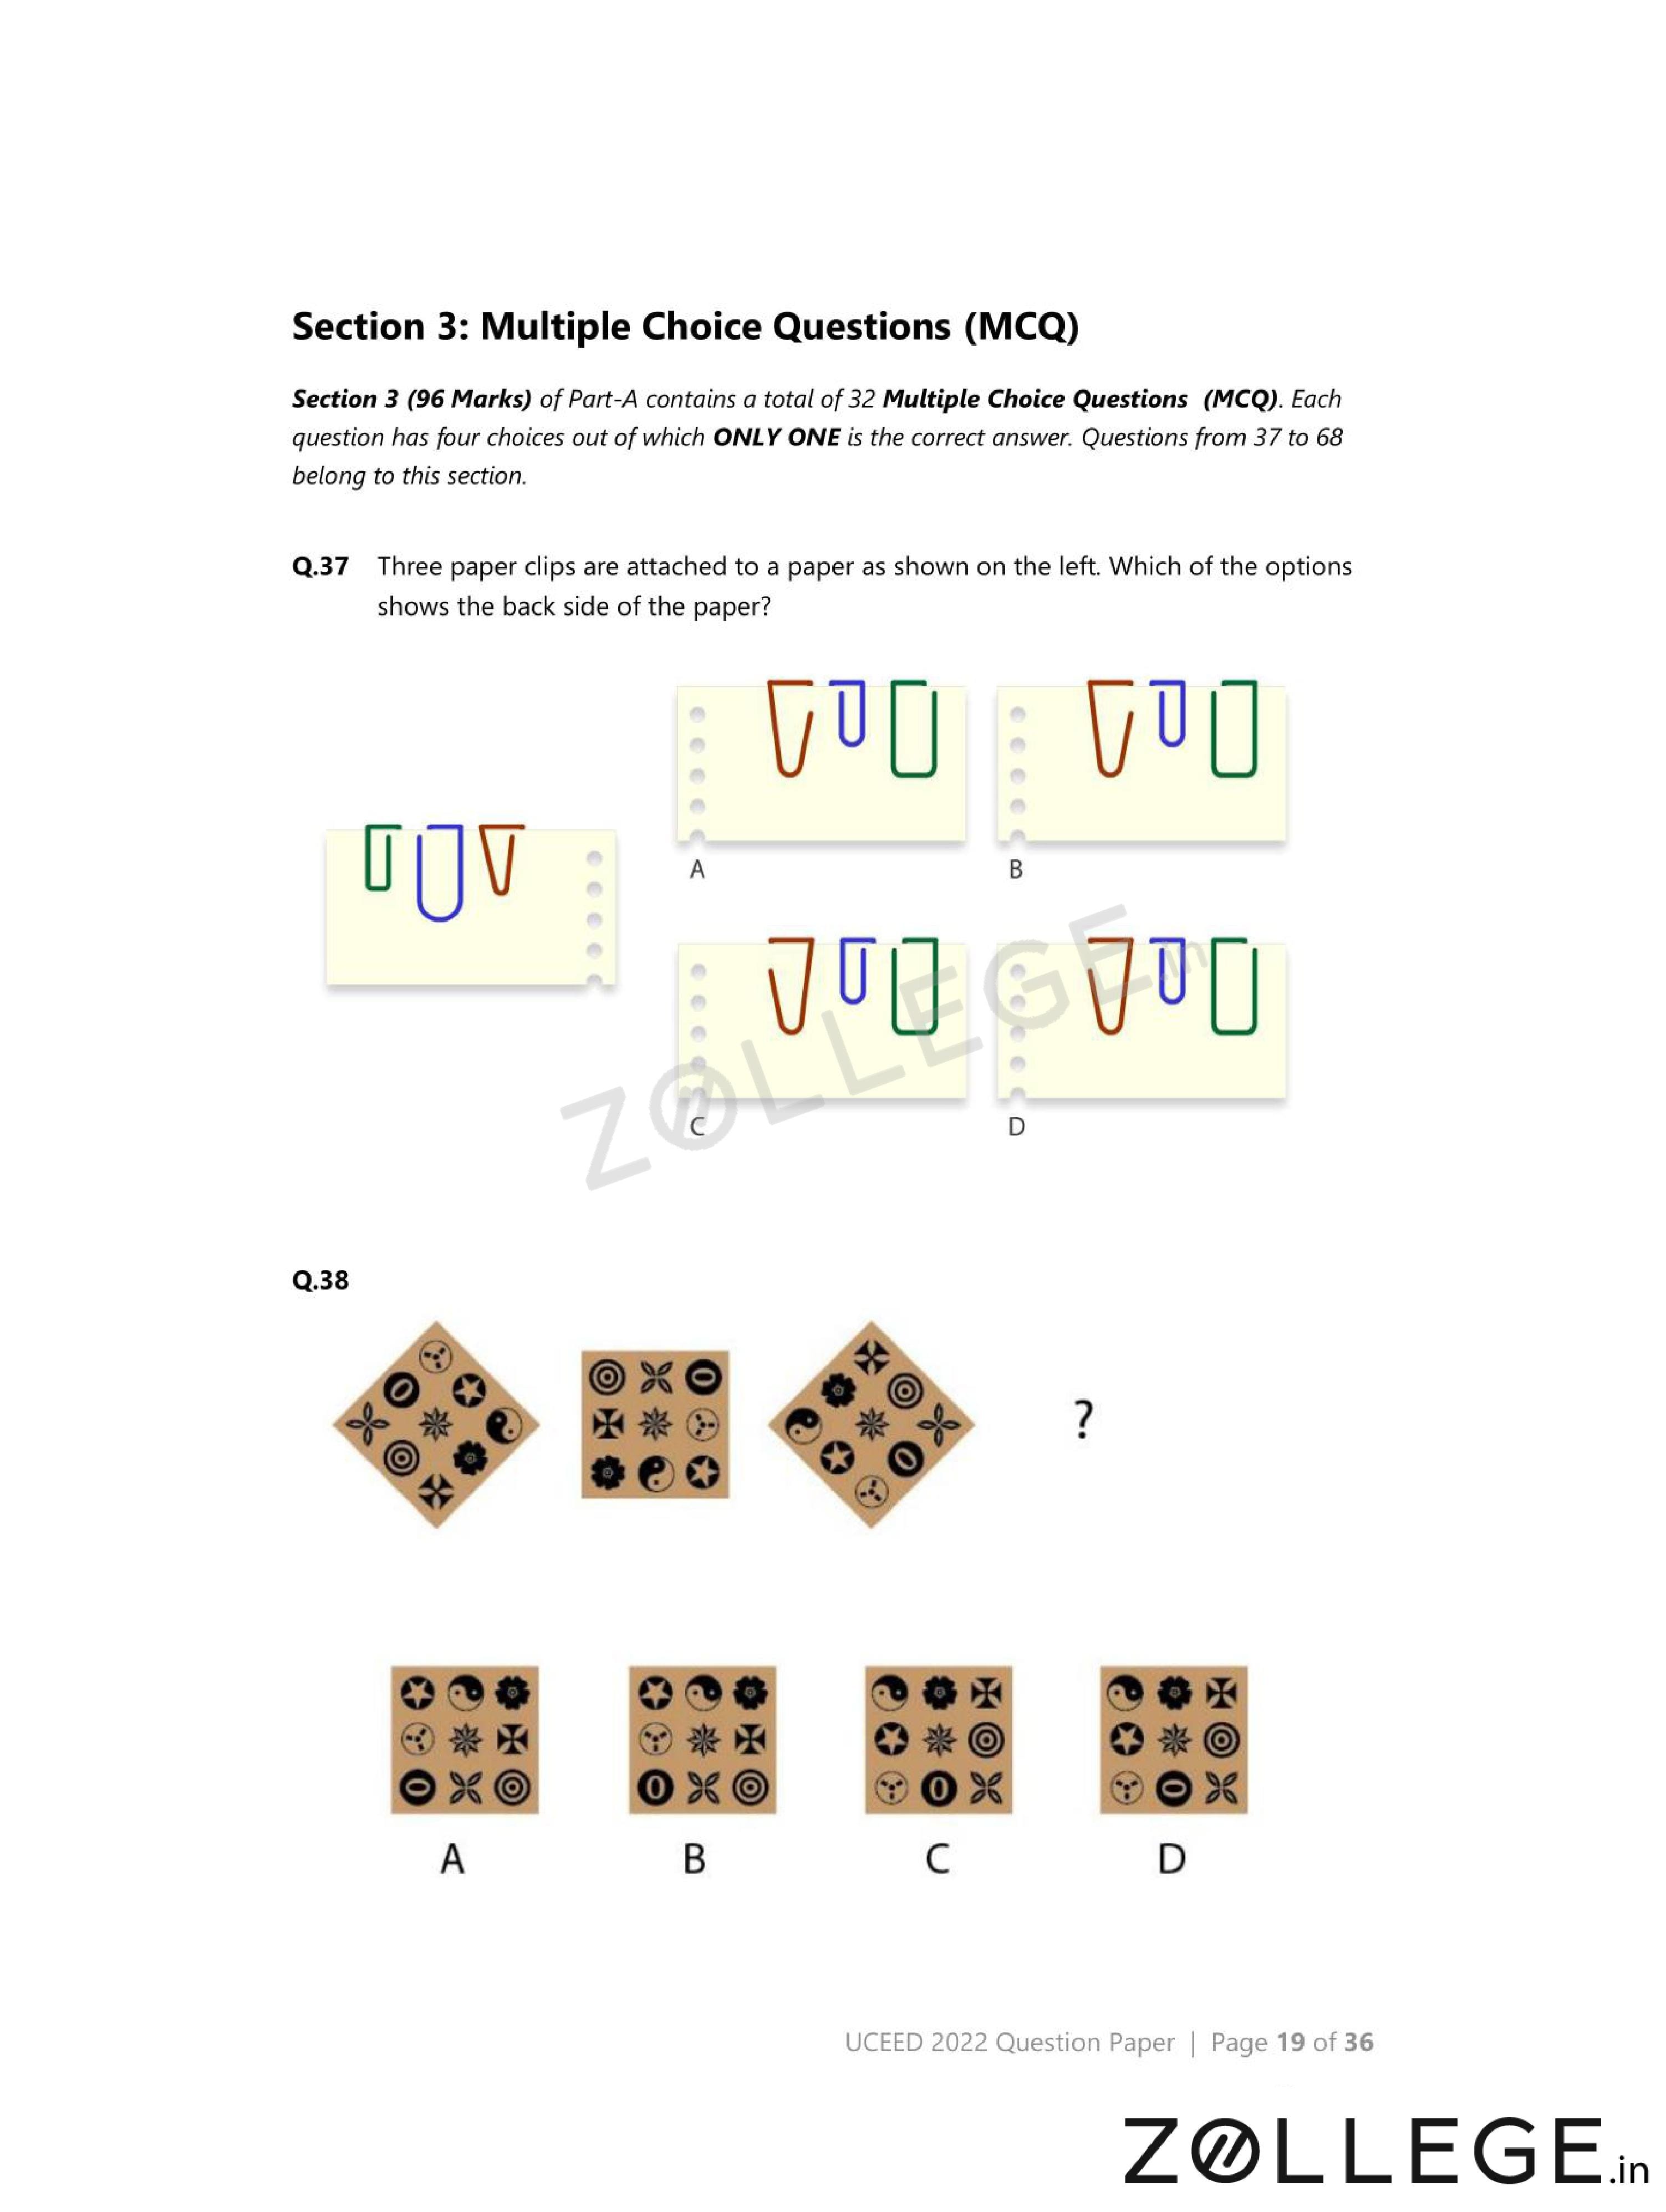
Three paper clips are attached to a paper as shown on the left. Which of the options shows the back side of the paper?

- (A) {
![]() }
} - (B) {
![]() }
} - (C) {
![]() }
} - (D) {
![]() }
}
 }
} }
} }
} }
}View Solution
Step 1: Understanding the Concept:
Viewing the back side of the paper is equivalent to a mirror reflection across the paper plane.
Step 2: Key Approach:
Reverse left-right orientation while maintaining vertical alignment of the clips.
Step 3: Detailed Explanation:
The relative positions of the paper clips must remain consistent with depth reversal.
Option (C) correctly shows the mirrored configuration of all three clips.
Other options either rotate the paper or misplace the clip openings.
Step 4: Final Answer:
The correct back-side view is option \(\mathbf{(C)}\).
Quick Tip: Back-side views are mirror images, not rotations.
The image on the left shows a configuration of shapes. Which option correctly represents the same configuration after rotation?

- (A) {
![]() }
} - (B) {
![]() }
} - (C) {
![]() }
} - (D) {
![]() }
}
 }
} }
} }
} }
}View Solution
Step 1: Understanding the Concept:
A rotation preserves distances and relative orientation between components.
Step 2: Key Approach:
Mentally rotate the given figure through the required angle.
Step 3: Detailed Explanation:
Option (A) matches the rotated orientation exactly.
Other options involve reflection or incorrect angular rotation.
Step 4: Final Answer:
The correct rotated figure is \(\mathbf{(A)}\).
Quick Tip: Track one distinctive feature while rotating to eliminate wrong options quickly.
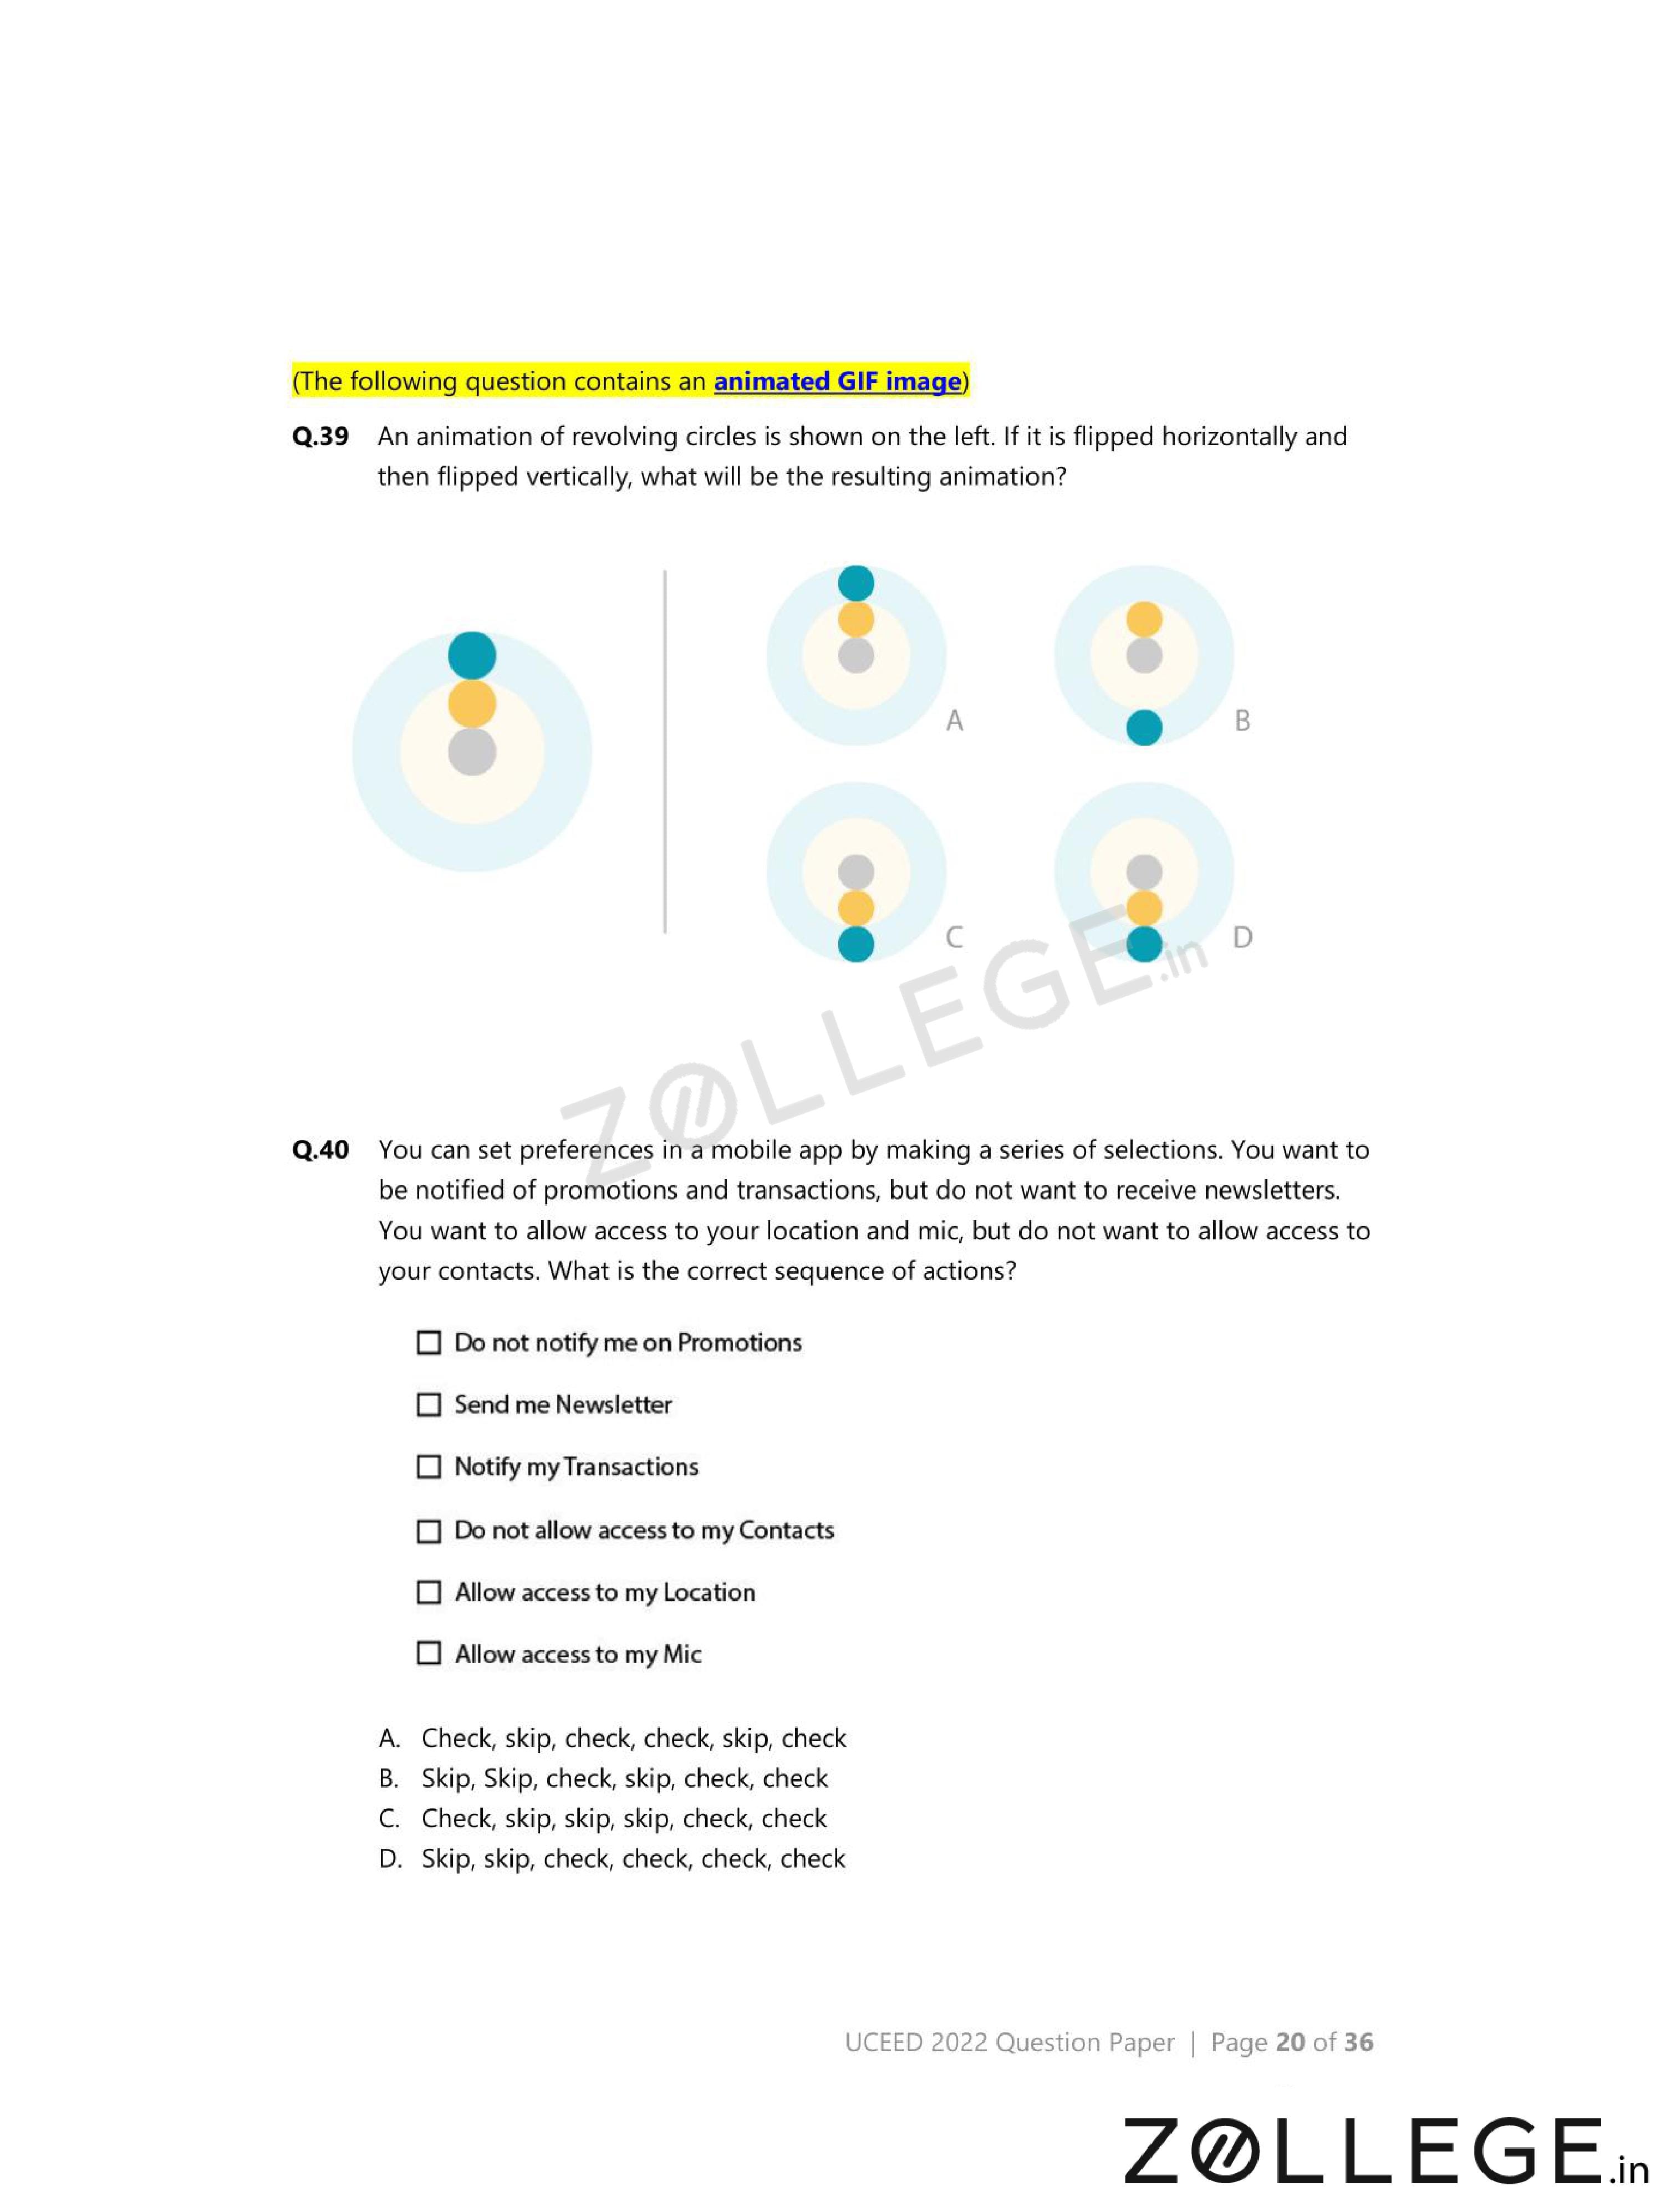
An animation of revolving circles is shown. If it is flipped horizontally and then flipped vertically, what will be the resulting animation?

- (A) {
![]() }
} - (B) {
![]() }
} - (C) {
![]() }
} - (D) {
![]() }
}
 }
} }
} }
} }
}View Solution
Step 1: Understanding the Concept:
A horizontal flip followed by a vertical flip is equivalent to a \(180^\circ\) rotation.
Step 2: Key Approach:
Apply the transformations step by step to the original animation.
Step 3: Detailed Explanation:
After the first flip, left and right positions are exchanged.
After the second flip, top and bottom positions are also exchanged.
The final result matches a half-turn rotation of the original animation.
Option (D) shows this configuration.
Step 4: Final Answer:
The resulting animation is shown in option \(\mathbf{(D)}\).
Quick Tip: Two perpendicular flips are equivalent to a \(180^\circ\) rotation.
You want notifications for promotions and transactions, but not newsletters. You want to allow access to location and mic, but not contacts. What is the correct sequence of actions?
{
View Solution
Step 1: Understanding the Concept:
Each preference must be accepted or rejected based on the user's requirements.
Step 2: Key Approach:
Translate the verbal conditions into a sequence of check or skip actions.
Step 3: Detailed Explanation:
Promotions: Check.
Newsletters: Skip.
Transactions: Check.
Contacts: Skip.
Location: Check.
Mic: Check.
This sequence matches option (C).
Step 4: Final Answer:
The correct sequence is \(\mathbf{(C)}\).
Quick Tip: Convert preference questions into a simple yes/no list before checking options.
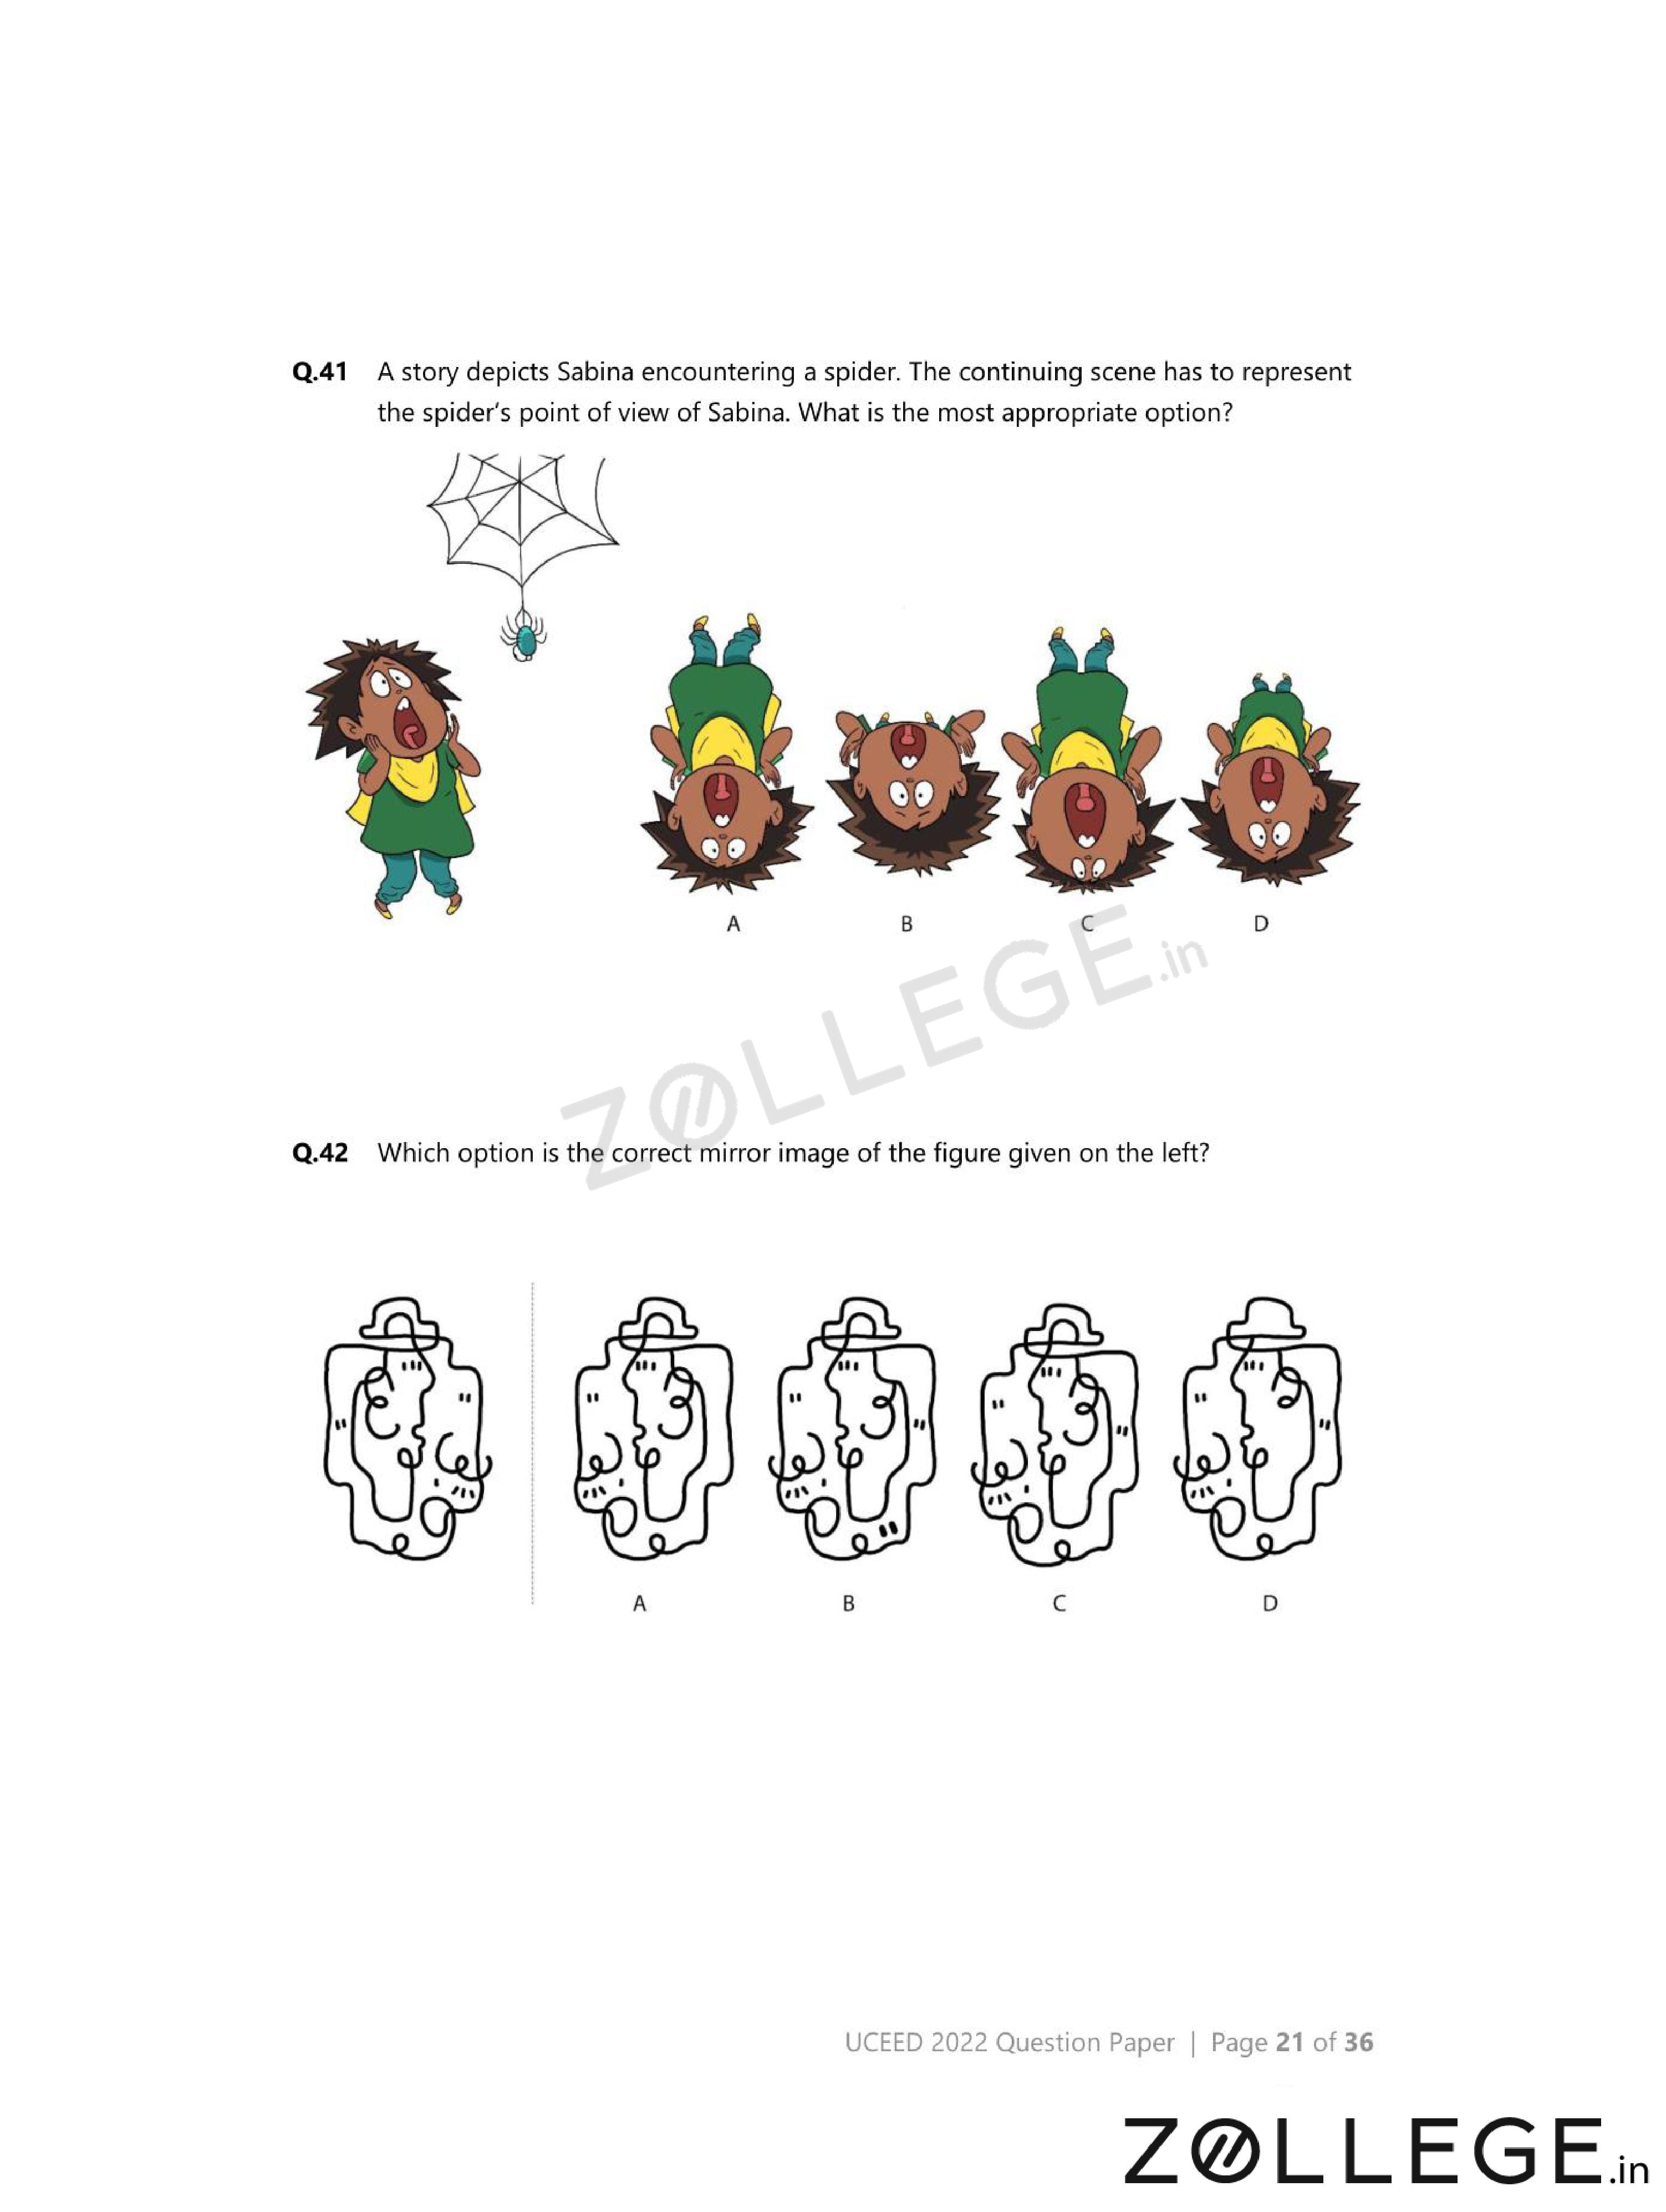
A story depicts Sabina encountering a spider. The continuing scene has to represent the spider’s point of view of Sabina. What is the most appropriate option?

- (A) {
![]() }
} - (B) {
![]() }
} - (C) {
![]() }
} - (D) {
![]() }
}
 }
} }
} }
} }
}View Solution
Step 1: Understanding the Concept:
The scene must be visualized from the spider’s eye level, not from Sabina’s.
Perspective and relative size are the key factors.
Step 2: Key Approach:
Lower the viewpoint close to the ground and look upward at Sabina.
Step 3: Detailed Explanation:
From the spider’s point of view, Sabina will appear very large and looming.
The angle will be upward, exaggerating height and facial features.
Option (B) correctly represents this low-angle perspective.
Other options either retain a human eye-level view or incorrect proportions.
Step 4: Final Answer:
The most appropriate option is \(\mathbf{(B)}\).
Quick Tip: In POV questions, always change camera height to match the observer.
Which option is the correct mirror image of the figure given on the left?

- (A) {
![]() }
} - (B) {
![]() }
} - (C) {
![]() }
} - (D) {
![]() }
}
 }
} }
} }
} }
}View Solution
Step 1: Understanding the Concept:
A mirror image involves left-right reversal while keeping top and bottom unchanged.
Step 2: Key Approach:
Flip the original figure horizontally and compare features.
Step 3: Detailed Explanation:
All protrusions, angles, and orientations must reverse laterally.
Option (A) shows an exact left-right reversal of the given figure.
Other options involve rotation or partial reflection.
Step 4: Final Answer:
The correct mirror image is \(\mathbf{(A)}\).
Quick Tip: Mirror images reverse left and right only, not top and bottom.
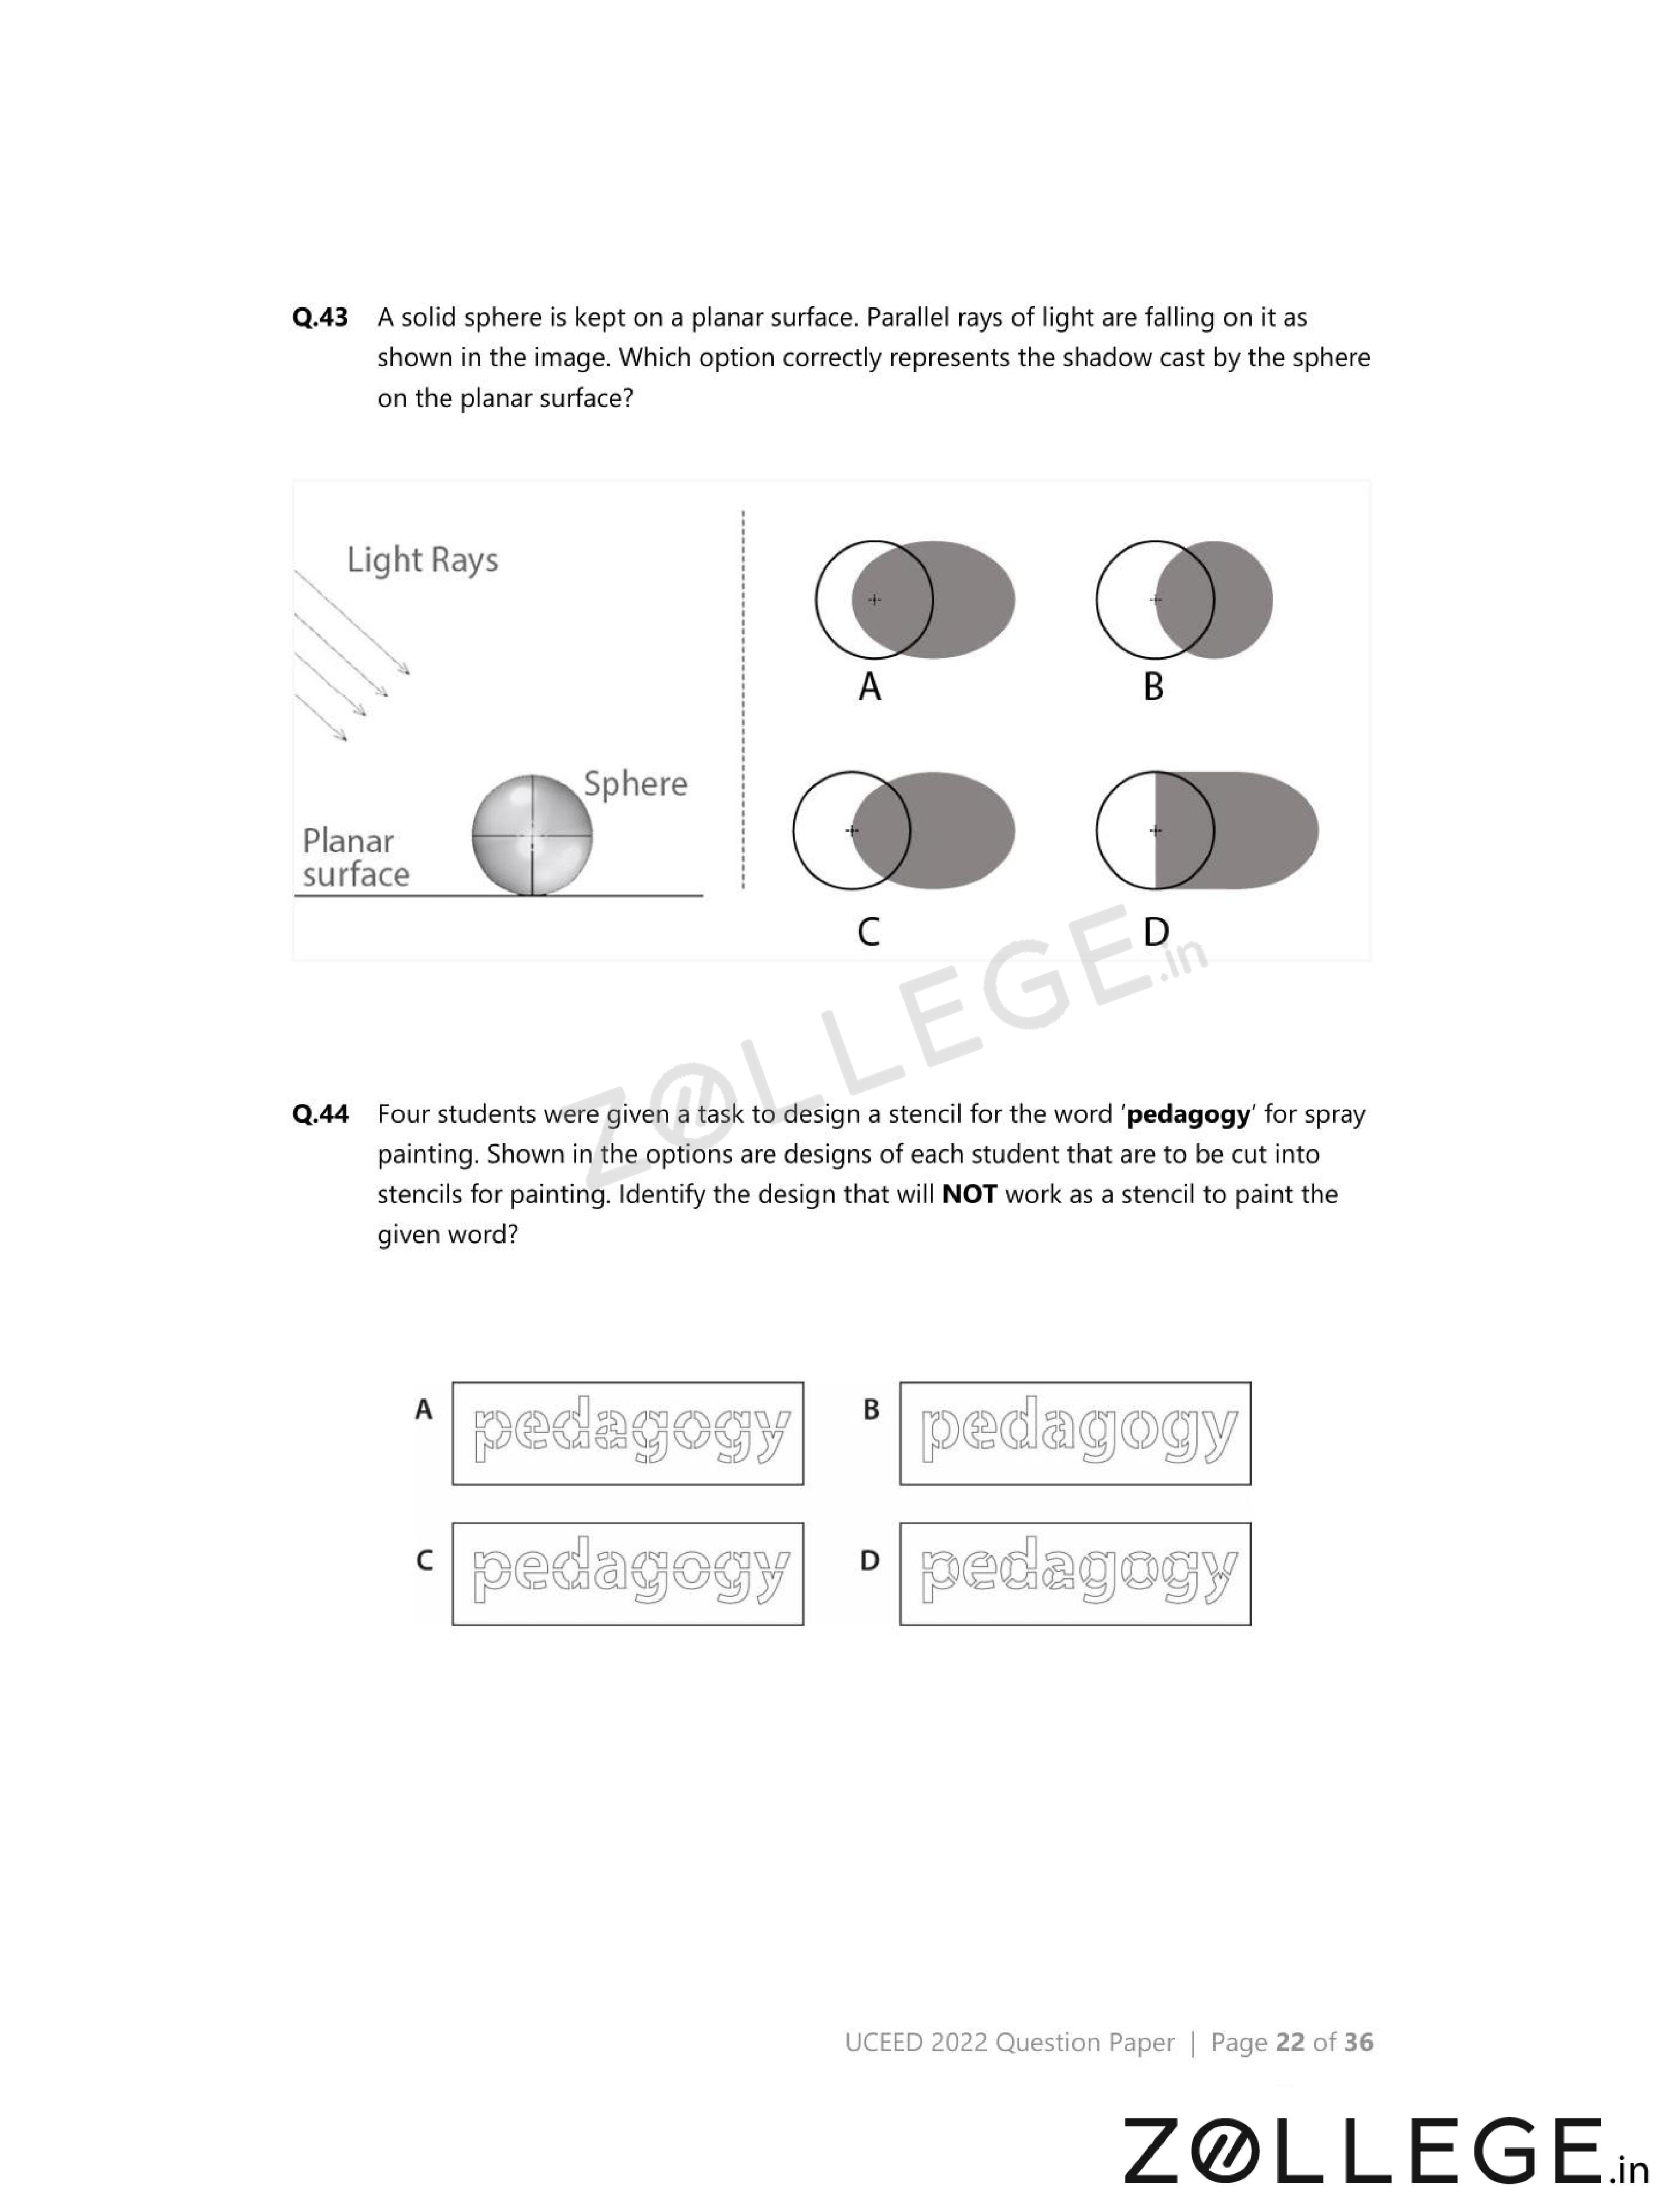
A solid sphere is kept on a planar surface. Parallel rays of light are falling on it as shown. Which option correctly represents the shadow cast by the sphere on the planar surface?

- (A) {
![]() }
} - (B) {
![]() }
} - (C) {
![]() }
} - (D) {
![]() }
}
 }
} }
} }
} }
}View Solution
Step 1: Understanding the Concept:
A sphere blocks light symmetrically when illuminated by parallel rays.
Step 2: Key Approach:
Project the outline of the sphere onto the plane along the light direction.
Step 3: Detailed Explanation:
The shadow of a sphere under parallel light is always circular.
Due to the angle of light, the circle shifts but remains circular.
Option (D) correctly shows a circular shadow displaced on the plane.
Other options distort the shadow shape incorrectly.
Step 4: Final Answer:
The correct shadow is shown in \(\mathbf{(D)}\).
Quick Tip: For parallel light rays, focus on the silhouette of the object.
Four students designed stencils for the word `pedagogy'. Identify the design that will NOT work as a stencil to paint the word.
- (A) {
![]() }
} - (B) {
![]() }
} - (C) {
![]() }
} - (D) {
![]() }
}
 }
} }
} }
} }
}View Solution
Step 1: Understanding the Concept:
A stencil must keep all enclosed regions attached to the main structure.
Step 2: Key Approach:
Check letters like `a', `o', `g' which contain enclosed regions.
Step 3: Detailed Explanation:
In option (C), enclosed regions are completely detached.
These parts would fall off during stencil cutting.
Other options provide connecting bridges to support enclosed areas.
Step 4: Final Answer:
The stencil that will NOT work is \(\mathbf{(C)}\).
Quick Tip: Always check enclosed letter regions when evaluating stencils.
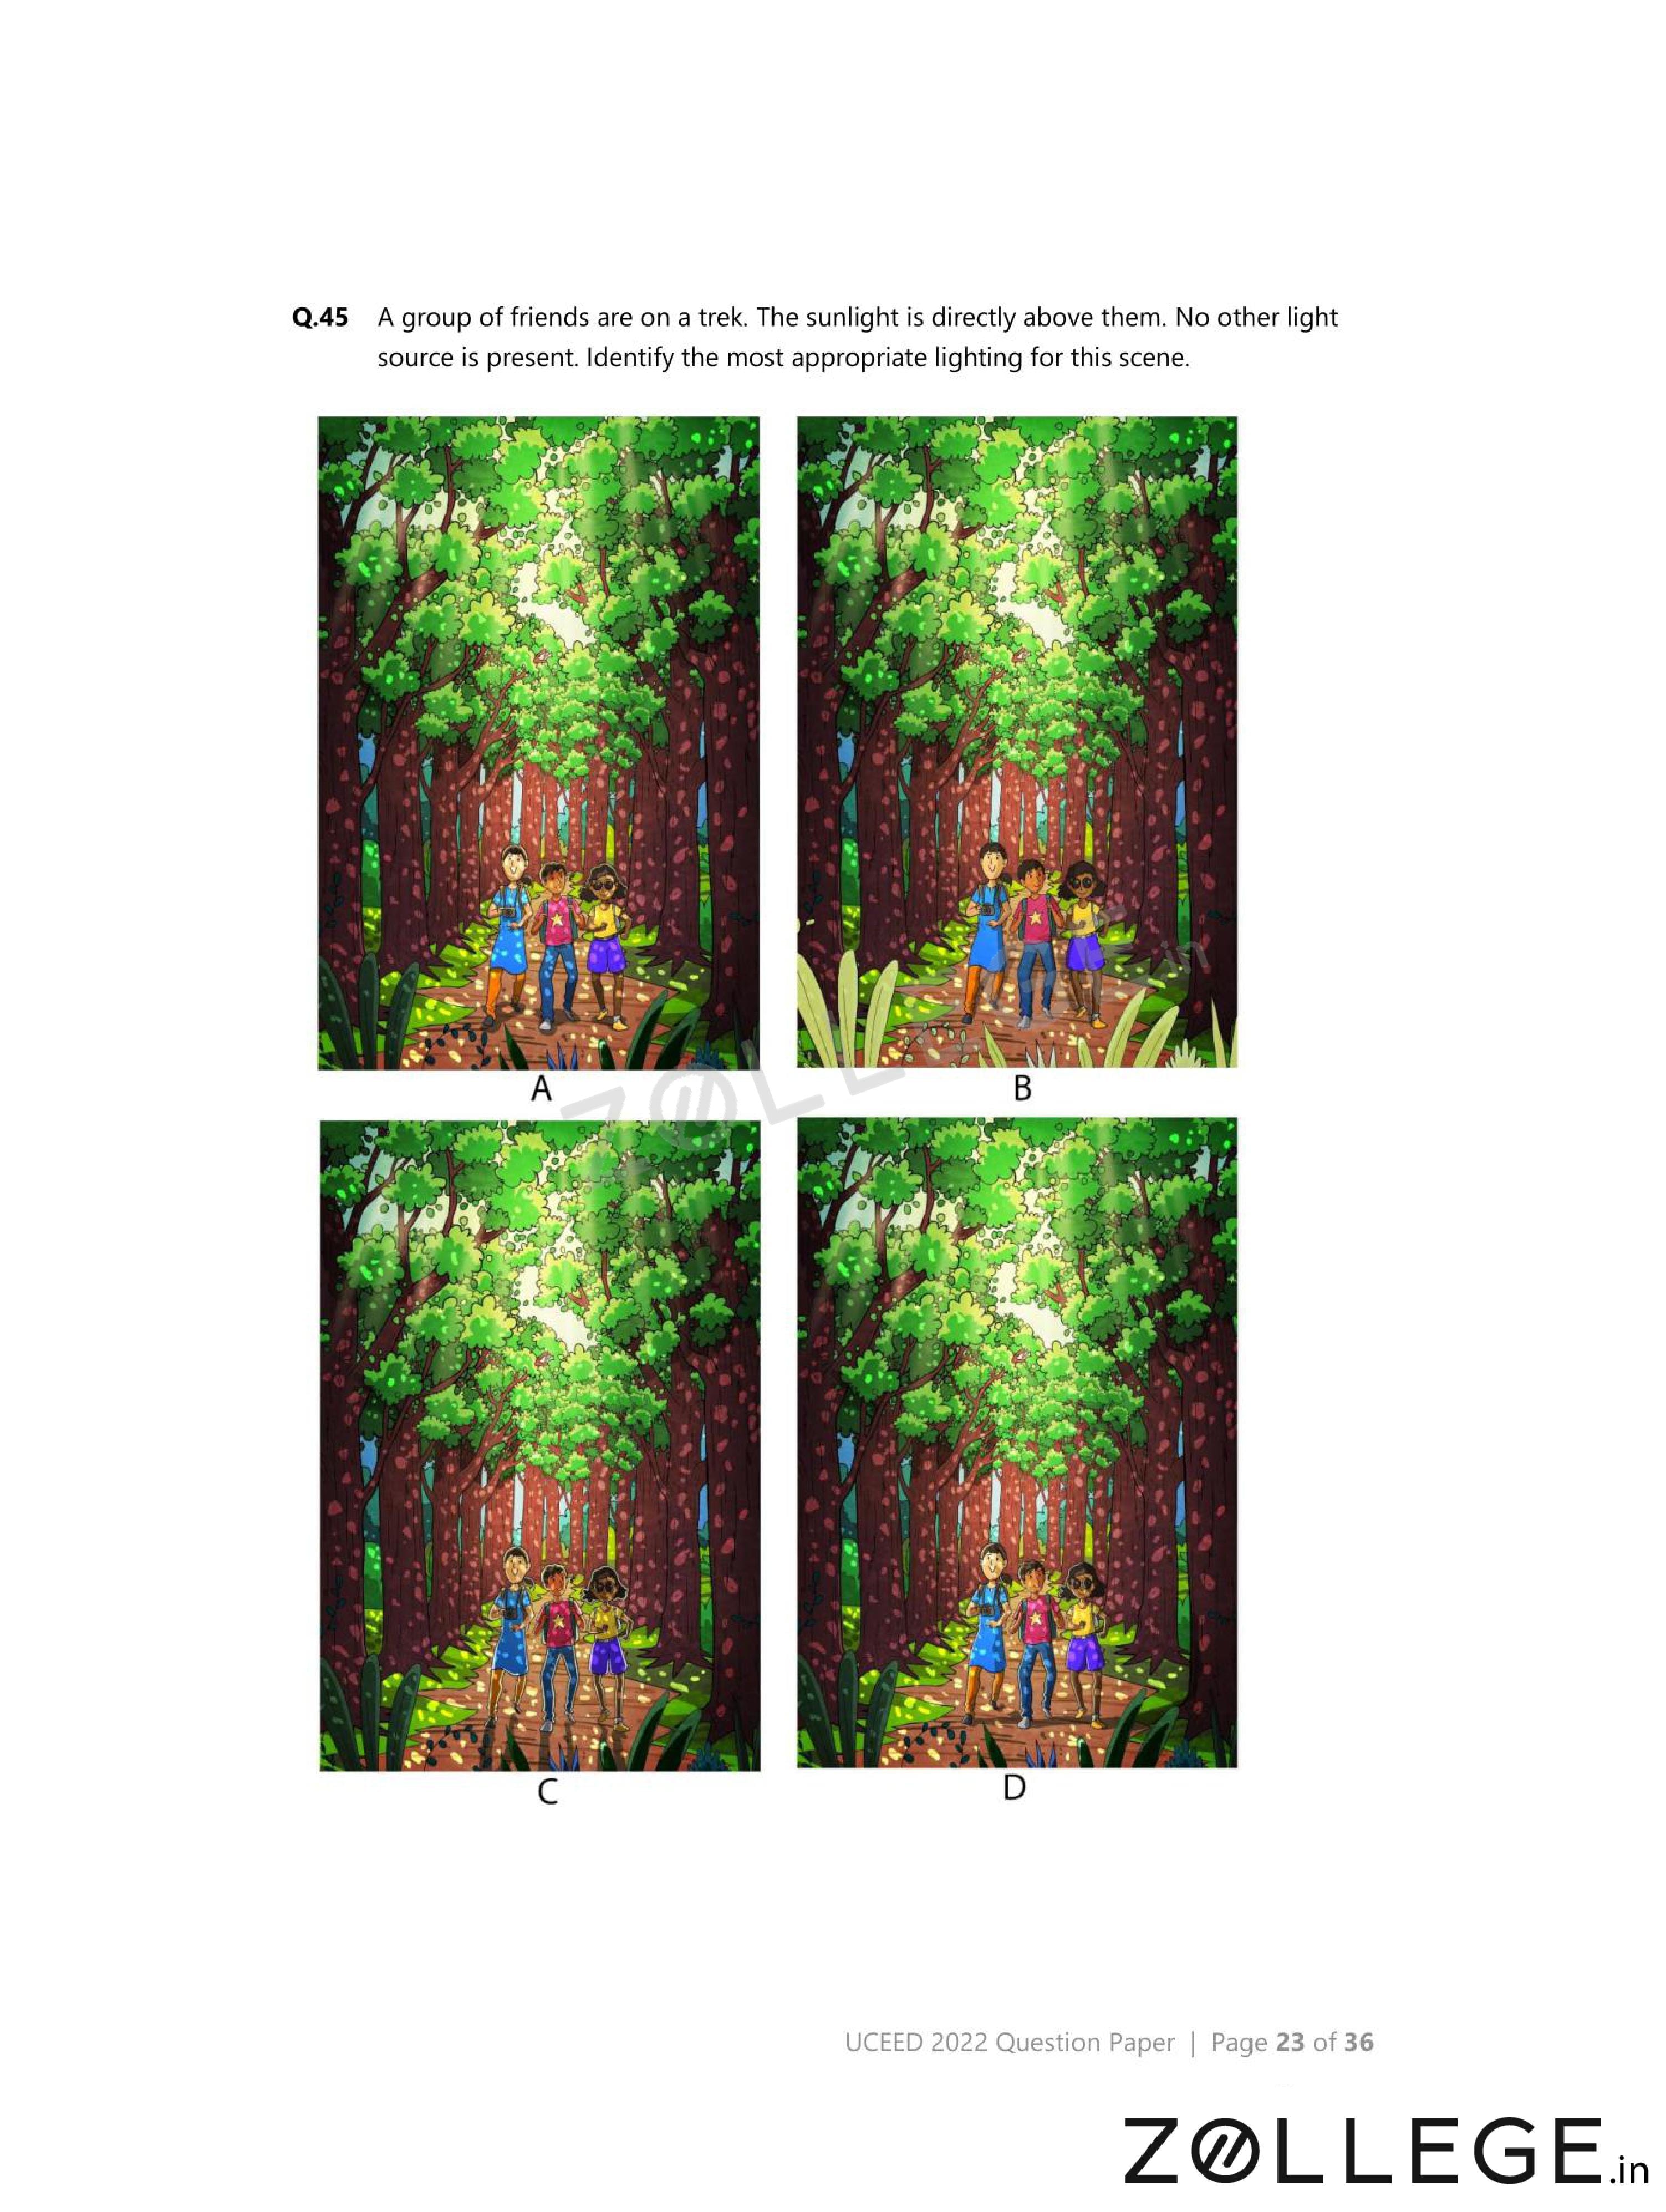
A group of friends are on a trek. The sunlight is directly above them. No other light source is present. Identify the most appropriate lighting for this scene.
- (A) {
![]() }
} - (B) {
![]() }
} - (C) {
![]() }
} - (D) {
![]() }
}
 }
} }
} }
} }
}View Solution
Step 1: Understanding the Concept:
When sunlight is directly overhead, shadows fall directly below objects.
Step 2: Key Approach:
Look for minimal, centered shadows under the figures.
Step 3: Detailed Explanation:
Option (A) shows short shadows directly beneath the people.
Other options show side lighting or elongated shadows, which are incorrect.
Step 4: Final Answer:
The correct lighting is shown in \(\mathbf{(A)}\).
Quick Tip: Overhead lighting produces the shortest and most centered shadows.
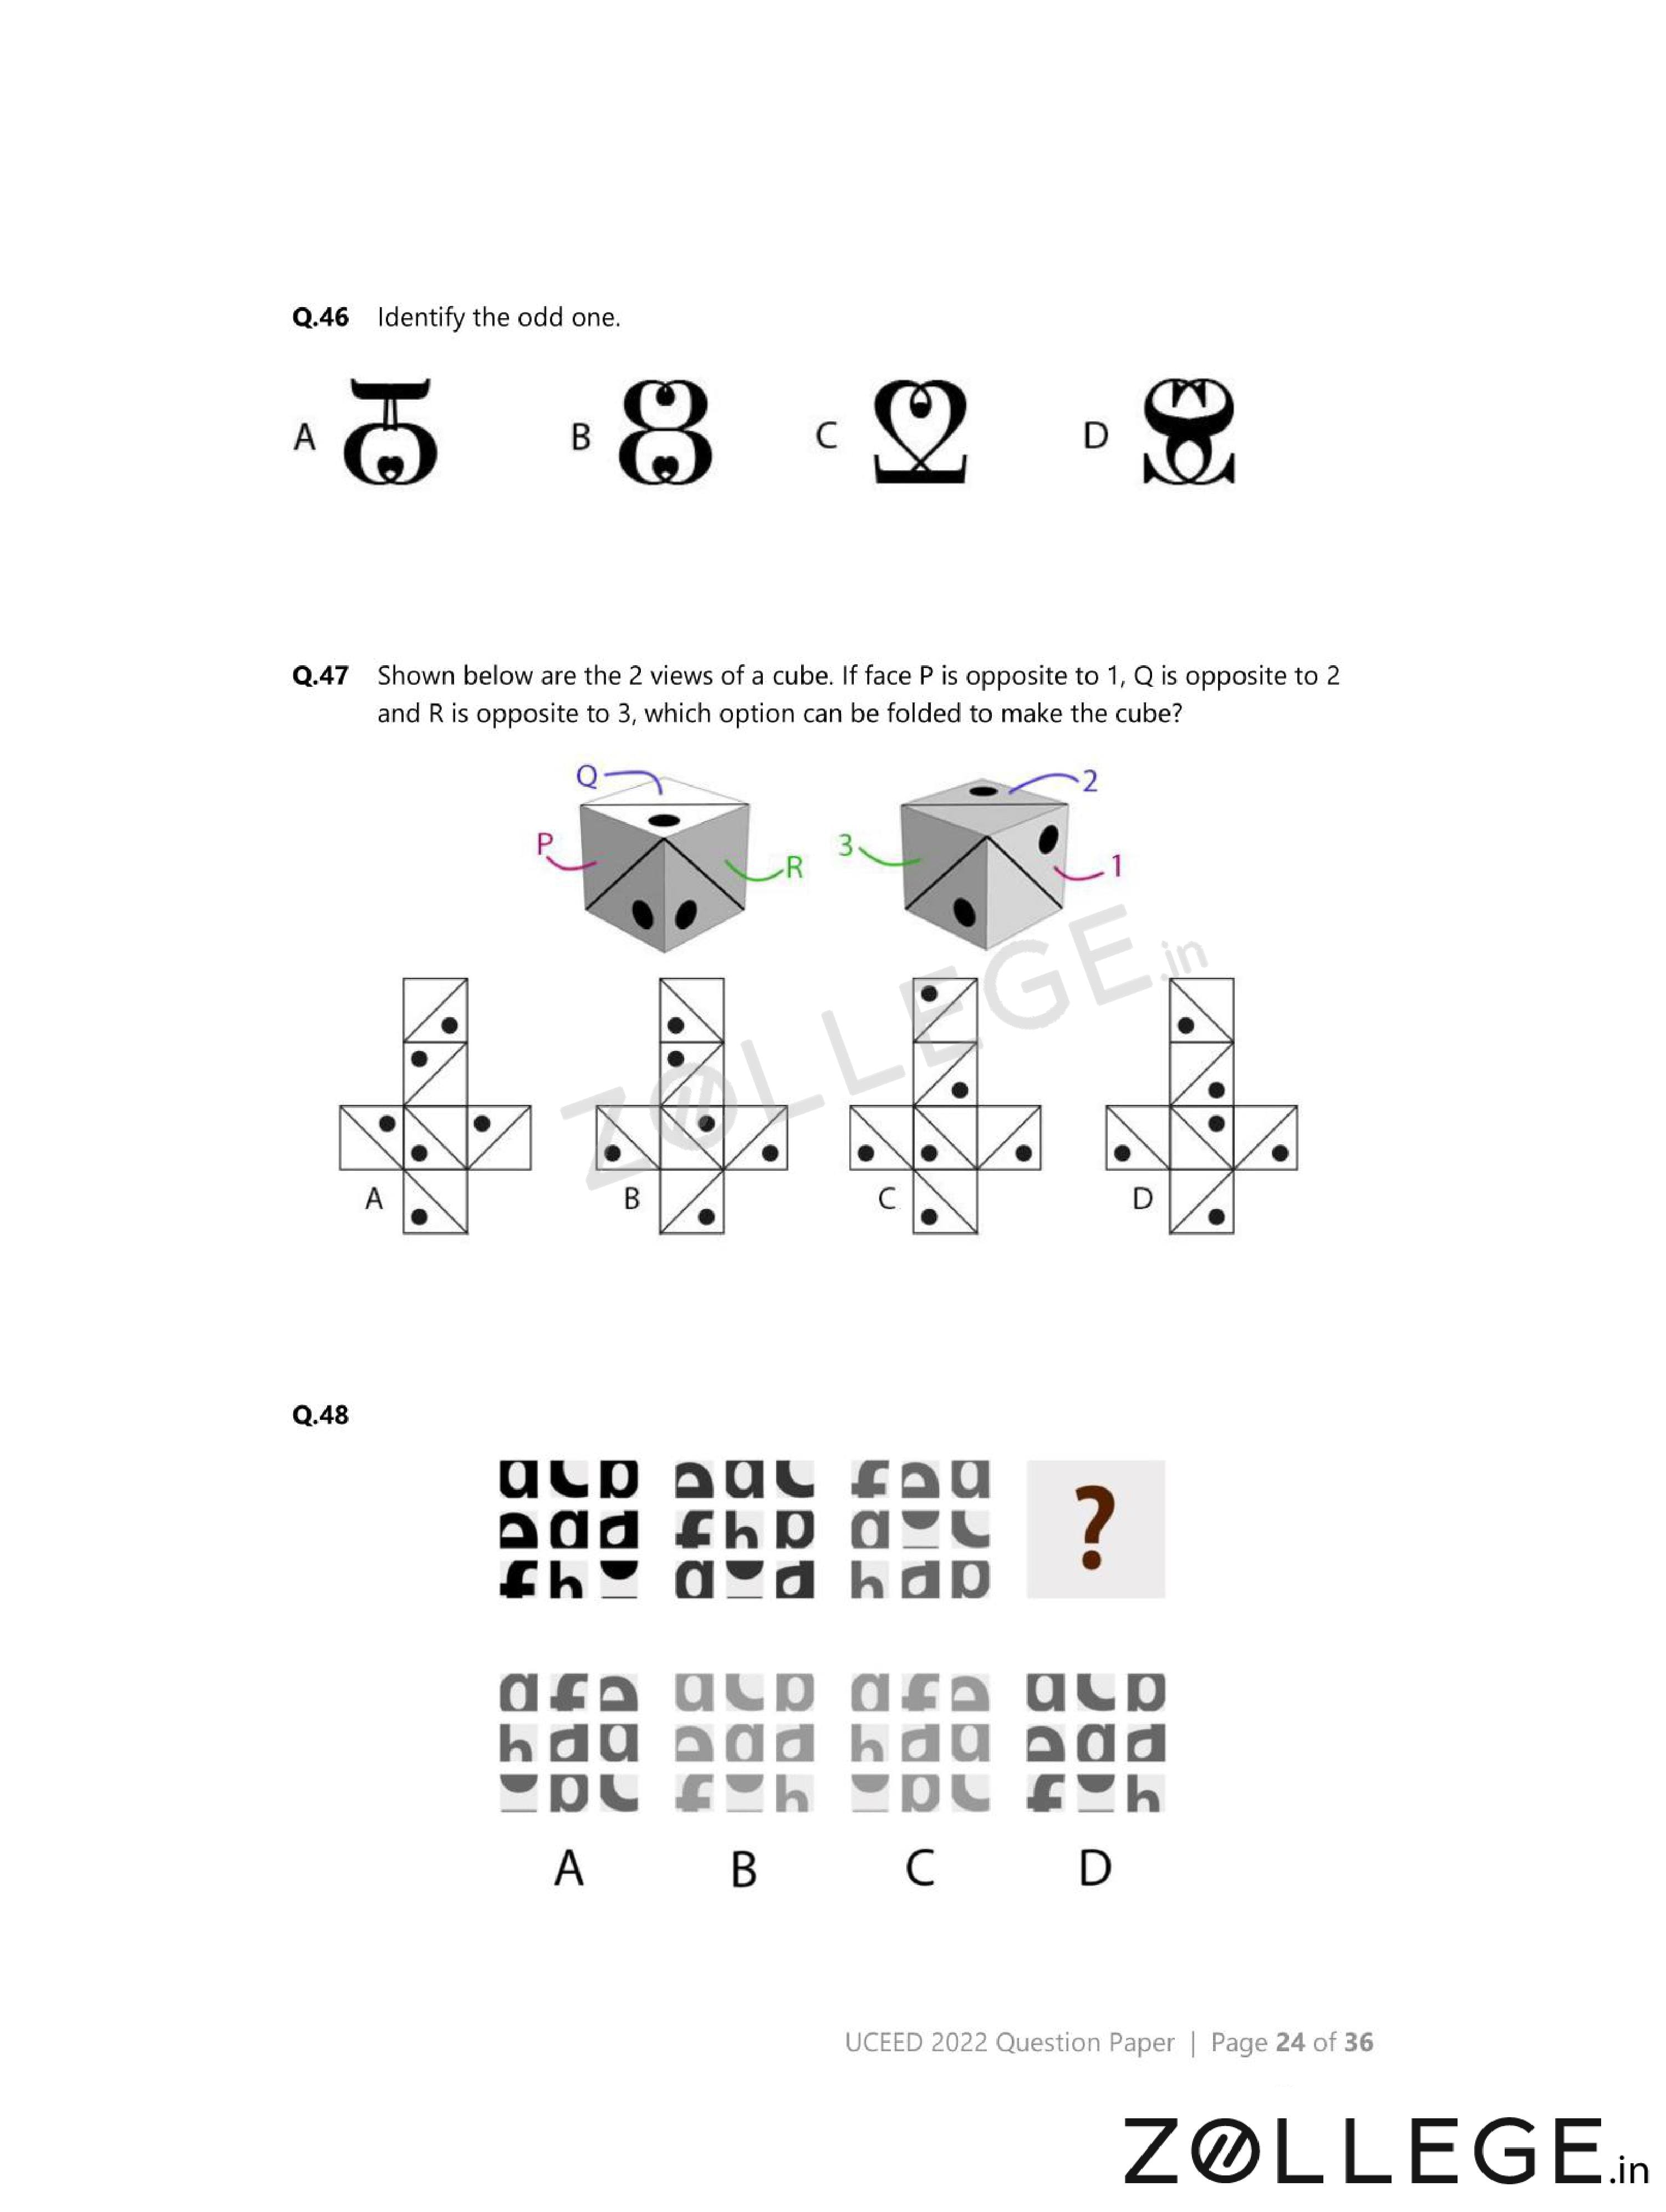
Identify the odd one.
- (A) {
![]() }
} - (B) {
![]() }
} - (C) {
![]() }
} - (D) {
![]() }
}
 }
} }
} }
} }
}View Solution
Step 1: Understanding the Concept:
The odd figure differs from others based on a consistent visual rule.
This rule may involve symmetry, repetition, or geometric structure.
Step 2: Key Approach:
Compare each option with respect to shape orientation and internal consistency.
Step 3: Detailed Explanation:
Options (A), (B), and (C) follow a uniform pattern where elements repeat symmetrically.
Option (D) breaks this pattern due to asymmetry in structure.
Hence, it does not belong to the group.
Step 4: Final Answer:
The odd one out is \(\mathbf{(D)}\).
Quick Tip: Always identify the common rule first before looking for the exception.
Shown below are the two views of a cube. If face P is opposite to 1, Q is opposite to 2 and R is opposite to 3, which option can be folded to make the cube?

- (A) {
![]() }
} - (B) {
![]() }
} - (C) {
![]() }
} - (D) {
![]() }
}
 }
} }
} }
} }
}View Solution
Step 1: Understanding the Concept:
In a cube, each face has exactly one opposite face.
Opposite faces never share an edge.
Step 2: Key Approach:
Use the given opposite-face pairs to eliminate invalid nets.
Step 3: Detailed Explanation:
Given: \[ P \leftrightarrow 1,\quad Q \leftrightarrow 2,\quad R \leftrightarrow 3. \]
Option (A) respects all opposite relationships after folding.
Other options place at least one opposite pair adjacent, which is impossible.
Step 4: Final Answer:
The correct cube net is \(\mathbf{(A)}\).
Quick Tip: In cube problems, first fix opposite faces before checking adjacency.
Identify the correct option.

- (A) {
![]() }
} - (B) {
![]() }
} - (C) {
![]() }
} - (D) {
![]() }
}
 }
} }
} }
} }
}View Solution
Step 1: Understanding the Concept:
The correct option must preserve the logical or visual transformation shown.
Step 2: Key Approach:
Observe the relationship between shapes and their relative positions.
Step 3: Detailed Explanation:
Option (C) correctly applies the transformation rule seen in the reference image.
Other options violate orientation or relative placement rules.
Step 4: Final Answer:
The correct option is \(\mathbf{(C)}\).
Quick Tip: Track one invariant feature to identify the correct transformation.
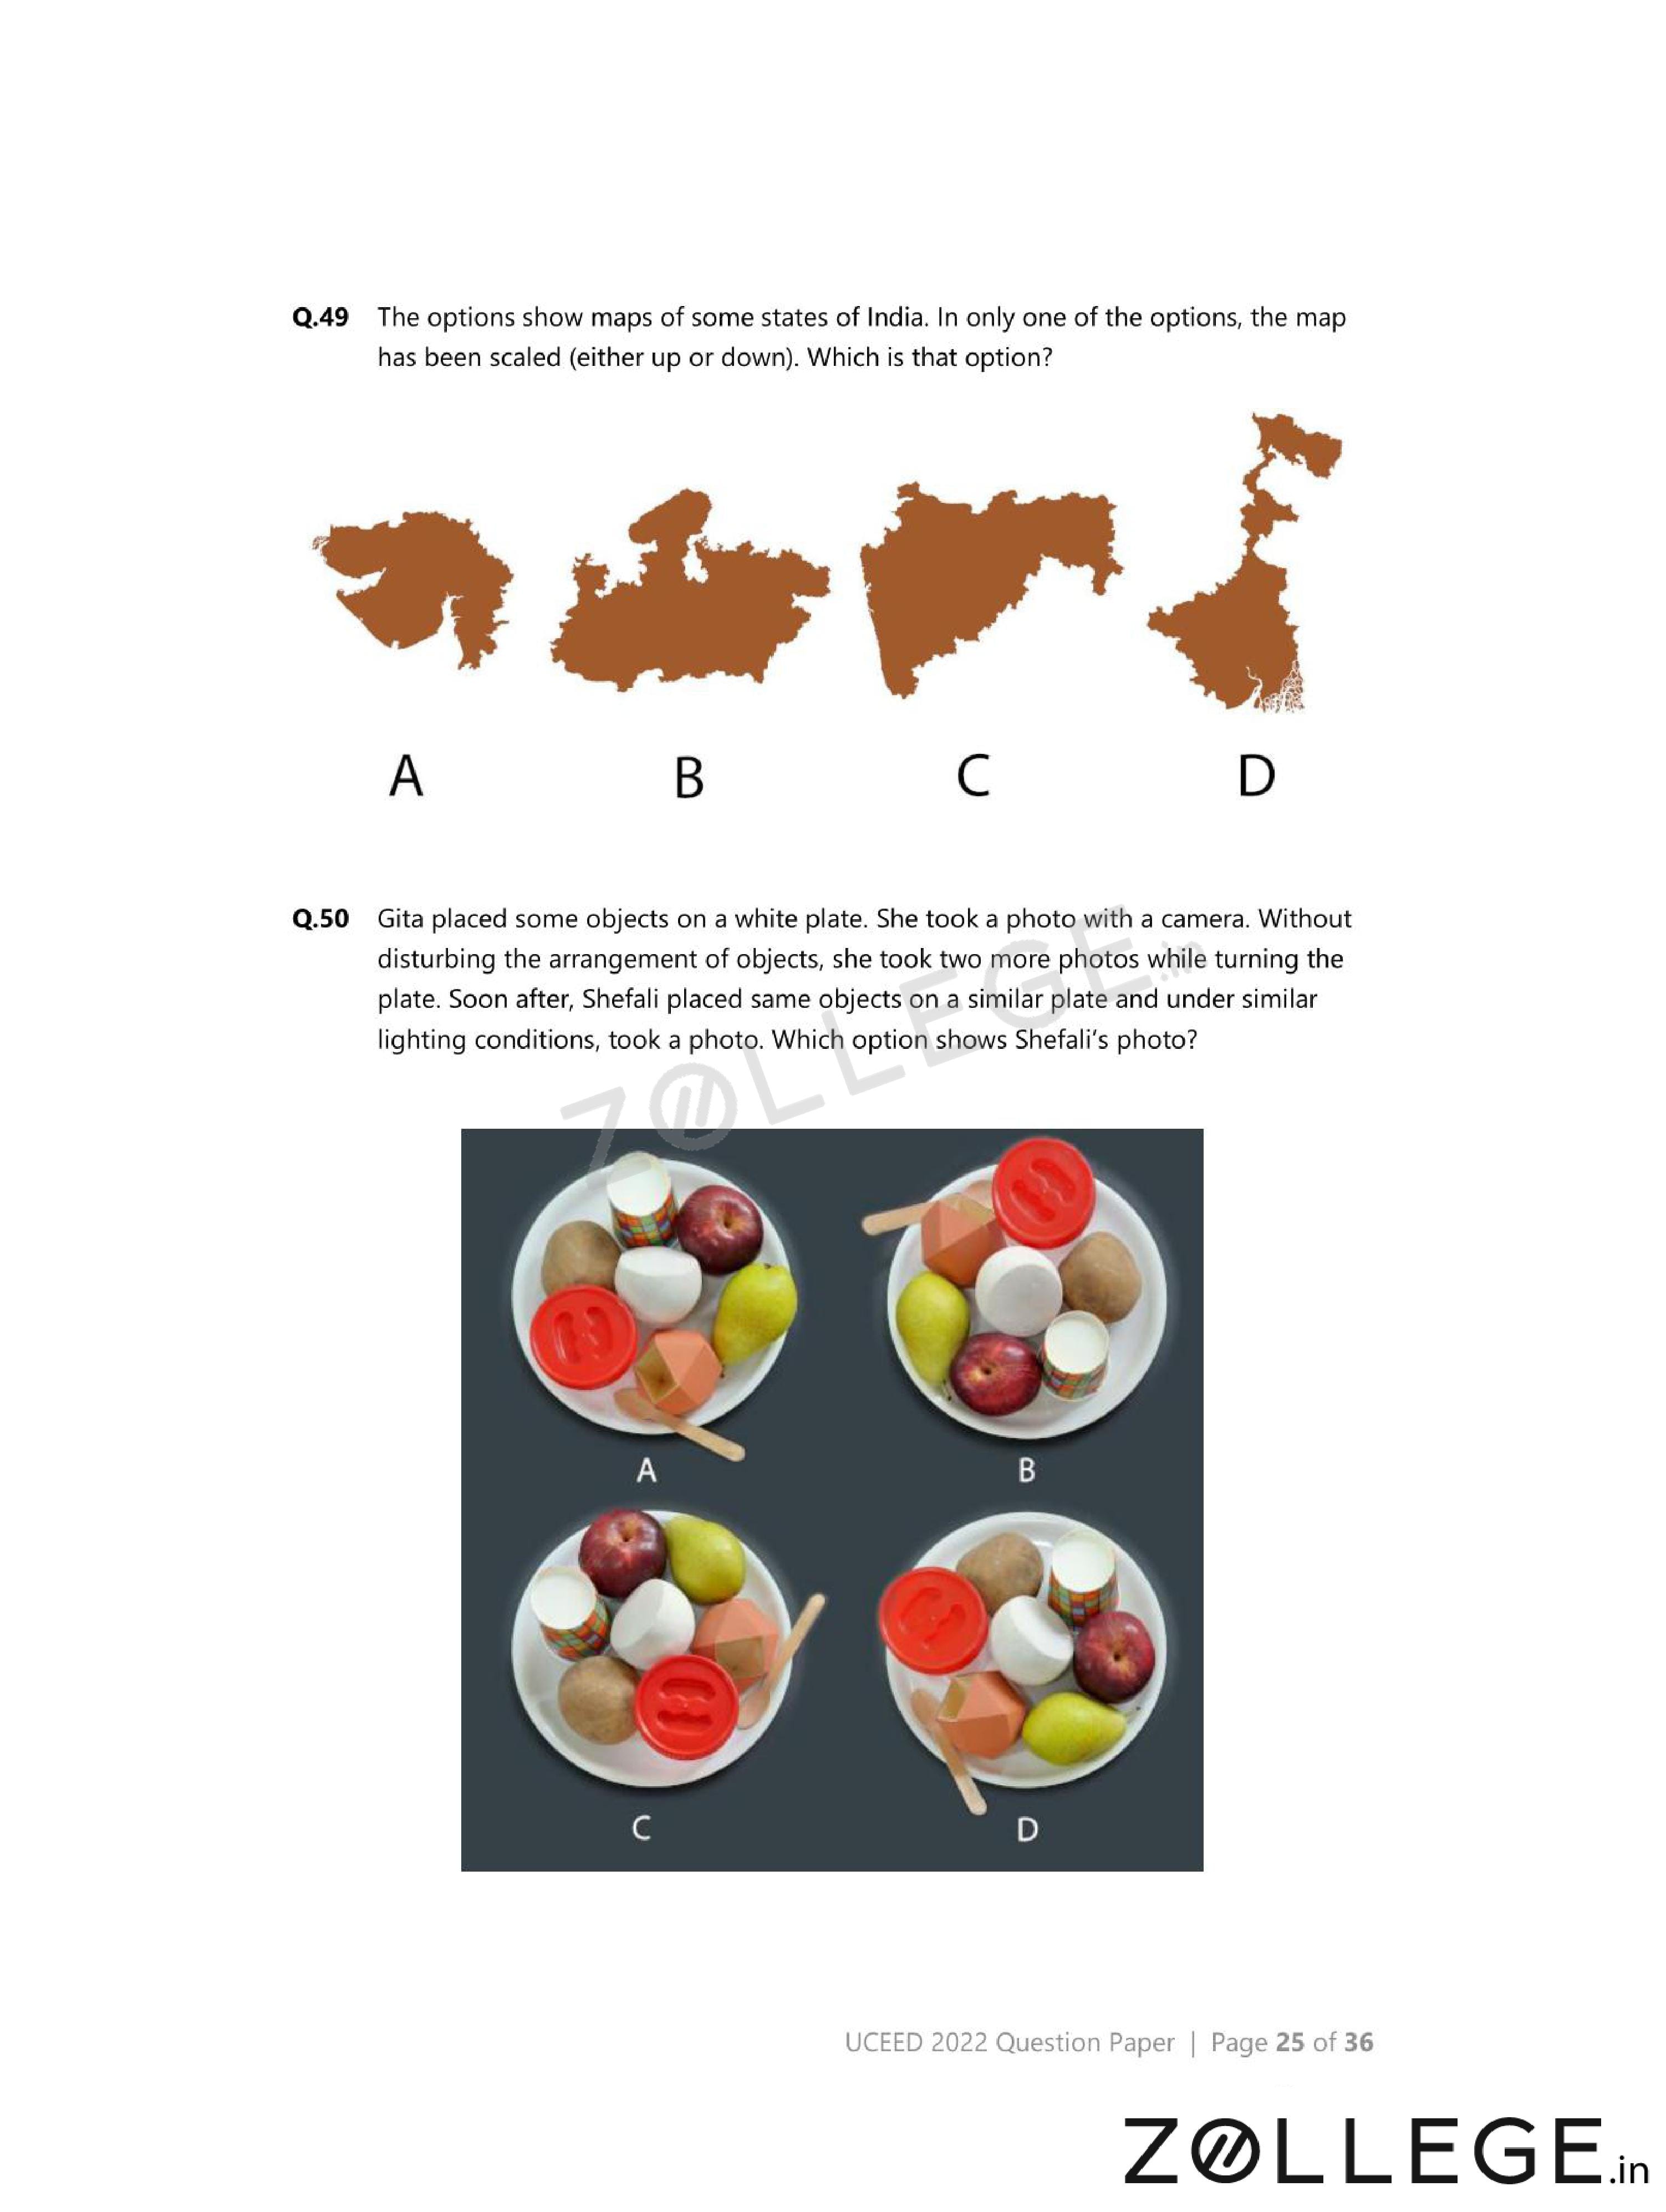
The options show maps of some states of India. In only one of the options, the map has been scaled (either up or down). Which is that option?
- (A) {
![]() }
} - (B) {
![]() }
} - (C) {
![]() }
} - (D) {
![]() }
}
 }
} }
} }
} }
}View Solution
Step 1: Understanding the Concept:
Scaling changes size but preserves shape proportions.
Step 2: Key Approach:
Compare angles, relative lengths, and boundary curvature.
Step 3: Detailed Explanation:
Option (B) maintains all proportions but differs in size.
Other options show distortions, not uniform scaling.
Step 4: Final Answer:
The scaled map is \(\mathbf{(B)}\).
Quick Tip: True scaling preserves angles and ratios, not just appearance.
Gita placed objects on a plate and took photographs while rotating the plate. Shefali later placed the same objects similarly. Which option shows Shefali’s photo?
- (A) {
![]() }
} - (B) {
![]() }
} - (C) {
![]() }
} - (D) {
![]() }
}
 }
} }
} }
} }
}View Solution
Step 1: Understanding the Concept:
Rotating the plate changes relative orientation but not object positions with respect to the plate.
Step 2: Key Approach:
Determine the absolute orientation independent of camera rotation.
Step 3: Detailed Explanation:
Shefali’s photo must match one of the rotated configurations of Gita’s arrangement.
Option (D) matches exactly after accounting for rotation.
Step 4: Final Answer:
The correct photo is \(\mathbf{(D)}\).
Quick Tip: Fix one object as a reference point to compare rotated views.
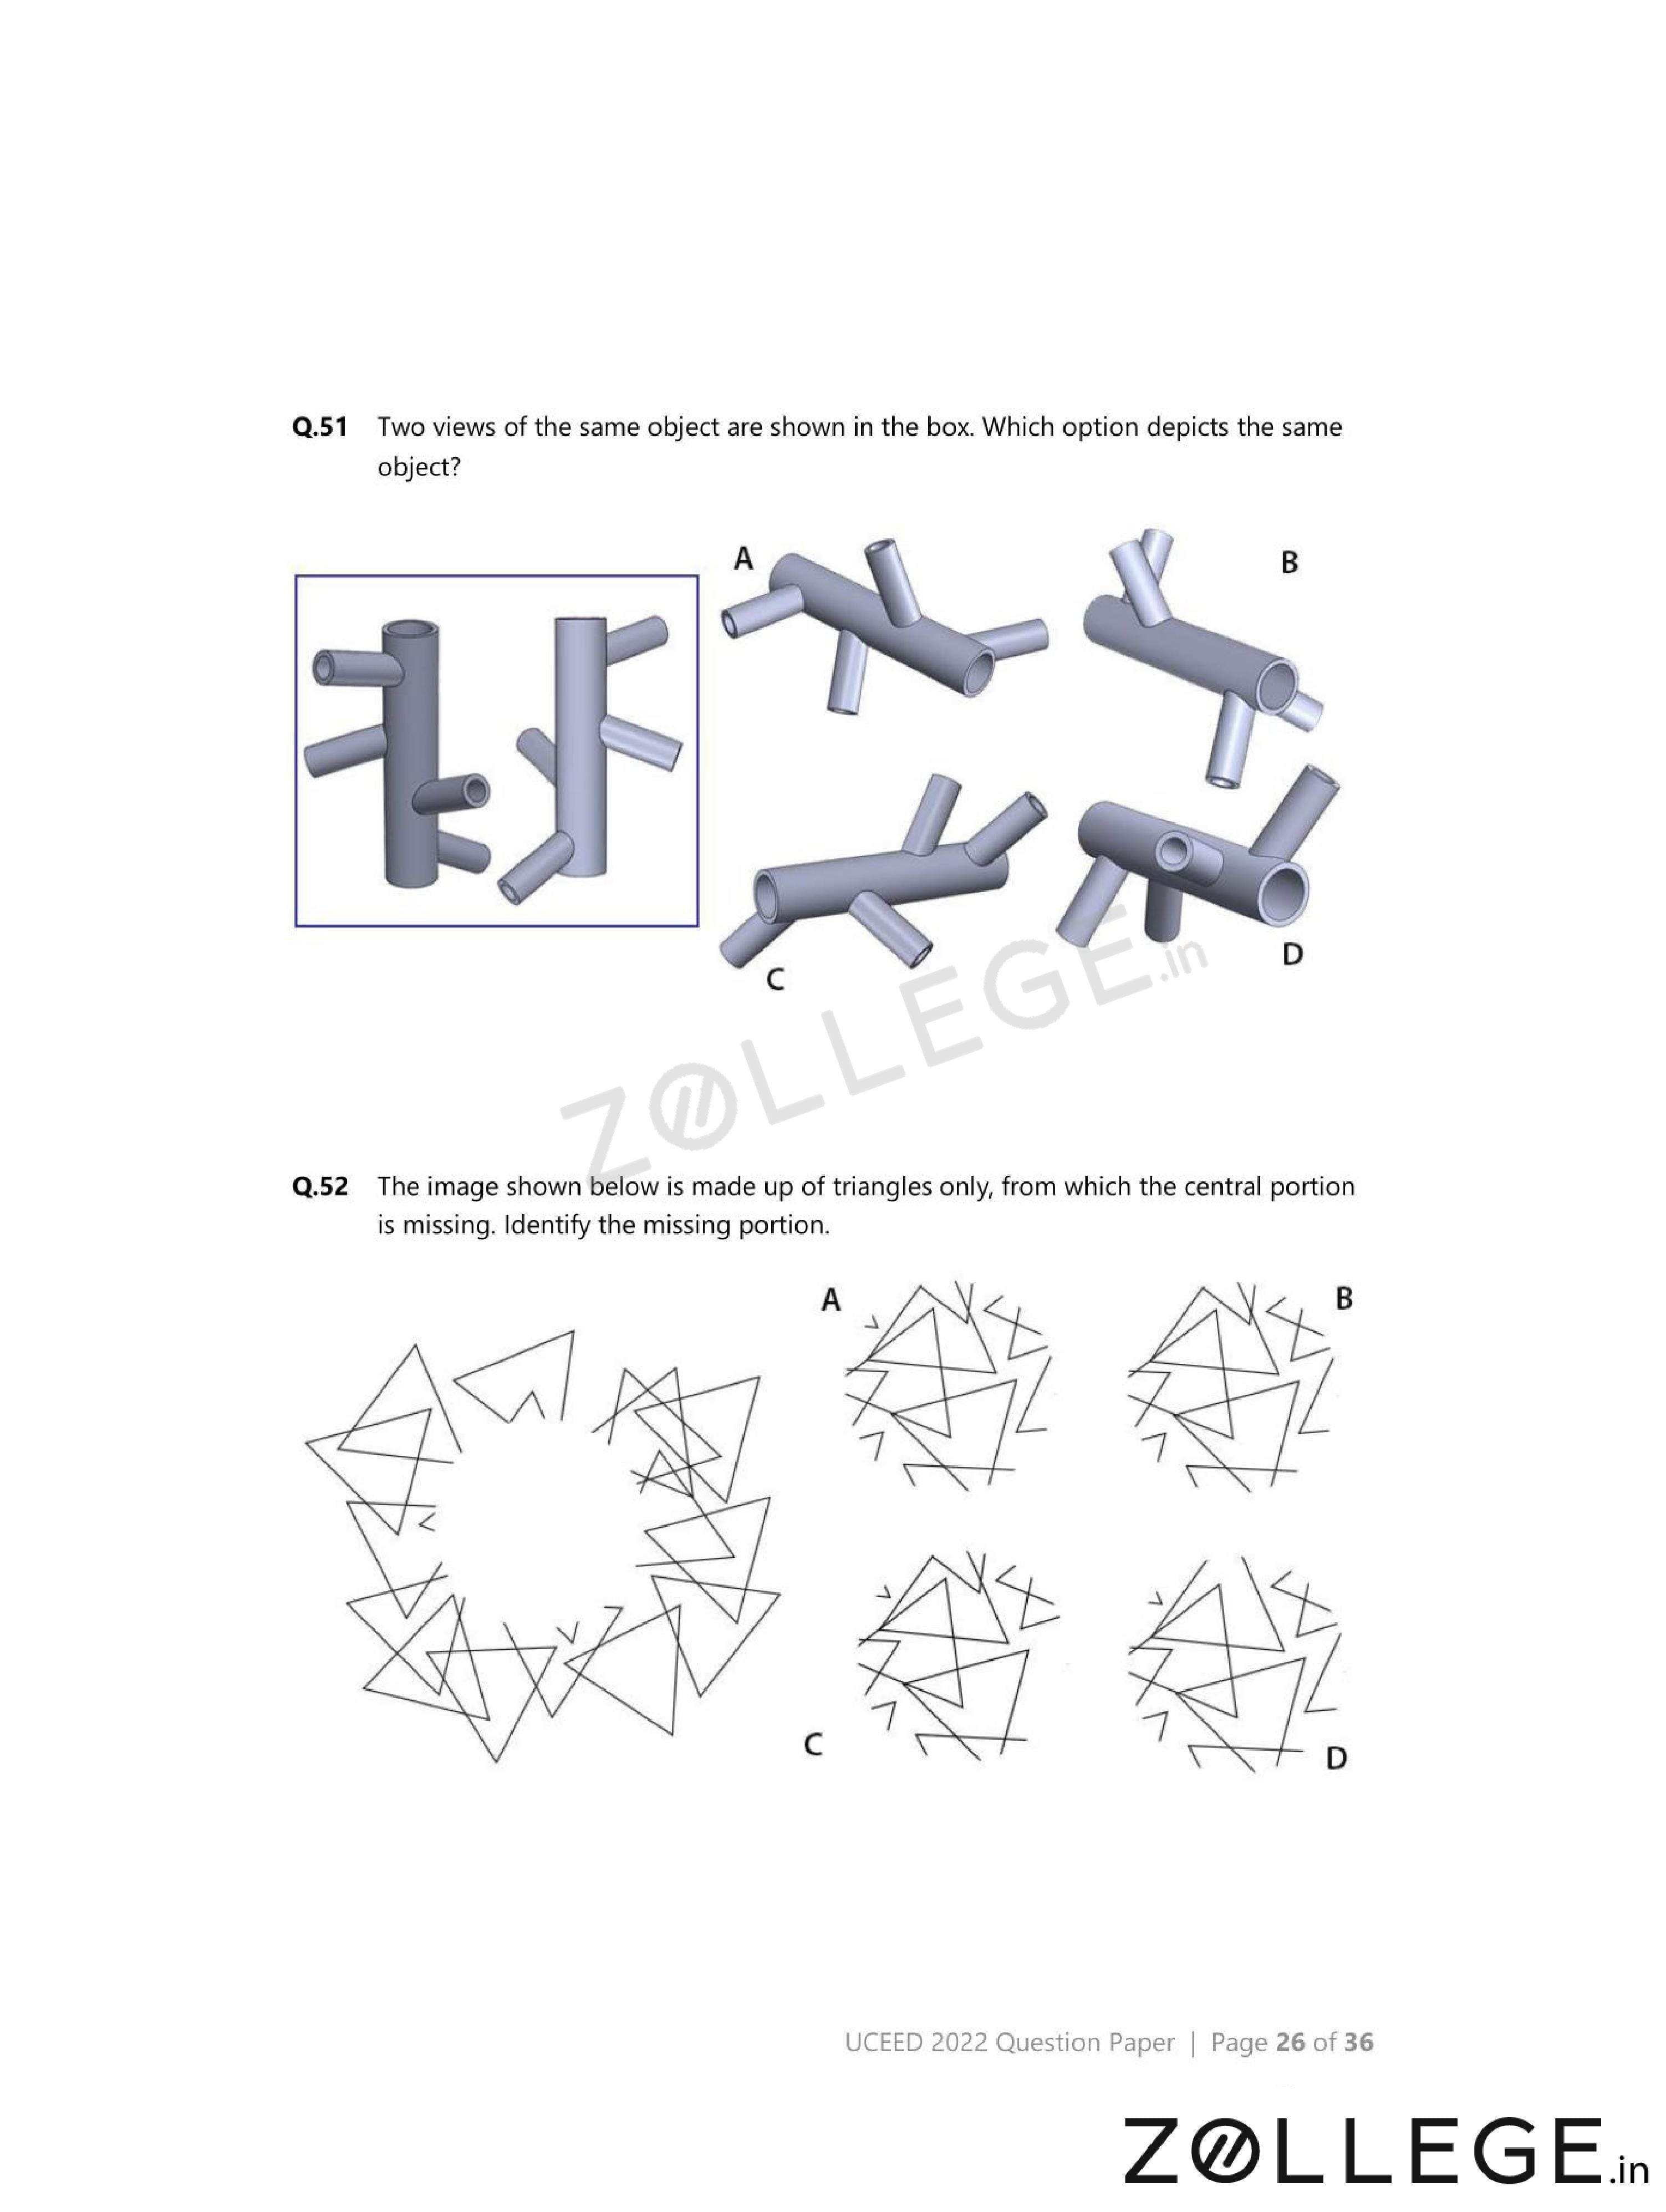
Two views of the same object are shown in the box. Which option depicts the same object?

- (A) {
![]() }
} - (B) {
![]() }
} - (C) {
![]() }
} - (D) {
![]() }
}
 }
} }
} }
} }
}View Solution
Step 1: Understanding the Concept:
Different views of the same 3D object must preserve relative positions of edges, faces, and junctions.
Only orientation changes are allowed, not reflection or deformation.
Step 2: Key Approach:
Identify distinctive features such as notches, protrusions, and edge lengths in the given views.
Step 3: Detailed Explanation:
By mentally rotating the given object, the adjacency of faces and the sequence of edges can be matched.
Option (B) preserves all face adjacencies and relative proportions after rotation.
Other options mismatch either a corner detail or invert a face, which is not possible by rotation alone.
Step 4: Final Answer:
The option that depicts the same object is \(\mathbf{(B)}\).
Quick Tip: Track one unique corner or notch across views to verify 3D consistency quickly.
The image shown below is made up of triangles only, from which the central portion is missing. Identify the missing portion.

- (A) {
![]() }
} - (B) {
![]() }
} - (C) {
![]() }
} - (D) {
![]() }
}
 }
} }
} }
} }
}View Solution
Step 1: Understanding the Concept:
The missing part must complete the triangular tiling without gaps or overlaps.
Edge lengths and orientations must match exactly.
Step 2: Key Approach:
Observe the orientation of surrounding triangles and the shape of the cavity.
Step 3: Detailed Explanation:
The central gap has specific angles and edge directions dictated by the surrounding pattern.
Option (C) matches all three sides of the cavity with correct angles and orientation.
Other options either mismatch an edge length or require reflection that breaks continuity.
Step 4: Final Answer:
The correct missing portion is \(\mathbf{(C)}\).
Quick Tip: Match both angle orientation and edge length when filling missing tessellation pieces.
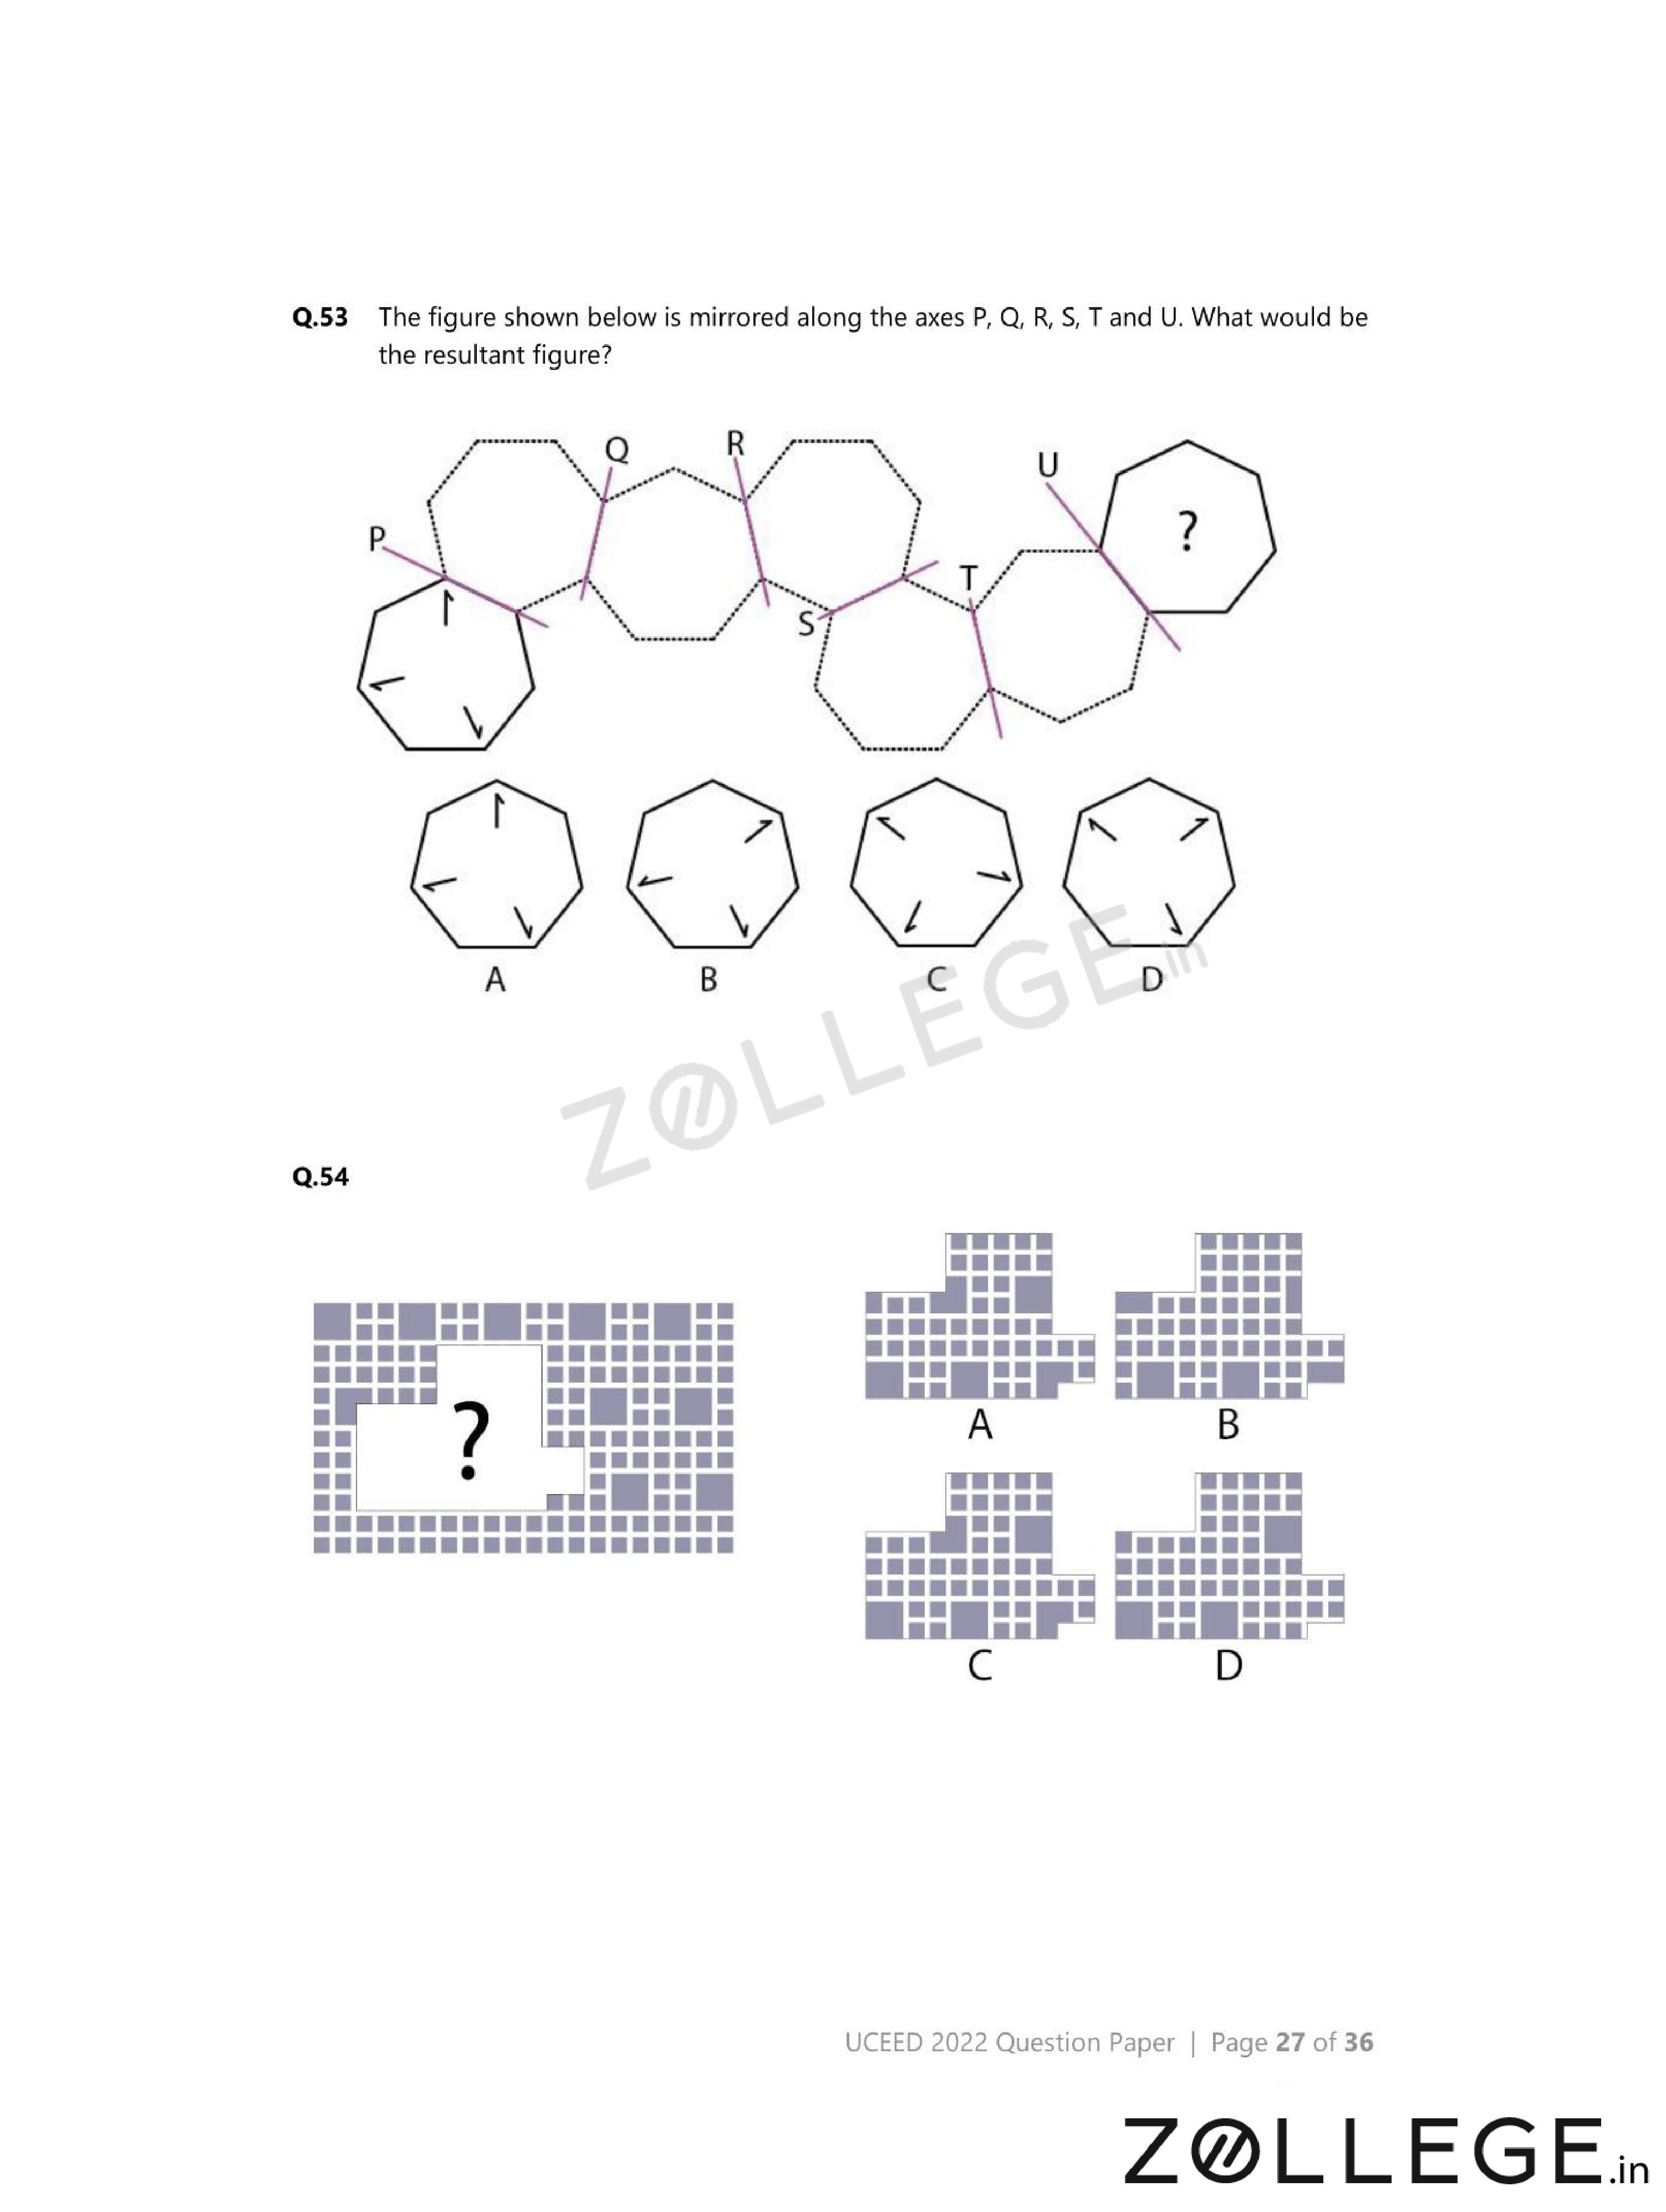
The figure shown below is mirrored along the axes P, Q, R, S, T and U. What would be the resultant figure?

- (A) {
![]() }
} - (B) {
![]() }
} - (C) {
![]() }
} - (D) {
![]() }
}
 }
} }
} }
} }
}View Solution
Step 1: Understanding the Concept:
Successive reflections across multiple axes can combine to form an equivalent rotation or symmetry.
Step 2: Key Approach:
Apply reflections step by step, noting how orientation changes after each axis.
Step 3: Detailed Explanation:
Reflecting across paired perpendicular axes results in a rotation.
After reflecting across axes P through U in sequence, the net effect preserves the original shape with a specific orientation.
Option (A) matches the final orientation and placement of all features.
Other options show either mirrored-only or partially rotated outcomes.
Step 4: Final Answer:
The resultant figure is \(\mathbf{(A)}\).
Quick Tip: Multiple reflections often simplify to a single rotation; look for preserved handedness.
Identify the correct option.

- (A) {
![]() }
} - (B) {
![]() }
} - (C) {
![]() }
} - (D) {
![]() }
}
 }
} }
} }
} }
}View Solution
Step 1: Understanding the Concept:
The correct option must follow the visual or logical rule implied by the given figure.
Step 2: Key Approach:
Identify invariants such as number of elements, symmetry, or relative spacing.
Step 3: Detailed Explanation:
Comparing all options against the reference, only option (D) preserves the defining rule.
Other options introduce an extra element, miss one, or alter symmetry incorrectly.
Step 4: Final Answer:
The correct option is \(\mathbf{(D)}\).
Quick Tip: Count elements and check symmetry before focusing on finer details.
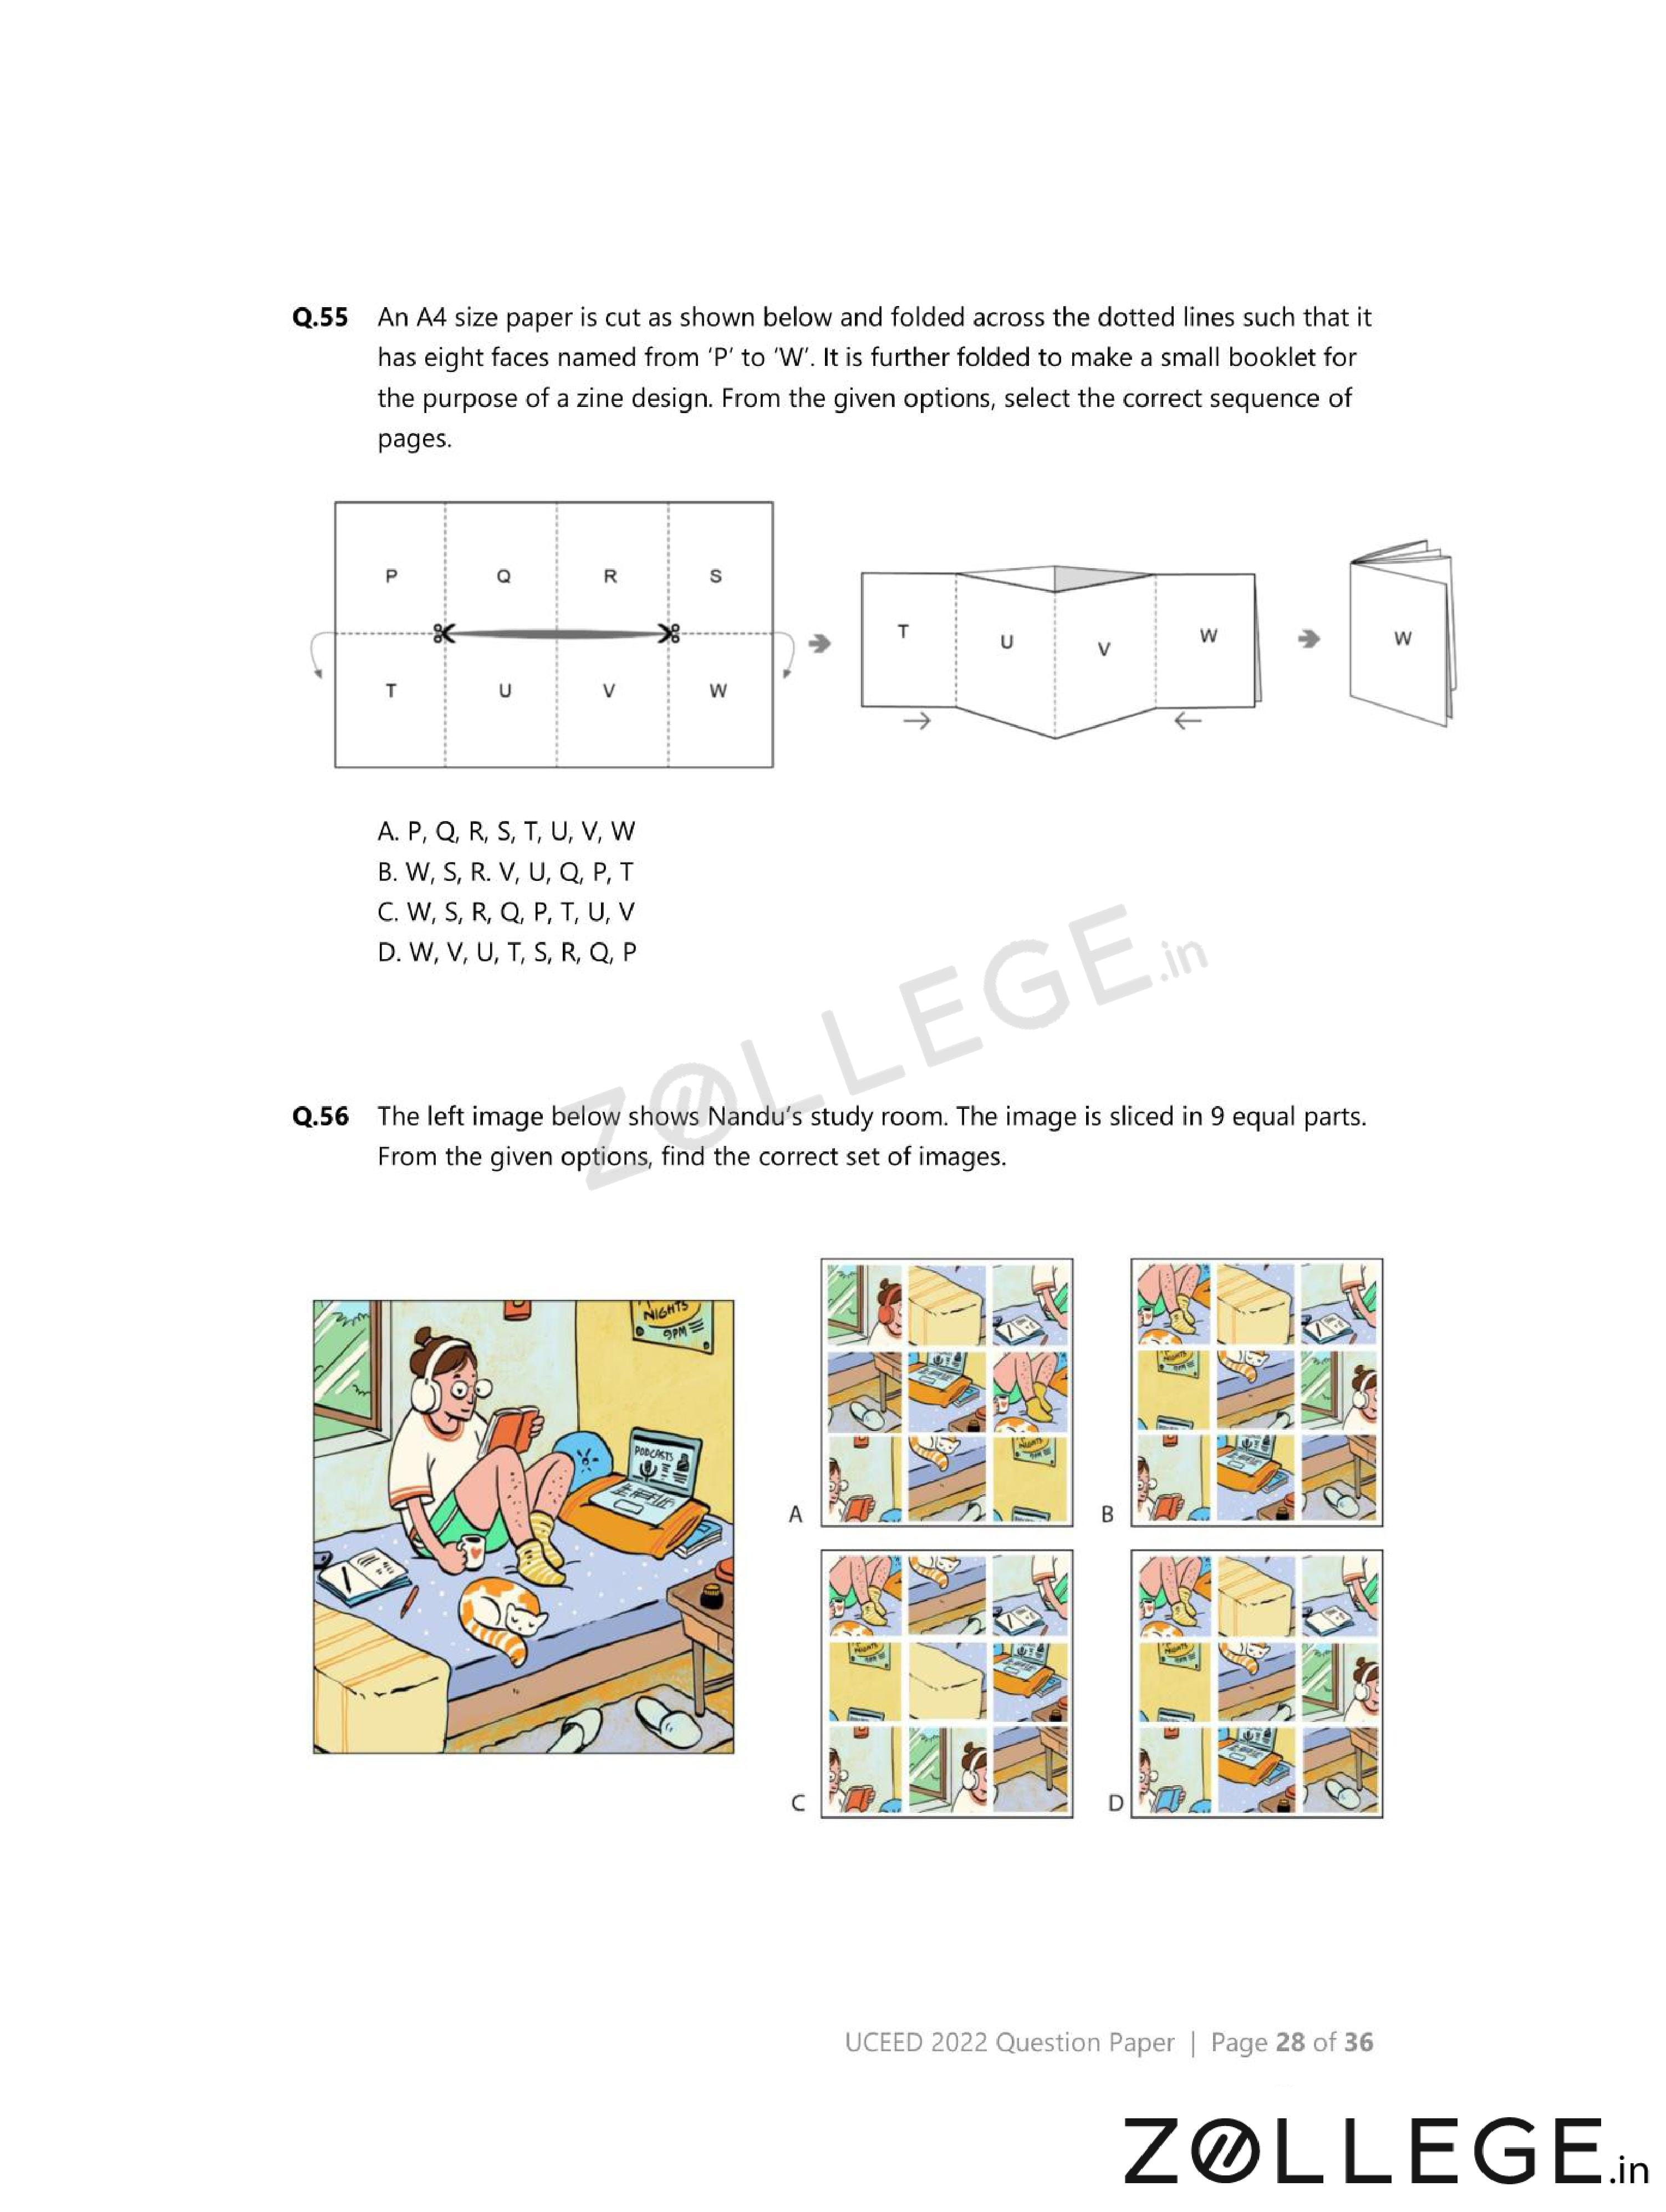
An A4 size paper is cut and folded as shown to make a small booklet with pages P to W. From the given options, select the correct sequence of pages.

View Solution
Step 1: Understanding the Concept:
Folding a sheet multiple times reverses page order on alternate folds.
The final booklet has pages arranged from front to back.
Step 2: Key Approach:
Track the position of each labeled face after every fold.
Step 3: Detailed Explanation:
After the first fold, outer pages move inward.
Subsequent folds reverse the order of intermediate pages.
Following the folding sequence carefully results in the order: \[ W, V, U, T, S, R, Q, P. \]
This matches option (D).
Step 4: Final Answer:
The correct page sequence is \(\mathbf{(D)}\).
Quick Tip: In booklet problems, mark front and back early and reverse order at each fold.
The left image below shows Nandu’s study room. The image is sliced into 9 equal parts. From the given options, find the correct set of images.

- (A) {
![]() }
} - (B) {
![]() }
} - (C) {
![]() }
} - (D) {
![]() }
}
 }
} }
} }
} }
}View Solution
Step 1: Understanding the Concept:
The original image is divided into a \(3 \times 3\) grid.
Each slice must match exactly in orientation and position.
Step 2: Key Approach:
Observe continuity of objects such as table edges, walls, and floor lines across slices.
Step 3: Detailed Explanation:
Only option (B) preserves all continuous lines and object alignments across adjacent pieces.
Other options contain mismatched edges or rotated slices that break continuity.
Step 4: Final Answer:
The correct set of images is \(\mathbf{(B)}\).
Quick Tip: In sliced-image questions, check alignment of straight edges first.
Identify the correct option.

- (A) {
![]() }
} - (B) {
![]() }
} - (C) {
![]() }
} - (D) {
![]() }
}
 }
} }
} }
} }
}View Solution
Step 1: Understanding the Concept:
The figure follows a consistent visual transformation rule.
Step 2: Key Approach:
Identify how shapes change in orientation, number, or position.
Step 3: Detailed Explanation:
Option (A) correctly applies the same transformation pattern seen in the reference.
Other options violate either orientation consistency or element count.
Step 4: Final Answer:
The correct option is \(\mathbf{(A)}\).
Quick Tip: Fix one invariant feature to track transformations accurately.
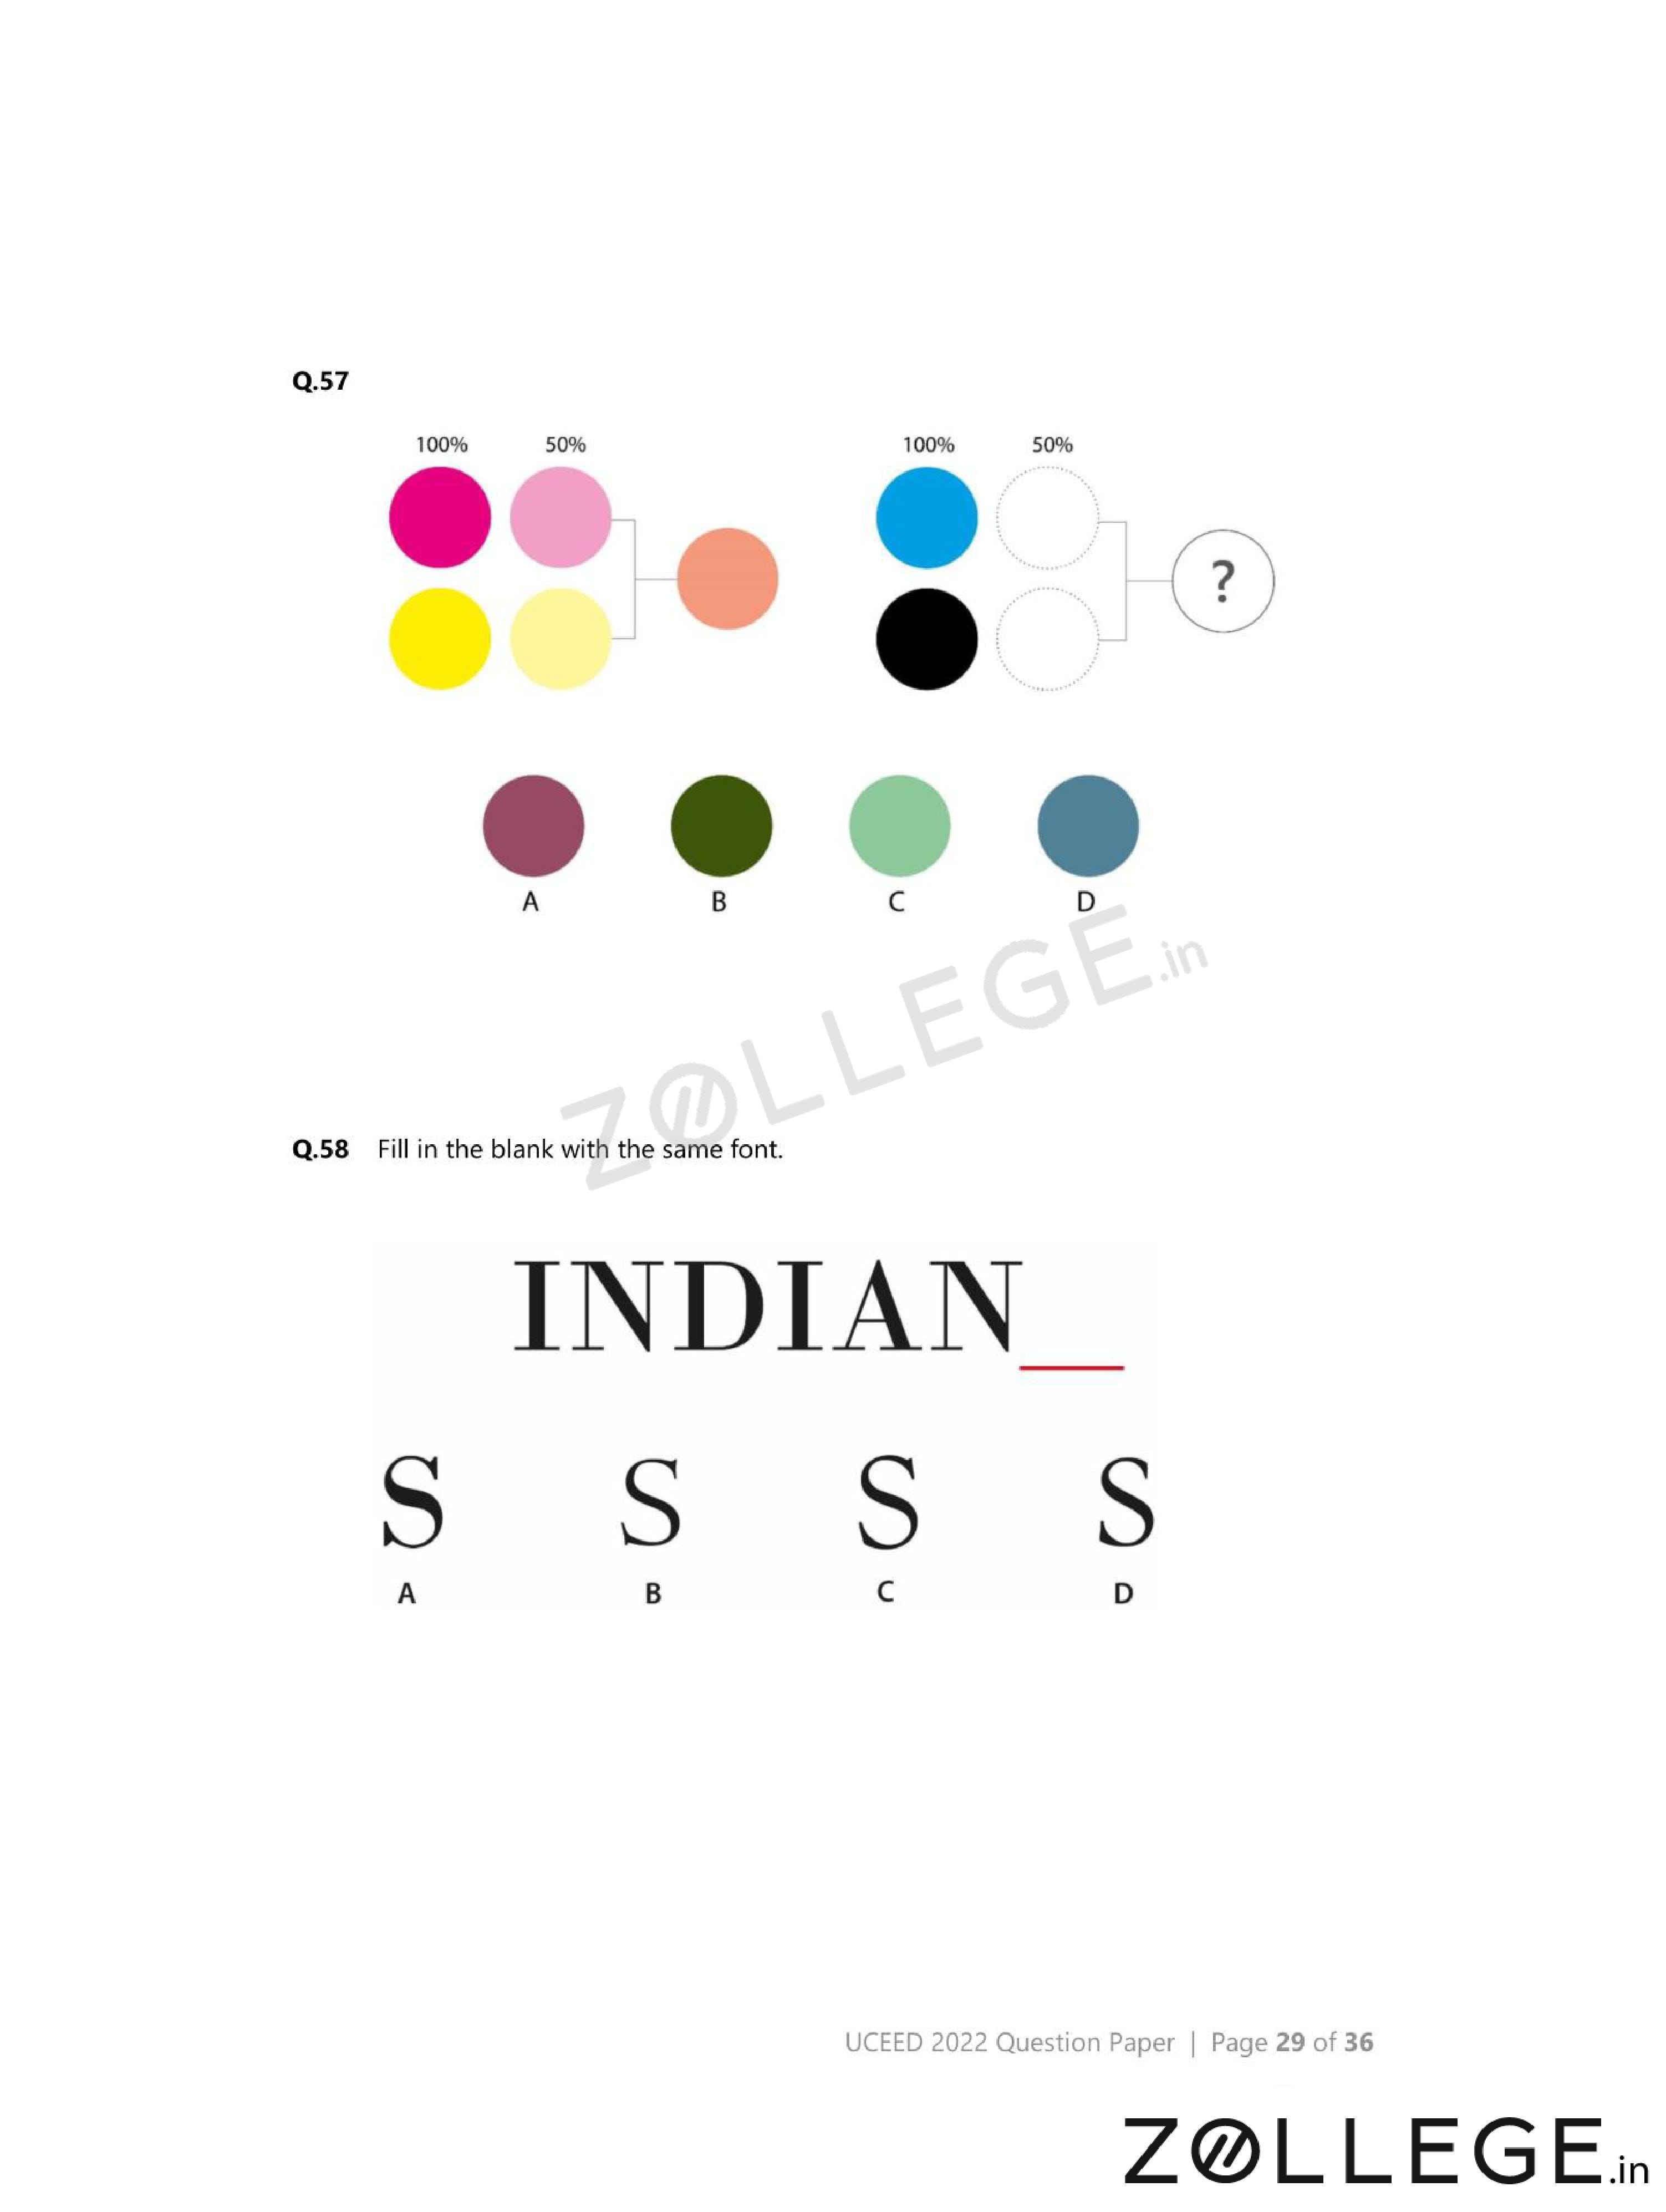
Fill in the blank with the same font.

- (A) {
![]() }
} - (B) {
![]() }
} - (C) {
![]() }
} - (D) {
![]() }
}
 }
} }
} }
} }
}View Solution
Step 1: Understanding the Concept:
Font consistency depends on stroke thickness, curvature, and terminal style.
Step 2: Key Approach:
Compare fine details such as serif shape, stroke contrast, and letter proportions.
Step 3: Detailed Explanation:
Option (C) matches all typographic features of the given font.
Other options differ in stroke endings or curvature.
Step 4: Final Answer:
The correct font match is \(\mathbf{(C)}\).
Quick Tip: Check small details like serif angles and stroke endings in font questions.
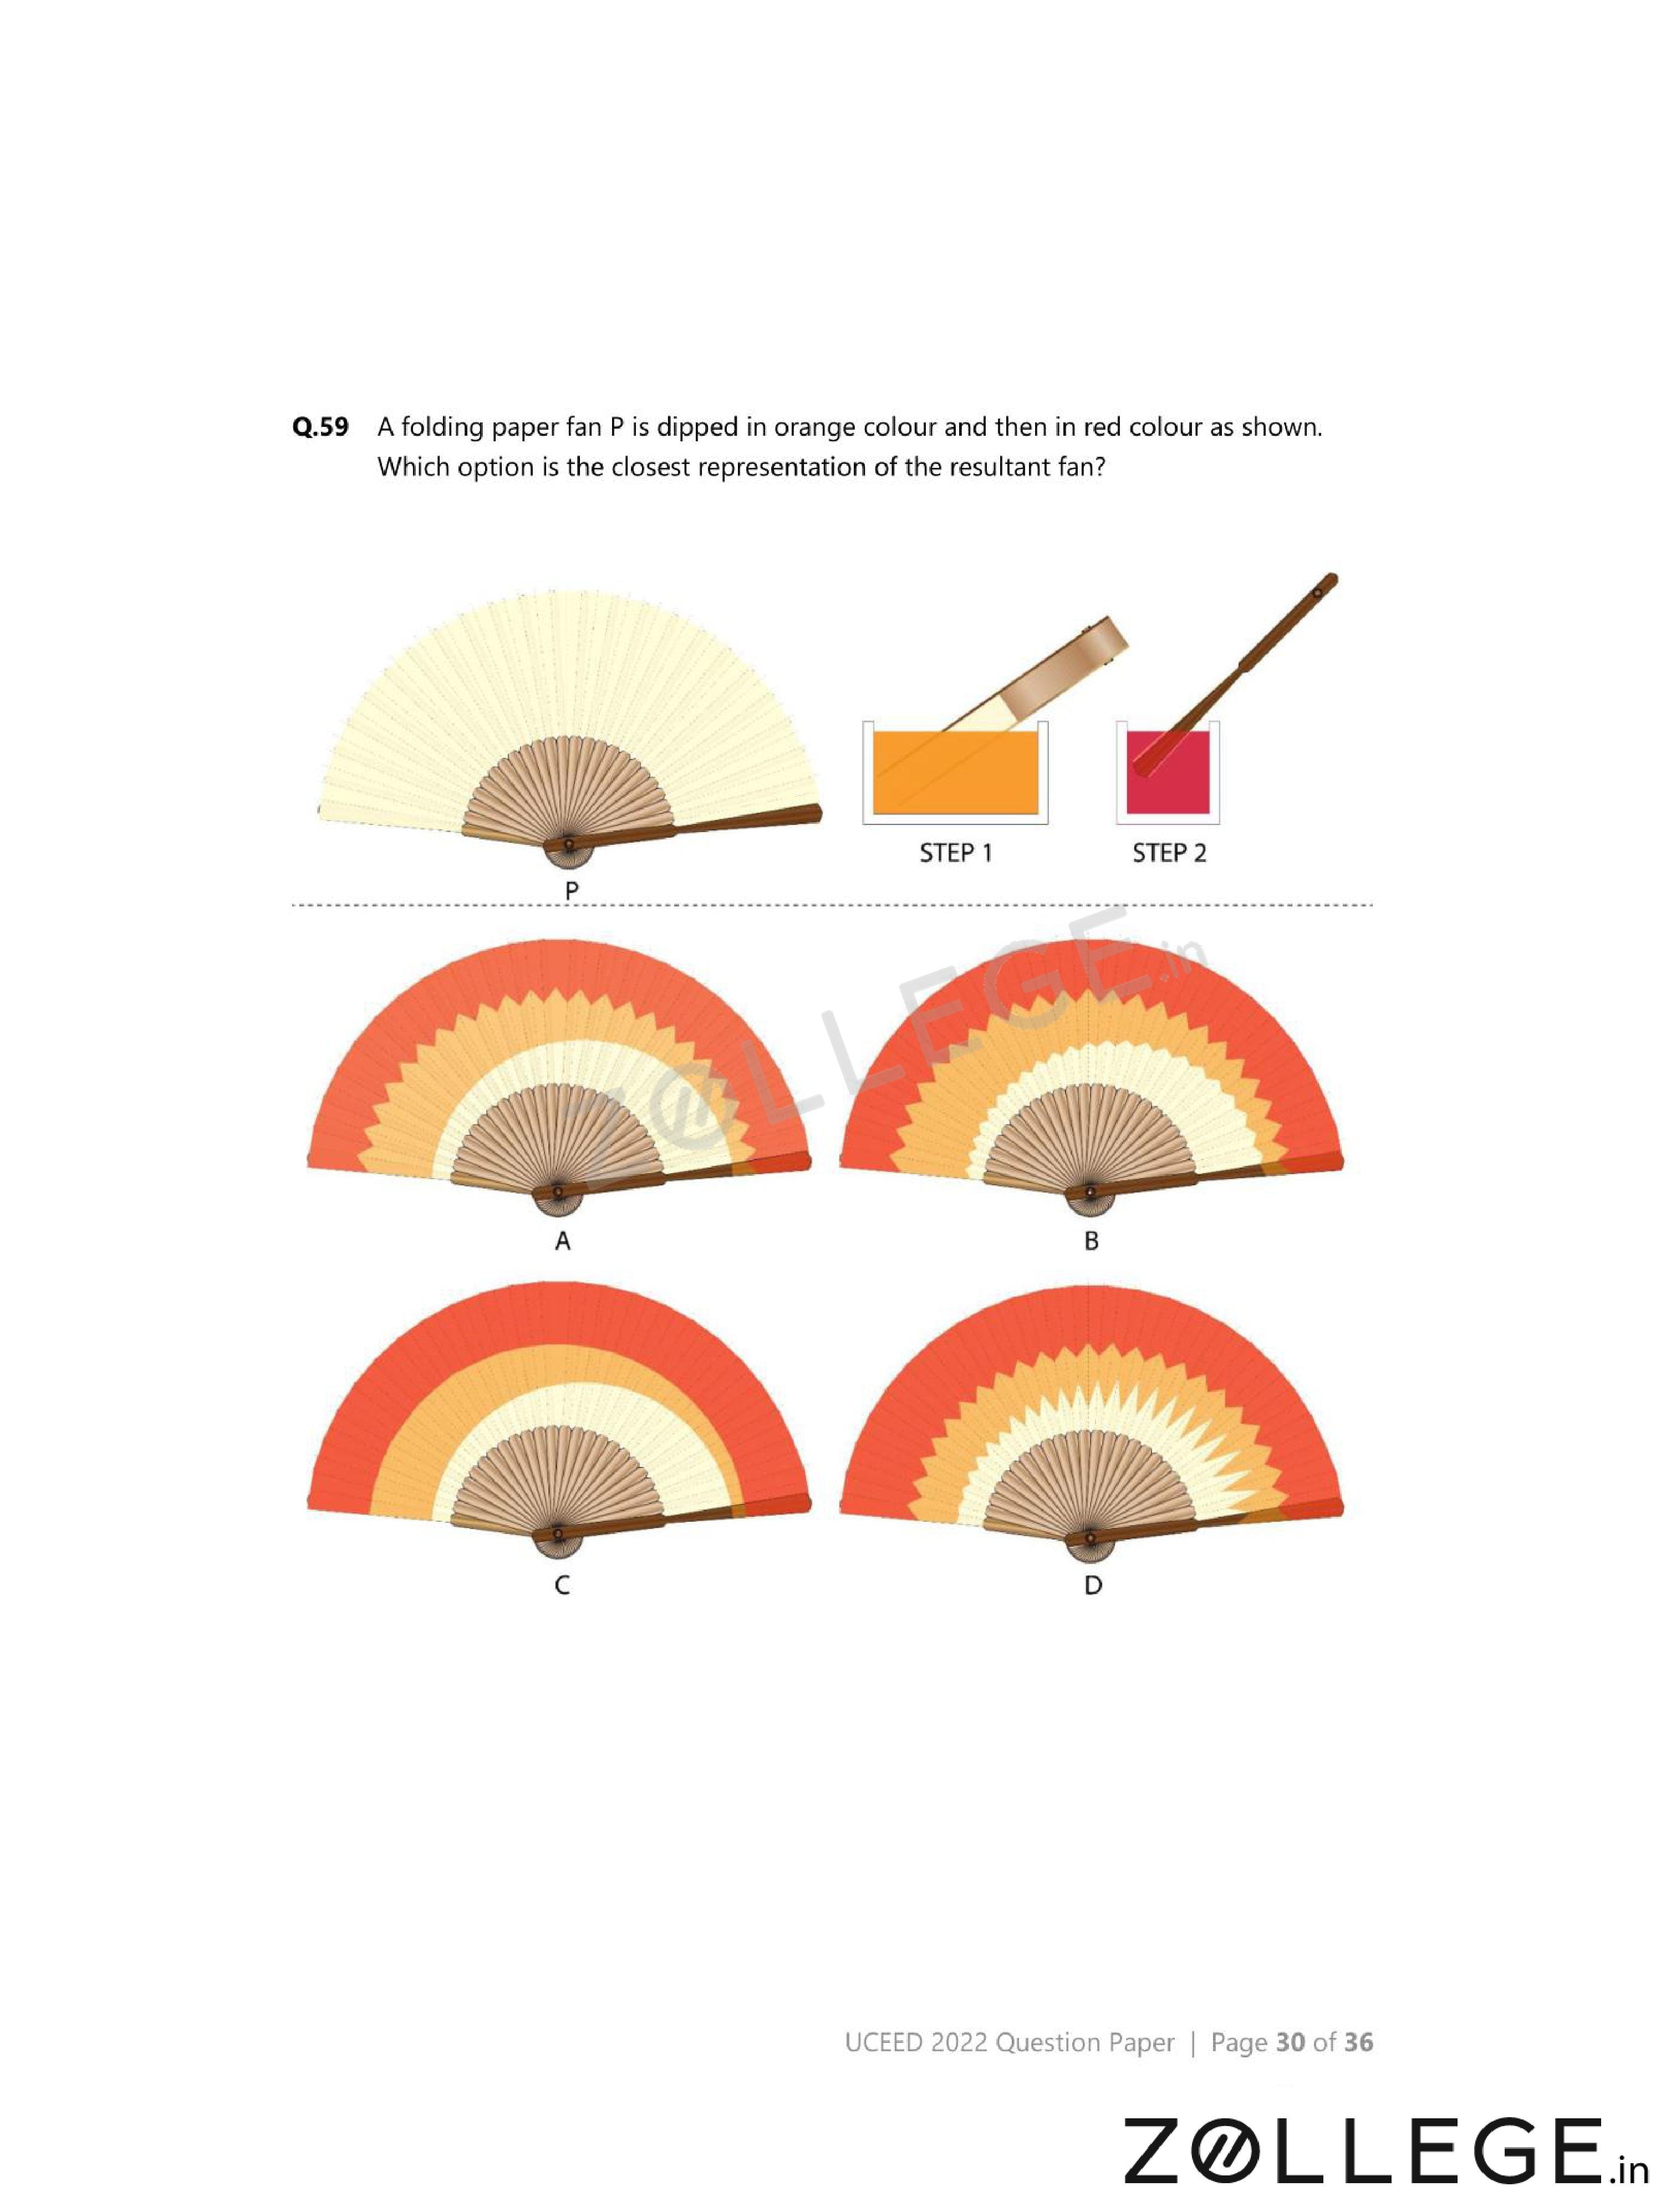
A folding paper fan P is dipped in orange colour and then in red colour as shown. Which option is the closest representation of the resultant fan?

- (A) {
![]() }
} - (B) {
![]() }
} - (C) {
![]() }
} - (D) {
![]() }
}
 }
} }
} }
} }
}View Solution
Step 1: Understanding the Concept:
Folded surfaces receive color symmetrically on corresponding folds.
Step 2: Key Approach:
Track which folds are exposed during each dipping step.
Step 3: Detailed Explanation:
First dip coats outer exposed folds with orange.
Second dip adds red on newly exposed areas.
Option (D) correctly represents combined color distribution after unfolding.
Step 4: Final Answer:
The closest representation is \(\mathbf{(D)}\).
Quick Tip: In color-dip problems, always imagine the folded state first.
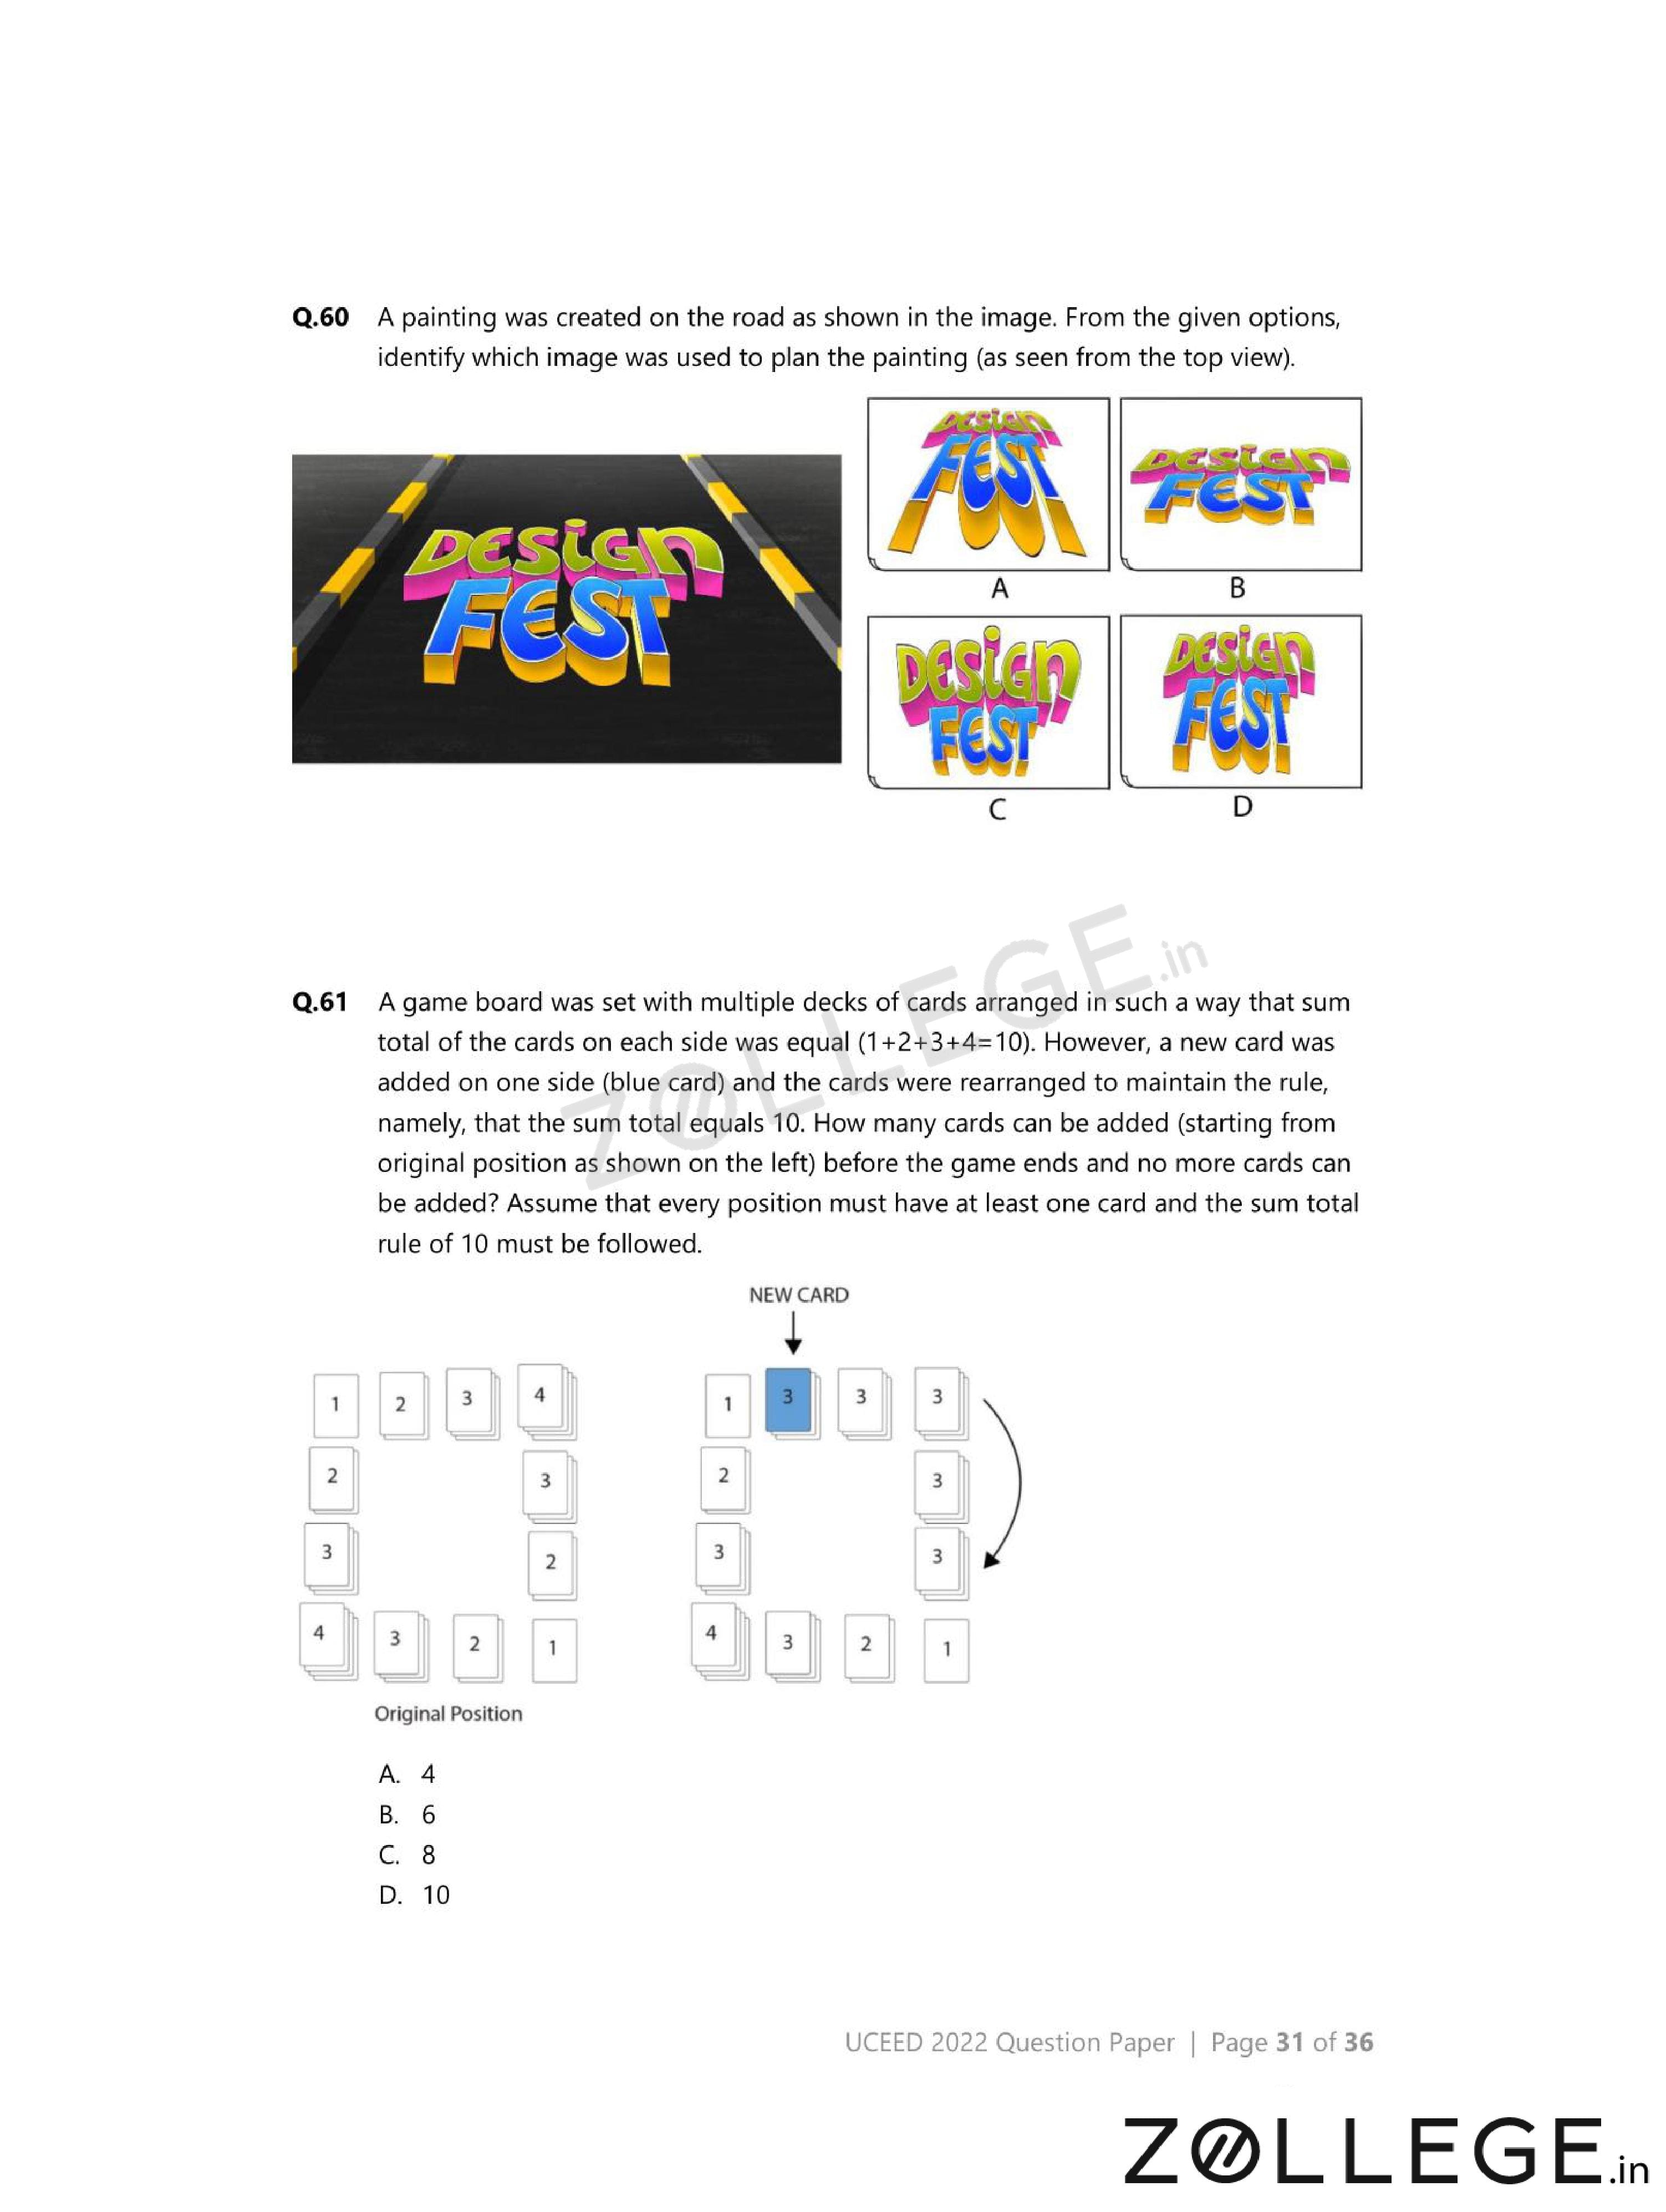
A painting was created on the road as shown. From the given options, identify which image was used to plan the painting (top view).

- (A) {
![]() }
} - (B) {
![]() }
} - (C) {
![]() }
} - (D) {
![]() }
}
 }
} }
} }
} }
}View Solution
Step 1: Understanding the Concept:
Road paintings often use anamorphic distortion when viewed from ground level.
Step 2: Key Approach:
Reverse the perspective distortion to imagine the top-view layout.
Step 3: Detailed Explanation:
Option (A) correctly maps stretched foreground elements and compressed background shapes.
Other options do not account for perspective scaling properly.
Step 4: Final Answer:
The correct planning image is \(\mathbf{(A)}\).
Quick Tip: Perspective paintings always look distorted in top view.
A game board was set with multiple decks of cards arranged in such a way that sum total of the cards on each side was equal \( (1+2+3+4=10) \). However, a new card was added on one side (blue card) and the cards were rearranged to maintain the rule, namely, that the sum total equals 10. How many cards can be added (starting from original position as shown) before the game ends and no more cards can be added?
{
View Solution
Step 1: Understanding the Concept:
Each side of the square must always have a sum of cards equal to \(10\).
Initially, each side has cards \(1, 2, 3, 4\) giving sum \(10\).
Step 2: Key Approach:
Every time a new card is added on one side, cards must be redistributed such that:
\[ Sum on each side = 10 \]
and each position must contain at least one card.
Step 3: Detailed Explanation:
With each additional card, the total number of cards increases by \(1\).
The total sum around the board must be divisible evenly into four sides.
By redistributing while maintaining minimum one card per side, the system allows redistribution only up to a fixed limit.
After adding the 6th card, redistribution is still possible while maintaining the sum condition.
On attempting to add the 7th card, it becomes impossible to distribute cards such that all four sides sum to \(10\) without violating the minimum constraint.
Step 4: Final Answer:
The maximum number of cards that can be added is \(6\).
Quick Tip: For constraint-based puzzles, always track total sum and minimum distribution limits together.
Check feasibility after each incremental step.
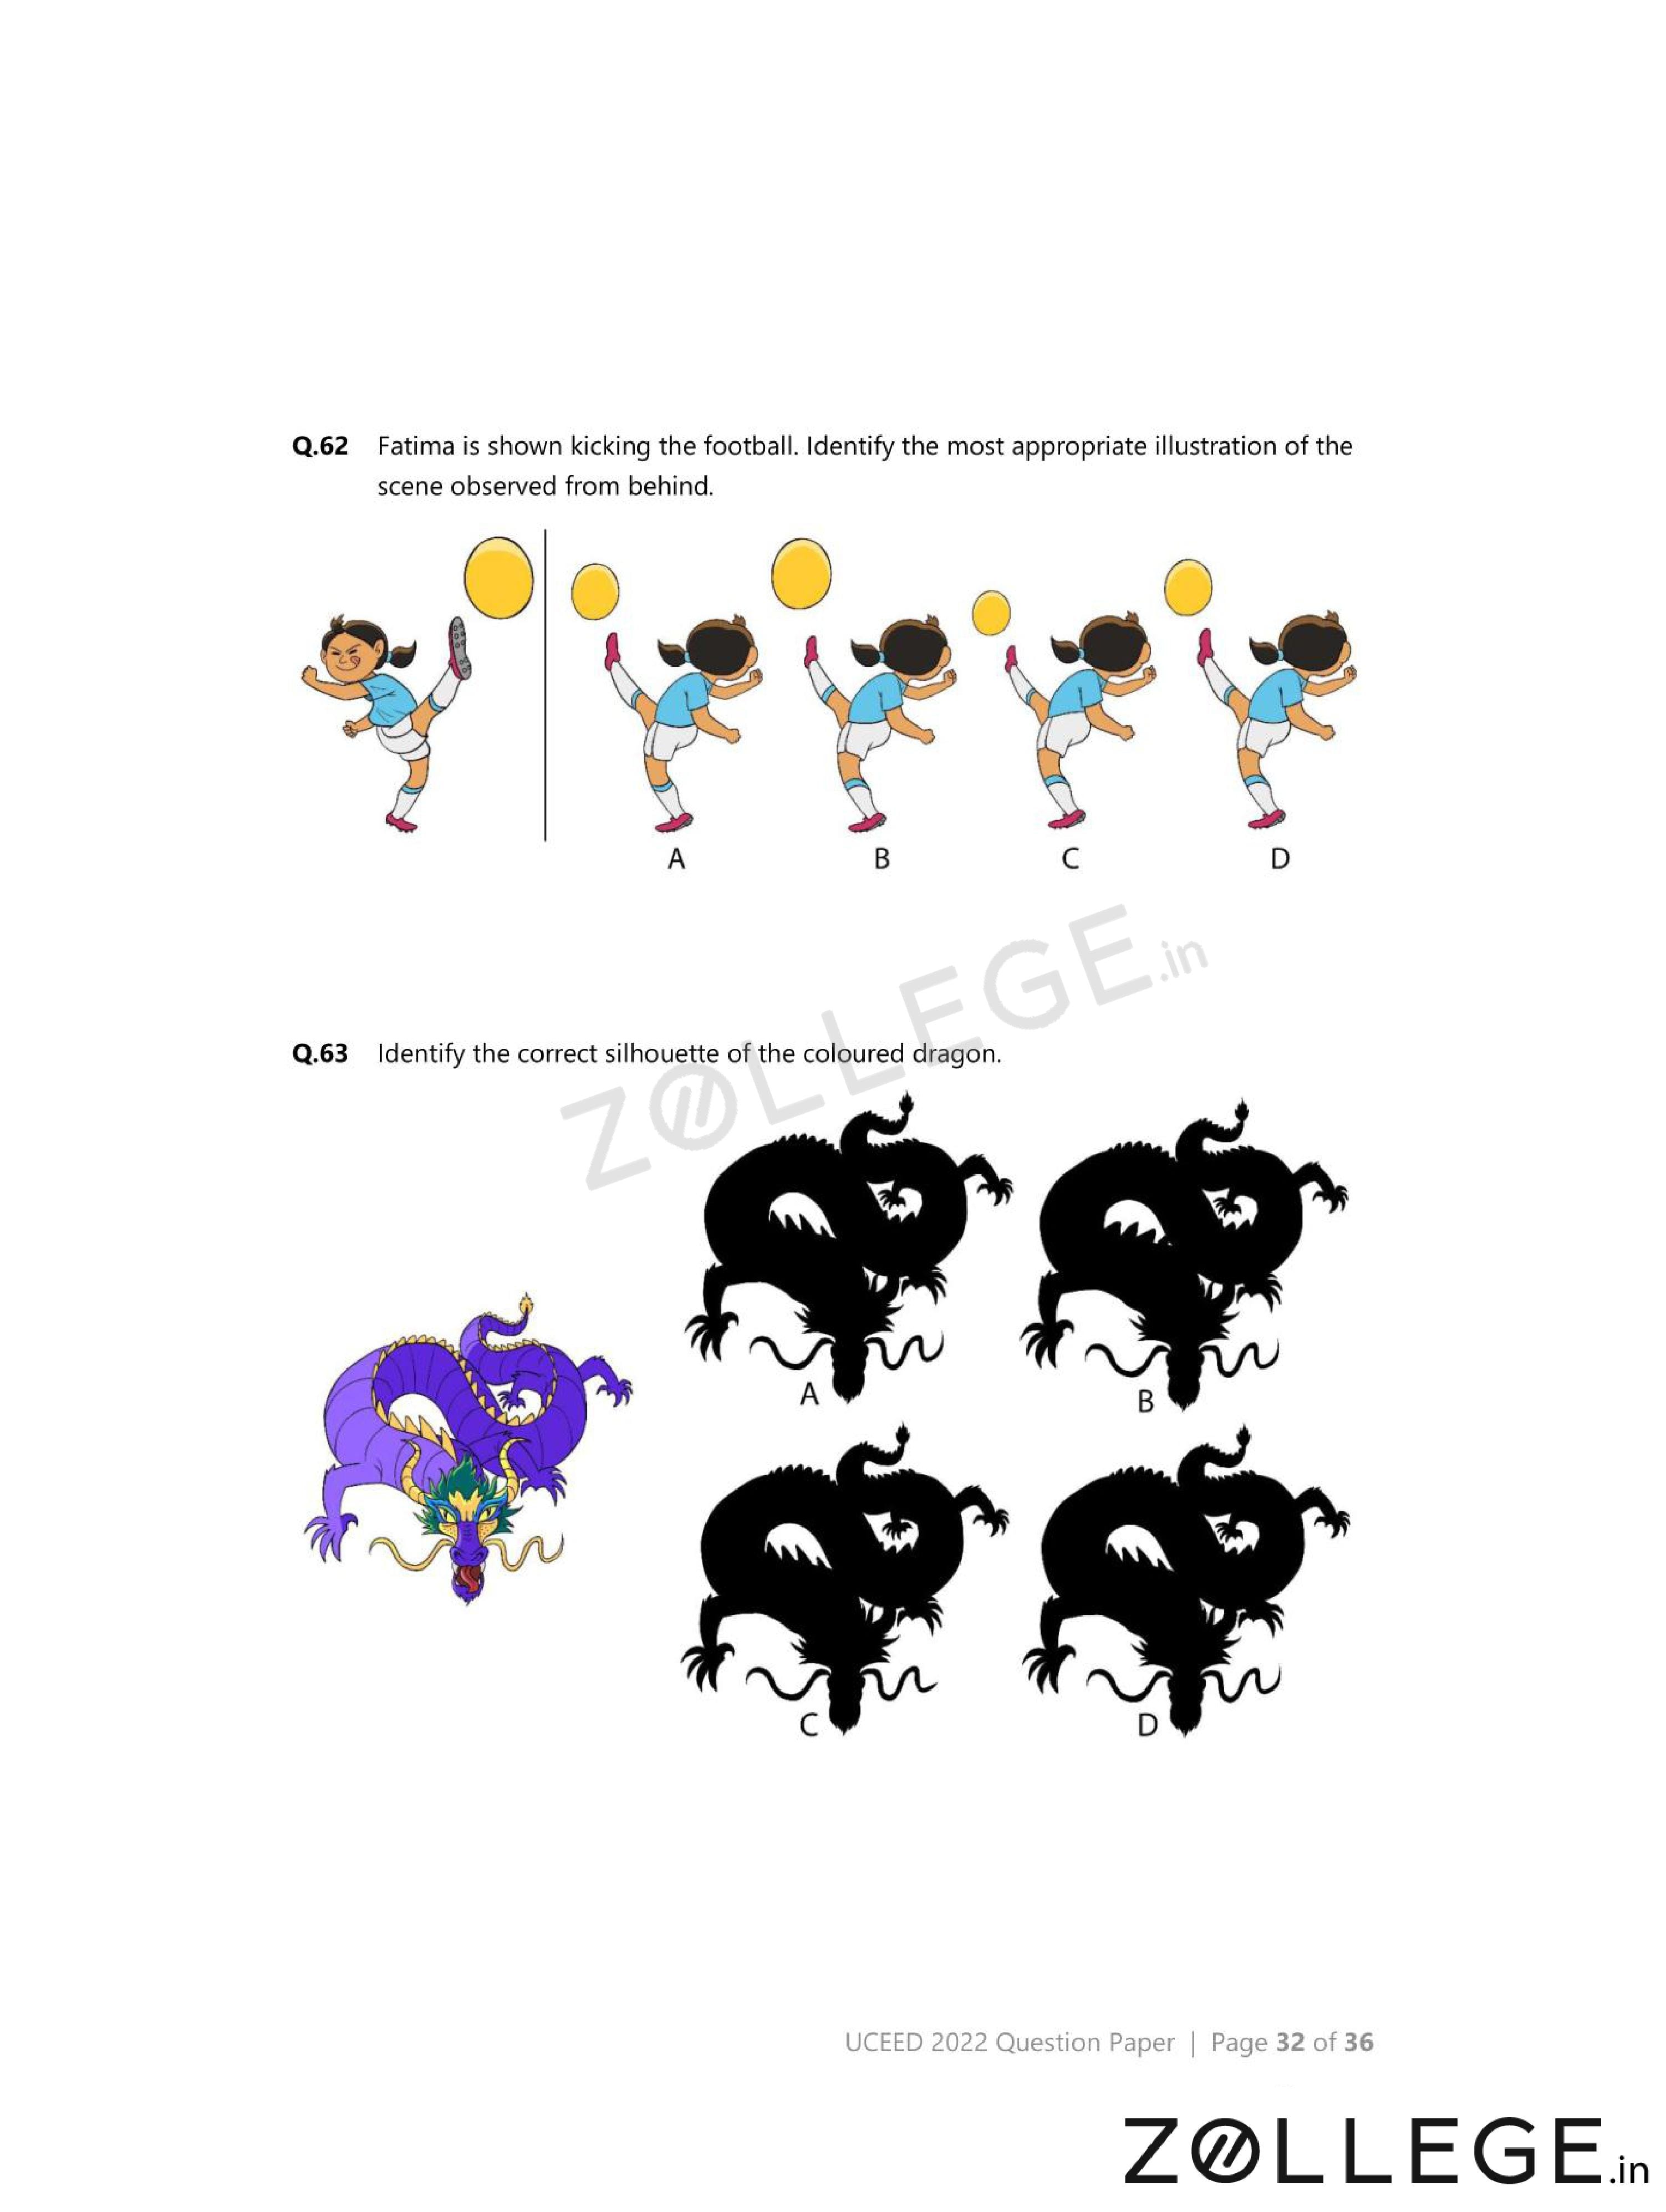
Fatima is shown kicking the football. Identify the most appropriate illustration of the scene observed from behind.
{
- (A) {
![]() }
} - (B) {
![]() }
} - (C) {
![]() }
} - (D) {
![]() }
}
 }
} }
} }
} }
}View Solution
Step 1: Understanding the Concept:
Viewing an action from behind reverses visible depth cues but not left-right orientation relative to the observer.
Step 2: Key Observation Method:
Observe leg position, kicking direction, torso orientation, and football placement relative to the body.
Step 3: Detailed Explanation:
From behind, Fatima’s kicking leg appears forward, while the non-kicking leg is planted.
The football must appear ahead of the kicking leg, and body posture must align with forward motion.
Only option (C) correctly preserves these spatial relationships without mirror inversion errors.
Step 4: Final Answer:
Option (C) correctly represents the view from behind.
Quick Tip: For viewpoint questions, mentally place yourself at the observer position instead of rotating the object mentally.
Identify the correct silhouette of the coloured dragon.
{
- (A) {
![]() }
} - (B) {
![]() }
} - (C) {
![]() }
} - (D) {
![]() }
}
 }
} }
} }
} }
}View Solution
Step 1: Understanding the Concept:
A silhouette shows only the outer boundary of an object, ignoring internal colors and details.
Step 2: Key Matching Criteria:
Match head shape, tail curvature, wing spread, and limb projections exactly.
Step 3: Detailed Explanation:
Option (A) preserves all external contours including horn direction, tail curl, and wing angles.
Other options either add or remove protrusions not present in the original dragon.
Step 4: Final Answer:
The correct silhouette is option (A).
Quick Tip: Ignore colors completely in silhouette questions and trace the outline mentally with your eyes.
Shown below are trajectories of 4 flies over the juice glasses. Identify the fly that crossed over the maximum number of glasses.
View Solution
Step 1: Understanding the Concept:
A glass is counted crossed if the fly’s path passes over its circular opening.
Step 2: Counting Strategy:
Track intersections between the fly trajectory and each glass opening.
Step 3: Detailed Explanation:
Option (D) crosses the largest number of distinct glass openings without re-counting overlaps.
Other trajectories either loop over fewer glasses or revisit the same glass.
Step 4: Final Answer:
The fly in option (D) crosses the maximum number of glasses.
Quick Tip: Always count unique crossings, not path length, in trajectory-based questions.
A list of 8 country names in Vietnamese (shown in red), and their English translations (shown in blue) are given. Which of the following statements is TRUE?
{
- (A) {
![]() }
} - (B) {
![]() }
} - (C) {
![]() }
} - (D) {
![]() }
}
 }
} }
} }
} }
}View Solution
Step 1: Understanding the Concept:
Vietnamese country names are phonetic adaptations of original names.
Step 2: Linguistic Matching Approach:
Match known phonetic similarities:
Hà Lan \(=\) Holland \(=\) Netherlands,
Áo \(=\) Austria,
Ba Lan \(=\) Poland.
Step 3: Detailed Explanation:
Option (B) correctly matches all three country names.
Other options contain at least one incorrect pairing.
Step 4: Final Answer:
The correct statement is option (B).
Quick Tip: In language-mapping questions, rely on phonetic resemblance rather than spelling similarity.
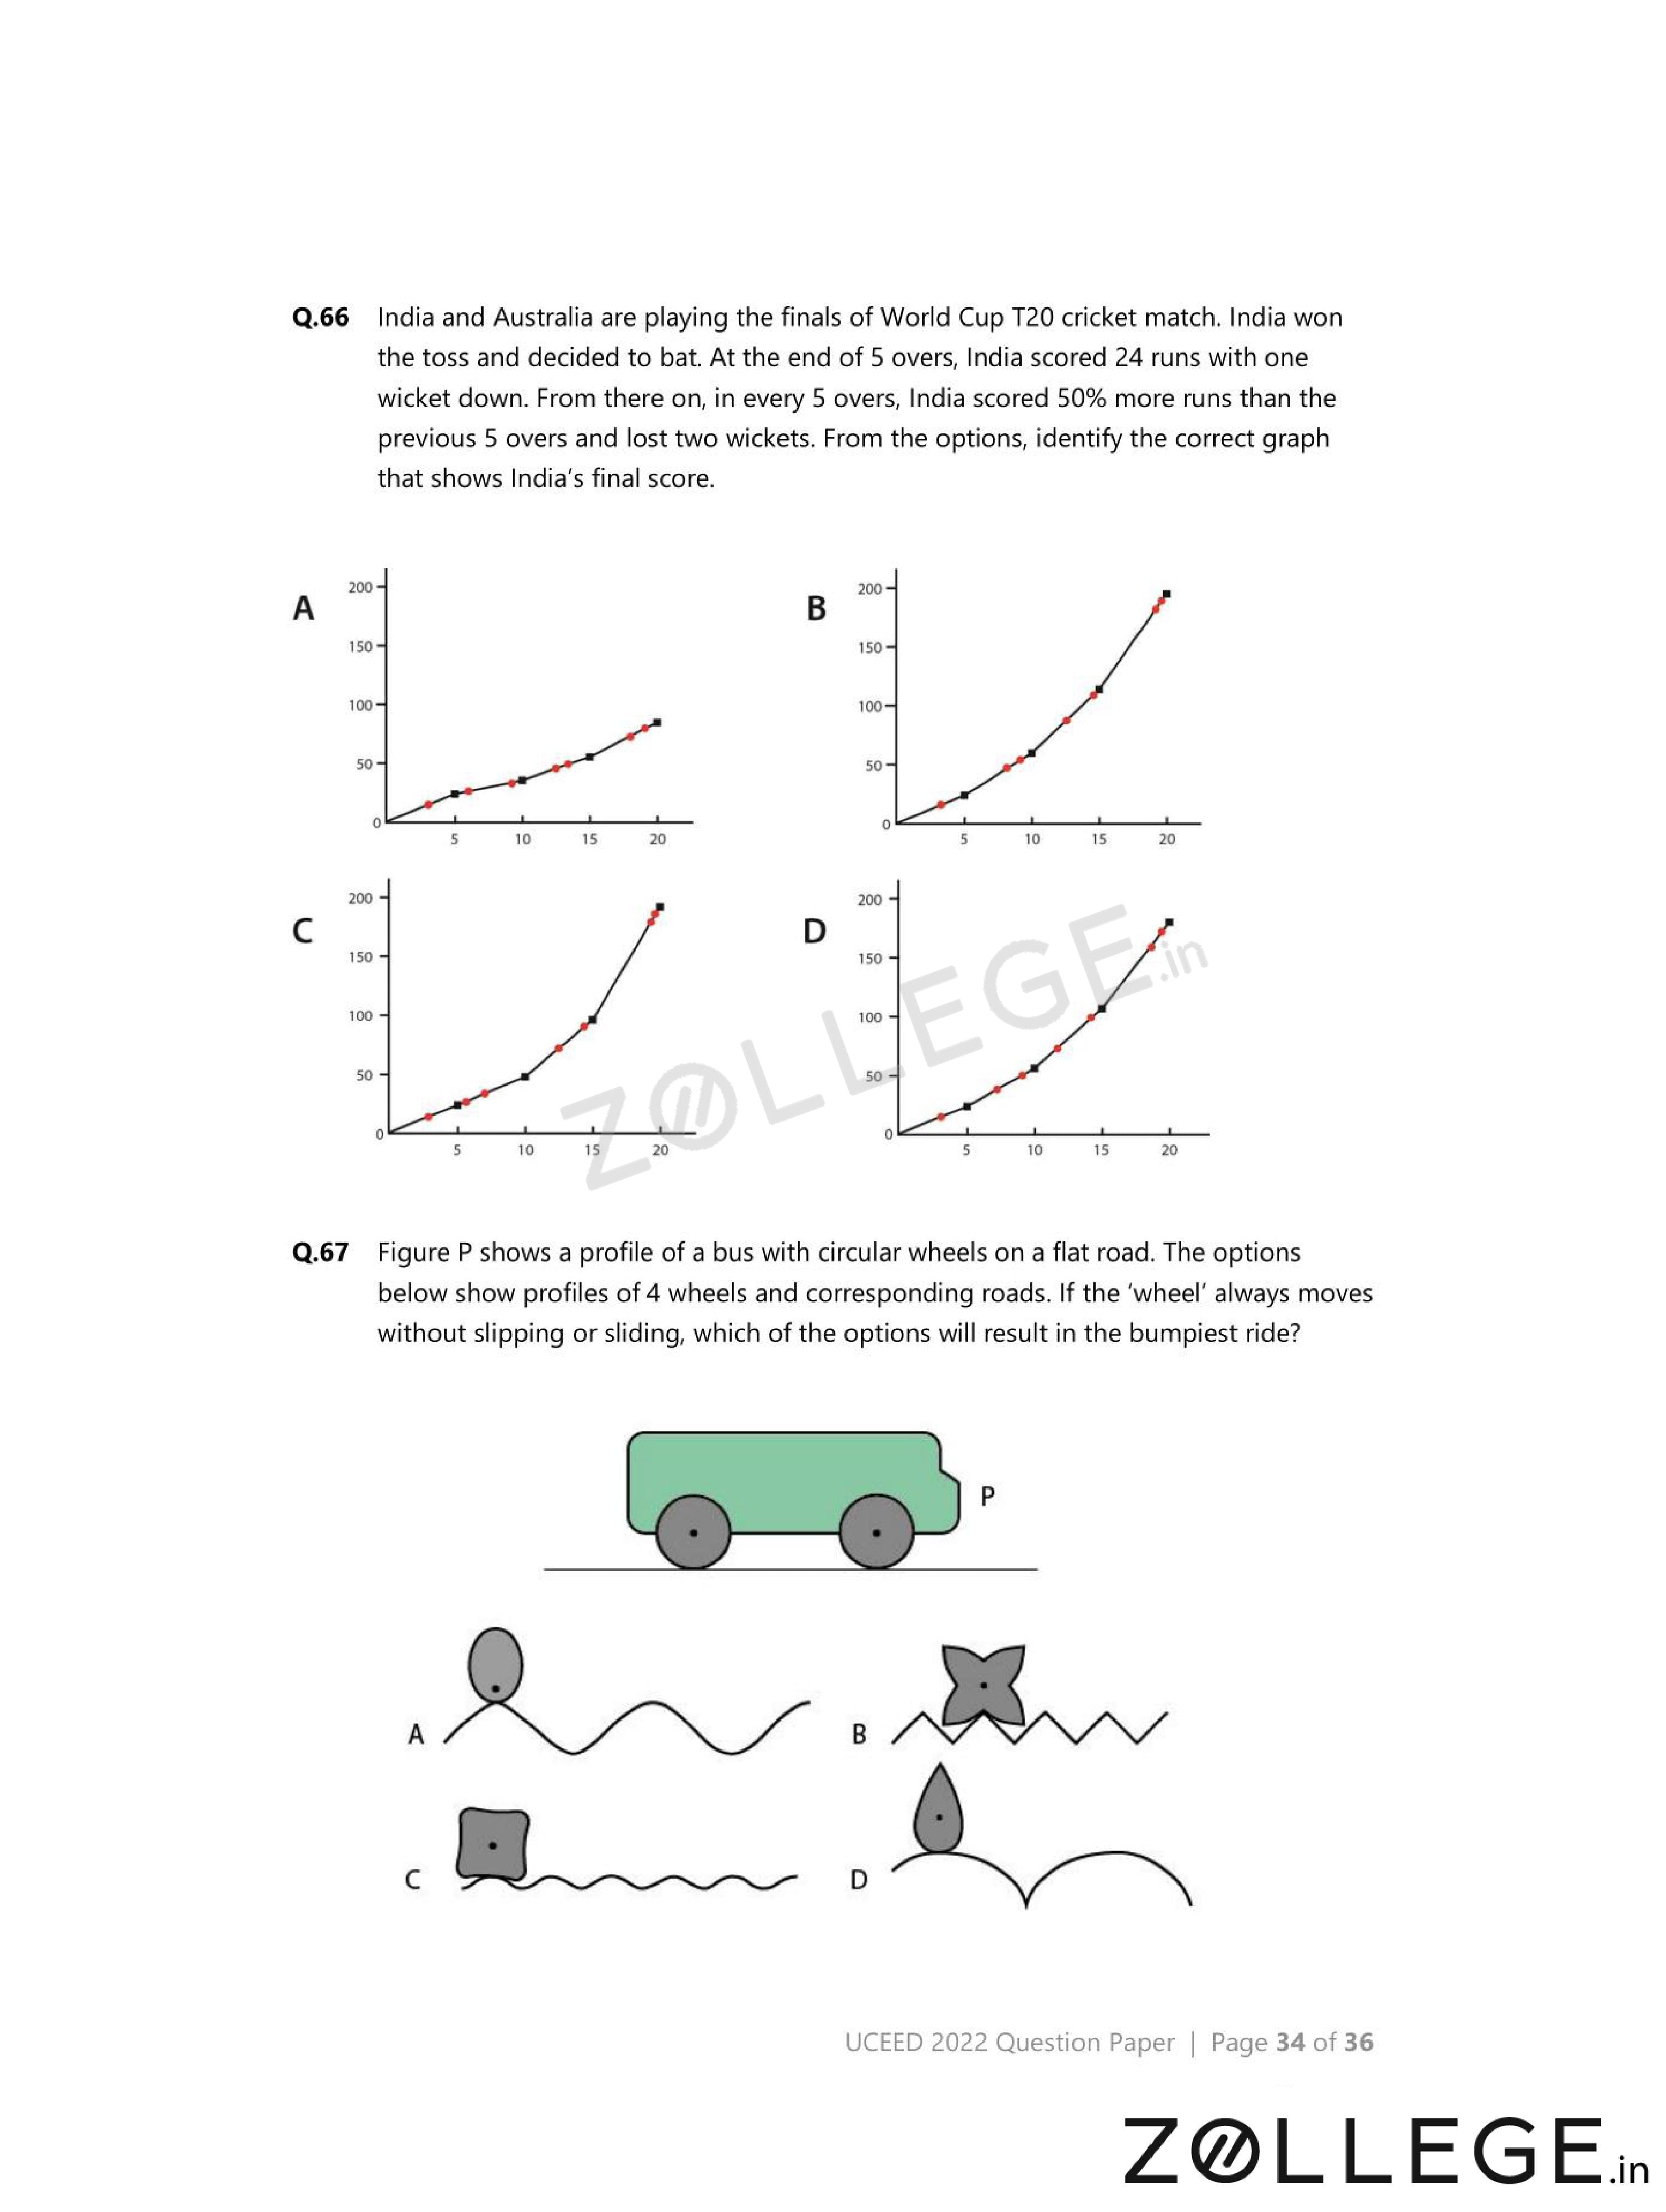
India and Australia are playing the finals of World Cup T20 cricket match. India won the toss and decided to bat. At the end of 5 overs, India scored 24 runs with one wicket down. From there on, in every 5 overs, India scored 50% more runs than the previous 5 overs and lost two wickets. From the options, identify the correct graph that shows India’s final score.
- (A) {
![]() }
} - (B) {
![]() }
} - (C) {
![]() }
} - (D) {
![]() }
}
 }
} }
} }
} }
}View Solution
Step 1: Understanding the Concept:
The match progresses in blocks of 5 overs.
Runs scored in each block increase by \(50%\) compared to the previous block.
Step 2: Key Calculation Approach:
Initial runs in first 5 overs \(= 24\).
Each subsequent block follows:
\[ Next runs = 1.5 \times Previous runs \]
Step 3: Detailed Explanation:
Runs progression over 5-over blocks:
\[ \begin{aligned} 0--5 overs &: 24
6--10 overs &: 24 \times 1.5 = 36
11--15 overs &: 36 \times 1.5 = 54
16--20 overs &: 54 \times 1.5 = 81 \end{aligned} \]
Total score: \[ 24 + 36 + 54 + 81 = 195 \]
The graph must show an accelerating (exponential-like) increase in total score with time.
Only option (C) correctly represents this cumulative growth pattern.
Step 4: Final Answer:
The correct graph is option (C).
Quick Tip: In graph-based questions, focus on the trend (linear vs exponential) rather than exact values first.
Figure P shows a profile of a bus with circular wheels on a flat road. The options below show profiles of 4 wheels and corresponding roads. If the wheel always moves without slipping or sliding, which of the options will result in the bumpiest ride?
{
- (A) {
![]() }
} - (B) {
![]() }
} - (C) {
![]() }
} - (D) {
![]() }
}
 }
} }
} }
} }
}View Solution
Step 1: Understanding the Concept:
A bumpier ride corresponds to greater vertical displacement of the bus axle while rolling.
Step 2: Motion Analysis Approach:
For rolling without slipping, vertical motion depends on how sharply the wheel-road contact height changes.
Step 3: Detailed Explanation:
Smooth roads or smoothly varying wheel profiles result in gradual height change.
Option (D) shows sharp changes in contact height due to irregular road-wheel interaction.
This causes frequent and large vertical oscillations of the bus body.
Step 4: Final Answer:
Option (D) results in the bumpiest ride.
Quick Tip: Maximum discomfort corresponds to maximum vertical acceleration, not horizontal motion.
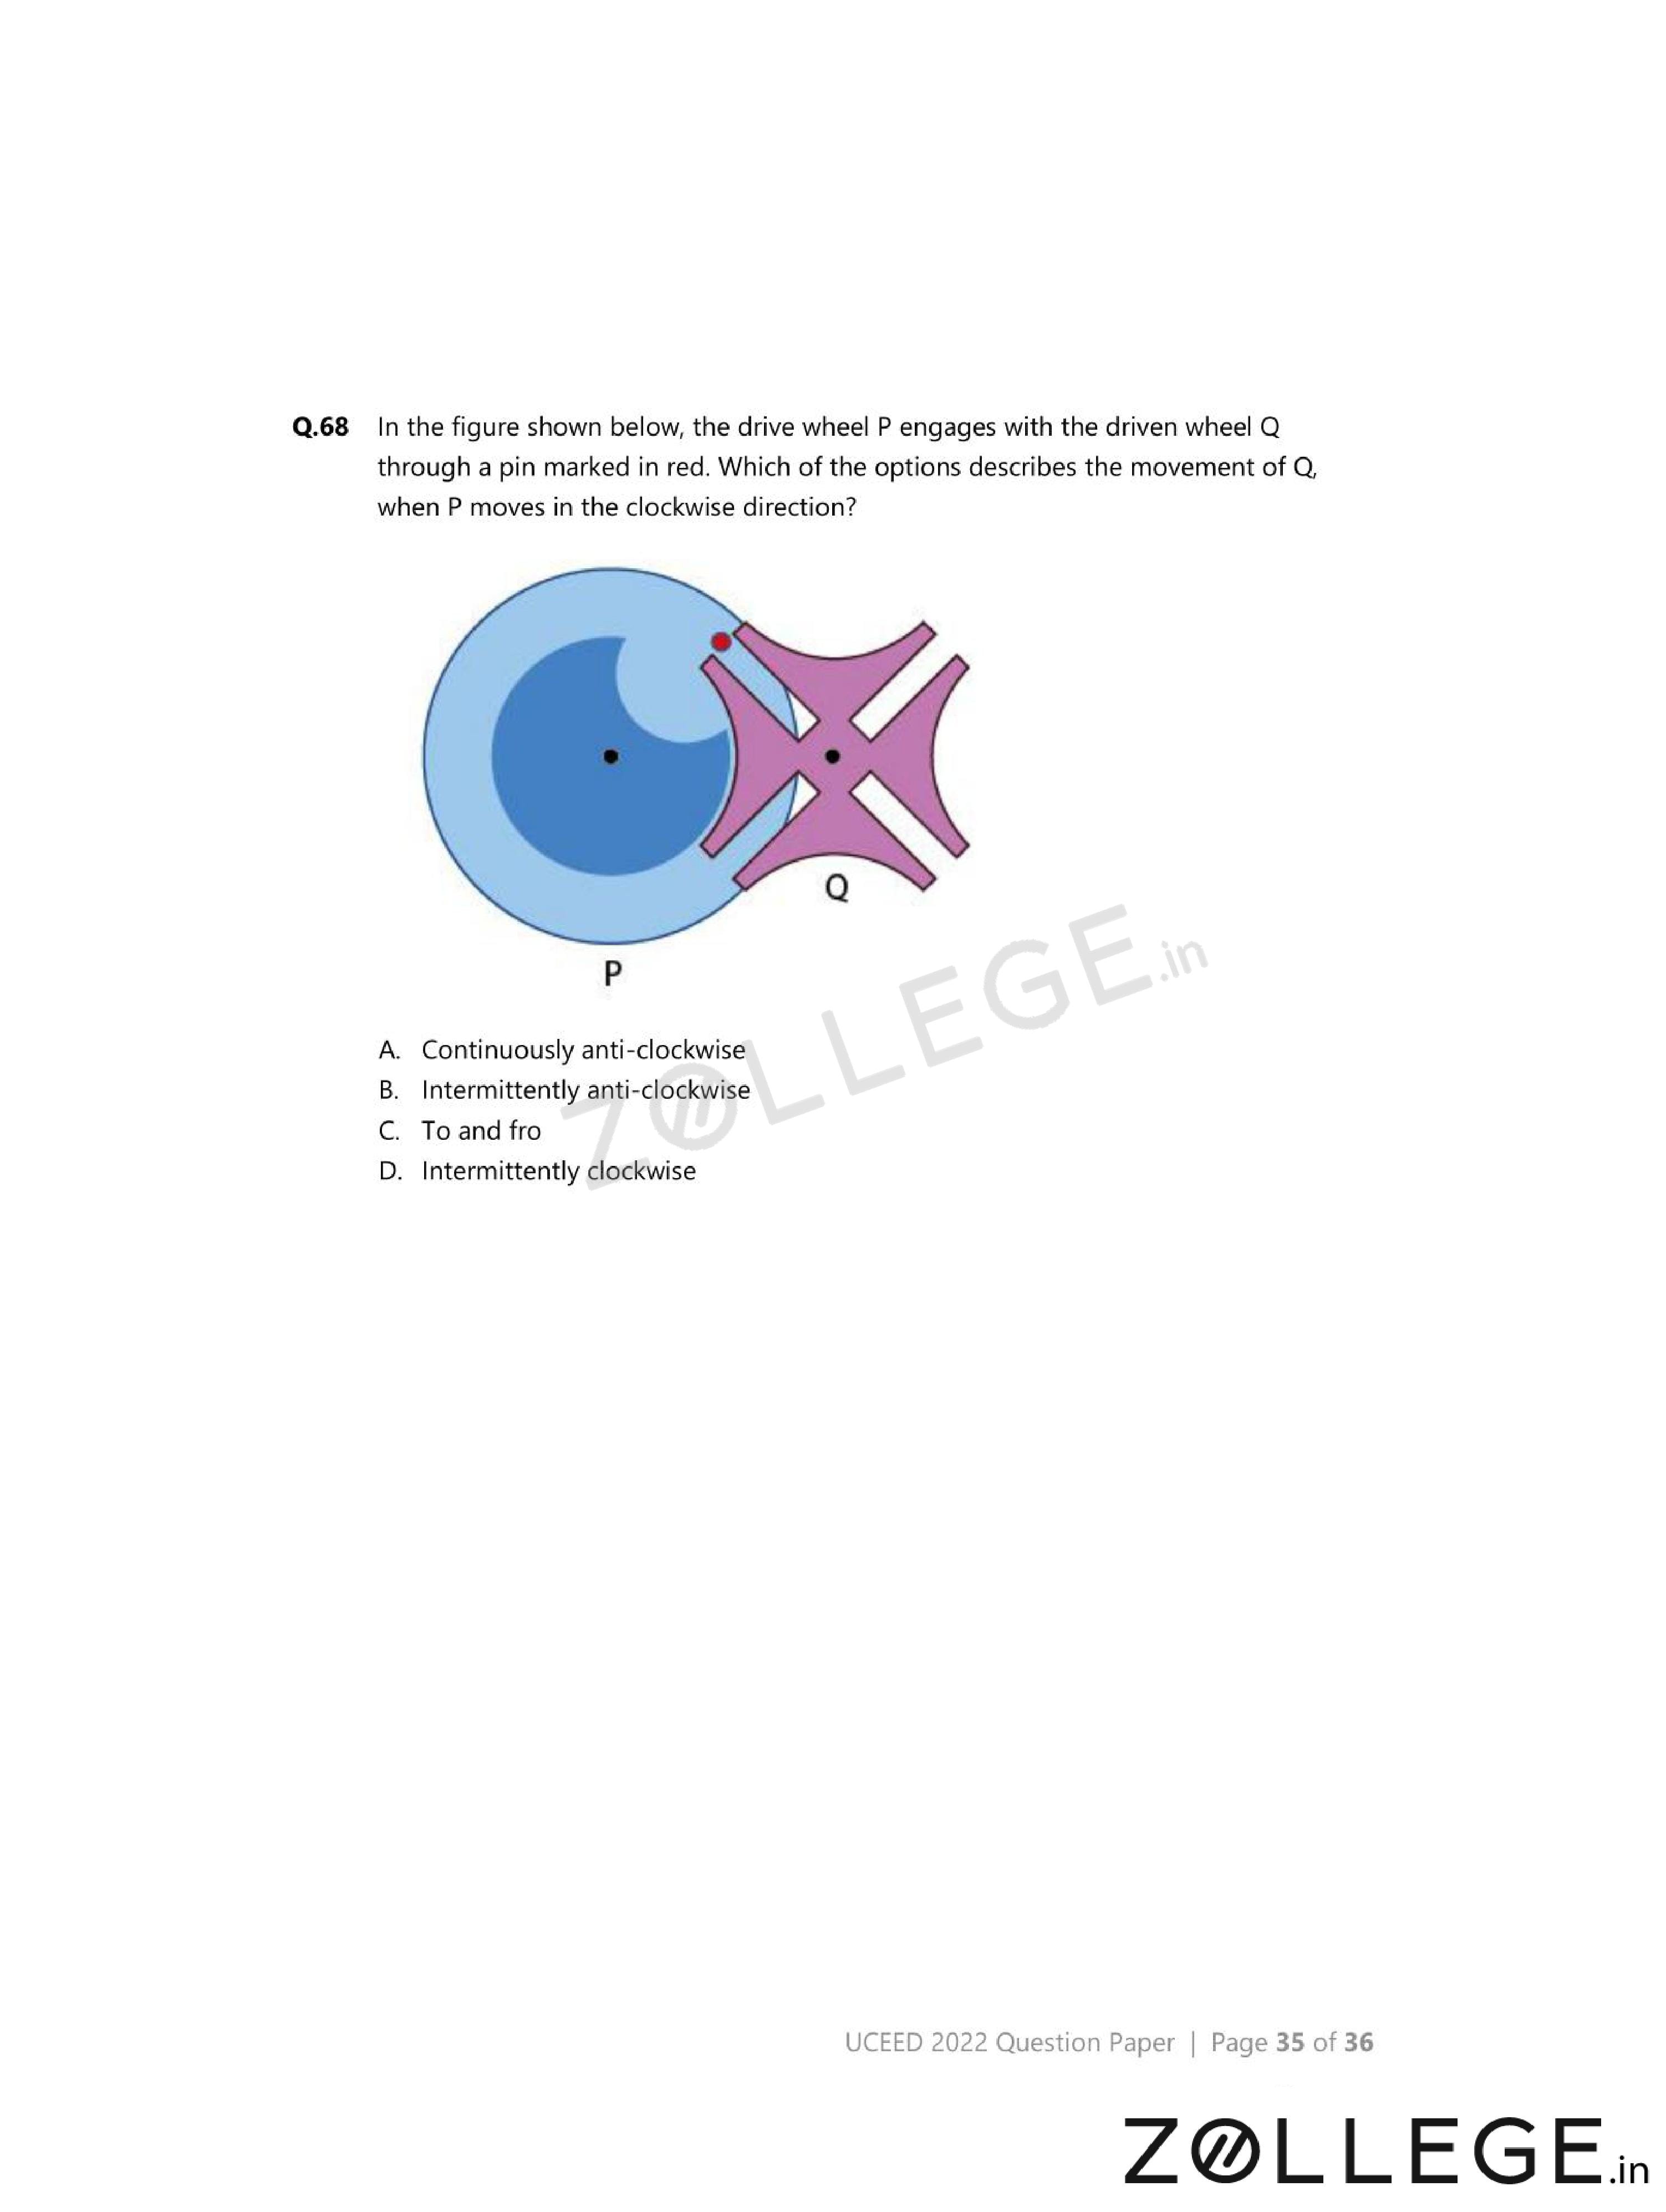
In the figure shown, the drive wheel P engages with the driven wheel Q through a pin marked in red. Which of the options describes the movement of Q, when P moves in the clockwise direction?
{
View Solution
Step 1: Understanding the Concept:
The motion transfer occurs only when the pin comes in contact with wheel Q.
Step 2: Mechanical Interaction Approach:
Continuous rotation requires continuous contact.
Here, contact is limited to specific angular positions.
Step 3: Detailed Explanation:
As wheel P rotates clockwise, the pin pushes Q in one direction for part of the rotation.
Once the pin disengages, Q moves back due to geometry and lack of constraint.
This produces an oscillatory, back-and-forth motion rather than full rotation.
Step 4: Final Answer:
The motion of Q is to and fro.
Quick Tip: Whenever engagement is partial or point-based, expect oscillatory rather than continuous motion.

*The article might have information for the previous academic years, please refer the official website of the exam.