
JEE Main 2019 Question Paper with Answer Key PDF for B.Arch(April 7 - Shift 2)


Content Writer | Updated On - Jan 5, 2026
JEE Main Question Papers are the most important study material for effective exam preparation. We at Zollege have provided all JEE Main Previous Year Papers with Solution PDFs here. JEE Main 2019 B. Arch exam was conducted successfully on April 7, 2019. NTA conducted the exam in the Shift 2. According to student reactions and expert reviews, the paper was reported to be moderate.
Students can freely download the JEE Main previous year question paper PDFs along with their solutions here. We strongly encourage JEE Main aspirants to scan through all the JEE Main Question Paper to know the overall difficulty level, JEE Main Syllabus and understand the changes in JEE Main Exam Pattern over the years.
JEE Main 2019 B.Arch Question Paper with Solution PDF (Shift 2)
| JEE Main 2019 B.Arch Question Paper PDF | JEE Main 2019 B.Arch Solution PDF |
|---|---|
| Download PDF | Check Solutions |

The number of elements in the set, \(A \cap B \cap C\) where \(A = \{(x, y) \in \mathbb{R} \times \mathbb{R} : |x| + |y| \geq 1\}\), \(B = \{(x, y) \in \mathbb{R} \times \mathbb{R} : x^2 + y^2 \leq 1\}\) and \(C = \{(x, y) \in \mathbb{R} \times \mathbb{R} : \max\{|x|, |y|\} = 1\}\), is :
View Solution
Step 1: Understanding the Concept:
The problem asks for the number of points common to three sets defined in the 2D Cartesian plane.
Set \( A \) represents the region on or outside the square formed by \( |x| + |y| = 1 \).
Set \( B \) represents the interior and boundary of a unit circle \( x^2 + y^2 = 1 \).
Set \( C \) represents the boundary of a square with vertices at \( (\pm 1, \pm 1) \), defined by \( \max\{|x|, |y|\} = 1 \).
Step 2: Key Formula or Approach:
We examine the intersection of the sets by checking which points of set \( C \) (the square boundary) also lie in set \( B \) (the circle) and set \( A \) (the exterior diamond).
Step 3: Detailed Explanation:
1. Analyzing Set C: The equation \( \max\{|x|, |y|\} = 1 \) corresponds to four line segments:
\( x = 1, y \in [-1, 1] \); \( x = -1, y \in [-1, 1] \); \( y = 1, x \in [-1, 1] \); \( y = -1, x \in [-1, 1] \).
2. Analyzing the intersection with Set B: Set \( B \) is \( x^2 + y^2 \leq 1 \).
For the side \( x = 1 \), we substitute into the circle inequality: \( 1^2 + y^2 \leq 1 \implies y^2 \leq 0 \implies y = 0 \).
Similarly, for \( x = -1 \), we get \( y = 0 \).
For \( y = 1 \), we get \( x = 0 \), and for \( y = -1 \), we get \( x = 0 \).
The points in \( B \cap C \) are \( (1, 0), (-1, 0), (0, 1), (0, -1) \).
3. Checking these points in Set A: Set \( A \) is \( |x| + |y| \geq 1 \).
For \( (1, 0) \): \( |1| + |0| = 1 \geq 1 \) (True).
For \( (-1, 0) \): \( |-1| + |0| = 1 \geq 1 \) (True).
For \( (0, 1) \): \( |0| + |1| = 1 \geq 1 \) (True).
For \( (0, -1) \): \( |0| + |-1| = 1 \geq 1 \) (True).
Step 4: Final Answer:
All 4 points satisfy all conditions. Therefore, the number of elements in \( A \cap B \cap C \) is 4.
Quick Tip: Geometric visualization helps quickly identify that the unit circle is inscribed in the square \( \max\{|x|,|y|\}=1 \), so they can only touch at the midpoints of the sides.
Let \(u = \frac{-1 + i\sqrt{3}}{2}\) and \(z = u - u^2 - 2\). Then the value of \(z^4 + 3z^3 + 2z^2 - 11z - 6\) is :
View Solution
Step 1: Understanding the Concept:
The given value of \( u \) is the primitive cube root of unity, usually denoted as \( \omega \).
Recall properties: \( \omega^2 + \omega + 1 = 0 \) and \( \omega^3 = 1 \).
Step 2: Key Formula or Approach:
1. Simplify \( z \) using properties of \( \omega \).
2. Form a quadratic equation in \( z \) and use polynomial division or substitution.
Step 3: Detailed Explanation:
Given \( u = \omega \).
\[ z = \omega - \omega^2 - 2 \]
Using \( \omega^2 = -1 - \omega \):
\[ z = \omega - (-1 - \omega) - 2 = 2\omega + 1 - 2 = 2\omega - 1 \]
\[ z + 1 = 2\omega \]
Squaring both sides:
\[ (z + 1)^2 = 4\omega^2 = 4(-1 - \omega) \]
From \( 2\omega = z + 1 \), we have \( \omega = \frac{z + 1}{2} \):
\[ z^2 + 2z + 1 = -4 - 4\left(\frac{z + 1}{2}\right) = -4 - 2(z + 1) = -4 - 2z - 2 = -2z - 6 \]
\[ z^2 + 4z + 7 = 0 \]
Now, evaluate the polynomial \( P(z) = z^4 + 3z^3 + 2z^2 - 11z - 6 \) using \( z^2 + 4z + 7 = 0 \):
\[ z^4 + 3z^3 + 2z^2 - 11z - 6 = z^2(z^2 + 4z + 7) - z^3 - 5z^2 - 11z - 6 \]
\[ = 0 - z(z^2 + 4z + 7) - z^2 - 4z - 6 \]
\[ = 0 - (z^2 + 4z + 7) + 1 = 1 \]
Step 4: Final Answer:
The value of the expression is 1.
Quick Tip: Whenever you see \( \frac{-1 \pm i\sqrt{3}}{2} \), immediately replace it with \( \omega \) or \( \omega^2 \) to simplify complex algebra.
Let \((a, b)\) be the solution of the system \([x \ y] \begin{bmatrix} 1 & 3
5 & 1 \end{bmatrix} = [2 \ 1]\). If \(\alpha\) and \(\beta\) are the roots of the equation \(ax^2 + 2bx - (a+b) = 0\), then the equation, whose roots are \(\alpha\beta\) and \(\frac{1}{\alpha} + \frac{1}{\beta}\), is :
View Solution
Step 1: Understanding the Concept:
First, solve the matrix equation to find \( a \) and \( b \). Then, use the properties of roots (Sum and Product) to find the new quadratic equation.
Step 2: Key Formula or Approach:
Matrix multiplication: \( [x \ y] \begin{bmatrix} A & B
C & D \end{bmatrix} = [xA+yC \ xB+yD] \).
Sum of roots \( = -b/a \); Product of roots \( = c/a \).
Step 3: Detailed Explanation:
1. Solving for (a, b):
\[ [x \ y] \begin{bmatrix} 1 & 3
5 & 1 \end{bmatrix} = [x + 5y \ \ 3x + y] = [2 \ 1] \]
Solving \( x + 5y = 2 \) and \( 3x + y = 1 \):
From second equation, \( y = 1 - 3x \). Substitute into first:
\( x + 5(1 - 3x) = 2 \implies x + 5 - 15x = 2 \implies -14x = -3 \implies x = \frac{3}{14} \).
\( y = 1 - 3\left(\frac{3}{14}\right) = \frac{5}{14} \).
So, \( a = \frac{3}{14} \) and \( b = \frac{5}{14} \).
2. Finding roots \(\alpha, \beta\):
The equation is \( \frac{3}{14}x^2 + 2\left(\frac{5}{14}\right)x - \left(\frac{3}{14} + \frac{5}{14}\right) = 0 \).
Multiplying by 14: \( 3x^2 + 10x - 8 = 0 \).
\( \alpha + \beta = -\frac{10}{3} \), \( \alpha\beta = -\frac{8}{3} \).
3. Forming new equation:
Roots are \( R_1 = \alpha\beta = -\frac{8}{3} \) and \( R_2 = \frac{1}{\alpha} + \frac{1}{\beta} = \frac{\alpha + \beta}{\alpha\beta} = \frac{-10/3}{-8/3} = \frac{5}{4} \).
Sum of new roots \( = -\frac{8}{3} + \frac{5}{4} = \frac{-32 + 15}{12} = -\frac{17}{12} \).
Product of new roots \( = \left(-\frac{8}{3}\right)\left(\frac{5}{4}\right) = -\frac{10}{3} = -\frac{40}{12} \).
Equation: \( x^2 - (Sum)x + (Product) = 0 \implies x^2 + \frac{17}{12}x - \frac{40}{12} = 0 \).
\( 12x^2 + 17x - 40 = 0 \).
Step 4: Final Answer:
The required equation is \( 12x^2 + 17x - 40 = 0 \).
Quick Tip: For the expression \( \frac{1}{\alpha} + \frac{1}{\beta} \), always rewrite it as \( \frac{\alpha+\beta}{\alpha\beta} \) to directly use coefficients from the original quadratic.
If \(A^{20} = \begin{bmatrix} a & b
c & d \end{bmatrix}\) where \(A = \begin{bmatrix} 1 & 1
0 & 2 \end{bmatrix}\), then \(a + b + c + d\) is equal to :
View Solution
Step 1: Understanding the Concept:
We need to find a pattern for higher powers of matrix \( A \).
Step 2: Key Formula or Approach:
Calculate \( A^2, A^3 \) to identify the general term for \( A^n \).
Step 3: Detailed Explanation:
\[ A = \begin{bmatrix} 1 & 1
0 & 2 \end{bmatrix} \]
\[ A^2 = \begin{bmatrix} 1 & 1
0 & 2 \end{bmatrix} \begin{bmatrix} 1 & 1
0 & 2 \end{bmatrix} = \begin{bmatrix} 1 & 1+2
0 & 4 \end{bmatrix} = \begin{bmatrix} 1 & 3
0 & 4 \end{bmatrix} = \begin{bmatrix} 1 & 2^2-1
0 & 2^2 \end{bmatrix} \]
\[ A^3 = \begin{bmatrix} 1 & 3
0 & 4 \end{bmatrix} \begin{bmatrix} 1 & 1
0 & 2 \end{bmatrix} = \begin{bmatrix} 1 & 1+6
0 & 8 \end{bmatrix} = \begin{bmatrix} 1 & 7
0 & 8 \end{bmatrix} = \begin{bmatrix} 1 & 2^3-1
0 & 2^3 \end{bmatrix} \]
By induction, \( A^n = \begin{bmatrix} 1 & 2^n - 1
0 & 2^n \end{bmatrix} \).
For \( n = 20 \):
\[ a = 1, \ b = 2^{20} - 1, \ c = 0, \ d = 2^{20} \]
\[ a + b + c + d = 1 + (2^{20} - 1) + 0 + 2^{20} = 2 \cdot 2^{20} = 2^{21} \]
Step 4: Final Answer:
The sum \( a + b + c + d = 2^{21} \).
Quick Tip: For matrices of the form \( \begin{bmatrix} 1 & k
0 & a \end{bmatrix} \), the \( n \)-th power usually involves a geometric series in the top-right entry.
The number of solutions of the equations \(3x - y - z = 0, -3x + 2y + z = 0, -3x + z = 0\) such that \(x, y, z\) are non-negative integers and \(x^2 + y^2 + z^2 \leq 10\) is :
View Solution
Step 1: Understanding the Concept:
This is a homogeneous system of linear equations. We solve for the variables and apply the integer and inequality constraints.
Step 2: Key Formula or Approach:
Use elimination to find the relationship between \( x, y, z \).
Step 3: Detailed Explanation:
1. \( 3x - y - z = 0 \) ... (i)
2. \( -3x + 2y + z = 0 \) ... (ii)
3. \( -3x + z = 0 \implies z = 3x \) ... (iii)
Adding (i) and (ii): \( y = 0 \).
Substitute \( y = 0 \) in (i): \( 3x - z = 0 \implies z = 3x \), which is consistent with (iii).
The general solution is \( (x, 0, 3x) \).
Given constraint: \( x^2 + y^2 + z^2 \leq 10 \).
\[ x^2 + 0^2 + (3x)^2 \leq 10 \implies 10x^2 \leq 10 \implies x^2 \leq 1 \]
Since \( x \) is a non-negative integer, \( x \in \{0, 1\} \).
- If \( x = 0 \), then \( y = 0, z = 0 \). Solution: \( (0, 0, 0) \).
- If \( x = 1 \), then \( y = 0, z = 3 \). Solution: \( (1, 0, 3) \).
Step 4: Final Answer:
There are 2 solutions.
Quick Tip: In a homogeneous system, \( (0, 0, 0) \) is always a solution. If the equations are linearly dependent, there are infinitely many real solutions, but constraints often restrict them to a small finite set.
The number of subsets of \(\{1, 2, \dots, 99\}\) containing at least 50 elements is :
View Solution
Step 1: Understanding the Concept:
The number of subsets of a set with \( n \) elements is \( \sum_{k=0}^n \binom{n}{k} = 2^n \). We need the sum of combinations from \( k=50 \) to 99.
Step 2: Key Formula or Approach:
Use the property \( \binom{n}{k} = \binom{n}{n-k} \).
Step 3: Detailed Explanation:
Let \( S = \binom{99}{50} + \binom{99}{51} + \dots + \binom{99}{99} \).
The total sum is:
\[ \sum_{k=0}^{99} \binom{99}{k} = \binom{99}{0} + \binom{99}{1} + \dots + \binom{99}{49} + \binom{99}{50} + \dots + \binom{99}{99} = 2^{99} \]
By symmetry, \( \binom{99}{0} = \binom{99}{99} \), \( \binom{99}{1} = \binom{99}{98} \), and so on up to \( \binom{99}{49} = \binom{99}{50} \).
Note that there are 100 terms in the expansion. The terms from 0 to 49 are exactly equal to the terms from 50 to 99.
Thus, \( 2 \times S = 2^{99} \implies S = 2^{98} \).
Step 4: Final Answer:
The number of subsets is \( 2^{98} \).
Quick Tip: For odd \( n \), the total number of subsets is always halved into "at least half" and "less than half". So the answer is simply \( 2^{n-1} \).
The coefficient of \(x^5\) in the expansion of \((1-x)\left(\frac{x^3 - 6}{2x^2}\right)^{10}\) is :
View Solution
Step 1: Understanding the Concept:
We need to find a specific coefficient in a product of a polynomial and a binomial power.
Step 2: Key Formula or Approach:
General term \( T_{r+1} = \binom{n}{r} a^{n-r} b^r \).
Step 3: Detailed Explanation:
Expression \( = (1-x) \cdot \frac{1}{2^{10} x^{20}} (x^3 - 6)^{10} \).
We want the coefficient of \( x^5 \). This is equivalent to finding the coefficient of \( x^{25} \) in \( (1-x)(x^3 - 6)^{10} \), then dividing by \( 2^{10} \).
Let \( (x^3 - 6)^{10} = \sum_{r=0}^{10} \binom{10}{r} (x^3)^{10-r} (-6)^r = \sum_{r=0}^{10} \binom{10}{r} x^{30-3r} (-6)^r \).
The full expression is \( (1-x) \sum_{r=0}^{10} \binom{10}{r} x^{30-3r} (-6)^r \).
For the "1" term: we need \( 30-3r = 25 \implies 3r = 5 \) (No integer solution).
For the "-x" term: we need \( 30-3r = 24 \implies 3r = 6 \implies r = 2 \).
The term is \( -x \cdot \binom{10}{2} (x^3)^8 (-6)^2 = - \binom{10}{2} \cdot 36 \cdot x^{25} \).
Coefficient \( = -\frac{45 \times 36}{1024} = -\frac{1620}{1024} = -\frac{405}{256} \).
Step 4: Final Answer:
The coefficient is \( -\frac{405}{256} \).
Quick Tip: Always simplify the variable powers first. Finding \( x^k \) in \( (1-x)P(x) \) requires finding \( x^k \) and \( x^{k-1} \) in \( P(x) \).
An A.P. having an odd number of terms, has its first, second and middle terms as \(-12, -7\) and \(38\) respectively, then the sum of this A.P. is :
View Solution
Step 1: Understanding the Concept:
Identify the number of terms \( n \) using the given first, second, and middle term values.
Step 2: Key Formula or Approach:
Middle term of an A.P. with \( n \) terms (where \( n \) is odd) is \( a_{\frac{n+1}{2}} \).
Sum \( S_n = \frac{n}{2}[2a + (n-1)d] = n \times (middle term) \).
Step 3: Detailed Explanation:
1. First term \( a = -12 \).
2. Second term \( a + d = -7 \implies d = -7 - (-12) = 5 \).
3. Let the number of terms be \( n = 2k+1 \). The middle term is the \( (k+1) \)-th term.
\[ a_{k+1} = a + kd = 38 \]
\[ -12 + 5k = 38 \implies 5k = 50 \implies k = 10 \]
Total number of terms \( n = 2(10) + 1 = 21 \).
4. Sum of A.P.:
\[ S_{21} = n \times (middle term) = 21 \times 38 \]
\[ 21 \times 38 = 798 \]
Step 4: Final Answer:
The sum of the A.P. is 798.
Quick Tip: A useful shortcut: For any A.P. with an odd number of terms, the sum is simply the number of terms multiplied by the middle term.
If \(S_n = \sum_{r=1}^n T_r = n(n+1)(n+2)(n+3)\), then \(\sum_{r=1}^{10} \frac{1}{T_r}\) is equal to :
View Solution
Step 1: Understanding the Concept:
First find the general term \( T_r \) from the sum \( S_n \), then use the method of partial fractions (telescoping sum) to evaluate the sum of reciprocals.
Step 2: Key Formula or Approach:
\( T_n = S_n - S_{n-1} \).
Step 3: Detailed Explanation:
1. \( T_n = n(n+1)(n+2)(n+3) - (n-1)n(n+1)(n+2) \)
\( T_n = n(n+1)(n+2) [ (n+3) - (n-1) ] = 4n(n+1)(n+2) \).
2. \( \frac{1}{T_r} = \frac{1}{4r(r+1)(r+2)} \).
Using partial fractions: \( \frac{1}{r(r+1)(r+2)} = \frac{1}{2} \left[ \frac{1}{r(r+1)} - \frac{1}{(r+1)(r+2)} \right] \).
So, \( \frac{1}{T_r} = \frac{1}{8} \left[ \frac{1}{r(r+1)} - \frac{1}{(r+1)(r+2)} \right] \).
3. Sum from \( r=1 \) to 10:
\[ \sum_{r=1}^{10} \frac{1}{T_r} = \frac{1}{8} \left[ \left(\frac{1}{1 \cdot 2} - \frac{1}{2 \cdot 3}\right) + \left(\frac{1}{2 \cdot 3} - \frac{1}{3 \cdot 4}\right) + \dots + \left(\frac{1}{10 \cdot 11} - \frac{1}{11 \cdot 12}\right) \right] \]
This is a telescoping sum:
\[ = \frac{1}{8} \left[ \frac{1}{2} - \frac{1}{132} \right] = \frac{1}{8} \left[ \frac{66 - 1}{132} \right] = \frac{65}{8 \times 132} = \frac{65}{1056} \]
Step 4: Final Answer:
The sum is \( \frac{65}{1056} \).
Quick Tip: For terms involving products of consecutive integers in the denominator, the difference of the first and last factors in the denominator (like \( (r+2) - r = 2 \)) always helps in splitting the fraction.
If \(\lim_{x \to 4} \frac{x^{3/4} - 4^{3/4}}{x^{4/3} - 4^{4/3}} = 9p\), then \(p\) is equal to :
View Solution
Step 1: Understanding the Concept:
Use the standard limit formula \( \lim_{x \to a} \frac{x^n - a^n}{x - a} = n a^{n-1} \).
Step 2: Key Formula or Approach:
The ratio form is \( \lim_{x \to a} \frac{x^n - a^n}{x^m - a^m} = \frac{n}{m} a^{n-m} \).
Step 3: Detailed Explanation:
Here \( a = 4, n = \frac{3}{4}, m = \frac{4}{3} \).
\[ Limit = \frac{3/4}{4/3} \cdot 4^{(3/4) - (4/3)} = \frac{9}{16} \cdot 4^{-7/12} \]
Given this equals \( 9p \):
\[ 9p = \frac{9}{16} \cdot (2^2)^{-7/12} = \frac{9}{16} \cdot 2^{-7/6} \]
\[ p = \frac{1}{16} \cdot 2^{-7/6} = 2^{-4} \cdot 2^{-7/6} = 2^{-(4 + 7/6)} = 2^{-31/6} \]
Step 4: Final Answer:
The value of \( p \) is \( 2^{-31/6} \).
Quick Tip: Expressing all numbers as powers of the same base (base 2 here) simplifies exponents and avoids messy calculations.
Let \(f : \mathbb{R} \to \mathbb{R}\) be a differentiable function such that \(f(u + v) = f(u) + 2v^2 + 4uv\) for all \(u, v \in \mathbb{R}\). If \(f(1) = 3\), then the equation of the normal to the curve \(y = f(x)\) at the point \((\frac{1}{2}, f(\frac{1}{2}))\) is :
View Solution
Step 1: Understanding the Concept:
Determine the function \( f(x) \) from the functional equation using the definition of the derivative.
Step 2: Key Formula or Approach:
\( f'(x) = \lim_{h \to 0} \frac{f(x+h) - f(x)}{h} \).
Step 3: Detailed Explanation:
1. Let \( u = x, v = h \): \( f(x+h) = f(x) + 2h^2 + 4xh \).
\( f(x+h) - f(x) = 2h^2 + 4xh \).
\( f'(x) = \lim_{h \to 0} \frac{2h^2 + 4xh}{h} = \lim_{h \to 0} (2h + 4x) = 4x \).
2. Integrating \( f'(x) \): \( f(x) = \int 4x dx = 2x^2 + C \).
Using \( f(1) = 3 \): \( 2(1)^2 + C = 3 \implies C = 1 \).
So, \( f(x) = 2x^2 + 1 \).
3. At \( x = 1/2 \):
\( y = f(1/2) = 2(1/4) + 1 = 1.5 = 3/2 \).
Slope of tangent \( m_T = f'(1/2) = 4(1/2) = 2 \).
Slope of normal \( m_N = -1/2 \).
4. Equation of normal:
\( y - \frac{3}{2} = -\frac{1}{2}(x - \frac{1}{2}) \implies 2y - 3 = -x + \frac{1}{2} \).
Multiplying by 2: \( 4y - 6 = -2x + 1 \implies 2x + 4y = 7 \).
Step 4: Final Answer:
The equation is \( 2x + 4y = 7 \).
Quick Tip: For functional equations involving terms like \( uv \), it is highly likely that the function is a polynomial of degree 2.
Let \(\lambda \in \mathbb{R}\) and \(f(x) = \begin{cases} |\lambda|[x+1], & x < -1
-|\lambda|, & x = -1
[\sin(\pi x)] + 2\lambda x, & x > -1 \end{cases}\) where \([t]\) denotes the greatest integer function. If \(f(x)\) is continuous at \(x = -1\), then \(\lambda\) is equal to :
View Solution
Step 1: Understanding the Concept:
For continuity at \( x = -1 \), the Left Hand Limit (LHL), Right Hand Limit (RHL), and the value of the function \( f(-1) \) must be equal.
Step 2: Key Formula or Approach:
Identify limits of the greatest integer function near \( x = -1 \).
Step 3: Detailed Explanation:
1. Value at x = -1: \( f(-1) = -|\lambda| \).
2. Left Hand Limit (LHL): \( \lim_{x \to -1^-} |\lambda|[x+1] \).
As \( x \to -1^- \), \( x+1 \to 0^- \), so \( [x+1] = -1 \).
\( LHL = |\lambda|(-1) = -|\lambda| \).
3. Right Hand Limit (RHL): \( \lim_{x \to -1^+} [\sin(\pi x)] + 2\lambda x \).
As \( x \to -1^+ \), \( \pi x \) is slightly greater than \( -\pi \) (3rd quadrant).
In the 3rd quadrant, \( \sin(\pi x) \) is negative and close to 0 (e.g., -0.01).
So \( [\sin(\pi x)] = -1 \).
\( RHL = -1 + 2\lambda(-1) = -1 - 2\lambda \).
4. Condition for continuity: \( -|\lambda| = -1 - 2\lambda \implies |\lambda| = 2\lambda + 1 \).
Case \( \lambda \geq 0 \): \( \lambda = 2\lambda + 1 \implies \lambda = -1 \) (Rejected as \( \lambda \geq 0 \)).
Case \( \lambda < 0 \): \( -\lambda = 2\lambda + 1 \implies 3\lambda = -1 \implies \lambda = -\frac{1}{3} \).
Step 4: Final Answer:
The value of \( \lambda \) is \( -\frac{1}{3} \).
Quick Tip: Be careful with the greatest integer function near integers. \( [x] \) drops by 1 when approaching from the left.
If the tangent to the curve, \(x^2y + \alpha y^2 = \beta\), \((\alpha, \beta \in \mathbb{R})\) at the point \((1, 1)\) on it is \(4x + 3y = 7\), then the normal to it at the point \((x_1, -5)\), \(x_1 < 0\) on the curve, is :
View Solution
Step 1: Understanding the Concept:
First find \( \alpha \) and \( \beta \) using the point and tangent slope, then find the point \( x_1 \) and the normal equation.
Step 2: Key Formula or Approach:
Slope of tangent is \( \frac{dy}{dx} \). Normal slope is \( -1/(dy/dx) \).
Step 3: Detailed Explanation:
1. Finding constants: Differentiate \( x^2y + \alpha y^2 = \beta \):
\( 2xy + x^2 y' + 2\alpha y y' = 0 \implies y' = \frac{-2xy}{x^2 + 2\alpha y} \).
At \( (1, 1) \), slope is \( -\frac{4}{3} \) (from \( 4x+3y=7 \)):
\( \frac{-2}{1 + 2\alpha} = -\frac{4}{3} \implies 6 = 4 + 8\alpha \implies \alpha = \frac{1}{4} \).
Point \( (1, 1) \) on curve: \( 1 + \alpha(1) = \beta \implies 1 + \frac{1}{4} = \beta \implies \beta = \frac{5}{4} \).
Curve is \( 4x^2 y + y^2 = 5 \).
2. Finding Point \((x_1, -5)\):
\( 4x_1^2(-5) + (-5)^2 = 5 \implies -20x_1^2 + 25 = 5 \implies 20x_1^2 = 20 \implies x_1 = -1 \) (as \( x_1 < 0 \)).
3. Normal at \((-1, -5)\):
\( y' = \frac{-2(-1)(-5)}{1^2 + 2(1/4)(-5)} = \frac{-10}{1 - 2.5} = \frac{-10}{-1.5} = \frac{20}{3} \).
Slope of normal \( m_N = -\frac{3}{20} \).
Equation: \( y + 5 = -\frac{3}{20}(x + 1) \implies 20y + 100 = -3x - 3 \implies 3x + 20y + 103 = 0 \).
Step 4: Final Answer:
The normal equation is \( 3x + 20y + 103 = 0 \).
Quick Tip: Implicit differentiation is usually faster for finding slopes of tangents to curves defined by equations.
Let \(AP\) and \(BQ\) be two vertical poles standing on the horizontal ground at two points \(A\) and \(B\) respectively. If \(AP = 16\) m, \(BQ = 22\) m and \(AB = 20\) m, then the minimum value (in m\(^2\)) of \(RP^2 + RQ^2\), where \(R\) is any point on \(AB\), is :
View Solution
Step 1: Understanding the Concept:
Model the problem using coordinates and use calculus or properties of parabolas to minimize the quadratic sum.
Step 2: Key Formula or Approach:
Distance formula and differentiation.
Step 3: Detailed Explanation:
Let \( A = (0, 0), B = (20, 0), P = (0, 16), Q = (20, 22) \).
Let \( R = (x, 0) \) where \( 0 \leq x \leq 20 \).
\[ RP^2 = x^2 + 16^2 = x^2 + 256 \]
\[ RQ^2 = (20 - x)^2 + 22^2 = 400 - 40x + x^2 + 484 = x^2 - 40x + 884 \]
Let \( f(x) = RP^2 + RQ^2 = 2x^2 - 40x + 1140 \).
This is a parabola opening upwards. Minimum occurs at \( x = -\frac{-40}{2(2)} = 10 \).
Minimum value:
\[ f(10) = 2(100) - 400 + 1140 = 200 - 400 + 1140 = 940 \]
Step 4: Final Answer:
The minimum value is 940 m\(^2\).
Quick Tip: By symmetry, if the objective is to minimize the sum of squared distances to two heights, the optimal point is the midpoint of the base only if heights are equal. Otherwise, use \( x = \frac{-b}{2a} \).
The integral \(\int \frac{2}{e^{2x} - 1} dx\) is equal to : (Here \(C\) is a constant of integration).
View Solution
Step 1: Understanding the Concept:
This integral involves exponentials. We can use substitution by transforming the integrand into a form involving \( e^x \) and \( e^{-x} \).
Step 2: Key Formula or Approach:
Multiply numerator and denominator by \( e^{-x} \).
Step 3: Detailed Explanation:
\[ I = \int \frac{2}{e^{2x} - 1} dx = \int \frac{2 e^{-x}}{e^x - e^{-x}} dx \]
We can express the numerator \( 2e^{-x} \) as \( (e^x + e^{-x}) - (e^x - e^{-x}) \):
\[ I = \int \frac{(e^x + e^{-x}) - (e^x - e^{-x})}{e^x - e^{-x}} dx \]
\[ I = \int \left( \frac{e^x + e^{-x}}{e^x - e^{-x}} - 1 \right) dx \]
Separating the integrals:
\[ I = \int \frac{e^x + e^{-x}}{e^x - e^{-x}} dx - \int 1 dx \]
Let \( u = e^x - e^{-x} \implies du = (e^x + e^{-x}) dx \).
\[ I = \ln |e^x - e^{-x}| - x + C \]
Step 4: Final Answer:
The integral is \( -x + \ln |e^x - e^{-x}| + C \).
Quick Tip: Whenever you have \( e^{2x} \pm 1 \) in the denominator, dividing numerator and denominator by \( e^x \) often creates forms like \( \sinh(x) \) or \( \cosh(x) \) which are easy to integrate.
The integral \(\int_{-1/2}^{1/2} (\sin^{-1}(3x - 4x^3) - \cos^{-1}(4x^3 - 3x)) \, dx\) is :
View Solution
Step 1: Understanding the Concept:
The problem involves the integration of inverse trigonometric functions. We can simplify the integrand using standard inverse trigonometric identities for \(3\theta\) and the property of definite integrals over symmetric intervals \([-a, a]\).
Step 2: Key Formula or Approach:
1. \(\sin^{-1}(3x - 4x^3) = 3\sin^{-1}x\) for \(x \in [-\frac{1}{2}, \frac{1}{2}]\).
2. \(\cos^{-1}(-u) = \pi - \cos^{-1}u\).
3. \(\sin^{-1}u + \cos^{-1}u = \frac{\pi}{2}\).
Step 3: Detailed Explanation:
Let the integrand be \(f(x) = \sin^{-1}(3x - 4x^3) - \cos^{-1}(4x^3 - 3x)\).
We know that for \(x \in [-\frac{1}{2}, \frac{1}{2}]\), the argument \(3x - 4x^3\) lies in the range \([-1, 1]\).
The second term can be rewritten as:
\[ \cos^{-1}(4x^3 - 3x) = \cos^{-1}(-(3x - 4x^3)) \]
Using the property \(\cos^{-1}(-u) = \pi - \cos^{-1}u\):
\[ \cos^{-1}(4x^3 - 3x) = \pi - \cos^{-1}(3x - 4x^3) \]
Now, substitute this back into the original function:
\[ f(x) = \sin^{-1}(3x - 4x^3) - [\pi - \cos^{-1}(3x - 4x^3)] \]
\[ f(x) = \sin^{-1}(3x - 4x^3) + \cos^{-1}(3x - 4x^3) - \pi \]
Using the identity \(\sin^{-1}u + \cos^{-1}u = \frac{\pi}{2}\):
\[ f(x) = \frac{\pi}{2} - \pi = -\frac{\pi}{2} \]
The integral becomes:
\[ I = \int_{-1/2}^{1/2} -\frac{\pi}{2} \, dx = -\frac{\pi}{2} [x]_{-1/2}^{1/2} = -\frac{\pi}{2} \left( \frac{1}{2} - \left(-\frac{1}{2}\right) \right) = -\frac{\pi}{2} (1) = -\frac{\pi}{2} \]
Note: While the calculated value is \(-\frac{\pi}{2}\), the options provided in competitive exams often focus on the magnitude or might contain a sign convention error in the question itself. Based on the options provided, \(\frac{\pi}{2}\) is the intended numerical result.
Step 4: Final Answer:
The value of the integral is \(-\frac{\pi}{2}\) (magnitude \(\frac{\pi}{2}\)).
Quick Tip: Always look for the identity \(\sin^{-1} f(x) + \cos^{-1} f(x) = \frac{\pi}{2}\) when you see the same argument in both functions. It reduces complex expressions to constants instantly.
The area (in sq. units) of the region \(A = \{(x, y) : 0 \leq y \leq x \leq \sqrt{2 - y}\}\) is :
View Solution
Step 1: Understanding the Concept:
The region is defined by the intersection of three inequalities: \(y \geq 0\), \(x \geq y\), and \(x \leq \sqrt{2-y}\). The last inequality implies \(x^2 \leq 2-y\) or \(y \leq 2-x^2\).
Step 2: Key Formula or Approach:
The area can be calculated by integrating with respect to \(y\) from \(0\) to the intersection point.
Area \(= \int_{y_1}^{y_2} (x_{right} - x_{left}) \, dy\).
Step 3: Detailed Explanation:
1. Identify the Curves:
- Curve 1: \(x = y\) (a straight line through the origin).
- Curve 2: \(x = \sqrt{2-y} \implies x^2 = 2-y \implies y = 2-x^2\) (a parabola).
2. Find the Intersection Points:
Set \(y = x\) in the equation \(x = \sqrt{2-y}\):
\(x = \sqrt{2-x} \implies x^2 = 2-x \implies x^2 + x - 2 = 0\).
Solving the quadratic: \((x+2)(x-1) = 0\). Since \(x \geq 0\), we have \(x = 1\).
At \(x = 1\), \(y = 1\). So the intersection point is \((1, 1)\).
3. Set up the Integral:
The region is bounded by \(y\) from \(0\) to \(1\). For a fixed \(y\), \(x\) ranges from \(y\) to \(\sqrt{2-y}\).
Area \(= \int_{0}^{1} (\sqrt{2-y} - y) \, dy\).
4. Evaluate the Integral:
\[ Area = \int_{0}^{1} (2-y)^{1/2} \, dy - \int_{0}^{1} y \, dy \]
\[ = \left[ -\frac{2}{3}(2-y)^{3/2} \right]_{0}^{1} - \left[ \frac{y^2}{2} \right]_{0}^{1} \]
\[ = \left( -\frac{2}{3}(1)^{3/2} - (-\frac{2}{3}(2)^{3/2}) \right) - \left( \frac{1}{2} - 0 \right) \]
\[ = \left( -\frac{2}{3} + \frac{2}{3} \cdot 2\sqrt{2} \right) - \frac{1}{2} \]
\[ = \frac{4\sqrt{2}}{3} - \frac{2}{3} - \frac{1}{2} = \frac{4\sqrt{2}}{3} - \frac{7}{6} \]
Step 4: Final Answer:
The area is \(\frac{4\sqrt{2}}{3} - \frac{7}{6}\) sq. units.
Quick Tip: When a region is bounded by a curve \(x=f(y)\), integrating with respect to \(y\) is usually much easier as it avoids splitting the area into multiple parts.
Let \(y = y(x)\) be the solution of the differential equation \(e^y \, dy = (1 + x + e^y + xe^y) \, dx\) and \(y(1) = 0\). Then \(y(-3)\) is equal to :
View Solution
Step 1: Understanding the Concept:
This is a first-order differential equation. We first check if it's variable separable by factoring the right-hand side.
Step 2: Key Formula or Approach:
Factoring: \(1 + x + e^y + xe^y = (1+x) + e^y(1+x) = (1+x)(1+e^y)\).
Step 3: Detailed Explanation:
1. Separate the variables:
\[ e^y \, dy = (1+x)(1+e^y) \, dx \]
\[ \frac{e^y}{1+e^y} \, dy = (1+x) \, dx \]
2. Integrate both sides:
\[ \int \frac{e^y}{1+e^y} \, dy = \int (1+x) \, dx \]
Let \(u = 1+e^y \implies du = e^y \, dy\).
\[ \ln(1+e^y) = x + \frac{x^2}{2} + C \]
3. Apply initial condition \(y(1) = 0\):
\[ \ln(1+e^0) = 1 + \frac{1^2}{2} + C \]
\[ \ln(2) = \frac{3}{2} + C \implies C = \ln 2 - \frac{3}{2} \]
So the solution is: \(\ln(1+e^y) = x + \frac{x^2}{2} + \ln 2 - \frac{3}{2}\).
4. Find \(y(-3)\):
Substitute \(x = -3\):
\[ \ln(1+e^y) = -3 + \frac{(-3)^2}{2} + \ln 2 - \frac{3}{2} \]
\[ \ln(1+e^y) = -3 + \frac{9}{2} + \ln 2 - \frac{3}{2} \]
\[ \ln(1+e^y) = -3 + \frac{6}{2} + \ln 2 = -3 + 3 + \ln 2 = \ln 2 \]
5. Solve for \(y\):
\[ \ln(1+e^y) = \ln 2 \implies 1+e^y = 2 \implies e^y = 1 \implies y = 0 \]
Step 4: Final Answer:
The value of \(y(-3)\) is \(0\).
Quick Tip: Always look for factorization patterns like \(ac+ad+bc+bd = (a+b)(c+d)\) in differential equations to see if they are separable.
If \(A_0, A_1, A_2, A_3, A_4\) and \(A_5\) are the vertices of a regular hexagon inscribed in a circle of unit radius, then the product of the lengths of the line segments \(A_0 A_1, A_0 A_2\) and \(A_0 A_3\) is :
View Solution
Step 1: Understanding the Concept:
A regular hexagon inscribed in a unit circle has its vertices represented by the 6th roots of unity if one vertex is at \((1, 0)\). We can use trigonometric relations or geometry to find segment lengths.
Step 2: Key Formula or Approach:
For a regular polygon with \(n\) sides in a circle of radius \(R\), the length of the chord joining \(A_0\) to \(A_k\) is \(L_k = 2R \sin\left(\frac{k\pi}{n}\right)\).
Step 3: Detailed Explanation:
Here \(R = 1\) and \(n = 6\). We need the product of lengths \(A_0 A_1, A_0 A_2, A_0 A_3\).
1. Length \(A_0 A_1\) (side of hexagon):
\[ A_0 A_1 = 2(1) \sin\left(\frac{1 \cdot \pi}{6}\right) = 2 \sin(30^\circ) = 2 \cdot \frac{1}{2} = 1 \]
2. Length \(A_0 A_2\) (shorter diagonal):
\[ A_0 A_2 = 2(1) \sin\left(\frac{2 \cdot \pi}{6}\right) = 2 \sin(60^\circ) = 2 \cdot \frac{\sqrt{3}}{2} = \sqrt{3} \]
3. Length \(A_0 A_3\) (longer diagonal/diameter):
\[ A_0 A_3 = 2(1) \sin\left(\frac{3 \cdot \pi}{6}\right) = 2 \sin(90^\circ) = 2 \cdot 1 = 2 \]
4. Product:
\[ Product = (A_0 A_1)(A_0 A_2)(A_0 A_3) = 1 \cdot \sqrt{3} \cdot 2 = 2\sqrt{3} \]
Step 4: Final Answer:
The product of the lengths is \(2\sqrt{3}\).
Quick Tip: In a regular hexagon of side \(a\), the short diagonal is \(a\sqrt{3}\) and the long diagonal is \(2a\). Since \(a=R=1\) here, lengths are \(1, \sqrt{3}, 2\).
A line is drawn from a point \(P(-4, 3)\) to cut the circle, \(x^2 + y^2 = 4\) at the points \(A\) and \(B\). Then \(PA \cdot PB\) is equal to :
View Solution
Step 1: Understanding the Concept:
The product \(PA \cdot PB\) for any line through point \(P\) intersecting a circle at \(A\) and \(B\) is constant and equal to the absolute value of the Power of Point \(P\) with respect to the circle.
Step 2: Key Formula or Approach:
Power of a point \(P(x_1, y_1)\) with respect to circle \(S \equiv x^2 + y^2 - r^2 = 0\) is \(S_1 = x_1^2 + y_1^2 - r^2\).
Step 3: Detailed Explanation:
1. Given Data:
- Point \(P = (-4, 3)\).
- Circle \(S \equiv x^2 + y^2 - 4 = 0\).
2. Calculate the Power of Point P:
\[ S_1 = (-4)^2 + (3)^2 - 4 \]
\[ S_1 = 16 + 9 - 4 = 21 \]
3. Result:
According to the Secant-Secant Theorem, \(PA \cdot PB = |S_1| = 21\).
Step 4: Final Answer:
The value of \(PA \cdot PB\) is \(21\).
Quick Tip: The product \(PA \cdot PB\) is independent of the direction of the line. It's always equal to \(|OP^2 - r^2|\), where \(O\) is the center.
The normal to the ellipse \(\frac{x^2}{16} + \frac{y^2}{36} = 1\) at a point \(P\) on the ellipse has slope \(\frac{2}{3}\). If this normal intersects the major axis of the ellipse at a point \(A\), then \((PA)^2\) is equal to :
View Solution
Step 1: Understanding the Concept:
We need to find the equation of the normal with a given slope for the ellipse. Note that \(b^2 = 36 > a^2 = 16\), so the major axis is the \(y\)-axis (\(x=0\)).
Step 2: Key Formula or Approach:
For ellipse \(\frac{x^2}{a^2} + \frac{y^2}{b^2} = 1\), the normal at \((x_1, y_1)\) is \(\frac{a^2 x}{x_1} - \frac{b^2 y}{y_1} = a^2 - b^2\).
Slope \(m = \frac{a^2 y_1}{b^2 x_1}\).
Step 3: Detailed Explanation:
1. Given: \(a^2 = 16, b^2 = 36, m = 2/3\).
Major axis is \(y\)-axis. The point \(A\) lies on the \(y\)-axis (where \(x=0\)).
2. Slope relation:
\(m = \frac{16 y_1}{36 x_1} = \frac{4 y_1}{9 x_1} = \frac{2}{3} \implies \frac{y_1}{x_1} = \frac{2}{3} \cdot \frac{9}{4} = \frac{3}{2}\).
So \(y_1 = \frac{3}{2} x_1\).
3. Point on ellipse:
\(\frac{x_1^2}{16} + \frac{(3x_1/2)^2}{36} = 1 \implies \frac{x_1^2}{16} + \frac{9x_1^2}{4 \cdot 36} = 1 \implies \frac{x_1^2}{16} + \frac{x_1^2}{16} = 1\).
\(2x_1^2 = 16 \implies x_1^2 = 8\) and \(y_1^2 = \frac{9}{4} x_1^2 = \frac{9}{4} \cdot 8 = 18\).
4. Finding point A:
Normal equation: \(\frac{16x}{x_1} - \frac{36y}{y_1} = 16 - 36 = -20\).
At point \(A\) (on major axis \(x=0\)):
\(- \frac{36y_A}{y_1} = -20 \implies y_A = \frac{20 y_1}{36} = \frac{5 y_1}{9}\).
So \(A = (0, \frac{5 y_1}{9})\) and \(P = (x_1, y_1)\).
5. Calculate \((PA)^2\):
\((PA)^2 = (x_1 - 0)^2 + (y_1 - \frac{5y_1}{9})^2 = x_1^2 + (\frac{4y_1}{9})^2\)
\((PA)^2 = x_1^2 + \frac{16 y_1^2}{81} = 8 + \frac{16 \cdot 18}{81} = 8 + \frac{16 \cdot 2}{9} = 8 + \frac{32}{9}\)
\((PA)^2 = \frac{72 + 32}{9} = \frac{104}{9}\).
Step 4: Final Answer:
The value of \((PA)^2\) is \(\frac{104}{9}\).
Quick Tip: In such problems, always check whether \(a > b\) or \(b > a\) to identify the major axis correctly before finding intersection points.
If tangents are drawn from the point \((4, 2)\) to the hyperbola, \(16x^2 - 25y^2 = 400\), then the sum of the reciprocals of the slopes of these tangents is :
View Solution
Step 1: Understanding the Concept:
We use the condition of tangency for a hyperbola and the point-slope form to form a quadratic equation in terms of the slope \(m\).
Step 2: Key Formula or Approach:
For hyperbola \(\frac{x^2}{a^2} - \frac{y^2}{b^2} = 1\), the tangent with slope \(m\) is \(y = mx \pm \sqrt{a^2 m^2 - b^2}\).
Step 3: Detailed Explanation:
1. Standard Form:
\(16x^2 - 25y^2 = 400 \implies \frac{x^2}{25} - \frac{y^2}{16} = 1\).
Here \(a^2 = 25\) and \(b^2 = 16\).
2. Equation of Tangent:
The tangent passing through \((4, 2)\) is \(2 = m(4) \pm \sqrt{25m^2 - 16}\).
Rearranging: \(2 - 4m = \pm \sqrt{25m^2 - 16}\).
3. Forming Quadratic in m:
Squaring both sides: \((2 - 4m)^2 = 25m^2 - 16\).
\(4 + 16m^2 - 16m = 25m^2 - 16 \implies 9m^2 + 16m - 20 = 0\).
Let \(m_1\) and \(m_2\) be the slopes of the tangents.
From Vieta's formulas: \(m_1 + m_2 = -\frac{16}{9}\) and \(m_1 m_2 = -\frac{20}{9}\).
4. Sum of reciprocals:
\[ \frac{1}{m_1} + \frac{1}{m_2} = \frac{m_1 + m_2}{m_1 m_2} = \frac{-16/9}{-20/9} = \frac{16}{20} = \frac{4}{5} \]
Step 4: Final Answer:
The sum of the reciprocals is \(\frac{4}{5}\).
Quick Tip: The expression \(\frac{1}{m_1} + \frac{1}{m_2}\) is symmetric, so you don't need to find individual slopes; just use the sum and product of the roots.
A plane passes through the points \((\alpha, 1, 0), (\alpha, 2, 1), (-2, 2, -1)\) and \((1, 1, 0)\) for some \(\alpha \in \mathbb{R}\). Then the distance of the point \((1, 1, 1)\) from this plane is :
View Solution
Step 1: Understanding the Concept:
Four points are coplanar if the determinant formed by vectors between them is zero. We first find \(\alpha\), then find the equation of the plane.
Step 2: Key Formula or Approach:
1. Coplanarity: \(\begin{vmatrix} x_2-x_1 & y_2-y_1 & z_2-z_1
x_3-x_1 & y_3-y_1 & z_3-z_1
x_4-x_1 & y_4-y_1 & z_4-z_1 \end{vmatrix} = 0\).
2. Distance from \((x_0, y_0, z_0)\) to \(Ax+By+Cz+D=0\) is \(d = \frac{|Ax_0+By_0+Cz_0+D|}{\sqrt{A^2+B^2+C^2}}\).
Step 3: Detailed Explanation:
1. Finding \(\alpha\):
Let the points be \(P_1(\alpha, 1, 0), P_2(\alpha, 2, 1), P_3(-2, 2, -1), P_4(1, 1, 0)\).
\(\vec{P_4 P_1} = (\alpha-1, 0, 0)\), \(\vec{P_4 P_2} = (\alpha-1, 1, 1)\), \(\vec{P_4 P_3} = (-3, 1, -1)\).
\(\begin{vmatrix} \alpha-1 & 0 & 0
\alpha-1 & 1 & 1
-3 & 1 & -1 \end{vmatrix} = (\alpha-1)(-1 - 1) = -2(\alpha-1) = 0 \implies \alpha = 1\).
2. Plane Equation:
The points are \((1, 1, 0), (1, 2, 1), (-2, 2, -1)\).
Normal \(\vec{n} = (P_2 - P_4) \times (P_3 - P_4) = (0, 1, 1) \times (-3, 1, -1)\).
\(\vec{n} = \begin{vmatrix} \hat{i} & \hat{j} & \hat{k}
0 & 1 & 1
-3 & 1 & -1 \end{vmatrix} = \hat{i}(-2) - \hat{j}(3) + \hat{k}(3) = (-2, -3, 3)\).
Equation: \(-2(x-1) - 3(y-1) + 3(z-0) = 0 \implies 2x + 3y - 3z = 5\).
3. Distance Calculation:
Distance from \((1, 1, 1)\) to \(2x + 3y - 3z - 5 = 0\):
\(d = \frac{|2(1) + 3(1) - 3(1) - 5|}{\sqrt{2^2 + 3^2 + (-3)^2}} = \frac{|2 - 5|}{\sqrt{4 + 9 + 9}} = \frac{3}{\sqrt{22}}\).
Step 4: Final Answer:
The distance is \(\frac{3}{\sqrt{22}}\).
Quick Tip: If two points have identical coordinates except one (like \(P_1\) and \(P_4\)), the vector between them lies along a coordinate axis, simplifying the coplanarity determinant significantly.
Let \(\vec{OA} = \vec{a} = \frac{1}{2}(\hat{i} + \hat{j} - 2\hat{k})\), \(\vec{OC} = \vec{b} = \hat{i} - 2\hat{j} + \hat{k}\) and \(\vec{OB} = 10\vec{a} + 2\vec{b}\). Let \(p\) (in sq. units) be the area of the quadrilateral \(OABC\) and \(q\) (in sq. units) be the area of the parallelogram with \(\vec{OA}\) and \(\vec{OC}\) as adjacent sides, then \(\frac{p}{q}\) is equal to :
View Solution
Step 1: Understanding the Concept:
The area of a quadrilateral \(OABC\) can be found by summing the areas of triangles \(OAB\) and \(OBC\). The area of a parallelogram is the magnitude of the cross product of its adjacent sides.
Step 2: Key Formula or Approach:
1. Area of \(\triangle OPQ = \frac{1}{2} |\vec{OP} \times \vec{OQ}|\).
2. Area of parallelogram with sides \(\vec{a}, \vec{b} = |\vec{a} \times \vec{b}|\).
Step 3: Detailed Explanation:
1. Area q:
\(q = |\vec{a} \times \vec{b}|\).
2. Area p (Quadrilateral \(OABC\)):
The quadrilateral is formed by vertices \(O, A, B, C\). Its area is:
\(p = Area(\triangle OAB) + Area(\triangle OBC)\)
\(p = \frac{1}{2} |\vec{OA} \times \vec{OB}| + \frac{1}{2} |\vec{OB} \times \vec{OC}|\)
Substitute \(\vec{OB} = 10\vec{a} + 2\vec{b}\):
\(\vec{OA} \times \vec{OB} = \vec{a} \times (10\vec{a} + 2\vec{b}) = 10(\vec{a} \times \vec{a}) + 2(\vec{a} \times \vec{b}) = 2(\vec{a} \times \vec{b})\).
\(\vec{OB} \times \vec{OC} = (10\vec{a} + 2\vec{b}) \times \vec{b} = 10(\vec{a} \times \vec{b}) + 2(\vec{b} \times \vec{b}) = 10(\vec{a} \times \vec{b})\).
So, \(p = \frac{1}{2} |2(\vec{a} \times \vec{b})| + \frac{1}{2} |10(\vec{a} \times \vec{b})|\)
\(p = |\vec{a} \times \vec{b}| + 5|\vec{a} \times \vec{b}| = 6|\vec{a} \times \vec{b}|\).
3. Ratio:
\(\frac{p}{q} = \frac{6|\vec{a} \times \vec{b}|}{|\vec{a} \times \vec{b}|} = 6\).
Step 4: Final Answer:
The ratio \(\frac{p}{q}\) is \(6\).
Quick Tip: Using vector properties like \(\vec{x} \times \vec{x} = 0\) allows you to simplify areas without calculating the actual cross products of the component vectors.
A bag contains 8 white and 6 black balls. A ball is drawn at random from the bag, its colour is observed and kept aside (i.e., not returned in the bag). Three additional balls of the same colour as observed are put in the bag. If now two balls are drawn simultaneously at random from the bag, then the probability that these two balls are of different colours, is :
View Solution
Step 1: Understanding the Concept:
The problem involves multiple stages of probability.
First, a ball is drawn and its color determines how the bag is modified.
Then, two balls are drawn from the modified bag.
We use the Law of Total Probability to find the final probability of drawing two different colored balls.
Step 2: Key Formula or Approach:
1. Total probability \( P(E) = P(C_1) \cdot P(E|C_1) + P(C_2) \cdot P(E|C_2) \).
2. Combination formula \( \binom{n}{r} = \frac{n!}{r!(n-r)!} \).
Step 3: Detailed Explanation:
Initially, the bag has 8 White (W) and 6 Black (B) balls. Total balls = 14.
Let \( W_1 \) be the event that the first ball drawn is white, and \( B_1 \) be the event that it is black.
\( P(W_1) = \frac{8}{14} = \frac{4}{7} \).
\( P(B_1) = \frac{6}{14} = \frac{3}{7} \).
Case 1: First ball is White (\( W_1 \)):
One white ball is removed (leaving 7W, 6B) and 3 white balls are added.
New composition: \( (7+3)W + 6B = 10W + 6B \). Total balls = 16.
Probability of drawing 2 different colors (1W and 1B):
\[ P(Diff | W_1) = \frac{\binom{10}{1} \cdot \binom{6}{1}}{\binom{16}{2}} = \frac{10 \cdot 6}{\frac{16 \cdot 15}{2}} = \frac{60}{120} = \frac{1}{2} \].
Case 2: First ball is Black (\( B_1 \)):
One black ball is removed (leaving 8W, 5B) and 3 black balls are added.
New composition: \( 8W + (5+3)B = 8W + 8B \). Total balls = 16.
Probability of drawing 2 different colors (1W and 1B):
\[ P(Diff | B_1) = \frac{\binom{8}{1} \cdot \binom{8}{1}}{\binom{16}{2}} = \frac{8 \cdot 8}{120} = \frac{64}{120} = \frac{8}{15} \].
Total Probability:
\[ P(Diff) = P(W_1) \cdot P(Diff | W_1) + P(B_1) \cdot P(Diff | B_1) \]
\[ P(Diff) = \left( \frac{4}{7} \cdot \frac{1}{2} \right) + \left( \frac{3}{7} \cdot \frac{8}{15} \right) \]
\[ P(Diff) = \frac{2}{7} + \frac{8}{35} = \frac{10 + 8}{35} = \frac{18}{35} \].
Step 4: Final Answer:
The probability that the two balls drawn are of different colors is \( \frac{18}{35} \).
Quick Tip: In multi-stage probability problems, clearly list the bag's state after each possible initial outcome to avoid calculation errors.
Always simplify fractions at the very end to keep denominators common for easier addition.
A factory has two machines A and B. The machine A produces 60% of the items manufactured while the machine B produces 40% of the items. Further 2% of the items produced by the machine A are defective and 1% of that produced by the machine B are defective. If an item is drawn at random from the manufactured items, then the probability of its being defective is :
View Solution
Step 1: Understanding the Concept:
This problem requires the Theorem of Total Probability.
We are given the production split between two machines and the defective rate for each machine.
The total probability of drawing a defective item is the weighted sum of the defective probabilities from each source.
Step 2: Detailed Explanation:
Let \( A \) and \( B \) be the events that an item is produced by machine A and machine B, respectively.
Let \( D \) be the event that the item is defective.
Given:
\( P(A) = 60% = 0.60 \)
\( P(B) = 40% = 0.40 \)
Probability that an item from machine A is defective: \( P(D|A) = 2% = 0.02 \).
Probability that an item from machine B is defective: \( P(D|B) = 1% = 0.01 \).
Using the Law of Total Probability:
\[ P(D) = P(A) \cdot P(D|A) + P(B) \cdot P(D|B) \]
\[ P(D) = (0.60 \times 0.02) + (0.40 \times 0.01) \]
\[ P(D) = 0.012 + 0.004 \]
\[ P(D) = 0.016 \].
Step 3: Final Answer:
The probability that a randomly drawn item is defective is 0.016.
Quick Tip: For total probability, simply multiply the probability of choosing a path by the probability of success on that path and add them up.
The mean deviation about the mean of the data in the following frequency distribution:
\begin{tabular{|c|c|c|c|c|
\hline \( x \) & 0 & 1 & 2 & 3
\hline
frequency & 2 & 5 & 4 & 1
\hline
\end{tabular
is :
View Solution
Step 1: Understanding the Concept:
Mean Deviation (M.D.) about the mean measures the average absolute distance of each observation from the arithmetic mean.
For grouped data, we calculate the mean first, find absolute deviations, and then find their weighted average using frequencies.
Step 2: Key Formula or Approach:
1. Mean \( \bar{x} = \frac{\sum f_i x_i}{\sum f_i} \).
2. M.D. (\(\bar{x}\)) = \(\frac{\sum f_i |x_i - \bar{x}|}{\sum f_i} \).
Step 2: Detailed Explanation:
First, find the total frequency \( N \):
\( N = \sum f_i = 2 + 5 + 4 + 1 = 12 \).
Calculate \( \sum f_i x_i \):
\( \sum f_i x_i = (0 \times 2) + (1 \times 5) + (2 \times 4) + (3 \times 1) = 0 + 5 + 8 + 3 = 16 \).
Mean \( \bar{x} = \frac{16}{12} = \frac{4}{3} \).
Now, calculate absolute deviations \( |x_i - \bar{x}| \):
For \( x = 0 \): \( |0 - \frac{4}{3}| = \frac{4}{3} \).
For \( x = 1 \): \( |1 - \frac{4}{3}| = \frac{1}{3} \).
For \( x = 2 \): \( |2 - \frac{4}{3}| = \frac{2}{3} \).
For \( x = 3 \): \( |3 - \frac{4}{3}| = \frac{5}{3} \).
Calculate \( \sum f_i |x_i - \bar{x}| \):
\( \sum f_i |x_i - \bar{x}| = 2(\frac{4}{3}) + 5(\frac{1}{3}) + 4(\frac{2}{3}) + 1(\frac{5}{3}) \)
\( = \frac{8}{3} + \frac{5}{3} + \frac{8}{3} + \frac{5}{3} = \frac{26}{3} \).
Calculate Mean Deviation:
M.D. (\(\bar{x}\)) = \(\frac{\sum f_i |x_i - \bar{x}|}{N} = \frac{26/3}{12} = \frac{26}{36} = \frac{13}{18} \).
Step 3: Final Answer:
The mean deviation about the mean is \( \frac{13}{18} \).
Quick Tip: When the mean is a fraction, keep everything in fractional form throughout the calculation to maintain precision and avoid rounding errors.
Let \( S = \{ \theta \in (0, 2\pi) : 2 \sin \theta (4 \sin \theta - \sin 3\theta) = 3 \} \). Then \( \sum_{\theta \in S} \tan^2 3\theta \) is equal to :
View Solution
Step 1: Understanding the Concept:
This question requires solving a trigonometric equation to find the set \( S \) of solutions in the given interval.
We use the triple angle formula for sine to simplify the expression and convert it into a quadratic equation in terms of \( \sin^2 \theta \).
Step 2: Key Formula or Approach:
1. Triple angle formula: \( \sin 3\theta = 3 \sin \theta - 4 \sin^3 \theta \).
Step 2: Detailed Explanation:
Simplify the expression inside the parenthesis:
\( 4 \sin \theta - \sin 3\theta = 4 \sin \theta - (3 \sin \theta - 4 \sin^3 \theta) = \sin \theta + 4 \sin^3 \theta \).
Substitute back into the equation:
\( 2 \sin \theta (\sin \theta + 4 \sin^3 \theta) = 3 \)
\( 2 \sin^2 \theta + 8 \sin^4 \theta = 3 \)
Let \( \sin^2 \theta = t \). Then:
\( 8t^2 + 2t - 3 = 0 \).
Factoring the quadratic equation:
\( 8t^2 + 6t - 4t - 3 = 0 \)
\( 2t(4t+3) - 1(4t+3) = 0 \)
\( (2t-1)(4t+3) = 0 \).
Since \( \sin^2 \theta \ge 0 \), we take \( t = \frac{1}{2} \).
\( \sin^2 \theta = \frac{1}{2} \implies \sin \theta = \pm \frac{1}{\sqrt{2}} \).
For \( \theta \in (0, 2\pi) \), the solutions are:
\( \theta = \frac{\pi}{4}, \frac{3\pi}{4}, \frac{5\pi}{4}, \frac{7\pi}{4} \). These are the elements of set \( S \).
Now calculate \( \tan^2 3\theta \) for these values:
If \( \theta = \frac{\pi}{4}, \frac{3\pi}{4}, \frac{5\pi}{4}, \frac{7\pi}{4} \), then \( 3\theta = \frac{3\pi}{4}, \frac{9\pi}{4}, \frac{15\pi}{4}, \frac{21\pi}{4} \).
For all these angles, the terminal side is in a quadrant where the absolute value of tan is 1.
Specifically:
\( \tan^2(\frac{3\pi}{4}) = (-1)^2 = 1 \).
\( \tan^2(\frac{9\pi}{4}) = \tan^2(2\pi + \frac{\pi}{4}) = 1^2 = 1 \).
\( \tan^2(\frac{15\pi}{4}) = \tan^2(4\pi - \frac{\pi}{4}) = (-1)^2 = 1 \).
\( \tan^2(\frac{21\pi}{4}) = \tan^2(5\pi + \frac{\pi}{4}) = 1^2 = 1 \).
The sum is:
\( \sum_{\theta \in S} \tan^2 3\theta = 1 + 1 + 1 + 1 = 4 \).
Step 3: Final Answer:
The sum \( \sum_{\theta \in S} \tan^2 3\theta \) is equal to 4.
Quick Tip: Notice the symmetry of the solutions. For \( \sin^2 \theta = 1/2 \), all possible \( \tan^2 3\theta \) values are identical, making the sum simply \( n \times value \).
Two towers AB and CD are standing on a horizontal plane with points A and C on the plane. If AB = 10 m and the angles of elevation of D from A and B are 60\(^\circ\) and 15\(^\circ\) respectively, then which of the following (in meters) is not true ?
View Solution
Step 1: Understanding the Concept:
This is a heights and distances problem. We use right-angled triangle trigonometry to relate the heights of the towers and the horizontal distance between them.
Step 2: Key Formula or Approach:
1. \( \tan \theta = \frac{Height}{Base} \).
2. \( \tan 15^\circ = 2 - \sqrt{3} \).
Step 2: Detailed Explanation:
Let the height of tower \( CD = h \) and the distance between the bases \( AC = x \).
Tower \( AB \) has height 10 m.
In \( \triangle ACD \):
\( \tan 60^\circ = \frac{h}{x} \implies \sqrt{3} = \frac{h}{x} \implies x = \frac{h}{\sqrt{3}} \).
From point \( B \) to point \( D \):
Let \( E \) be a point on \( CD \) such that \( BE \perp CD \).
Then \( BE = AC = x \) and \( DE = CD - AB = h - 10 \).
In \( \triangle BED \):
\( \tan 15^\circ = \frac{h - 10}{x} \).
Substituting \( x = \frac{h}{\sqrt{3}} \) and \( \tan 15^\circ = 2 - \sqrt{3} \):
\( (2 - \sqrt{3}) = \frac{h - 10}{h/\sqrt{3}} \)
\( \frac{2h}{\sqrt{3}} - h = h - 10 \)
\( 10 = 2h - \frac{2h}{\sqrt{3}} = 2h \left( \frac{\sqrt{3} - 1}{\sqrt{3}} \right) \)
\( h = \frac{5\sqrt{3}}{\sqrt{3} - 1} = \frac{5\sqrt{3}(\sqrt{3} + 1)}{2} = \frac{5(3 + \sqrt{3})}{2} \). (Option B is true)
Now find \( x \) (AC):
\( x = \frac{h}{\sqrt{3}} = \frac{5(3 + \sqrt{3})}{2\sqrt{3}} = \frac{5(\sqrt{3} + 1)}{2} \). (Option A is true)
Find \( AD \):
In \( \triangle ACD \), \( AD = \frac{h}{\sin 60^\circ} = \frac{h}{\sqrt{3}/2} = \frac{2h}{\sqrt{3}} = \frac{2}{\sqrt{3}} \cdot \frac{5\sqrt{3}(\sqrt{3} + 1)}{2} = 5(\sqrt{3} + 1) \). (Option D is true)
Find \( BD \):
\( BD^2 = BE^2 + DE^2 = x^2 + (h-10)^2 \).
\( h-10 = \frac{15+5\sqrt{3}}{2} - 10 = \frac{5\sqrt{3} - 5}{2} = \frac{5(\sqrt{3} - 1)}{2} \).
\( BD^2 = \left[ \frac{5(\sqrt{3} + 1)}{2} \right]^2 + \left[ \frac{5(\sqrt{3} - 1)}{2} \right]^2 = \frac{25}{4} [(\sqrt{3}+1)^2 + (\sqrt{3}-1)^2] \)
\( BD^2 = \frac{25}{4} [(3+1+2\sqrt{3}) + (3+1-2\sqrt{3})] = \frac{25 \cdot 8}{4} = 50 \).
\( BD = \sqrt{50} = 5\sqrt{2} \).
Option (C) says \( BD = 5\sqrt{3} \), which is not true.
Step 3: Final Answer:
The statement which is not true is (C) \( BD = 5\sqrt{3} \).
Quick Tip: Remember the value of \( \tan 15^\circ = 2 - \sqrt{3} \) or \( \frac{\sqrt{3}-1}{\sqrt{3}+1} \). It appears frequently in JEE and other competitive exam height and distance problems.
Which one of the following statements is a tautology ?
View Solution
Step 1: Understanding the Concept:
A tautology is a compound statement that is true for all possible truth values of its simple component statements.
We can use truth tables or logical laws (De Morgan's, distributive, etc.) to evaluate each option.
Step 2: Detailed Explanation:
Evaluate each option using logical equivalences:
Option (A): \( p \land \sim(p \land q) \)
By De Morgan's Law: \( p \land (\sim p \lor \sim q) \).
By Distributive Law: \( (p \land \sim p) \lor (p \land \sim q) \equiv F \lor (p \land \sim q) \equiv p \land \sim q \).
This depends on truth values of \( p \) and \( q \). Not a tautology.
Option (B): \( (p \land q) \lor \sim(p \lor q) \equiv (p \land q) \lor (\sim p \land \sim q) \).
This is equivalent to the bi-conditional \( p \leftrightarrow q \). It is true if \( p, q \) have the same truth values, false otherwise. Not a tautology.
Option (C): \( (p \lor q) \land \sim(p \land q) \).
This is the exclusive OR (\( p \oplus q \)). It is false if both are true or both are false. Not a tautology.
Option (D): \( q \lor \sim(p \land q) \)
By De Morgan's Law: \( q \lor (\sim p \lor \sim q) \).
By Commutative and Associative Laws: \( (q \lor \sim q) \lor \sim p \).
Since \( q \lor \sim q \equiv T \):
\( T \lor \sim p \equiv T \).
This expression is always true regardless of the values of \( p \) and \( q \). This is a tautology.
Step 3: Final Answer:
The correct tautology is (D) \( q \lor (\sim(p \land q)) \).
Quick Tip: If an expression contains \( A \lor \sim A \) as a part of a larger disjunction, the whole expression is instantly a tautology because \( T \lor anything = T \).
Which one of the following was usually constructed in a chaitya in a Buddhist Monastery ?
View Solution
Step 1: Understanding the Concept:
In Buddhist architecture, a Chaitya (or Chaitya-griha) refers to a prayer hall or shrine that contains a stupa.
It is a place for congregational worship and meditation.
Step 2: Detailed Explanation:
Chaityas were large, hall-like structures often rock-cut or built with wood and stone.
At the end of the rectangular hall, there is a semi-circular apse where a Stupa is located.
The Stupa represents the Buddha and serves as the primary object of veneration.
Monastic cells for monks to live in are usually found in the adjacent Viharas, not the Chaityas.
Step 3: Final Answer:
A Stupa was the central object constructed within a Chaitya. Quick Tip: Remember: Chaitya = Prayer Hall (with Stupa); Vihara = Residential quarters/monastery for monks.
The famous Sun Temple is located in which of the following State ?
View Solution
Step 1: Understanding the Concept:
The most prominent Sun Temple in India is the Konark Sun Temple, a UNESCO World Heritage site.
Step 2: Detailed Explanation:
The Sun Temple of Konark is located in the state of Odisha, near the city of Puri.
It was built in the 13th century (around 1250 CE) by King Narasimhadeva I of the Eastern Ganga Dynasty.
The temple is designed in the shape of a colossal chariot of the Sun God, Surya, with 24 carved stone wheels and 7 horses.
Step 3: Final Answer:
The Sun Temple is located in the State of Odisha. Quick Tip: Konark is also known as the "Black Pagoda" due to its dark color, while the Jagannath Temple in Puri is known as the "White Pagoda".
The horizontal part of a staircase is known as which of the following ?
View Solution
Step 1: Understanding the Concept:
A staircase consists of several components, primarily the vertical and horizontal parts that form the steps.
Step 2: Detailed Explanation:
1. Tread: This is the horizontal portion of a step upon which the foot is placed.
2. Riser: This is the vertical portion between each tread in a staircase.
3. Rail: This is the handrail that users hold for support.
4. Baluster: These are the vertical rods or posts that support the handrail.
Step 3: Final Answer:
The horizontal part of a staircase is called the Tread. Quick Tip: A common thumb rule for stairs is: \( 2 \times Riser + 1 \times Tread = 600 to 640 mm \).
Where amongst the following are the famous rock cut caves found in India ?
View Solution
Step 1: Understanding the Concept:
Rock-cut architecture is a form of carving structures out of naturally occurring solid rock.
Step 2: Detailed Explanation:
The Ellora Caves, located in Maharashtra, are one of the largest rock-cut monastery-temple cave complexes in the world.
They feature Buddhist, Hindu, and Jain monuments and artwork dating from the 600–1000 CE period.
Cave 16 at Ellora features the Kailasa temple, a chariot-shaped monument dedicated to Lord Shiva, which is the largest single monolithic rock excavation in the world.
Step 3: Final Answer:
Famous rock-cut caves are found in Ellora. Quick Tip: Ellora and Ajanta are both famous cave sites in Maharashtra, but while Ajanta is primarily Buddhist and known for paintings, Ellora represents multiple religions and is known for its architecture.
Which one of the following colors is considered to be the happiest of colors ?
View Solution
Step 1: Understanding the Concept:
Color psychology studies how different colors influence human emotions and behavior.
Step 2: Detailed Explanation:
Yellow is universally recognized as the color of happiness, optimism, and enlightenment.
It is associated with the sun and brightness, which typically triggers positive feelings of warmth and joy.
While Blue is calming, Red is aggressive/passionate, and Black is formal/somber, Yellow remains the most associated with cheerfulness.
Step 3: Final Answer:
Yellow is considered the happiest color in color psychology. Quick Tip: Yellow is often used in spaces where social interaction and communication are encouraged, as it stimulates mental activity.
Who amongst the following designed the Madhya Pradesh Assembly building ?
View Solution
Step 1: Understanding the Concept:
The Vidhan Bhavan (State Assembly Building) in Bhopal is a landmark project in post-independence Indian architecture.
Step 2: Detailed Explanation:
The Vidhan Bhavan in Bhopal, Madhya Pradesh, was designed by the renowned Indian architect Charles Correa.
Completed in 1996, the building is circular in plan and incorporates a series of courtyards, reflecting the traditional "mandala" concept.
Correa was awarded the Aga Khan Award for Architecture for this specific project.
Step 3: Final Answer:
Charles Correa is the architect of the Madhya Pradesh Assembly building. Quick Tip: Charles Correa is also famous for designing the Jawahar Kala Kendra in Jaipur and the Sabarmati Ashram museum.
Which among the following is the tallest building in Kolkata ?
View Solution
Step 1: Understanding the Concept:
Identifying major skyscrapers and their heights in Indian metropolitan cities.
Step 2: Detailed Explanation:
"The 42" is a residential skyscraper located on Chowringhee Road in Kolkata.
Standing at a height of approximately 260 meters (850 ft) with 65 floors, it is the tallest building in Kolkata and was briefly the tallest building in India upon completion.
Step 3: Final Answer:
The 42 is currently the tallest building in Kolkata. Quick Tip: Always keep updated with skyscraper rankings as they change frequently with new construction.
The Capitol Complex of Chandigarh is designed by which one of the following architect ?
View Solution
Step 1: Understanding the Concept:
Chandigarh was India's first planned city after independence, and its master plan and key administrative buildings were designed by a Swiss-French architect.
Step 2: Detailed Explanation:
The Capitol Complex, which includes the Legislative Assembly, the Secretariat, and the High Court, was designed by Le Corbusier.
The site also features his iconic "Open Hand" monument, which symbolizes "peace and reconciliation; open to give and open to receive".
The complex is now a UNESCO World Heritage site.
Step 3: Final Answer:
The Capitol Complex was designed by Le Corbusier. Quick Tip: Le Corbusier's principles of the "Five Points of Architecture" and the "Modulor" scale were extensively used in the design of Chandigarh.
The texture of a baby's skin is which one of the following ?
View Solution
Step 1: Understanding the Concept:
Texture refers to the surface quality or "feel" of an object.
Step 2: Detailed Explanation:
A baby's skin is known for being soft and delicate.
"Smooth" describes a surface that is even and without lumps, ripples, or roughness.
"Rough" would be the opposite, and "Corrugated" refers to a series of parallel ridges and furrows (like cardboard).
Step 3: Final Answer:
The texture is Smooth. Quick Tip: In design exams, texture is often categorized as "Tactile" (what you feel) or "Visual" (what you see).
A gondola is a boat found mainly in the canals of which one of the following cities ?
View Solution
Step 1: Understanding the Concept:
Gondolas are traditional, flat-bottomed Venetian rowing boats.
Step 2: Detailed Explanation:
Venice, Italy, is a city built on more than 100 small islands in a lagoon in the Adriatic Sea.
It has no roads, only canals—including the Grand Canal thoroughfare—lined with Renaissance and Gothic palaces.
The Gondola is the primary symbol and a traditional mode of transport in these Venetian canals.
Step 3: Final Answer:
Gondolas are found in Venice. Quick Tip: The person who rows a gondola is called a "Gondolier".
The best shadow less light is found from which of the following direction ?
View Solution
Step 1: Understanding the Concept:
The orientation of light affects shadows and consistency of illumination, especially in the northern hemisphere.
Step 2: Detailed Explanation:
In the Northern Hemisphere, North-facing windows receive diffuse, indirect sunlight throughout the day.
Unlike East or West light (which changes with the sun's position) or South light (which is harsh and direct), North light is consistent and creates minimal harsh shadows.
This is why artists' studios and drafting rooms are traditionally designed with large north-facing windows.
Step 3: Final Answer:
North direction provides the best shadowless light. Quick Tip: For exams, remember: North light is diffuse; South light is direct/harsh (in the northern hemisphere).
In the Indian product market Ebco is known for the manufacture of which one of the following ?
View Solution
Step 1: Understanding the Concept:
Ebco is a prominent Indian company specializing in furniture fittings and accessories.
Step 2: Detailed Explanation:
Ebco (Ebco Private Limited) is one of India's leading manufacturers in the furniture hardware segment.
Their product range includes drawer slides, hinges, computer furniture fittings, joinery fittings, wardrobe fittings, and various other architectural hardware solutions.
Step 3: Final Answer:
Ebco is known for Architectural hardware. Quick Tip: Brands like Hafele, Hettich, and Ebco are key names to remember for architectural hardware.
What is the thickness of a normal one brick thick wall ?
View Solution
Step 1: Understanding the Concept:
Brick wall thickness is determined by the dimensions of a standard brick used in construction.
Step 2: Detailed Explanation:
A standard modular brick has dimensions of \( 190 mm \times 90 mm \times 90 mm \).
When laid with mortar, the nominal dimensions become \( 200 mm \times 100 mm \times 100 mm \).
However, the traditional "9-inch" wall (one brick length) in the Indian context is roughly \( 230 mm \).
Therefore, a one-brick thick wall is standardly taken as 230 mm.
Step 3: Final Answer:
The thickness of a normal one-brick wall is 230 mm. Quick Tip: Standard Wall Thicknesses:
Half Brick wall = 115 mm (approx. 4.5 inches)
One Brick wall = 230 mm (approx. 9 inches)
Which of the following colors is made when red and yellow colors are mixed ?
View Solution
Step 1: Understanding the Concept:
This question pertains to the color wheel and the mixing of primary colors.
Step 2: Detailed Explanation:
In the RYB (Red, Yellow, Blue) color model used in art:
1. Red and Yellow (Primary) mixed together produce **Orange** (Secondary).
2. Red and Blue produce **Purple**.
3. Blue and Yellow produce **Green**.
Step 3: Final Answer:
Red + Yellow = Orange. Quick Tip: Primary colors: Red, Yellow, Blue.
Secondary colors: Orange, Green, Violet/Purple.
A gutter with a sloping roof is meant for which of the following ?
View Solution
Step 1: Understanding the Concept:
Gutters are plumbing/drainage components of a building's exterior.
Step 2: Detailed Explanation:
A rain gutter is a narrow channel, or trough, forming the component of a roof system which collects and diverts rainwater shed by the roof.
Its primary purpose is to protect the building's foundation by channeling water away from its base.
It also helps to reduce erosion, prevents leaks in basements and crawlspaces, and protects painted or stained surfaces by reducing exposure to water.
Step 3: Final Answer:
A gutter is meant for draining rain water. Quick Tip: Gutters are usually connected to vertical pipes called "downspouts" or "rainwater pipes".
Identify the correct mirror image for the given problem figure when the mirror is placed at line X-X.
View Solution
Step 1: Understanding the Concept:
A mirror image is formed by a lateral inversion of the object.
When a mirror is placed vertically (line X-X), the left side of the object appears on the right side of the image, and the right side appears on the left.
The top and bottom orientations remain unchanged.
Step 2: Detailed Explanation:
1. Observe the problem figure: It is a square divided into multiple triangular and rectangular segments.
2. There are specific horizontal and diagonal lines concentrated on the left side of the square.
3. In the mirror image, these features must move to the right side of the square.
4. By comparing the options:
- Figure 1: Shows the horizontal and diagonal segments shifted correctly to the right side. It is the perfect lateral inversion.
- Figure 2: Shows a vertical flip (top-to-bottom), which is characteristic of a water image, not a mirror image.
- Figure 3: The arrangement of internal lines is completely altered and does not correspond to a reflection.
- Figure 4: The lines are not mirrored correctly relative to the X-X axis.
Step 3: Final Answer:
Therefore, Figure 1 is the correct mirror image.
Quick Tip: For vertical mirrors, remember: Left \(\leftrightarrow\) Right.
Points closer to the mirror in the object must be closer to the mirror in the image.
Top and Bottom stay the same.
Identify the correct mirror image for the given problem figure when the mirror is placed at line X-X.
View Solution
Step 1: Understanding the Concept:
A vertical mirror (X-X) causes lateral inversion.
The parts of the figure pointing towards the mirror will point away in the reflection, and vice versa.
Step 2: Detailed Explanation:
1. The problem figure consists of a square with diagonal lines forming a smaller diamond shape inside.
2. There is a specific triangular structure in the middle that points towards the right (towards the mirror X-X).
3. In the mirror image, this central part must point towards the left (away from the mirror).
4. Evaluating the options:
- Figure 1: Correctly mirrors the central triangle pointing it to the left and maintains the correct diagonal structure.
- Figure 2: The triangle still points to the right, meaning no reflection occurred.
- Figure 3: The central part is rotated downwards, which is incorrect.
- Figure 4: The lines are oriented vertically and horizontally, losing the diagonal detail of the original.
Step 3: Final Answer:
Figure 1 is the correct mirror reflection.
Quick Tip: Focus on a single unique "anchor" part of the image (like a pointing arrow or a shaded corner) and see where it moves in the options to eliminate wrong answers quickly.
Identify the correct mirror image for the given problem figure when the mirror is placed at line X-X.
View Solution
Step 1: Understanding the Concept:
Lateral inversion swaps the horizontal positions.
Distances from the mirror line are preserved in the reflection.
Step 2: Detailed Explanation:
1. The problem figure shows lines radiating from a point near the left edge of the square.
2. There is an irregular polygon shape attached to these lines.
3. In the mirror image, the "source" point of the radiating lines should appear near the right edge of the square.
4. Analyzing the options:
- Figure 1: The radiating point is still on the left. Incorrect.
- Figure 2: The radiating point is correctly placed on the right, and the lines extend towards the left. This is the exact lateral inversion.
- Figure 3: The point is located at the bottom-left corner. Incorrect.
- Figure 4: The figure is upside down. Incorrect.
Step 3: Final Answer:
Figure 2 is the correct laterally inverted image.
Quick Tip: Imagine folding the paper along the mirror line X-X. The figure on the left should overlap exactly with the correct option on the right.
Identify the correct mirror image for the given problem figure when the mirror is placed at line X-X.
View Solution
Step 1: Understanding the Concept:
Horizontal parts of an object are flipped in a vertical mirror reflection.
The shape's path (like a maze) will reverse its horizontal direction.
Step 2: Detailed Explanation:
1. The problem figure is a blocky, maze-like shape similar to a stylized 'G' or 'C'.
2. The "open" part of the shape is facing towards the right (the mirror).
3. In the mirror image, the "open" part must face towards the left.
4. Checking the options:
- Figure 1: The shape is flipped horizontally. The segments that went right now go left. This is correct.
- Figure 2: This is an exact copy of the problem figure (no reflection).
- Figure 3: This is a vertical inversion (water image).
- Figure 4: The shape is rotated 180 degrees.
Step 3: Final Answer:
Figure 1 represents the correct mirror image.
Quick Tip: Treat the figure as a sequence of directions (e.g., Up, Right, Down, Left). In a vertical mirror image, the sequence becomes (Up, Left, Down, Right).
Identify the correct mirror image for the given problem figure when the mirror is placed at line X-X.
View Solution
Step 1: Understanding the Concept:
For a complex geometric figure, check the placement of internal lines relative to the vertical axis.
Step 2: Detailed Explanation:
1. The problem figure is a square divided into several polygons. Note the triangle at the bottom-left corner and the specific intersecting lines.
2. In the reflection:
- The bottom-left triangle should move to the bottom-right corner.
- The slope of the diagonal lines must reverse (e.g., / becomes \ ).
3. Comparing the options:
- Figure 1: The entire layout is flipped horizontally. The large triangle on the right side of the square corresponds to the large triangle on the left side of the original.
- Figure 2: The internal lines do not form a mirror pattern.
- Figure 3: Shows the original orientation.
- Figure 4: The lines are rearranged in an entirely different configuration.
Step 3: Final Answer:
Figure 1 is the correct mirror image.
Quick Tip: Mentally label corners as A (top-left), B (top-right), C (bottom-left), and D (bottom-right). After mirroring, A moves to B, B moves to A, C moves to D, and D moves to C.
Identify the next figure in the following non-verbal series based on the pattern established by the first three boxes.
View Solution
Step 1: Understanding the Concept:
This is a figure series completion problem. We need to identify the transformation rule applied to the symbols and the orientation of the box at each step.
Step 2: Key Formula or Approach:
The boxes alternate between being square-oriented and tilted (rotated by 45 degrees). Observe the movement of individual symbols (circle, triangle, diamond, square) through successive 45-degree clockwise (CW) rotations of the entire assembly.
Step 3: Detailed Explanation:
1. Analysis of Figure 1 to Figure 2: The box rotates 45\(^\circ\) clockwise.
- The Circle at top-left (TL) moves to the Top (T) position.
- The Triangle at top-right (TR) moves to the Right (R) position.
- The Square at bottom-right (BR) moves to the Bottom (B) position.
- The Diamond at bottom-left (BL) moves to the Left (L) position.
This matches Figure 2 perfectly.
2. Analysis of Figure 2 to Figure 3: The assembly rotates another 45\(^\circ\) clockwise to become square again.
- The Circle (T) moves to TR.
- The Triangle (R) moves to BR.
- The Square (B) moves to BL.
- The Diamond (L) moves to TL.
Looking at Figure 3, the symbols are in these positions: TL=Diamond, TR=Circle, BL=Square, BR=Triangle.
3. Finding the Question Figure: Rotate Figure 3 by another 45\(^\circ\) clockwise.
- TL (Diamond) moves to the Top (T).
- TR (Circle) moves to the Right (R).
- BR (Triangle) moves to the Bottom (B).
- BL (Square) moves to the Left (L).
The resulting tilted box should have Top=Diamond, Right=Circle, Bottom=Triangle, Left=Square. Based on the logical progression and visual matching of the symbols in the options, Option 3 is the most consistent fit.
Step 4: Final Answer:
The next figure in the series is shown in Option 3.
Quick Tip: In rotation problems, track one unique symbol (like the circle) to eliminate options quickly. Here, the circle moves: TL \(\to\) Top \(\to\) TR \(\to\) Right. Only Option 3 and Option 2 have the circle on the right, but the other symbols confirm Option 3.
Determine the next figure in the series following the logical sequence of the given figures.
View Solution
Step 1: Understanding the Concept:
The problem involves a sequence of boxes with symbols inside, undergoing consistent angular rotations.
Step 2: Key Formula or Approach:
Track the orientation of the box and the positions of the symbols (Circle, Triangle, Hollow Square, Solid Square). The sequence suggests a 45-degree counter-clockwise (CCW) rotation at each step.
Step 3: Detailed Explanation:
1. Figure 1 to Figure 2: Box rotates 45\(^\circ\) CCW.
- The Circle at top-left (TL) moves to Left (L).
- The Triangle at top-right (TR) moves to Top (T).
- The Solid Square at bottom-right (BR) moves to Right (R).
- The Hollow Square at bottom-left (BL) moves to Bottom (B).
Matches Figure 2 exactly.
2. Figure 2 to Figure 3: Box rotates another 45\(^\circ\) CCW to become square-oriented.
- Top (Triangle) \(\to\) TL.
- Right (Solid Square) \(\to\) TR.
- Bottom (Hollow Square) \(\to\) BR.
- Left (Circle) \(\to\) BL.
Matches Figure 3 exactly.
3. Next Step: Rotate Figure 3 by 45\(^\circ\) CCW to get a tilted box.
- TL (Triangle) \(\to\) Left (L).
- TR (Solid Square) \(\to\) Top (T).
- BR (Hollow Square) \(\to\) Right (R).
- BL (Circle) \(\to\) Bottom (B).
The resulting figure must have Top=Solid Square, Right=Hollow Square, Bottom=Circle, Left=Triangle.
Step 4: Final Answer:
Comparing this result with the options, Option 3 matches this configuration perfectly.
Quick Tip: If the first box is a square and the second is a diamond, the third is a square, the fourth must be a diamond. This narrows down your search to Option 3 immediately.
Find the fourth figure in the sequence based on the pattern observed in the first three grids.
View Solution
Step 1: Understanding the Concept:
In this series, symbols in a 2\(\times\)2 grid change positions and identities according to a repeating or alternating rule.
Step 2: Detailed Explanation:
1. Analysis of Grid 1 to Grid 2:
- Top row (Circle, Triangle) swaps positions \(\to\) (Triangle, Circle).
- Bottom row (Circle, Solid Square) changes to different symbols \(\to\) (Hollow Square, Circle).
2. Analysis of Grid 2 to Grid 3:
- Top row (Triangle, Circle) swaps again \(\to\) (Circle, Triangle).
- Bottom row (Hollow Square, Circle) remains the same.
3. Predicting Grid 4: Following the logic of swapping top symbols at every step, the top row of Grid 3 (Circle, Triangle) will swap to (Triangle, Circle). Since the bottom row stayed the same in the previous step, it should now change or swap. In Option 4, the top row is (Triangle, Circle) and the bottom row has swapped its symbols from (Hollow Square, Circle) to (Circle, Hollow Square).
Step 3: Final Answer:
Option 4 follows the alternating pattern of top swaps and bottom row modifications.
Quick Tip: Break the grid into rows. Usually, the top row follows a simple swapping rule while the bottom row might involve symbol substitutions or rotations.
Identify the next figure in the following series of circular patterns.
View Solution
Step 1: Understanding the Concept:
The problem involves a repeating geometry inside a circle that rotates by a fixed angle in each step.
Step 2: Detailed Explanation:
1. Observe the "V-shape" or internal sector markers in the circle.
2. In Figure 1, the marker is in the top-right quadrant.
3. In Figure 2, it has rotated 90\(^\circ\) counter-clockwise (CCW) to the top-left quadrant.
4. In Figure 3, it has rotated another 90\(^\circ\) CCW to the bottom-left quadrant.
5. To complete the series, the marker must rotate another 90\(^\circ\) CCW to the bottom-right quadrant.
Step 3: Final Answer:
Option 4 shows the marker in the bottom-right quadrant, which is the correct progression.
Quick Tip: Treat the circular quadrants like a clock face. The pattern is moving from 1:30 to 10:30 to 7:30. The next logical position is 4:30.
Select the correct option to replace the question mark in the sequence.
View Solution
Step 1: Understanding the Concept:
This problem tracks the movement of a shaded sector in a circle divided into 16 equal parts.
Step 2: Detailed Explanation:
1. In Figure 1, let's call the shaded sector position "1" (at approximately 1 o'clock).
2. In Figure 2, the shaded sector moves 2 places counter-clockwise (CCW).
3. In Figure 3, the shaded sector moves 3 places CCW from its position in Figure 2.
4. Following this incremental rule (\(+1\) added to the step size each time), the next move should be 4 places CCW from the position in Figure 3.
5. Looking at the options, Option 2 shows the shaded sector at the 9 o'clock position, which is exactly 4 steps away from the Figure 3 position.
Step 3: Final Answer:
The correct figure is shown in Option 2.
Quick Tip: In movement series, if the jump is not constant, check if it increases by a fixed amount (arithmetic progression) like \(+1, +2, +3 \dots\) or \(+2, +3, +4 \dots\)
Identify the correct view of the 3D object from the direction indicated by the arrow.

View Solution
Step 1: Understanding the Concept:
The task is to find the two-dimensional elevation (front or side view) of a 3D isometric object looking in the direction of the arrow.
Step 2: Detailed Explanation:
1. Observe the object: It consists of blocks arranged in three levels of "steps".
2. The arrow points at the side profile of these steps.
3. From this perspective, we will see three distinct vertical columns:
- The leftmost column is 3 blocks high.
- The middle column is 2 blocks high.
- The rightmost column is 1 block high.
4. These columns will appear side-by-side as a single 2D shape.
Step 3: Final Answer:
Option 3 correctly represents this descending staircase profile (3, 2, 1).
Quick Tip: Count the vertical "faces" visible from the arrow's direction. The maximum height you see at each horizontal position determines the final 2D outline.
Find the correct 2D elevation for the 3D block arrangement looking in the direction of the arrow.

View Solution
Step 1: Understanding the Concept:
The elevation view represents the profile of an object as seen from a specific side.
Step 2: Detailed Explanation:
1. Looking in the direction of the arrow, we analyze the object from left to right.
2. Far left: There is a column of 2 blocks.
3. Center: There is only 1 block visible at the base level.
4. Far right: There is also only 1 block visible at the base level.
5. The result is a profile that is 2 blocks high on the left and 1 block high across the rest of the width.
Step 3: Final Answer:
Option 4 shows this exact configuration: a taller block on the left and two shorter ones to the right.
Quick Tip: Ignore the "depth" of the object. Just focus on the vertical heights of each column as they appear relative to the viewer's eye.
Identify the correct view from the given arrow direction for the 3D shape.

View Solution
Step 1: Understanding the Concept:
Analyzing the "visible faces" from a side perspective to determine the 2D projected image.
Step 2: Detailed Explanation:
1. The object has a 'C' or bracket-like profile.
2. Looking from the arrow direction:
- On the left side of the view, there is a tall continuous vertical block (height 3).
- On the right side, there is a block at the top and a block at the bottom, with a void (gap) in the middle.
3. Projecting this into 2D, we see a full-height rectangle on the left and two squares separated by an empty space on the right.
Step 3: Final Answer:
Option 2 correctly depicts this arrangement.
Quick Tip: Check for voids. Gaps in the 3D object will appear as empty spaces or dashed lines (if hidden) in architectural drawings, or simply gaps in basic visualization.
Determine the 2D elevation seen from the direction of the arrow.

View Solution
Step 1: Understanding the Concept:
The view from the side of a staircase-like object is a rectangular profile where the steps are stacked vertically.
Step 2: Detailed Explanation:
1. The arrow is pointing directly at the "front" of the steps.
2. From this direction, all we see are the vertical faces (risers) of the steps.
3. There are 3 steps in total. Each vertical face is a rectangle.
4. Stacked together, they will appear as a single large rectangle divided into three horizontal segments.
Step 3: Final Answer:
Option 1 shows exactly three stacked horizontal rectangles, representing the three visible risers.
Quick Tip: When looking directly at steps, you don't see the "depth" of the treads. You only see a flat surface made of the stacked risers.
Select the correct 2D projection of the given 3D block arrangement from the arrow direction.

View Solution
Step 1: Understanding the Concept:
Visualizing a 3D object from a side to find its height profile.
Step 2: Detailed Explanation:
1. Looking in the direction of the arrow:
- The left part of the object is a column with height 2.
- The right part of the object is a single block with height 1.
2. The projected 2D view will therefore be a vertical rectangle of 2 units on the left and a square of 1 unit on the right.
Step 3: Final Answer:
Option 4 correctly represents this L-shaped 2D profile.
Quick Tip: Verify both height and width. This object is 2 units wide and has a maximum height of 2 units. Option 4 is the only one fitting this description correctly.
Find the correct figure from the given options which is hidden in the problem figure.

View Solution
Step 1: Understanding the Concept:
This is an Embedded Figures problem. The objective is to identify which of the smaller geometric shapes provided in the options is contained within the complex arrangement of lines in the main problem figure.
Step 2: Detailed Explanation:
1. We examine the problem figure, which is a square containing various diagonal, horizontal, and vertical lines.
2. By scanning the different segments formed by these intersections, we look for a match with the provided options.
3. Option 3 represents a trapezoidal shape. By looking at the top-right to central region of the problem figure, we can trace the exact lines that form this trapezoid.
4. Specifically, the top edge is horizontal, the left edge is vertical, and the other two sides are formed by diagonal lines existing in the grid.
5. Options 1, 2, and 4 do not have all their constituent lines present with the correct relative angles in the problem figure.
Step 3: Final Answer:
The shape shown in Figure 3 is hidden in the problem figure. Quick Tip: To solve embedded figure questions quickly, focus on the unique angles and relative lengths of the sides of the option figures. Eliminate options that have angles not present in the main diagram.
Find the correct figure from the given options which is hidden in the problem figure.

View Solution
Step 1: Understanding the Concept:
This question requires spatial reasoning to find a specific sub-shape (embedded figure) within a larger, more complex geometric pattern.
Step 2: Detailed Explanation:
1. Inspect the problem figure: a square divided into multiple triangular and quadrangular zones.
2. Compare each option figure with the segments of the problem figure.
3. Figure 1 is a complex polygon with a specific inward notch. By looking at the upper-central portion of the problem figure, we can identify a set of intersecting lines that perfectly outline this polygon.
4. The other figures (2, 3, and 4) have proportions or orientations that do not align with any combination of lines in the problem figure.
Step 3: Final Answer:
The shape in Figure 1 is hidden within the problem figure. Quick Tip: Mentally "isolate" parts of the problem figure by covering up the rest with your hand to see if a specific shape from the options emerges.
Find the correct figure from the given options which is hidden in the problem figure.

View Solution
Step 1: Understanding the Concept:
This is a standard non-verbal reasoning task where we must find an "embedded" or "hidden" figure.
Step 2: Detailed Explanation:
1. Analyze the internal structure of the problem figure. It has a high density of diagonal lines intersecting near the corners.
2. Look for the shape in Figure 4. It is a hook-like polygon.
3. This specific shape can be found by tracing the lines in the lower-right quadrant of the problem figure square.
4. The vertices of Figure 4 align exactly with the intersection points of the lines in that specific area.
Step 3: Final Answer:
Figure 4 is the hidden shape. Quick Tip: Look for "closed loops" or specific vertex points (corners) in the options and see if those same vertex points exist in the main figure.
Find the correct figure from the given options which is hidden in the problem figure.

View Solution
Step 1: Understanding the Concept:
In this embedded figure problem, we must visually extract a part of the complex diagram that matches one of the options.
Step 2: Detailed Explanation:
1. The problem figure consists of two mirrored sets of triangles and polygons.
2. Figure 1 is a shape resembling a bird or a stylized 'Y'.
3. By looking at the right-hand side of the problem figure, we can trace the lines that form this shape. It is composed of segments from the central diagonal and the peripheral lines on the right.
4. Figures 2, 3, and 4 cannot be found as they require lines that are missing or at incorrect angles in the source figure.
Step 3: Final Answer:
The shape in Figure 1 is the one hidden in the problem figure. Quick Tip: Use the "elimination method": if an option has a line at an angle not found in the problem figure (e.g., a 45-degree line when only 30-degree lines exist), discard it immediately.
Find the correct figure from the given options which is hidden in the problem figure.

View Solution
Step 1: Understanding the Concept:
Identify the hidden sub-figure within the larger pattern.
Step 2: Detailed Explanation:
1. Examine the problem figure, noting the dense web of lines in the upper right.
2. Compare the shape in Figure 4 (a flag-like polygon) with the diagram.
3. In the top-right corner of the problem figure, there is a sequence of lines that perfectly matches the boundary of Figure 4.
4. The proportions of the flag-head and the pole-like extension match exactly with the segments in that quadrant.
Step 3: Final Answer:
Figure 4 is the shape hidden in the diagram. Quick Tip: Focus on the most "closed" or distinct part of the option figure first (like the "head" of the flag in this case) and locate it in the main figure.
Identify the correct top view (Plan) for the given 3D isometric object.

View Solution
Step 1: Understanding the Concept:
The Top View (also called the Plan) is an orthographic projection of a 3D object as seen from directly above. In this view, height is not visible, but the footprint and the edges between surfaces at different heights are represented by lines.
Step 2: Detailed Explanation:
1. Observe the 3D object: It has a footprint of a \(2 \times 2\) square grid.
2. Analyzing the levels:
- The back-left quadrant is the highest (2 blocks high).
- The back-right and front-left quadrants are at an intermediate level (1 block high).
- The front-right quadrant appears to be lower or part of the base structure.
3. When viewed from the top, you will see a large square divided into four smaller squares.
4. Because all four quadrants are at different heights or are distinct surfaces, there will be solid lines between all of them.
5. Figure 4 represents this \(2 \times 2\) grid with internal divisions clearly marked, matching the geometry of the object.
Step 3: Final Answer:
Figure 4 is the correct top view. Quick Tip: When determining the top view, imagine the object is "squashed" flat onto the ground. Every vertical drop between two surfaces will appear as a line in the plan.
Identify the correct top view for the given 3D block arrangement.

View Solution
Step 1: Understanding the Concept:
To find the top view, we must determine the "footprint" of the object and the relative heights of its components.
Step 2: Detailed Explanation:
1. Look at the 3D object. It is built on a \(2 \times 2\) grid.
2. The footprint is L-shaped: there are blocks in the back-left, back-right, and front-right quadrants. The front-left quadrant is empty.
3. From the top, we will see three squares arranged in an 'L' shape.
4. Since the back-left block (2 levels high) is taller than the adjacent back-right and front-right blocks (1 level high), there must be a line separating the tallest square from the others.
5. Figure 4 correctly shows this L-shaped plan with the necessary internal divisions.
Step 3: Final Answer:
The correct top view is Figure 4. Quick Tip: Always identify the overall outer boundary of the footprint first. This quickly eliminates options with the wrong shape (like a full square when the object is L-shaped).
Identify the correct top view for the given 3D object.

View Solution
Step 1: Understanding the Concept:
This 3D object has a central tall portion surrounded by lower steps. The top view must capture this symmetry and the height changes.
Step 2: Detailed Explanation:
1. The base of the object is a \(3 \times 3\) grid.
2. The tallest part is the center square.
3. Surrounding the center are four blocks at a lower level, forming a "plus" or "cross" shape when seen from the top.
4. The corners of the \(3 \times 3\) grid appear to be empty or at the base level.
5. Looking from above, you will see a \(3 \times 3\) square. The lines in the plan will define the central square and the four surrounding squares.
6. Figure 1 represents this perfectly, showing the cross-like arrangement of surfaces at different levels within the \(3 \times 3\) boundary.
Step 3: Final Answer:
Figure 1 is the correct plan. Quick Tip: In symmetrical objects, look for symmetry in the options. A centered object in 3D will result in a centered plan.
Identify the correct top view for the given 3D staircase structure.

View Solution
Step 1: Understanding the Concept:
For a staircase, the top view shows the "treads" (the horizontal parts of the steps) as a series of rectangles or squares.
Step 2: Detailed Explanation:
1. The 3D object is a set of stairs turning around a corner.
2. It occupies a \(2 \times 2\) square area.
3. There are four distinct levels (steps) rising in a clockwise or counter-clockwise fashion.
4. From the top, you will see four equal squares meeting at a center point, forming a \(2 \times 2\) grid.
5. Because each square is at a different height, there are lines between all of them.
6. Figure 1 is the standard representation of a \(2 \times 2\) grid which perfectly matches the top-down perspective of these steps.
Step 3: Final Answer:
Figure 1 is the correct top view. Quick Tip: For steps, the number of "boxes" in the top view usually equals the number of horizontal levels (treads) visible in the 3D drawing.
Identify the correct top view for the given 3D isometric figure.

View Solution
Step 1: Understanding the Concept:
Determine the plan view by projecting the visible top surfaces onto a horizontal plane.
Step 2: Detailed Explanation:
1. The 3D object is an L-shaped block. It consists of a vertical rectangular column and a horizontal base extending from one side.
2. The footprint is made of three units in an 'L' shape (if we consider it on a \(2 \times 2\) grid, one corner is missing).
3. From the top, you see the top surface of the tall column (a square) and the top surface of the lower base (two squares).
4. This results in an L-shaped plan. A line must exist between the tall square and the adjacent lower square because of the height difference.
5. Figure 4 correctly shows this L-shaped boundary with internal lines representing the different components.
Step 3: Final Answer:
Figure 4 is the correct top view. Quick Tip: Check the orientation: if the "arm" of the L points towards the bottom-right in the 3D drawing, ensure the 2D plan reflects that same orientation relative to the axes.
The problem figure shows the top view of an object. Looking in the direction of the arrow, identify the correct elevation from the given options.

View Solution
Step 1: Understanding the Concept:
The given figure is a plan (top view) showing three distinct levels nested within each other: a large outer square, a middle diamond (square rotated by 45 degrees), and a small inner square.
To find the elevation, we must visualize the vertical heights associated with these shapes when viewed from the direction indicated by the arrow.
Step 2: Detailed Explanation:
1. Analysis of the Plan: The outermost square represents the base. The middle diamond represents a second tier, and the innermost square represents the topmost tier.
2. Visualizing the Elevation: From the bottom arrow's perspective, we will see three horizontal layers stacked vertically.
3. Tier 1 (Base): This will be the widest part of the elevation, corresponding to the outer square's width.
4. Tier 2 (Middle): This corresponds to the diamond. Its widest part is its diagonal, which is less than the outer square but more than the inner square.
5. Tier 3 (Top): This is the smallest square, appearing as the narrowest block at the top.
6. Comparing Options: Figure 2 shows three stacked rectangular blocks where the base is widest, the middle is slightly narrower, and the top is the narrowest. This matches the hierarchical structure shown in the plan.
Step 3: Final Answer:
Figure 2 correctly represents the elevation.
Quick Tip: Project the outer edges of each shape in the plan vertically to determine the widths of the corresponding steps in the elevation.
The problem figure shows the plan of an object. Looking from the direction of the arrow, identify the correct elevation from the given options.

View Solution
Step 1: Understanding the Concept:
The plan shows a square with two diagonal lines intersecting at the center. This pattern typically represents a pyramid or a hipped roof structure.
Step 2: Detailed Explanation:
1. Identify the Shape: The diagonals meeting at the center point of a square base indicate that the object has a single peak directly above the center.
2. Visualizing from the Arrow: Looking from the front, we will see a triangular profile representing the sloped faces of the pyramid.
3. Analysis of Options:
- Figure 1 shows a flat top, which contradicts the central peak.
- Figure 2 shows a triangular peak on top of a rectangular base, which is consistent with a pyramid structure rising from a base block.
- Figure 3 and 4 show different trapezoidal or curved profiles not supported by the diagonal lines in the plan.
Step 3: Final Answer:
Figure 2 is the correct elevation.
Quick Tip: Diagonal lines intersecting at the center of a square plan almost always signify a pyramid or cone-like peak in orthographic projections.
Given below is the top view of an object. Identify the correct elevation in the direction of the arrow.

View Solution
Step 1: Understanding the Concept:
The plan shows a square divided by four vertical parallel lines. This suggests a series of vertical partitions or a set of steps viewed from the side.
Step 2: Detailed Explanation:
1. Plan Analysis: The vertical lines in the plan represent the horizontal edges (depth) of different vertical surfaces when viewed from the side.
2. Elevation Projection: Looking from the arrow direction (bottom to top), we are looking parallel to these lines. This means we will see the heights and widths of these sections.
3. Matching Proportions: The plan shows segments of varying widths. The elevation must reflect the silhouette formed by these segments.
4. Analysis of Figure 2: It shows a staggered silhouette with vertical columns of different heights, which logically follows from the vertical divisions seen in the plan.
Step 3: Final Answer:
Figure 2 matches the projection of the plan.
Quick Tip: In plan-to-elevation conversion, vertical lines in the plan translate to the distinct vertical faces you see in the front view.
The problem figure shows the elevation of an object. Looking from the direction of the arrow, identify the correct plan from the given options.

View Solution
Step 1: Understanding the Concept:
We are given a front elevation showing a three-tiered stepped structure. We need to identify the corresponding plan (top view).
Step 2: Detailed Explanation:
1. Elevation Analysis: The object consists of a wide base, a middle section, and a top section, all centered on each other.
2. Top-Down View: When looking from the top (plan view), we will see the top surfaces of all three tiers simultaneously.
3. Shape of Tiers: Since the elevation blocks are rectangular/square in profile, the top view will show concentric or nested squares/rectangles.
4. Matching with Options: Figure 1 shows three nested squares. This represents the footprint of the base, the middle tier, and the top tier as seen from above.
Step 3: Final Answer:
Figure 1 is the correct plan for the given elevation.
Quick Tip: A stepped elevation always translates to nested or adjacent shapes in the plan view, representing the treads or top surfaces of those steps.
The problem figure shows the plan of an object. Looking in the direction of the arrow, identify the correct elevation from the given options.

View Solution
Step 1: Understanding the Concept:
The plan features two distinct triangular symbols inside a square. These triangles represent the footprint of pyramid-like or prism-like projections on a base.
Step 2: Detailed Explanation:
1. Symmetry in Plan: One triangle is pointing up and one is pointing down. This suggests two pointed features on the object.
2. Elevation Visualization: From the arrow's perspective, we will see two vertical peaks rising from a flat surface.
3. Evaluating Options:
- Figure 2 shows a base with two triangular peaks rising upwards, which perfectly matches the description derived from the plan.
- Other options show flat or rectangular tops which do not correspond to the sharp points implied by the triangles in the plan.
Step 3: Final Answer:
Figure 2 is the correct elevation.
Quick Tip: Geometric symbols in a plan (like triangles) often denote specific 3D features (like peaks or sloping walls) in the elevation.
Find the correct 2D elevation of the given 3D isometric object when viewed in the direction of the arrow.

View Solution
Step 1: Understanding the Concept:
An isometric drawing shows an object from a 30-degree angle to provide a 3D effect. To find the 2D elevation, we must look directly in the direction of the arrow and project the visible surfaces onto a 2D plane.
Step 2: Detailed Explanation:
1. Analyse the Object: The object is a block with a smaller section removed from one corner, creating a "step" effect.
2. View from Arrow: Looking from the direction of the arrow, we see the side profile of this stepped structure.
3. Shape Outline: We see a tall vertical rectangle on the left and a shorter rectangular section extending to the right.
4. Internal Lines: A line will exist where the surface height changes.
5. Matching Figure 2: Figure 2 shows the exact L-shaped silhouette with the internal division marking the change in block height.
Step 3: Final Answer:
Figure 2 is the correct 2D elevation.
Quick Tip: Count the vertical "faces" visible from the arrow's direction. Each change in depth or height will result in a line in the 2D drawing.
Find the correct 2D elevation of the given 3D isometric object looking in the direction of the arrow.

View Solution
Step 1: Understanding the Concept:
The task is to convert a 3D isometric view into a 2D orthographic elevation from the side indicated by the arrow.
Step 2: Detailed Explanation:
1. Isometric Analysis: The object consists of a tall rectangular pillar on a flat base.
2. Projection: From the arrow direction, we see the front face of the tall pillar and the front edge of the base.
3. Geometry: The elevation will appear as a narrow tall rectangle sitting on top of a wider, flat rectangle.
4. Matching Option: Figure 1 shows a tall vertical segment positioned on one side of a broader base, which matches the spatial arrangement seen in the isometric view.
Step 3: Final Answer:
Figure 1 is the correct elevation.
Quick Tip: Identify the tallest point and the widest point from the arrow's perspective. The 2D view must contain these maximum extents.
Looking in the direction of the arrow, identify the correct 2D elevation of the given 3D isometric structure.

View Solution
Step 1: Understanding the Concept:
The elevation is the silhouette and surface detail of an object viewed from a specific side.
Step 2: Detailed Explanation:
1. Analyse the Object: The structure has several steps and a cutout section in the middle.
2. Perspective from Arrow: Looking from the arrow direction, we see the profile of these steps rising.
3. Silhouette: We will see a staggered outline consisting of vertical risers and horizontal treads (appearing as lines).
4. Matching with Figure 1: Figure 1 correctly depicts the multi-leveled, staggered profile of the steps as they appear from the side view.
Step 3: Final Answer:
Figure 1 is the correct 2D elevation.
Quick Tip: Treat the arrow as your line of sight. Any corner that projects "out" or "in" along that line of sight will be represented as a line in the elevation.
Find the correct 2D elevation of the given 3D isometric object in the direction of the arrow.

View Solution
Step 1: Understanding the Concept:
The elevation required is a direct front-on view of the object's side as indicated.
Step 2: Detailed Explanation:
1. Isometric Analysis: The block has a large square indentation or "pit" in the center of its top surface.
2. View from Arrow: When looking from the side indicated by the arrow, we will see the outer vertical wall of the block.
3. Internal Details: Since the indentation is visible in the silhouette or as a drop in height from this angle, it will be represented by horizontal and vertical lines showing the "dip".
4. Selection: Figure 1 shows a block with a central lowered section, which perfectly mirrors the physical structure shown in the 3D drawing.
Step 3: Final Answer:
Figure 1 correctly identifies the elevation.
Quick Tip: Pay attention to the depth of the hollow sections. They create "hidden" or "visible" lines in elevation that define the object's interior.
Looking from the direction of the arrow, identify the correct 2D elevation of the given 3D isometric structure.

View Solution
Step 1: Understanding the Concept:
This problem requires visualizing the side profile of a stepped 3D structure.
Step 2: Detailed Explanation:
1. Analyse the Steps: The object is a series of blocks stacked like a winding staircase.
2. Side Profile: Looking in the direction of the arrow, we see the side edges of the steps.
3. Staircase Shape: This view will reveal the classic "sawtooth" or staircase silhouette.
4. Evaluation of Figure 2: Figure 2 shows a four-step rising profile, which matches the number of levels visible in the isometric view from that specific angle.
Step 3: Final Answer:
Figure 2 is the correct 2D elevation.
Quick Tip: Count the number of levels. The number of steps in the silhouette must match the number of vertical increments in the 3D object.
In the space provided in the answer sheet for this question, draw margin lines to form a frame. In this frame create an aesthetic composition using only cylinders and cubes. These can be of any size and may be placed separate, overlapping or within each other. The idea is to produce an aesthetic and visually exciting composition of these shapes in the frame without making it represent any realistic form like house face etc. These shapes and the other spaces should be filled with some colors of your choice so that the visual quality of the composition is enhanced.
View Solution
Step 1: Understanding the Concept:
This question tests the candidate's ability to create an abstract 3D composition using basic geometric primitives (cubes and cylinders). The focus is on design principles such as balance, proportion, rhythm, and color harmony without creating a recognizable real-world object.
Step 2: Key Formula or Approach:
1. Frame Construction: Start by drawing a clean rectangular border.
2. Hierarchy of Shapes: Use varying sizes of cubes and cylinders to create a sense of scale.
3. Overlap and Depth: Place some shapes behind others to create a 3D spatial effect. Intersecting shapes can add visual complexity.
4. Visual Balance: Ensure the weight of the composition is distributed evenly (symmetrical or asymmetrical balance).
Step 3: Detailed Explanation:
- Drafting: Lightly sketch the cubes and cylinders using isometric or perspective views to give them volume. Ensure the ellipses of the cylinders match the perspective of the cube faces.
- Compositional Flow: Arrange the elements so that they lead the viewer's eye across the frame. For example, a tall cylinder can act as a vertical anchor while small cubes provide a rhythmic trail.
- Coloring: Choose a color scheme (e.g., complementary colors like Blue and Orange, or analogous colors like Red, Orange, and Yellow). Use highlights and shadows on the faces of the cubes and the curved surfaces of the cylinders to enhance the 3D effect.
Step 4: Final Answer:
The final output should be a vibrant, balanced, and purely abstract arrangement of geometric forms that fills the frame effectively.
Quick Tip: Avoid "floating" all objects in the center; let some shapes bleed out of the frame or touch the margins to make the composition feel more dynamic and professional.
Copy the graphic image shown in the space provided for the answer of this question. Credit will be given to the exactness of your answer.

View Solution
Step 1: Understanding the Concept:
This task assesses observational skills, hand-eye coordination, and the ability to replicate proportions, line weights, and details accurately from a given reference image (a dancer).
Step 2: Key Formula or Approach:
1. Skeleton/Basic Shapes: Use the "stick figure" or "gesture drawing" method to capture the pose.
2. Proportions: Compare the height of the head to the total height and the width of the shoulders to the waist.
3. Refinement: Add the contours of the clothing (dhoti/skirt) and the anatomy.
Step 3: Detailed Explanation:
- Initial Blocking: Lightly draw the central axis of the body. Identify the "S" curve of the dancer's spine.
- Detailing: Observe the specific mudras (hand gestures) and the position of the feet with ghungroos. Replicate the intricate jewelry and the pleats in the attire.
- Line Quality: Use confident, continuous lines rather than "hairy" or broken lines. Vary the thickness slightly to indicate shadows or heavier fabric.
Step 4: Final Answer:
The final drawing should be a faithful reproduction of the provided graphic, matching its scale and intricate details as closely as possible.
Quick Tip: Use the "negative space" technique: look at the shapes of the gaps between the arms and the body to verify if your proportions are correct.
Design and draw an appropriate pattern for a bed cover for a girls room. Color or shade it to enhance its visual quality.
View Solution
Step 1: Understanding the Concept:
This question evaluates surface ornamentation skills and understanding of target-audience aesthetics. A pattern for a girl's room bed cover typically involves motifs that are whimsical, floral, or geometric.
Step 2: Key Formula or Approach:
1. Motif Selection: Choose a central element (e.g., a butterfly, a flower, or an abstract star).
2. Repetition: Use a grid (square, brick, or diamond) to repeat the motif across the surface.
3. Border Design: Complement the main pattern with a distinct border.
Step 3: Detailed Explanation:
- Theme: For a "girl's room," one might choose a nature theme. Combine organic shapes like vines with soft geometric accents.
- Color Palette: Use a cohesive palette. Pastel shades (pinks, purples, mint) are traditional, but vibrant contemporary combinations (teal and coral) can also be used.
- Execution: Ensure the repeat is seamless. Add texture using fine lines or stippling to make the fabric look realistic.
Step 4: Final Answer:
A well-balanced, repeating textile pattern that fills the allotted space with harmonious colors.
Quick Tip: Include a "swatch" or a zoomed-in detail of one single repeat unit to show the complexity of your design before showing it as a full pattern.
Draw an imaginary picture of a restaurant.
View Solution
Step 1: Understanding the Concept:
This evaluates the candidate's understanding of perspective, interior design, and environmental storytelling. A restaurant scene requires a sense of depth and human scale.
Step 2: Key Formula or Approach:
1. Perspective Choice: One-point perspective is ideal for showing the depth of a dining hall.
2. Vanishing Point: Place a vanishing point on the horizon line to guide the lines of the floor, tables, and ceiling.
Step 3: Detailed Explanation:
- Layout: Draw rows of tables with chairs. Include details like tablecloths, cutlery, and menus to add realism.
- Architectural Elements: Add windows, lighting fixtures (like chandeliers or pendant lights), and perhaps a counter or a glimpse of the kitchen door.
- Activity: Add human figures (customers eating, a waiter serving) to give the space life and help establish the height of the furniture.
Step 4: Final Answer:
An interior perspective drawing that conveys a specific dining atmosphere (e.g., a cozy cafe or a formal fine-dining space).
Quick Tip: Draw the furniture first as basic boxes in perspective, then round off the edges to create chairs and tables; this ensures they sit correctly on the floor.
Draw from imagination a picture of an Indian leader.
View Solution
Step 1: Understanding the Concept:
This task tests portraiture skills, knowledge of historical/contemporary figures, and the ability to capture recognizable features and character.
Step 2: Key Formula or Approach:
1. Feature Mapping: Use the "Loomis method" or a basic oval to divide the face into thirds (forehead to brow, brow to nose, nose to chin).
2. Iconic Traits: Focus on unique identifiers (e.g., Gandhi's glasses/dhoti, Bose's military cap, or Kalam's hairstyle).
Step 3: Detailed Explanation:
- Anatomy: Ensure the eyes are placed halfway down the head. Use shading to define the cheekbones, jawline, and depth of the eyes.
- Context: You may draw a bust (head and shoulders) or a full-figure drawing in a characteristic pose (e.g., a leader addressing a crowd).
- Symbolism: Include relevant symbols (like the Indian flag or a specific book) to reinforce the identity of the leader.
Step 4: Final Answer:
A recognizable and well-proportioned portrait of a notable Indian leader with appropriate tonal shading.
Quick Tip: Pay close attention to the eyes; they convey the personality and "spirit" of the leader more than any other feature.
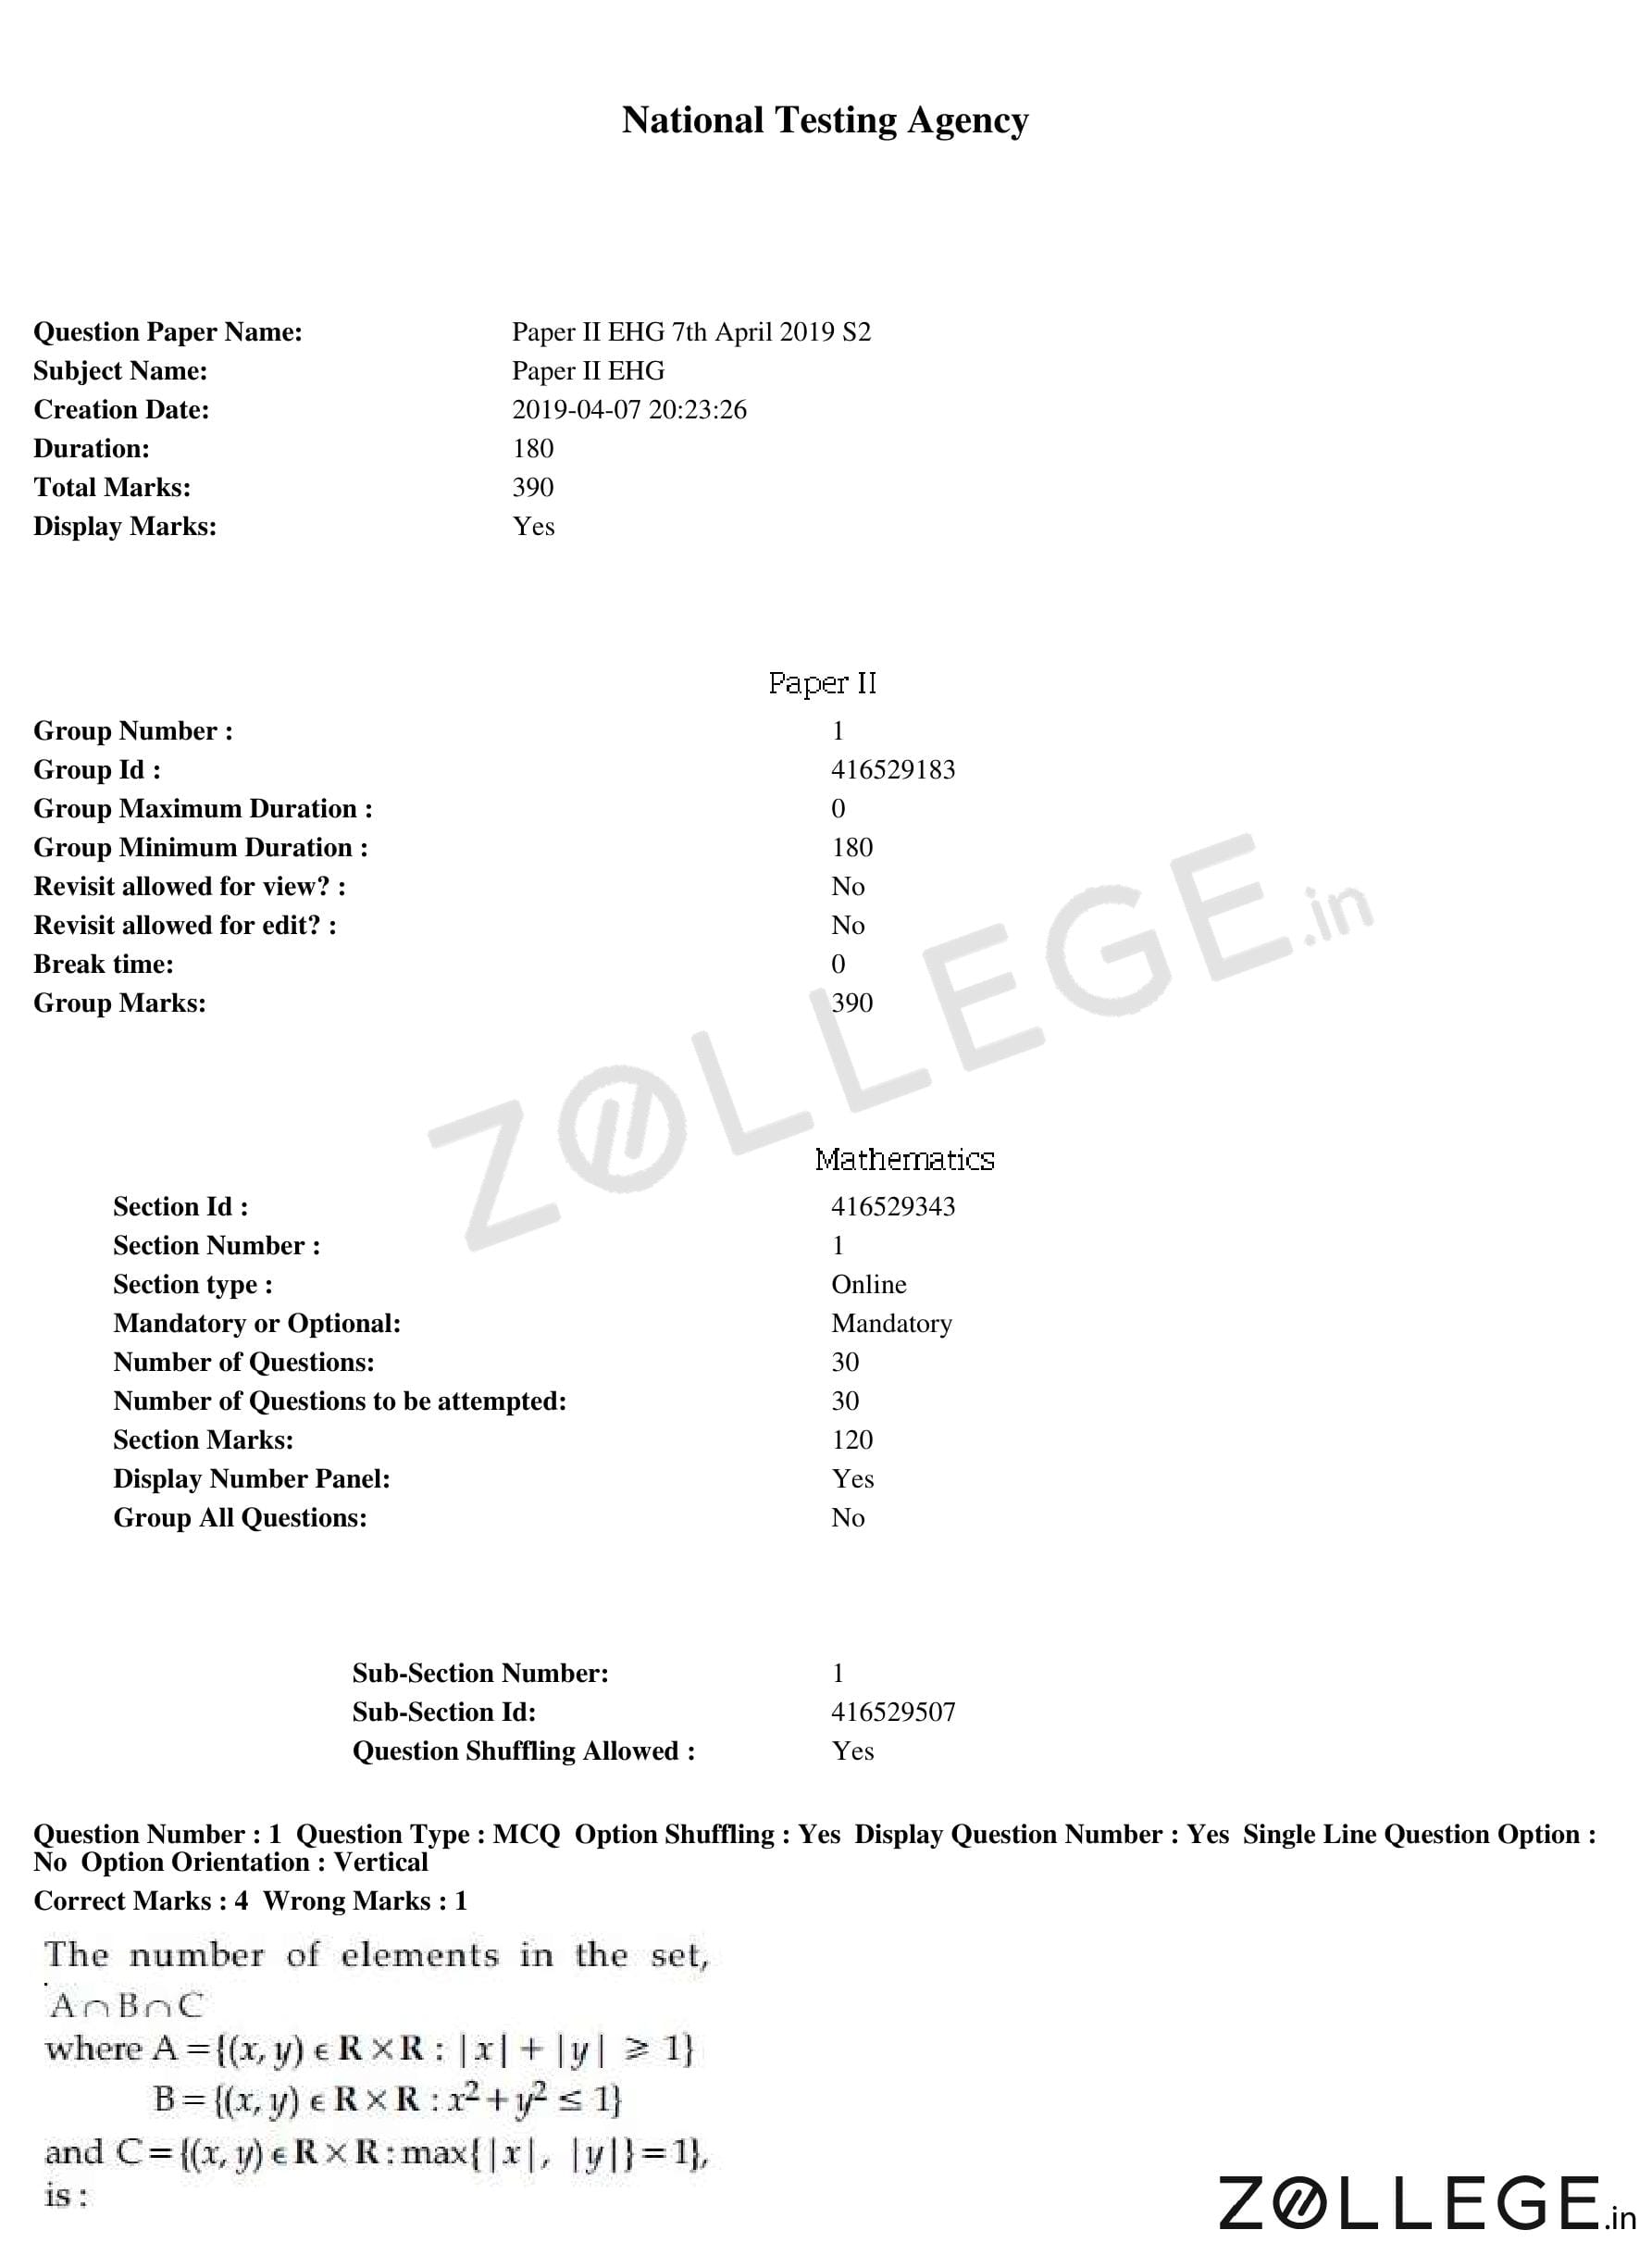
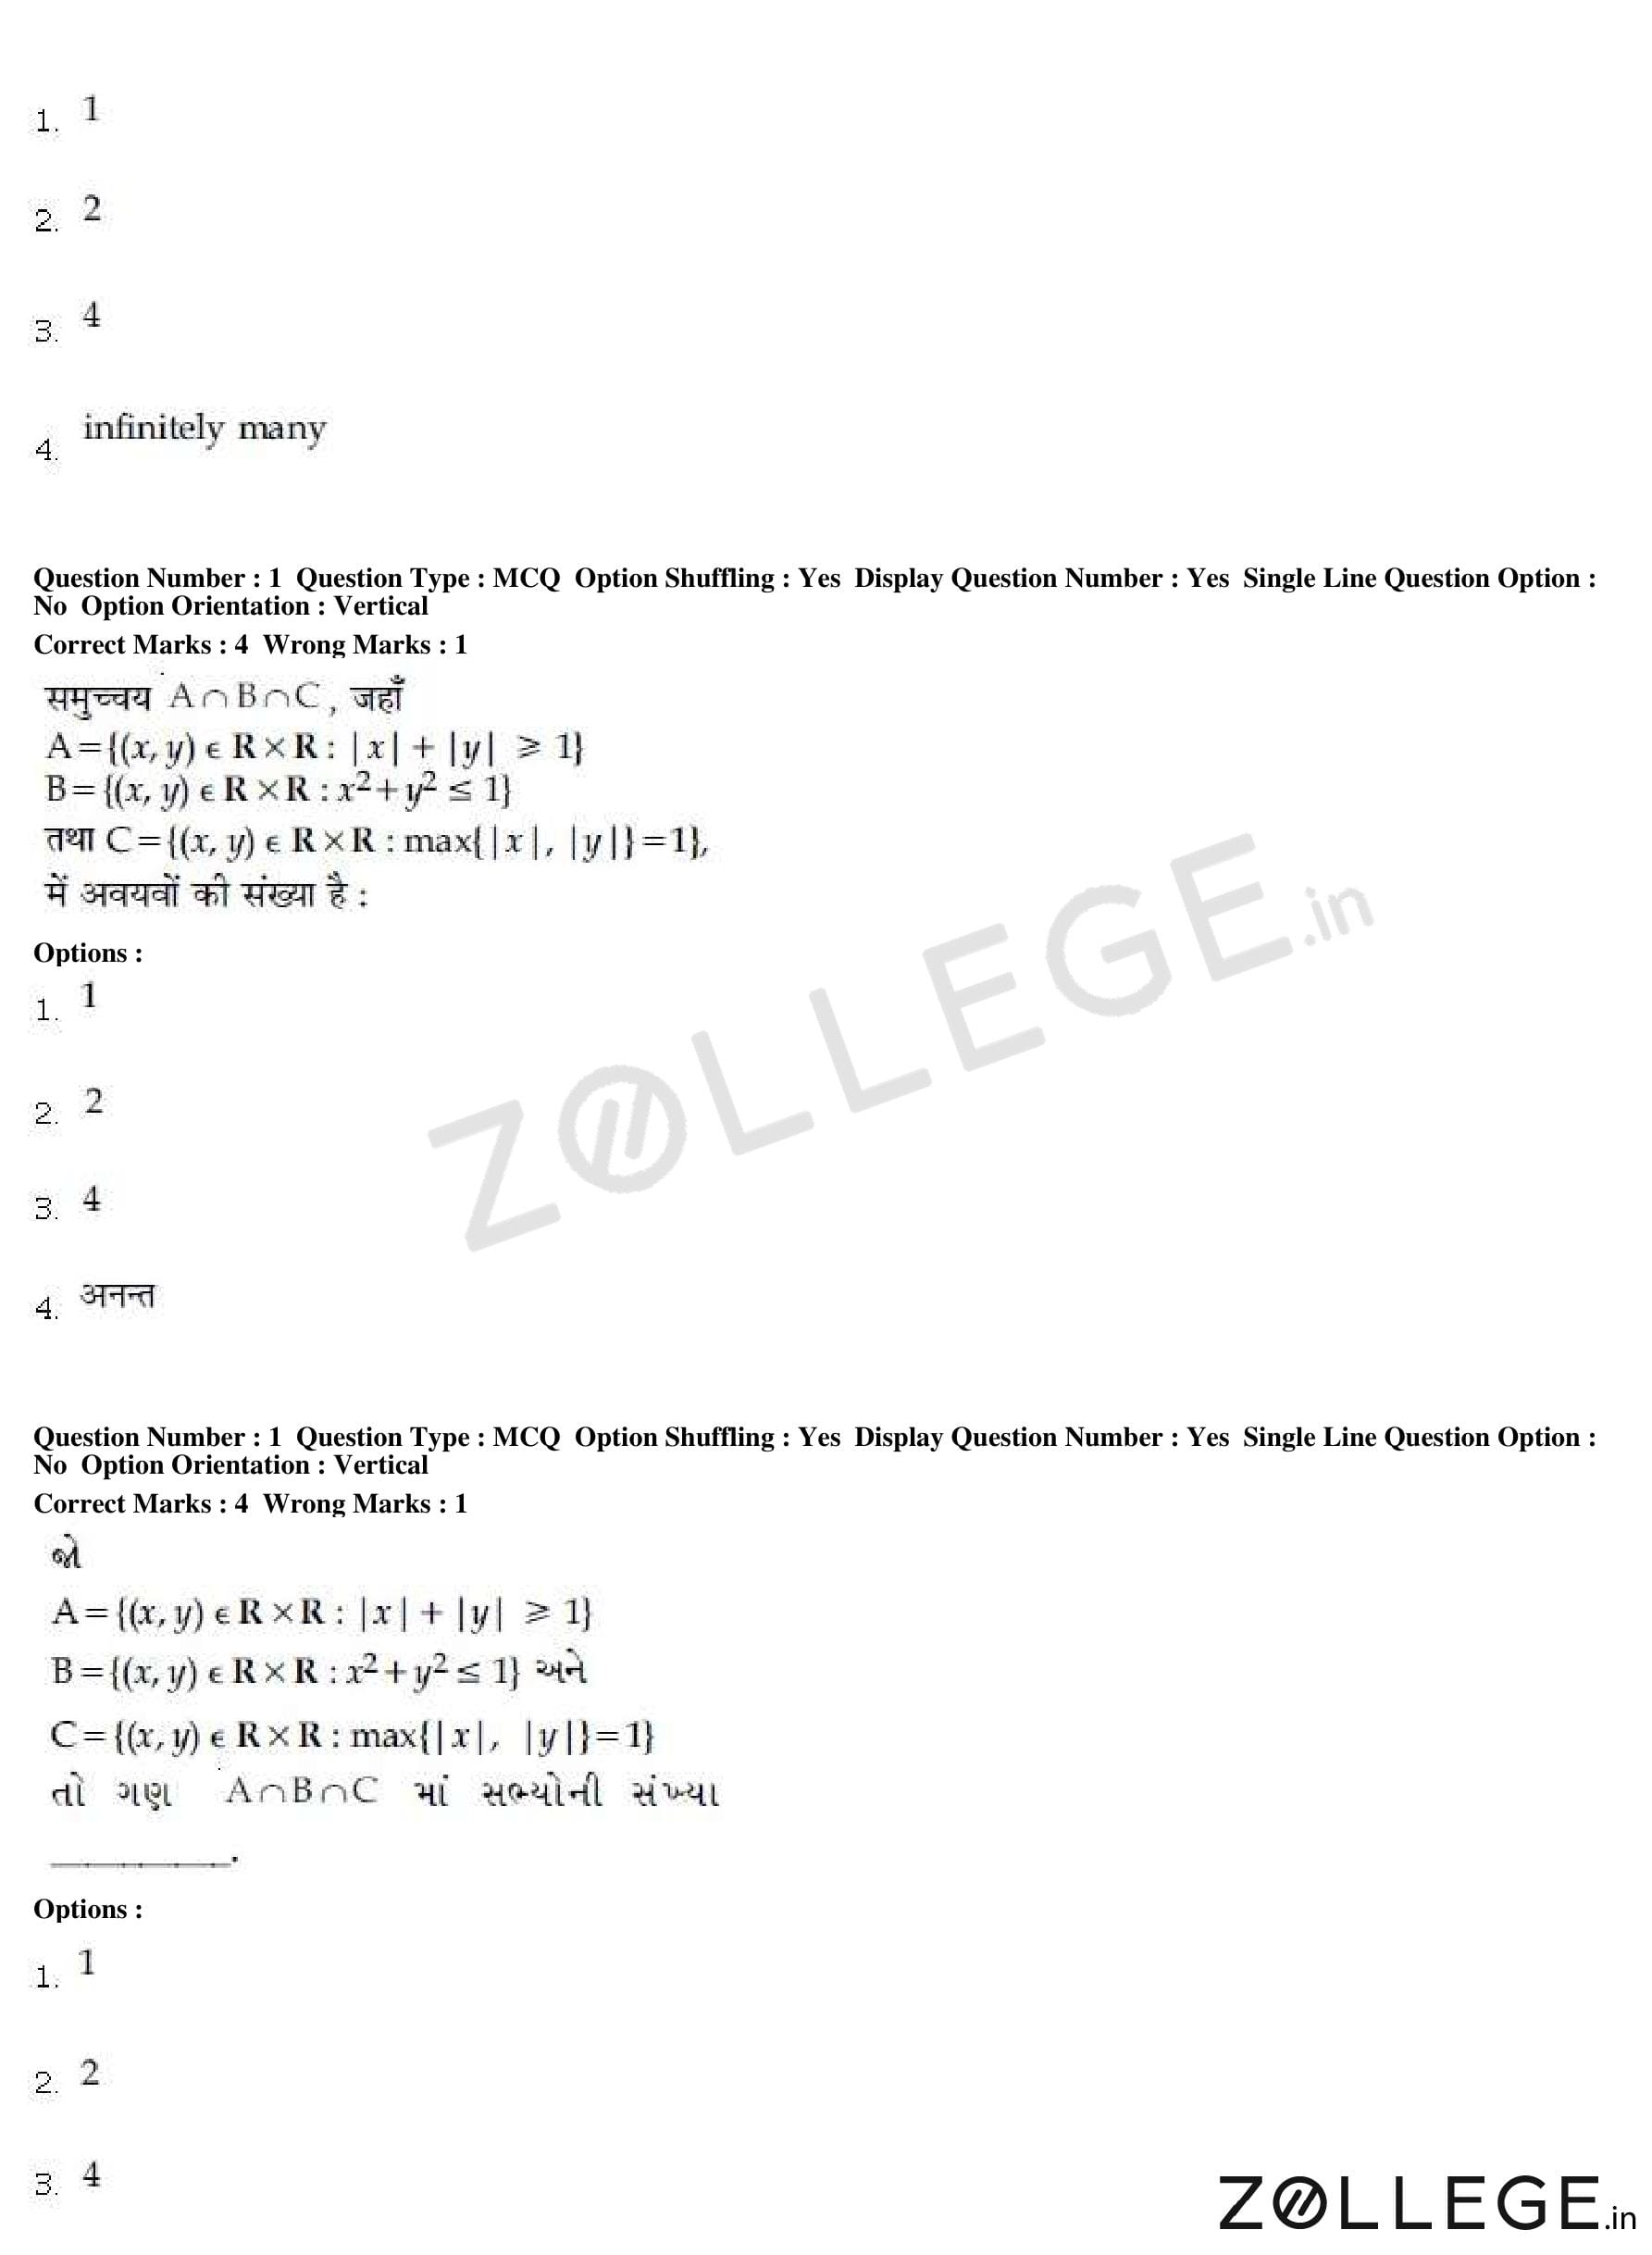
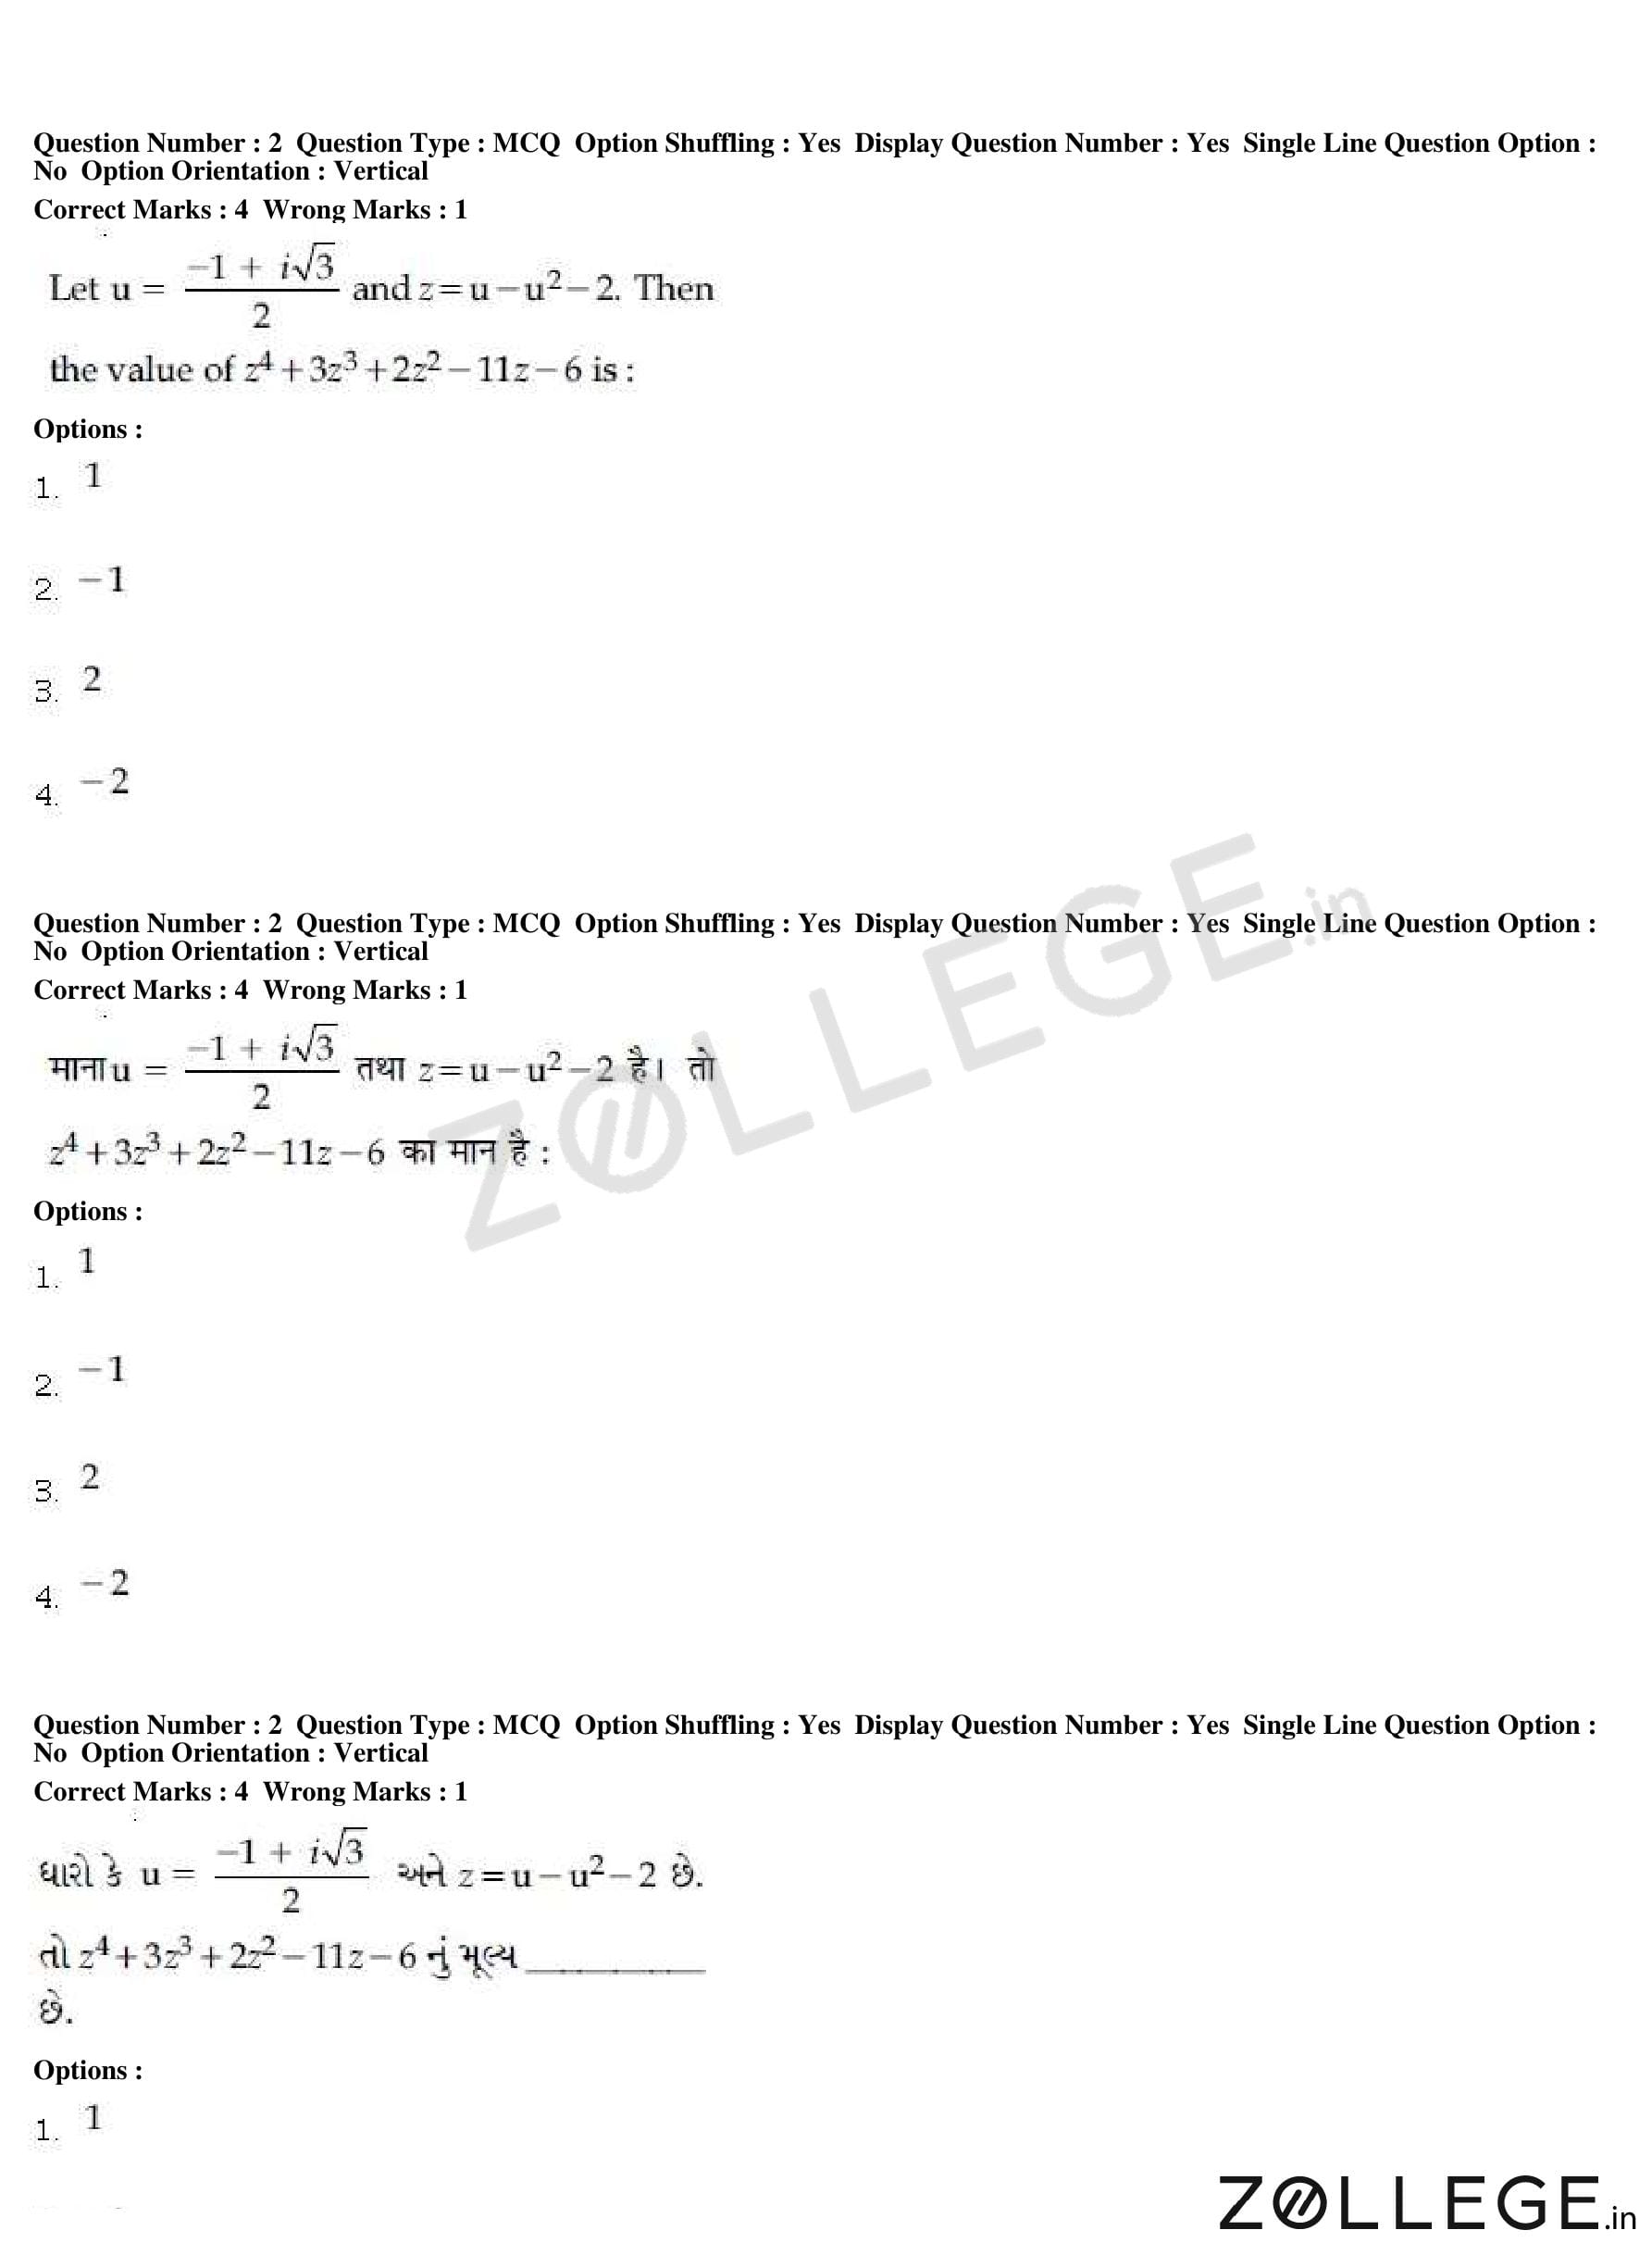
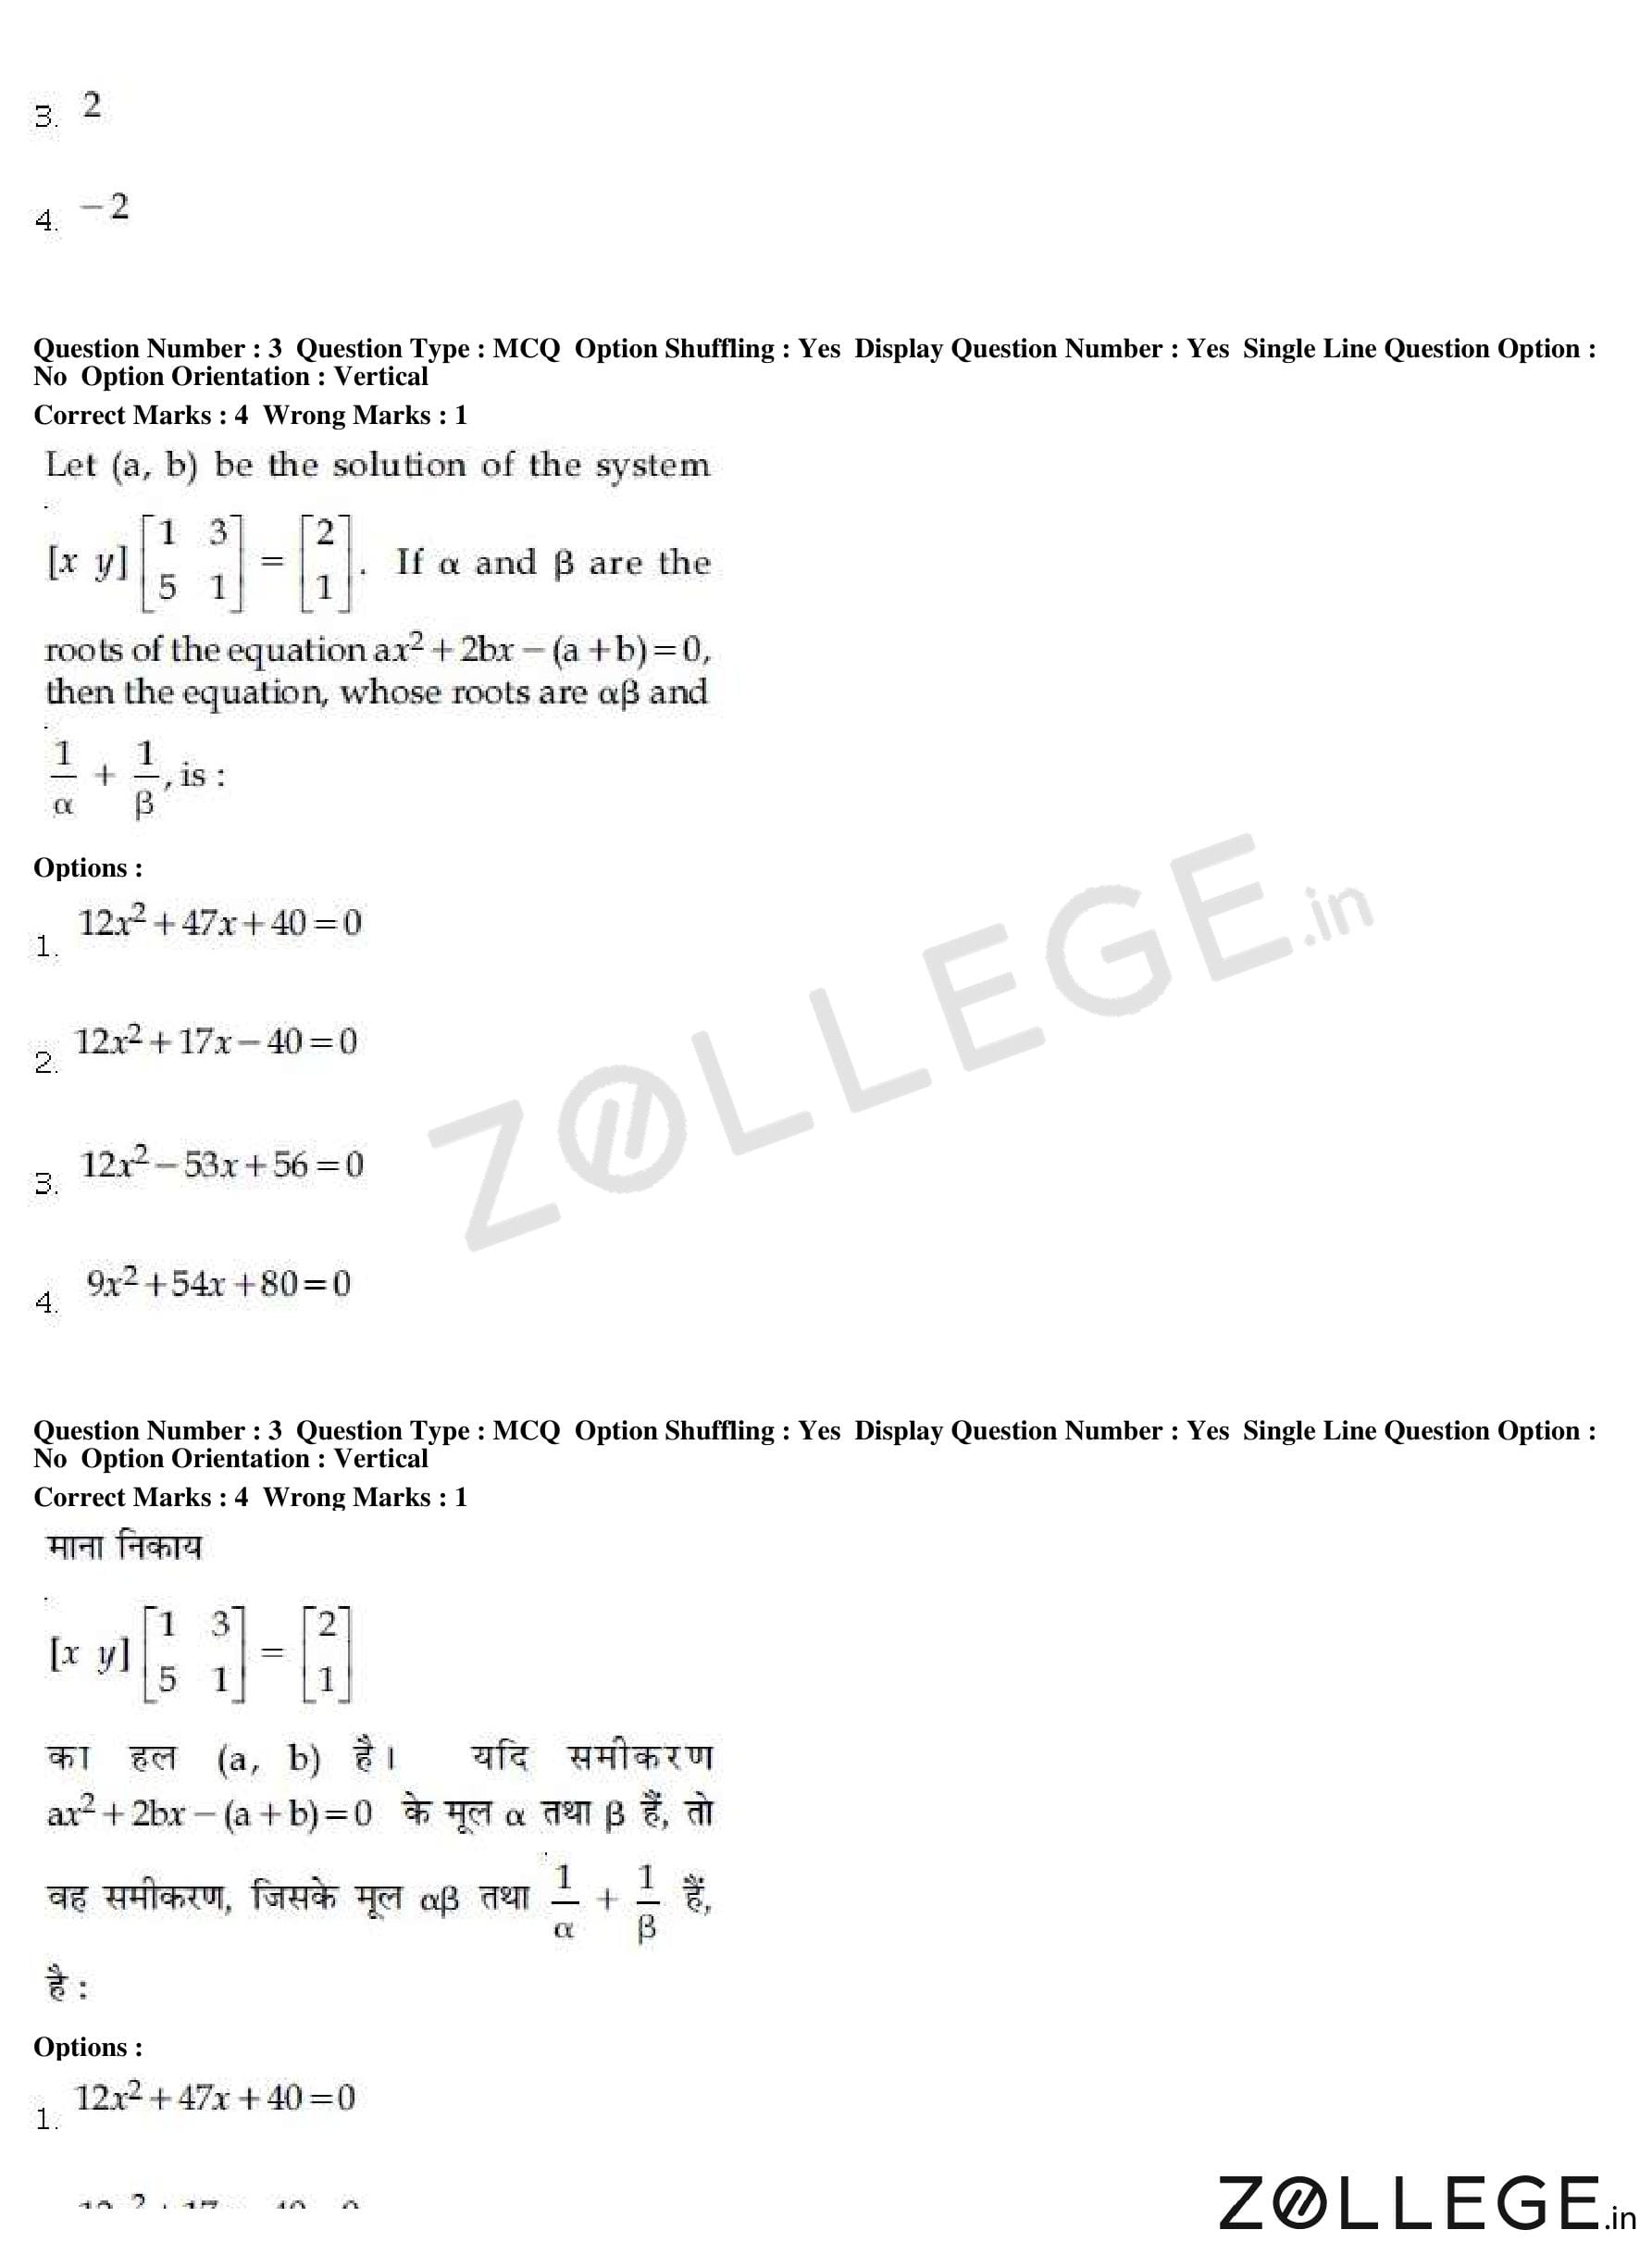
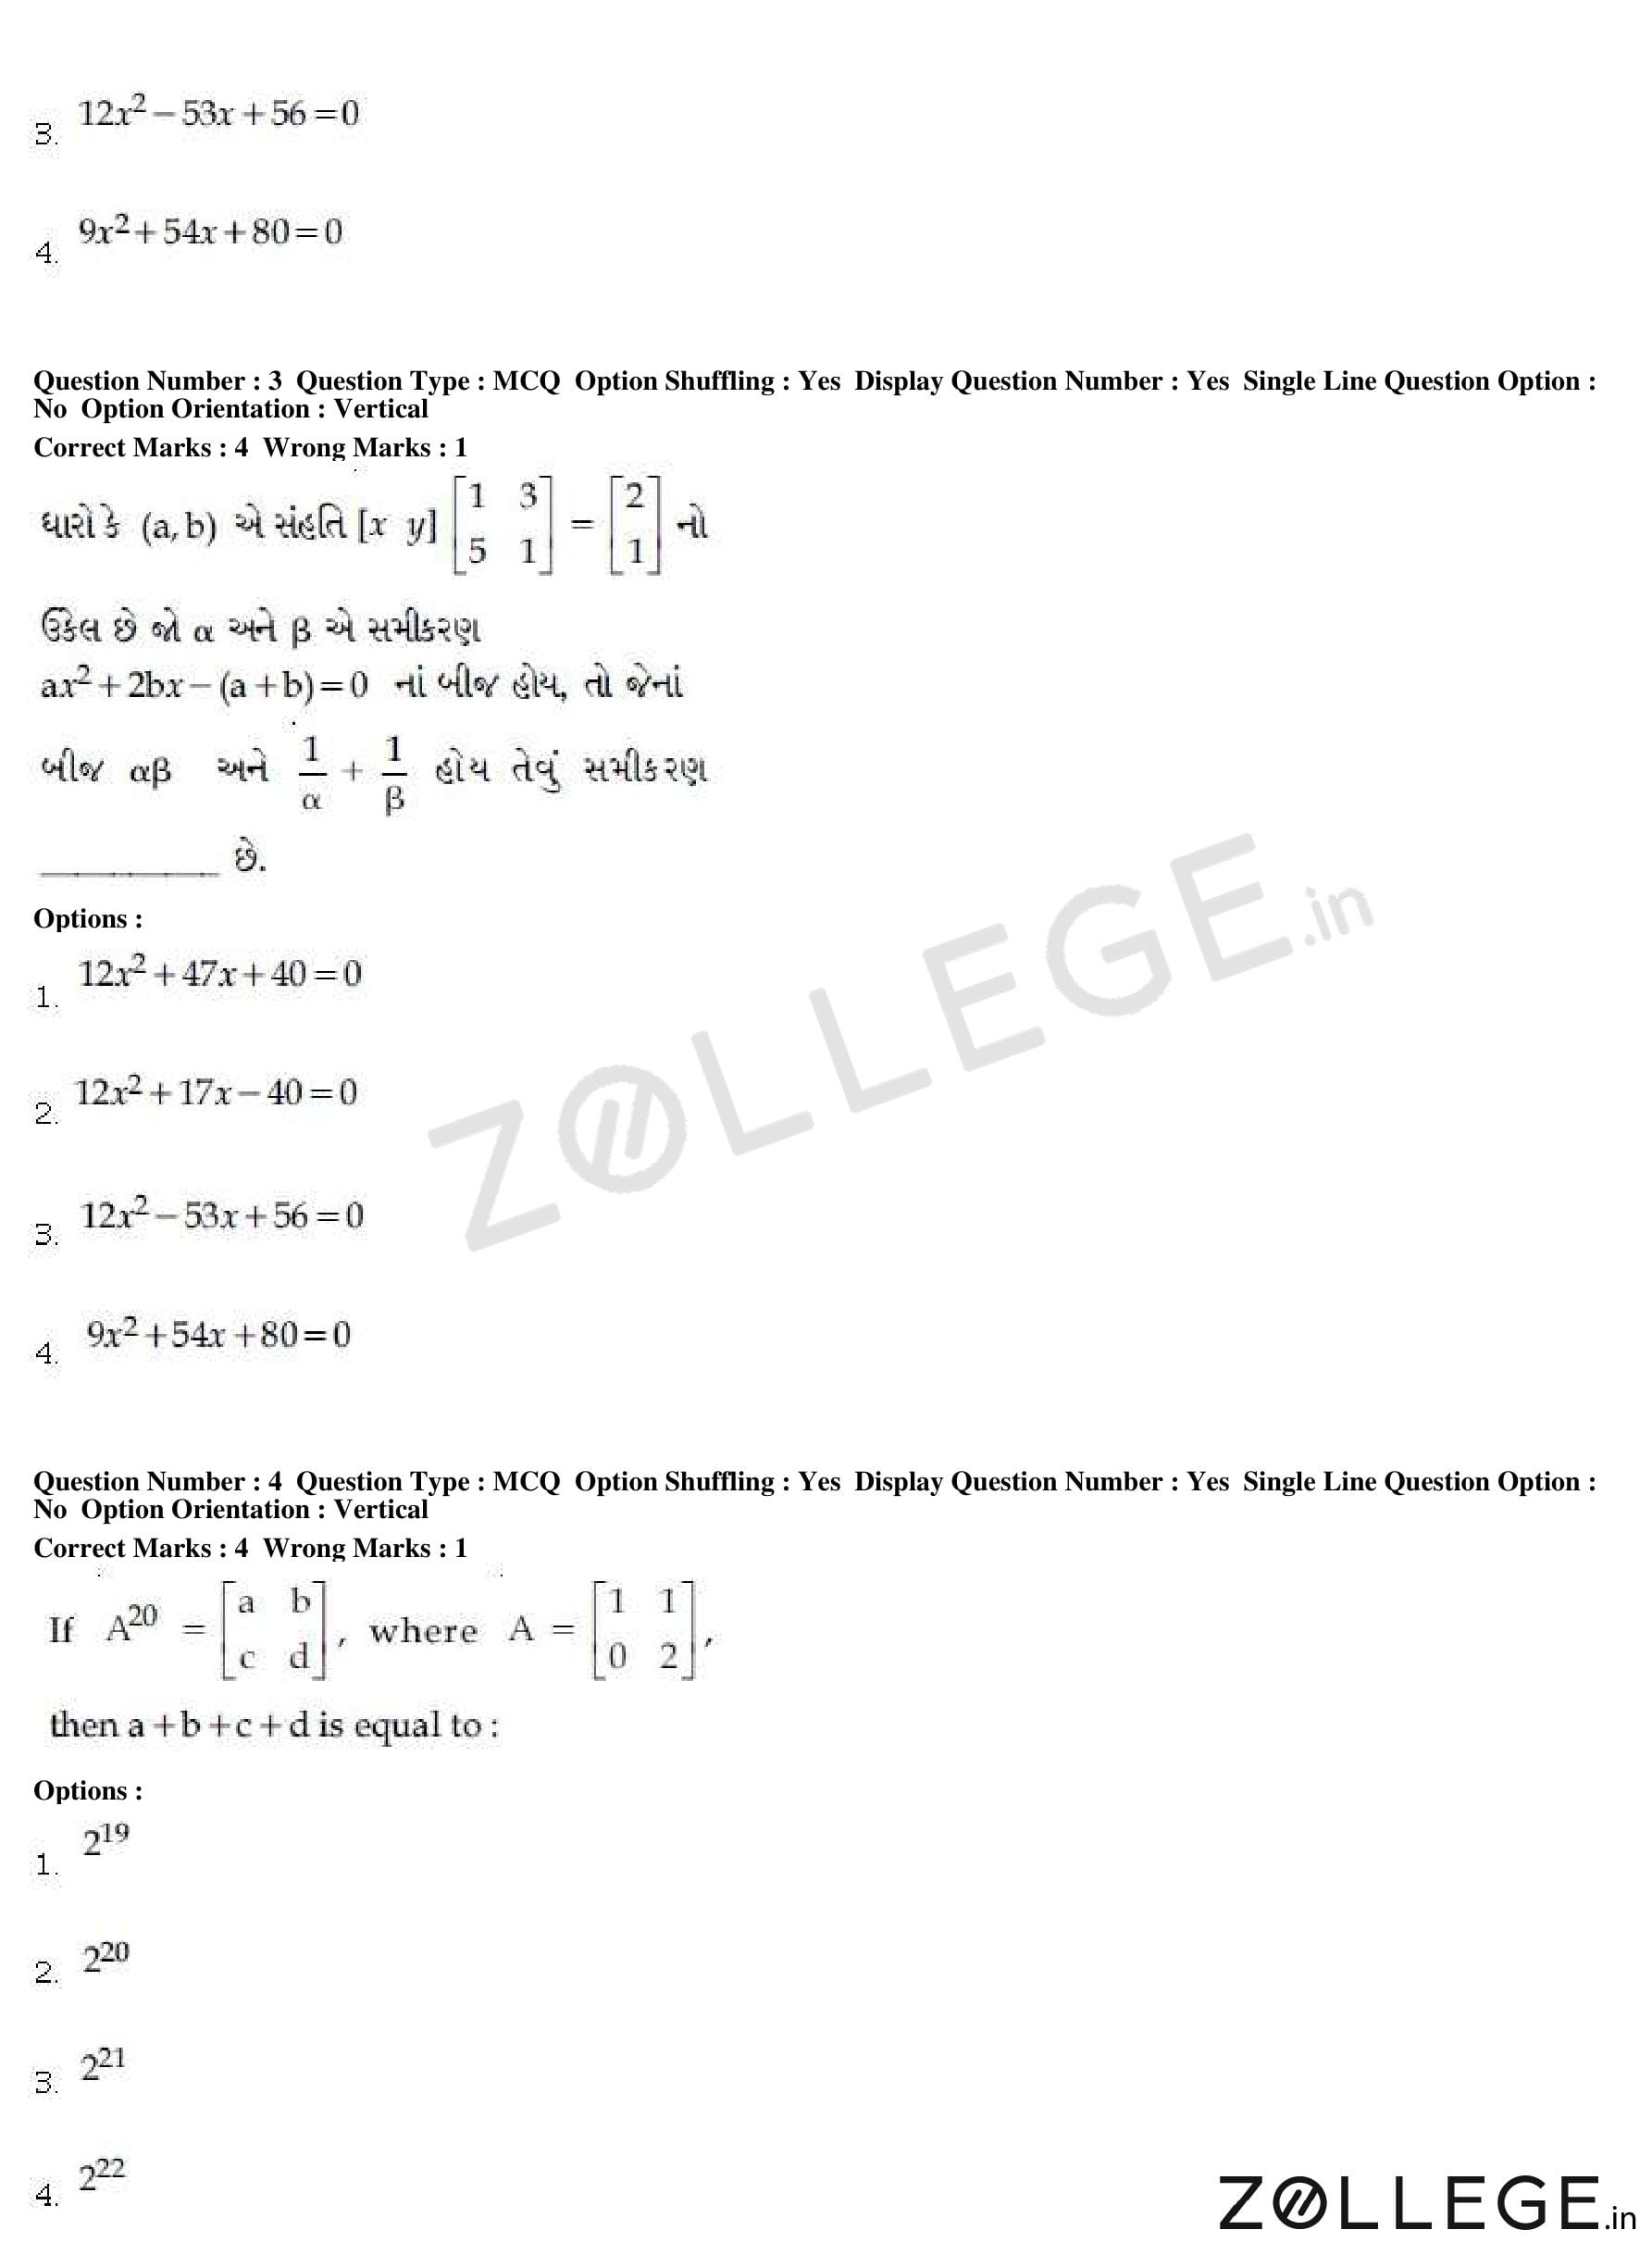
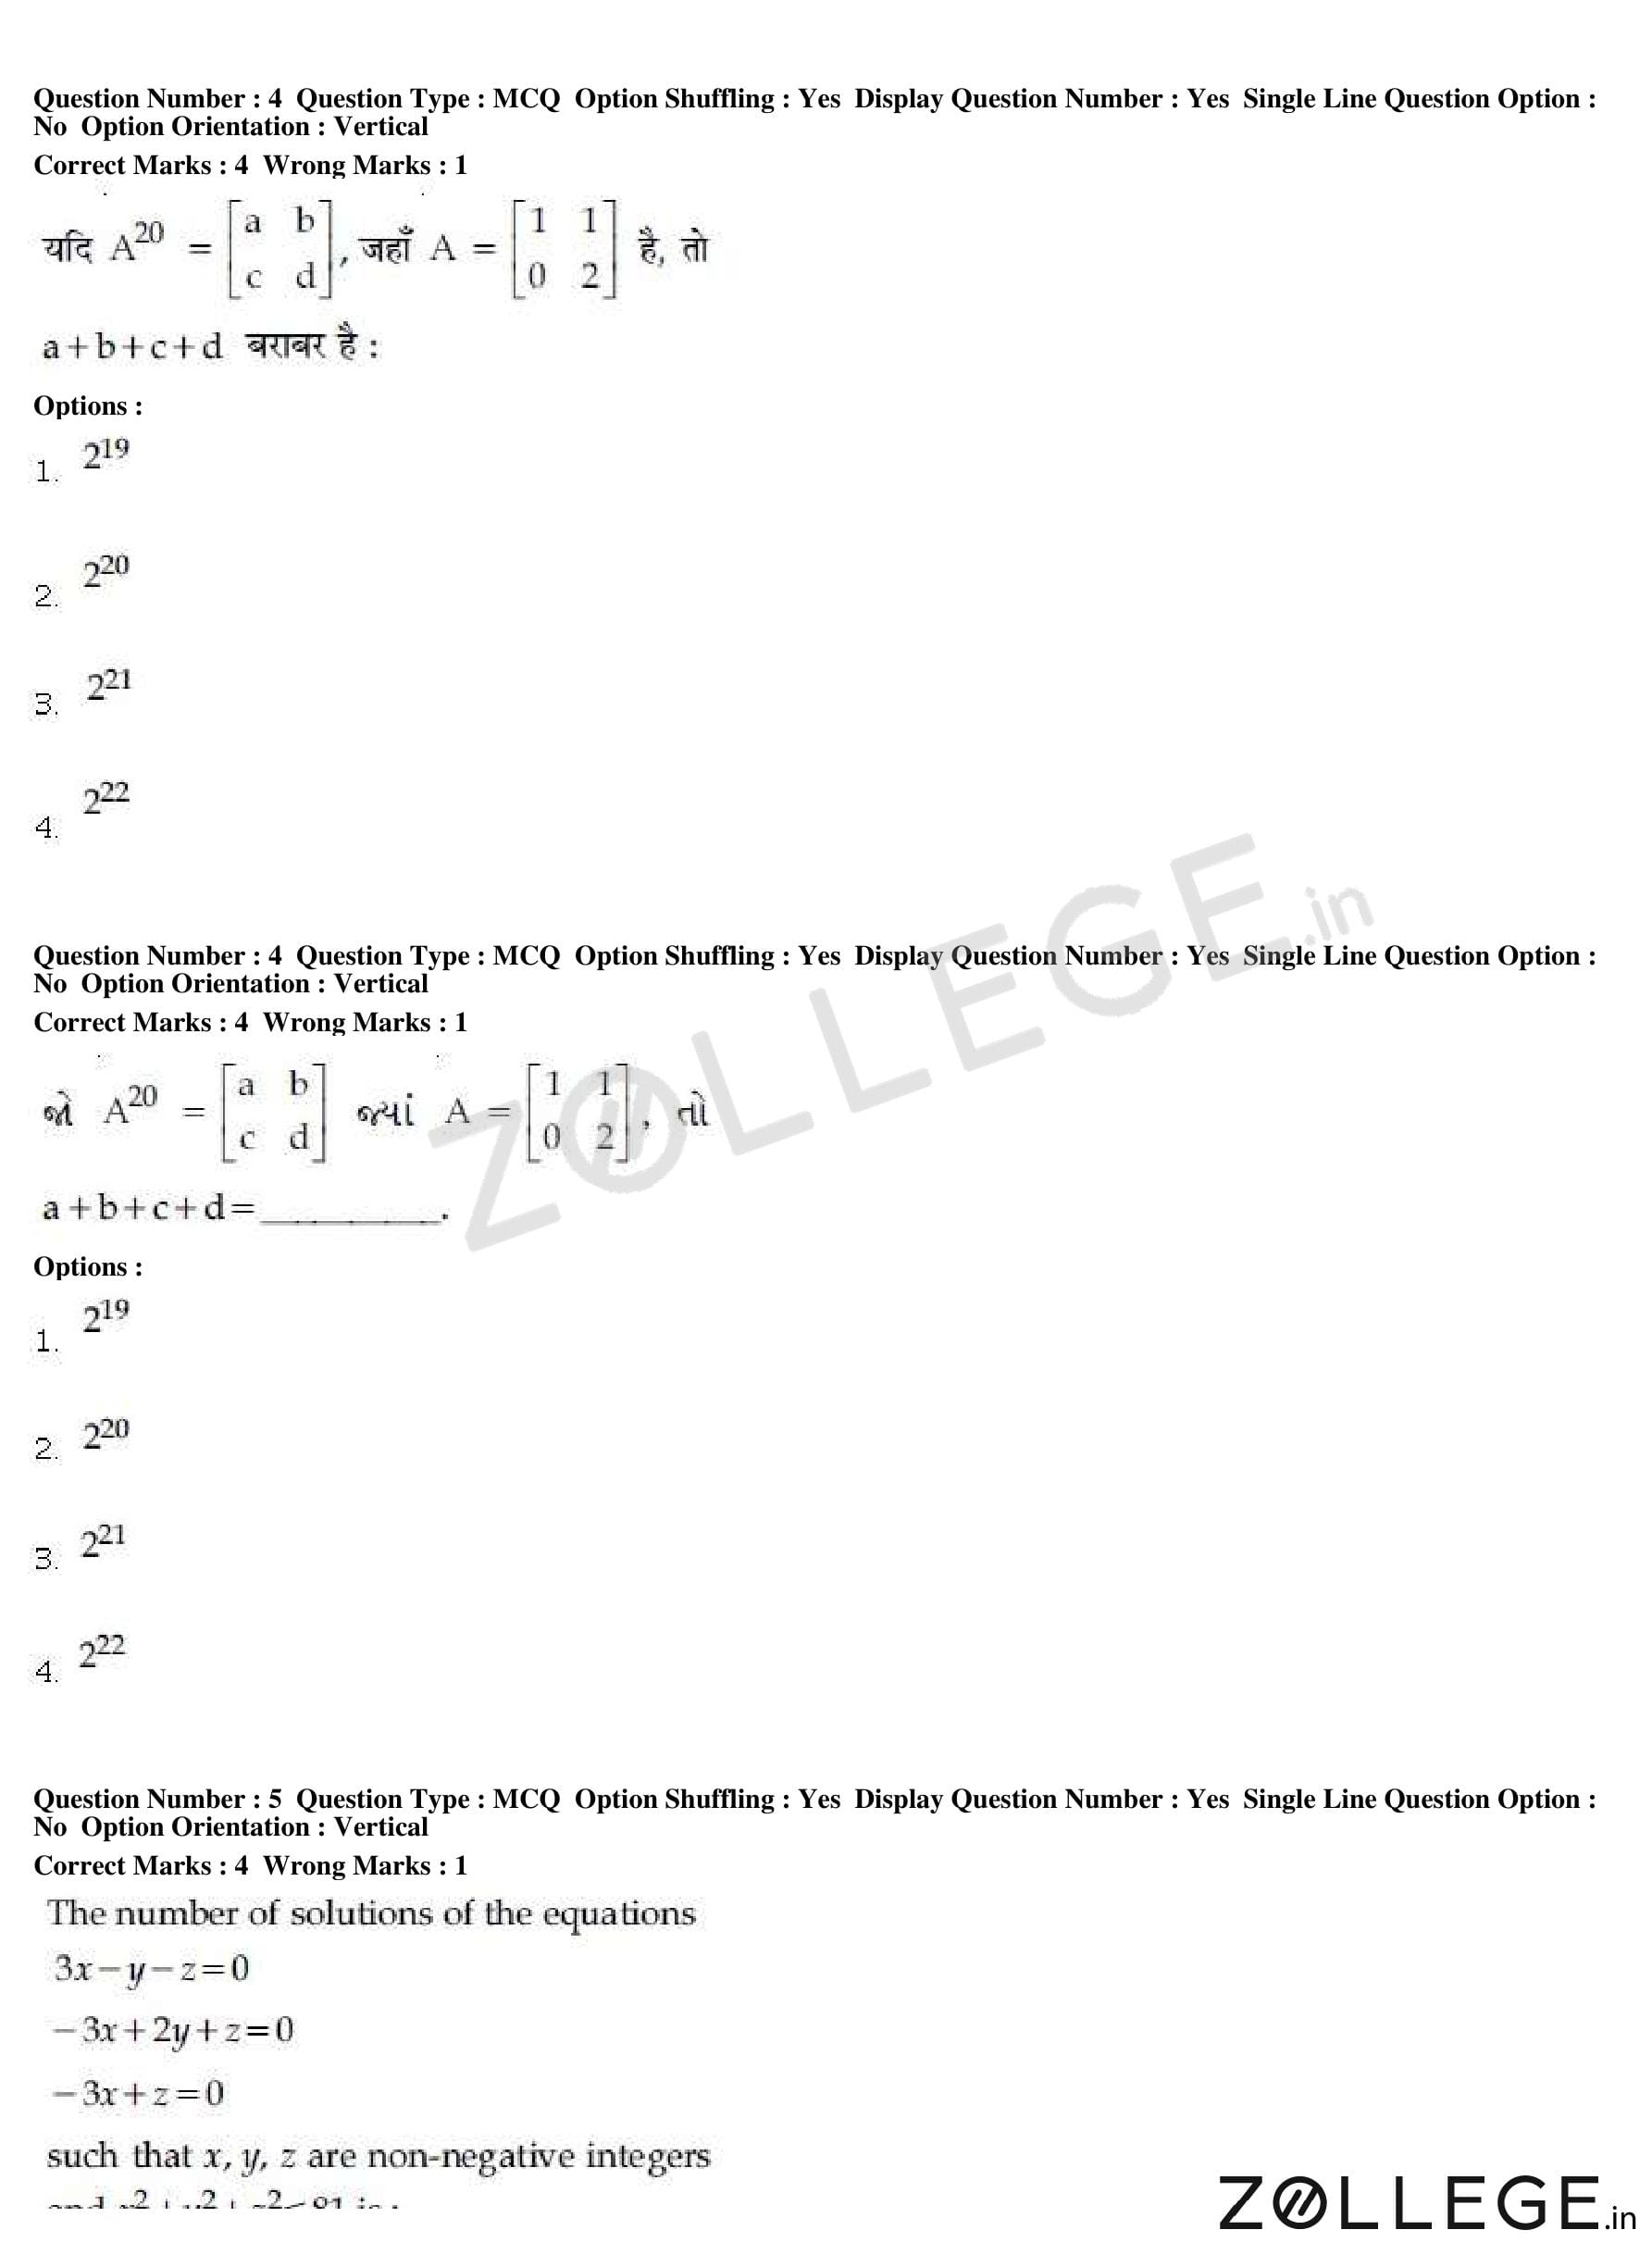
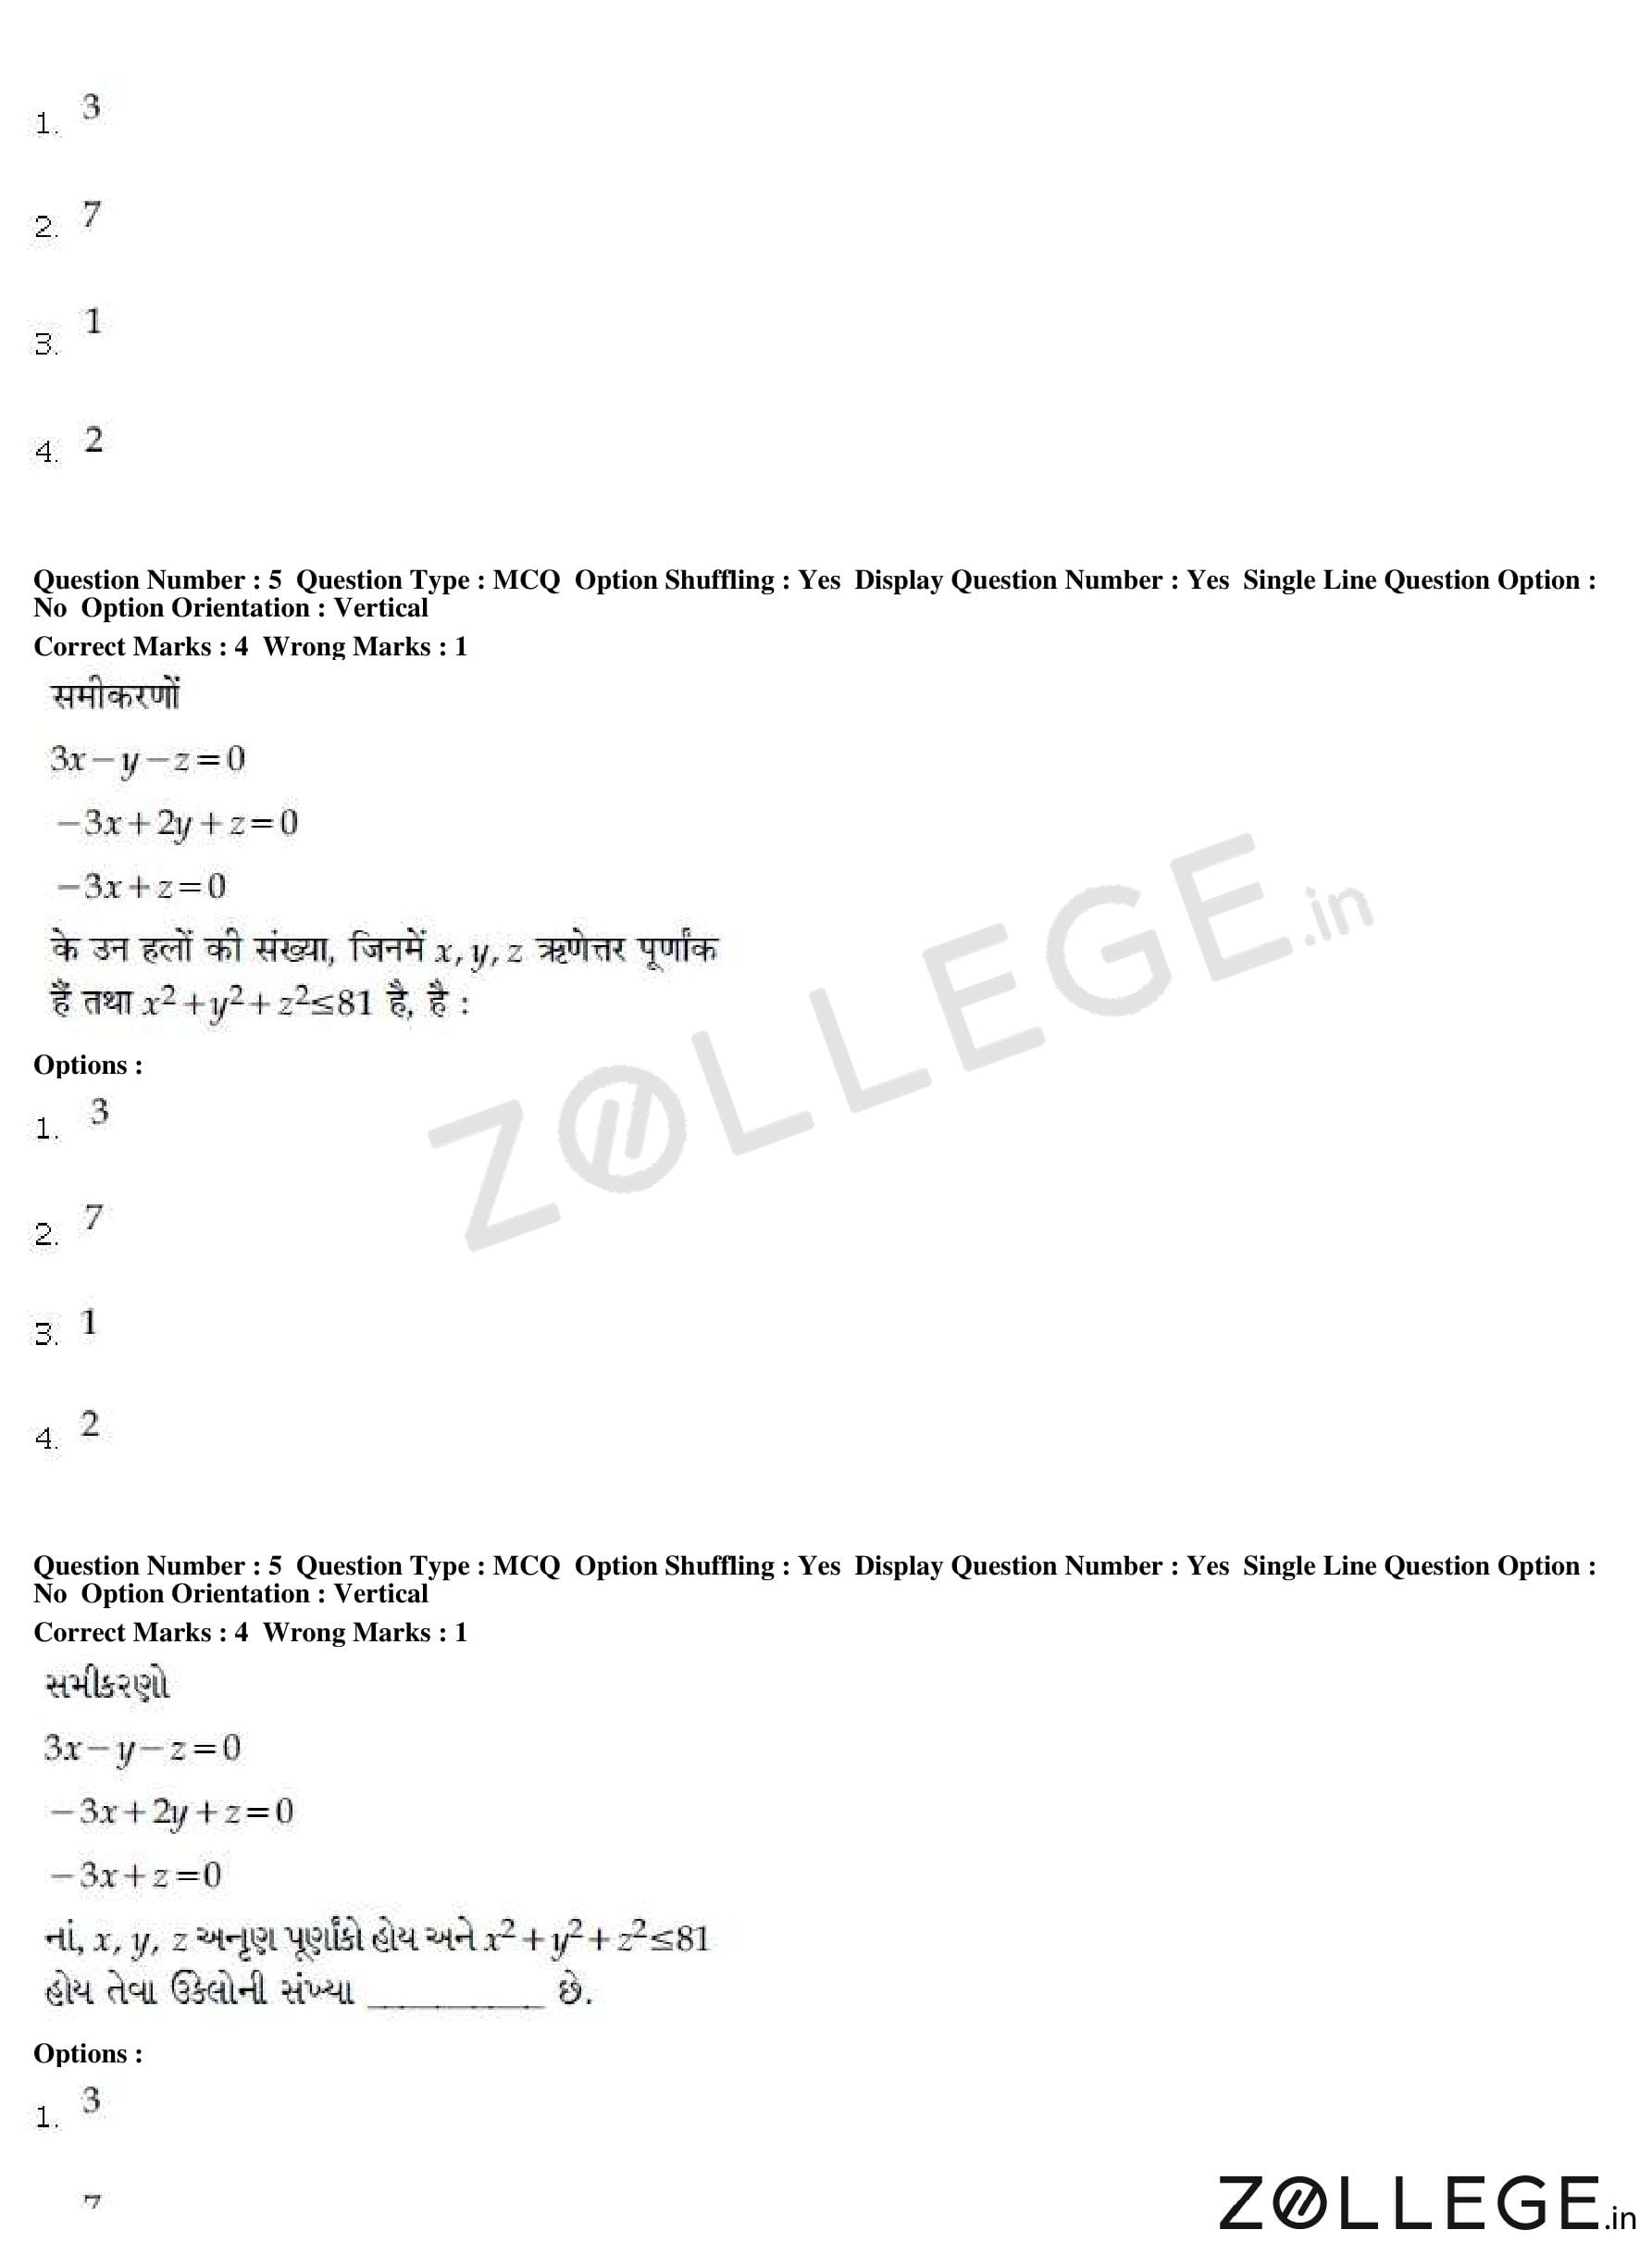
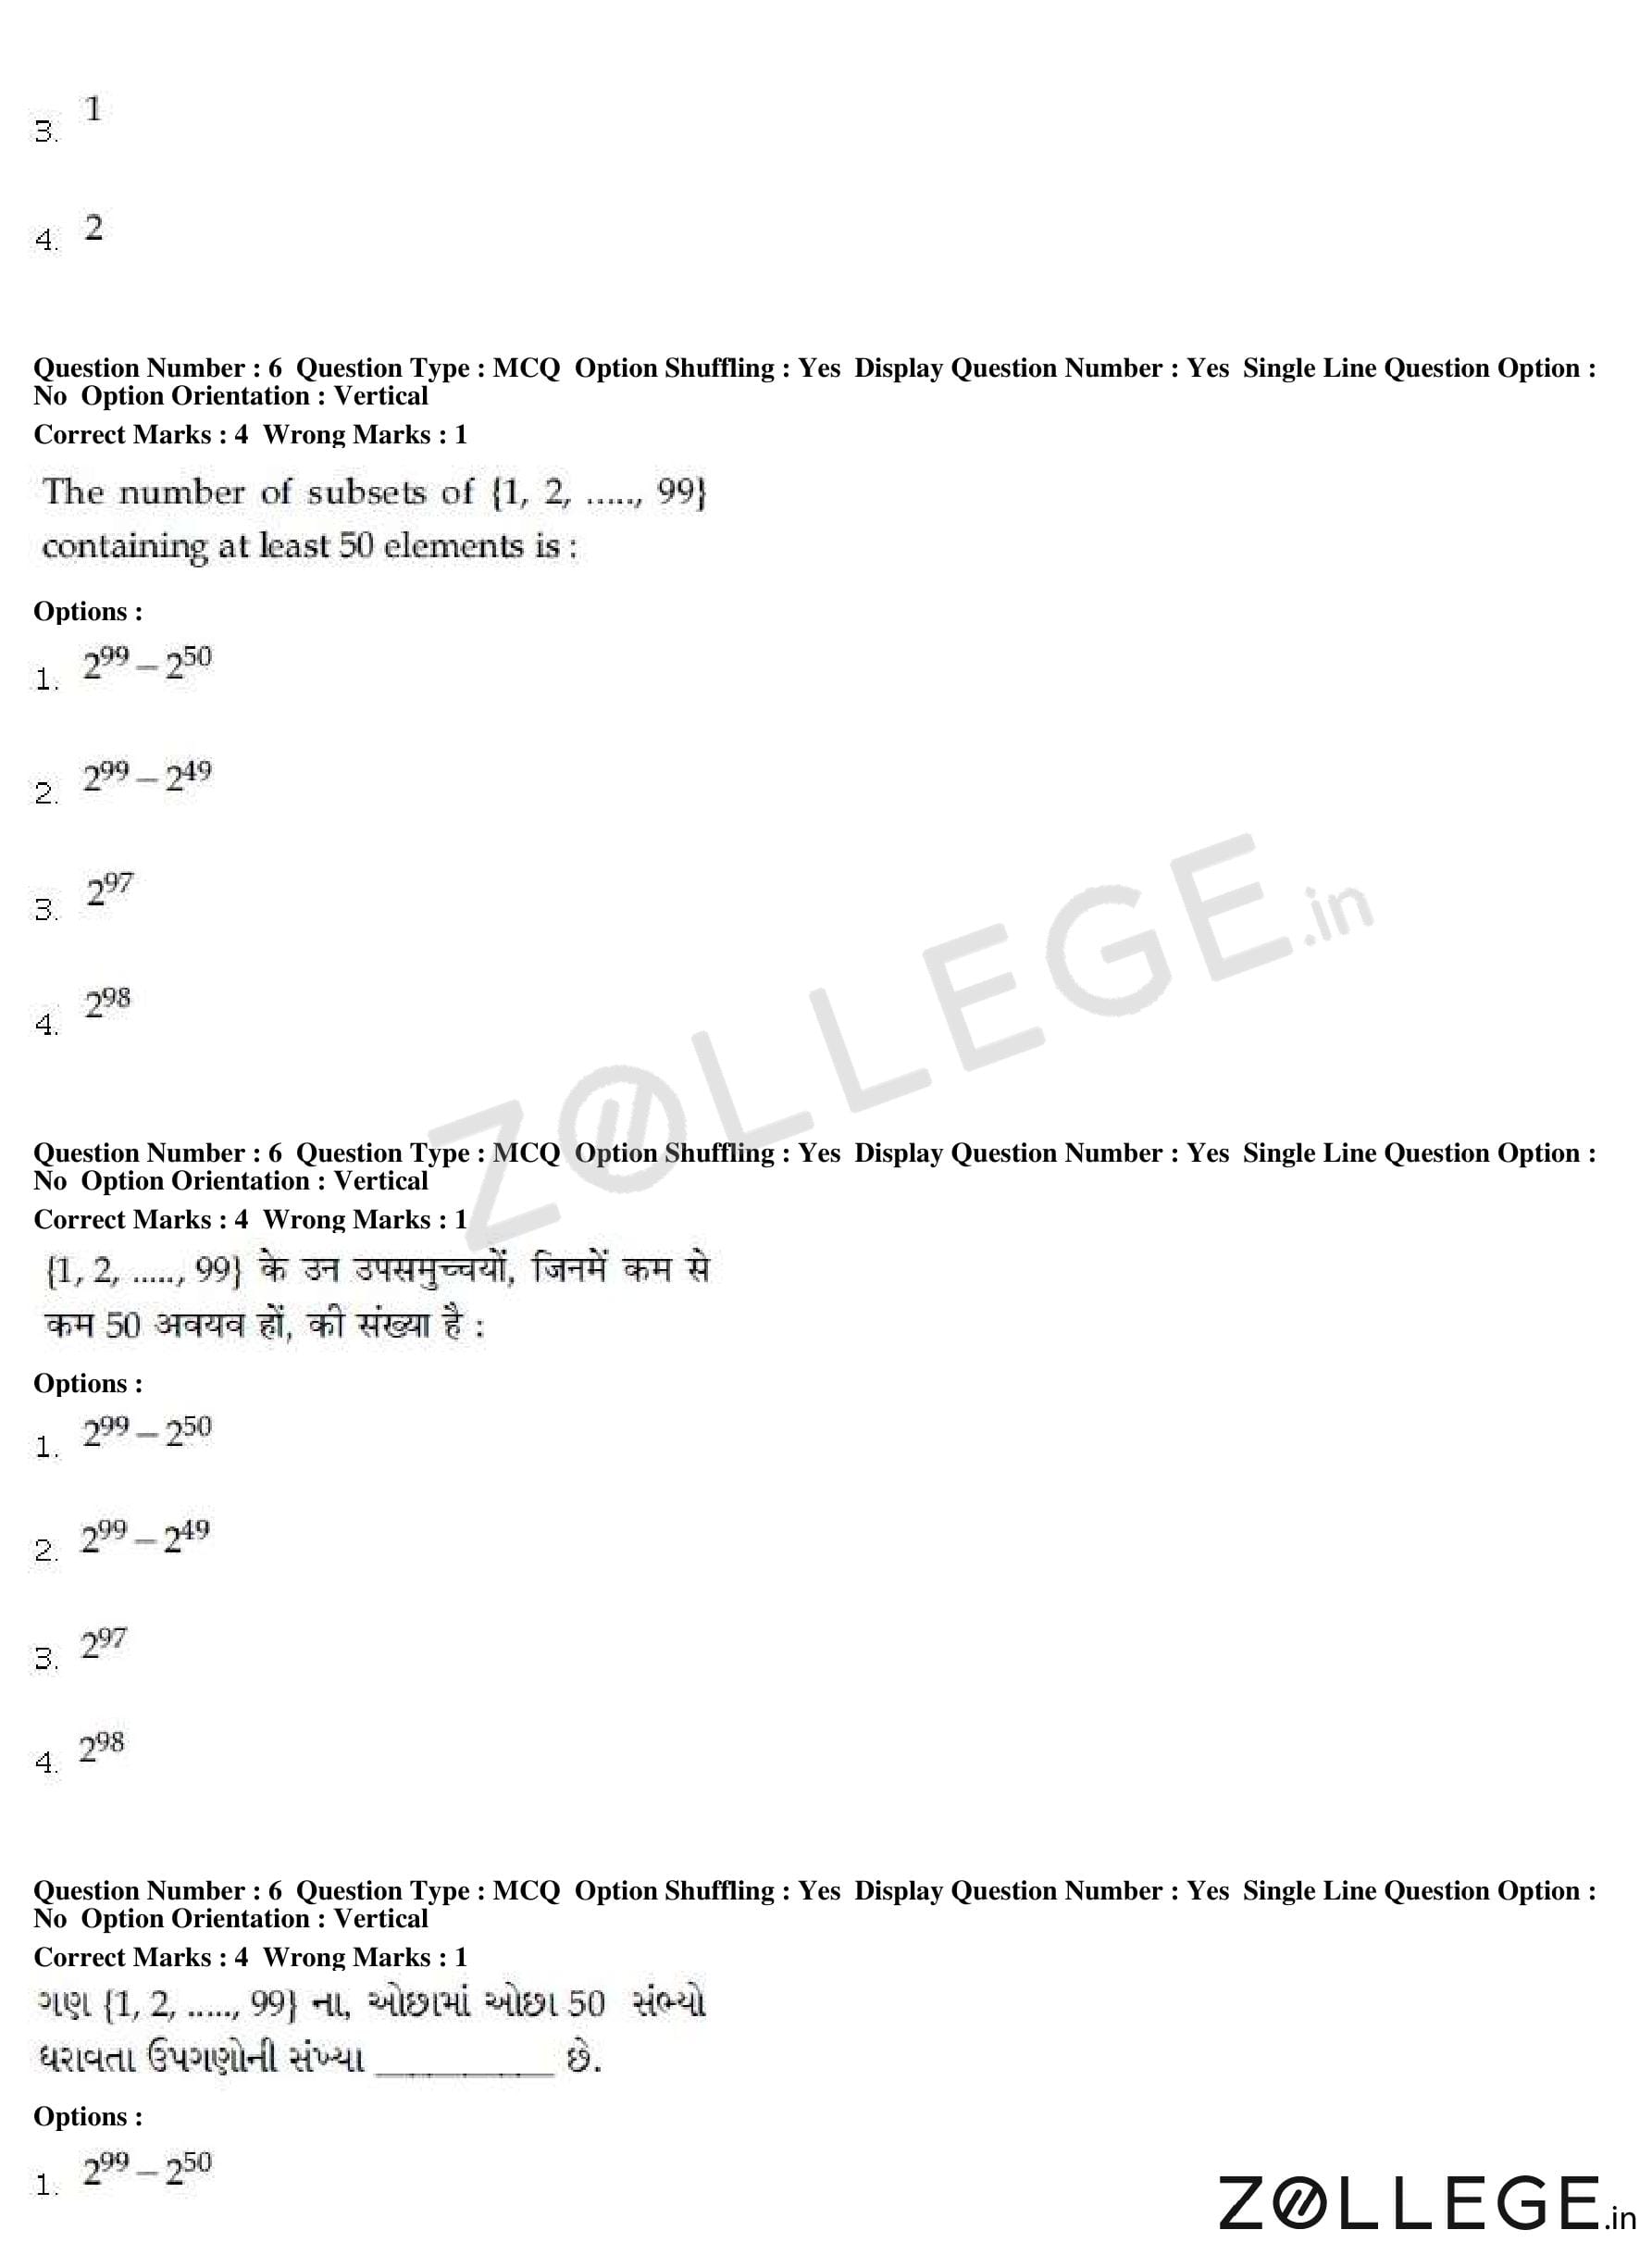
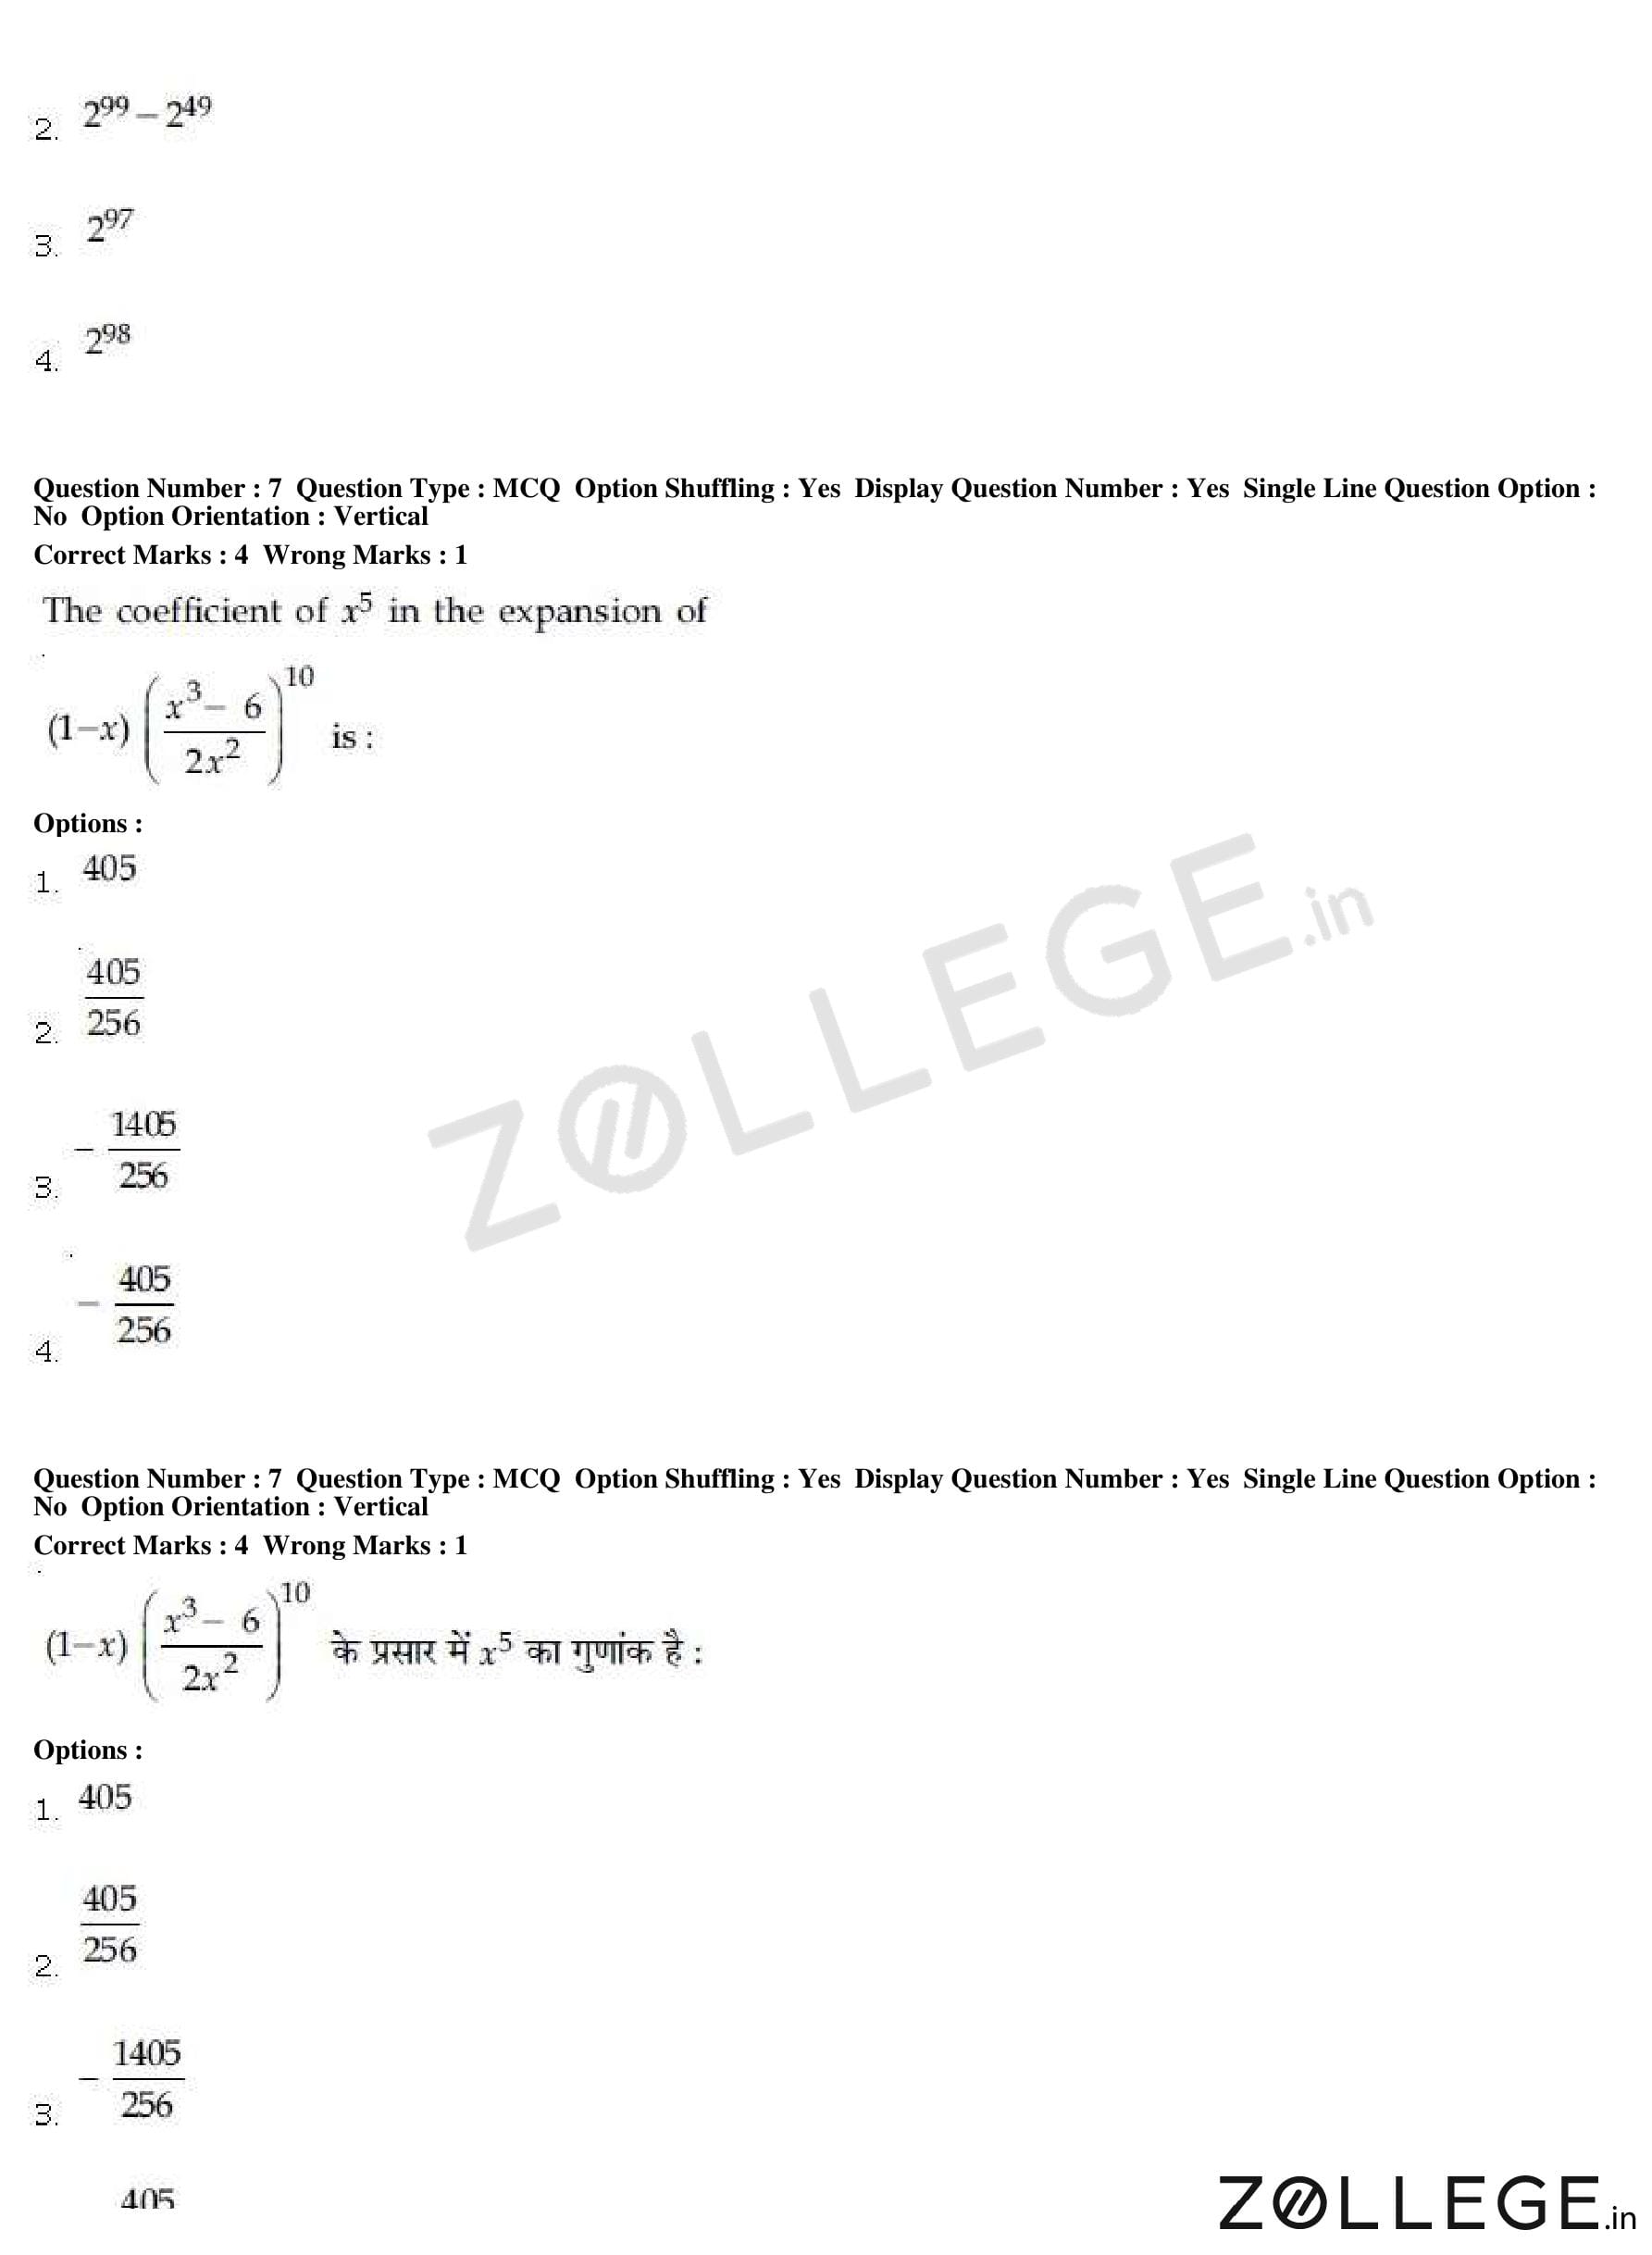
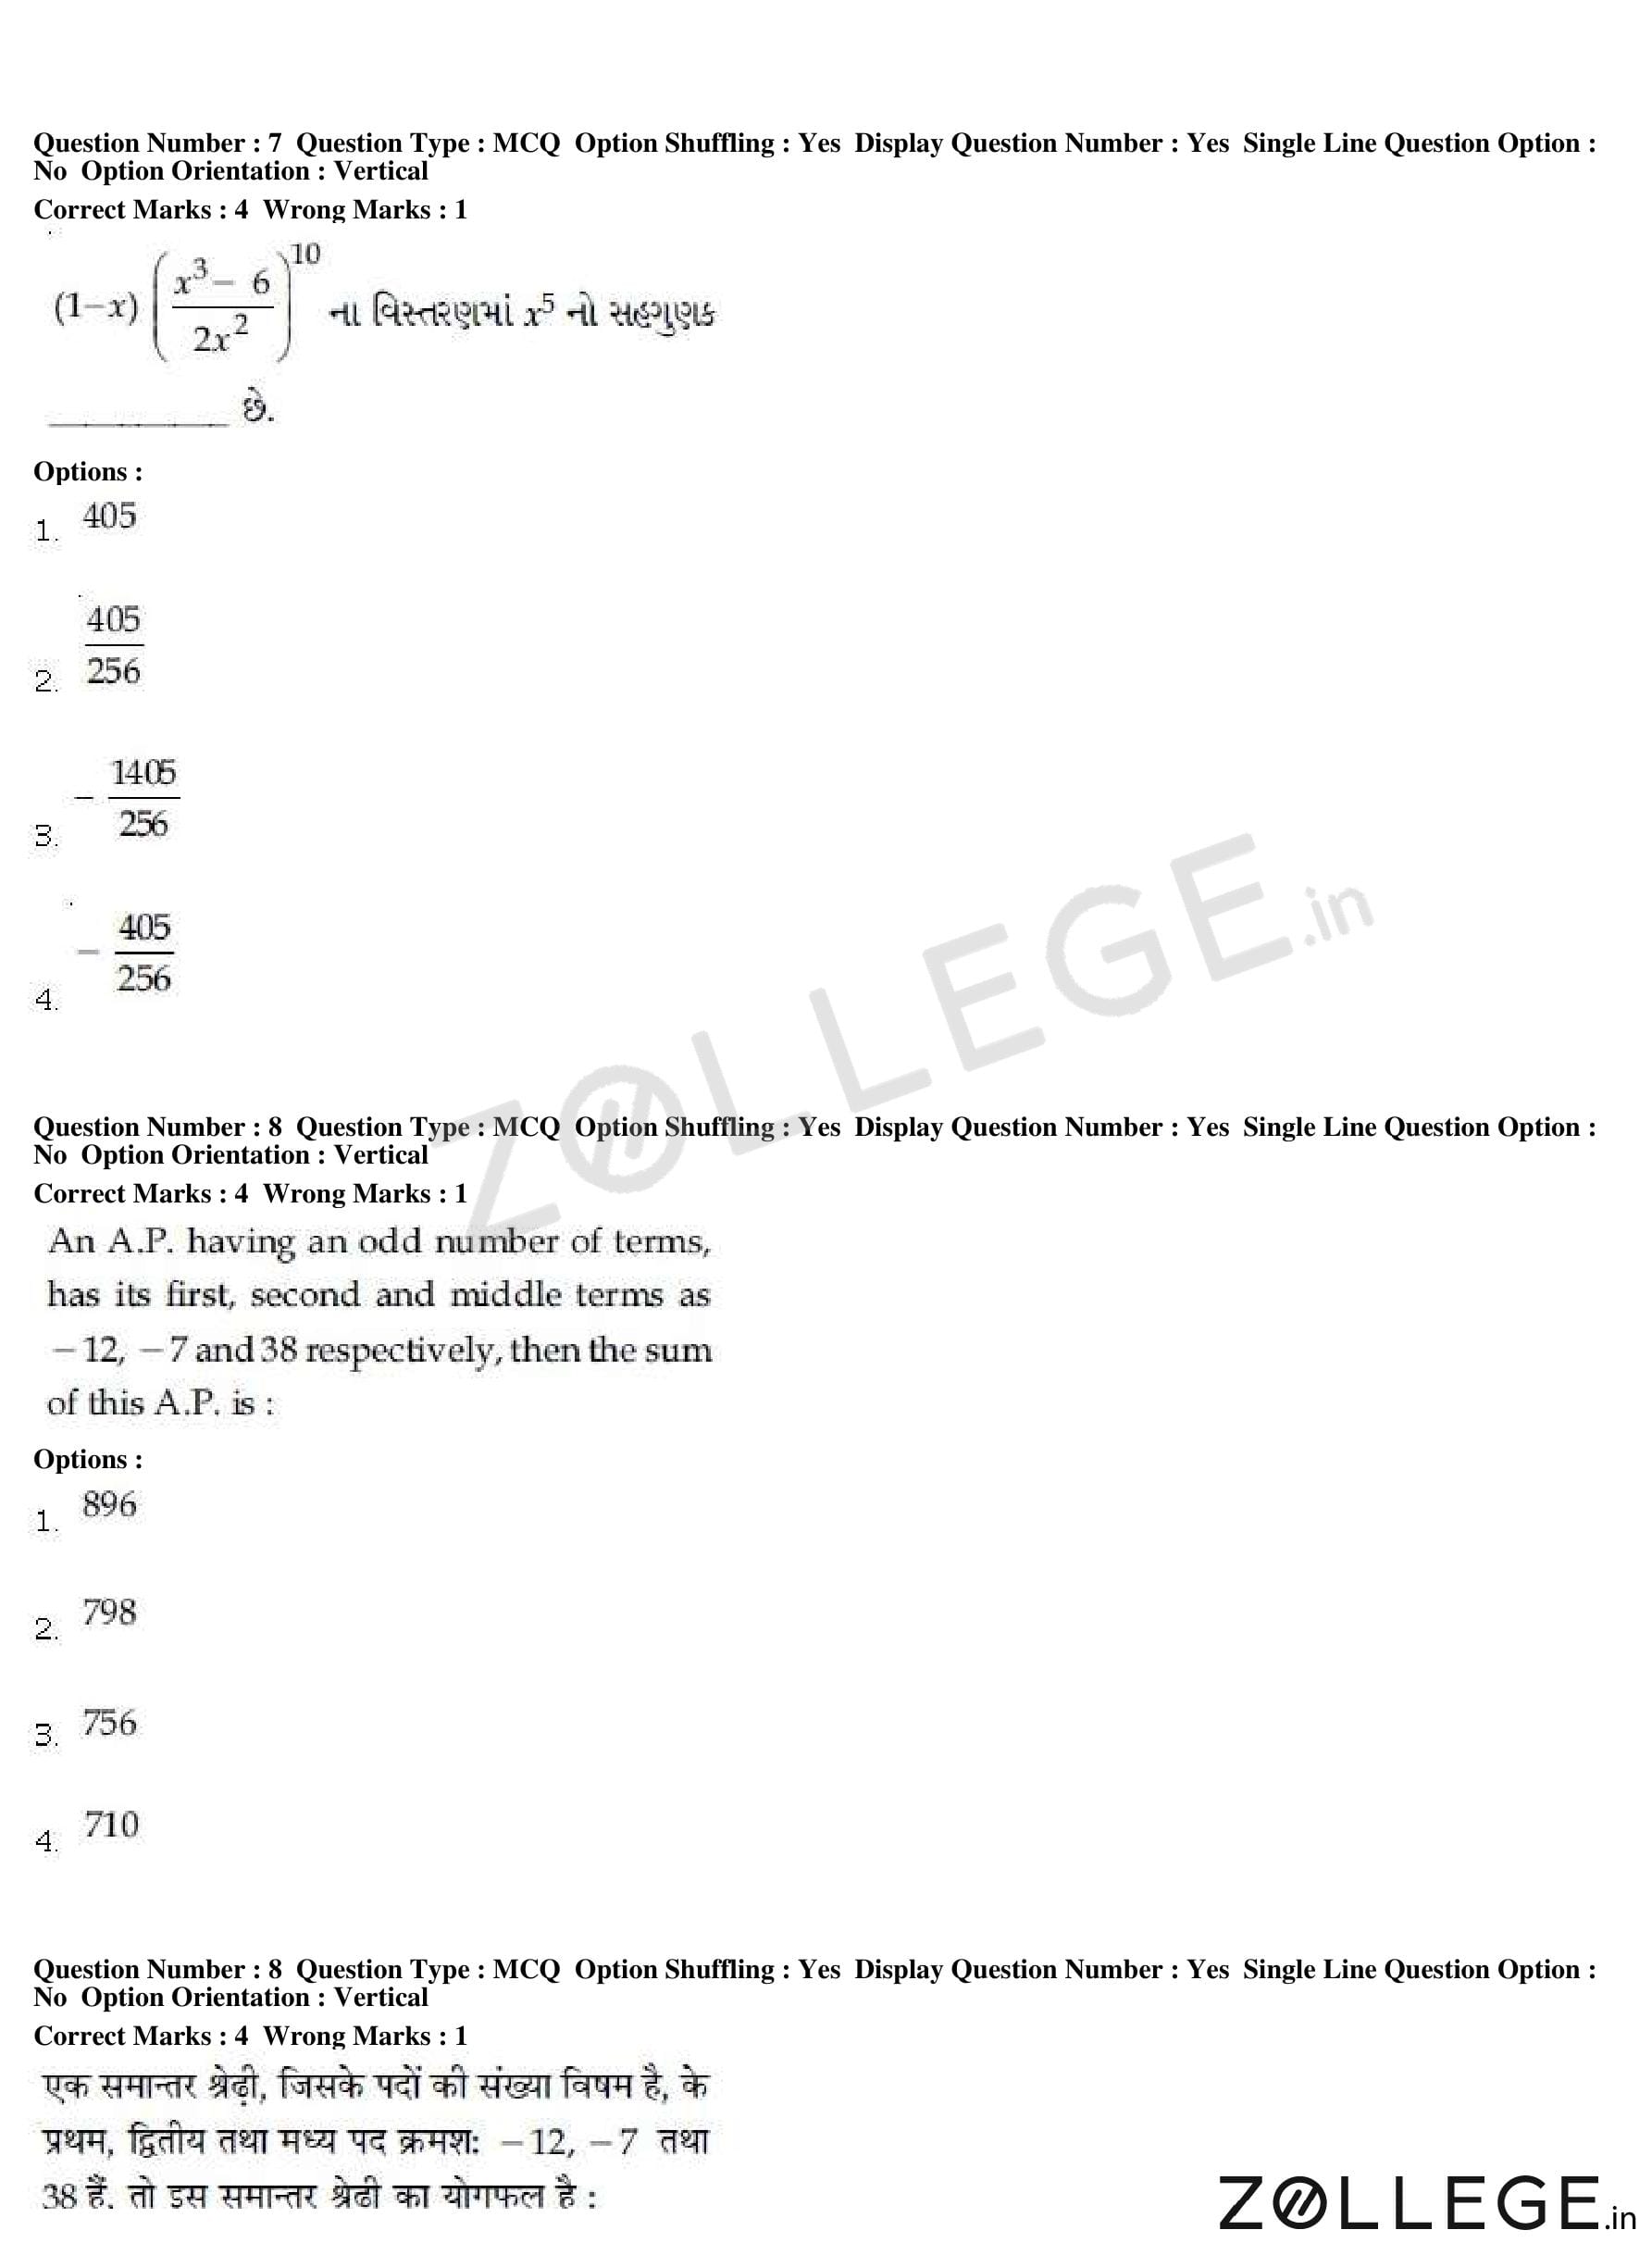
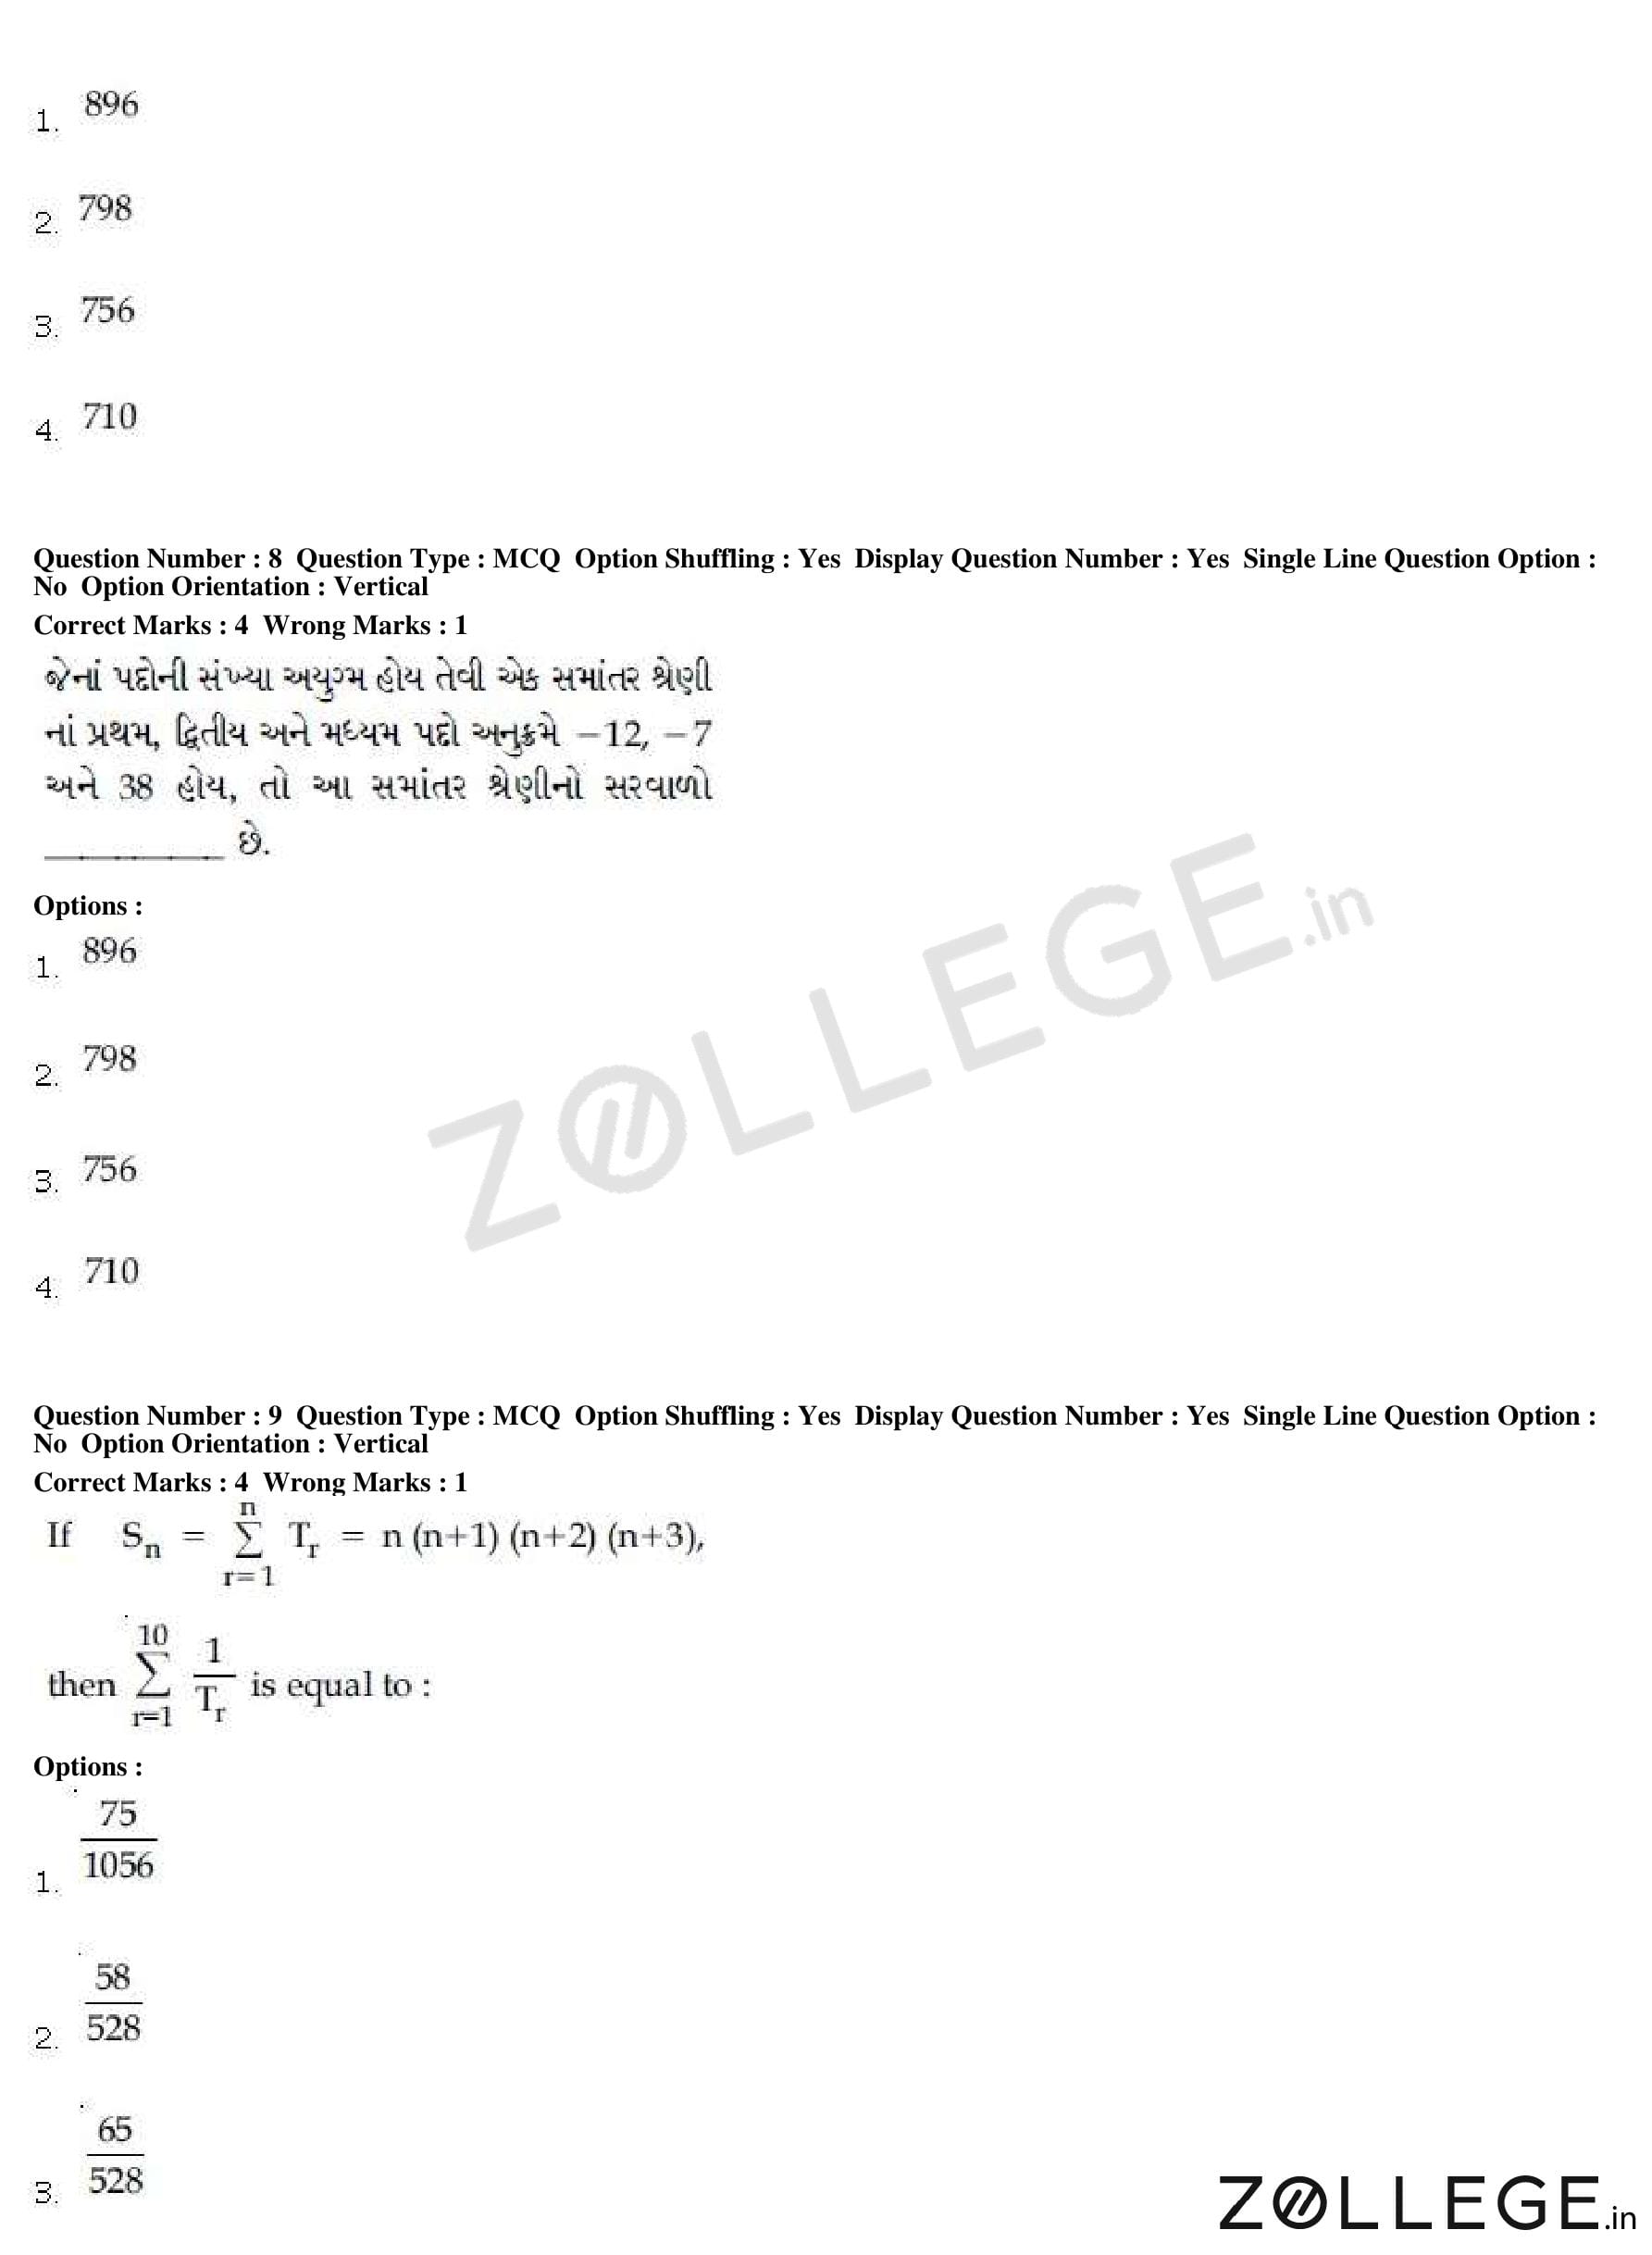
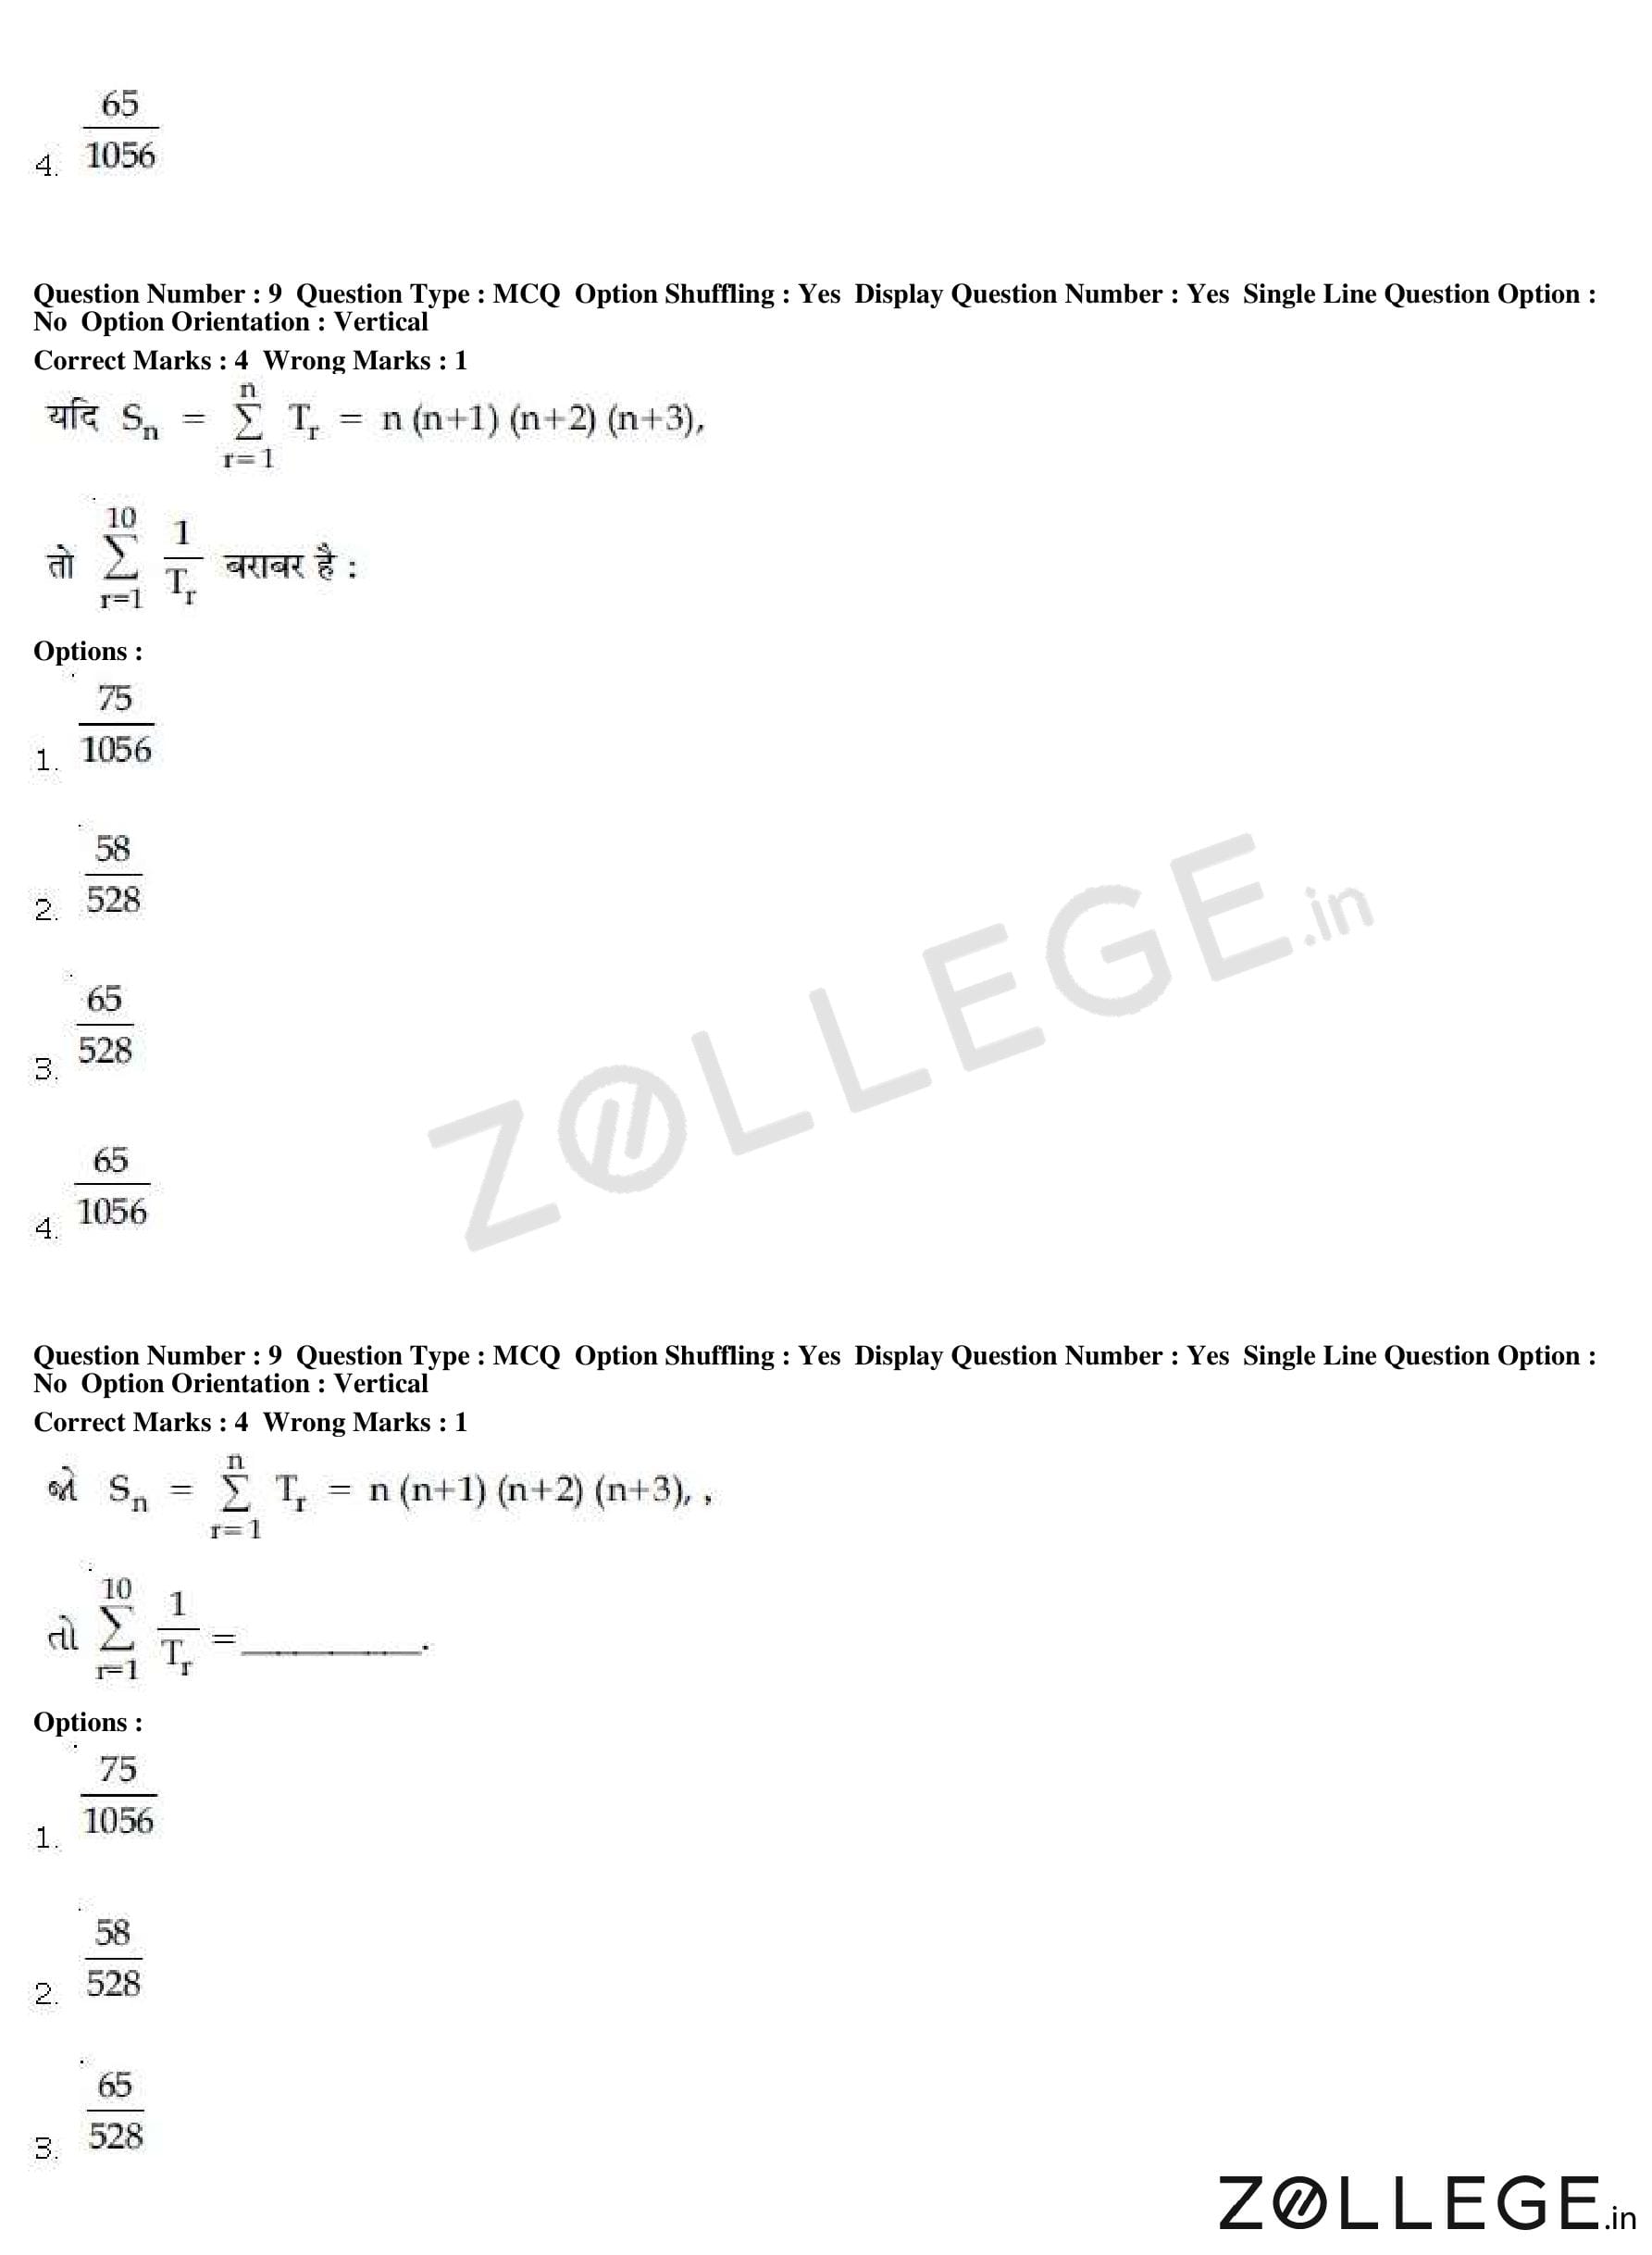
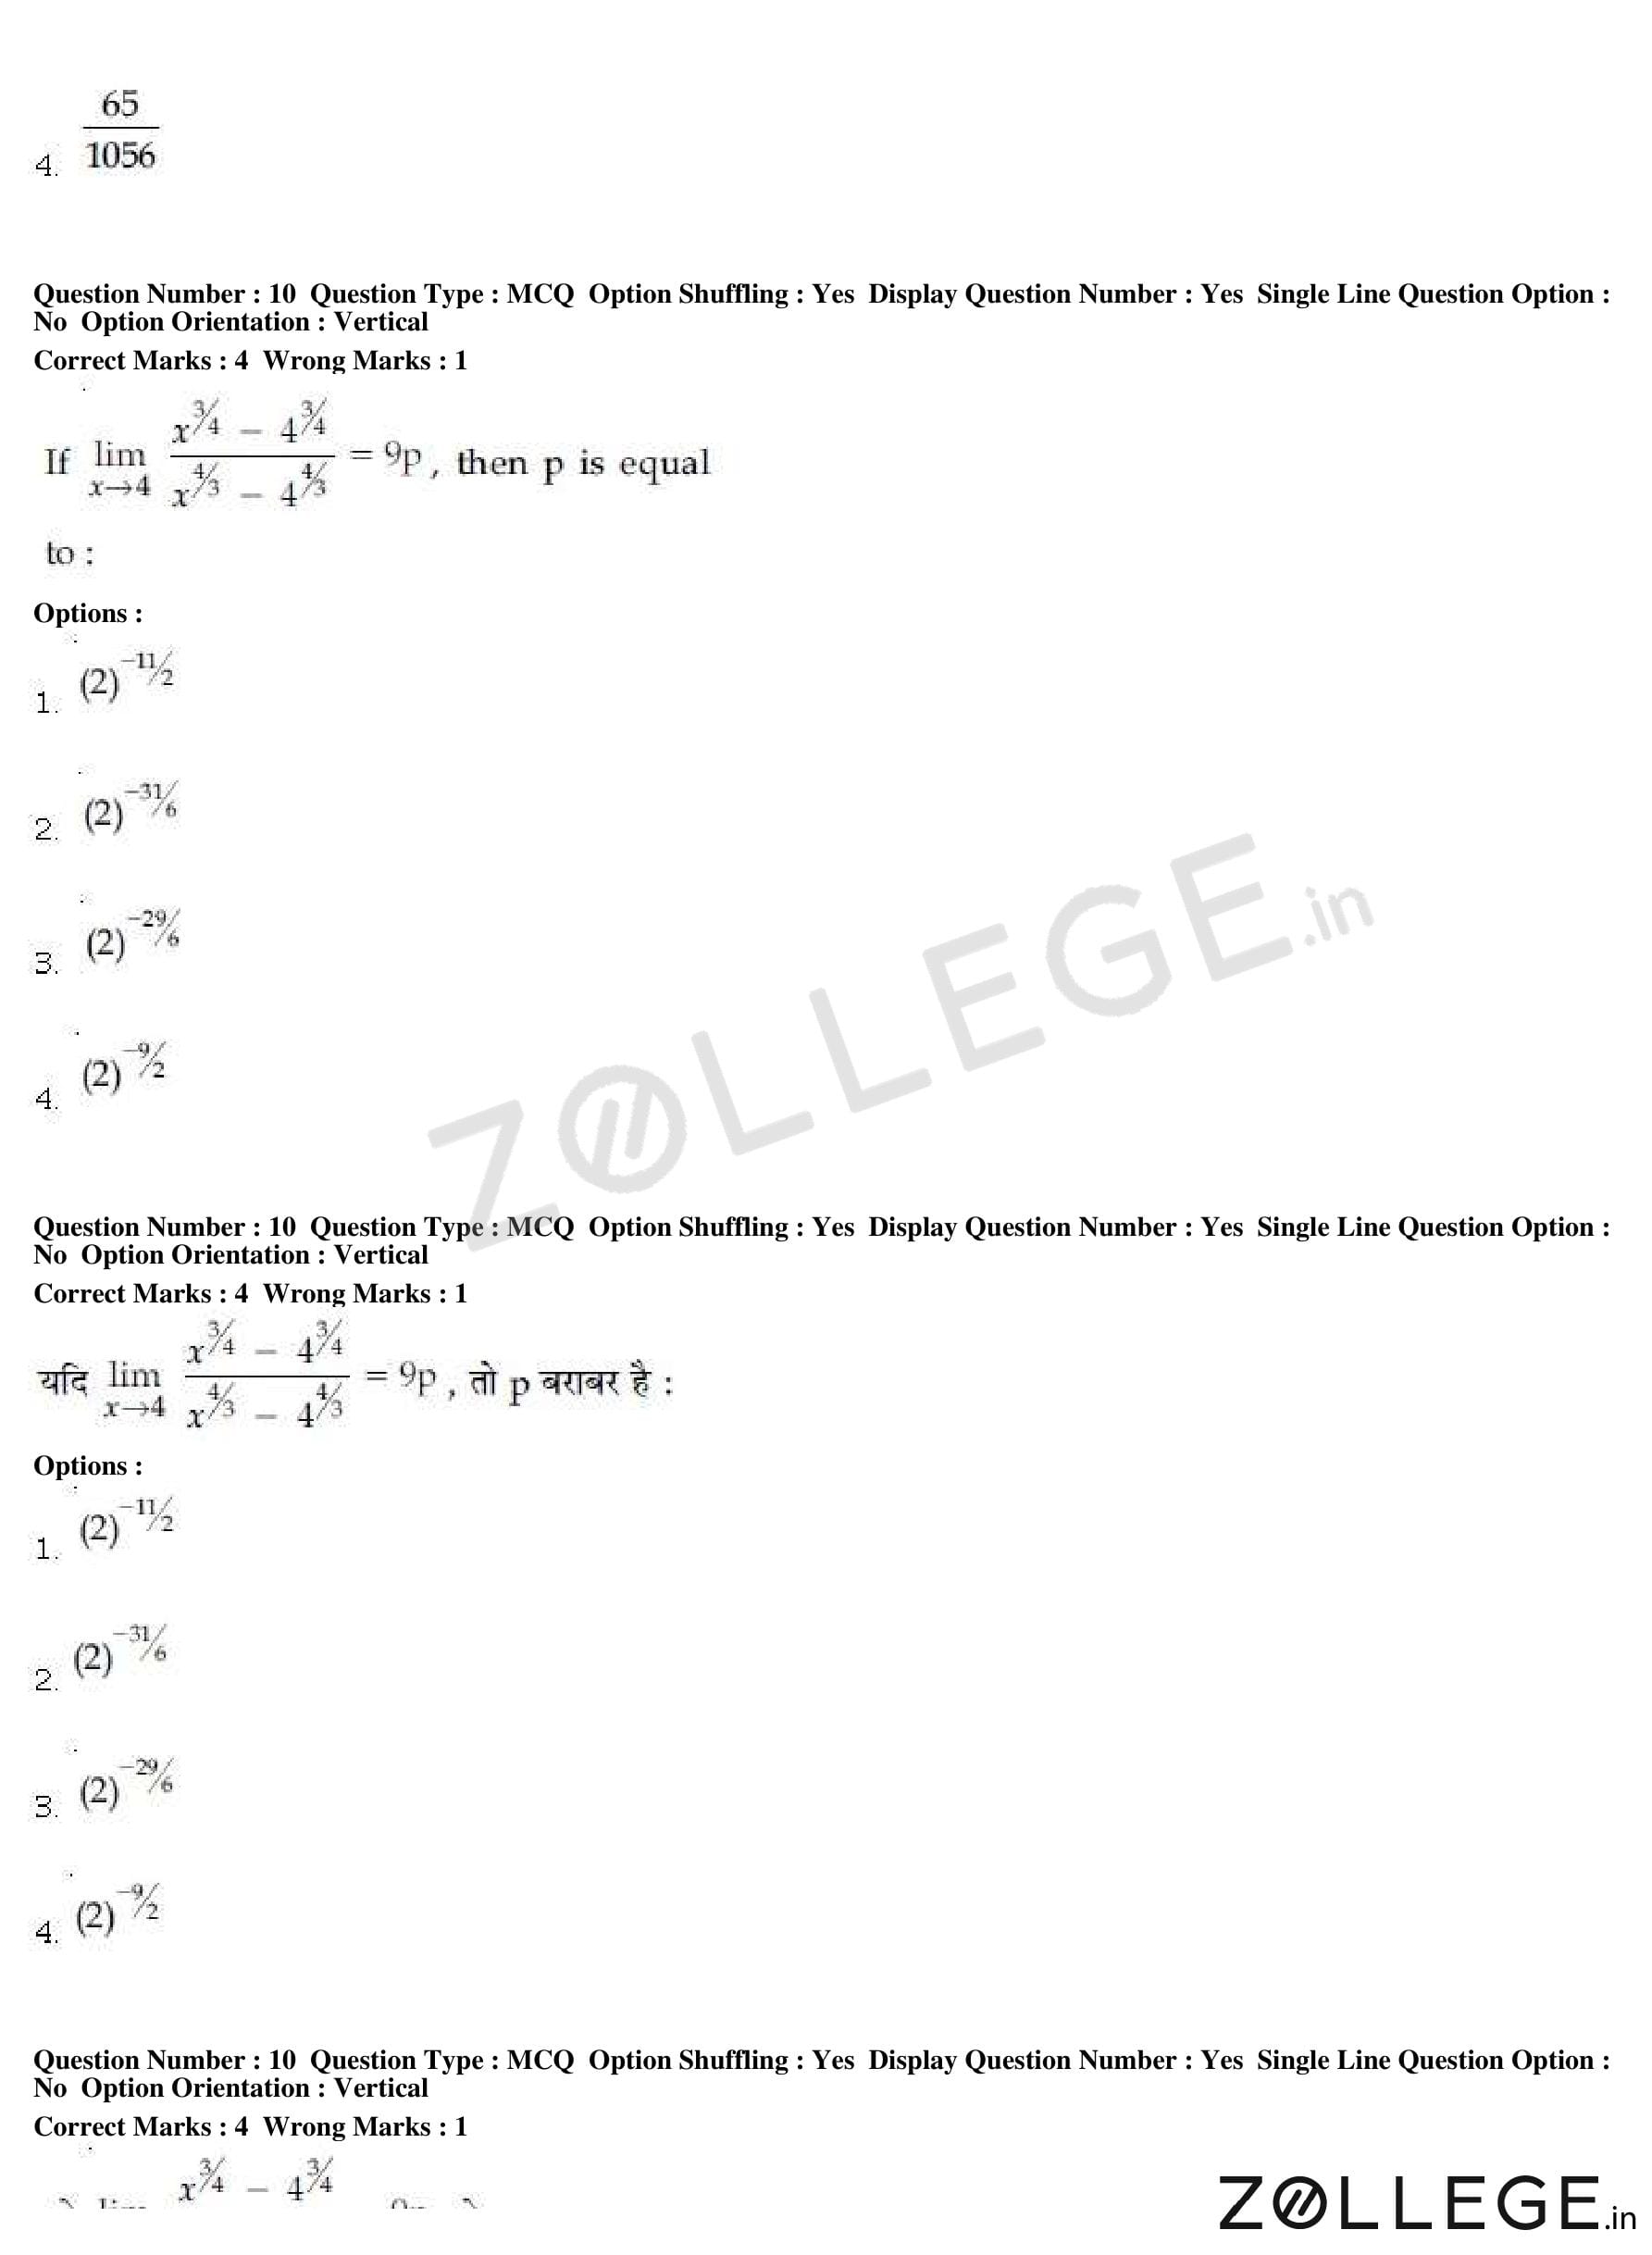
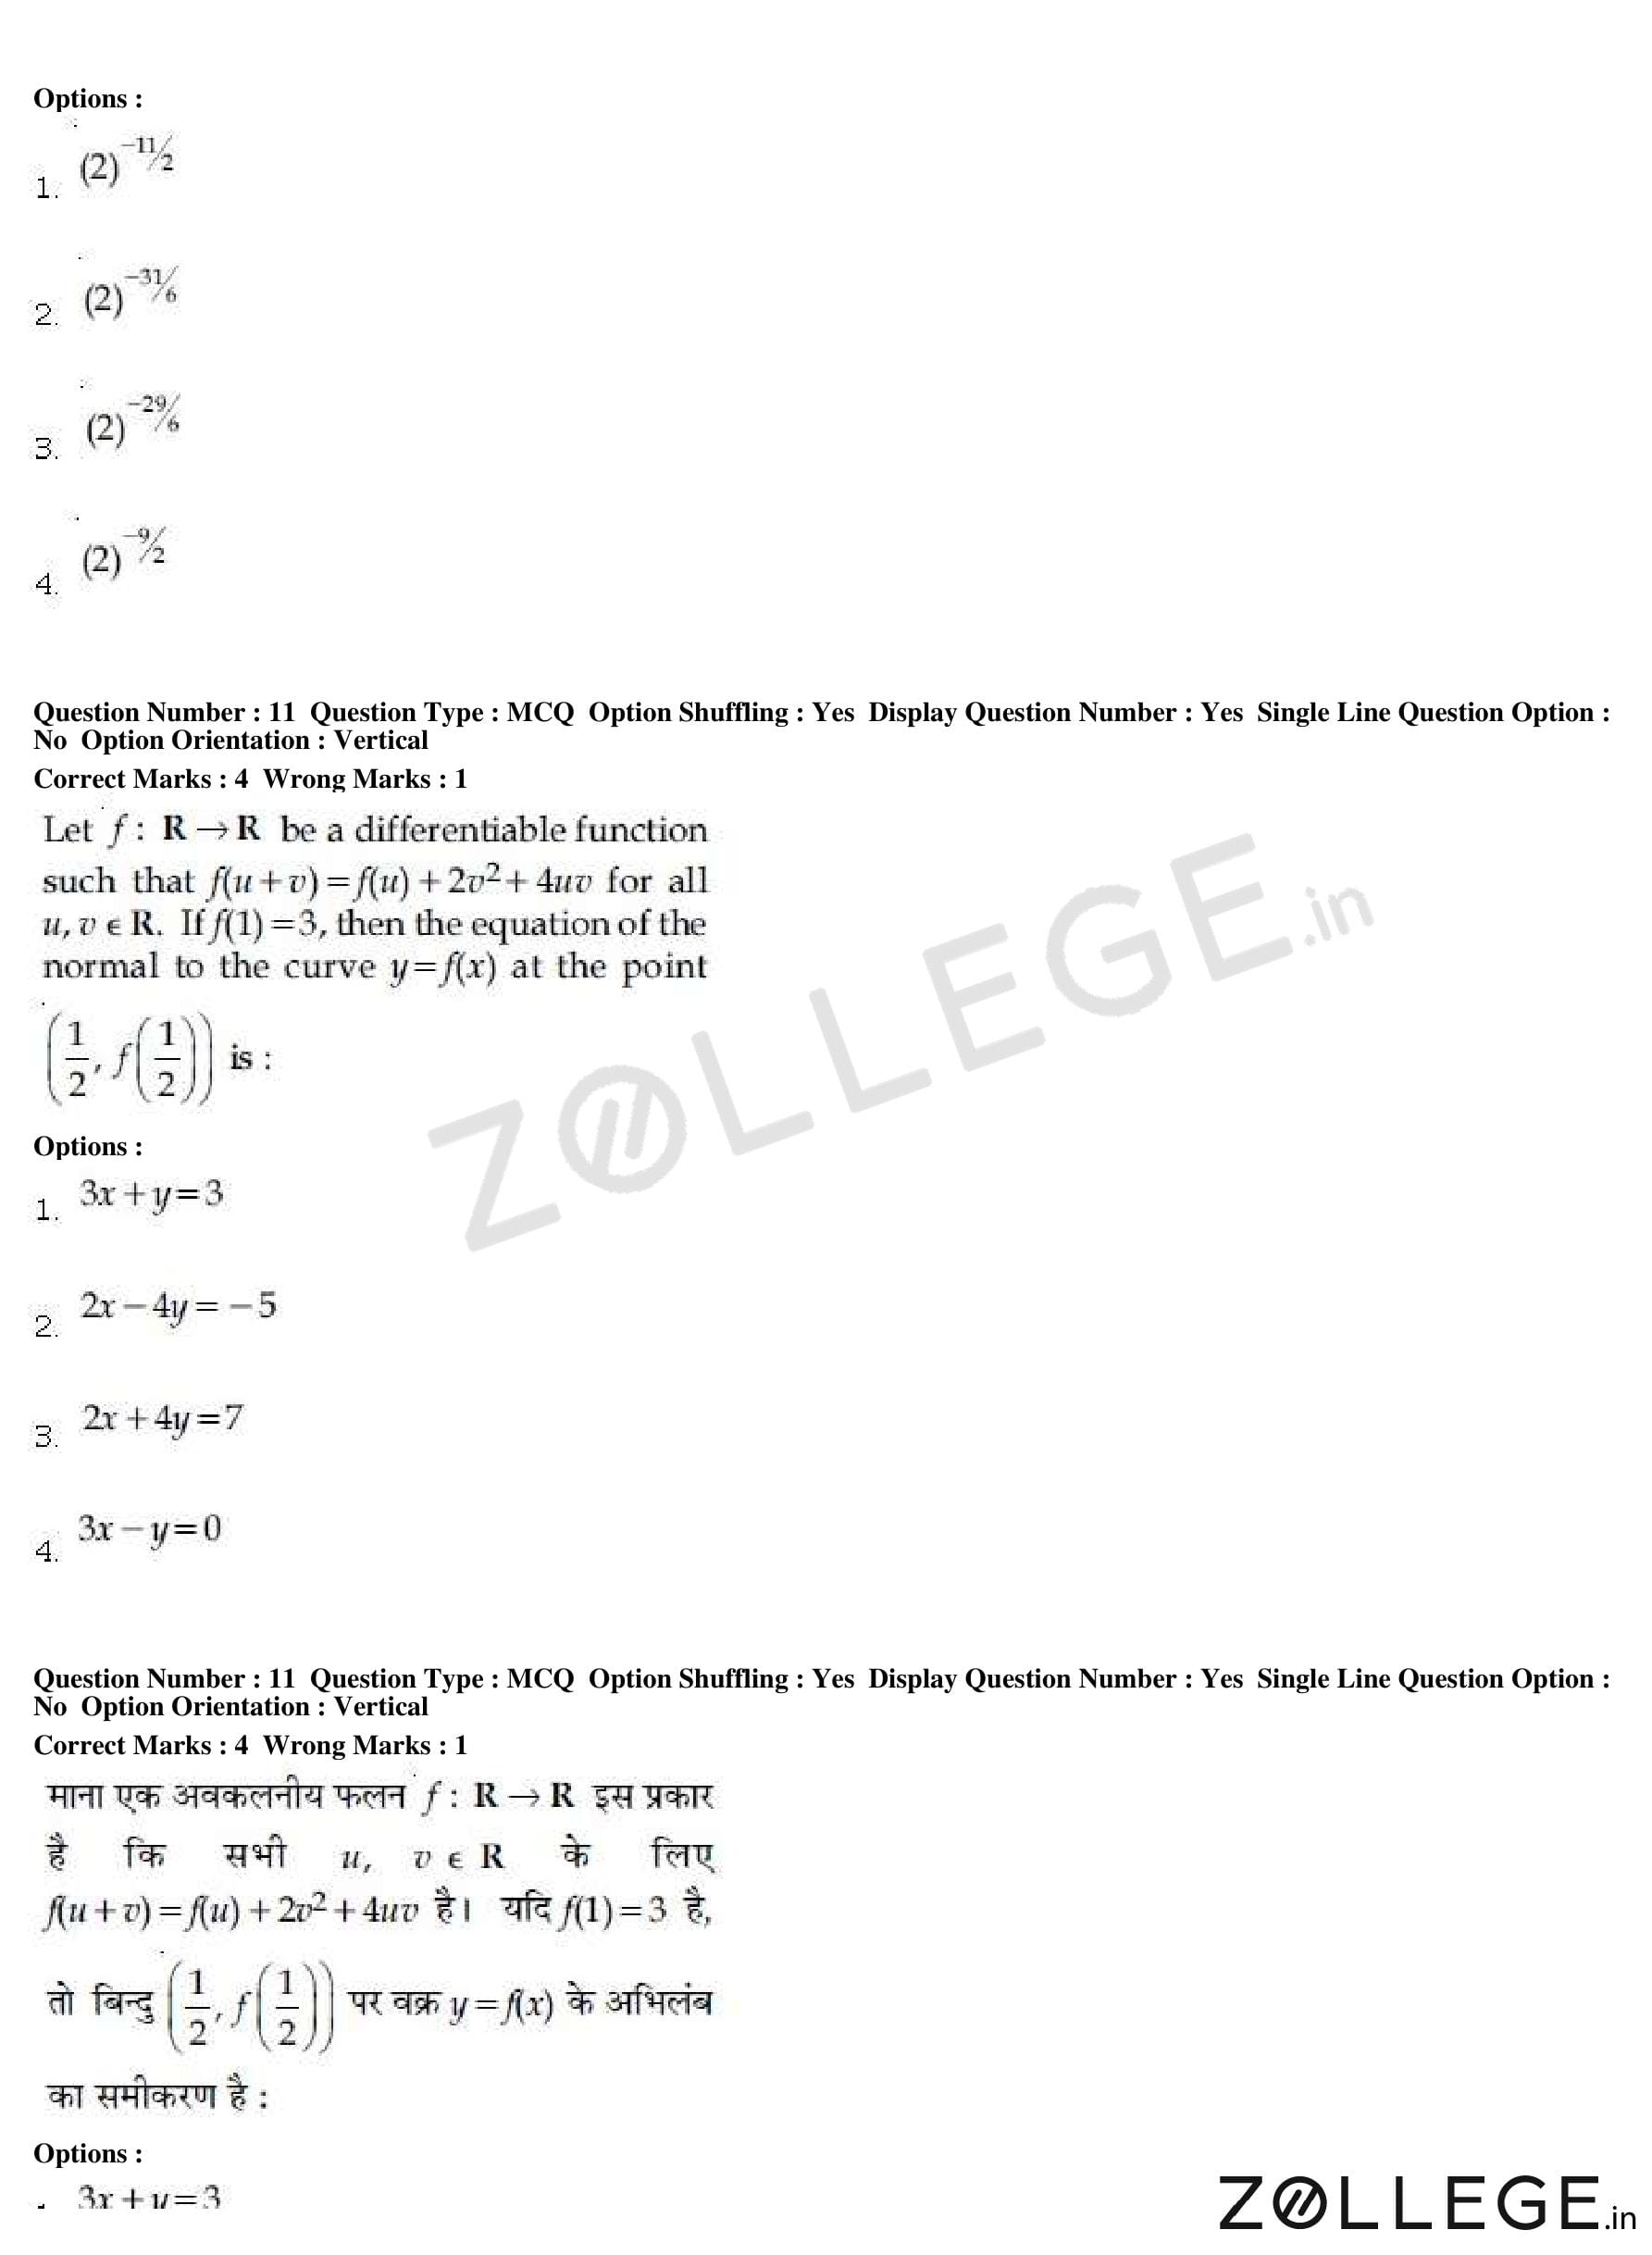
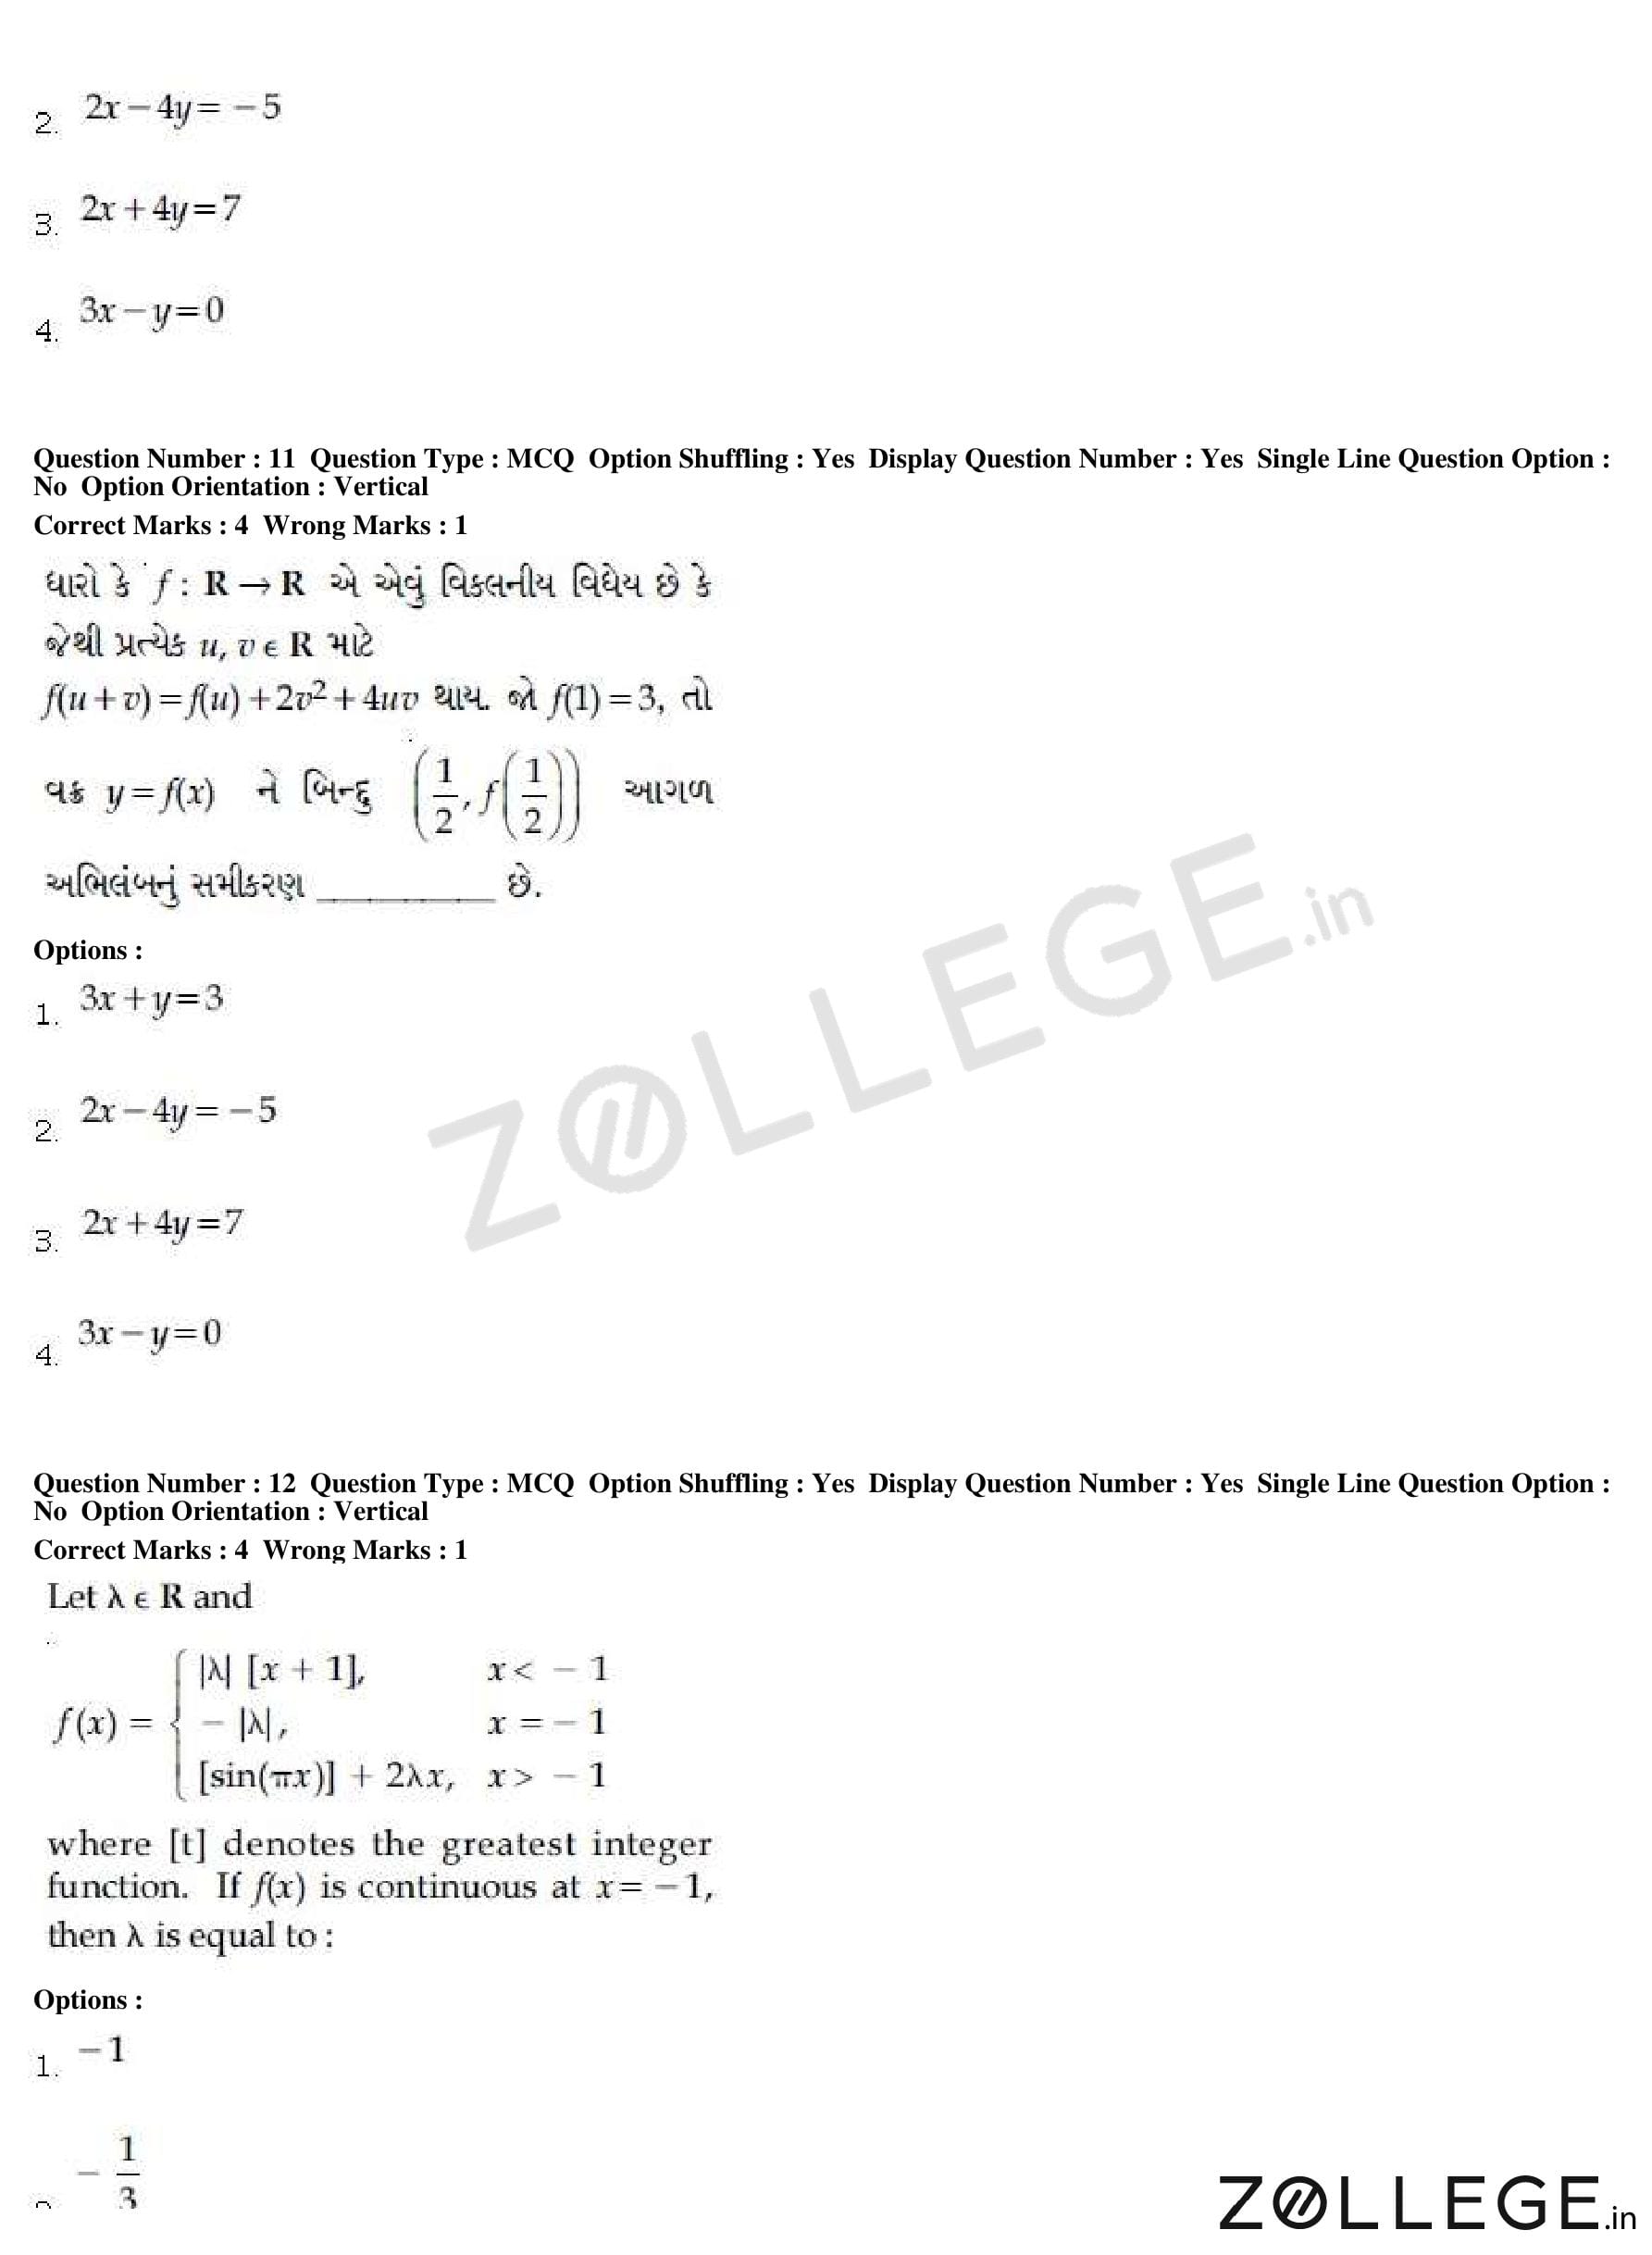
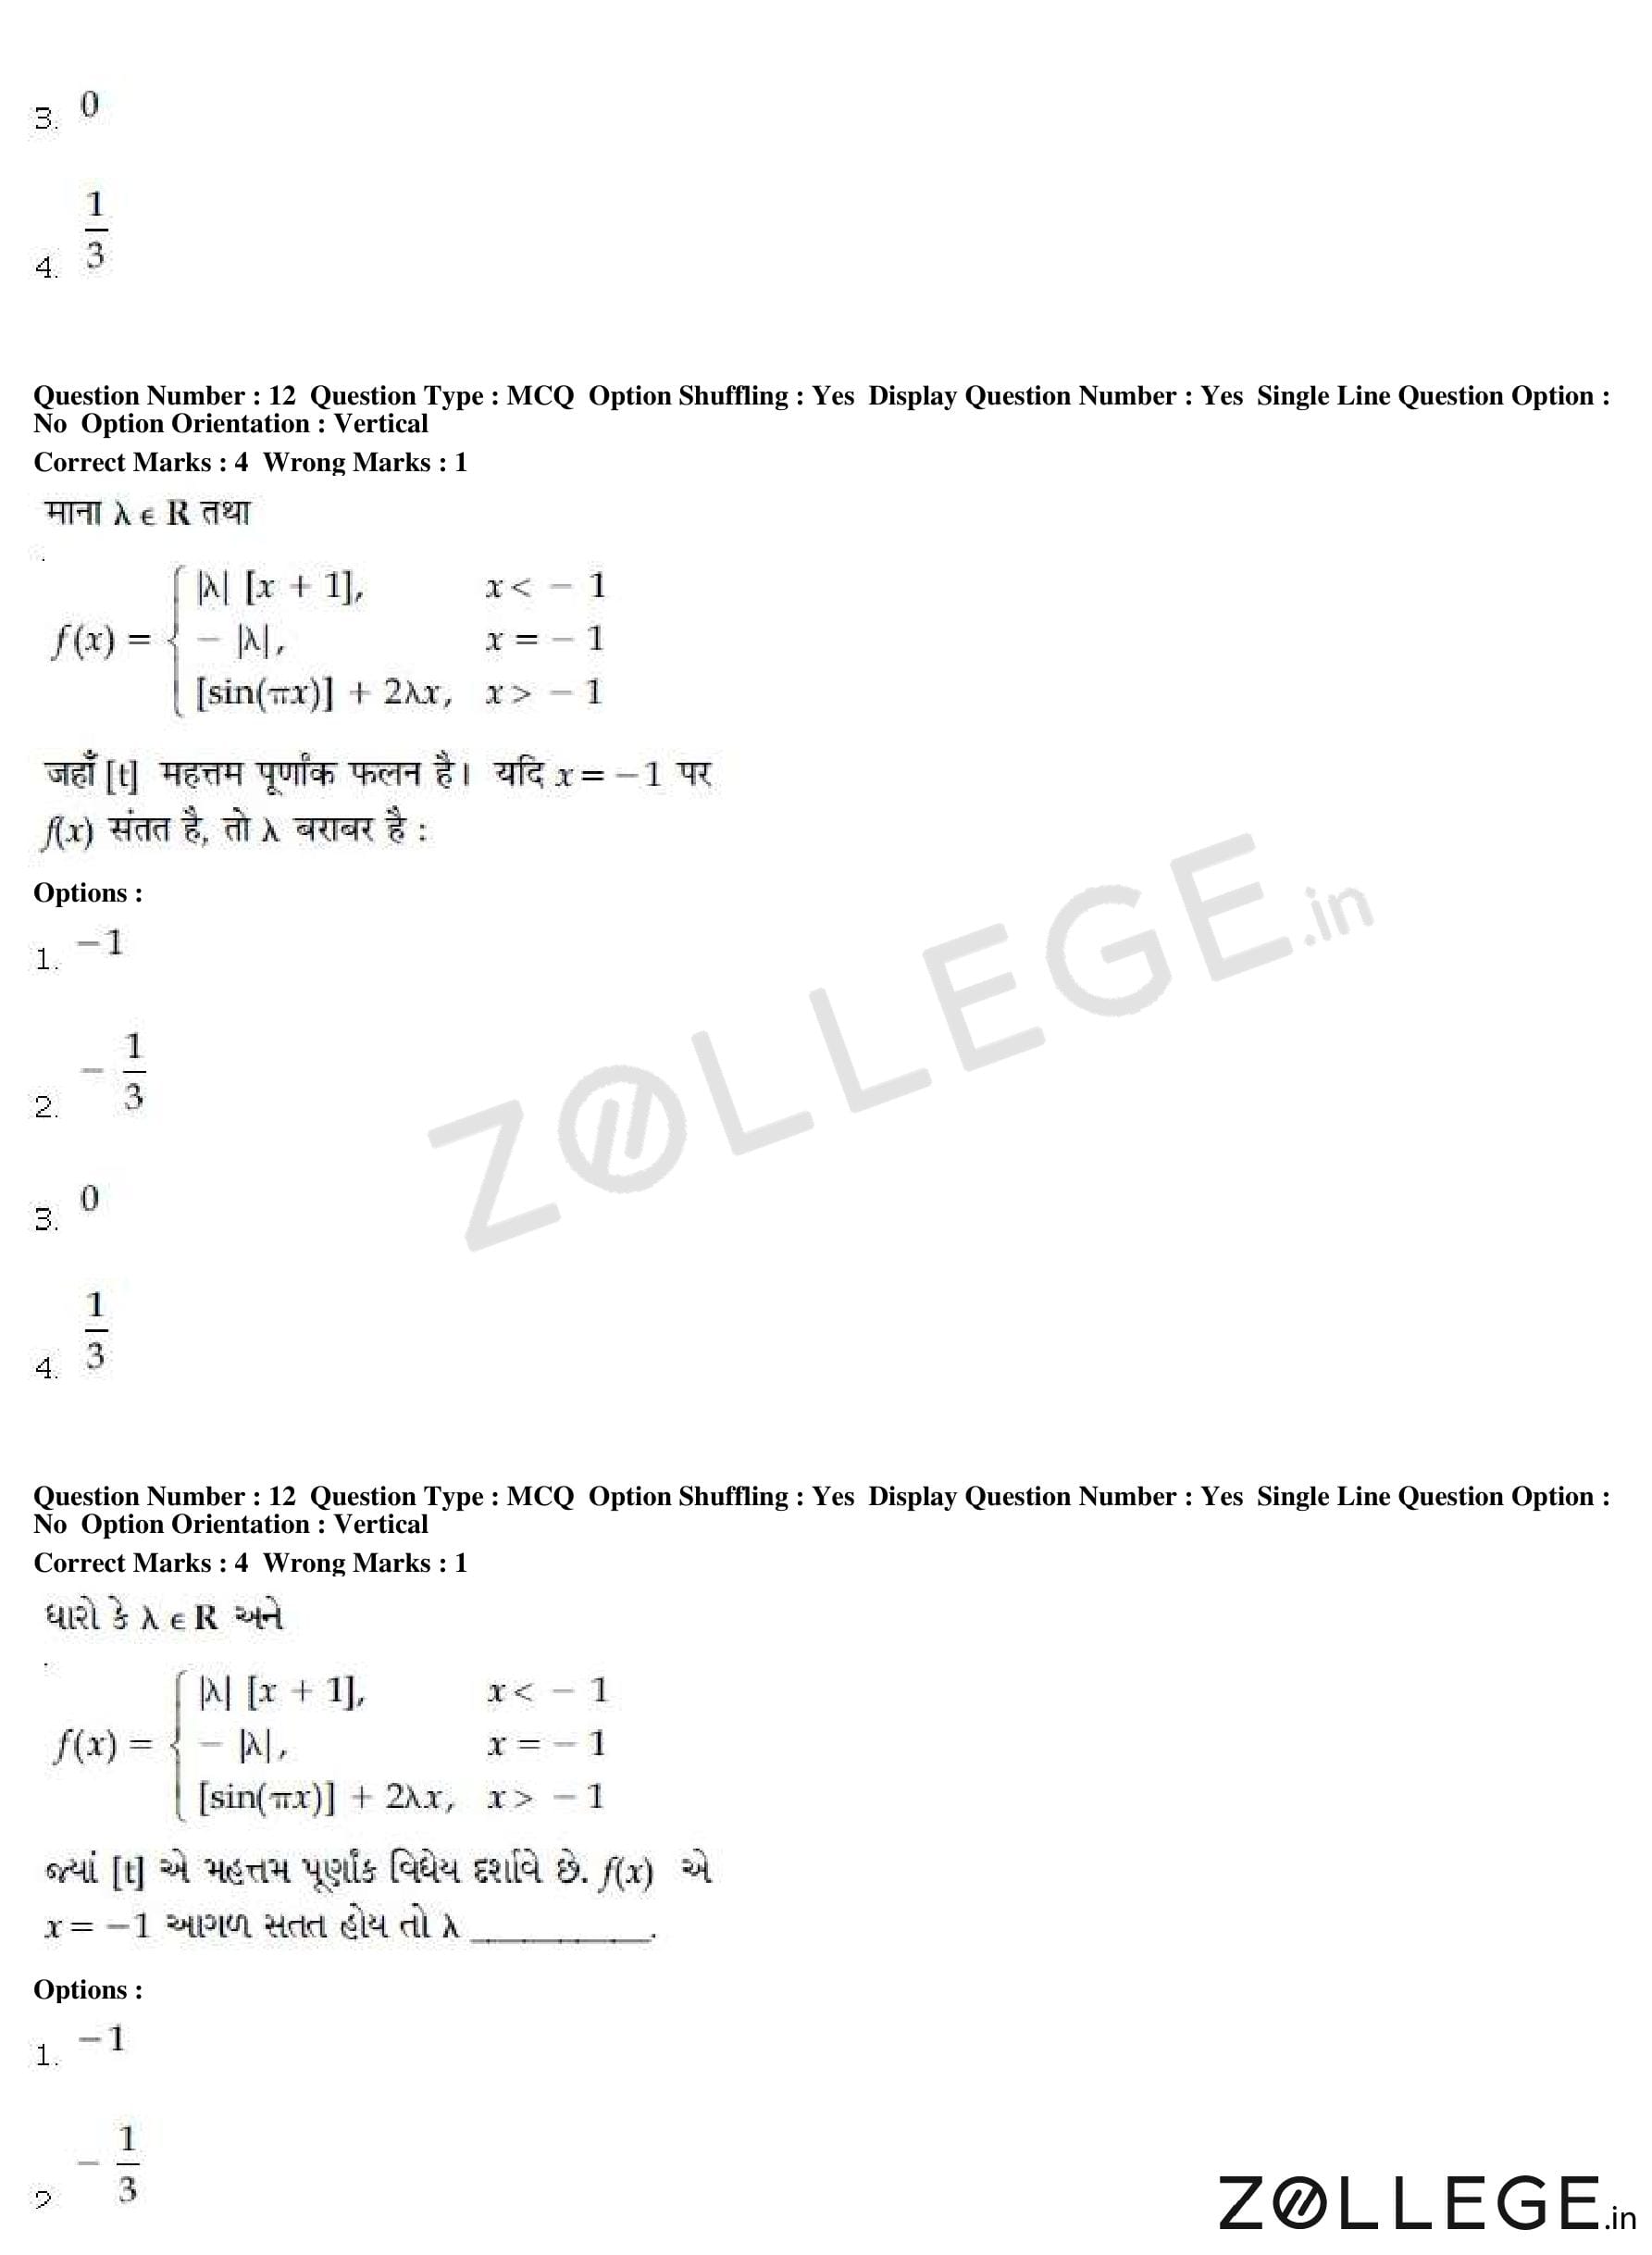
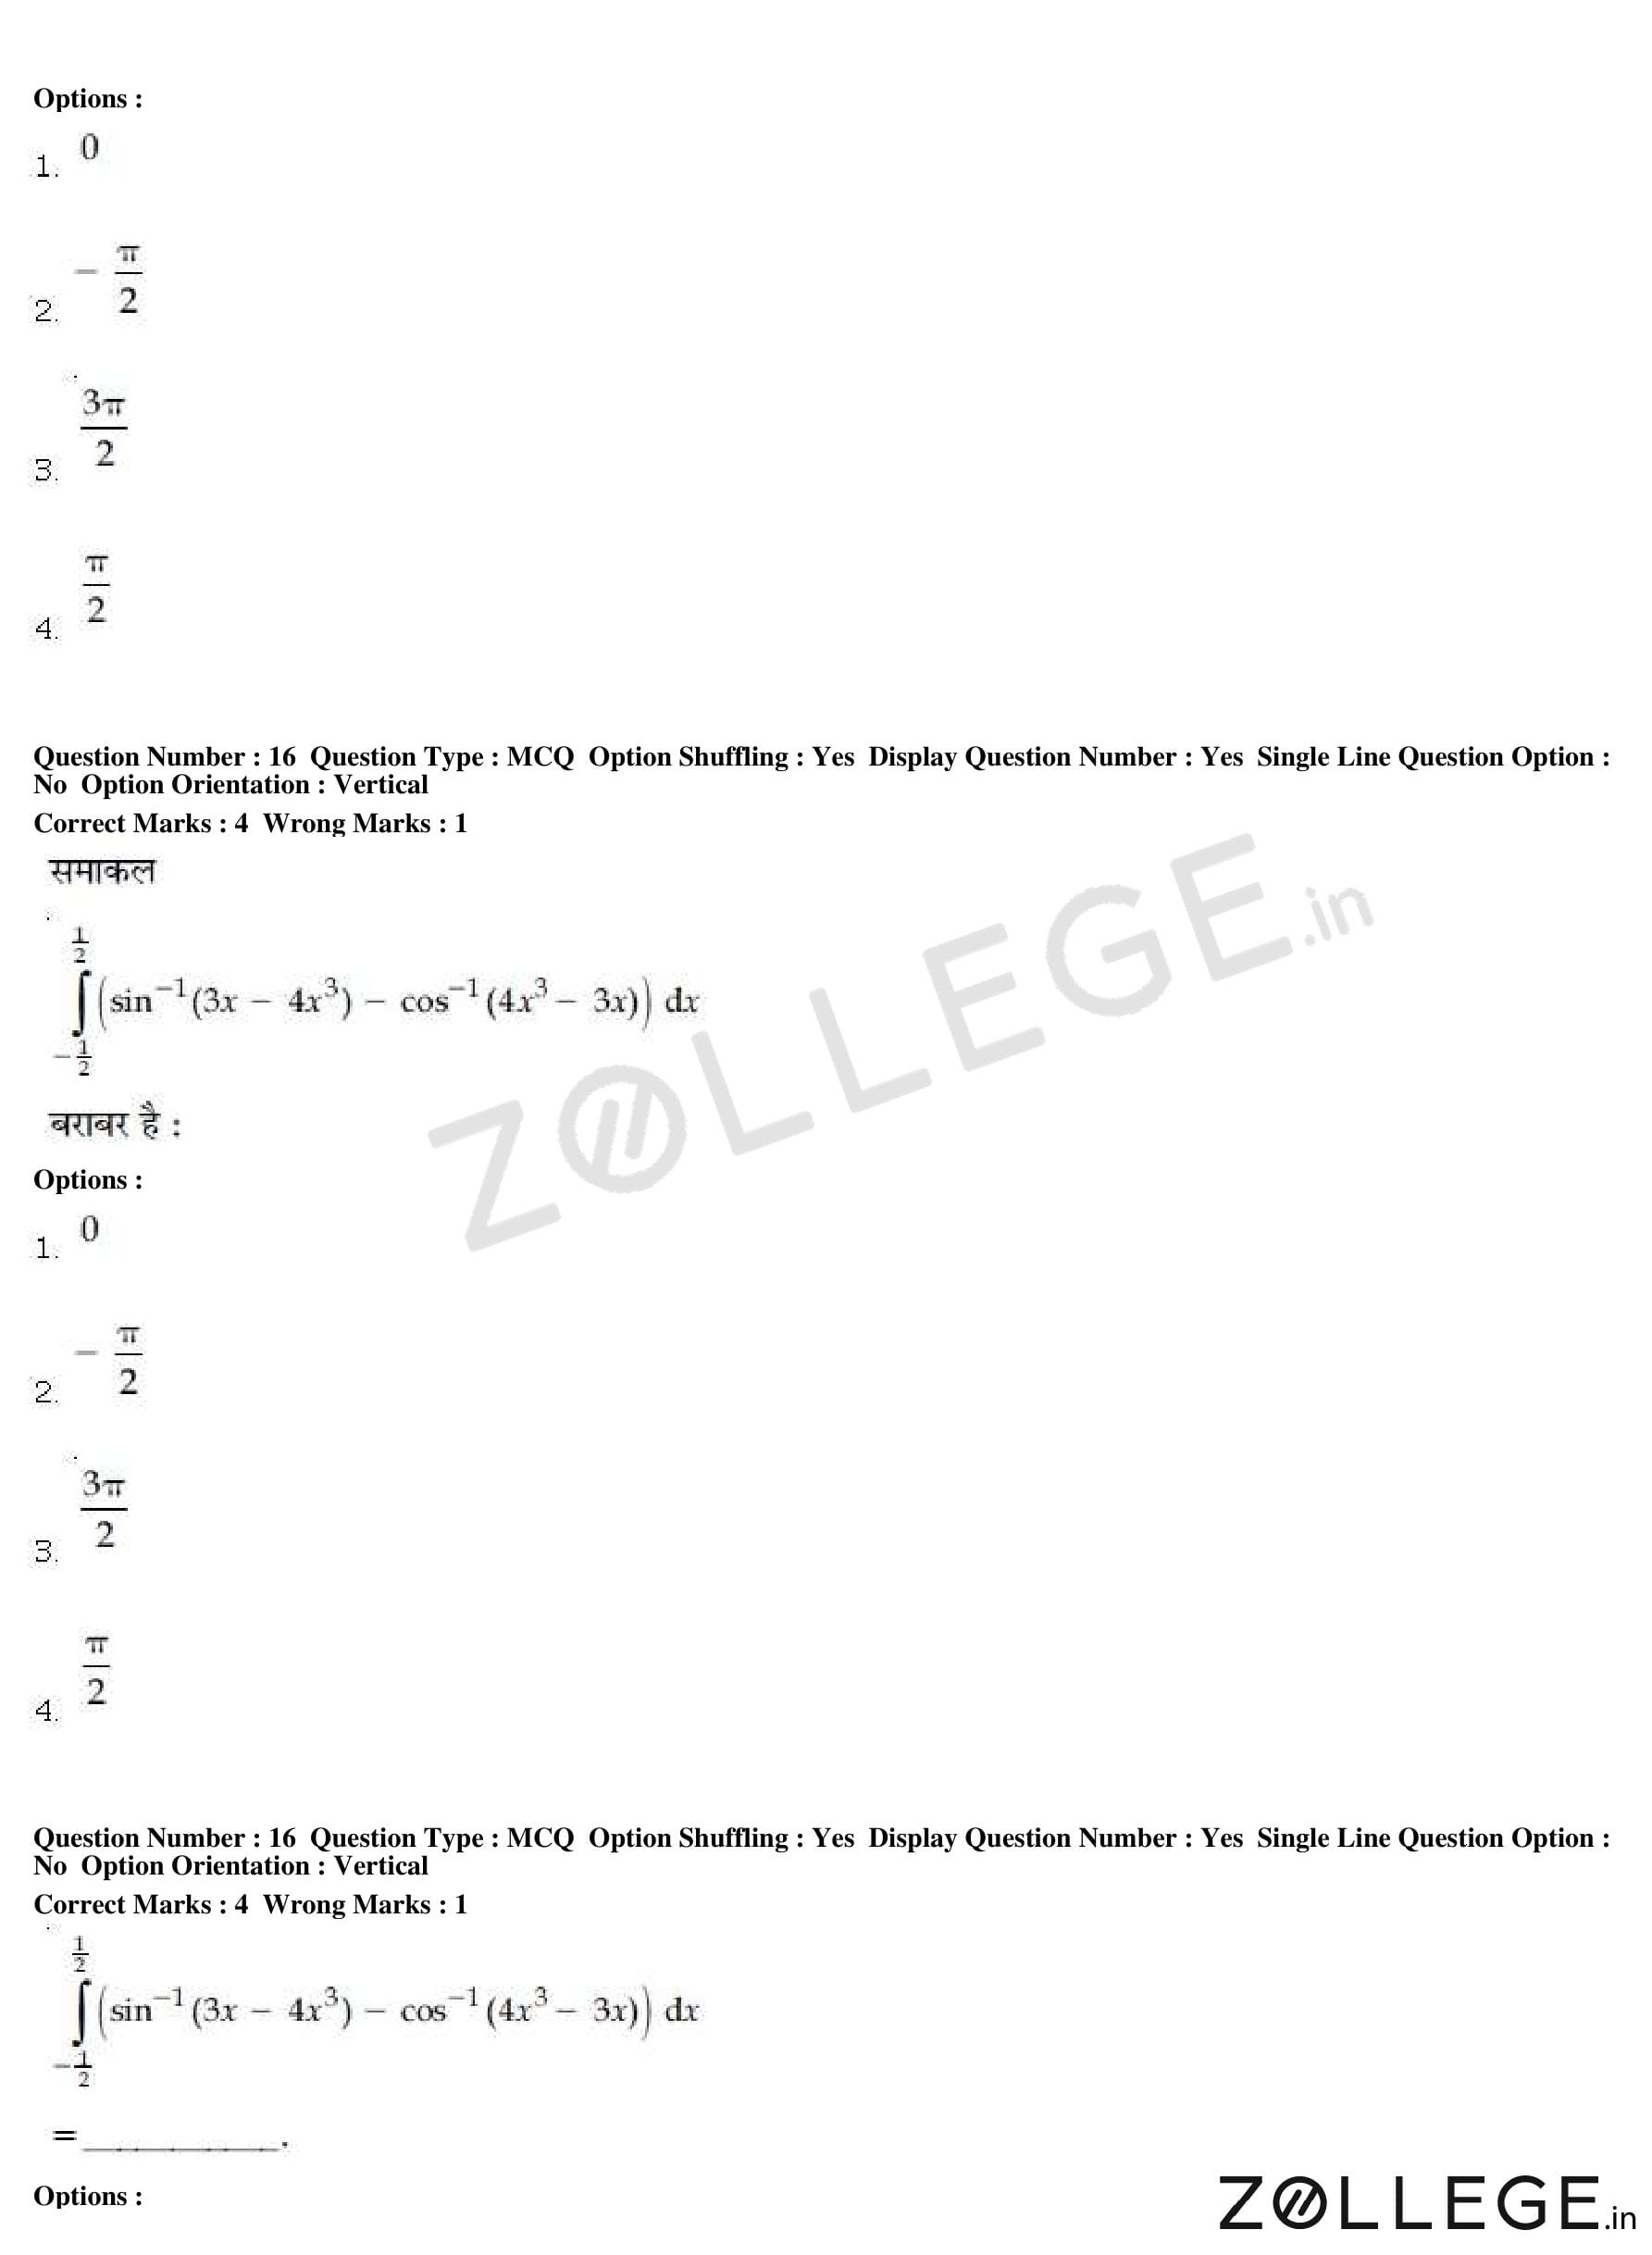
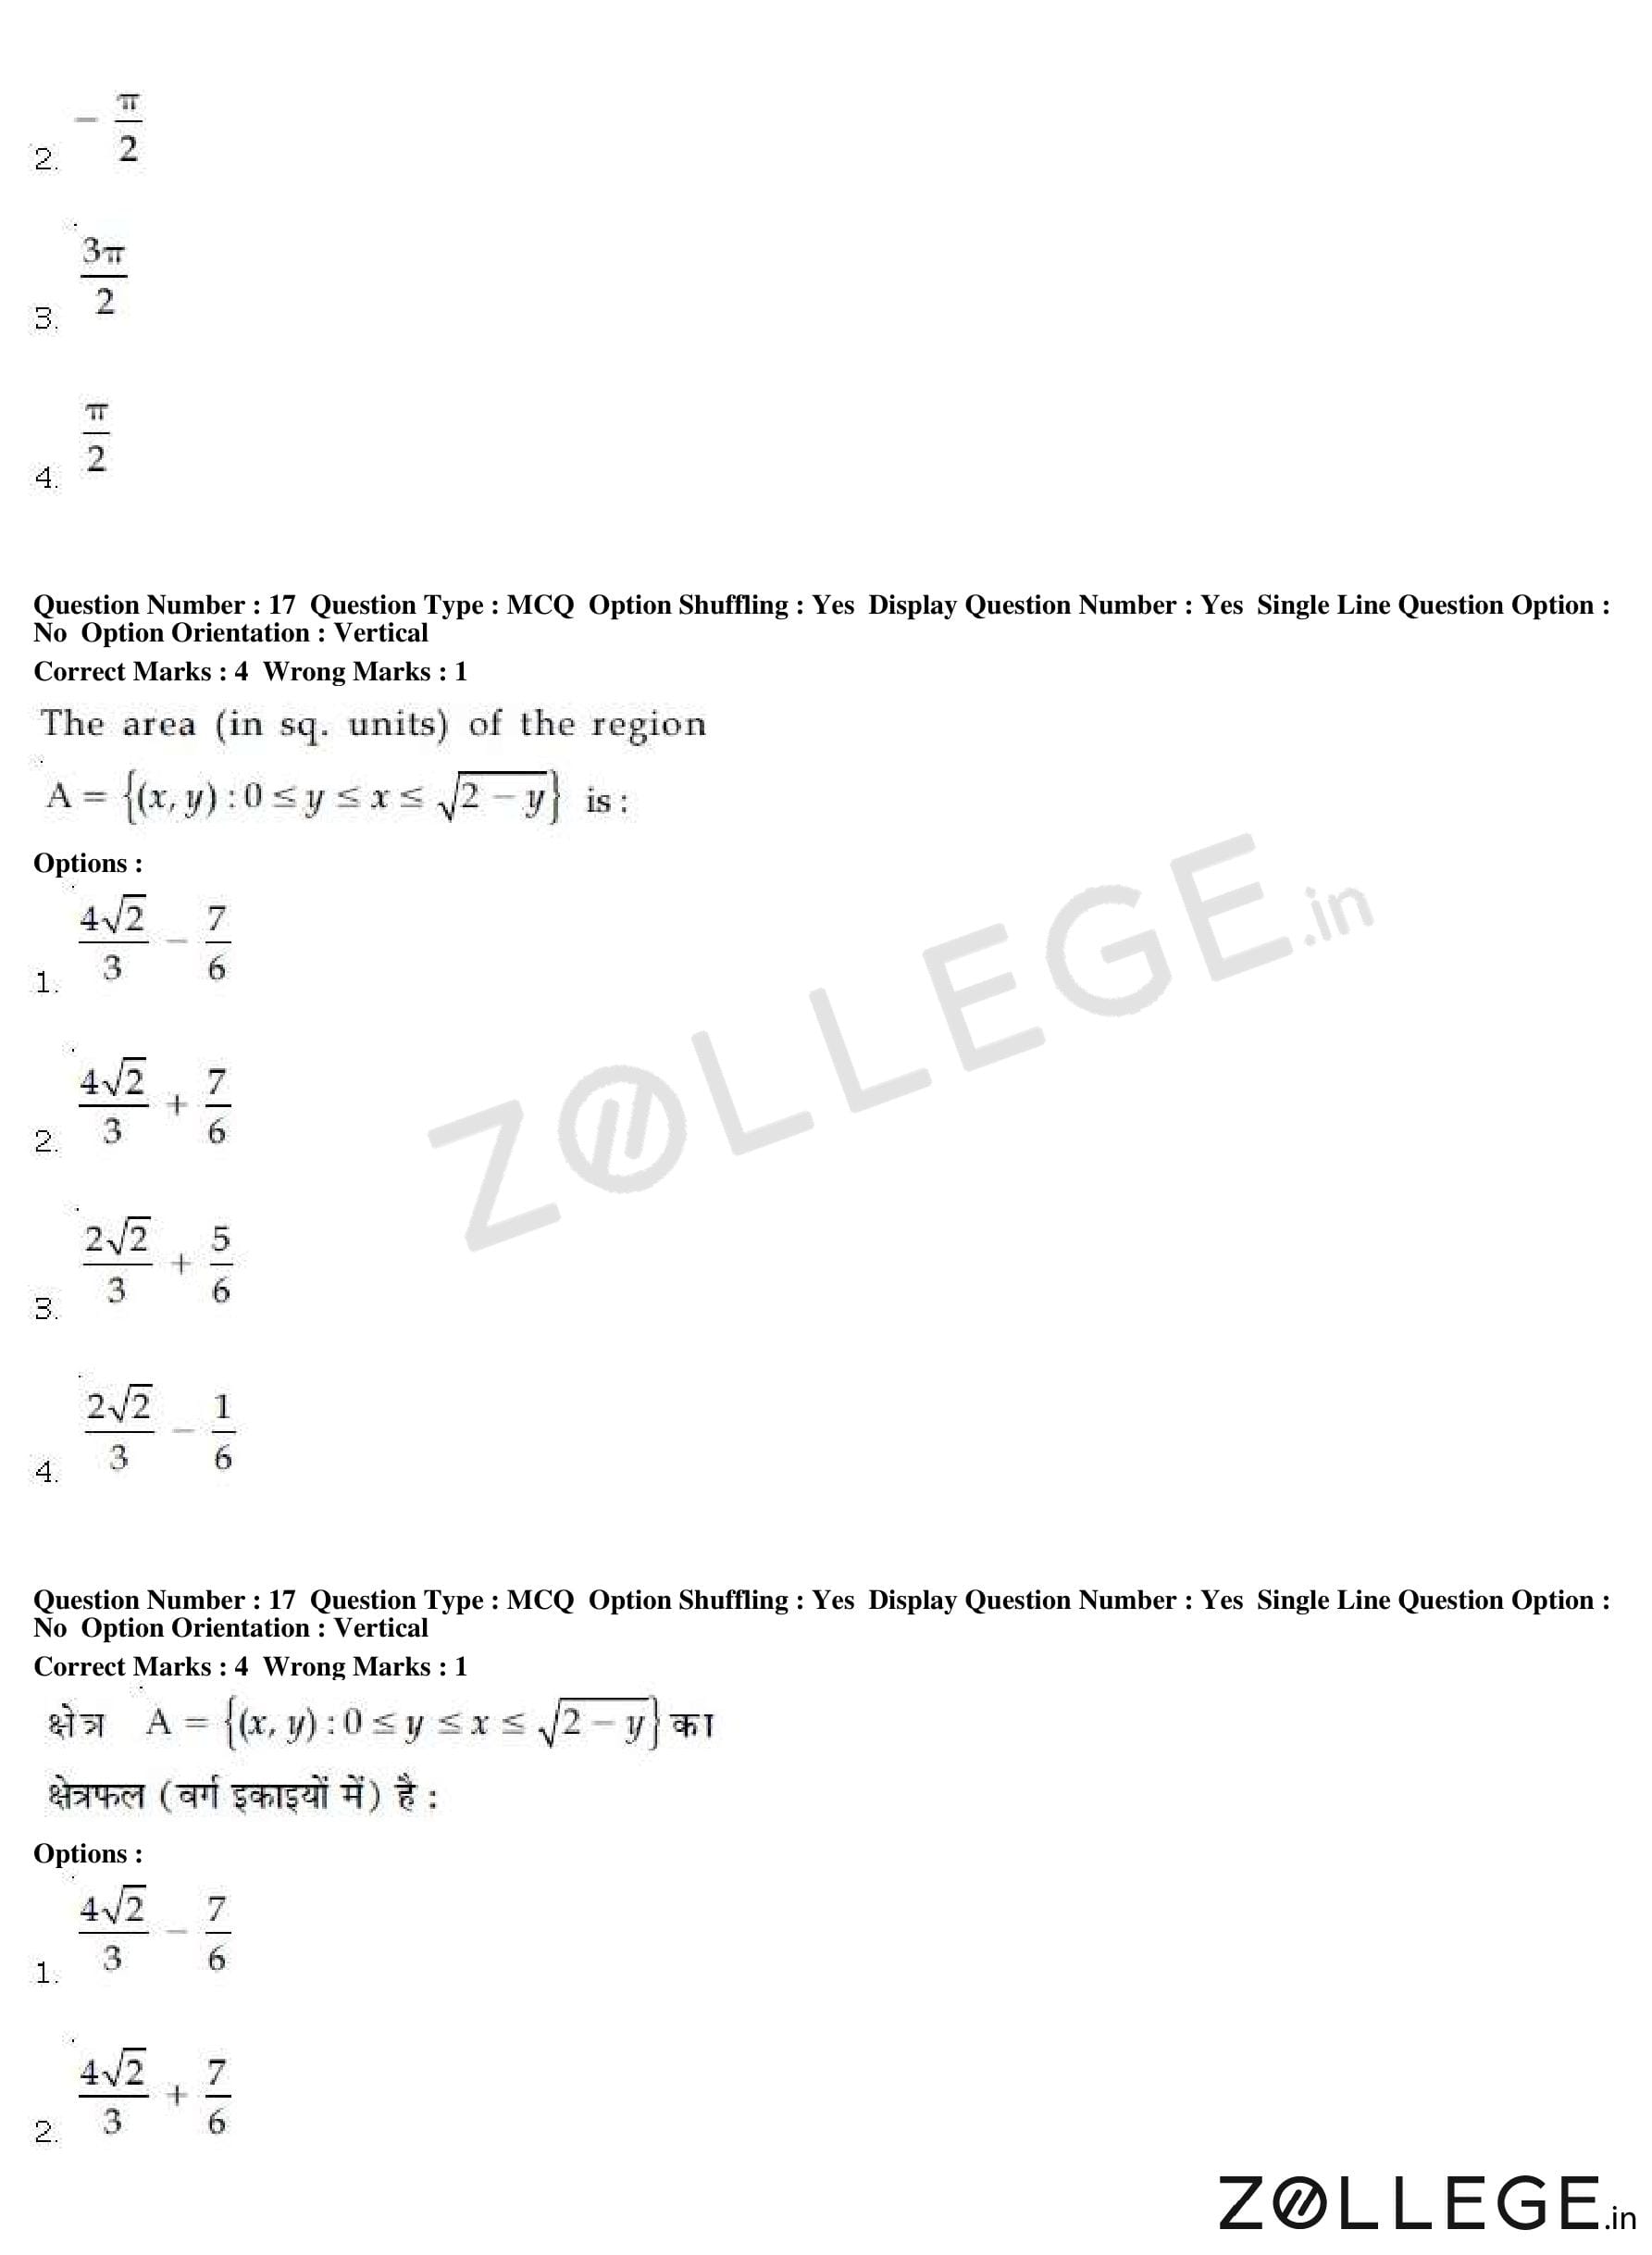
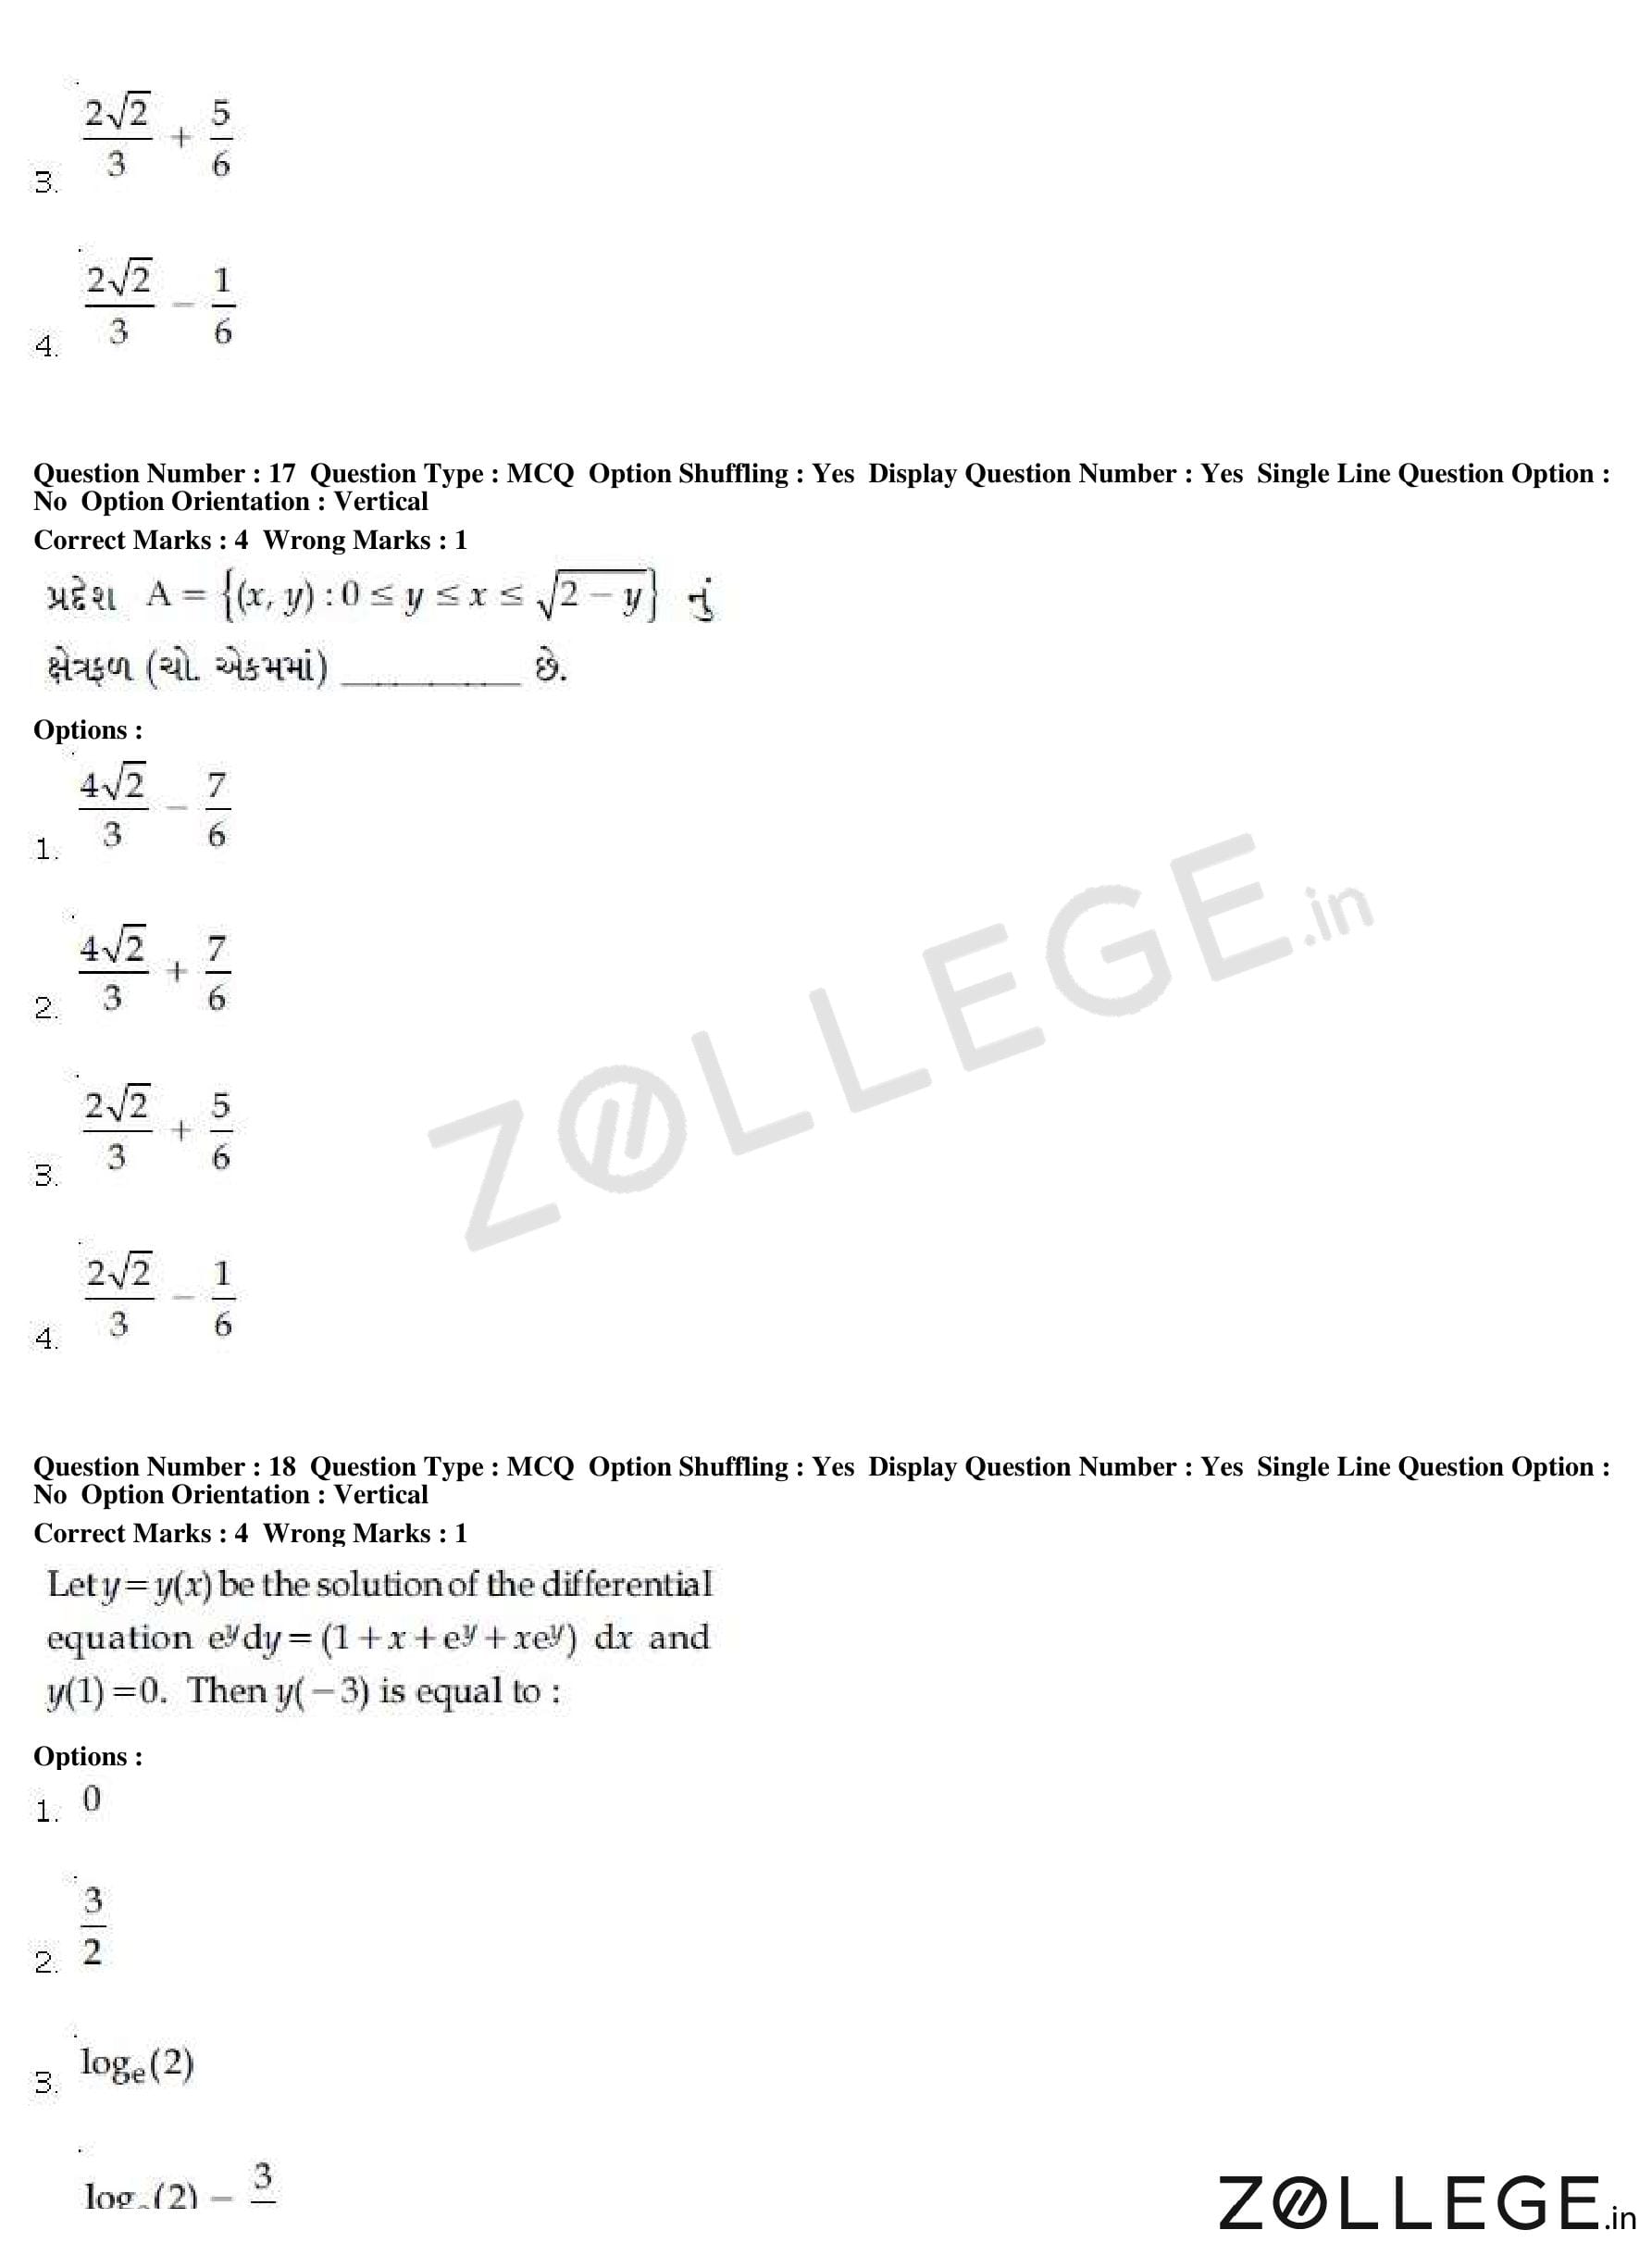
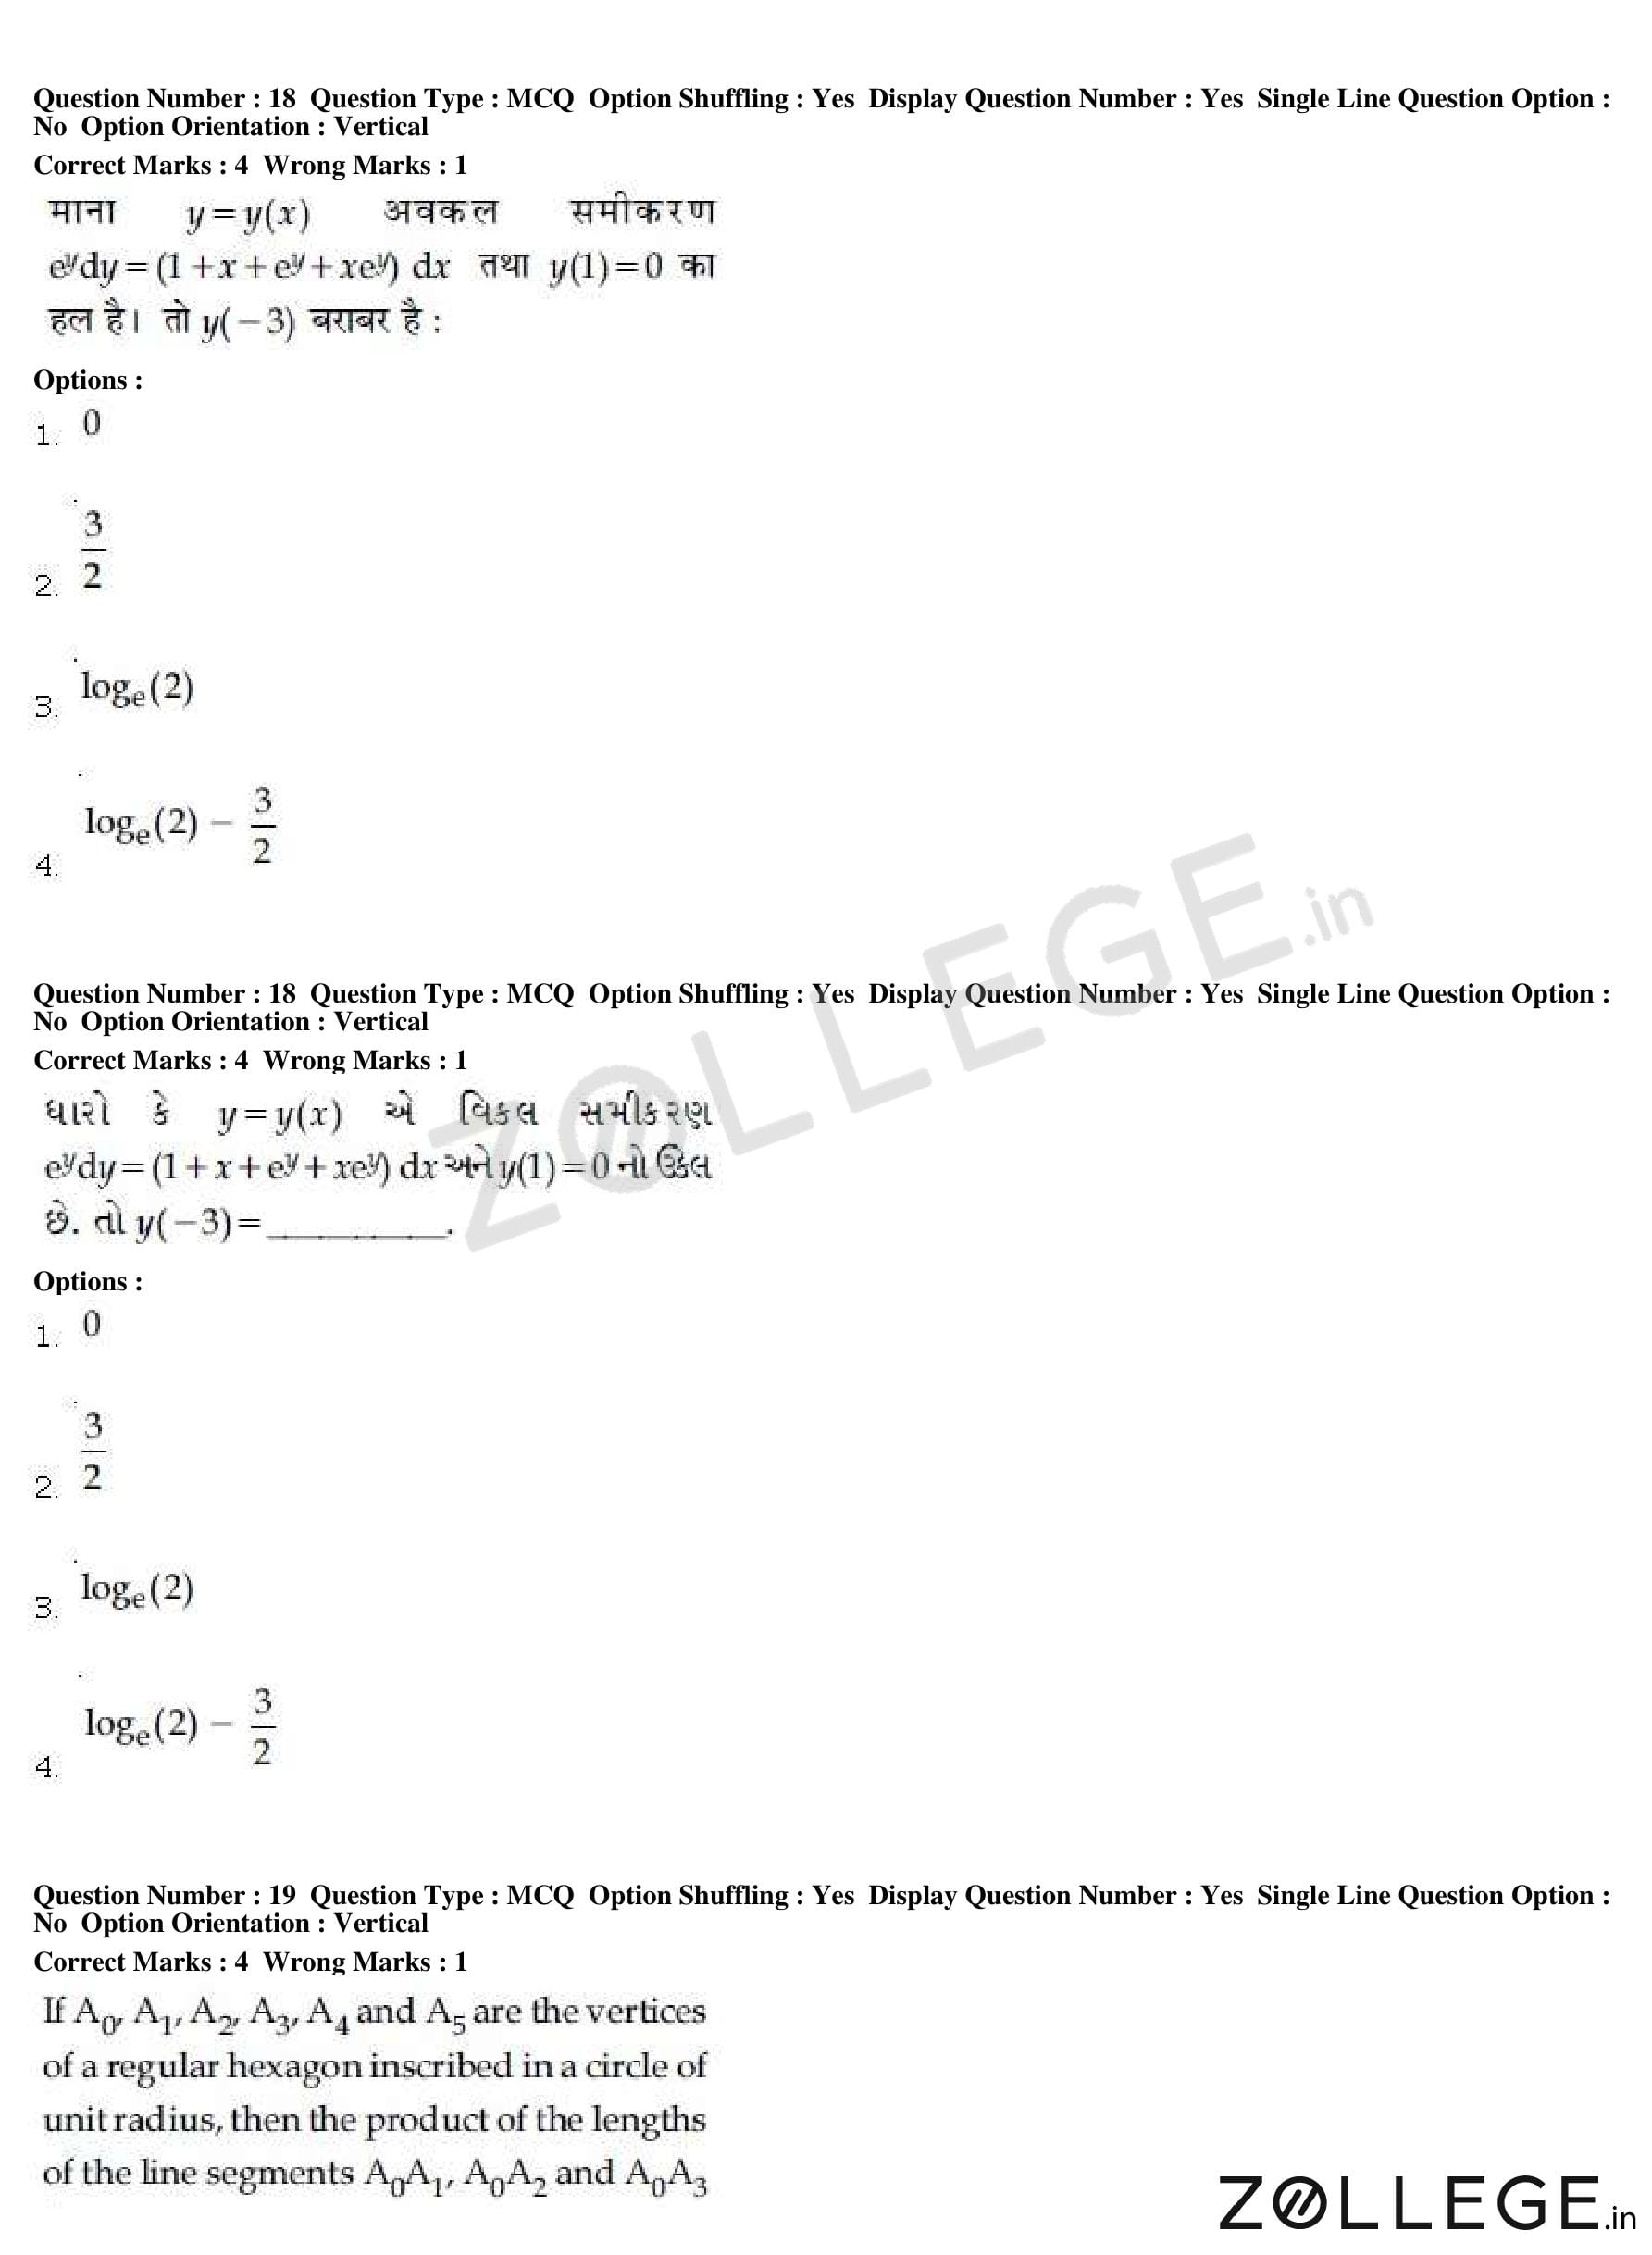
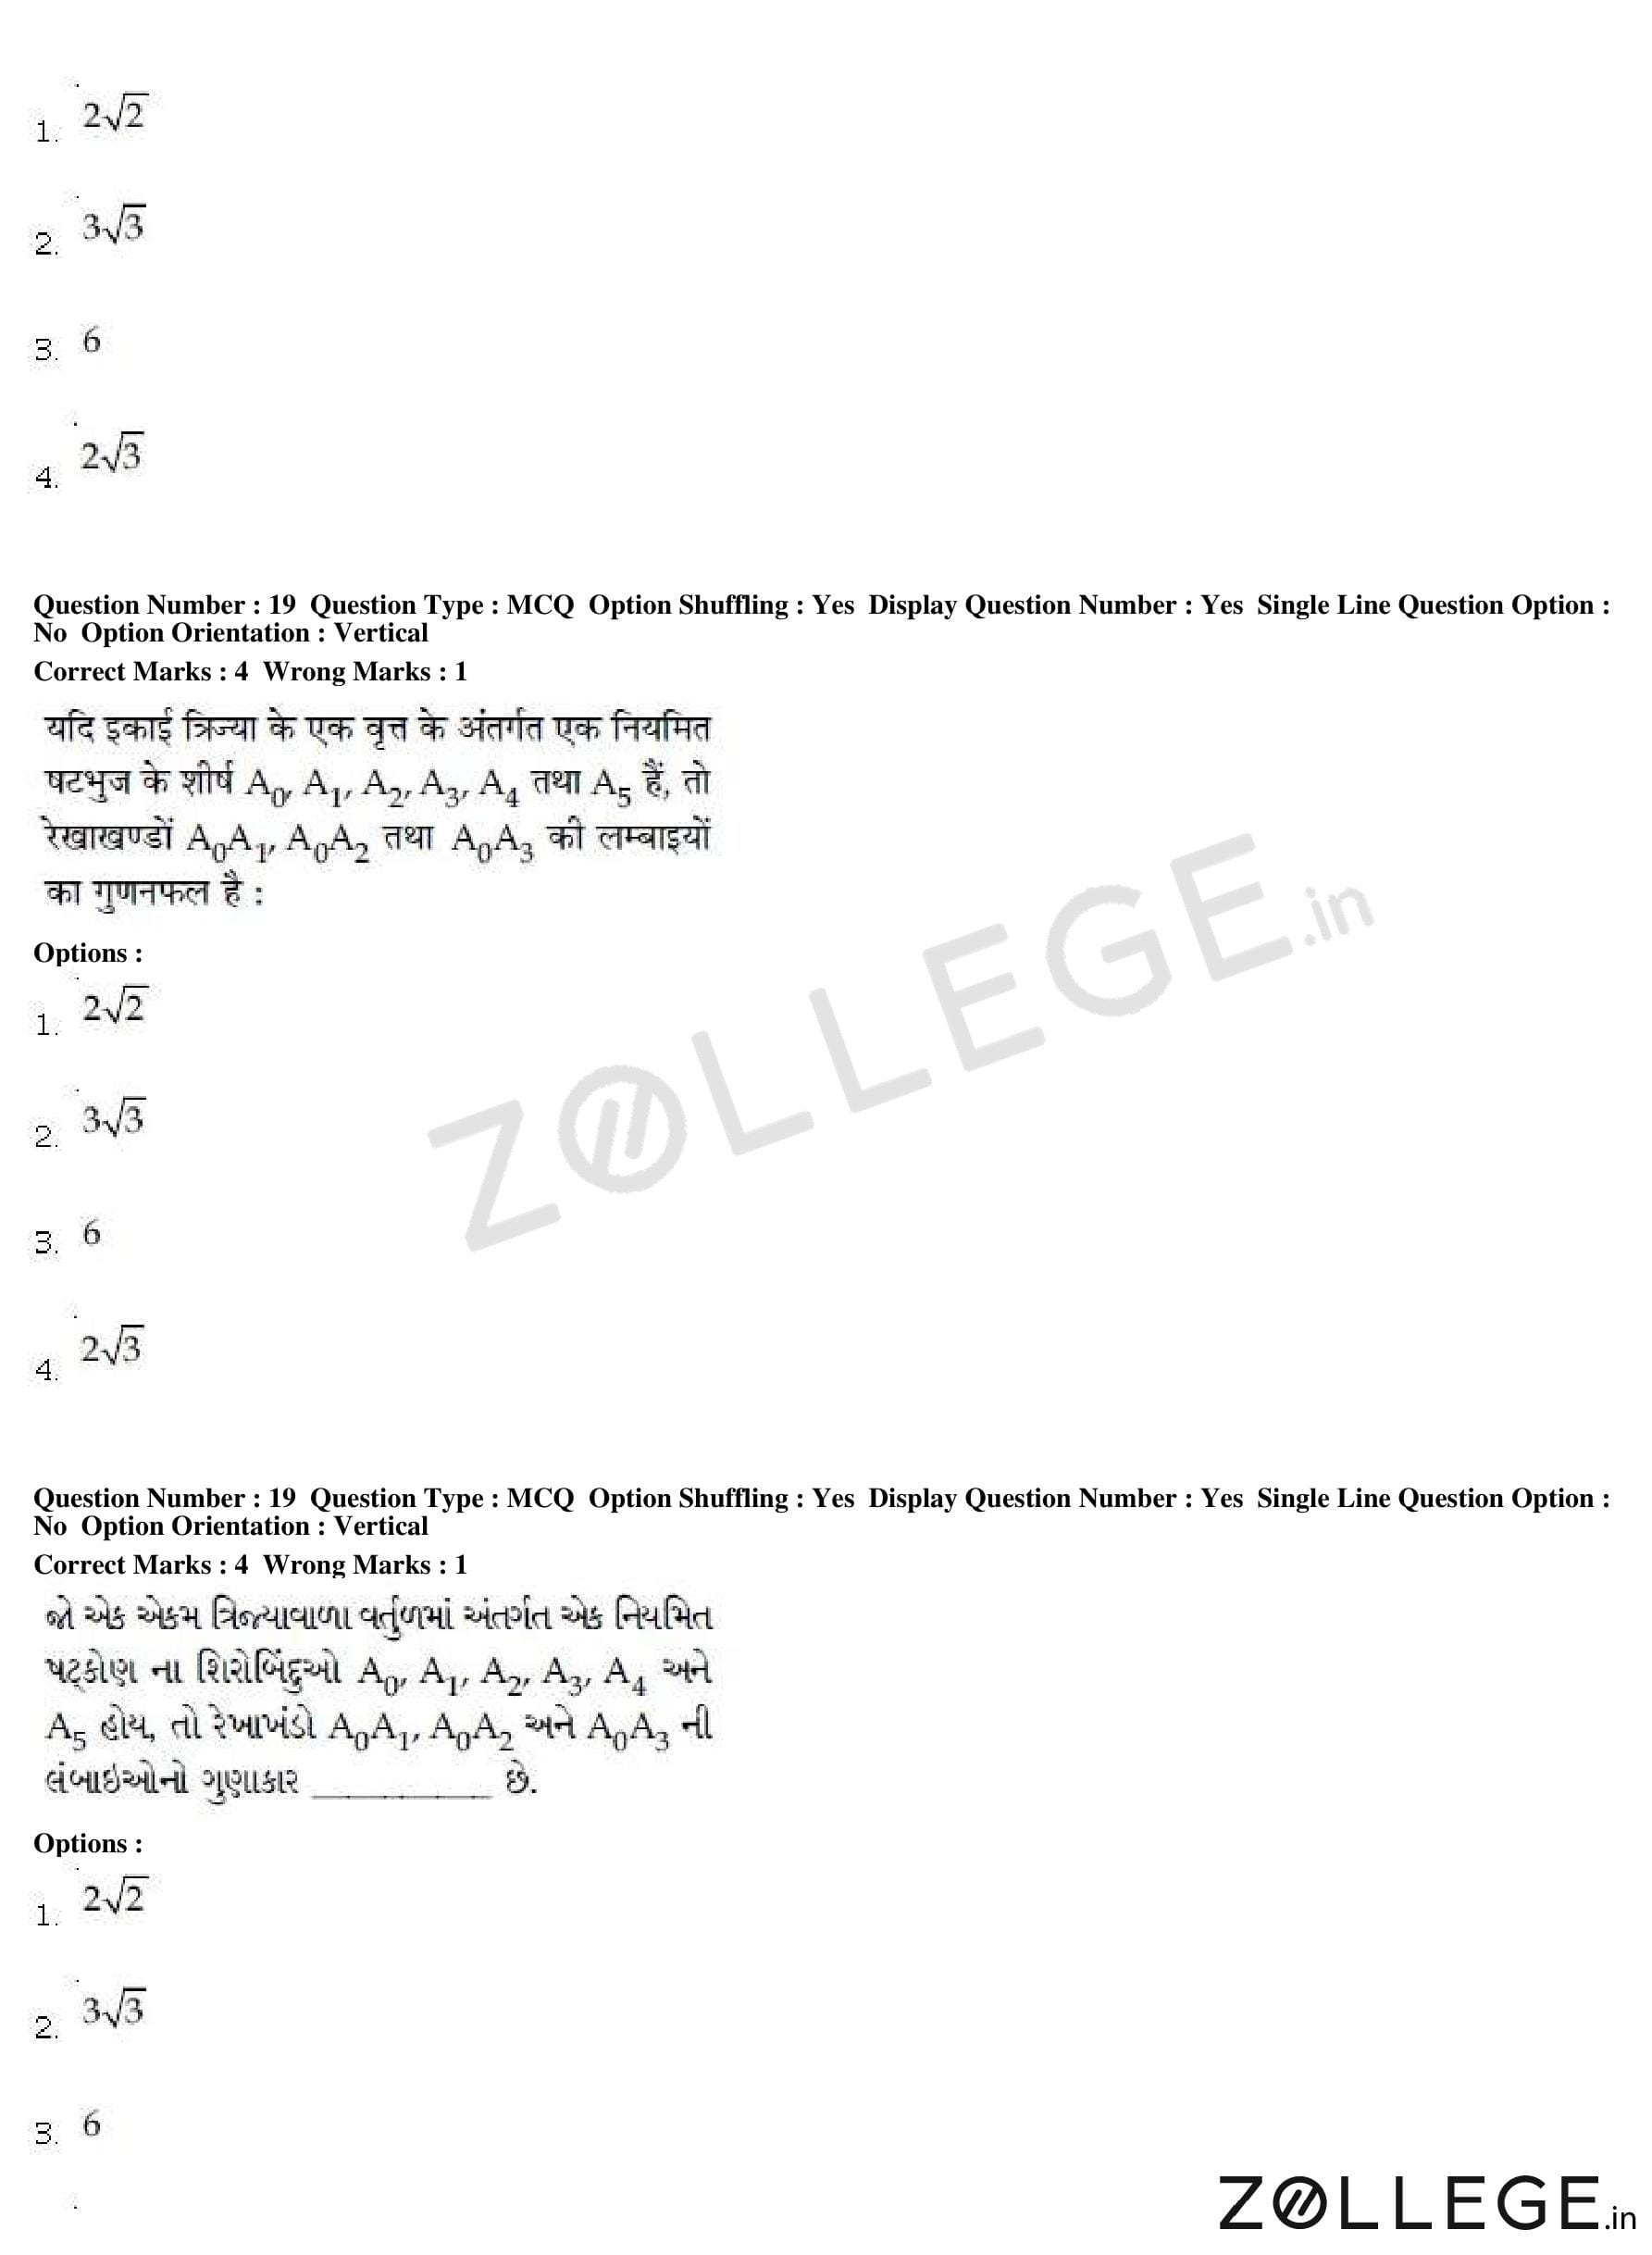
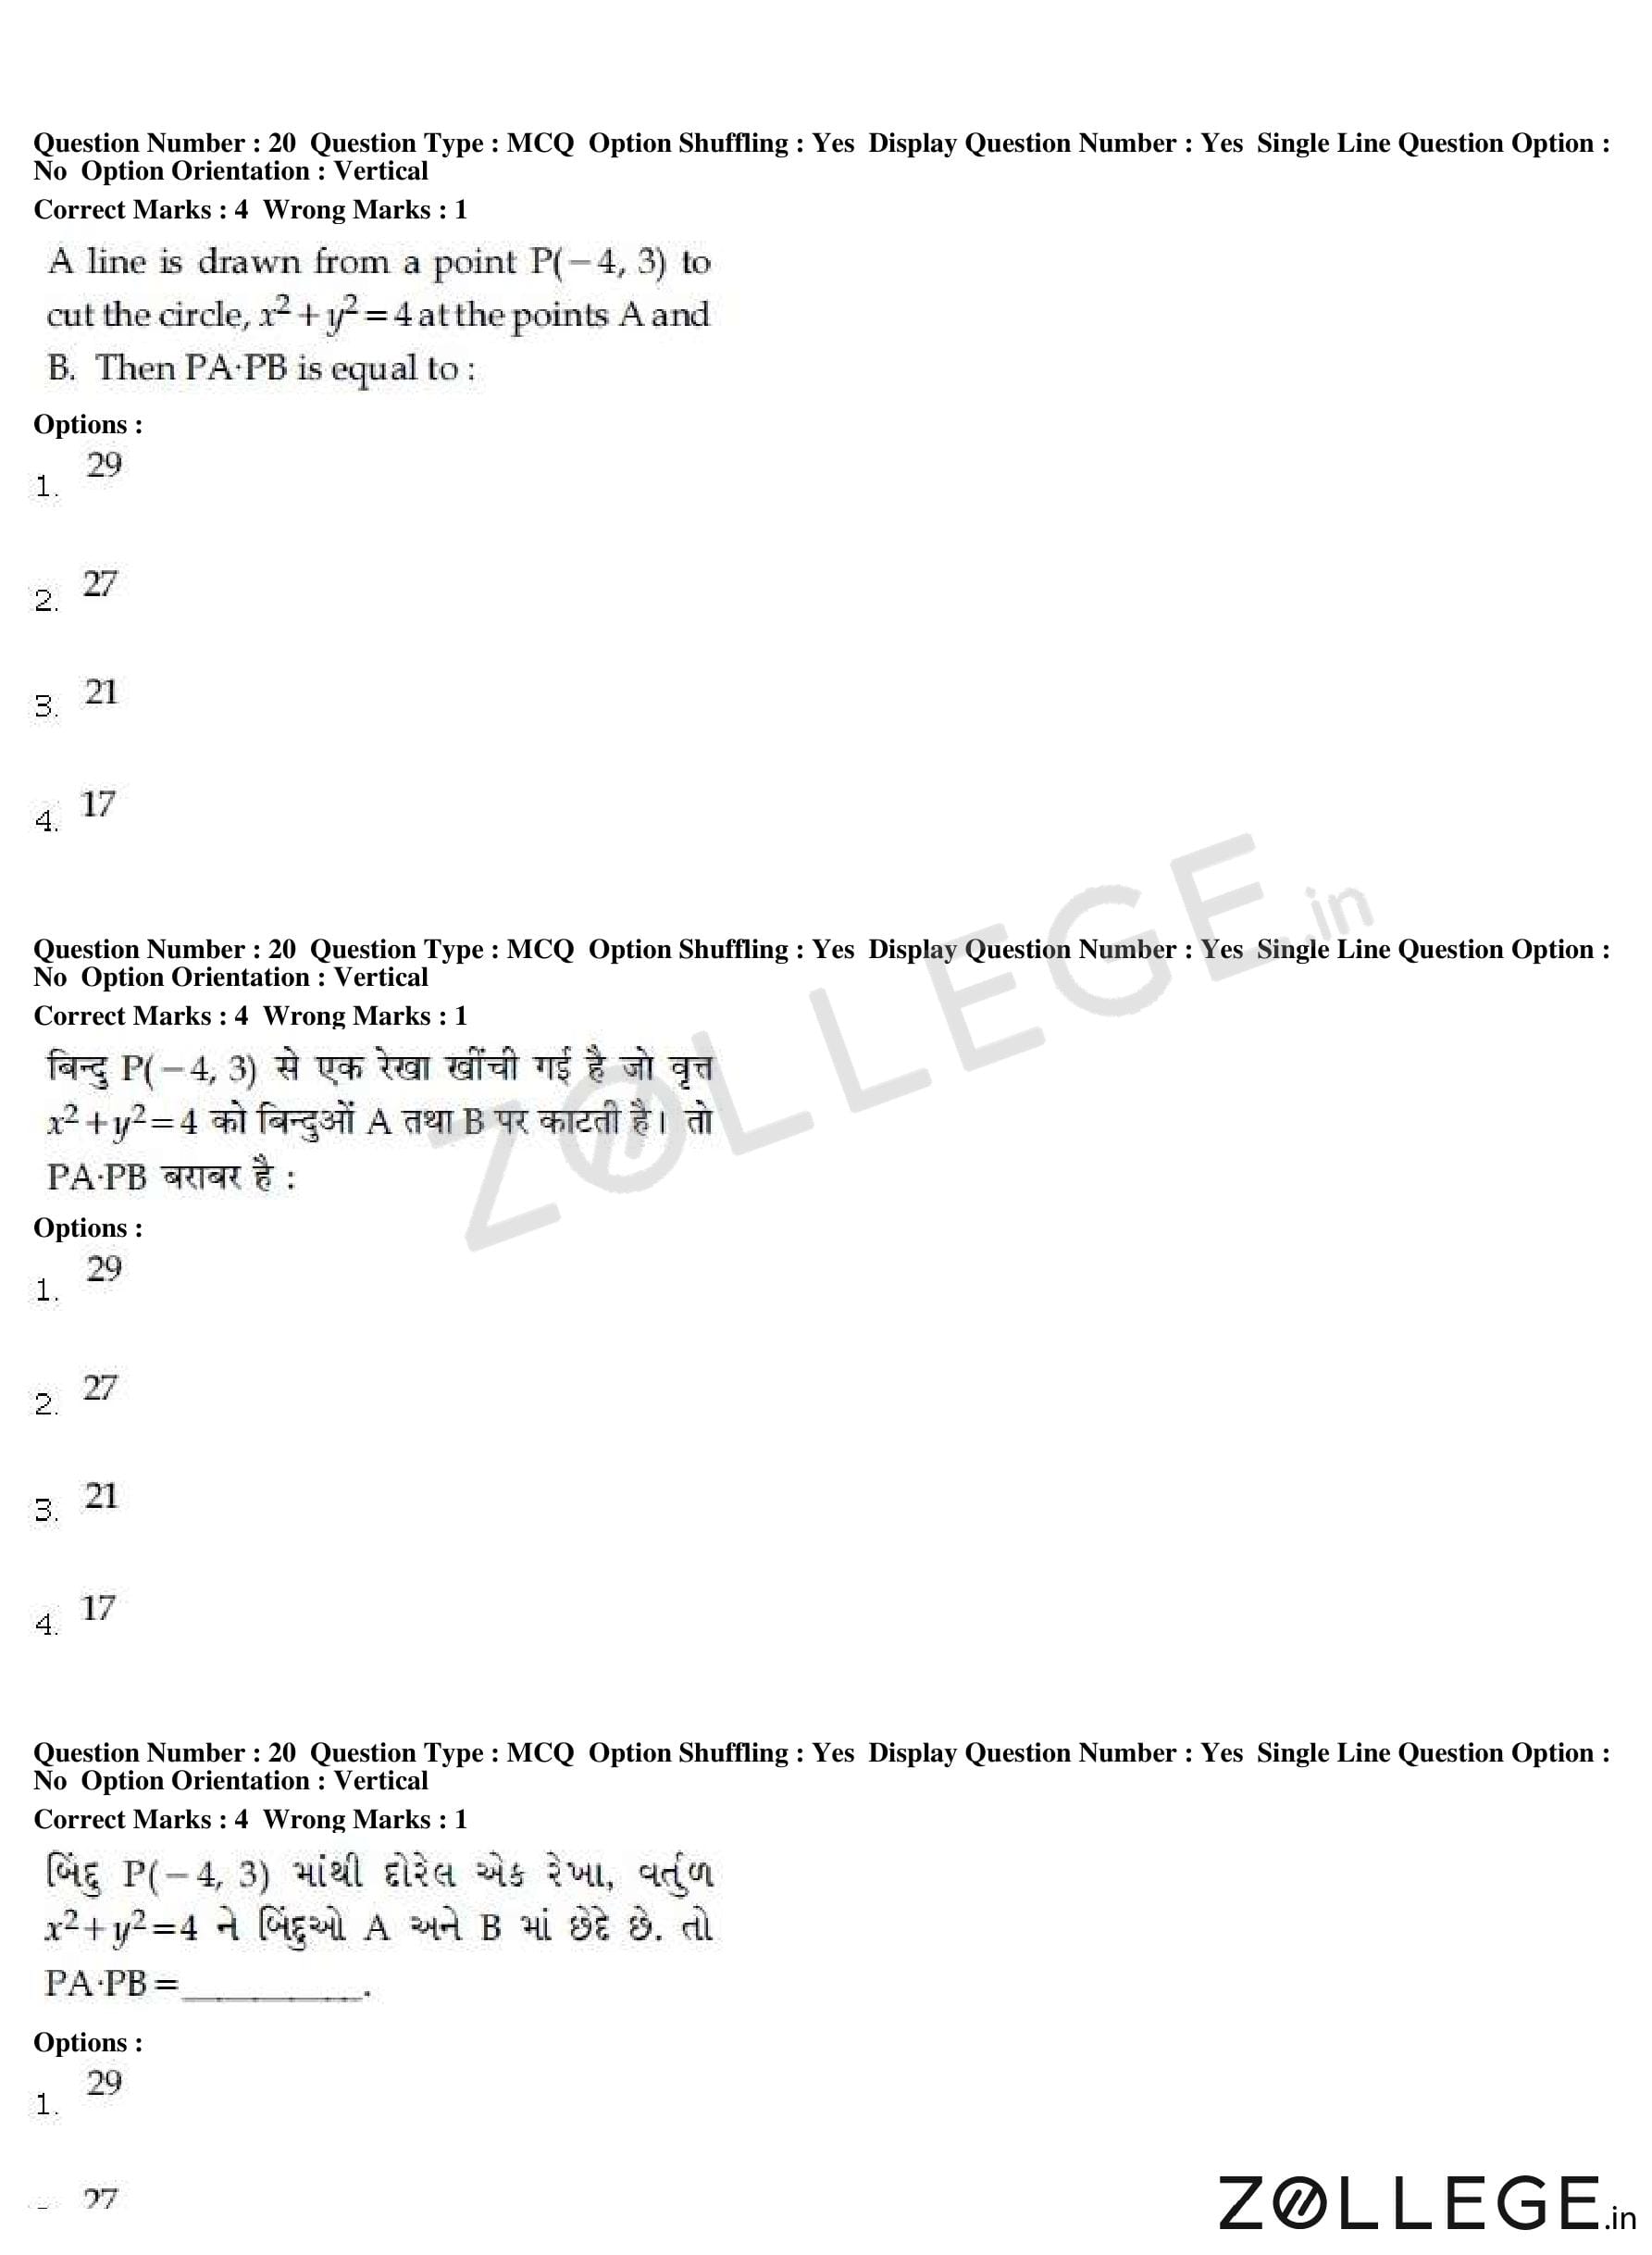
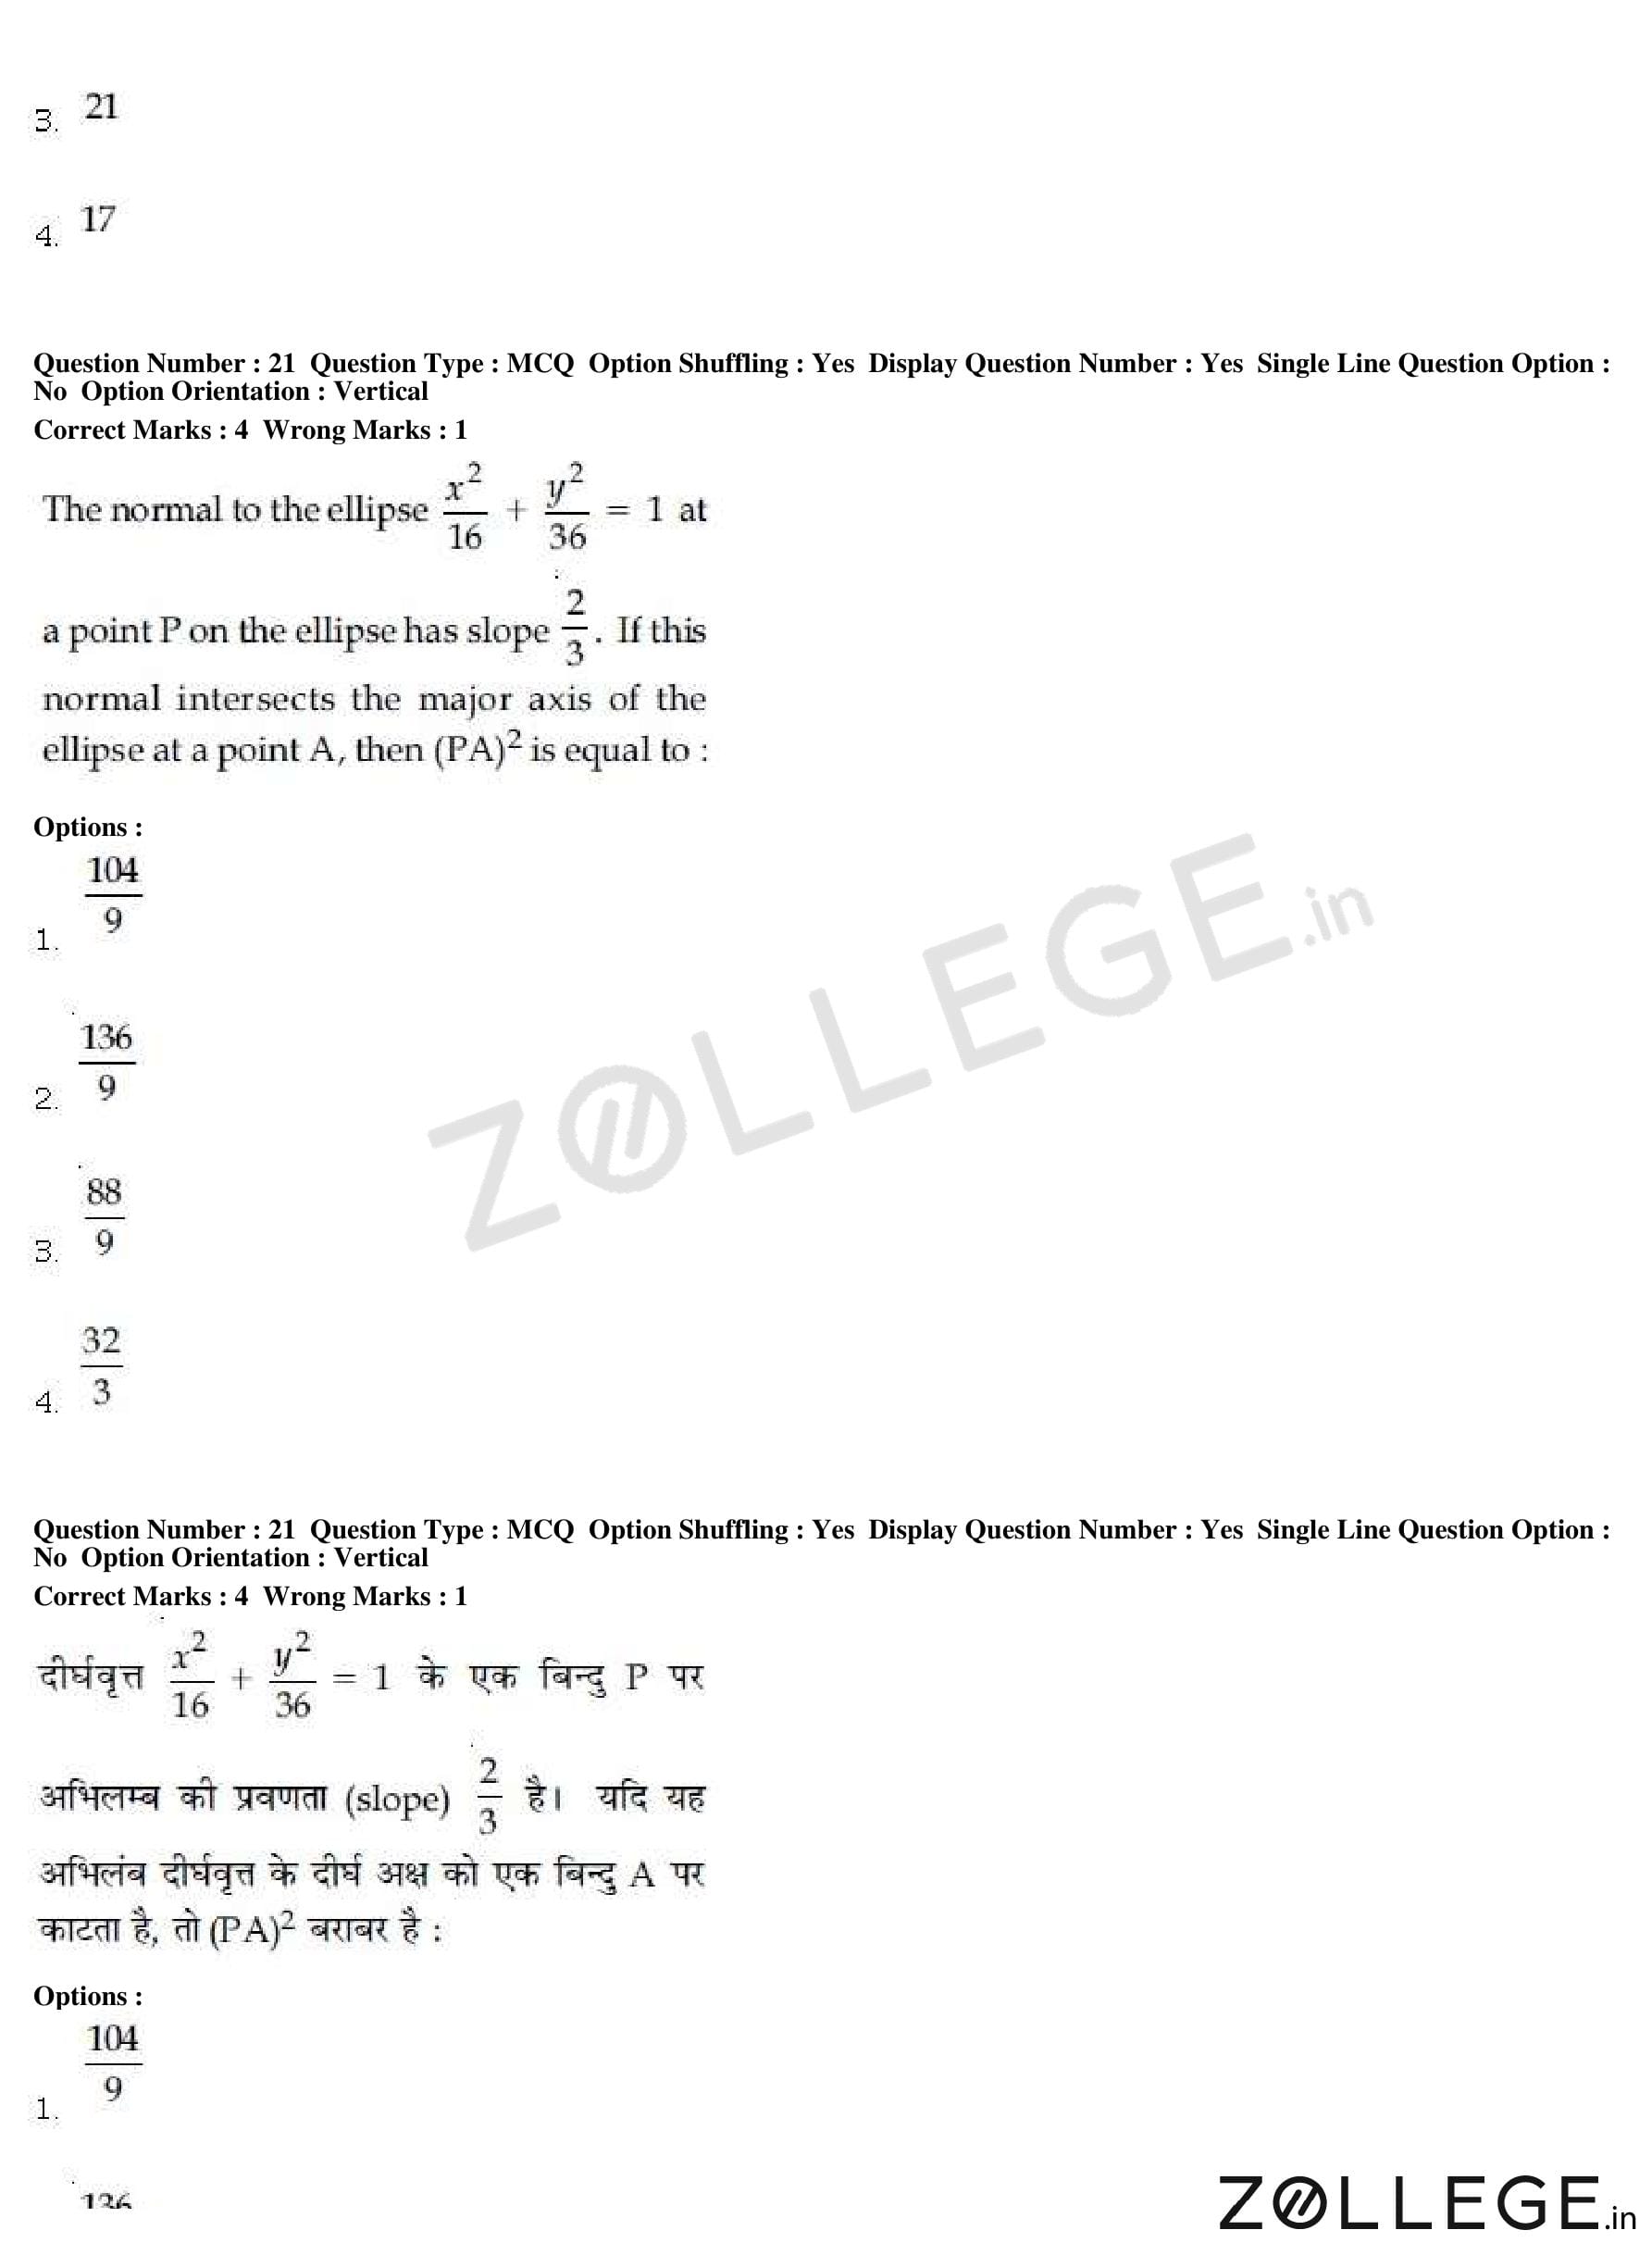
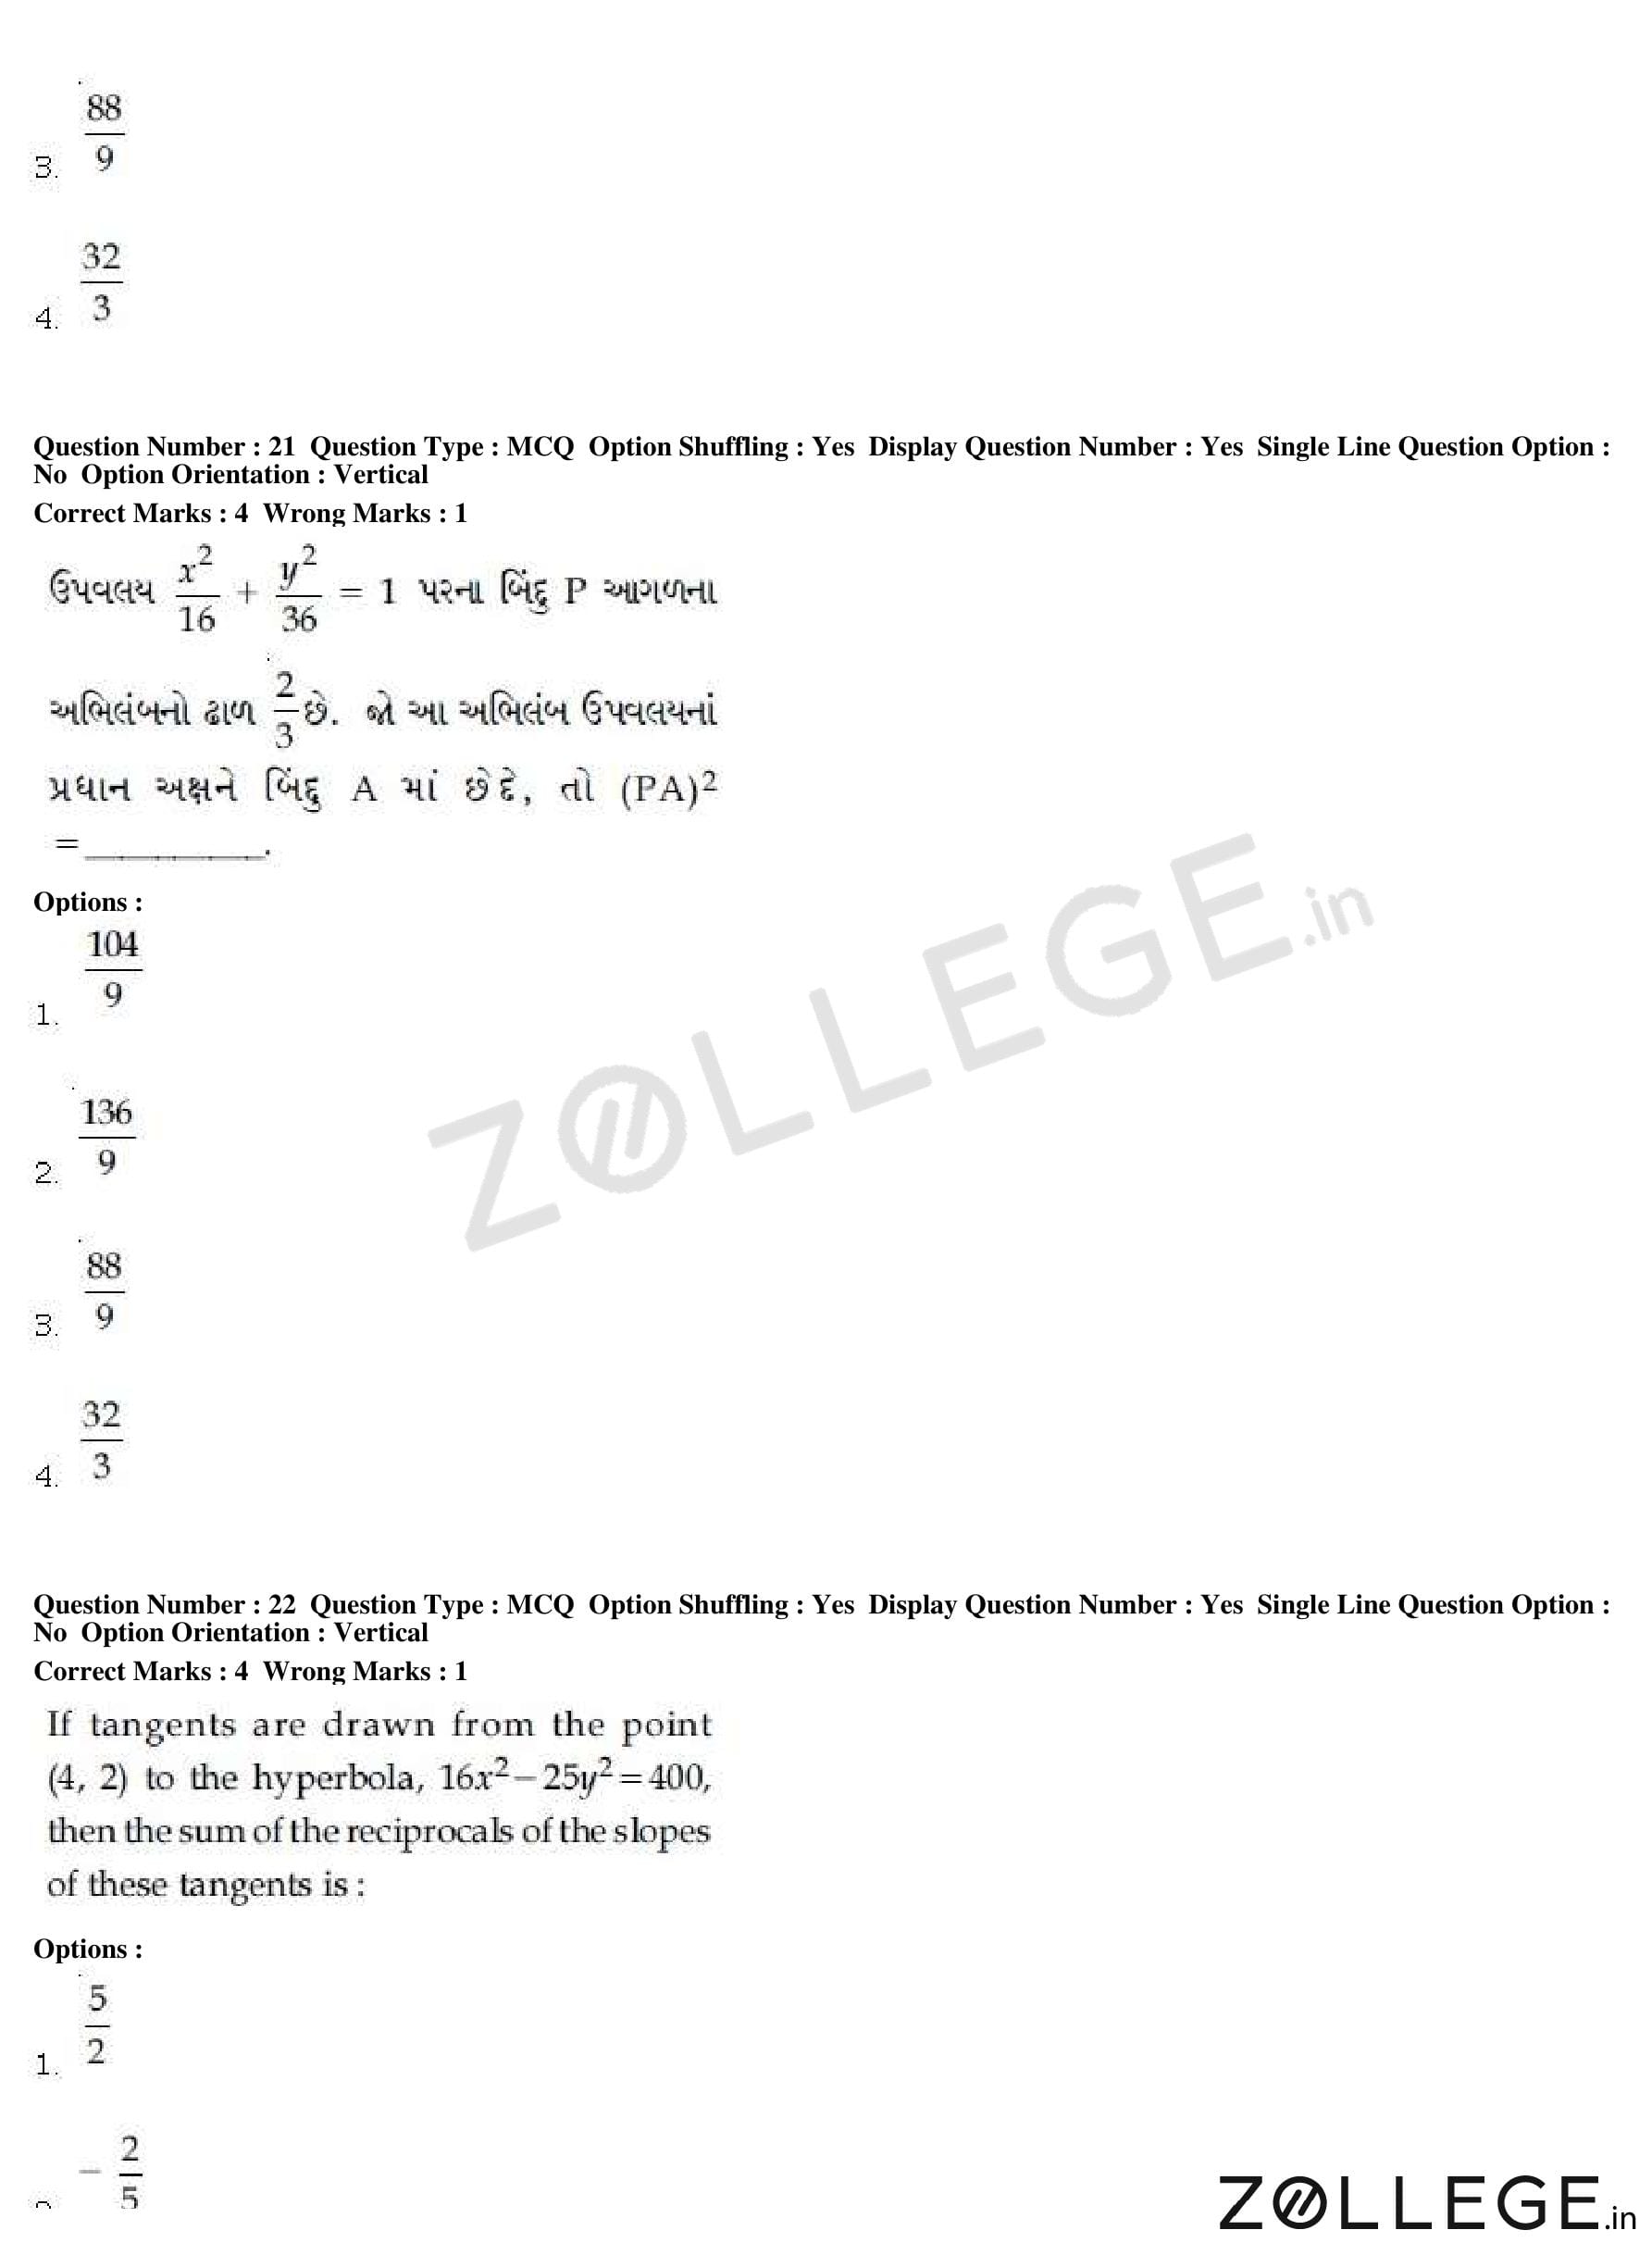
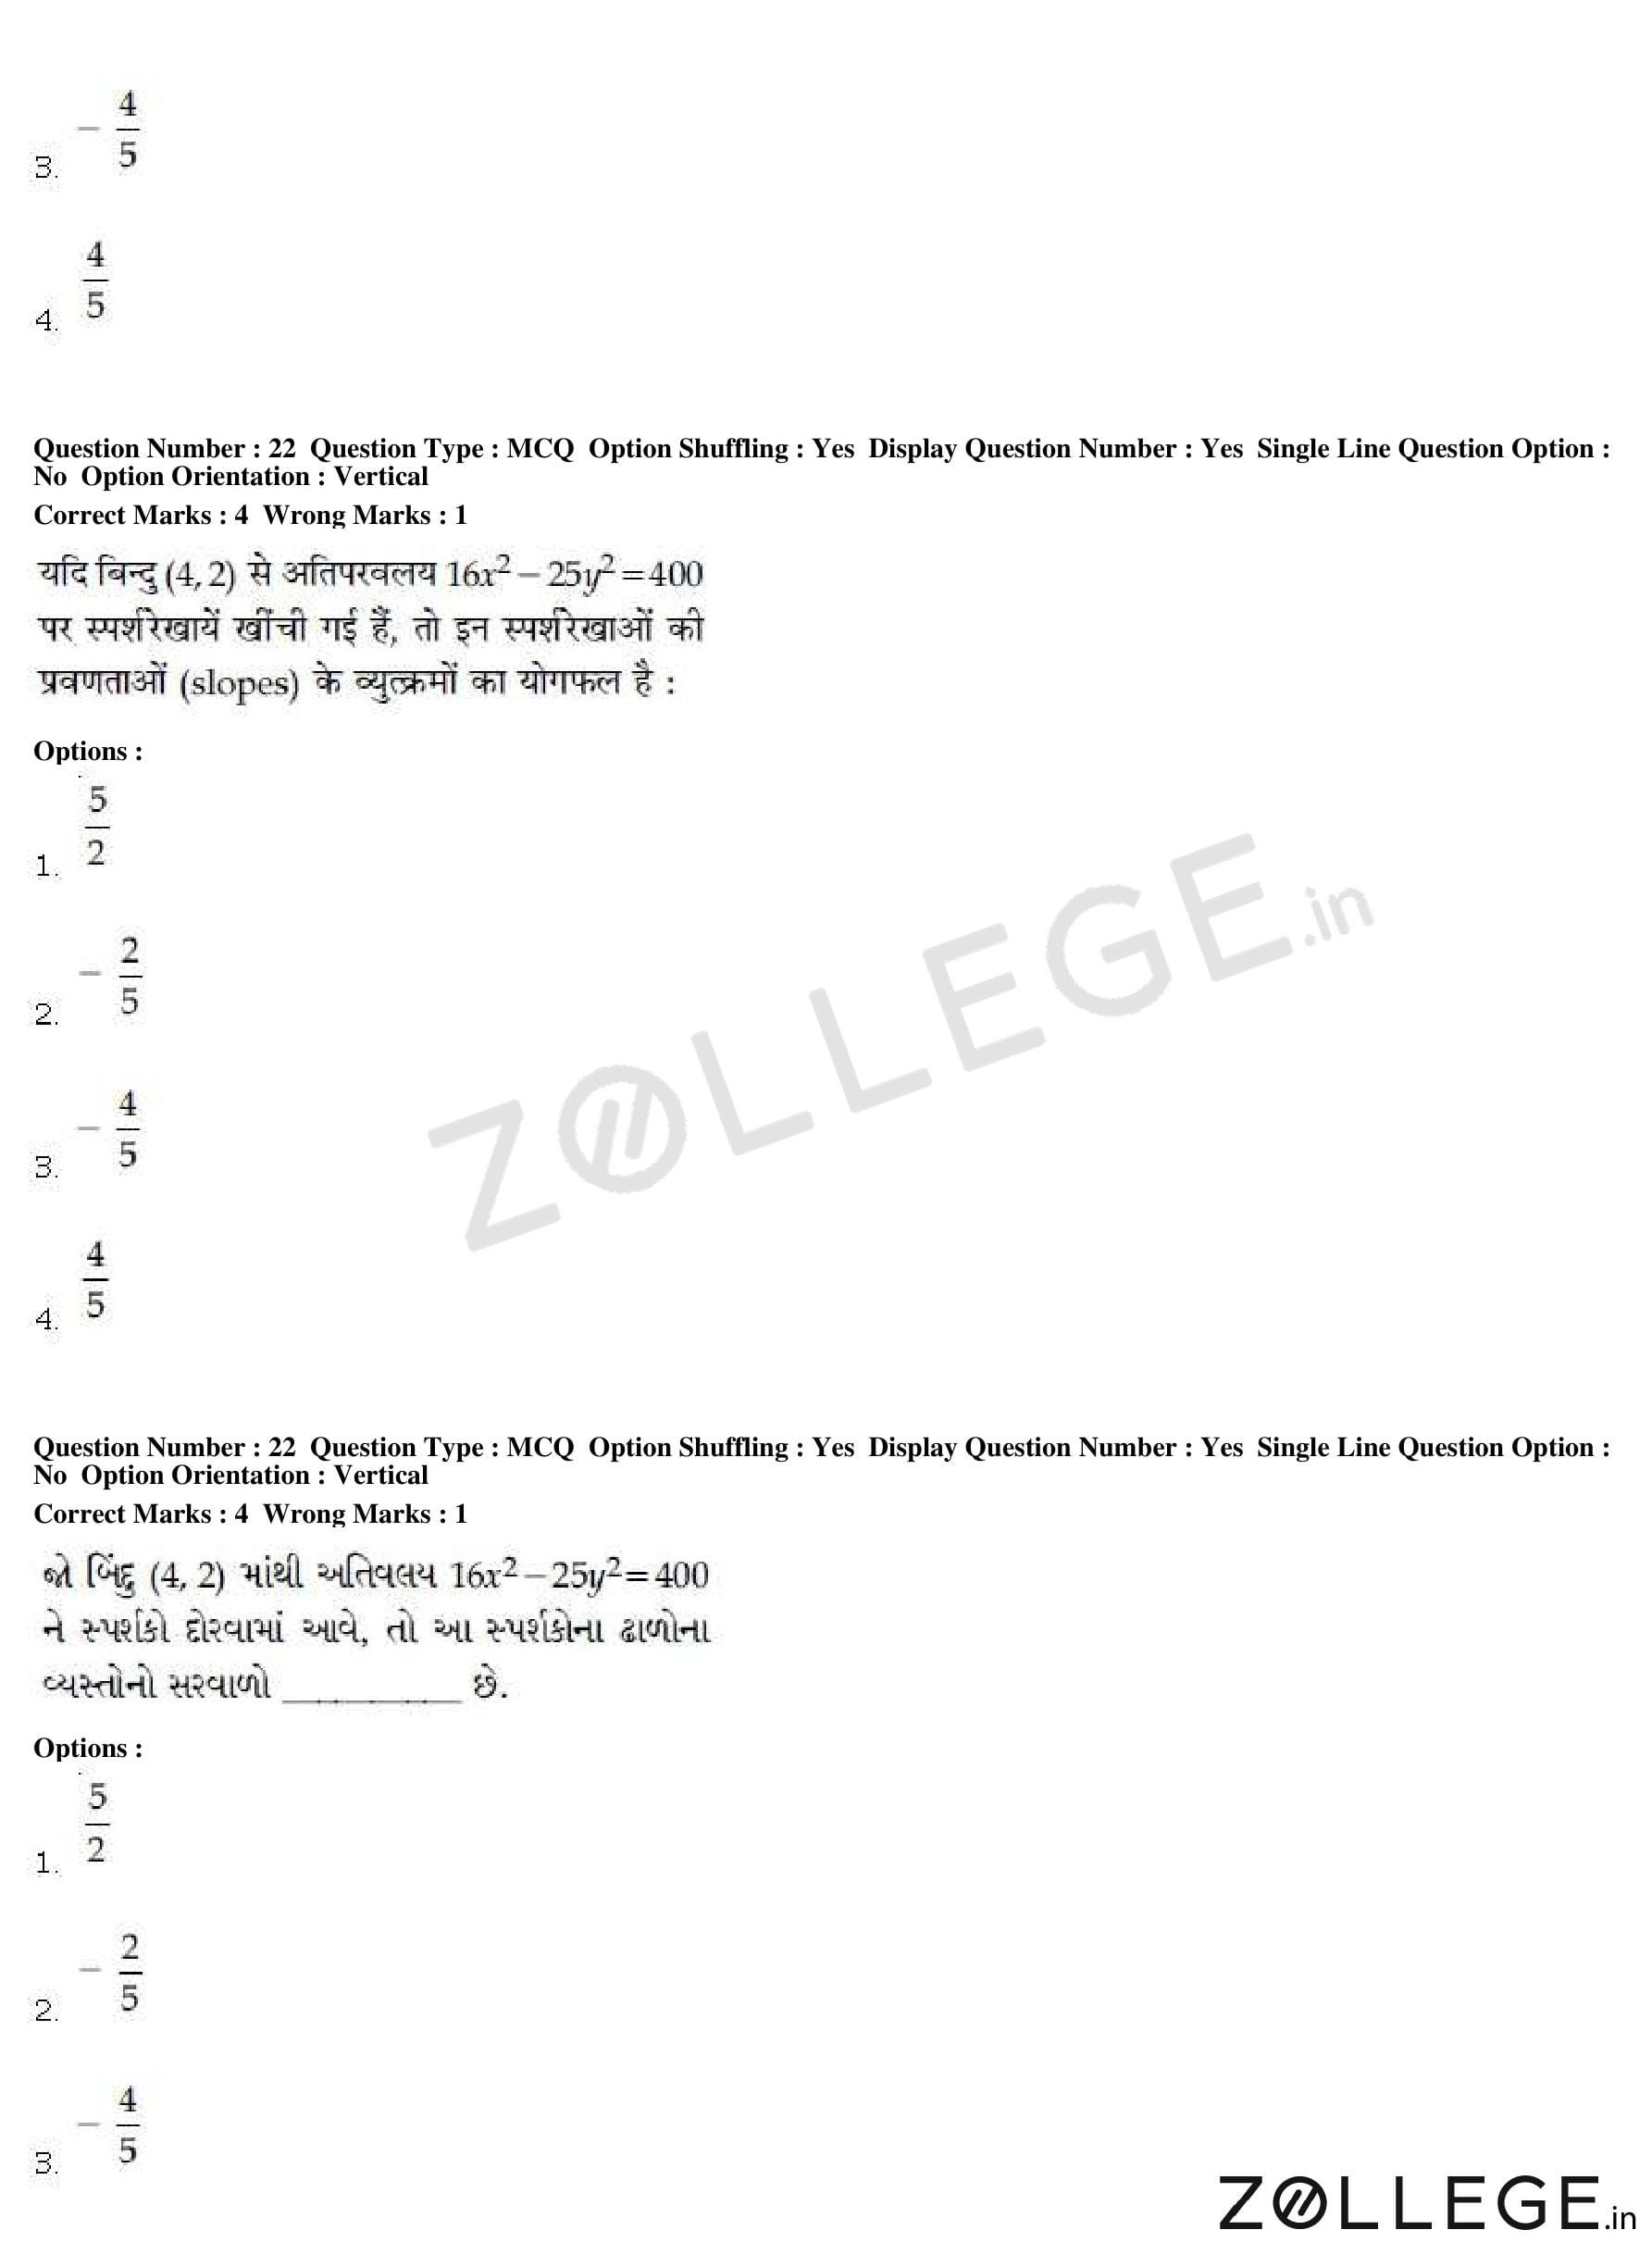
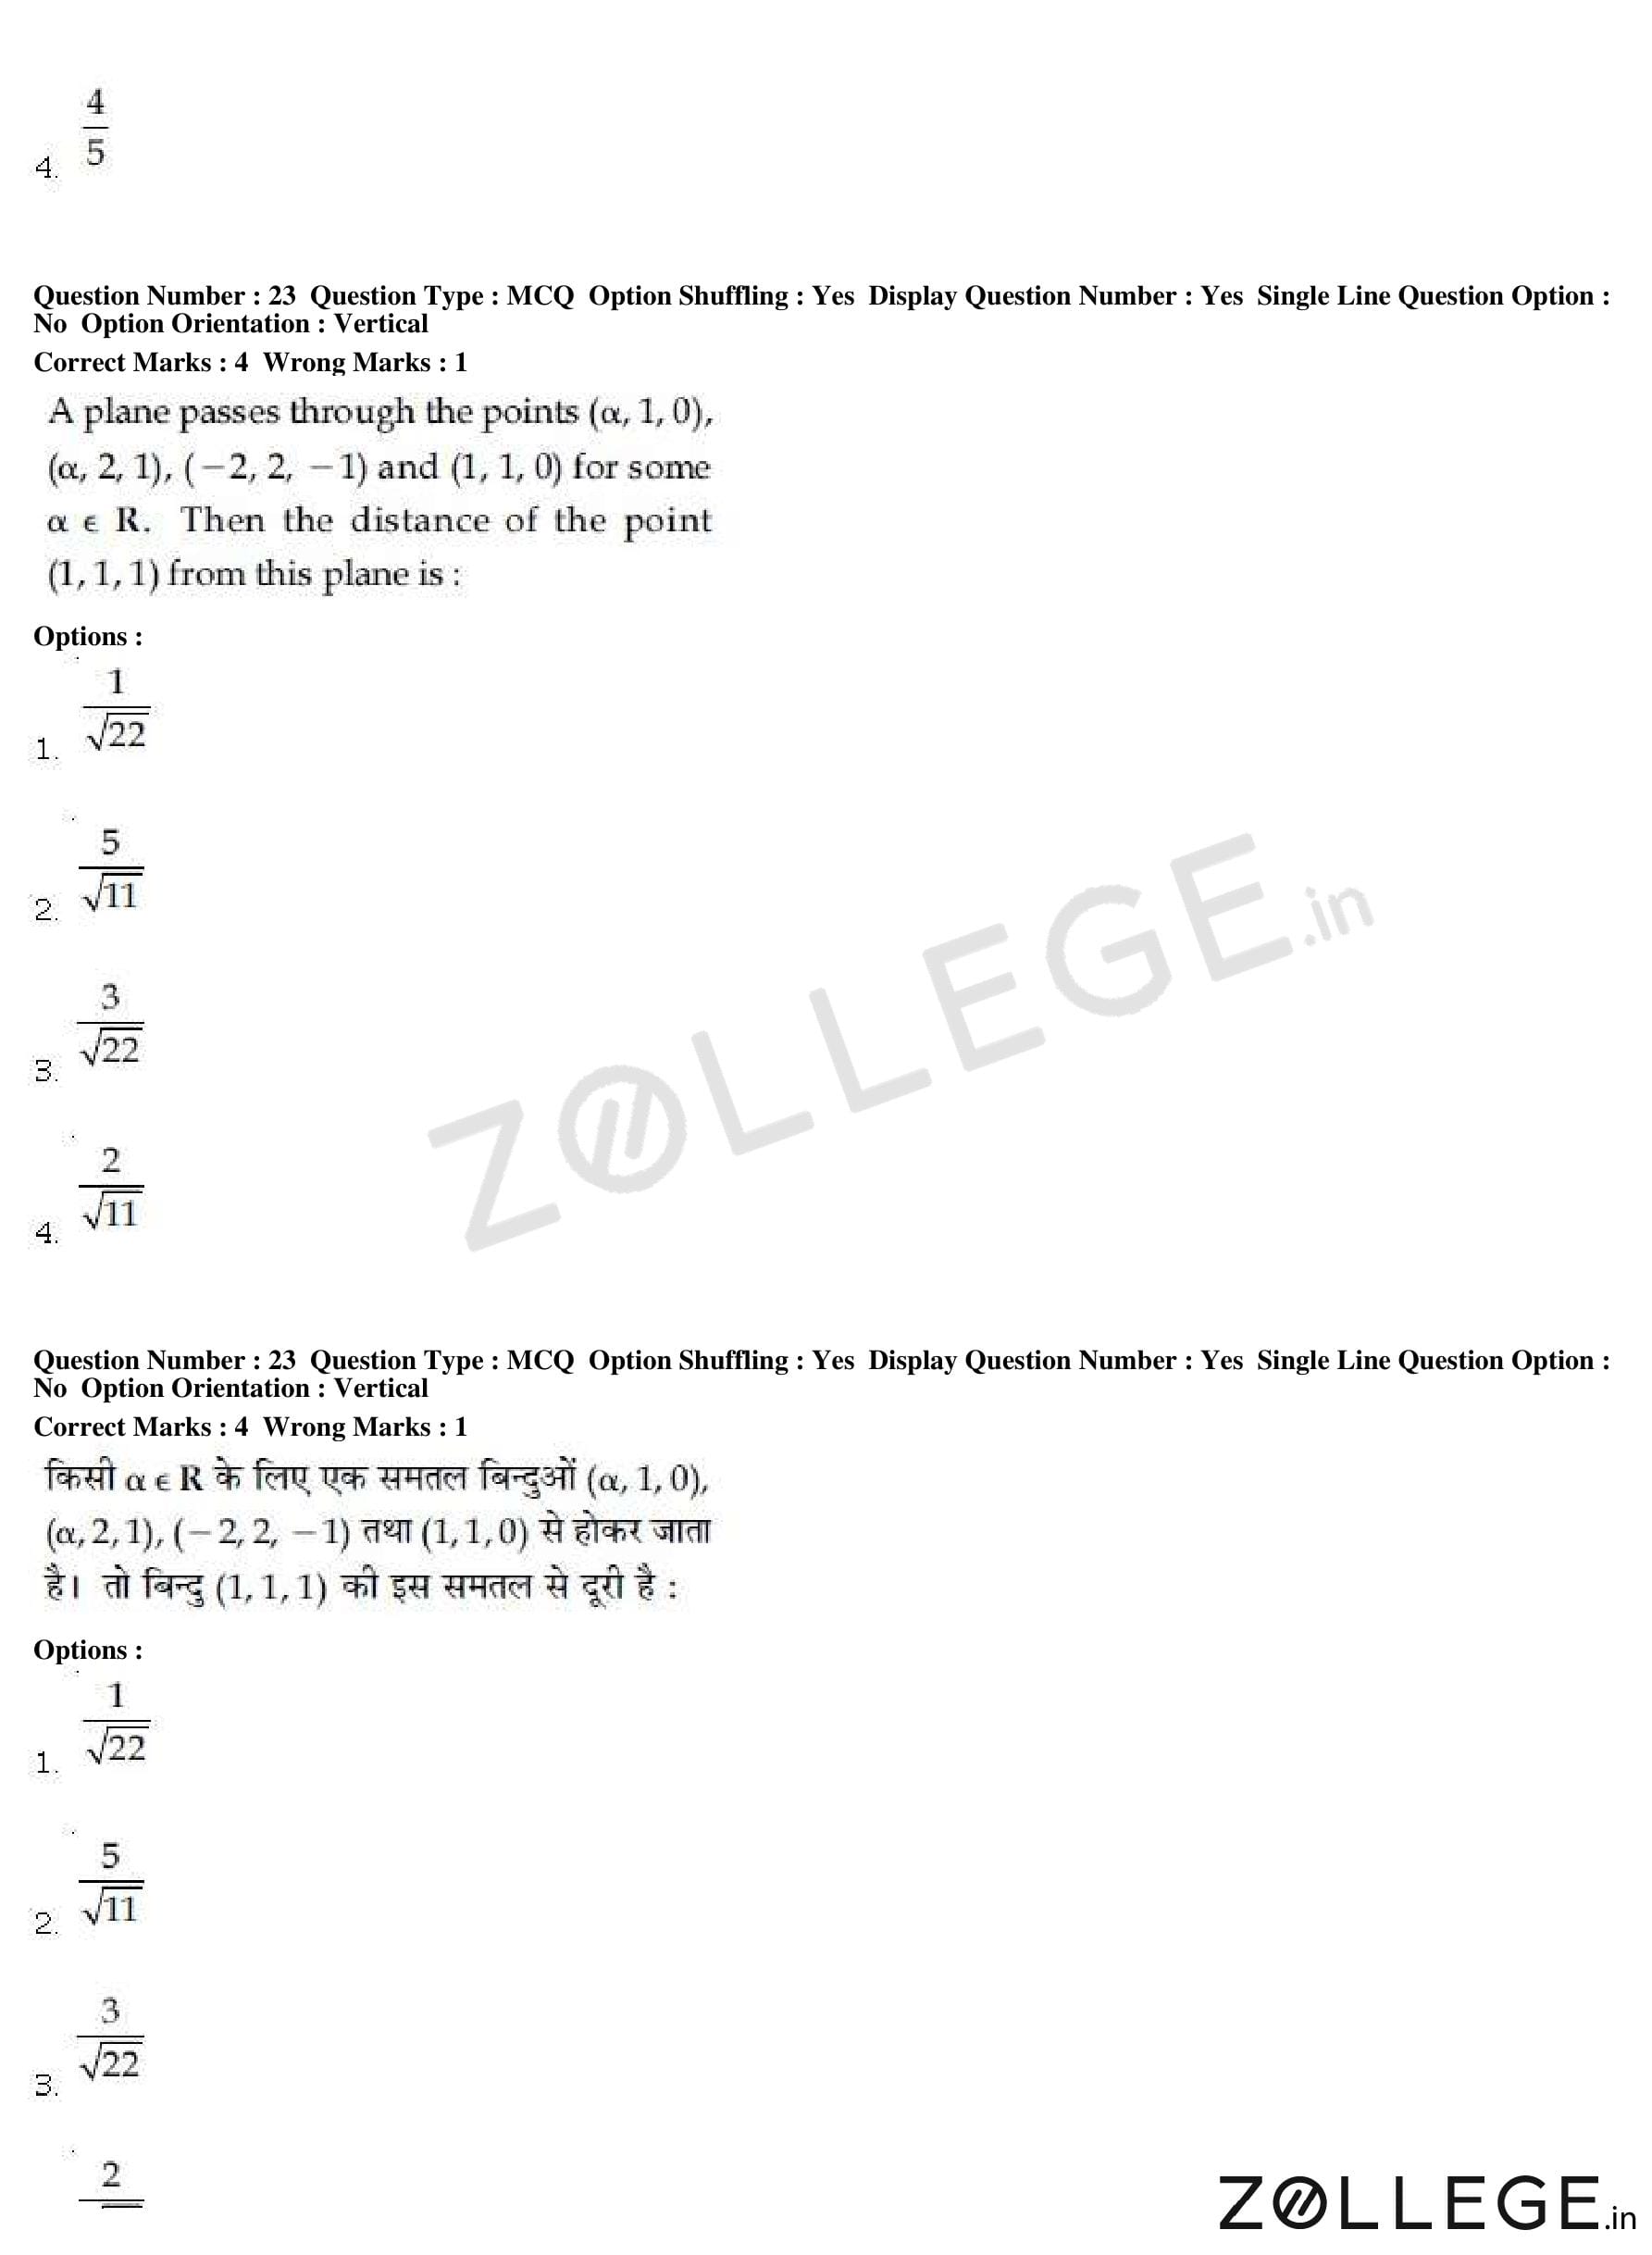
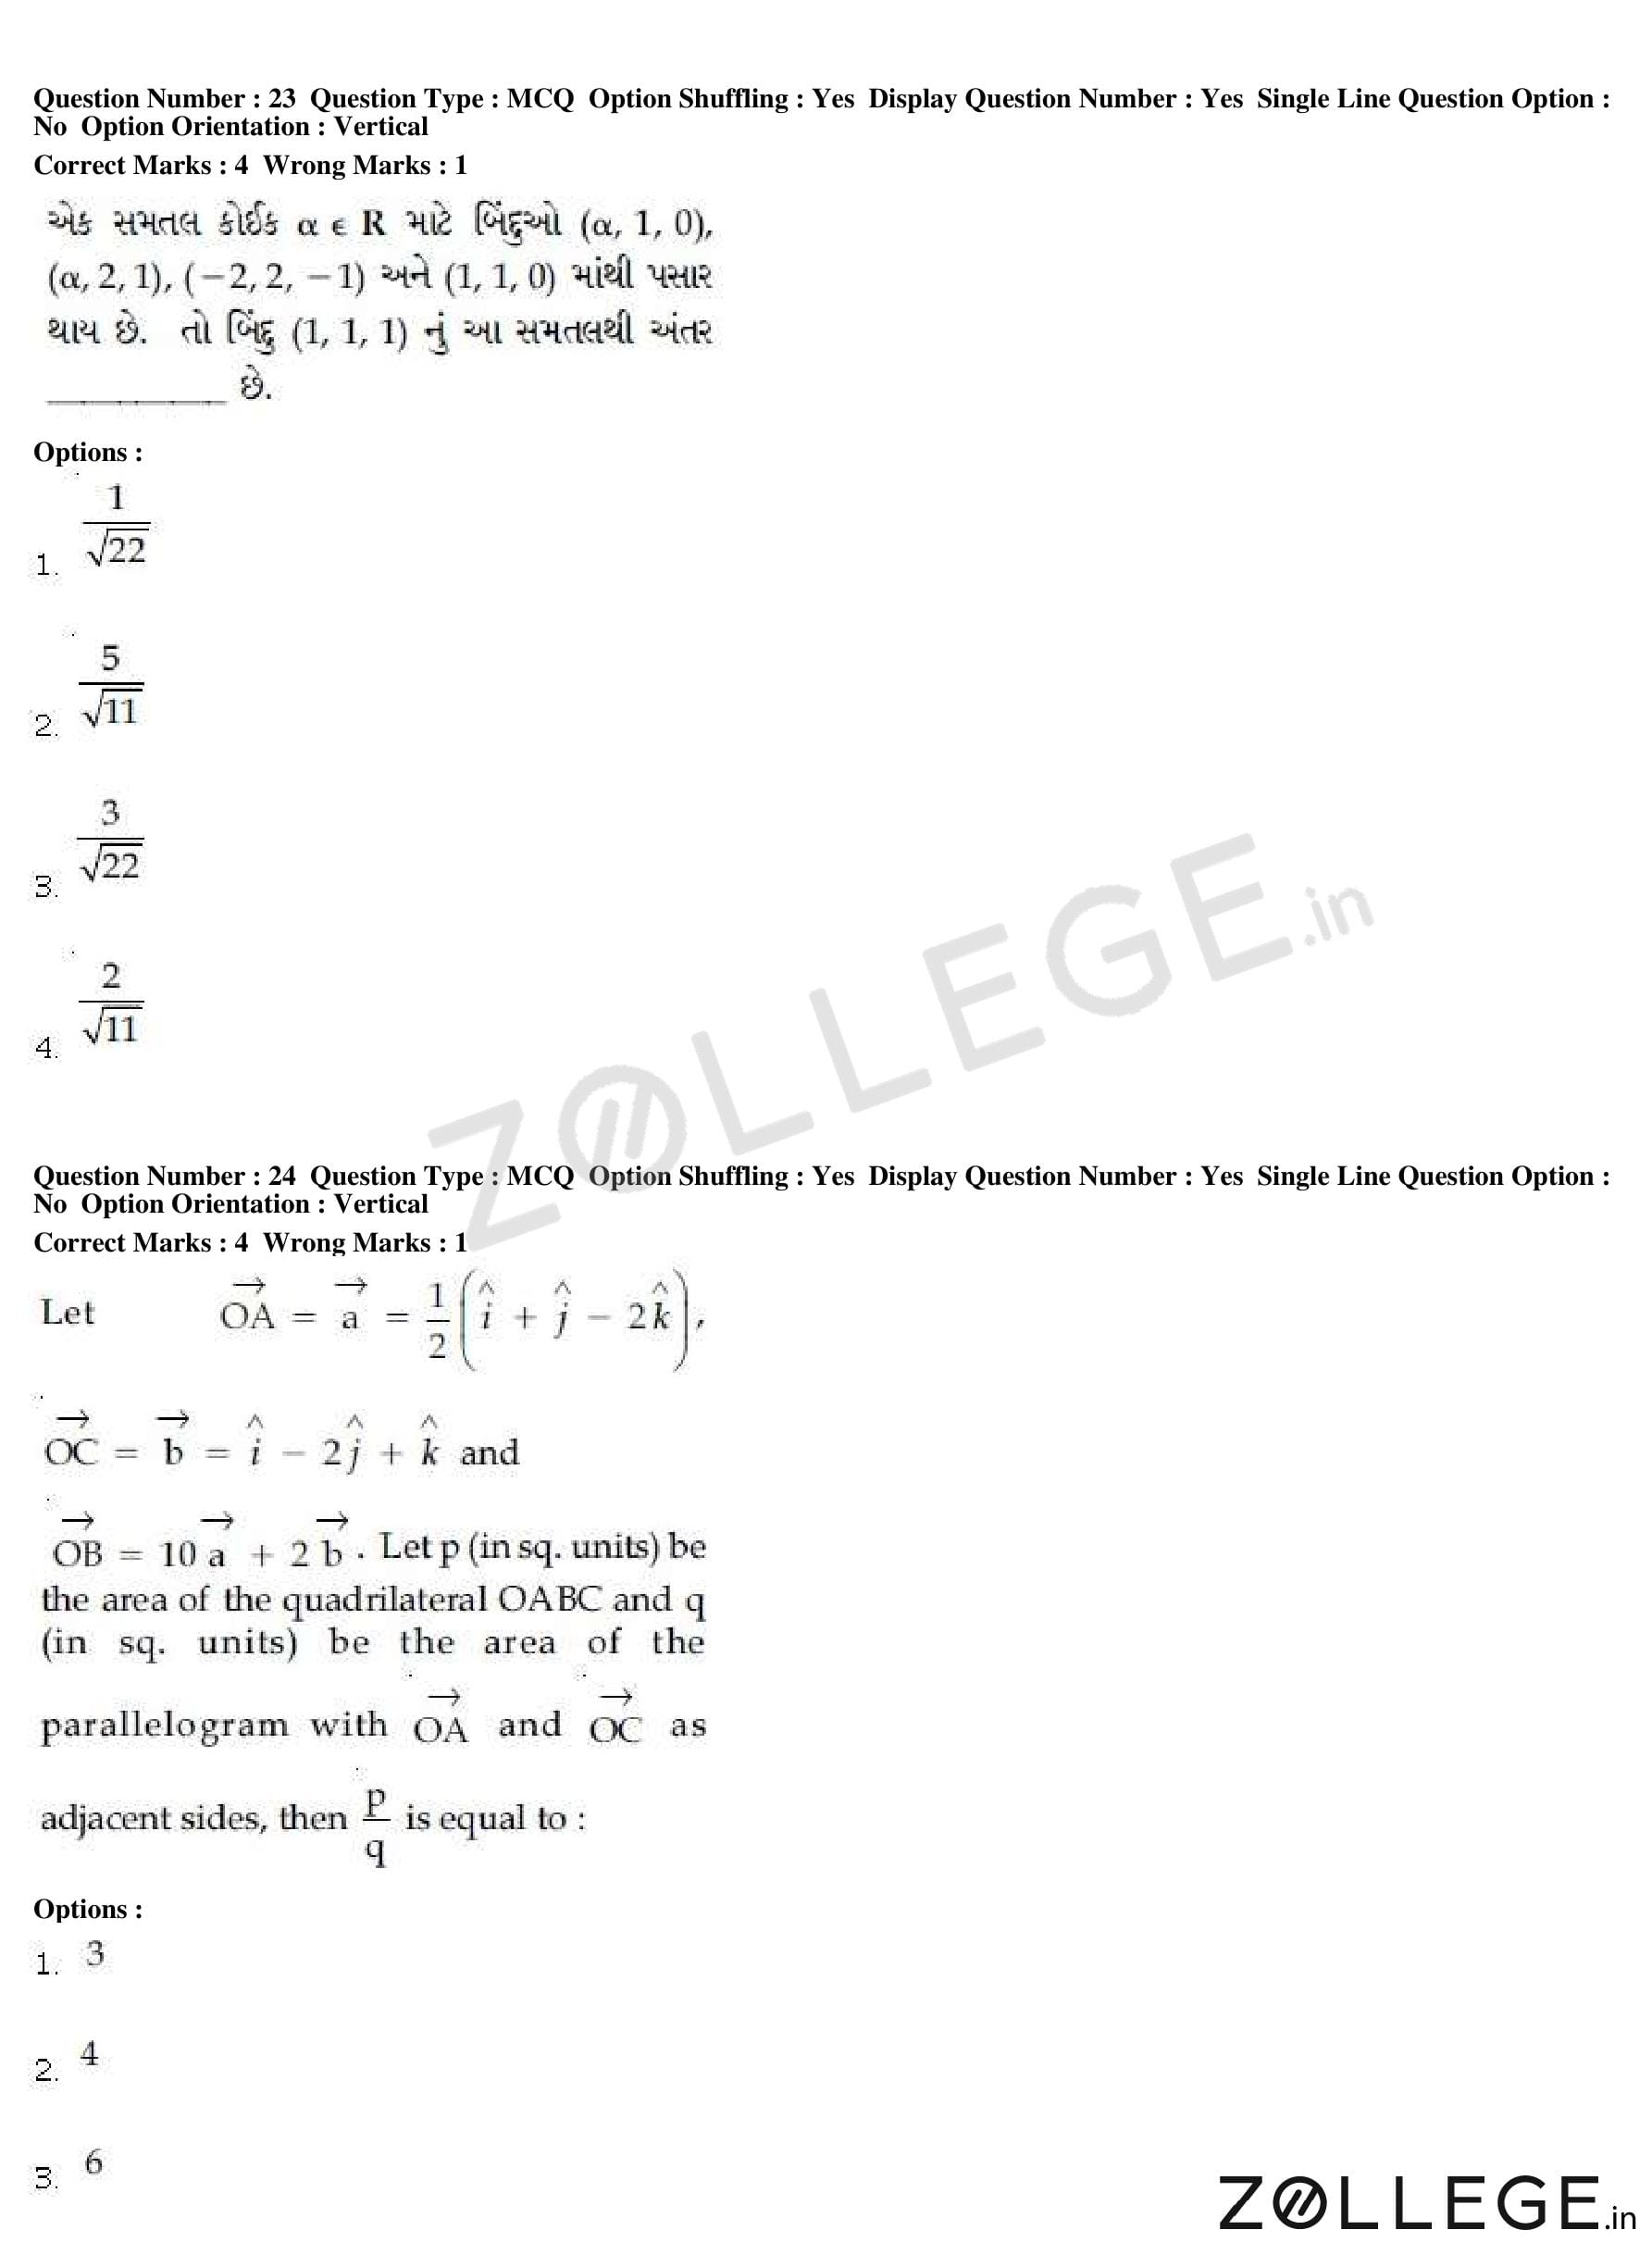
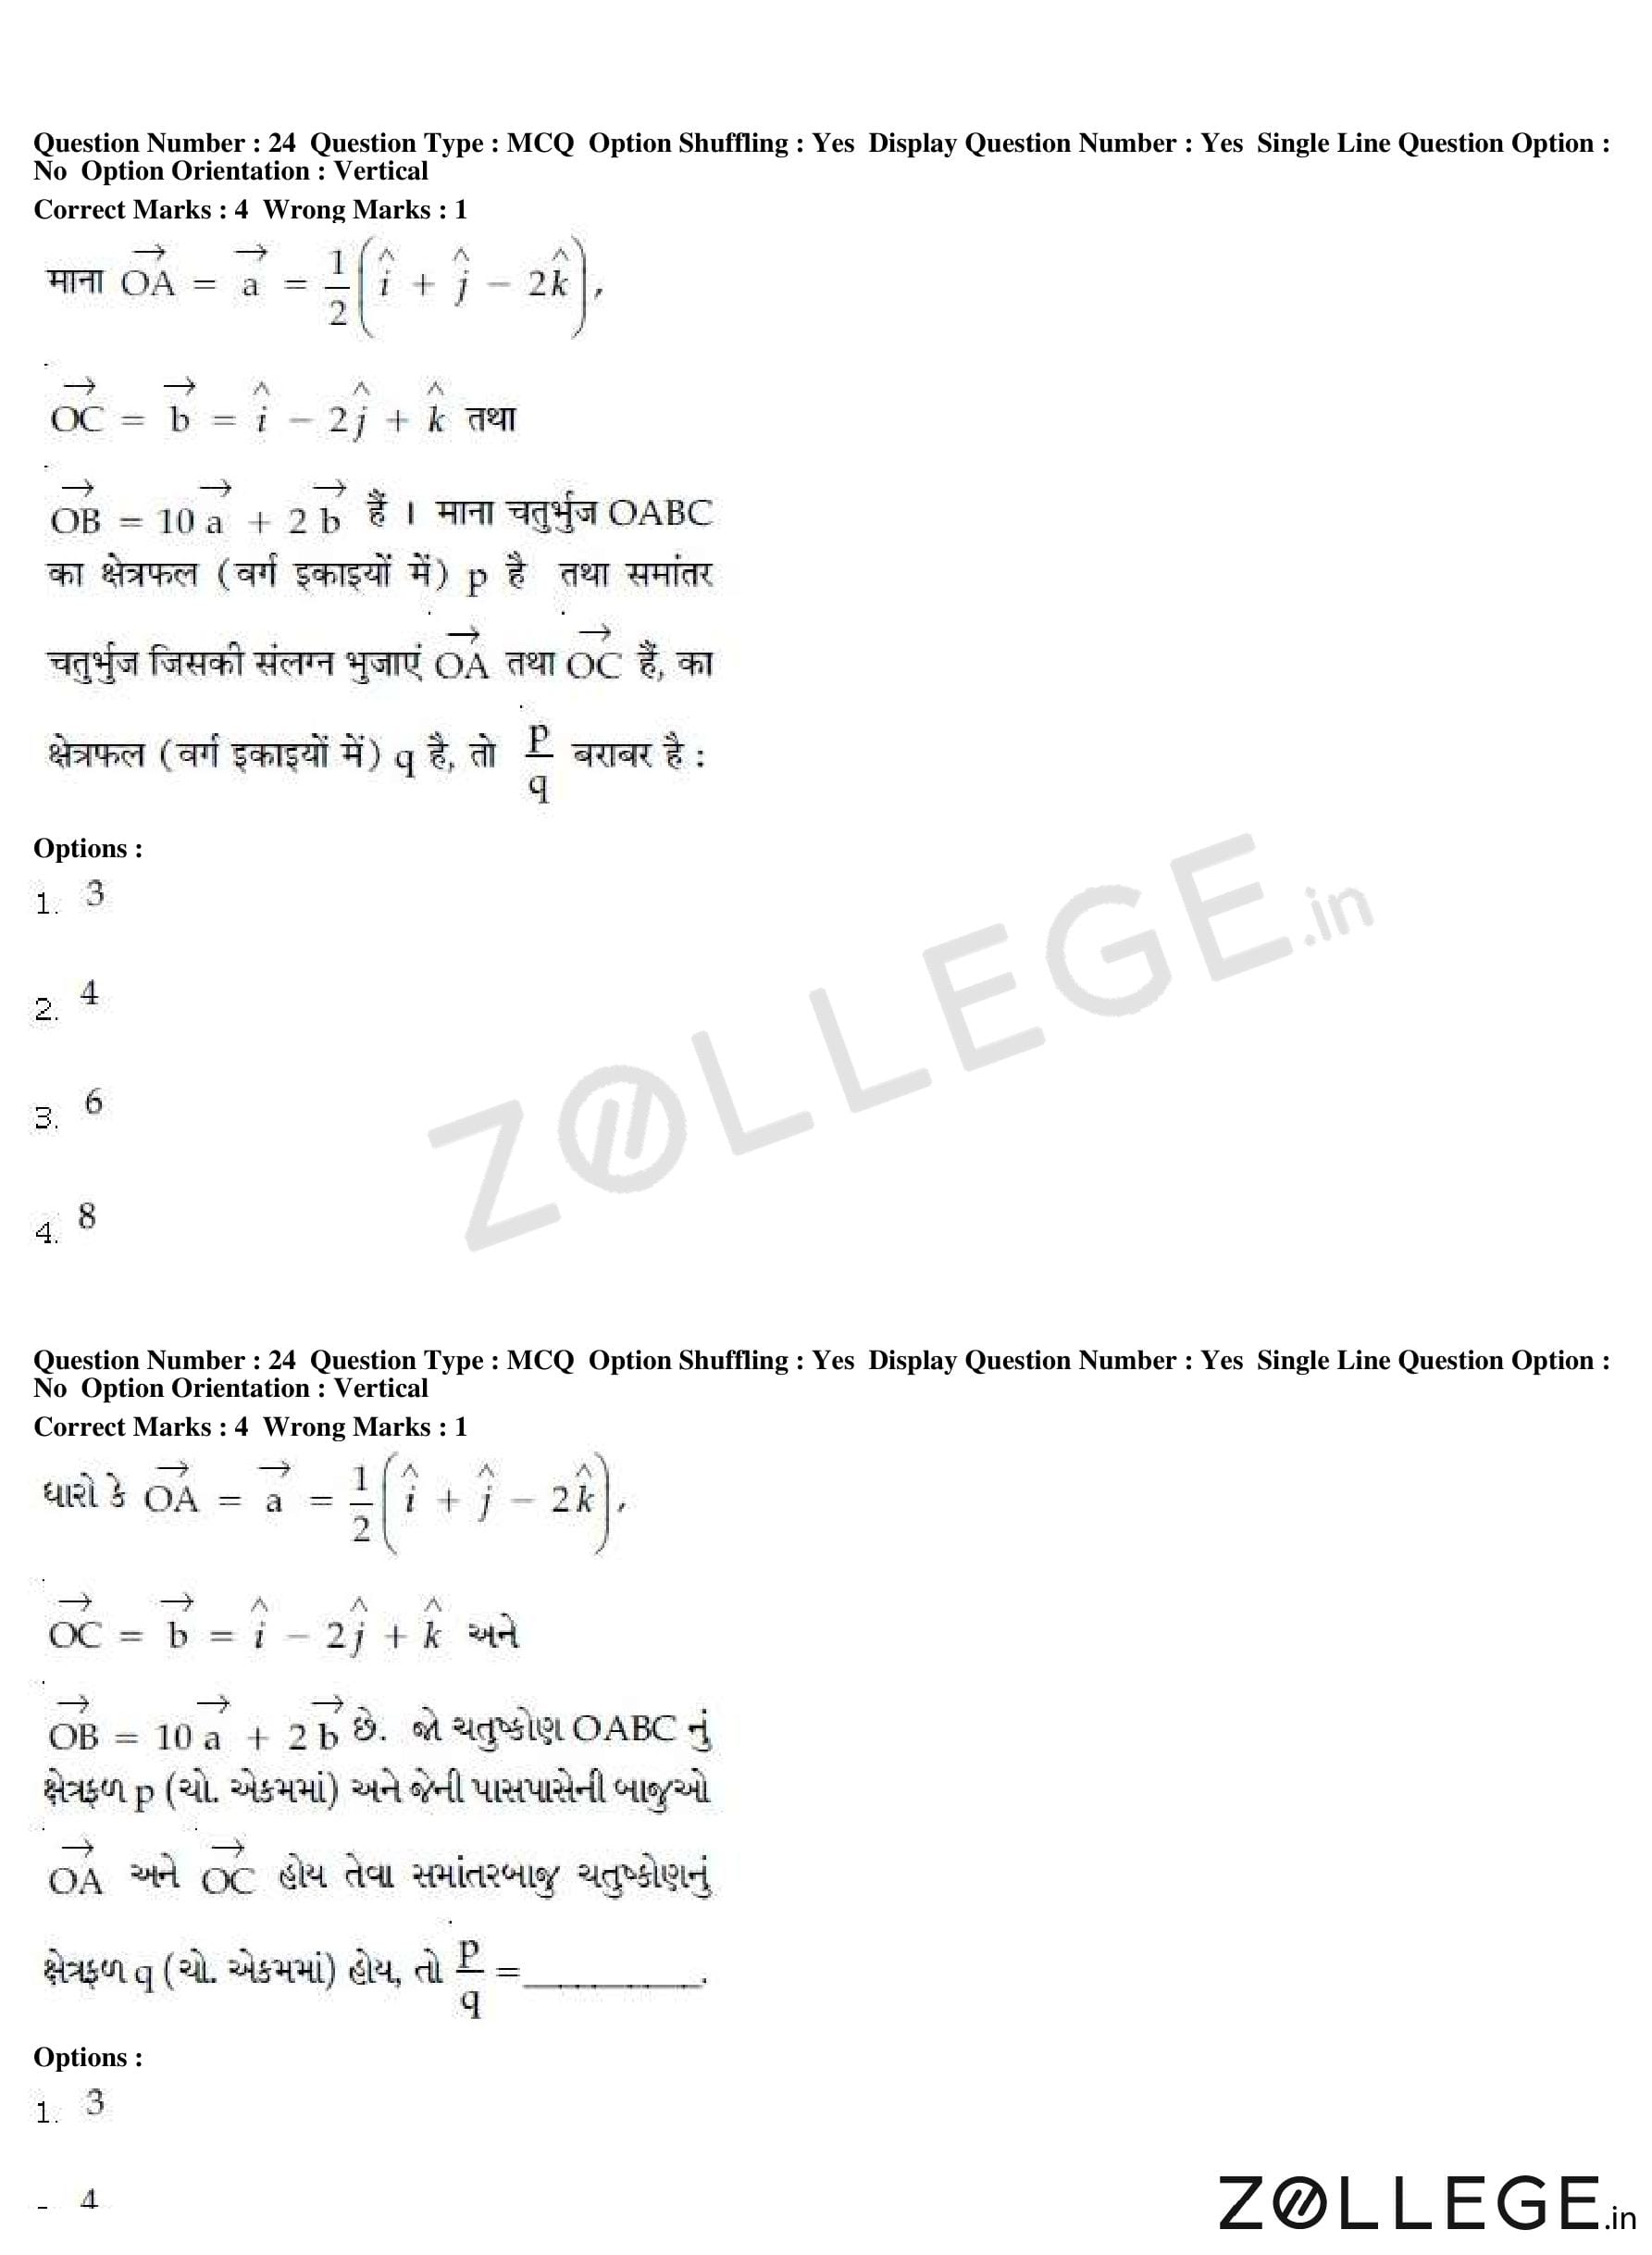
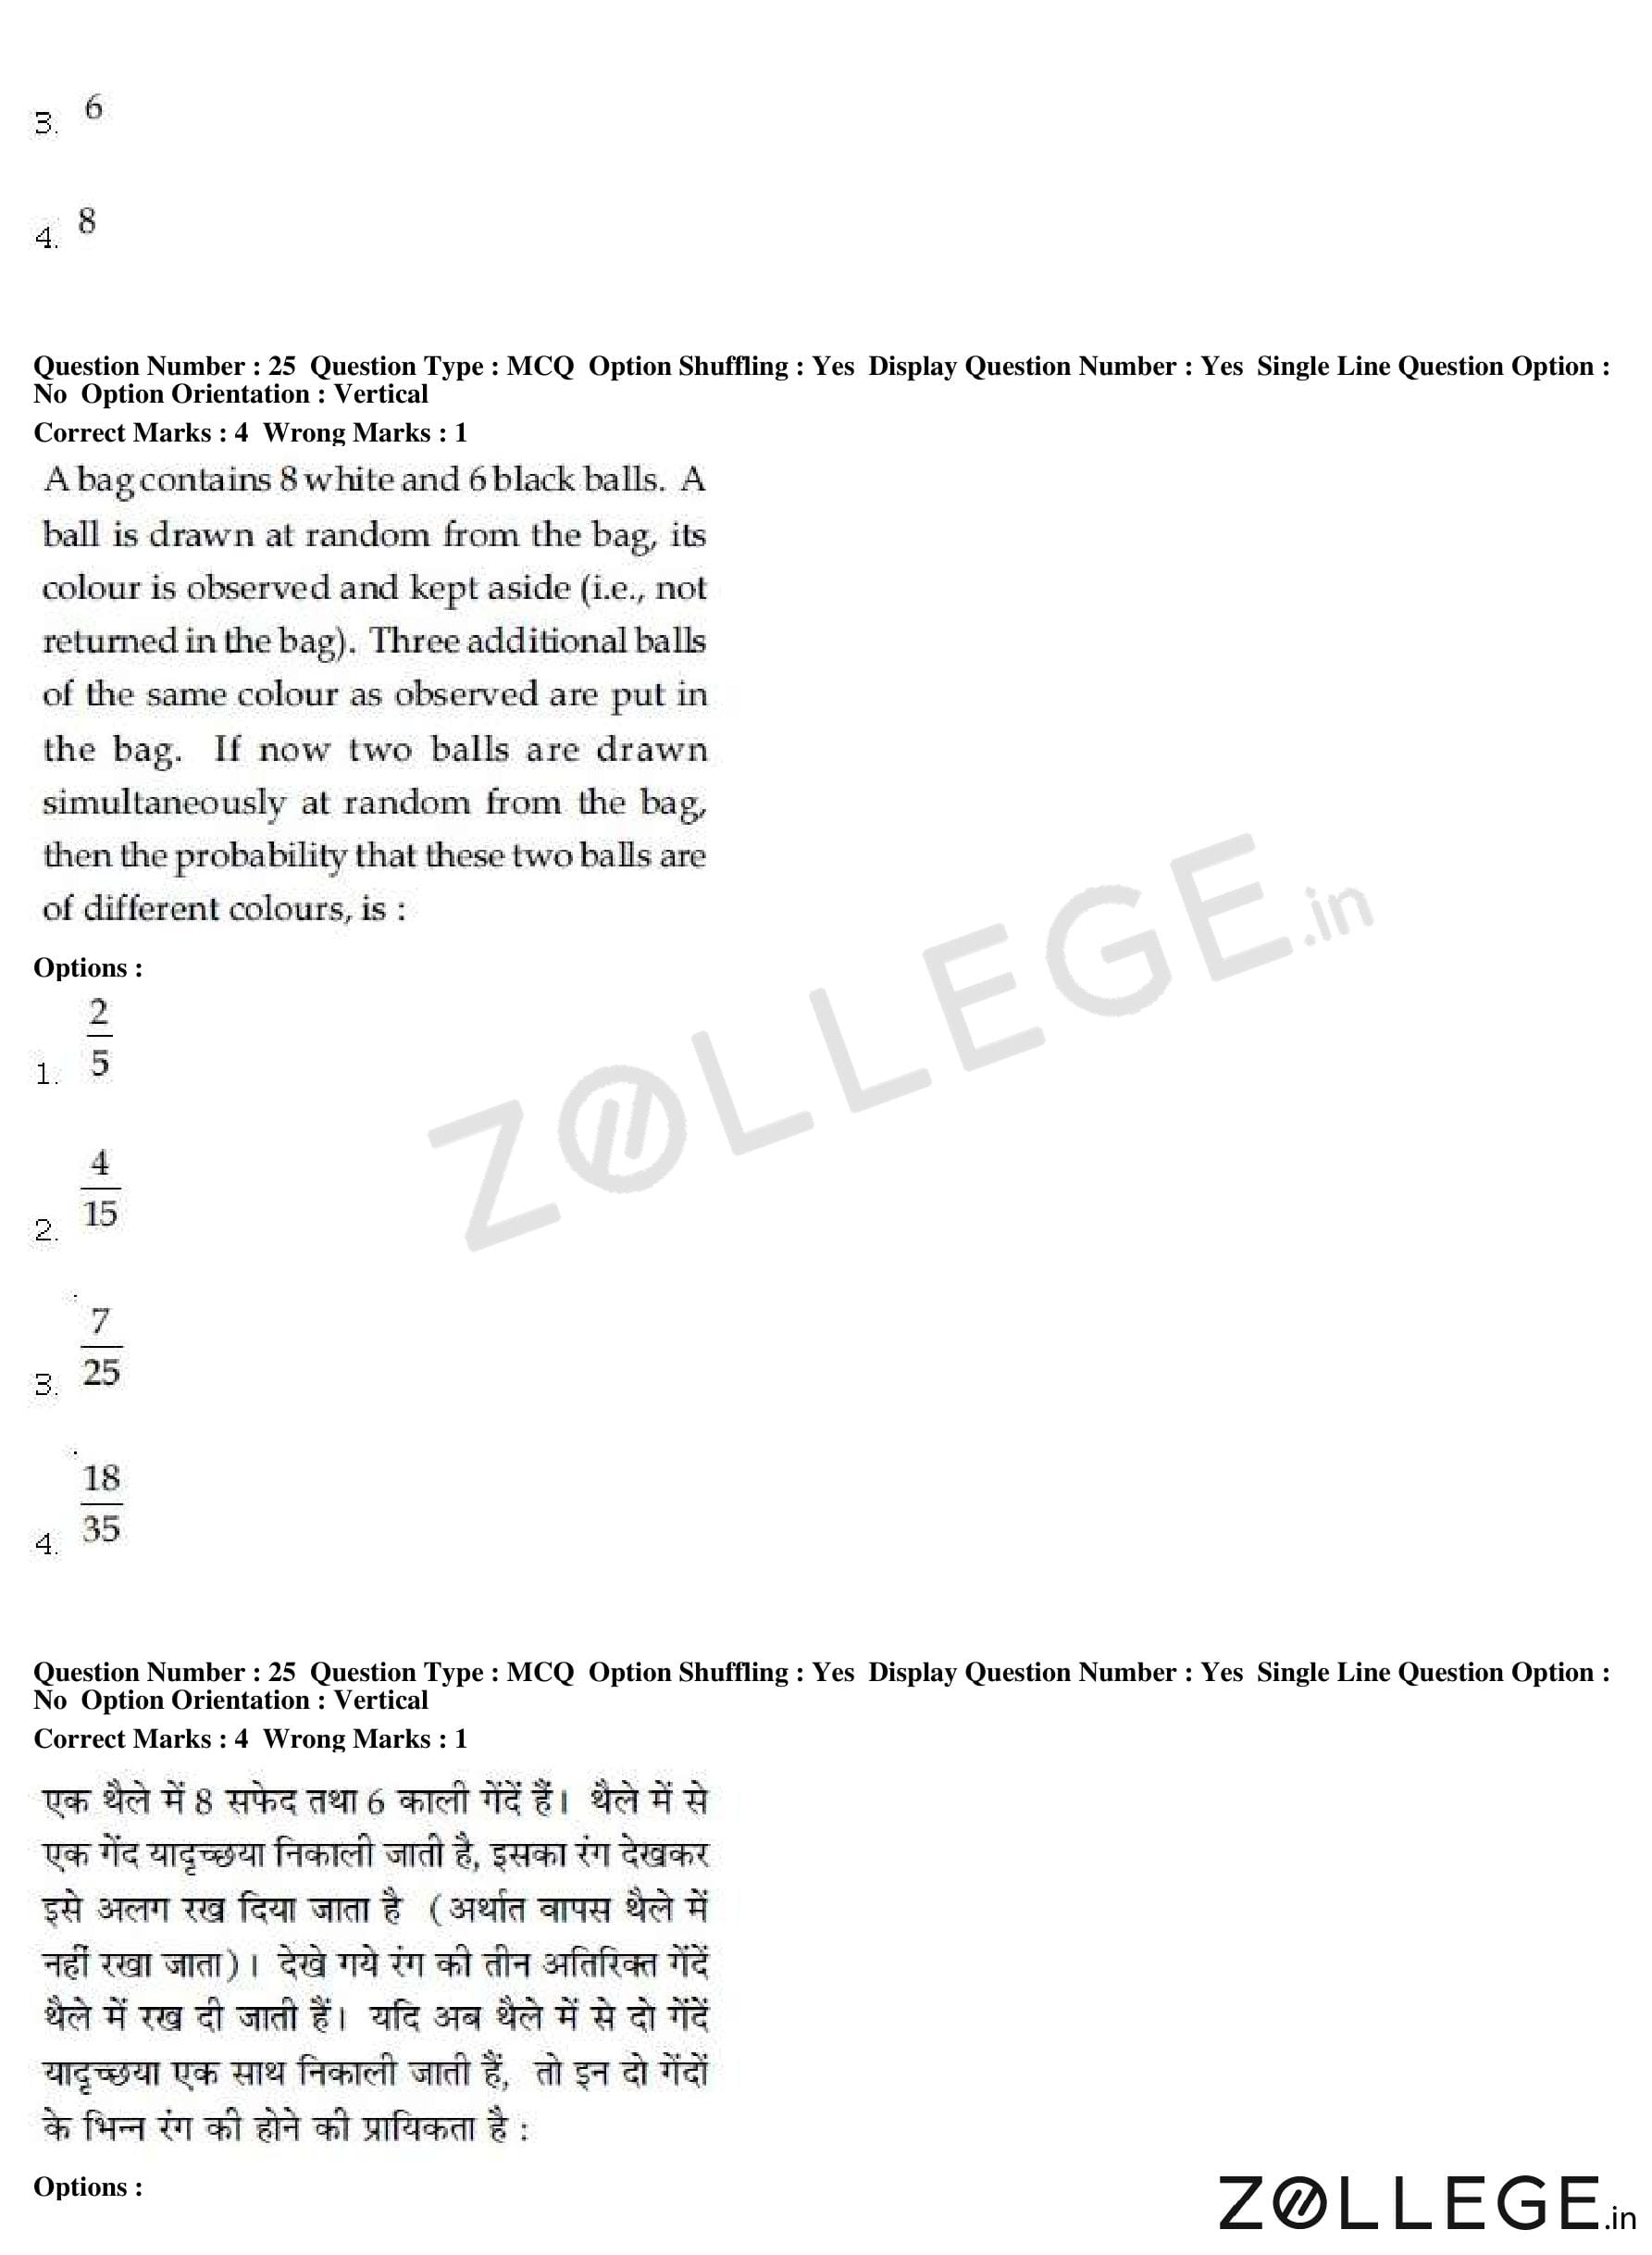
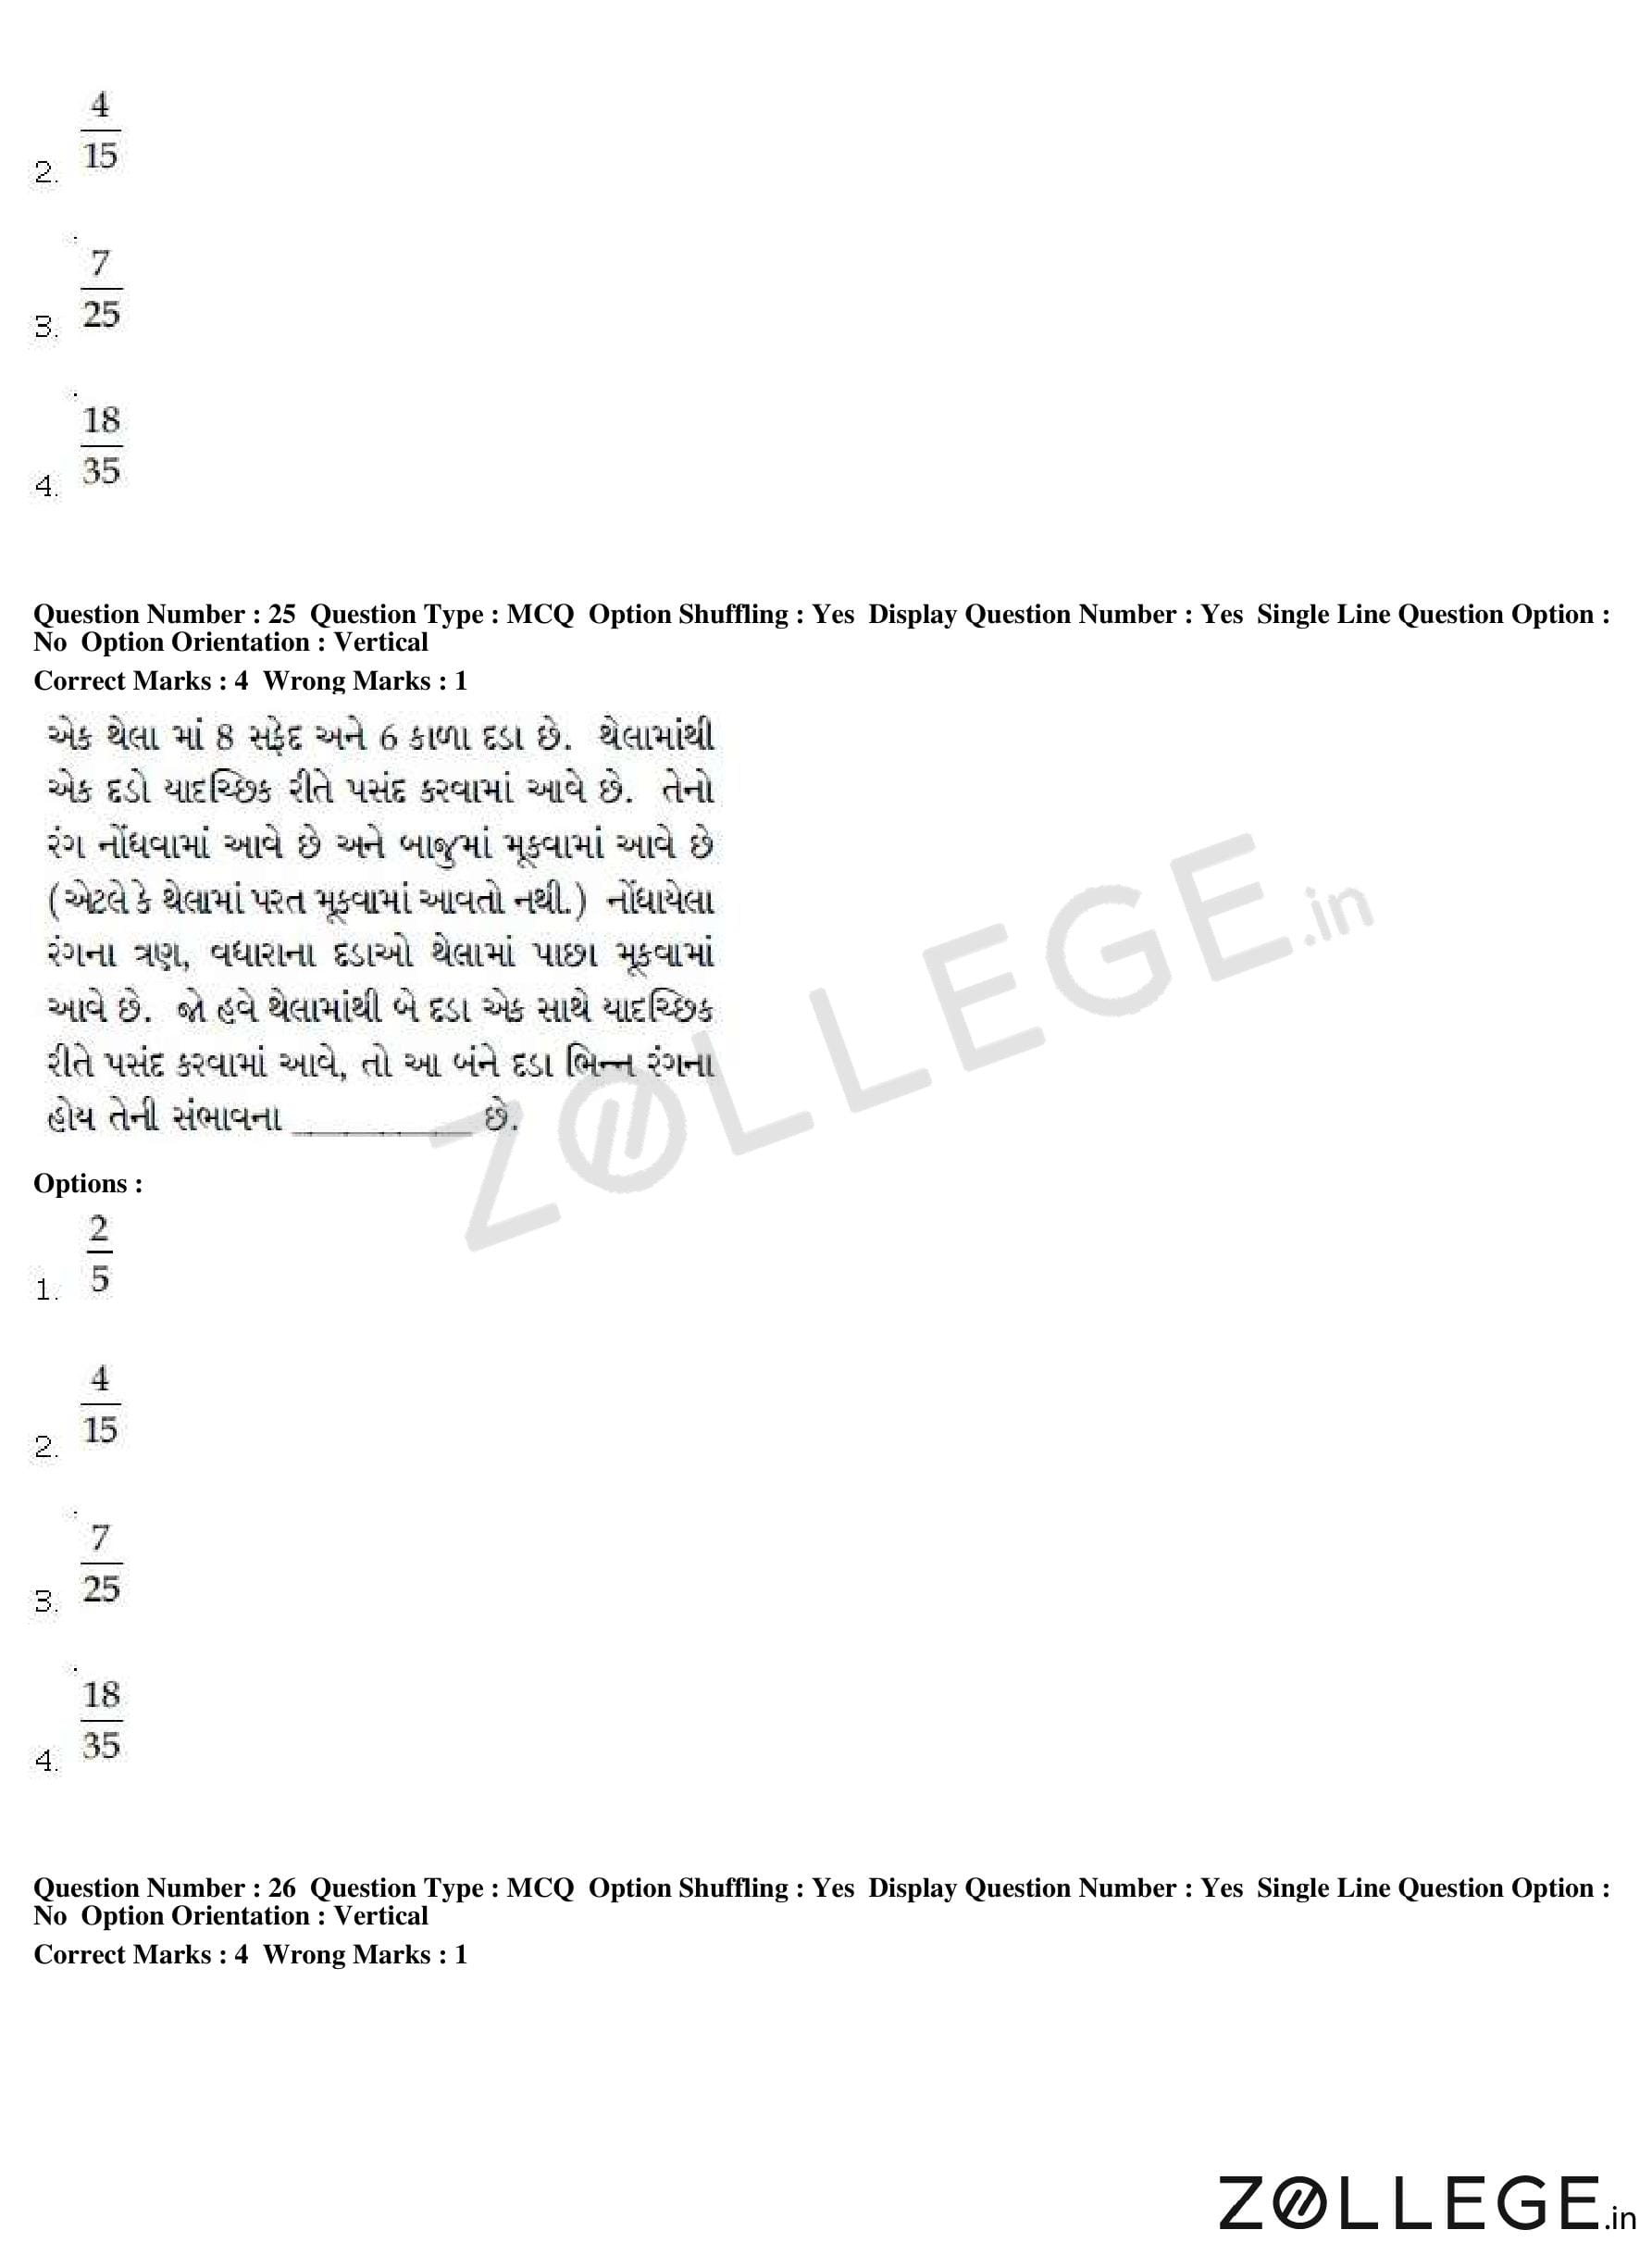
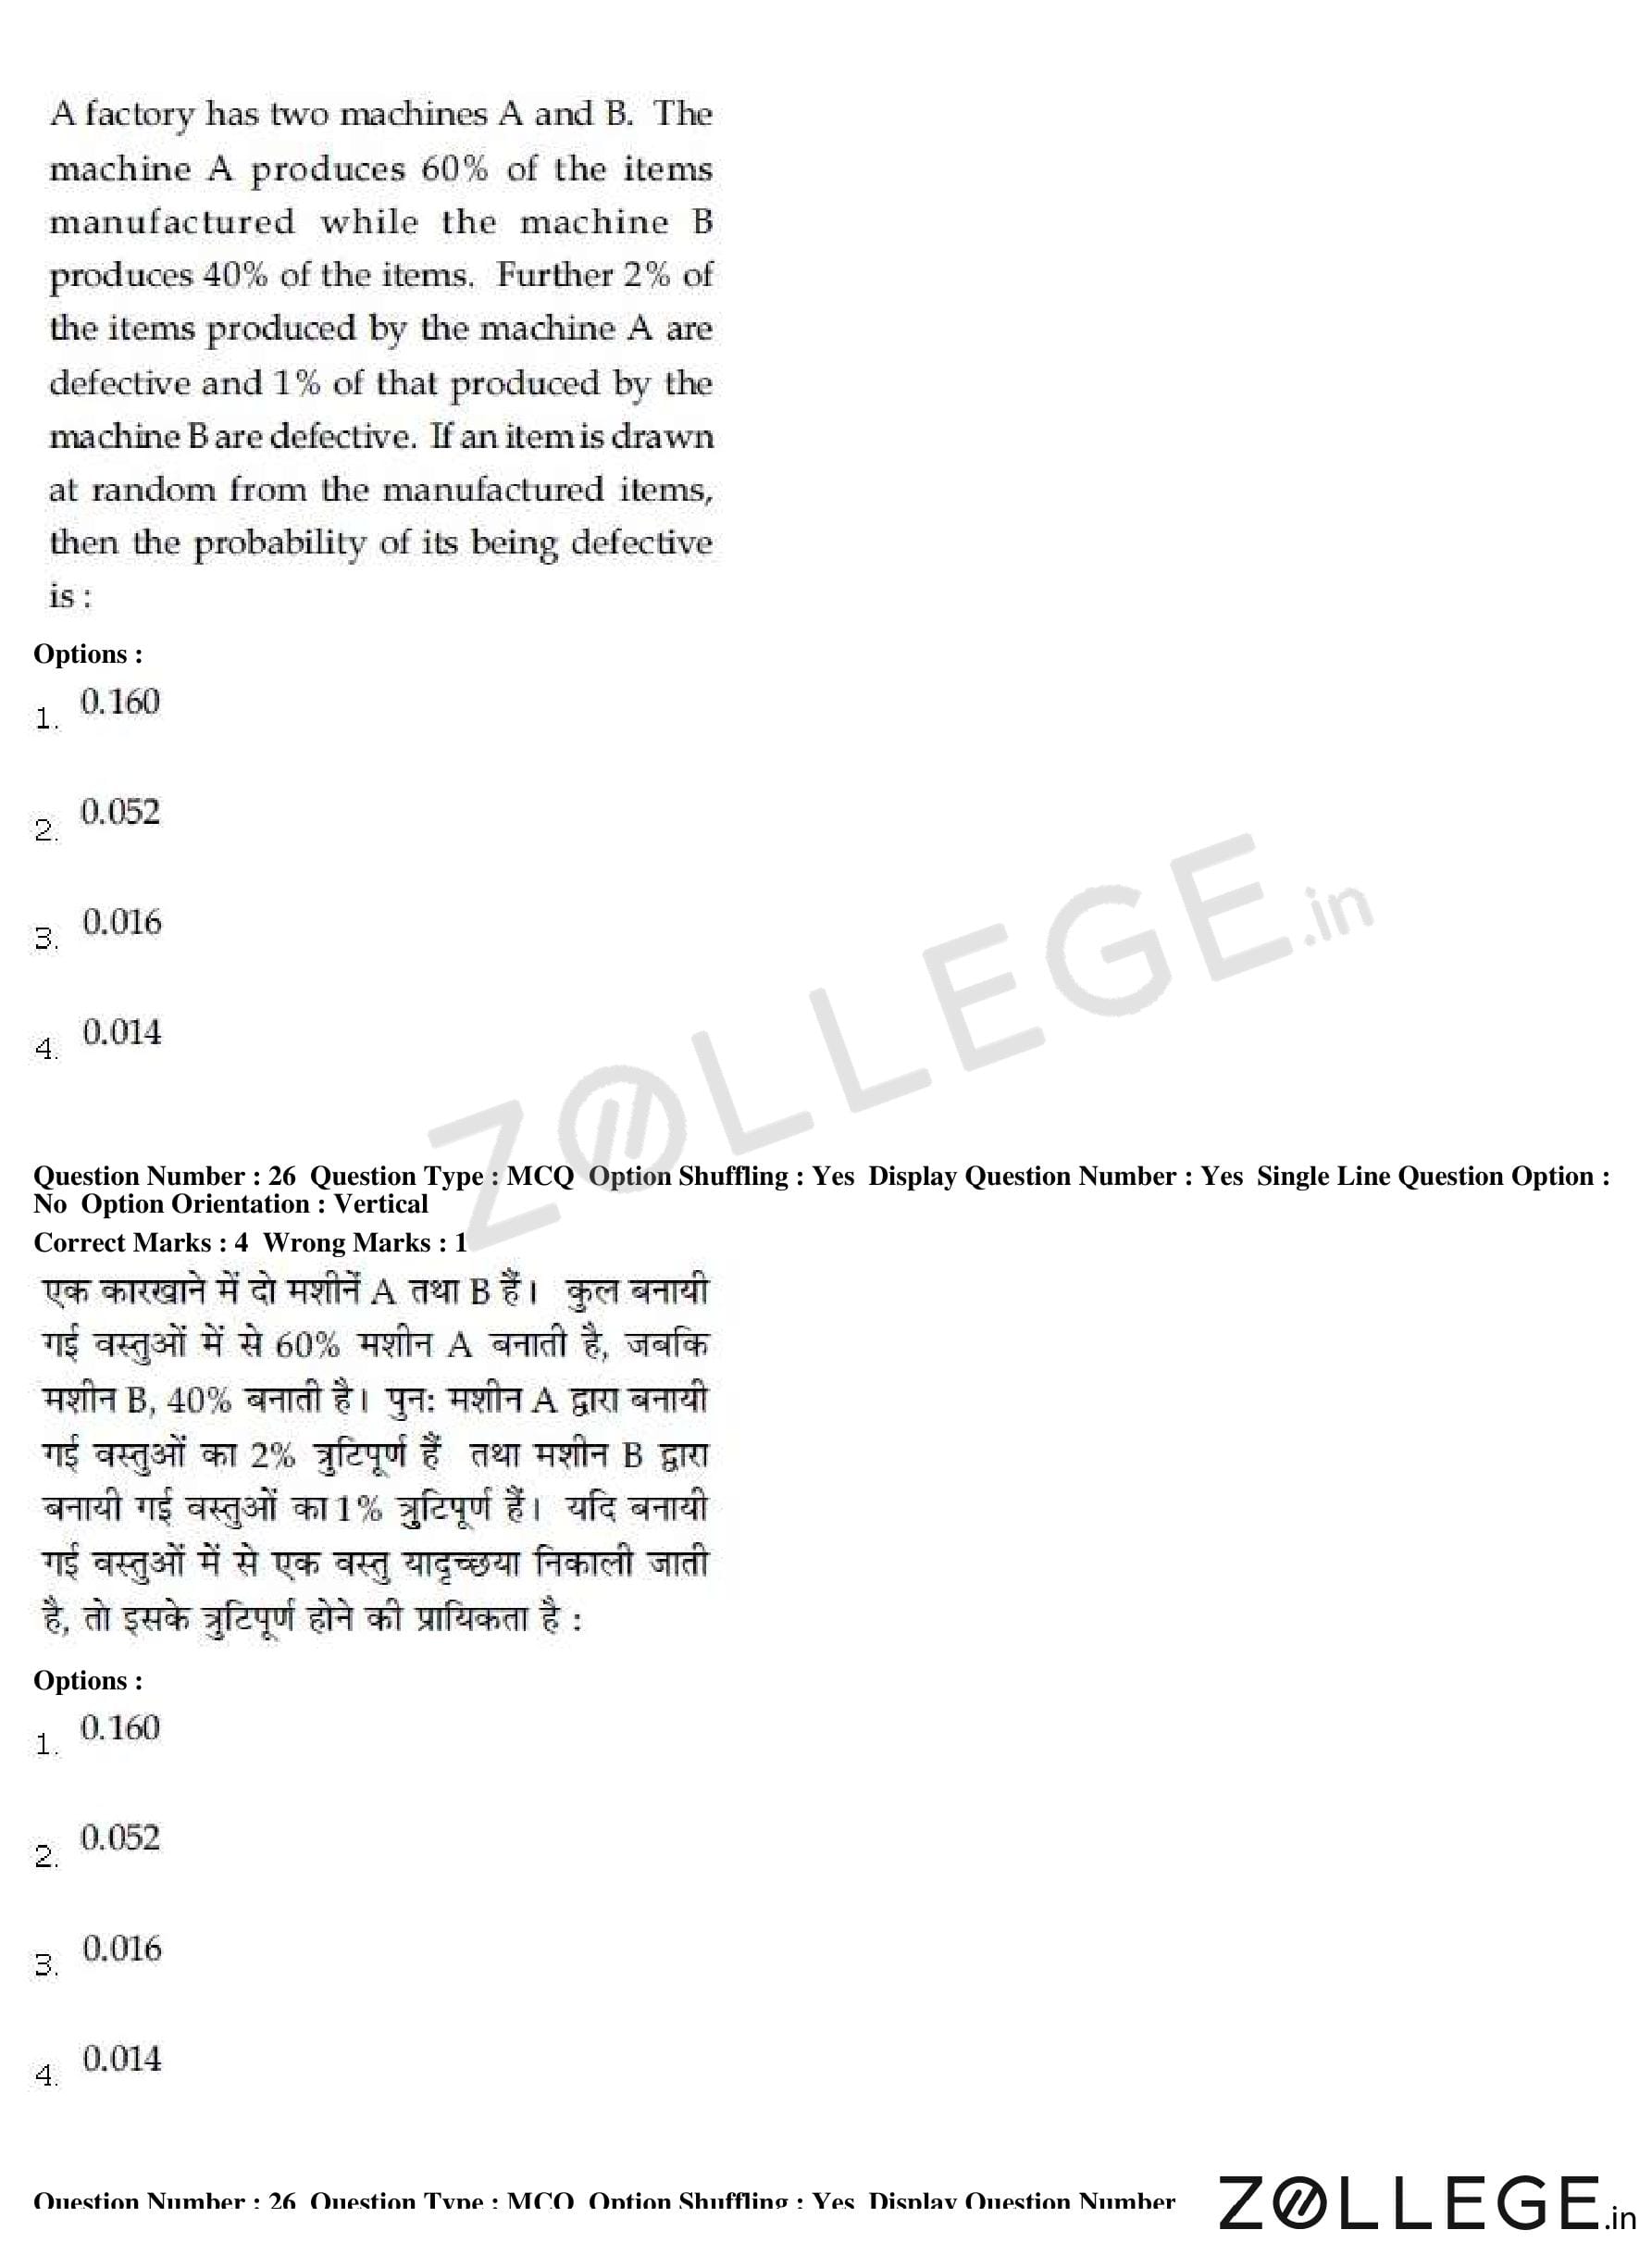
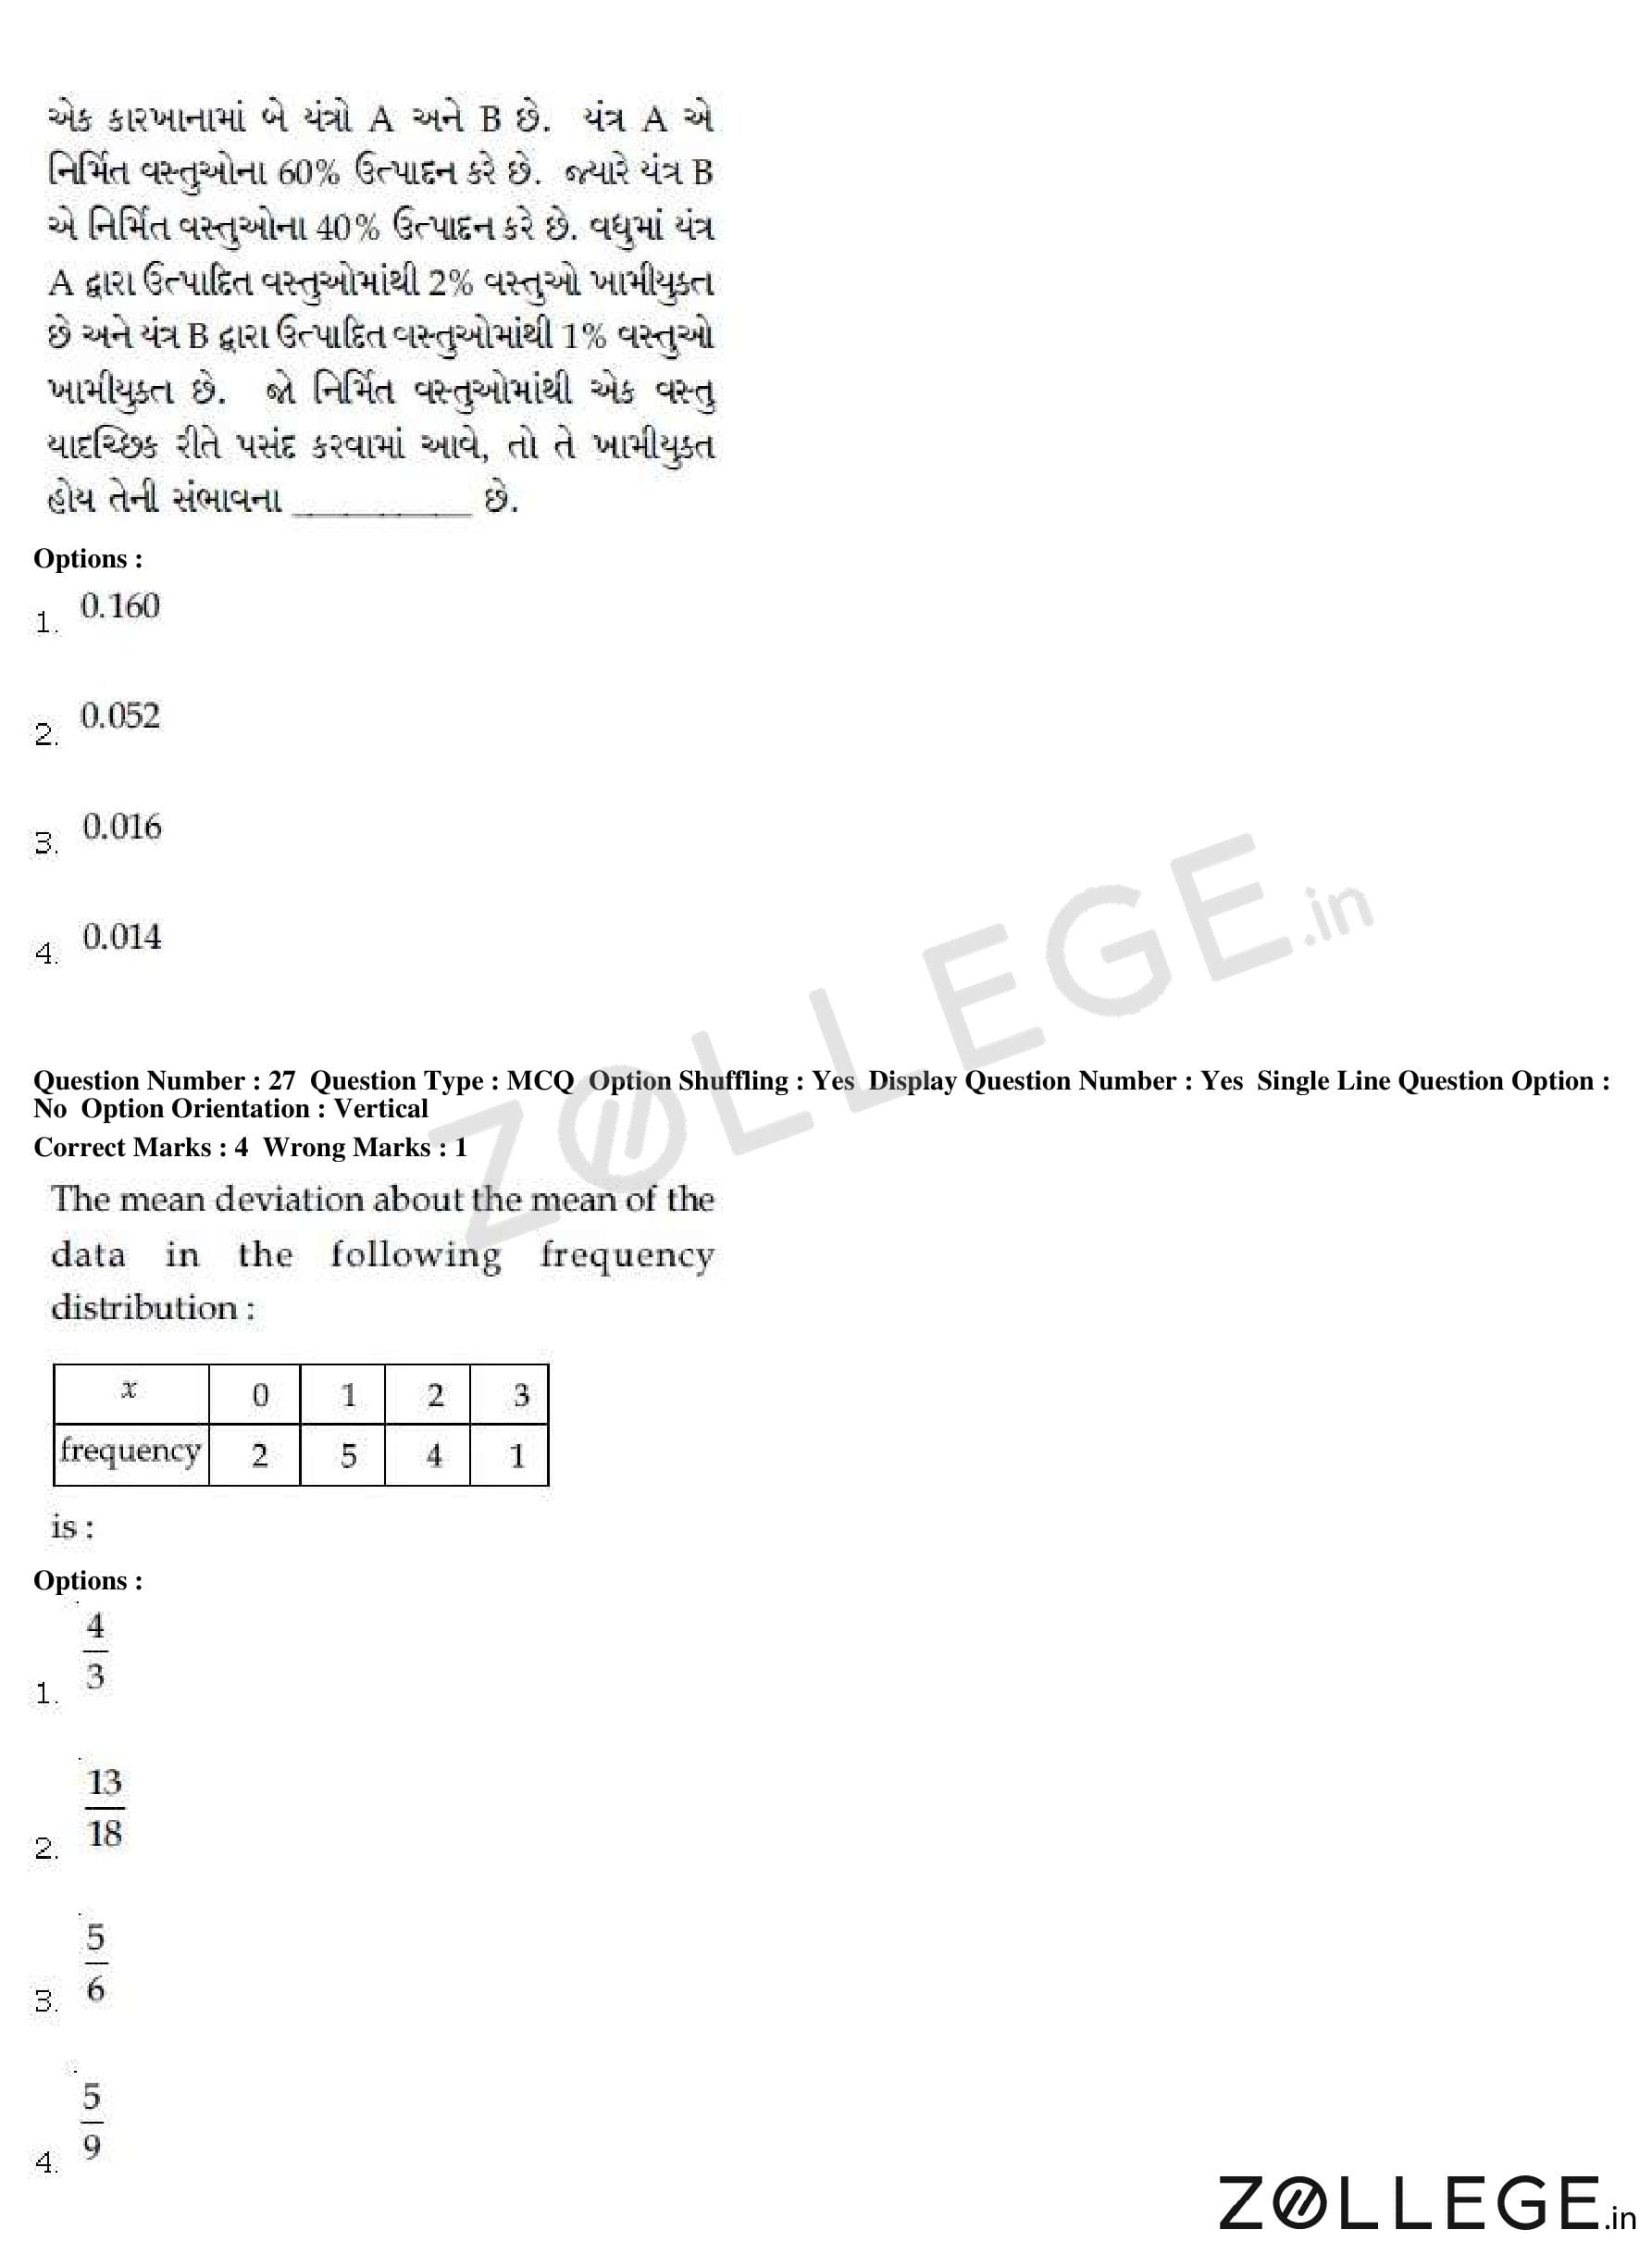
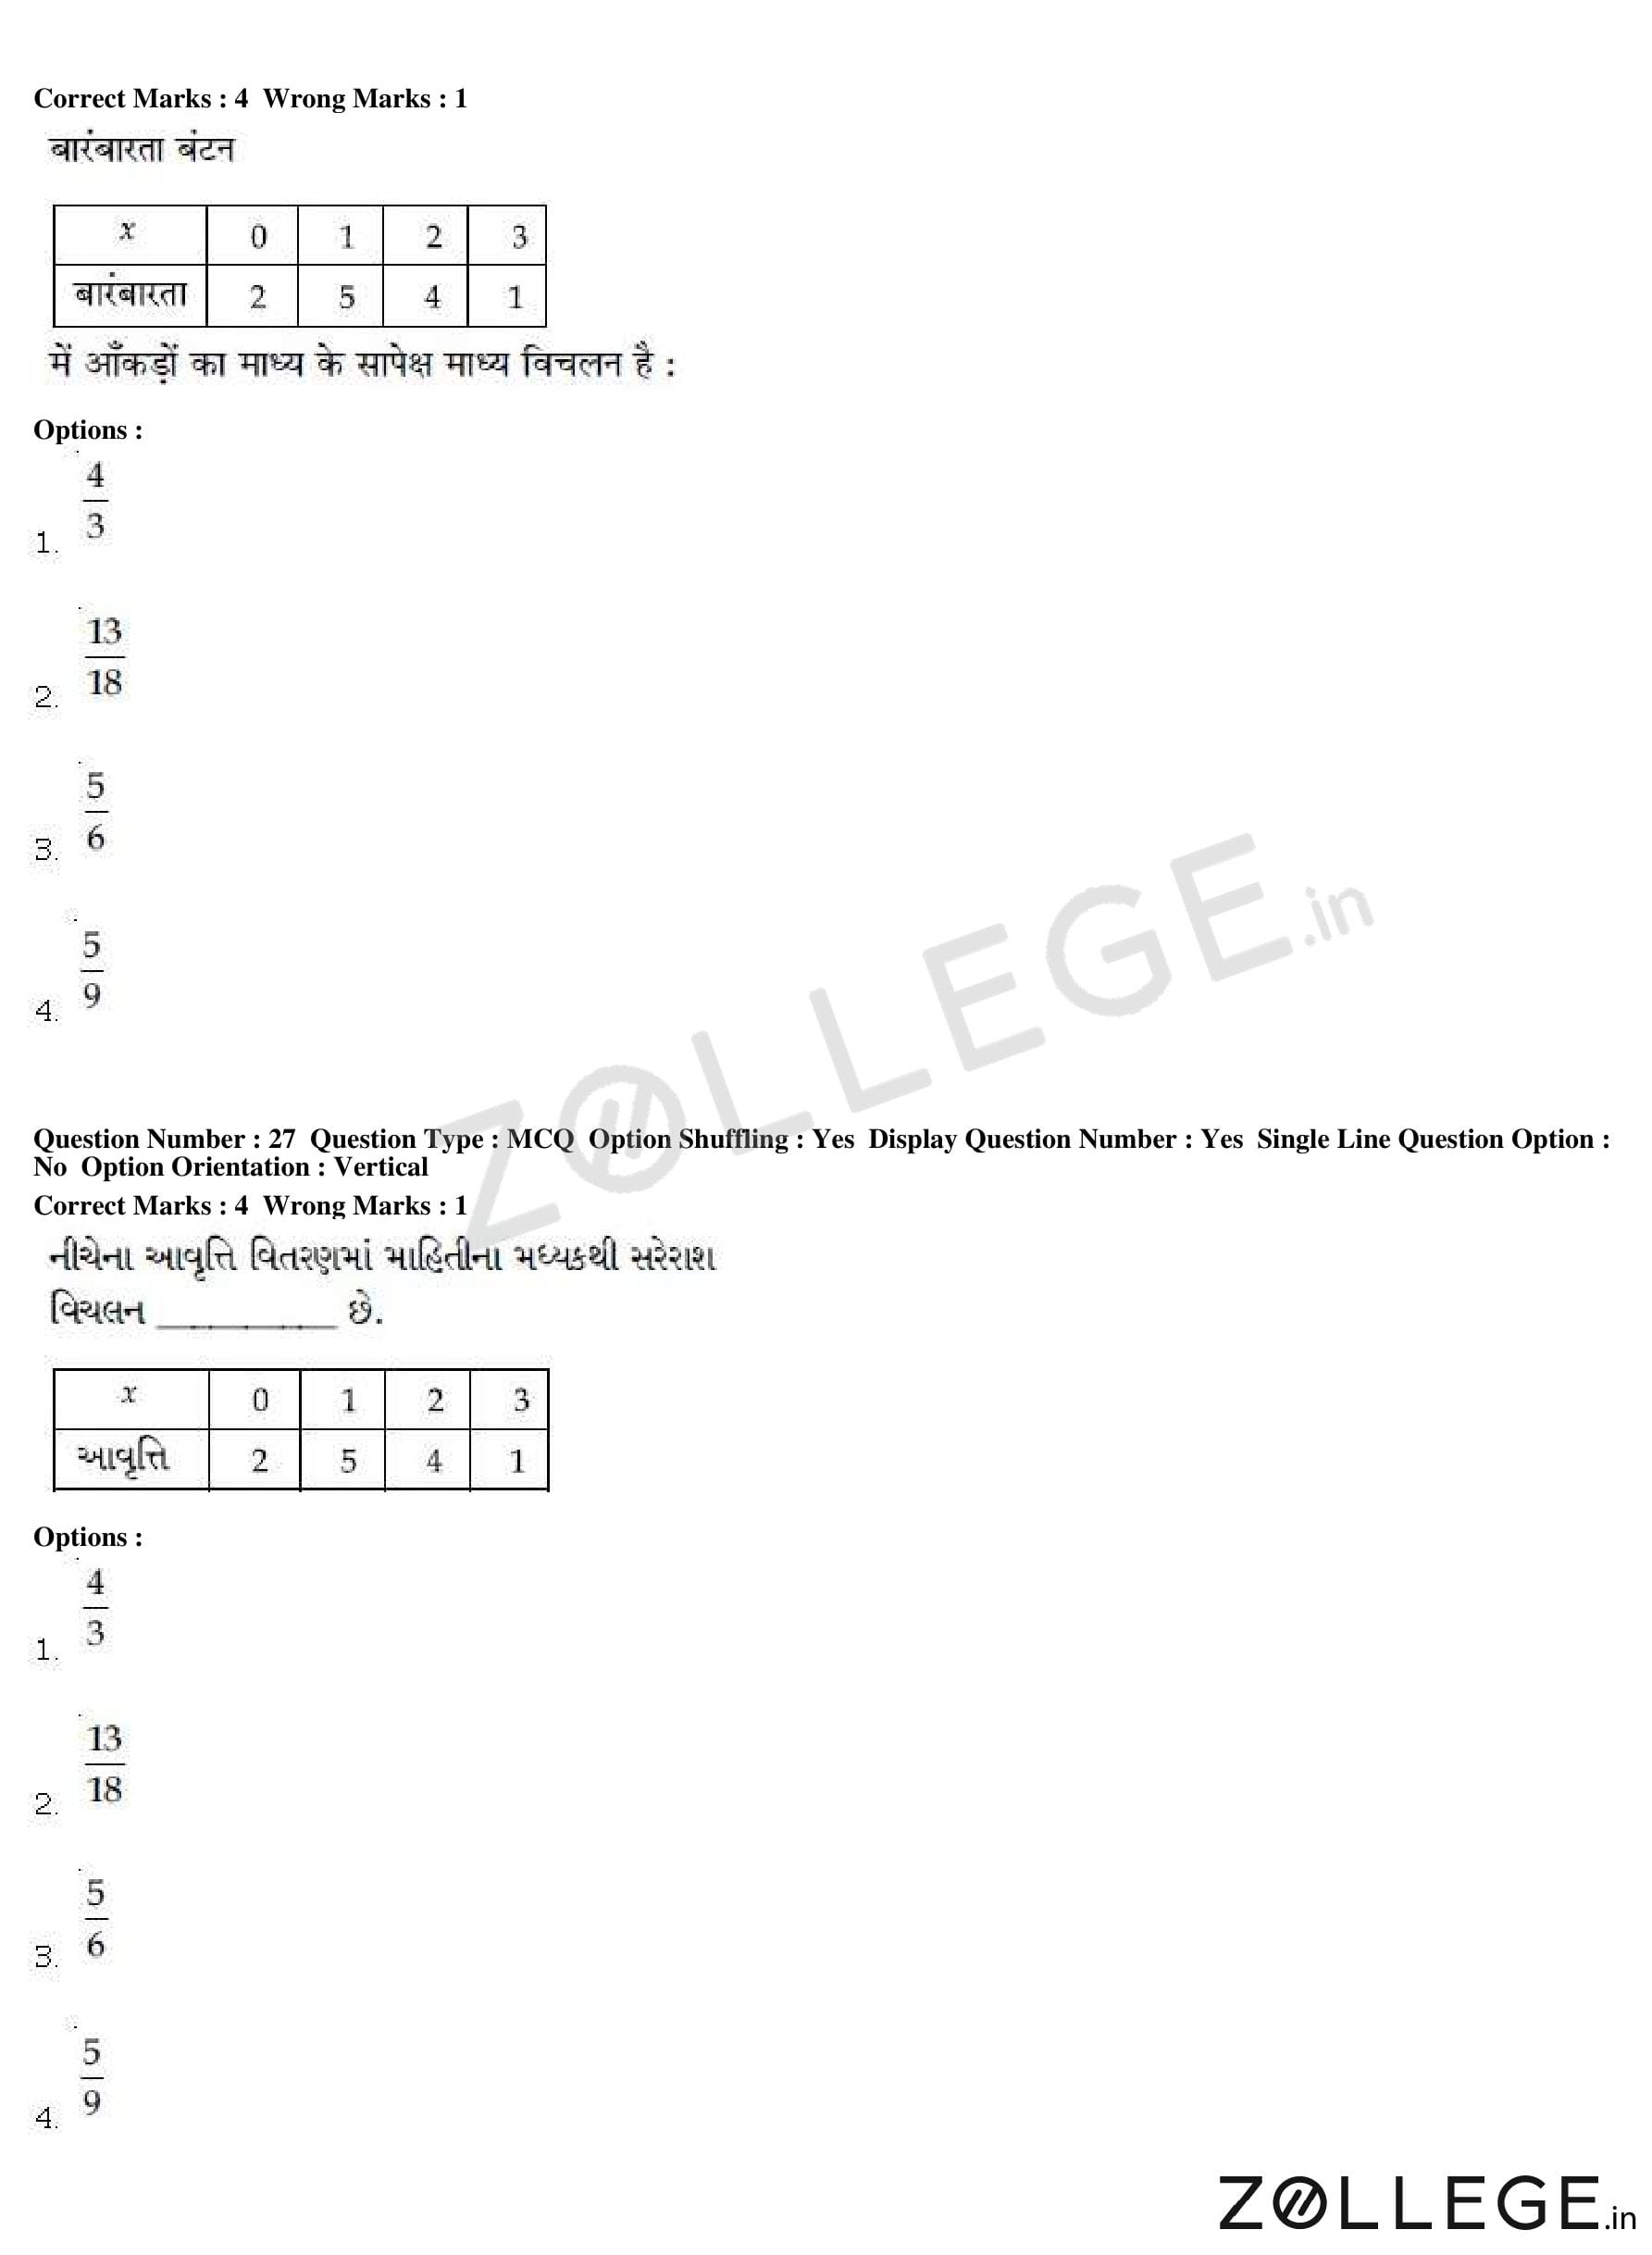
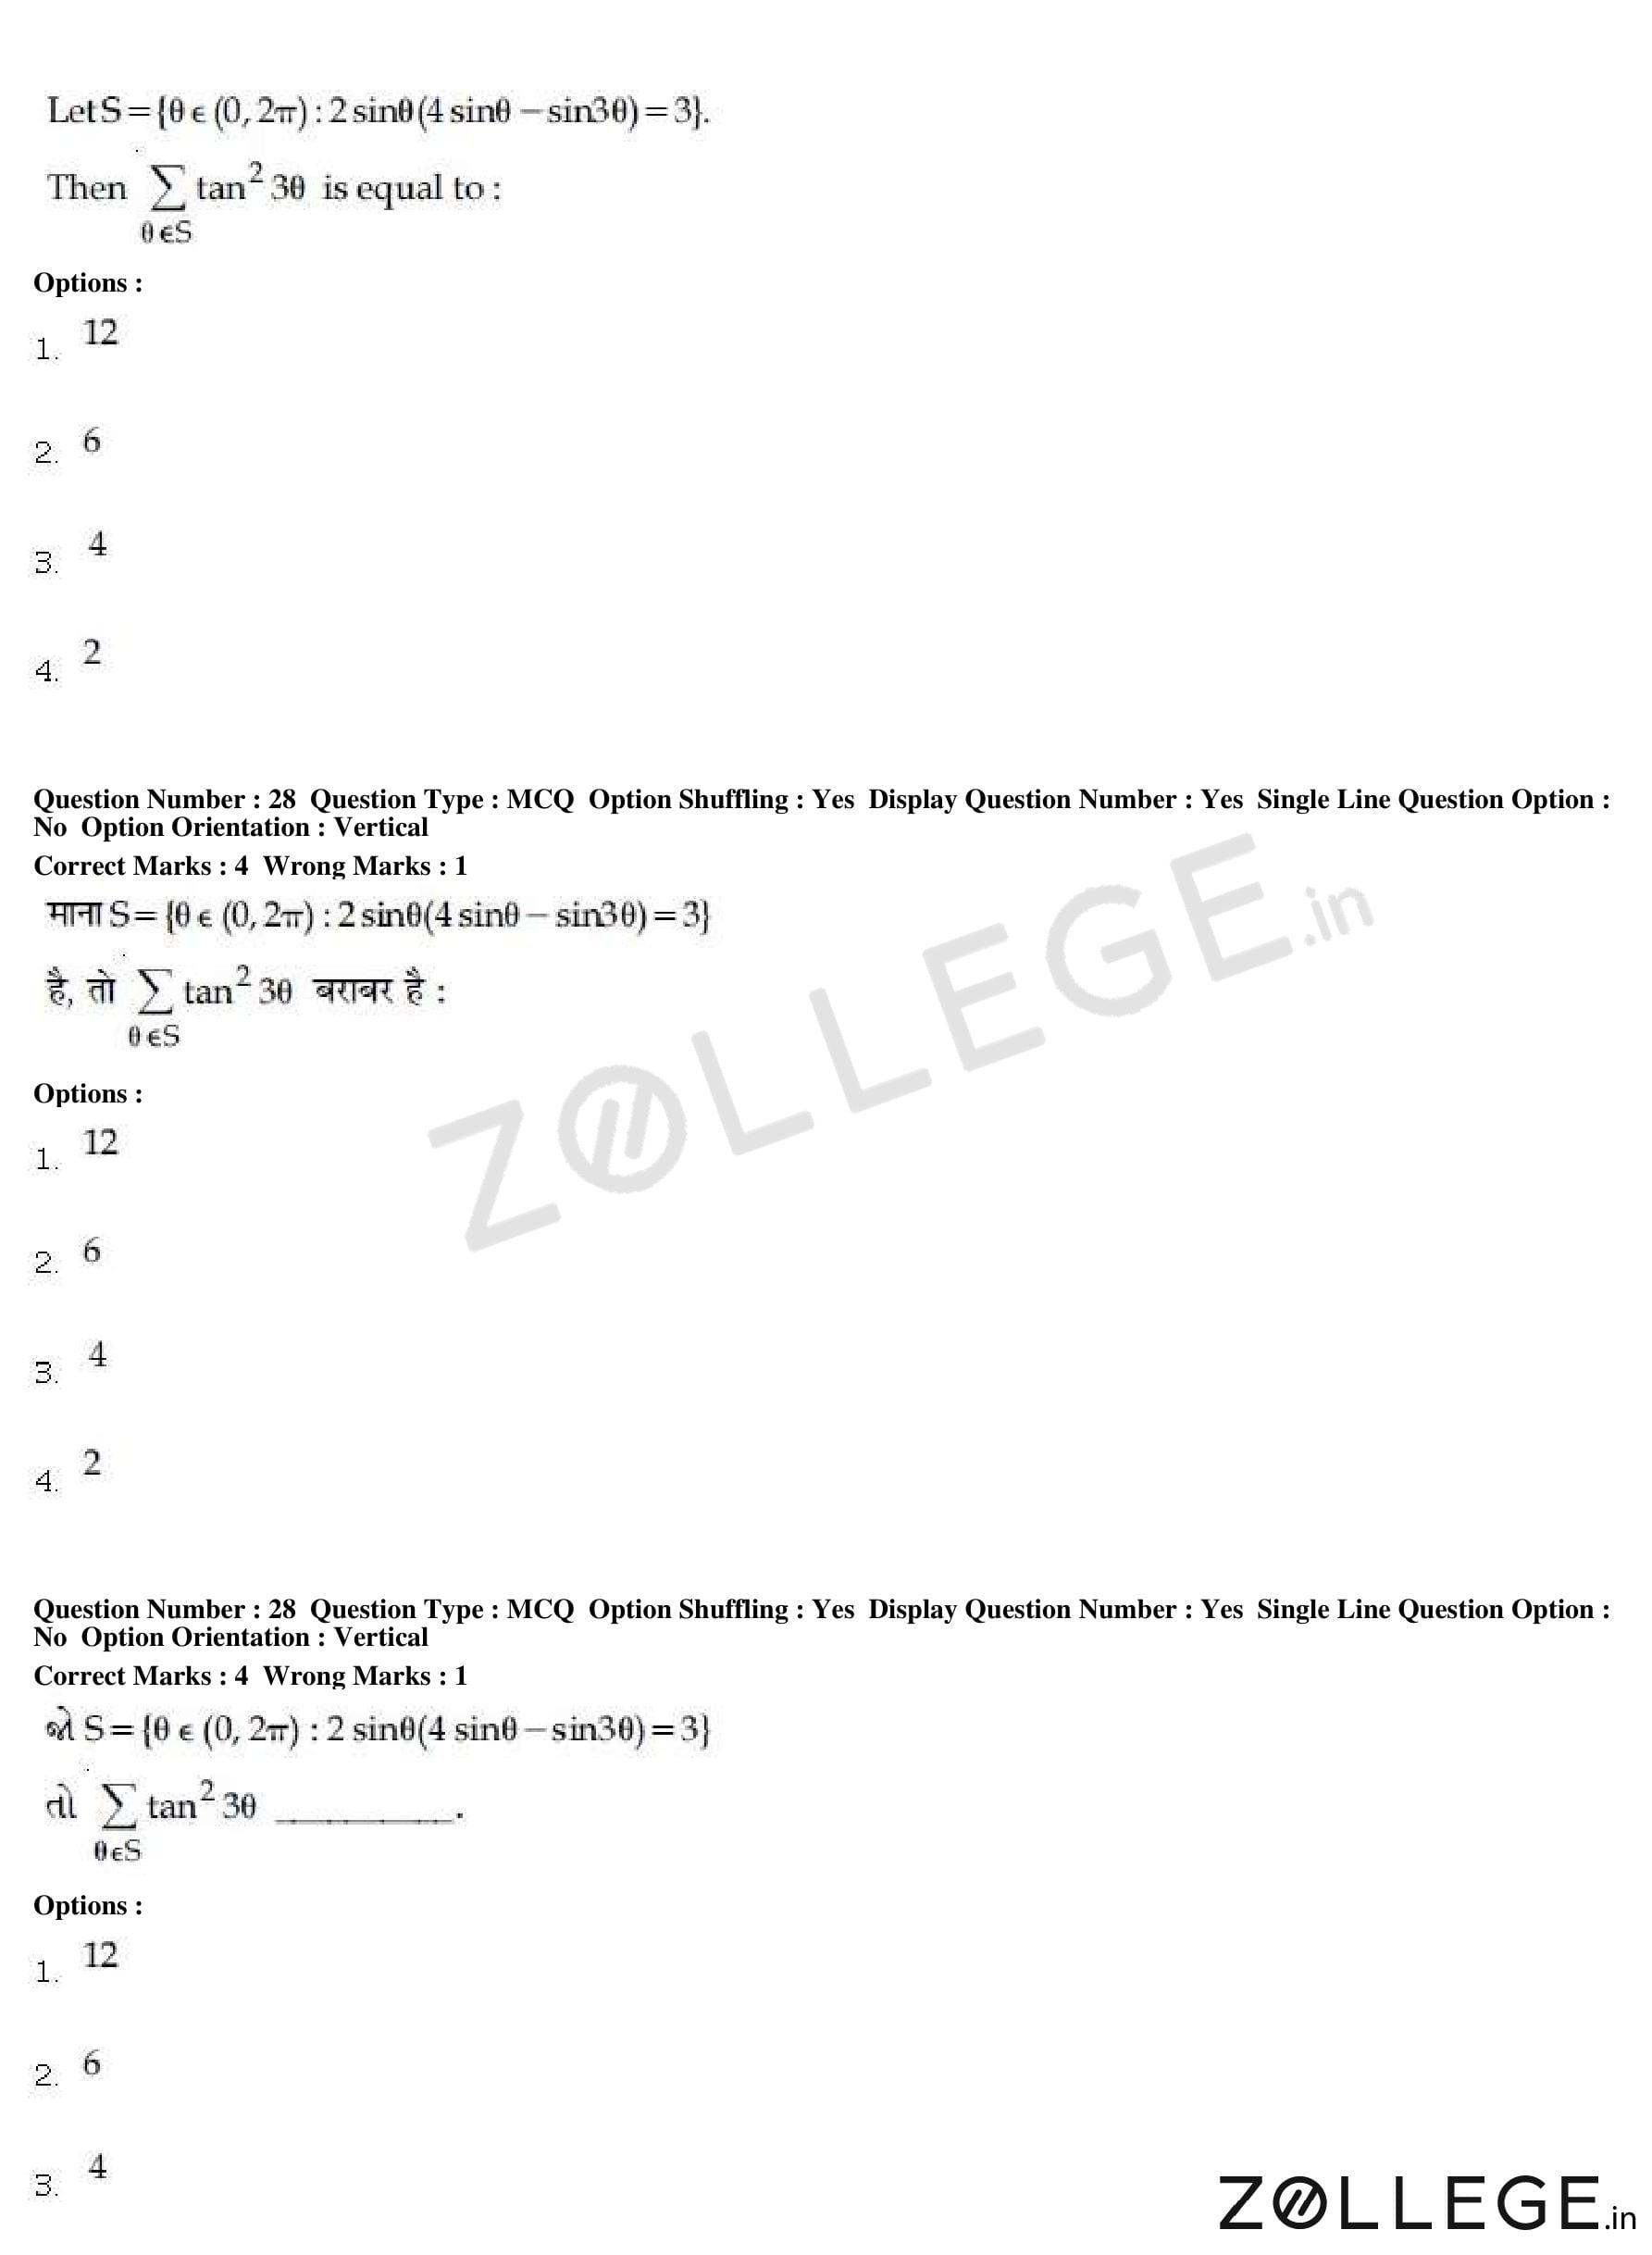
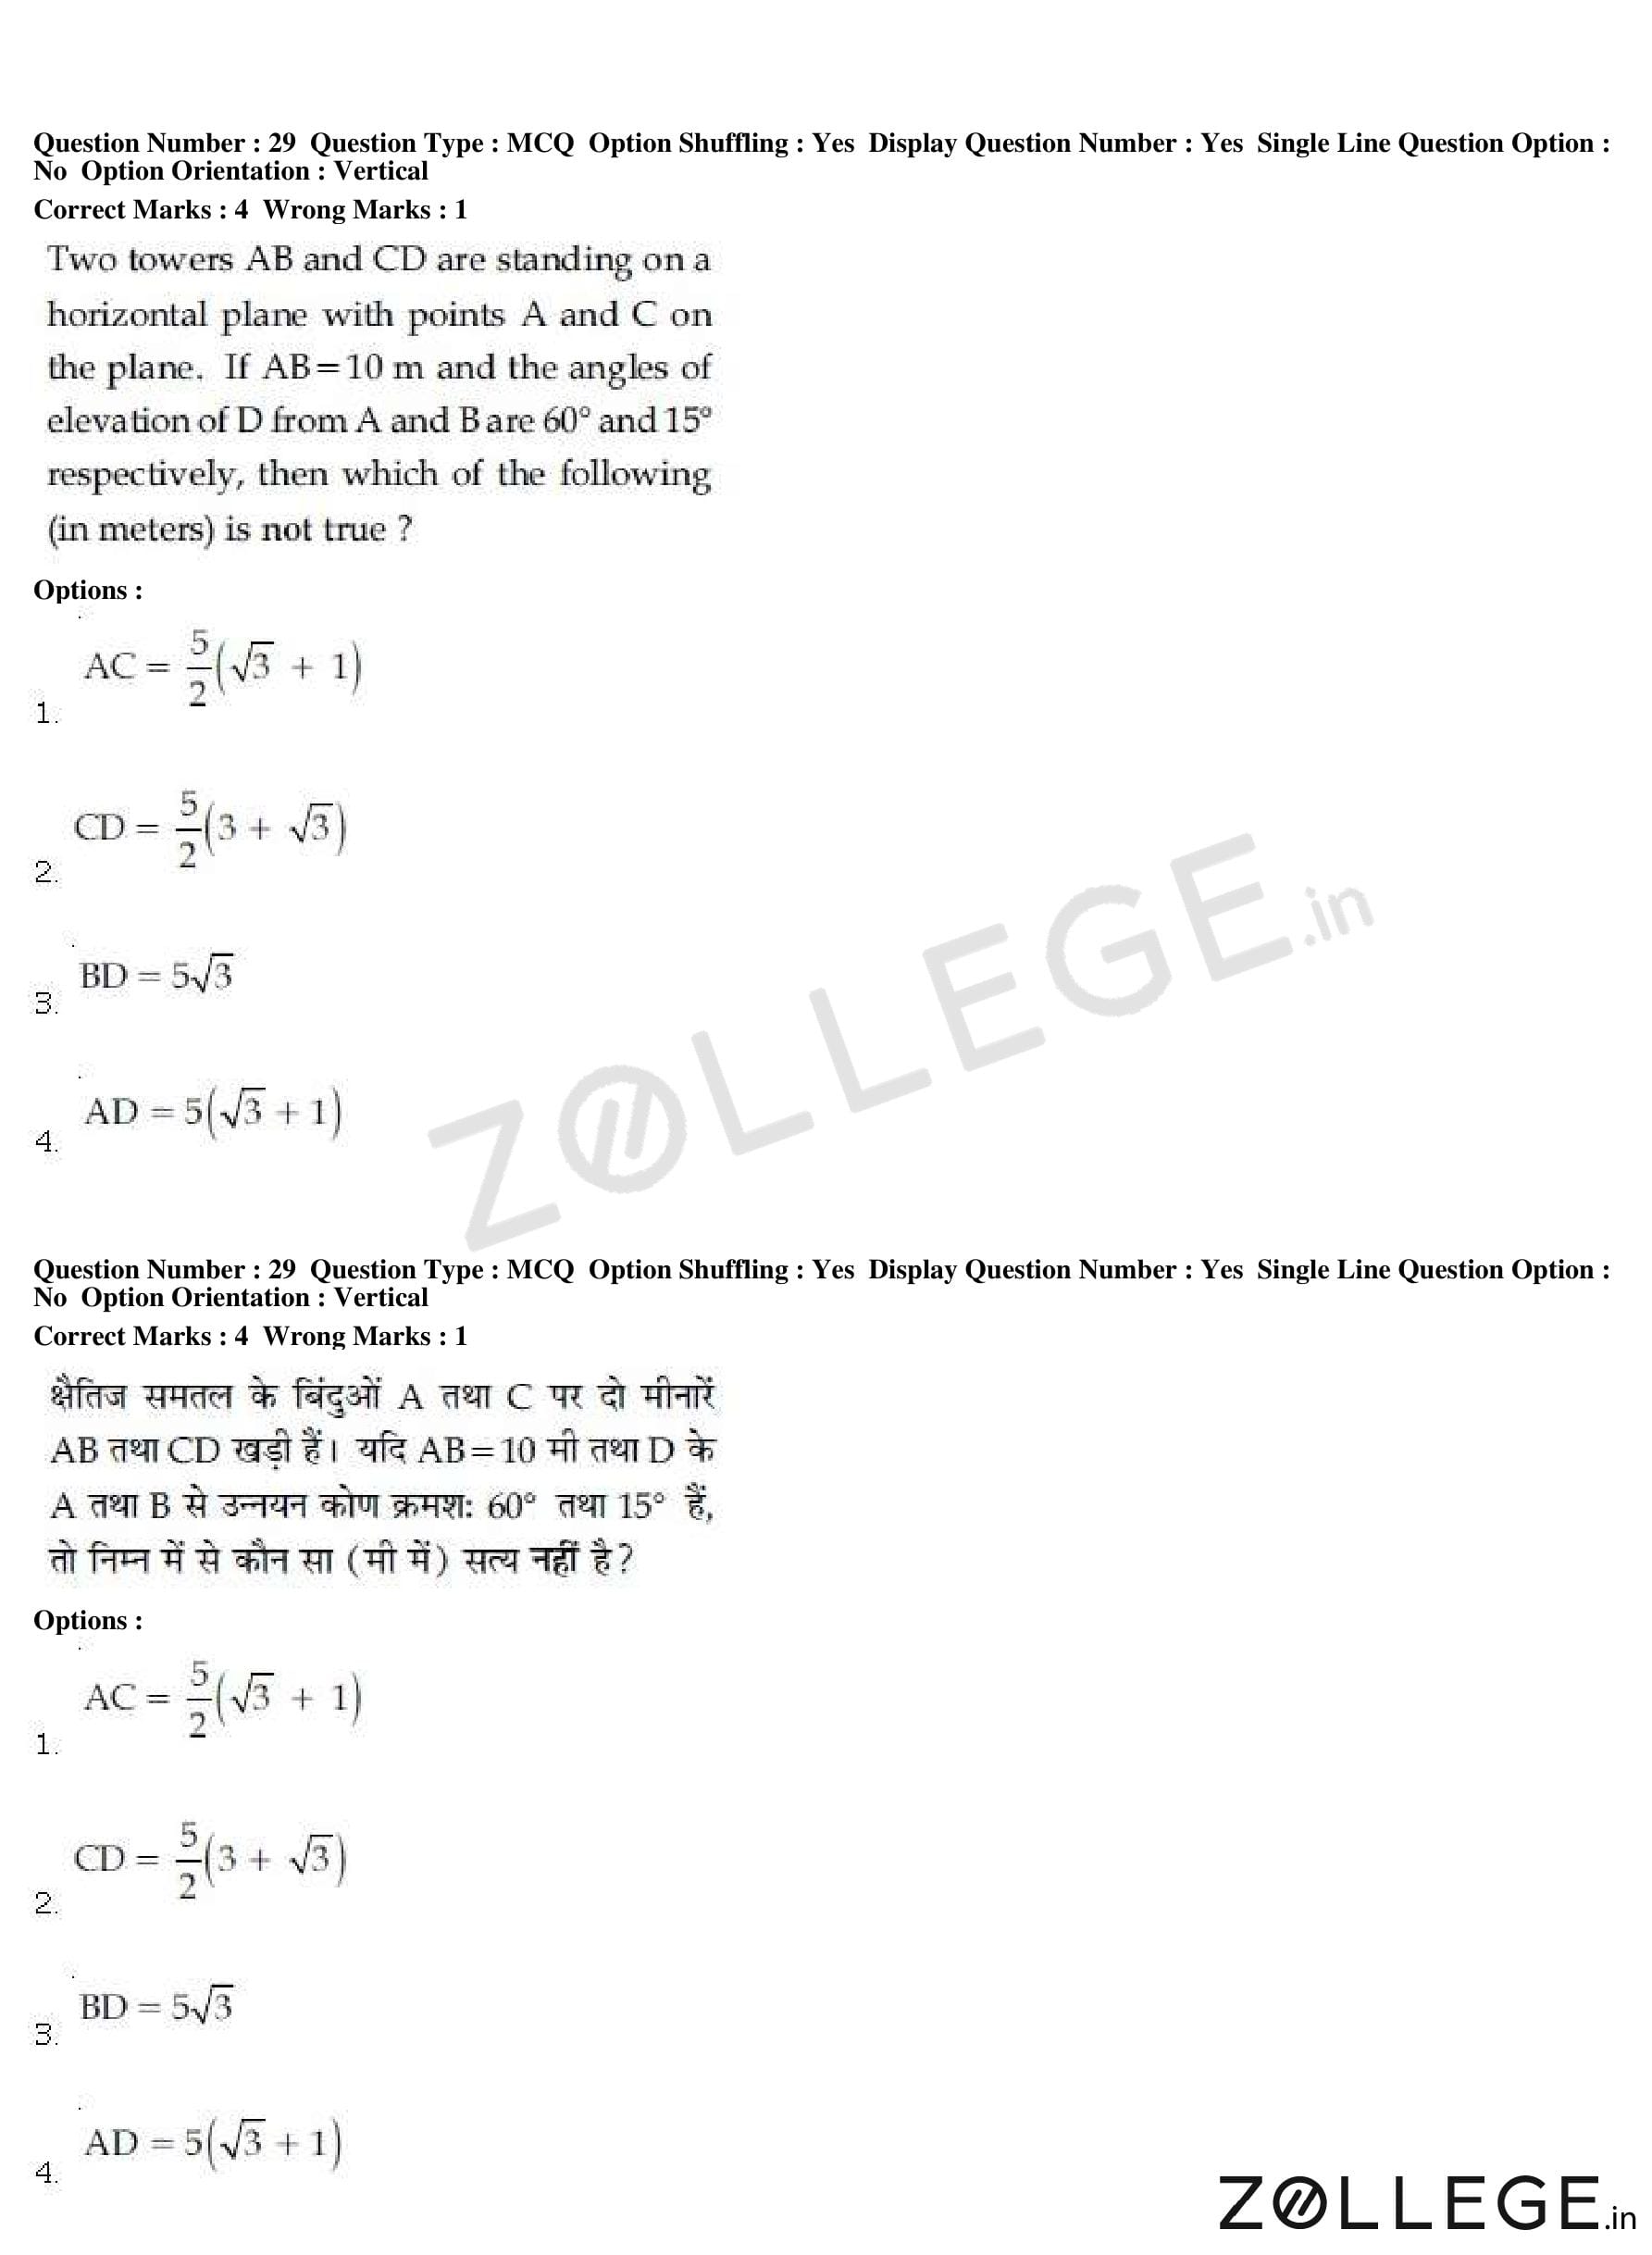
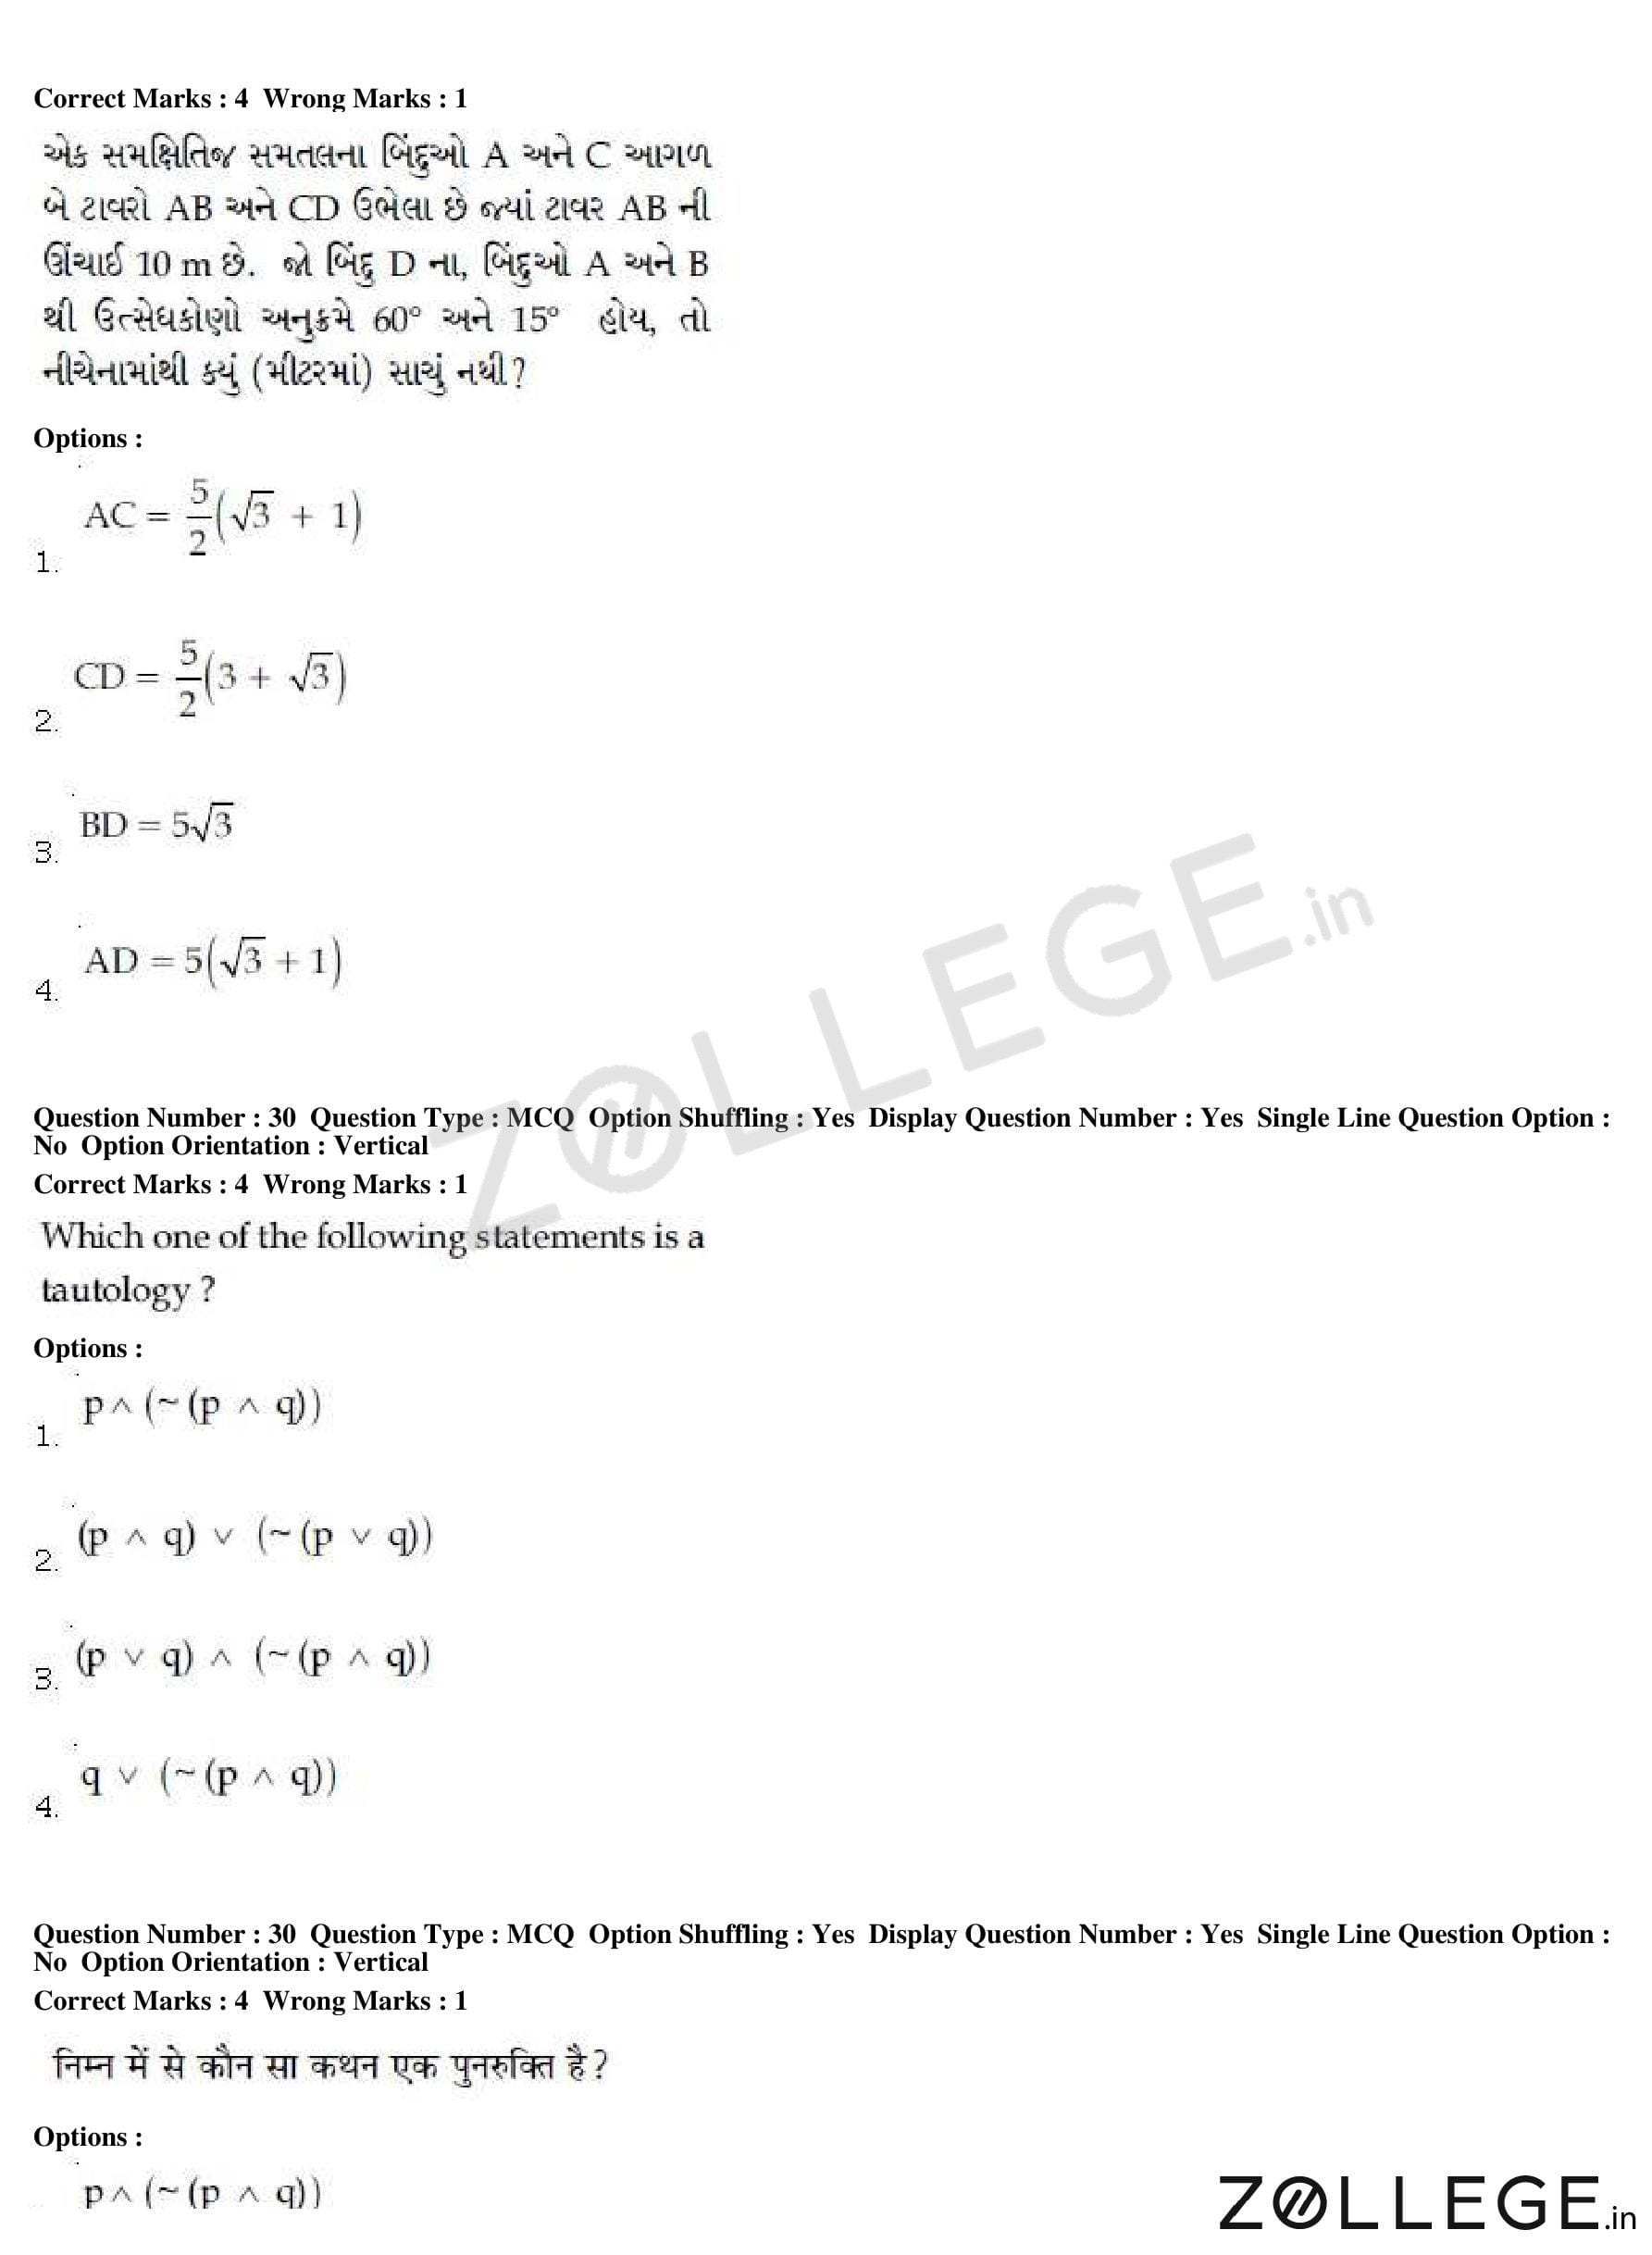
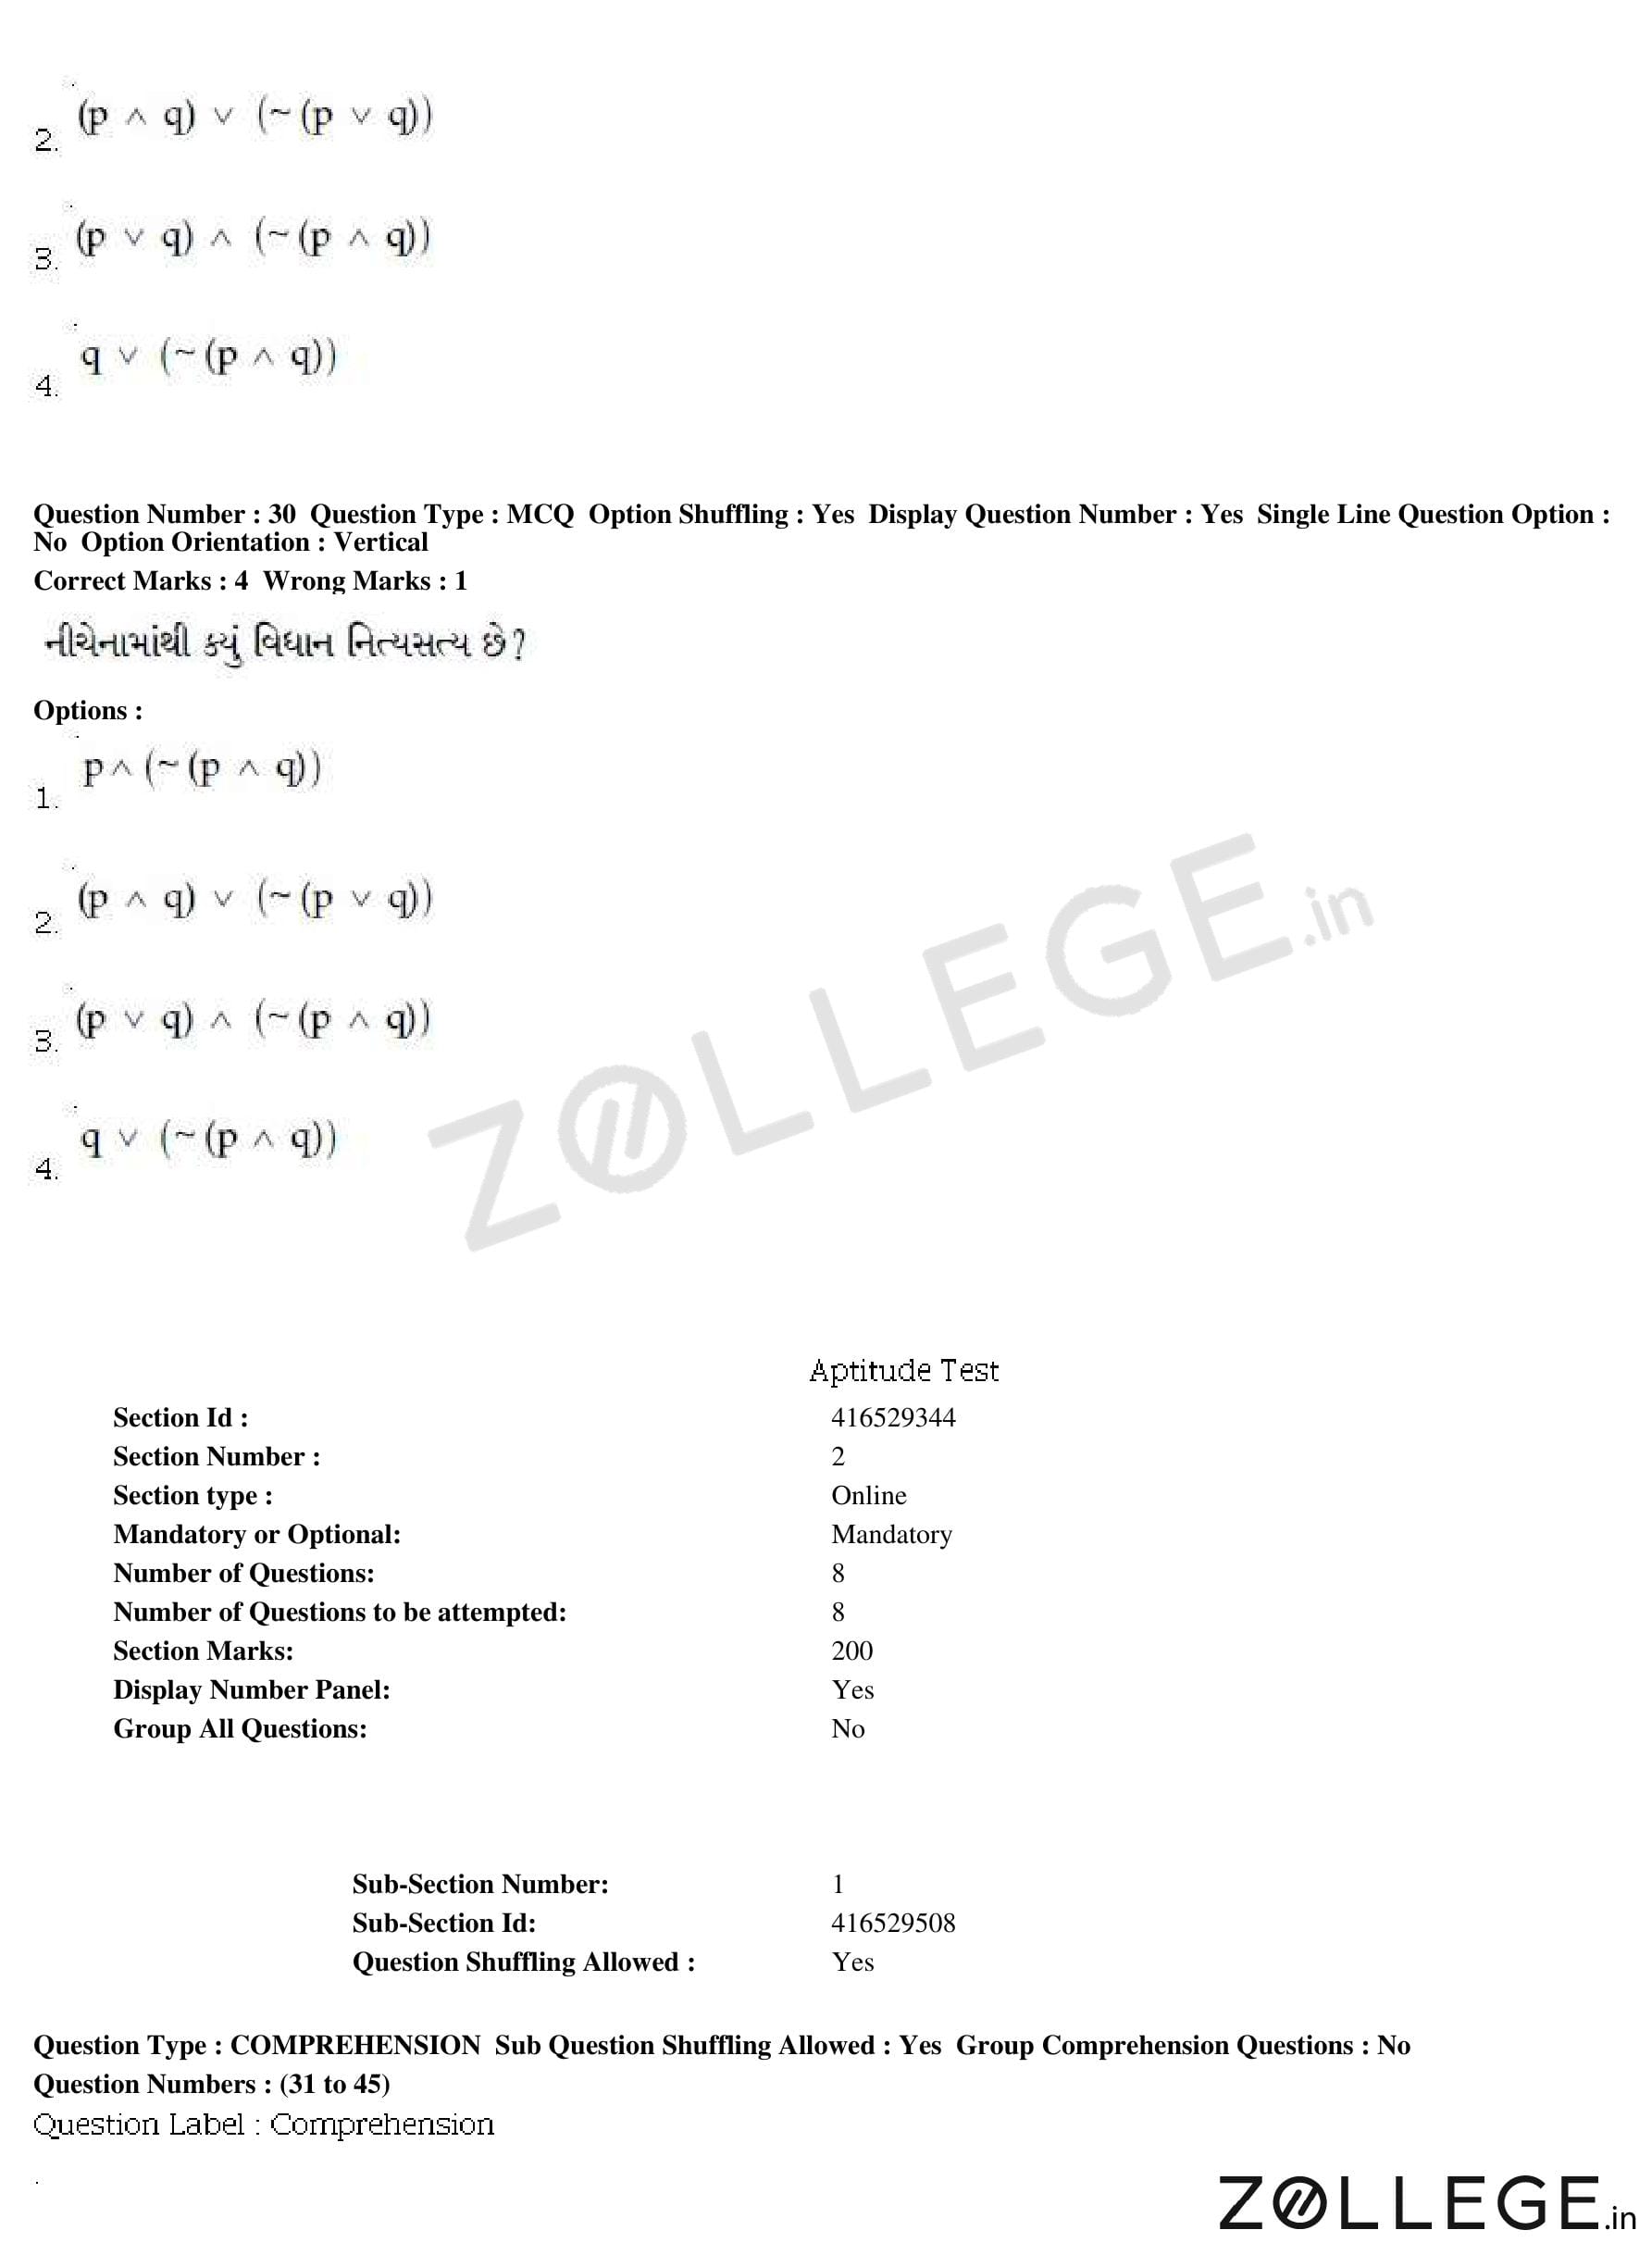
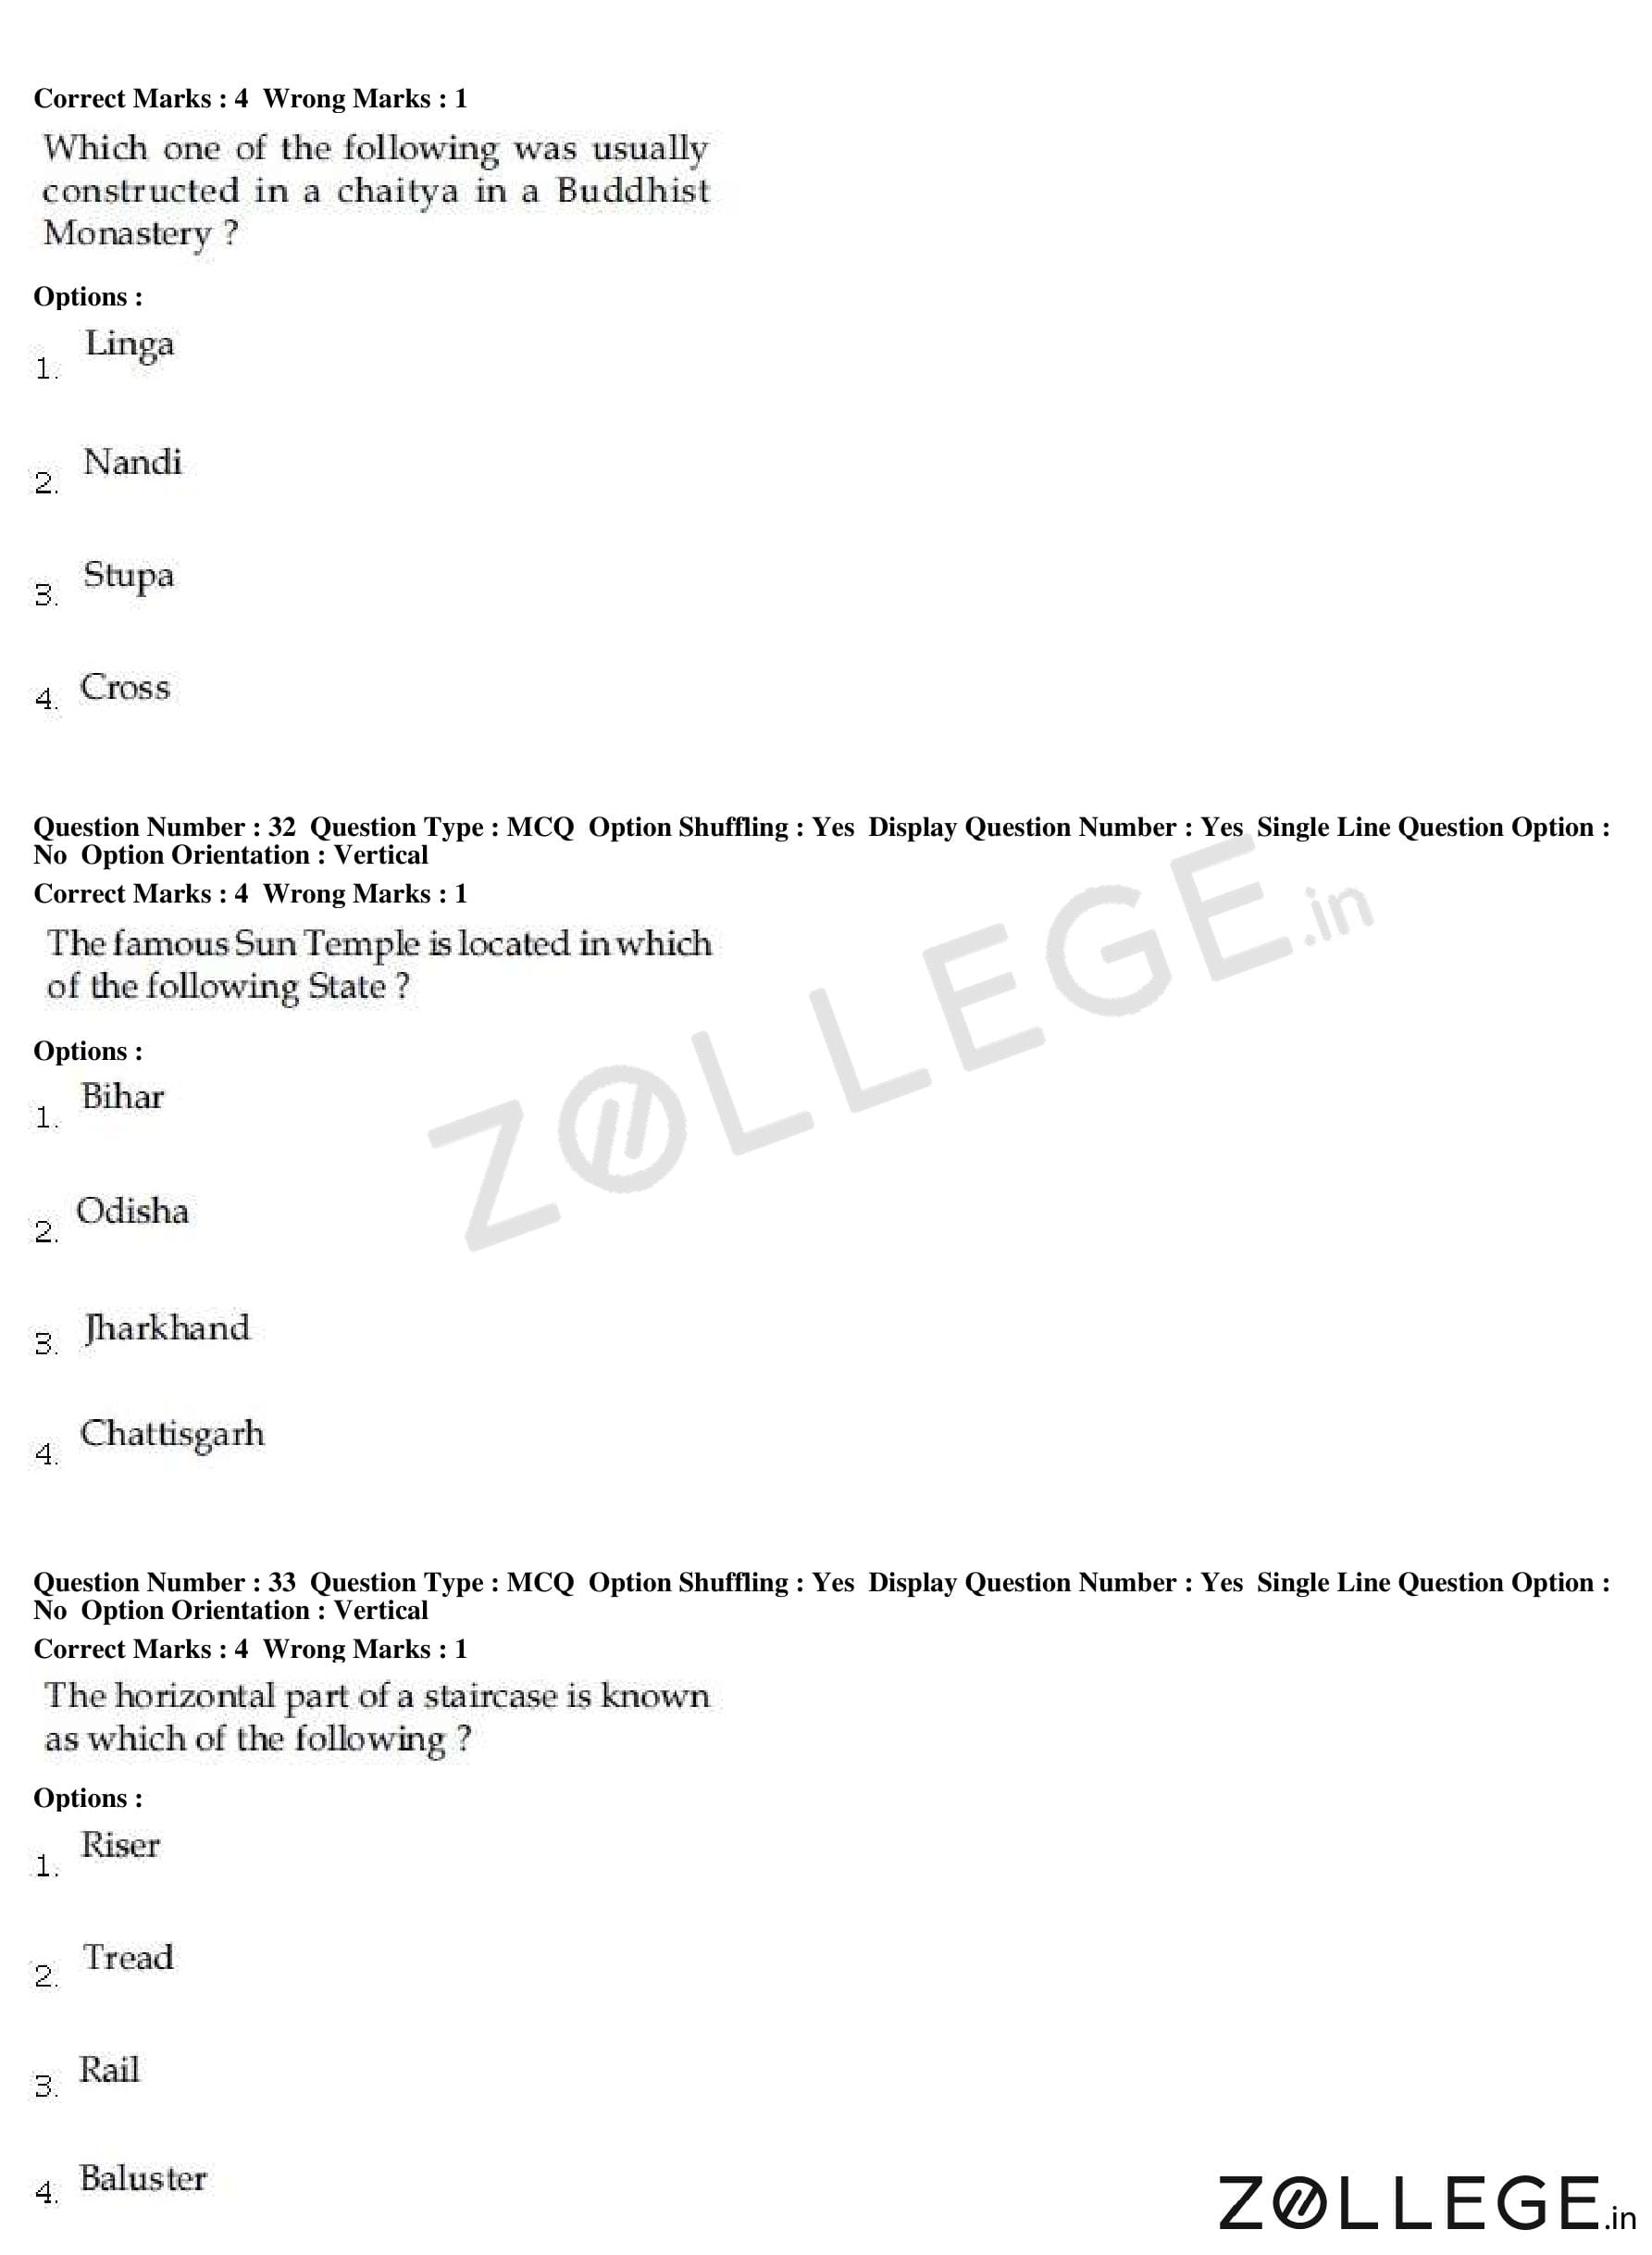
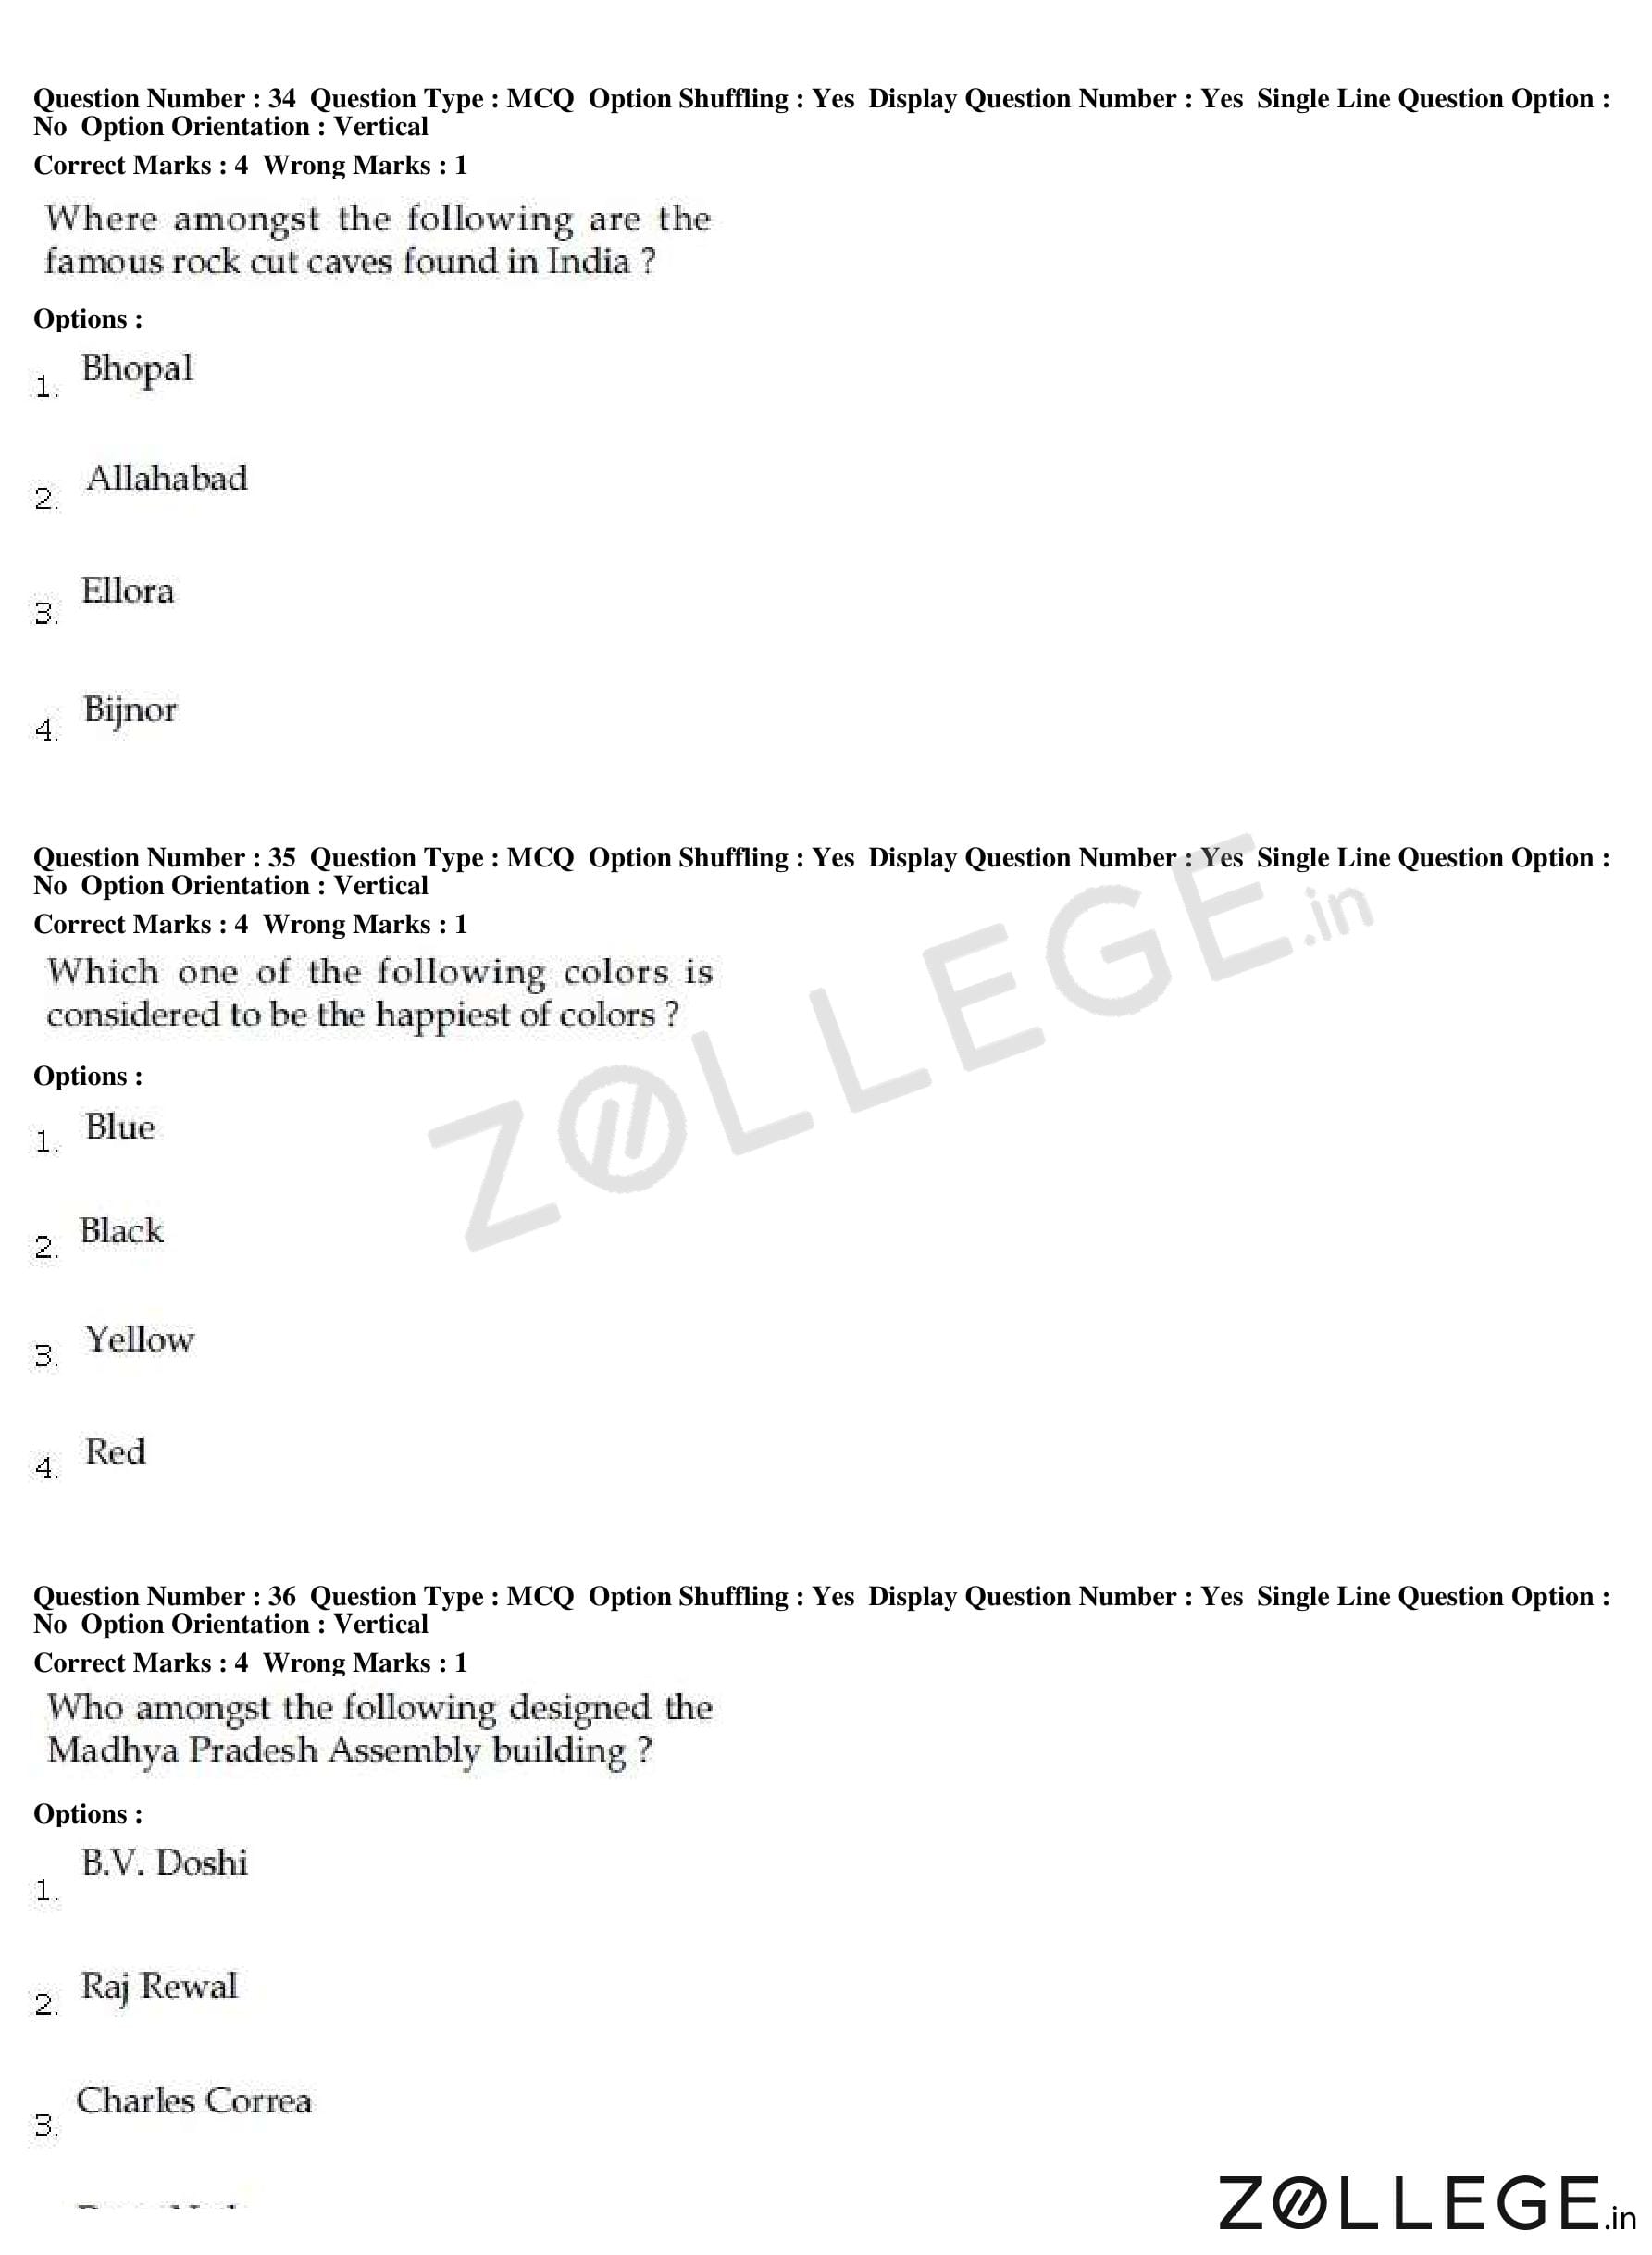
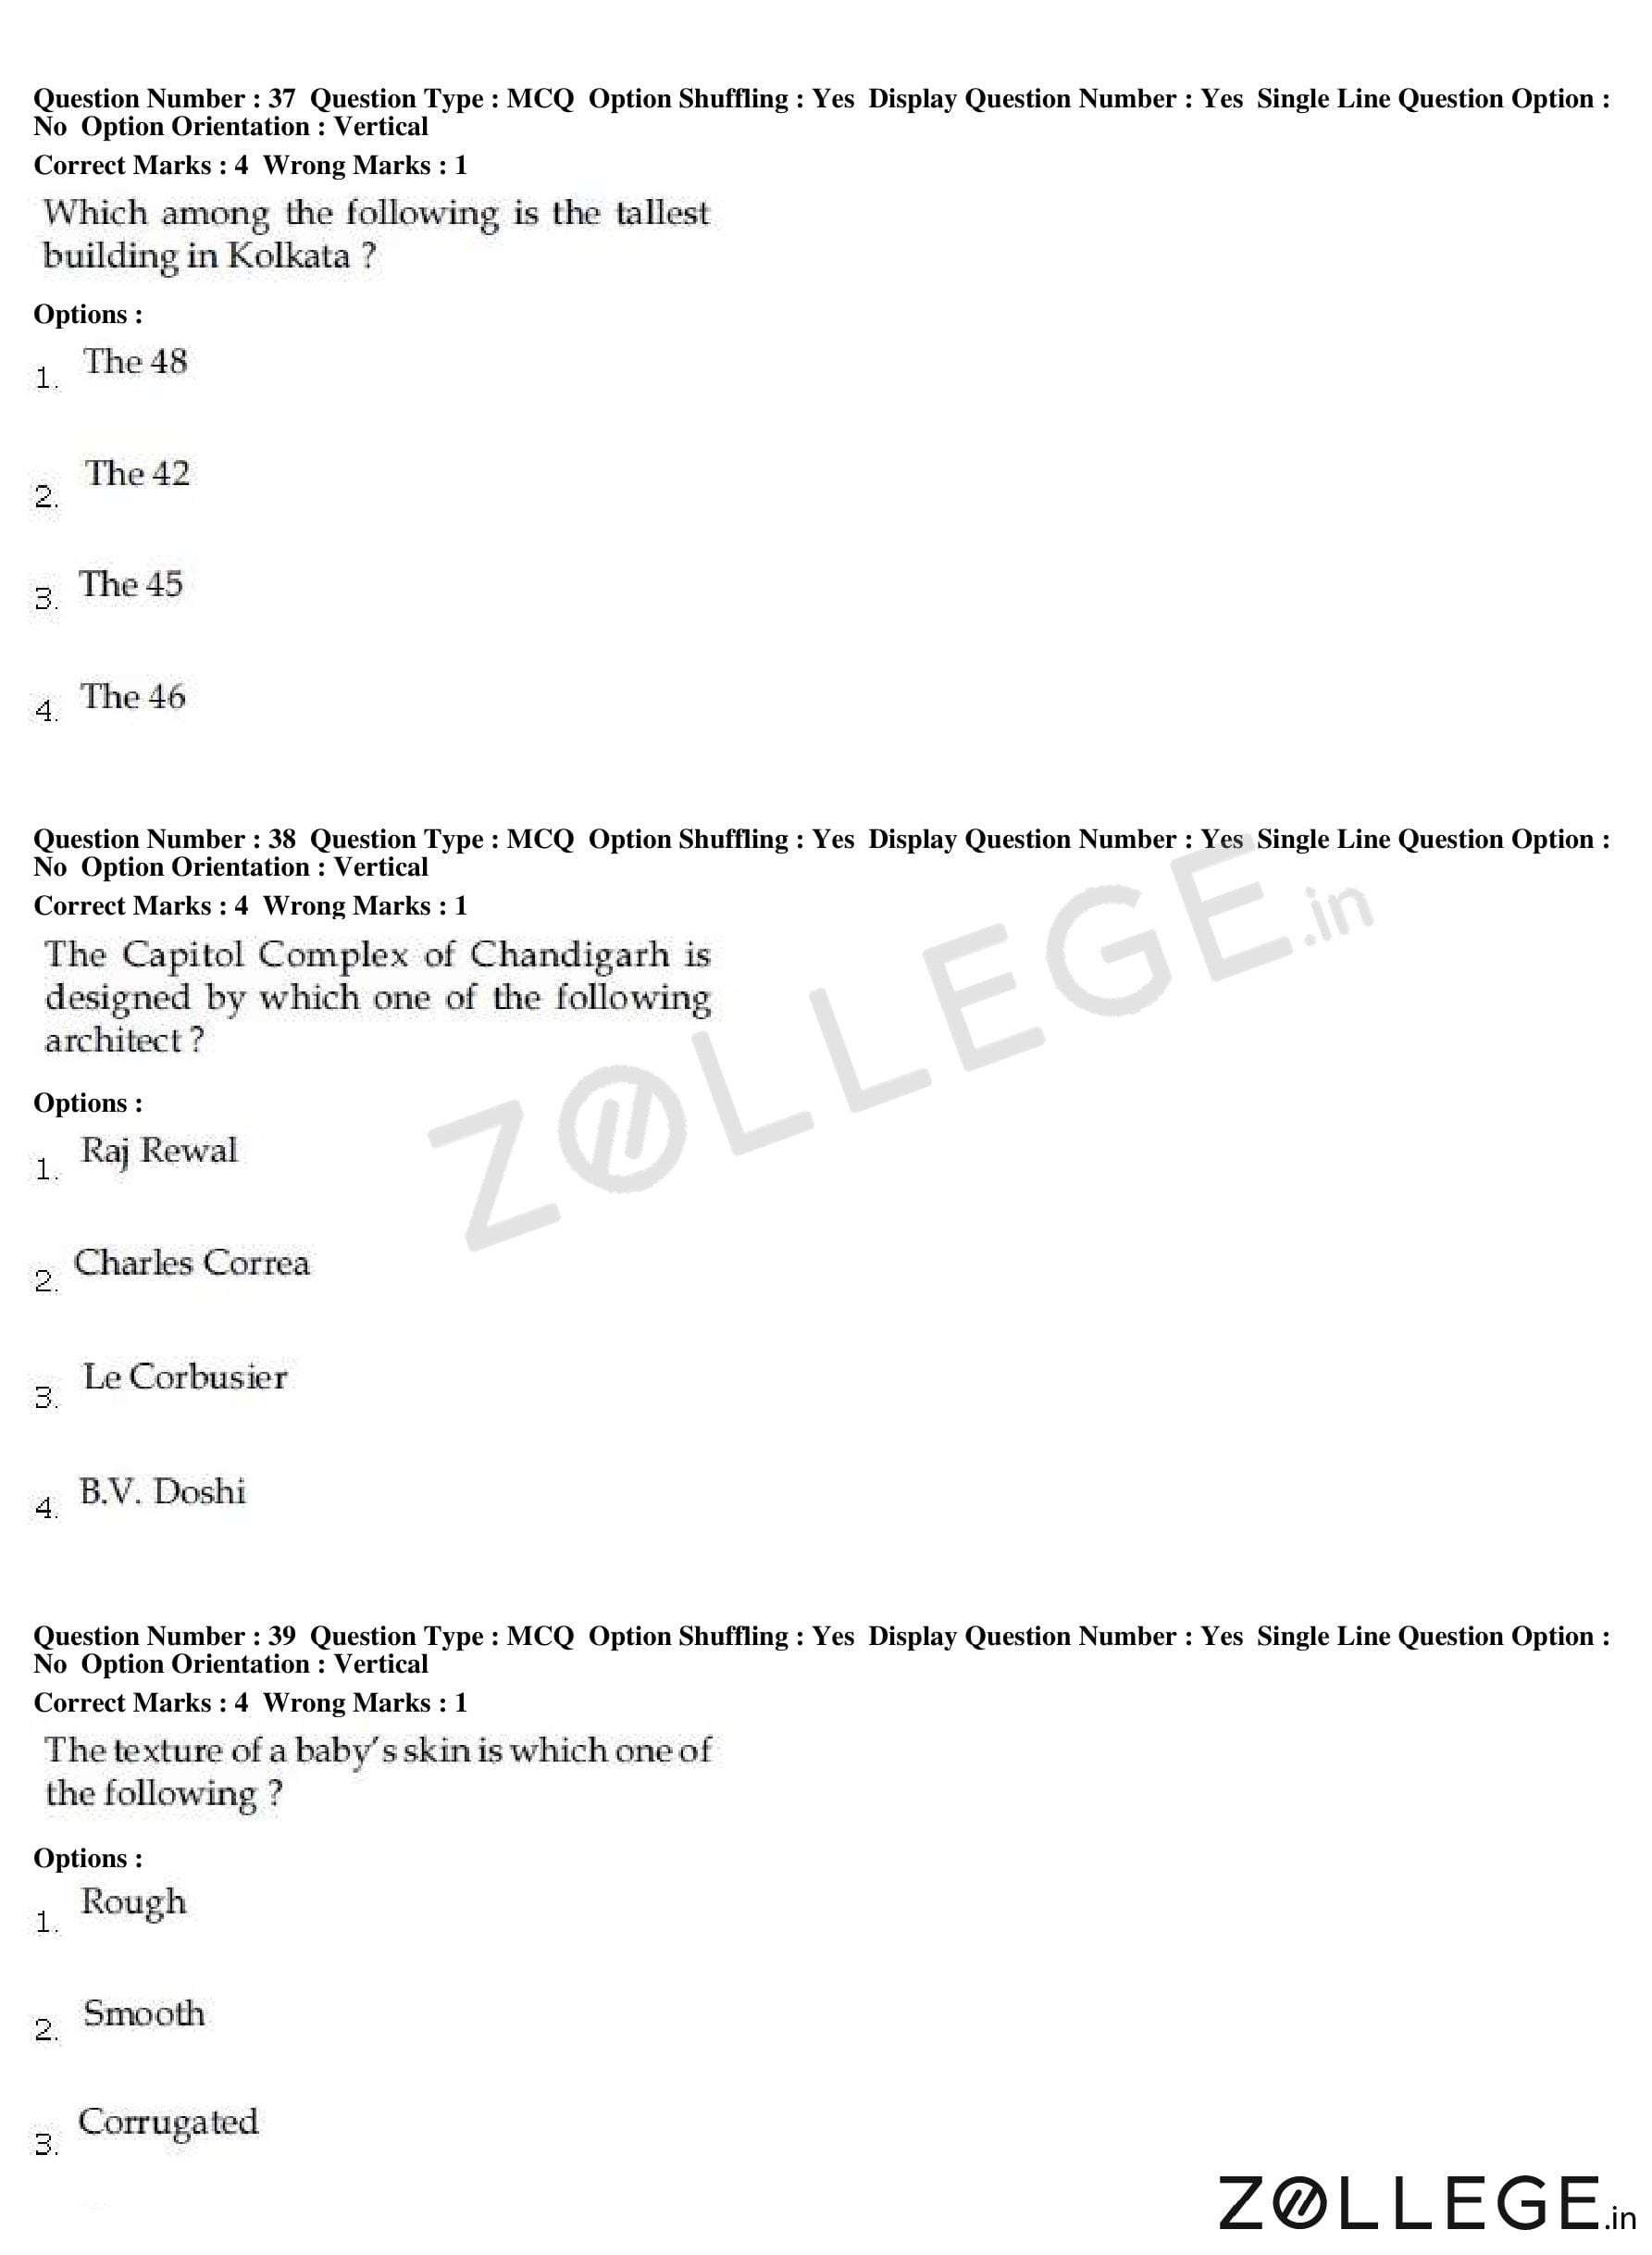
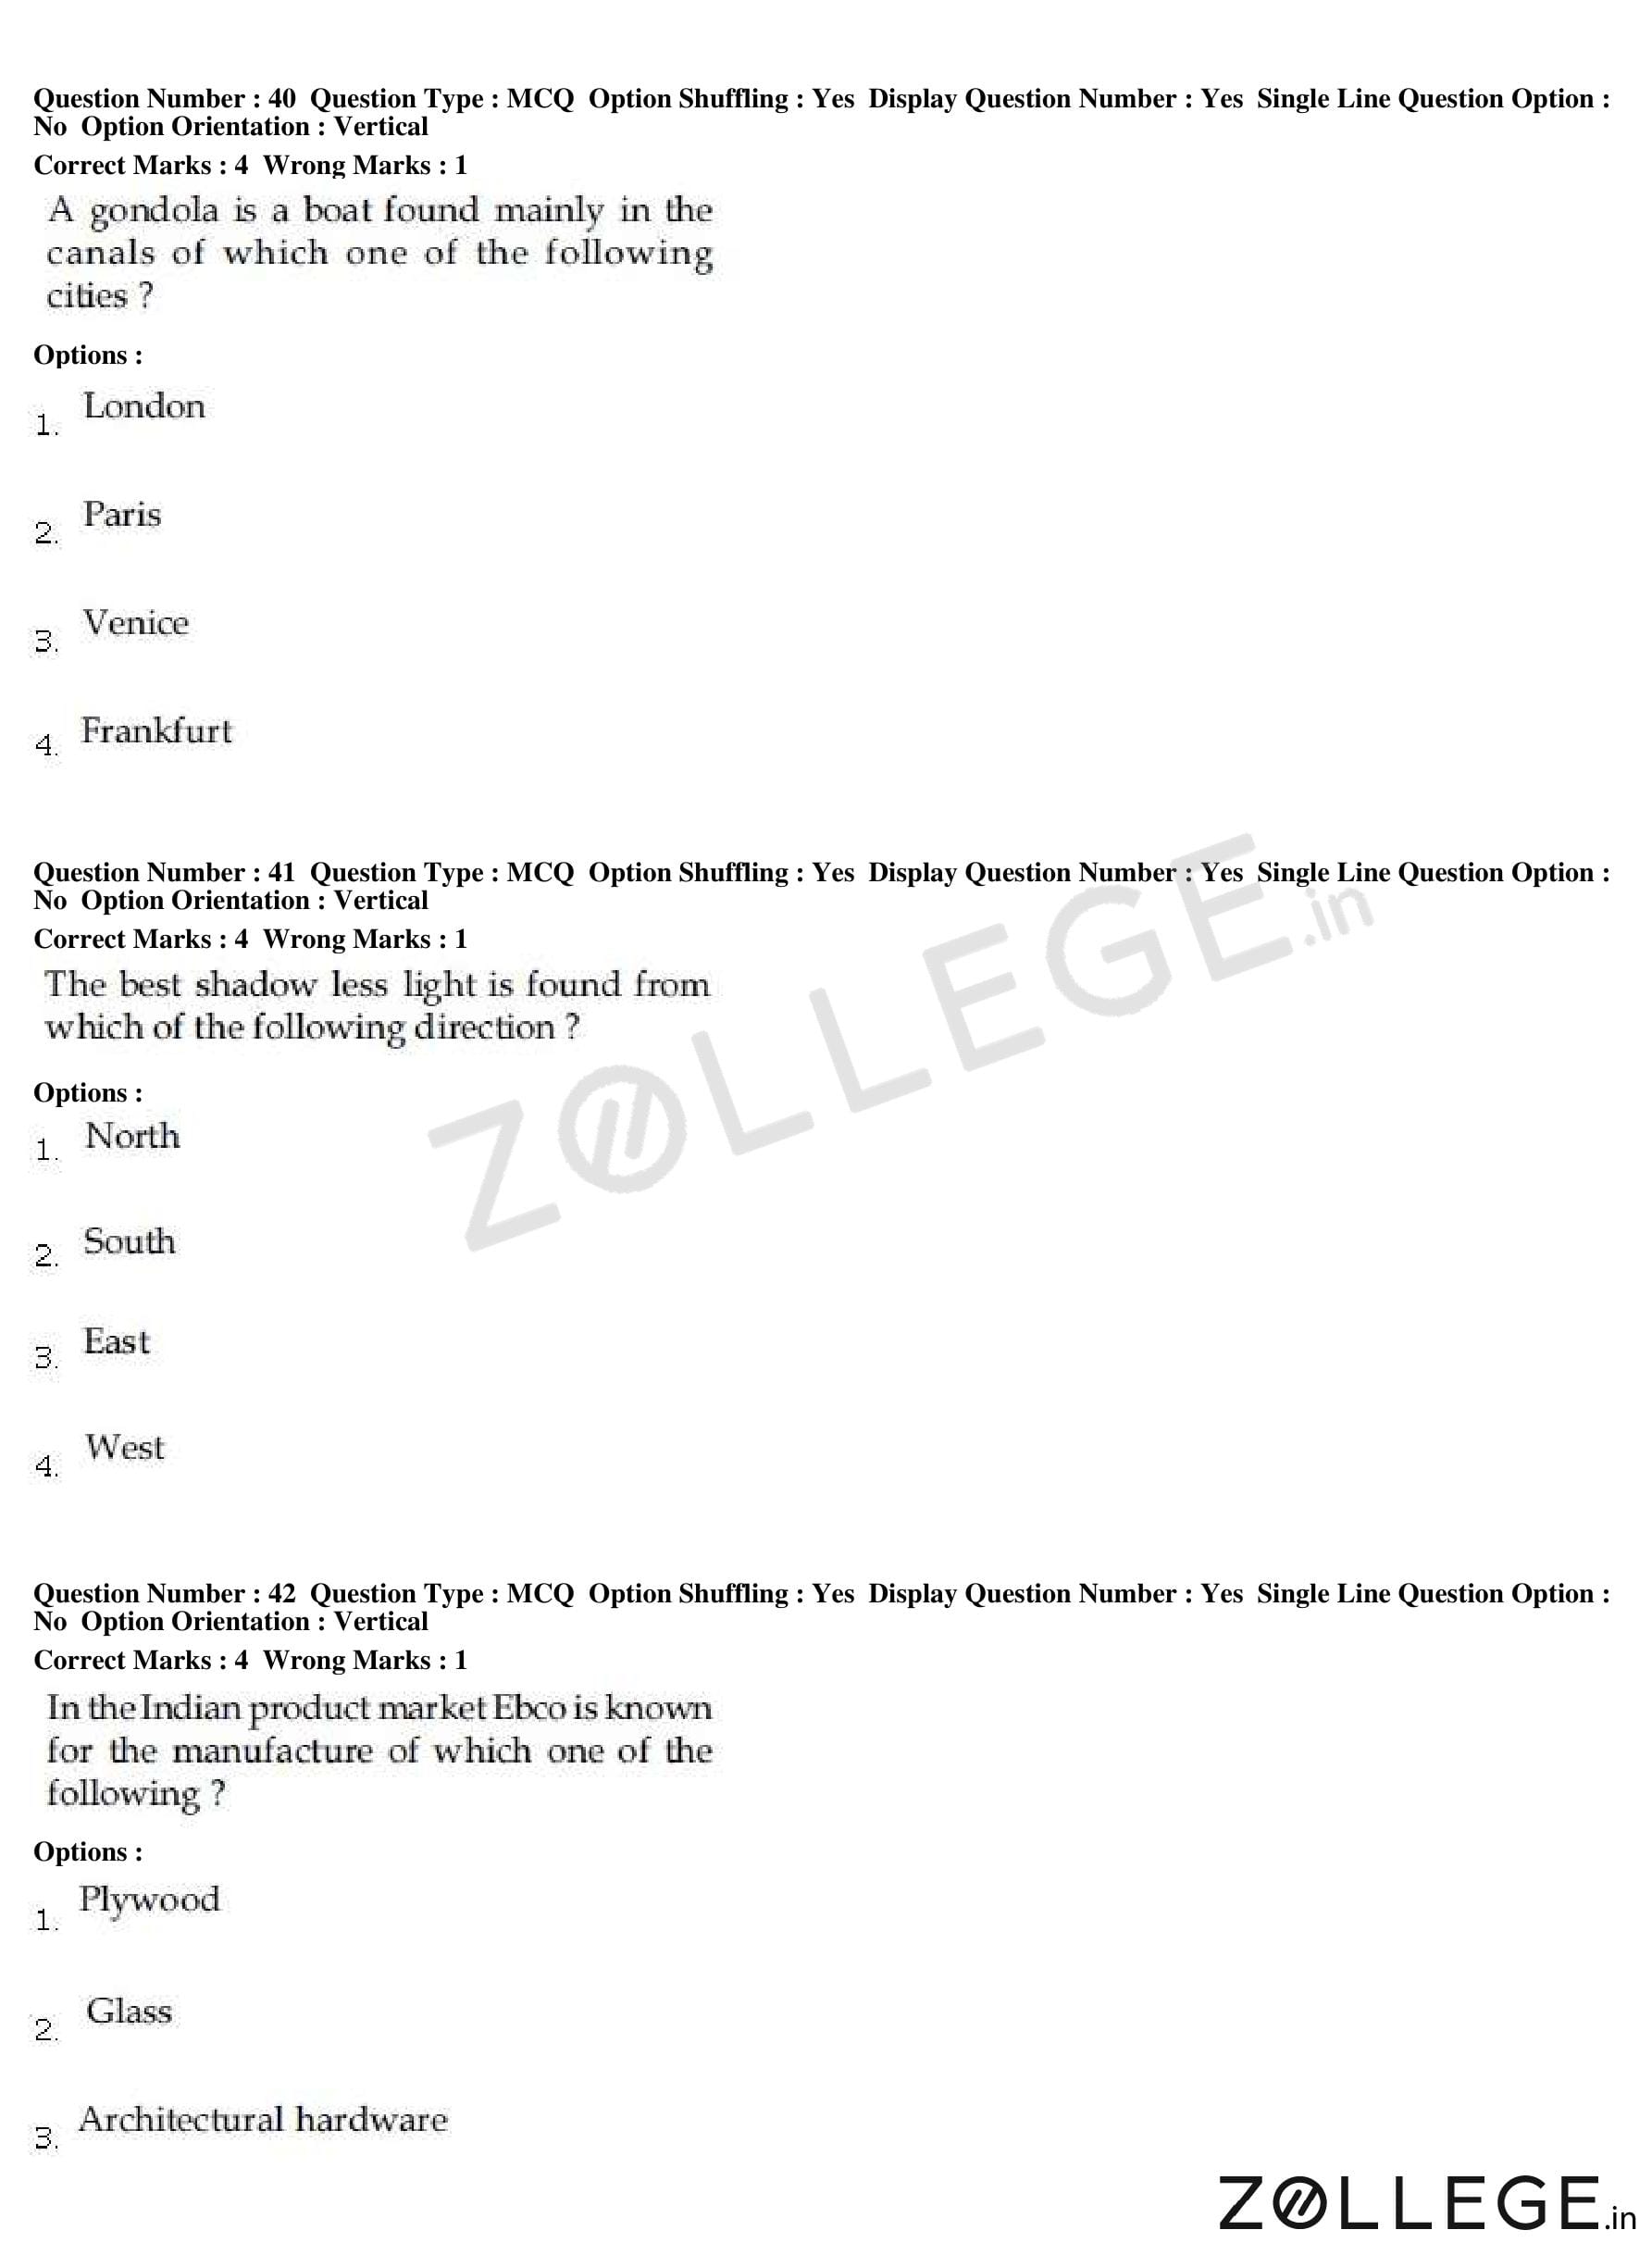
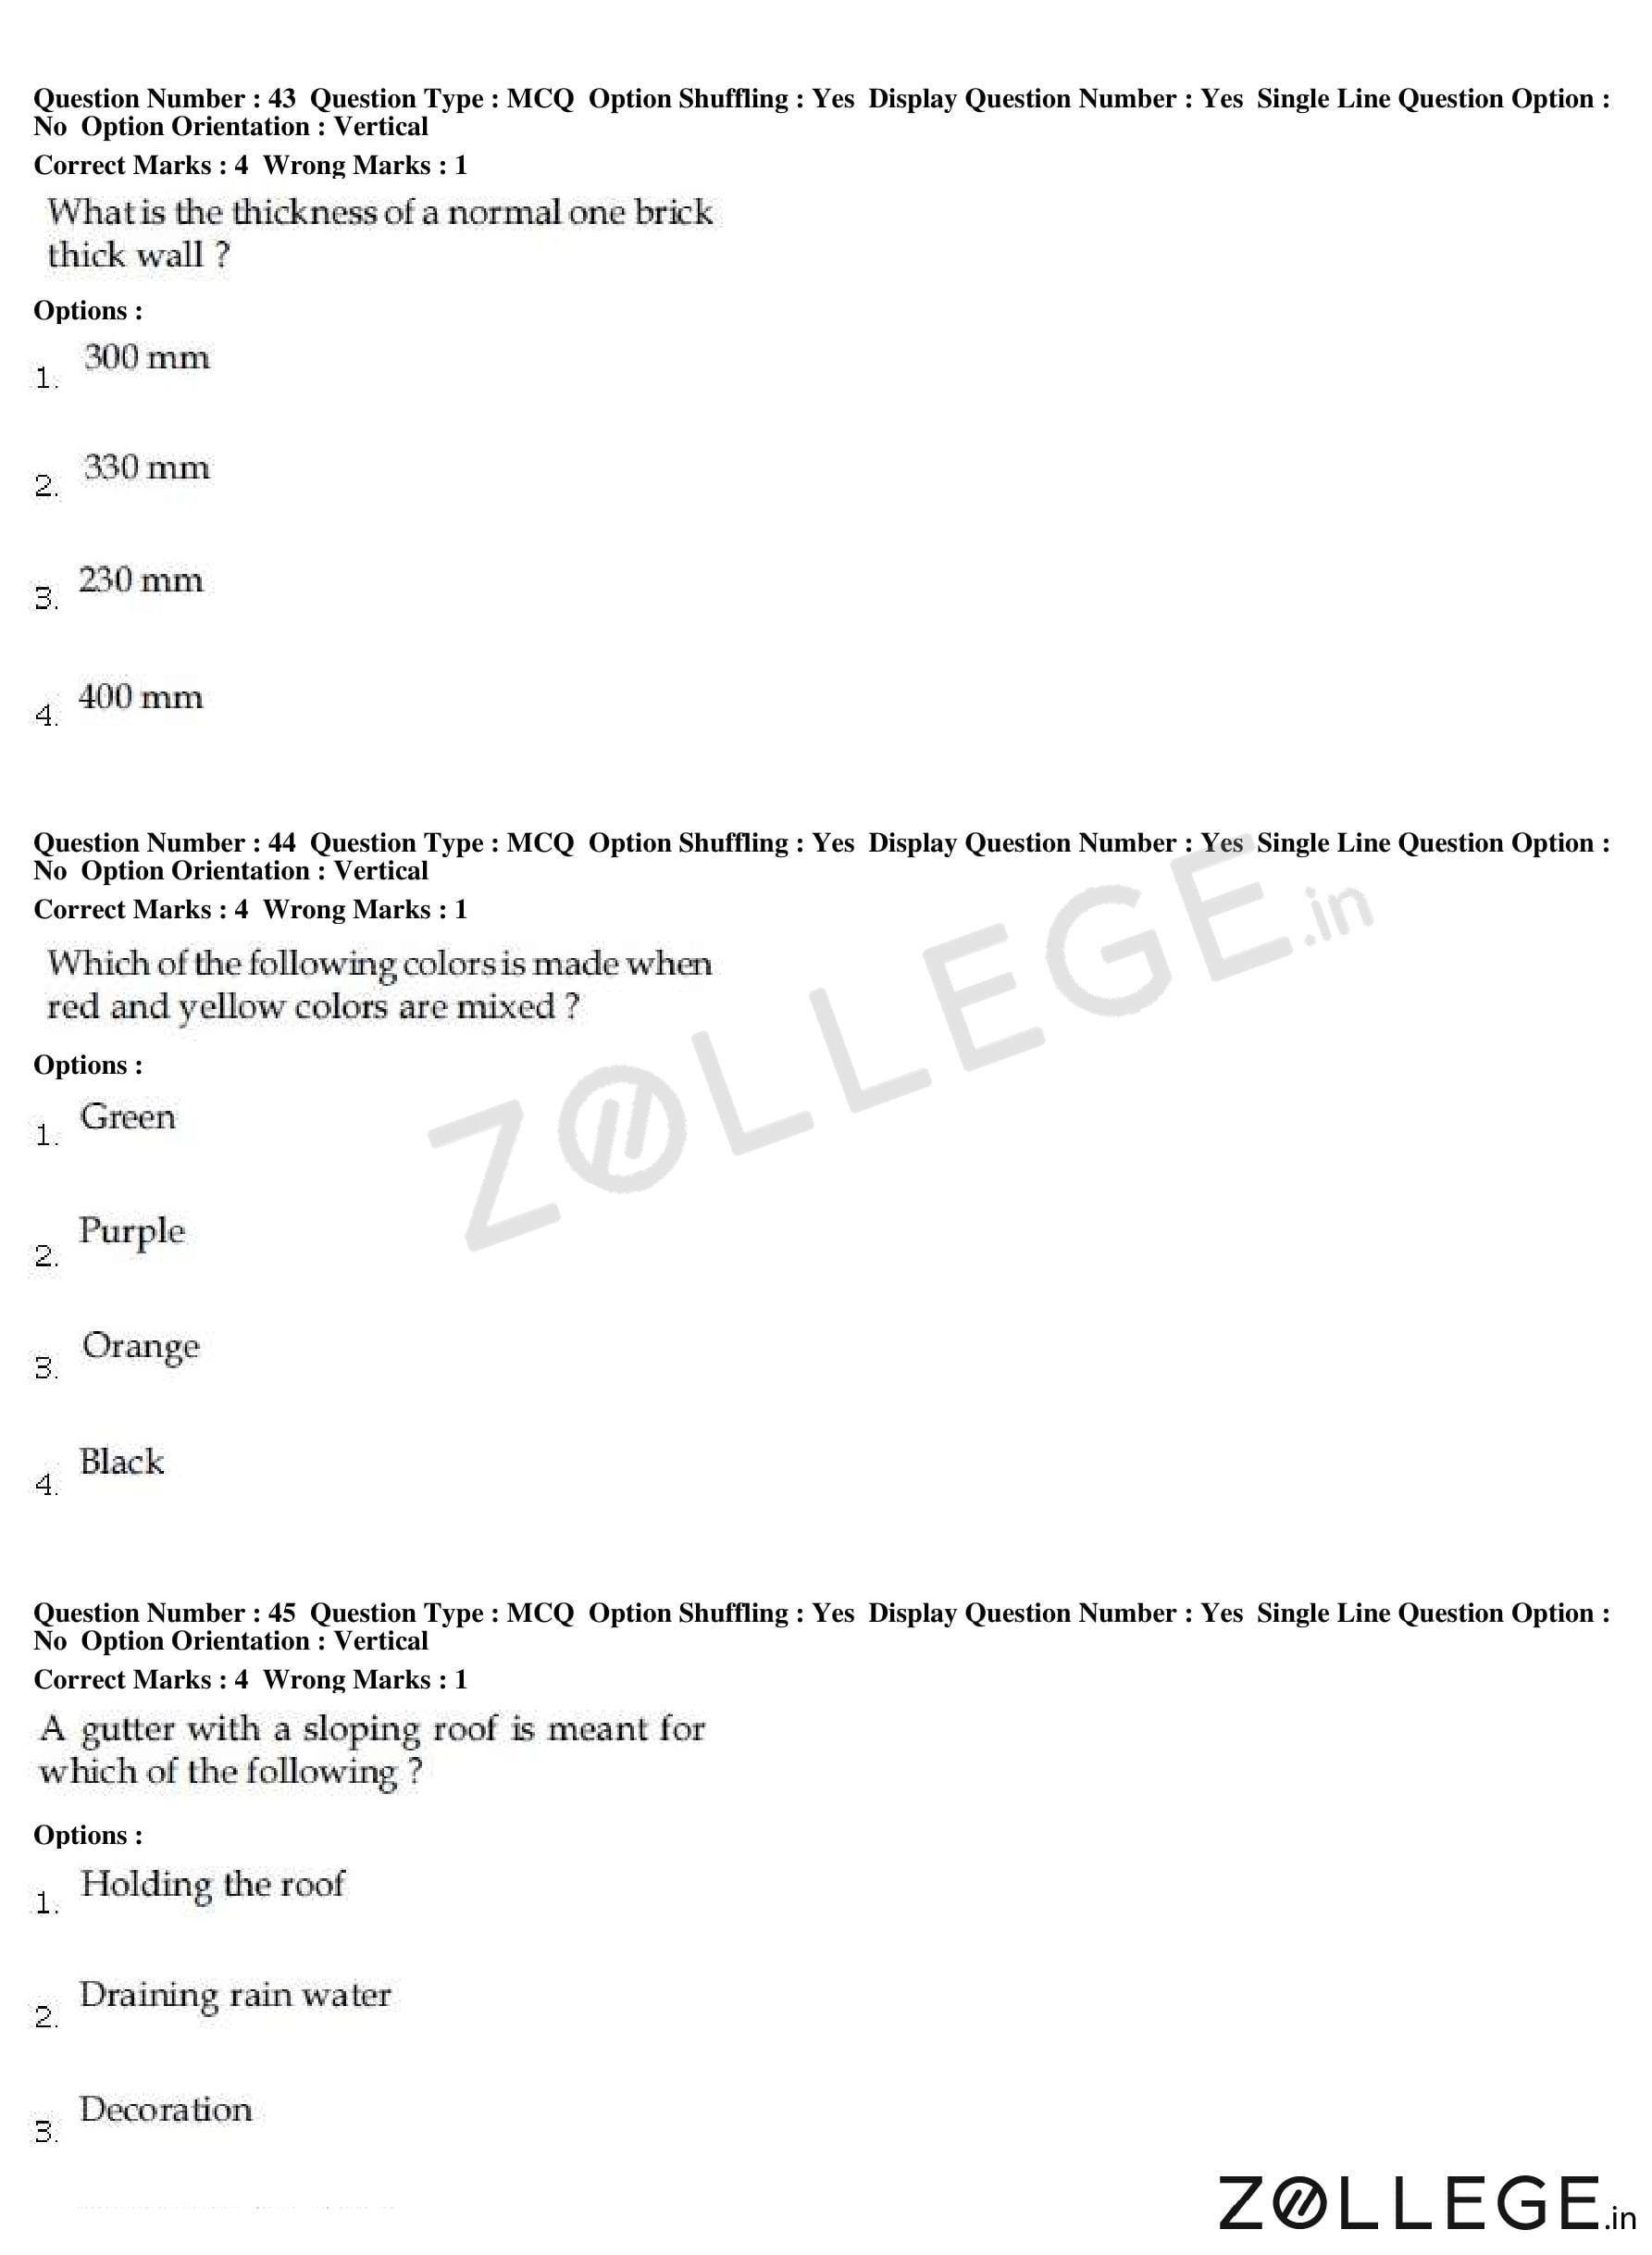
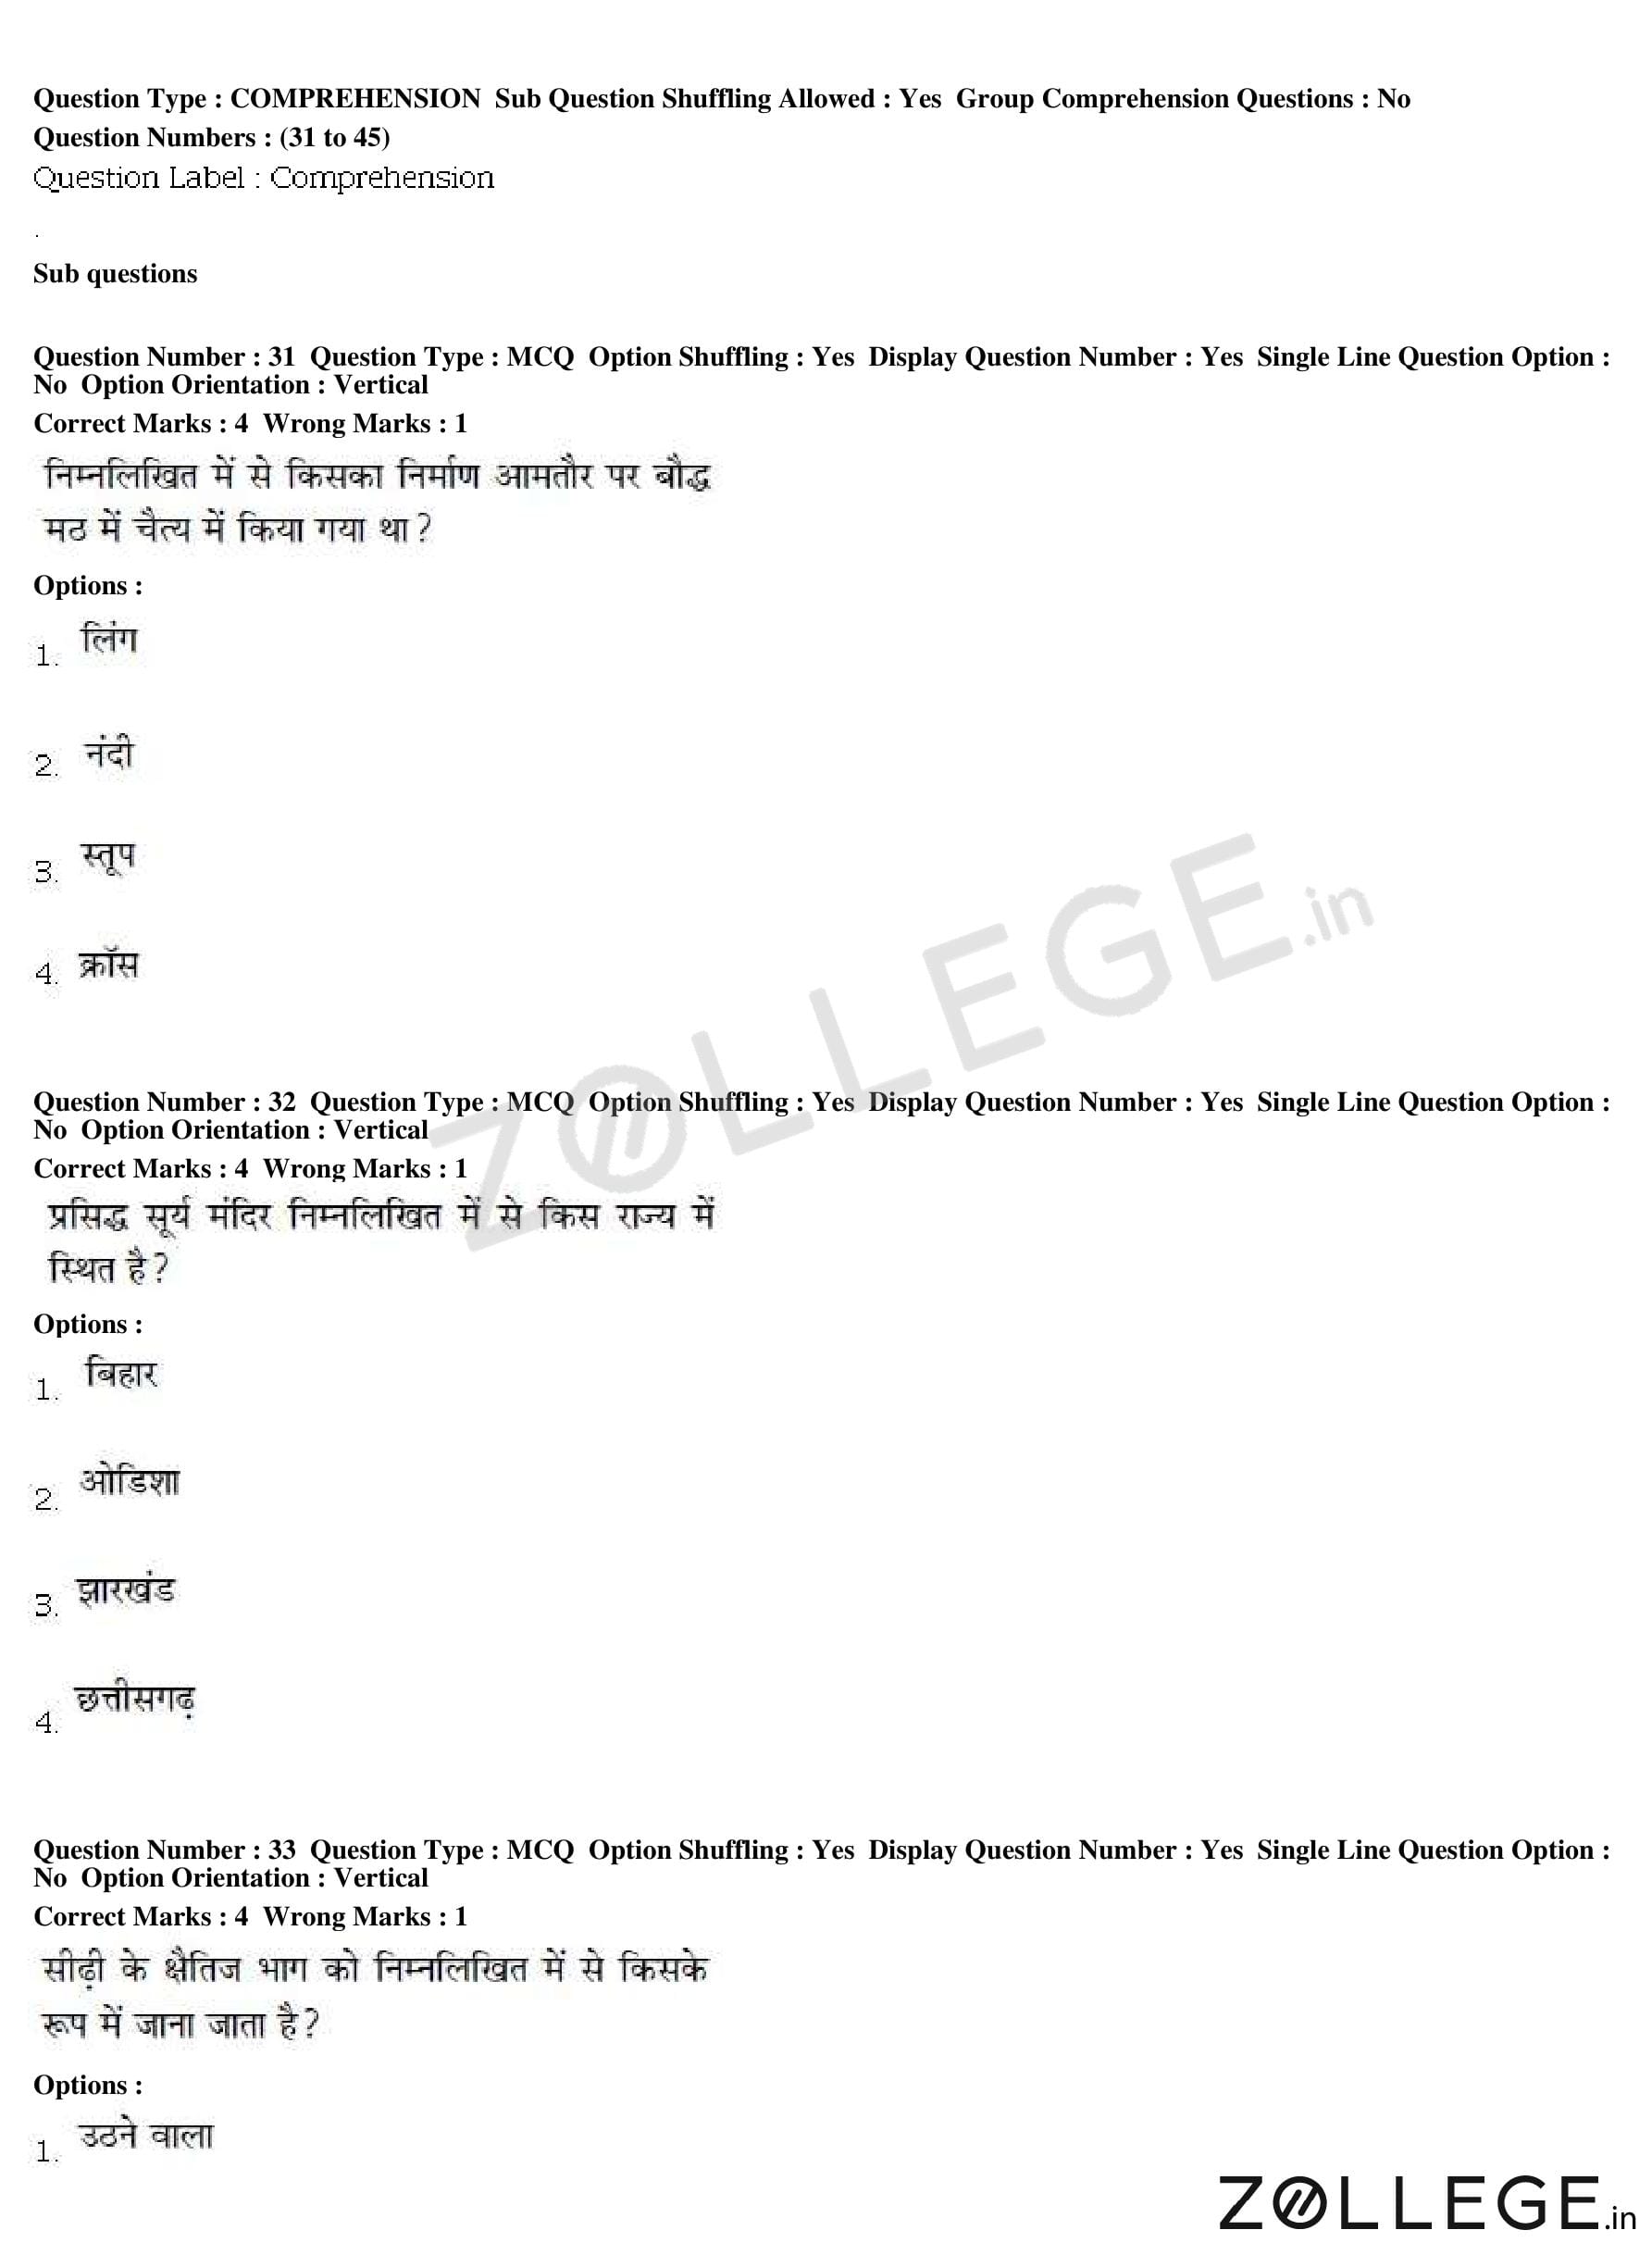
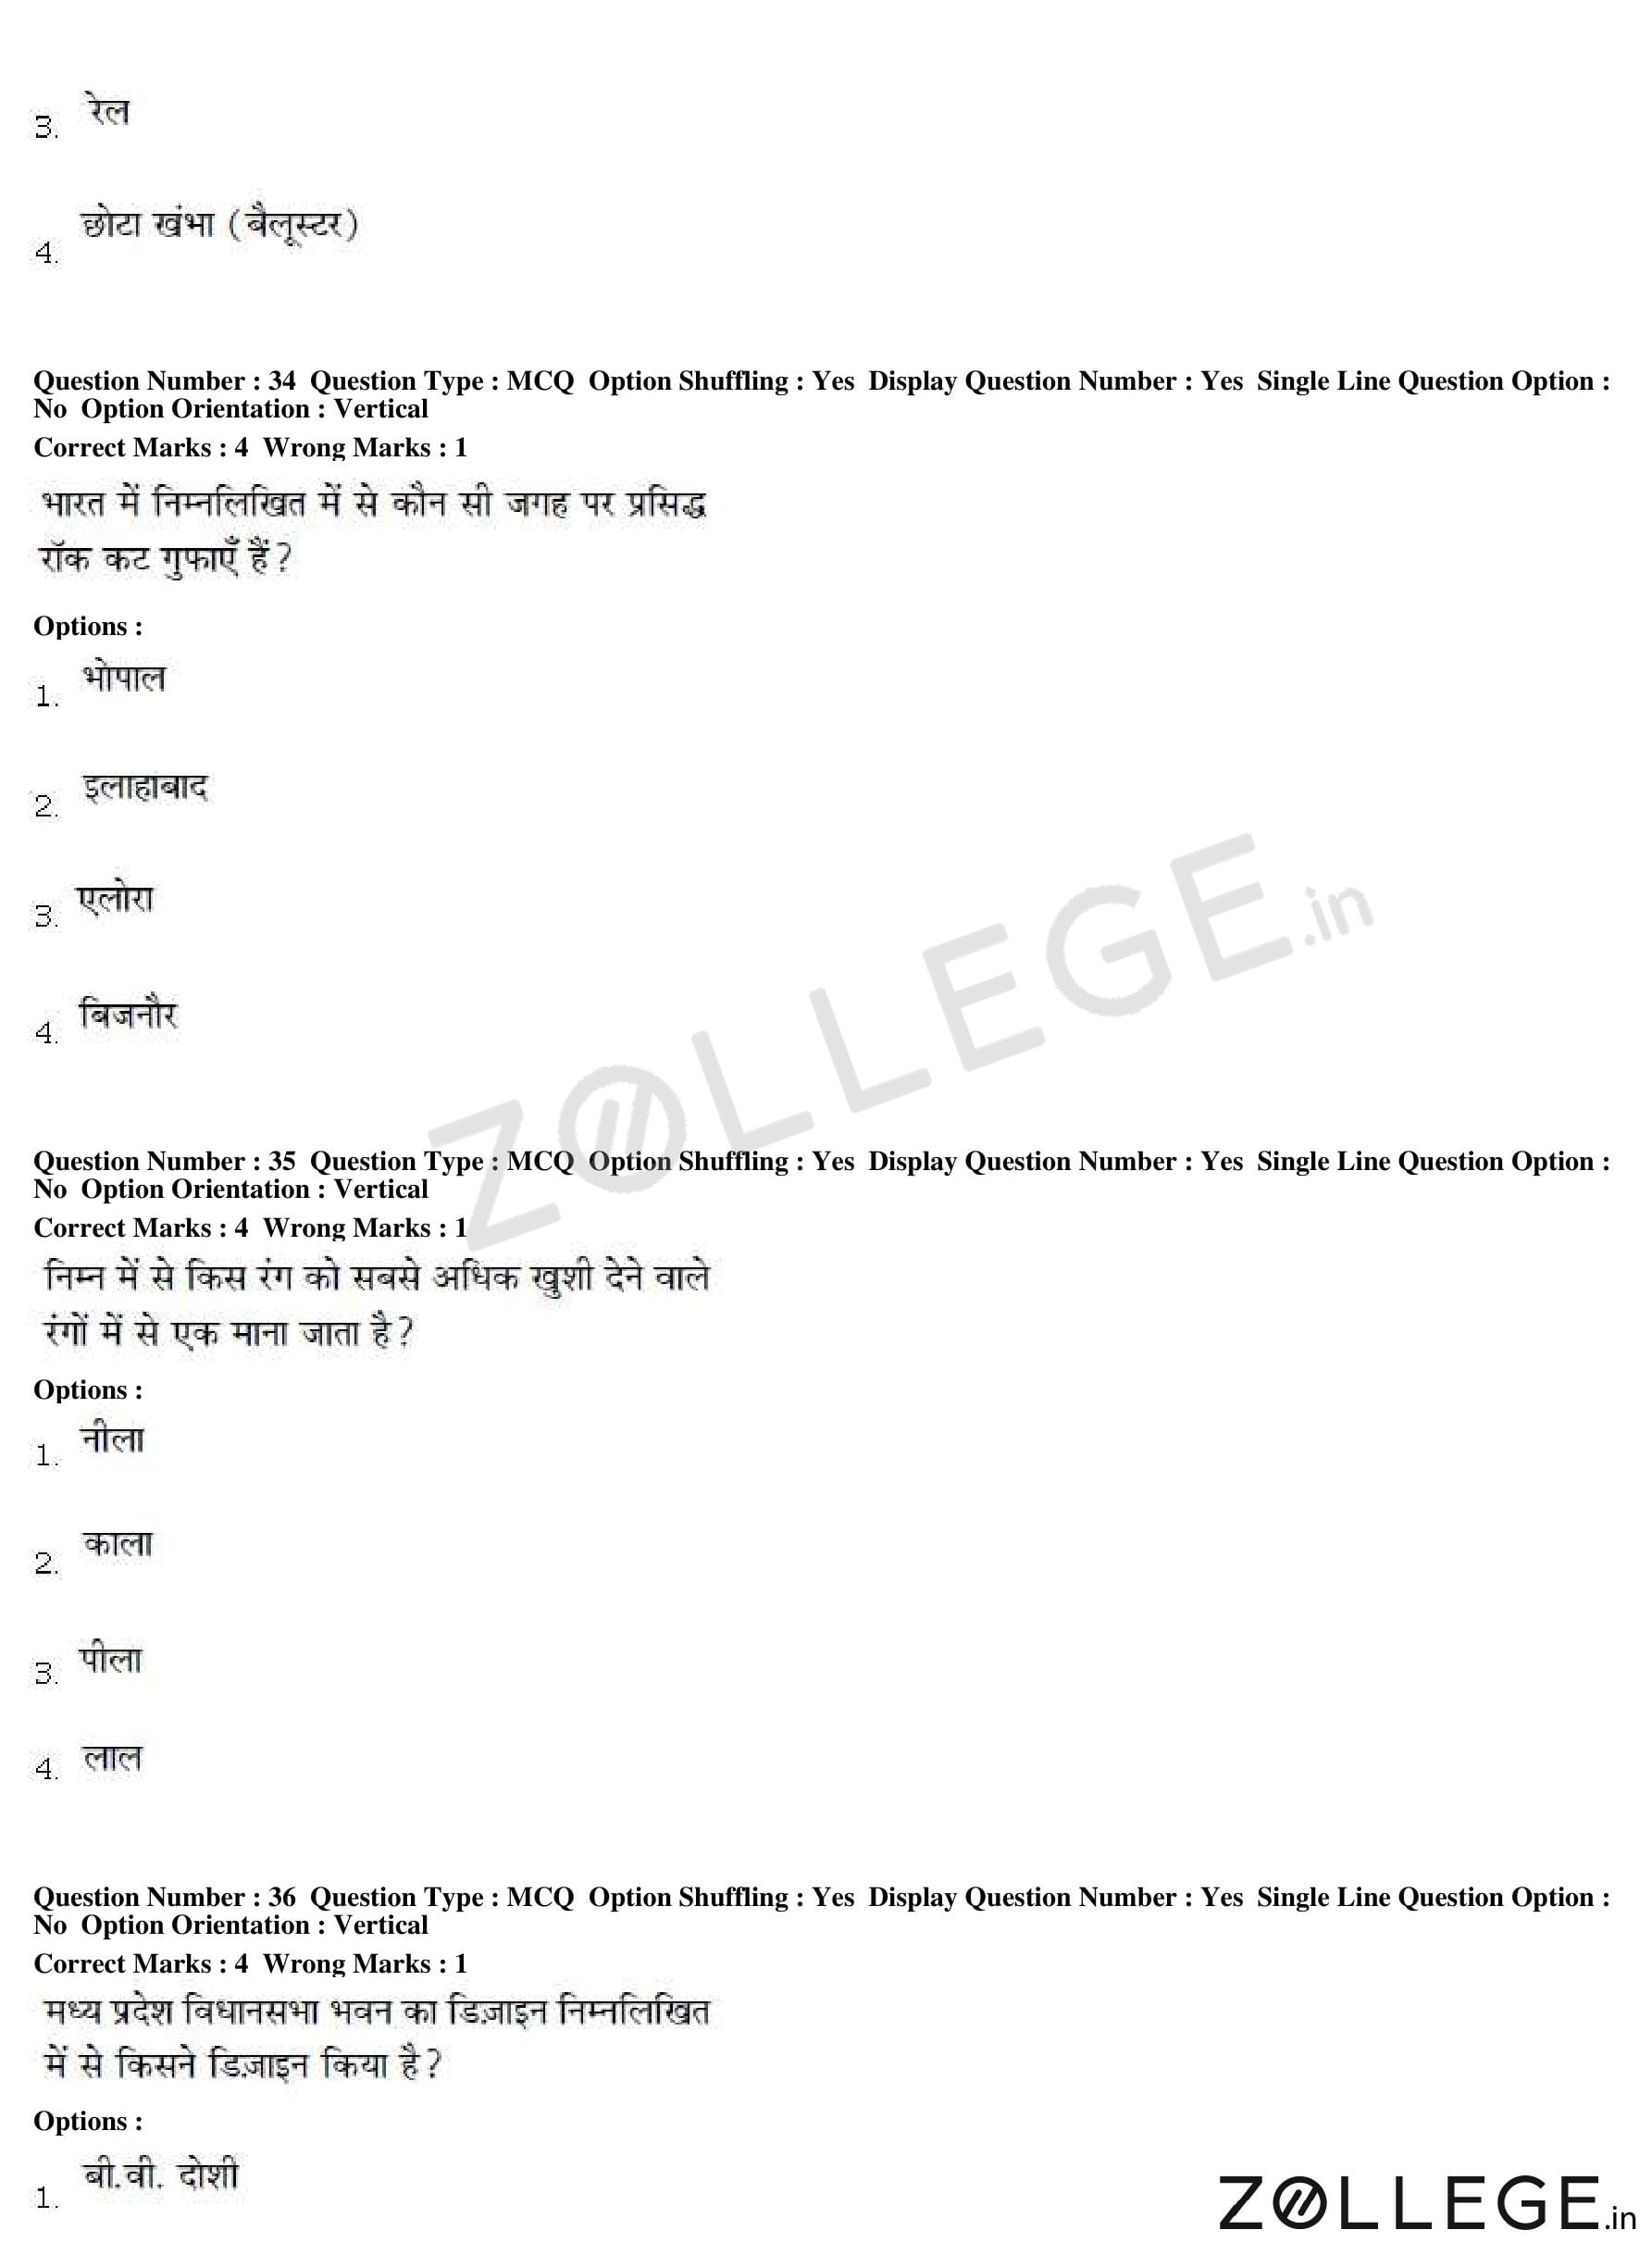
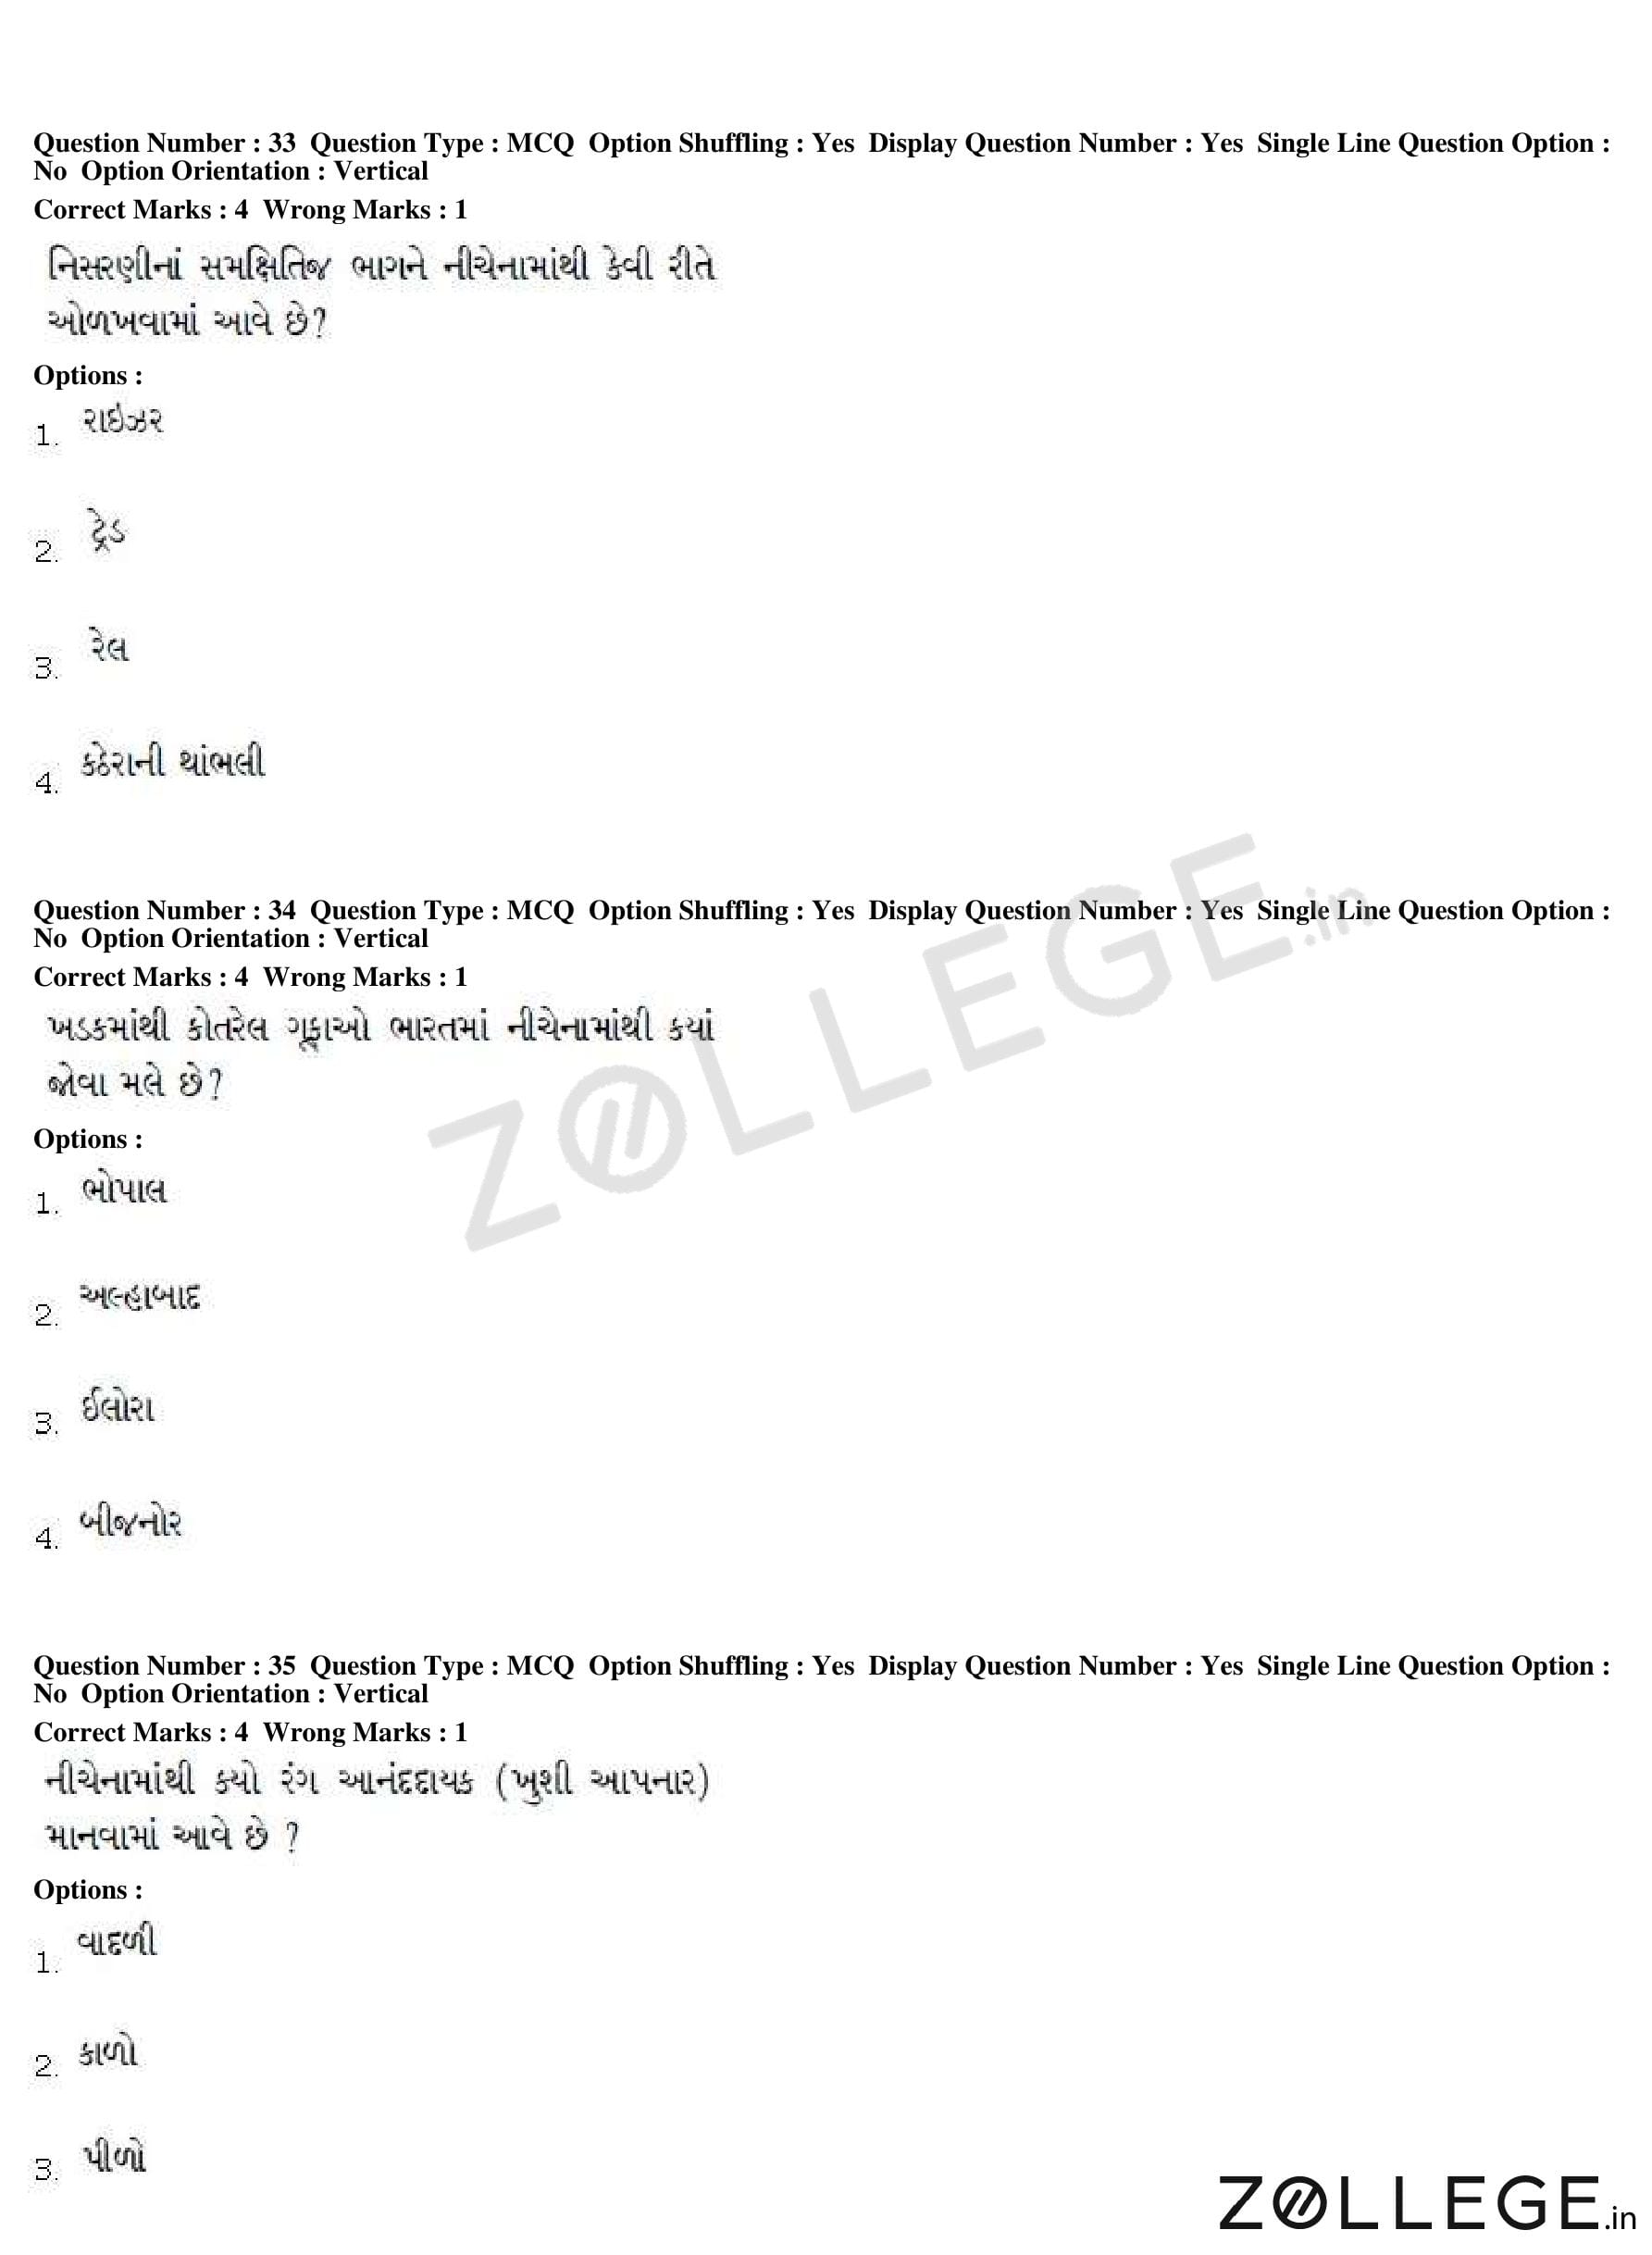
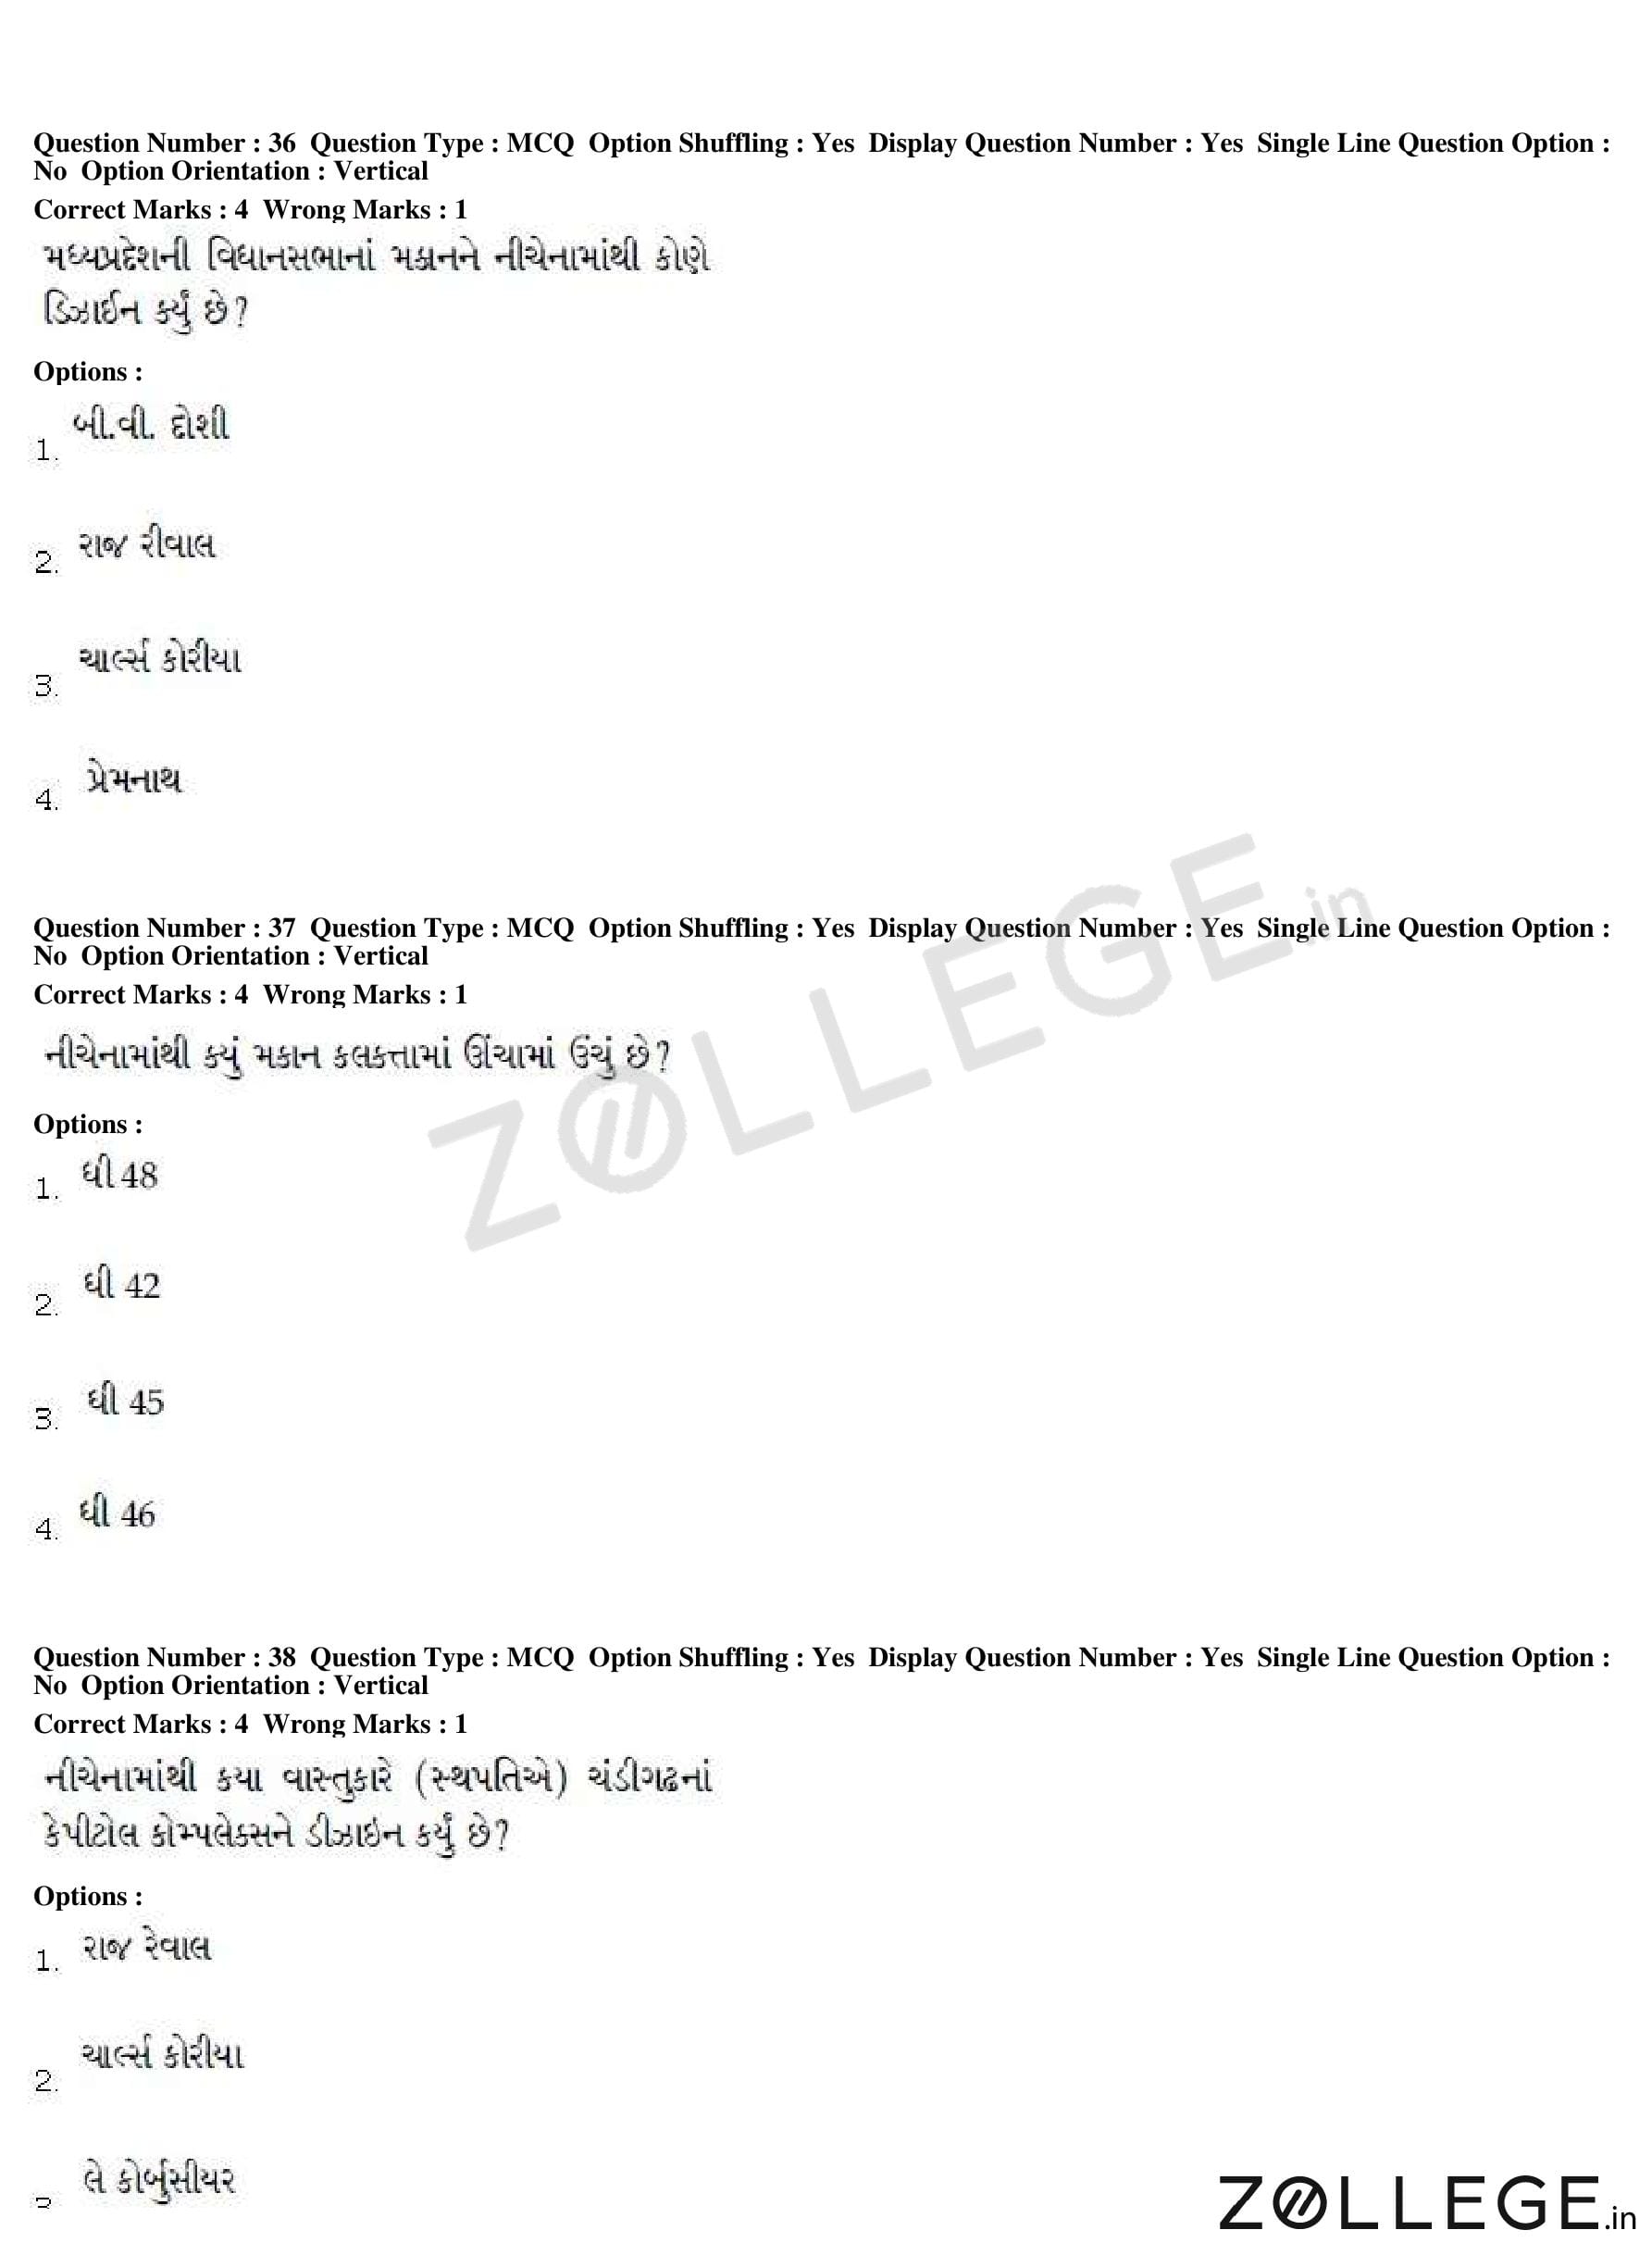
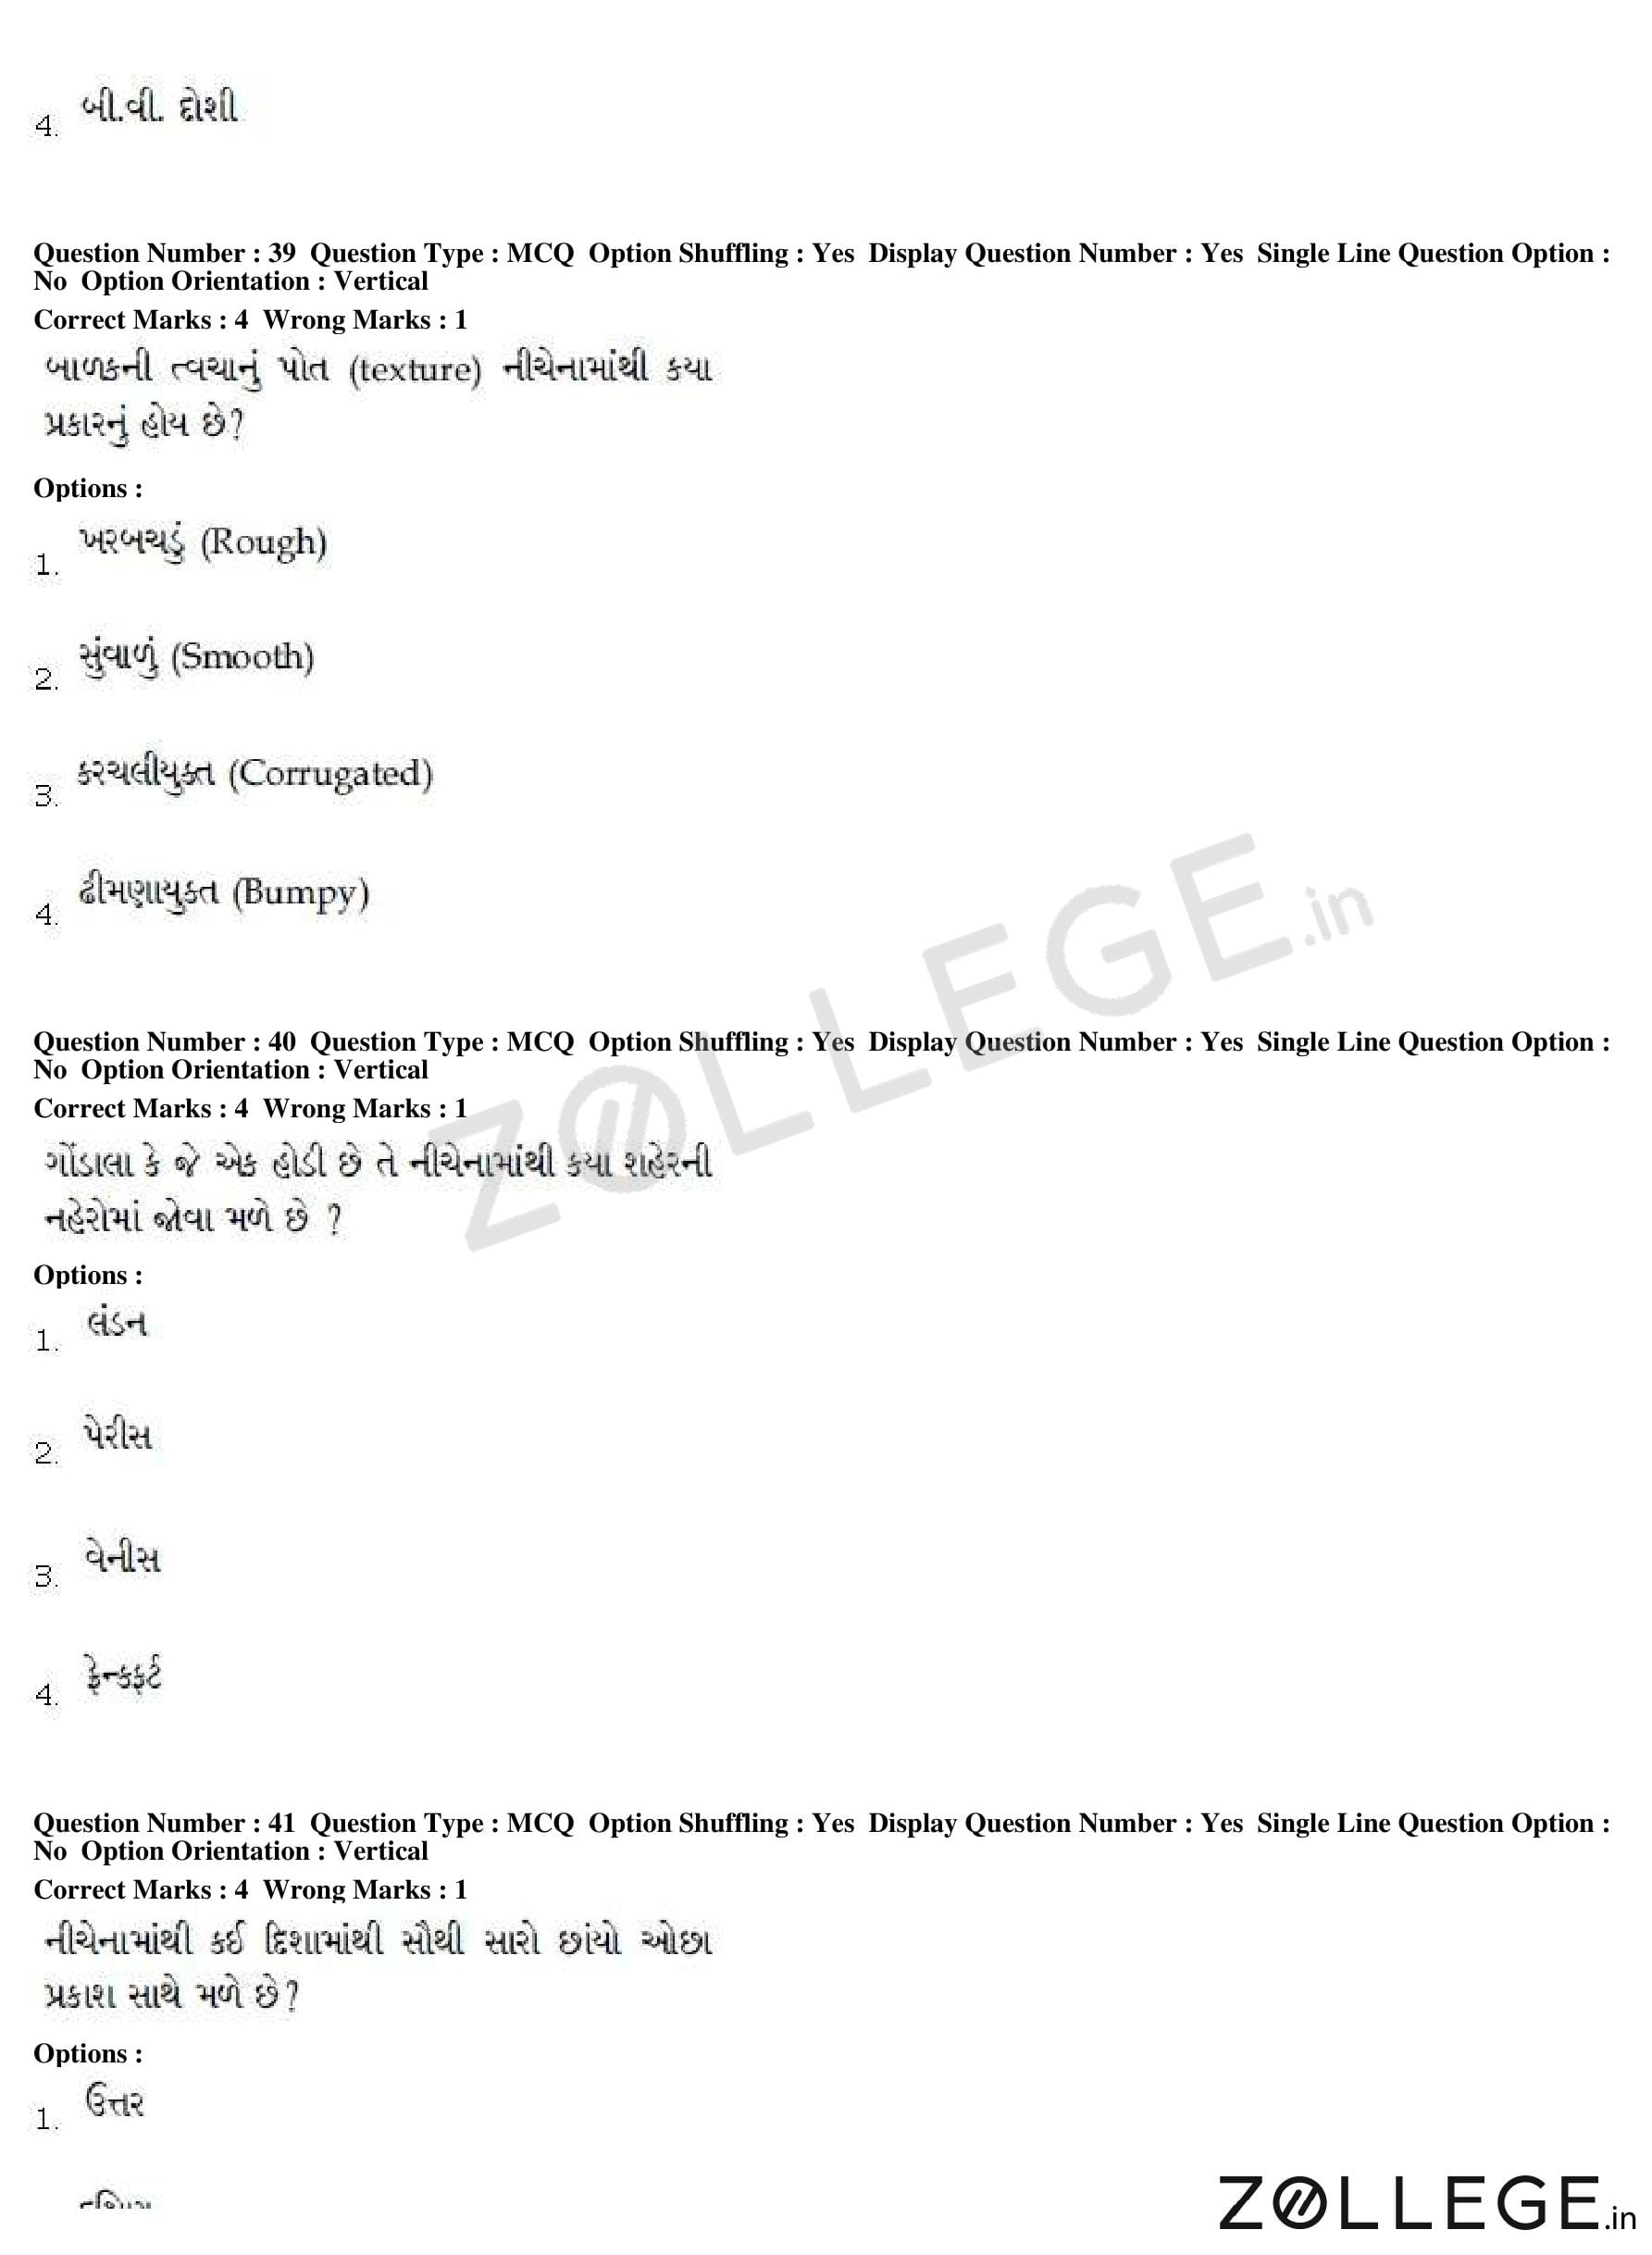
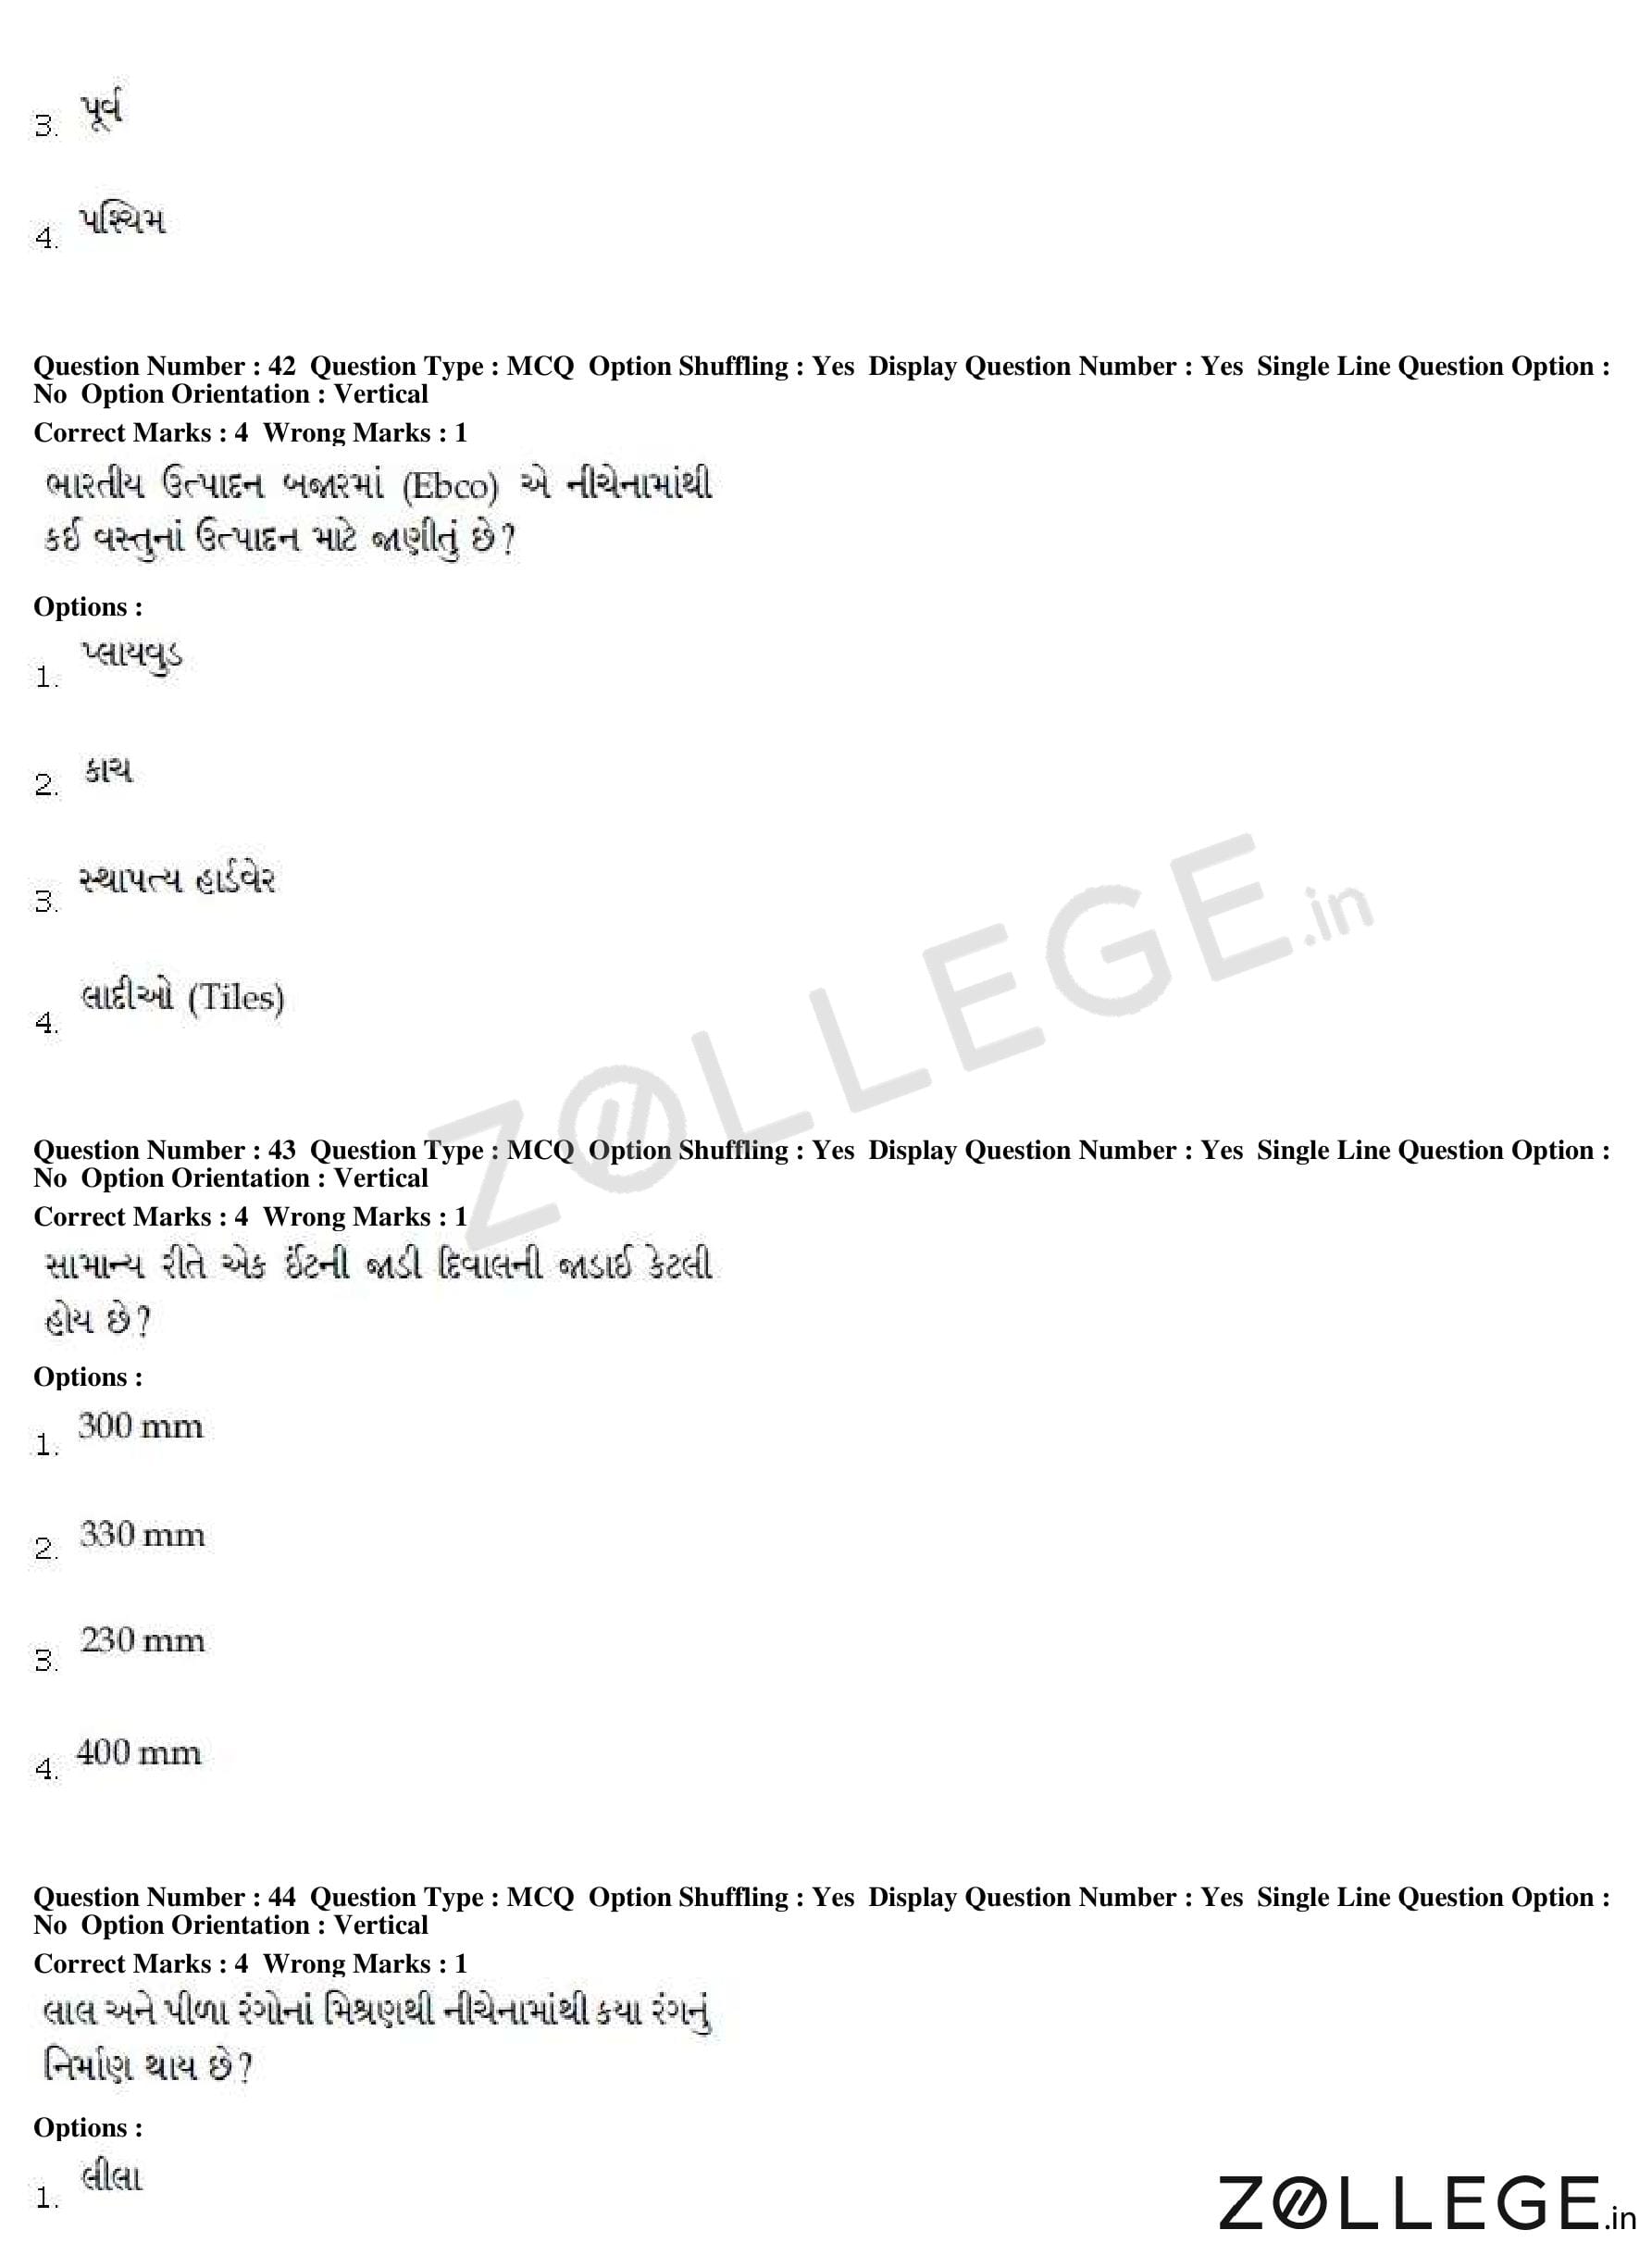
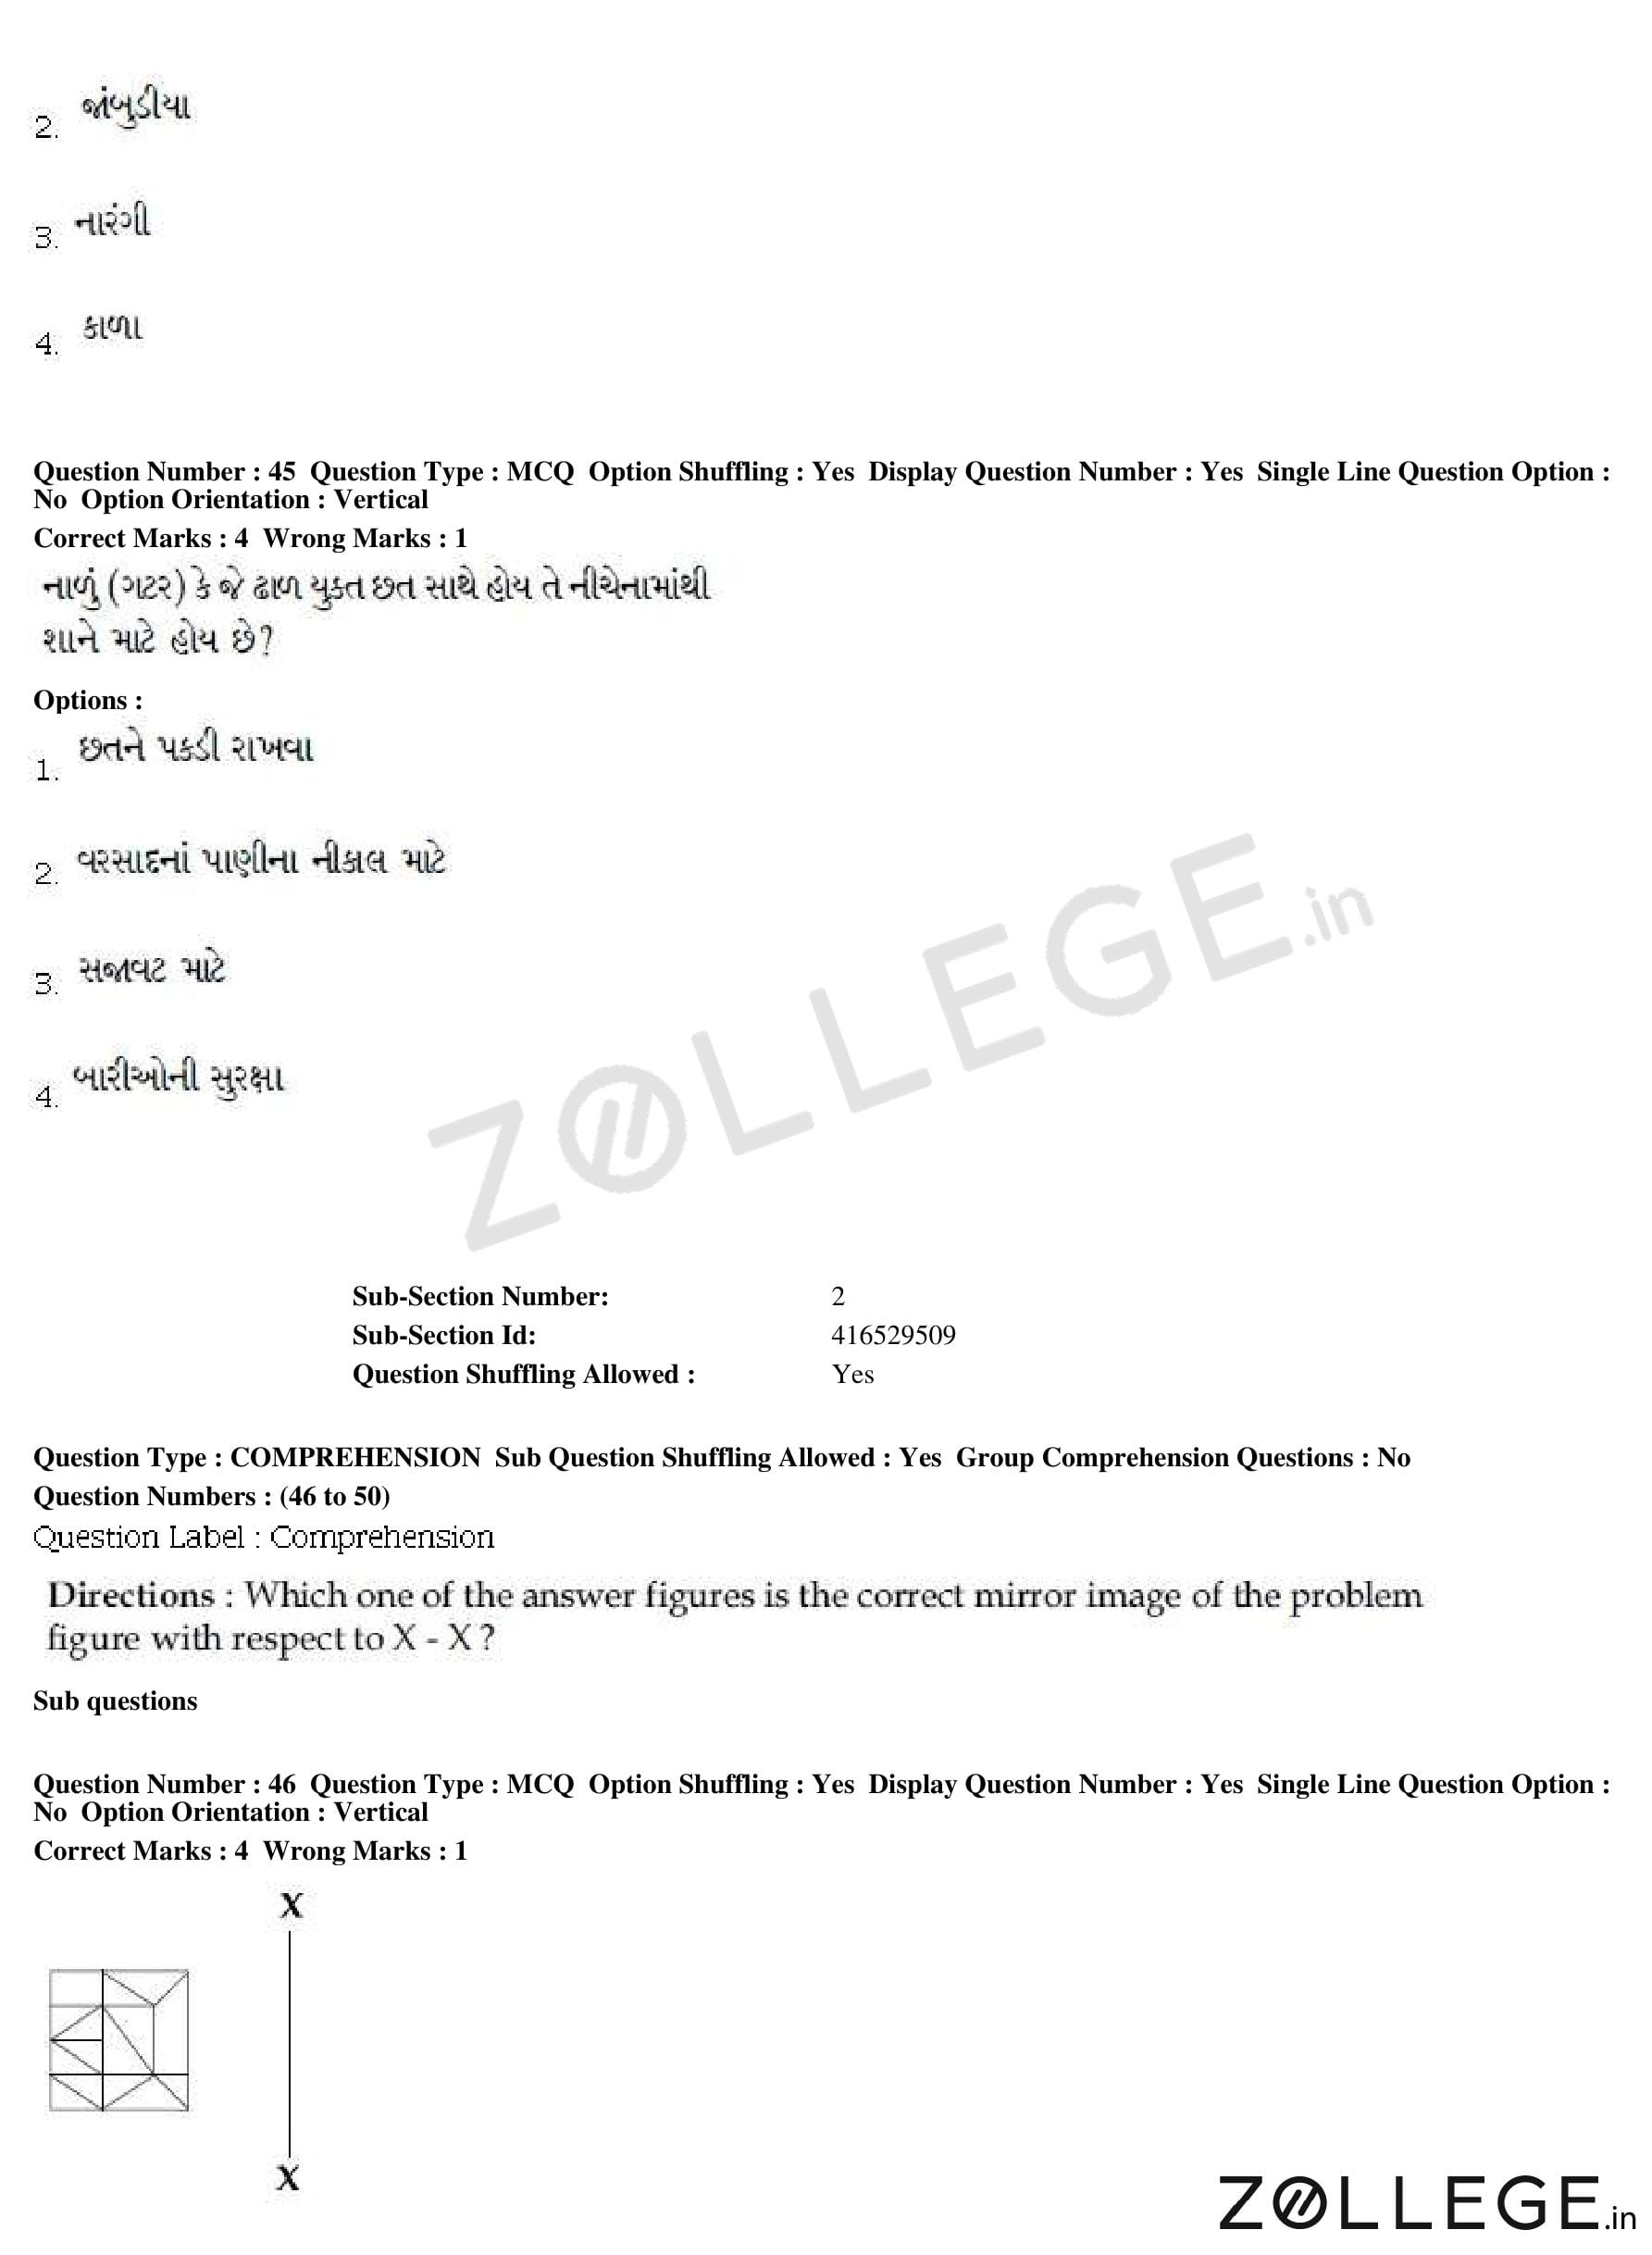
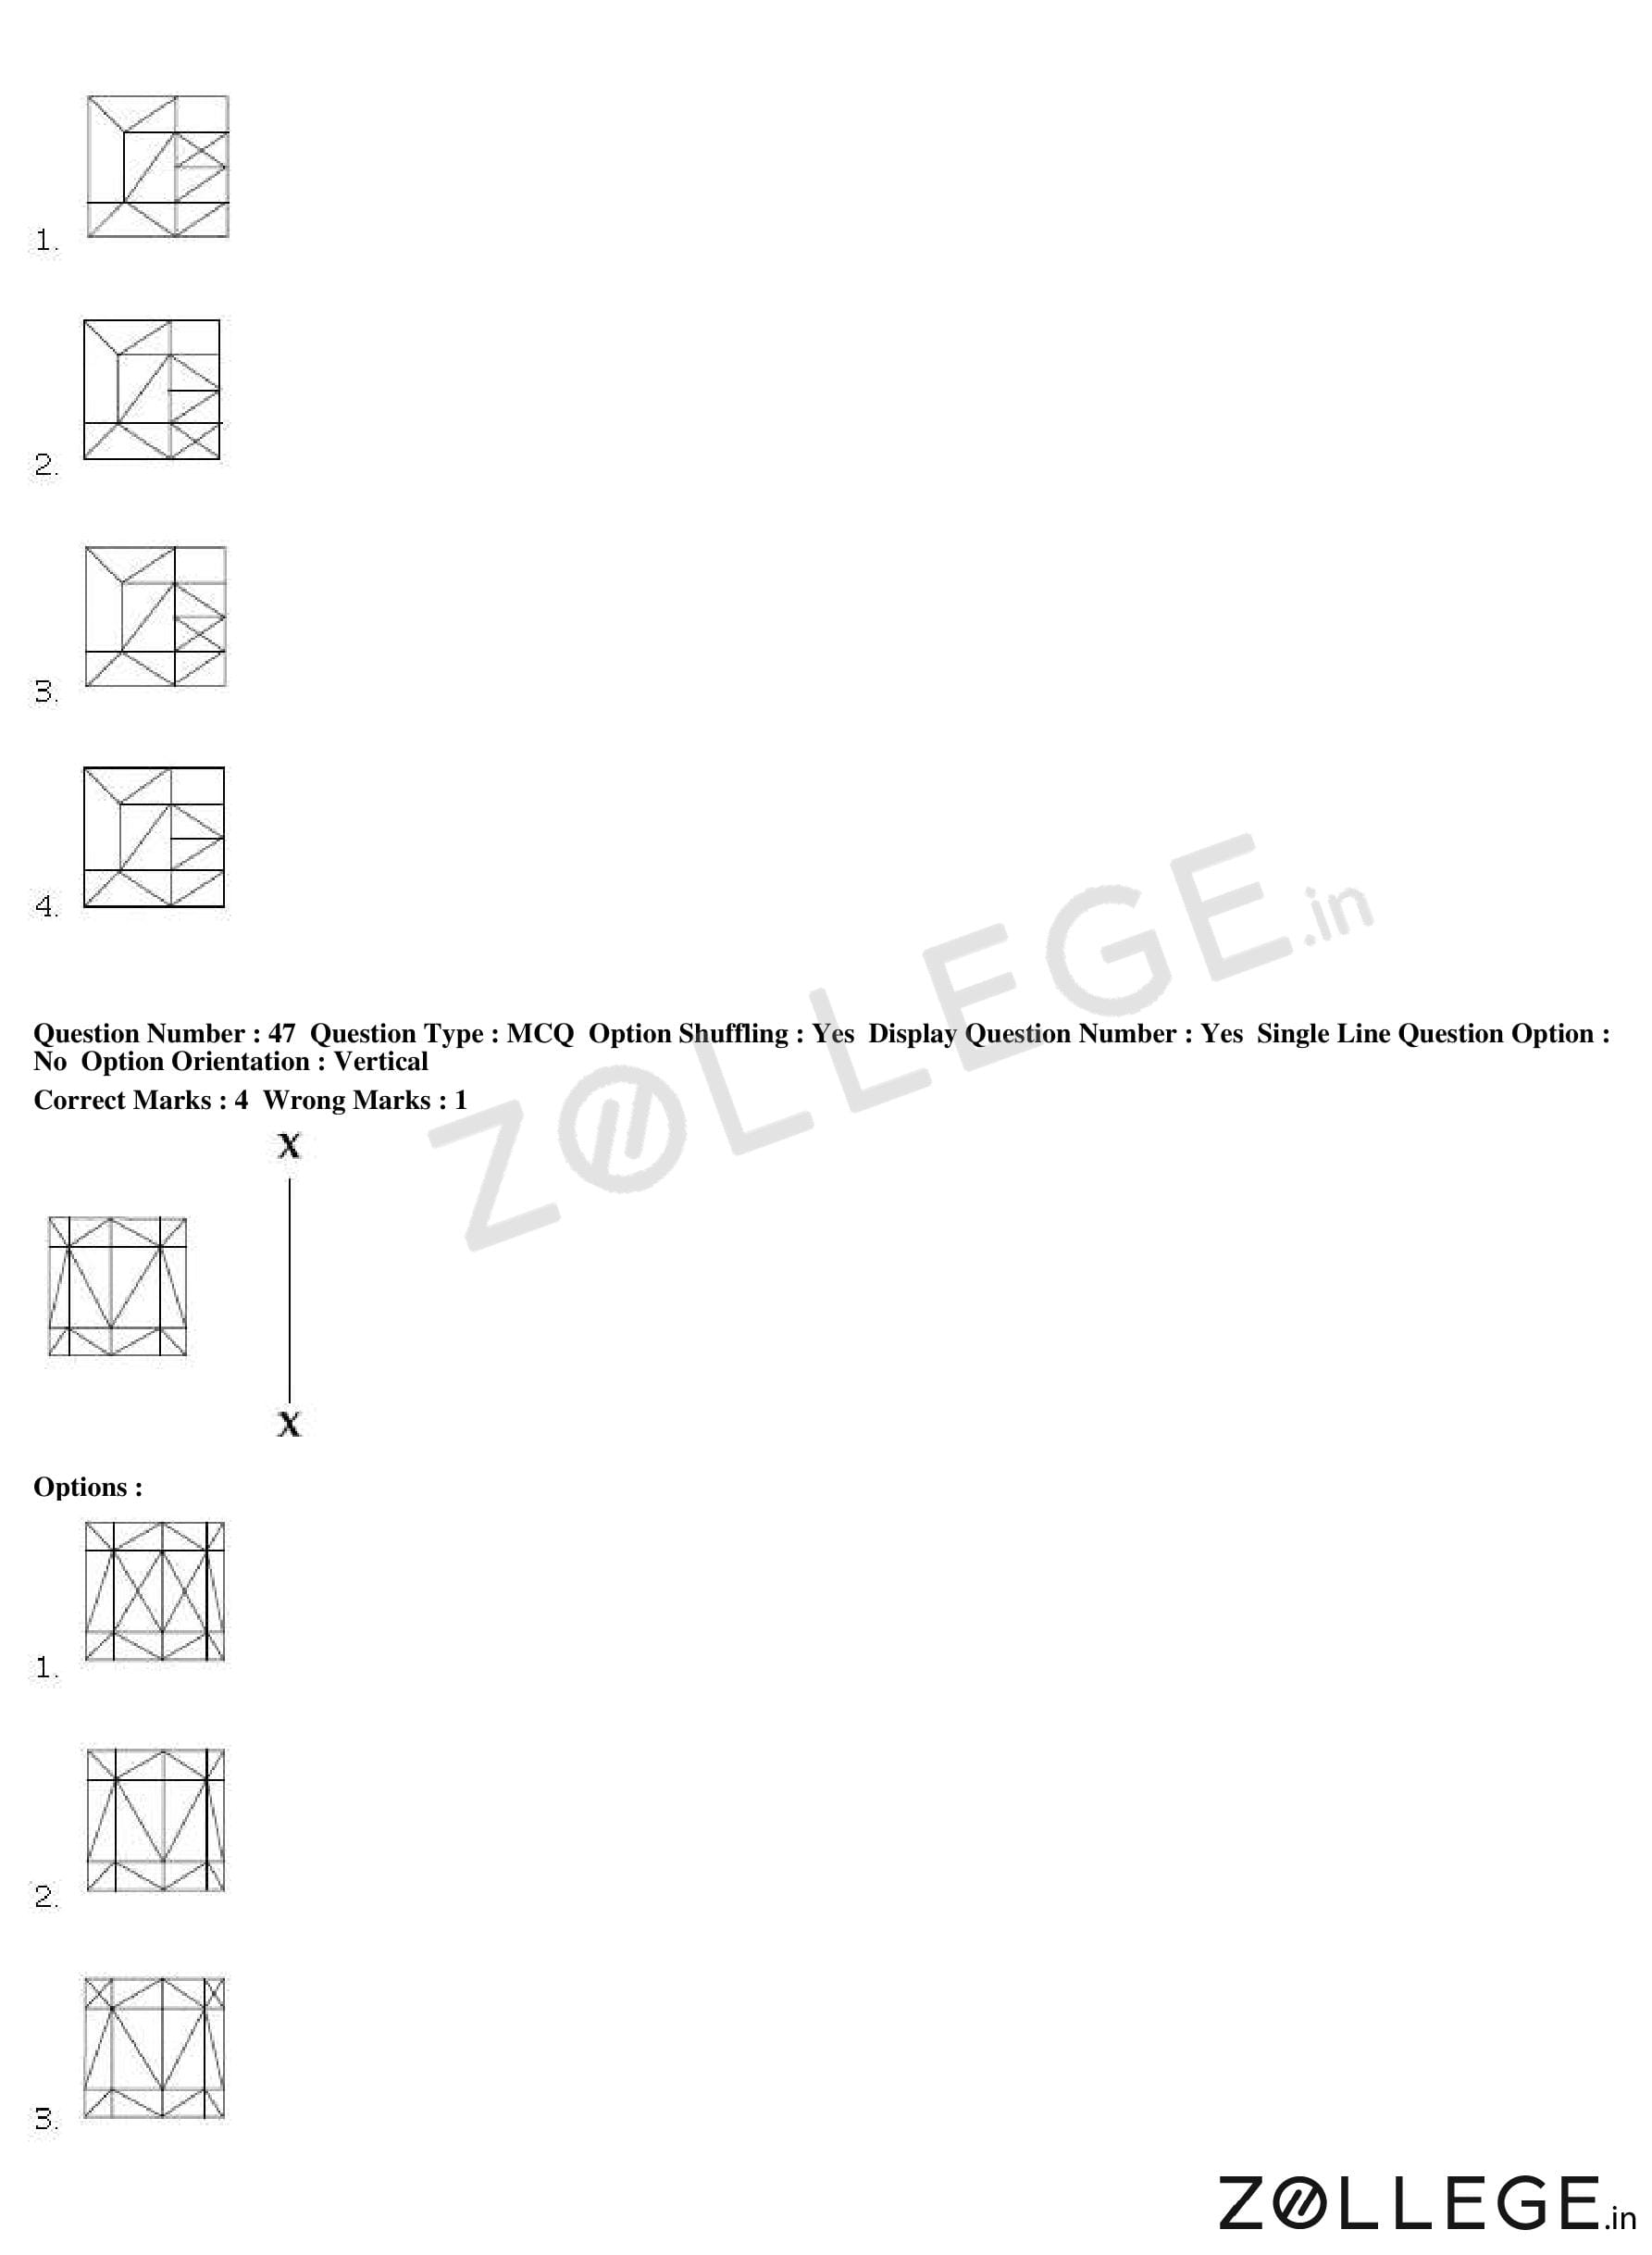
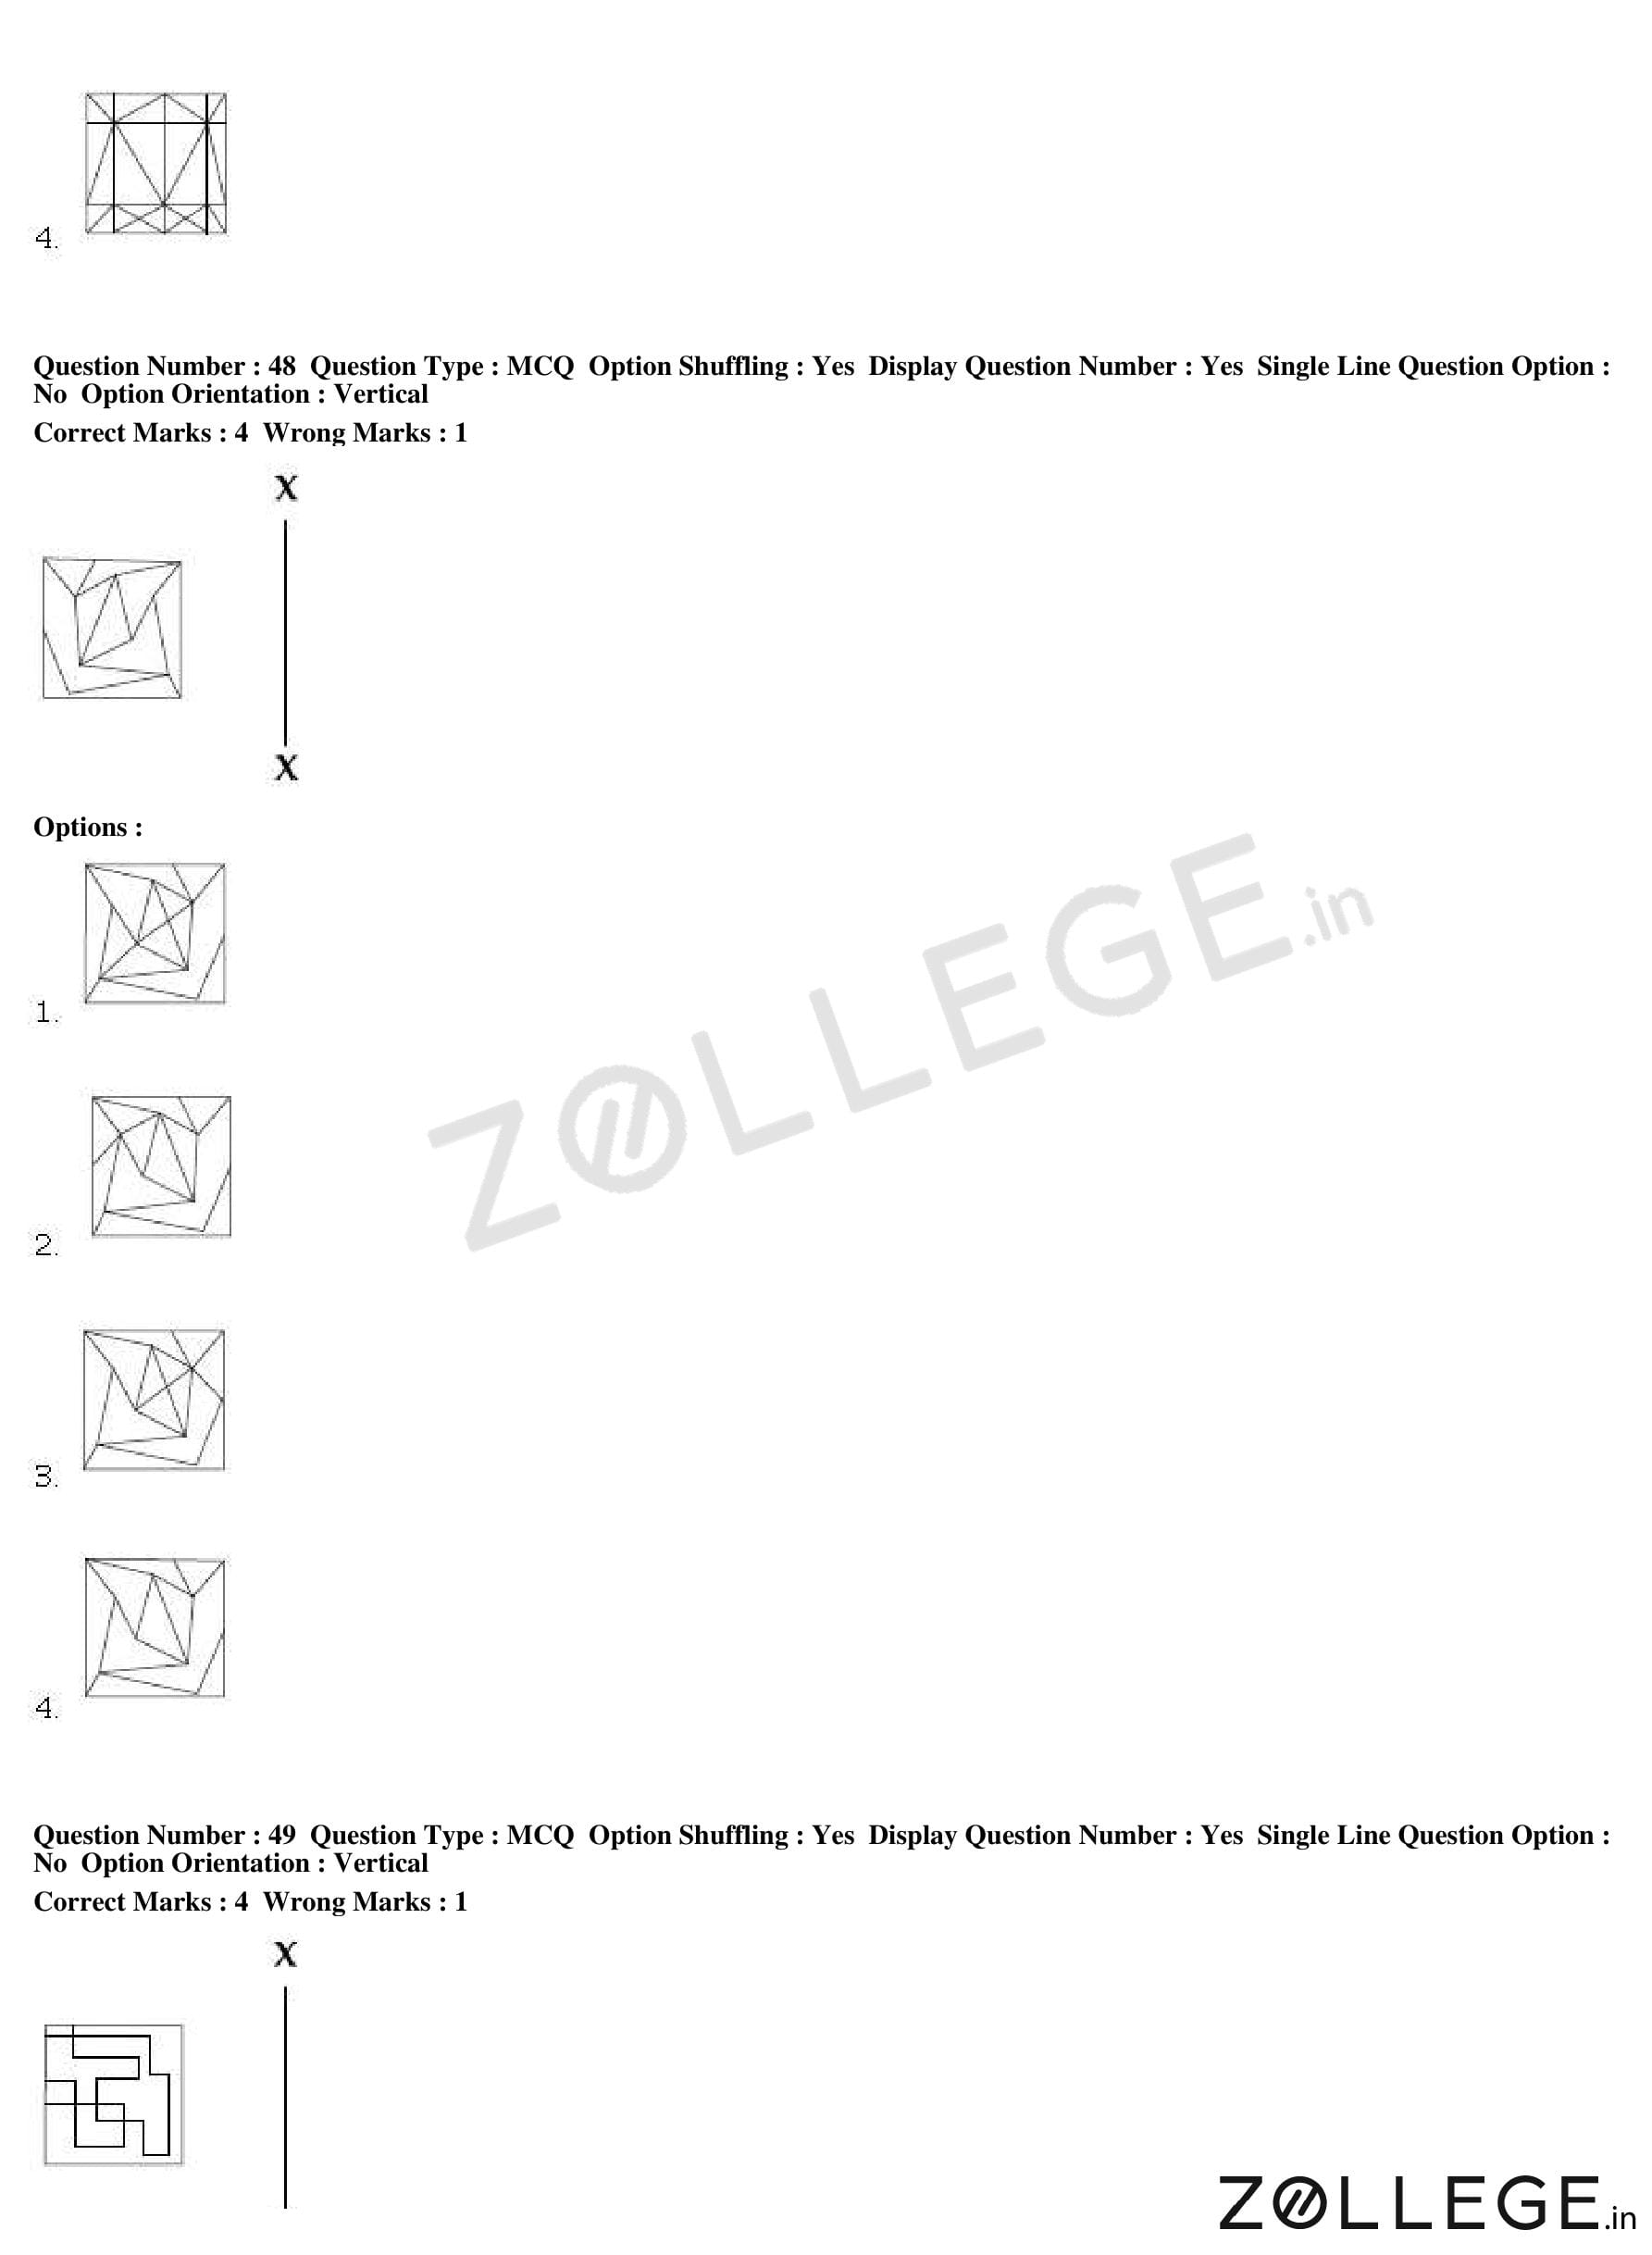
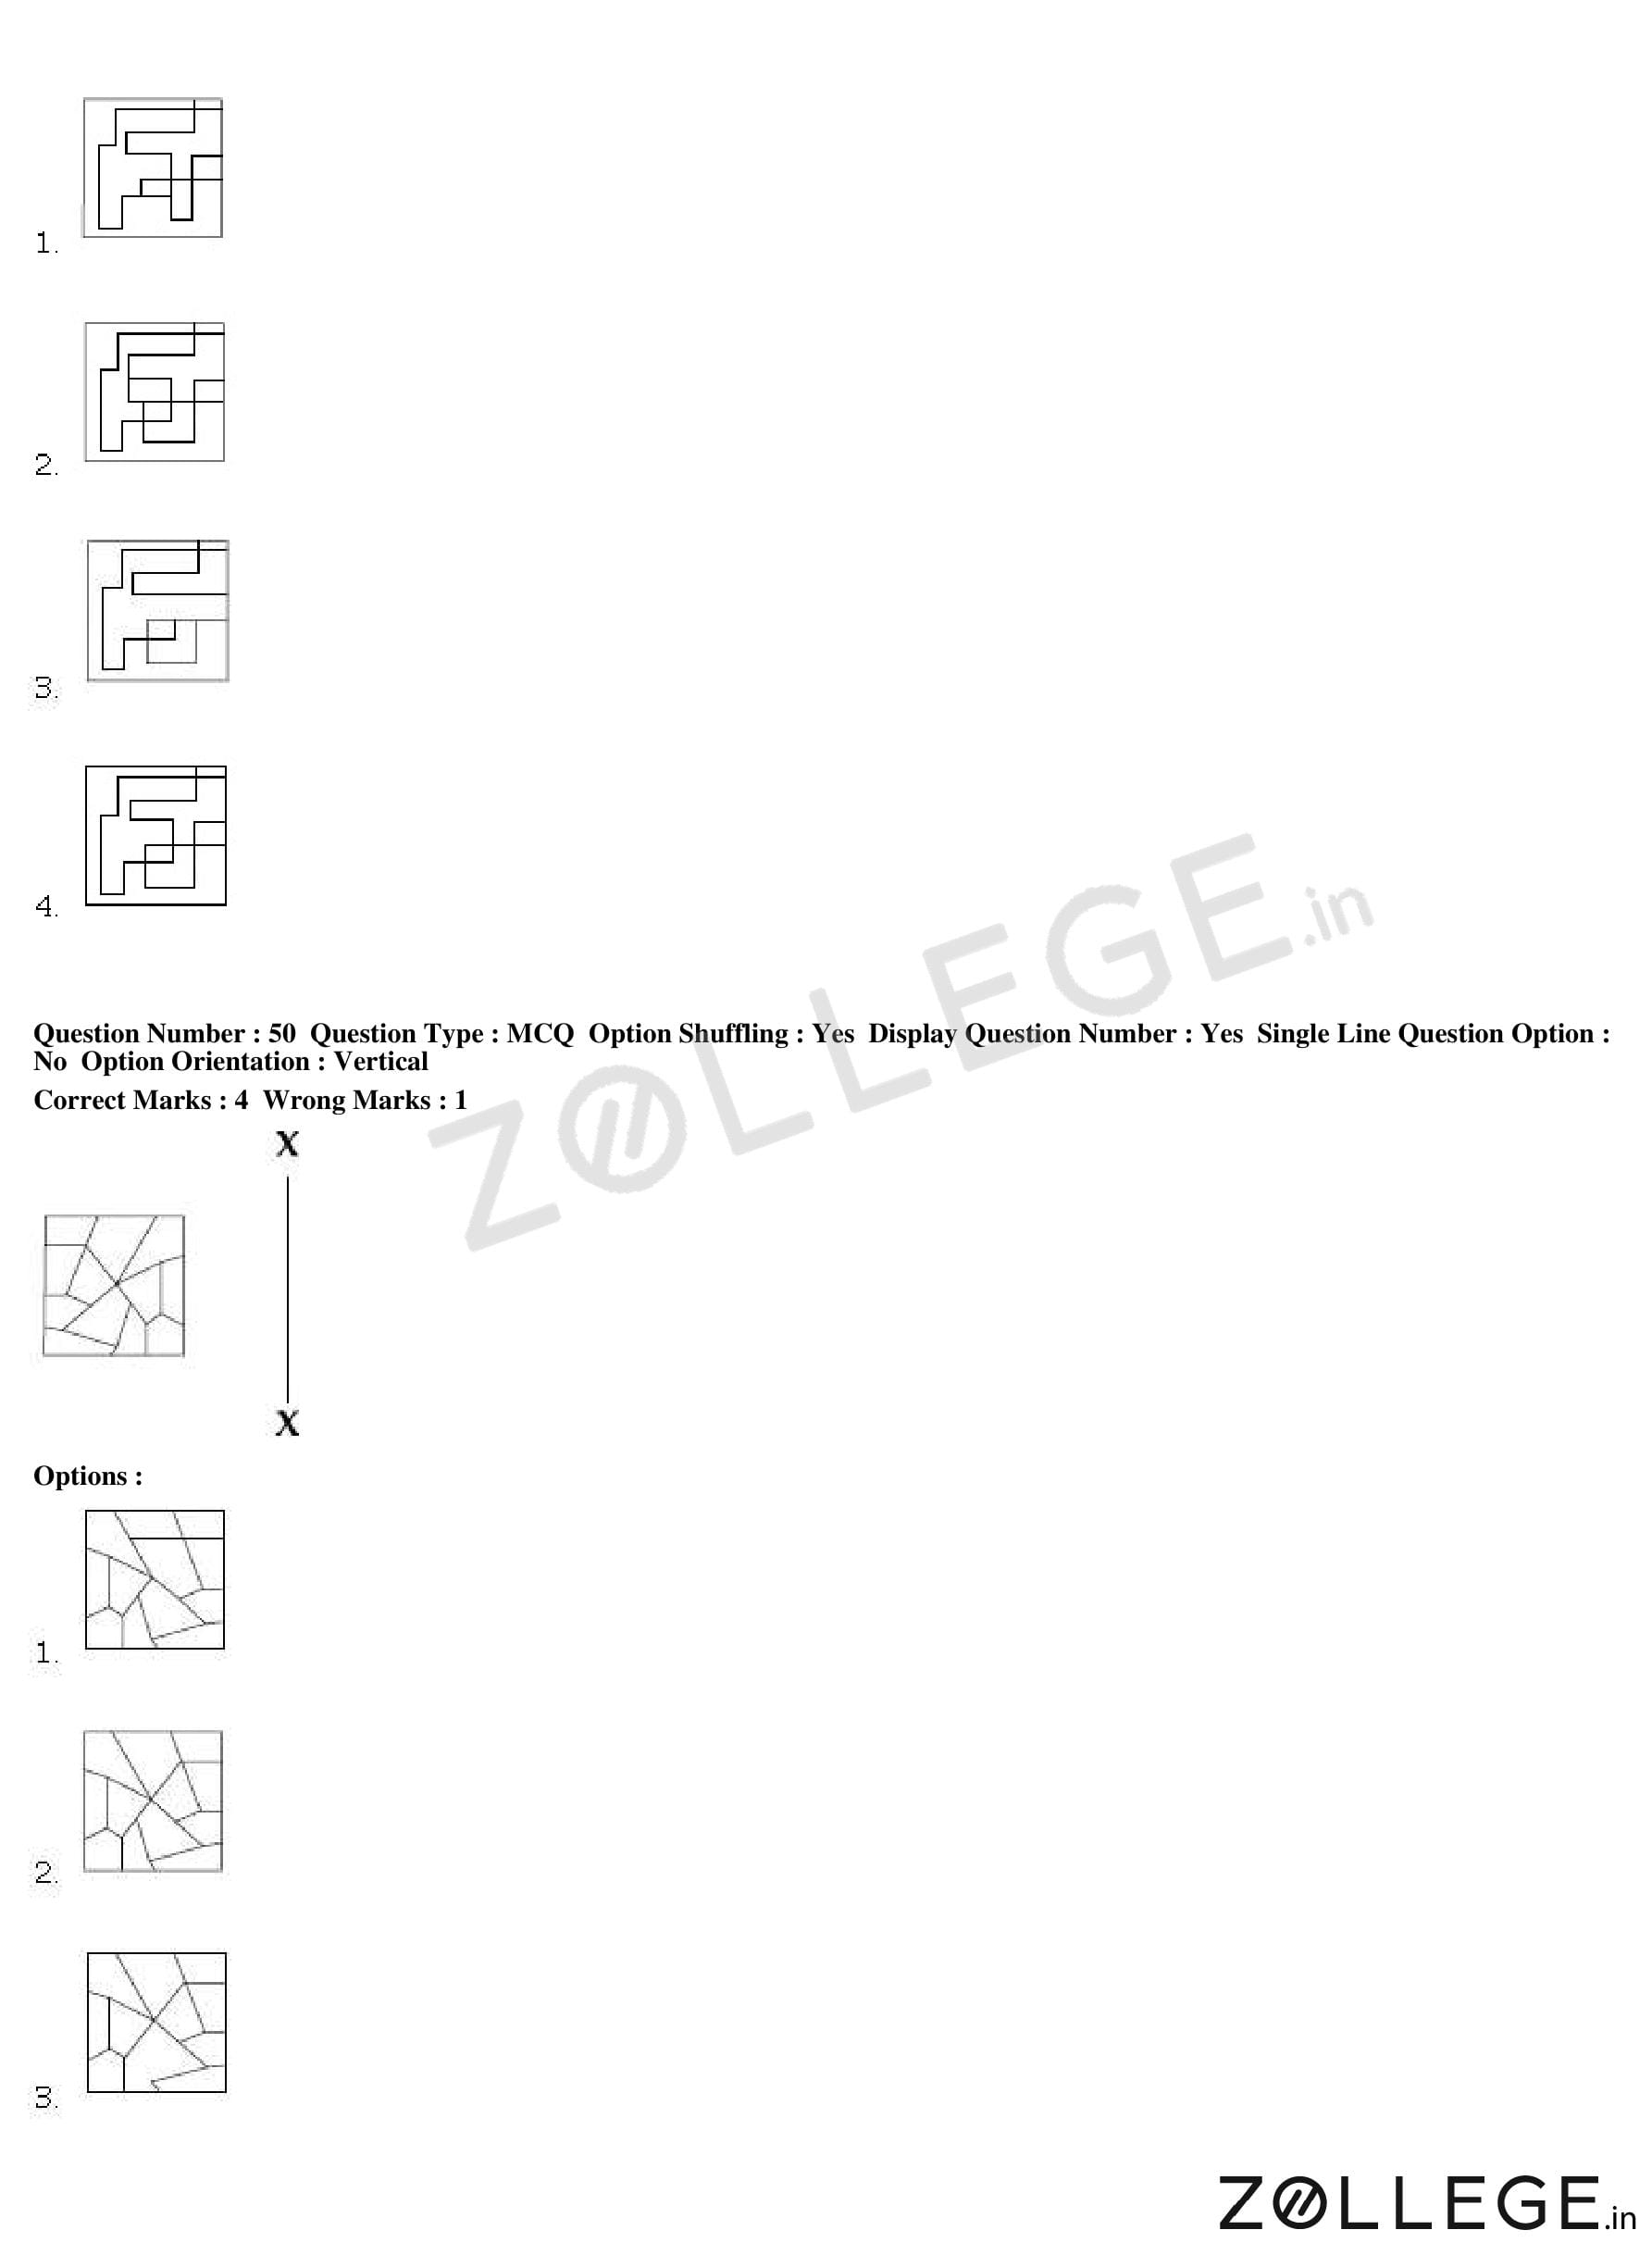
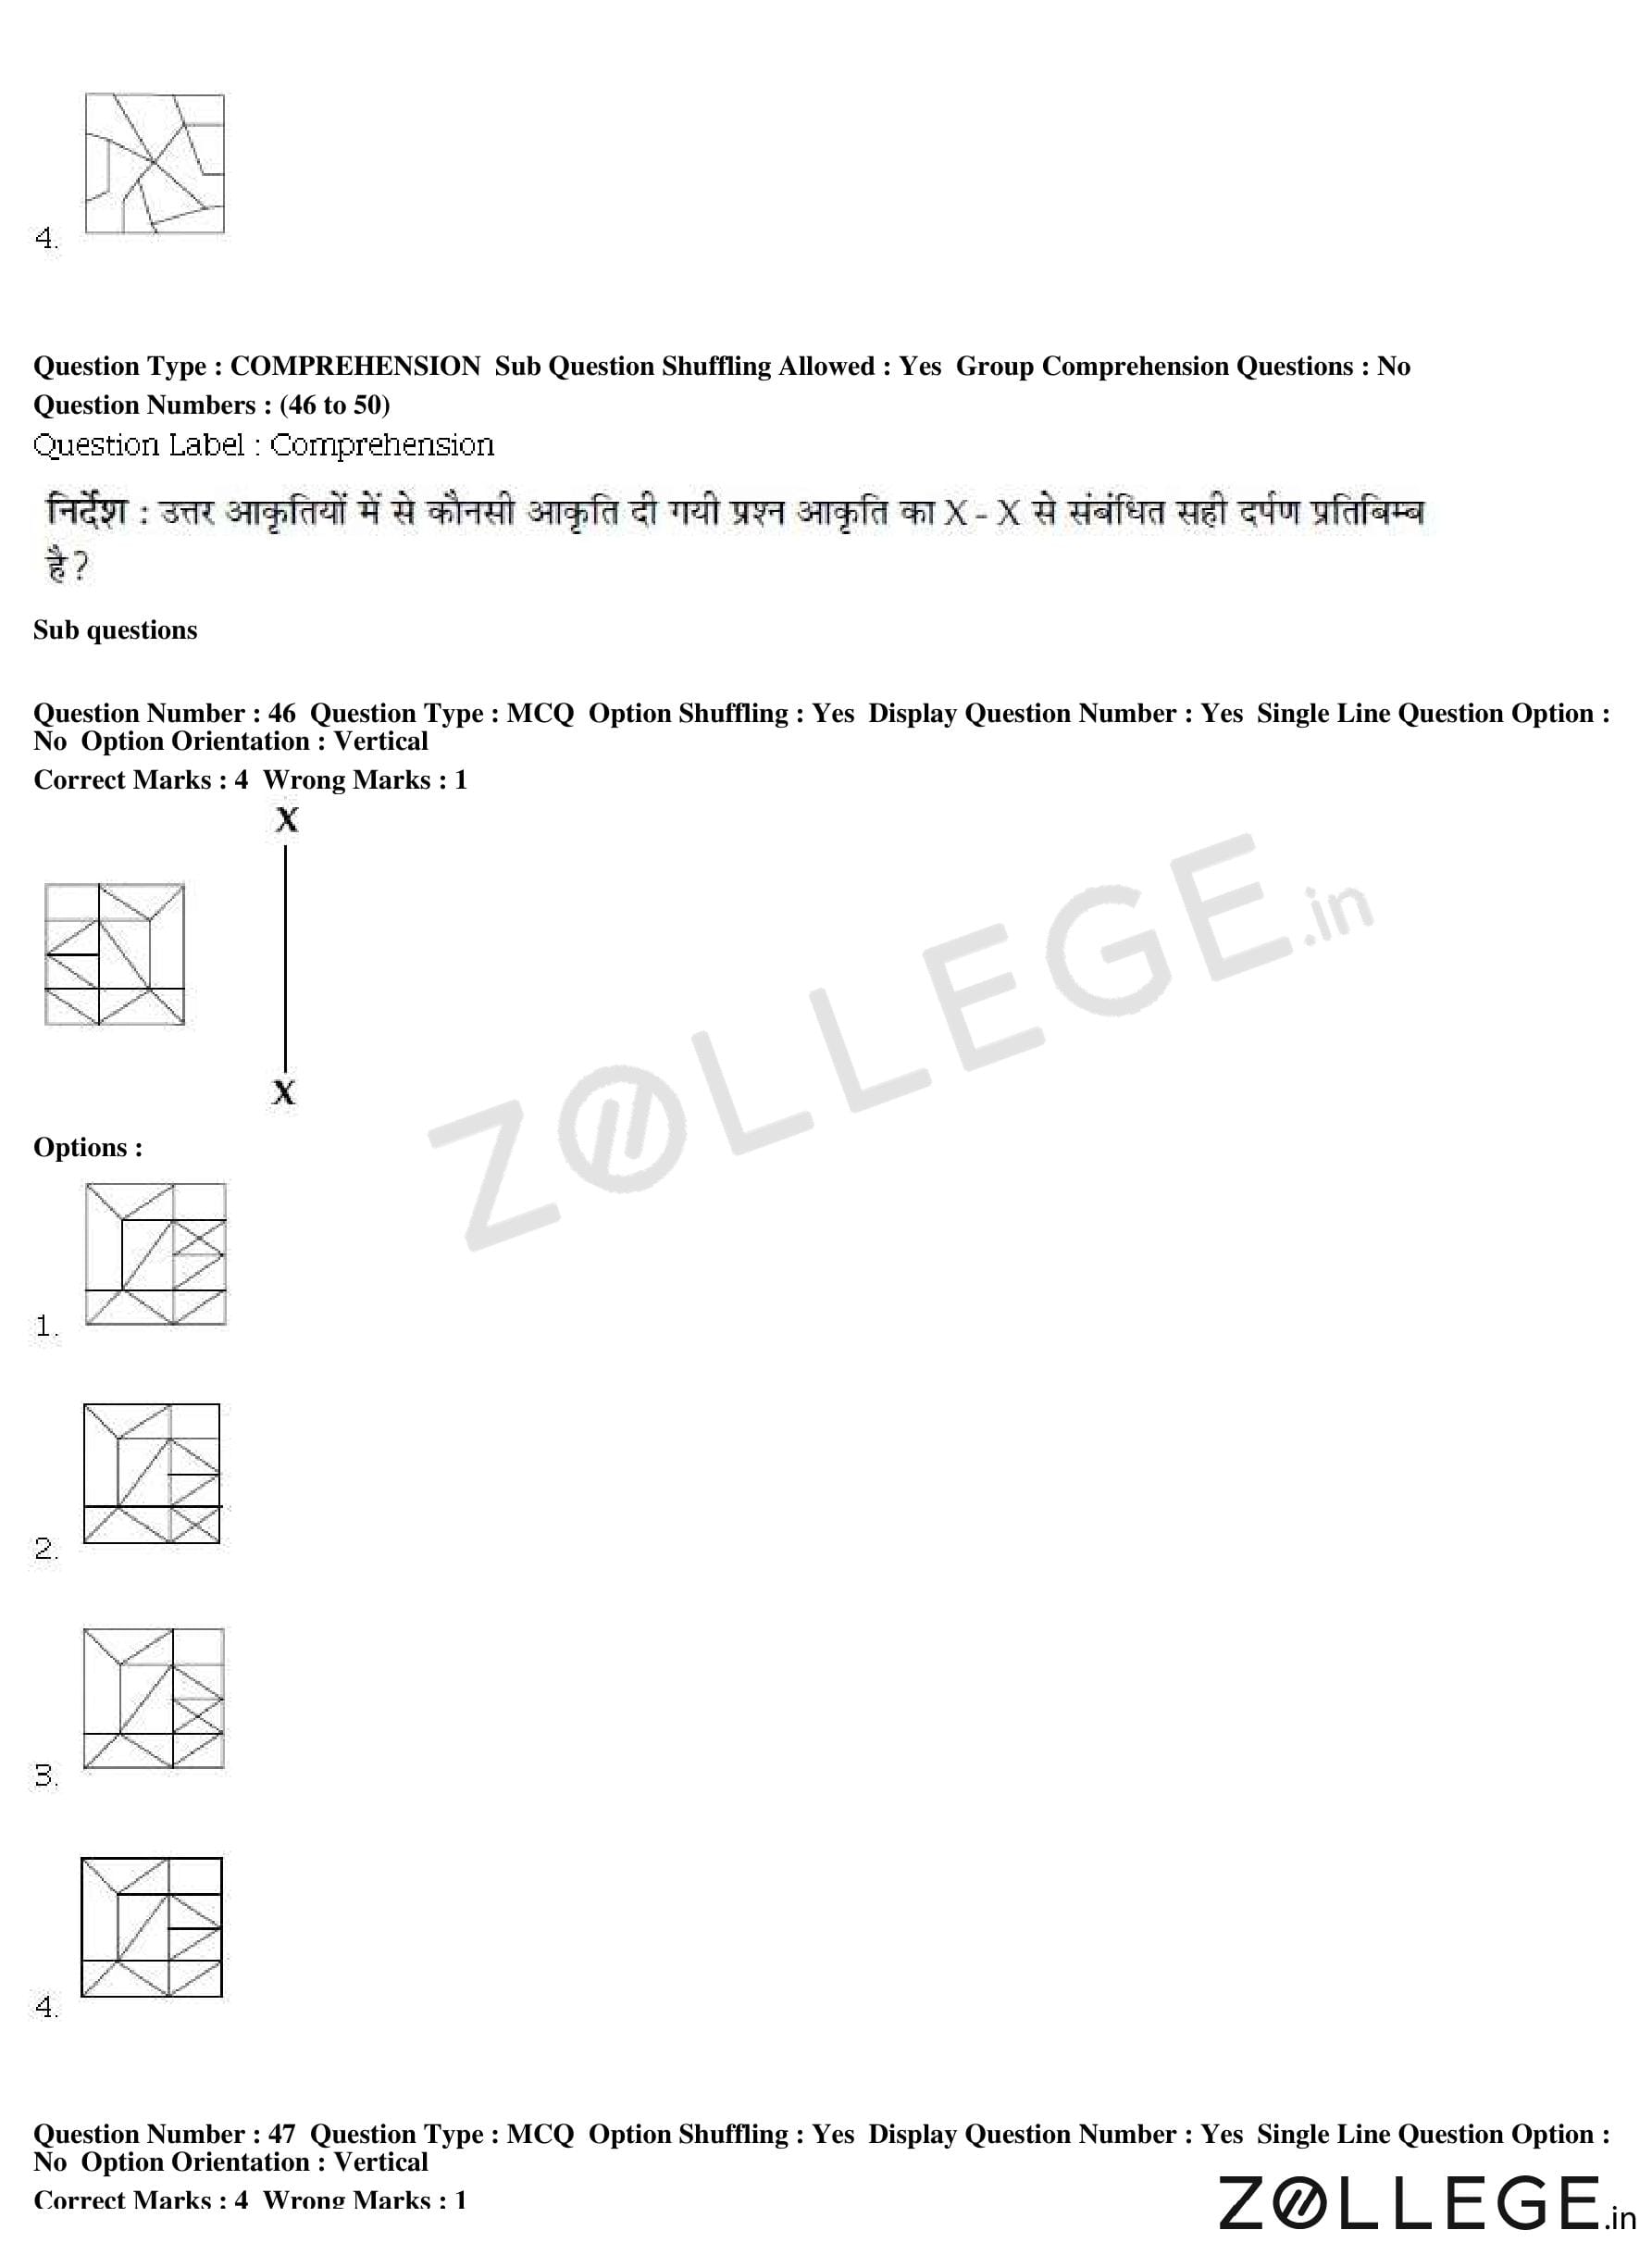
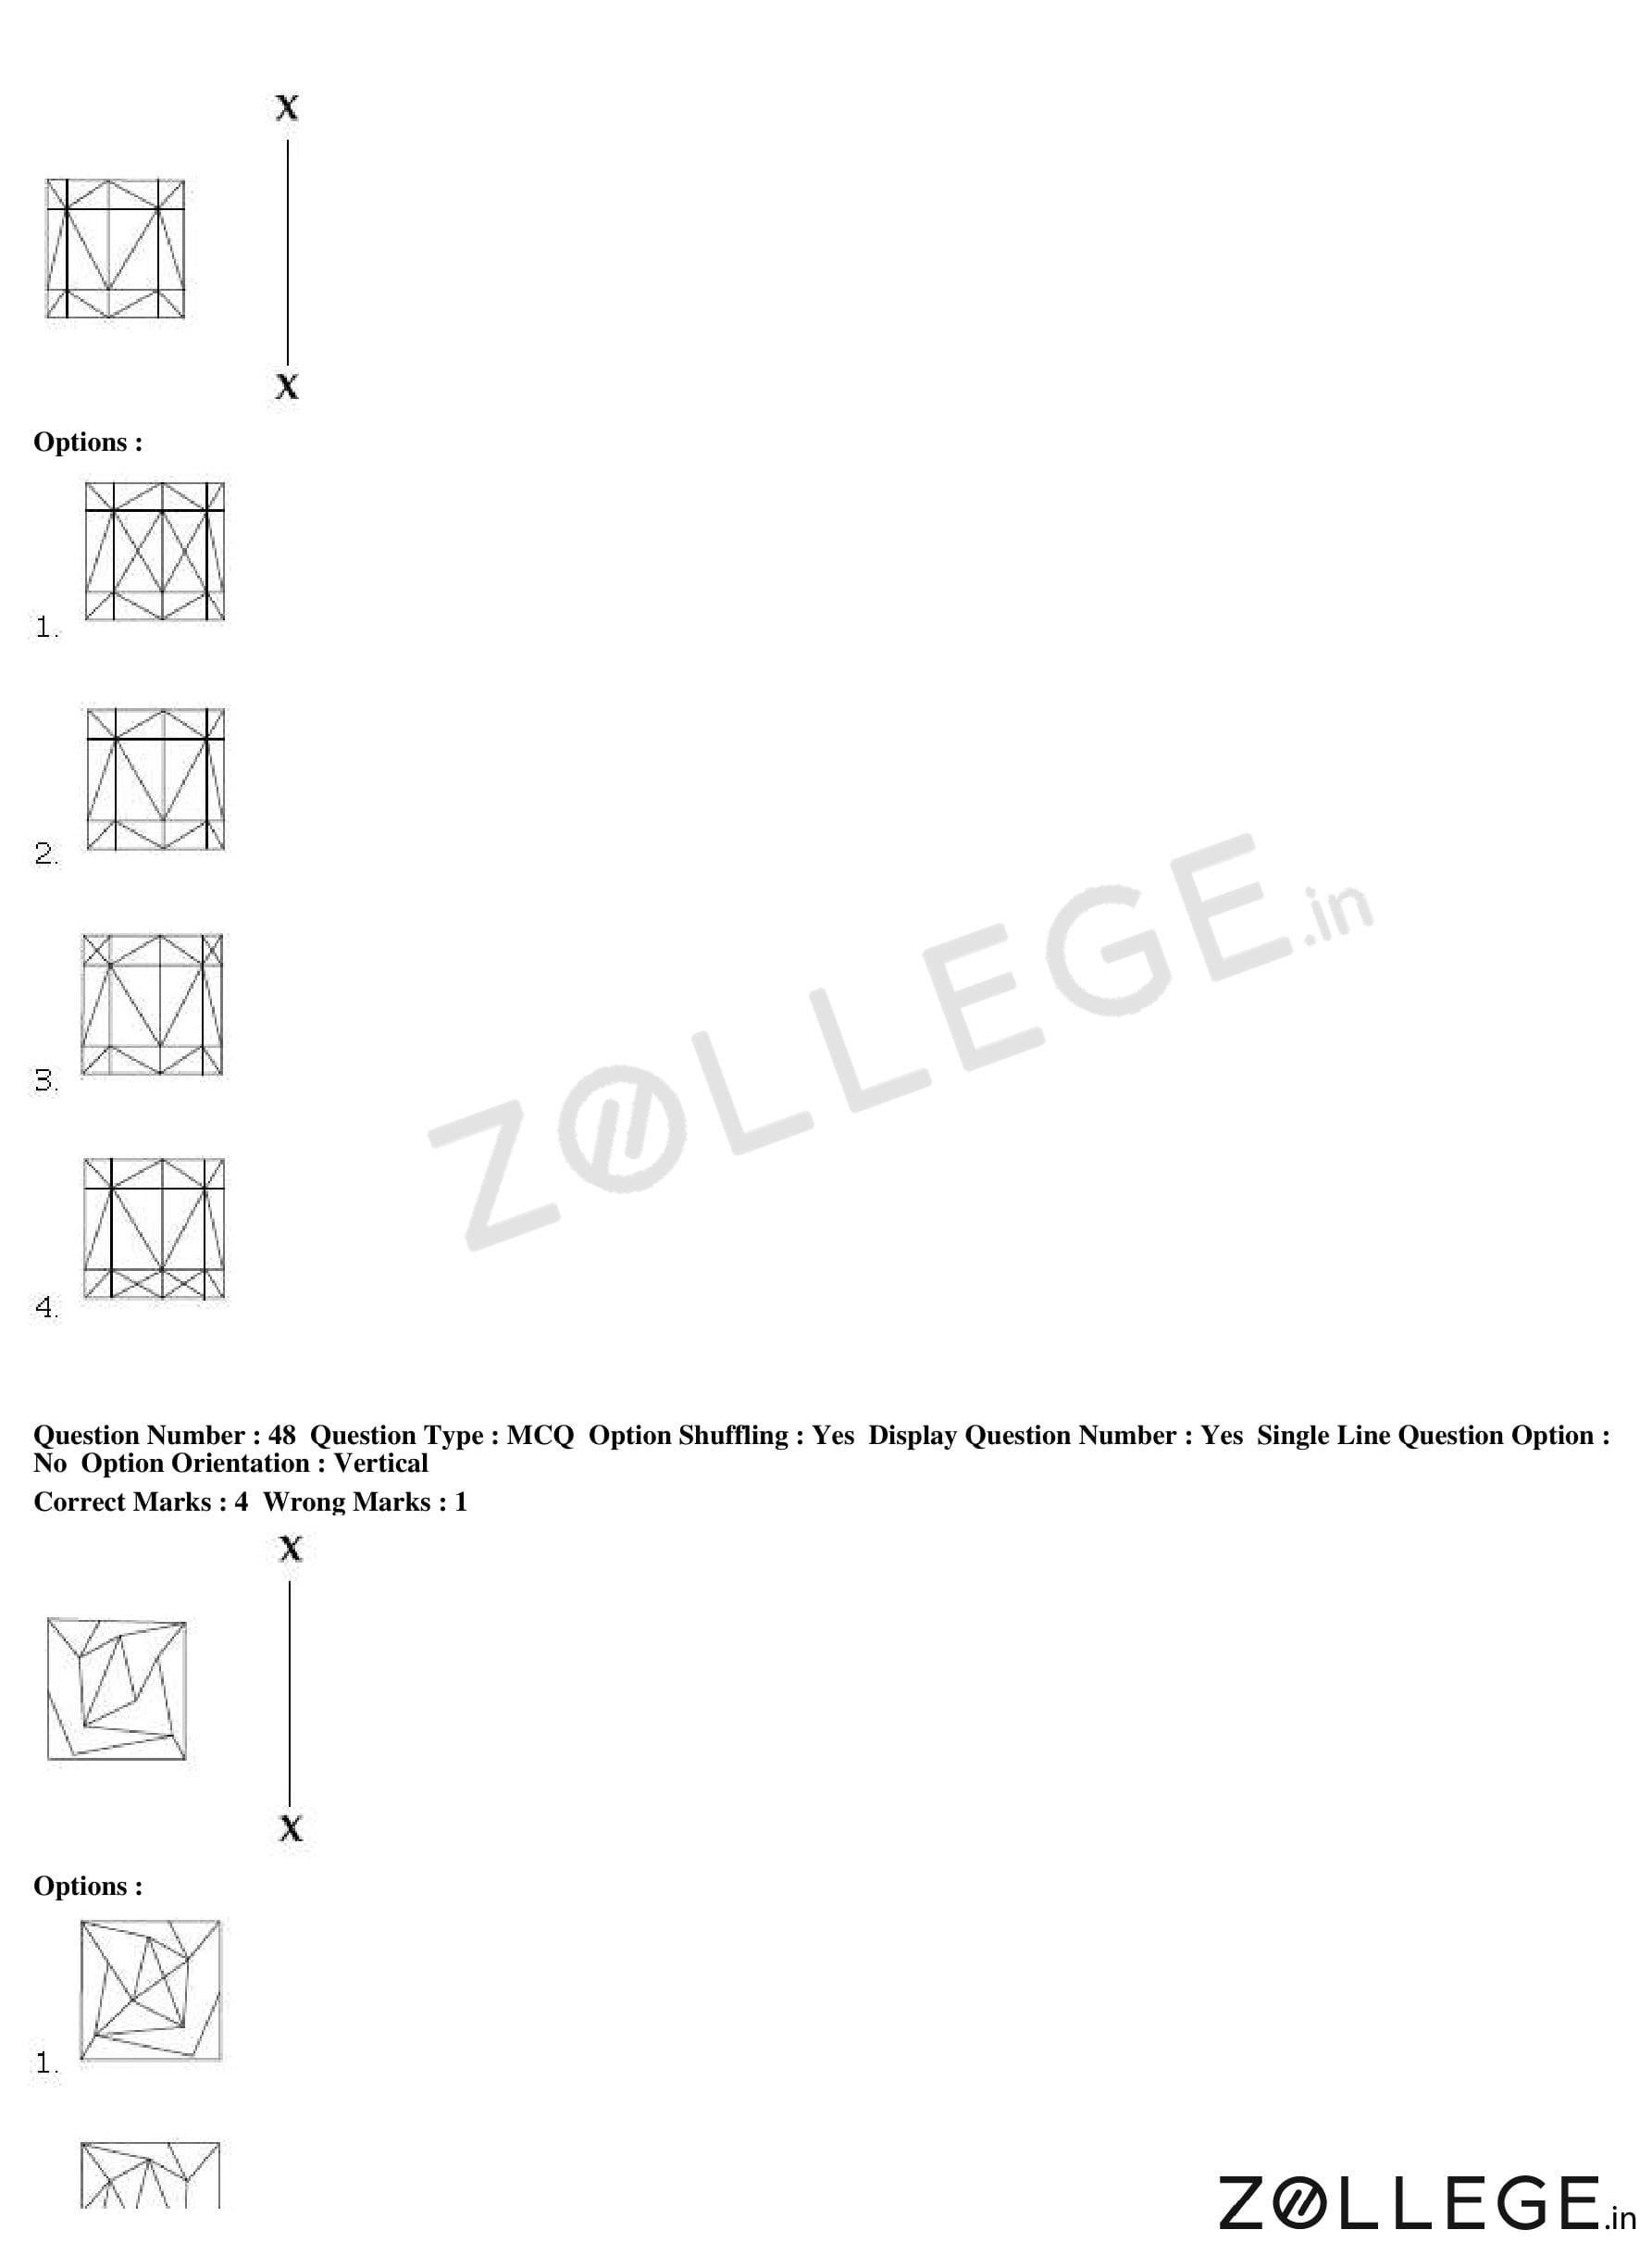
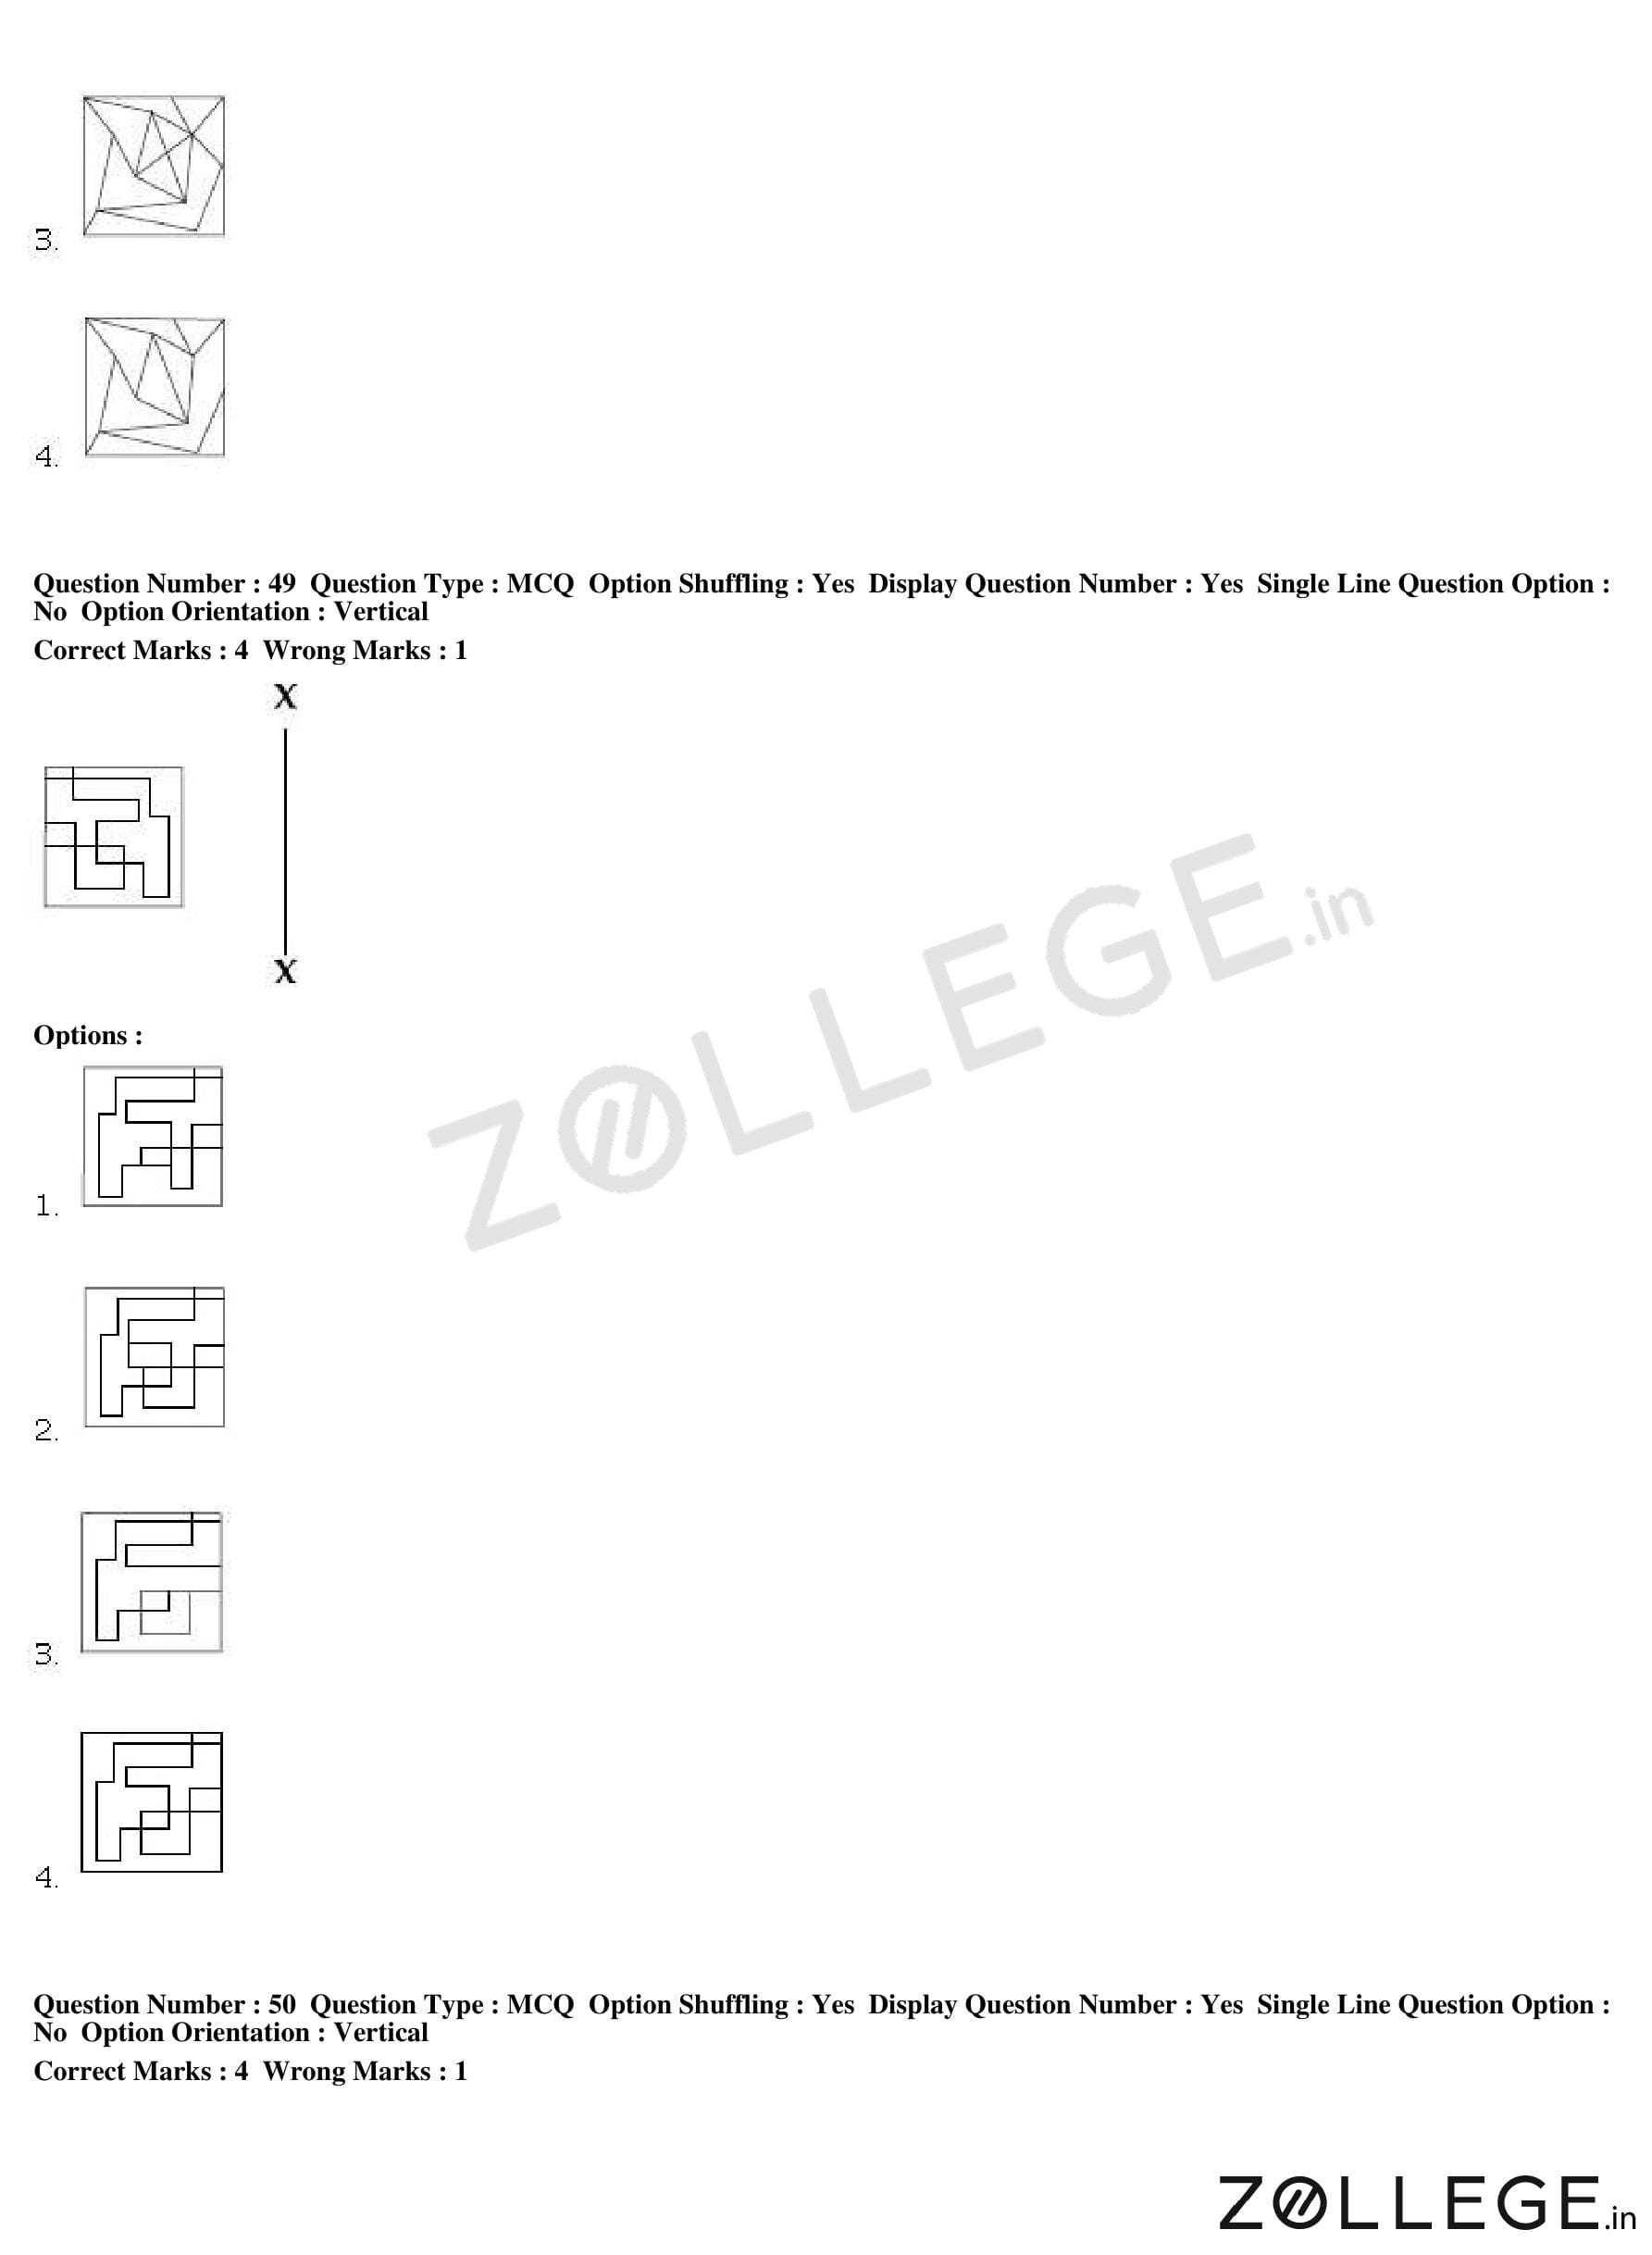
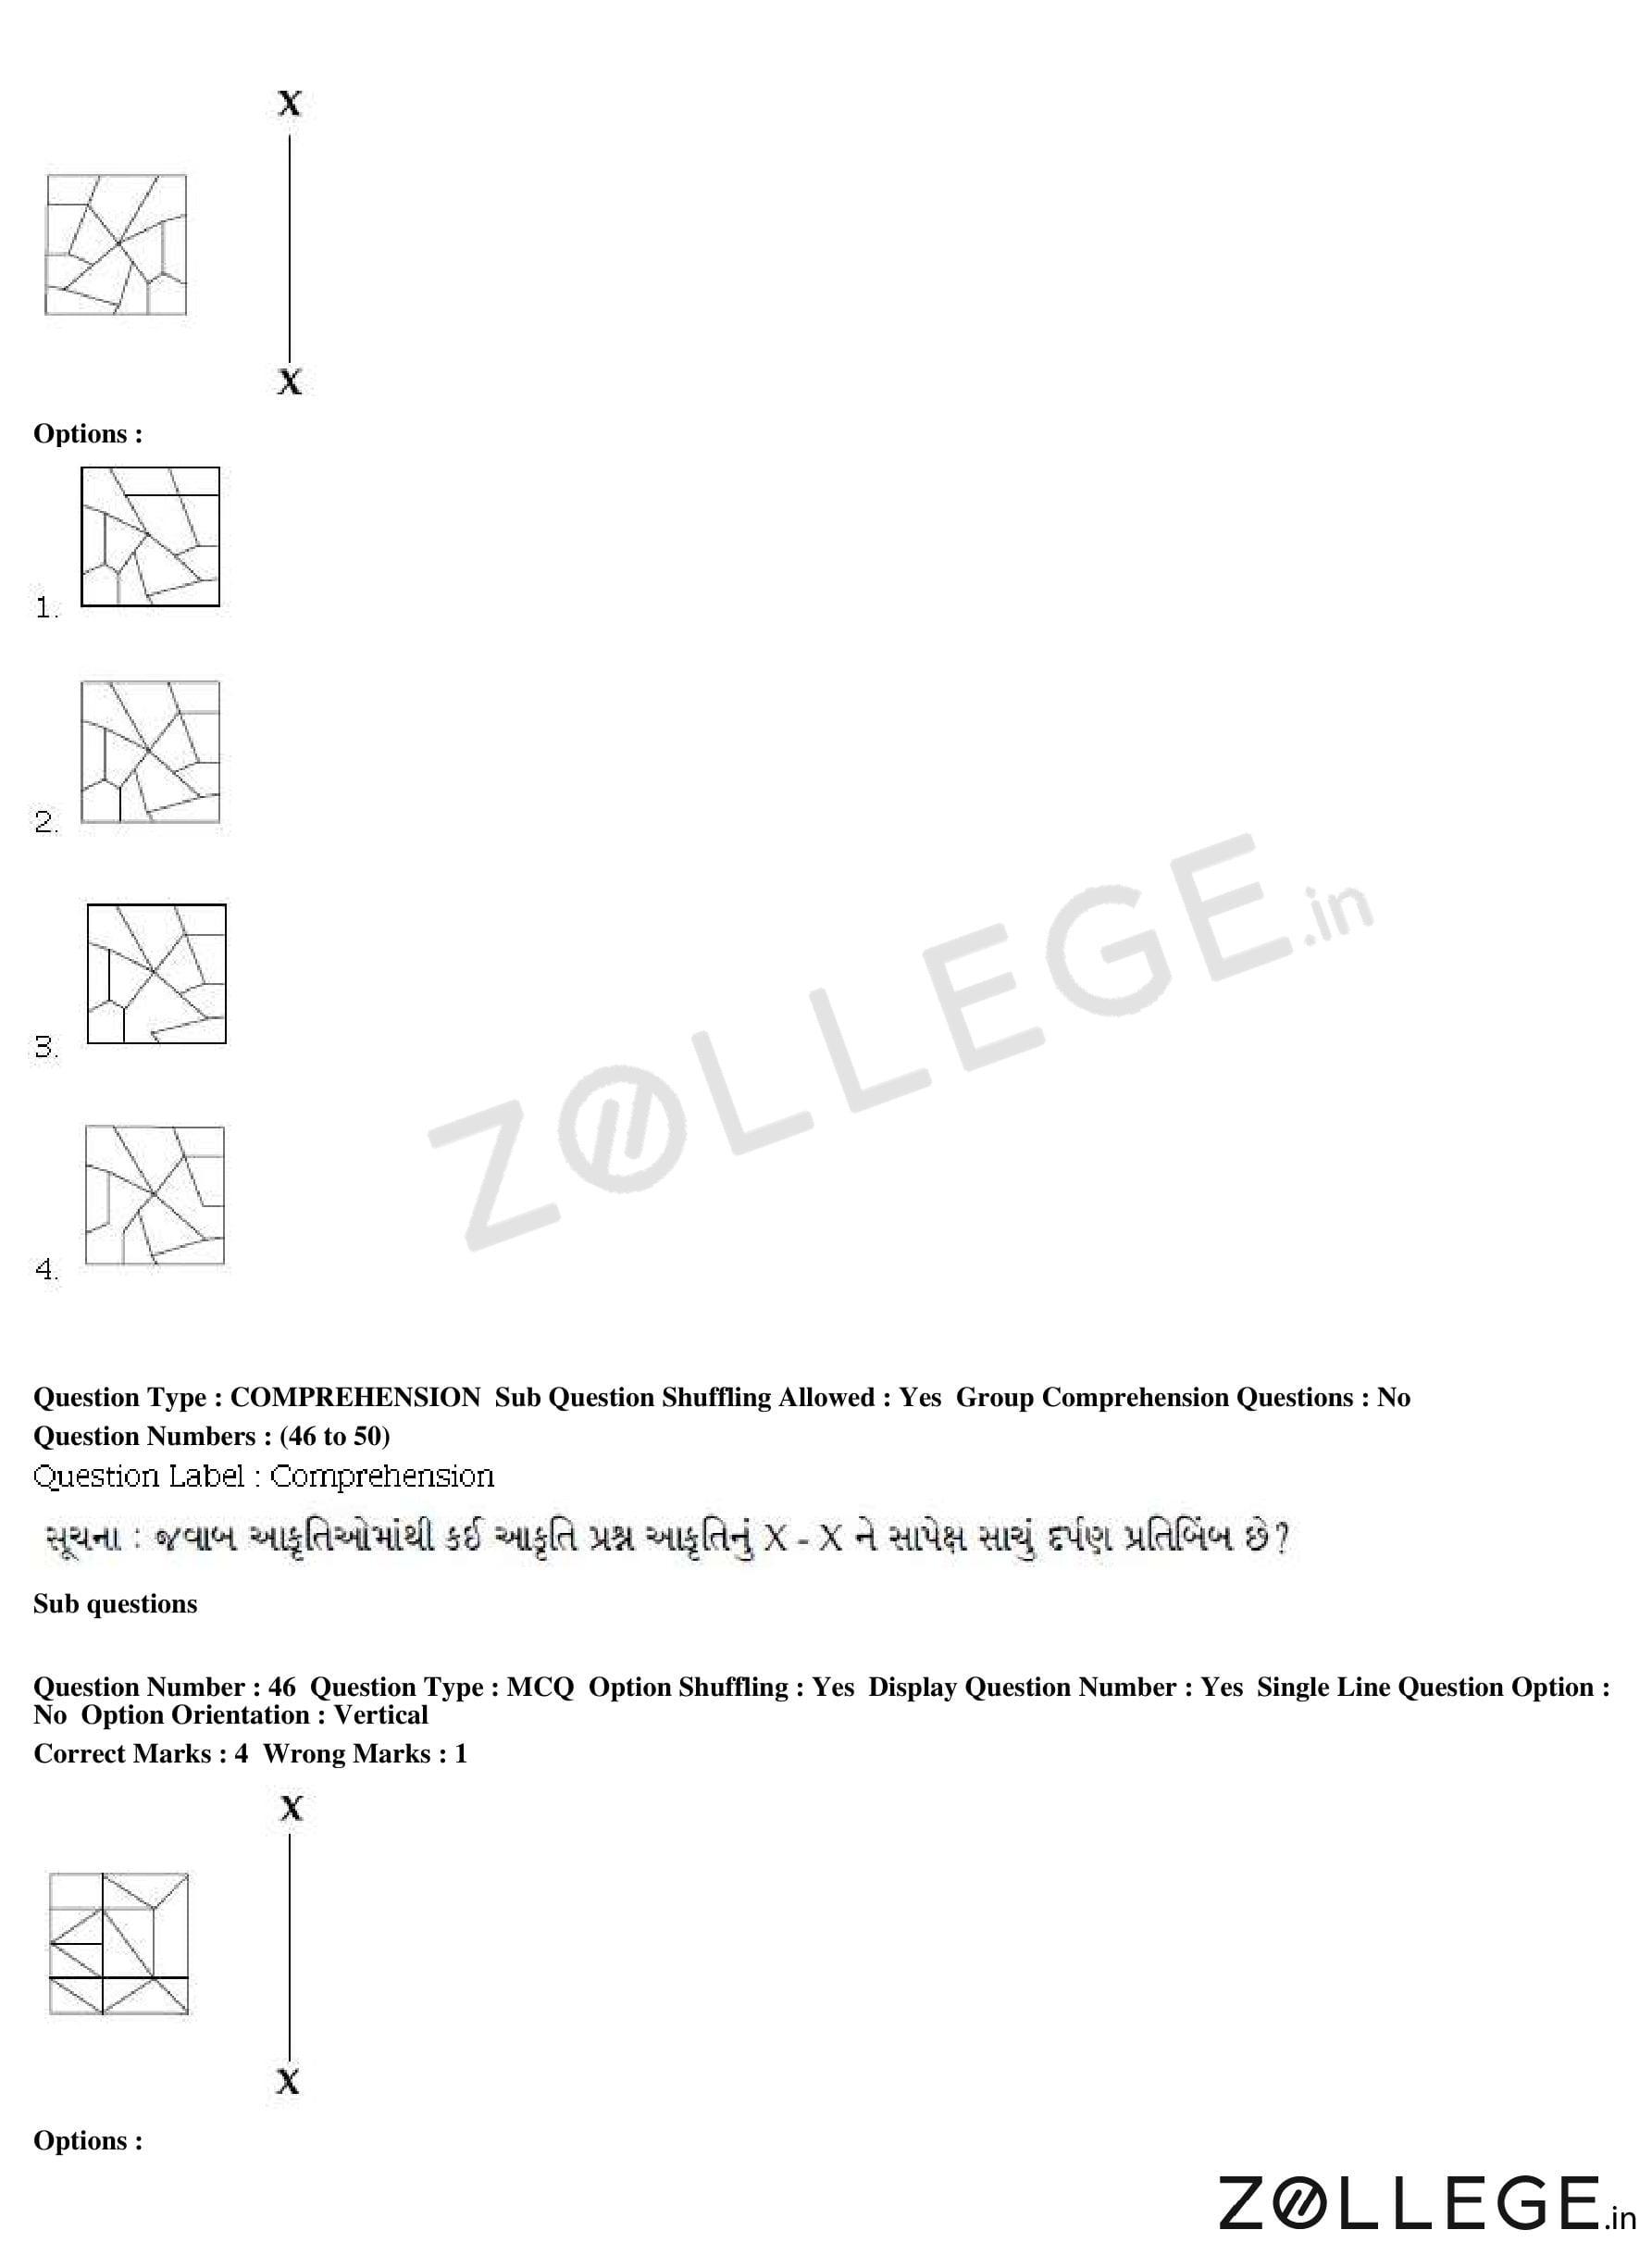
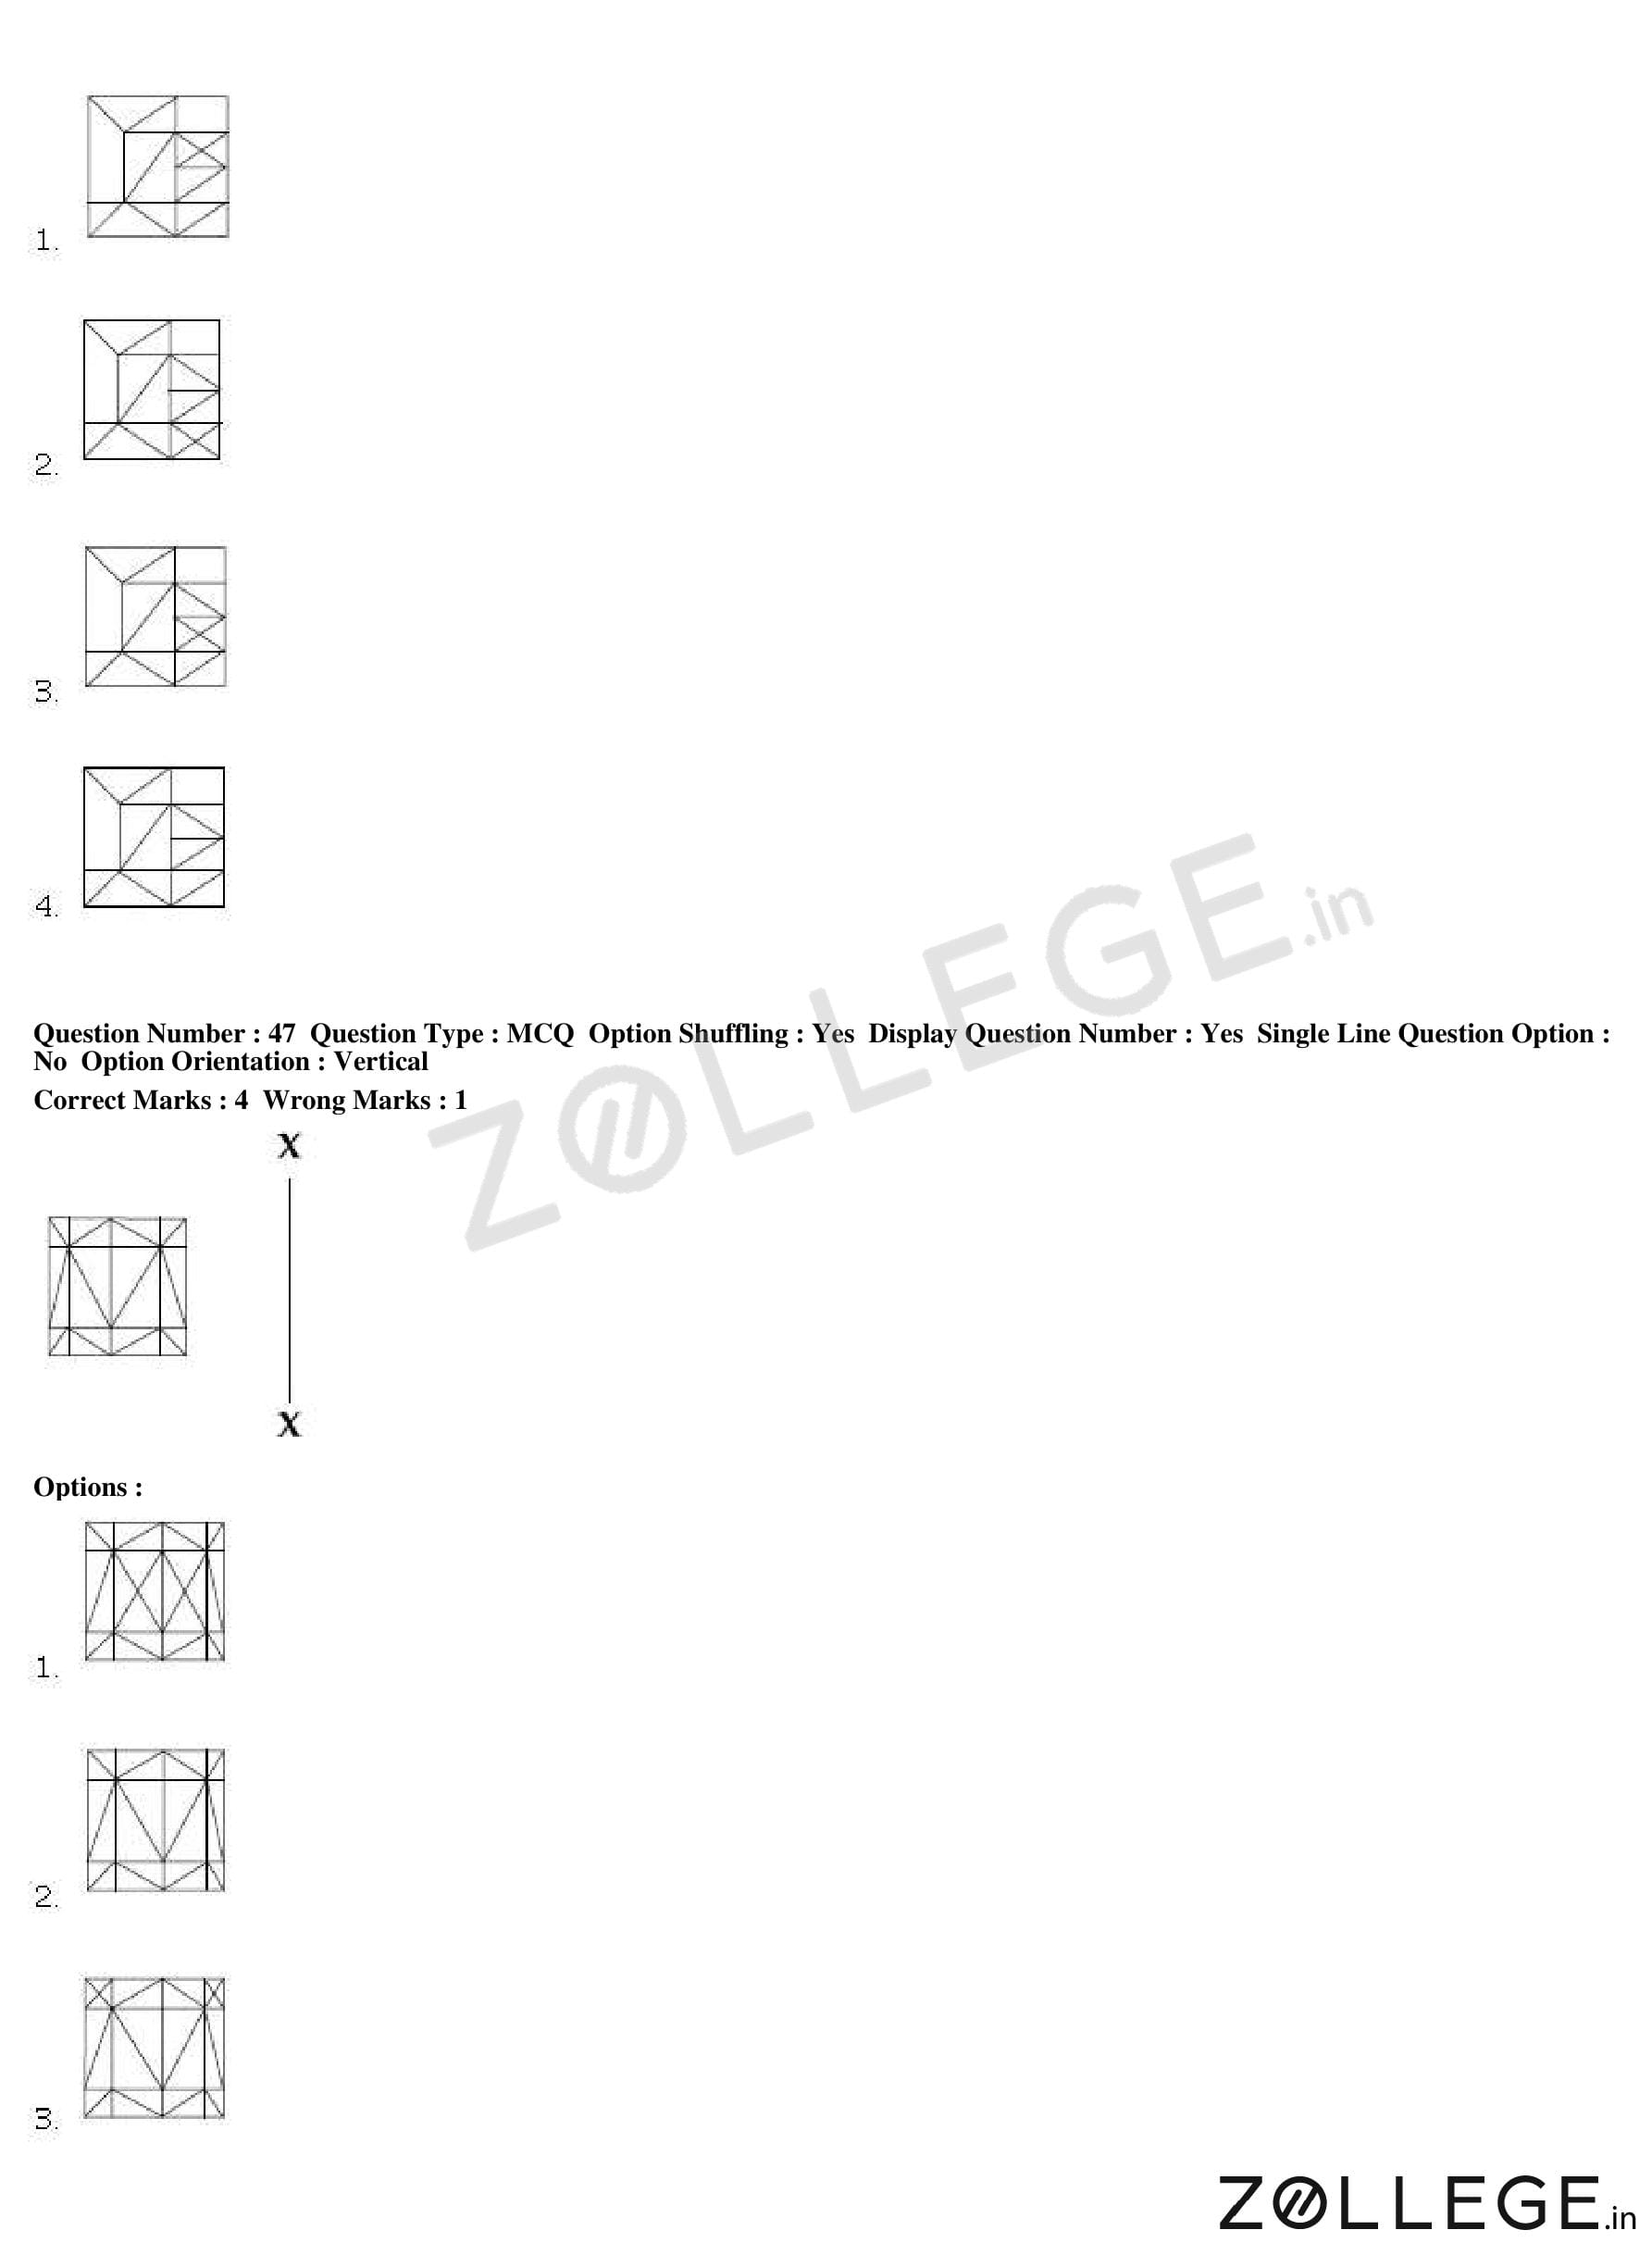
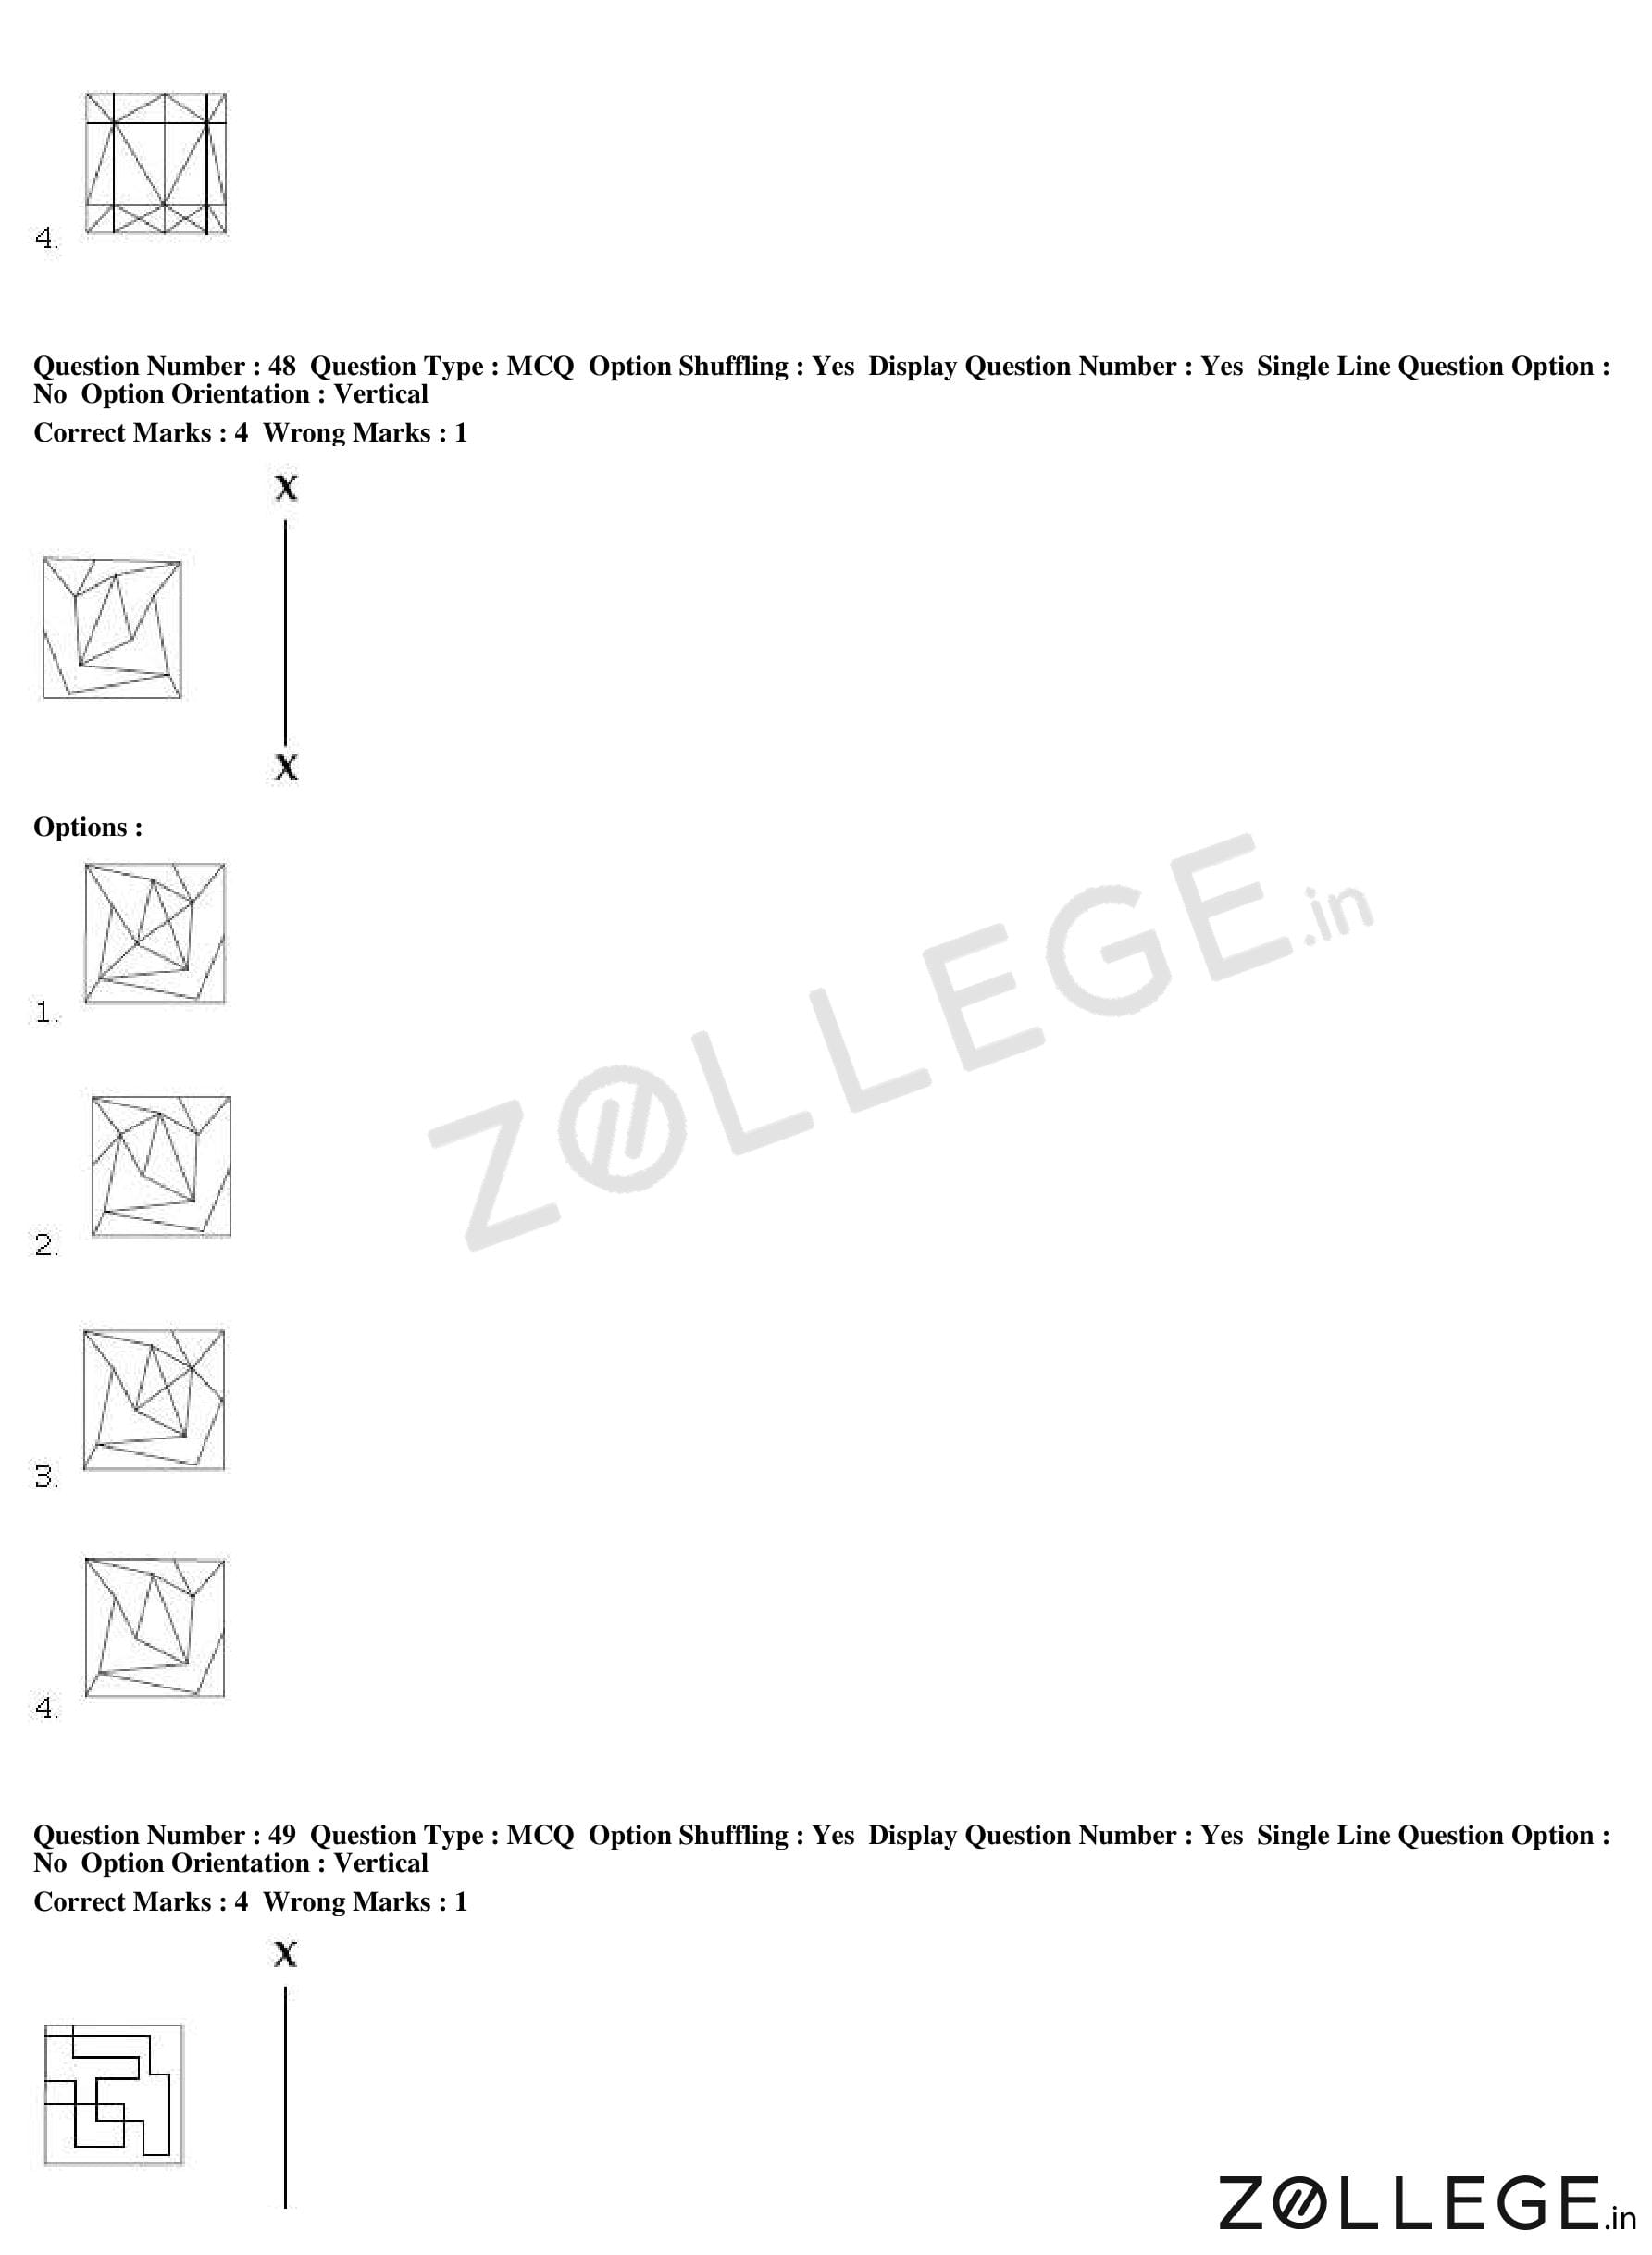
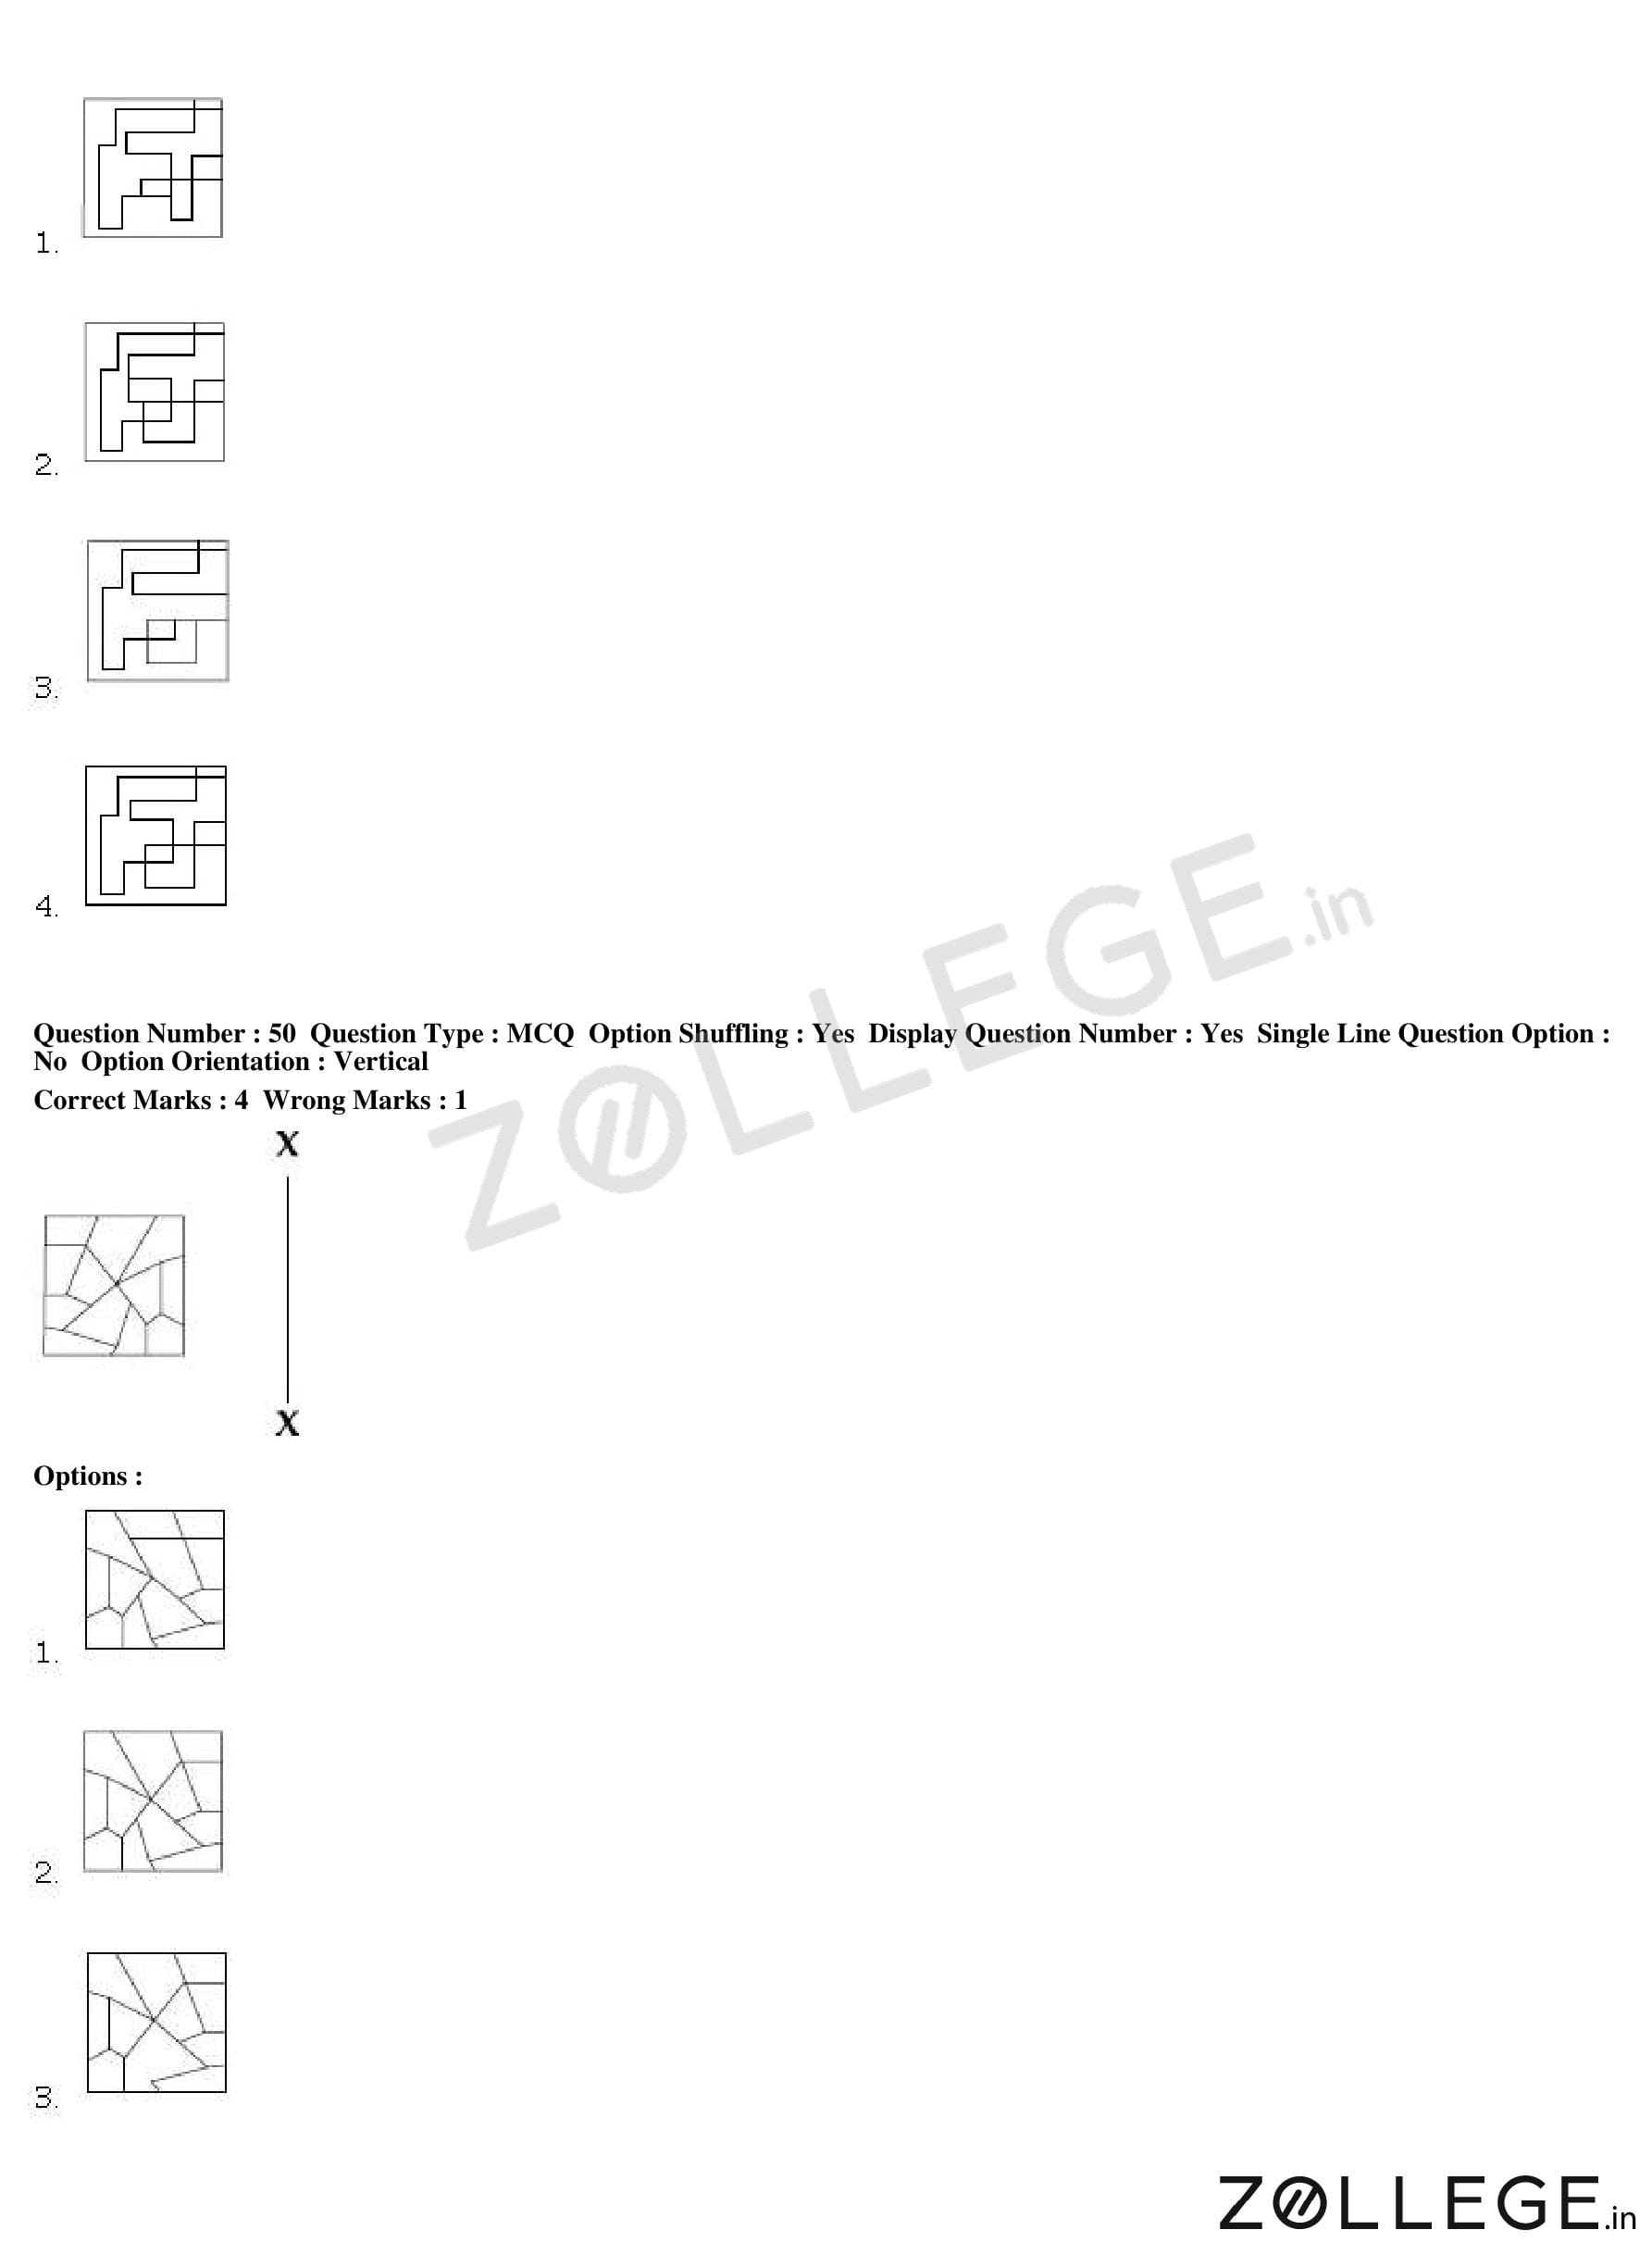
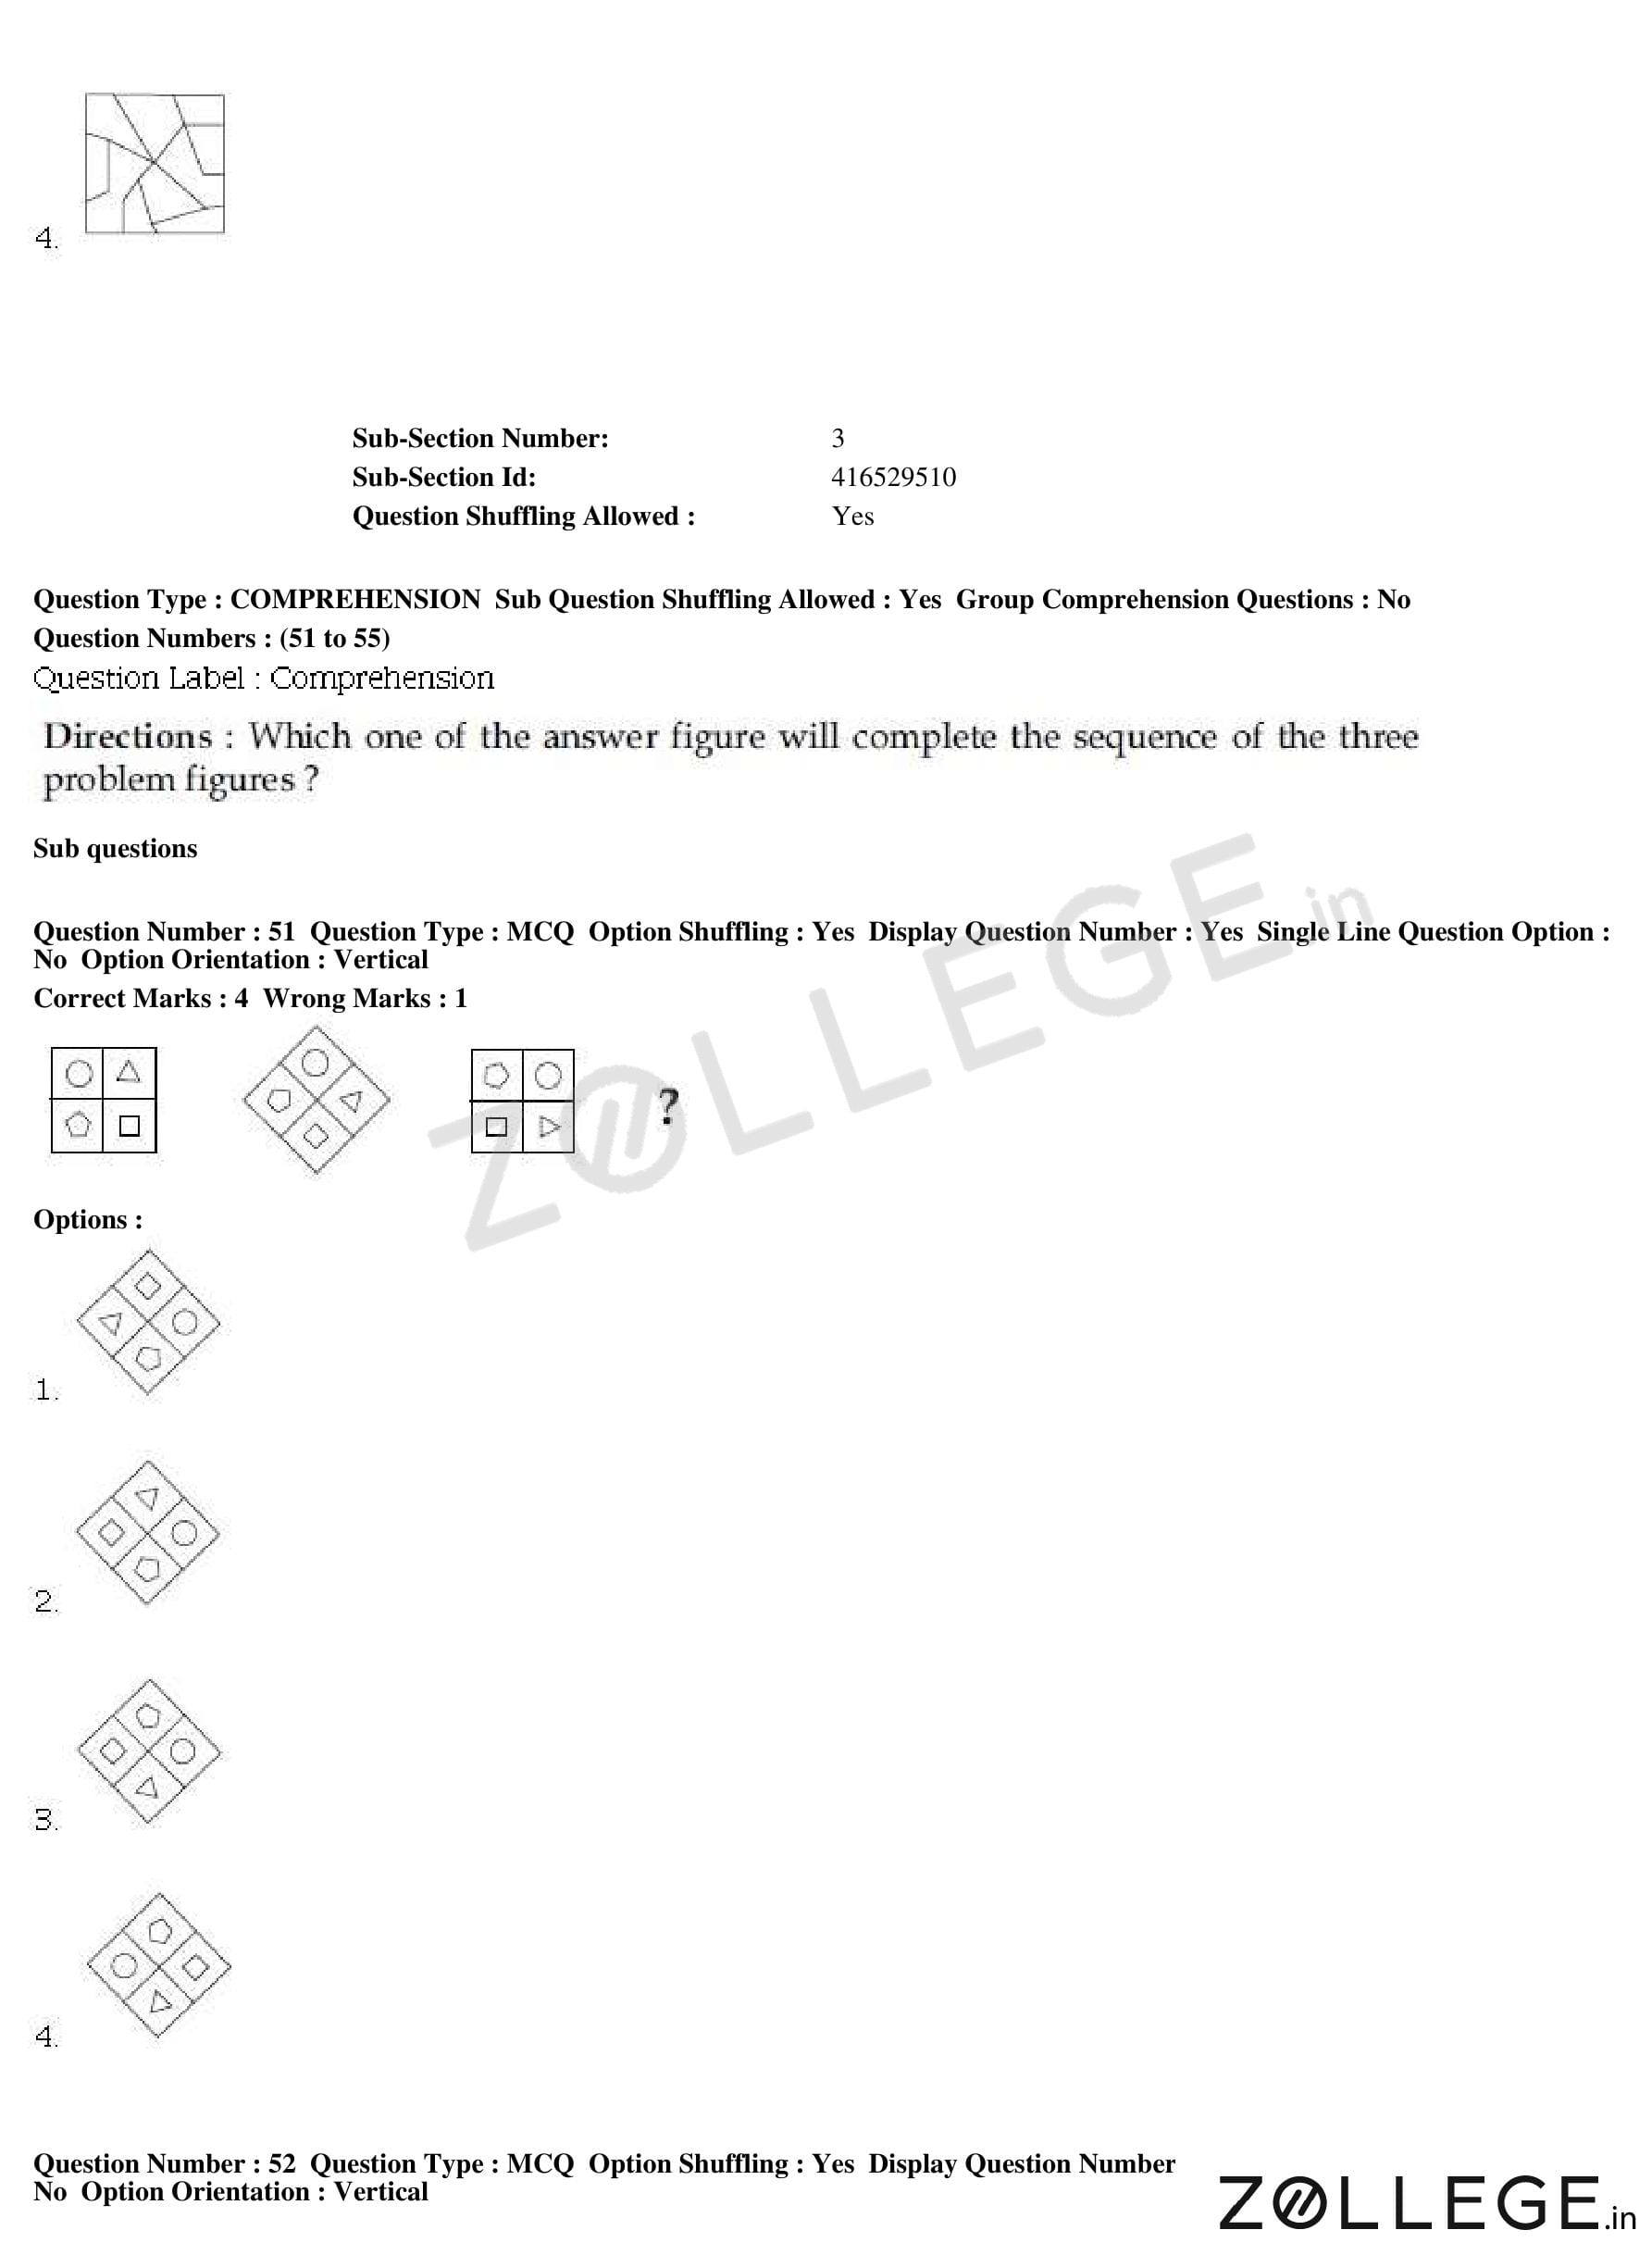
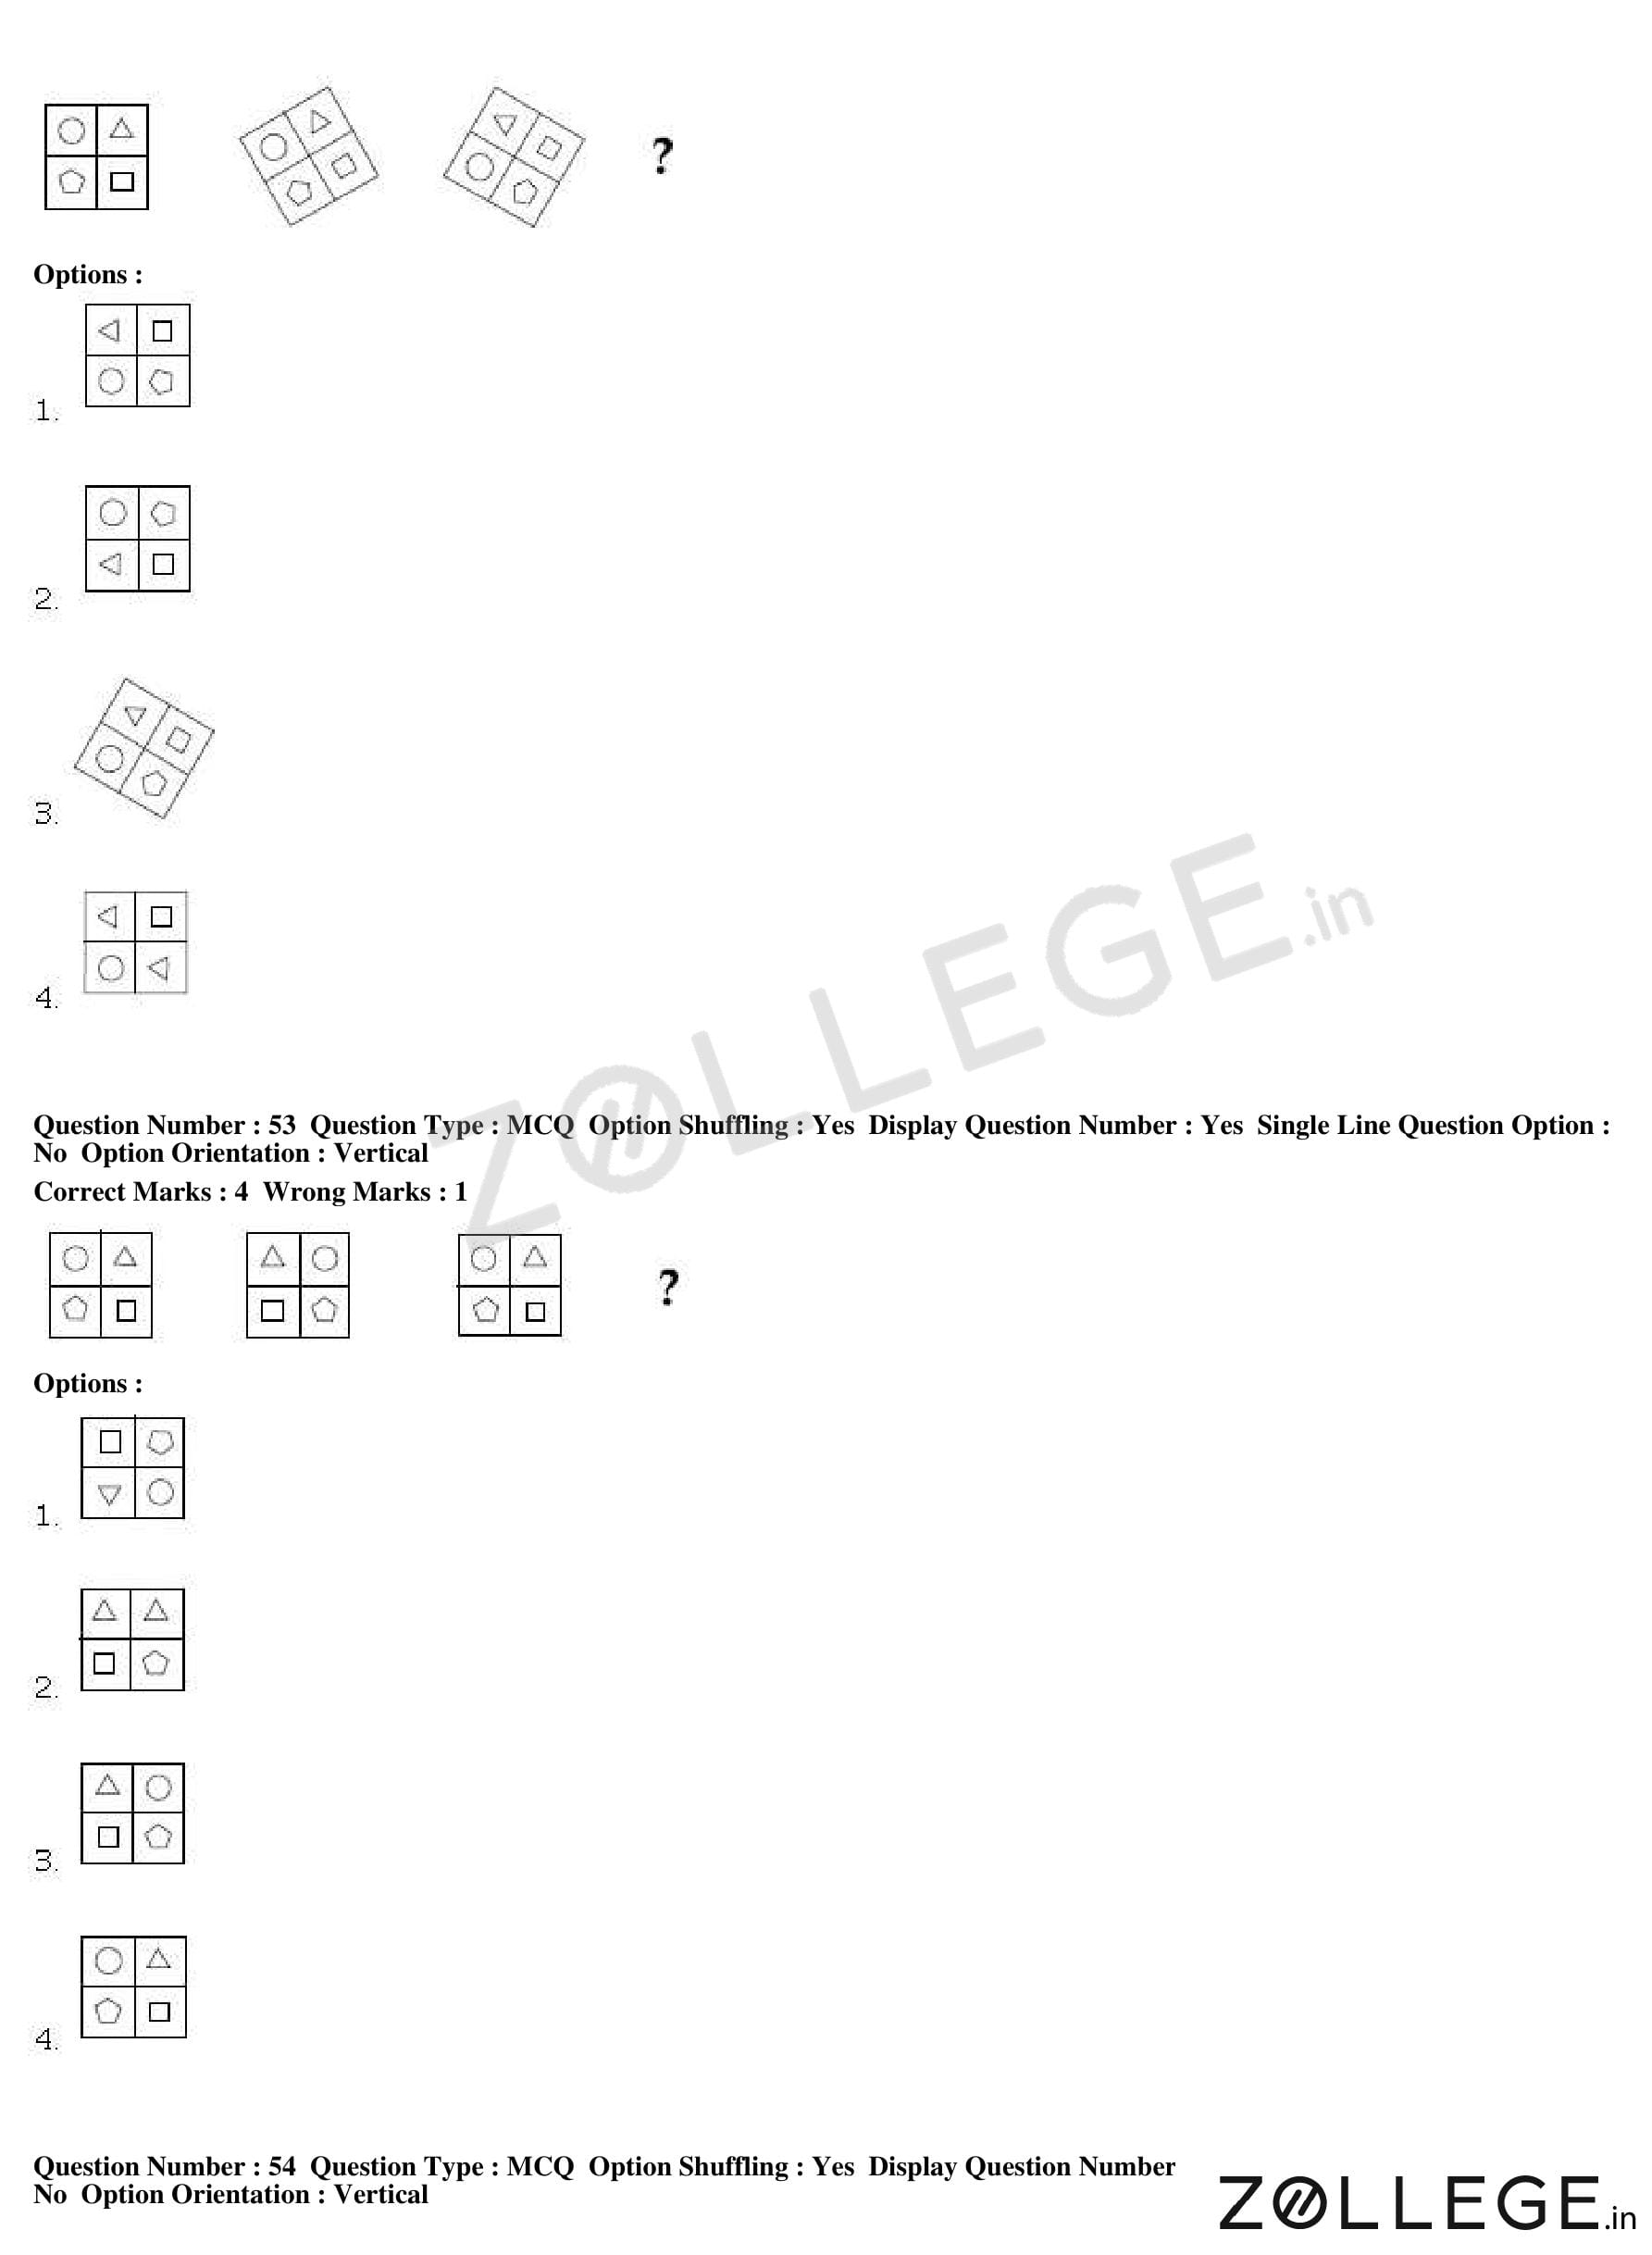
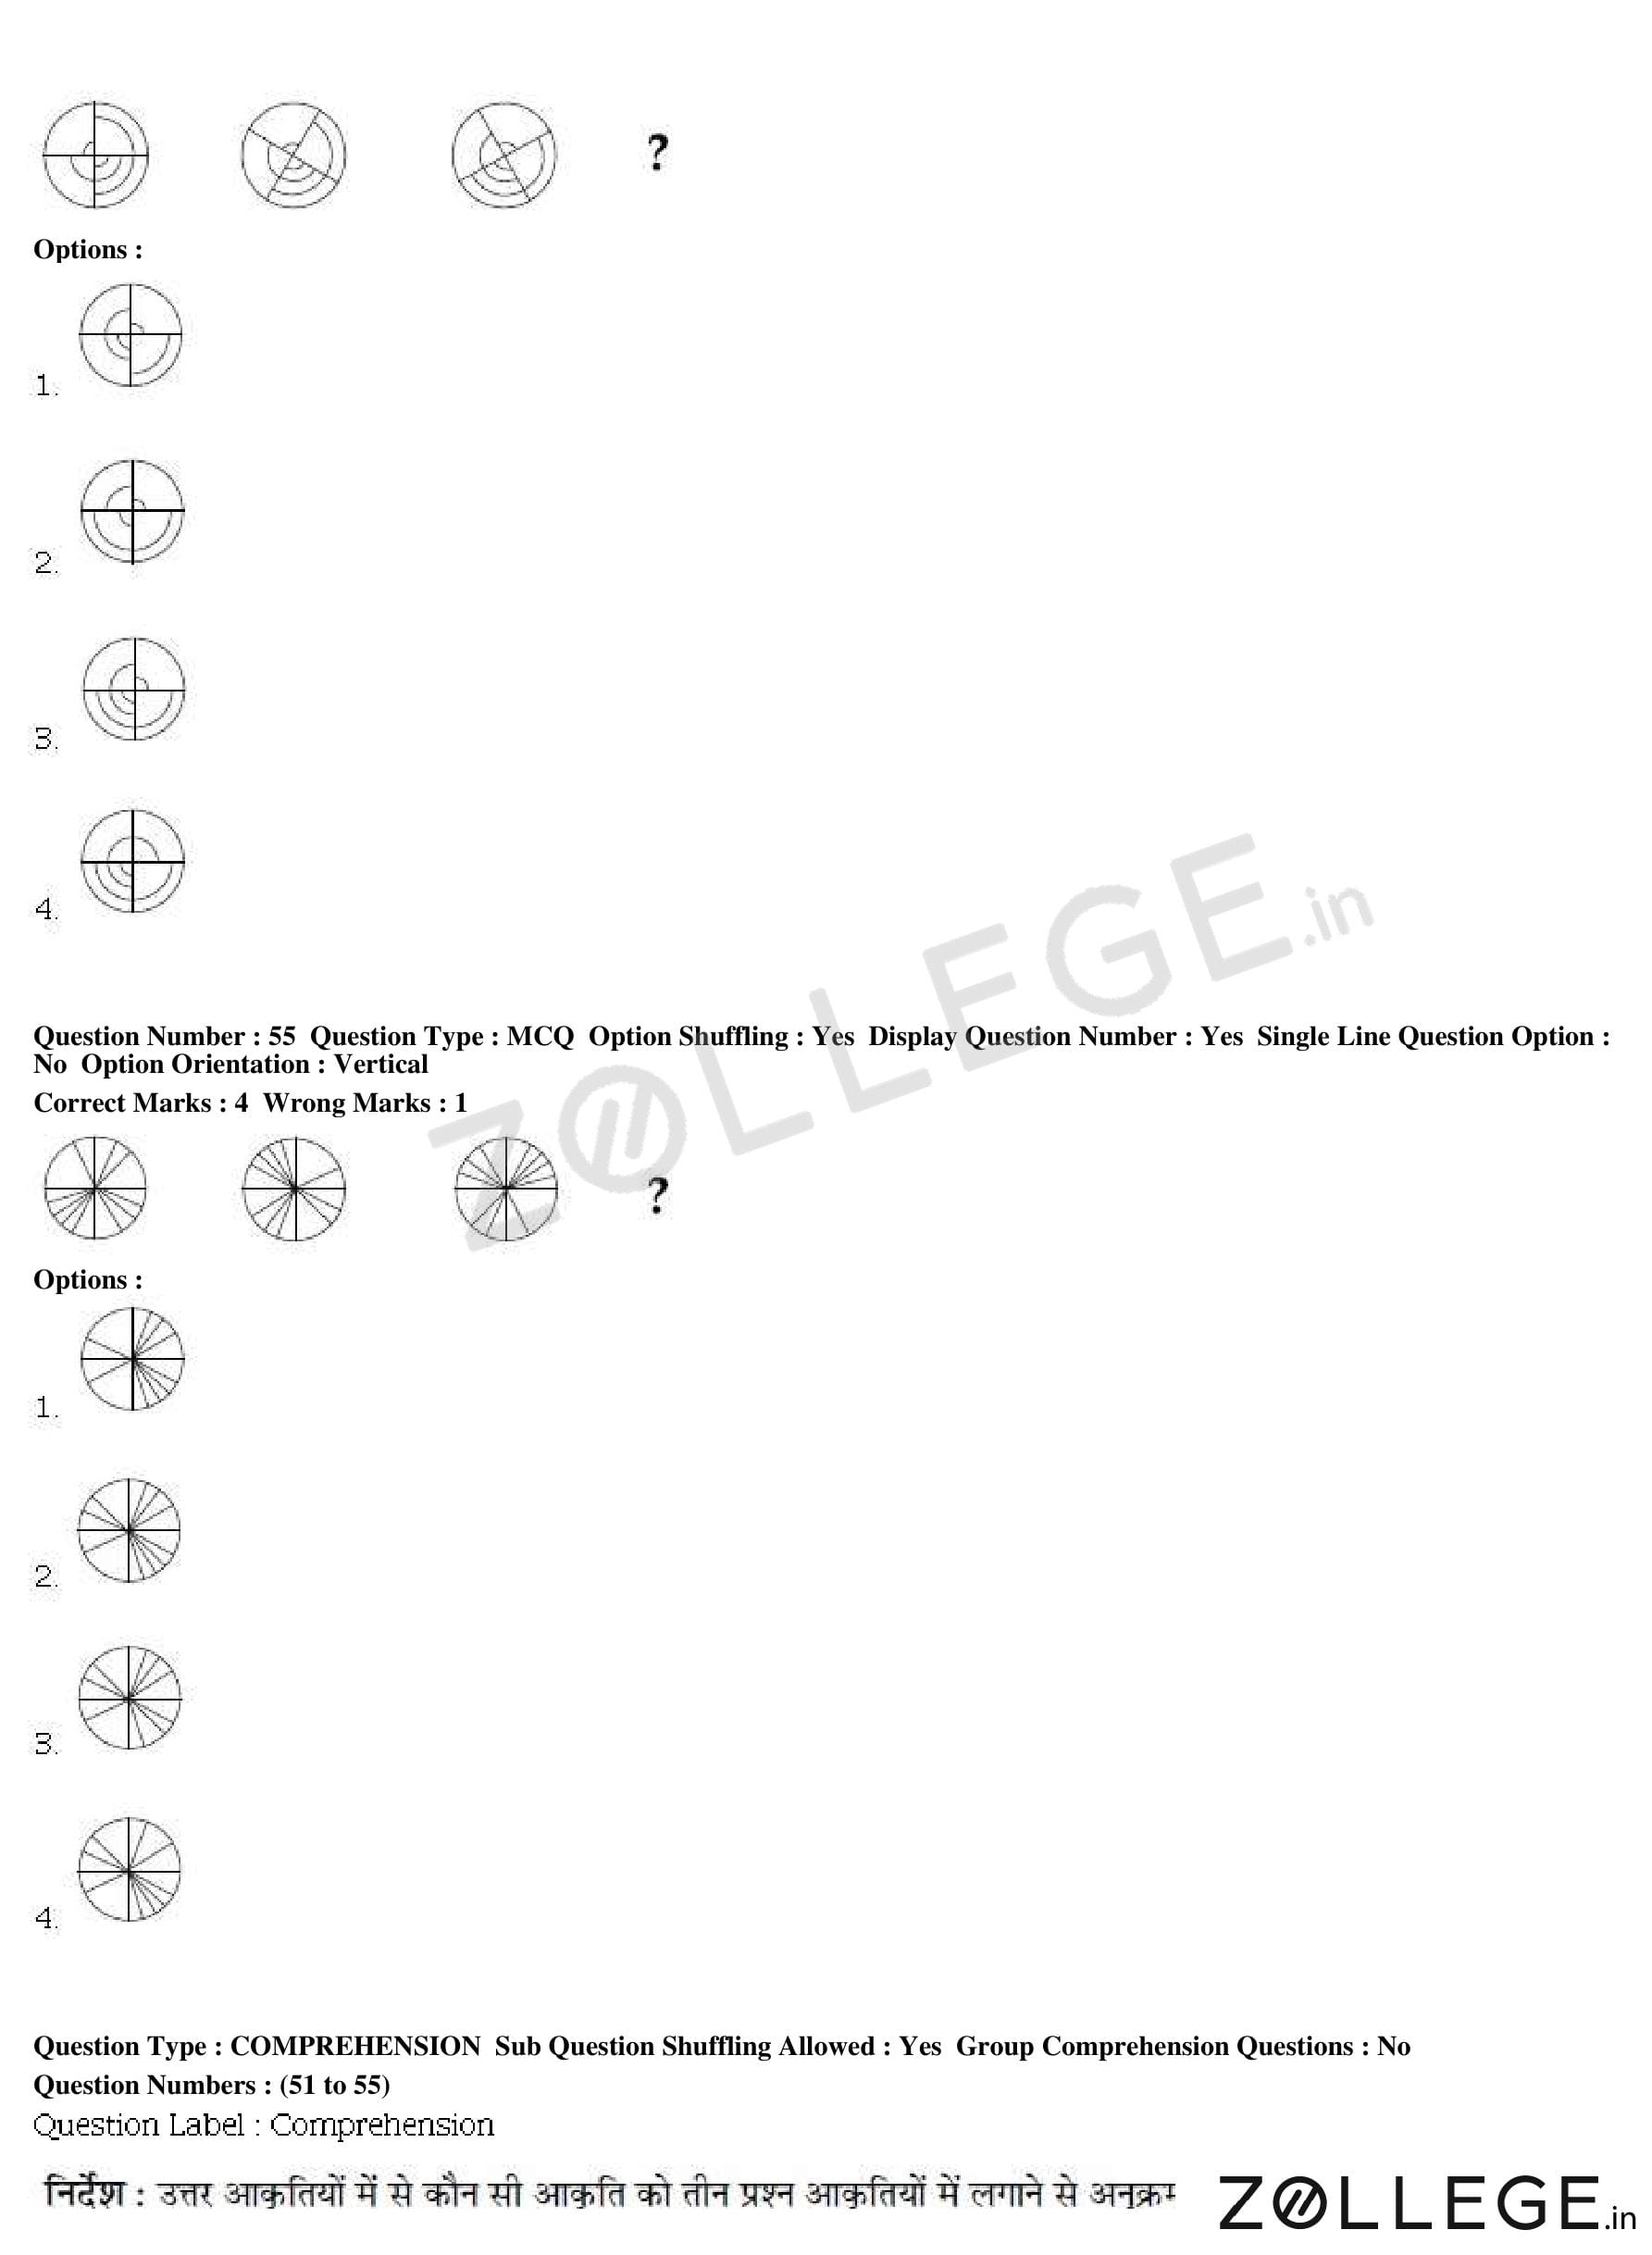
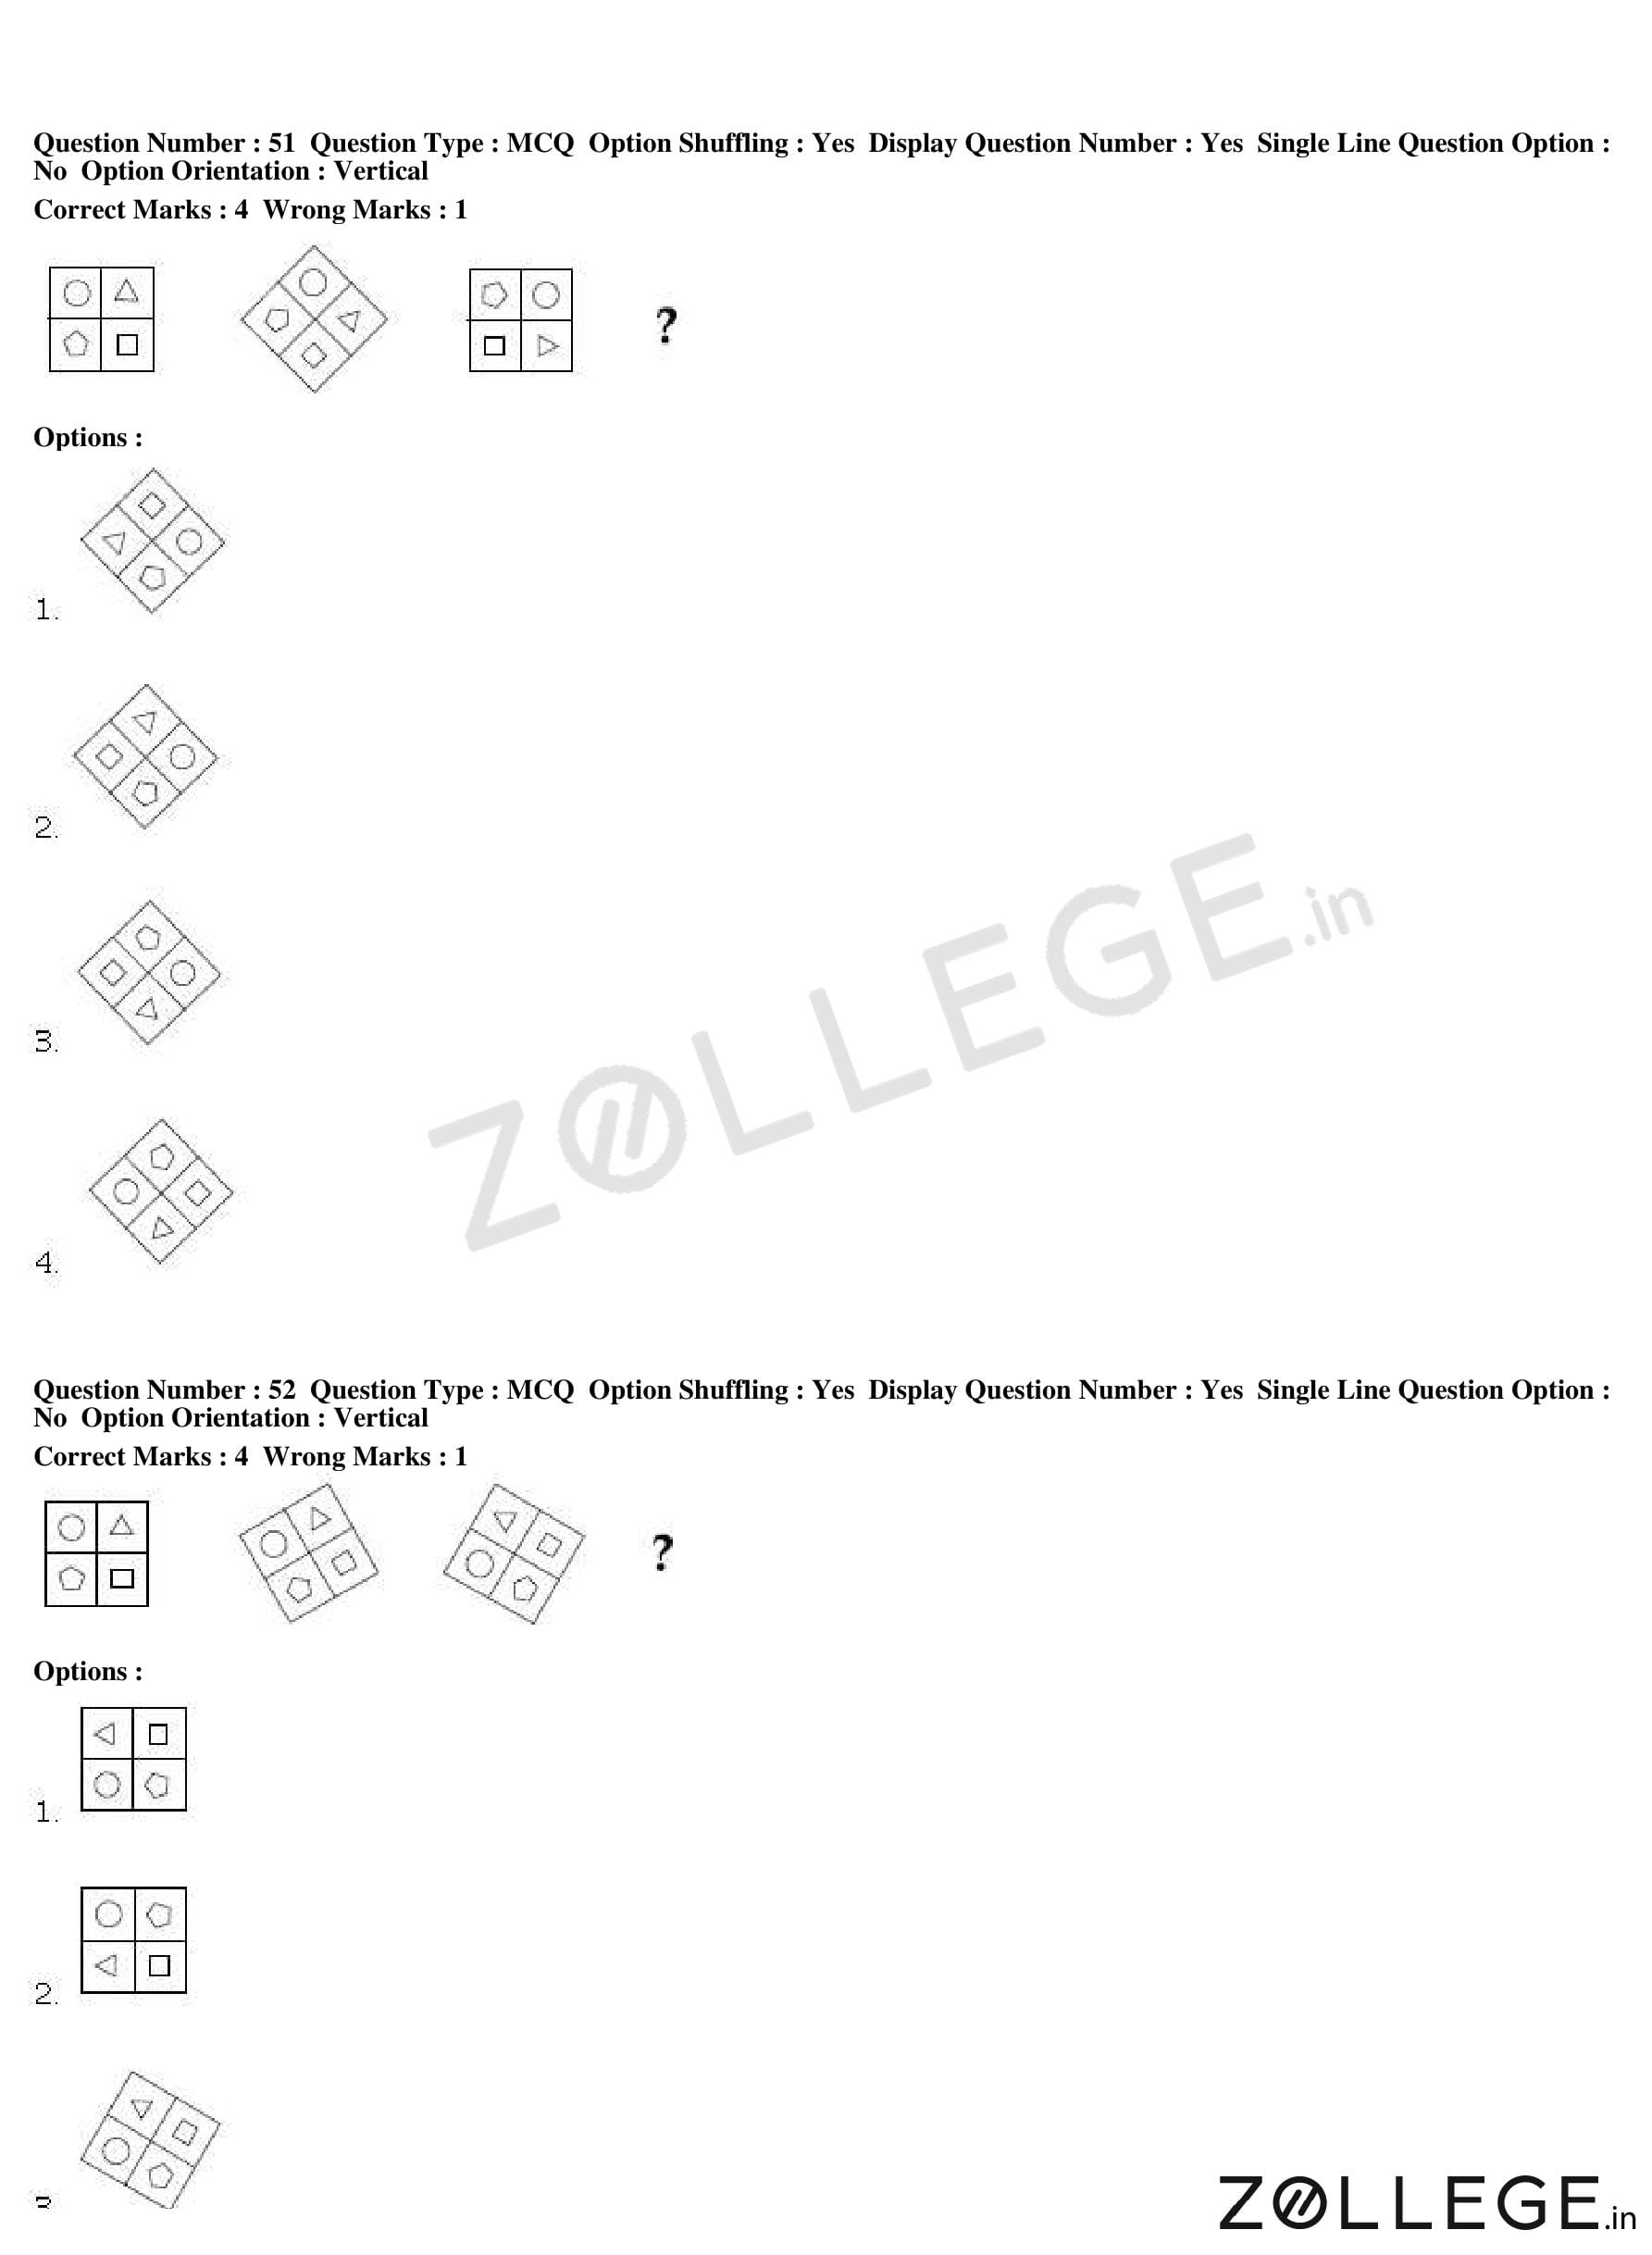
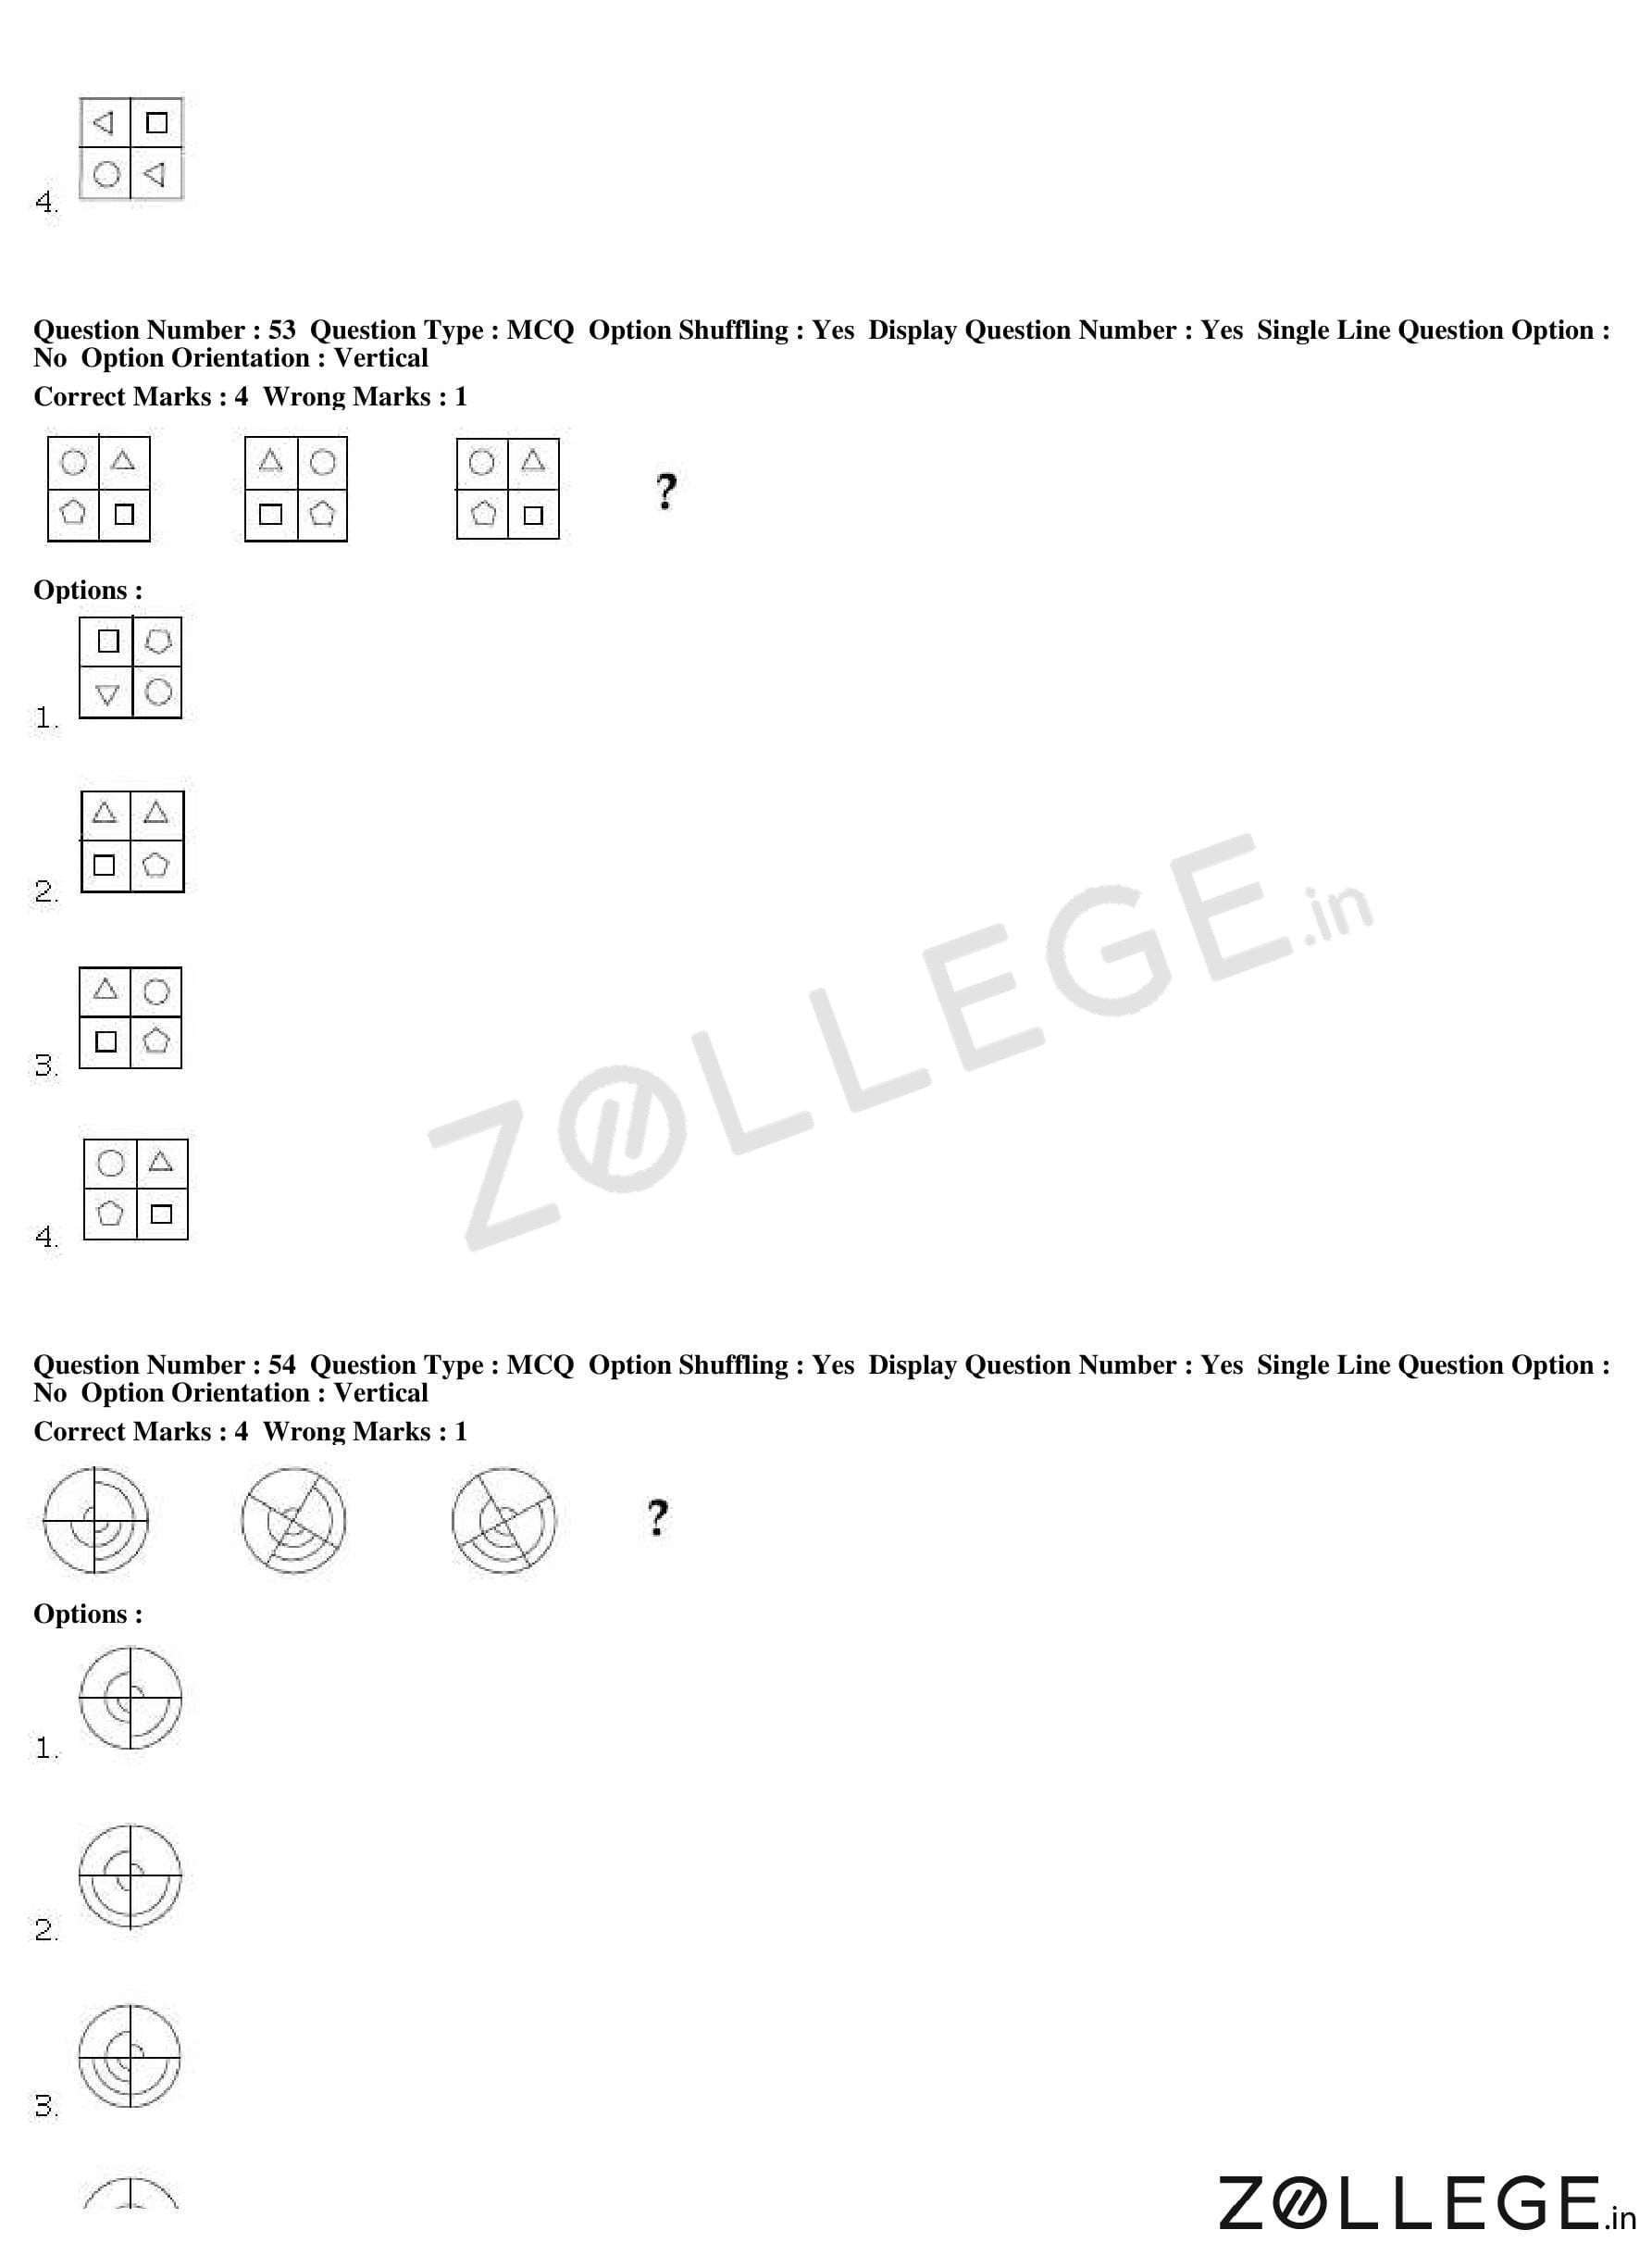
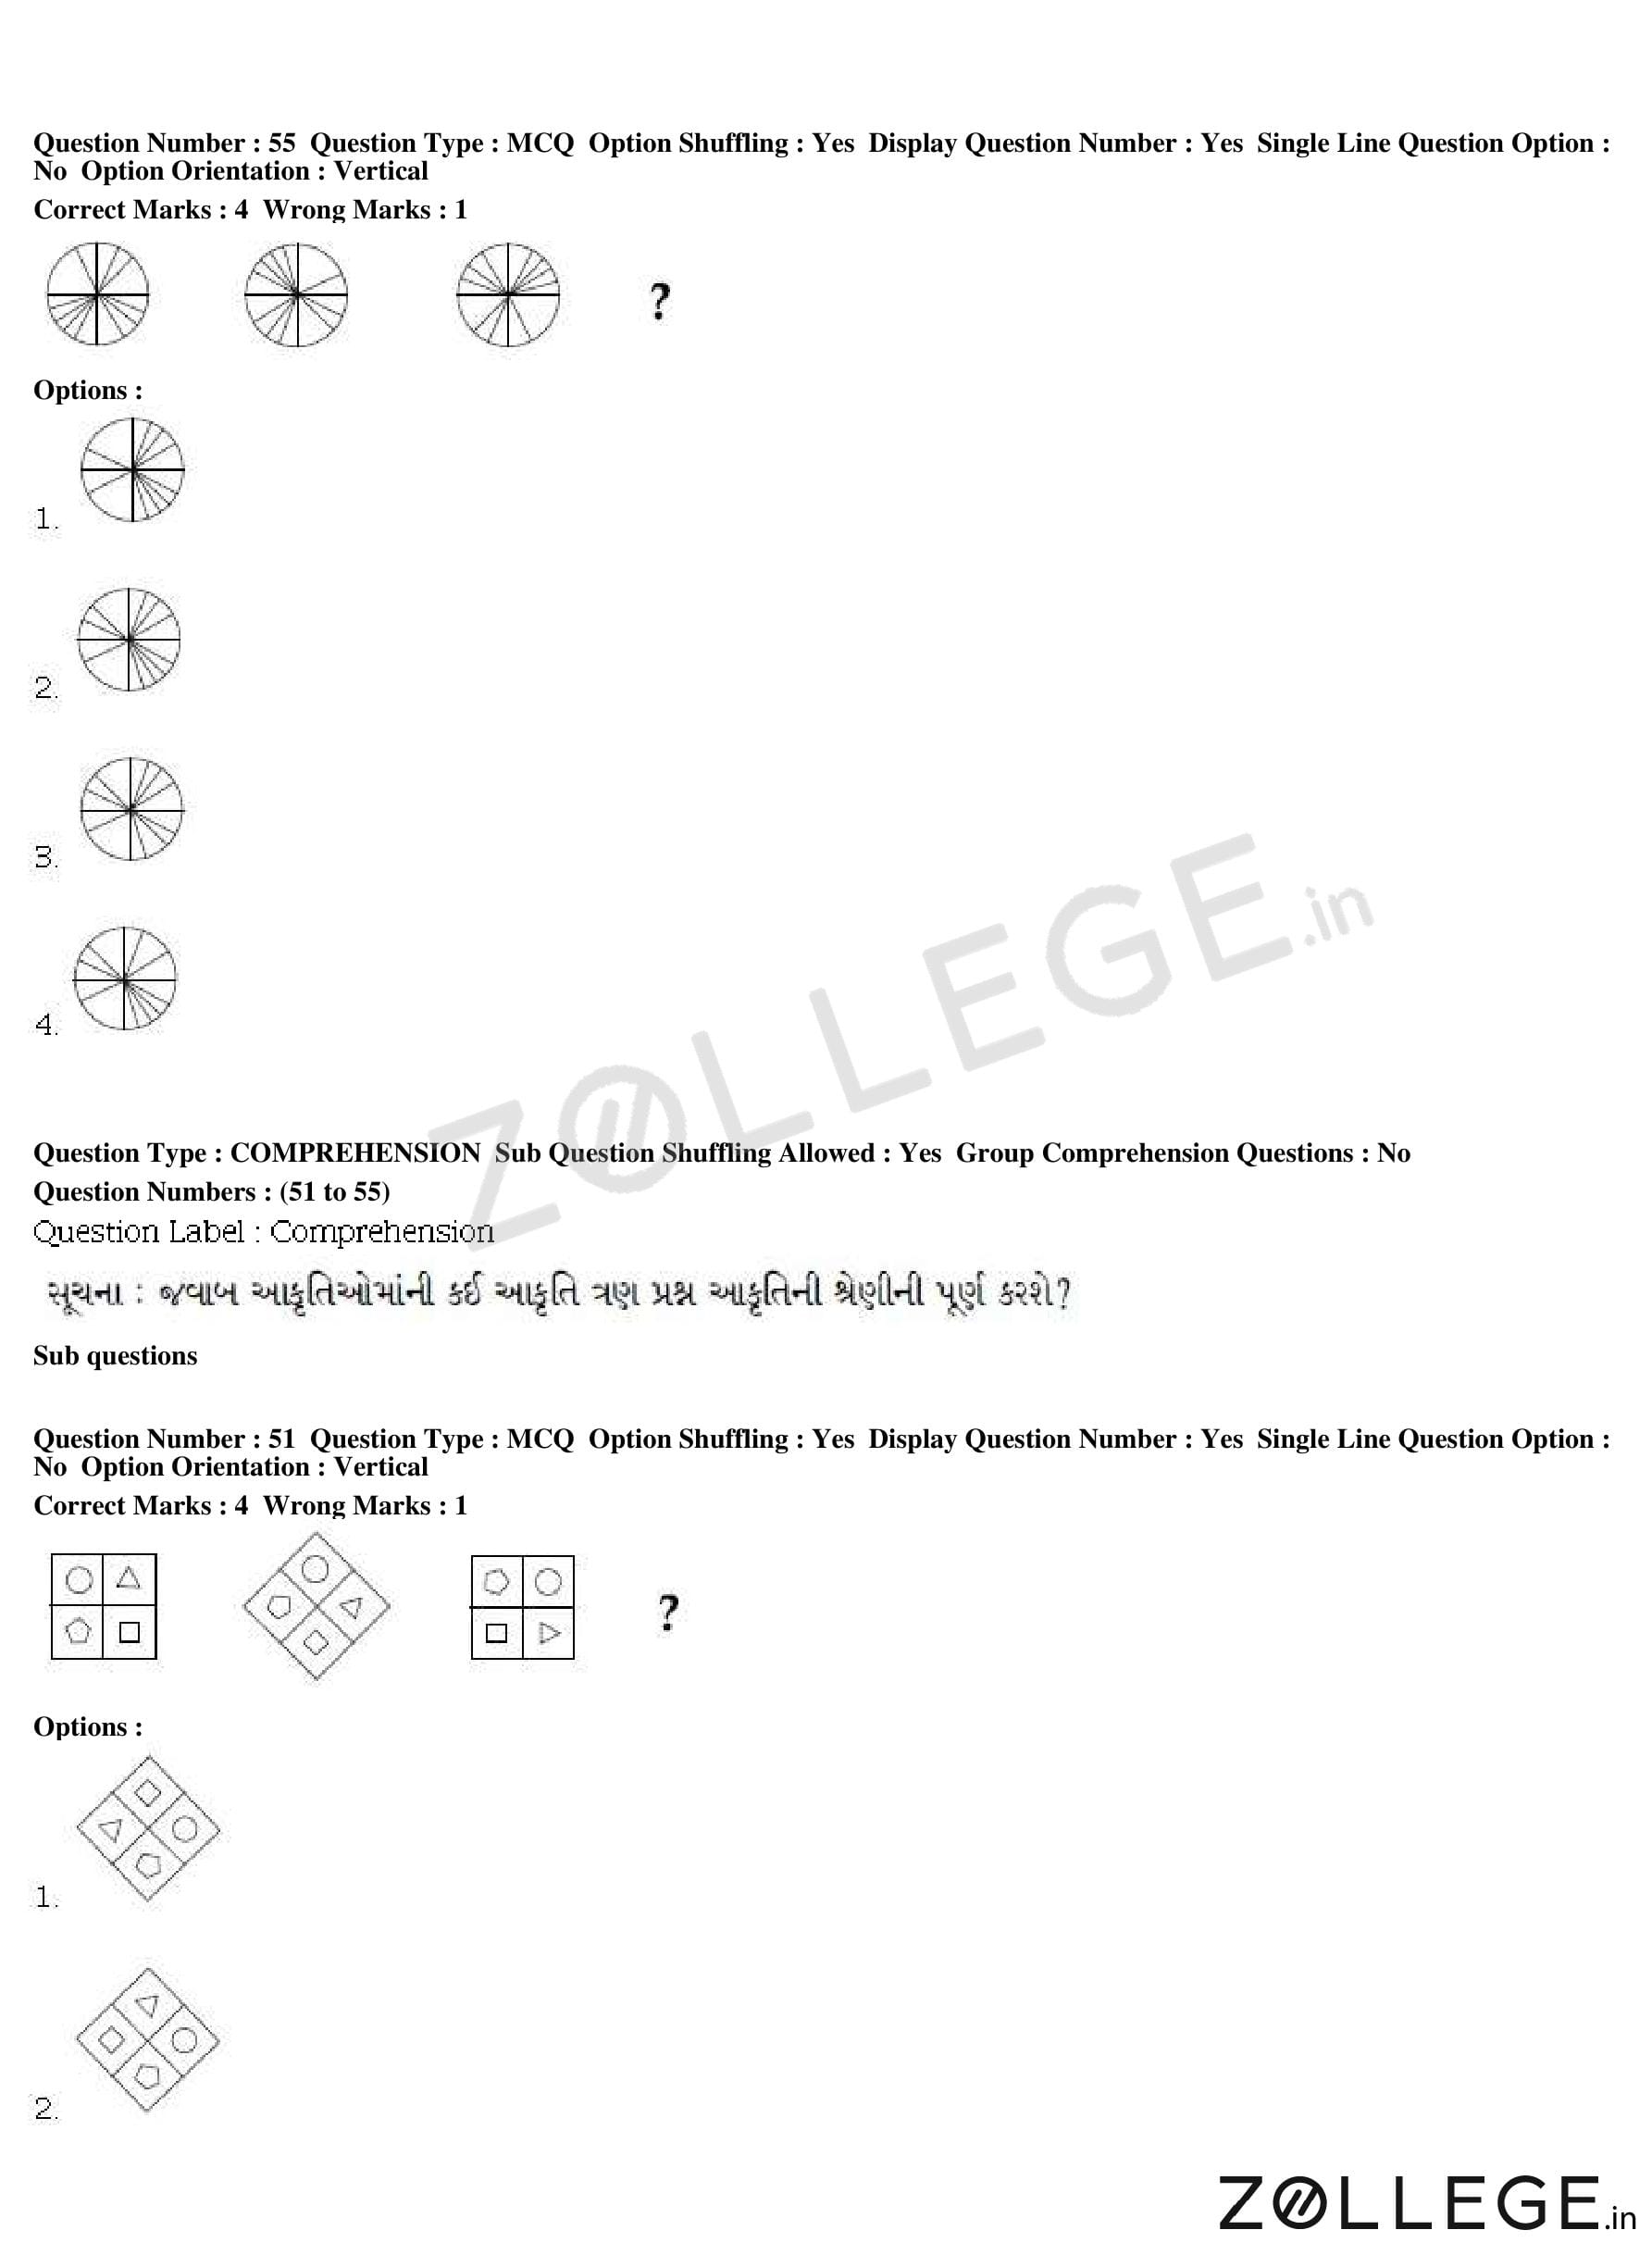
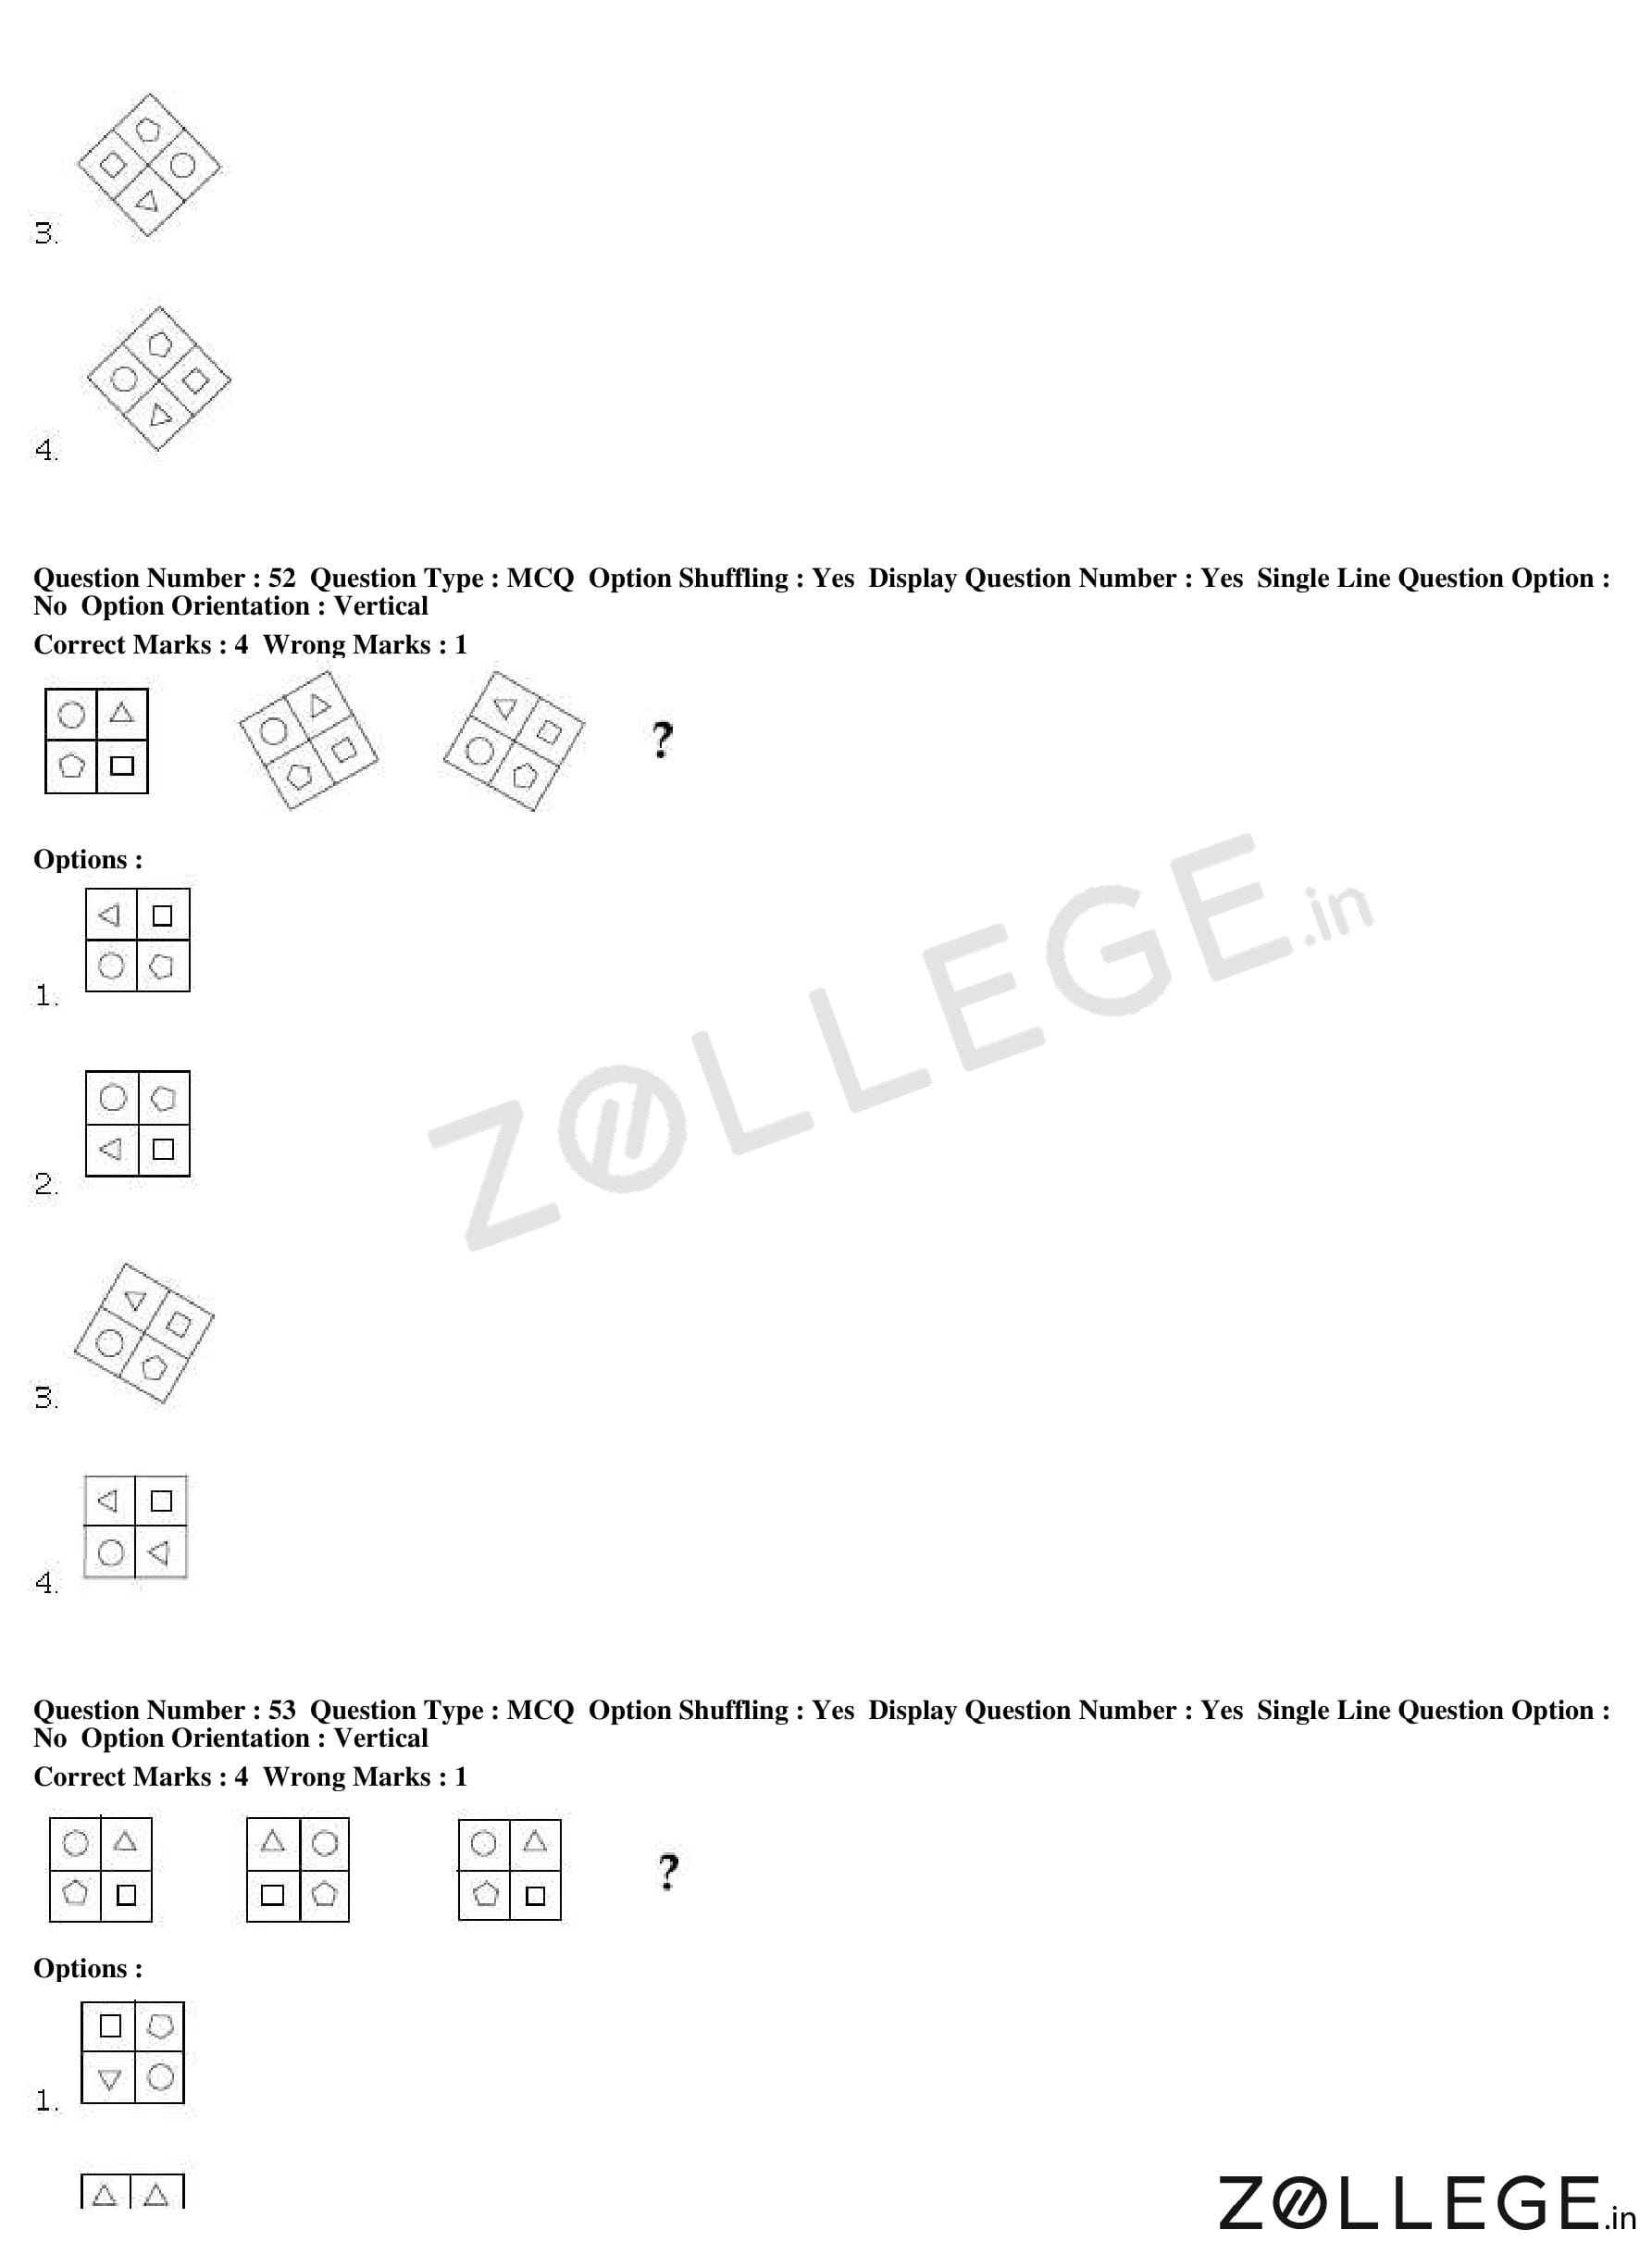
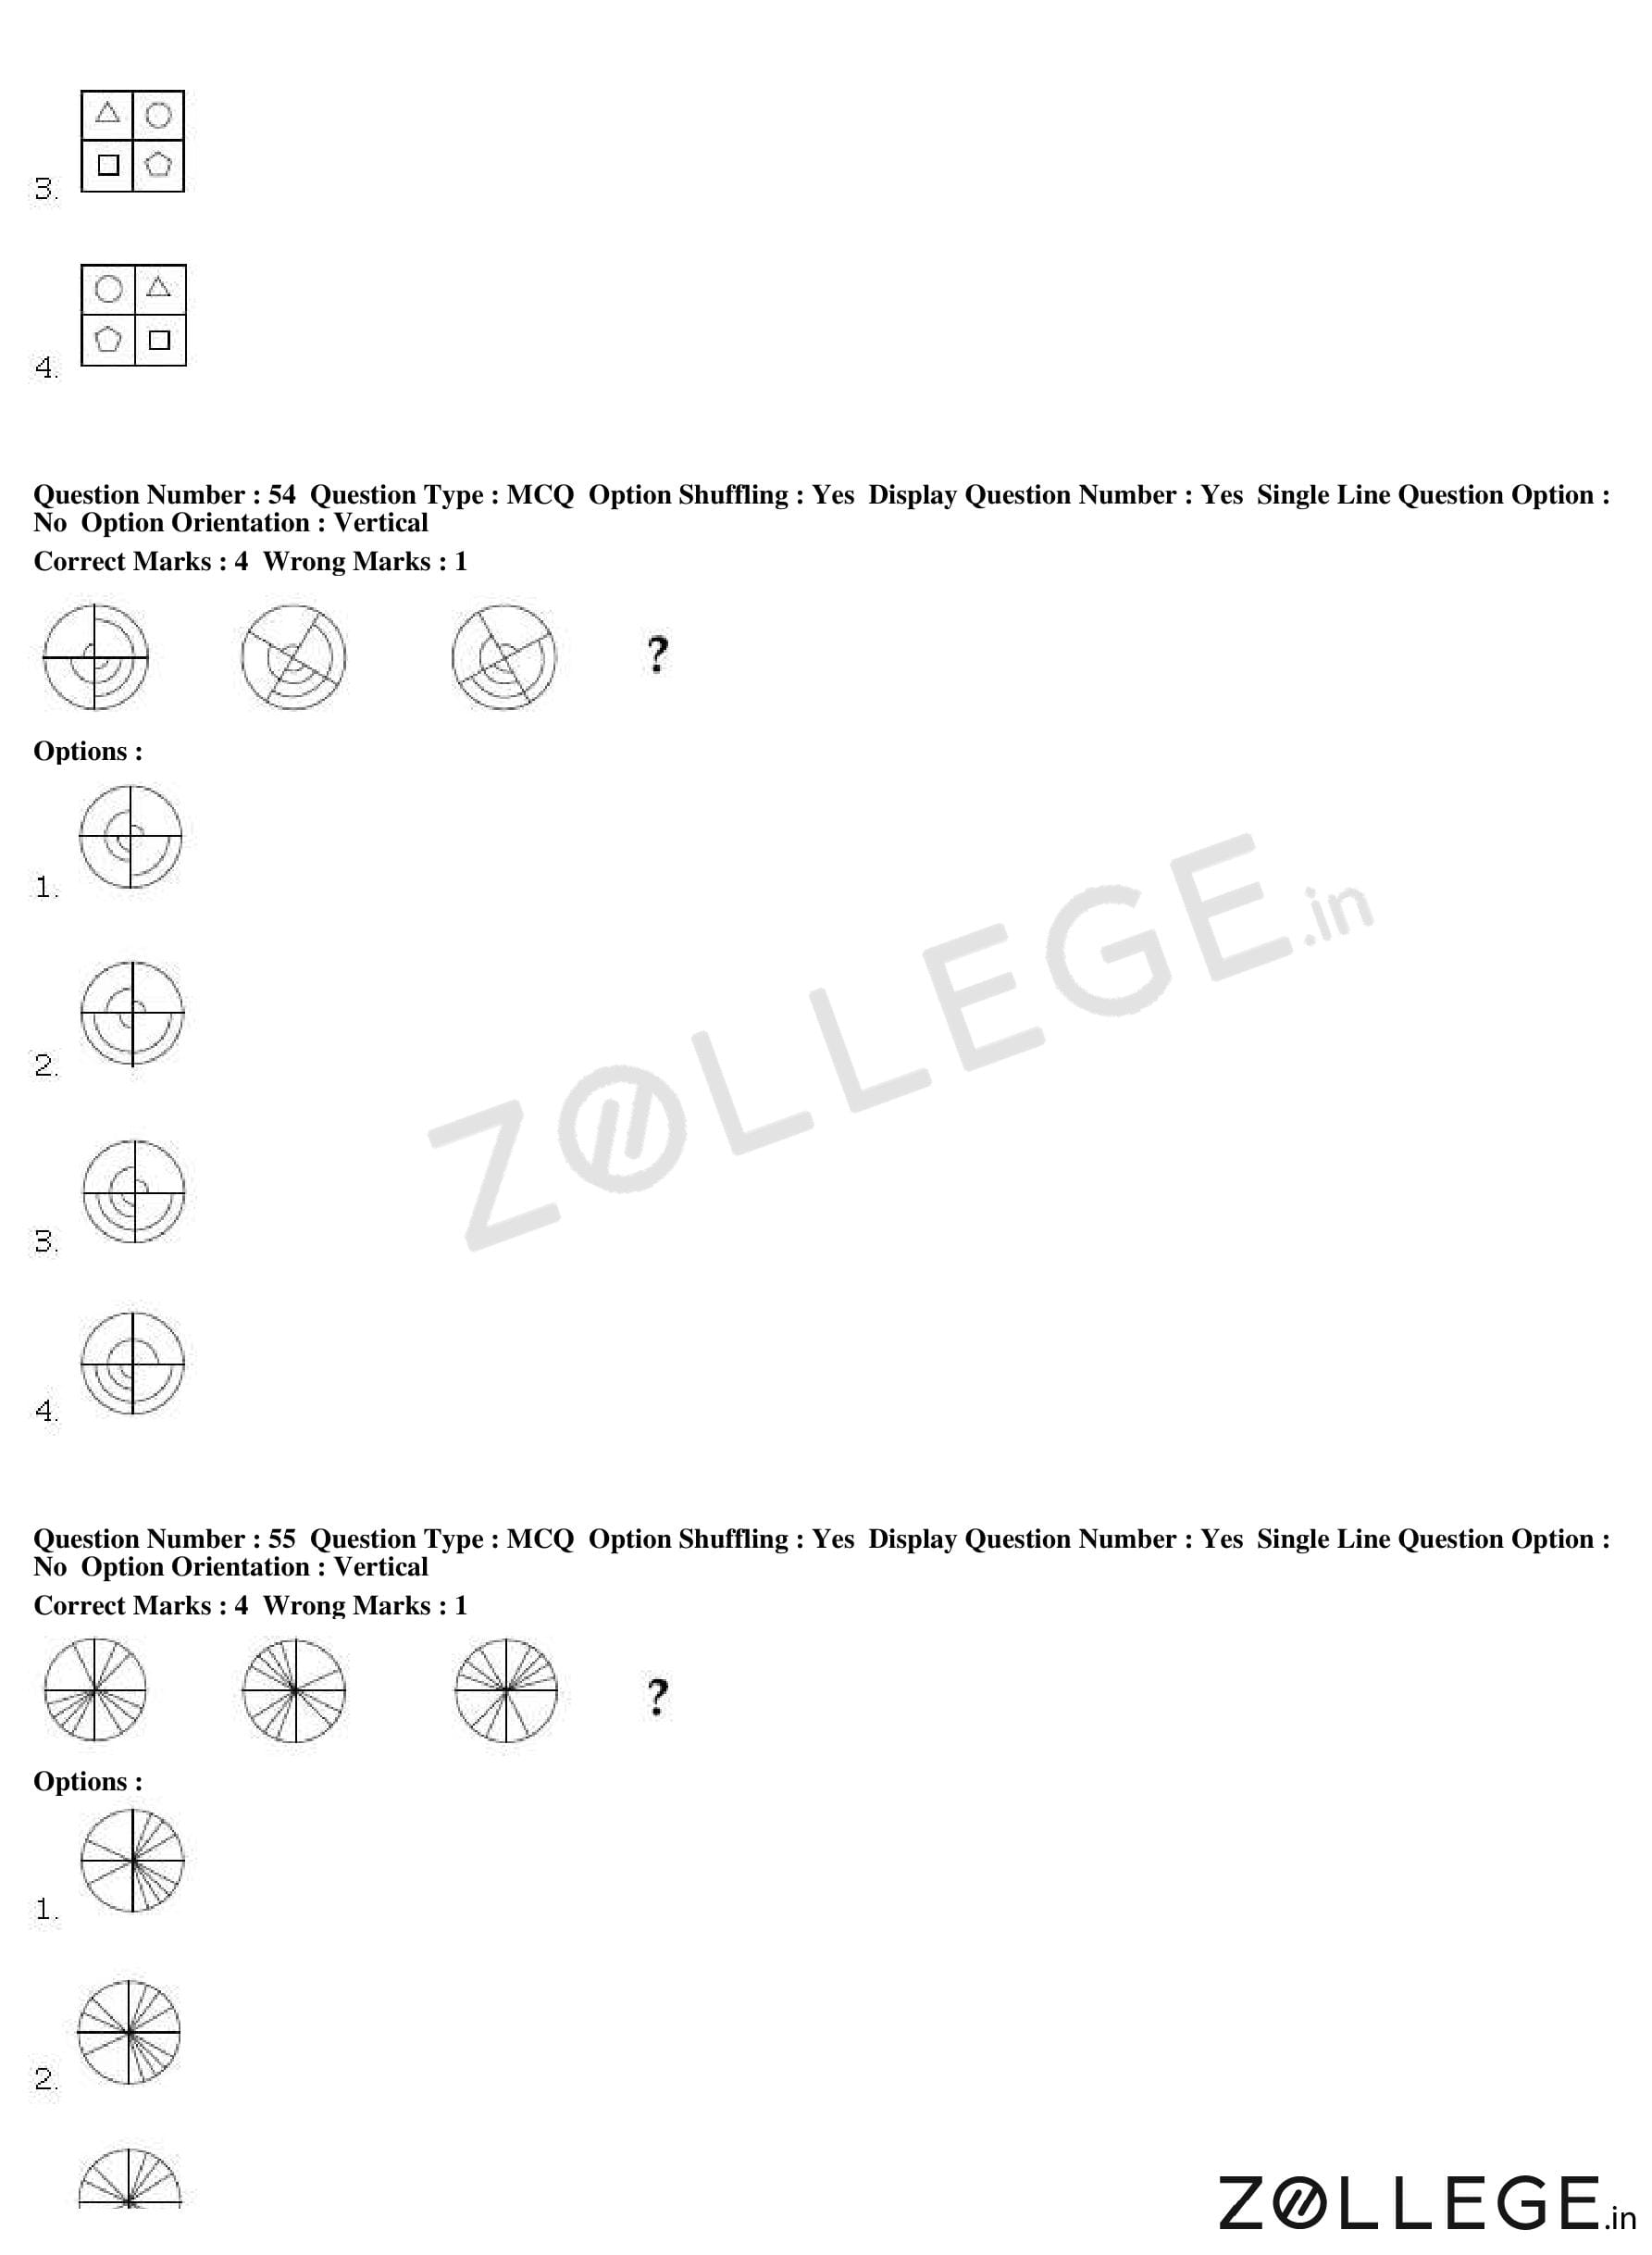
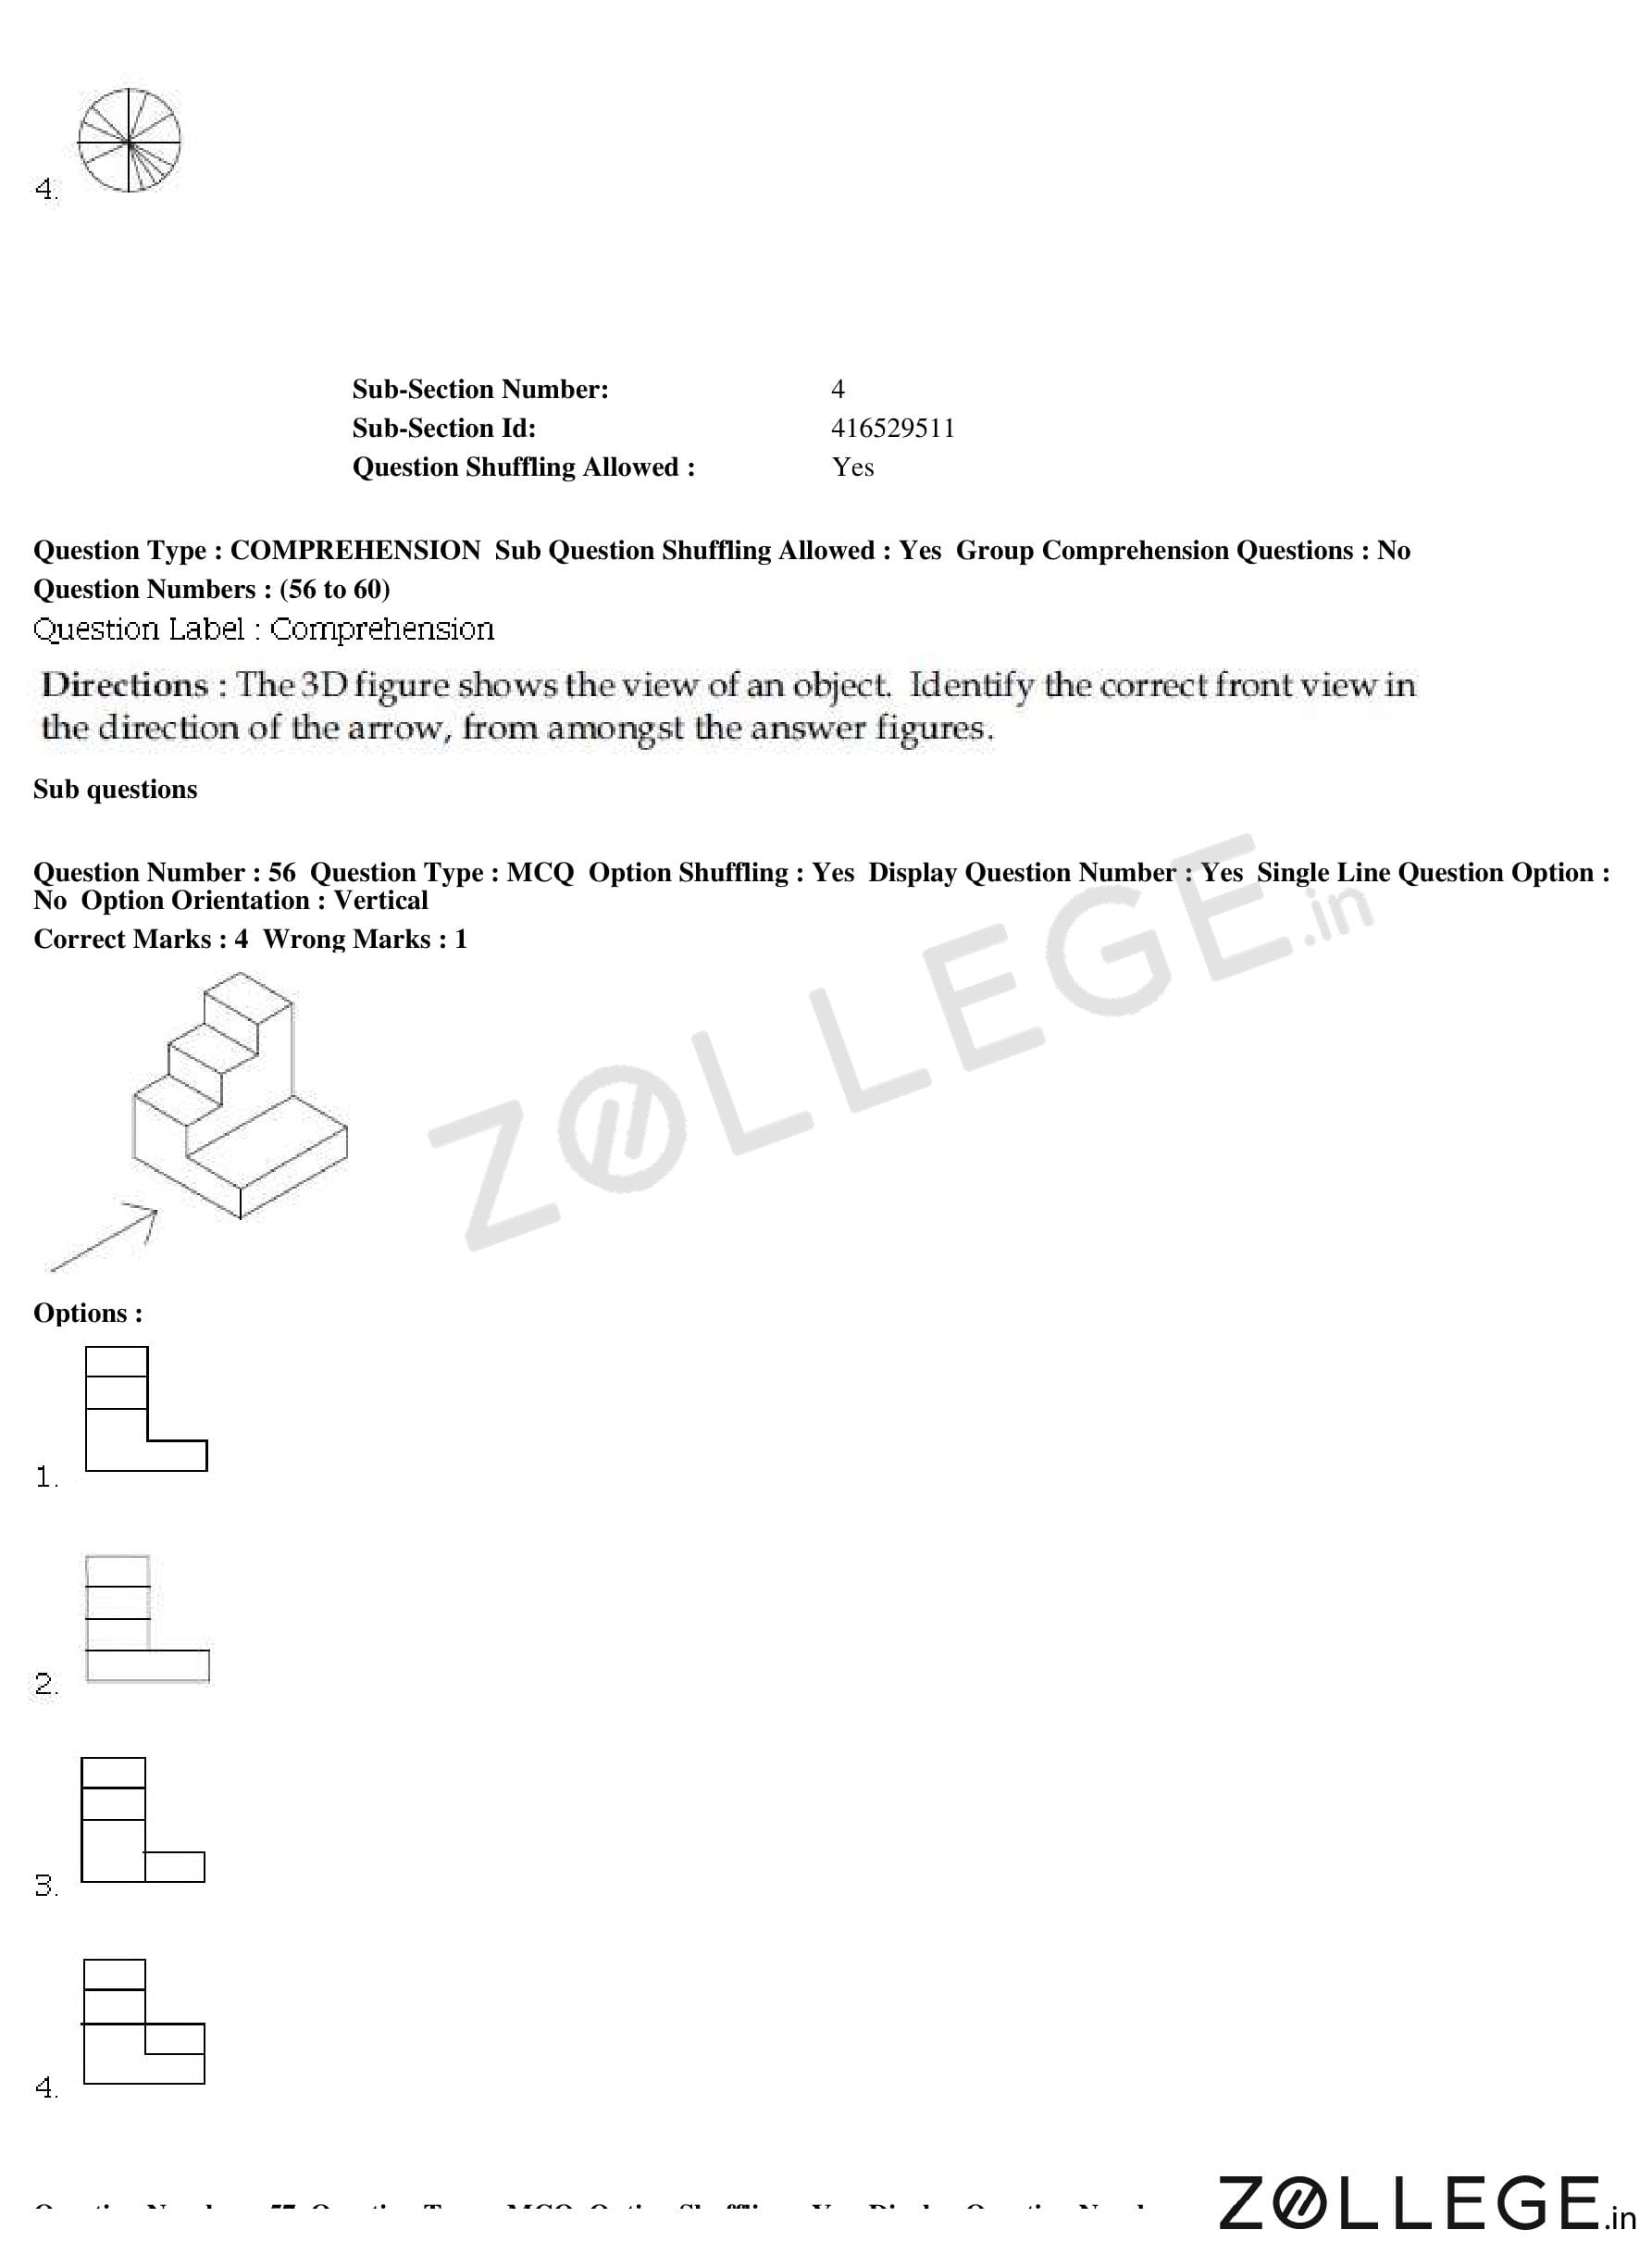
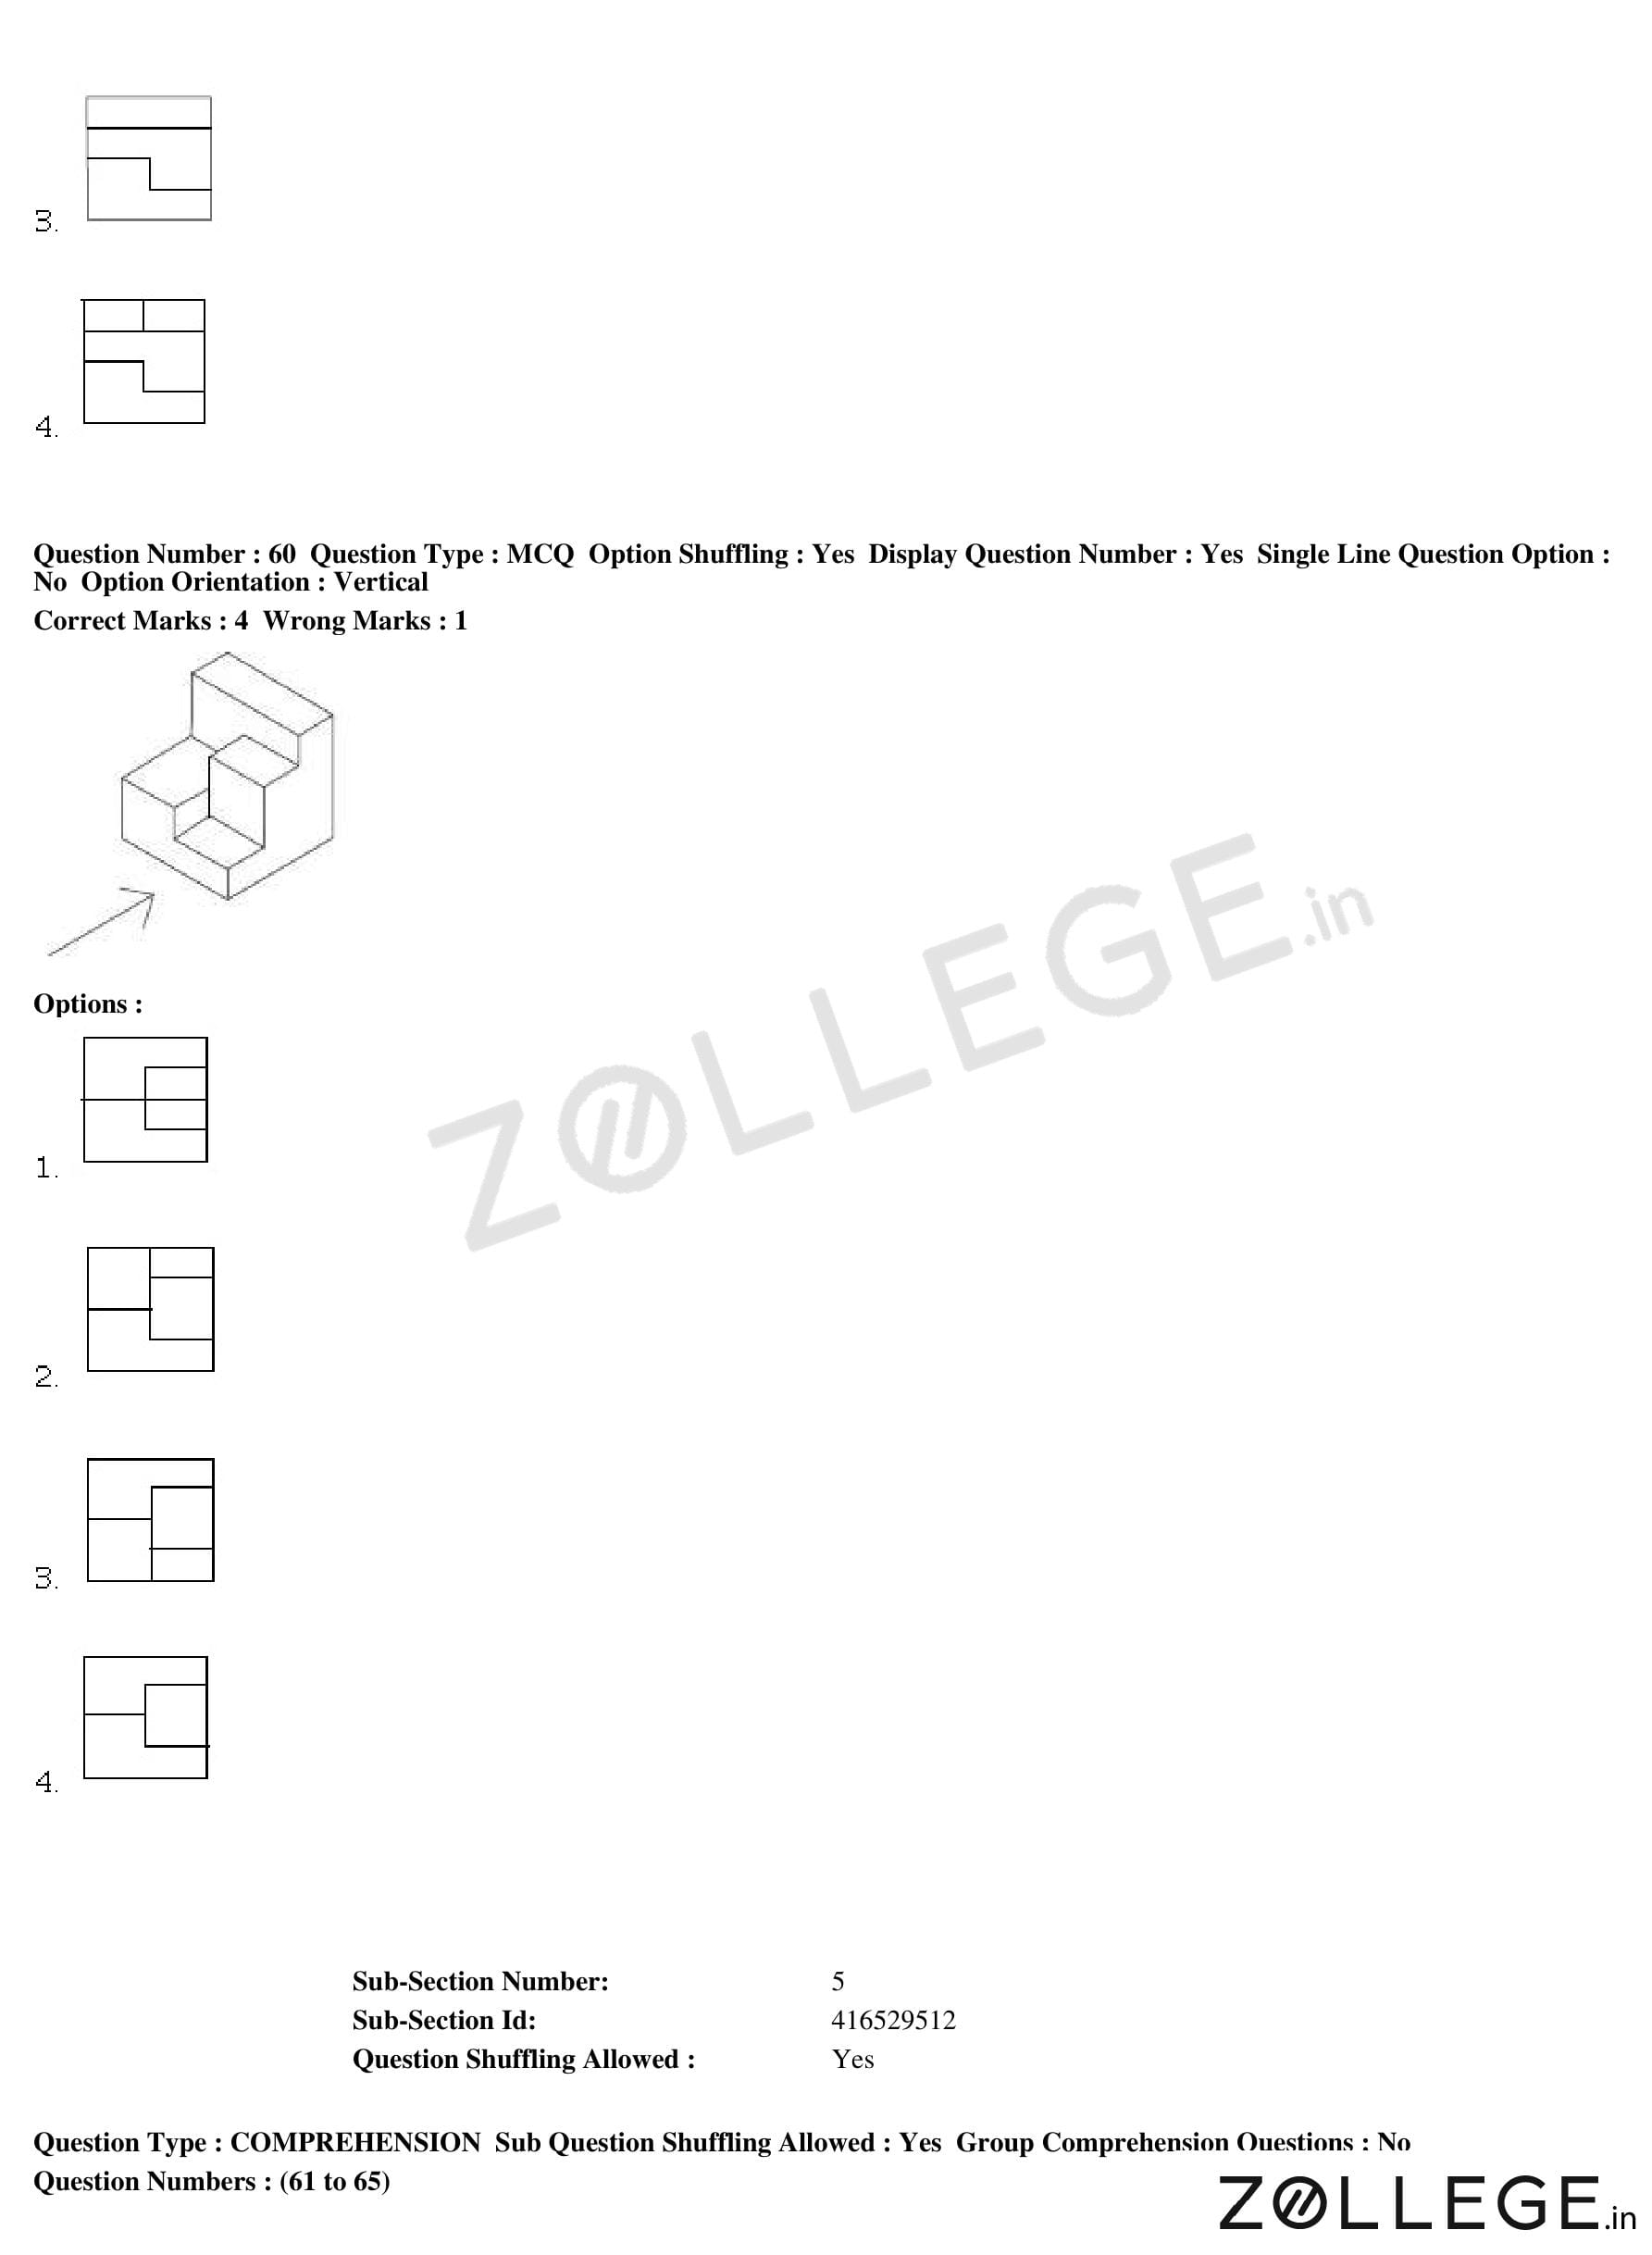
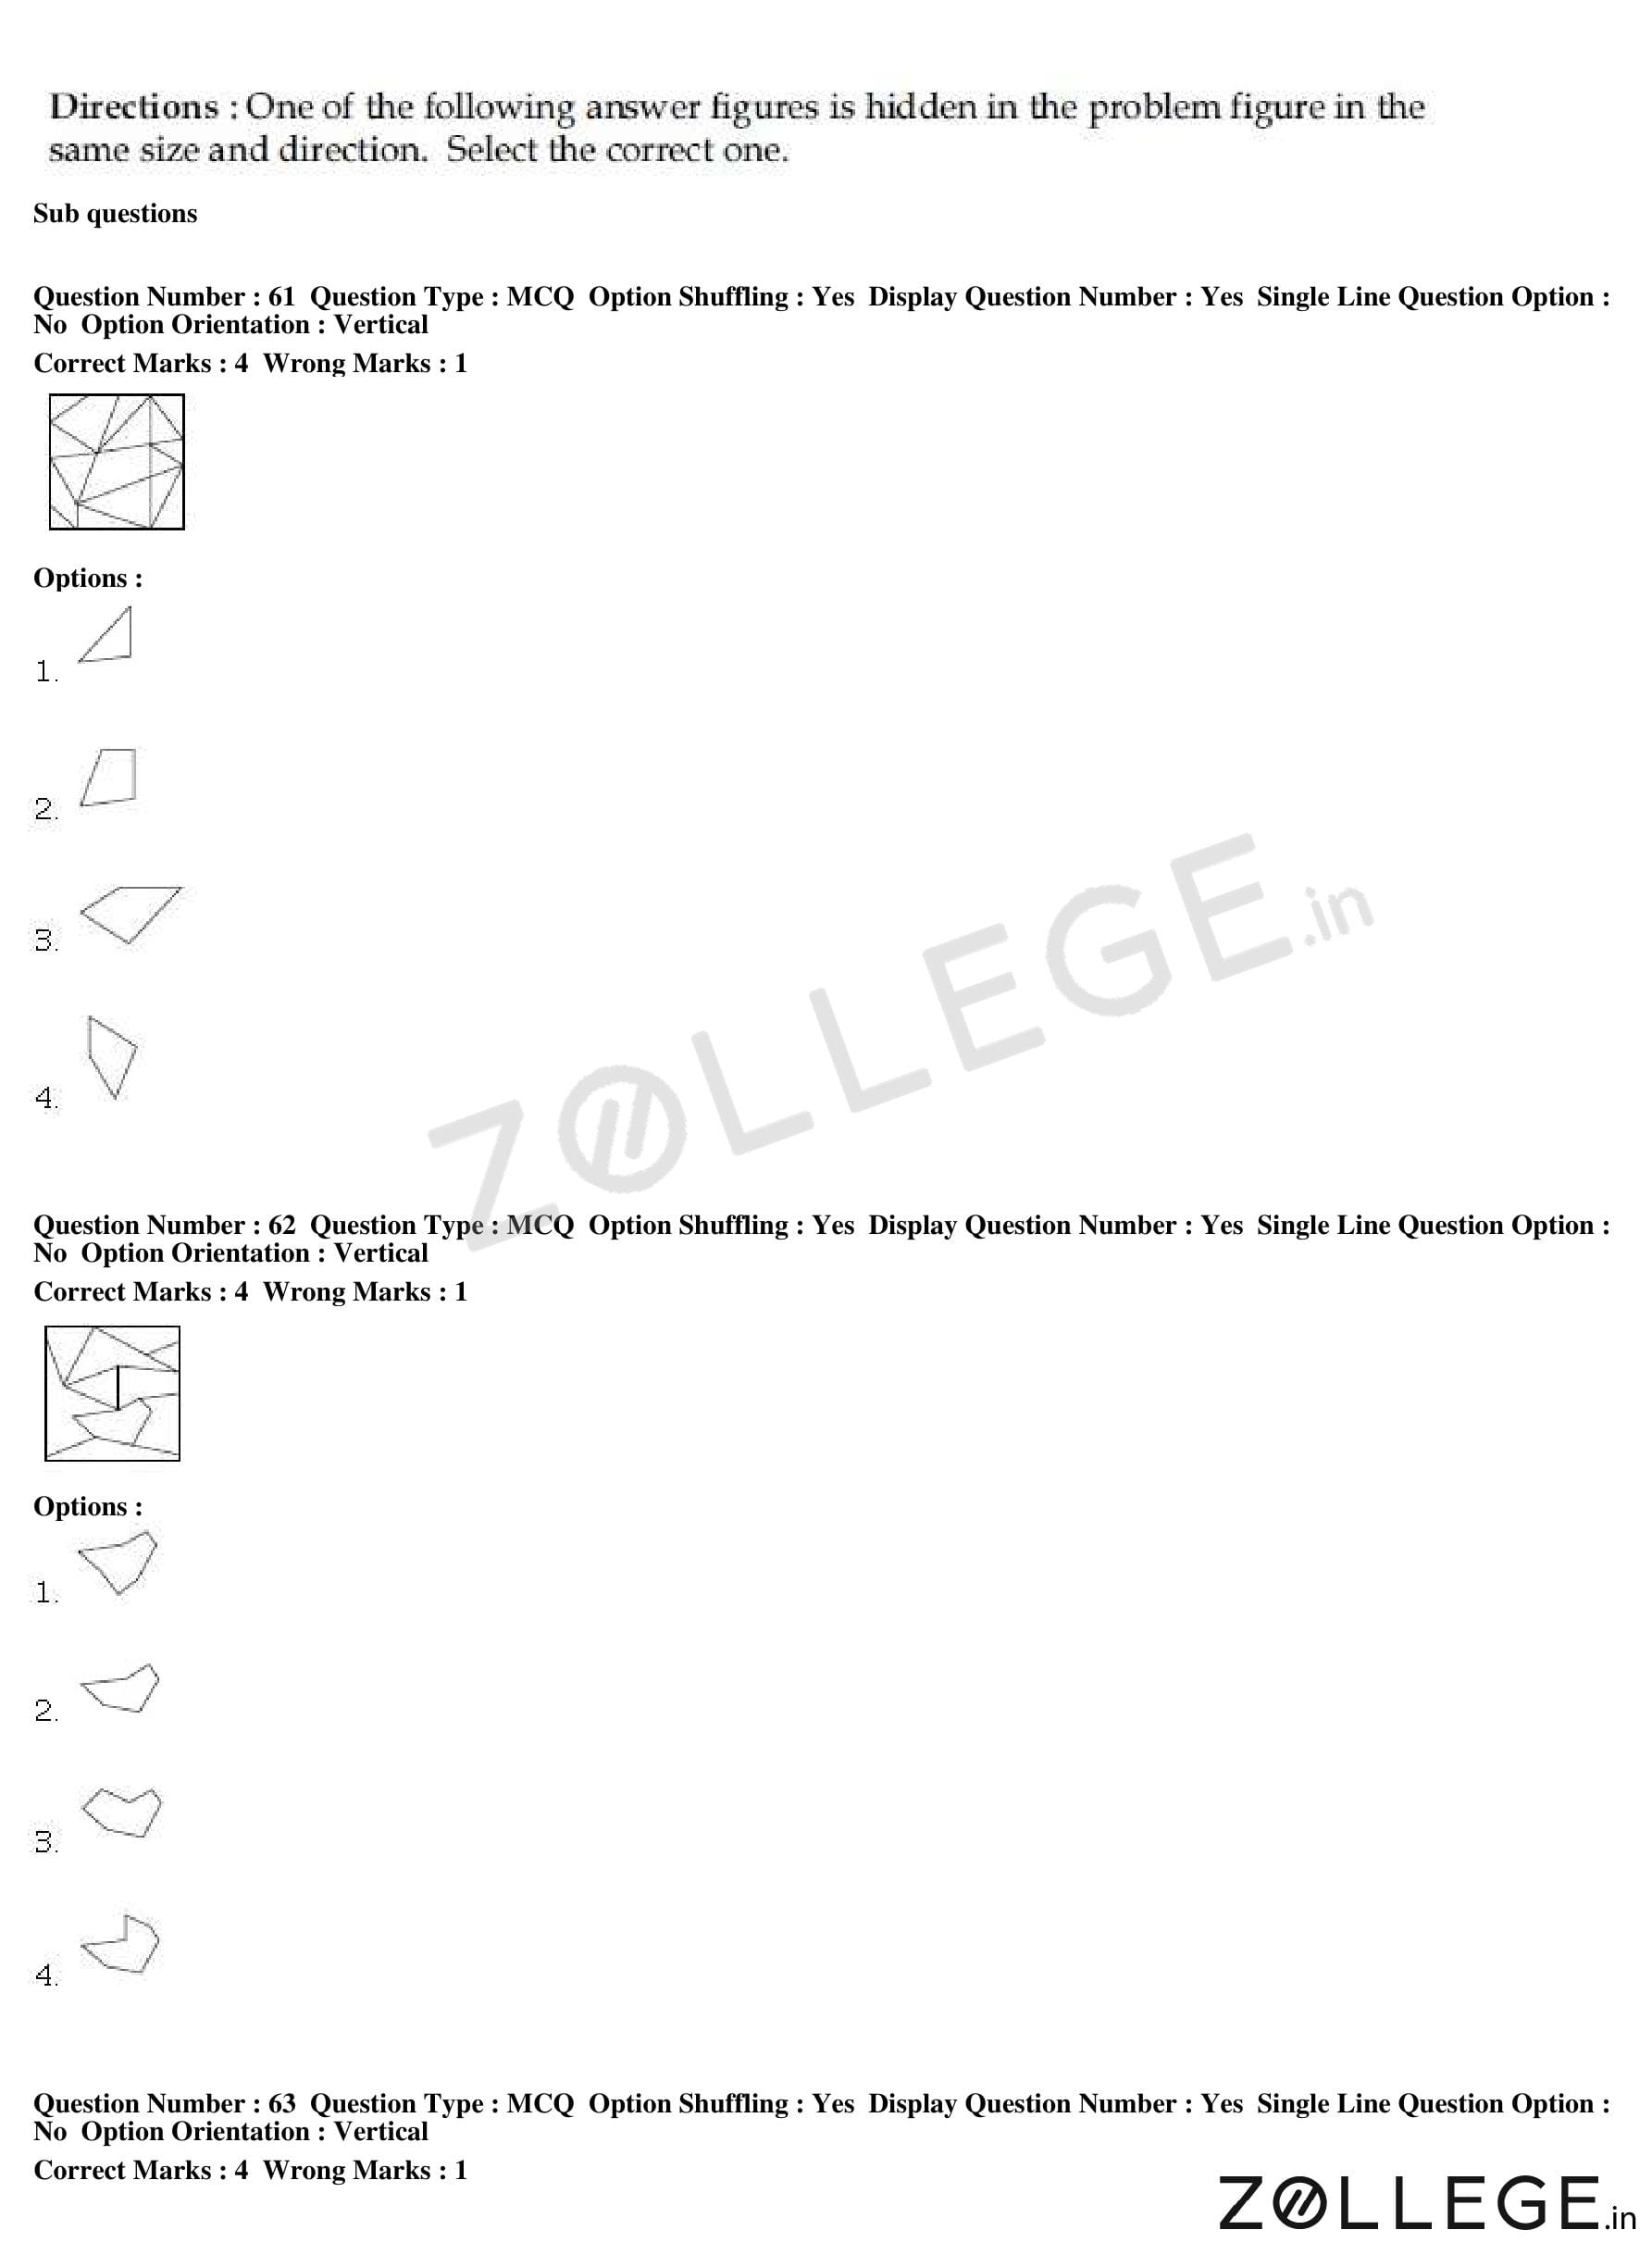
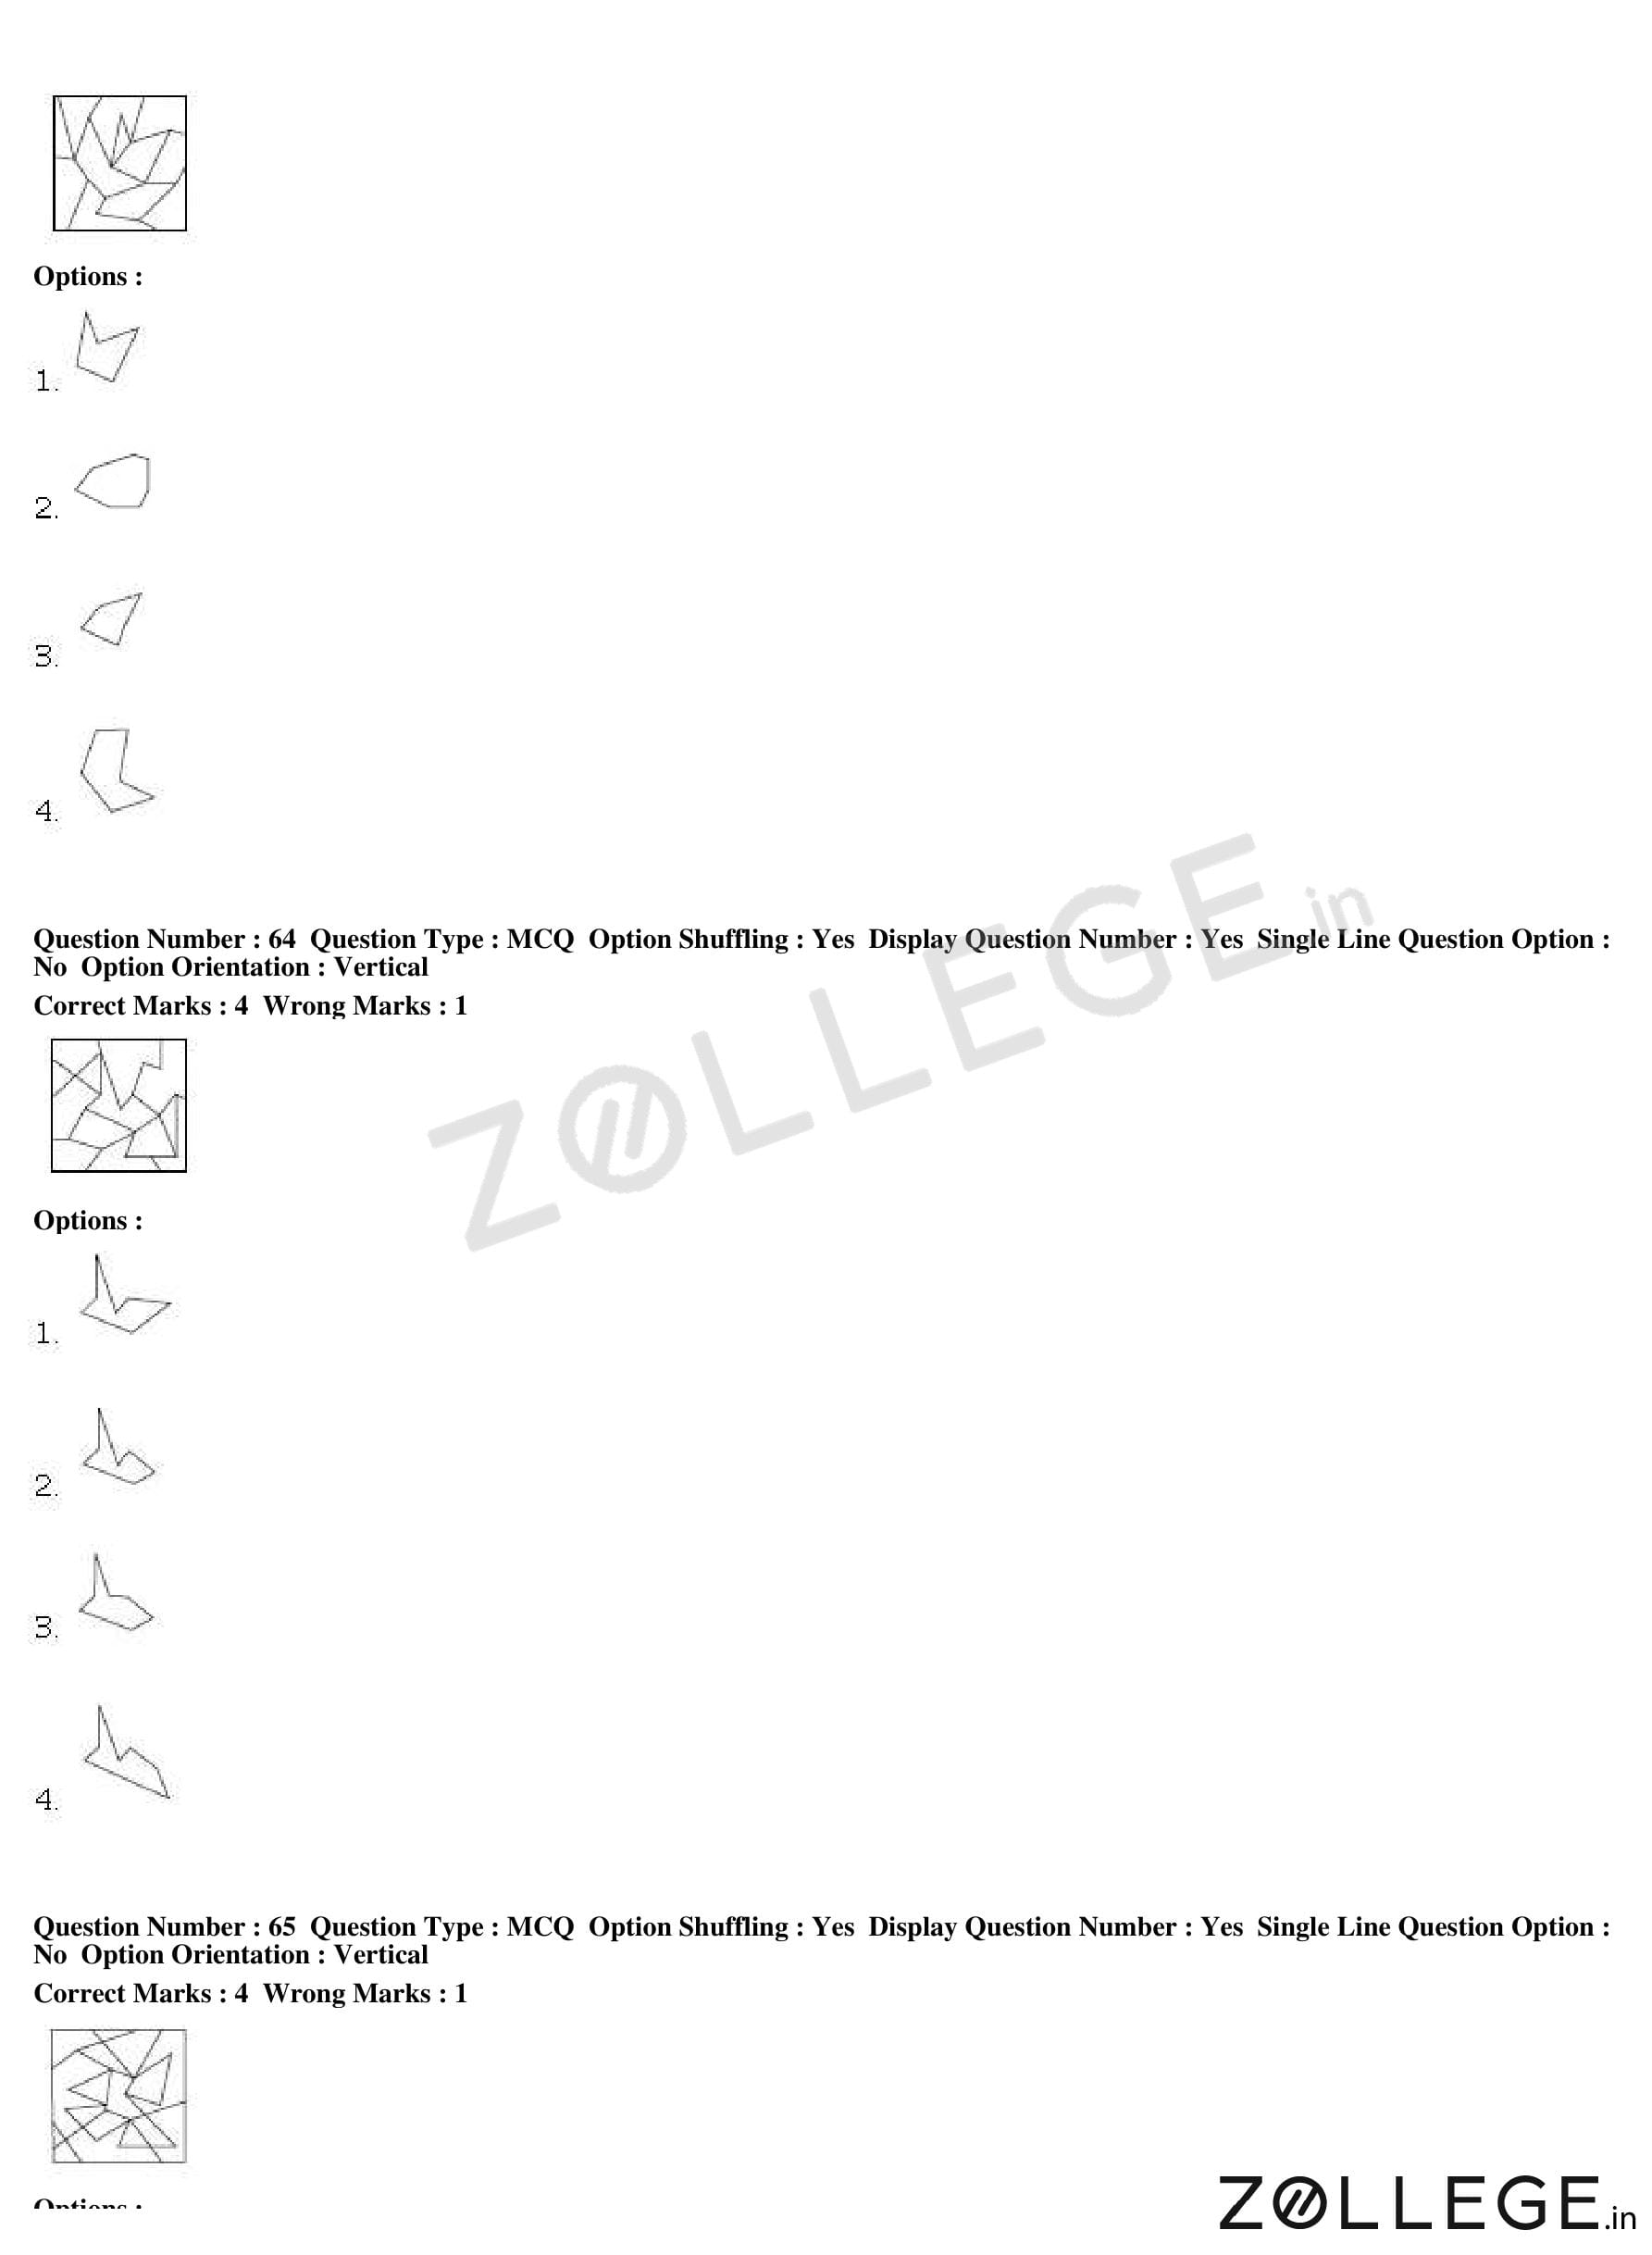
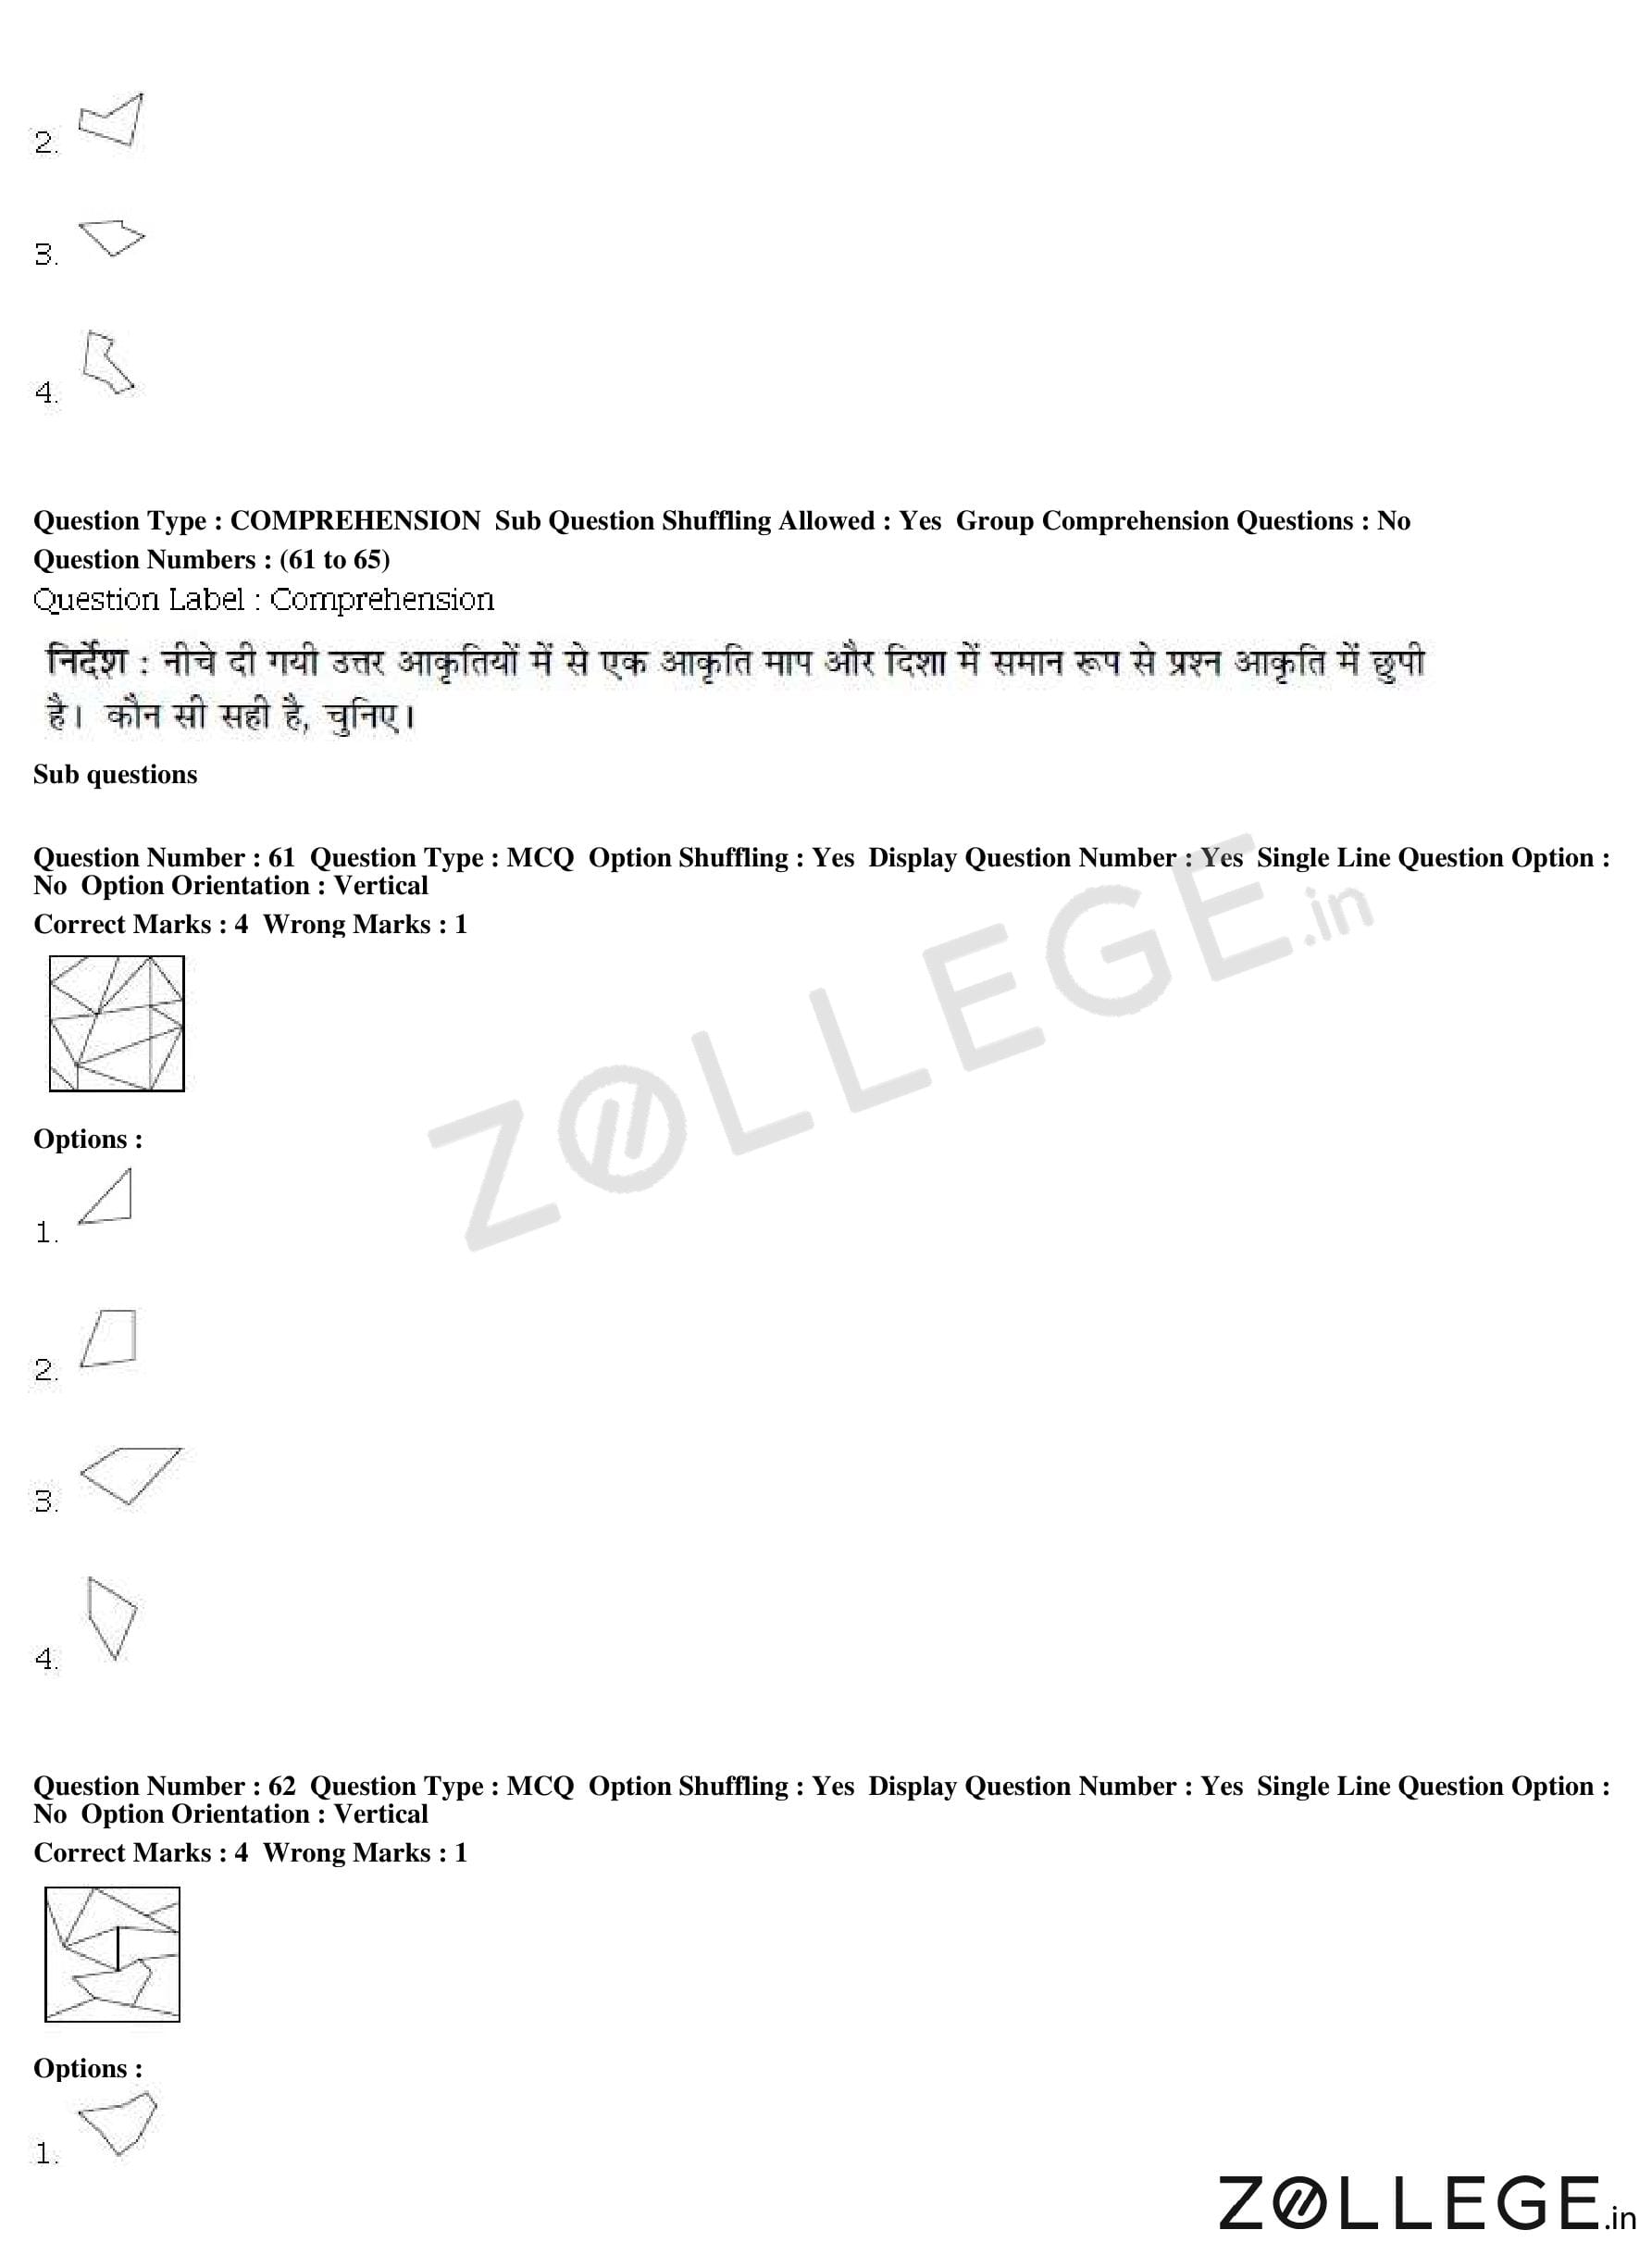
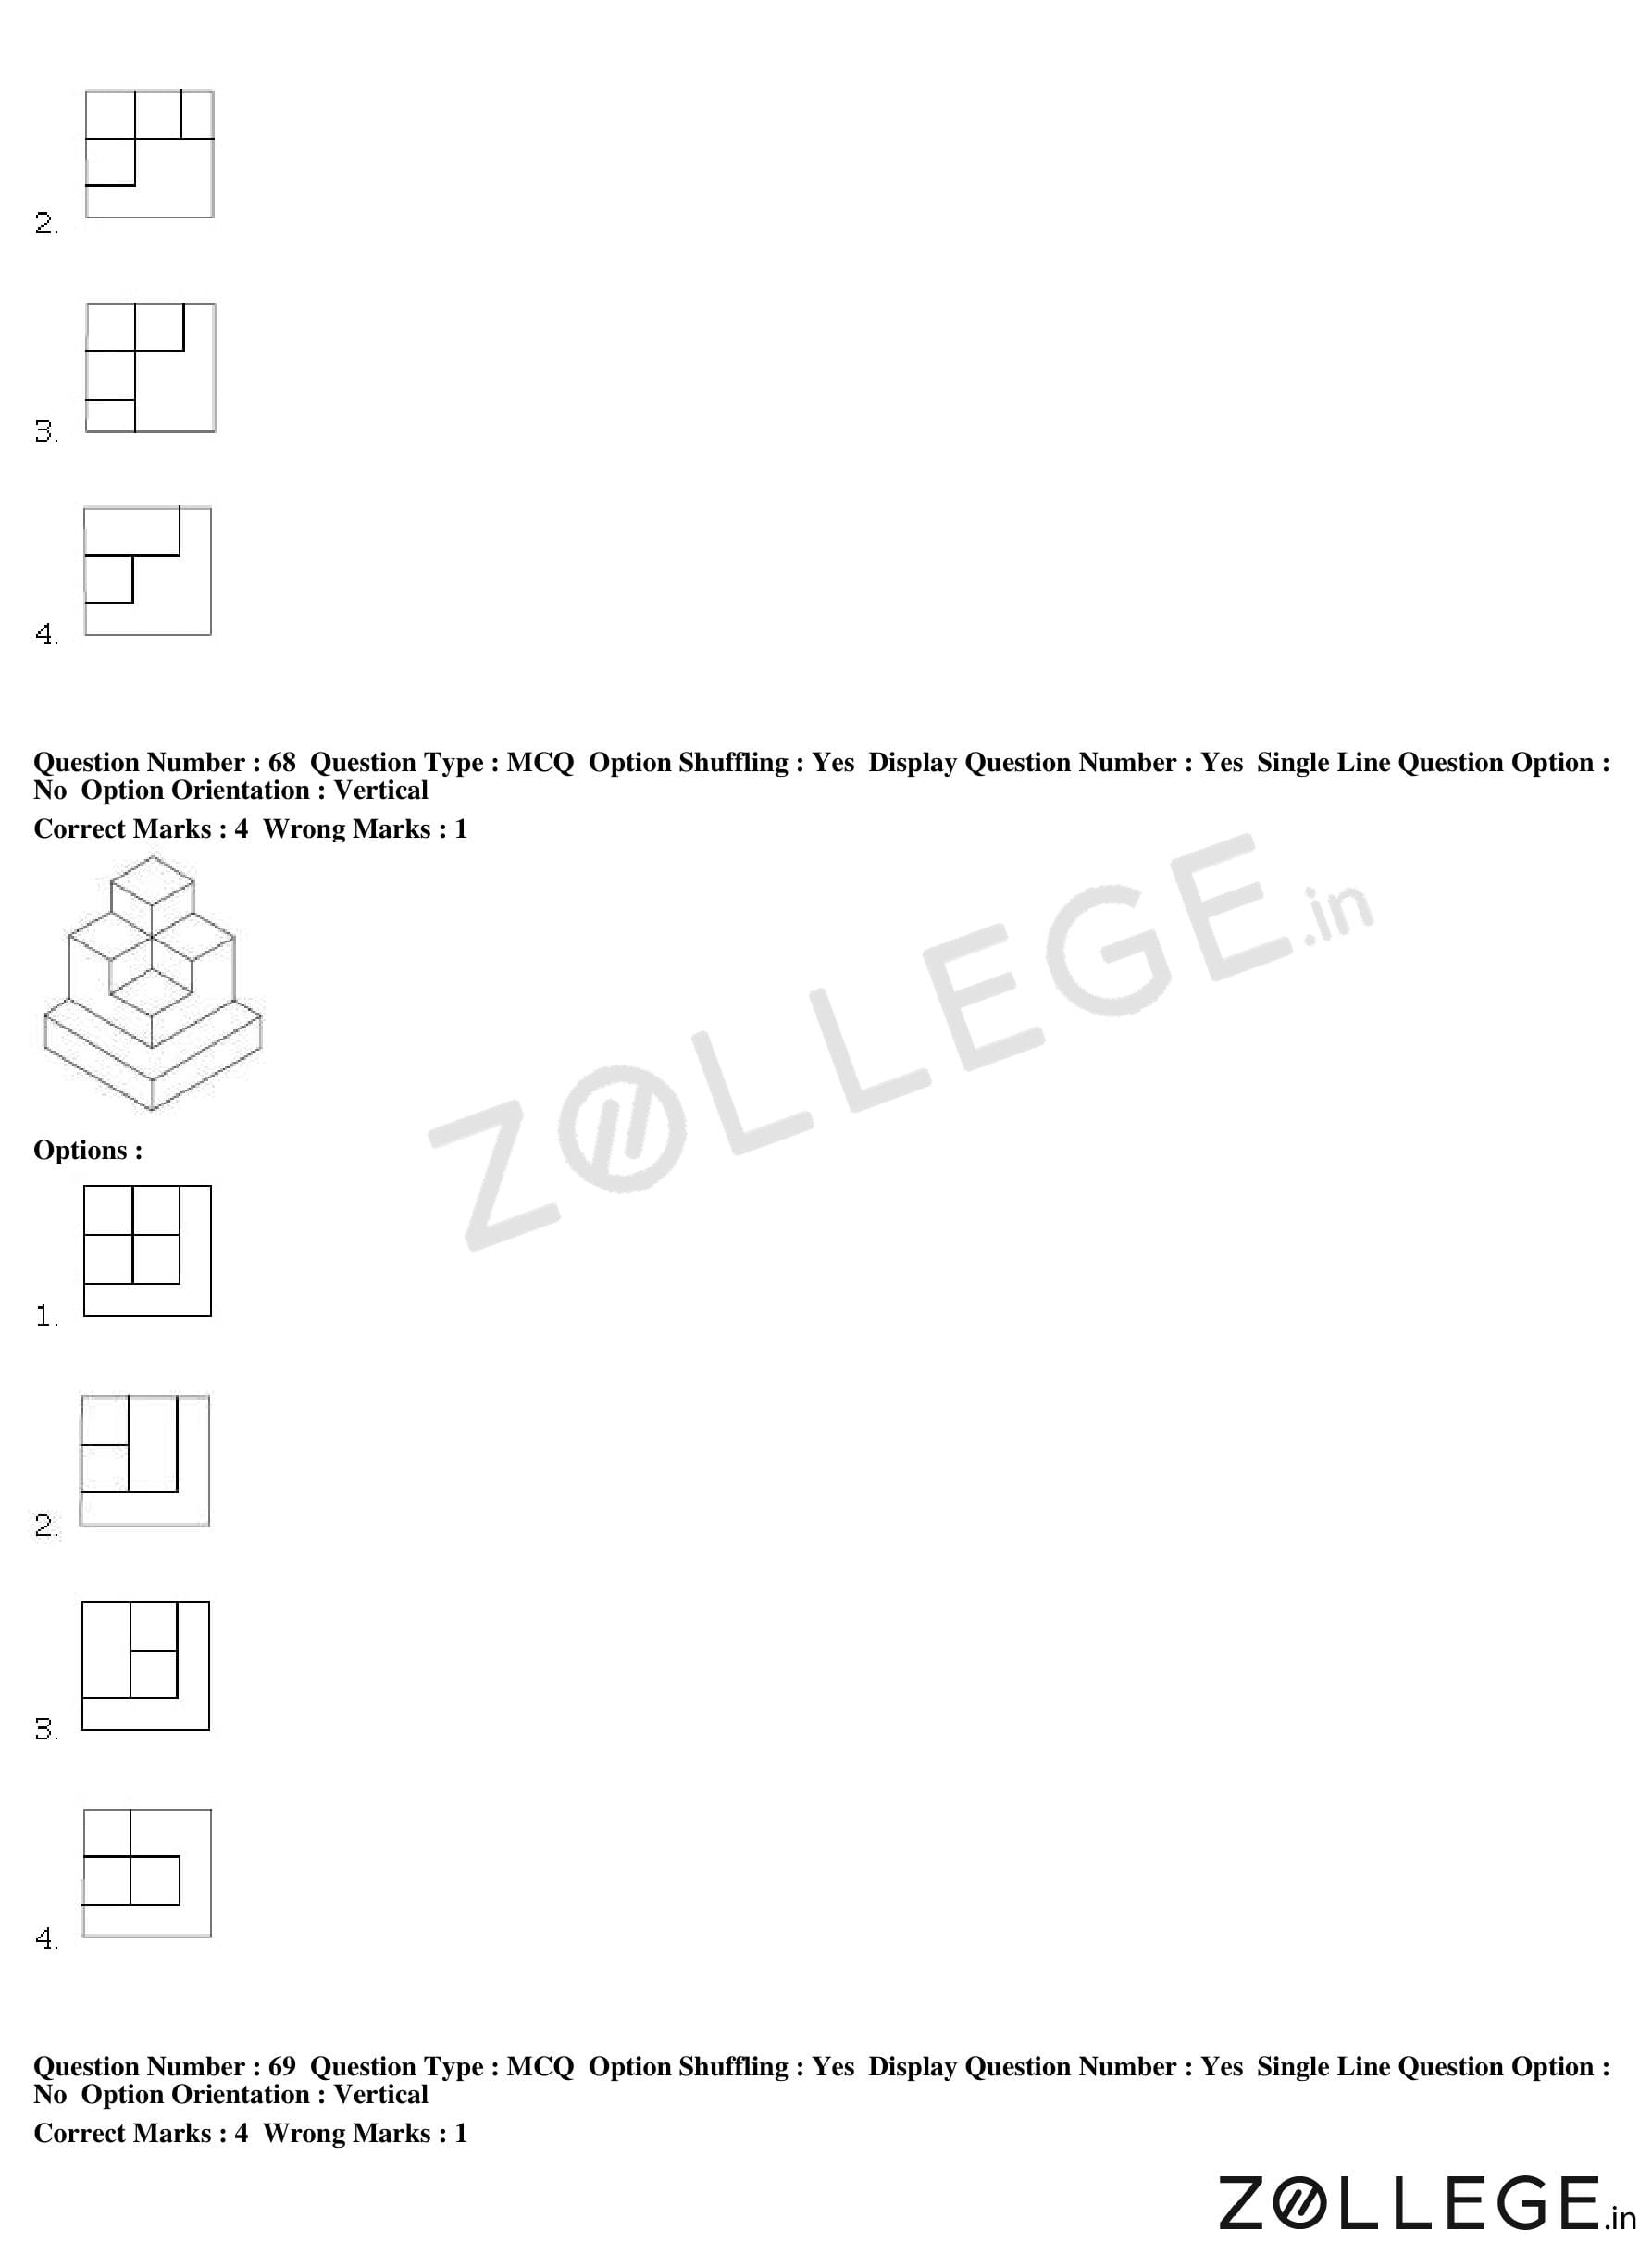
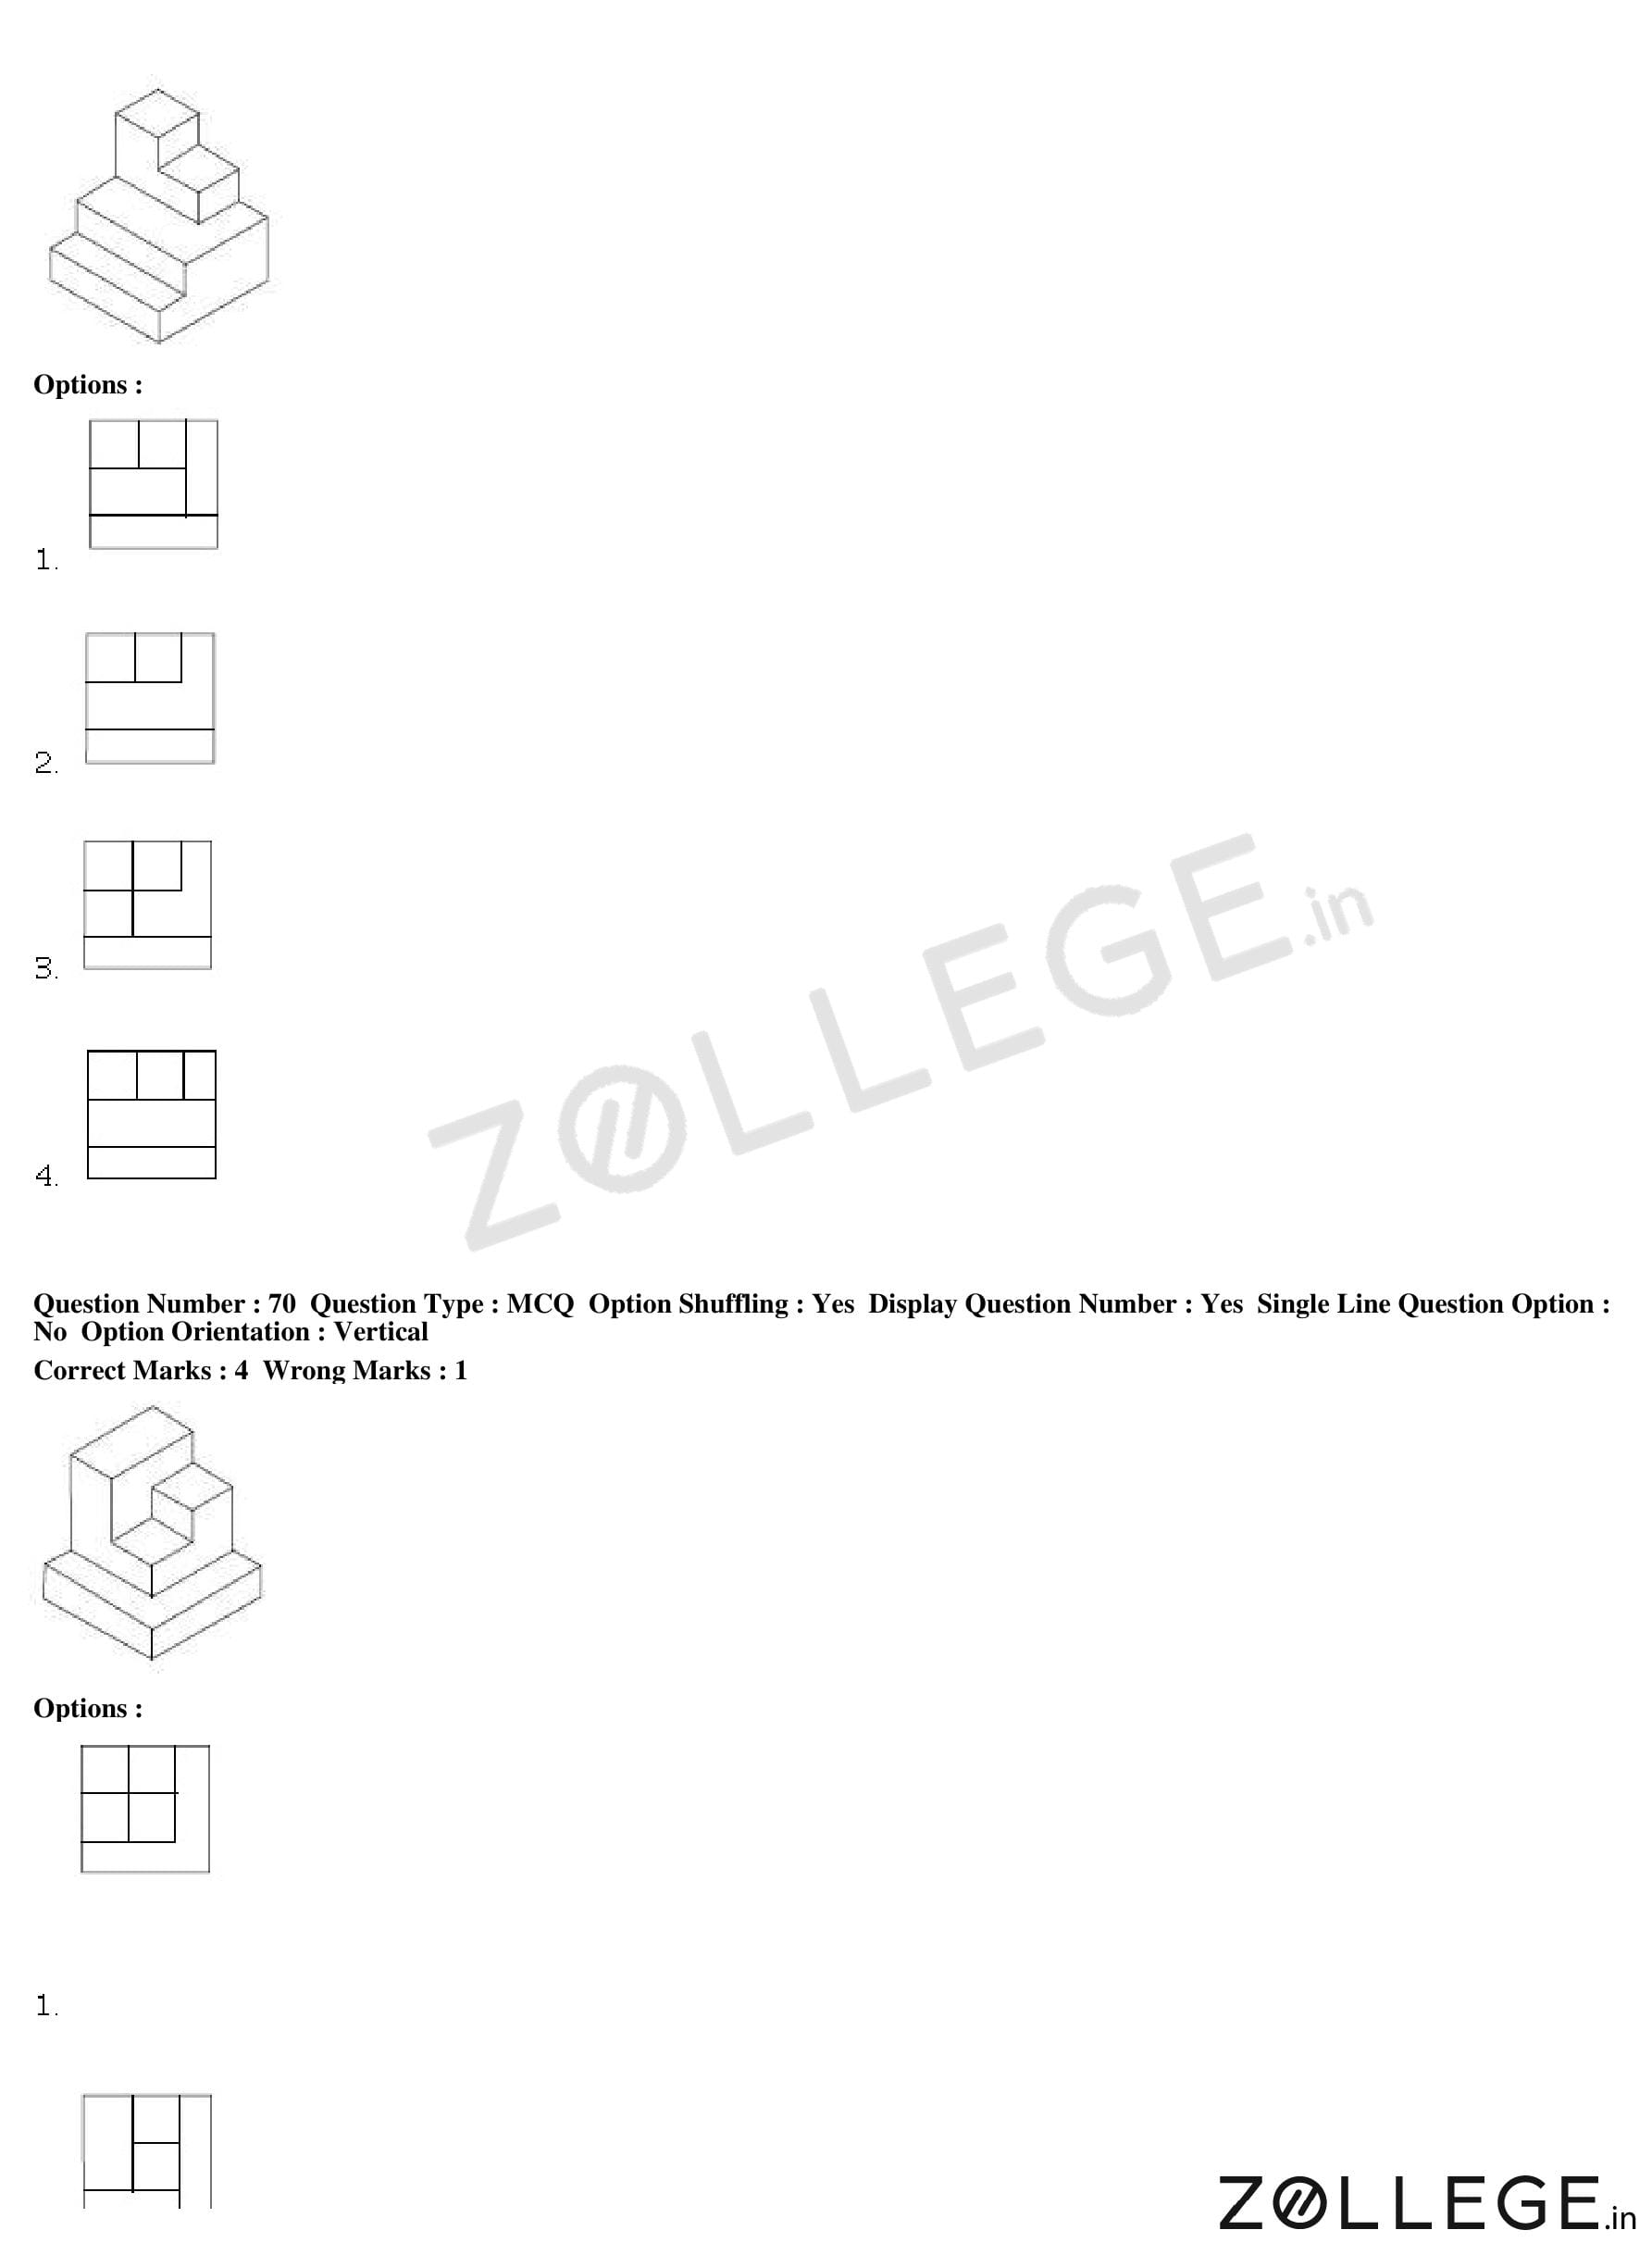
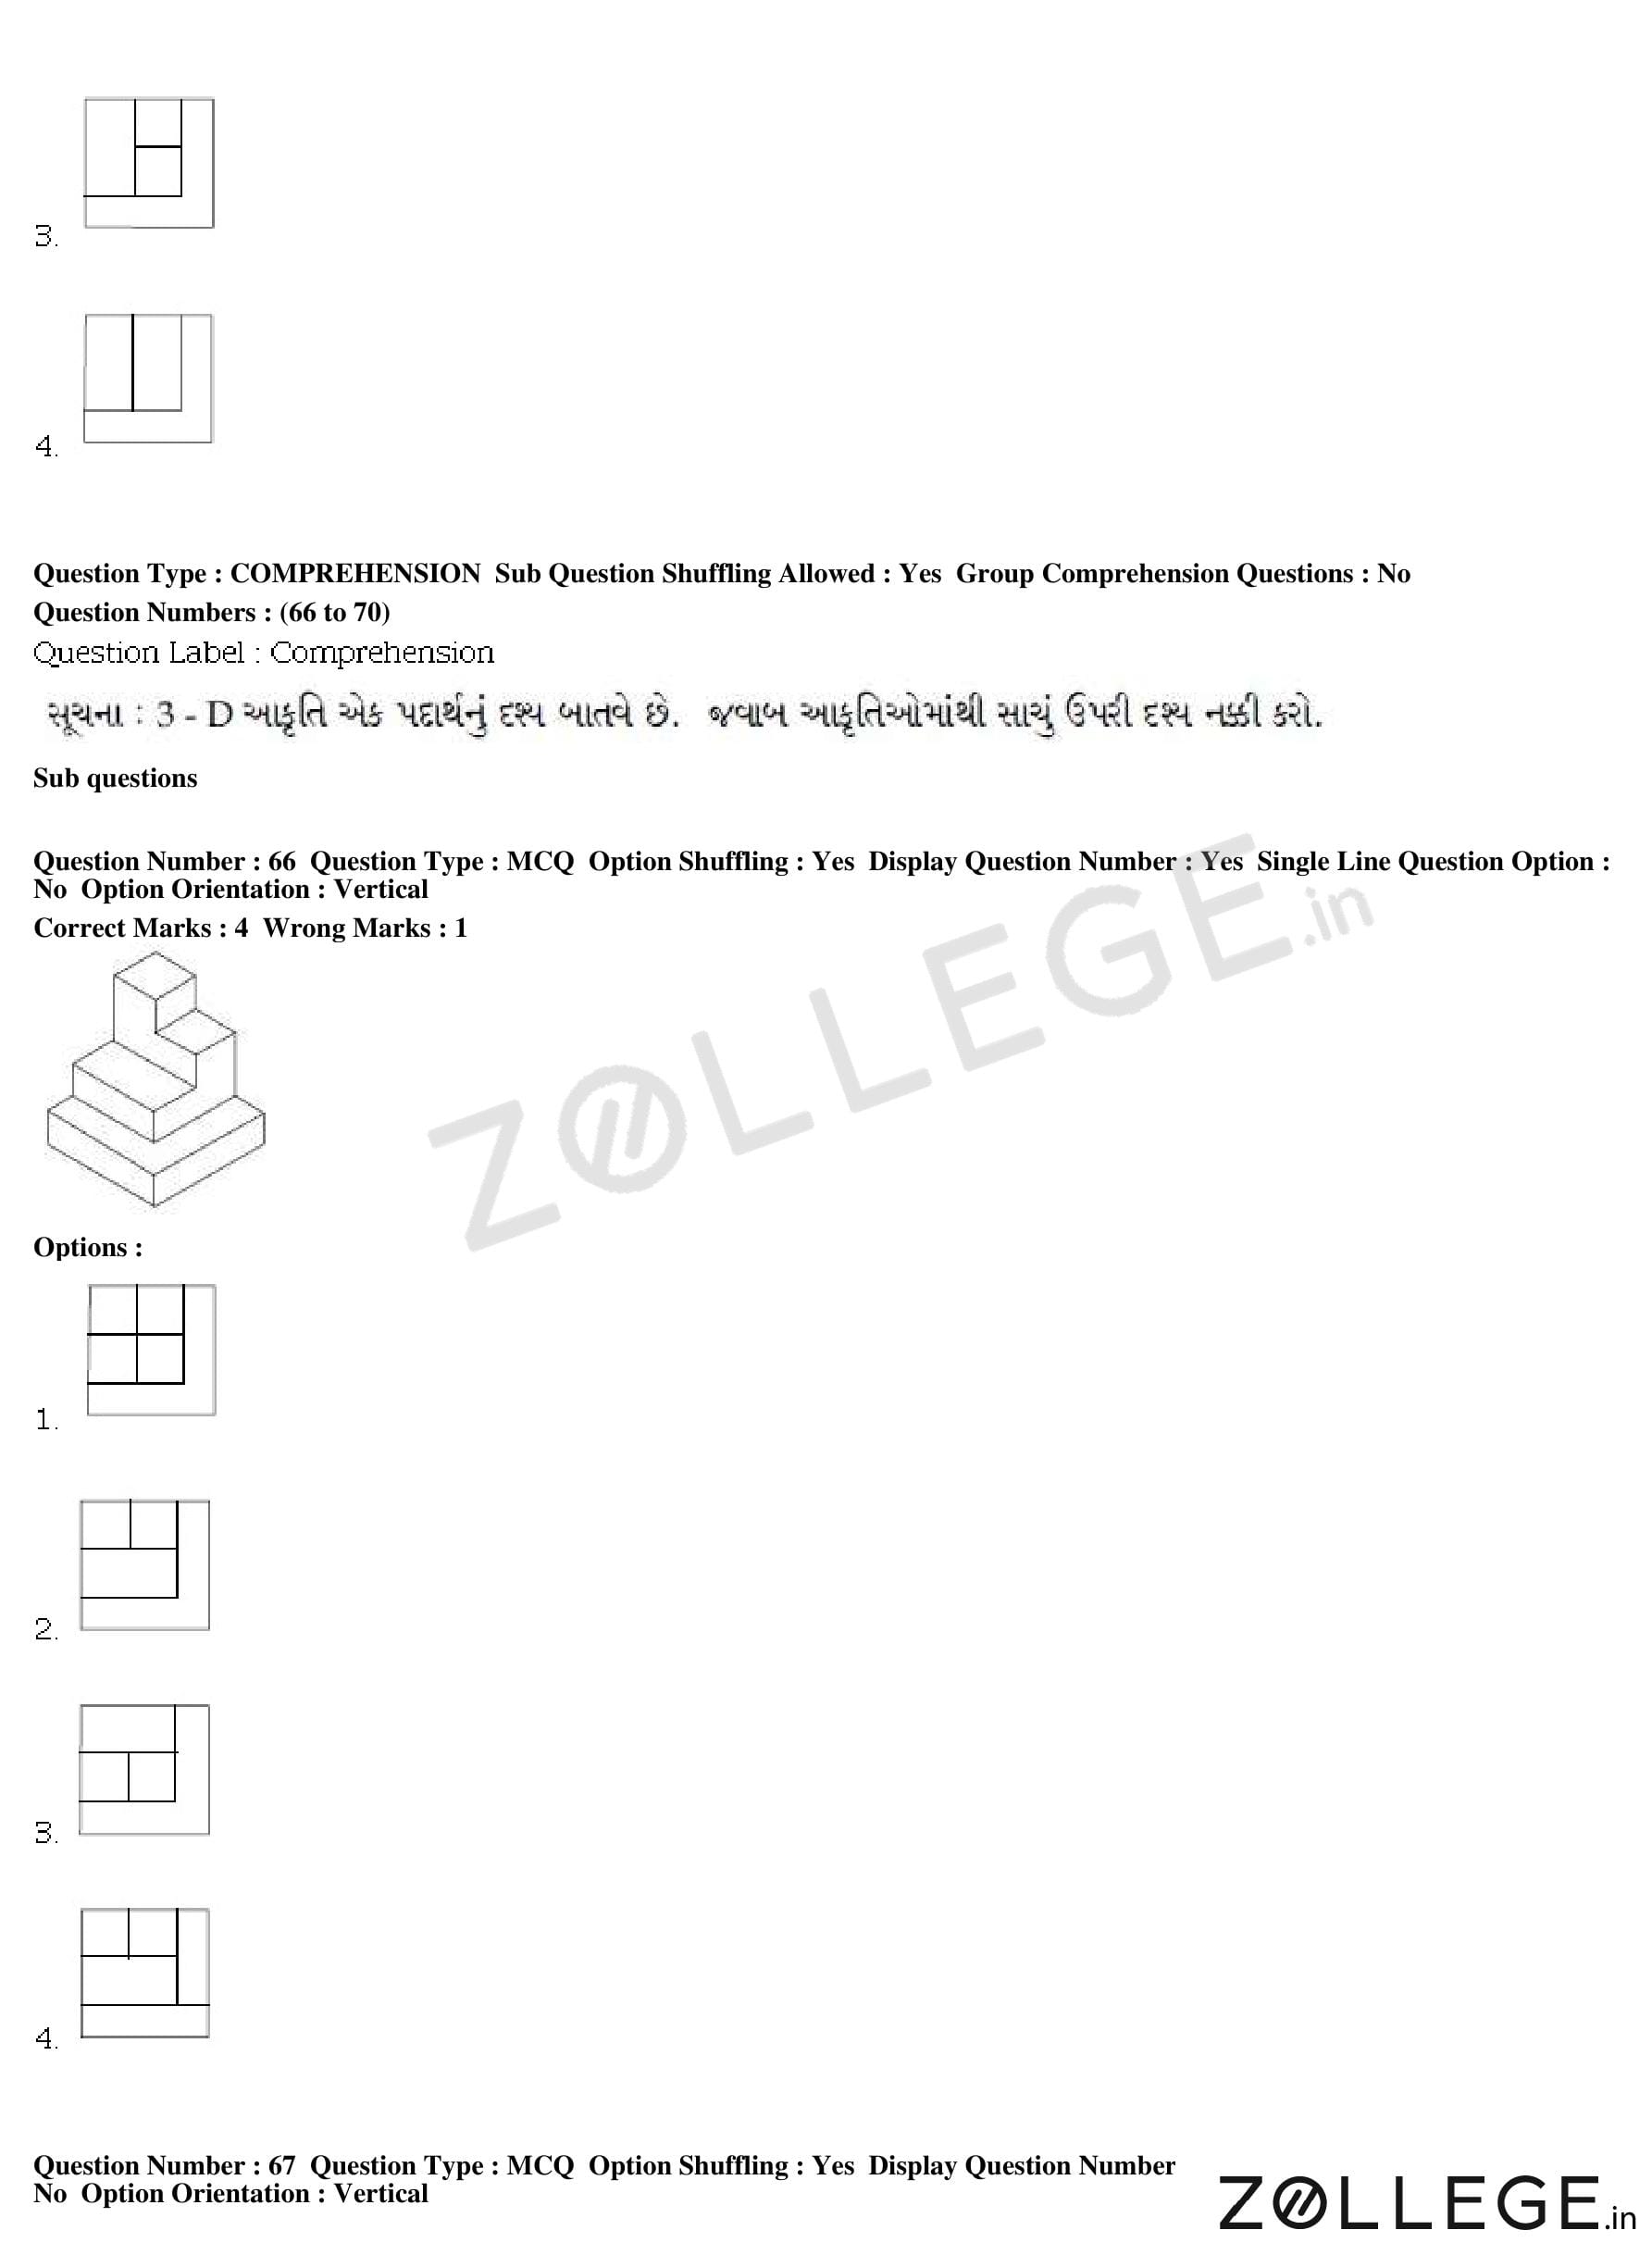
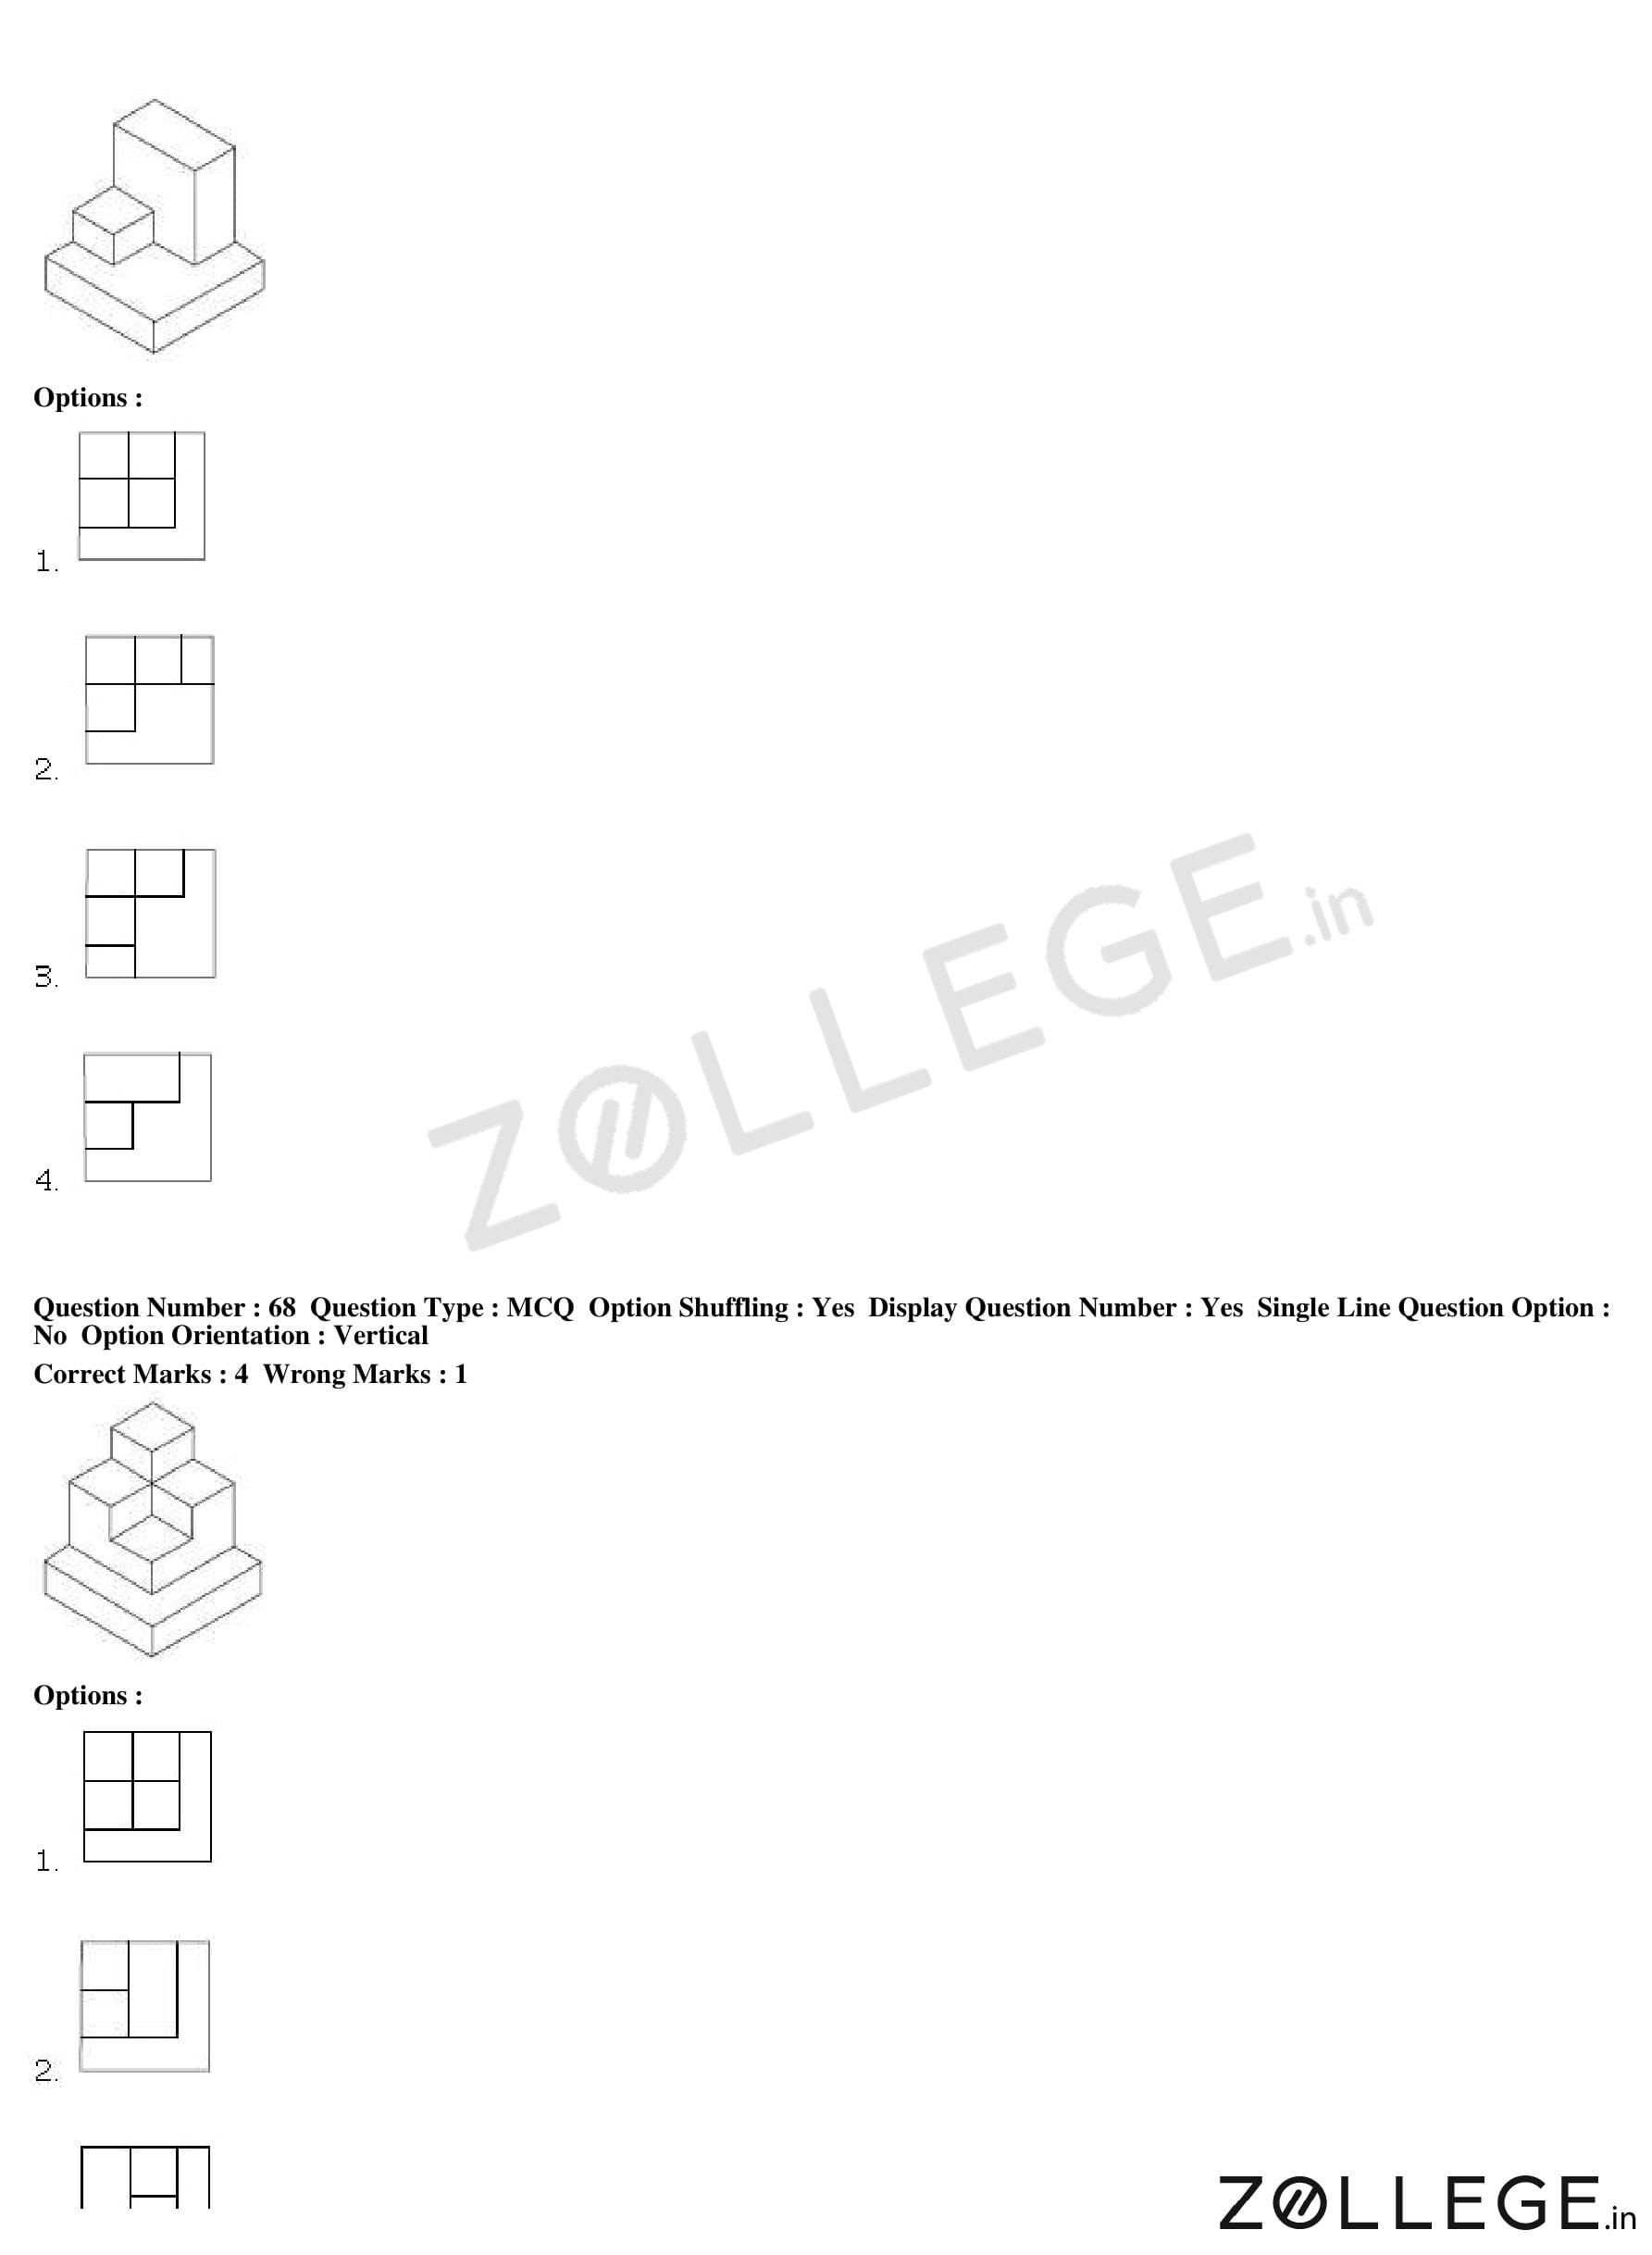
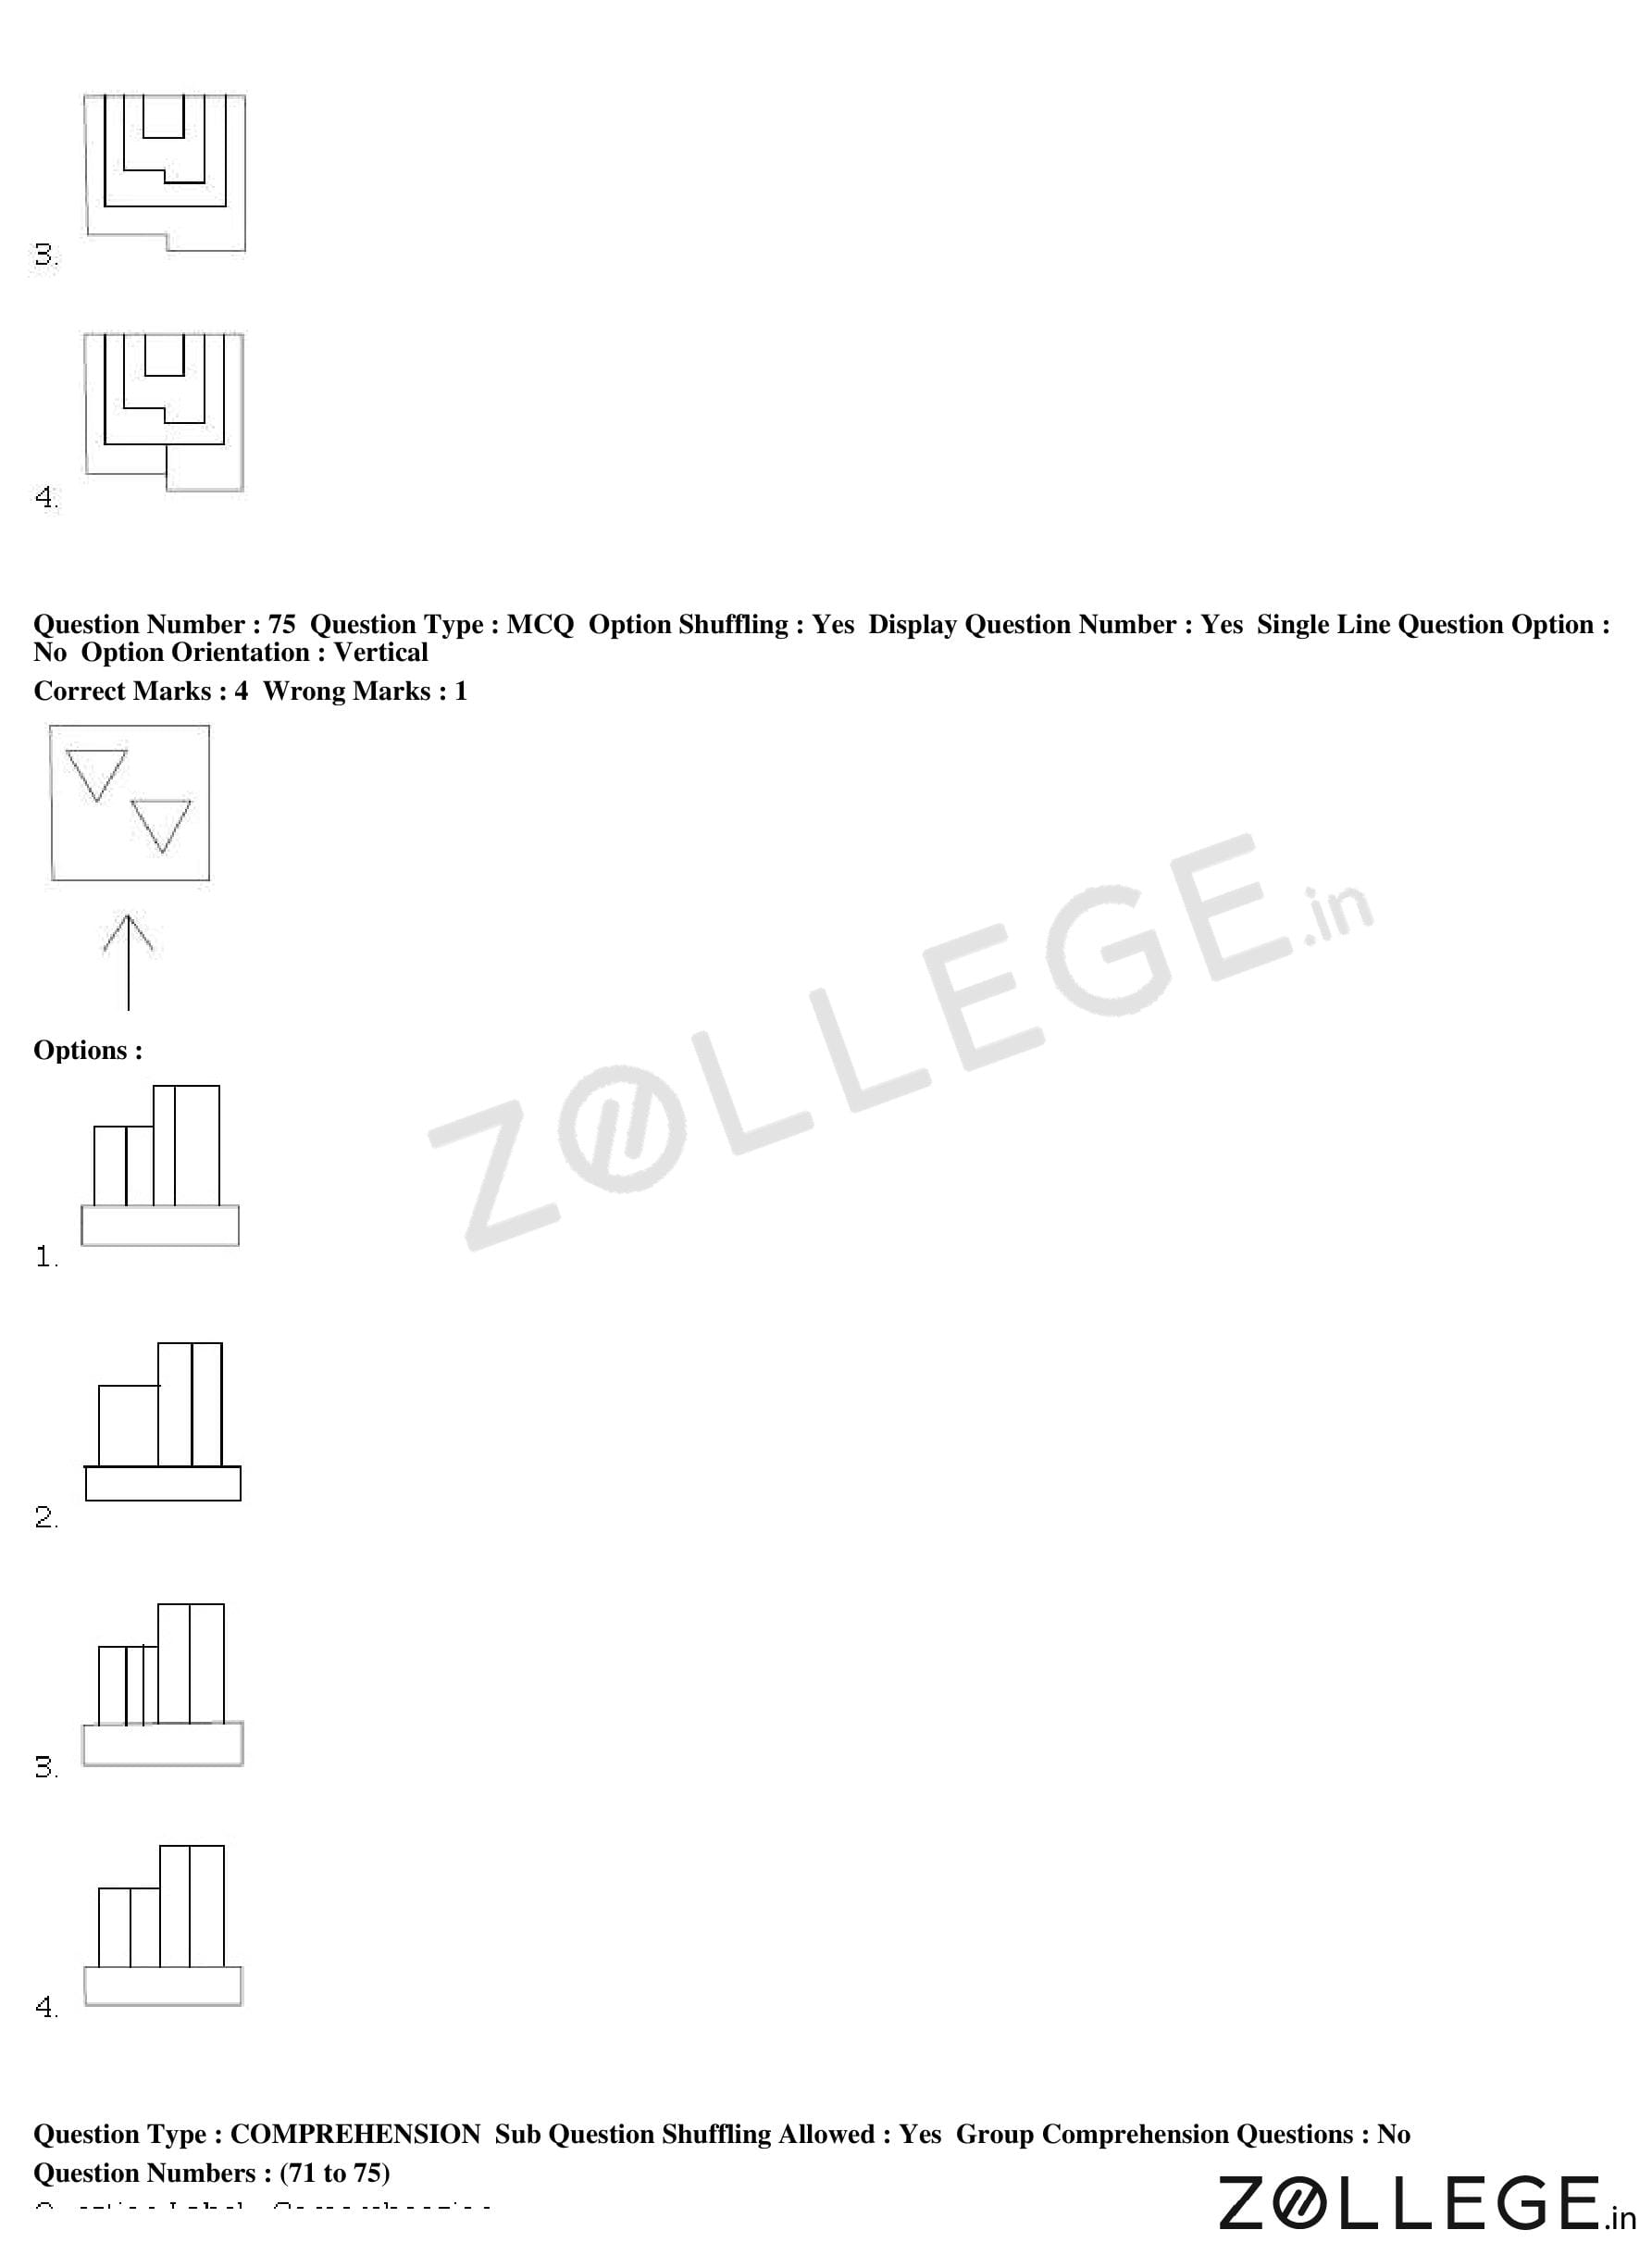
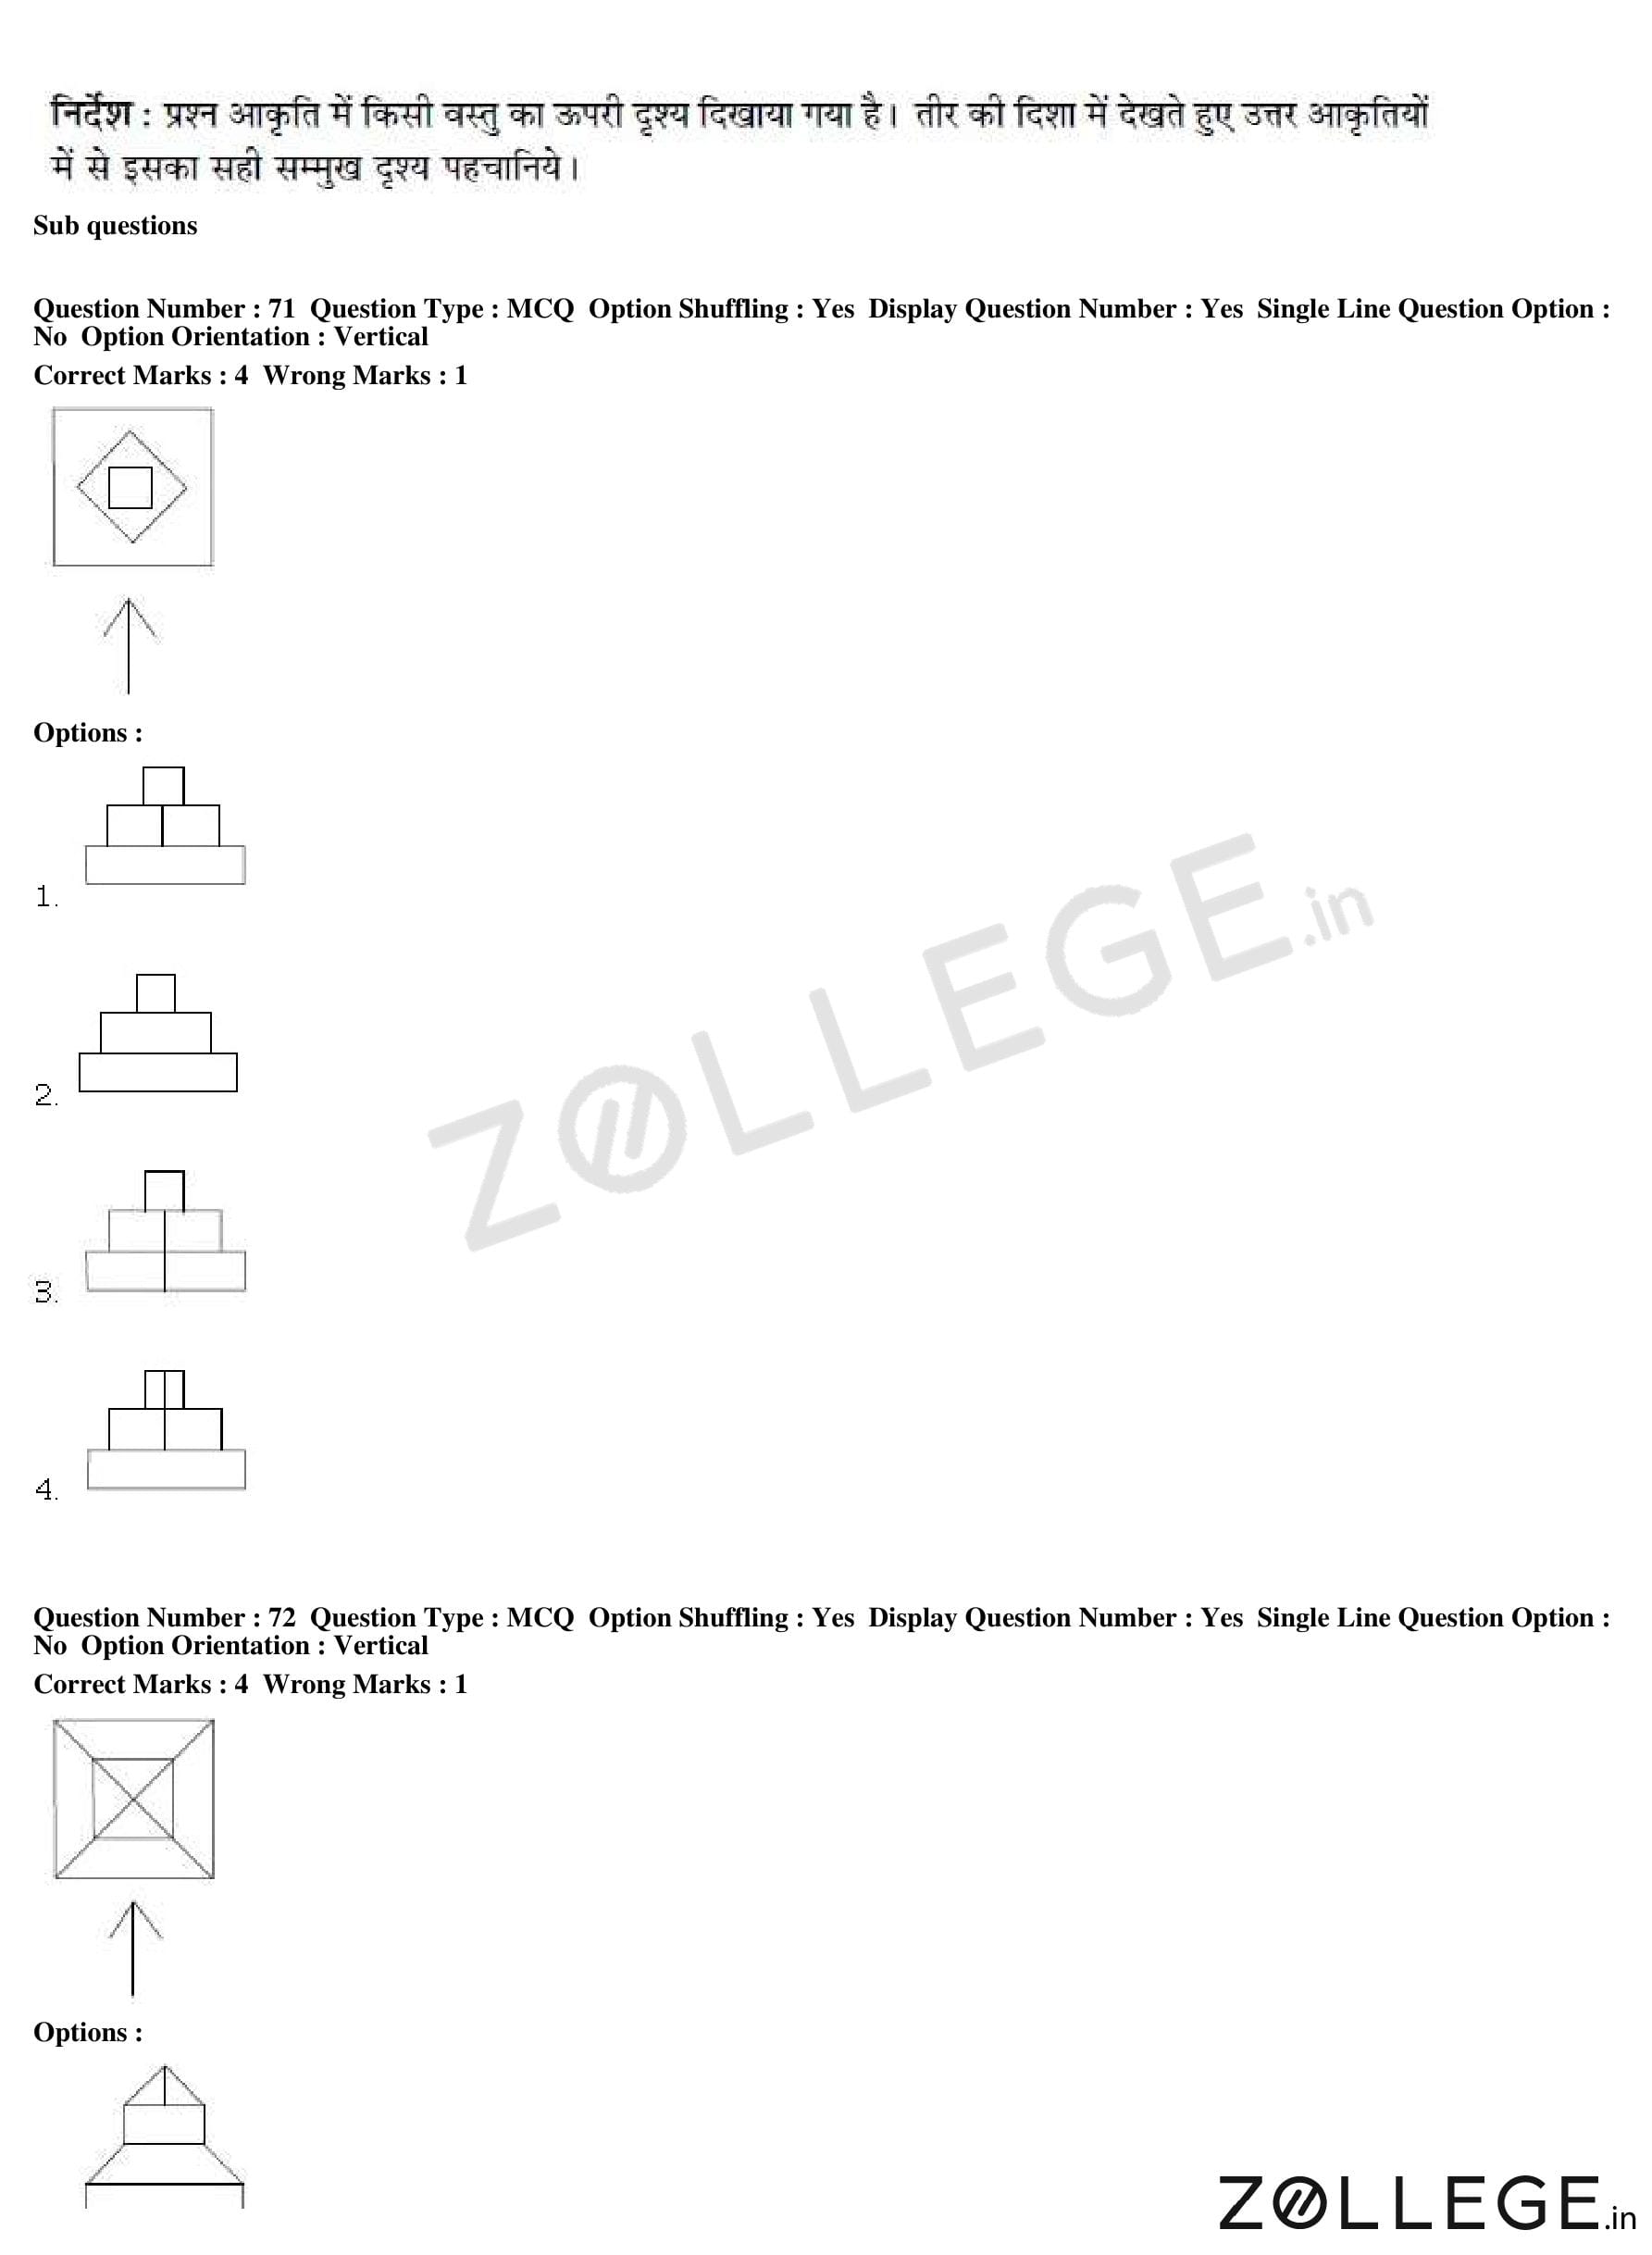
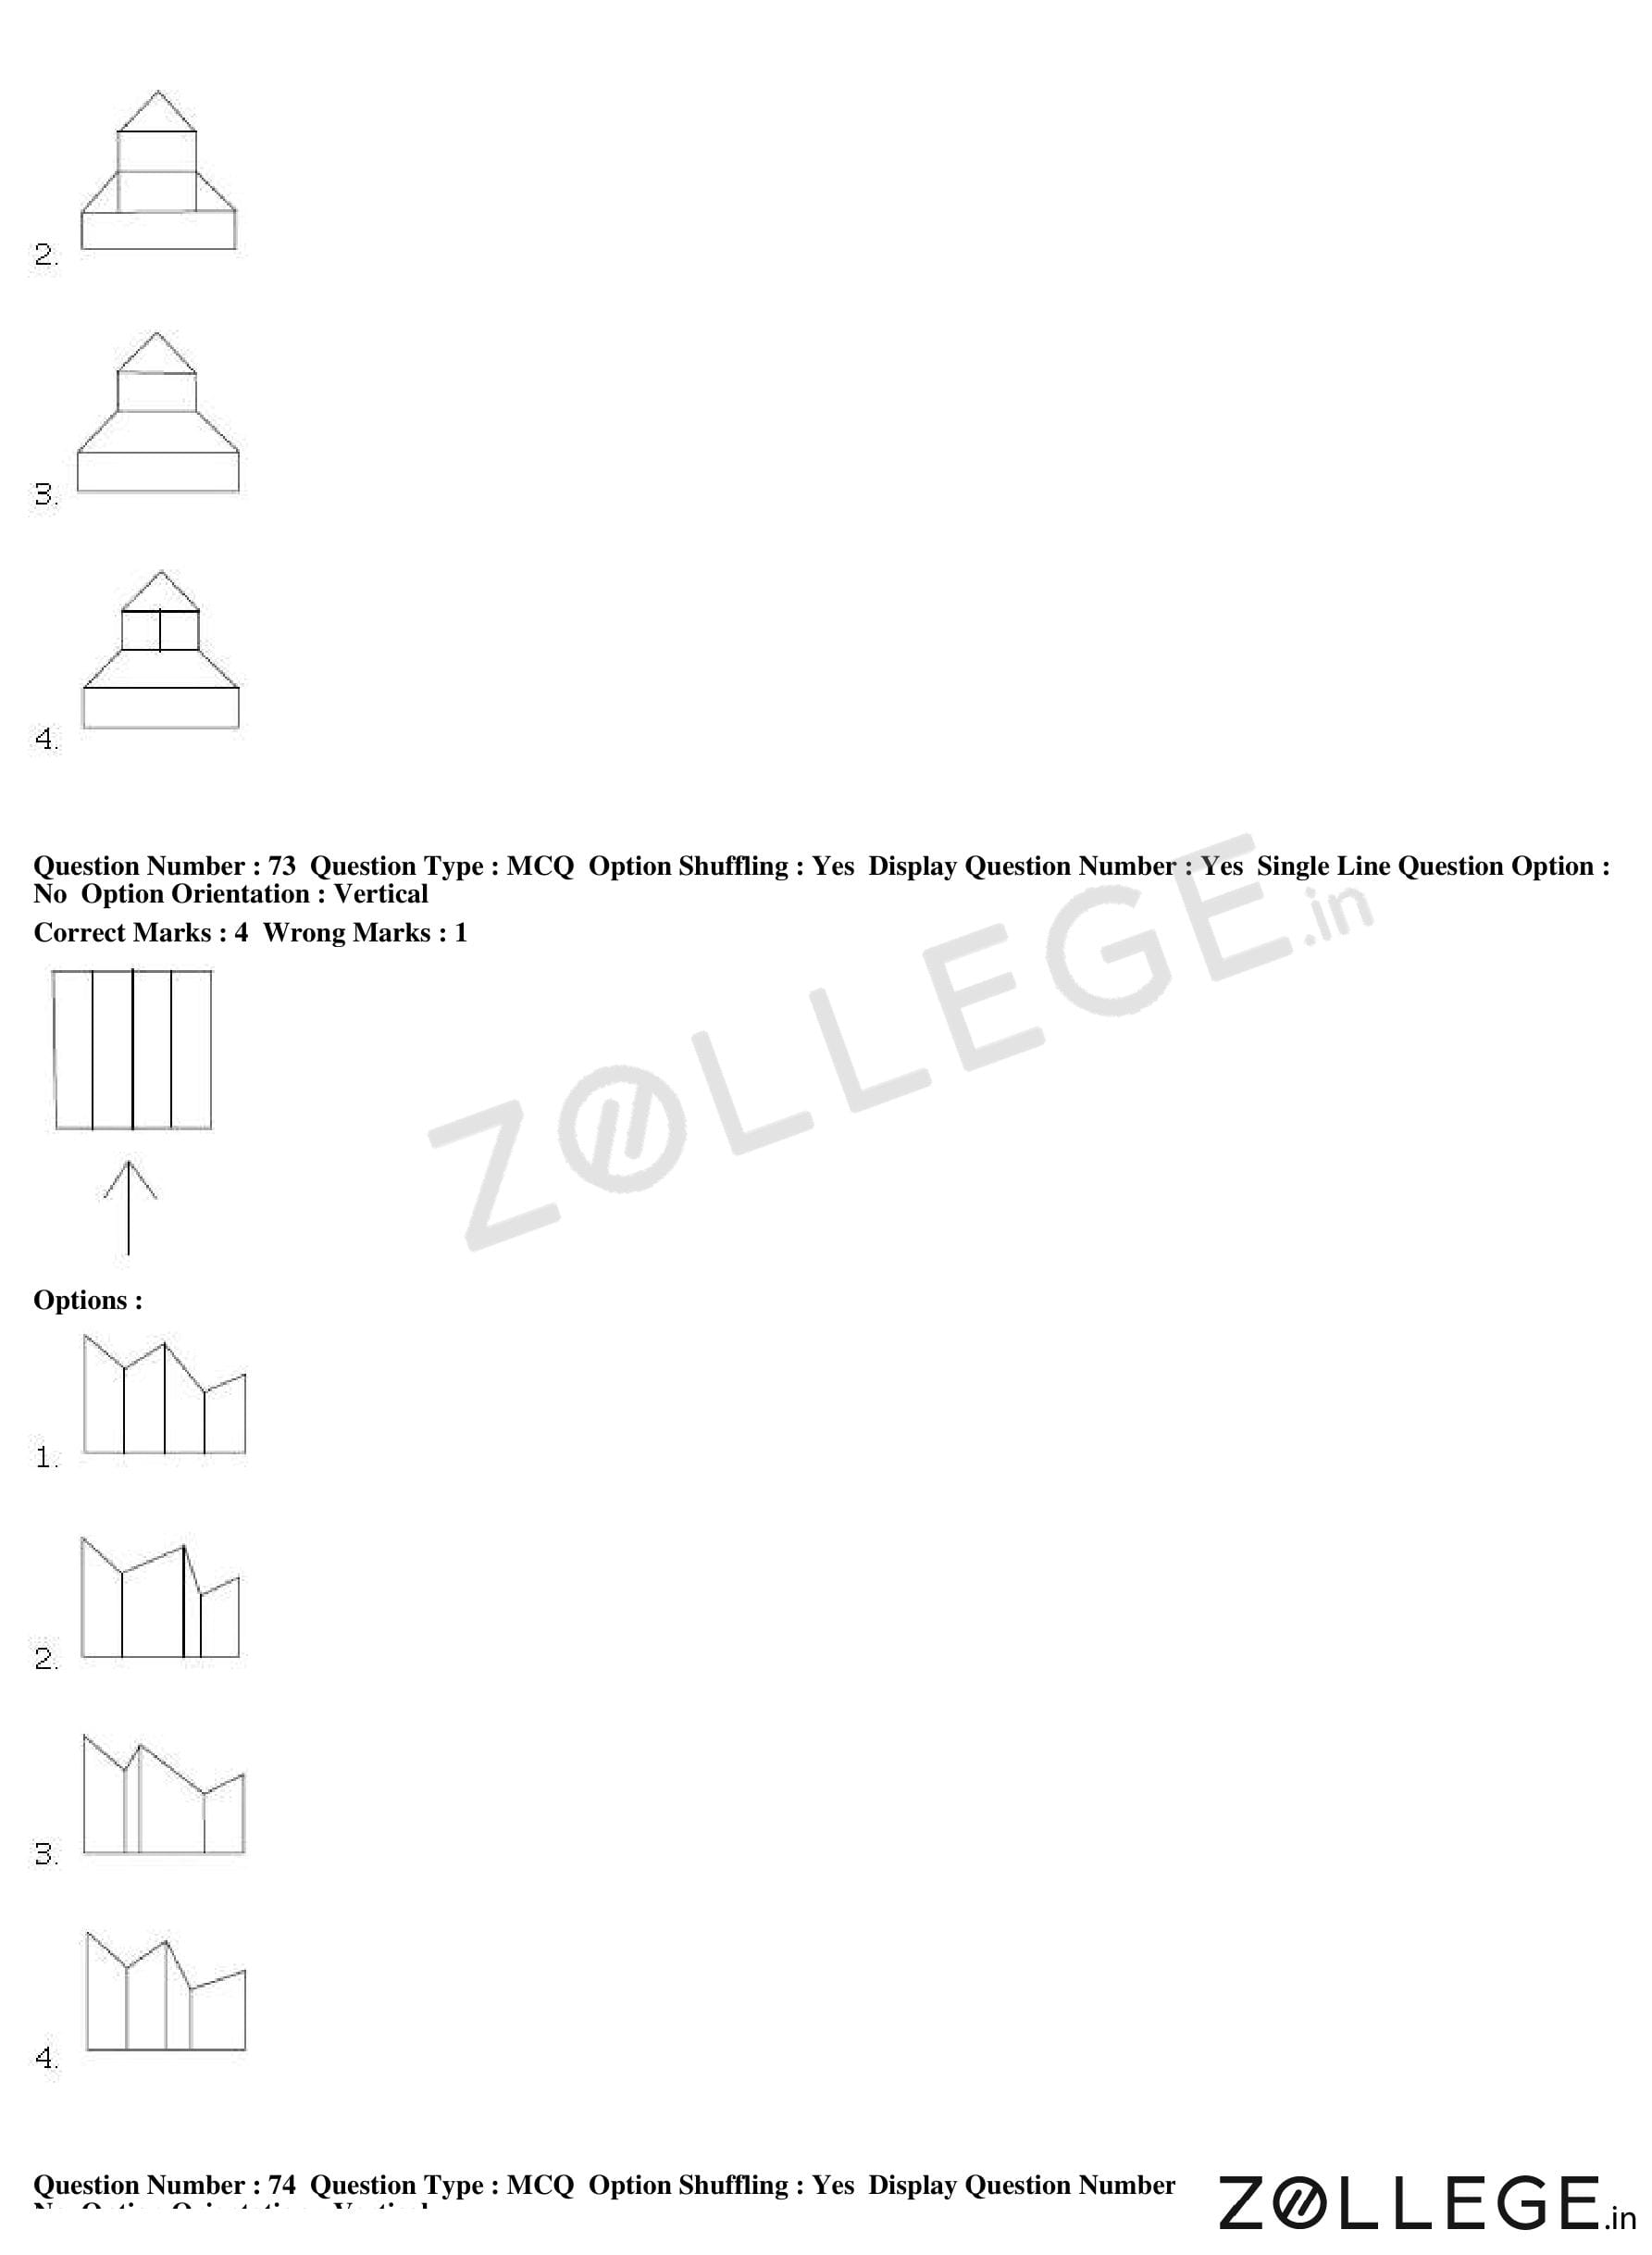
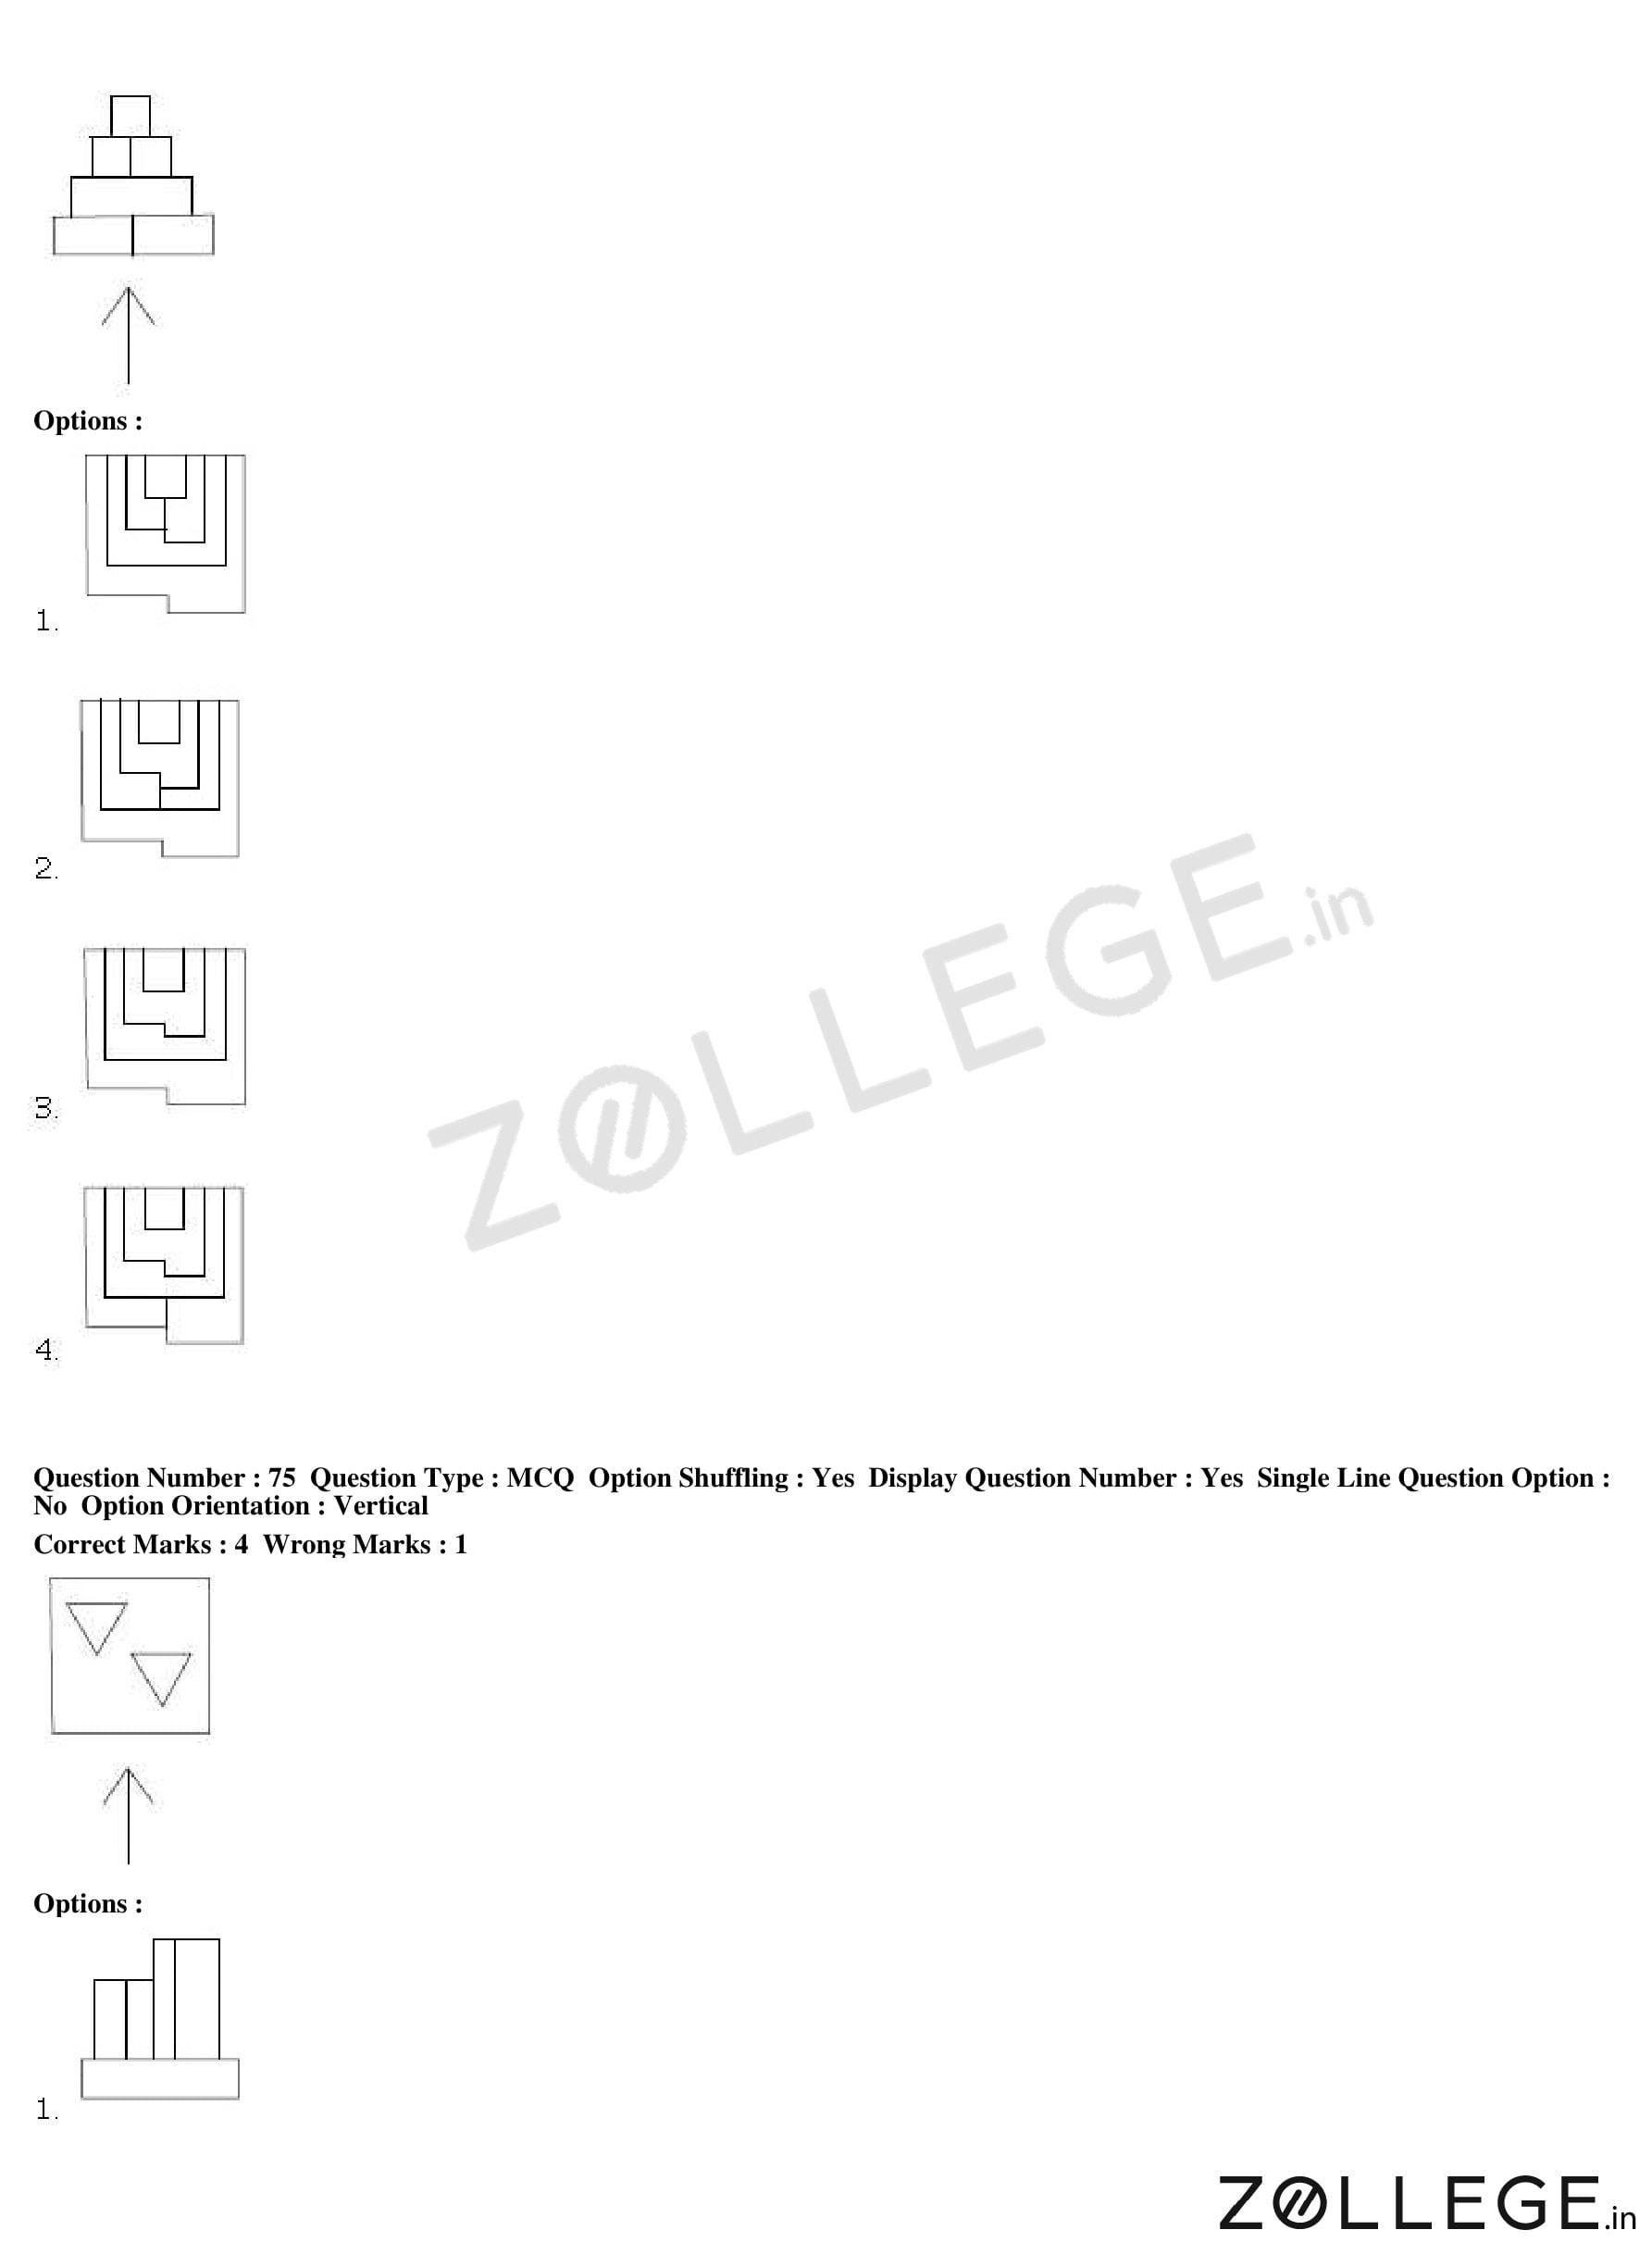
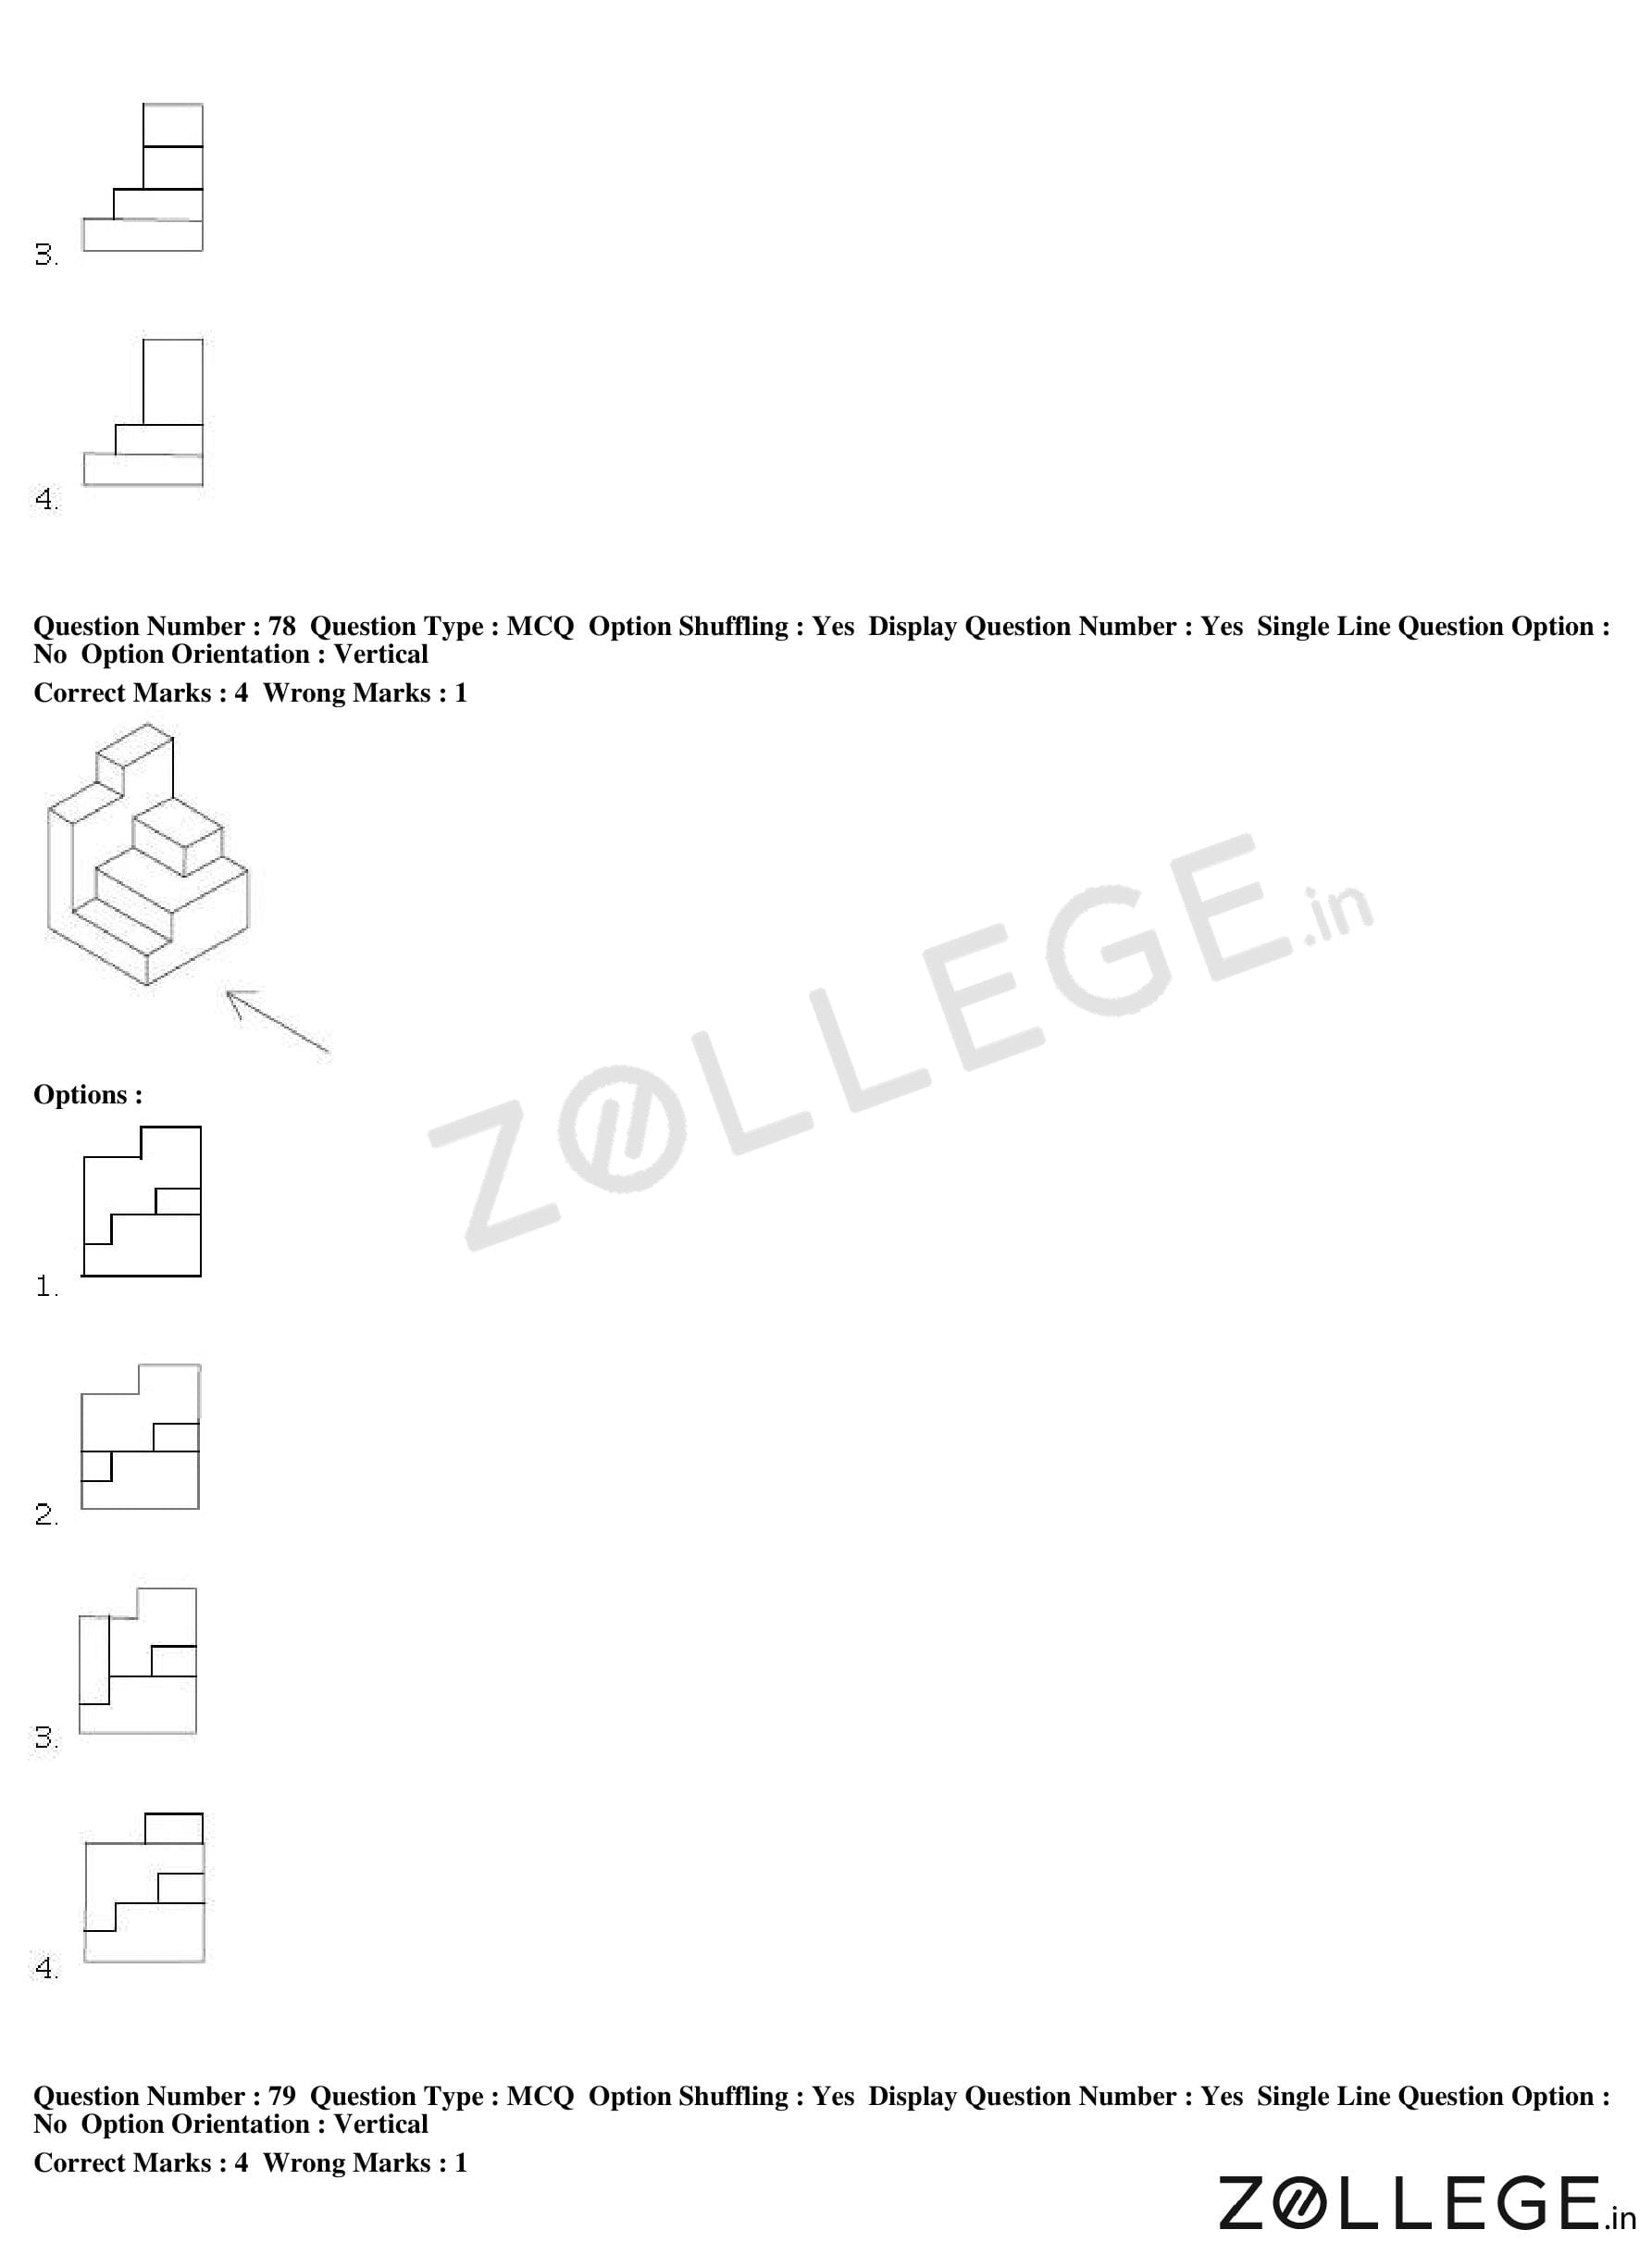
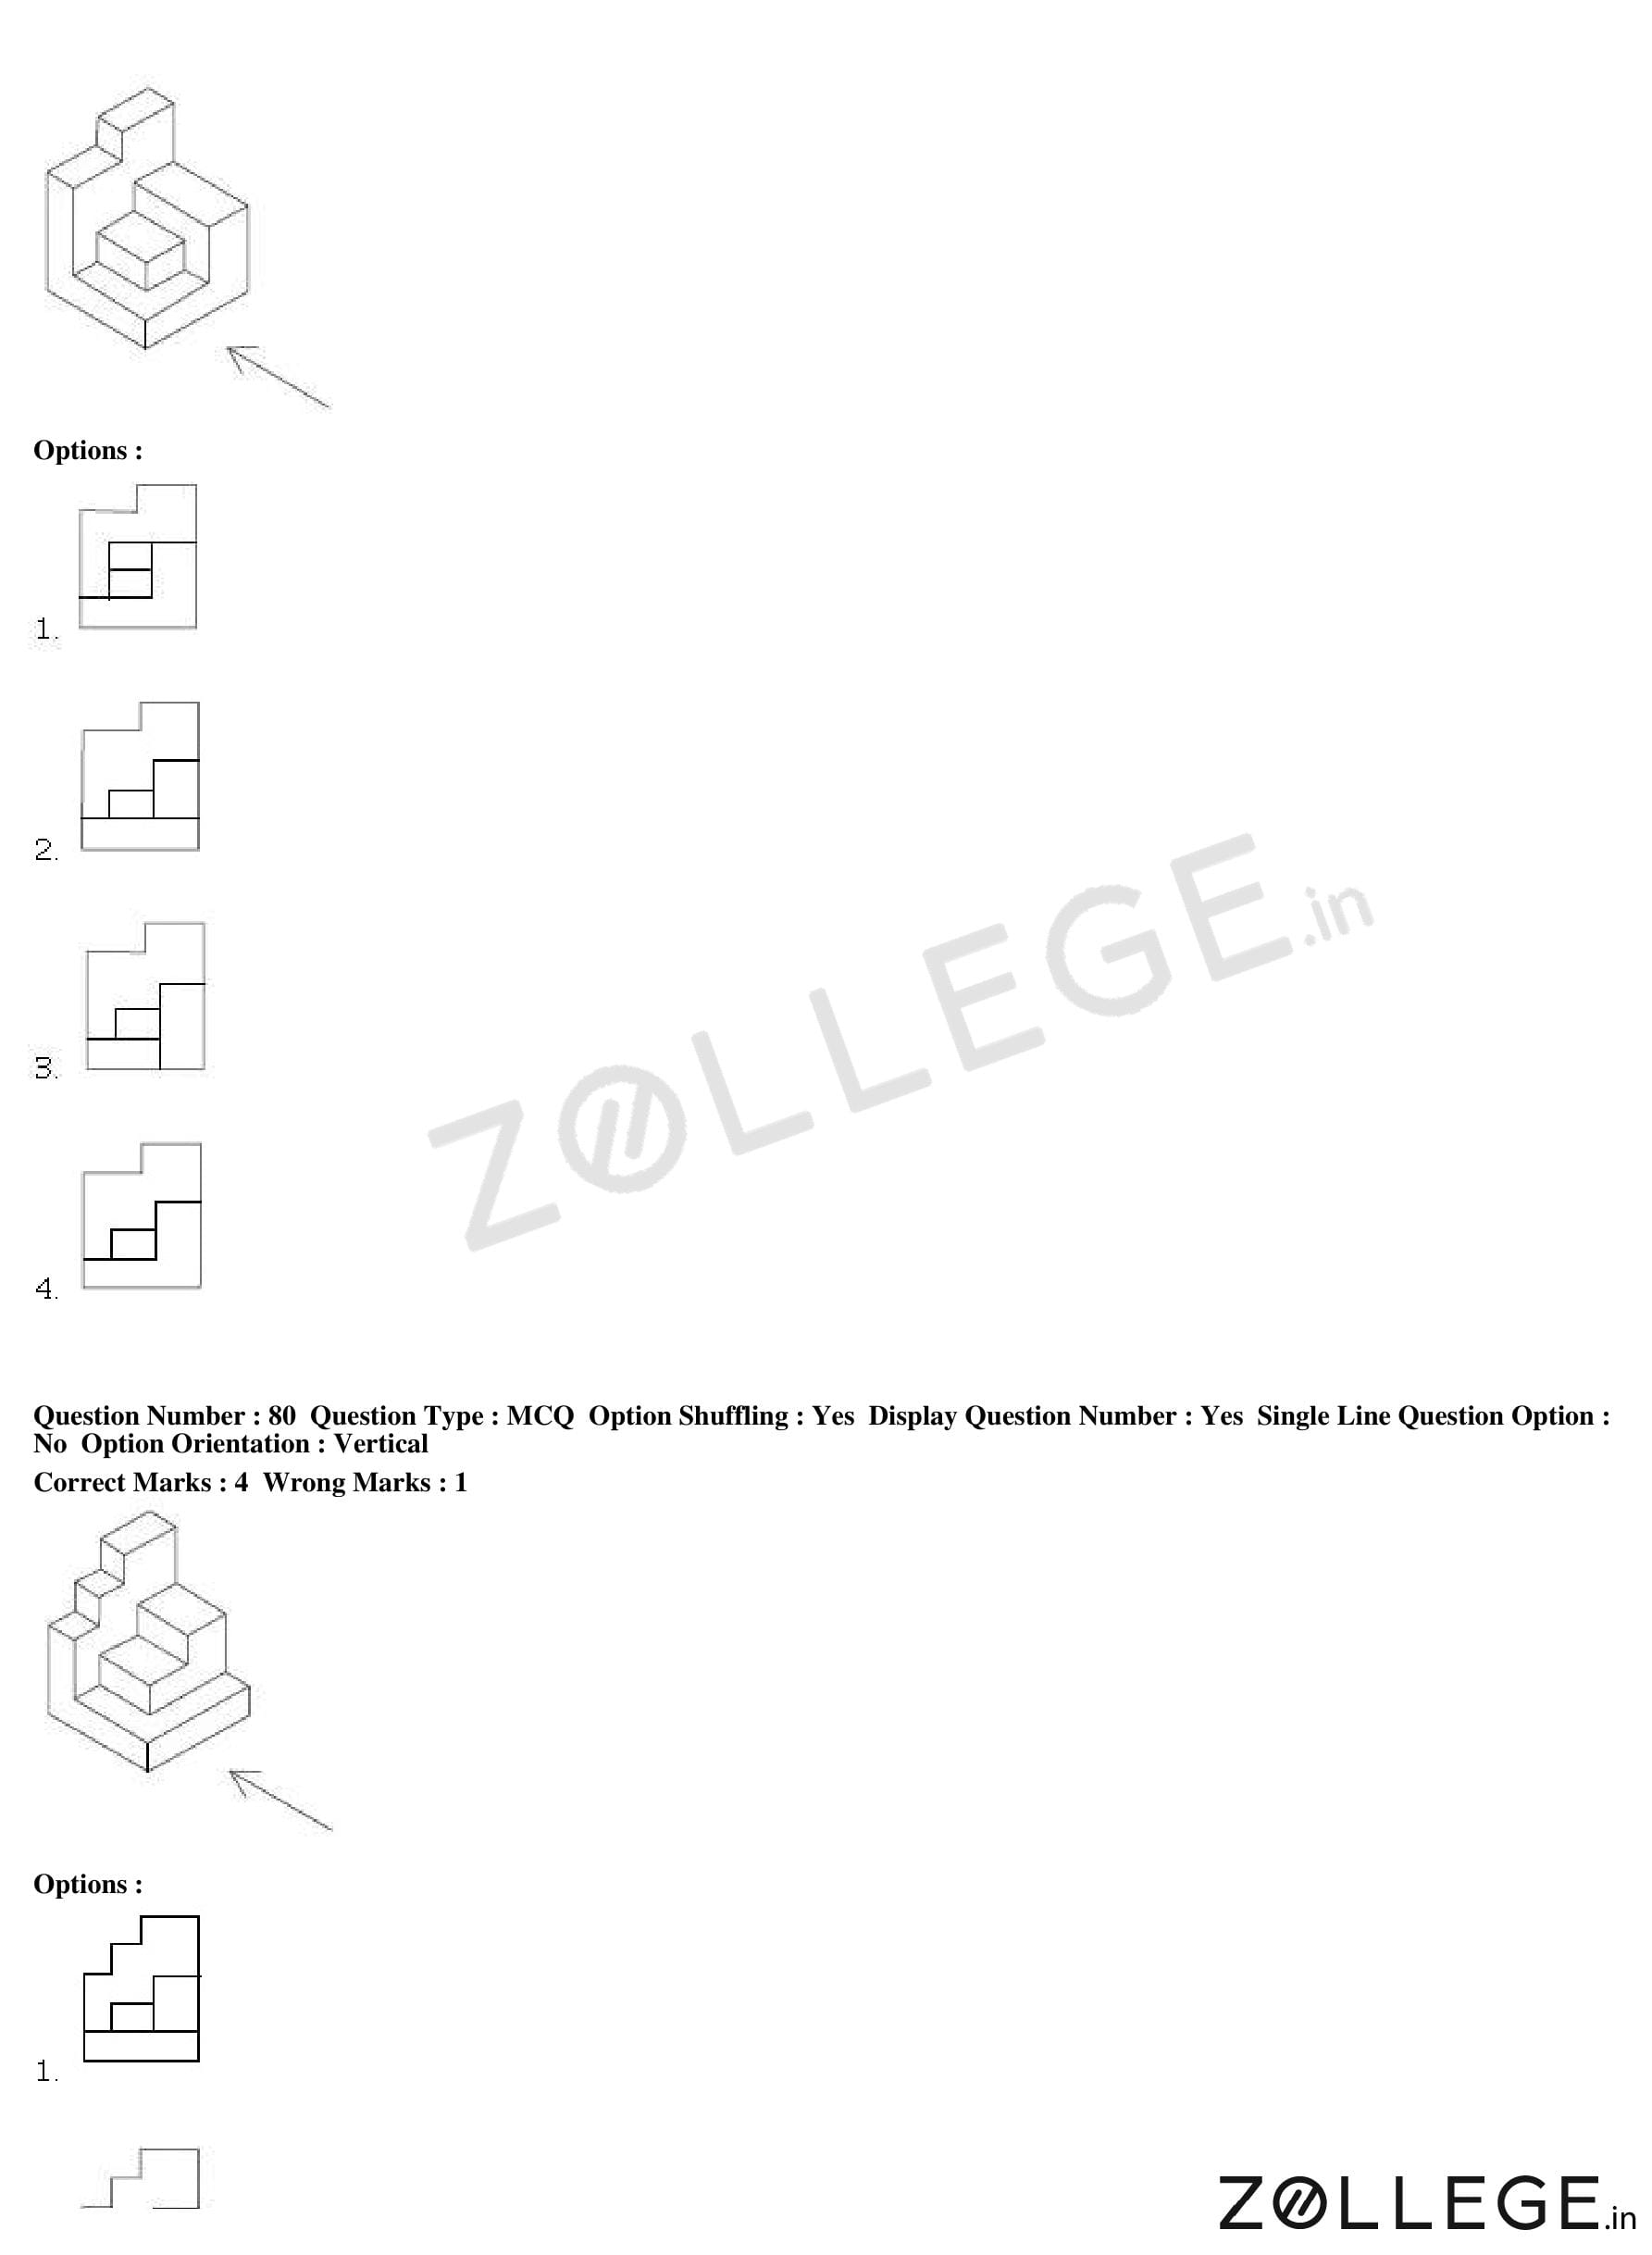
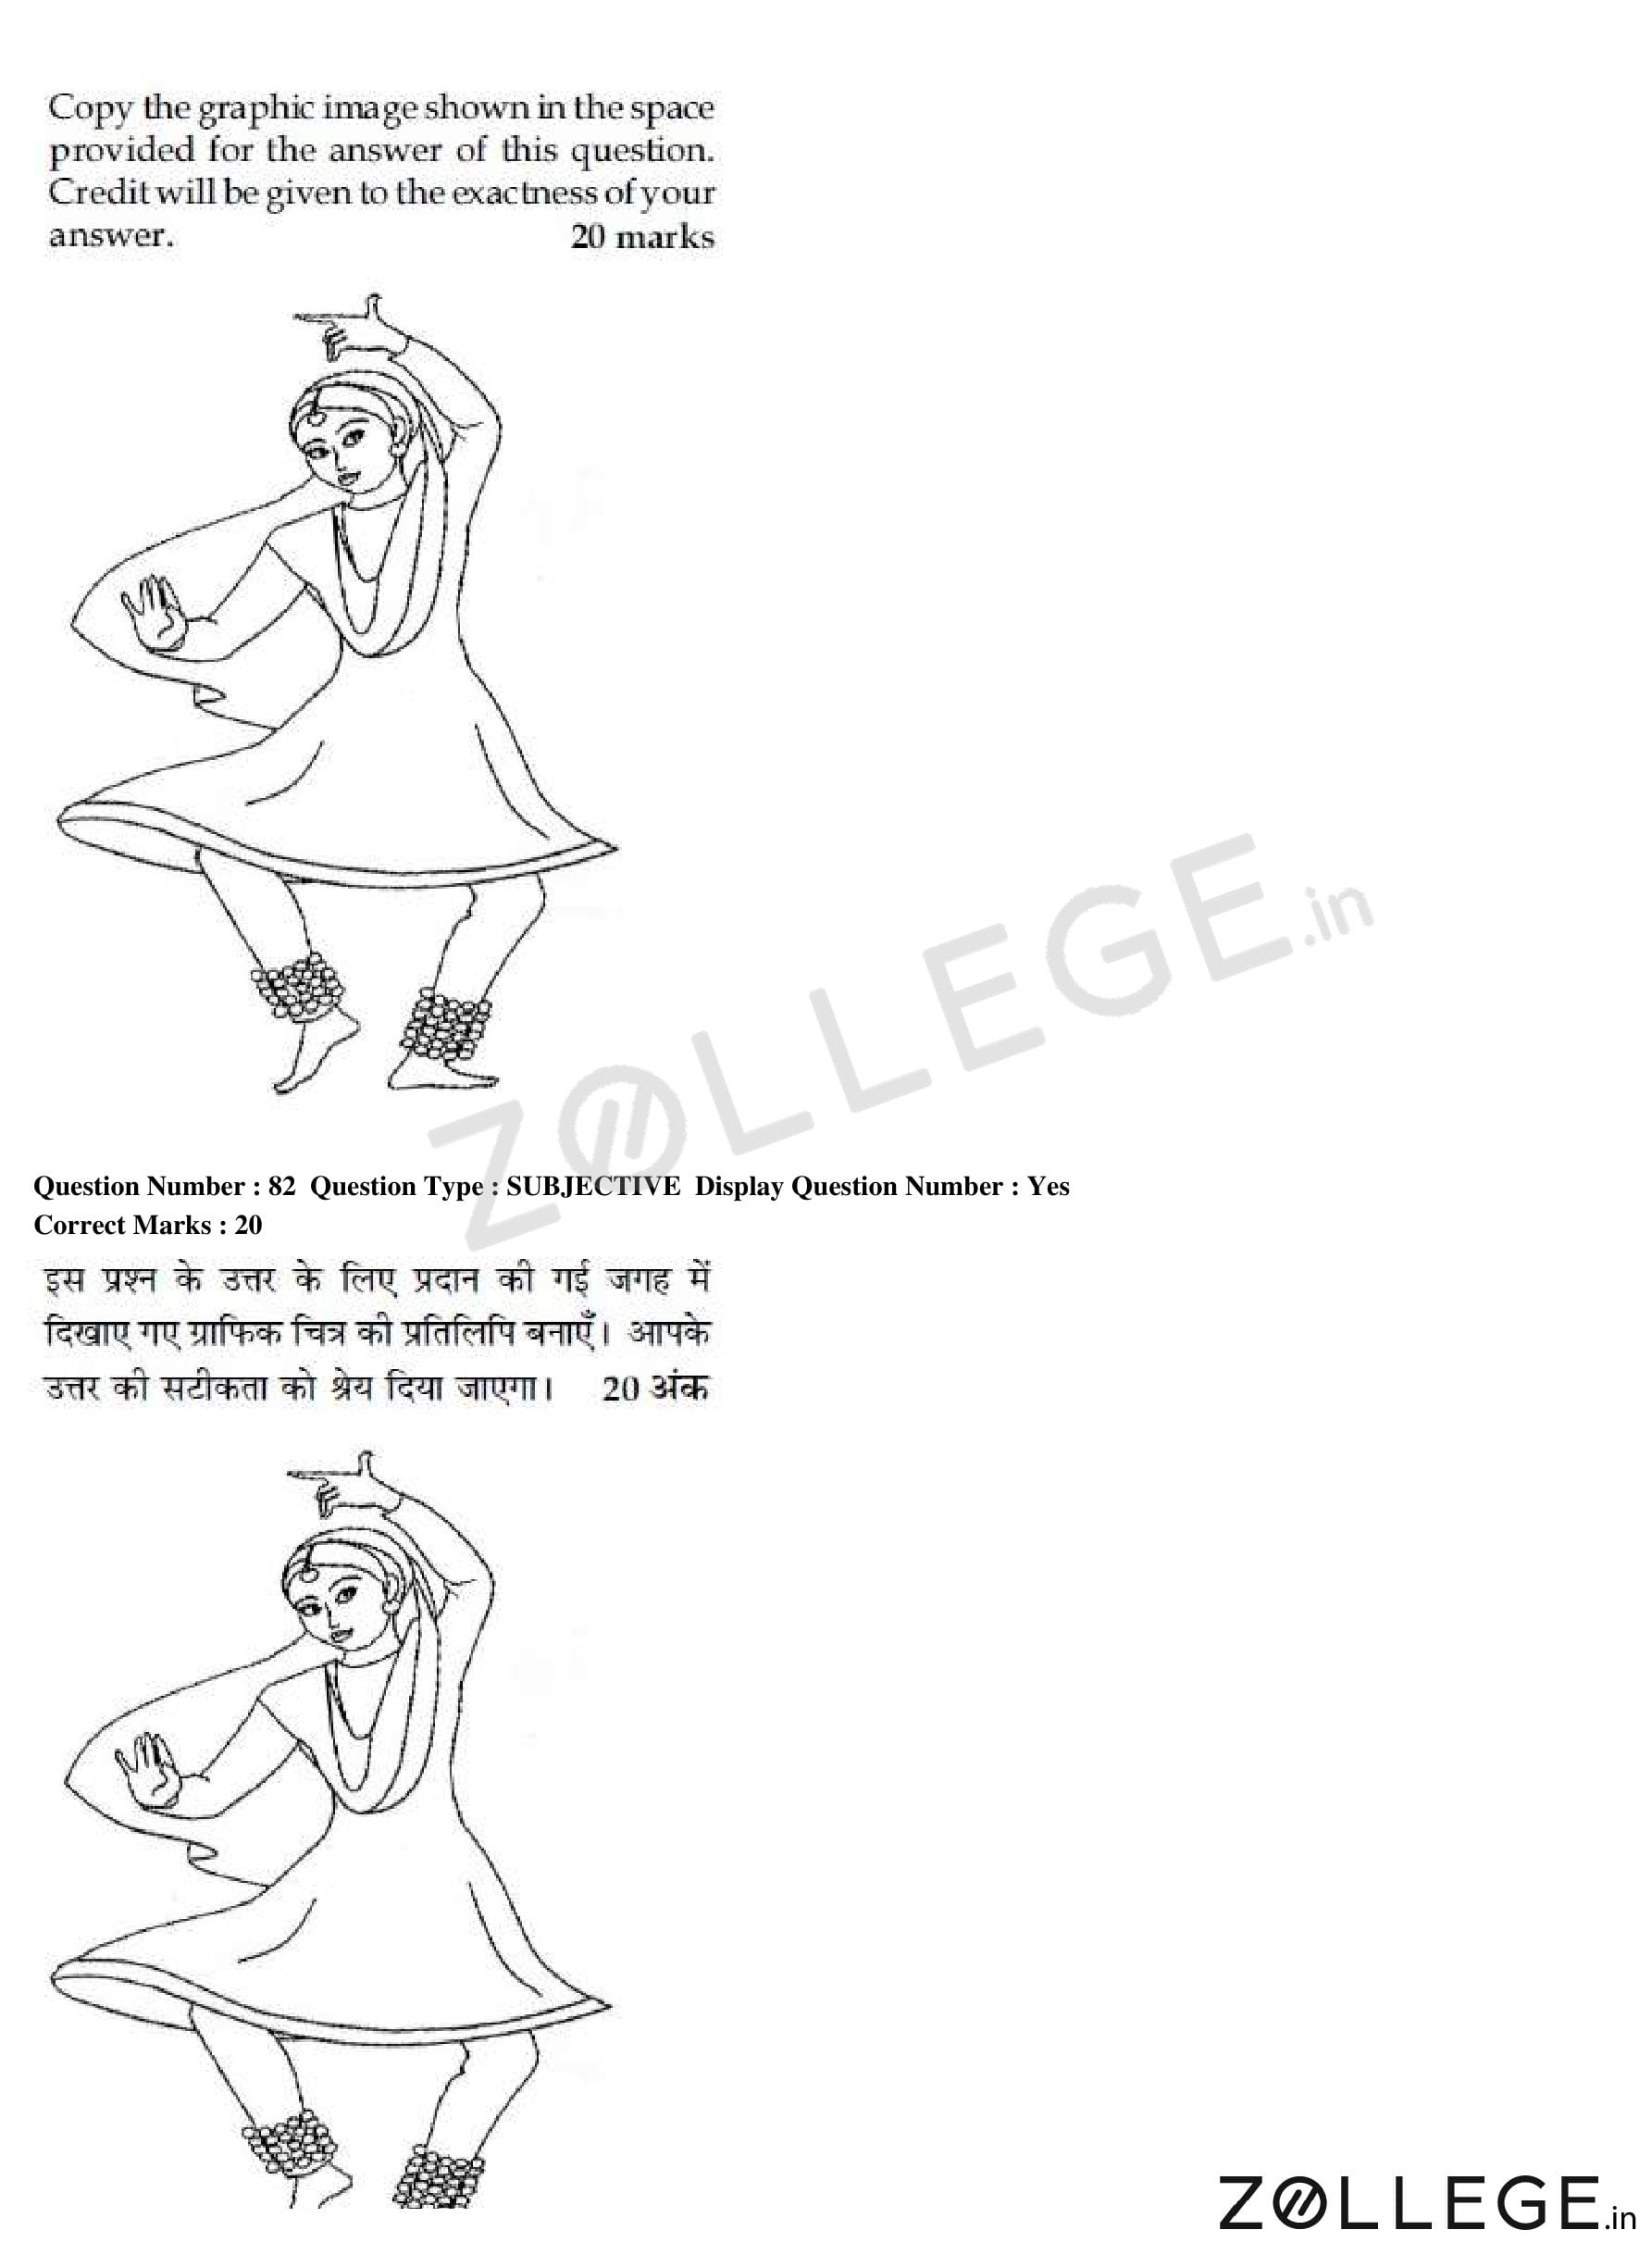
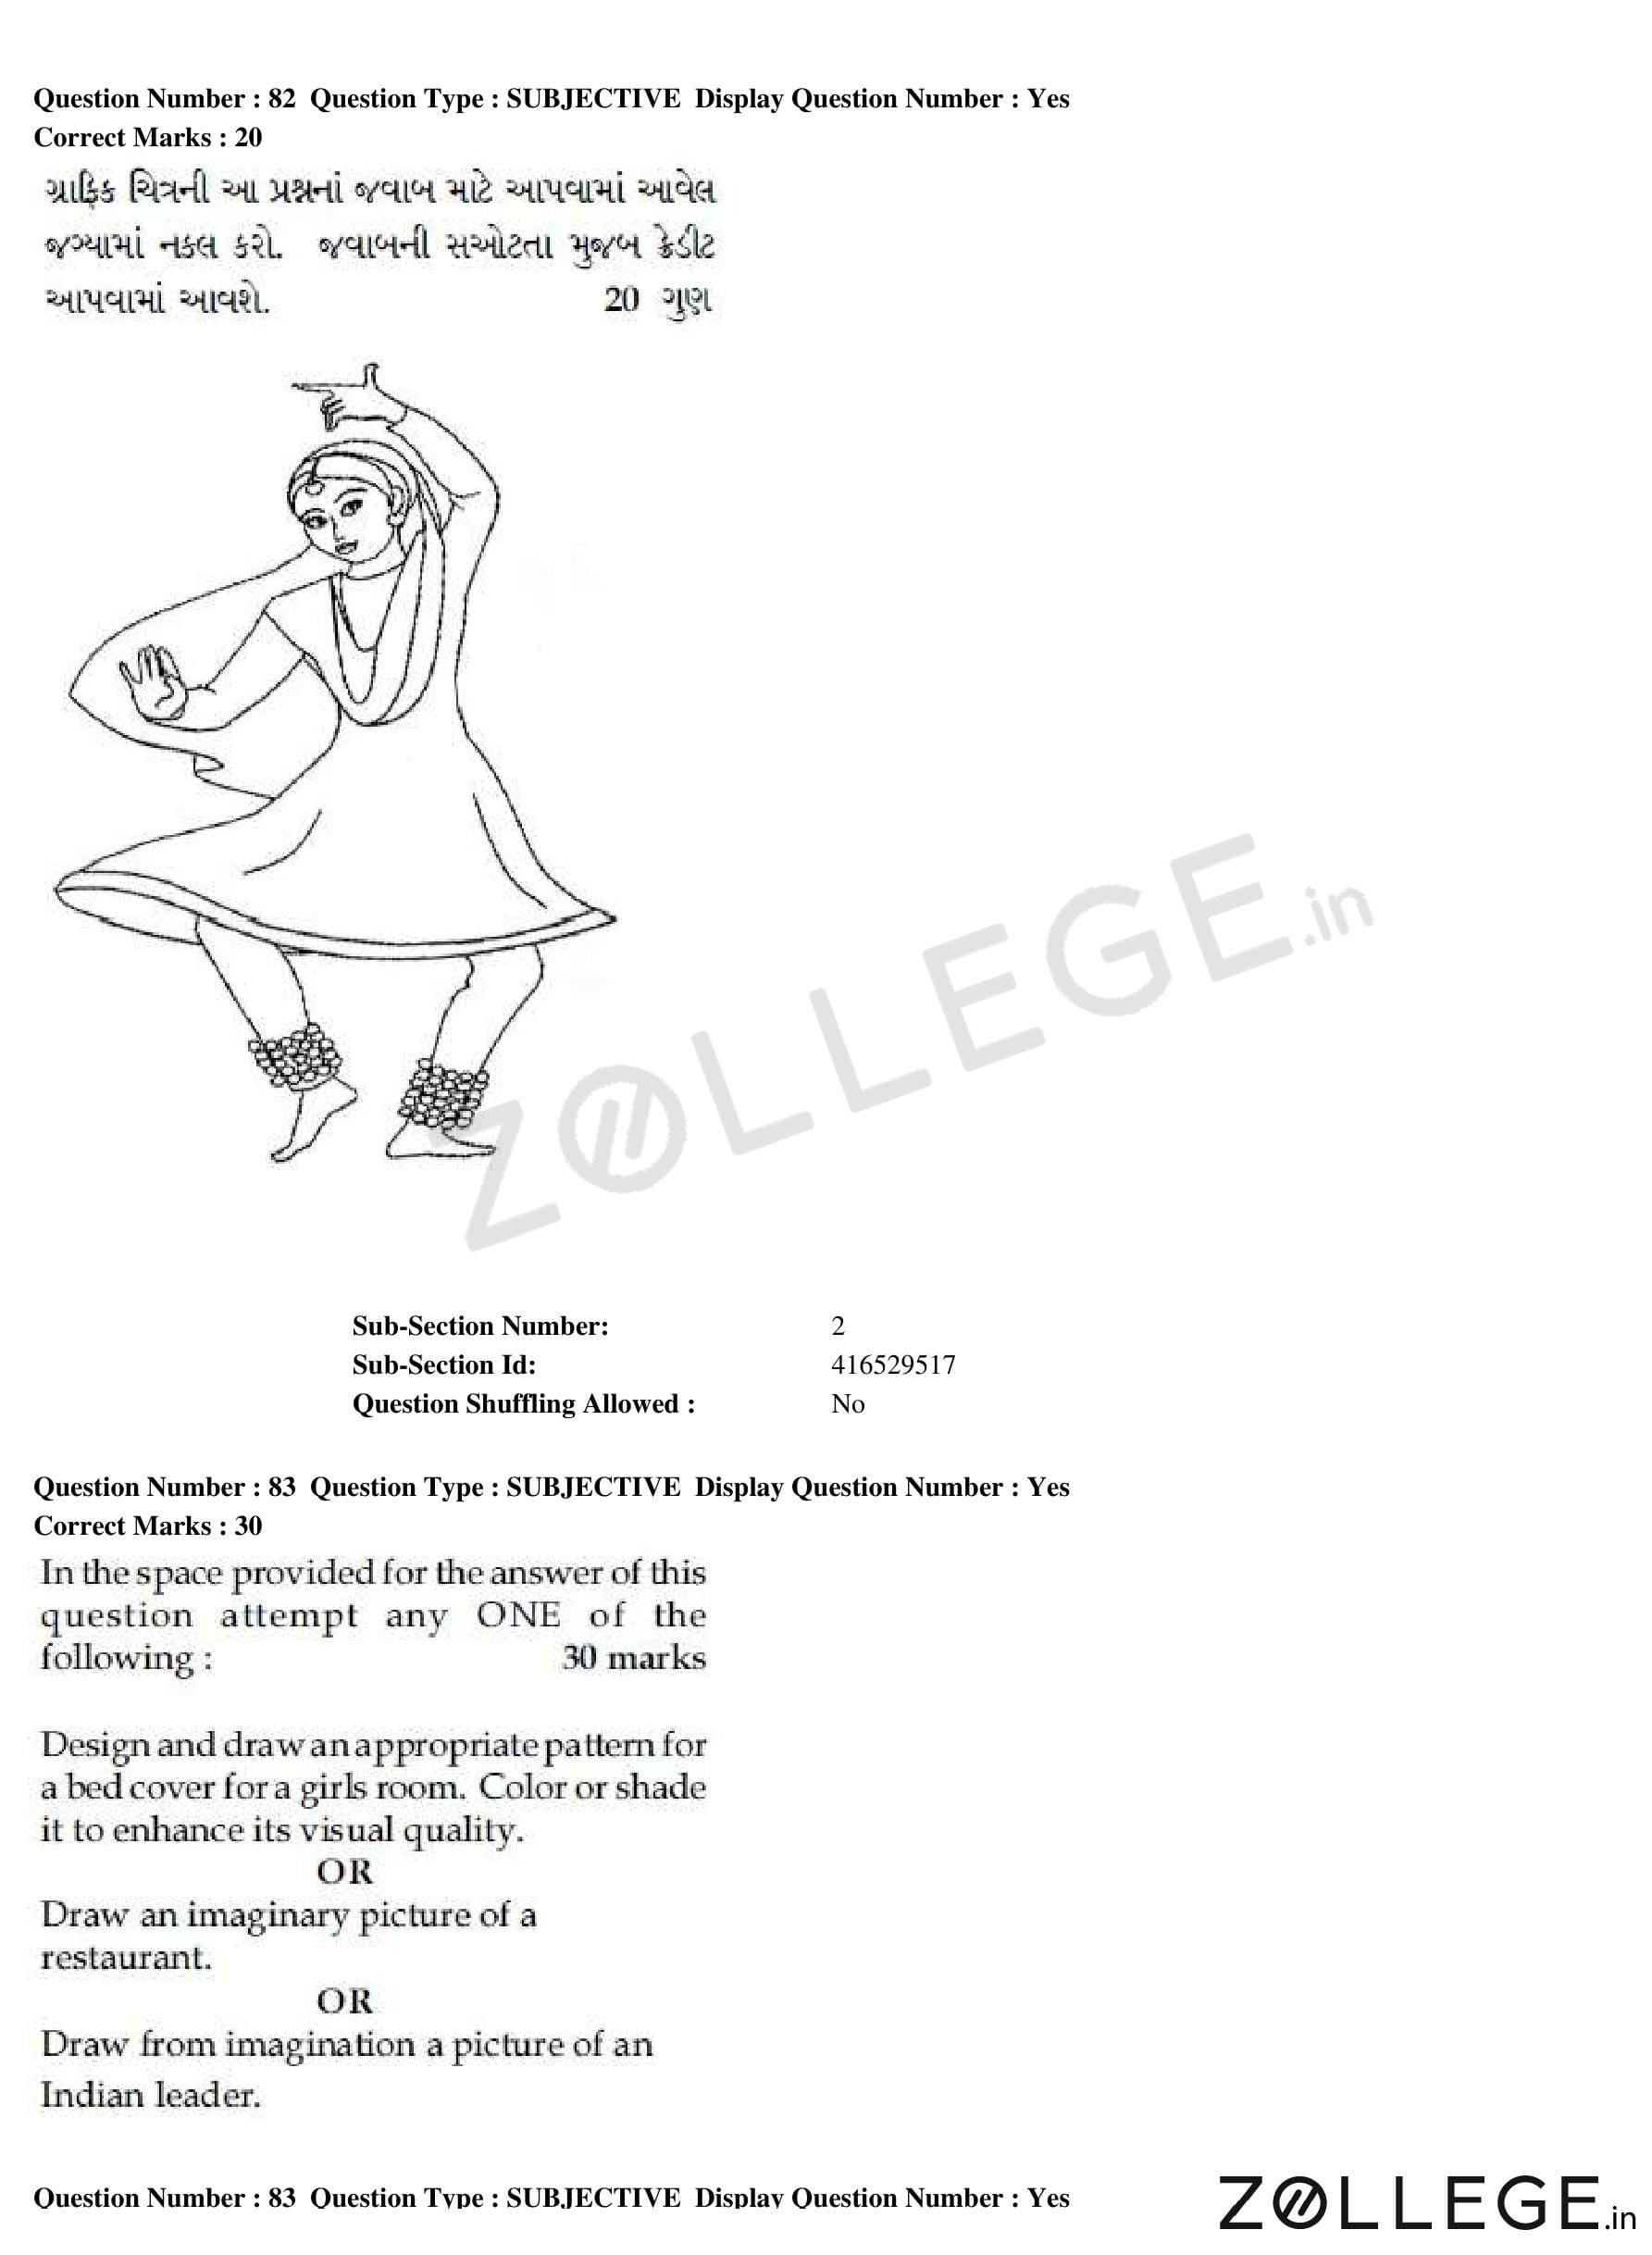
Previous Year JEE Main Question Papers
*The article might have information for the previous academic years, please refer the official website of the exam.