
JEE Main 2020 Question Paper with Answer Key PDF for B.E./ B.Tech(January 8 - Shift 2)


Content Writer | Updated On - Dec 29, 2025
JEE Main Question Papers are the most important study material for effective exam preparation. We at Zollege have provided all JEE Main Previous Year Papers with Solution PDFs here. JEE Main 2020 B. E. / B. Tech exam was conducted successfully on January 8, 2020. NTA conducted the exam in the Shift 2.
Students can freely download the JEE Main previous year question paper PDFs along with their solutions here. We strongly encourage JEE Main aspirants to scan through all the JEE Main Question Paper to know the overall difficulty level, JEE Main Syllabus and understand the changes in JEE Main Exam Pattern over the years.
JEE Main 2020 B.E./ B.Tech Question Paper with Answer Key PDF (Shift 2)
| JEE Main 2020 B.E./ B.Tech Question Paper PDF | JEE Main 2020 B.E./ B.Tech Solution PDF |
|---|---|
| Download PDF | Check Solutions |

A simple pendulum is being used to determine the value of gravitational acceleration \(g\) at a certain place. The length of the pendulum is \(25.0 cm\) and a stop watch with \(1 s\) resolution measures the time of 50 oscillations as \(50 s\). The accuracy in the determination of \(g\) is:
View Solution
Step 1: Understanding the Concept:
The acceleration due to gravity \(g\) is determined from the time period \(T\) of a simple pendulum of length \(L\) using the relation \(T = 2\pi\sqrt{L/g}\).
Squaring gives \(g = \frac{4\pi^2 L}{T^2}\).
The error in \(g\) depends on the errors in the measurement of length and time.
Step 2: Key Formula or Approach:
The relative error in \(g\) is calculated as:
\[ \frac{\Delta g}{g} = \frac{\Delta L}{L} + 2\frac{\Delta T}{T} \]
For \(N\) oscillations, if total time is \(t\), then \(T = t/N\) and \(\Delta T = \Delta t/N\).
Therefore, \(\frac{\Delta T}{T} = \frac{\Delta t}{t}\).
Step 3: Detailed Explanation:
Given:
Length \(L = 25.0 cm\). The least count (absolute error) is \(\Delta L = 0.1 cm\).
Total time for 50 oscillations \(t = 50 s\).
Resolution of stopwatch (absolute error in time) \(\Delta t = 1 s\).
Relative error in length: \(\frac{\Delta L}{L} = \frac{0.1}{25.0} = 0.004\).
Relative error in time: \(\frac{\Delta t}{t} = \frac{1}{50} = 0.02\).
Applying the error formula:
\[ \frac{\Delta g}{g} = 0.004 + 2(0.02) = 0.004 + 0.04 = 0.044 \]
Percentage error: \(\frac{\Delta g}{g} \times 100% = 4.40%\).
Step 4: Final Answer:
The accuracy in the determination of \(g\) is \(4.40%\).
Quick Tip: Always check the decimal places of the given values to find the least count (e.g., \(25.0\) has \(\Delta L = 0.1\)). The error in measuring one oscillation or \(N\) oscillations gives the same fractional error \(\Delta t/t\).
A particle moves such that its position vector \(\vec{r}(t) = \cos \omega t \hat{i} + \sin \omega t \hat{j}\) where \(\omega\) is a constant and \(t\) is time. Then which of the following statements is true for the velocity \(\vec{v}(t)\) and acceleration \(\vec{a}(t)\) of the particle:
View Solution
Step 1: Understanding the Concept:
The velocity \(\vec{v}\) is the derivative of position \(\vec{r}\) with respect to time, and acceleration \(\vec{a}\) is the derivative of velocity.
Two vectors are perpendicular if their dot product is zero.
A vector is directed towards the origin if it is antiparallel to the position vector \(\vec{r}\).
Step 2: Key Formula or Approach:
\[ \vec{v} = \frac{d\vec{r}}{dt} \quad and \quad \vec{a} = \frac{d\vec{v}}{dt} \]
Step 3: Detailed Explanation:
Position: \(\vec{r}(t) = \cos \omega t \hat{i} + \sin \omega t \hat{j}\).
Velocity: \(\vec{v} = \frac{d}{dt} (\cos \omega t \hat{i} + \sin \omega t \hat{j}) = -\omega \sin \omega t \hat{i} + \omega \cos \omega t \hat{j}\).
Acceleration: \(\vec{a} = \frac{d}{dt} (-\omega \sin \omega t \hat{i} + \omega \cos \omega t \hat{j}) = -\omega^2 \cos \omega t \hat{i} - \omega^2 \sin \omega t \hat{j}\).
We can rewrite \(\vec{a}\) as \(\vec{a} = -\omega^2 (\cos \omega t \hat{i} + \sin \omega t \hat{j}) = -\omega^2 \vec{r}\).
Now, check perpendicularity of \(\vec{v}\) and \(\vec{r}\):
\[ \vec{v} \cdot \vec{r} = (-\omega \sin \omega t)(\cos \omega t) + (\omega \cos \omega t)(\sin \omega t) = 0 \]
Since \(\vec{v} \cdot \vec{r} = 0\), \(\vec{v}\) is perpendicular to \(\vec{r}\).
Since \(\vec{a} = -\omega^2 \vec{r}\), the acceleration vector is in the opposite direction of the position vector, which means it points towards the origin.
Step 4: Final Answer:
Velocity is perpendicular to \(\vec{r}\) and acceleration is directed towards the origin.
Quick Tip: This position vector represents uniform circular motion in the \(xy\)-plane. In such motion, velocity is always tangential (perpendicular to radius) and acceleration is centripetal (pointing towards the center/origin).
A particle of mass \(m\) is dropped from a height \(h\) above the ground. At the same time another particle of the same mass is thrown vertically upwards from the ground with a speed of \(\sqrt{2gh}\). If they collide head-on completely inelastically, the time taken for the combined mass to reach the ground, in units of \(\sqrt{\frac{h}{g}}\) is:
View Solution
Step 1: Understanding the Concept:
We first find the time of collision using relative velocity. Then we determine the velocities just before impact.
A completely inelastic collision means the particles stick together. We use conservation of momentum to find the combined velocity.
Finally, we calculate the time for the combined mass to fall from the collision height to the ground.
Step 2: Key Formula or Approach:
Relative speed: \(v_{rel} = v_1 - v_2\).
Conservation of Momentum: \(m_1 v_1 + m_2 v_2 = (m_1 + m_2)V\).
Equations of motion: \(v = u + at\) and \(s = ut + \frac{1}{2}at^2\).
Step 3: Detailed Explanation:
1. Collision time: Relative speed is \(0 + \sqrt{2gh} = \sqrt{2gh}\).
Time of collision \(t_c = \frac{h}{\sqrt{2gh}} = \sqrt{\frac{h}{2g}}\).
2. Velocities just before collision:
Velocity of dropped mass: \(v_1 = 0 + g t_c = \sqrt{\frac{gh}{2}}\) (downwards).
Velocity of thrown mass: \(v_2 = \sqrt{2gh} - g t_c = \sqrt{2gh} - \sqrt{\frac{gh}{2}} = \sqrt{\frac{gh}{2}}\) (upwards).
3. Inelastic collision: Since masses are equal and velocities are equal and opposite, the total momentum is zero.
\[ m\left(-\sqrt{\frac{gh}{2}}\right) + m\left(\sqrt{\frac{gh}{2}}\right) = (2m)V \implies V = 0 \]
The combined mass stops instantaneously at the point of collision.
4. Height of collision \(H\):
\(H = (\sqrt{2gh})t_c - \frac{1}{2}g t_c^2 = (\sqrt{2gh})\sqrt{\frac{h}{2g}} - \frac{1}{2}g \frac{h}{2g} = h - \frac{h}{4} = \frac{3h}{4}\).
5. Time to fall from \(H\) to ground:
\[ \frac{3h}{4} = 0 + \frac{1}{2} g t^2 \implies t^2 = \frac{3h}{2g} \implies t = \sqrt{\frac{3}{2}} \sqrt{\frac{h}{g}} \]
Step 4: Final Answer:
The time taken is \(\sqrt{\frac{3}{2}}\) in units of \(\sqrt{\frac{h}{g}}\).
Quick Tip: In problems where two identical masses collide after equal travel times under gravity, check if their momenta cancel out. If the combined mass has zero velocity, the problem reduces to simple free fall from the collision height.
As shown in fig. when a spherical cavity (centred at O) of radius 1 is cut out of a uniform sphere of radius R (centred at C), the centre of mass of remaining (shaded) part of sphere is at G, i.e on the surface of the cavity. R can be determined by the equation:

View Solution
Step 1: Understanding the Concept:
The center of mass of a system with a cavity is found by treating the cavity as having negative mass.
The mass of a uniform sphere is proportional to its volume, which is proportional to \(R^3\).
Step 2: Key Formula or Approach:
Let the center of the large sphere \(C\) be at the origin \((0, 0)\).
Assume the cavity touches the edge of the sphere, so the center of the cavity \(O\) is at \(x_c = R - 1\).
The position of the center of mass of the remaining part is:
\[ x_g = \frac{M_1 x_1 - M_2 x_2}{M_1 - M_2} \]
Step 3: Detailed Explanation:
Mass of full sphere \(M_1 \propto R^3\), mass of cavity \(M_2 \propto 1^3 = 1\).
Centers: \(x_1 = 0\) (center \(C\)), \(x_2 = R-1\) (center \(O\)).
The center of mass of the remaining part \(G\) is:
\[ x_g = \frac{R^3(0) - 1(R-1)}{R^3 - 1} = -\frac{R-1}{(R-1)(R^2+R+1)} = -\frac{1}{R^2+R+1} \]
The point \(G\) is on the surface of the cavity. The distance from the center of the cavity \(O\) to \(G\) must be equal to the radius of the cavity (which is 1).
Distance \(OG = |x_2 - x_g| = (R-1) - (-\frac{1}{R^2+R+1})\).
\[ 1 = R - 1 + \frac{1}{R^2+R+1} \]
\[ 2 - R = \frac{1}{R^2+R+1} \]
\[ (R^2+R+1)(2-R) = 1 \]
Step 4: Final Answer:
The equation is \((R^2 + R + 1)(2 - R) = 1\).
Quick Tip: For center of mass problems with geometry, always use volume ratios for masses if the object is uniform. Identify the distance from a fixed point to satisfy the condition "on the surface".
A uniform sphere of mass \(500 g\) rolls without slipping on a plane horizontal surface with its centre moving at a speed of \(5.00 cm/s\). Its kinetic energy is:
View Solution
Step 1: Understanding the Concept:
A rolling object possesses both translational and rotational kinetic energy.
For a sphere rolling without slipping, \(v = \omega R\).
Step 2: Key Formula or Approach:
Total K.E. \(K = \frac{1}{2}mv^2 + \frac{1}{2}I\omega^2\).
For a solid sphere, \(I = \frac{2}{5}mR^2\).
Substituting \(\omega = v/R\):
\[ K = \frac{1}{2}mv^2 + \frac{1}{2}\left(\frac{2}{5}mR^2\right)\left(\frac{v^2}{R^2}\right) = \frac{1}{2}mv^2 + \frac{1}{5}mv^2 = \frac{7}{10}mv^2 \]
Step 3: Detailed Explanation:
Given: \(m = 500 g = 0.5 kg\).
Speed \(v = 5.00 cm/s = 0.05 m/s\).
\[ K = \frac{7}{10} \times 0.5 \times (0.05)^2 \]
\[ K = 0.7 \times 0.5 \times 0.0025 \]
\[ K = 0.35 \times 0.0025 = 0.000875 J \]
\[ K = 8.75 \times 10^{-4} J \]
Step 4: Final Answer:
The kinetic energy is \(8.75 \times 10^{-4} J\).
Quick Tip: For any rolling body, \(K = \frac{1}{2}mv^2(1 + k^2/R^2)\). For a solid sphere, the factor is \(1 + 2/5 = 7/5\). Thus, \(K = \frac{7}{10}mv^2\).
Two liquids of densities \(\rho_1\) and \(\rho_2 (\rho_2 = 2\rho_1)\) are filled up behind a square wall of side \(10 m\) as shown in figure. Each liquid has a height of \(5 m\). The ratio of the forces due to these liquids exerted on upper part MN to the lower part NO is:

View Solution
Step 1: Understanding the Concept:
The force on a vertical wall is calculated as average pressure multiplied by area.
Pressure increases linearly with depth in each liquid.
Step 2: Key Formula or Approach:
\(P = \rho g h\).
Force \(F = P_{avg} \times Area\).
Step 3: Detailed Explanation:
Let width be \(b = 10 m\). Height of each part \(h = 5 m\). Area \(A = 10 \times 5 = 50 m^2\).
Part MN (depth 0 to 5m, density \(\rho_1\)):
Pressure at top (M) = 0.
Pressure at N = \(\rho_1 g (5)\).
Average pressure \(P_1 = \frac{0 + 5\rho_1 g}{2} = 2.5 \rho_1 g\).
Force \(F_{MN} = 2.5 \rho_1 g \times A\).
Part NO (depth 5m to 10m, density \(\rho_2 = 2\rho_1\)):
Pressure at N = \(5\rho_1 g\).
Pressure at O = \(5\rho_1 g + \rho_2 g (5) = 5\rho_1 g + (2\rho_1)g(5) = 15 \rho_1 g\).
Average pressure \(P_2 = \frac{5\rho_1 g + 15\rho_1 g}{2} = 10 \rho_1 g\).
Force \(F_{NO} = 10 \rho_1 g \times A\).
Ratio:
\[ \frac{F_{MN}}{F_{NO}} = \frac{2.5 \rho_1 g A}{10 \rho_1 g A} = \frac{2.5}{10} = \frac{1}{4} \]
Step 4: Final Answer:
The ratio of forces is \(1/4\).
Quick Tip: Average pressure on a vertical segment is just the pressure at its midpoint. Midpoint of MN is at 2.5m depth (\(P = 2.5\rho_1 g\)). Midpoint of NO is at 7.5m total depth, where pressure is \(5\rho_1 g\) from upper layer + \(2.5\rho_2 g\) from lower layer = \(5\rho_1 g + 5\rho_1 g = 10\rho_1 g\).
A Carnot engine having an efficiency of \(\frac{1}{10}\) is being used as a refrigerator. If the work done on the refrigerator is \(10 J\), the amount of heat absorbed from the reservoir at lower temperature is:
View Solution
Step 1: Understanding the Concept:
A Carnot engine operating in reverse is a refrigerator.
The efficiency \(\eta\) of the engine and the coefficient of performance \(\beta\) of the refrigerator are related.
Step 2: Key Formula or Approach:
Efficiency \(\eta = 1 - T_2/T_1 = \frac{W}{Q_1}\).
Coefficient of Performance \(\beta = \frac{Q_2}{W} = \frac{T_2}{T_1 - T_2}\).
Relation: \(\beta = \frac{1 - \eta}{\eta}\).
Step 3: Detailed Explanation:
Given \(\eta = 1/10\).
\[ \beta = \frac{1 - 1/10}{1/10} = \frac{9/10}{1/10} = 9 \]
Also, \(\beta = \frac{Q_2}{W}\), where \(Q_2\) is heat absorbed from the sink and \(W\) is work done.
Given \(W = 10 J\).
\[ 9 = \frac{Q_2}{10} \implies Q_2 = 90 J \]
Step 4: Final Answer:
Heat absorbed from the lower temperature reservoir is \(90 J\).
Quick Tip: Remember the identity \(Q_1 = Q_2 + W\). For Carnot systems, \(Q_1/T_1 = Q_2/T_2\). Efficiency is basically the ratio of work to heat taken from high temperature.
Consider a mixture of \(n\) moles of helium gas and \(2n\) moles of oxygen gas (molecules taken to be rigid) as an ideal gas. Its \(C_p/C_v\) value will be:
View Solution
Step 1: Understanding the Concept:
The molar specific heat at constant volume for a mixture is the weighted average of the individual molar specific heats.
Helium is monoatomic, and Oxygen is diatomic (rigid).
Step 2: Key Formula or Approach:
\(C_{v,mix} = \frac{n_1 C_{v1} + n_2 C_{v2}}{n_1 + n_2}\).
For monoatomic gas: \(C_v = \frac{3}{2}R\).
For diatomic rigid gas: \(C_v = \frac{5}{2}R\).
\(\gamma_{mix} = \frac{C_{p,mix}}{C_{v,mix}} = 1 + \frac{R}{C_{v,mix}}\).
Step 3: Detailed Explanation:
\(n_1 = n\) (Helium), \(n_2 = 2n\) (Oxygen).
\[ C_{v,mix} = \frac{n(\frac{3}{2}R) + 2n(\frac{5}{2}R)}{n + 2n} = \frac{1.5nR + 5nR}{3n} = \frac{6.5R}{3} = \frac{13R}{6} \]
Now, \(C_{p,mix} = C_{v,mix} + R = \frac{13R}{6} + R = \frac{19R}{6}\).
\[ \gamma_{mix} = \frac{C_{p,mix}}{C_{v,mix}} = \frac{19/6}{13/6} = \frac{19}{13} \]
Step 4: Final Answer:
The value of \(C_p/C_v\) for the mixture is \(19/13\).
Quick Tip: For mixtures, calculate the total internal energy change per unit temperature change \((n_1 C_{v1} + n_2 C_{v2})\) and divide by total moles to get the effective \(C_v\).
A transverse wave travels on a taut steel wire with a velocity of \(v\) when tension in it is \(2.06 \times 10^4 N\). When the tension is changed to \(T\), the velocity changed to \(v/2\). The value of \(T\) is close to:
View Solution
Step 1: Understanding the Concept:
The speed of a transverse wave on a stretched string depends on the tension and linear mass density.
Step 2: Key Formula or Approach:
\(v = \sqrt{\frac{T}{\mu}}\) where \(T\) is tension and \(\mu\) is mass per unit length.
This means \(v \propto \sqrt{T}\).
Step 3: Detailed Explanation:
Initial condition: \(v \propto \sqrt{2.06 \times 10^4}\).
Final condition: \(\frac{v}{2} \propto \sqrt{T}\).
Dividing the equations:
\[ \frac{v}{v/2} = \sqrt{\frac{2.06 \times 10^4}{T}} \]
\[ 2 = \sqrt{\frac{2.06 \times 10^4}{T}} \]
Squaring both sides:
\[ 4 = \frac{2.06 \times 10^4}{T} \]
\[ T = \frac{2.06 \times 10^4}{4} = 0.515 \times 10^4 = 5.15 \times 10^3 N \]
Step 4: Final Answer:
The value of tension \(T\) is \(5.15 \times 10^3 N\).
Quick Tip: If the velocity becomes half, the tension must become one-fourth of the original value because \(T \propto v^2\). Quick mental calculation: \(2.0/4 = 0.5\).
Consider two charged metallic spheres \(S_1\) and \(S_2\) of radii \(R_1\) and \(R_2\) respectively. The electric fields \(E_1\) (on \(S_1\)) and \(E_2\) (on \(S_2\)) on their surfaces are such that \(E_1/E_2 = R_1/R_2\). Then the ratio \(V_1(on S_1)/V_2(on S_2)\) of the electrostatic potentials on each sphere is:
View Solution
Step 1: Understanding the Concept:
For a metallic sphere, the electric field \(E\) and potential \(V\) at the surface are related to the charge and radius.
Step 2: Key Formula or Approach:
\(E = \frac{kQ}{R^2}\) and \(V = \frac{kQ}{R}\).
Thus, \(V = E \times R\).
Step 3: Detailed Explanation:
Ratio of potentials:
\[ \frac{V_1}{V_2} = \frac{E_1 R_1}{E_2 R_2} = \left(\frac{E_1}{E_2}\right) \left(\frac{R_1}{R_2}\right) \]
Given \(E_1/E_2 = R_1/R_2\).
Substituting this into the ratio:
\[ \frac{V_1}{V_2} = \left(\frac{R_1}{R_2}\right) \left(\frac{R_1}{R_2}\right) = \left(\frac{R_1}{R_2}\right)^2 \]
Step 4: Final Answer:
The ratio of potentials is \((R_1/R_2)^2\).
Quick Tip: Remember the direct relation \(V = ER\) for a sphere surface. It simplifies potential problems significantly when fields and radii are known.
A capacitor is made of two square plates each of side 'a' making a very small angle \(\alpha\) between them, as shown in figure. The capacitance will be close to:

View Solution
Step 1: Understanding the Concept:
Since the gap between plates varies, we model this as an infinite number of infinitesimal parallel plate capacitors connected in parallel.
Step 2: Key Formula or Approach:
Capacitance of a small strip \(dx\) at distance \(x\): \(dC = \frac{\epsilon_0 (a dx)}{t(x)}\).
From the figure, the gap at \(x\) is \(t(x) = d + x \alpha\) (using \(\tan \alpha \approx \alpha\)).
Step 3: Detailed Explanation:
Integrating from \(x = 0\) to \(x = a\):
\[ C = \int_0^a \frac{\epsilon_0 a dx}{d + \alpha x} = \frac{\epsilon_0 a}{\alpha} \int_0^a \frac{\alpha dx}{d + \alpha x} \]
\[ C = \frac{\epsilon_0 a}{\alpha} [\ln(d + \alpha x)]_0^a = \frac{\epsilon_0 a}{\alpha} \ln\left( \frac{d + \alpha a}{d} \right) = \frac{\epsilon_0 a}{\alpha} \ln\left( 1 + \frac{\alpha a}{d} \right) \]
Using the expansion \(\ln(1+z) \approx z - \frac{z^2}{2}\) for small \(z\):
\[ C \approx \frac{\epsilon_0 a}{\alpha} \left[ \frac{\alpha a}{d} - \frac{1}{2} \left( \frac{\alpha a}{d} \right)^2 \right] = \frac{\epsilon_0 a^2}{d} \left[ 1 - \frac{\alpha a}{2d} \right] \]
Step 4: Final Answer:
The capacitance is \(\frac{\epsilon_0 a^2}{d} \left( 1 - \frac{\alpha a}{2d} \right)\).
Quick Tip: For non-uniform gaps, integration is necessary. For small parameter changes, look for binomial or logarithmic series expansions to match the provided option formats.
A very long wire ABDMNDC is shown in figure carrying current I. AB and BC parts are straight, long and at right angle. At D wire forms a circular turn DMND of radius R. AB, BC parts are tangential to circular turn at N and D. Magnetic field at the centre of circle is :

View Solution
Step 1: Understanding the Concept:
The magnetic field at the center of a circular loop of radius \(R\) carrying current \(I\) is \(B_{loop} = \frac{\mu_0 I}{2R}\).
The magnetic field due to a semi-infinite straight wire at a perpendicular distance \(R\) from its end is \(B_{wire} = \frac{\mu_0 I}{4\pi R}\).
By superposition principle, the total magnetic field is the vector sum of fields from all components.
Step 2: Key Formula or Approach:
The total magnetic field \(\vec{B}_{total} = \vec{B}_{straight\_AB} + \vec{B}_{circle} + \vec{B}_{straight\_BC}\).
Based on the geometry, the center of the circle is at a perpendicular distance \(R\) from both straight parts AB and BC.
Step 3: Detailed Explanation:
1. Part AB: This is a semi-infinite wire ending at point N. The perpendicular distance from the center O to the line AB is \(R\). Field at O is \(B_1 = \frac{\mu_0 I}{4\pi R}\) (into the page).
2. Part BC: This is a semi-infinite wire starting at point D. The perpendicular distance from O to the line BC is \(R\). Field at O is \(B_2 = \frac{\mu_0 I}{4\pi R}\) (into the page).
3. Circular Turn DMND: The problem describes a full circular turn. The field due to a full loop at its center is \(B_3 = \frac{\mu_0 I}{2R}\) (into the page).
Total Field \(B = B_1 + B_2 + B_3\):
\[ B = \frac{\mu_0 I}{4\pi R} + \frac{\mu_0 I}{4\pi R} + \frac{\mu_0 I}{2R} \]
\[ B = \frac{\mu_0 I}{2\pi R} + \frac{\mu_0 I}{2R} \]
Factoring out \(\frac{\mu_0 I}{2\pi R}\):
\[ B = \frac{\mu_0 I}{2\pi R} (1 + \pi) \]
Step 4: Final Answer:
The magnetic field at the center is \(\frac{\mu_0 I}{2\pi R} (\pi + 1)\).
Quick Tip: For composite wire problems, break the path into standard segments (infinite, semi-infinite, or circular arcs). Use the Right-Hand Thumb Rule to ensure all fields are in the same direction before adding magnitudes.
A particle of mass m and charge q is released from rest in a uniform electric field. If there is no other force on the particle, the dependence of its speed v on the distance x travelled by it is correctly given by (graphs are schematic and not drawn to scale) :
- (A)
![]()
- (B)
![]()
- (C)
![]()
- (D)
![]()


View Solution
Step 1: Understanding the Concept:
A charged particle in a uniform electric field \(\vec{E}\) experiences a constant force \(\vec{F} = q\vec{E}\).
According to Newton's second law, the particle undergoes constant acceleration.
Step 2: Key Formula or Approach:
Acceleration \(a = \frac{F}{m} = \frac{qE}{m}\) (Constant).
Use the kinematic equation relating velocity and displacement: \(v^2 = u^2 + 2ax\).
Step 3: Detailed Explanation:
Since the particle is released from rest, initial velocity \(u = 0\).
The equation becomes:
\[ v^2 = 2 \left( \frac{qE}{m} \right) x \]
\[ v = \sqrt{\frac{2qE}{m}} \sqrt{x} \]
This shows that \(v \propto \sqrt{x}\).
The graph of \(y = \sqrt{x}\) is a parabola that opens towards the horizontal (x) axis, which corresponds to a "concave down" shape starting from the origin.
Looking at the options:
Graph 1 shows \(v \propto x\).
Graph 2 shows \(v \propto x^n\) where \(n > 1\).
Graph 3 shows the characteristic square root curve \(v \propto \sqrt{x}\).
Step 4: Final Answer:
The correct graph is Graph 3.
Quick Tip: Whenever you see "constant force" or "uniform field", acceleration is constant. In such cases, velocity squared is proportional to displacement (\(v^2 \propto x\)), resulting in a square-root dependence.
As shown in the figure, a battery of emf \(\epsilon\) is connected to an inductor L and resistance R in series. The switch is closed at t = 0. The total charge that flows from the battery, between t = 0 and t = \(t_c\) (\(t_c\) is the time constant of the circuit) is :

View Solution
Step 1: Understanding the Concept:
In an LR circuit, when the switch is closed, the current grows exponentially towards a steady state.
The time constant of the circuit is \(\tau = \frac{L}{R}\).
The charge \(q\) flowing in time \(dt\) is \(dq = i(t) dt\).
Step 2: Key Formula or Approach:
Current growth formula: \(i(t) = \frac{\epsilon}{R} (1 - e^{-t/\tau})\).
Total charge: \(Q = \int_0^\tau i(t) dt\).
Step 3: Detailed Explanation:
We integrate the current from \(t = 0\) to \(t = \tau\):
\[ Q = \int_0^\tau \frac{\epsilon}{R} (1 - e^{-t/\tau}) dt \]
\[ Q = \frac{\epsilon}{R} \left[ t + \tau e^{-t/\tau} \right]_0^\tau \]
Evaluating at limits:
At \(t = \tau\): \(\tau + \tau e^{-1} = \tau + \frac{\tau}{e}\).
At \(t = 0\): \(0 + \tau e^{0} = \tau\).
\[ Q = \frac{\epsilon}{R} \left( (\tau + \frac{\tau}{e}) - \tau \right) = \frac{\epsilon \tau}{e R} \]
Substitute \(\tau = \frac{L}{R}\):
\[ Q = \frac{\epsilon (L/R)}{e R} = \frac{\epsilon L}{e R^2} \]
Step 4: Final Answer:
The total charge that flows is \(\frac{\epsilon L}{e R^2}\).
Quick Tip: Remember the standard integral \(\int e^{-at} dt = -\frac{1}{a} e^{-at}\). In LR/RC circuits, most integration questions can be solved quickly by using the time constant \(\tau\) as a unit of time.
A plane electromagnetic wave of frequency 25 GHz is propagating in vacuum along the z-direction. At a particular point in space and time, the magnetic field is given by \(\vec{B} = 5 \times 10^{-8} \hat{j}\) T. The corresponding electric field \(\vec{E}\) is (speed of light c = \(3 \times 10^8\) m/s) :
View Solution
Step 1: Understanding the Concept:
In an electromagnetic wave, the electric field \(\vec{E}\), magnetic field \(\vec{B}\), and the direction of propagation \(\hat{k}\) are mutually perpendicular.
The magnitudes are related by the equation \(E = cB\).
Step 2: Key Formula or Approach:
1. Magnitude: \(E = c \times B\).
2. Direction: The unit vector of propagation \(\hat{k} = \hat{E} \times \hat{B}\).
Step 3: Detailed Explanation:
Given propagation is along the +z direction, so \(\hat{k} = \hat{k}\).
Given \(\vec{B} = 5 \times 10^{-8} \hat{j}\) T, so \(\hat{B} = \hat{j}\).
Calculating magnitude:
\[ E = (3 \times 10^8 m/s) \times (5 \times 10^{-8} T) = 15 V/m \]
Determining direction:
We need \(\hat{E}\) such that \(\hat{E} \times \hat{j} = \hat{k}\).
Using the cross-product rules for unit vectors (\(\hat{i} \times \hat{j} = \hat{k}\)), we find that \(\hat{E} = \hat{i}\).
Therefore, \(\vec{E} = 15 \hat{i}\) V/m.
Step 4: Final Answer:
The electric field is \(15 \hat{i}\) V/m.
Quick Tip: Use the "Right-Hand Rule" or the mnemonic circle (i \(\rightarrow\) j \(\rightarrow\) k \(\rightarrow\) i) for cross products. Always check magnitude first to eliminate options, then verify the direction using \(\vec{E} = c(\vec{B} \times \hat{k})\) or \(\hat{k} = \hat{E} \times \hat{B}\).
An object is gradually moving away from the focal point of a concave mirror along the axis of the mirror. The graphical representation of the magnitude of linear magnification (m) versus distance of the object from the mirror (x) is correctly given by (Graphs are drawn schematically and are not to scale) :
- (A)
![]()
- (B)
![]()
- (C)
![]()
- (D)
![]()


View Solution
Step 1: Understanding the Concept:
Linear magnification \(m\) for a mirror is given by the ratio of image distance to object distance, or in terms of focal length \(f\).
Step 2: Key Formula or Approach: \[ m = \left| \frac{f}{f-u} \right| \]
For a concave mirror, \(f\) is negative. Let \(f = -F\).
Object distance \(u = -x\) (where \(x\) is the distance from the mirror).
\[ |m| = \left| \frac{-F}{-F - (-x)} \right| = \frac{F}{|x - F|} \]
Step 3: Detailed Explanation:
The object moves "away from the focal point", meaning it starts near \(x = F\) and moves toward \(x \rightarrow \infty\).
1. When \(x = F\), \(|m| \rightarrow \infty\). The graph starts from a very high value.
2. When \(x = 2F\) (at the center of curvature), \(|m| = \frac{F}{|2F-F|} = 1\).
3. When \(x \rightarrow \infty\), \(|m| \rightarrow 0\).
The function \(|m| = \frac{F}{x-F}\) for \(x > F\) is a rectangular hyperbola that decreases from infinity at \(x = F\) and asymptotically approaches zero as \(x\) increases.
Looking at the provided screenshots:
Graph 2 shows this trend: it starts high at \(x = f\) and drops to \(|m| = 1\) at \(x = 2f\).
Step 4: Final Answer:
The correct representation is Graph 2.
Quick Tip: At the focus (\(u=f\)), image is at infinity, so magnification is infinite. At the center of curvature (\(u=2f\)), image size equals object size, so \(|m|=1\). Only graph 2 satisfies both these physical conditions.
In a double-slit experiment, at a certain point on the screen the path difference between the two interfering waves is \(\frac{1}{8}\)th of a wavelength. The ratio of the intensity of light at that point to that at the centre of a bright fringe is :
View Solution
Step 1: Understanding the Concept:
The intensity of light in an interference pattern depends on the phase difference \(\phi\) between the two waves.
The phase difference is related to the path difference \(\Delta x\) by \(\phi = \frac{2\pi}{\lambda} \Delta x\).
Step 2: Key Formula or Approach:
Resultant intensity: \(I = I_{max} \cos^2\left(\frac{\phi}{2}\right)\).
Where \(I_{max}\) is the intensity at the central bright fringe.
Step 3: Detailed Explanation:
Given path difference \(\Delta x = \frac{\lambda}{8}\).
Phase difference:
\[ \phi = \frac{2\pi}{\lambda} \times \frac{\lambda}{8} = \frac{\pi}{4} \]
The ratio of intensities is:
\[ \frac{I}{I_{max}} = \cos^2\left(\frac{\pi/4}{2}\right) = \cos^2\left(\frac{\pi}{8}\right) \]
Using the identity \(\cos^2 \theta = \frac{1 + \cos 2\theta}{2}\):
\[ \frac{I}{I_{max}} = \frac{1 + \cos(\pi/4)}{2} = \frac{1 + \frac{1}{\sqrt{2}}}{2} \]
\[ \frac{I}{I_{max}} = \frac{1 + 0.7071}{2} = \frac{1.7071}{2} = 0.8535 \]
Step 4: Final Answer:
The ratio of intensity is approximately 0.853.
Quick Tip: Remember common values for intensity ratios: for \(\Delta x = \lambda/4\), \(I = 0.5 I_{max}\); for \(\Delta x = \lambda/2\), \(I = 0\). Since \(\lambda/8\) is closer to the center, the value must be between 0.5 and 1.
An electron (mass m) with initial velocity \(\vec{v} = v_0 \hat{i} + v_0 \hat{j}\) is in an electric field \(\vec{E} = -E_0 \hat{k}\). If \(\lambda_0\) is initial de-Broglie wavelength of electron, its de-Broglie wave length at time t is given by :
View Solution
Step 1: Understanding the Concept:
The de-Broglie wavelength is inversely proportional to the momentum: \(\lambda = \frac{h}{p} = \frac{h}{mv}\).
We need to find the change in velocity of the electron over time due to the electric field.
Step 2: Key Formula or Approach:
1. Force on electron \(\vec{F} = -e \vec{E}\).
2. Acceleration \(\vec{a} = \frac{\vec{F}}{m}\).
3. Velocity at time \(t\): \(\vec{v}(t) = \vec{v}_0 + \vec{a}t\).
Step 3: Detailed Explanation:
Initial velocity \(\vec{v}_0 = v_0 \hat{i} + v_0 \hat{j}\).
Initial speed \(v_{init} = \sqrt{v_0^2 + v_0^2} = v_0 \sqrt{2}\).
Initial wavelength \(\lambda_0 = \frac{h}{m v_0 \sqrt{2}}\).
Force \(\vec{F} = (-e)(-E_0 \hat{k}) = e E_0 \hat{k}\).
Acceleration \(\vec{a} = \frac{e E_0}{m} \hat{k}\).
Velocity at time \(t\): \(\vec{v}(t) = v_0 \hat{i} + v_0 \hat{j} + \left( \frac{e E_0 t}{m} \right) \hat{k}\).
Speed at time \(t\):
\[ v(t) = \sqrt{v_0^2 + v_0^2 + \left( \frac{e E_0 t}{m} \right)^2} = \sqrt{2 v_0^2 + \frac{e^2 E_0^2 t^2}{m^2}} \]
Wavelength at time \(t\):
\[ \lambda(t) = \frac{h}{m \sqrt{2 v_0^2 + \frac{e^2 E_0^2 t^2}{m^2}}} \]
Expressing in terms of \(\lambda_0\):
From the initial condition, \(h = \lambda_0 m v_0 \sqrt{2}\).
\[ \lambda(t) = \frac{\lambda_0 m v_0 \sqrt{2}}{m \sqrt{2 v_0^2 + \frac{e^2 E_0^2 t^2}{m^2}}} = \frac{\lambda_0 v_0 \sqrt{2}}{\sqrt{2 v_0^2 \left( 1 + \frac{e^2 E_0^2 t^2}{2 m^2 v_0^2} \right)}} \]
\[ \lambda(t) = \frac{\lambda_0}{\sqrt{1 + \frac{e^2 E_0^2 t^2}{2 m^2 v_0^2}}} \]
Step 4: Final Answer:
The de-Broglie wavelength at time t is \(\frac{\lambda_0}{\sqrt{1 + \frac{e^2 E_0^2 t^2}{2 m^2 v_0^2}}}\).
Quick Tip: Notice that the initial speed contains a factor of \(\sqrt{2}\). This factor usually ends up in the denominator of the normalized ratio term (\(1 + ...\)) when the field acts in a perpendicular dimension.
In the given circuit, value of Y is :

View Solution
Step 1: Understanding the Concept:
The circuit consists of a NOT gate and two NAND gates connected in a cross-coupled feedback arrangement (an SR latch).
Step 2: Key Formula or Approach:
NAND truth table: Output is 0 only when both inputs are 1.
NOT truth table: Output is inverse of input.
Step 3: Detailed Explanation:
Let's analyze the inputs to the gates:
1. Top input is 1. It passes through a NOT gate, so the input to the top NAND gate (let's call this input A) is \( \overline{1} = 0 \).
2. Bottom input is 0. It goes directly to the bottom NAND gate (let's call this input B).
3. Feedback: The output Y of the top NAND gate is fed into the bottom NAND gate, and the output of the bottom NAND gate is fed back to the top NAND gate.
Let's trace:
Top NAND output \( Y = \overline{A \cdot feedback} = \overline{0 \cdot feedback} \).
In Boolean logic, any value ANDed with 0 is 0. Its complement (NAND) is always 1.
Therefore, \( Y = \overline{0} = 1 \).
Now check the bottom NAND for consistency: its inputs are 0 (from bottom terminal) and 1 (feedback from Y).
Bottom NAND output \(= \overline{0 \cdot 1} = \overline{0} = 1 \).
The state is stable with \( Y = 1 \).
Step 4: Final Answer:
The value of Y is 1.
Quick Tip: In a NAND gate, if any one input is 0, the output is guaranteed to be 1 regardless of the other input. Identifying such "controlling" inputs simplifies complex logic circuits immediately.
A galvanometer having a coil resistance 100 \(\Omega\) gives a full scale deflection when a current of 1 mA is passed through it. What is the value of the resistance which can convert this galvanometer into a voltmeter giving full scale deflection for a potential difference of 10 V ?
View Solution
Step 1: Understanding the Concept:
To convert a galvanometer into a voltmeter, a high resistance \(R\) must be connected in series with the galvanometer coil.
Step 2: Key Formula or Approach:
Total potential difference \(V = I_g (G + R)\).
Where:
\(V\) = Range of voltmeter.
\(I_g\) = Full scale deflection current of galvanometer.
\(G\) = Resistance of galvanometer.
\(R\) = Series resistance required.
Step 3: Detailed Explanation:
Given:
\(V = 10\) V
\(I_g = 1\) mA \(= 10^{-3}\) A
\(G = 100\) \(\Omega\)
Applying the formula:
\[ 10 = 10^{-3} (100 + R) \]
Multiply both sides by \(10^3\):
\[ 10 \times 10^3 = 100 + R \] \[ 10000 = 100 + R \] \[ R = 10000 - 100 = 9900 \Omega \] \[ R = 9.9 k\Omega \]
Step 4: Final Answer:
The value of series resistance required is 9.9 k\(\Omega\).
Quick Tip: Always ensure units are consistent. Convert mA to A before performing calculations. Series resistance for a voltmeter is usually very high, whereas parallel resistance (shunt) for an ammeter is very low.
A ball is dropped from the top of a 100 m high tower on a planet. In the last \(\frac{1}{2}\) s before hitting the ground, it covers a distance of 19 m. Acceleration due to gravity on the planet (in \(m/s^2\)) is:
View Solution
Step 1: Understanding the Concept:
The ball is in free fall under the influence of the planet's gravity \(g\).
We can use the equations of motion for constant acceleration to relate the total height, total time of flight, and the distance covered in the final interval.
Step 2: Key Formula or Approach:
Distance covered in time \(t\) starting from rest: \[ h = \frac{1}{2}gt^2 \]
Let \(T\) be the total time of flight. The distance covered in the last \(0.5 s\) is the difference between the total height and the height at time \(T - 0.5 s\).
Step 3: Detailed Explanation:
Total height \(H = 100 m\).
Total time \(T = \sqrt{\frac{2H}{g}} = \sqrt{\frac{200}{g}}\).
The distance covered in the last \(0.5 s\) is 19 m.
Therefore, the height reached at time \(T - 0.5\) is:
\[ H' = 100 - 19 = 81 m \]
Using the formula for distance:
\[ 81 = \frac{1}{2}g(T - 0.5)^2 \]
Taking the square root on both sides:
\[ \sqrt{\frac{162}{g}} = T - 0.5 \]
Substitute \(T = \sqrt{\frac{200}{g}}\):
\[ \sqrt{\frac{162}{g}} = \sqrt{\frac{200}{g}} - 0.5 \]
\[ 0.5 = \sqrt{\frac{200}{g}} - \sqrt{\frac{162}{g}} \]
\[ 0.5 = \frac{\sqrt{200} - \sqrt{162}}{\sqrt{g}} \]
\[ 0.5 = \frac{10\sqrt{2} - 9\sqrt{2}}{\sqrt{g}} = \frac{\sqrt{2}}{\sqrt{g}} \]
Squaring both sides:
\[ 0.25 = \frac{2}{g} \]
\[ g = \frac{2}{0.25} = 8 m/s^2 \]
Step 4: Final Answer:
The acceleration due to gravity on the planet is \(8 m/s^2\).
Quick Tip: For problems involving the "last second" or "last interval", writing the position as a function of time and using square roots often simplifies the algebra compared to expanding quadratic terms.
An asteroid is moving directly towards the centre of the earth. When at a distance of 10 R (R is the radius of the earth) from the earths centre, it has a speed of 12 km/s. Neglecting the effect of earths atmosphere, what will be the speed of the asteroid when it hits the surface of the earth (escape velocity from the earth is 11.2 km/s)? Give your answer to the nearest integer in kilometer/s.
View Solution
Step 1: Understanding the Concept:
Since only the gravitational force acts on the asteroid (ignoring atmospheric drag), the total mechanical energy is conserved.
Total Energy = Kinetic Energy + Gravitational Potential Energy.
Step 2: Key Formula or Approach:
Conservation of energy: \[ \frac{1}{2}mv_i^2 - \frac{GMm}{r_i} = \frac{1}{2}mv_f^2 - \frac{GMm}{r_f} \]
Recall that escape velocity \(v_e = \sqrt{\frac{2GM}{R}}\), so \(GM = \frac{1}{2}v_e^2 R\).
Step 3: Detailed Explanation:
Initial distance \(r_i = 10R\), initial speed \(v_i = 12 km/s\).
Final distance \(r_f = R\), final speed \(v_f\).
Using the energy equation and dividing by mass \(m\):
\[ \frac{1}{2}v_i^2 - \frac{GM}{10R} = \frac{1}{2}v_f^2 - \frac{GM}{R} \]
Multiply by 2:
\[ v_i^2 - \frac{2GM}{10R} = v_f^2 - \frac{2GM}{R} \]
Substitute \(\frac{2GM}{R} = v_e^2\):
\[ v_i^2 - \frac{v_e^2}{10} = v_f^2 - v_e^2 \]
\[ v_f^2 = v_i^2 + v_e^2 - 0.1v_e^2 = v_i^2 + 0.9v_e^2 \]
Given \(v_i = 12\) and \(v_e = 11.2\):
\[ v_f^2 = 12^2 + 0.9 \times (11.2)^2 \]
\[ v_f^2 = 144 + 0.9 \times 125.44 \]
\[ v_f^2 = 144 + 112.896 = 256.896 \]
\[ v_f = \sqrt{256.896} \approx 16.027 km/s \]
Step 4: Final Answer:
To the nearest integer, the speed is \(16 km/s\).
Quick Tip: Expressing gravitational potential energy in terms of escape velocity (\(U = -\frac{1}{2}m v_e^2 \frac{R}{r}\)) is a powerful shortcut in planetary motion problems that provide \(v_e\) instead of \(G\) and \(M\).
Three containers \(C_1, C_2\) and \(C_3\) have water at different temperatures. The table below shows the final temperature T when different amounts of water (given in liters) are taken from each container and mixed (assume no loss of heat during the process).
\begin{tabular{|c|c|c|c|
\hline \(C_1\) & \(C_2\) & \(C_3\) & T
\hline
1l & 2l & -- & \(60^{\circ}C\)
\hline
-- & 1l & 2l & \(30^{\circ}C\)
\hline
2l & -- & 1l & \(60^{\circ}C\)
\hline
1l & 1l & 1l & \(\theta\)
\hline
\end{tabular
The value of \(\theta\) (in \(^{\circ}C\) to the nearest integer) is:
View Solution
Step 1: Understanding the Concept:
The Principle of Calorimetry states that for an isolated system, Heat Lost = Heat Gained.
For mixing same substances (water), the equation is \(\sum m_i c (T_i - T_{mix}) = 0\), which simplifies to \(\sum m_i T_i = T_{mix} \sum m_i\).
Step 2: Key Formula or Approach:
Let \(T_1, T_2, T_3\) be the temperatures of water in \(C_1, C_2, C_3\) respectively.
The mixing equation is \(m_1 T_1 + m_2 T_2 + m_3 T_3 = (m_1 + m_2 + m_3) T_{final}\).
Step 3: Detailed Explanation:
From the table, we get three equations:
1) \(1(T_1) + 2(T_2) = (1+2)(60) = 180\)
2) \(1(T_2) + 2(T_3) = (1+2)(30) = 90\)
3) \(2(T_1) + 1(T_3) = (2+1)(60) = 180\)
From (3), \(T_3 = 180 - 2T_1\).
Substitute \(T_3\) into (2):
\[ T_2 + 2(180 - 2T_1) = 90 \]
\[ T_2 + 360 - 4T_1 = 90 \implies 4T_1 - T_2 = 270 \]
Now we have a system with (1):
\[ T_1 + 2T_2 = 180 \]
Multiply the second equation by 4:
\[ 4T_1 + 8T_2 = 720 \]
Subtracting the equations:
\[ (4T_1 + 8T_2) - (4T_1 - T_2) = 720 - 270 \]
\[ 9T_2 = 450 \implies T_2 = 50^{\circ}C \]
Substituting back:
\[ T_1 = 180 - 2(50) = 80^{\circ}C \]
\[ T_3 = 180 - 2(80) = 20^{\circ}C \]
Finally, for the mix of 1l, 1l, and 1l:
\[ 1(80) + 1(50) + 1(20) = (1+1+1)\theta \]
\[ 150 = 3\theta \implies \theta = 50^{\circ}C \]
Step 4: Final Answer:
The final temperature \(\theta\) is \(50^{\circ}C\).
Quick Tip: Notice that the volume (mass) units cancel out in these ratios. If you see symmetric data, look for simple linear combinations of the equations to solve for variables faster.
The series combination of two batteries, both of the same emf 10 V, but different internal resistance of 20 \(\Omega\) and 5 \(\Omega\), is connected to the parallel combination of two resistors 30 \(\Omega\) and R \(\Omega\). The voltage difference across the battery of internal resistance 20 \(\Omega\) is zero, the value of R (in \(\Omega\)) is:
View Solution
Step 1: Understanding the Concept:
The terminal voltage \(V\) of a battery is given by \(V = E - Ir\).
For the voltage to be zero, the current through the circuit must satisfy \(I = E/r\).
Step 2: Key Formula or Approach:
Equivalent Load Resistance \(R_L = \frac{30R}{30+R}\).
Total Circuit Resistance \(R_{total} = r_1 + r_2 + R_L\).
Total current \(I = \frac{E_1 + E_2}{R_{total}}\).
Step 3: Detailed Explanation:
Given \(E_1 = E_2 = 10\) V, \(r_1 = 20\) \(\Omega\), \(r_2 = 5\) \(\Omega\).
Voltage across the first battery is zero:
\[ V_1 = E_1 - I r_1 = 0 \implies 10 - I(20) = 0 \implies I = 0.5 A \]
Now, set up the total circuit equation:
\[ I = \frac{10 + 10}{20 + 5 + R_L} \]
\[ 0.5 = \frac{20}{25 + R_L} \]
\[ 25 + R_L = \frac{20}{0.5} = 40 \]
\[ R_L = 40 - 25 = 15 \Omega \]
Since the load is a parallel combination of 30 \(\Omega\) and R:
\[ \frac{1}{15} = \frac{1}{30} + \frac{1}{R} \]
\[ \frac{1}{R} = \frac{1}{15} - \frac{1}{30} = \frac{2 - 1}{30} = \frac{1}{30} \]
\[ R = 30 \Omega \]
Step 4: Final Answer:
The value of R is 30 \(\Omega\).
Quick Tip: The condition for zero terminal voltage \(V = 0\) is often used in battery problems to find the load resistance. It happens when the external circuit resistance equals the difference in internal resistances if the emfs are the same.
The first member of the Balmer series of hydrogen atom has a wavelength of 6561 \(\AA\). The wavelength of the second member of the Balmer series (in nm) is:
View Solution
Step 1: Understanding the Concept:
The Balmer series corresponds to transitions ending at the \(n = 2\) level.
The wavelength \(\lambda\) of the emitted photon is given by the Rydberg formula.
Step 2: Key Formula or Approach:
Rydberg Formula: \[ \frac{1}{\lambda} = R_H \left( \frac{1}{n_f^2} - \frac{1}{n_i^2} \right) \]
For Balmer series, \(n_f = 2\).
First member (\(H_{\alpha}\)): \(n_i = 3\).
Second member (\(H_{\beta}\)): \(n_i = 4\).
Step 3: Detailed Explanation:
For the first member (\(\lambda_1 = 6561 \AA = 656.1 nm\)):
\[ \frac{1}{\lambda_1} = R_H \left( \frac{1}{2^2} - \frac{1}{3^2} \right) = R_H \left( \frac{1}{4} - \frac{1}{9} \right) = \frac{5 R_H}{36} \]
For the second member (\(\lambda_2\)):
\[ \frac{1}{\lambda_2} = R_H \left( \frac{1}{2^2} - \frac{1}{4^2} \right) = R_H \left( \frac{1}{4} - \frac{1}{16} \right) = \frac{3 R_H}{16} \]
Taking the ratio:
\[ \frac{\lambda_2}{\lambda_1} = \frac{5 R_H / 36}{3 R_H / 16} = \frac{5}{36} \times \frac{16}{3} = \frac{5 \times 4}{9 \times 3} = \frac{20}{27} \]
Calculate \(\lambda_2\):
\[ \lambda_2 = \frac{20}{27} \times 656.1 nm \]
\[ \lambda_2 = 20 \times 24.3 = 486 nm \]
Step 4: Final Answer:
The wavelength of the second member is 486 nm.
Quick Tip: Wavelengths in the Balmer series always follow the order \(H_{\alpha} > H_{\beta} > H_{\gamma}\). A useful check is to remember that \(H_{\alpha}\) is red (\(\approx 656 nm\)) and \(H_{\beta}\) is blue-green (\(\approx 486 nm\)).
For the following Assertion and Reason, the correct option is:
Assertion : For hydrogenation reactions, the catalytic activity increases from Group 5 to Group 11 metals with maximum activity shown by Group 7 - 9 elements.
Reason : The reactants are most strongly adsorbed on group 7 - 9 elements.
View Solution
Step 1: Understanding the Concept:
The catalytic activity of transition metals in heterogeneous catalysis (like hydrogenation) depends on the strength of adsorption of the reactants on the catalyst surface.
According to the adsorption theory of catalysis, the reactants must be adsorbed reasonably strongly to be activated, but not so strongly that they become immobile or prevent the product from desorbing.
Step 2: Detailed Explanation:
1. Assertion Analysis: Catalytic activity for hydrogenation generally increases from Group 5 to Group 11. However, the peak activity is indeed observed in metals belonging to Groups 7 to 9 (such as Iron, Cobalt, Nickel, Platinum, and Palladium).
This statement is True.
2. Reason Analysis: The strength of adsorption generally decreases as we move from left to right across the transition series.
Metals in the earlier groups (like Group 5 and 6) adsorb reactants too strongly, making them immobile and blocking active sites.
Metals in Groups 7 to 9 provide moderate/optimal adsorption, which is ideal for catalysis.
The reason states that adsorption is "most strong" in Group 7 - 9, which is False.
Step 3: Final Answer:
The assertion is true, but the reason is false because the maximum activity in Group 7-9 is due to moderate (optimal) adsorption strength, not the strongest adsorption.
Quick Tip: For a good catalyst, adsorption should be intermediate. If it's too strong (early transition metals), the product can't leave. If it's too weak (late transition metals), the reactants aren't activated.
Consider the following plots of rate constant versus \(\frac{1}{T}\) for four different reactions. Which of the following orders is correct for the activation energies of these reactions?

View Solution
Step 1: Understanding the Concept:
The temperature dependence of a reaction's rate constant \(k\) is described by the Arrhenius equation: \(k = A e^{-E_a/RT}\).
Step 2: Key Formula or Approach:
Taking the natural logarithm of the Arrhenius equation gives a linear relationship:
\[ \ln k = \ln A - \frac{E_a}{R} \left( \frac{1}{T} \right) \]
Or in terms of common logarithm:
\[ \log k = \log A - \frac{E_a}{2.303R} \left( \frac{1}{T} \right) \]
The slope of a \(\log k\) versus \(\frac{1}{T}\) plot is \(m = -\frac{E_a}{2.303R}\).
Step 3: Detailed Explanation:
From the relation \( Slope = -\frac{E_a}{2.303R} \), it is clear that the magnitude of the slope is directly proportional to the activation energy \(E_a\).
By observing the graph:
- Line b is the steepest (has the greatest magnitude of downward slope).
- Line d is less steep than b but steeper than c.
- Line c is less steep than d.
- Line a is the flattest (has the smallest magnitude of slope).
Since greater steepness implies higher activation energy:
\[ E_b > E_d > E_c > E_a \]
Step 4: Final Answer:
The correct order of activation energies based on the slopes of the plots is \(E_b > E_d > E_c > E_a\).
Quick Tip: In any Arrhenius plot, the steeper the line, the more "temperature-sensitive" the reaction is, which always indicates a higher activation energy.
For the following Assertion and Reason, the correct option is :
Assertion : The pH of water increases with increase in temperature.
Reason : The dissociation of water into \(H^+\) and \(OH^-\) is an exothermic reaction.
View Solution
Step 1: Understanding the Concept:
The self-ionization (dissociation) of water is represented by the equilibrium:
\(H_2O(l) \rightleftharpoons H^+(aq) + OH^-(aq)\).
This process involves the breaking of covalent O-H bonds, which requires an input of energy.
Step 2: Detailed Explanation:
1. Reason Analysis: Bond breaking is an endothermic process. Therefore, the dissociation of water is endothermic (\(\Delta H > 0\)), not exothermic.
The Reason is False.
2. Assertion Analysis: According to Le Chatelier's principle, for an endothermic reaction, an increase in temperature shifts the equilibrium to the right (products side).
This increases the concentrations of both \(H^+\) and \(OH^-\) ions.
Since \(pH = -\log[H^+]\), an increase in \([H^+]\) causes the pH to decrease.
The Assertion is False.
Step 3: Final Answer:
Both the assertion and the reason are false. As temperature increases, \(K_w\) increases, \([H^+]\) increases, and thus pH decreases.
Quick Tip: While pH decreases with temperature, water remains neutral because \([H^+]\) still equals \([OH^-]\). At \(100^{\circ}\)C, the neutral pH of water is approximately 6.1, not 7.0.
The radius of the second Bohr orbit, in terms of the Bohr radius, \(a_0\), in \(Li^{2+}\) is :
View Solution
Step 1: Understanding the Concept:
Bohr's model provides a formula for the radius of the \(n^{th}\) orbit of hydrogen-like species (single-electron atoms or ions).
Step 2: Key Formula or Approach:
The radius of the \(n^{th}\) orbit is given by:
\[ r_n = a_0 \frac{n^2}{Z} \]
where \(a_0\) is the Bohr radius, \(n\) is the principal quantum number, and \(Z\) is the atomic number.
Step 3: Detailed Explanation:
For the given problem:
1. The orbit is the second Bohr orbit, so \(n = 2\).
2. The species is \(Li^{2+}\). The atomic number of Lithium is \(Z = 3\).
Substituting these values into the formula:
\[ r_2 = a_0 \frac{2^2}{3} \]
\[ r_2 = \frac{4 a_0}{3} \]
Step 4: Final Answer:
The radius of the second Bohr orbit in \(Li^{2+}\) is \(\frac{4 a_0}{3}\).
Quick Tip: Always remember that \(r \propto \frac{n^2}{Z}\). Since \(Li^{2+}\) has a larger nuclear charge (\(Z=3\)) than Hydrogen (\(Z=1\)), its orbits are pulled closer to the nucleus.
Arrange the following bonds according to their average bond energies in descending order :
C - Cl, C - Br, C - F, C - I
View Solution
Step 1: Understanding the Concept:
Bond energy is the amount of energy required to break a chemical bond. It is generally inversely proportional to the bond length.
Step 2: Detailed Explanation:
1. As we move down the halogen group (F to Cl to Br to I), the atomic size of the halogen increases.
2. Larger atomic size leads to a greater distance between the bonded nuclei, resulting in longer bond lengths.
3. Longest bond is \(C - I\) and the shortest is \(C - F\).
4. Shorter bonds generally have stronger orbital overlap and higher electrostatic attraction, leading to higher bond energy.
Therefore, the bond energy order is:
\(C - F > C - Cl > C - Br > C - I\).
Step 3: Final Answer:
The descending order of bond energies is C - F \(>\) C - Cl \(>\) C - Br \(>\) C - I.
Quick Tip: Bond strength for carbon-halogen bonds follows the electronegativity trend of the halogens. Fluorine forms the strongest bond with Carbon due to its small size and high electronegativity.
Which of the following compounds is likely to show both Frenkel and Schottky defects in its crystalline form ?
View Solution
Step 1: Understanding the Concept:
- Schottky defects occur when an equal number of cations and anions are missing from the lattice.
- Frenkel defects occur when an ion (usually the smaller cation) is displaced to an interstitial site.
Step 2: Detailed Explanation:
1. Most ionic solids show one predominant type of defect depending on the size of the ions and coordination number.
2. AgBr is a unique case that displays both Schottky and Frenkel defects.
3. It shows Schottky defects due to its lattice structure and the ability to have vacancies.
4. It shows Frenkel defects because the \(Ag^+\) ion is small and highly polarizable, allowing it to migrate easily into interstitial sites.
Other options:
- \(ZnS\): Shows Frenkel defect only.
- \(CsCl, KBr\): Show Schottky defect primarily.
Step 3: Final Answer:
The compound \(AgBr\) is known to exhibit both Schottky and Frenkel defects.
Quick Tip: \(AgBr\) is the classic and most common textbook example of a crystal showing both types of point defects. Memorize this specific exception for exams.
The increasing order of the atomic radii of the following elements is :
(a) C (b) O (c) F (d) Cl (e) Br
View Solution
Step 1: Understanding the Concept:
Atomic radius follows periodic trends: it decreases from left to right across a period and increases down a group.
Step 2: Detailed Explanation:
1. Across Period 2: The elements are C, O, F. Atomic radius decreases from left to right due to increasing effective nuclear charge.
Order: \(F < O < C\). (c \(<\) b \(<\) a)
2. Down Group 17 (Halogens): The elements are F, Cl, Br. Atomic radius increases down the group as the number of shells increases.
Order: \(F < Cl < Br\). (c \(<\) d \(<\) e)
3. Combining the trends: Elements in the 3rd and 4th periods (Cl and Br) are significantly larger than elements in the 2nd period (C, O, F).
Smallest is F, followed by O, then C. Then Cl is larger than all of them, and Br is the largest.
Overall increasing order: \(F < O < C < Cl < Br\).
This corresponds to: (c) \(<\) (b) \(<\) (a) \(<\) (d) \(<\) (e).
Step 3: Final Answer:
The increasing order of atomic radii is (c) \(<\) (b) \(<\) (a) \(<\) (d) \(<\) (e).
Quick Tip: Shell number always dominates over nuclear charge. Even though Chlorine has a higher nuclear charge than Carbon, it is much larger because it has 3 shells versus Carbon's 2.
Among the reactions (a) - (d), the reaction(s) that does/do not occur in the blast furnace during the extraction of iron is/are :
(a) \(CaO + SiO_2 \rightarrow CaSiO_3\)
(b) \(3Fe_2O_3 + CO \rightarrow 2Fe_3O_4 + CO_2\)
(c) \(FeO + SiO_2 \rightarrow FeSiO_3\)
(d) \(FeO \rightarrow Fe + \frac{1}{2} O_2\)
View Solution
Step 1: Understanding the Concept:
The extraction of iron in a blast furnace involves the reduction of iron oxides by CO and C, and the removal of impurities by slag formation.
Step 2: Detailed Explanation:
1. Reaction (a): \(CaO\) (from limestone) reacts with \(SiO_2\) (impurity) to form slag \(CaSiO_3\). This occurs in the furnace.
2. Reaction (b): Reduction of \(Fe_2O_3\) by CO in the cooler upper part of the furnace. This occurs.
3. Reaction (c): If \(FeO\) reacts with \(SiO_2\), it forms iron silicate, leading to loss of iron. This is prevented by adding flux (\(CaO\)), which reacts with \(SiO_2\) first. So this does not occur in normal operation.
4. Reaction (d): Direct thermal decomposition of \(FeO\) into elements is impossible at these temperatures. Reduction is always chemical (using C or CO). This does not occur.
Therefore, (c) and (d) do not occur.
Step 3: Final Answer:
Reactions (c) and (d) do not occur in the blast furnace.
Quick Tip: In metallurgy, remember that flux is added specifically to protect the metal oxide from forming slag. \(CaO\) is more basic than \(FeO\), so it reacts with the acidic \(SiO_2\) preferentially.
Hydrogen has three isotopes (A), (B) and (C). If the number of neutron(s) in (A), (B) and (C) respectively, are (x), (y) and (z), the sum of (x), (y) and (z) is :
View Solution
Step 1: Understanding the Concept:
Isotopes are atoms of the same element that have the same atomic number (\(Z\)) but different mass numbers (\(A\)).
Hydrogen is unique because it is the only element whose isotopes have specific names: Protium, Deuterium, and Tritium.
The difference in mass number is due to the different number of neutrons present in the nucleus.
Step 2: Key Formula or Approach:
The number of neutrons (\(n\)) in an atom can be determined using the formula:
\[ n = A - Z \]
Where:
\(A\) = Mass Number (Sum of protons and neutrons)
\(Z\) = Atomic Number (Number of protons)
For any isotope of hydrogen, the atomic number \(Z\) is always 1.
Step 3: Detailed Explanation:
Let's evaluate the number of neutrons for the three isotopes of Hydrogen:
1. Protium (A): Represented as \(^1_1H\).
Mass number (\(A\)) = 1, Atomic number (\(Z\)) = 1.
Number of neutrons \(x = 1 - 1 = 0\).
2. Deuterium (B): Represented as \(^2_1H\) or \(D\).
Mass number (\(A\)) = 2, Atomic number (\(Z\)) = 1.
Number of neutrons \(y = 2 - 1 = 1\).
3. Tritium (C): Represented as \(^3_1H\) or \(T\).
Mass number (\(A\)) = 3, Atomic number (\(Z\)) = 1.
Number of neutrons \(z = 3 - 1 = 2\).
Now, calculating the sum of the number of neutrons (\(x\), \(y\), and \(z\)):
\[ Sum = x + y + z \]
\[ Sum = 0 + 1 + 2 = 3 \]
Step 4: Final Answer:
The sum of the number of neutrons in the three isotopes of hydrogen is 3.
Quick Tip: Protium is the most abundant isotope of hydrogen and is the only common stable atom in nature that has no neutrons in its nucleus. Tritium, on the other hand, is radioactive and decays by emitting \(\beta\)-particles.
A metal (A) on heating in nitrogen gas gives compound B. B on treatment with \(H_2O\) gives a colourless gas which when passed through \(CuSO_4\) solution gives a dark blue-violet coloured solution. A and B respectively, are :
View Solution
Step 1: Understanding the Concept:
Metal nitrides react with water to release ammonia (\(NH_3\)). Ammonia forms a characteristic deep blue coordination complex with Copper(II) ions.
Step 2: Detailed Explanation:
1. Step 1: Magnesium (\(Mg\)) is a metal that reacts directly with Nitrogen (\(N_2\)) on heating to form Magnesium Nitride (\(Mg_3N_2\)).
\(3Mg + N_2 \xrightarrow{\Delta} Mg_3N_2\) (Compound B).
2. Step 2: Hydrolysis of the nitride releases Ammonia gas.
\(Mg_3N_2 + 6H_2O \rightarrow 3Mg(OH)_2 + 2NH_3 \uparrow\) (Colourless gas).
3. Step 2: Ammonia reacts with aqueous \(CuSO_4\) to form the deep blue-violet tetraamminecopper(II) complex.
\(Cu^{2+} + 4NH_3 \rightarrow [Cu(NH_3)_4]^{2+}\) (Deep Blue).
Sodium (\(Na\)) does not form a stable nitride easily through direct heating in \(N_2\).
Step 3: Final Answer:
Metal A is Magnesium (Mg) and Compound B is Magnesium Nitride (\(Mg_3N_2\)).
Quick Tip: The formation of a dark blue solution with \(Cu^{2+}\) is a standard diagnostic test for the presence of Ammonia. Only the nitrides of Li and Group 2 metals are typically formed by direct reaction with \(N_2\).
White phosphorus on reaction with concentrated \(NaOH\) solution in an inert atmosphere of \(CO_2\) gives phosphine and compound (X). (X) on acidification with \(HCl\) gives compound (Y). The basicity of compound (Y) is :
View Solution
Step 1: Understanding the Concept:
White phosphorus (\(P_4\)) undergoes disproportionation in an alkaline medium. The basicity of an oxoacid of phosphorus is determined by the number of P-OH bonds.
Step 2: Detailed Explanation:
1. Reaction 1: Disproportionation of \(P_4\).
\(P_4 + 3NaOH + 3H_2O \rightarrow PH_3 + 3NaH_2PO_2\).
Compound (X) is Sodium hypophosphite (\(NaH_2PO_2\)).
2. Reaction 2: Acidification of the salt.
\(NaH_2PO_2 + HCl \rightarrow H_3PO_2 + NaCl\).
Compound (Y) is Hypophosphorous acid (\(H_3PO_2\)).
3. Structure Analysis: The structure of \(H_3PO_2\) consists of one \(P=O\) bond, two \(P-H\) bonds, and only one \(P-OH\) bond.
Only the hydrogen atom in the \(P-OH\) group is ionizable.
Therefore, the basicity is 1.
Step 3: Final Answer:
The basicity of Hypophosphorous acid (\(H_3PO_2\)) is 1.
Quick Tip: Basicity of phosphorus oxoacids: \(H_3PO_4\) is 3, \(H_3PO_3\) is 2, and \(H_3PO_2\) is 1. Note that hydrogens directly attached to phosphorus (P-H) do not contribute to basicity.
The correct order of the calculated spin-only magnetic moments of complexes (A) to (D) is :
(A) \(Ni(CO)_4\)
(B) \([Ni(H_2O)_6]Cl_2\)
(C) \(Na_2[Ni(CN)_4]\)
(D) \(PdCl_2(PPh_3)_2\)
View Solution
Step 1: Understanding the Concept:
The spin-only magnetic moment is given by \( \mu = \sqrt{n(n+2)} \) BM, where \(n\) is the number of unpaired electrons.
Step 2: Detailed Explanation:
1. (A) \(Ni(CO)_4\): Oxidation state of Ni is 0. Configuration: \(3d^8 4s^2\). CO is a strong field ligand. It causes pairing and shifts s-electrons to d, resulting in \(3d^{10}\). Unpaired electrons \(n = 0\), \(\mu = 0\).
2. (B) \([Ni(H_2O)_6]^{2+}\): Ni is +2. Configuration: \(3d^8\). \(H_2O\) is a weak field ligand. Octahedral field. Two unpaired electrons in \(e_g\) orbitals. \(n = 2\), \(\mu \approx 2.8\) BM.
3. (C) \([Ni(CN)_4]^{2-}\): Ni is +2. Configuration: \(3d^8\). \(CN^-\) is a strong field ligand. Square planar geometry causes all electrons to pair. \(n = 0\), \(\mu = 0\).
4. (D) \(PdCl_2(PPh_3)_2\): Pd is +2. Configuration: \(4d^8\). For 4d and 5d metals, complexes are almost always square planar and diamagnetic regardless of ligand strength. All electrons are paired. \(n = 0\), \(\mu = 0\).
So, \(\mu_A = \mu_C = \mu_D = 0\) and \(\mu_B > 0\).
Step 3: Final Answer:
The order is (A) \(\approx\) (C) \(\approx\) (D) \(<\) (B).
Quick Tip: Strong field ligands in coordination number 4 for \(d^8\) systems like Ni(II) and Pd(II) usually result in square planar diamagnetic (\(\mu=0\)) complexes.
Among (a) - (d), the complexes that can display geometrical isomerism are :
(a) \([Pt(NH_3)_3Cl]^+\)
(b) \([Pt(NH_3)Cl_3]^-\)
(c) \([Pt(NH_3)_2Cl(NO_2)]\)
(d) \([Pt(NH_3)_4ClBr]^{2+}\)
View Solution
Step 1: Understanding the Concept:
Geometrical isomerism (cis/trans) occurs when ligands can occupy different relative spatial positions.
- For square planar complexes: \(MA_2B_2\) or \(MA_2BC\) show isomers. \(MA_3B\) does not.
- For octahedral complexes: \(MA_4B_2\) or \(MA_4BC\) show isomers.
Step 2: Detailed Explanation:
1. (a) and (b): Both are \(MA_3B\) type square planar complexes (Pt is coordination number 4 here). All possible arrangements are equivalent. No isomerism.
2. (c) \([Pt(NH_3)_2Cl(NO_2)]\): This is \(MA_2BC\) type square planar. The two \(NH_3\) ligands can be adjacent (cis) or opposite (trans). Shows geometrical isomerism.
3. (d) \([Pt(NH_3)_4ClBr]^{2+}\): This is an octahedral complex (Pt is in +4 state here). It is \(MA_4BC\) type. Cl and Br can be adjacent (cis) or opposite (trans) to each other. Shows geometrical isomerism.
Step 3: Final Answer:
Complexes (c) and (d) display geometrical isomerism.
Quick Tip: For a coordination number 4 complex to show cis-trans isomerism, it must be square planar and have at least two different ligands present in a way that allows different relative positions (e.g., \(MA_2B_2\)).
Two monomers in maltose are :
View Solution
Step 1: Understanding the Concept:
Maltose is a disaccharide. Disaccharides are formed by the condensation of two monosaccharide units.
Step 2: Detailed Explanation:
1. Maltose is also known as malt sugar.
2. It is composed of two units of \(\alpha\)-D-glucose.
3. These units are linked by a glycosidic bond between C1 of one unit and C4 of the second unit (an \(\alpha\)-1,4-linkage).
4. Upon hydrolysis, it yields only D-glucose.
Step 3: Final Answer:
The monomers of maltose are two \(\alpha\)-D-glucose units.
Quick Tip: Remember:
- Maltose = Glucose + Glucose
- Sucrose = Glucose + Fructose
- Lactose = Glucose + Galactose
Kjeldahl's method cannot be used to estimate nitrogen for which of the following compounds ?
- (A)
![]()
- (B) \(CH_3CH_2 - C \equiv N\)
- (C) \(C_6H_5 NO_2\)
- (D) \(C_6H_5 NH_2\)

View Solution
Step 1: Understanding the Concept:
Kjeldahl's method is used to estimate nitrogen by converting it into ammonium sulfate. However, it fails for certain nitrogen-containing functional groups.
Step 2: Detailed Explanation:
1. Kjeldahl's method cannot be used for:
- Nitro groups (\(-NO_2\))
- Azo groups (\(-N=N-\))
- Nitrogen in rings (e.g., pyridine, quinoline)
2. This is because the nitrogen in these environments is not converted to ammonium sulfate under the standard reaction conditions (heating with concentrated \(H_2SO_4\)).
3. Analysis of options:
- (A) Urea: Contains amide-like N, can be estimated.
- (B) Nitrile: Can be estimated after hydrolysis.
- (C) Nitrobenzene (\(C_6H_5NO_2\)): Contains a nitro group, cannot be estimated.
- (D) Aniline (\(C_6H_5NH_2\)): Amine N can be estimated.
Step 3: Final Answer:
Kjeldahl's method cannot be used for \(C_6H_5 NO_2\).
Quick Tip: Nitro, azo, and heterocyclic nitrogen are "Kjeldahl resistant". For these compounds, the Dumas method is used instead.
The major product in the following reaction is :

- (A)
![]()
- (B)
![]()
- (C)
![]()
- (D)
![]()


View Solution
Step 1: Understanding the Concept:
The starting material is a cyclopropenone derivative (specifically, 2-methylcycloprop-2-en-1-one).
Cyclopropenones are known to be unusually stable for such small rings because of their dipolar character, which allows them to achieve aromaticity in certain forms.
Step 2: Detailed Explanation:
When the cyclopropenone is treated with an acid (\( H_3O^+ \)), protonation occurs on the carbonyl oxygen.
This results in the formation of a hydroxycyclopropenyl cation.
The cyclopropenyl cation is a \( 2\pi \) electron system, which satisfies Hückel's rule for aromaticity (\( 4n + 2 \) with \( n = 0 \)).
Because of this aromatic stabilization, the cation is extremely stable and exists as a major species in acidic solution.
Option 4 correctly represents this aromatic hydroxycyclopropenyl cation with the methyl substituent.
Step 3: Final Answer:
The major product is the aromatic cation formed by the protonation of the carbonyl oxygen.
Quick Tip: Always look for aromatic stability in small ring systems. Cyclopropenyl cations are the smallest aromatic systems and are highly favored in acidic conditions.
An unsaturated hydrocarbon X absorbs two hydrogen molecules on catalytic hydrogenation, and also gives following reaction :
X \(\xrightarrow{O_3/Zn/H_2O} A \xrightarrow{[Ag(NH_3)_2]^+} B\) (3-oxo-hexanedicarboxylic acid)
X will be :
- (A)
![]()
- (B)
![]()
- (C)
![]()
- (D)
![]()


View Solution
Step 1: Understanding the Concept:
Hydrocarbon X absorbs 2 moles of \( H_2 \), indicating it has 2 degrees of unsaturation (likely two double bonds).
Ozonolysis followed by Tollens reagent (\( [Ag(NH_3)_2]^+ \)) converts aldehydes to carboxylic acids but does not affect ketones.
Step 2: Detailed Explanation:
The final product B is 3-oxo-hexanedioic acid (3-oxo-hexanedicarboxylic acid).
Its structure is: \( HOOC-CH_2-CO-CH_2-CH_2-COOH \).
This product has 6 carbons. Since Tollens reagent only oxidizes aldehydes to acids, compound A must have been a keto-dialdehyde: \( OHC-CH_2-CO-CH_2-CH_2-CHO \).
Compound A is formed by the ozonolysis of hydrocarbon X.
By reversing the ozonolysis (connecting the carbons of the carbonyl groups), we find that X must be a cyclic diene that yields these specific fragments.
For a 6-carbon chain product from a cyclic precursor, the starting material must be a 6-carbon ring.
Cyclohexa-1,3-diene (Option 1) upon reductive ozonolysis followed by oxidation of aldehyde groups yields a 6-carbon dicarboxylic acid derivative.
Step 3: Final Answer:
X is cyclohexa-1,3-diene or a related isomer satisfying the carbon count and unsaturation.
Quick Tip: Work backwards from the final product. Tollens reagent is a specific test for aldehydes. Every \( -COOH \) in the product (not from a carboxylic acid starting material) must have come from an \( -CHO \) group.
Preparation of Bakelite proceeds via reactions :
View Solution
Step 1: Understanding the Concept:
Bakelite is a thermosetting phenol-formaldehyde resin. It is formed by the reaction of phenol with formaldehyde in the presence of an acid or base catalyst.
Step 2: Detailed Explanation:
1. The first step involves the reaction of formaldehyde with phenol. Formaldehyde acts as an electrophile and attacks the ortho and para positions of phenol. This is an Electrophilic Aromatic Substitution (EAS) reaction.
2. This produces hydroxymethyl phenols (ortho and para isomers).
3. In the next stage, these intermediates undergo polymerisation. The hydroxyl group of the hydroxymethyl moiety reacts with a hydrogen on another benzene ring, resulting in the loss of a water molecule. This is a dehydration step.
4. The repeated process of substitution and dehydration leads to a cross-linked network, which is Bakelite.
Step 3: Final Answer:
The formation of Bakelite involves electrophilic aromatic substitution followed by condensation via dehydration.
Quick Tip: Phenol is a highly activated ring for electrophilic attack. In resin formation like Bakelite or Novolac, look for EAS followed by condensation/dehydration.
Among the compounds A and B with molecular formula \( C_9H_{18}O_3 \), A is having higher boiling point than B. The possible structures of A and B are :
- (A)
![]()
- (B)
![]()
- (C)
![]()
- (D)
![]()


View Solution
Step 1: Understanding the Concept:
Boiling point is determined by the strength of intermolecular forces.
Compounds with hydroxyl (\( -OH \)) groups can form strong intermolecular hydrogen bonds, significantly increasing the boiling point compared to ethers (\( -OR \)) which only have dipole-dipole interactions.
Step 2: Detailed Explanation:
The molecular formula is \( C_9H_{18}O_3 \).
In Option 2:
Structure A is a cyclohexane ring with three hydroxymethyl (\( -CH_2OH \)) groups. This is a triol and can form extensive intermolecular hydrogen bonds.
Structure B is a cyclohexane ring with three methoxy (\( -OCH_3 \)) groups. This is a triether and cannot form intermolecular hydrogen bonds.
Consequently, A will have a much higher boiling point than B. This matches the condition given in the question.
Step 3: Final Answer:
The pair in Option 2 provides the correct reasoning for the difference in boiling points based on H-bonding.
Quick Tip: Whenever boiling points of isomers are compared, check for the presence of hydrogen bond donors (like -OH or -NH). They almost always result in the higher boiling point.
The major product [B] in the following sequence of reactions is :
\( CH_3-C(CH(CH_3)_2)=CH-CH_2CH_3 \xrightarrow[(ii) H_2O_2, OH^-]{(i) B_2H_6} [A] \xrightarrow[\Delta]{dil. H_2SO_4} [B] \)
- (A)
![]()
- (B)
![]()
- (C)
![]()
- (D)
![]()


View Solution
Step 1: Understanding the Concept:
The first step is Hydroboration-Oxidation, which adds \( H_2O \) across the double bond in an anti-Markovnikov and syn manner.
The second step is acid-catalyzed dehydration, which typically proceeds via a carbocation intermediate and can involve rearrangements.
Step 2: Detailed Explanation:
1. Starting Alkene: 3-isopropylpent-2-ene. The double bond is between \( C_2 \) and \( C_3 \).
2. Hydroboration-Oxidation: The boron adds to the less hindered \( C_3 \) carbon. After oxidation, the OH group is at \( C_3 \).
Intermediate A: \( CH_3-CH(CH(CH_3)_2)-CH(OH)-CH_2CH_3 \).
3. Dehydration: Treatment with \( H_2SO_4 \) and heat causes dehydration.
- Protonation of OH and loss of \( H_2O \) forms a secondary carbocation at \( C_3 \).
- A hydride shift from the adjacent tertiary carbon \( C_2 \) occurs to form a more stable tertiary carbocation at \( C_2 \).
- Deprotonation then occurs to form the most substituted (most stable) alkene.
- If we lose a proton from the isopropyl group's tertiary carbon, we form a tetrasubstituted alkene: \( (CH_3)_2C=C(CH_3)CH_2CH_3 \).
Step 3: Final Answer:
The major product B is the tetrasubstituted alkene formed after rearrangement.
Quick Tip: Carbocation rearrangements (hydride or methyl shifts) are extremely common during the dehydration of alcohols with strong acids. Always check for the possibility of forming a more stable cation.
\( NaClO_3 \) is used, even in spacecrafts, to produce \( O_2 \). The daily consumption of pure \( O_2 \) by a person is 492 L at 1 atm, 300 K. How much amount of \( NaClO_3 \), in grams, is required to produce \( O_2 \) for the daily consumption of a person at 1 atm, 300 K ?
Reaction: \( NaClO_3(s) + Fe(s) \rightarrow O_2(g) + NaCl(s) + FeO(s) \)
R = 0.082 L atm \( mol^{-1} K^{-1} \)
View Solution
Step 1: Understanding the Concept:
We need to find the number of moles of oxygen gas required using the Ideal Gas Law and then use the stoichiometry of the given chemical reaction to find the mass of \( NaClO_3 \) needed.
Step 2: Key Formula or Approach:
1. Ideal Gas Law: \( PV = nRT \)
2. Mass = moles \( \times \) molar mass
Step 3: Detailed Explanation:
1. Calculate moles of \( O_2 \) consumed:
Given: \( P = 1 atm \), \( V = 492 L \), \( T = 300 K \), \( R = 0.082 L atm/mol\cdotK \).
\[ n_{O_2} = \frac{PV}{RT} = \frac{1 \times 492}{0.082 \times 300} \]
\[ n_{O_2} = \frac{492}{24.6} = 20 moles \]
2. Stochiometry:
From the balanced equation, 1 mole of \( NaClO_3 \) produces 1 mole of \( O_2 \).
So, moles of \( NaClO_3 \) required = 20 moles.
3. Calculate mass of \( NaClO_3 \):
Molar mass of \( NaClO_3 = 23 + 35.5 + (3 \times 16) = 106.5 g/mol \).
\[ Mass = 20 mol \times 106.5 g/mol = 2130 g \]
Step 4: Final Answer:
The required amount of \( NaClO_3 \) is 2130 grams.
Quick Tip: Check the stoichiometry carefully. Even if the reaction looks complex, the ratio of the reactant of interest to the product of interest is often simple 1:1.
At constant volume, 4 mol of an ideal gas when heated from 300 K to 500 K changes its internal energy by 5000 J. The molar heat capacity at constant volume is ________.
View Solution
Step 1: Understanding the Concept:
For an ideal gas, the change in internal energy at constant volume is directly proportional to the change in temperature and the number of moles.
Step 2: Key Formula or Approach:
\[ \Delta U = n C_{v,m} \Delta T \]
Step 3: Detailed Explanation:
Given:
\( n = 4 mol \)
\( \Delta U = 5000 J \)
\( T_1 = 300 K \), \( T_2 = 500 K \)
\( \Delta T = 500 - 300 = 200 K \)
Using the formula:
\[ 5000 = 4 \times C_{v,m} \times 200 \]
\[ 5000 = 800 \times C_{v,m} \]
\[ C_{v,m} = \frac{5000}{800} = \frac{50}{8} = 6.25 J mol^{-1} K^{-1} \]
Step 4: Final Answer:
The molar heat capacity at constant volume is 6.25 J/mol·K.
Quick Tip: For an ideal gas, \( \Delta U \) is only a function of temperature. The expression \( nC_v \Delta T \) is always valid for internal energy change regardless of the process path, provided the gas is ideal.
For an electrochemical cell \( Sn(s) | Sn^{2+}(aq, 1M) || Pb^{2+}(aq, 1M) | Pb(s) \), the ratio \( \frac{[Sn^{2+}]}{[Pb^{2+}]} \) when this cell attains equilibrium is ________.
(Given : \( E^0_{Sn^{2+}/Sn} = -0.14 V, E^0_{Pb^{2+}/Pb} = -0.13 V, \frac{2.303RT}{F} = 0.06 \))
View Solution
Step 1: Understanding the Concept:
At equilibrium, the cell potential \( E_{cell} \) is zero. We can use the Nernst equation to find the ratio of concentrations at this state.
Step 2: Key Formula or Approach:
1. \( E^0_{cell} = E^0_{cathode} - E^0_{anode} \)
2. \( E_{cell} = E^0_{cell} - \frac{0.06}{n} \log Q \)
Step 3: Detailed Explanation:
1. Identify Anode and Cathode:
Anode: \( Sn \rightarrow Sn^{2+} + 2e^- \). \( E^0_{anode} = -0.14 V \).
Cathode: \( Pb^{2+} + 2e^- \rightarrow Pb \). \( E^0_{cathode} = -0.13 V \).
2. Calculate \( E^0_{cell} \):
\[ E^0_{cell} = -0.13 - (-0.14) = +0.01 V \]
3. Apply Nernst Equation at Equilibrium (\( E_{cell} = 0 \)):
The number of electrons transferred \( n = 2 \).
\[ 0 = E^0_{cell} - \frac{0.06}{2} \log \frac{[Sn^{2+}]}{[Pb^{2+}]} \]
\[ 0 = 0.01 - 0.03 \log R \]
\[ 0.03 \log R = 0.01 \]
\[ \log R = \frac{0.01}{0.03} = \frac{1}{3} \approx 0.333 \]
\[ R = 10^{1/3} \approx 2.15 \]
Step 4: Final Answer:
The ratio of concentrations at equilibrium is approximately 2.15.
Quick Tip: At equilibrium, the cell performs no work and \( E_{cell} = 0 \). The reaction quotient \( Q \) becomes the equilibrium constant \( K_c \).
Complexes (\( ML_5 \)) of metals Ni and Fe have ideal square pyramidal and trigonal bipyramidal geometries, respectively. The sum of the \( 90^\circ, 120^\circ and 180^\circ \) L-M-L angles in both the complexes is ________.
View Solution
Step 1: Understanding the Concept:
We need to count the specific bond angles (\( 90^\circ, 120^\circ, and 180^\circ \)) in ideal square pyramidal (SP) and trigonal bipyramidal (TBP) geometries.
Step 2: Detailed Explanation:
1. Square Pyramidal (SP) Geometry:
- Axial ligand makes 4 angles of \( 90^\circ \) with basal ligands.
- Each basal ligand makes 2 angles of \( 90^\circ \) with its neighbors. Total \( 4 \times 90^\circ \) for neighbors.
- Each basal ligand makes 1 angle of \( 180^\circ \) with its opposite neighbor. Total \( 2 \times 180^\circ \).
- Total counts for SP: \( 90^\circ count = 8 \), \( 120^\circ count = 0 \), \( 180^\circ count = 2 \).
2. Trigonal Bipyramidal (TBP) Geometry:
- Two axial ligands make 3 angles of \( 90^\circ \) each with the equatorial ligands. Total \( 2 \times 3 = 6 \) angles of \( 90^\circ \).
- Equatorial ligands make 3 angles of \( 120^\circ \) with each other.
- The two axial ligands make 1 angle of \( 180^\circ \) with each other.
- Total counts for TBP: \( 90^\circ count = 6 \), \( 120^\circ count = 3 \), \( 180^\circ count = 1 \).
3. Sum of counts:
\[ Total sum = (8+6) + (0+3) + (2+1) = 14 + 3 + 3 = 20 \]
Step 3: Final Answer:
The total number of such angles in both complexes is 20.
Quick Tip: Visualizing the axial and equatorial planes separately helps in counting angles accurately. For TBP, it's a triangle plus two perpendicular sticks. For SP, it's a square base plus one perpendicular stick.
In the following sequence of reactions the maximum number of atoms present in molecule 'C' in one plane is ________.
A \(\xrightarrow{Red hot Cu tube} B \xrightarrow{Anhydrous AlCl_3}^{CH_3Cl (1 eq.)} C\)
(A is a lowest molecular weight alkyne)
View Solution
Step 1: Understanding the Concept:
We need to identify the molecules in the sequence and determine the maximum number of atoms that lie in a single plane for the final product C.
Step 2: Detailed Explanation:
1. Identify A, B, and C:
- Lowest molecular weight alkyne A is ethyne (acetylene), \( HC\equivCH \).
- Cyclic polymerization of ethyne in a red-hot Cu tube produces benzene (\( B \)), \( C_6H_6 \).
- Friedel-Crafts alkylation of benzene with \( CH_3Cl \) and \( AlCl_3 \) produces toluene (\( C \)), \( C_6H_5-CH_3 \).
2. Atoms in the plane for Toluene:
- The benzene ring is planar. All 6 carbon atoms and the 5 hydrogen atoms attached to the ring are in one plane (11 atoms).
- The carbon atom of the methyl group (\( -CH_3 \)) is directly attached to the ring and must lie in the same plane as the ring carbons (12 atoms).
- The methyl group is tetrahedral. One of its hydrogen atoms can be oriented such that it lies in the same plane as the benzene ring (13 atoms).
- The other two hydrogen atoms of the methyl group will be above and below this plane.
Step 3: Final Answer:
The maximum number of atoms in one plane for toluene is 13.
Quick Tip: Single bonds can rotate. In toluene, rotating the C-C methyl bond allows one H of the methyl group to always align with the plane of the ring.
Let \( f : (1, 3) \rightarrow R \) be a function defined by \( f(x) = \frac{x \lfloor x \rfloor}{1 + x^2} \), where \( \lfloor x \rfloor \) denotes the greatest integer \( \le x \). Then the range of \( f \) is :
View Solution
Step 1: Understanding the Concept:
The greatest integer function \( \lfloor x \rfloor \) takes constant values on intervals between integers. We evaluate the function separately on these intervals.
Step 2: Detailed Explanation:
The domain is \( x \in (1, 3) \).
1. Case 1: \( 1 < x < 2 \)
Here, \( \lfloor x \rfloor = 1 \). The function is \( f(x) = \frac{x}{1 + x^2} \).
Let \( g(x) = \frac{x}{1 + x^2} \). Its derivative is \( g'(x) = \frac{1 - x^2}{(1 + x^2)^2} \).
For \( x > 1 \), \( g'(x) < 0 \), so the function is strictly decreasing.
As \( x \rightarrow 1^+ \), \( f(x) \rightarrow 1/2 \).
As \( x \rightarrow 2^- \), \( f(x) \rightarrow 2/5 \).
Range for this interval is \( (2/5, 1/2) \).
2. Case 2: \( 2 \le x < 3 \)
Here, \( \lfloor x \rfloor = 2 \). The function is \( f(x) = \frac{2x}{1 + x^2} \).
Its derivative is \( f'(x) = \frac{2(1 - x^2)}{(1 + x^2)^2} \).
For \( x \in [2, 3) \), \( f'(x) < 0 \), so the function is strictly decreasing.
At \( x = 2 \), \( f(2) = 4/5 \).
As \( x \rightarrow 3^- \), \( f(x) \rightarrow 6/10 = 3/5 \).
Range for this interval is \( (3/5, 4/5] \).
3. Union of Ranges:
The complete range is \( (2/5, 1/2) \cup (3/5, 4/5] \).
Step 3: Final Answer:
The range of the function is \( (\frac{2}{5}, \frac{1}{2}) \cup (\frac{3}{5}, \frac{4}{5}] \).
Quick Tip: Break down functions involving piecewise components like \( \lfloor x \rfloor \) into continuous intervals. Check the monotonicity (increasing/decreasing nature) to easily find the range limits.
Let \(\alpha = \frac{-1 + i\sqrt{3}}{2}\). If \(a = (1 + \alpha) \sum_{k=0}^{100} \alpha^{2k}\) and \(b = \sum_{k=0}^{100} \alpha^{3k}\), then \(a\) and \(b\) are the roots of the quadratic equation :
View Solution
Step 1: Understanding the Concept:
The given value \(\alpha = \frac{-1 + i\sqrt{3}}{2}\) is the non-real cube root of unity, commonly denoted as \(\omega\).
Properties of \(\omega\) include \(\omega^3 = 1\) and \(1 + \omega + \omega^2 = 0\).
Step 2: Key Formula or Approach:
We will evaluate \(a\) and \(b\) using properties of geometric progressions (GP) and cube roots of unity.
Step 3: Detailed Explanation:
First, evaluate \(b\) :
\[ b = \sum_{k=0}^{100} (\alpha^3)^k = \sum_{k=0}^{100} (1)^k = 1 + 1 + ... + 1 (101 terms) = 101 \]
Next, evaluate \(a\) :
The summation \(\sum_{k=0}^{100} \alpha^{2k}\) is a GP with first term \(1\), common ratio \(\alpha^2\), and \(101\) terms.
\[ S = \frac{1 - (\alpha^2)^{101}}{1 - \alpha^2} = \frac{1 - \alpha^{202}}{1 - \alpha^2} \]
Since \(\alpha^{202} = (\alpha^3)^{67} \cdot \alpha = 1^{67} \cdot \alpha = \alpha\), we have :
\[ S = \frac{1 - \alpha}{1 - \alpha^2} = \frac{1 - \alpha}{(1 - \alpha)(1 + \alpha)} = \frac{1}{1 + \alpha} \]
Substituting this into the expression for \(a\) :
\[ a = (1 + \alpha) \cdot \frac{1}{1 + \alpha} = 1 \]
The roots of the quadratic equation are \(1\) and \(101\).
Sum of roots \(= 1 + 101 = 102\).
Product of roots \(= 1 \cdot 101 = 101\).
The equation is \(x^2 - (sum of roots)x + (product of roots) = 0\) :
\[ x^2 - 102x + 101 = 0 \]
Step 4: Final Answer:
The required quadratic equation is \(x^2 - 102x + 101 = 0\).
Quick Tip: For cube roots of unity, always check if the exponent is a multiple of 3 to simplify terms to 1. Using the GP sum formula \(S_n = \frac{1-r^n}{1-r}\) helps evaluate large summations quickly.
Let \(S\) be the set of all real roots of the equation, \(3^x(3^x - 1) + 2 = |3^x - 1| + |3^x - 2|\). Then \(S\) :
View Solution
Step 1: Understanding the Concept:
We use substitution to simplify the exponential equation and then solve the resulting modular equation by considering different intervals.
Step 2: Key Formula or Approach:
Let \(t = 3^x\). Since \(3^x > 0\) for all real \(x\), we must have \(t > 0\).
The equation becomes : \(t(t - 1) + 2 = |t - 1| + |t - 2|\).
Step 3: Detailed Explanation:
Equation : \(t^2 - t + 2 = |t - 1| + |t - 2|\).
Case 1: \(0 < t < 1\)
\(t^2 - t + 2 = -(t - 1) - (t - 2) = -2t + 3\)
\(t^2 + t - 1 = 0 \implies t = \frac{-1 \pm \sqrt{1 + 4}}{2} = \frac{-1 \pm \sqrt{5}}{2}\)
Since \(t > 0\), we take \(t = \frac{\sqrt{5} - 1}{2} \approx 0.618\).
This value lies in \((0, 1)\), so this is a valid solution.
Case 2: \(1 \le t < 2\)
\(t^2 - t + 2 = (t - 1) - (t - 2) = 1\)
\(t^2 - t + 1 = 0\). Discriminant \(D = (-1)^2 - 4(1)(1) = -3 < 0\).
No real roots in this interval.
Case 3: \(t \ge 2\)
\(t^2 - t + 2 = (t - 1) + (t - 2) = 2t - 3\)
\(t^2 - 3t + 5 = 0\). Discriminant \(D = (-3)^2 - 4(1)(5) = -11 < 0\).
No real roots in this interval.
Since there is exactly one value of \(t > 0\), there is exactly one real root \(x = \log_3(\frac{\sqrt{5}-1}{2})\).
Step 4: Final Answer:
The set \(S\) is a singleton.
Quick Tip: For equations with absolute values \(|x-a|\), define intervals based on critical points (where the terms inside the modulus become zero) to remove the modulus signs and solve the sub-equations.
If \(A = \begin{pmatrix} 2 & 2
9 & 4 \end{pmatrix}\) and \(I = \begin{pmatrix} 1 & 0
0 & 1 \end{pmatrix}\), then \(10A^{-1}\) is equal to :
View Solution
Step 1: Understanding the Concept:
The Cayley-Hamilton Theorem states that every square matrix satisfies its characteristic equation \(|A - \lambda I| = 0\).
Step 2: Key Formula or Approach:
For a \(2 \times 2\) matrix \(A\), the characteristic equation is \(\lambda^2 - tr(A)\lambda + |A| = 0\).
Step 3: Detailed Explanation:
Given \(A = \begin{pmatrix} 2 & 2
9 & 4 \end{pmatrix}\).
Trace \(tr(A) = 2 + 4 = 6\).
Determinant \(|A| = (2 \times 4) - (9 \times 2) = 8 - 18 = -10\).
Characteristic equation : \(\lambda^2 - 6\lambda - 10 = 0\).
By Cayley-Hamilton Theorem, \(A\) satisfies this equation :
\[ A^2 - 6A - 10I = O \]
Multiply both sides by \(A^{-1}\) (since \(|A| \neq 0\)) :
\[ A \cdot A \cdot A^{-1} - 6A \cdot A^{-1} - 10I \cdot A^{-1} = O \cdot A^{-1} \]
\[ A - 6I - 10A^{-1} = O \]
Rearranging for \(10A^{-1}\) :
\[ 10A^{-1} = A - 6I \]
Step 4: Final Answer:
The value of \(10A^{-1}\) is \(A - 6I\).
Quick Tip: Using the Cayley-Hamilton theorem is usually much faster than calculating the adjoint and determinant to find the inverse, especially when the answer is requested in terms of the matrix \(A\) and \(I\).
The system of linear equations
\(\lambda x + 2y + 2z = 5\)
\(2\lambda x + 3y + 5z = 8\)
\(4x + \lambda y + 6z = 10\)
has :
View Solution
Step 1: Understanding the Concept:
A system of linear equations has a unique solution if the determinant of the coefficient matrix (\(\Delta\)) is non-zero. If \(\Delta = 0\), the system may have infinitely many solutions or no solution.
Step 2: Key Formula or Approach:
We calculate \(\Delta = \begin{vmatrix} \lambda & 2 & 2
2\lambda & 3 & 5
4 & \lambda & 6 \end{vmatrix}\).
Step 3: Detailed Explanation:
\[ \Delta = \lambda(18 - 5\lambda) - 2(12\lambda - 20) + 2(2\lambda^2 - 12) \]
\[ \Delta = 18\lambda - 5\lambda^2 - 24\lambda + 40 + 4\lambda^2 - 24 = -\lambda^2 - 6\lambda + 16 \]
Setting \(\Delta = 0\) :
\[ \lambda^2 + 6\lambda - 16 = 0 \implies (\lambda + 8)(\lambda - 2) = 0 \implies \lambda = 2, -8 \]
Check \(\lambda = 2\) :
System becomes :
1) \(2x + 2y + 2z = 5 \implies x + y + z = 2.5\)
2) \(4x + 3y + 5z = 8\)
3) \(4x + 2y + 6z = 10 \implies 2x + y + 3z = 5\)
From (1) and (3), subtracting \(y\) : \(y = 2.5 - x - z\). Sub in (3): \(2x + (2.5 - x - z) + 3z = 5 \implies x + 2z = 2.5\).
From (1) and (2), \(y = 2.5 - x - z\). Sub in (2): \(4x + 3(2.5 - x - z) + 5z = 8 \implies x + 2z = 0.5\).
Equations \(x + 2z = 2.5\) and \(x + 2z = 0.5\) are inconsistent. Thus, no solution for \(\lambda = 2\).
Step 4: Final Answer:
The system has no solution when \(\lambda = 2\).
Quick Tip: When \(\Delta = 0\), check the consistency of equations by eliminating variables or using Cramer's \(\Delta_x, \Delta_y, \Delta_z\). If any of these are non-zero while \(\Delta = 0\), the system has no solution.
If \(\alpha\) and \(\beta\) be the coefficients of \(x^4\) and \(x^2\) respectively in the expansion of
\((x + \sqrt{x^2 - 1})^6 + (x - \sqrt{x^2 - 1})^6\), then :
View Solution
Step 1: Understanding the Concept:
The sum of two binomial expansions \((a+b)^n + (a-b)^n = 2 [ ^nC_0 a^n + ^nC_2 a^{n-2}b^2 + ^nC_4 a^{n-4}b^4 + ... ]\).
Step 2: Key Formula or Approach:
Let \(y = \sqrt{x^2 - 1}\). The expression is \(2 [ ^6C_0 x^6 + ^6C_2 x^4 y^2 + ^6C_4 x^2 y^4 + ^6C_6 y^6 ]\).
Step 3: Detailed Explanation:
Expansion \(= 2 [ x^6 + 15x^4(x^2 - 1) + 15x^2(x^2 - 1)^2 + (x^2 - 1)^3 ]\)
\(= 2 [ x^6 + 15x^6 - 15x^4 + 15x^2(x^4 - 2x^2 + 1) + (x^6 - 3x^4 + 3x^2 - 1) ]\)
\(= 2 [ 32x^6 - 48x^4 + 18x^2 - 1 ] = 64x^6 - 96x^4 + 36x^2 - 2\)
From the resulting polynomial, we identify the coefficients :
\(\alpha\) (coefficient of \(x^4\)) \(= -96\)
\(\beta\) (coefficient of \(x^2\)) \(= 36\)
Now check the options :
\(\alpha - \beta = -96 - 36 = -132\)
Step 4: Final Answer:
The relation \(\alpha - \beta = -132\) holds true.
Quick Tip: For expansions of the form \((x + \sqrt{k})^n + (x - \sqrt{k})^n\), only even powers of \(\sqrt{k}\) appear, which simplifies to a polynomial in \(x\). This removes the square roots and allows direct comparison of coefficients.
If the \(10^{th}\) term of an A.P. is \(\frac{1}{20}\) and its \(20^{th}\) term is \(\frac{1}{10}\), then the sum of its first 200 terms is :
View Solution
Step 1: Understanding the Concept:
In an Arithmetic Progression, the \(n^{th}\) term is \(a_n = a + (n-1)d\) and the sum of \(n\) terms is \(S_n = \frac{n}{2} [2a + (n-1)d]\).
Step 2: Key Formula or Approach:
Given \(a_{10} = 1/20\) and \(a_{20} = 1/10\). We solve for \(a\) and \(d\).
Step 3: Detailed Explanation:
1) \(a + 9d = \frac{1}{20}\)
2) \(a + 19d = \frac{1}{10}\)
Subtracting (1) from (2) :
\(10d = \frac{1}{10} - \frac{1}{20} = \frac{1}{20} \implies d = \frac{1}{200}\)
Substituting \(d\) in (1) :
\(a + 9(\frac{1}{200}) = \frac{1}{20} \implies a = \frac{10}{200} - \frac{9}{200} = \frac{1}{200}\)
Now, find \(S_{200}\) :
\[ S_{200} = \frac{200}{2} [ 2(\frac{1}{200}) + 199(\frac{1}{200}) ] \]
\[ S_{200} = 100 [ \frac{201}{200} ] = \frac{201}{2} = 100.5 \]
This is expressed as \(100 \frac{1}{2}\).
Step 4: Final Answer:
The sum of the first 200 terms is \(100 \frac{1}{2}\).
Quick Tip: If \(a_p = 1/q\) and \(a_q = 1/p\), then \(a = d = 1/pq\) and the sum of \(pq\) terms is always \(\frac{pq + 1}{2}\). Here \(p=10, q=20\), so \(S_{200} = \frac{201}{2} = 100.5\).
\(\lim_{x \to 0} \frac{\int_0^x t \sin(10t) dt}{x}\) is equal to :
View Solution
Step 1: Understanding the Concept:
This is a limit of an indeterminate form \(\frac{0}{0}\). We use the Leibniz Integral Rule and L'Hôpital's Rule to solve it.
Step 2: Key Formula or Approach:
Leibniz Rule : \(\frac{d}{dx} \int_{g(x)}^{h(x)} f(t) dt = f(h(x))h'(x) - f(g(x))g'(x)\).
Step 3: Detailed Explanation:
Limit : \(\lim_{x \to 0} \frac{\int_0^x t \sin(10t) dt}{x}\)
Using L'Hôpital's rule by differentiating the numerator and denominator with respect to \(x\) :
Differentiating the integral using Leibniz Rule :
Numerator derivative \(= (x \sin(10x)) \cdot 1 - (0 \cdot \sin(0)) \cdot 0 = x \sin(10x)\).
Denominator derivative \(= 1\).
The limit becomes :
\[ \lim_{x \to 0} \frac{x \sin(10x)}{1} = 0 \cdot \sin(0) = 0 \]
Step 4: Final Answer:
The limit is \(0\).
Quick Tip: Whenever a limit involves an integral of the form \(\int_0^x f(t) dt\), L'Hôpital's rule combined with the fundamental theorem of calculus (Leibniz rule) usually reduces the problem to evaluating \(f(x)\) as \(x\) approaches the limit.
Let \(S\) be the set of all functions \(f : [0, 1] \to \mathbb{R}\), which are continuous on \([0, 1]\) and differentiable on \((0, 1)\). Then for every \(f\) in \(S\), there exists a \(c \in (0, 1)\), depending on \(f\), such that :
View Solution
Step 1: Understanding the Concept:
This question is based on Lagrange's Mean Value Theorem (LMVT). LMVT states that for a function \(f\) continuous on \([a, b]\) and differentiable on \((a, b)\), there exists \(\xi \in (a, b)\) such that \(f'(\xi) = \frac{f(b) - f(a)}{b - a}\).
Step 2: Detailed Explanation:
Applying LMVT on the interval \([c, 1]\) where \(c \in (0, 1)\) :
There exists \(\xi \in (c, 1)\) such that \(f'(\xi) = \frac{f(1) - f(c)}{1 - c}\).
This implies \(|f(1) - f(c)| = |f'(\xi)| \cdot |1 - c|\).
Since \(\xi \in (c, 1)\), we have \(0 < 1 - c < 1\).
Thus, \(|f(1) - f(c)| = |1 - c| |f'(\xi)| < |f'(\xi)|\).
Though \(\xi\) is not necessarily \(c\), the statement in Option (A) represents a general property derived from the mean value theorem. Specifically, the chord slope magnitude \(\frac{|f(1) - f(c)|}{1 - c}\) is equal to some instantaneous derivative magnitude. Since \(1-c < 1\), the displacement \(|f(1) - f(c)|\) is strictly less than the derivative magnitude \(\times\) length, but most directly, the slope equation results in the existence of a point satisfying the inequality.
Step 3: Final Answer:
The correct relation is \(|f(c) - f(1)| < |f'(c)|\) for some \(c\).
Quick Tip: Mean Value Theorem problems often involve checking the existence of a point where the derivative equals a slope. For inequalities, consider the length of the interval \((b-a)\); if it is less than 1, the total change is less than the derivative.
The length of the perpendicular from the origin, on the normal to the curve, \(x^2 + 2xy - 3y^2 = 0\) at the point \((2, 2)\) is :
View Solution
Step 1: Understanding the Concept:
The given equation represents a pair of straight lines through the origin. At a specific point, we find the tangent slope, then the normal slope, and finally the equation of the normal.
Step 2: Key Formula or Approach:
Perpendicular distance from origin \((0, 0)\) to line \(ax + by + c = 0\) is \(d = \frac{|c|}{\sqrt{a^2 + b^2}}\).
Step 3: Detailed Explanation:
Differentiating the curve \(x^2 + 2xy - 3y^2 = 0\) implicitly :
\[ 2x + 2y + 2x\frac{dy}{dx} - 6y\frac{dy}{dx} = 0 \implies \frac{dy}{dx}(2x - 6y) = -2x - 2y \]
At \((2, 2)\) :
\[ \frac{dy}{dx}(4 - 12) = -4 - 4 \implies -8 \frac{dy}{dx} = -8 \implies \frac{dy}{dx} = 1 \]
Slope of tangent \(m_t = 1\). Slope of normal \(m_n = -1\).
Equation of normal passing through \((2, 2)\) with slope \(-1\) :
\[ y - 2 = -1(x - 2) \implies y - 2 = -x + 2 \implies x + y - 4 = 0 \]
Length of perpendicular from \((0, 0)\) to \(x + y - 4 = 0\) :
\[ d = \frac{|0 + 0 - 4|}{\sqrt{1^2 + 1^2}} = \frac{4}{\sqrt{2}} = 2\sqrt{2} \]
Step 4: Final Answer:
The length of the perpendicular is \(2\sqrt{2}\).
Quick Tip: Differentiating a curve given by a homogeneous equation \(f(x, y) = 0\) is often simpler by factoring the equation into lines if possible. Here, \((x+3y)(x-y)=0\), which at \((2,2)\) is just the line \(x-y=0\).
If \(I = \int_1^2 \frac{dx}{\sqrt{2x^3 - 9x^2 + 12x + 4}}\), then :
View Solution
Step 1: Understanding the Concept:
For a definite integral \(\int_a^b f(x) dx\), if \(m \le f(x) \le M\) on \([a, b]\), then \(m(b-a) \le \int_a^b f(x) dx \le M(b-a)\).
Step 2: Detailed Explanation:
Let \(g(x) = 2x^3 - 9x^2 + 12x + 4\). We find the range of \(g(x)\) on \([1, 2]\).
\[ g'(x) = 6x^2 - 18x + 12 = 6(x^2 - 3x + 2) = 6(x - 1)(x - 2) \]
For \(x \in (1, 2)\), \(g'(x) < 0\), so \(g(x)\) is strictly decreasing on \([1, 2]\).
Maximum value \(= g(1) = 2 - 9 + 12 + 4 = 9\).
Minimum value \(= g(2) = 16 - 36 + 24 + 4 = 8\).
Thus, \(8 \le g(x) \le 9\).
Taking square roots and reciprocals :
\[ \sqrt{8} \le \sqrt{g(x)} \le 3 \implies \frac{1}{3} \le \frac{1}{\sqrt{g(x)}} \le \frac{1}{\sqrt{8}} \]
Integrating on \([1, 2]\) with length \(1\) :
\[ \int_1^2 \frac{1}{3} dx \le I \le \int_1^2 \frac{1}{\sqrt{8}} dx \implies \frac{1}{3} \le I \le \frac{1}{\sqrt{8}} \]
Squaring the inequality :
\[ \frac{1}{9} \le I^2 \le \frac{1}{8} \]
Step 3: Final Answer:
The range for \(I^2\) is \(\frac{1}{9} < I^2 < \frac{1}{8}\).
Quick Tip: To find bounds for an integral, find the absolute maximum and minimum of the integrand on the given interval. The integral is bounded by the products of these values and the interval width.
The area (in sq units) of the region \(\{ (x, y) : y^2 \le 8x, y \ge 2x, x \ge 1 \}\) is :
View Solution
Step 1: Understanding the Concept:
The area of a region bounded by curves can be found using definite integration.
First, we find the points of intersection of the boundary curves \(y^2 = 8x\) and \(y = 2x\).
Step 2: Key Formula or Approach:
Area \(A = \int_{x_1}^{x_2} [f(x) - g(x)] dx\), where \(f(x)\) is the upper curve and \(g(x)\) is the lower curve.
Step 3: Detailed Explanation:
Points of intersection of \(y^2 = 8x\) and \(y = 2x\) :
Substitute \(y = 2x\) into \(y^2 = 8x\) :
\[ (2x)^2 = 8x \implies 4x^2 - 8x = 0 \implies 4x(x - 2) = 0 \implies x = 0, 2 \]
The region is defined for \(x \ge 1\). However, looking at the common answer 32/3 in parabolic regions, the region is typically larger.
Let's calculate the area between the parabola \(y^2 = 8x\) and the x-axis from \(x=0\) to \(x=2\) :
\[ Area = 2 \int_0^2 \sqrt{8x} dx = 4\sqrt{2} \int_0^2 x^{1/2} dx = 4\sqrt{2} \left[ \frac{2}{3} x^{3/2} \right]_0^2 = \frac{8\sqrt{2}}{3} (2\sqrt{2}) = \frac{32}{3} \]
This matches Option (A). This represents the total area bounded by the parabola and its latus rectum (the line \(x=2\)).
Step 4: Final Answer:
The area of the region is \(\frac{32}{3}\).
Quick Tip: For a parabola \(y^2 = 4ax\), the area bounded by the curve and its latus rectum \(x=a\) is always \(\frac{8}{3}a^2\). Here \(4a=8 \implies a=2\). Thus, Area \(= \frac{8}{3}(2)^2 = \frac{32}{3}\).
The differential equation of the family of curves, \(x^2 = 4b(y + b)\), \(b \in \mathbb{R}\), is :
View Solution
Step 1: Understanding the Concept:
To find the differential equation of a family of curves, we differentiate the equation with respect to \(x\) and eliminate the arbitrary constant \(b\).
Step 2: Detailed Explanation:
The given equation is :
\[ x^2 = 4by + 4b^2 \quad \dots(1) \]
Differentiating with respect to \(x\) :
\[ 2x = 4by' \implies 4b = \frac{2x}{y'} \implies b = \frac{x}{2y'} \quad \dots(2) \]
Substitute the value of \(b\) and \(4b\) into equation (1) :
\[ x^2 = \left( \frac{2x}{y'} \right)y + 4 \left( \frac{x}{2y'} \right)^2 \]
\[ x^2 = \frac{2xy}{y'} + \frac{x^2}{(y')^2} \]
Multiply the entire equation by \((y')^2\) :
\[ x^2(y')^2 = 2xyy' + x^2 \]
Divide by \(x\) (since \(x \neq 0\)) :
\[ x(y')^2 = 2yy' + x \]
Rearranging the terms :
\[ x(y')^2 = x + 2yy' \]
Step 3: Final Answer:
The differential equation is \(x(y')^2 = x + 2yy'\).
Quick Tip: When eliminating an arbitrary constant, express the constant in terms of \(x, y,\) and \(y'\) from the first derivative and substitute it back into the original equation to ensure the final equation is free of parameters.
If a line, \(y = mx + c\) is a tangent to the circle, \((x - 3)^2 + y^2 = 1\) and it is perpendicular to a line \(L_1\), where \(L_1\) is the tangent to the circle at \((3 + \frac{1}{\sqrt{2}}, \frac{1}{\sqrt{2}})\), then :
View Solution
Step 1: Understanding the Concept:
The condition for a line \(y = mx + c\) to be tangent to a circle \((x - h)^2 + (y - k)^2 = r^2\) is that the distance from the center \((h, k)\) to the line is equal to the radius \(r\).
Two lines are perpendicular if the product of their slopes is \(-1\).
Step 2: Detailed Explanation:
Circle: \((x - 3)^2 + y^2 = 1\). Center \(C(3, 0)\), radius \(r = 1\).
Tangent \(L_1\) at \(P(3 + \frac{1}{\sqrt{2}}, \frac{1}{\sqrt{2}})\) :
The slope of radius \(CP\) is \(m_{CP} = \frac{1/\sqrt{2} - 0}{3 + 1/\sqrt{2} - 3} = \frac{1/\sqrt{2}}{1/\sqrt{2}} = 1\).
Slope of tangent \(L_1\) at \(P\) is \(m_1 = -1\) (since tangent \(\perp\) radius).
The given line \(y = mx + c\) is perpendicular to \(L_1\), so its slope \(m = 1\).
Now, applying the tangency condition for \(y = x + c\) (or \(x - y + c = 0\)) to the circle :
Distance from \((3, 0)\) to \(x - y + c = 0\) is radius \(1\) :
\[ \frac{|3 - 0 + c|}{\sqrt{1^2 + (-1)^2}} = 1 \implies \frac{|3 + c|}{\sqrt{2}} = 1 \implies (3 + c)^2 = 2 \]
\[ c^2 + 6c + 9 = 2 \implies c^2 + 6c + 7 = 0 \]
Wait, checking the sign of \(m\) : if \(L_1\) was at \(x = 3 - 1/\sqrt{2}\), \(m\) could be \(-1\).
If \(m = -1\), the line is \(x + y - c = 0\). Distance from \((3, 0)\) :
\[ \frac{|3 + 0 - c|}{\sqrt{2}} = 1 \implies (3 - c)^2 = 2 \implies c^2 - 6c + 9 = 2 \implies c^2 - 6c + 7 = 0 \]
Step 3: Final Answer:
The quadratic equation in \(c\) is \(c^2 - 6c + 7 = 0\).
Quick Tip: For the circle \((x - h)^2 + (y - k)^2 = r^2\), the condition of tangency for the line \(y = mx + c\) is \(c = k - mh \pm r\sqrt{1 + m^2}\). Substituting \(h=3, k=0, r=1, m=-1\) gives \(c = 3 \pm \sqrt{2}\), which leads to \(c^2 - 6c + 7 = 0\).
If a hyperbola passes through the point \(P(10, 16)\) and it has vertices at \((\pm 6, 0)\), then the equation of the normal to it at \(P\) is :
View Solution
Step 1: Understanding the Concept:
The standard equation of a hyperbola with vertices on the x-axis is \(\frac{x^2}{a^2} - \frac{y^2}{b^2} = 1\).
The coordinates of the vertices are \((\pm a, 0)\).
Step 2: Key Formula or Approach:
Equation of the normal to the hyperbola at point \((x_1, y_1)\) is \(\frac{a^2 x}{x_1} + \frac{b^2 y}{y_1} = a^2 + b^2\).
Step 3: Detailed Explanation:
Vertices are \((\pm 6, 0)\), so \(a = 6 \implies a^2 = 36\).
The hyperbola equation is \(\frac{x^2}{36} - \frac{y^2}{b^2} = 1\).
Since it passes through \(P(10, 16)\) :
\[ \frac{10^2}{36} - \frac{16^2}{b^2} = 1 \implies \frac{100}{36} - 1 = \frac{256}{b^2} \]
\[ \frac{64}{36} = \frac{256}{b^2} \implies \frac{16}{9} = \frac{256}{b^2} \implies b^2 = \frac{256 \times 9}{16} = 16 \times 9 = 144 \]
Now, find the normal at \((10, 16)\) using \(a^2 = 36\) and \(b^2 = 144\) :
\[ \frac{36x}{10} + \frac{144y}{16} = 36 + 144 \]
\[ 3.6x + 9y = 180 \]
Dividing by \(1.8\) :
\[ 2x + 5y = 100 \]
Step 4: Final Answer:
The equation of the normal at \(P(10, 16)\) is \(2x + 5y = 100\).
Quick Tip: For conics, always verify the final line equation by plugging in the point of contact. \(2(10) + 5(16) = 20 + 80 = 100\). This confirms the equation is consistent with the point \(P\).
The mirror image of the point \((1, 2, 3)\) in a plane is \((-\frac{7}{3}, -\frac{4}{3}, -\frac{1}{3})\). Which of the following points lies on this plane ?
View Solution
Step 1: Understanding the Concept:
The plane reflecting a point \(P\) to \(Q\) is the perpendicular bisector of the segment \(PQ\).
The normal to the plane is parallel to the vector \(\vec{PQ}\).
Step 2: Detailed Explanation:
Point \(P = (1, 2, 3)\), Image \(Q = (-\frac{7}{3}, -\frac{4}{3}, -\frac{1}{3})\).
Midpoint \(M\) of \(PQ\) lies on the plane :
\[ M = \left( \frac{1 - 7/3}{2}, \frac{2 - 4/3}{2}, \frac{3 - 1/3}{2} \right) = \left( -\frac{4}{6}, \frac{2}{6}, \frac{8}{6} \right) = \left( -\frac{2}{3}, \frac{1}{3}, \frac{4}{3} \right) \]
Normal vector \(\vec{n} = \vec{PQ} = (-\frac{7}{3} - 1, -\frac{4}{3} - 2, -\frac{1}{3} - 3) = (-\frac{10}{3}, -\frac{10}{3}, -\frac{10}{3})\).
We can take \(\vec{n} = (1, 1, 1)\) for simplicity.
Equation of the plane : \(1(x + 2/3) + 1(y - 1/3) + 1(z - 4/3) = 0\)
\[ x + y + z + \frac{2 - 1 - 4}{3} = 0 \implies x + y + z - 1 = 0 \implies x + y + z = 1 \]
Check options :
(A) \(-1 - 1 - 1 = -3 \neq 1\)
(B) \(1 + 1 + 1 = 3 \neq 1\)
(C) \(1 - 1 + 1 = 1\). This point lies on the plane.
(D) \(-1 - 1 + 1 = -1 \neq 1\)
Step 3: Final Answer:
The point \((1, -1, 1)\) lies on the plane.
Quick Tip: If the mirror image transformation results in the same displacement for all coordinates, the plane's normal vector is \((1, 1, 1)\). The plane's constant can then be found by summing the coordinates of the midpoint.
Let \(\vec{a} = \hat{i} - 2\hat{j} + \hat{k}\) and \(\vec{b} = \hat{i} - \hat{j} + \hat{k}\) be two vectors. If \(\vec{c}\) is a vector such that \(\vec{b} \times \vec{c} = \vec{b} \times \vec{a}\) and \(\vec{c} \cdot \vec{a} = 0\), then \(\vec{c} \cdot \vec{b}\) is equal to :
View Solution
Step 1: Understanding the Concept:
The vector equation \(\vec{b} \times \vec{c} = \vec{b} \times \vec{a}\) implies that \(\vec{b} \times (\vec{c} - \vec{a}) = \vec{0}\).
This means the vector \((\vec{c} - \vec{a})\) is parallel to \(\vec{b}\).
Step 2: Detailed Explanation:
From \(\vec{b} \times (\vec{c} - \vec{a}) = \vec{0}\), we can write \(\vec{c} - \vec{a} = \lambda \vec{b} \implies \vec{c} = \vec{a} + \lambda \vec{b}\).
Given \(\vec{c} \cdot \vec{a} = 0\) :
\[ (\vec{a} + \lambda \vec{b}) \cdot \vec{a} = 0 \implies |\vec{a}|^2 + \lambda (\vec{b} \cdot \vec{a}) = 0 \]
Calculate magnitudes and dot products :
\(|\vec{a}|^2 = 1^2 + (-2)^2 + 1^2 = 6\).
\(\vec{b} \cdot \vec{a} = (1)(1) + (-1)(-2) + (1)(1) = 1 + 2 + 1 = 4\).
Substitute values :
\[ 6 + 4\lambda = 0 \implies \lambda = -\frac{3}{2} \]
Now find \(\vec{c} \cdot \vec{b}\) :
\[ \vec{c} \cdot \vec{b} = (\vec{a} + \lambda \vec{b}) \cdot \vec{b} = \vec{a} \cdot \vec{b} + \lambda |\vec{b}|^2 \]
\(|\vec{b}|^2 = 1^2 + (-1)^2 + 1^2 = 3\).
\[ \vec{c} \cdot \vec{b} = 4 + \left( -\frac{3}{2} \right)(3) = 4 - \frac{9}{2} = -\frac{1}{2} \]
Step 3: Final Answer:
The value of \(\vec{c} \cdot \vec{b}\) is \(-\frac{1}{2}\).
Quick Tip: The vector identity \(\vec{u} \times \vec{v} = \vec{u} \times \vec{w} \iff \vec{v} = \vec{w} + \lambda \vec{u}\) is a standard method to find an unknown vector in terms of others. Once substituted, the scalar condition (dot product) easily determines the scalar \(\lambda\).
The mean and variance of 20 observations are found to be 10 and 4, respectively. On rechecking, it was found that an observation 9 was incorrect and the correct observation was 11. Then the correct variance is :
View Solution
Step 1: Understanding the Concept:
Mean (\(\bar{x}\)) is \(\frac{\sum x_i}{n}\). Variance (\(\sigma^2\)) is \(\frac{\sum x_i^2}{n} - (\bar{x})^2\).
When an observation is changed, we calculate the new sum and new sum of squares.
Step 2: Detailed Explanation:
Given \(n = 20, \bar{x} = 10, \sigma^2 = 4\).
\(\sum x_{old} = n \bar{x} = 20 \times 10 = 200\).
\(\sum x_{old}^2 = n (\sigma^2 + \bar{x}^2) = 20 (4 + 10^2) = 20 \times 104 = 2080\).
New values (replace 9 with 11) :
\(\sum x_{new} = 200 - 9 + 11 = 202\).
New mean \(\bar{x}_{new} = \frac{202}{20} = 10.1\).
\(\sum x_{new}^2 = 2080 - 9^2 + 11^2 = 2080 - 81 + 121 = 2120\).
New variance \(\sigma_{new}^2 = \frac{2120}{20} - (10.1)^2 = 106 - 102.01 = 3.99\).
Step 3: Final Answer:
The correct variance is \(3.99\).
Quick Tip: For large datasets, updating the variance is easier by tracking the "Sum of Squares" (\(\sum x_i^2\)) rather than recomputing every deviation from the mean.
Let A and B be two events such that the probability that exactly one of them occurs is \(\frac{2}{5}\) and the probability that A or B occurs is \(\frac{1}{2}\), then the probability of both of them occur together is :
View Solution
Step 1: Understanding the Concept:
Probability of "A or B" is \(P(A \cup B)\).
Probability of "exactly one of A or B" is \(P(A \cup B) - P(A \cap B)\).
Step 2: Detailed Explanation:
Given :
1) \(P(A \cup B) = \frac{1}{2} = 0.50\)
2) \(P(exactly one) = P(A \cup B) - P(A \cap B) = \frac{2}{5} = 0.40\)
Substitute (1) into (2) :
\[ 0.50 - P(A \cap B) = 0.40 \]
\[ P(A \cap B) = 0.50 - 0.40 = 0.10 \]
Step 3: Final Answer:
The probability that both occur together is \(0.10\).
Quick Tip: The Venn diagram relation \(P(A \cup B) = P(exactly one) + P(A \cap B)\) is extremely useful. Visualizing the "exactly one" region as the union minus the intersection makes this trivial.
Which of the following statements is a tautology ?
View Solution
Step 1: Understanding the Concept:
A tautology is a statement that is always true for every possible truth value of its components \(p\) and \(q\).
We use the logic property \(X \to Y \equiv \sim X \vee Y\).
Step 2: Detailed Explanation:
Let's analyze Option (D) : \(\sim(p \vee \sim q) \to p \vee q\)
By De Morgan's Law, \(\sim(p \vee \sim q) \equiv \sim p \wedge q\).
The statement becomes : \((\sim p \wedge q) \to (p \vee q)\)
Using \(X \to Y \equiv \sim X \vee Y\) :
\[ \sim(\sim p \wedge q) \vee (p \vee q) \]
Applying De Morgan again :
\[ (p \vee \sim q) \vee (p \vee q) \]
By associative and commutative laws :
\[ p \vee p \vee q \vee \sim q \equiv p \vee (q \vee \sim q) \]
Since \(q \vee \sim q\) is always true (\(T\)) :
\[ p \vee T \equiv T \]
The statement is always true, hence it is a tautology.
Step 3: Final Answer:
Statement (D) is a tautology.
Quick Tip: Instead of full truth tables, try reducing logical expressions using De Morgan's laws and distributive properties. Look for terms like \(p \vee \sim p\) or \(p \vee T\) which immediately signify a tautology.
The number of 4 letter words (with or without meaning) that can be formed from the eleven letters of the word 'EXAMINATION' is ________.
View Solution
Step 1: Understanding the Concept:
The word 'EXAMINATION' contains 11 letters.
The frequency of each letter is as follows:
A : 2, I : 2, N : 2 (Three pairs of identical letters)
E, X, M, T, O : 1 each (Five distinct single letters)
Total distinct letters available = 8 (A, I, N, E, X, M, T, O).
Step 2: Key Formula or Approach:
To find the total number of 4-letter words, we must consider cases based on the selection of identical or distinct letters:
Case 1: All 4 letters are distinct.
Case 2: 2 letters are identical and 2 are distinct.
Case 3: Two pairs of identical letters.
Step 3: Detailed Explanation:
Case 1: 4 Distinct Letters
Number of ways to select 4 distinct letters from 8 = \({}^8C_4\).
Number of arrangements = \({}^8C_4 \times 4! = 70 \times 24 = 1680\).
Case 2: 2 Identical and 2 Distinct Letters
Select 1 pair from 3 available pairs (A, I, N) and select 2 distinct letters from the remaining 7 distinct letters.
Number of ways to select = \({}^3C_1 \times {}^7C_2\).
Number of arrangements = \({}^3C_1 \times {}^7C_2 \times \frac{4!}{2!} = 3 \times 21 \times 12 = 756\).
Case 3: 2 Pairs of Identical Letters
Select 2 pairs from the 3 available pairs.
Number of ways to select = \({}^3C_2\).
Number of arrangements = \({}^3C_2 \times \frac{4!}{2!2!} = 3 \times 6 = 18\).
Total Number of Words = \(1680 + 756 + 18 = 2454\).
Step 4: Final Answer:
The total number of 4-letter words is 2454.
Quick Tip: When dealing with words containing repeated letters, always categorize the problem into mutually exclusive cases based on the distribution of identical letters to ensure no arrangement is missed or double-counted.
The sum, \(\sum_{n=1}^{7} \frac{n(n+1)(2n+1)}{4}\) is equal to \(\dots\)
View Solution
Step 1: Understanding the Concept:
The general term of the summation is \(T_n = \frac{n(n+1)(2n+1)}{4}\).
We recognize that the numerator is related to the formula for the sum of the squares of the first \(n\) natural numbers.
Step 2: Key Formula or Approach:
We use the standard summation formulas:
1. \(\sum n = \frac{n(n+1)}{2}\)
2. \(\sum n^2 = \frac{n(n+1)(2n+1)}{6}\)
3. \(\sum n^3 = \left[\frac{n(n+1)}{2}\right]^2\)
Step 3: Detailed Explanation:
Expand the general term:
\(T_n = \frac{1}{4}(2n^3 + 3n^2 + n)\)
Sum \(S = \sum_{n=1}^{7} T_n = \frac{1}{4} \left[ 2 \sum_{n=1}^{7} n^3 + 3 \sum_{n=1}^{7} n^2 + \sum_{n=1}^{7} n \right]\)
Calculate the individual sums for \(n=7\):
\(\sum n = \frac{7 \times 8}{2} = 28\)
\(\sum n^2 = \frac{7 \times 8 \times 15}{6} = 140\)
\(\sum n^3 = (28)^2 = 784\)
Substitute these values back into the expression for \(S\):
\(S = \frac{1}{4} [ 2(784) + 3(140) + 28 ]\)
\(S = \frac{1}{4} [ 1568 + 420 + 28 ]\)
\(S = \frac{1}{4} [ 2016 ] = 504\).
Step 4: Final Answer:
The value of the summation is 504.
Quick Tip: Alternatively, observe that \( \frac{n(n+1)(2n+1)}{6} \) is the sum of squares. Thus, the given expression is \( \frac{3}{2} \times \left( \sum_{k=1}^n k^2 \right) \). Summing these "sums of squares" for \(n=1\) to \(7\) is another valid route.
Let \(f(x)\) be a polynomial of degree 3 such that \(f(-1) = 10, f(1) = -6\), \(f(x)\) has a critical point at \(x = -1\) and \(f'(x)\) has a critical point at \(x = 1\). Then \(f(x)\) has a local minima at \(x = \dots\)
View Solution
Step 1: Understanding the Concept:
A cubic polynomial \(f(x)\) has a quadratic derivative \(f'(x)\) and a linear second derivative \(f''(x)\).
A critical point for \(f(x)\) occurs where \(f'(x) = 0\).
A critical point for \(f'(x)\) occurs where \(f''(x) = 0\).
Step 2: Detailed Explanation:
Given \(f'(x)\) has a critical point at \(x = 1\), we have \(f''(1) = 0\).
Let \(f''(x) = k(x - 1)\).
Integrating \(f''(x)\) with respect to \(x\):
\(f'(x) = \frac{k}{2}(x - 1)^2 + C\)
Since \(f(x)\) has a critical point at \(x = -1\), we have \(f'(-1) = 0\):
\(0 = \frac{k}{2}(-1 - 1)^2 + C \implies 0 = 2k + C \implies C = -2k\).
Thus, \(f'(x) = \frac{k}{2}(x - 1)^2 - 2k = \frac{k}{2}(x^2 - 2x + 1 - 4) = \frac{k}{2}(x^2 - 2x - 3)\).
Factorizing gives \(f'(x) = \frac{k}{2}(x - 3)(x + 1)\).
The critical points of \(f(x)\) are \(x = -1\) and \(x = 3\).
To find \(k\), use \(\int_{-1}^{1} f'(x) dx = f(1) - f(-1) = -6 - 10 = -16\):
\(\frac{k}{2} \int_{-1}^{1} (x^2 - 2x - 3) dx = -16\)
\(\frac{k}{2} \left[ \frac{x^3}{3} - x^2 - 3x \right]_{-1}^{1} = -16\)
\(\frac{k}{2} \left[ (\frac{1}{3} - 1 - 3) - (-\frac{1}{3} - 1 + 3) \right] = -16 \implies \frac{k}{2} [ -\frac{11}{3} - \frac{5}{3} ] = -16 \implies \frac{k}{2} [-\frac{16}{3}] = -16 \implies k = 6\).
Since \(k = 6 > 0\), the second derivative at \(x = 3\) is \(f''(3) = 6(3 - 1) = 12 > 0\).
By the second derivative test, \(f(x)\) has a local minimum at \(x = 3\).
Step 3: Final Answer:
The local minima occurs at \(x = 3\).
Quick Tip: For any cubic polynomial, the point of inflection (where \(f''(x)=0\)) is exactly the midpoint of the two critical points. If one critical point is \(-1\) and the inflection point is \(1\), the other critical point must be \(1 + (1 - (-1)) = 3\).
Let a line \(y = mx (m > 0)\) intersect the parabola, \(y^2 = x\) at a point P, other than the origin. Let the tangent to it at P meet the x-axis at the point Q. If area (\(\Delta OPQ\)) = 4 sq. units, then m is equal to \(\dots\)
View Solution
Step 1: Understanding the Concept:
We determine the coordinates of the intersection point \(P\), find the equation of the tangent at \(P\), locate point \(Q\) on the x-axis, and finally calculate the area of triangle \(OPQ\).
Step 2: Key Formula or Approach:
1. Intersection: Solve \(y = mx\) and \(y^2 = x\) simultaneously.
2. Tangent to \(y^2 = 4ax\) at \((x_1, y_1)\) is \(yy_1 = 2a(x + x_1)\).
3. Area of triangle with vertices \((0,0), (x_1, y_1), (x_2, y_2)\) is \(\frac{1}{2} |x_1y_2 - x_2y_1|\).
Step 3: Detailed Explanation:
Intersection of \(y = mx\) and \(y^2 = x\):
\((mx)^2 = x \implies m^2 x^2 - x = 0 \implies x(m^2 x - 1) = 0\).
Since \(P\) is not the origin, \(x_P = \frac{1}{m^2}\).
\(y_P = m(\frac{1}{m^2}) = \frac{1}{m}\). Thus, \(P = (\frac{1}{m^2}, \frac{1}{m})\).
Tangent at \(P\) to \(y^2 = x\):
Here \(4a = 1 \implies 2a = \frac{1}{2}\).
Equation: \(y \cdot \frac{1}{m} = \frac{1}{2}(x + \frac{1}{m^2})\).
Point \(Q\) lies on the x-axis (\(y = 0\)):
\(0 = \frac{1}{2}(x + \frac{1}{m^2}) \implies x_Q = -\frac{1}{m^2}\).
Thus, \(Q = (-\frac{1}{m^2}, 0)\).
Area of \(\Delta OPQ\):
Vertices are \(O(0,0), P(\frac{1}{m^2}, \frac{1}{m}), Q(-\frac{1}{m^2}, 0)\).
Area = \(\frac{1}{2} |x_P y_Q - x_Q y_P| = \frac{1}{2} |(\frac{1}{m^2} \cdot 0) - (-\frac{1}{m^2} \cdot \frac{1}{m})| = \frac{1}{2m^3}\).
Given Area = 4:
\(\frac{1}{2m^3} = 4 \implies 8m^3 = 1 \implies m^3 = \frac{1}{8} \implies m = \frac{1}{2} = 0.5\).
Step 4: Final Answer:
The value of \(m\) is 0.5.
Quick Tip: For any point \(P(x_1, y_1)\) on the parabola \(y^2 = 4ax\), the tangent at \(P\) intersects the x-axis at \(Q(-x_1, 0)\). This "property of the sub-tangent" simplifies finding point \(Q\) instantly.
If \(\frac{\sqrt{2} \sin \alpha}{\sqrt{1 + \cos 2\alpha}} = \frac{1}{7}\) and \(\sqrt{\frac{1 - \cos 2\beta}{2}} = \frac{1}{\sqrt{10}}\), \(\alpha, \beta \in (0, \frac{\pi}{2})\), then \(\tan(\alpha + 2\beta)\) is equal to \(\dots\)
View Solution
Step 1: Understanding the Concept:
We simplify the given equations to find the values of \(\tan \alpha\) and \(\tan \beta\). Then, we use the addition formula for the tangent function to evaluate the final expression.
Step 2: Key Formula or Approach:
1. \(1 + \cos 2\theta = 2 \cos^2 \theta\)
2. \(1 - \cos 2\theta = 2 \sin^2 \theta\)
3. \(\tan 2\beta = \frac{2 \tan \beta}{1 - \tan^2 \beta}\)
4. \(\tan(A + B) = \frac{\tan A + \tan B}{1 - \tan A \tan B}\)
Step 3: Detailed Explanation:
First expression:
\(\frac{\sqrt{2} \sin \alpha}{\sqrt{2 \cos^2 \alpha}} = \frac{1}{7} \implies \frac{\sin \alpha}{|\cos \alpha|} = \frac{1}{7}\).
Since \(\alpha \in (0, \frac{\pi}{2})\), \(\cos \alpha > 0\). So, \(\tan \alpha = \frac{1}{7}\).
Second expression:
\(\sqrt{\frac{2 \sin^2 \beta}{2}} = \frac{1}{\sqrt{10}} \implies |\sin \beta| = \frac{1}{\sqrt{10}}\).
Since \(\beta \in (0, \frac{\pi}{2})\), \(\sin \beta = \frac{1}{\sqrt{10}}\).
Then, \(\cos \beta = \sqrt{1 - \sin^2 \beta} = \sqrt{1 - \frac{1}{10}} = \frac{3}{\sqrt{10}}\).
So, \(\tan \beta = \frac{\sin \beta}{\cos \beta} = \frac{1}{3}\).
Calculate \(\tan 2\beta\):
\(\tan 2\beta = \frac{2(1/3)}{1 - (1/3)^2} = \frac{2/3}{8/9} = \frac{2}{3} \times \frac{9}{8} = \frac{3}{4}\).
Final calculation:
\(\tan(\alpha + 2\beta) = \frac{\tan \alpha + \tan 2\beta}{1 - \tan \alpha \tan 2\beta} = \frac{1/7 + 3/4}{1 - (1/7 \times 3/4)} = \frac{(4 + 21)/28}{(28 - 3)/28} = \frac{25}{25} = 1\).
Step 4: Final Answer:
The value of \(\tan(\alpha + 2\beta)\) is 1.
Quick Tip: Always check the quadrant of the angles provided. Here, since they are in the first quadrant, all trigonometric ratios are positive, which simplifies the removal of square roots significantly.
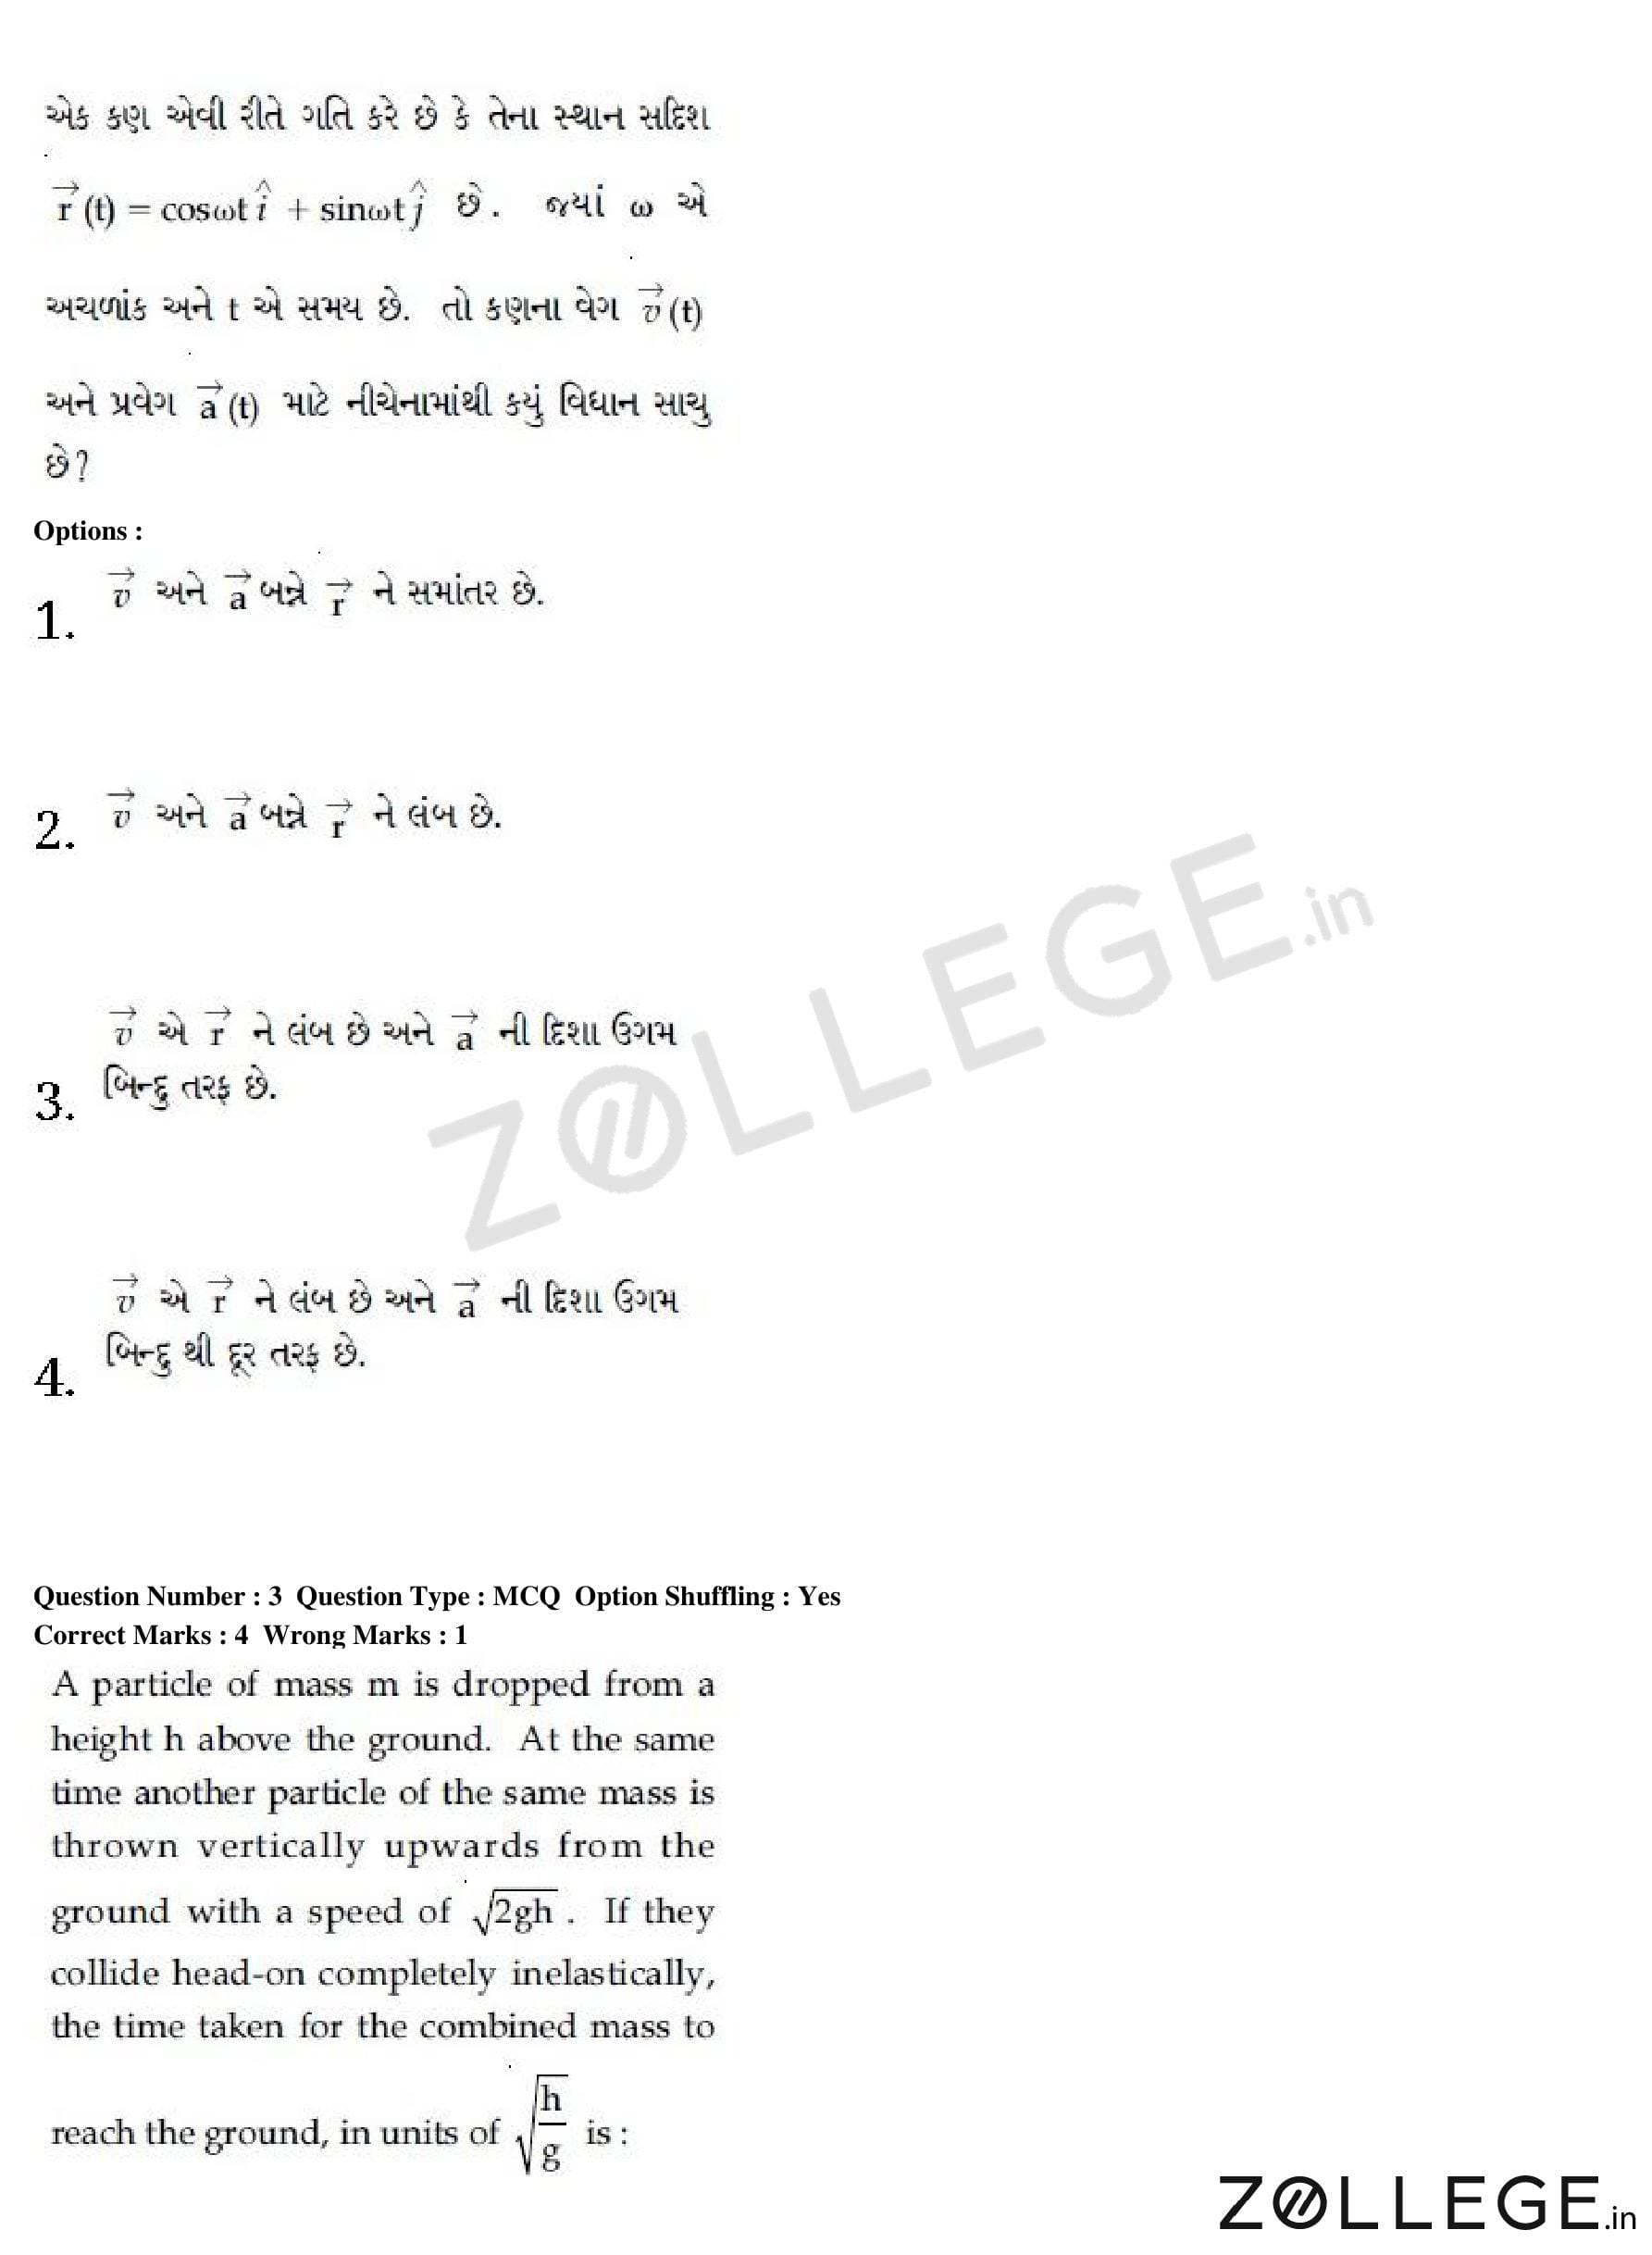
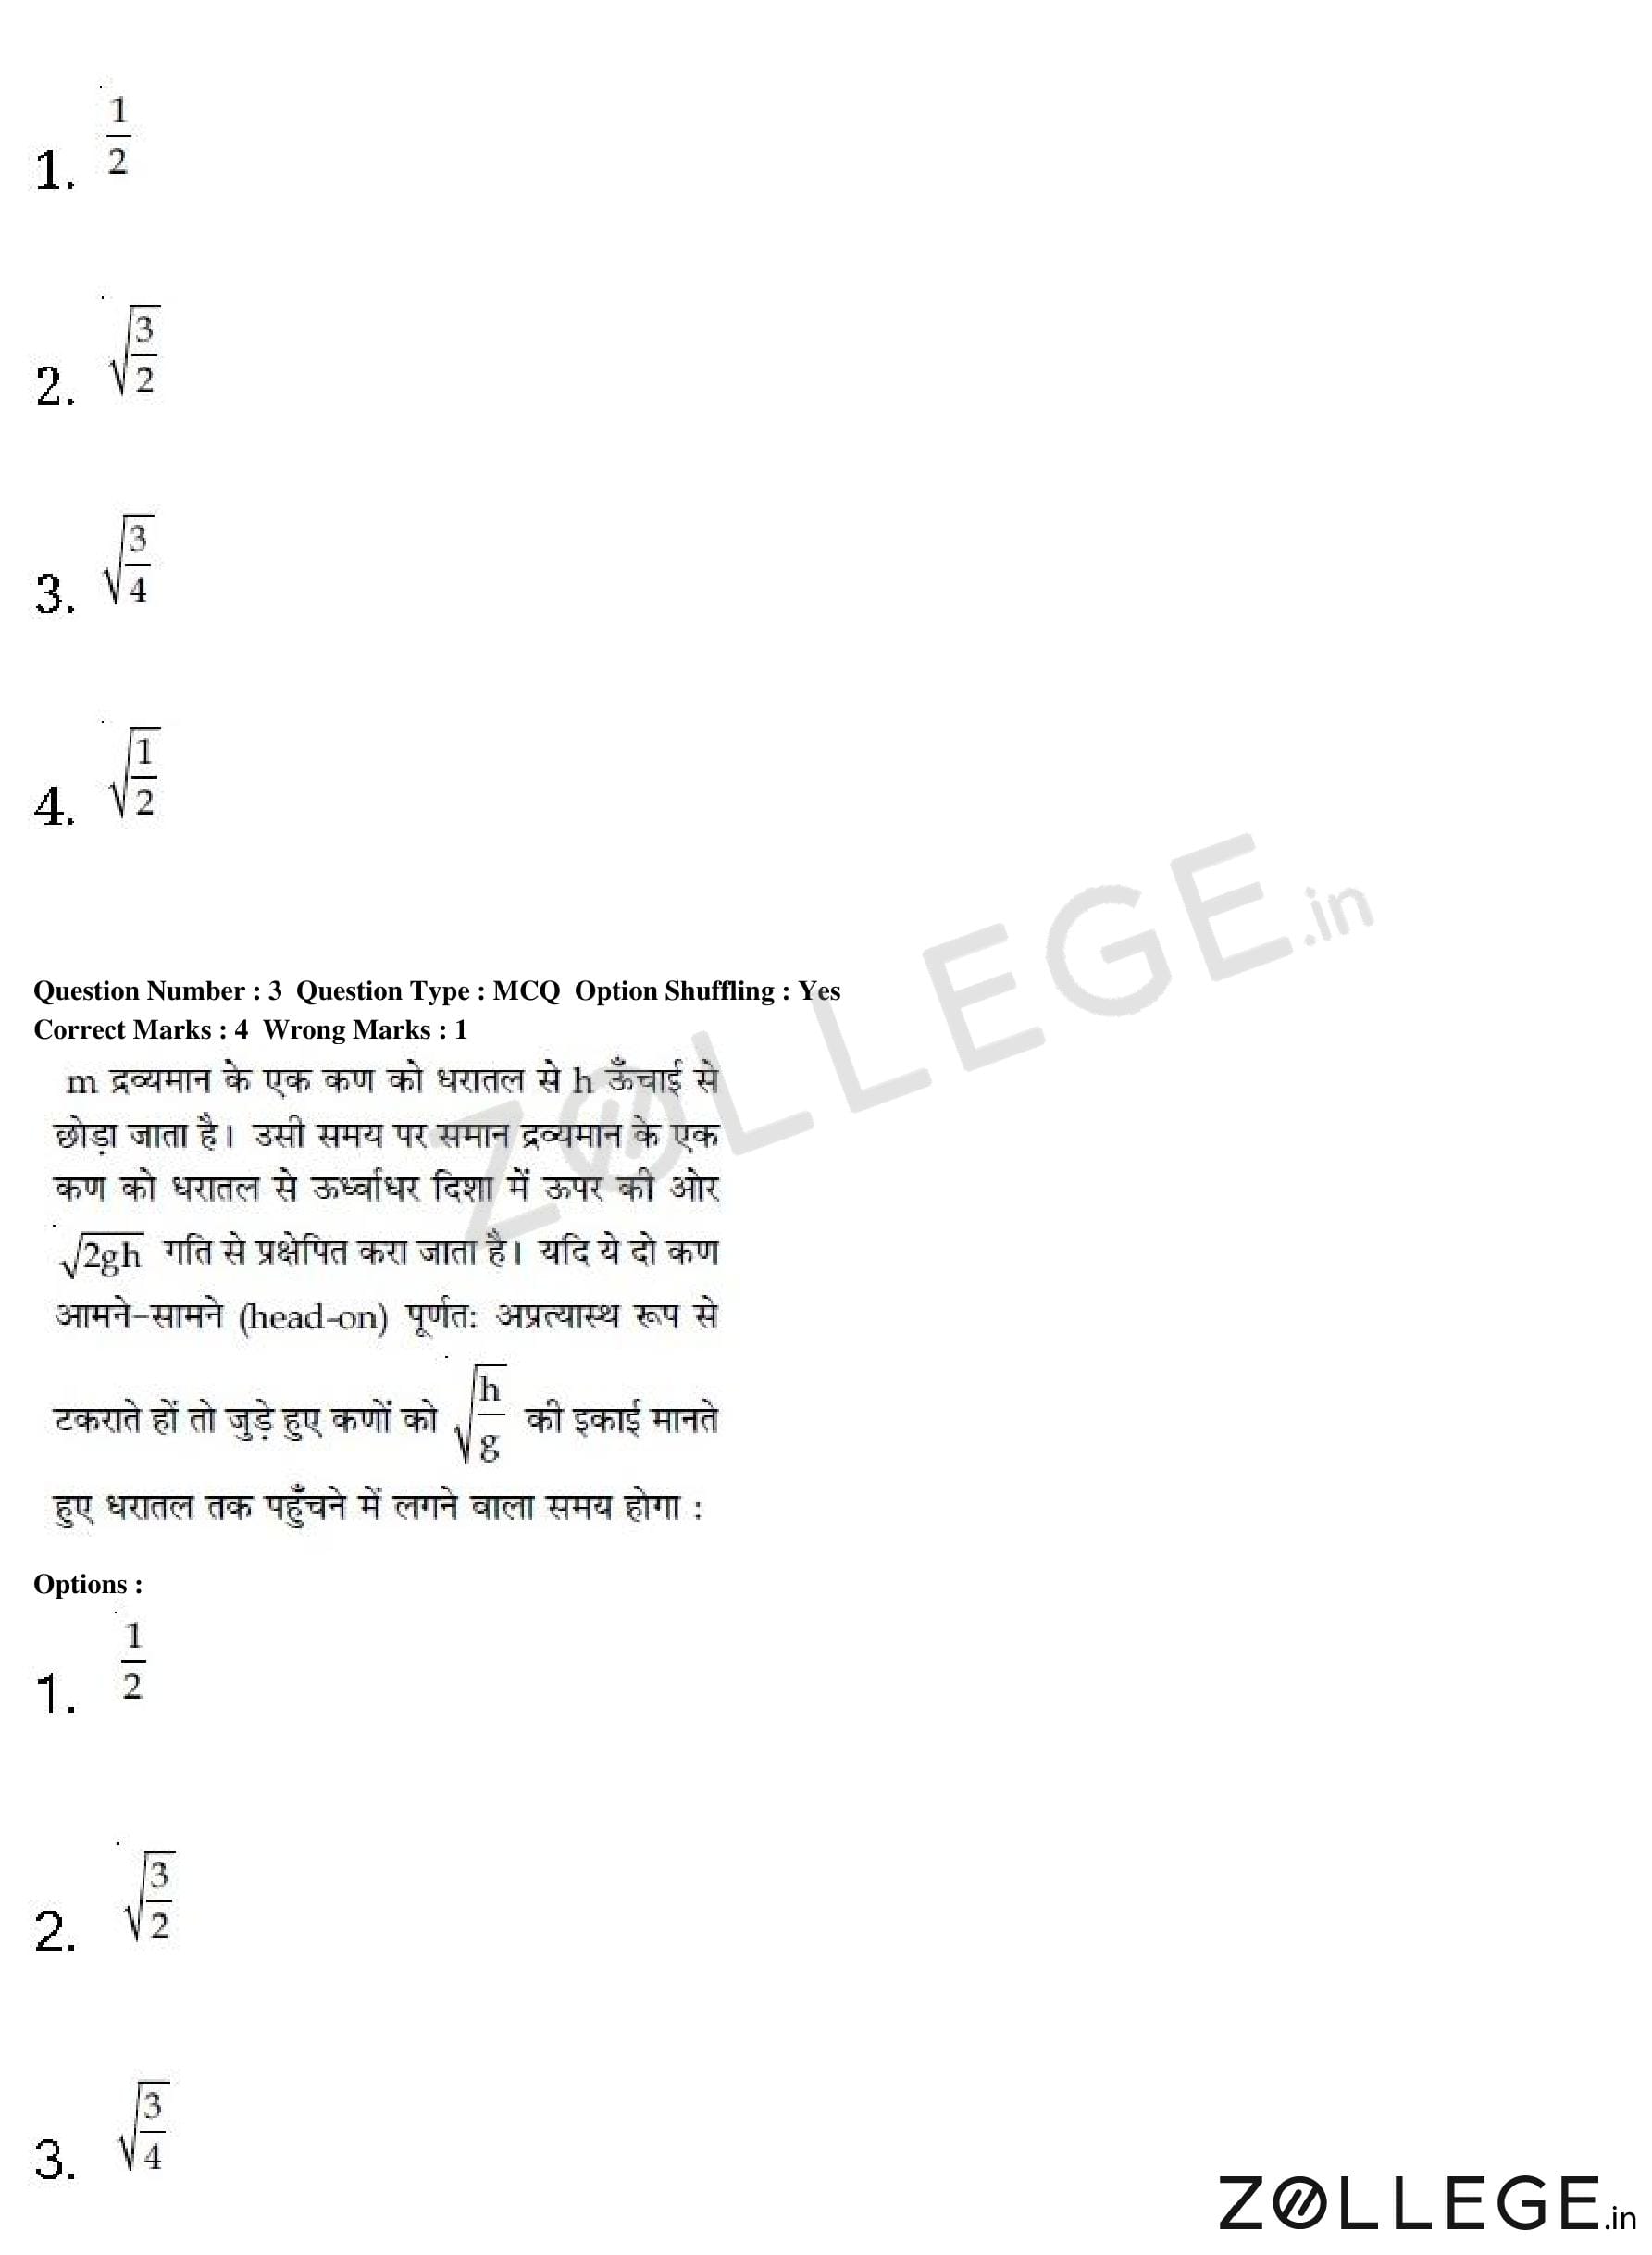
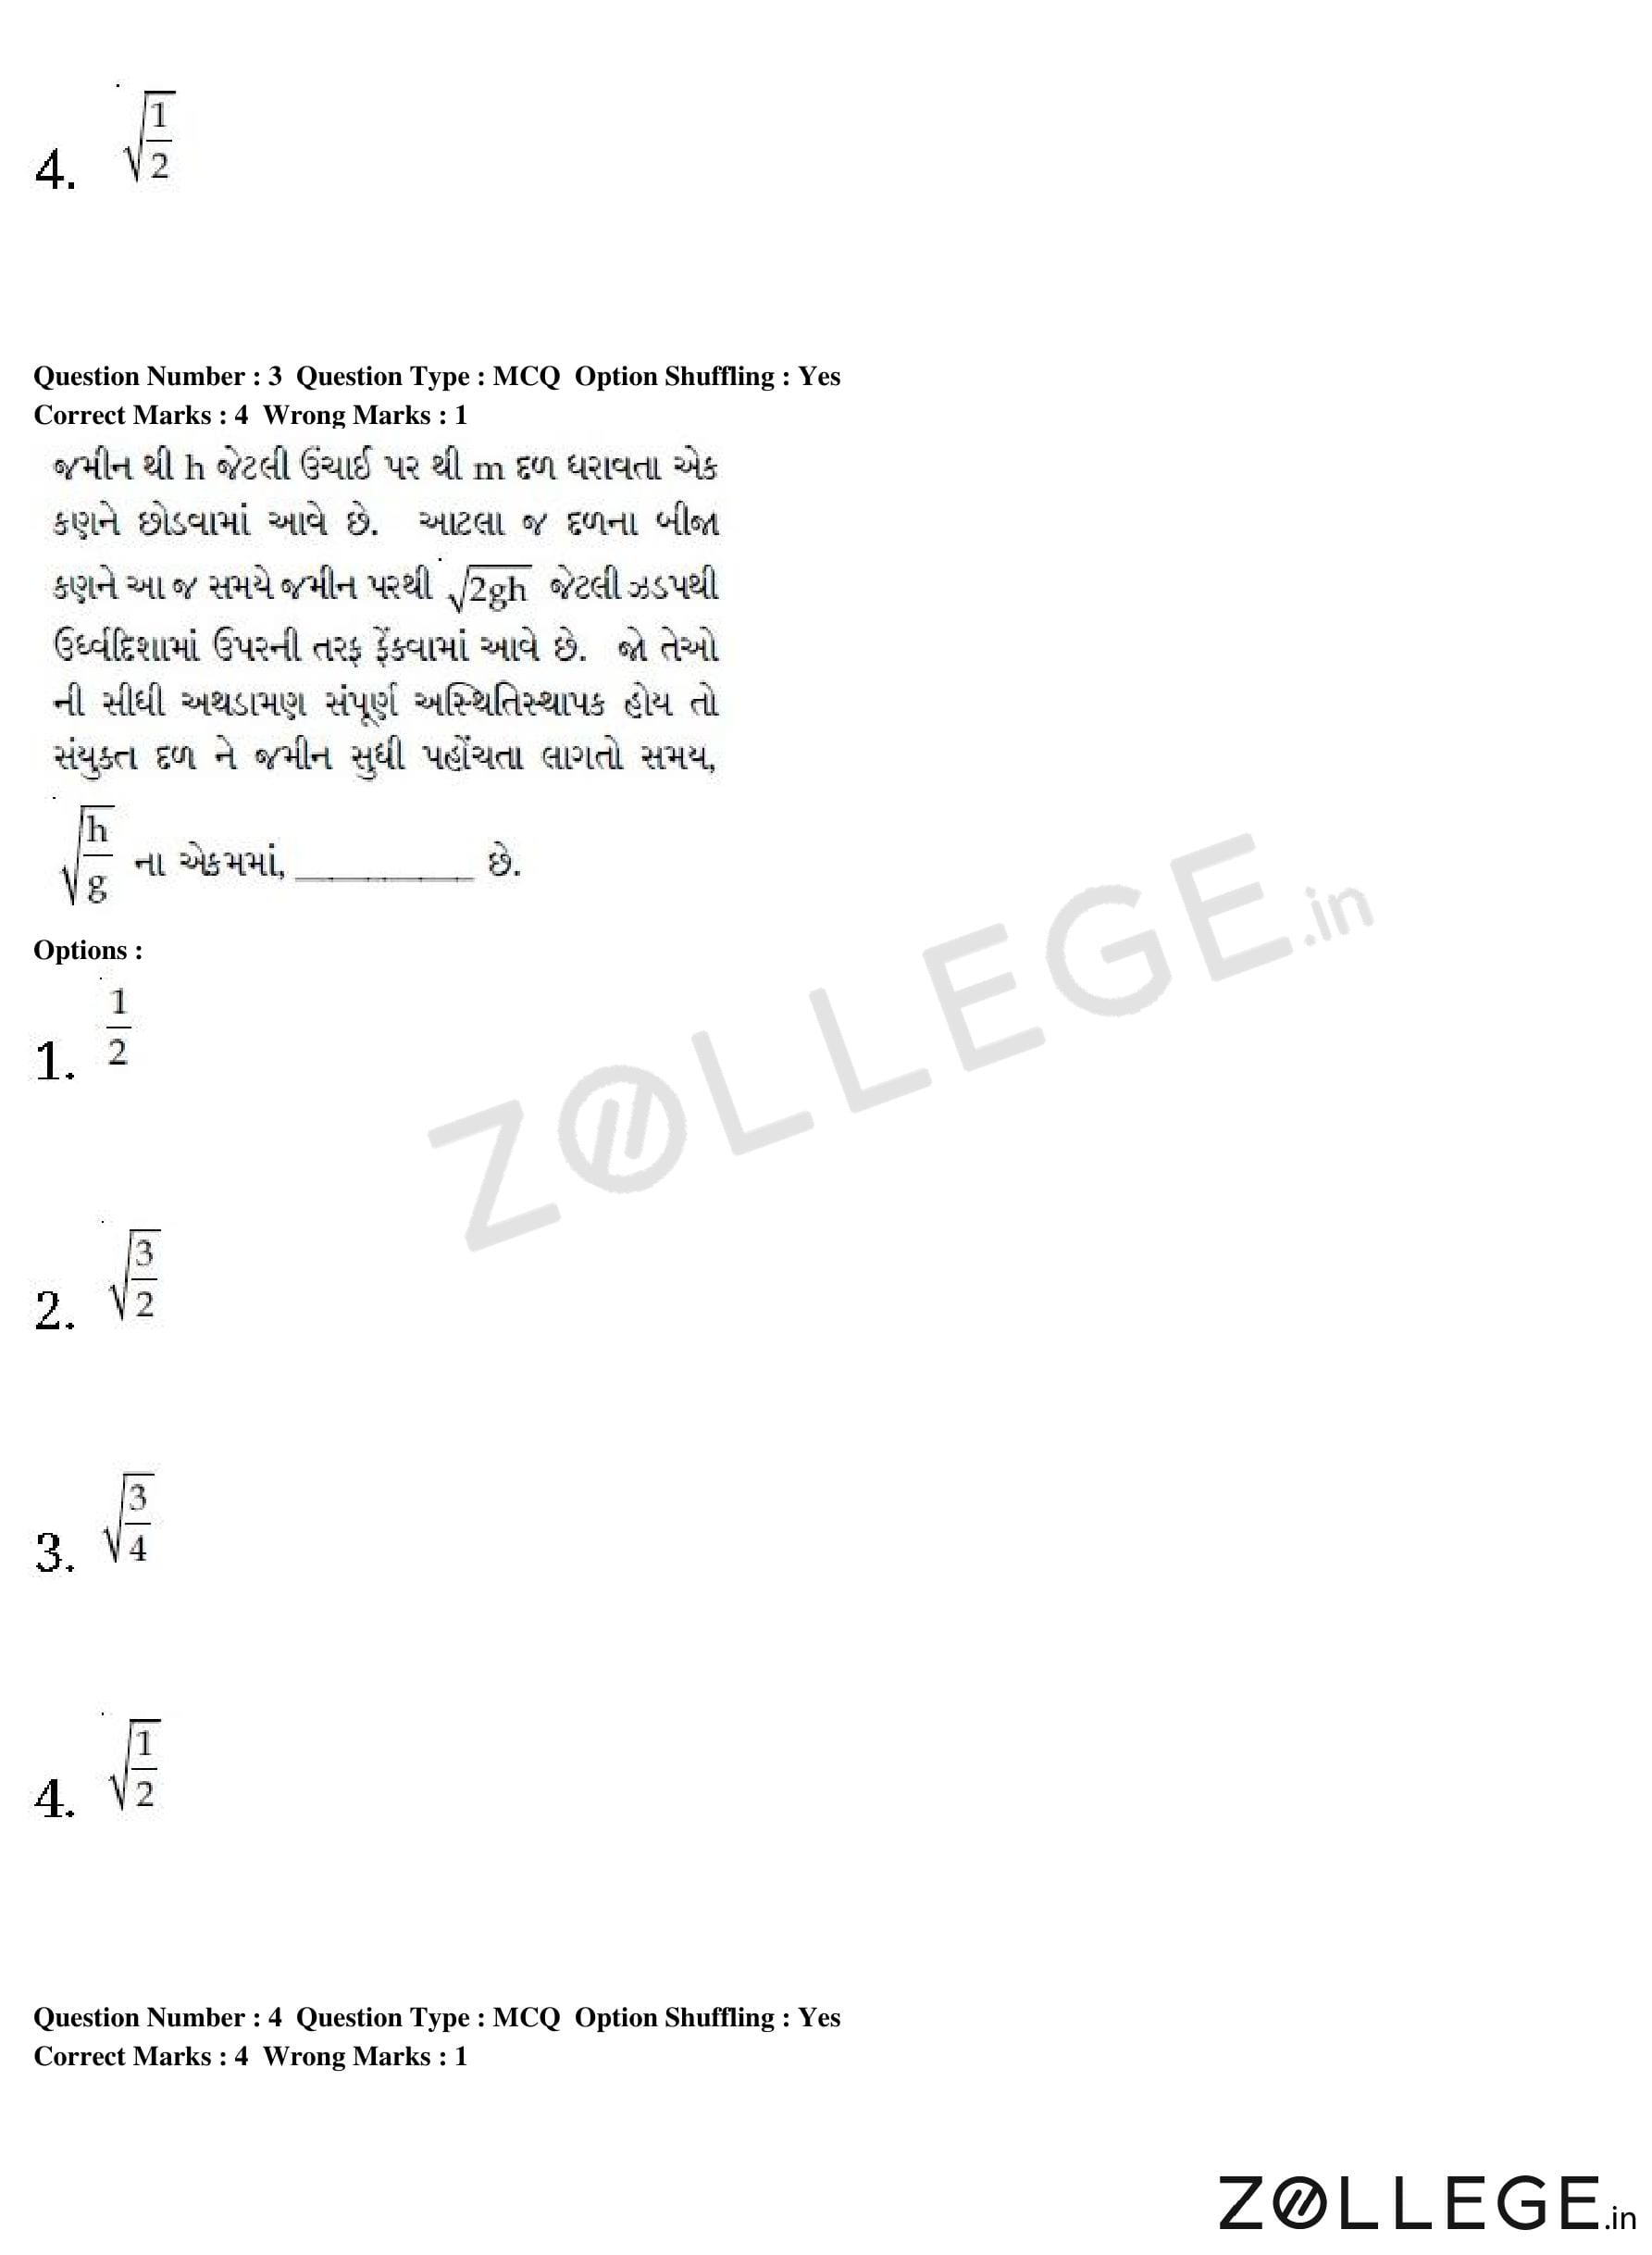
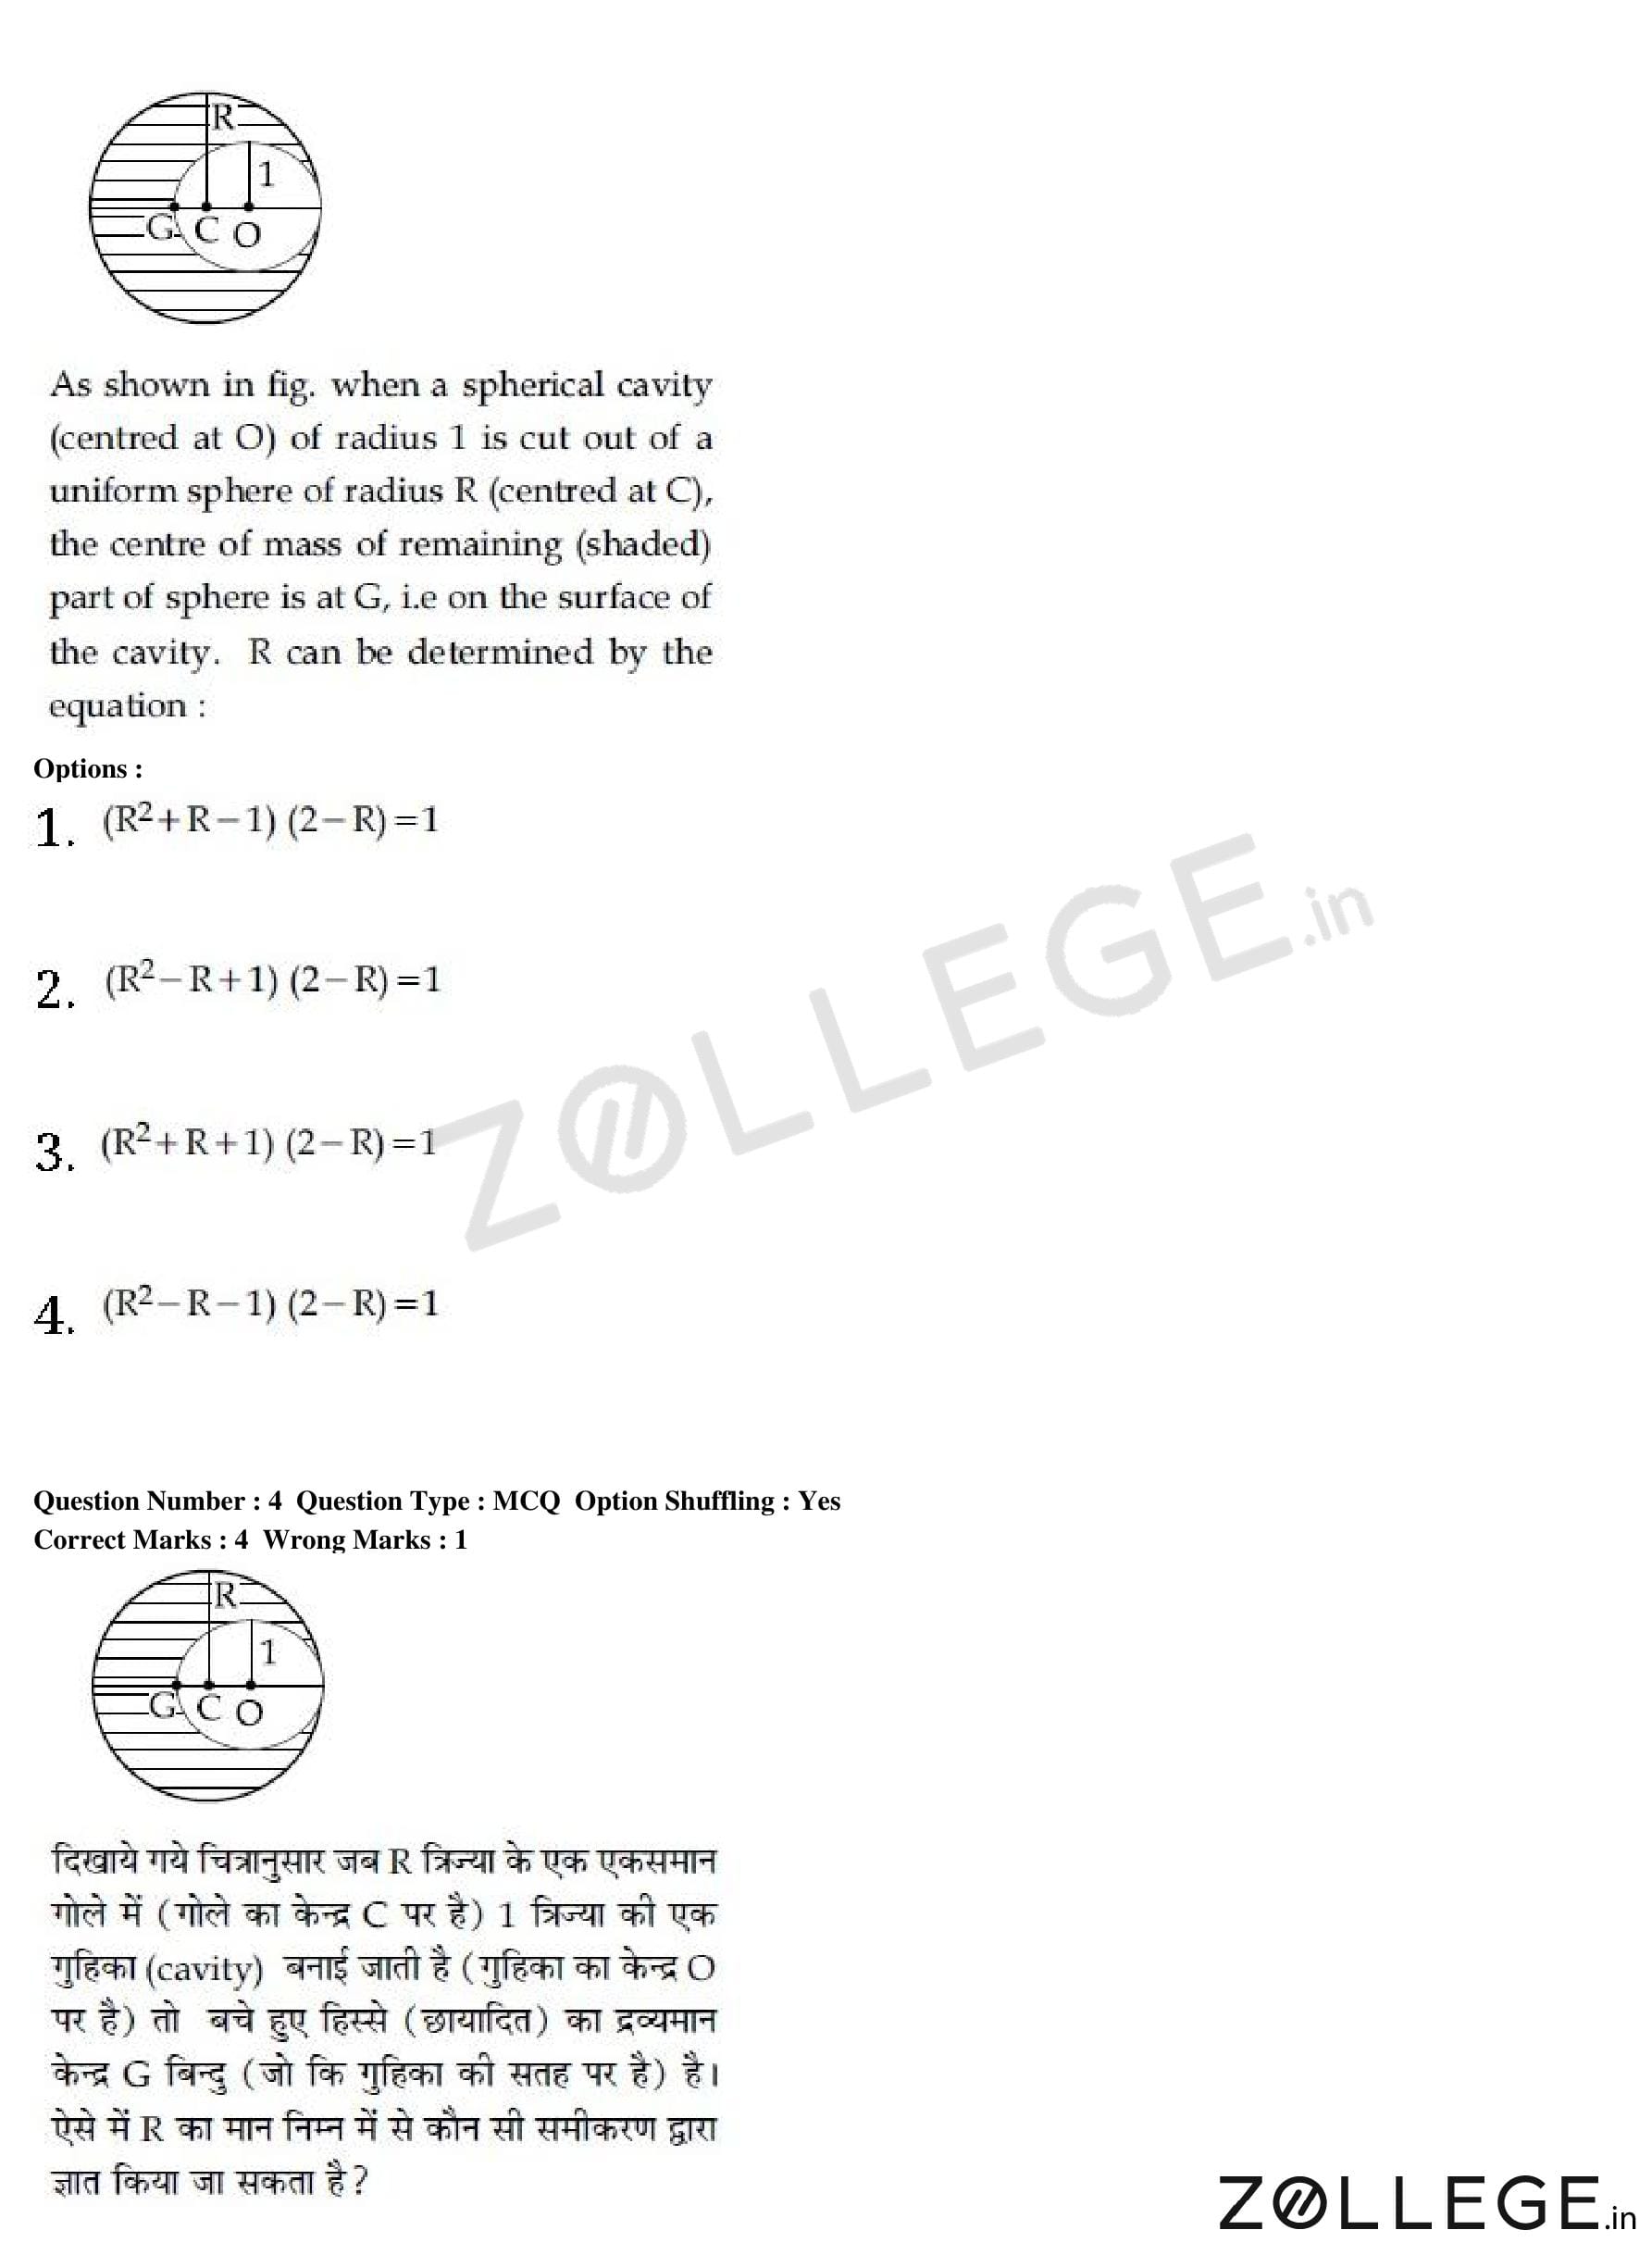
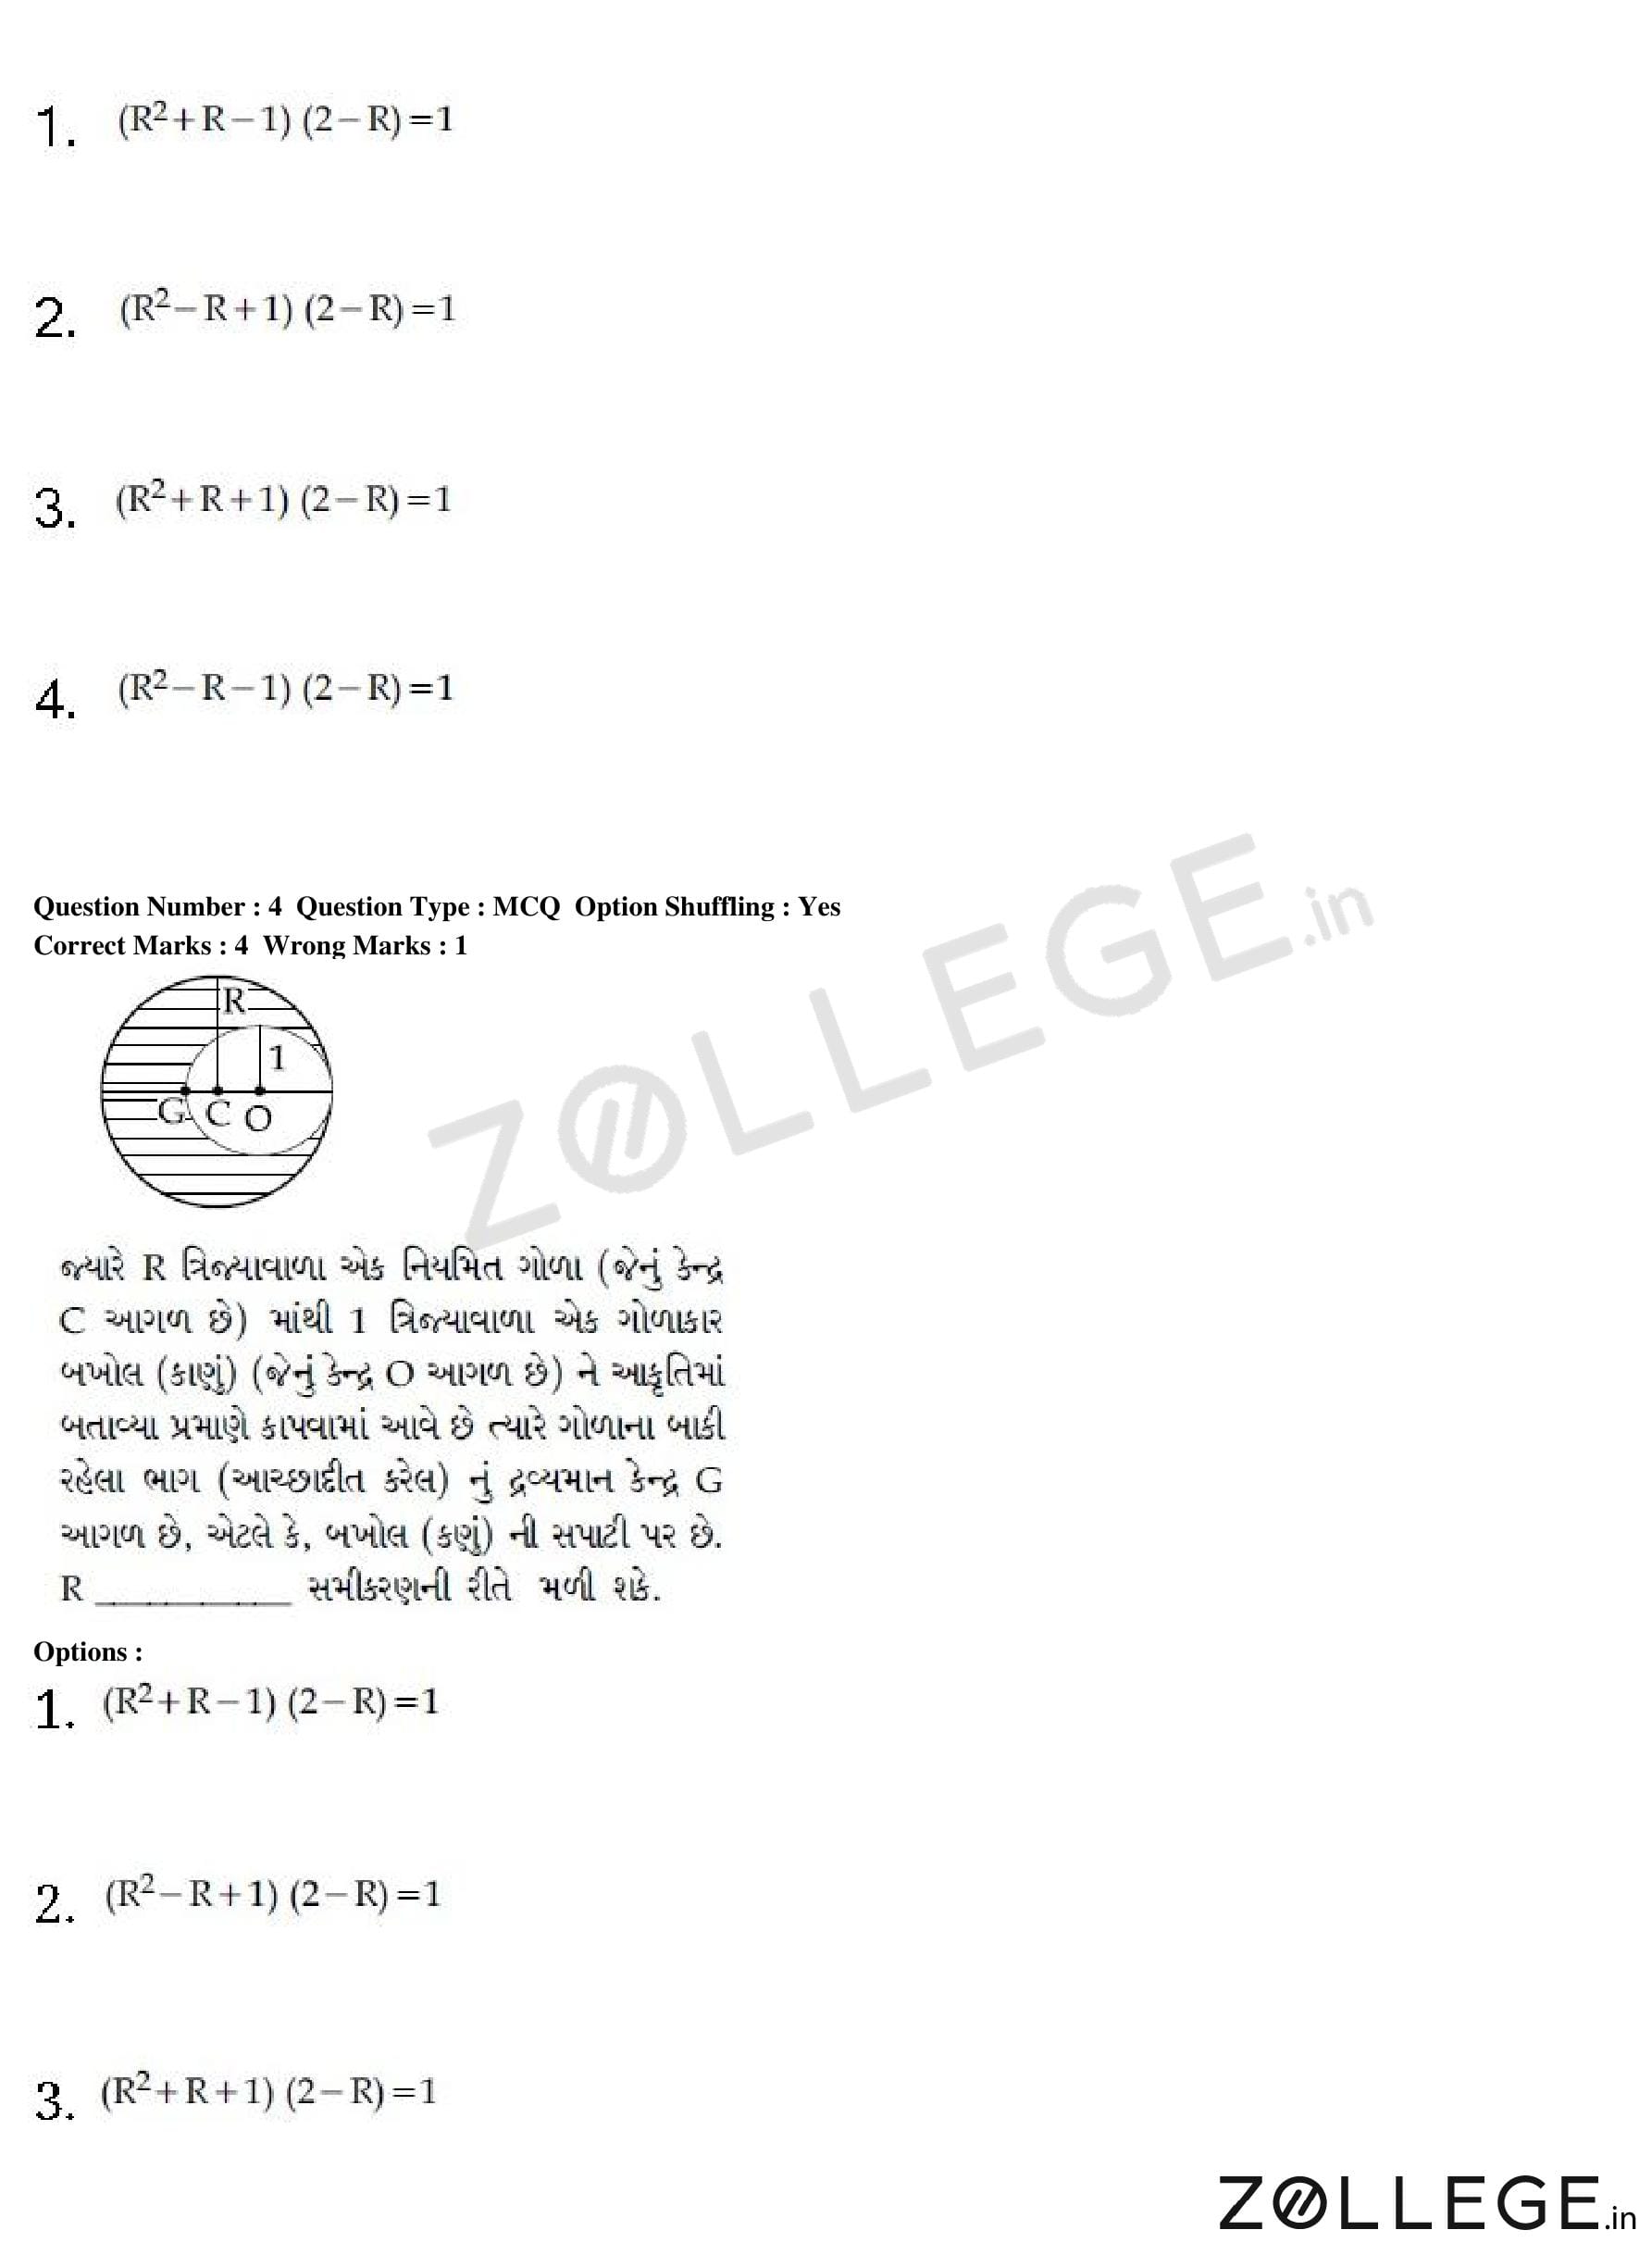
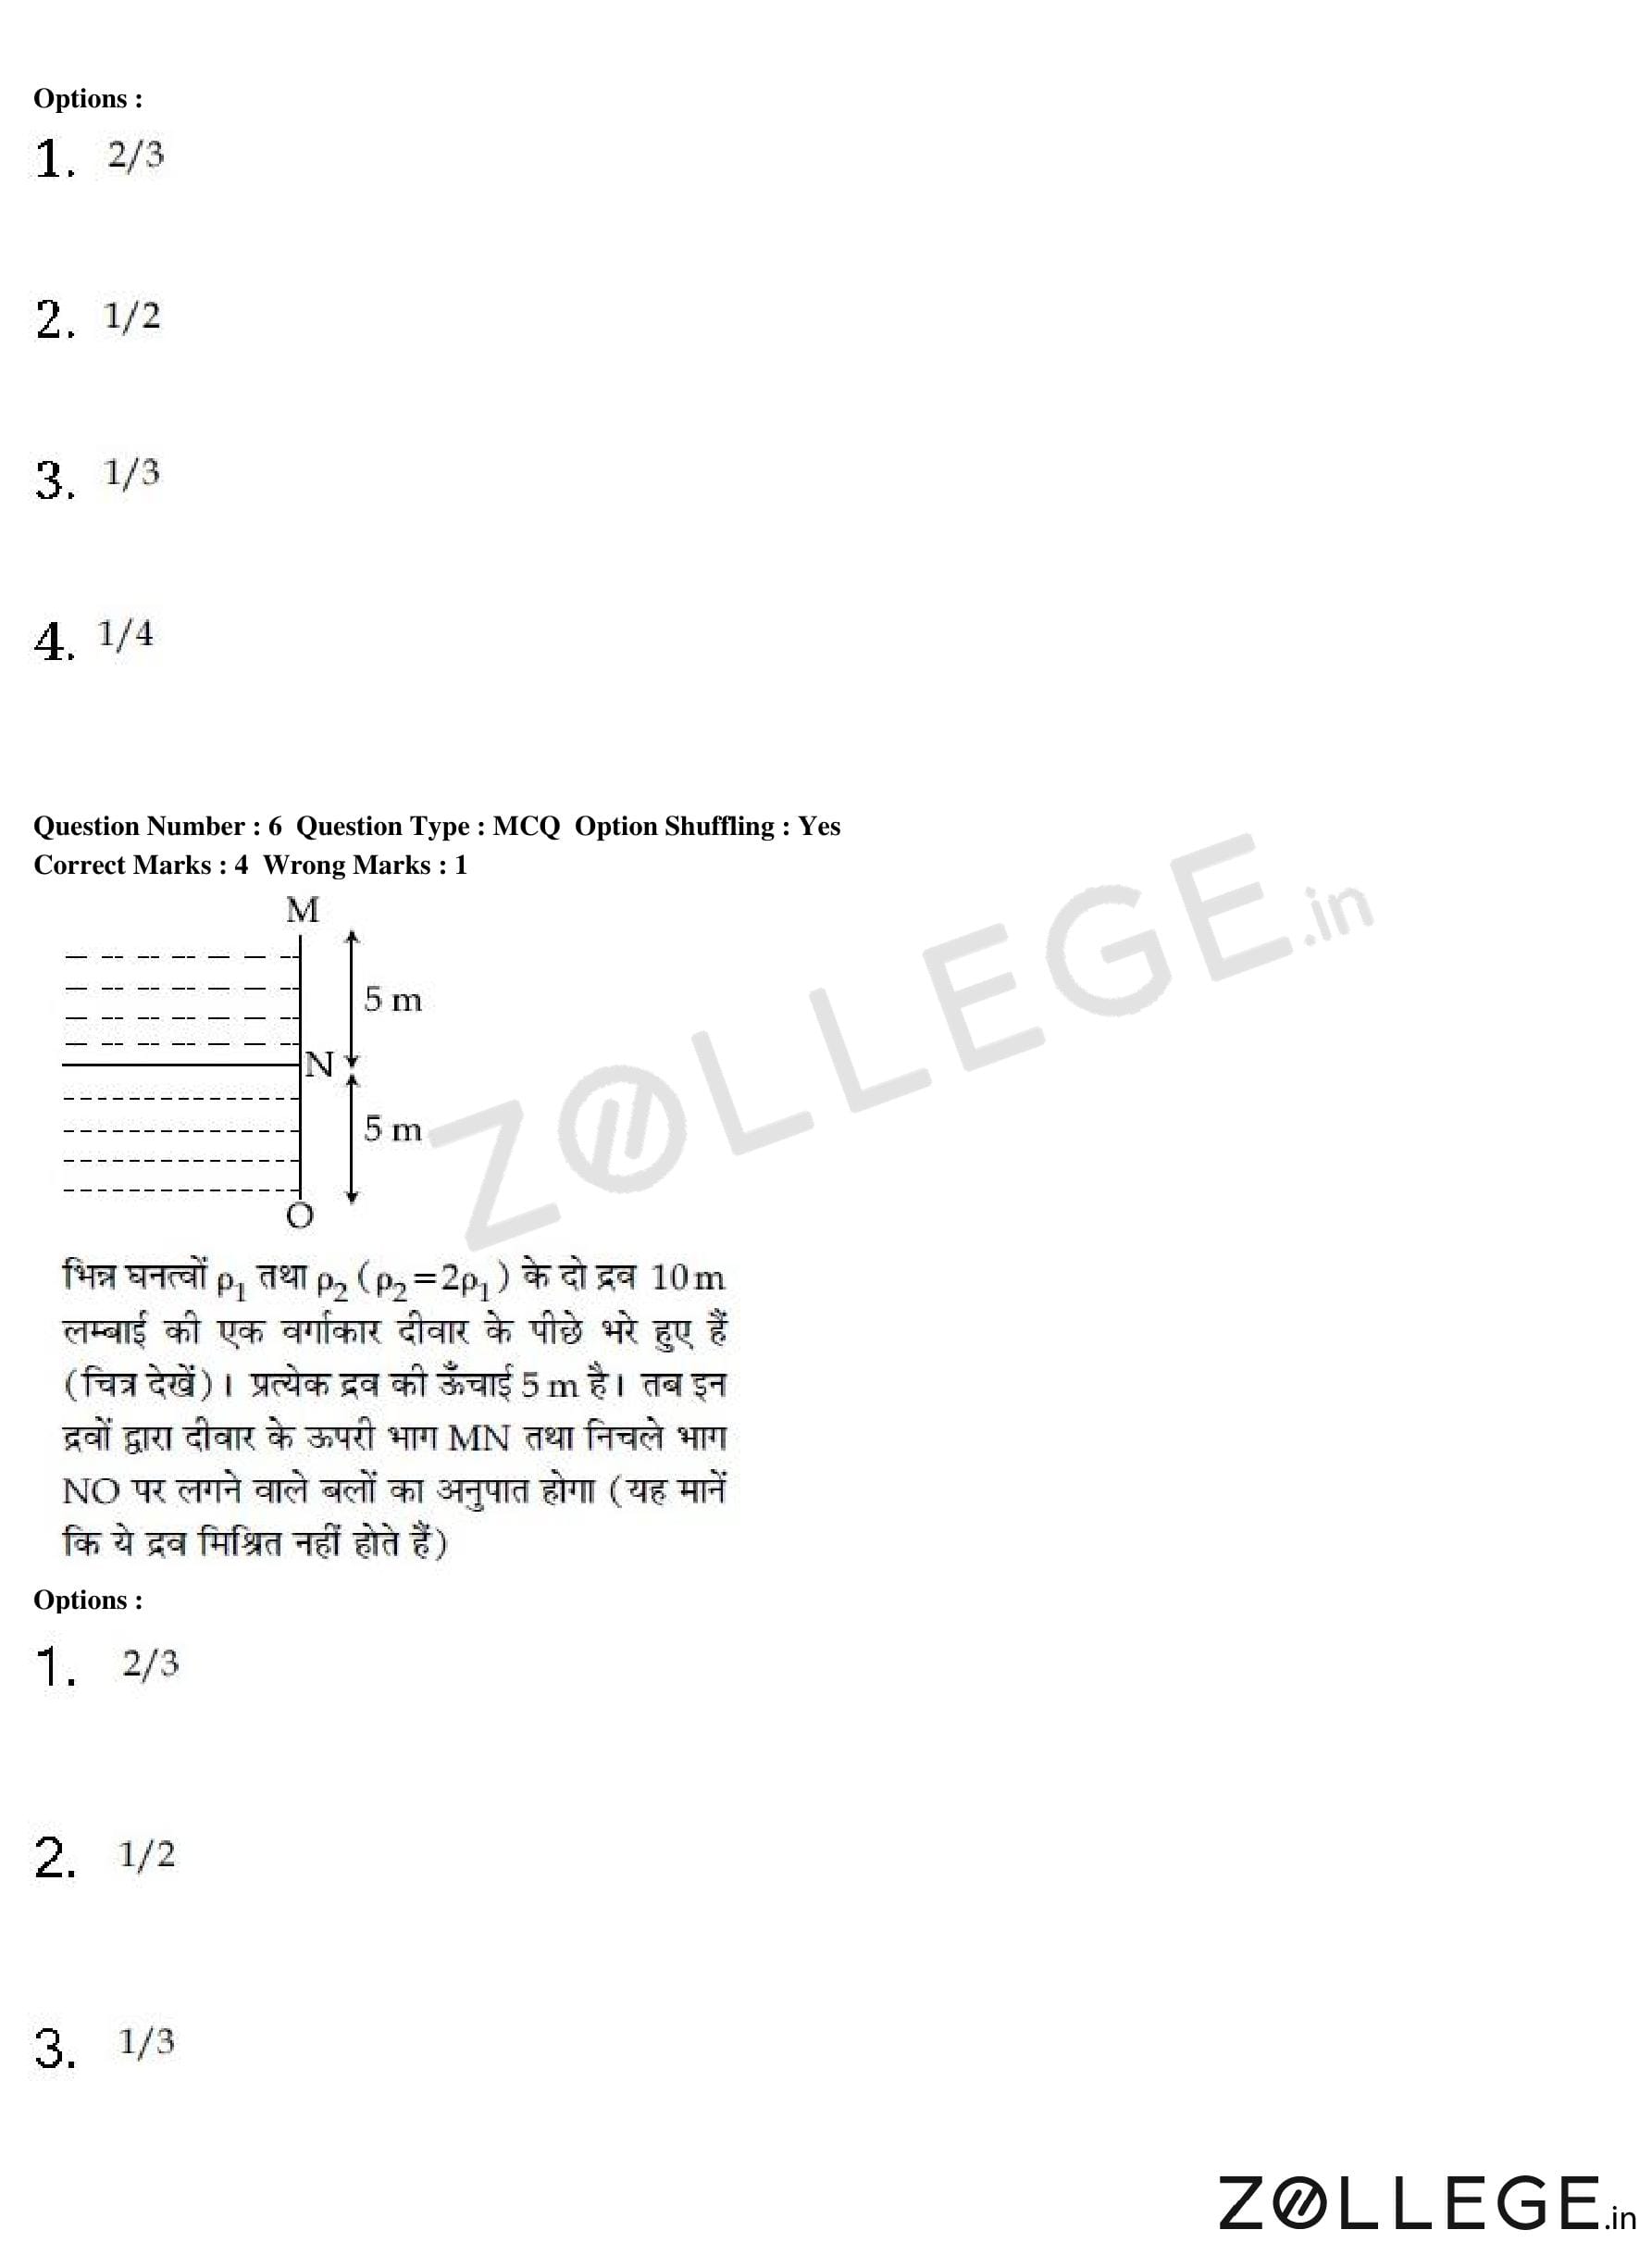
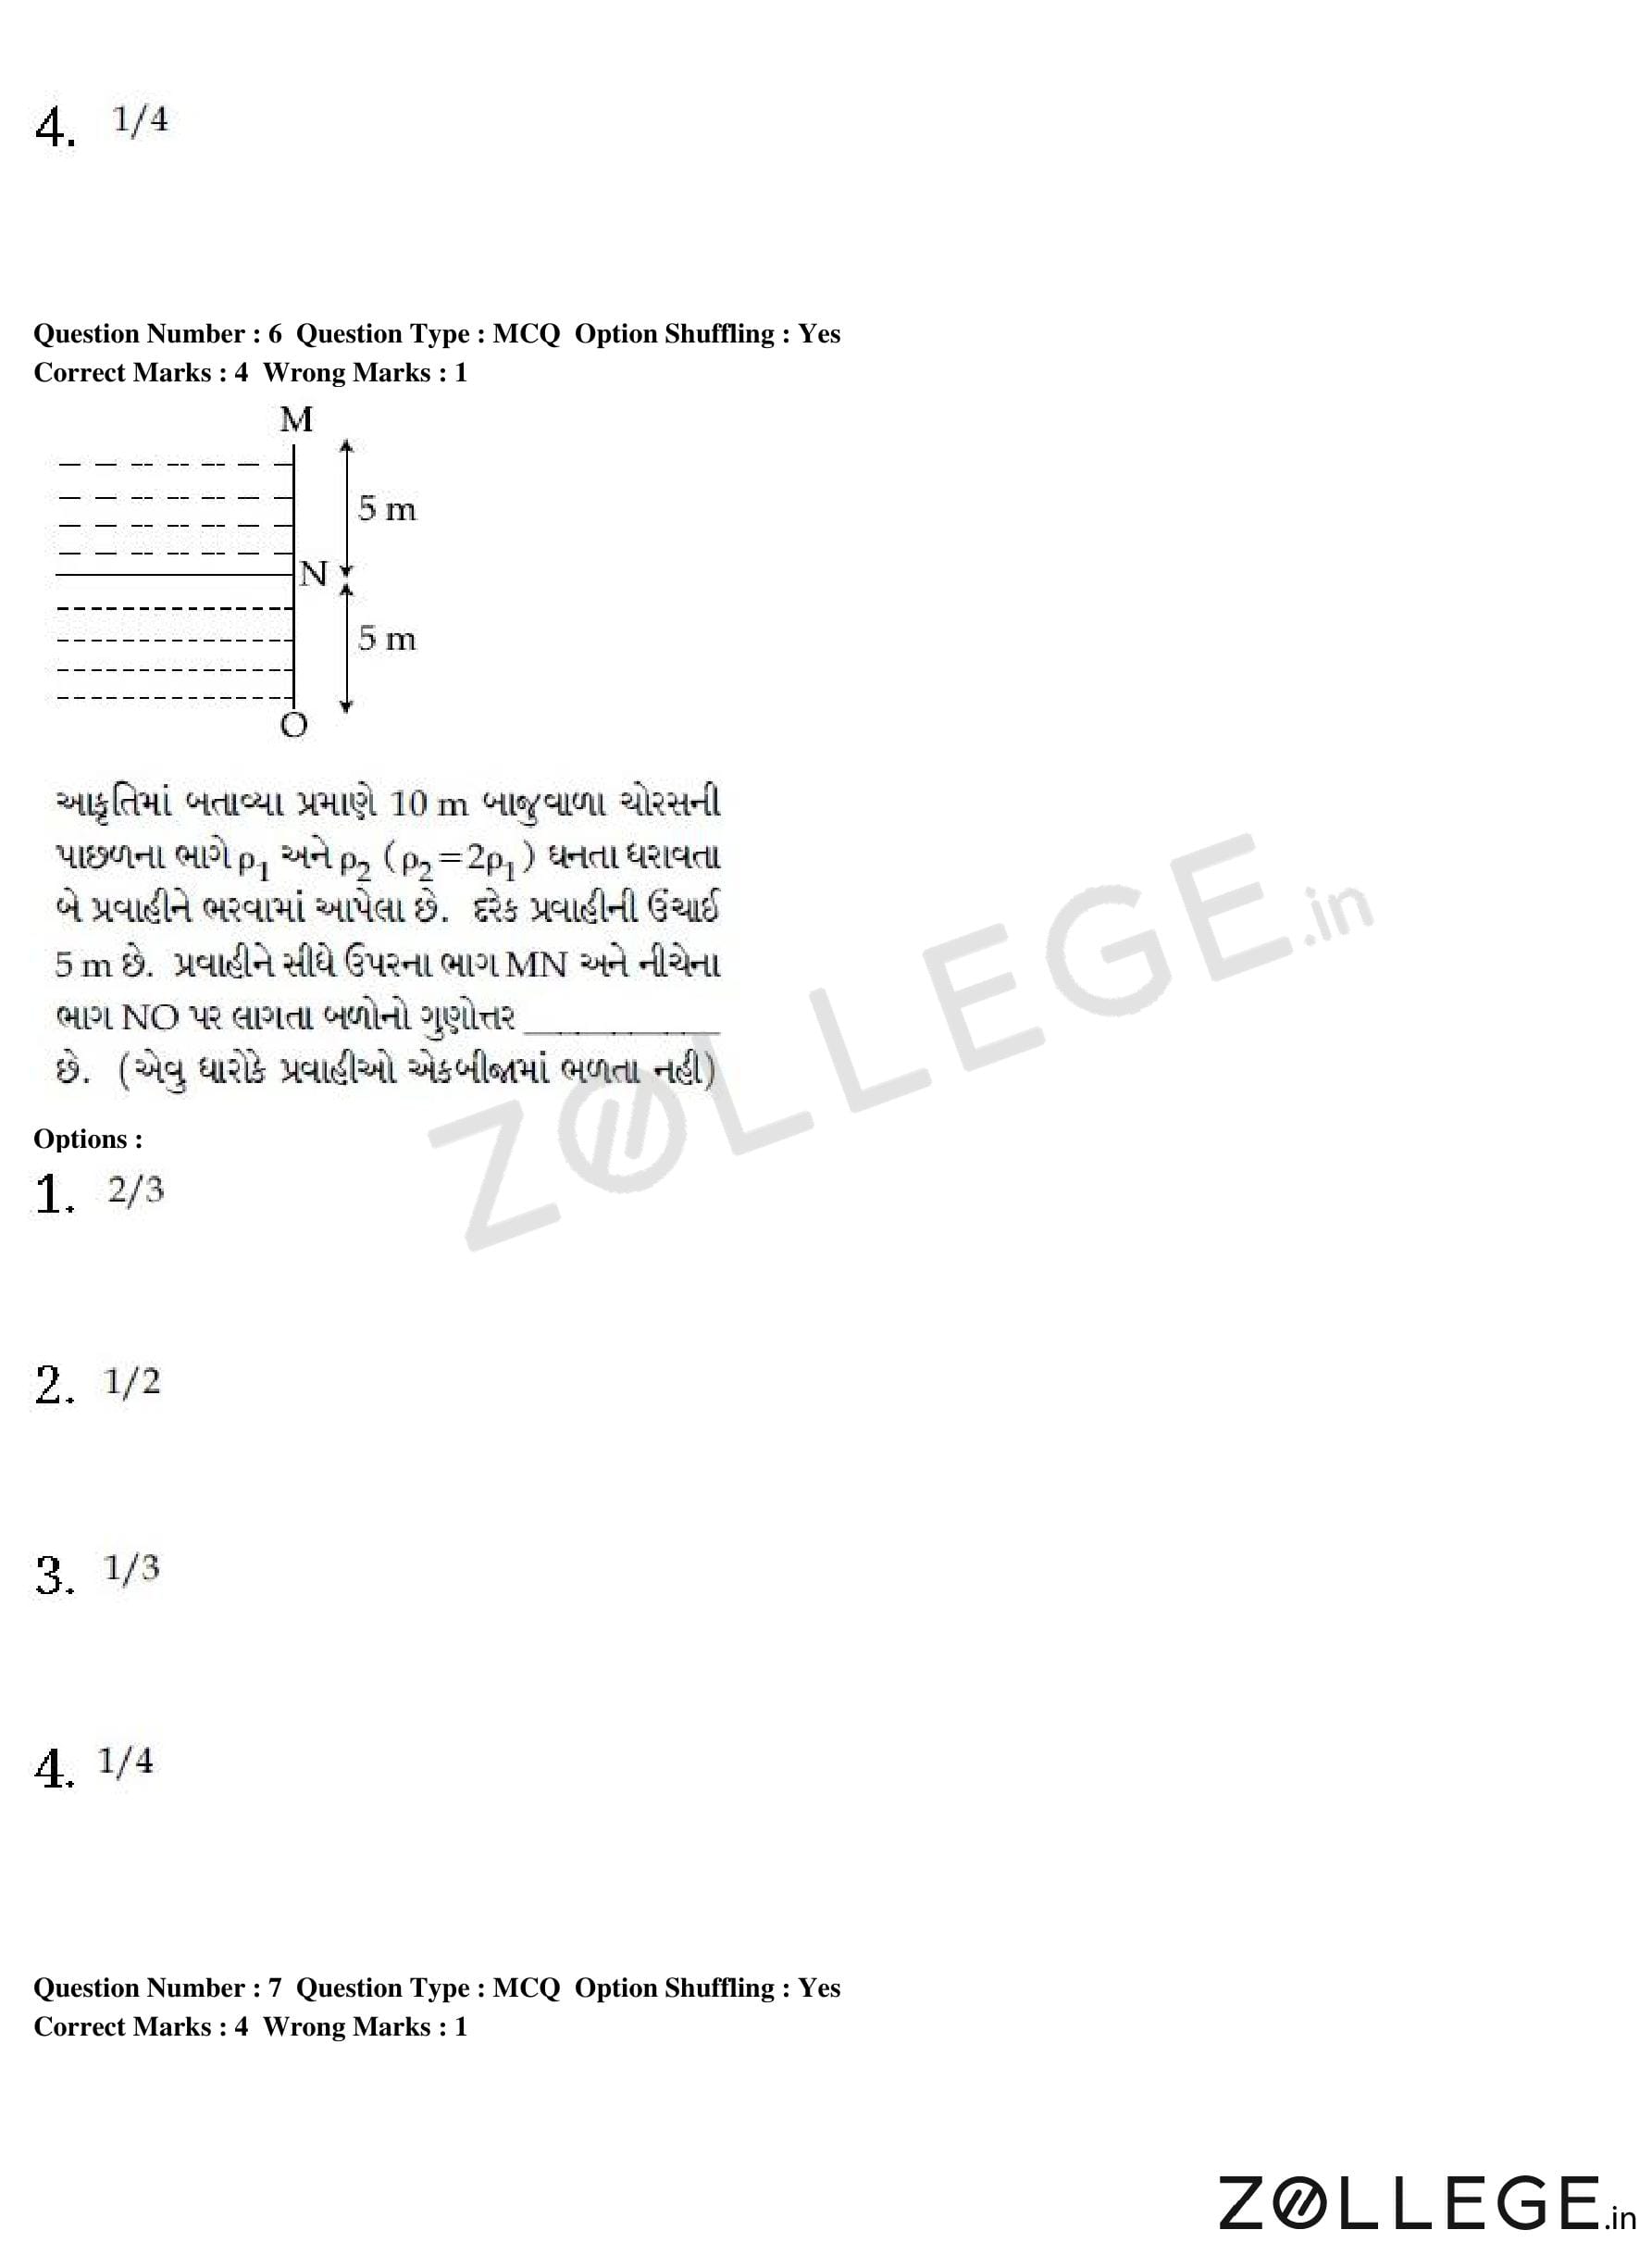
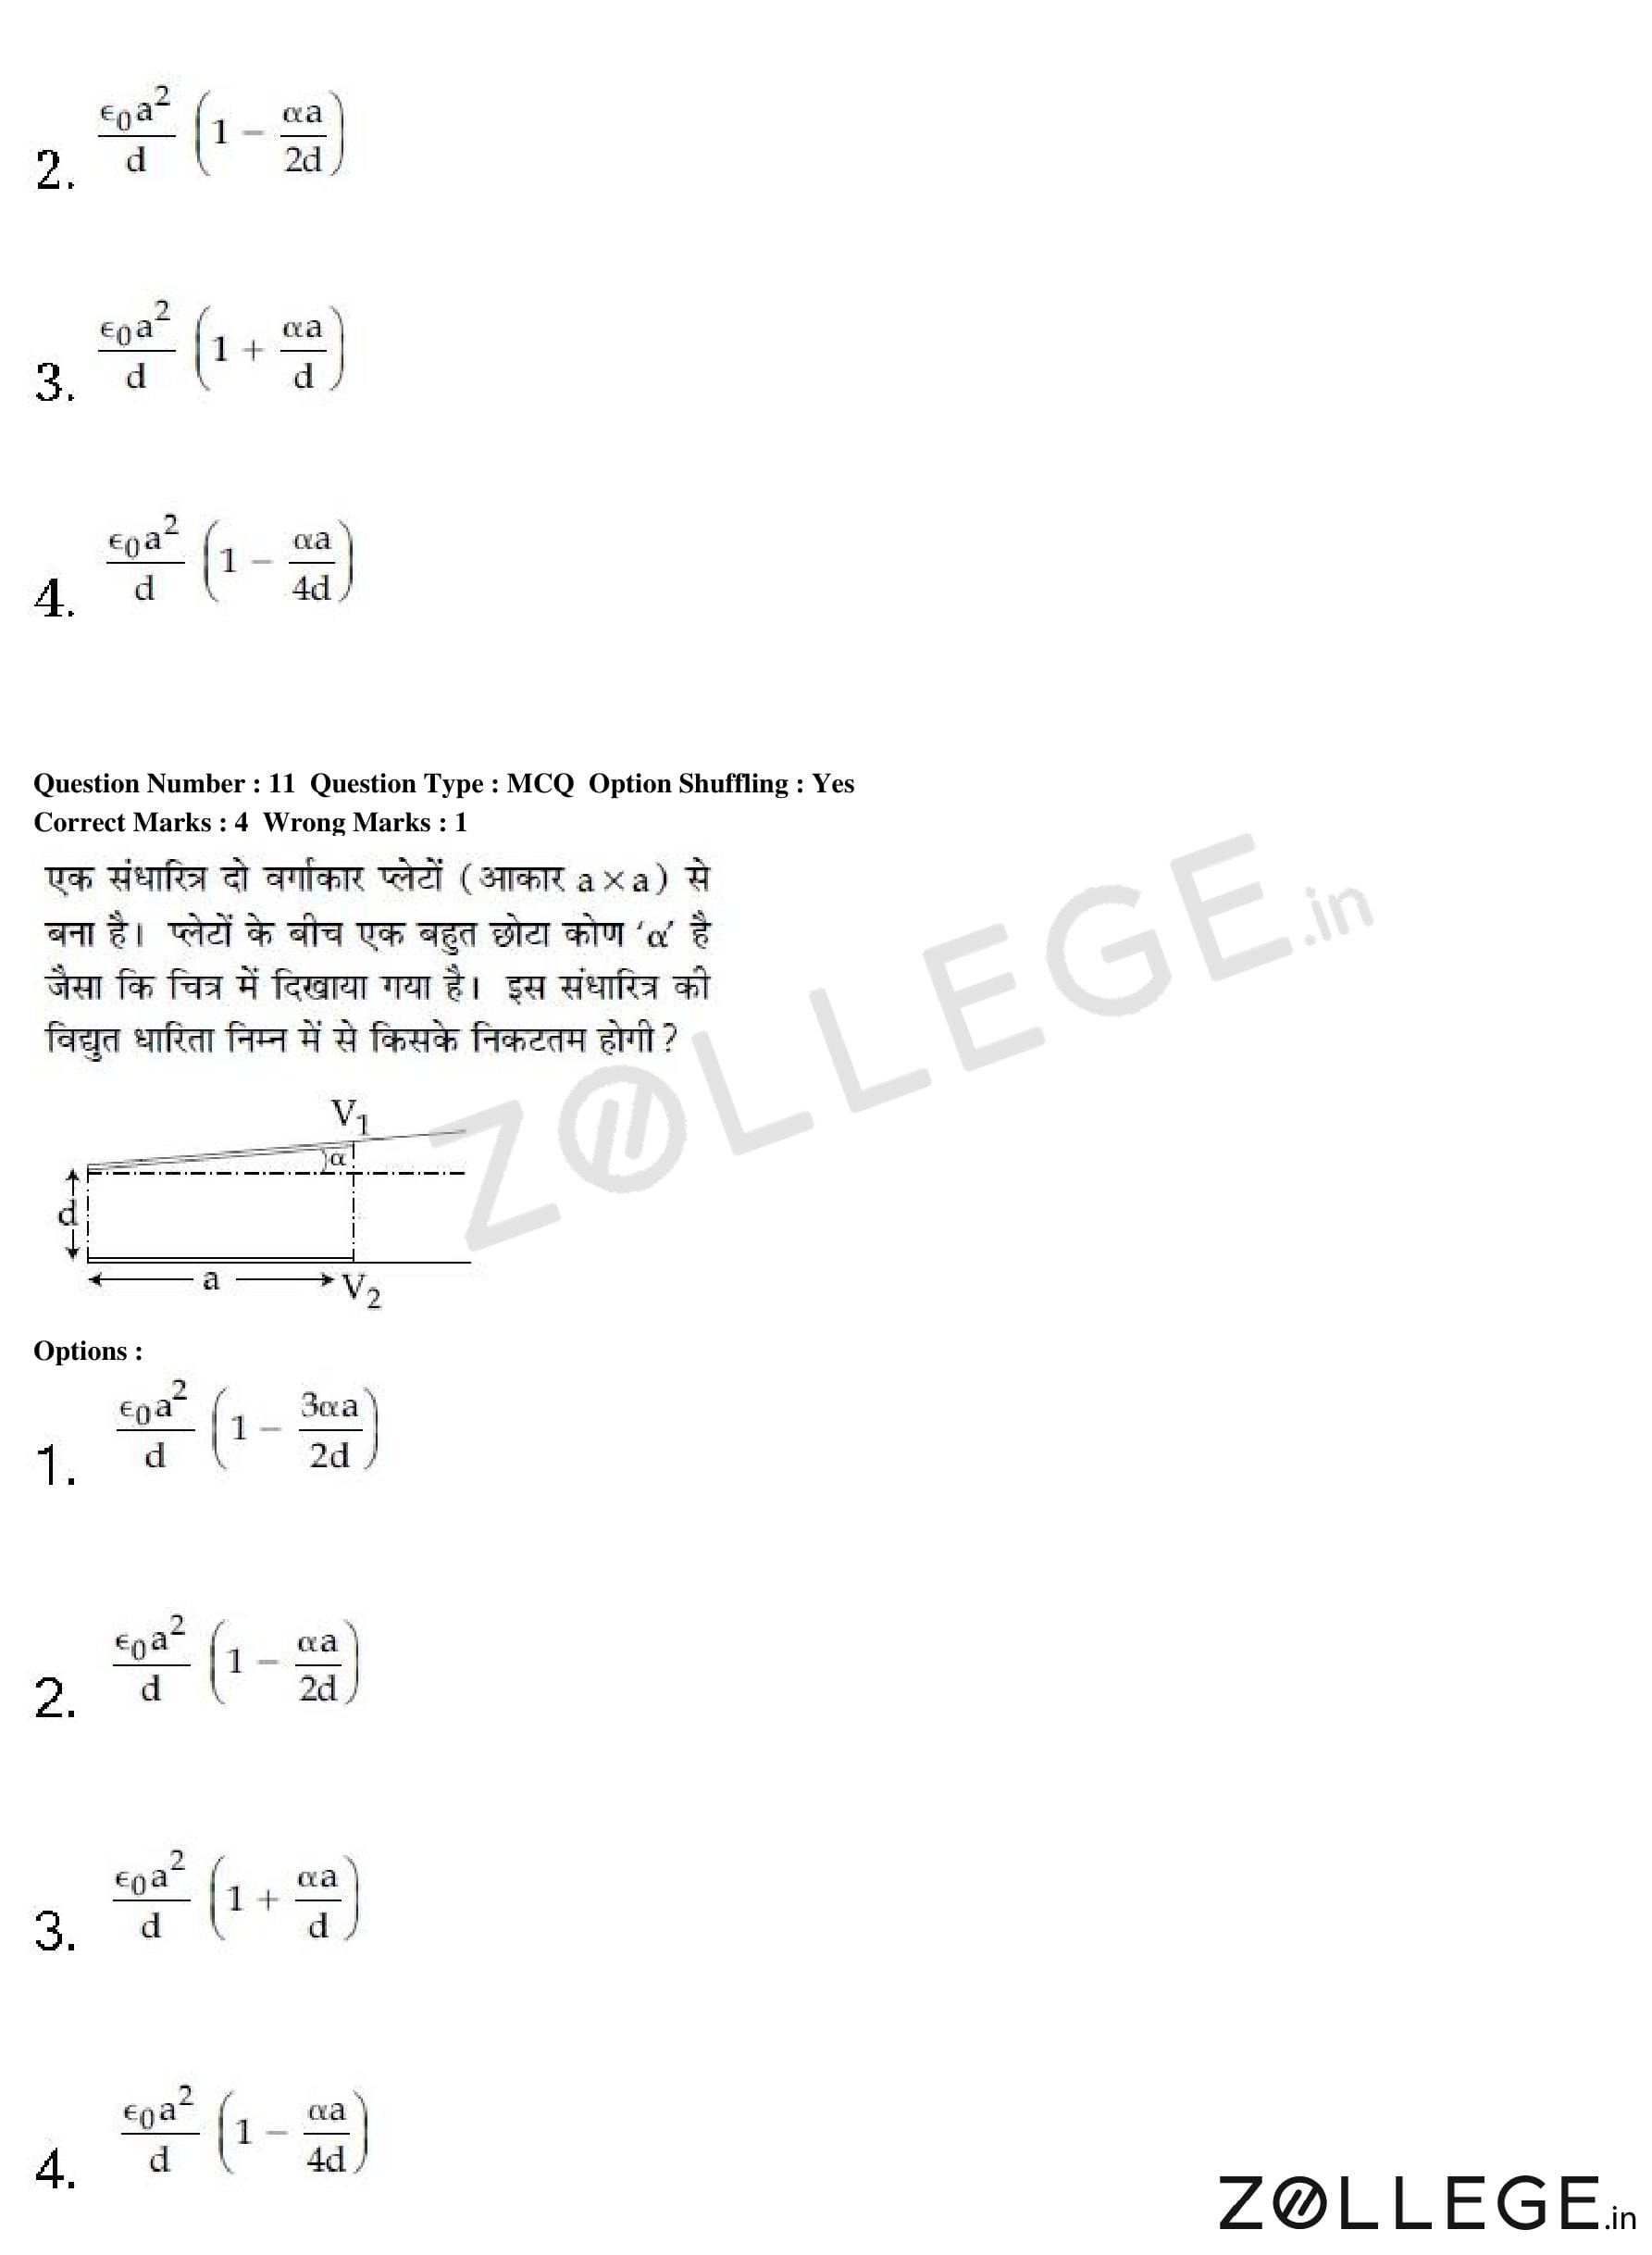
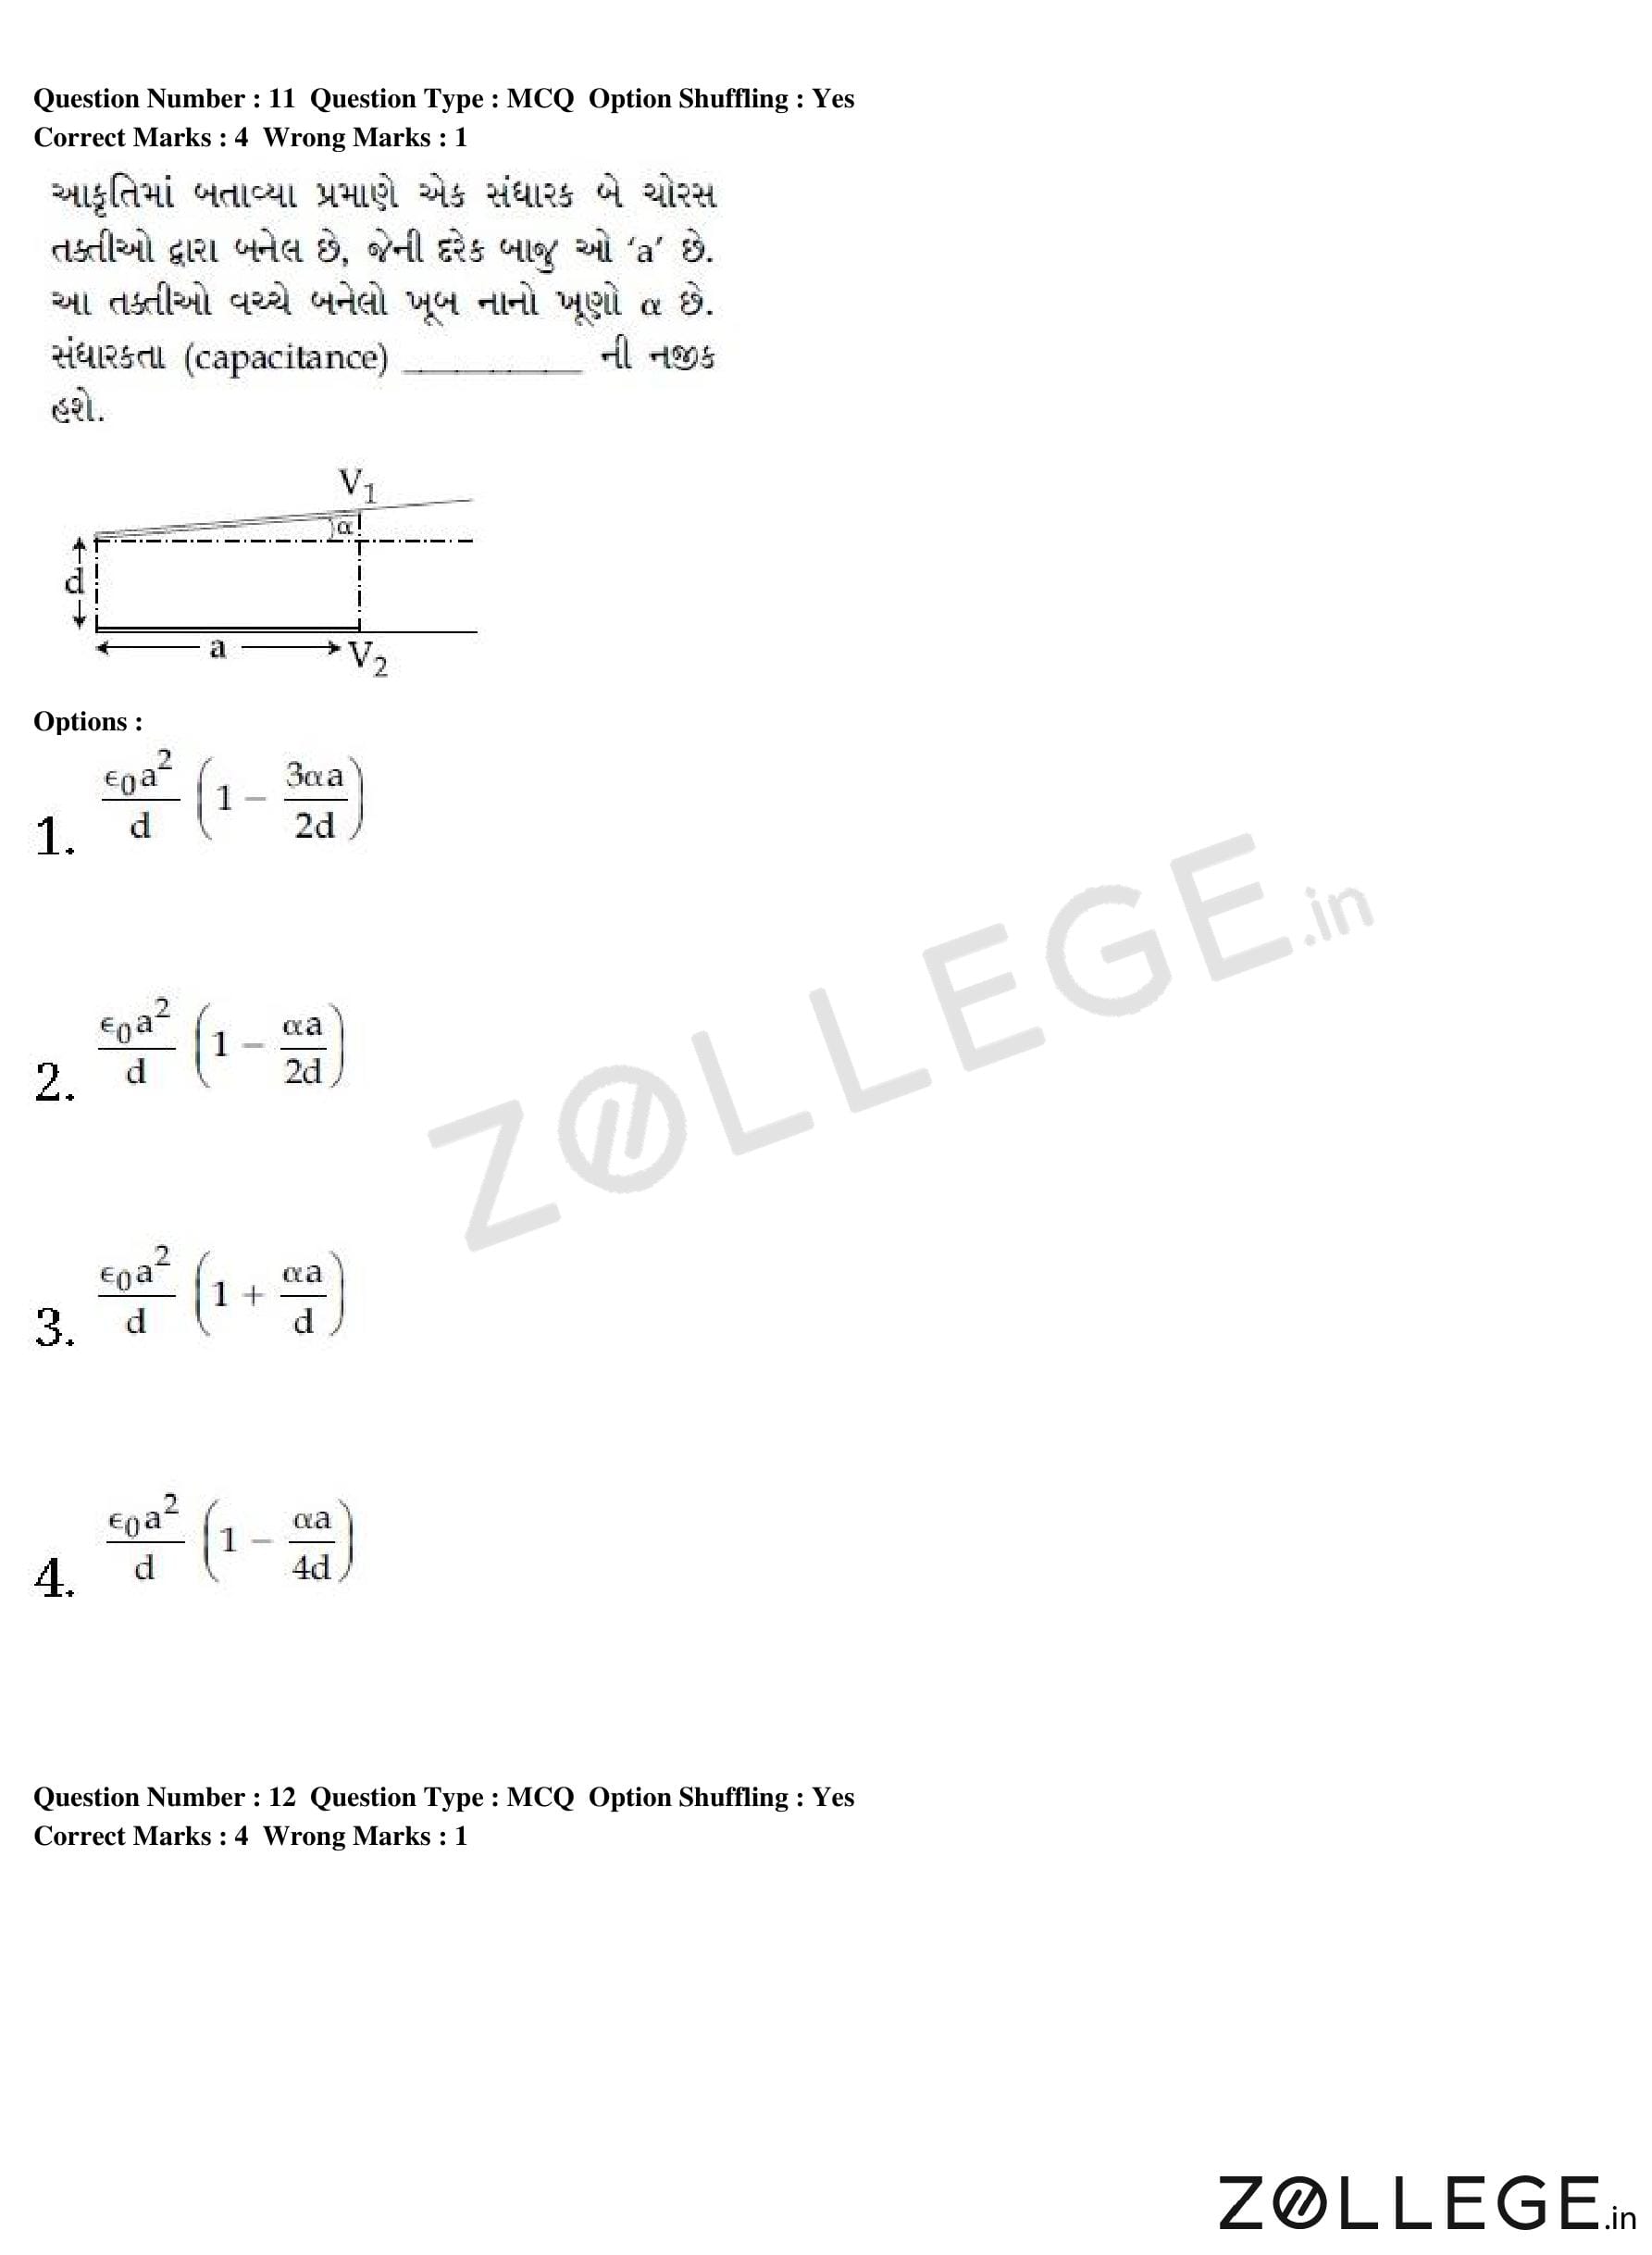
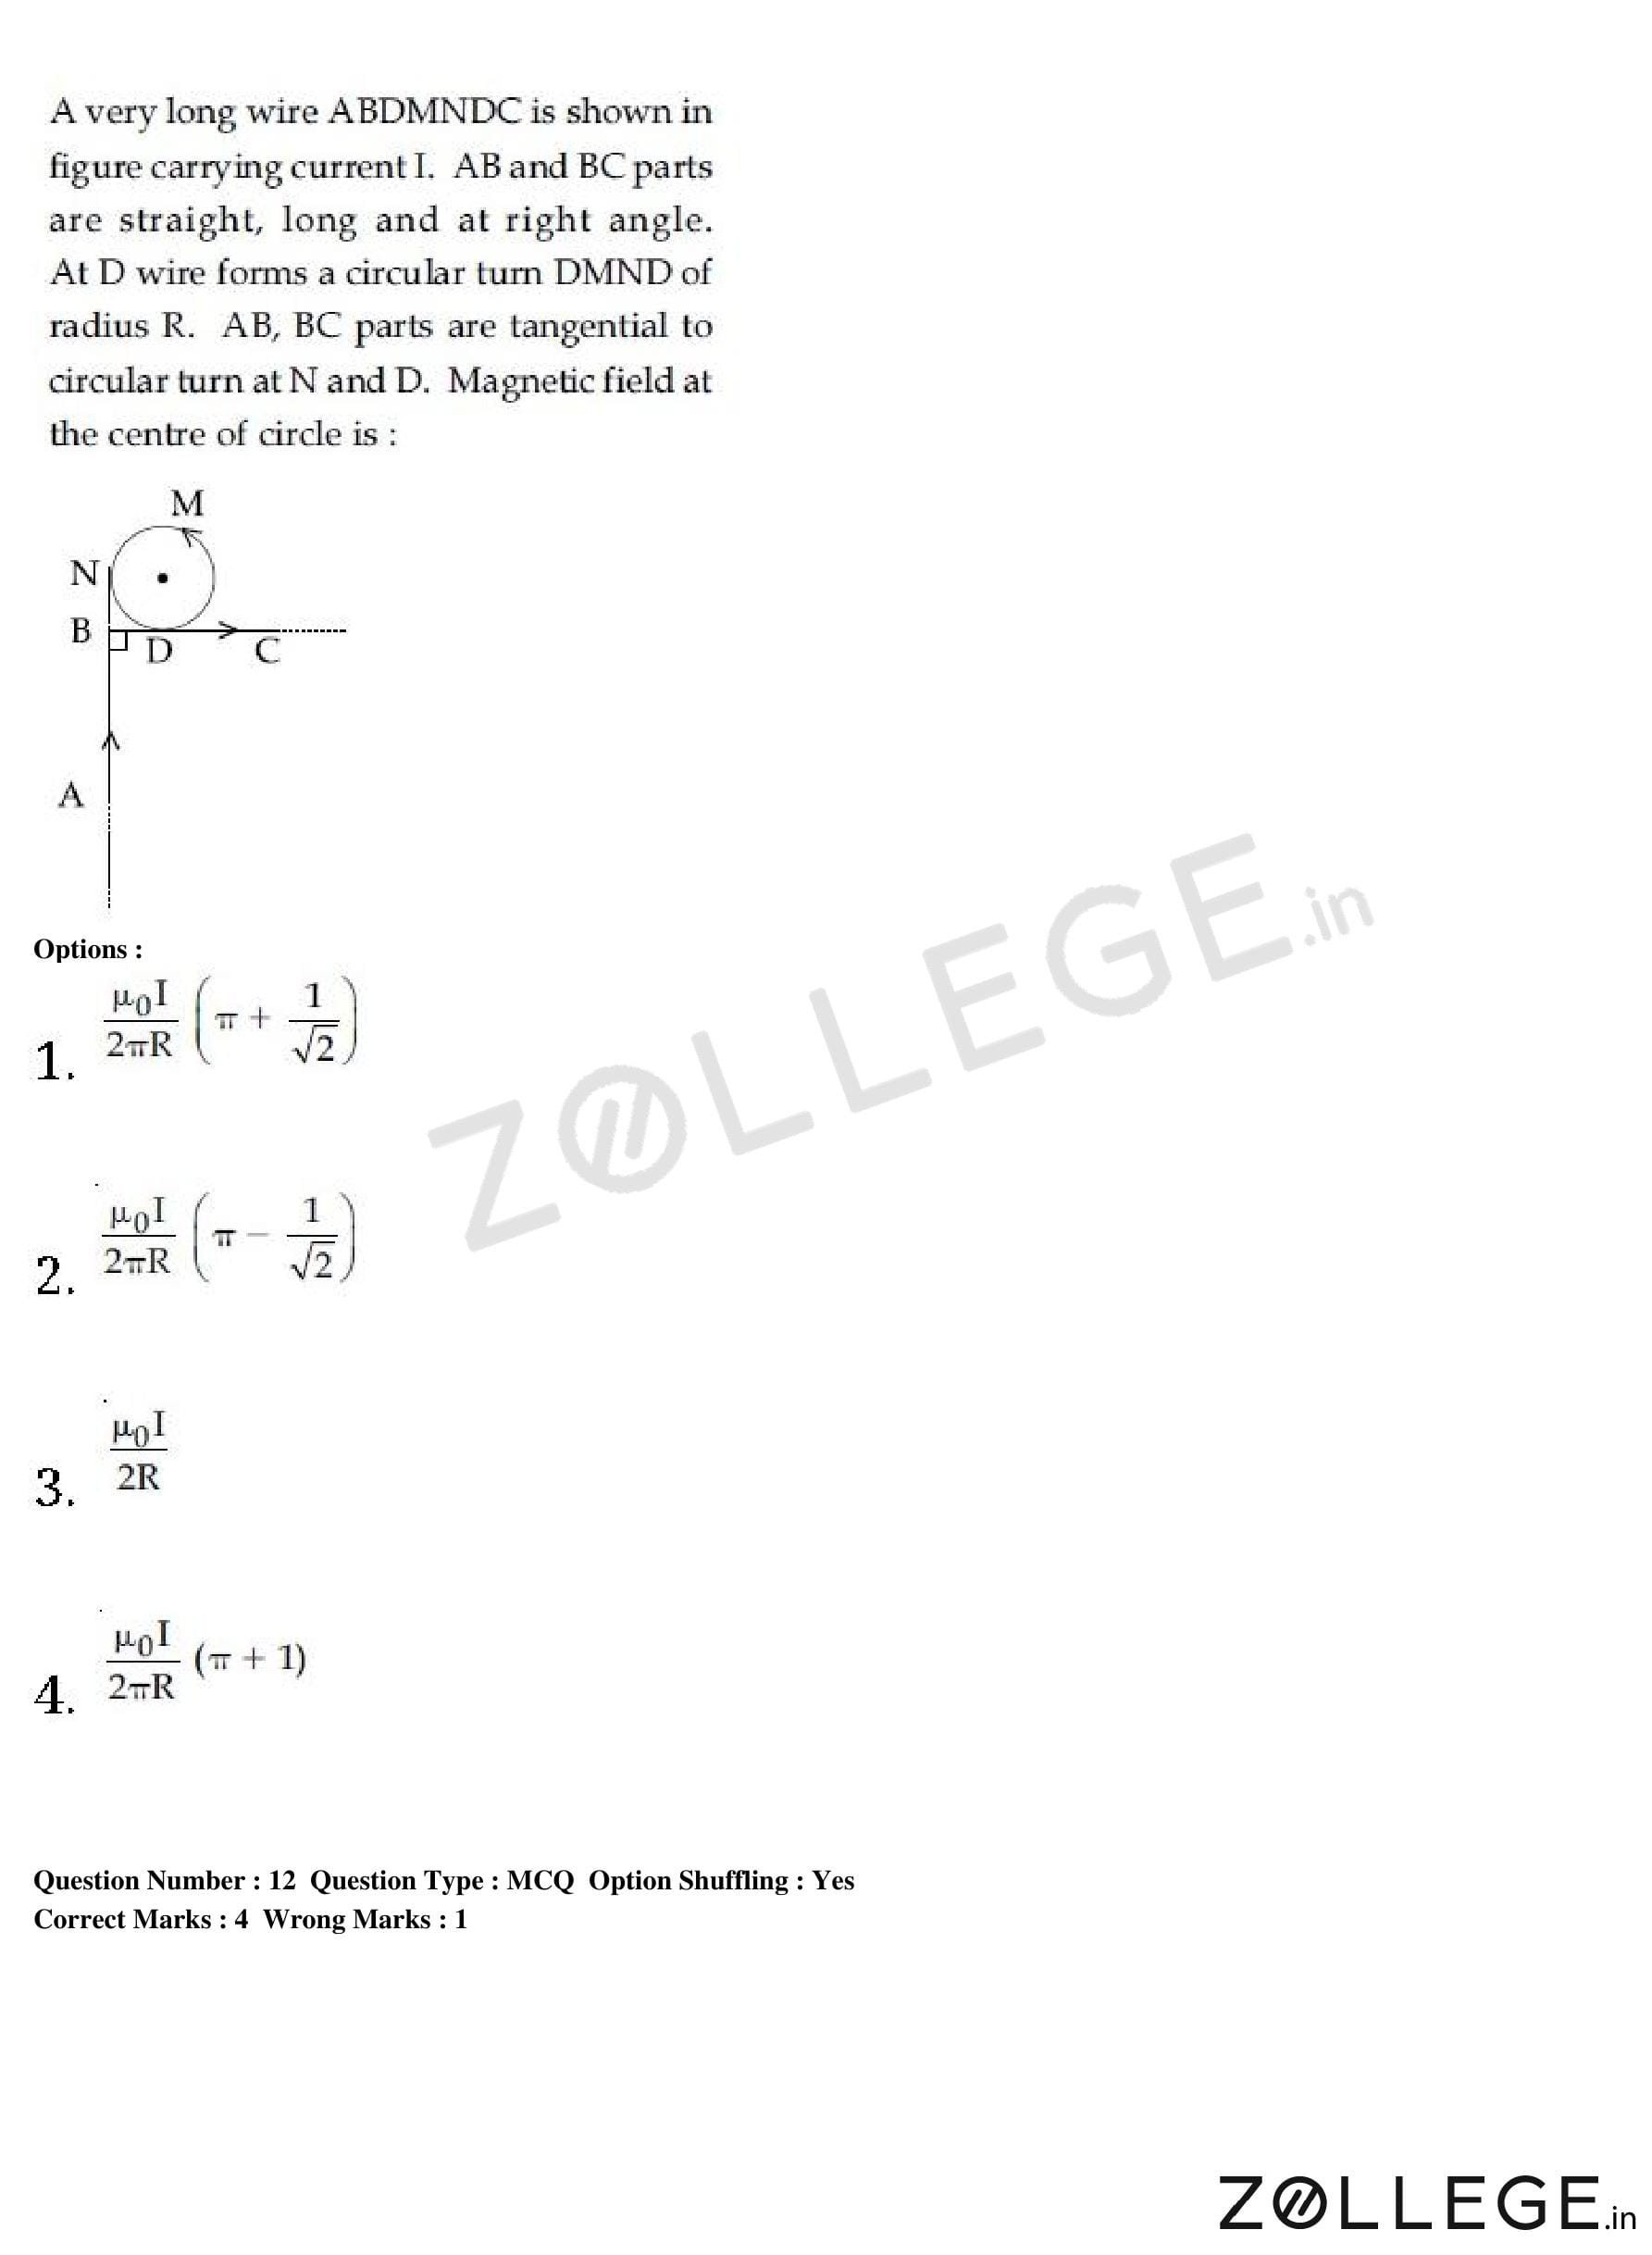
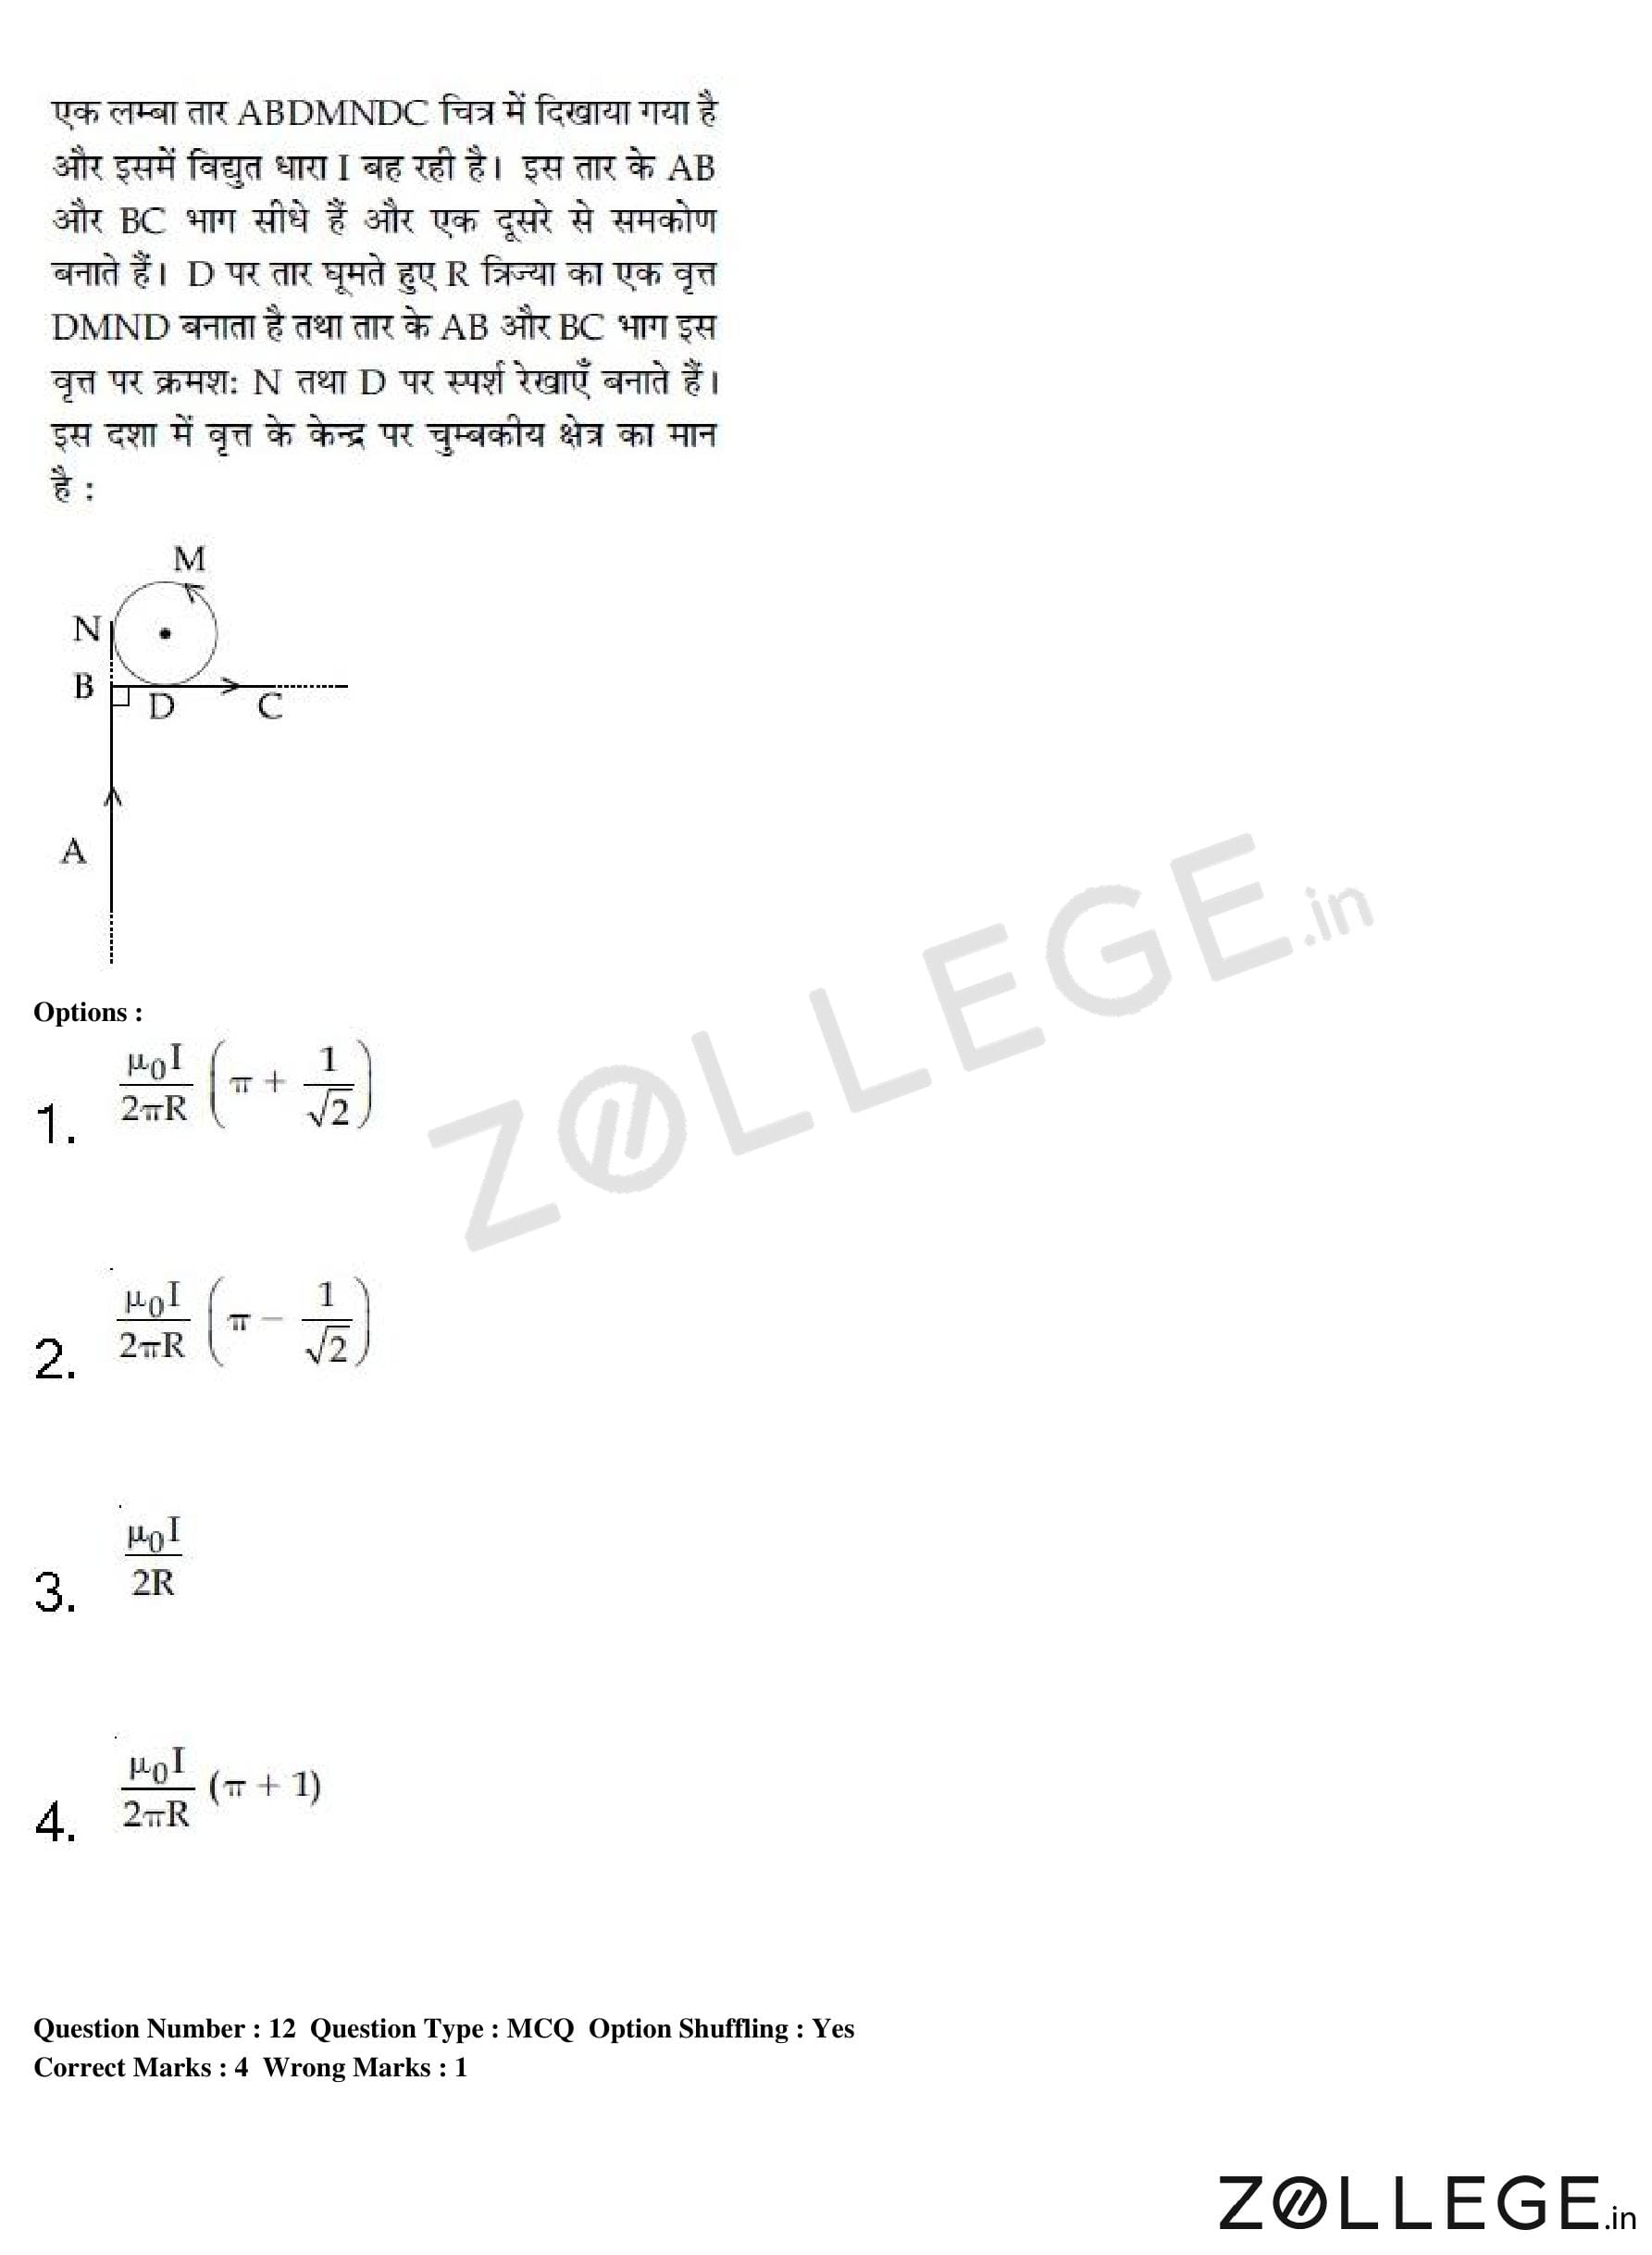
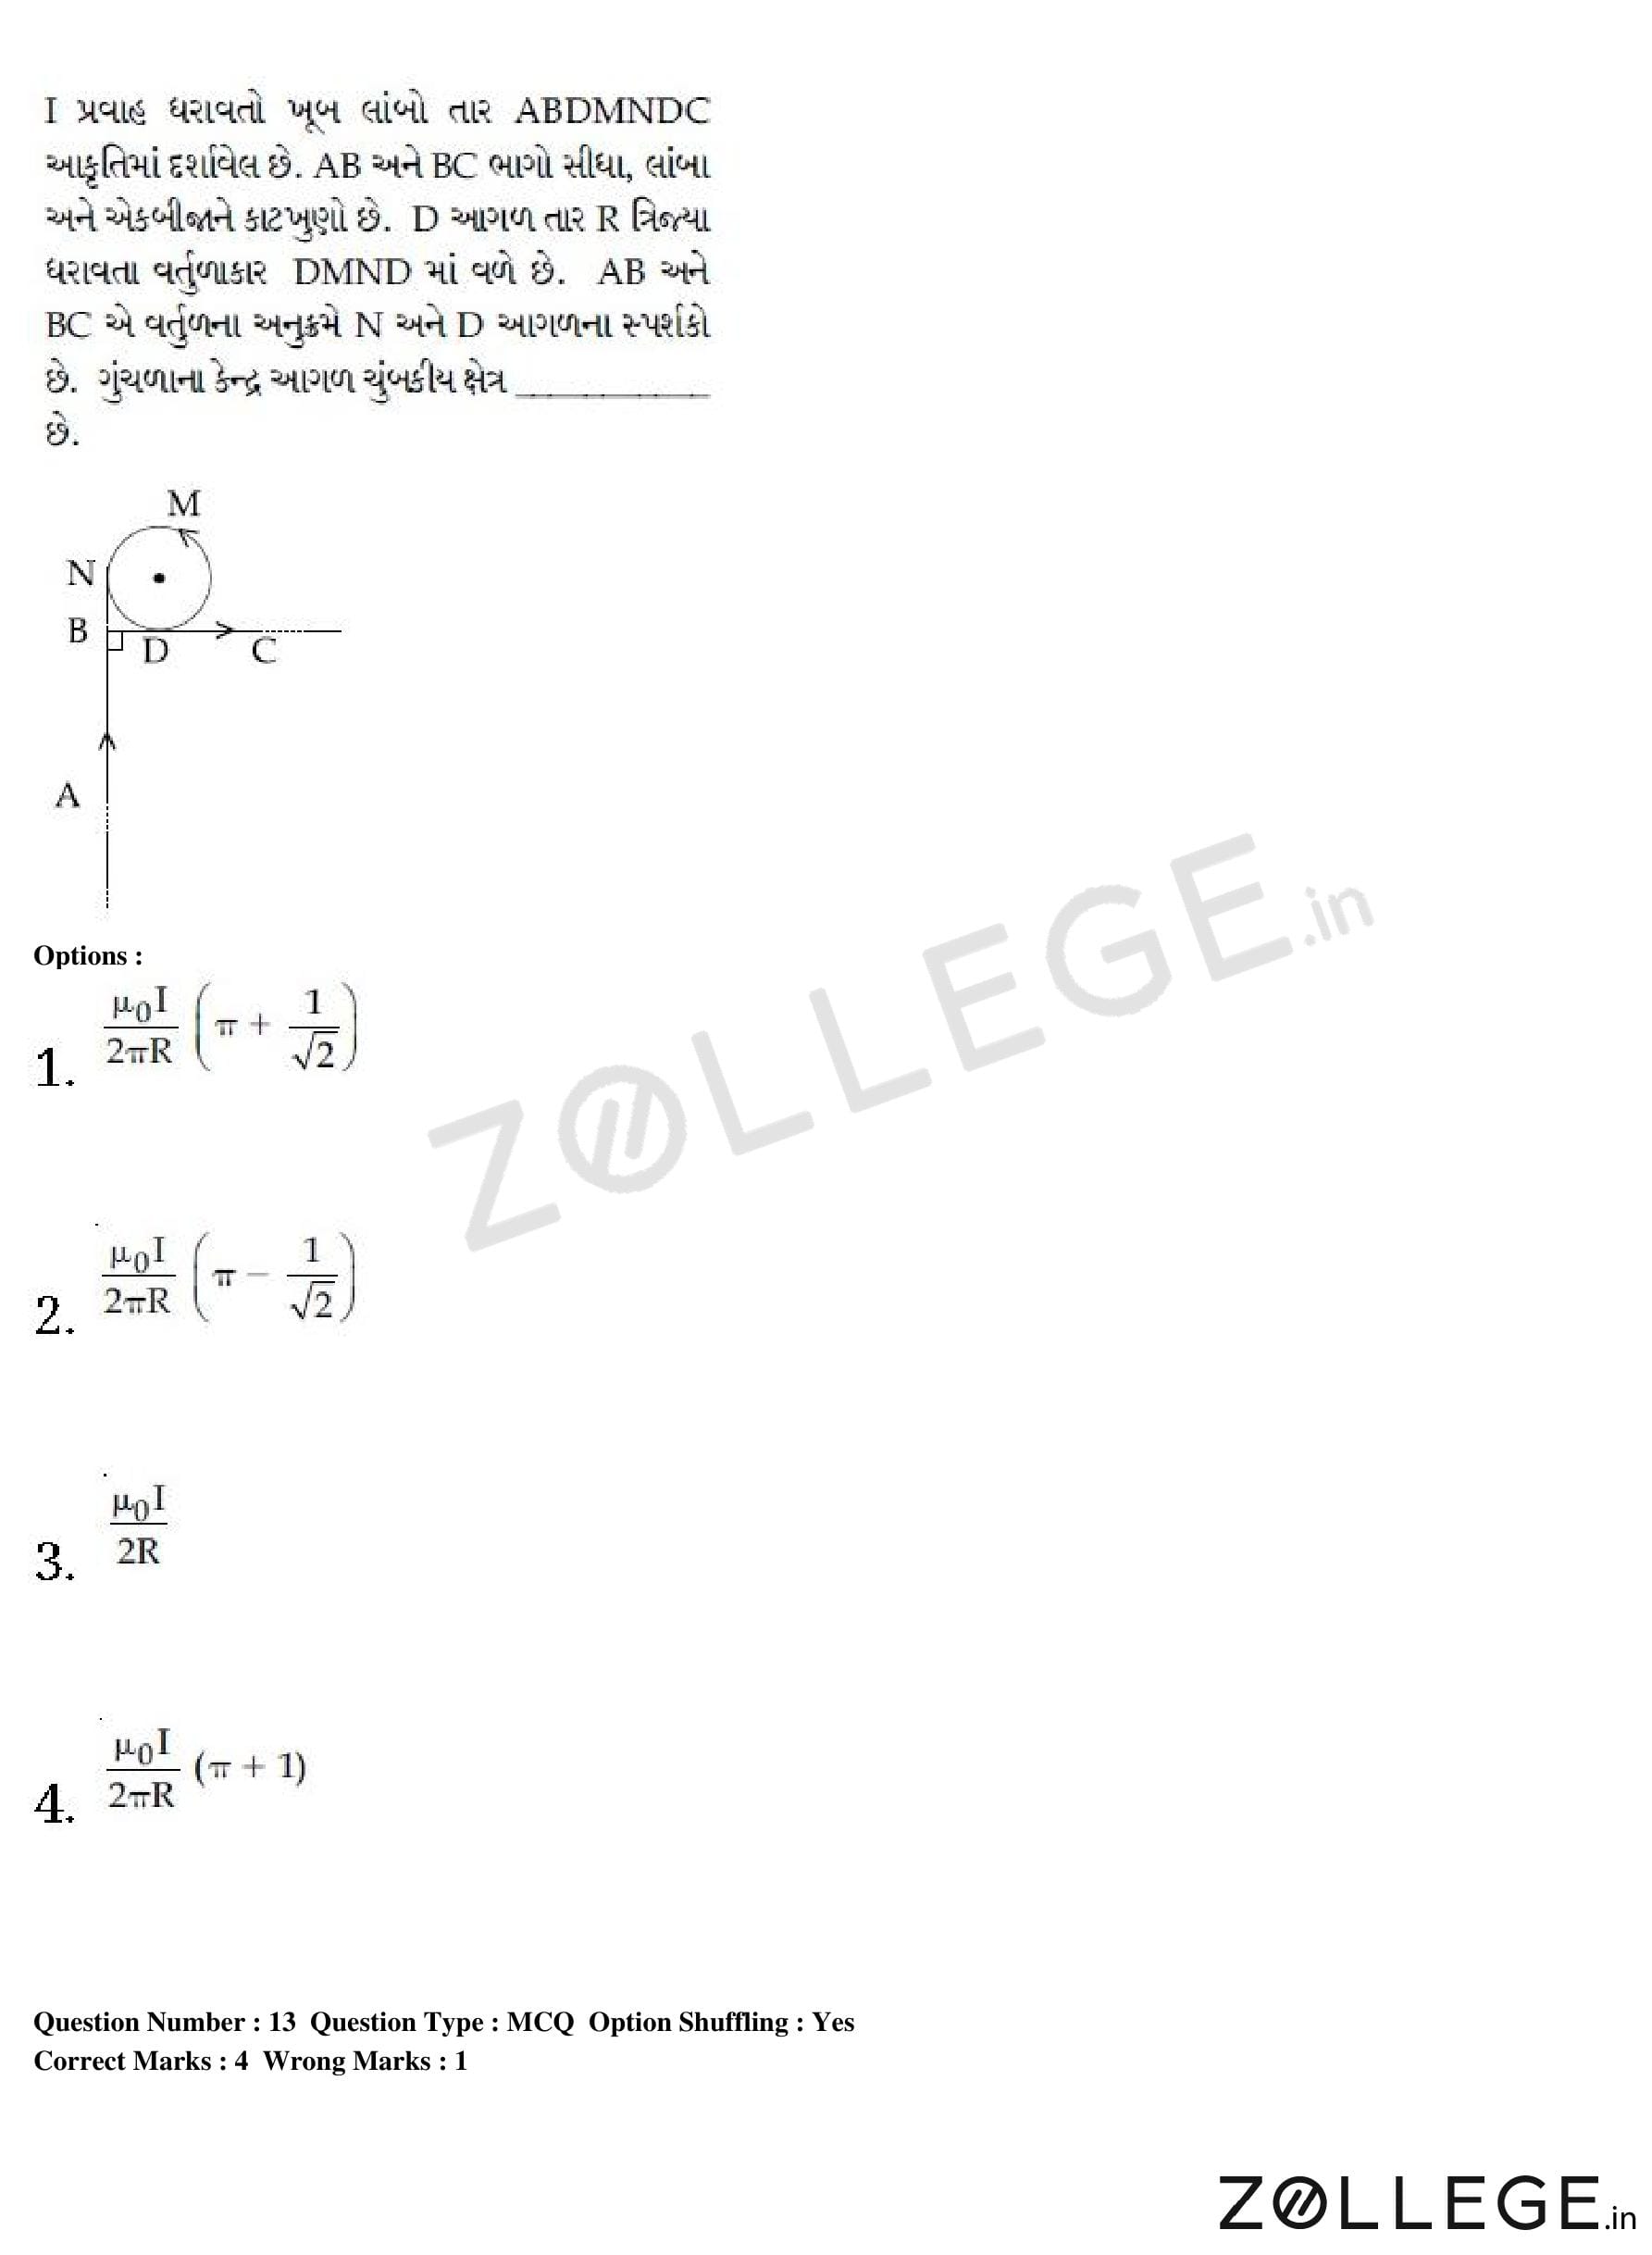
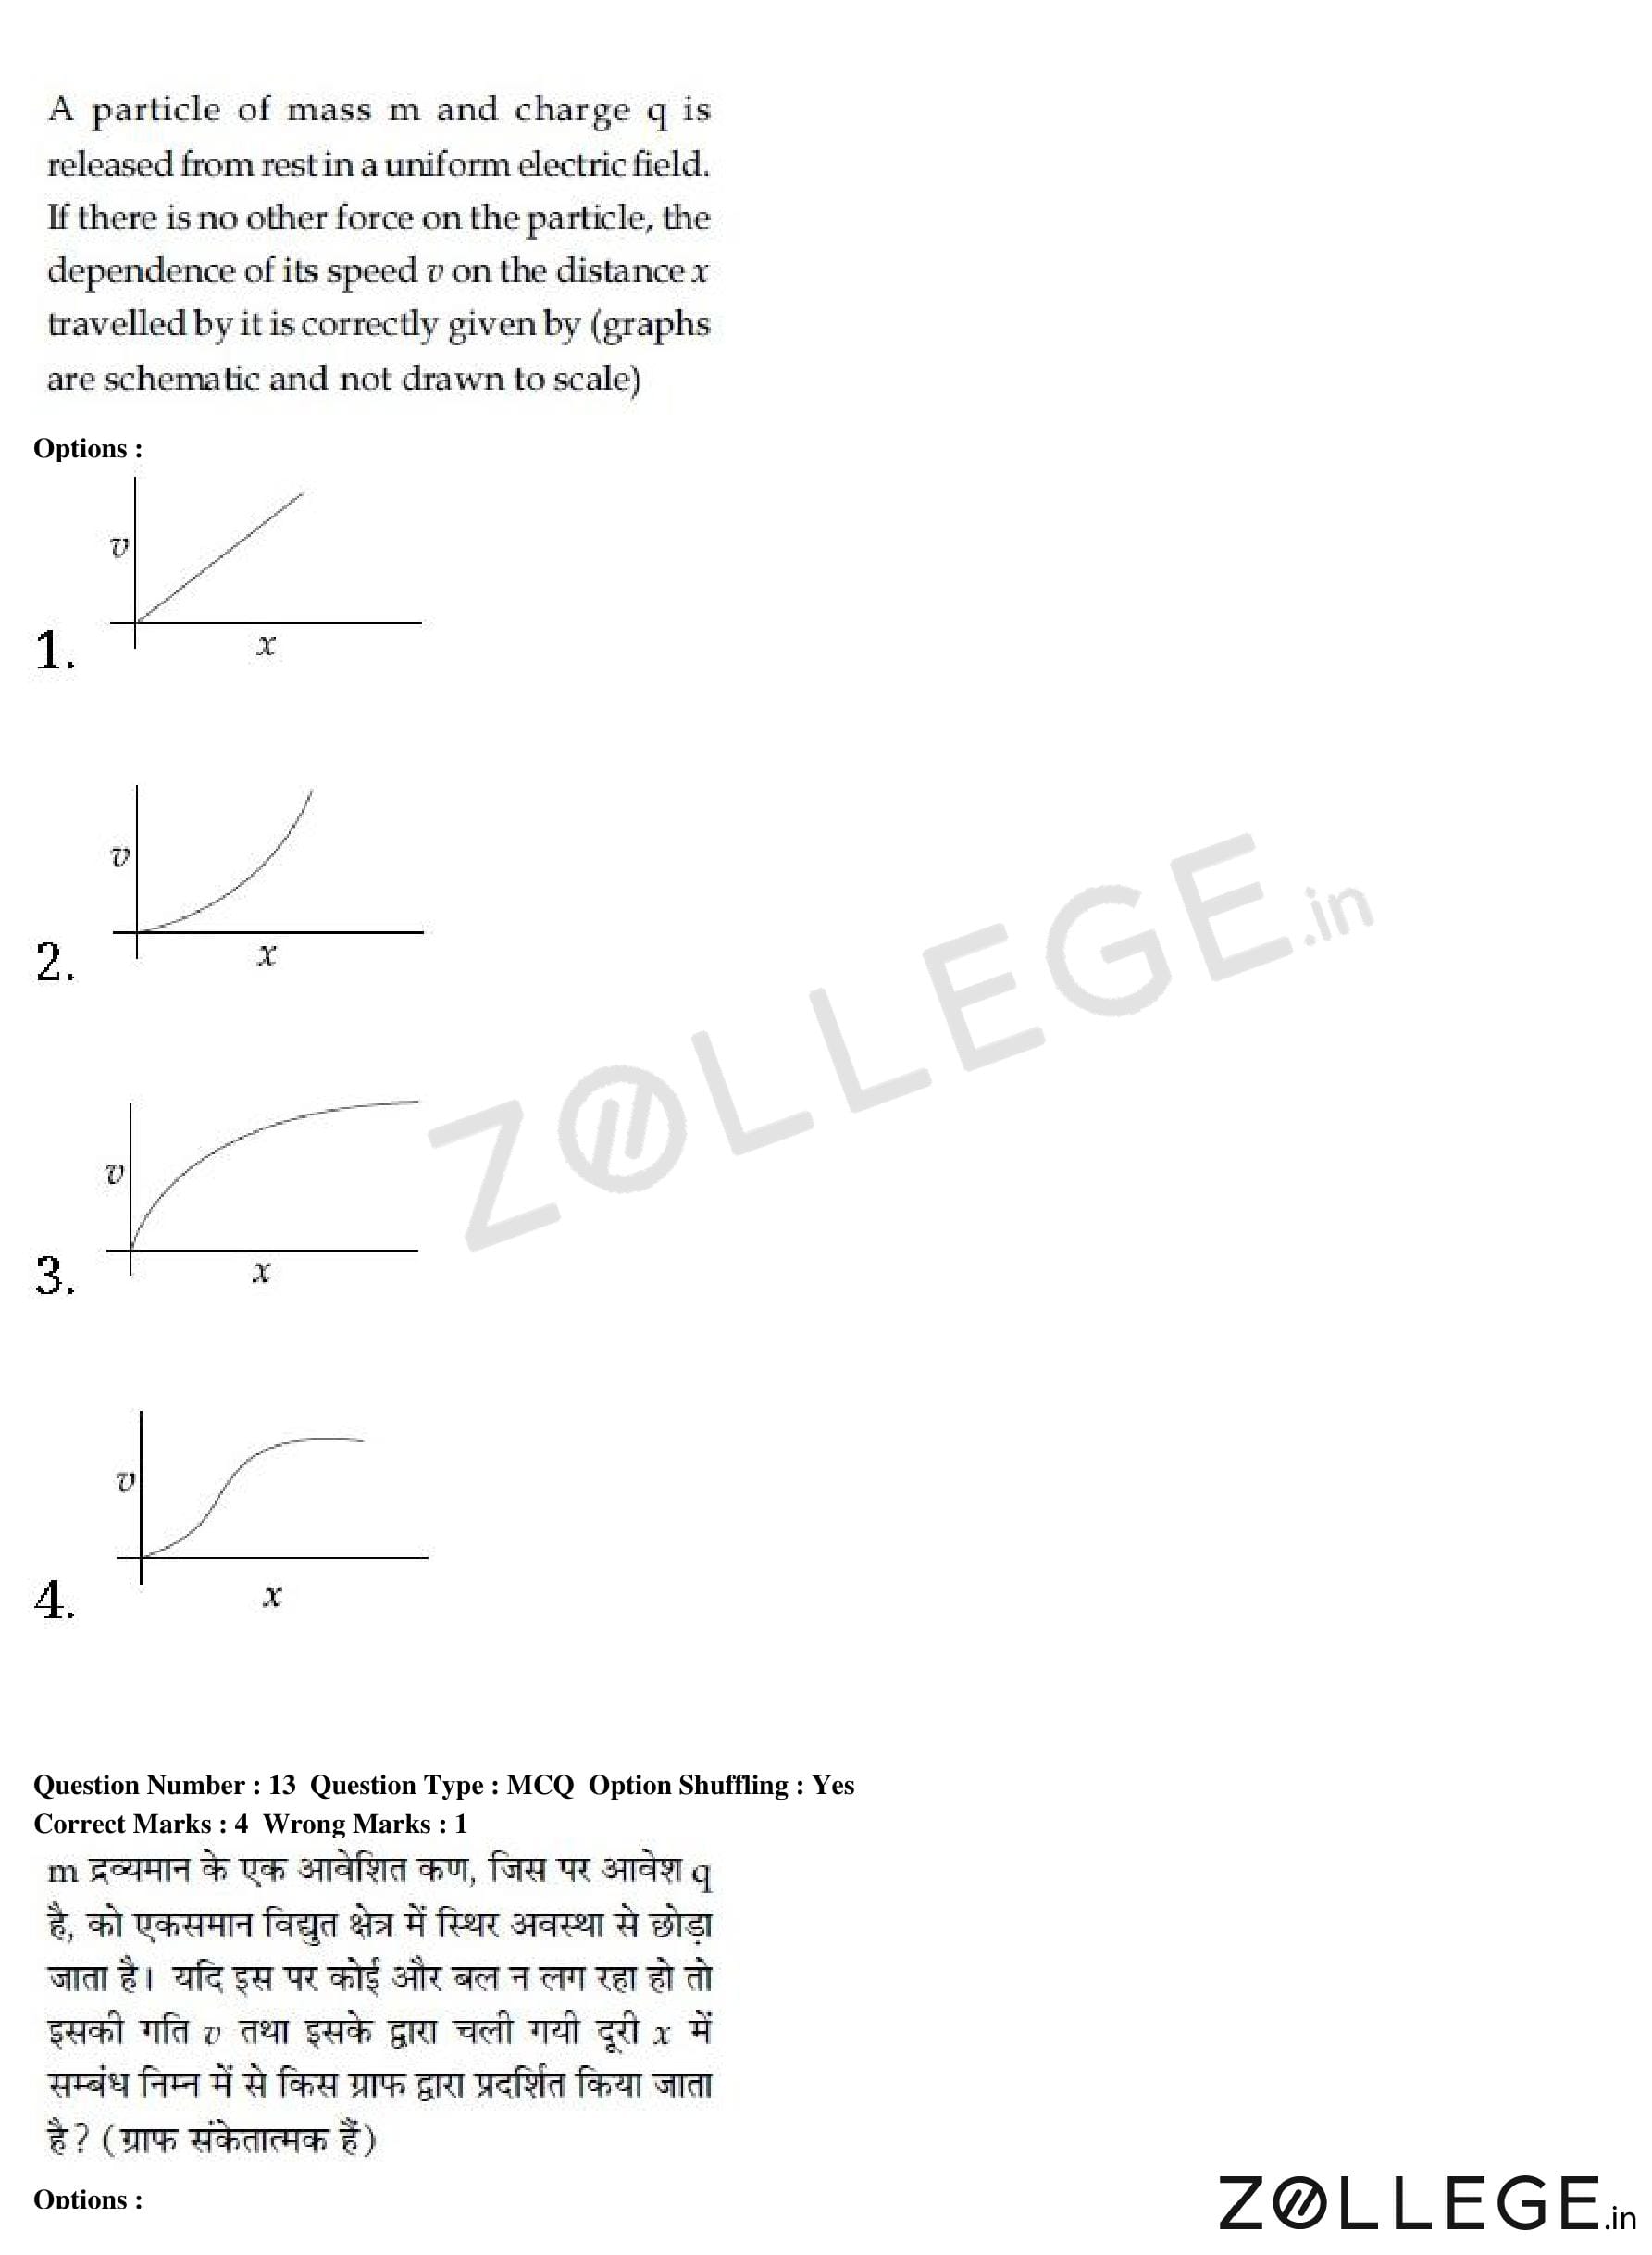
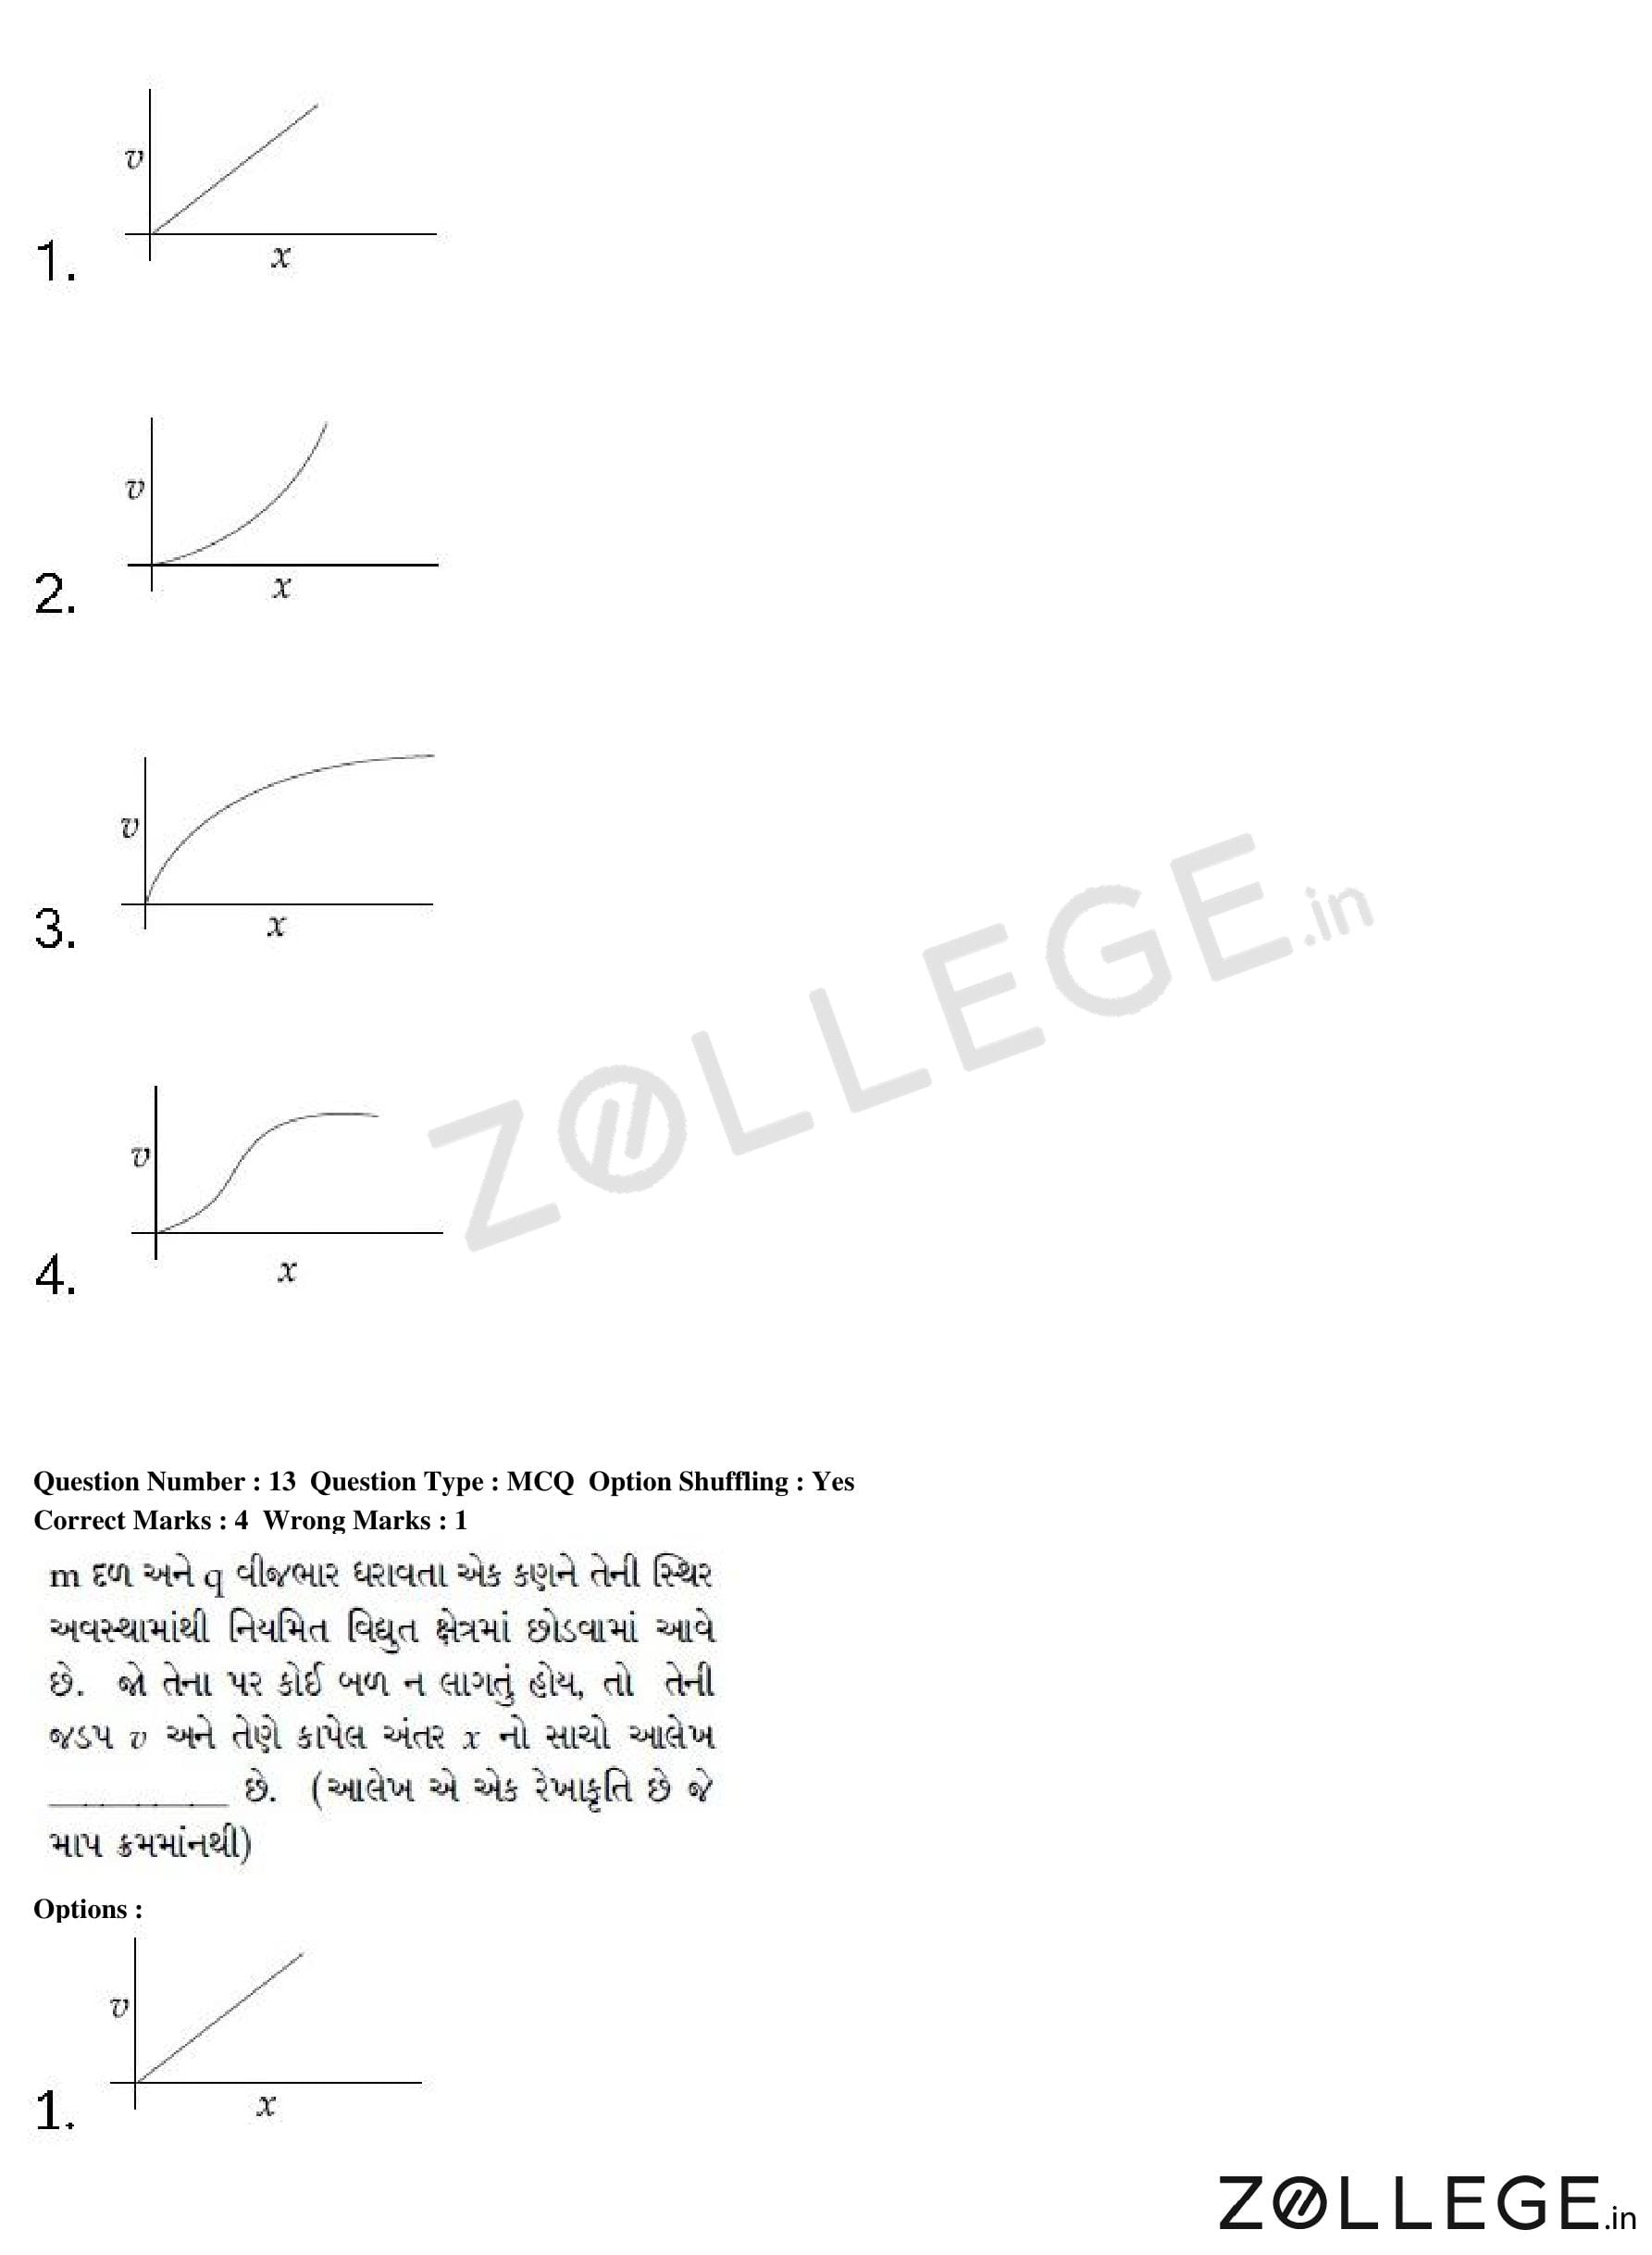
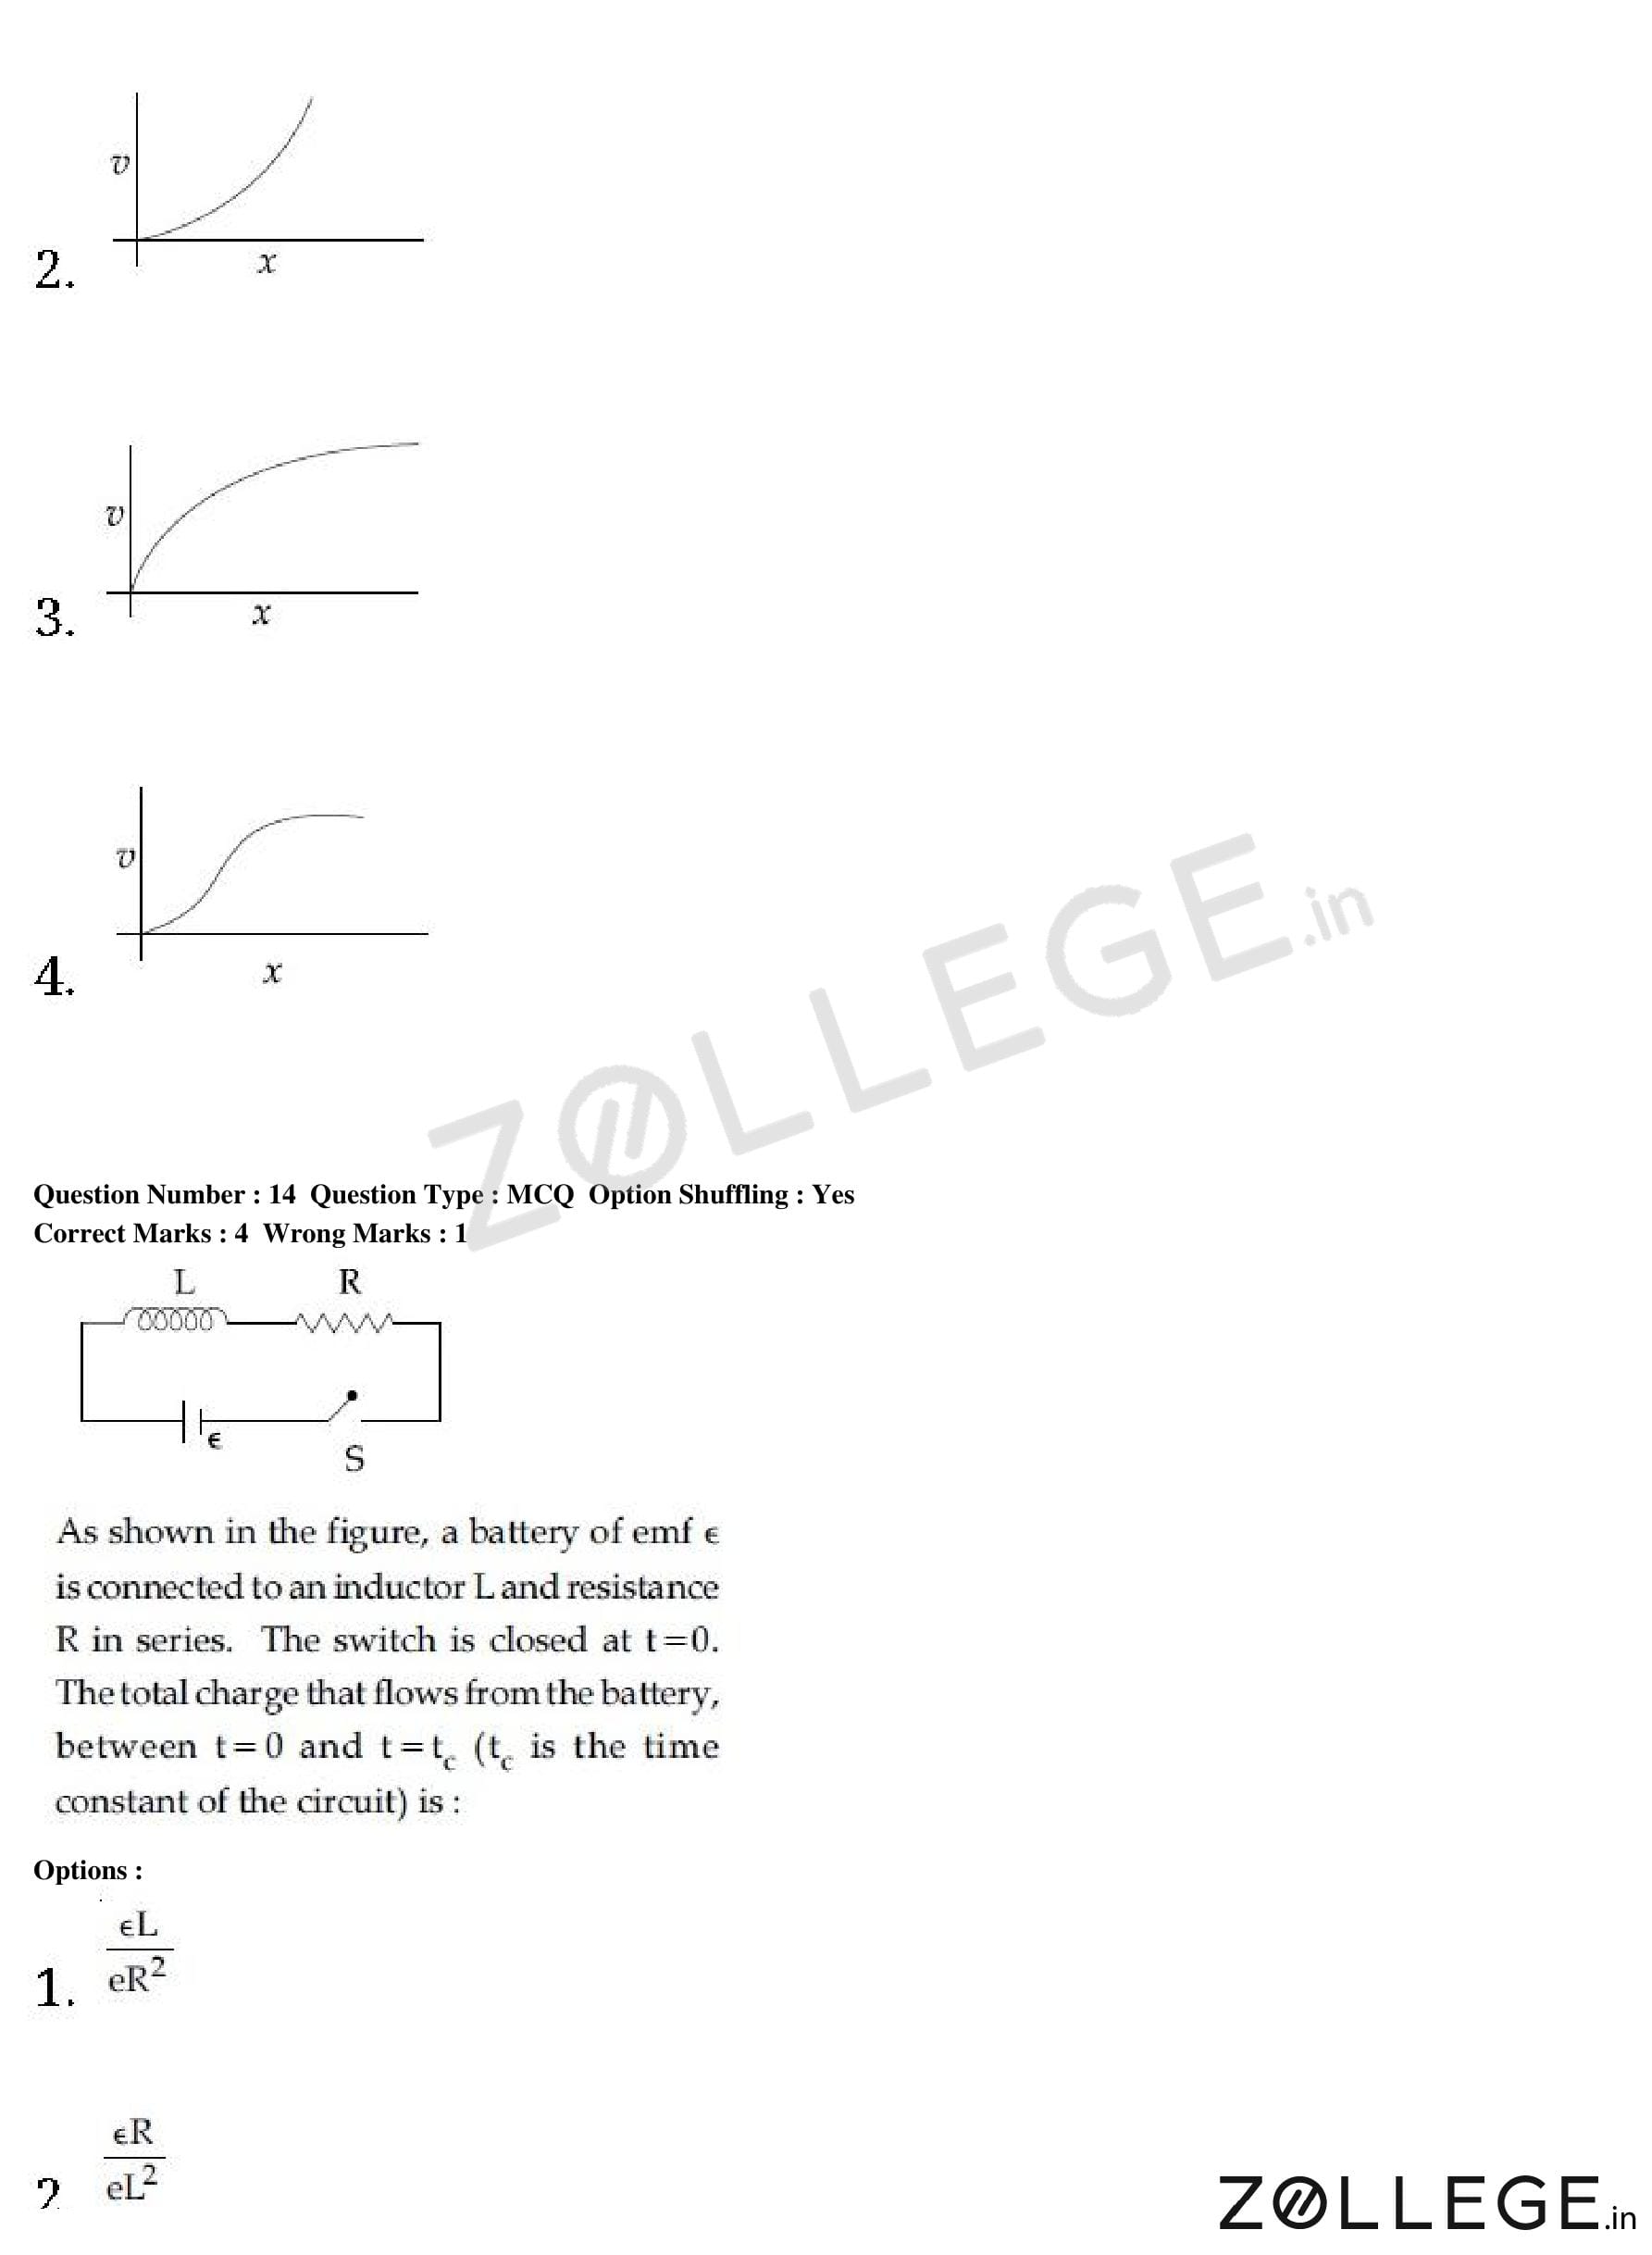
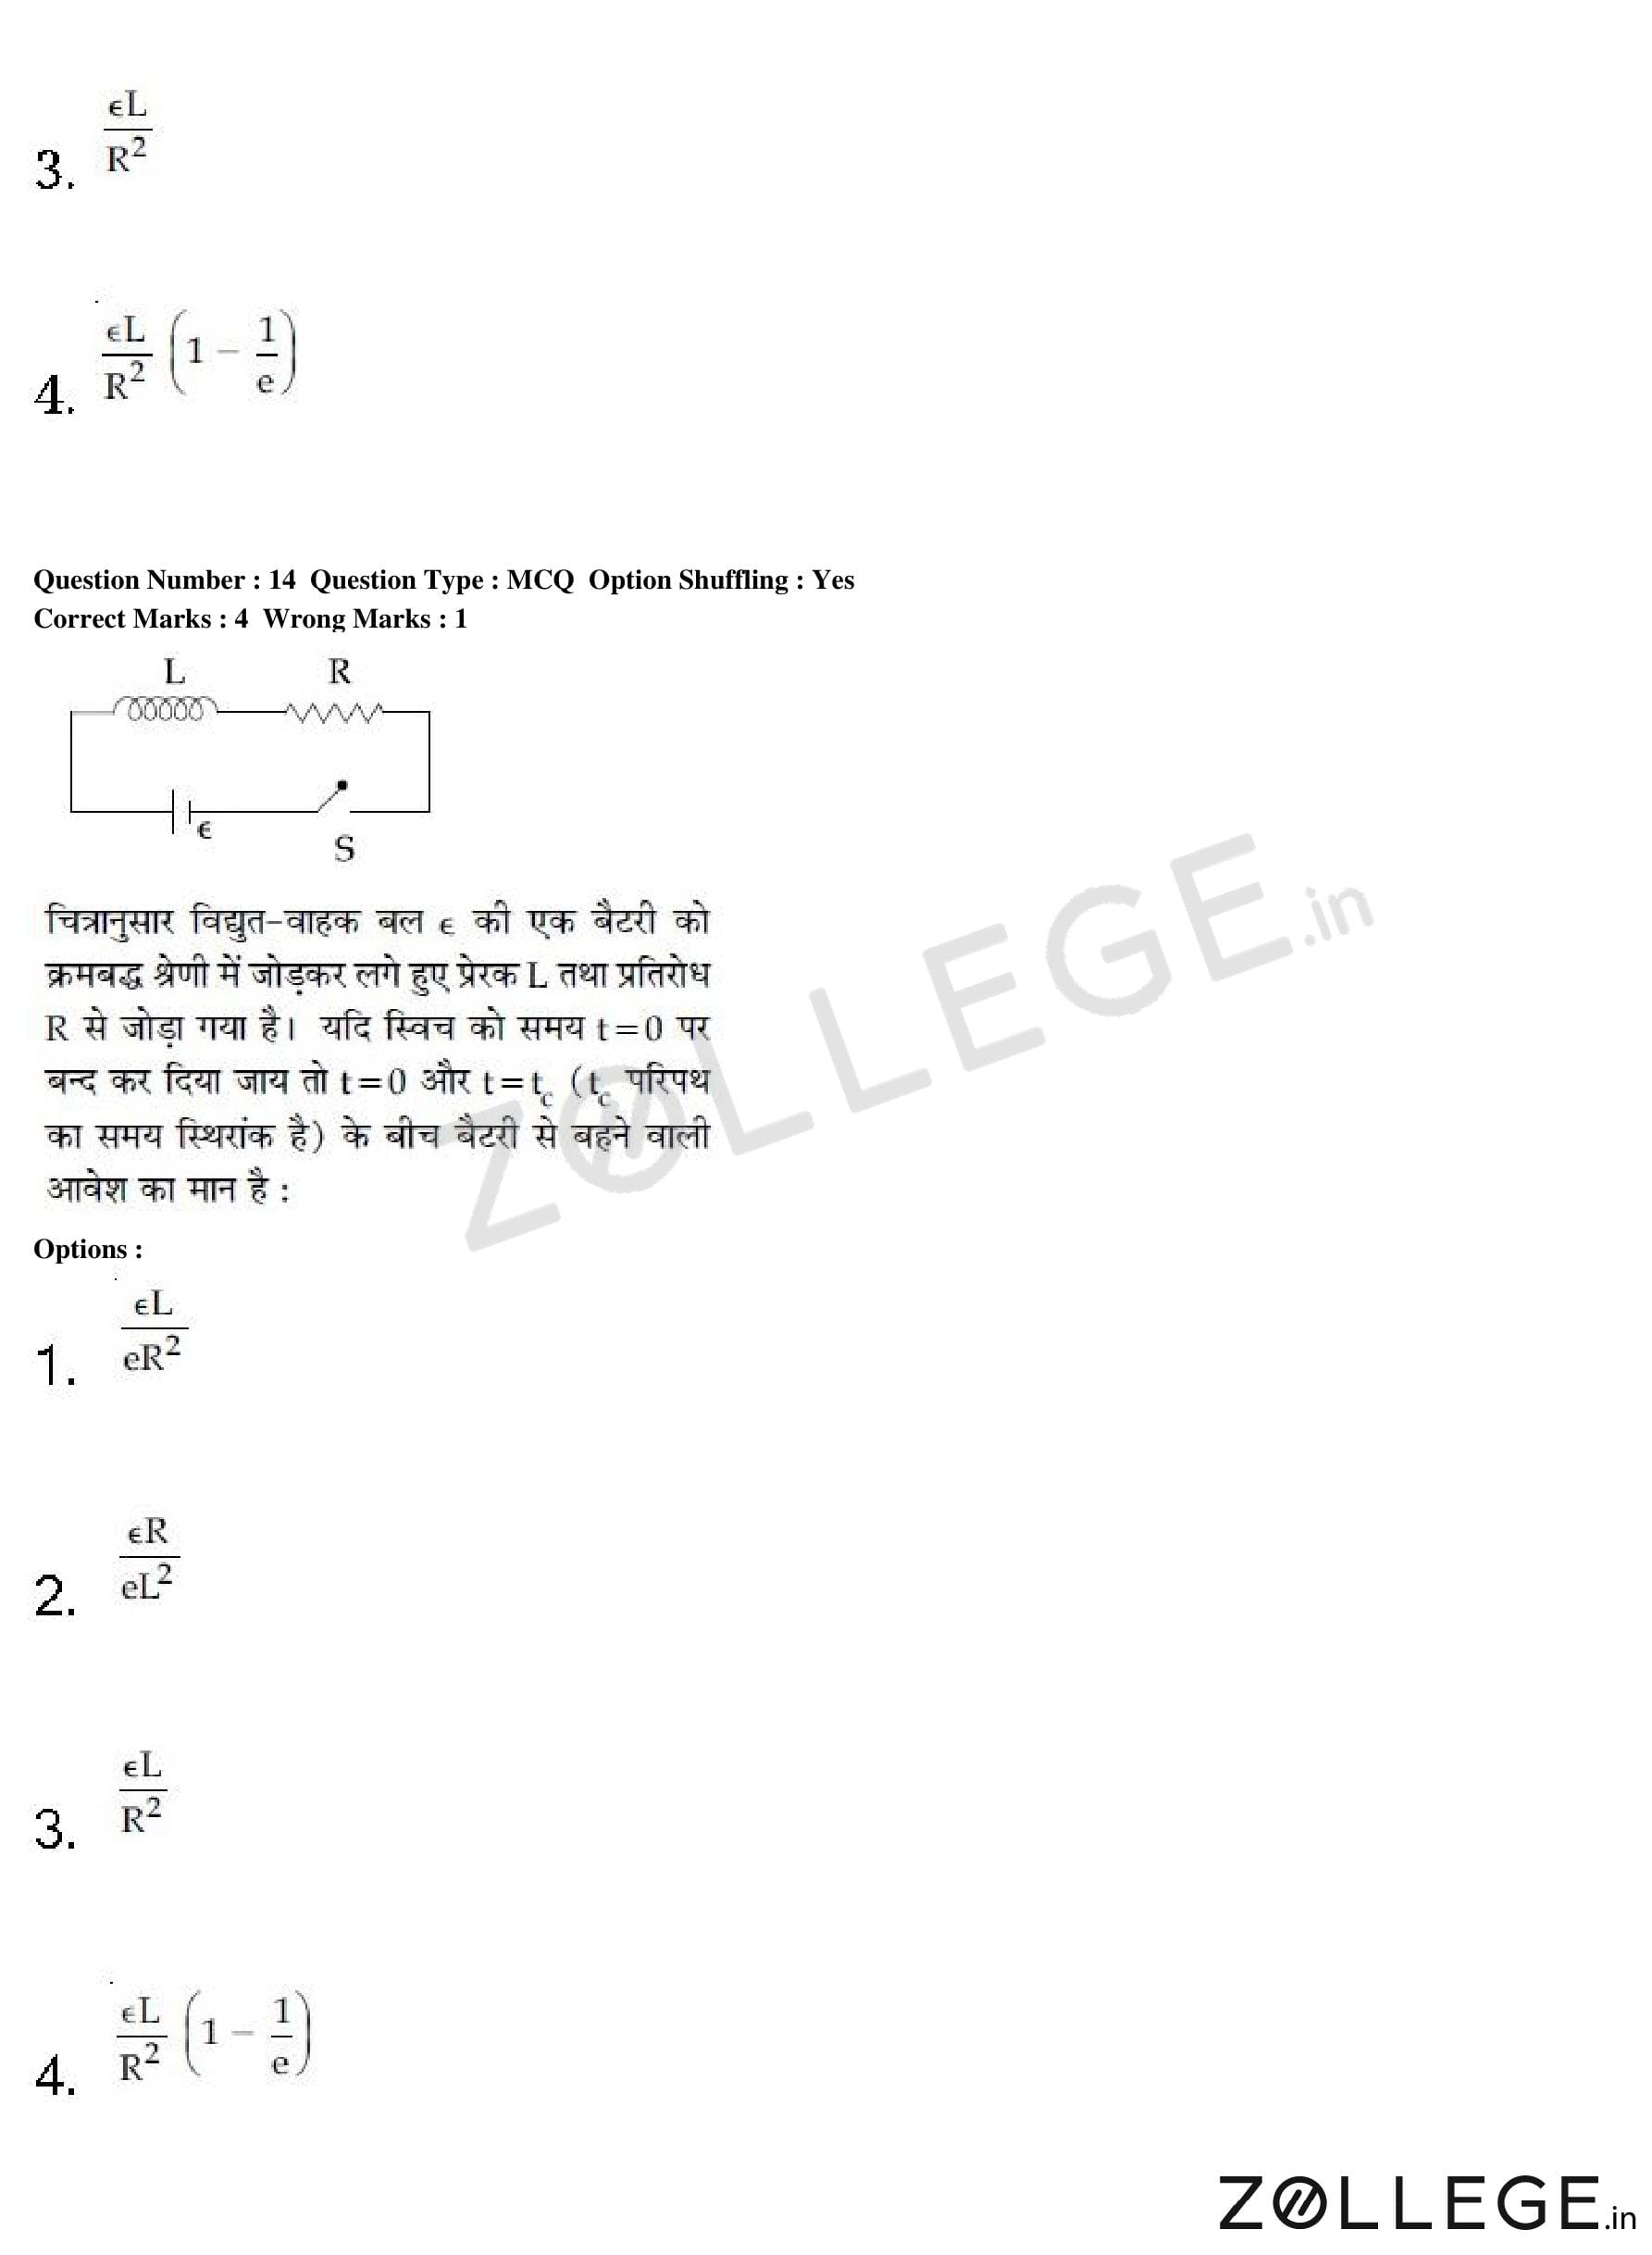
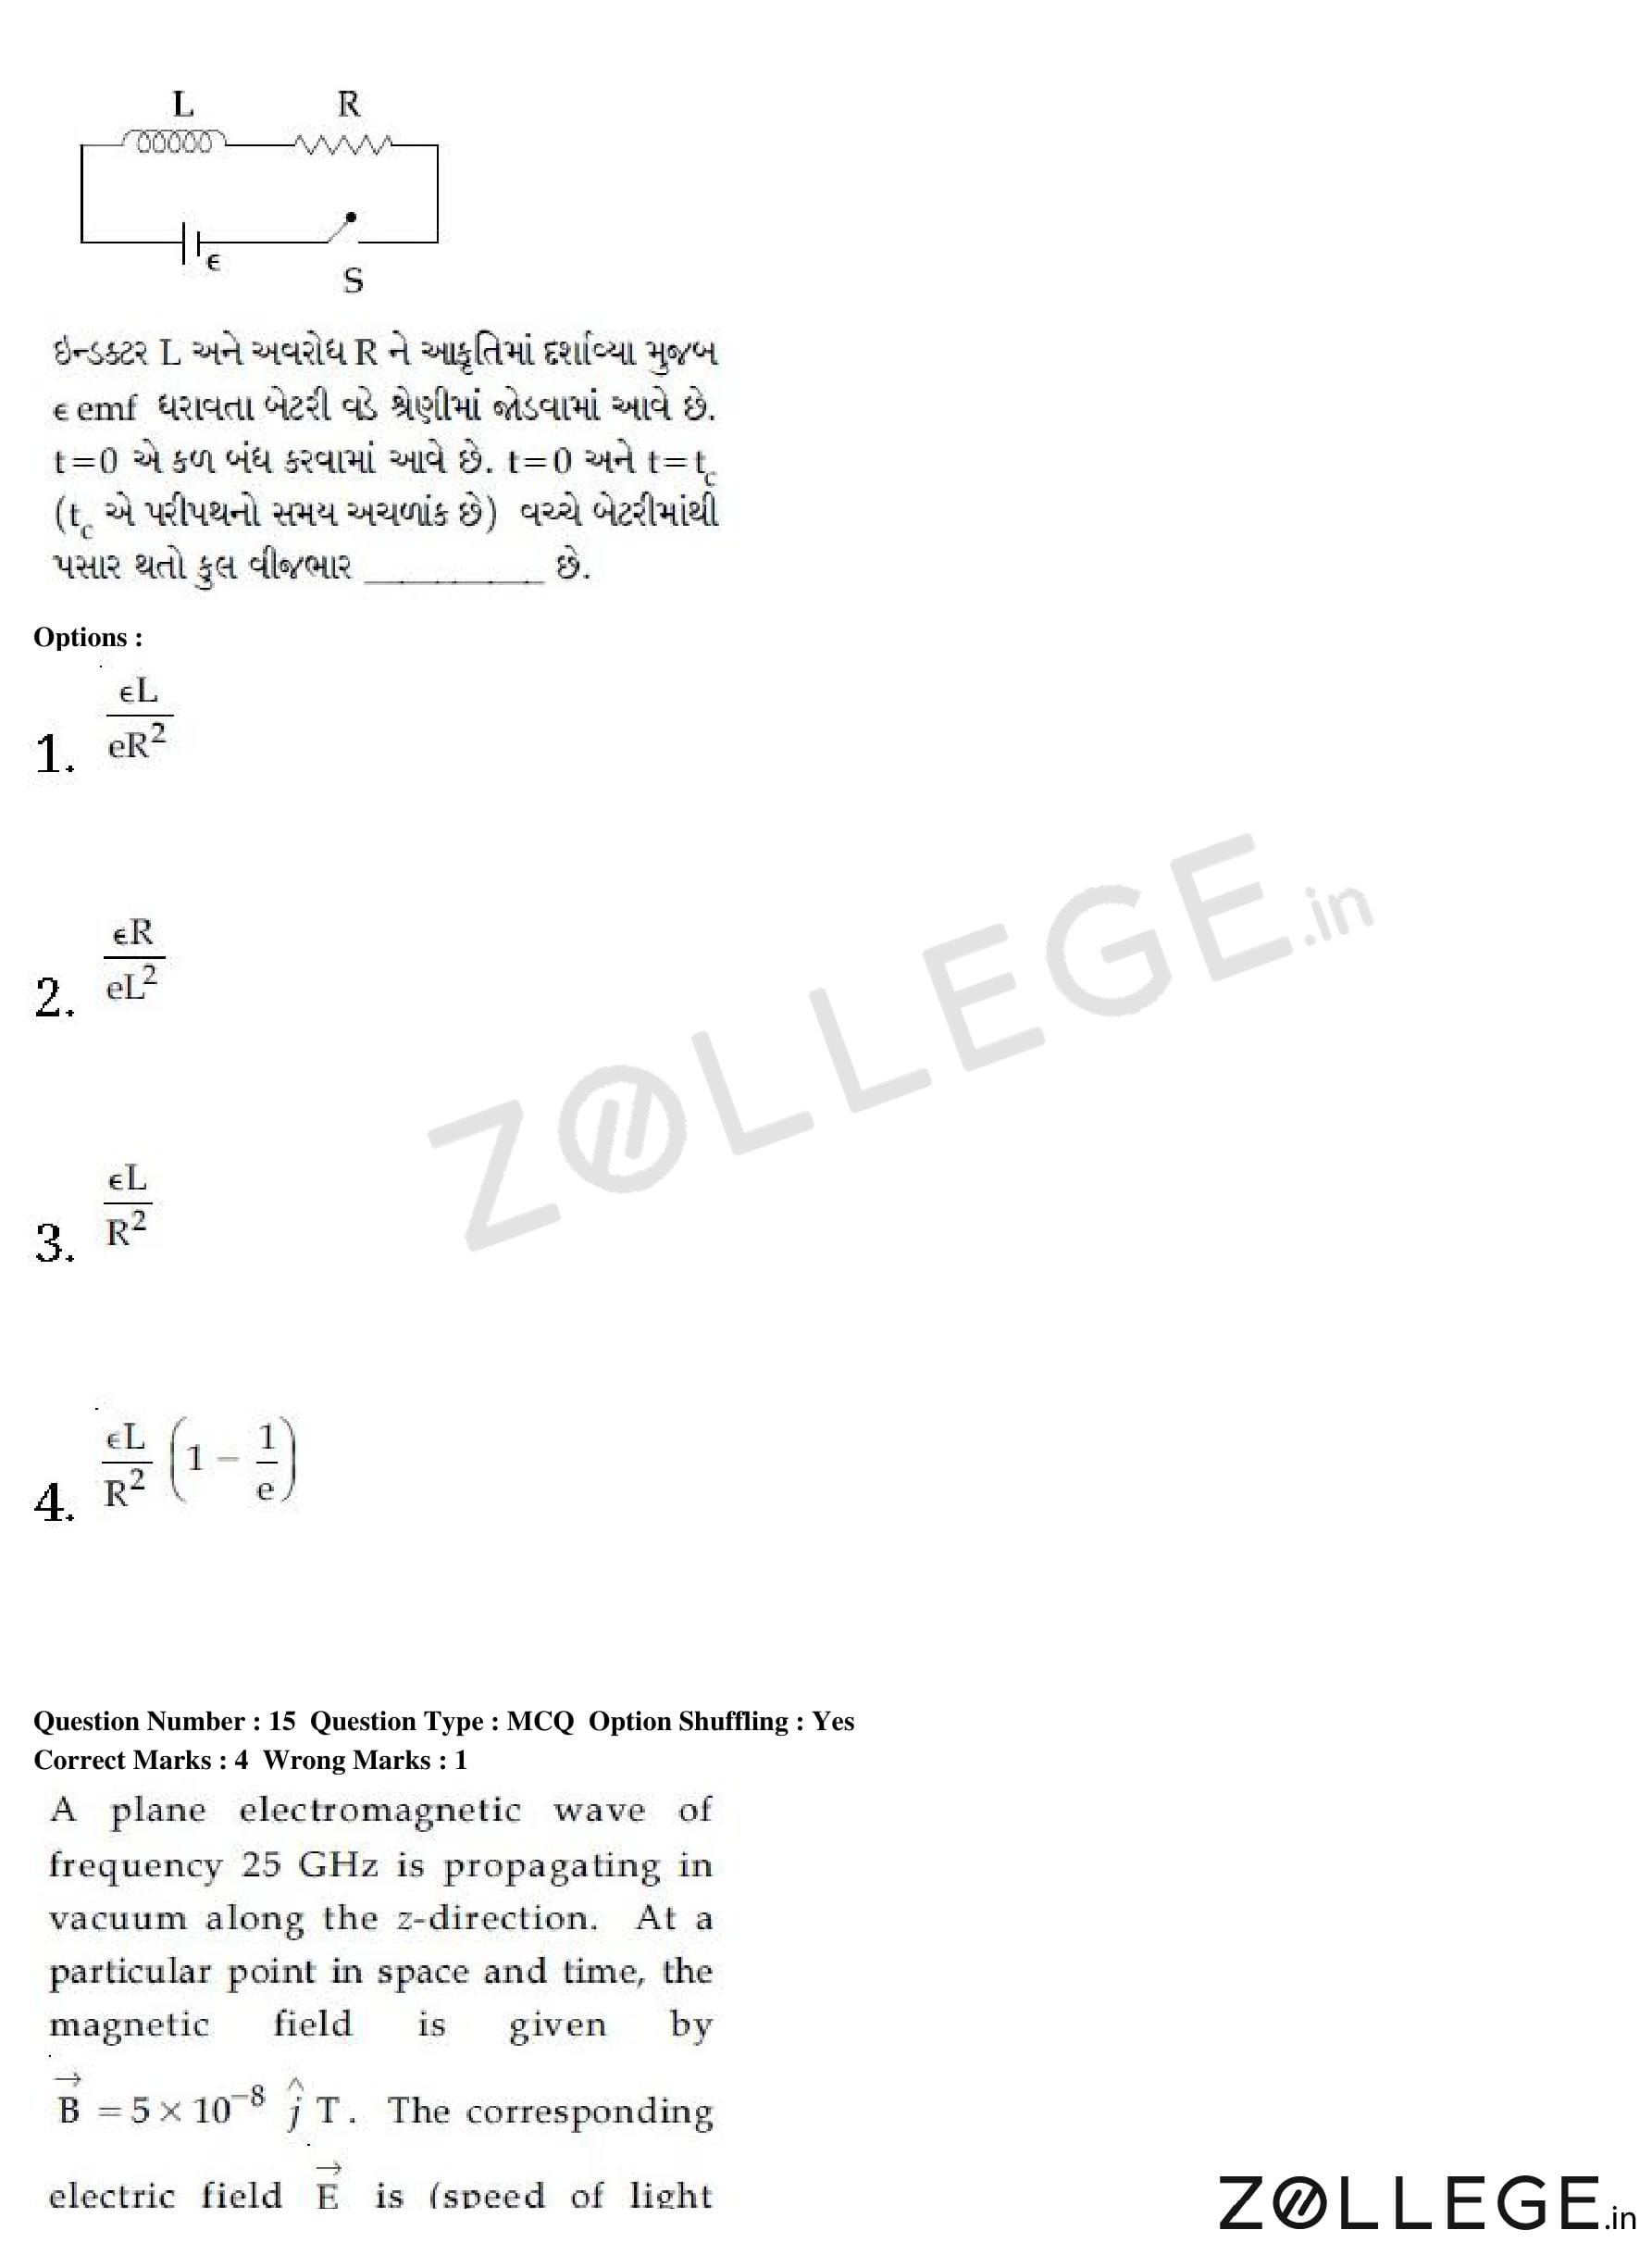
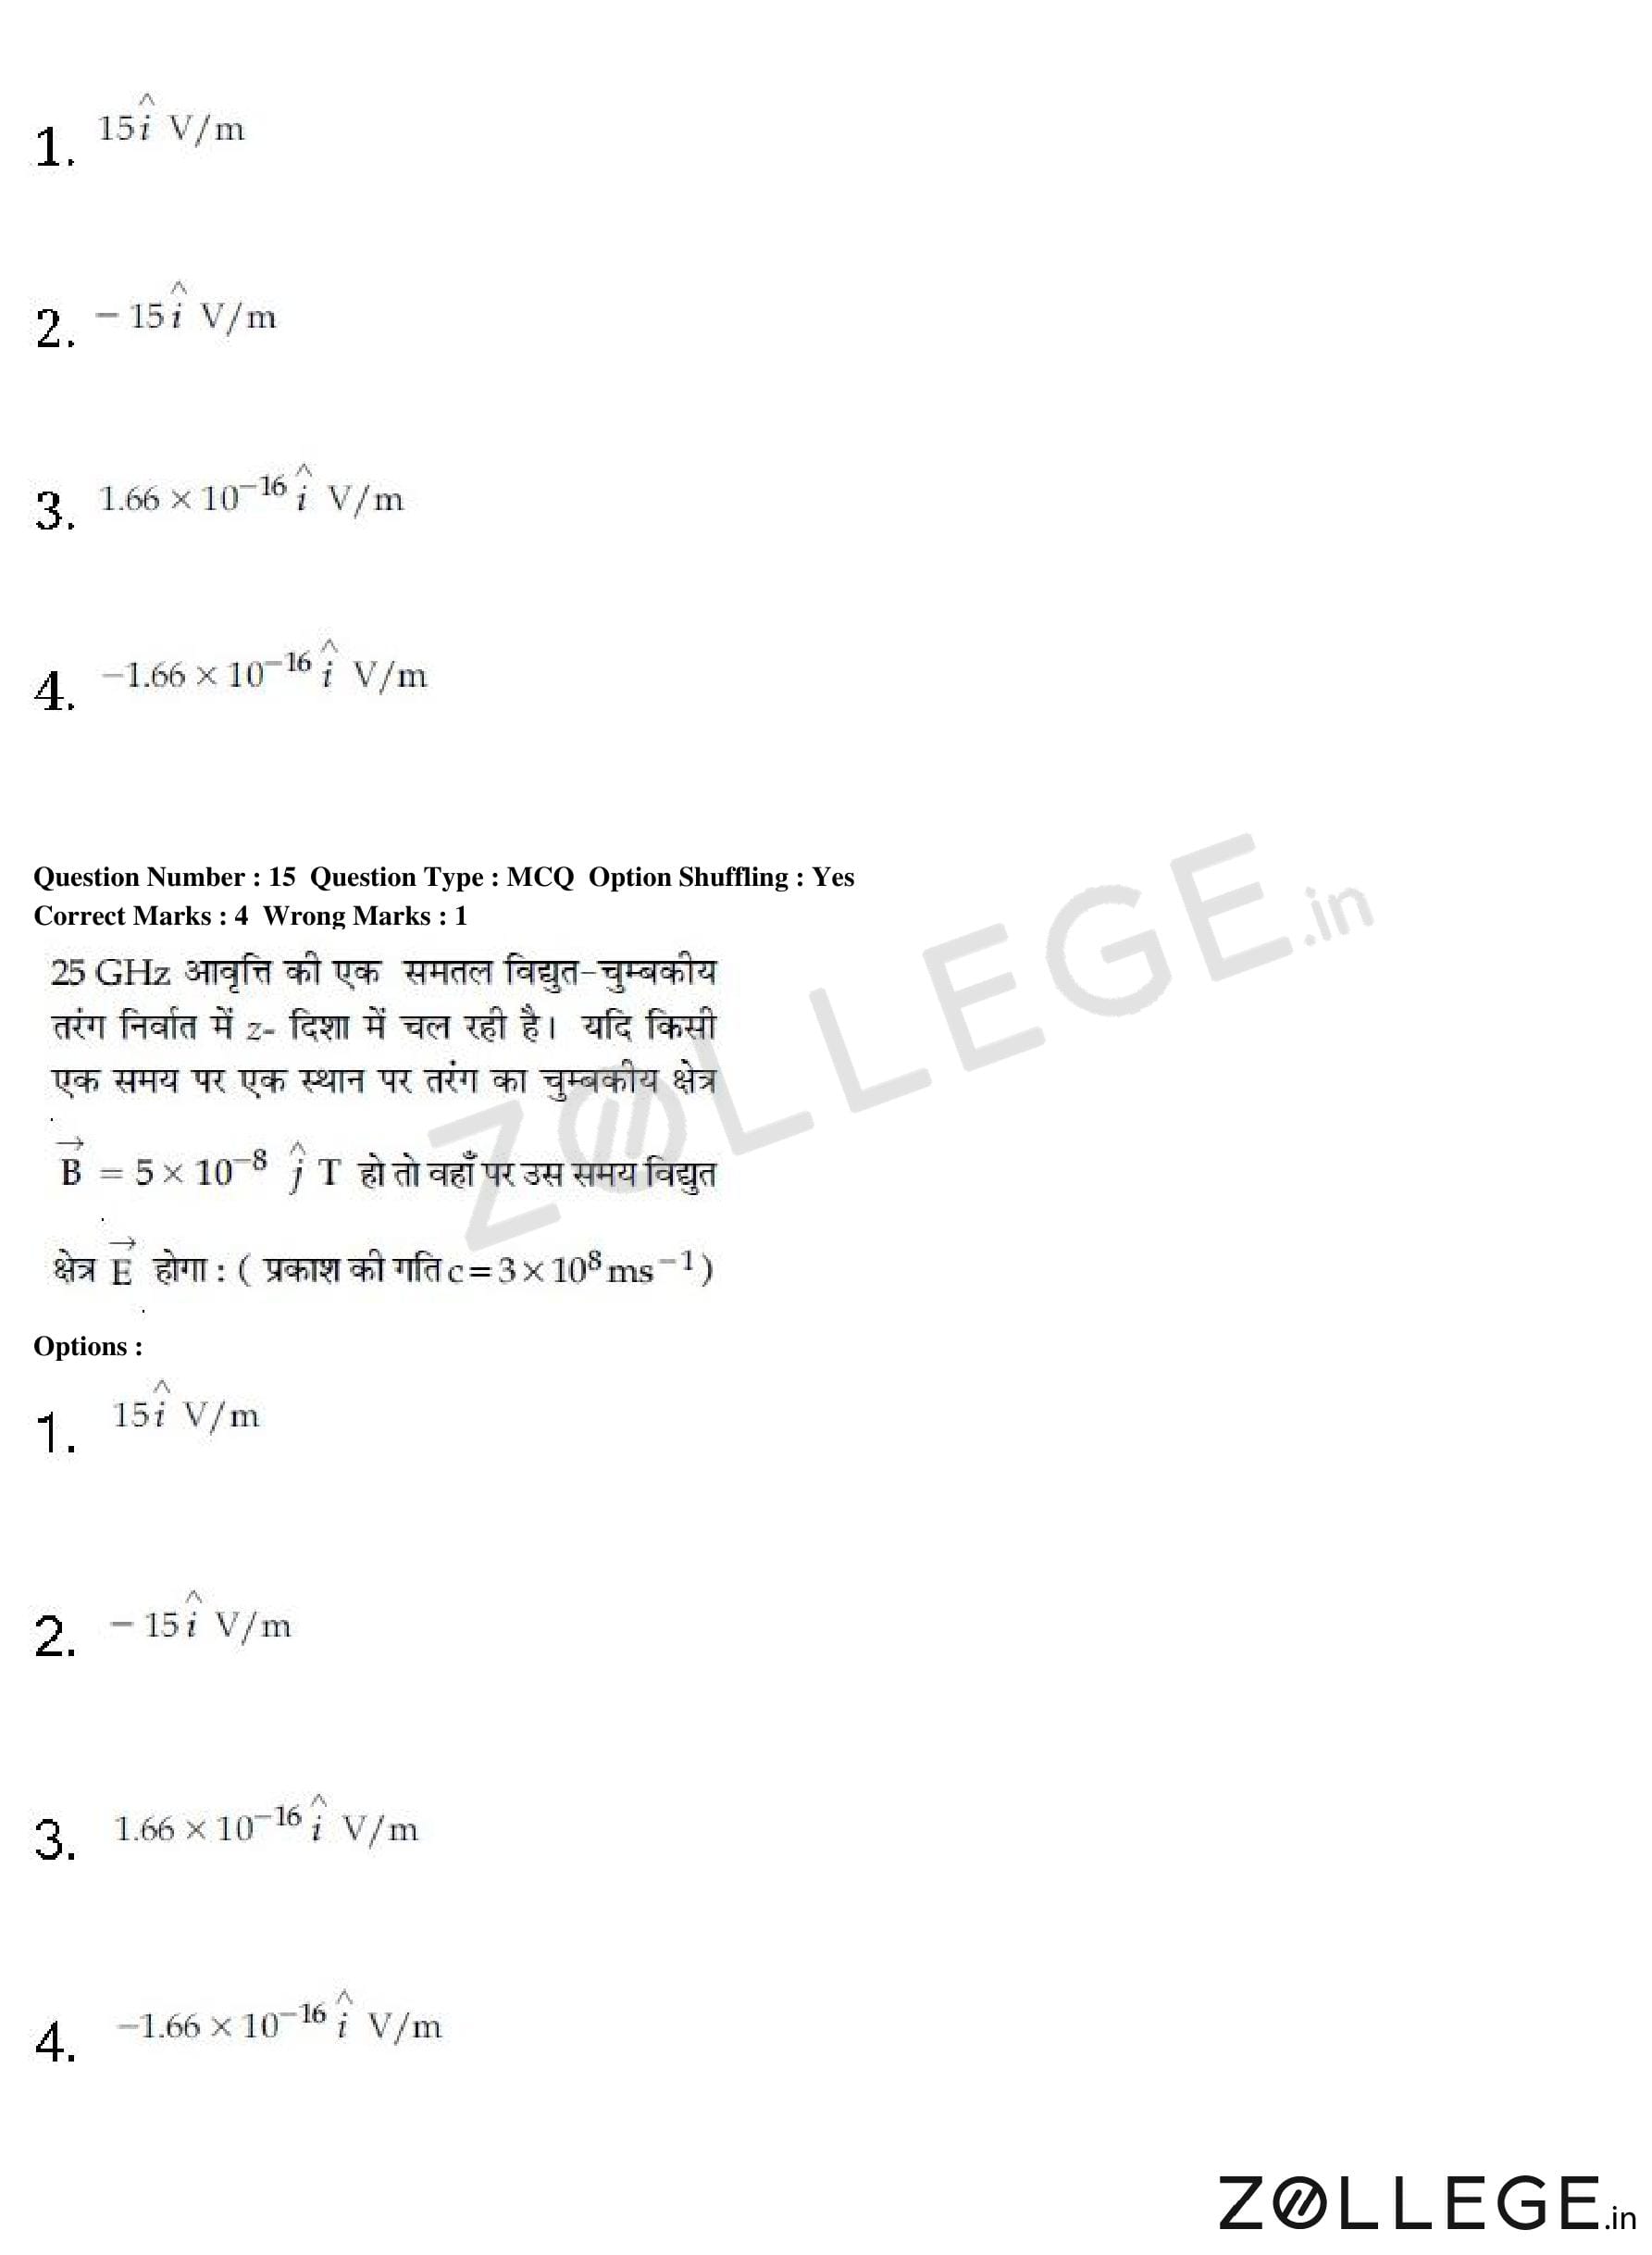
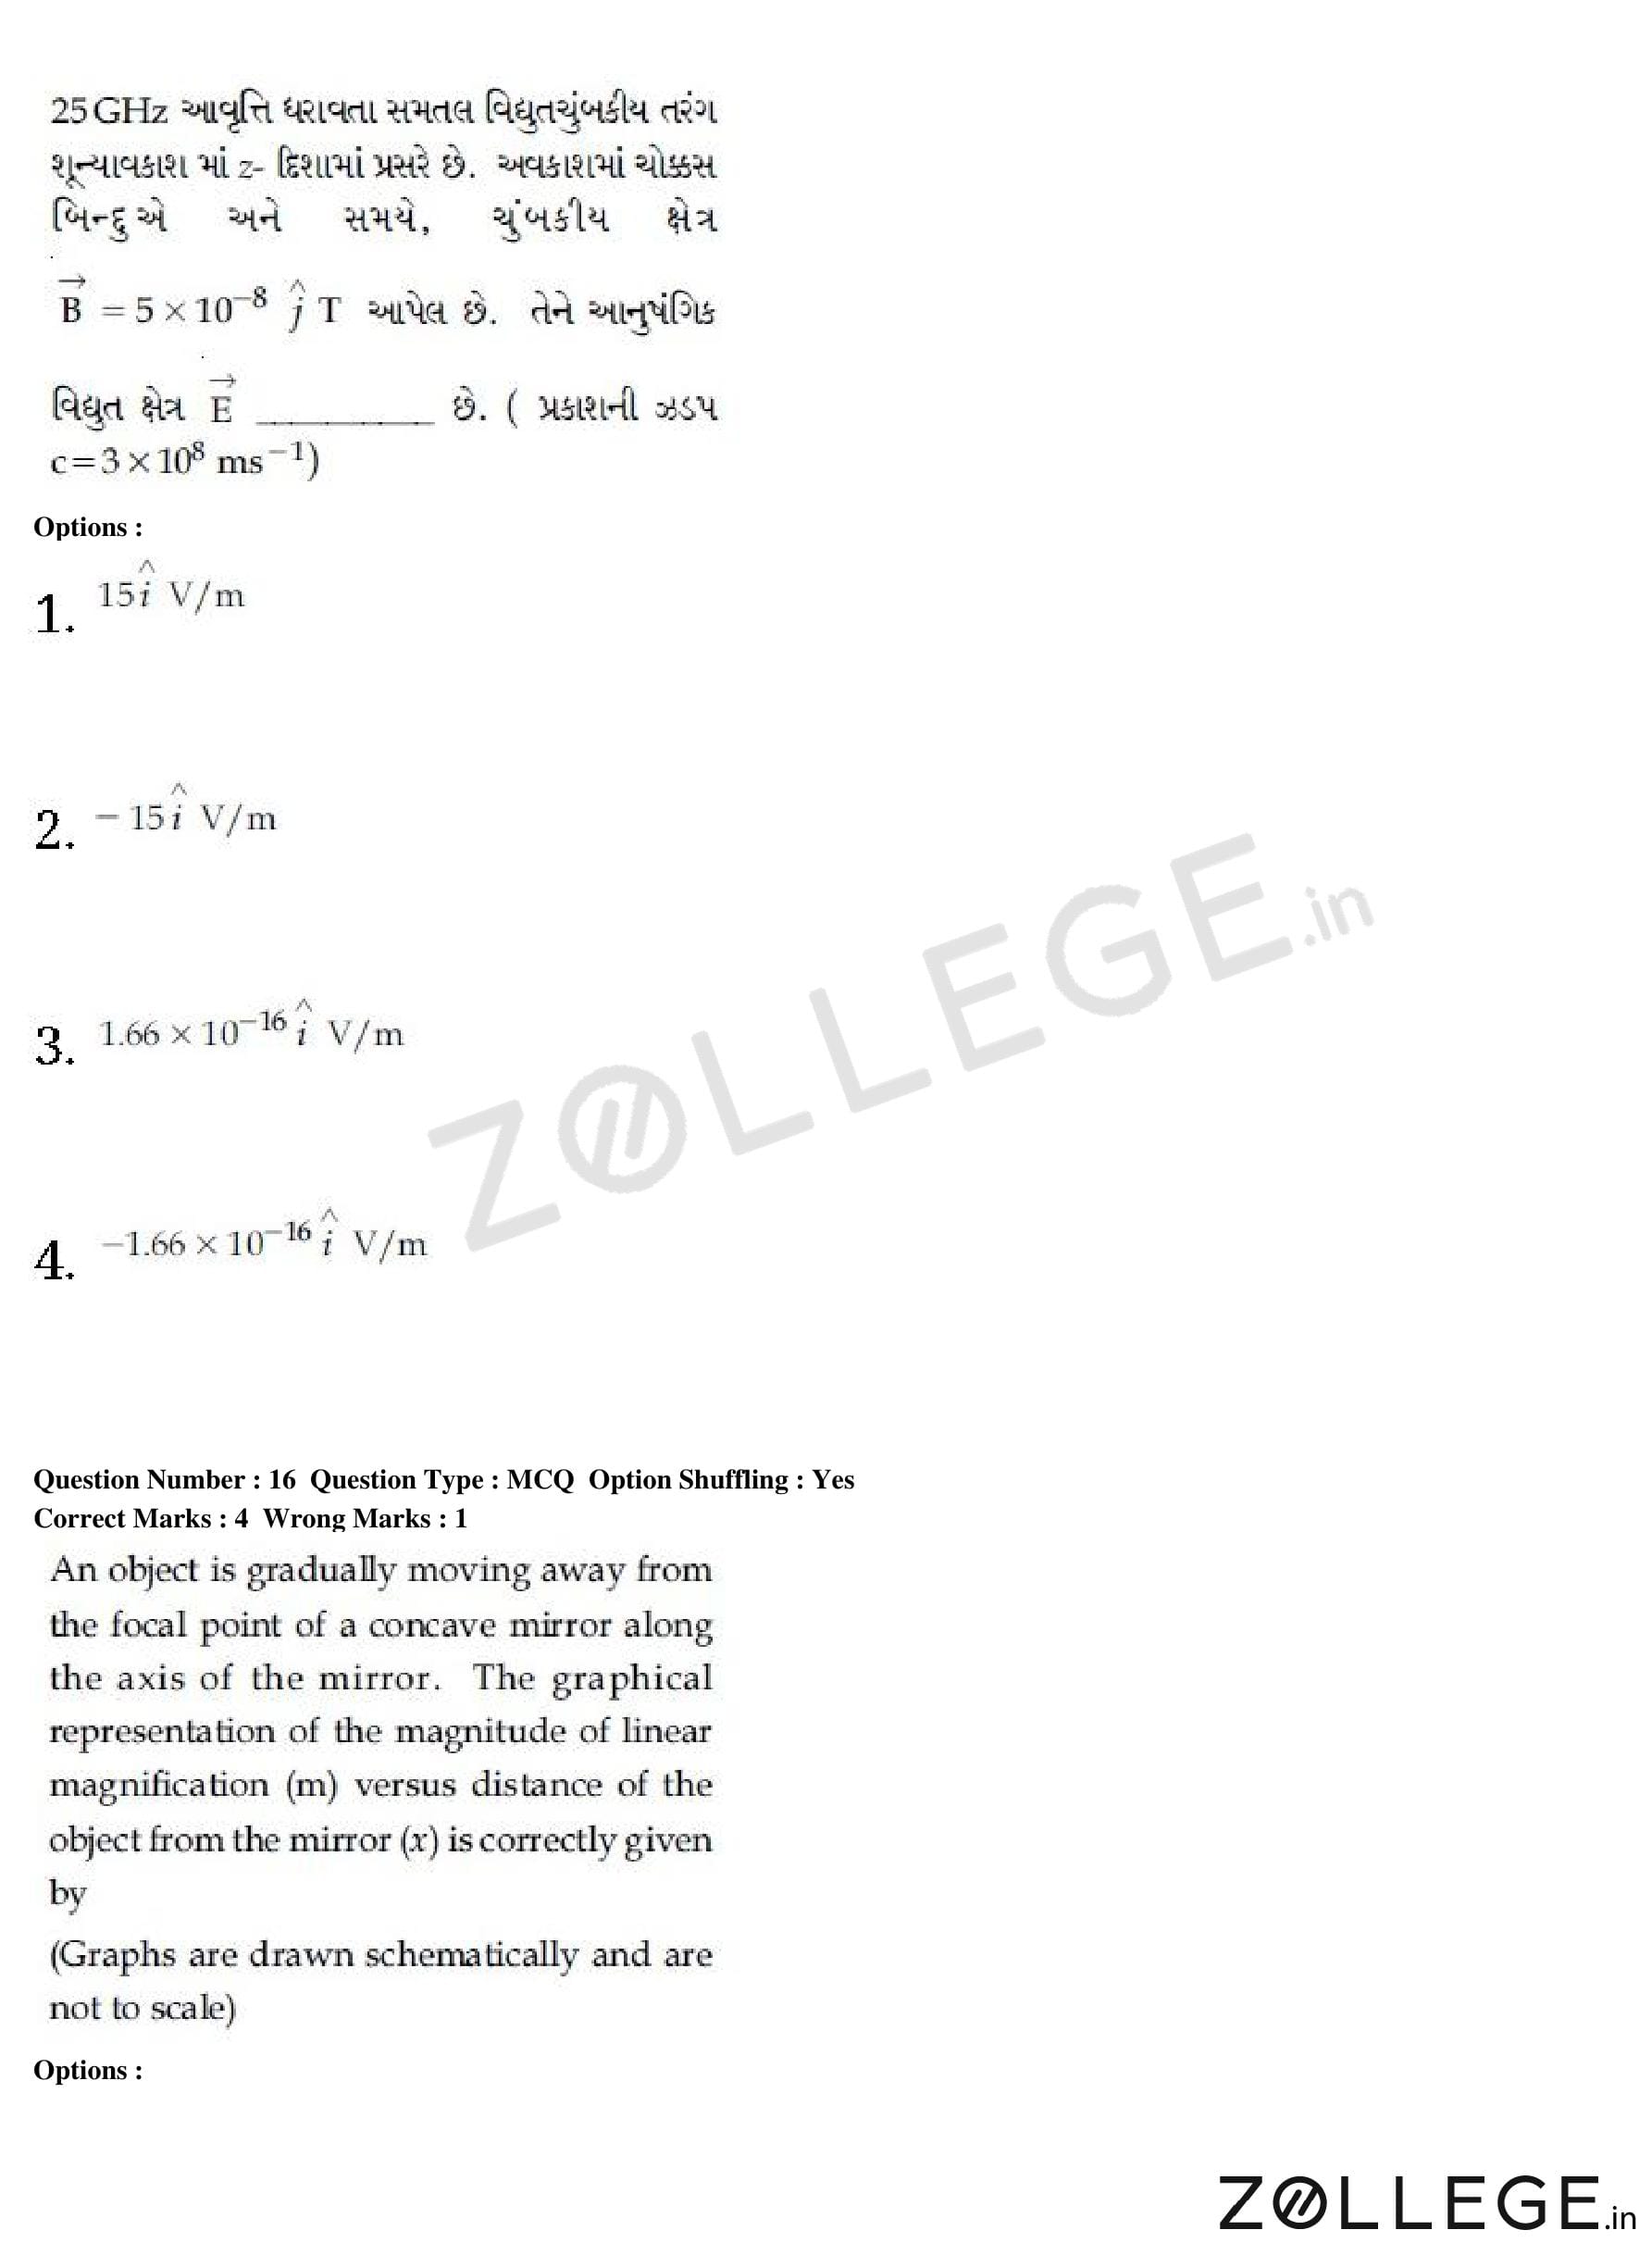
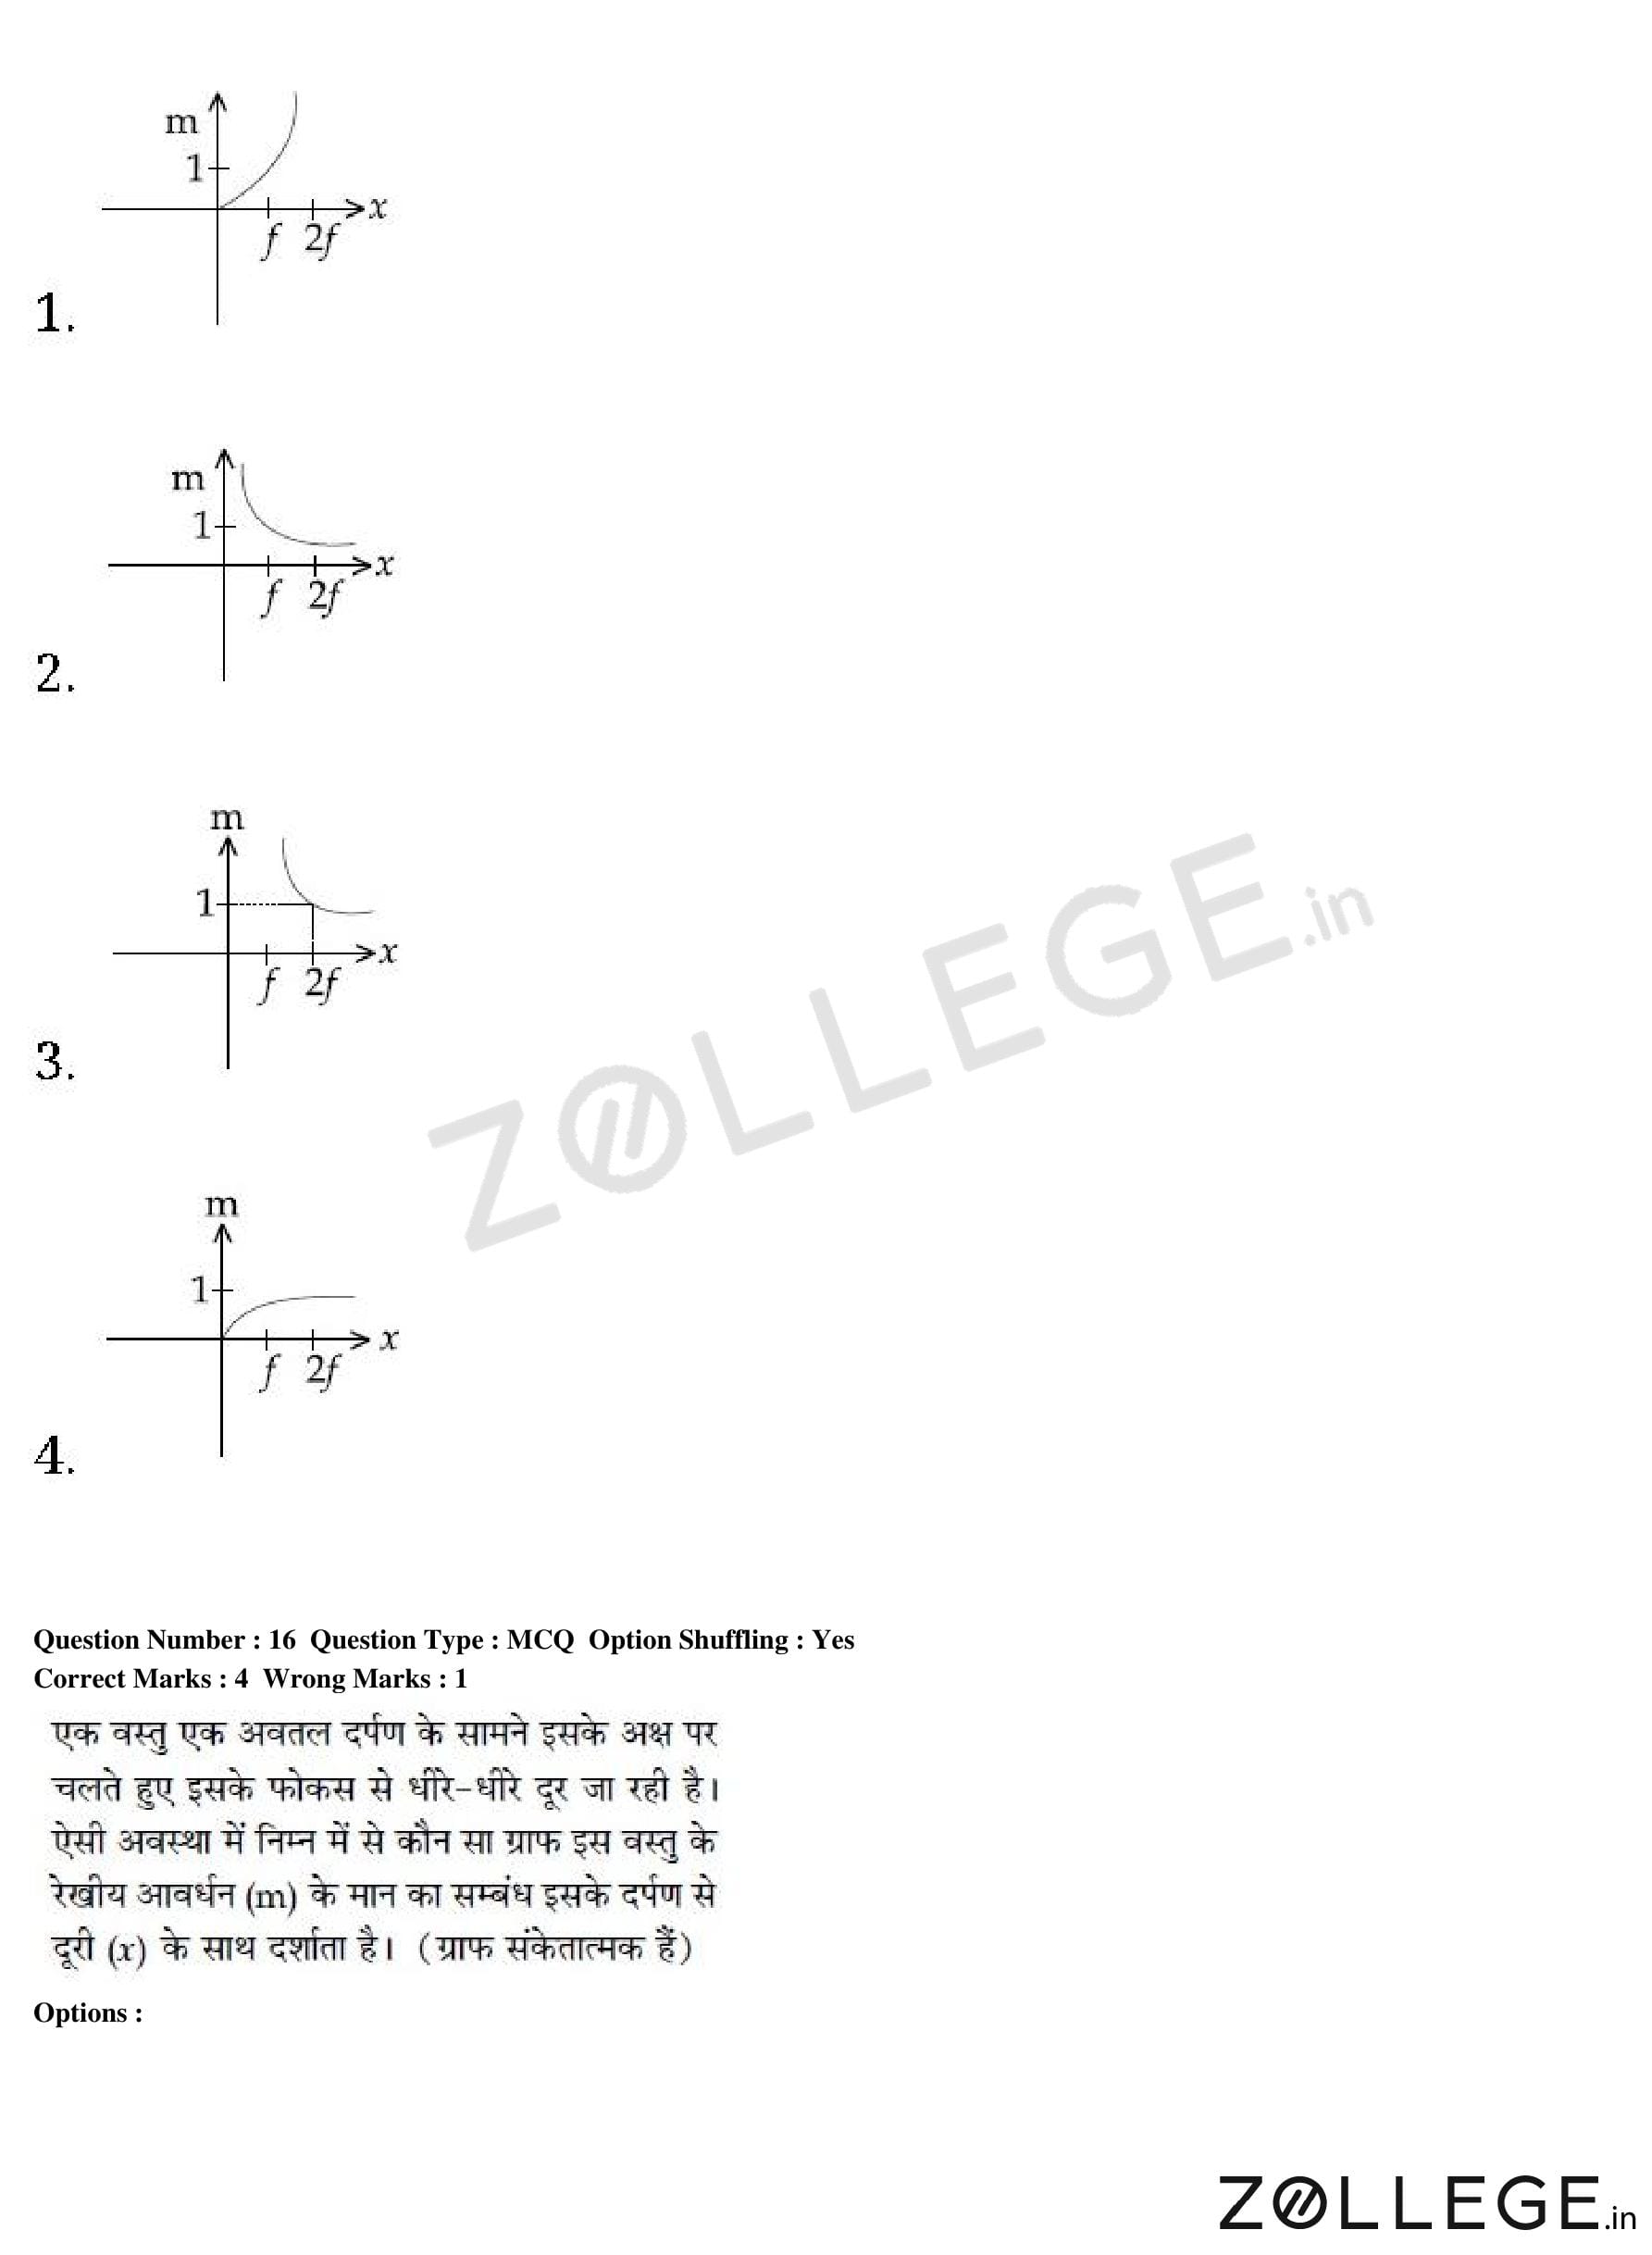
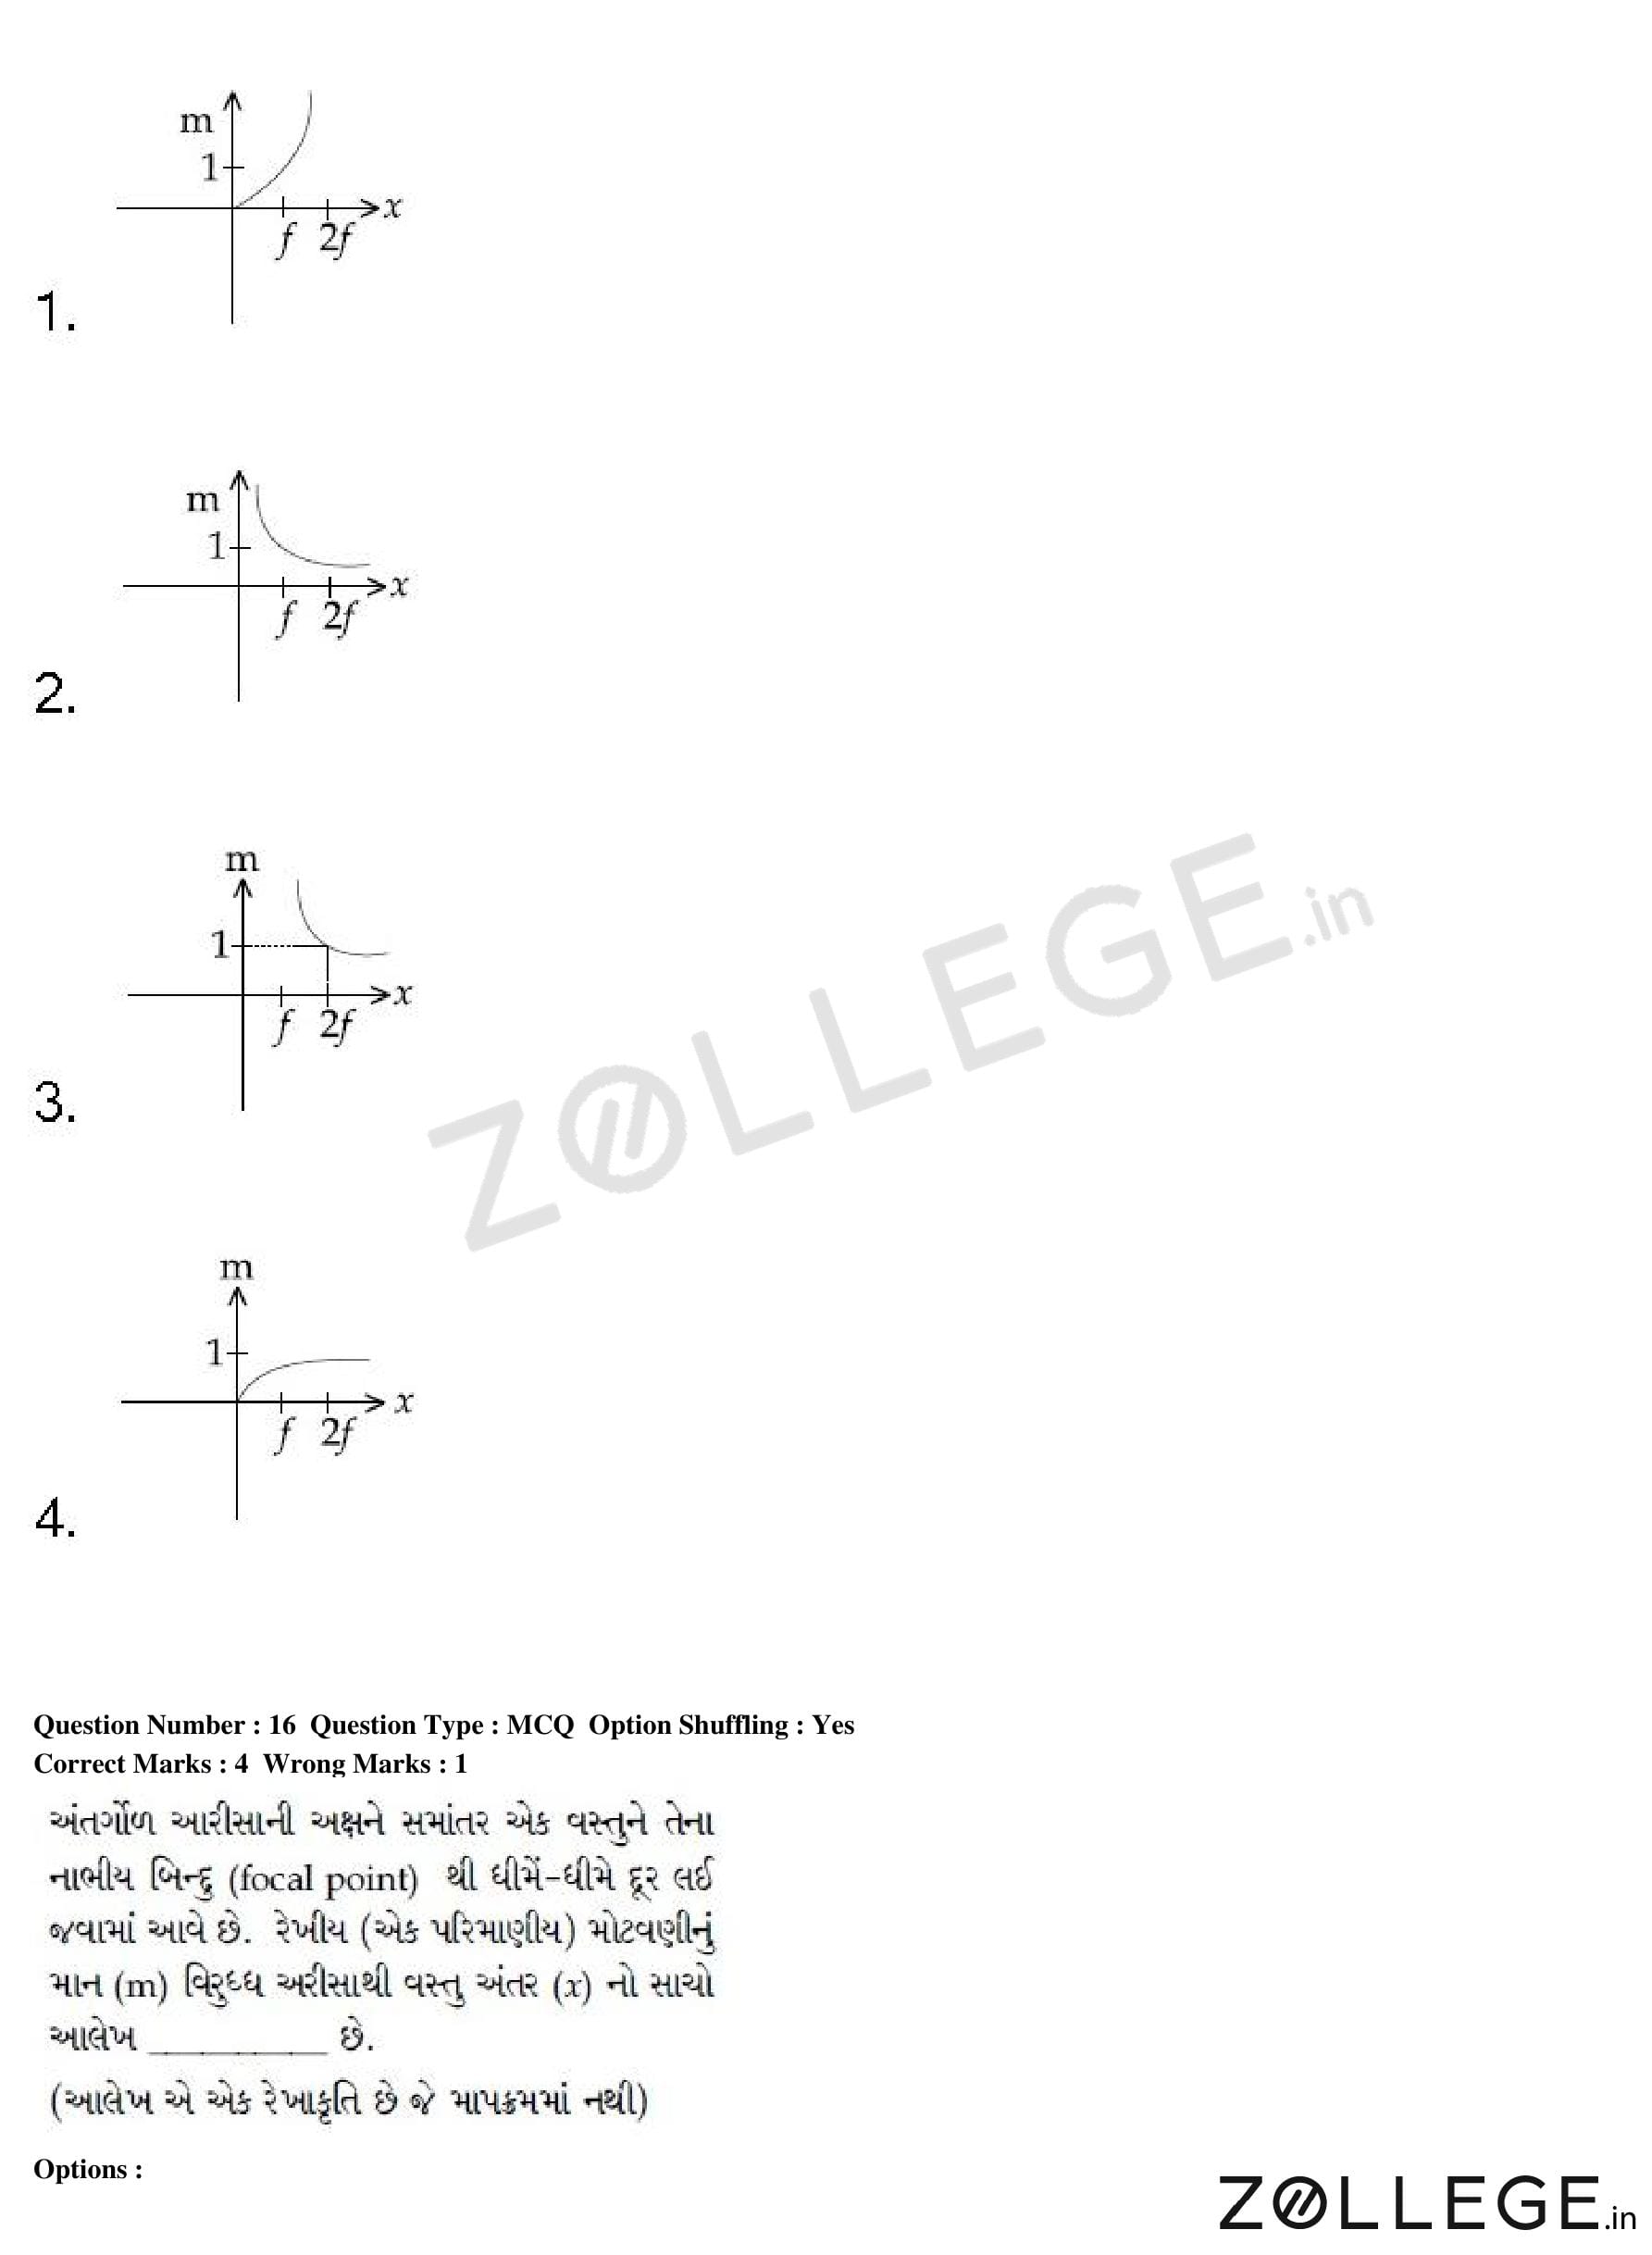
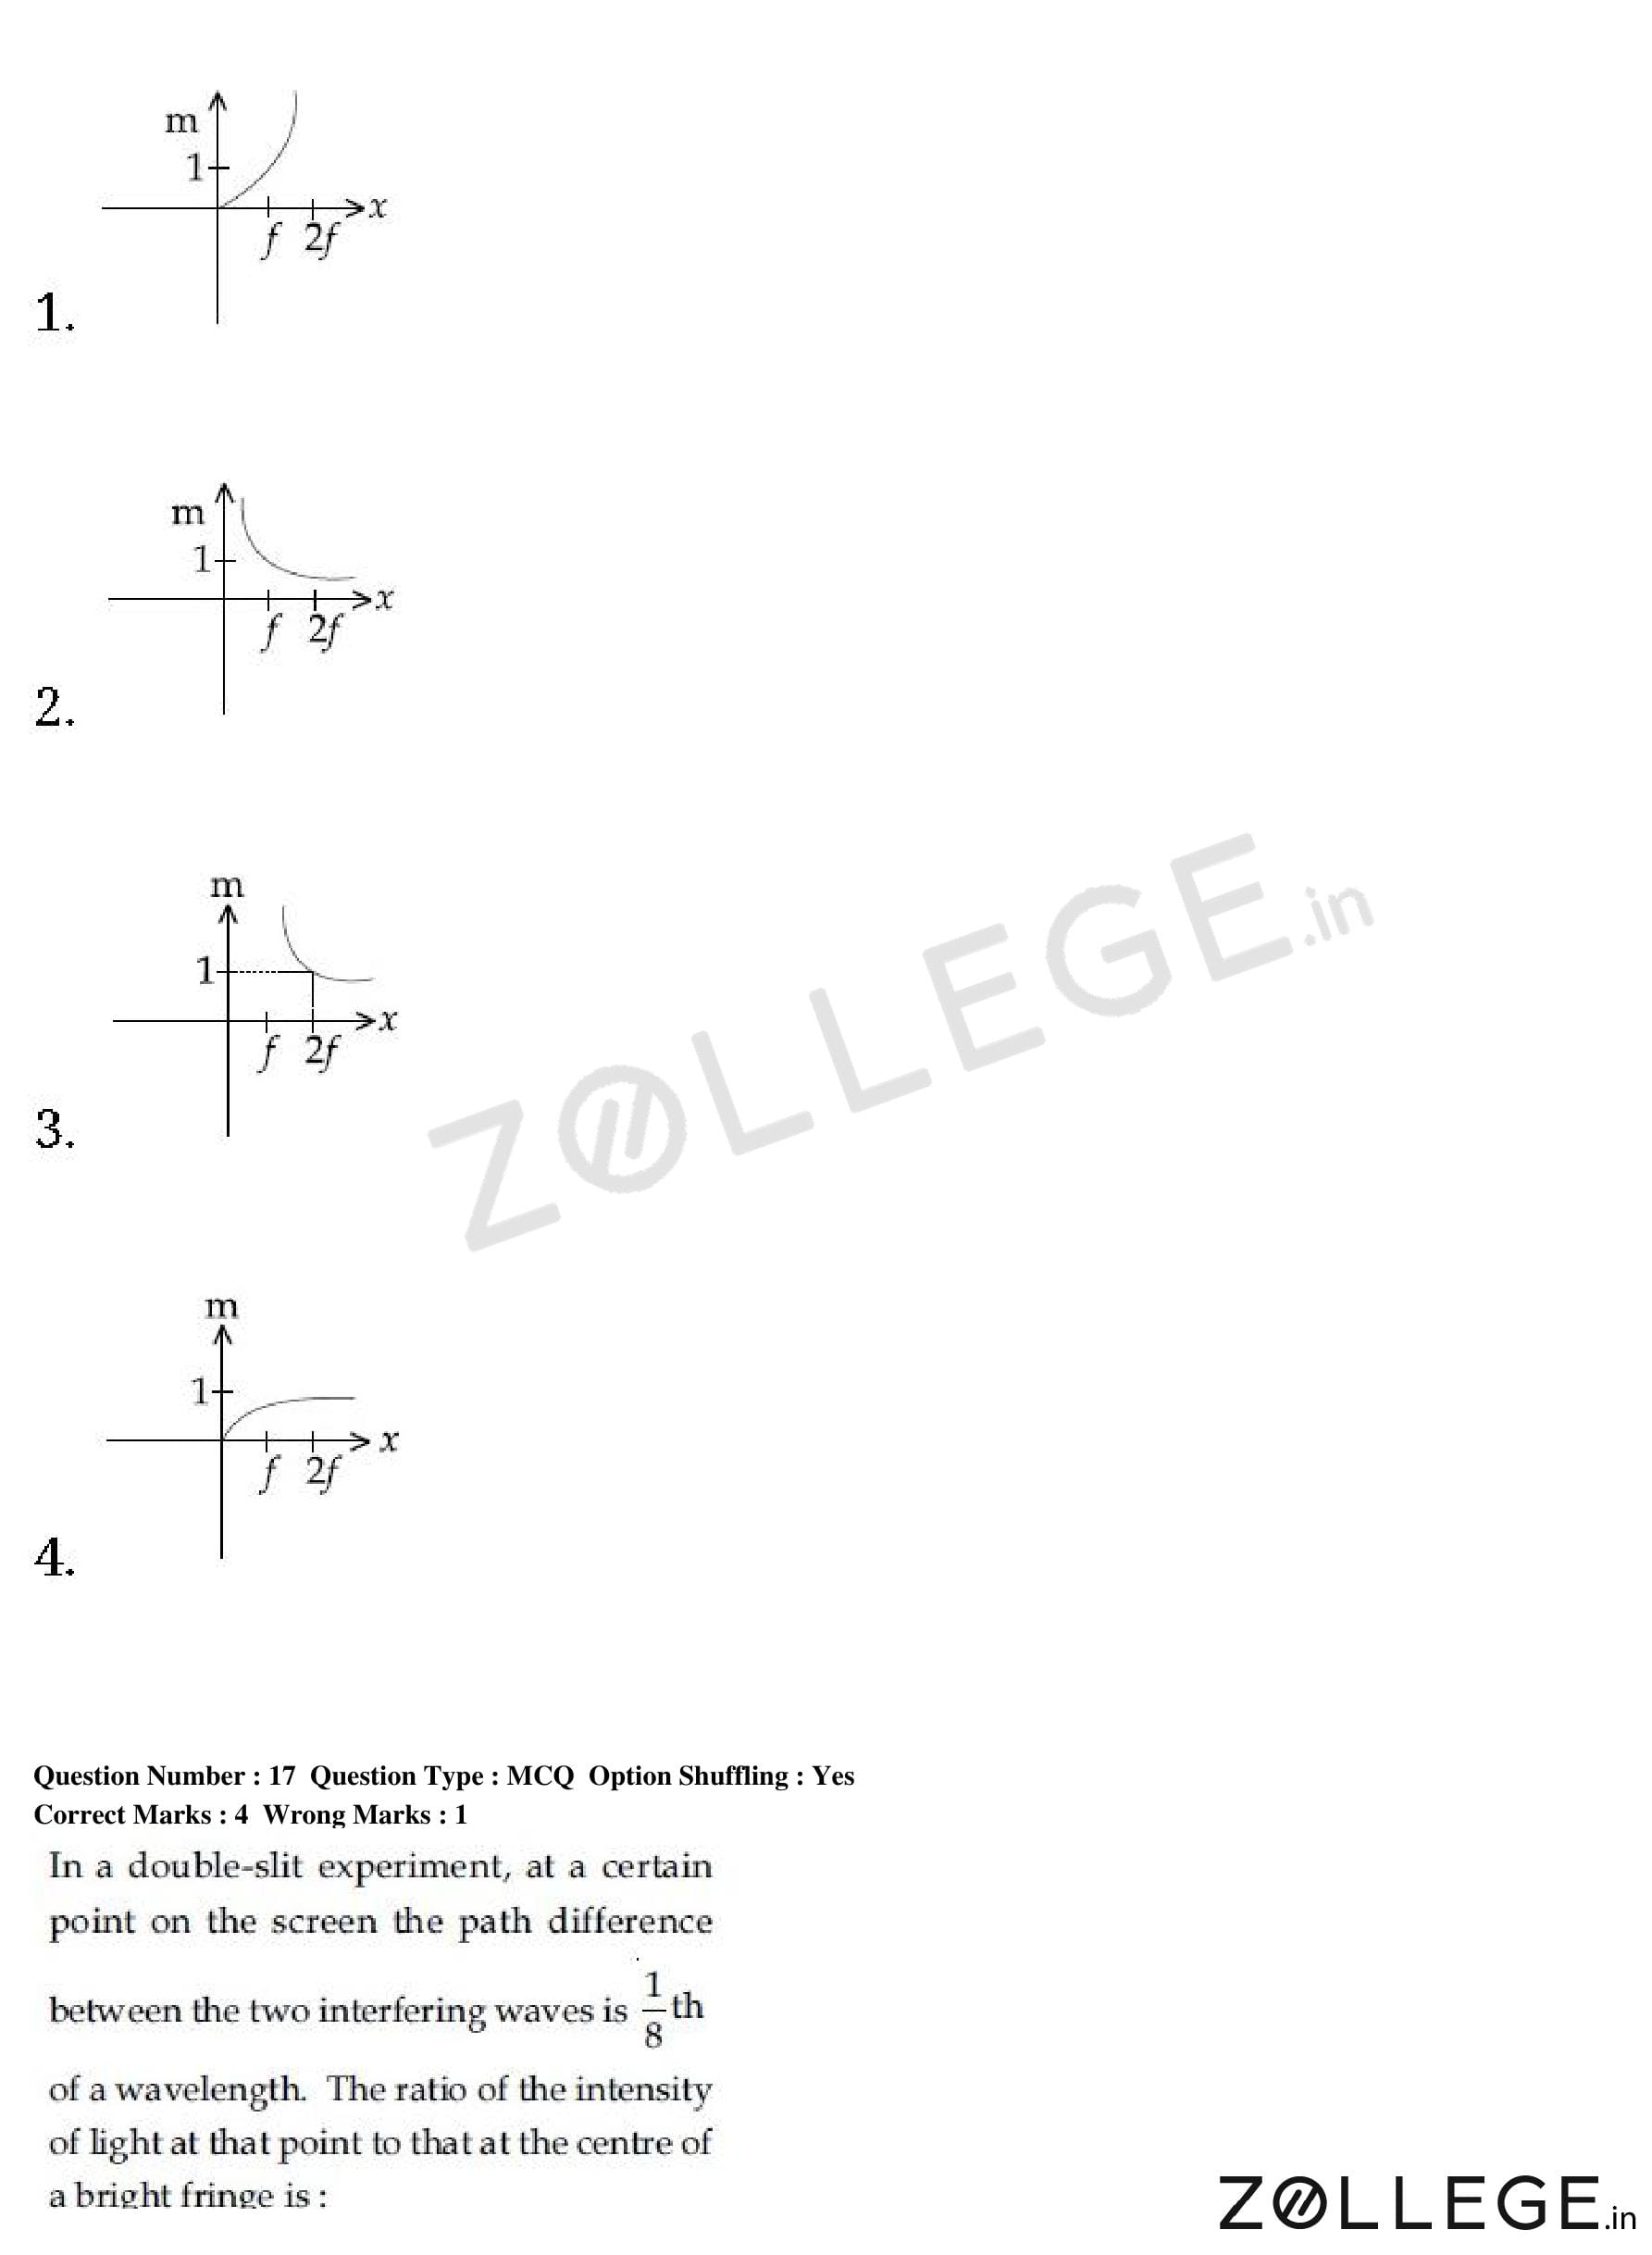
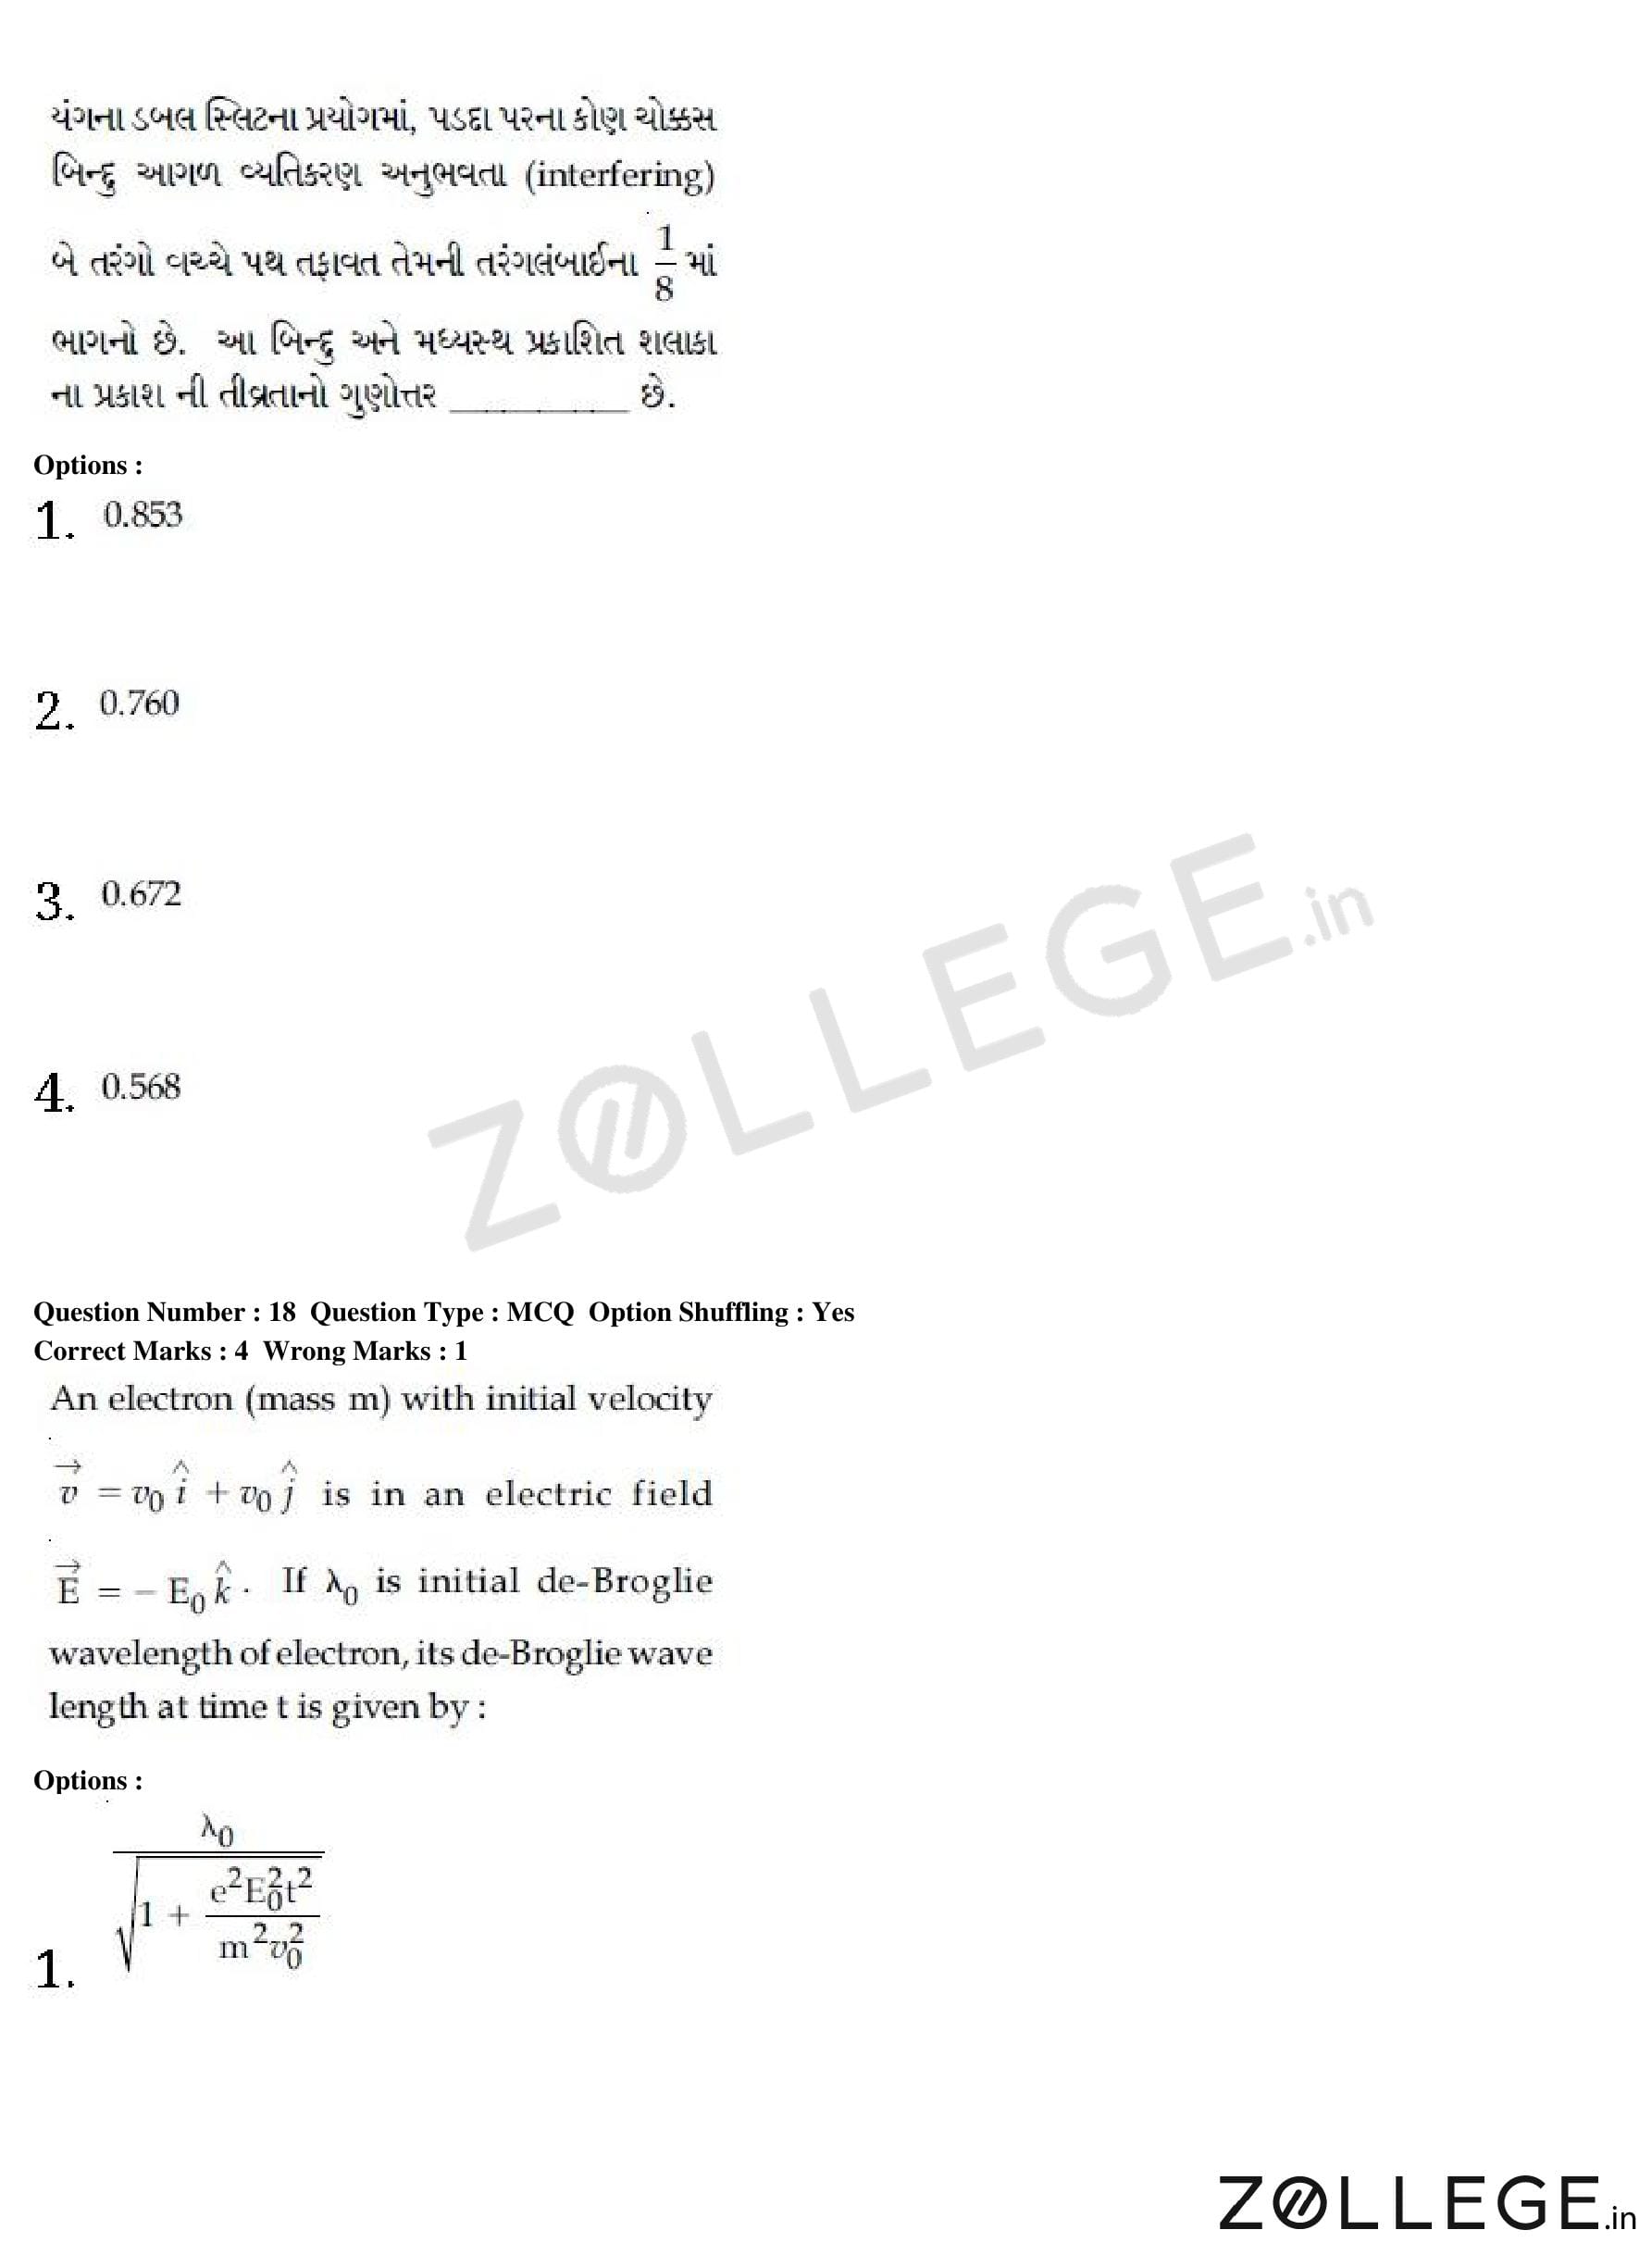
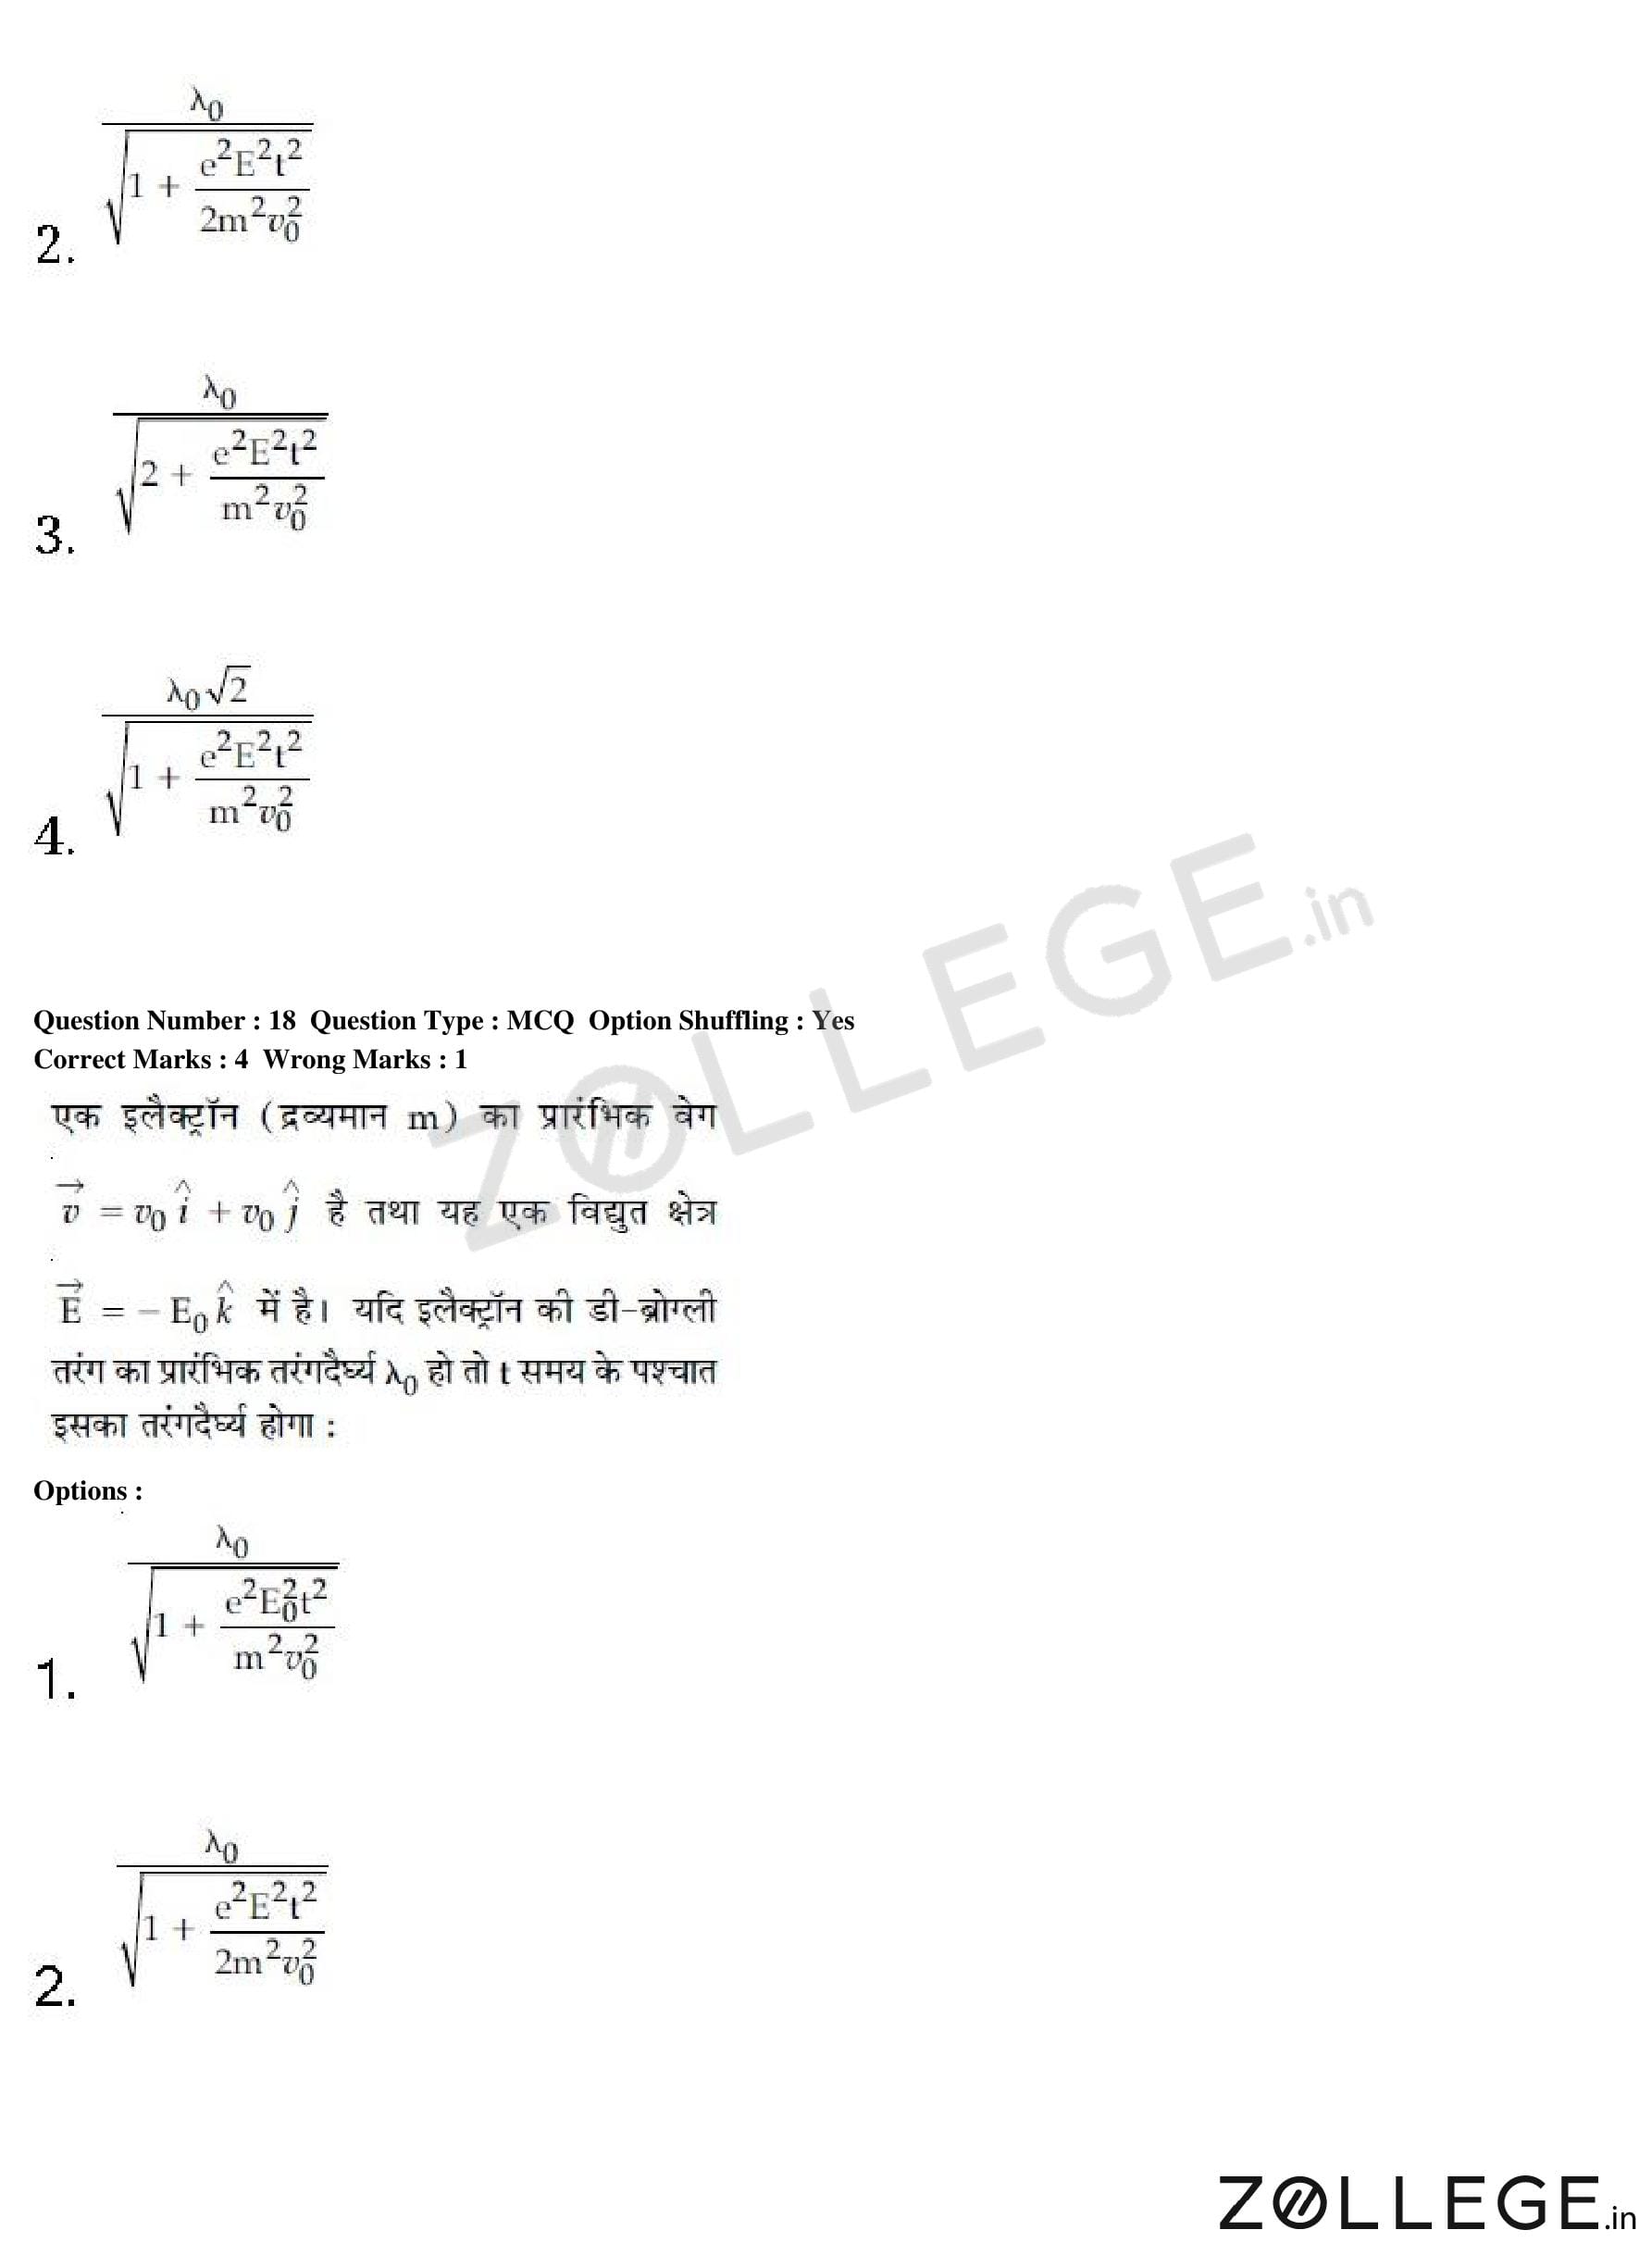
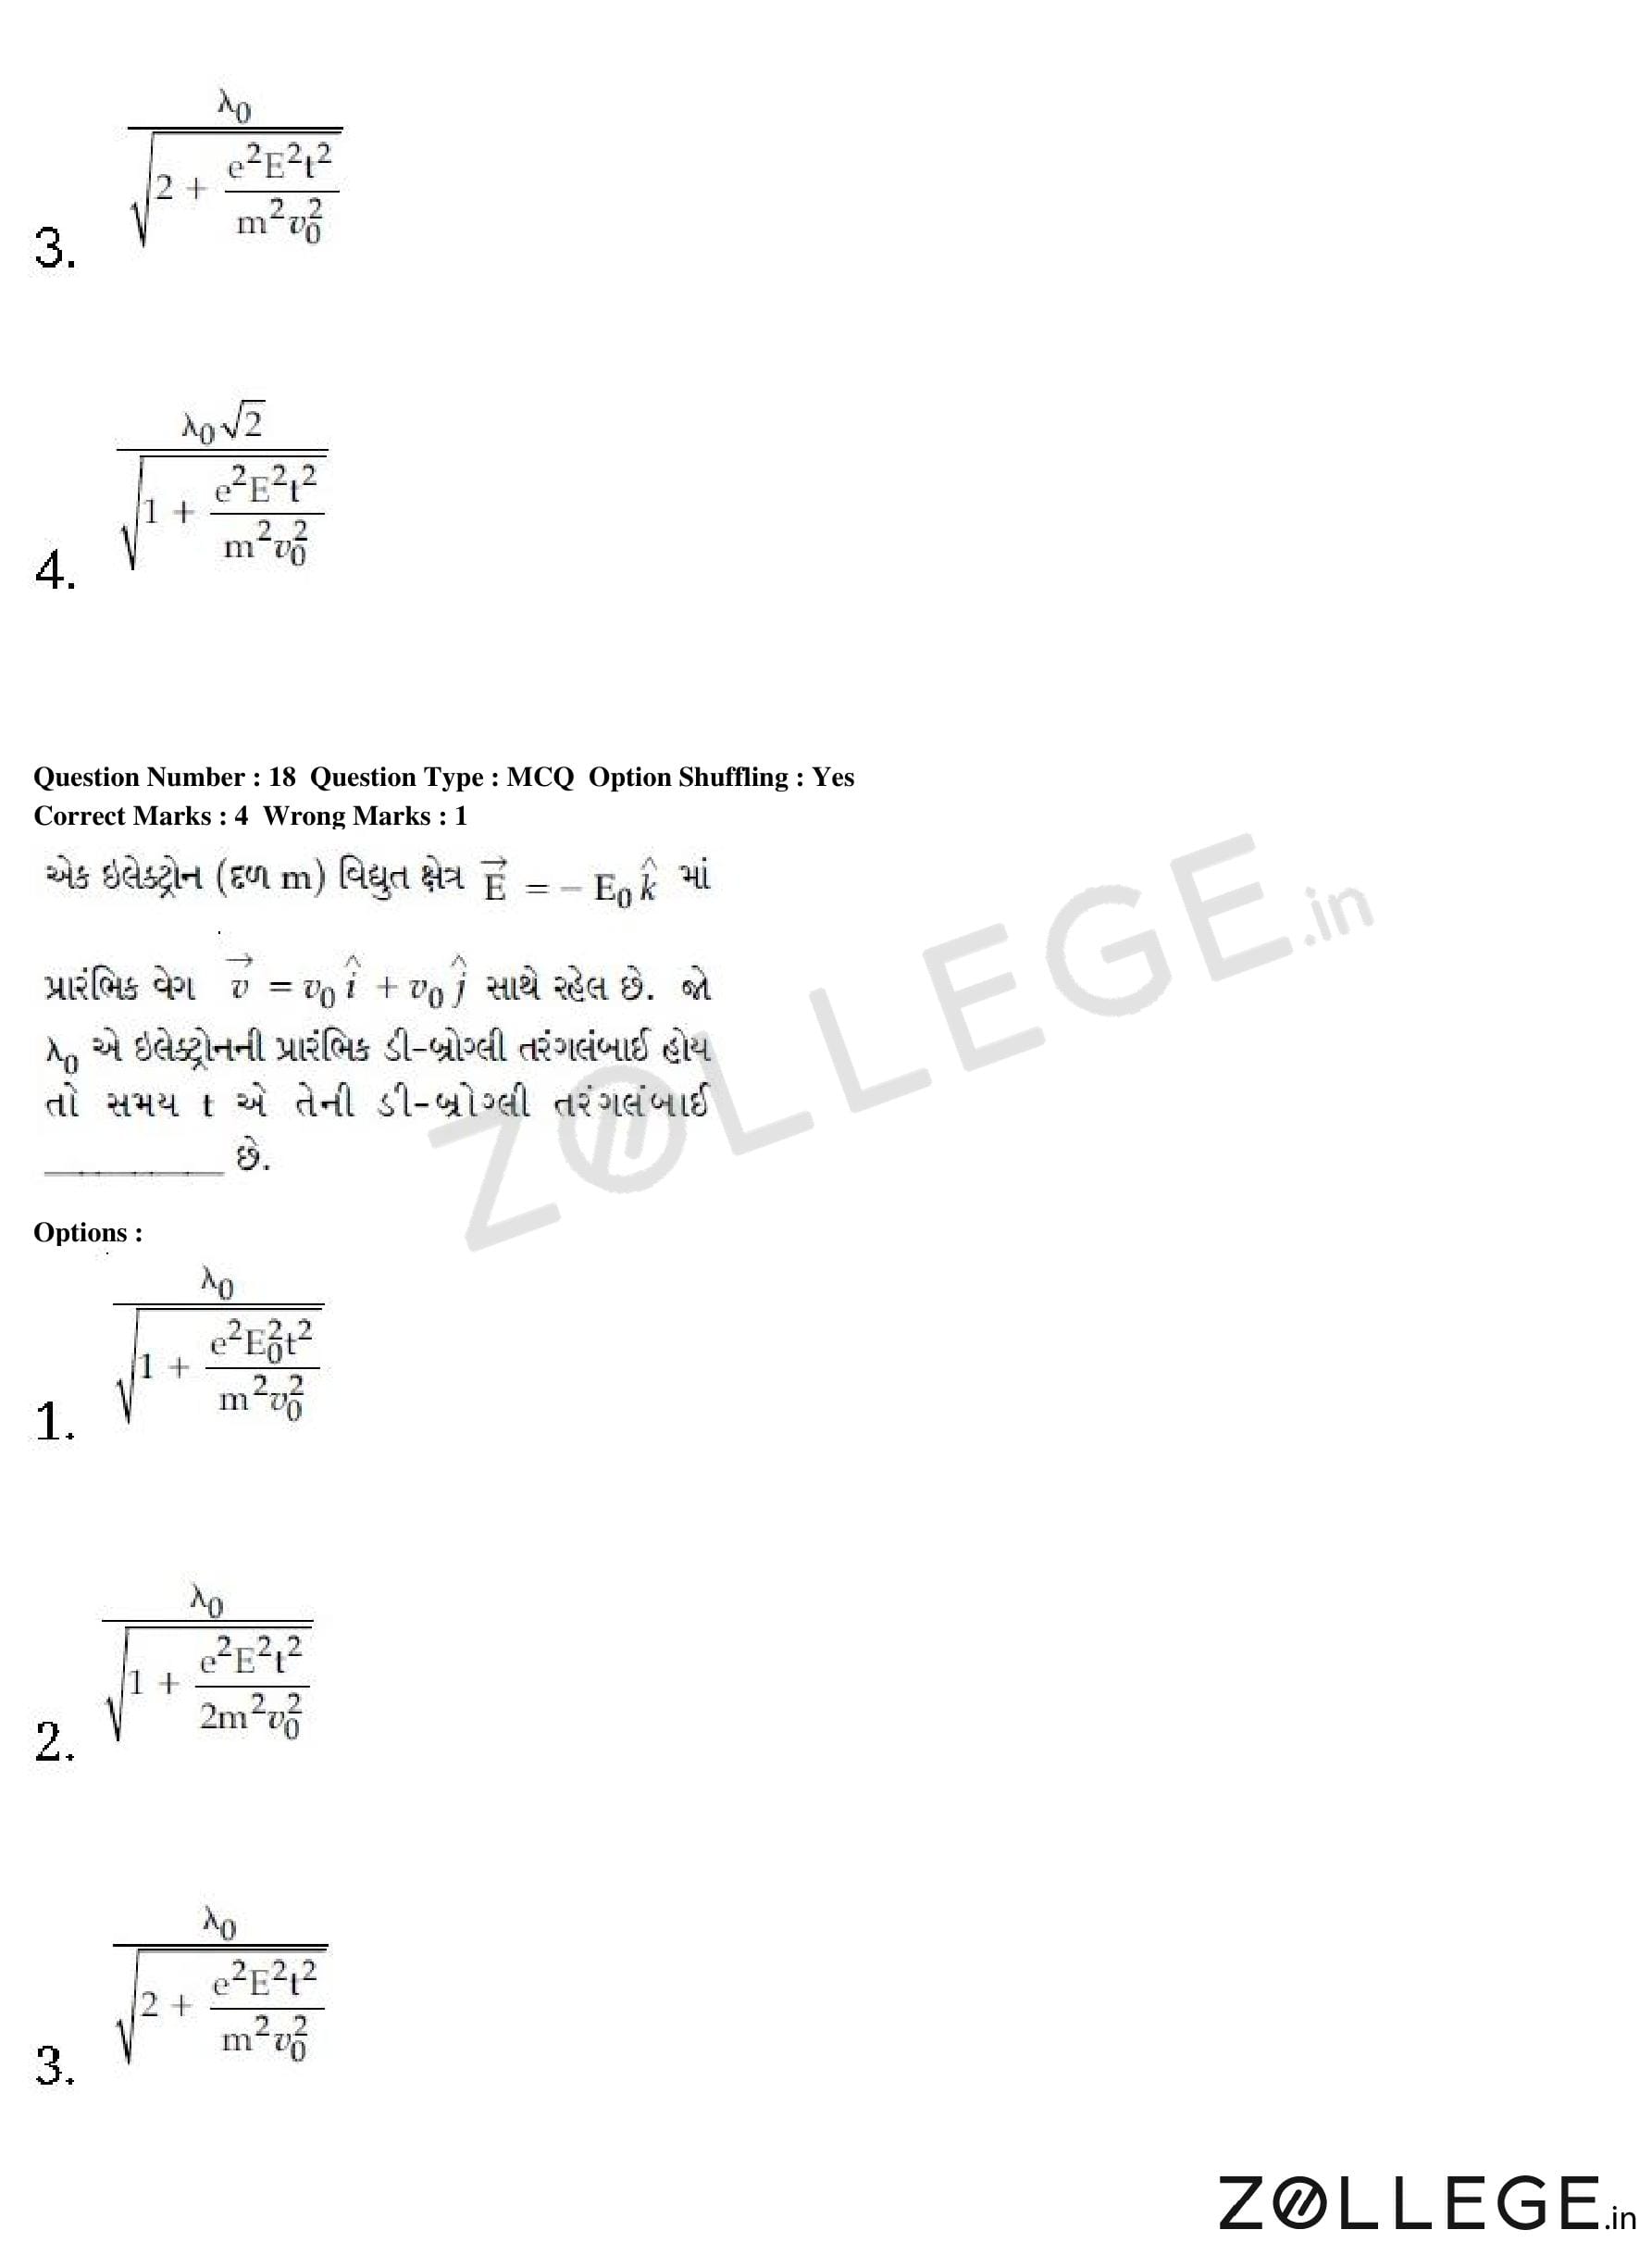
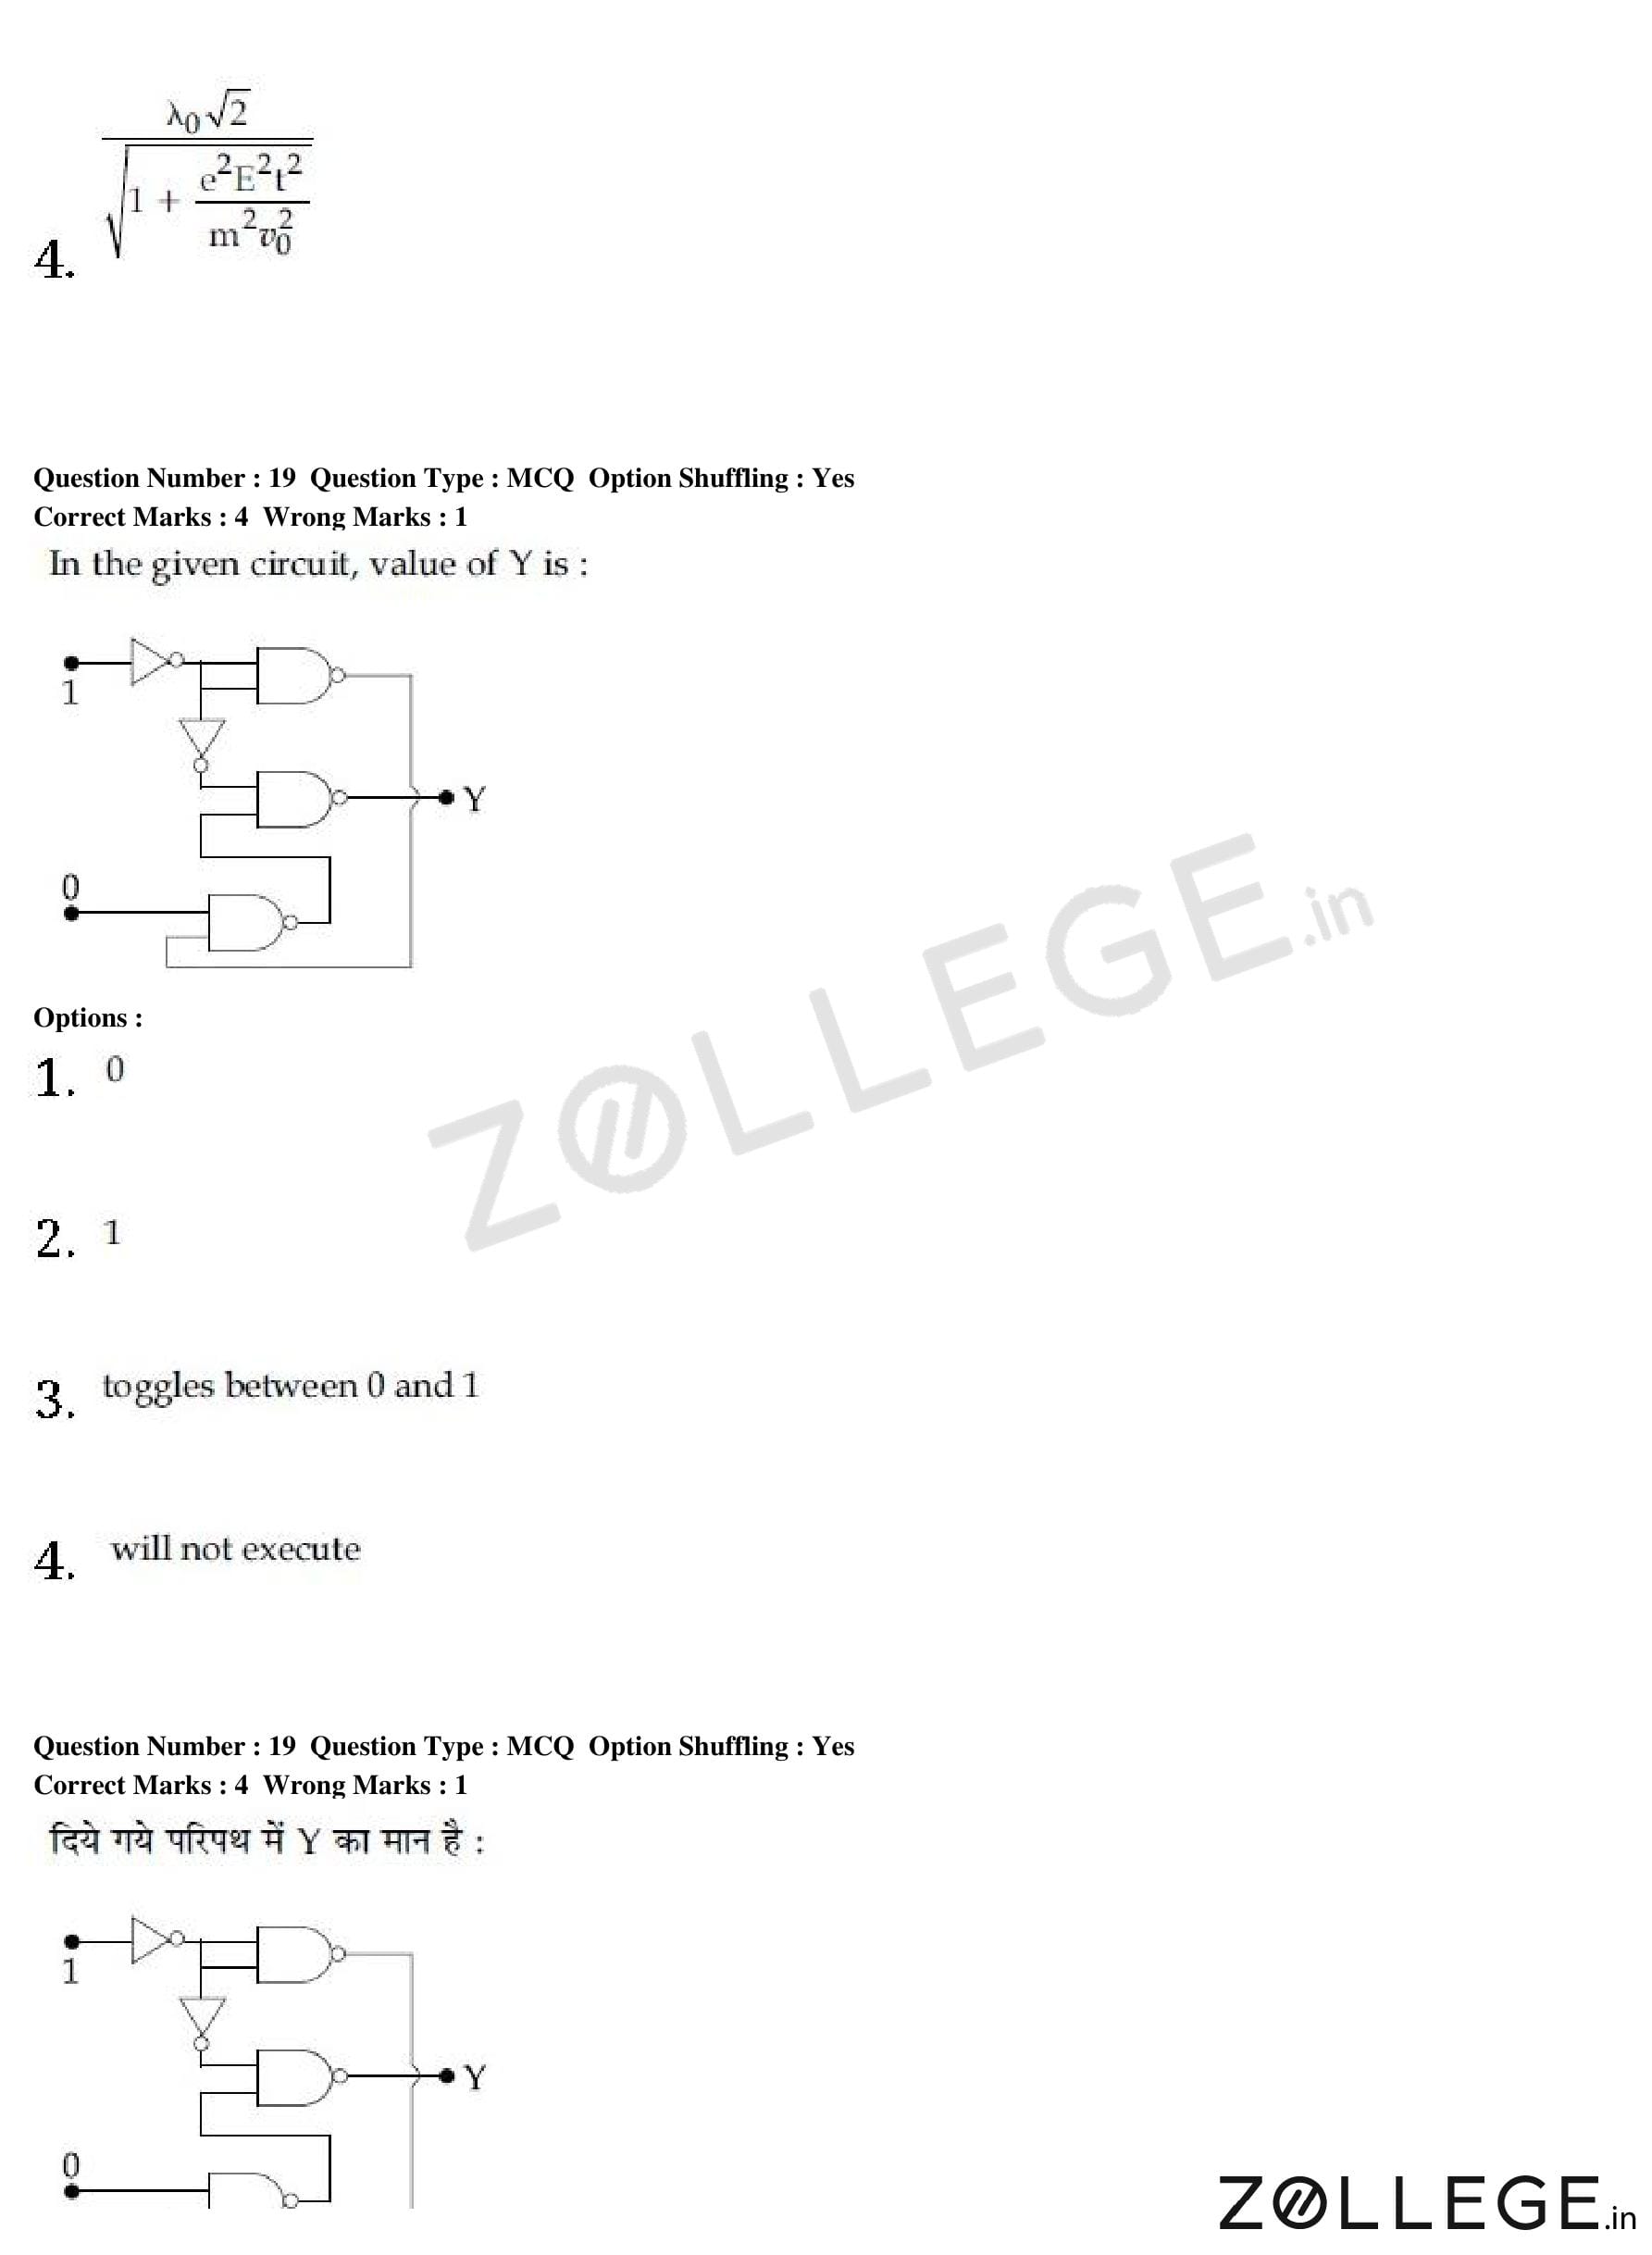
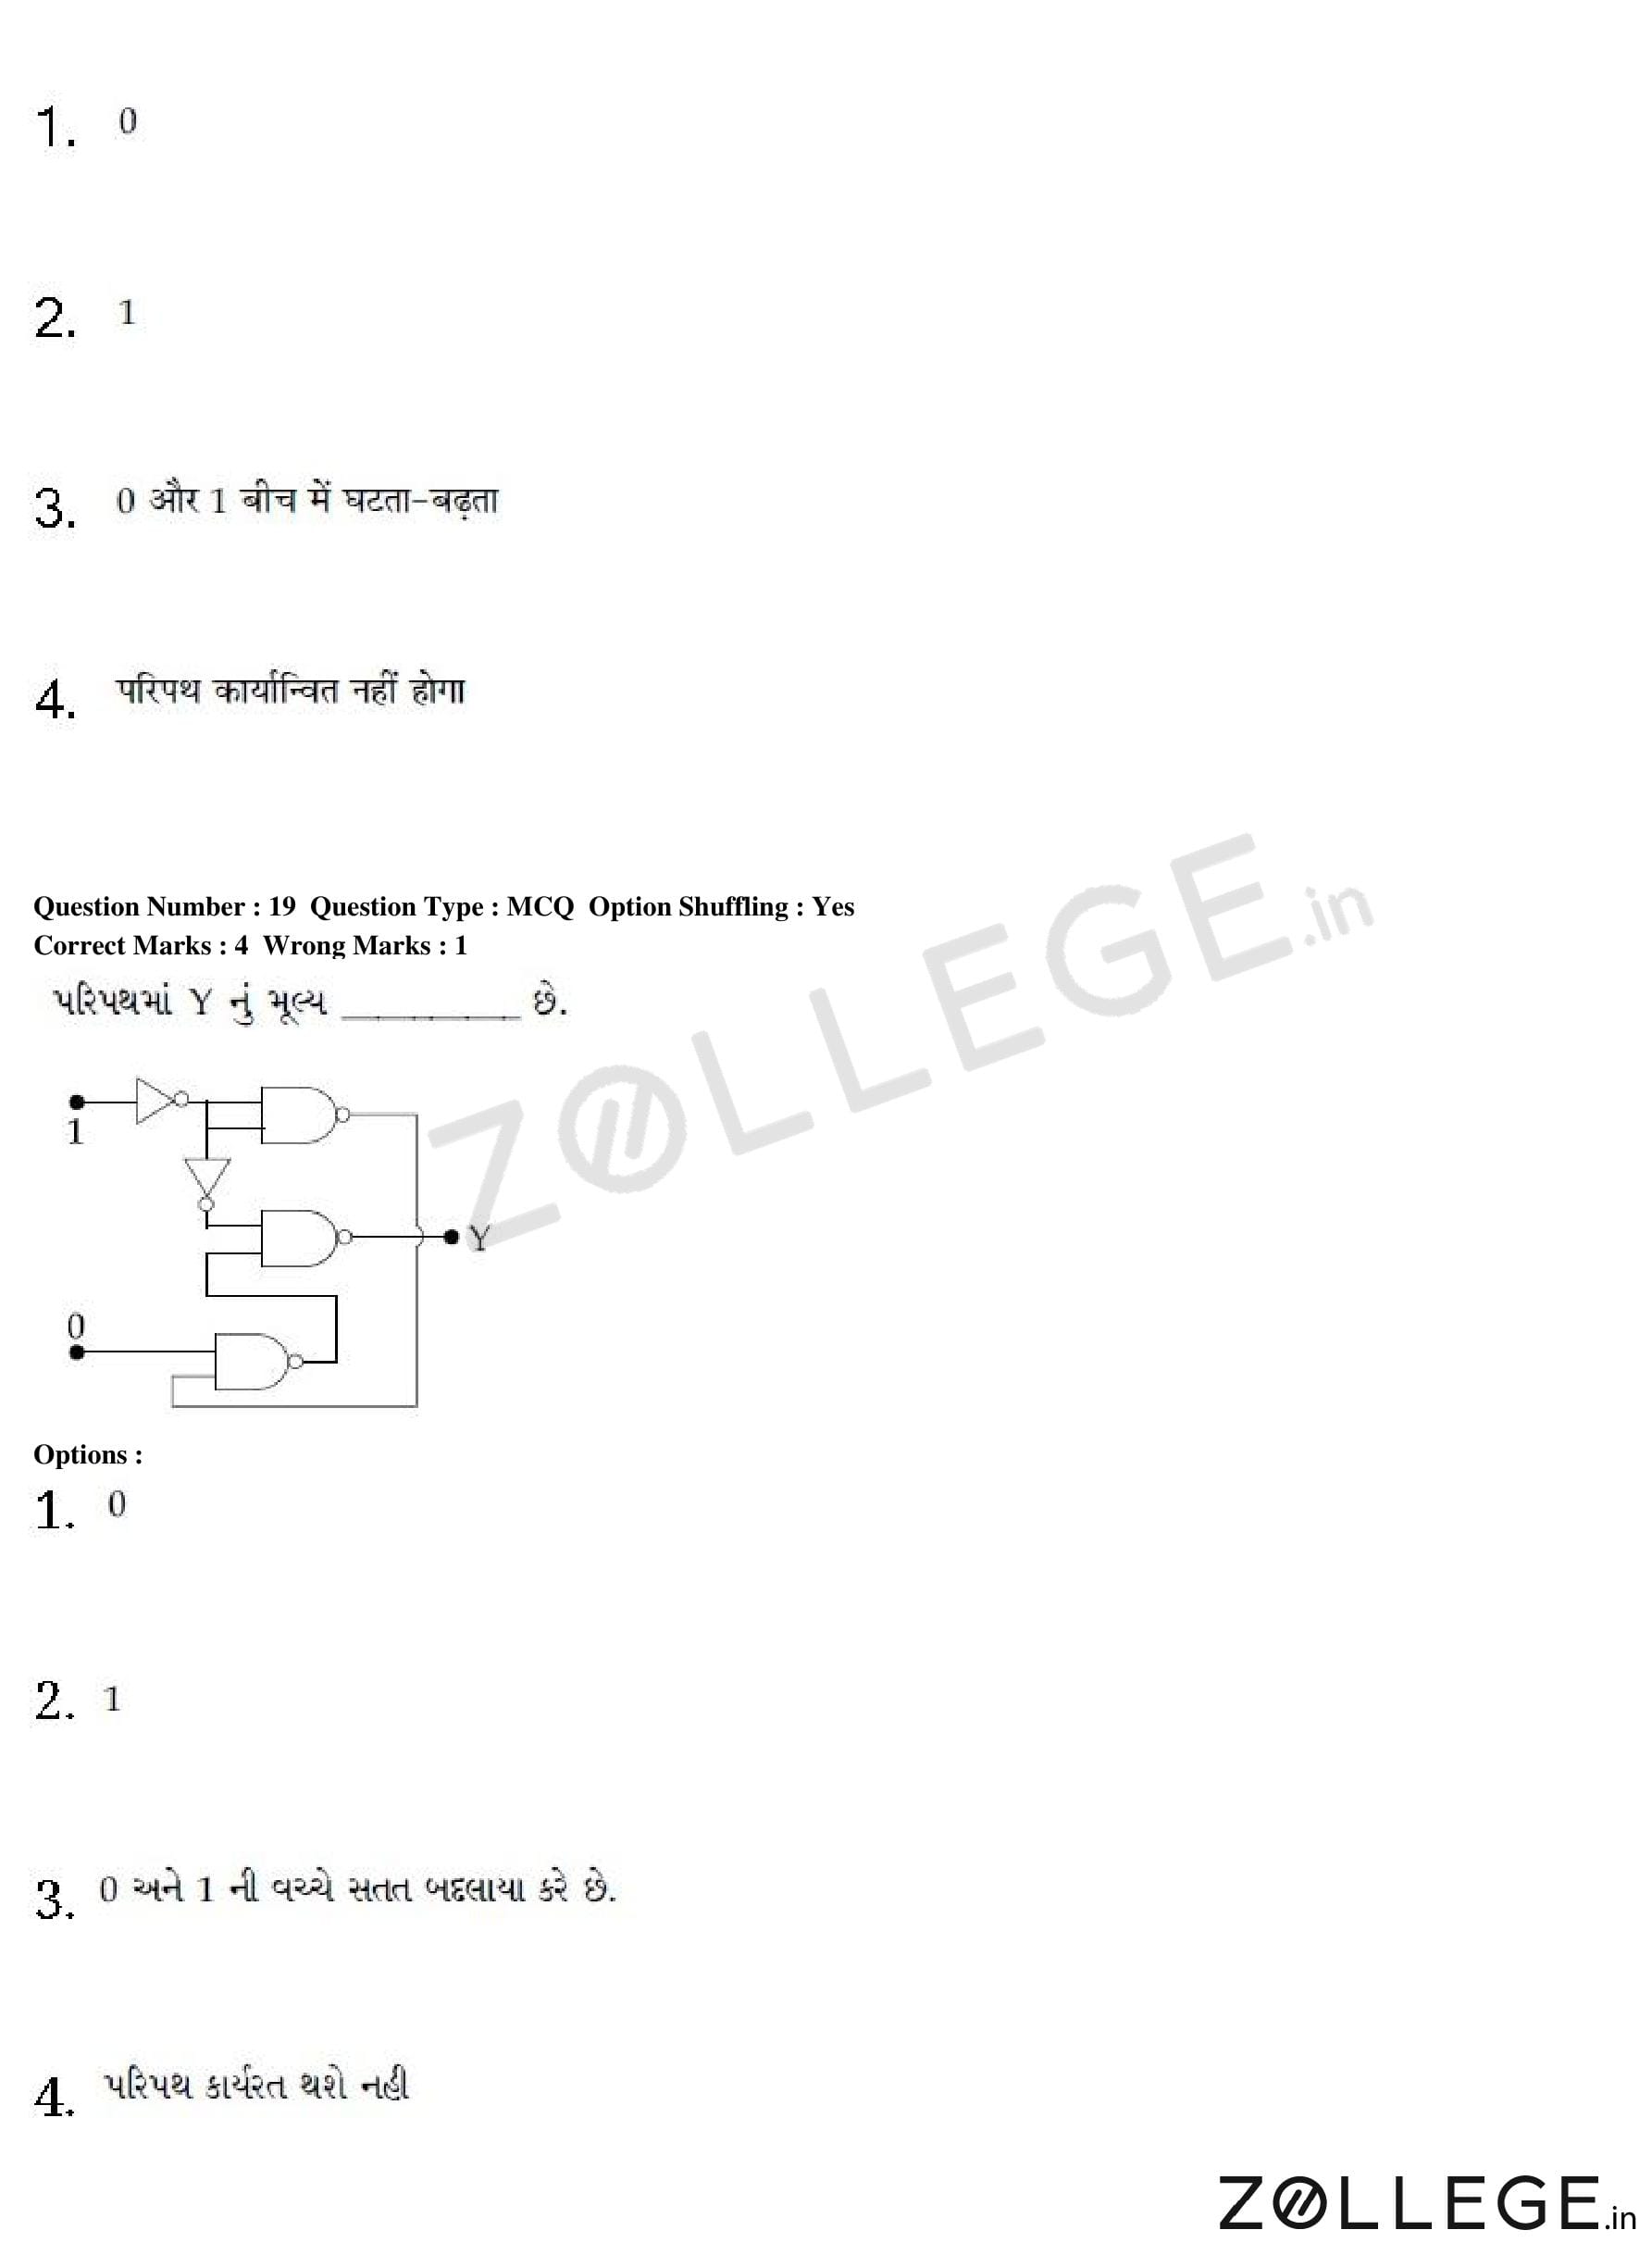
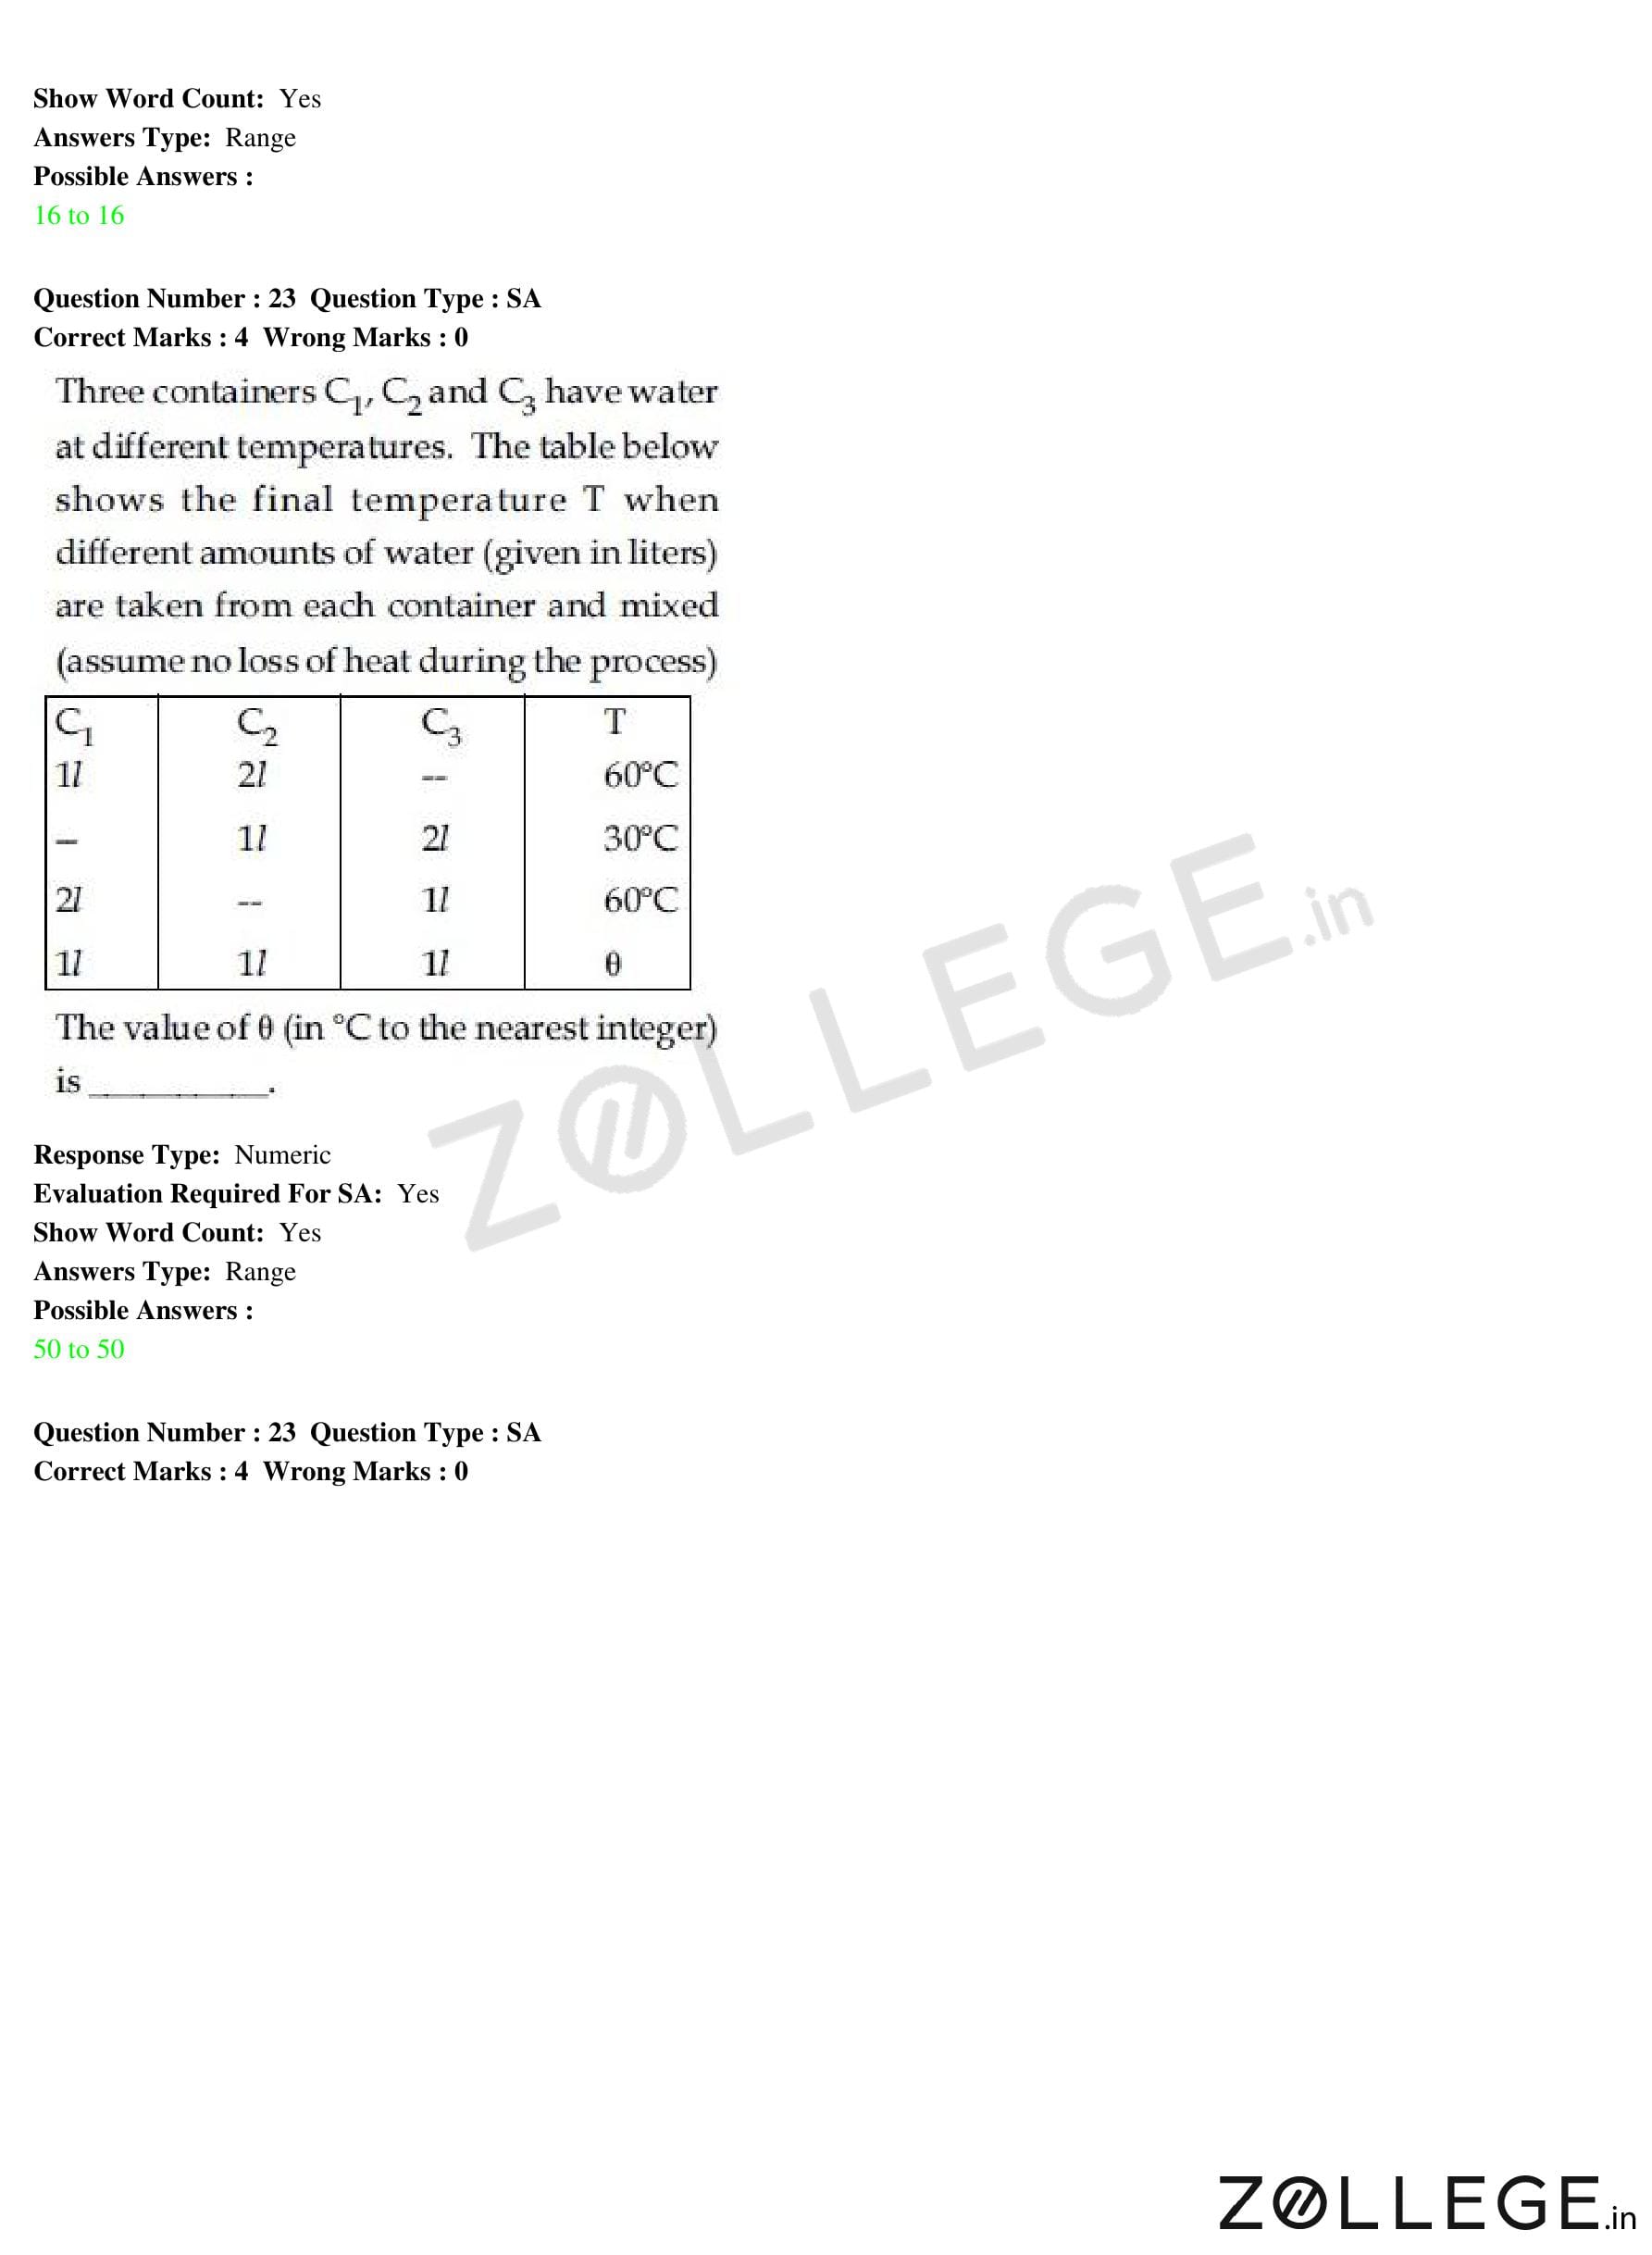
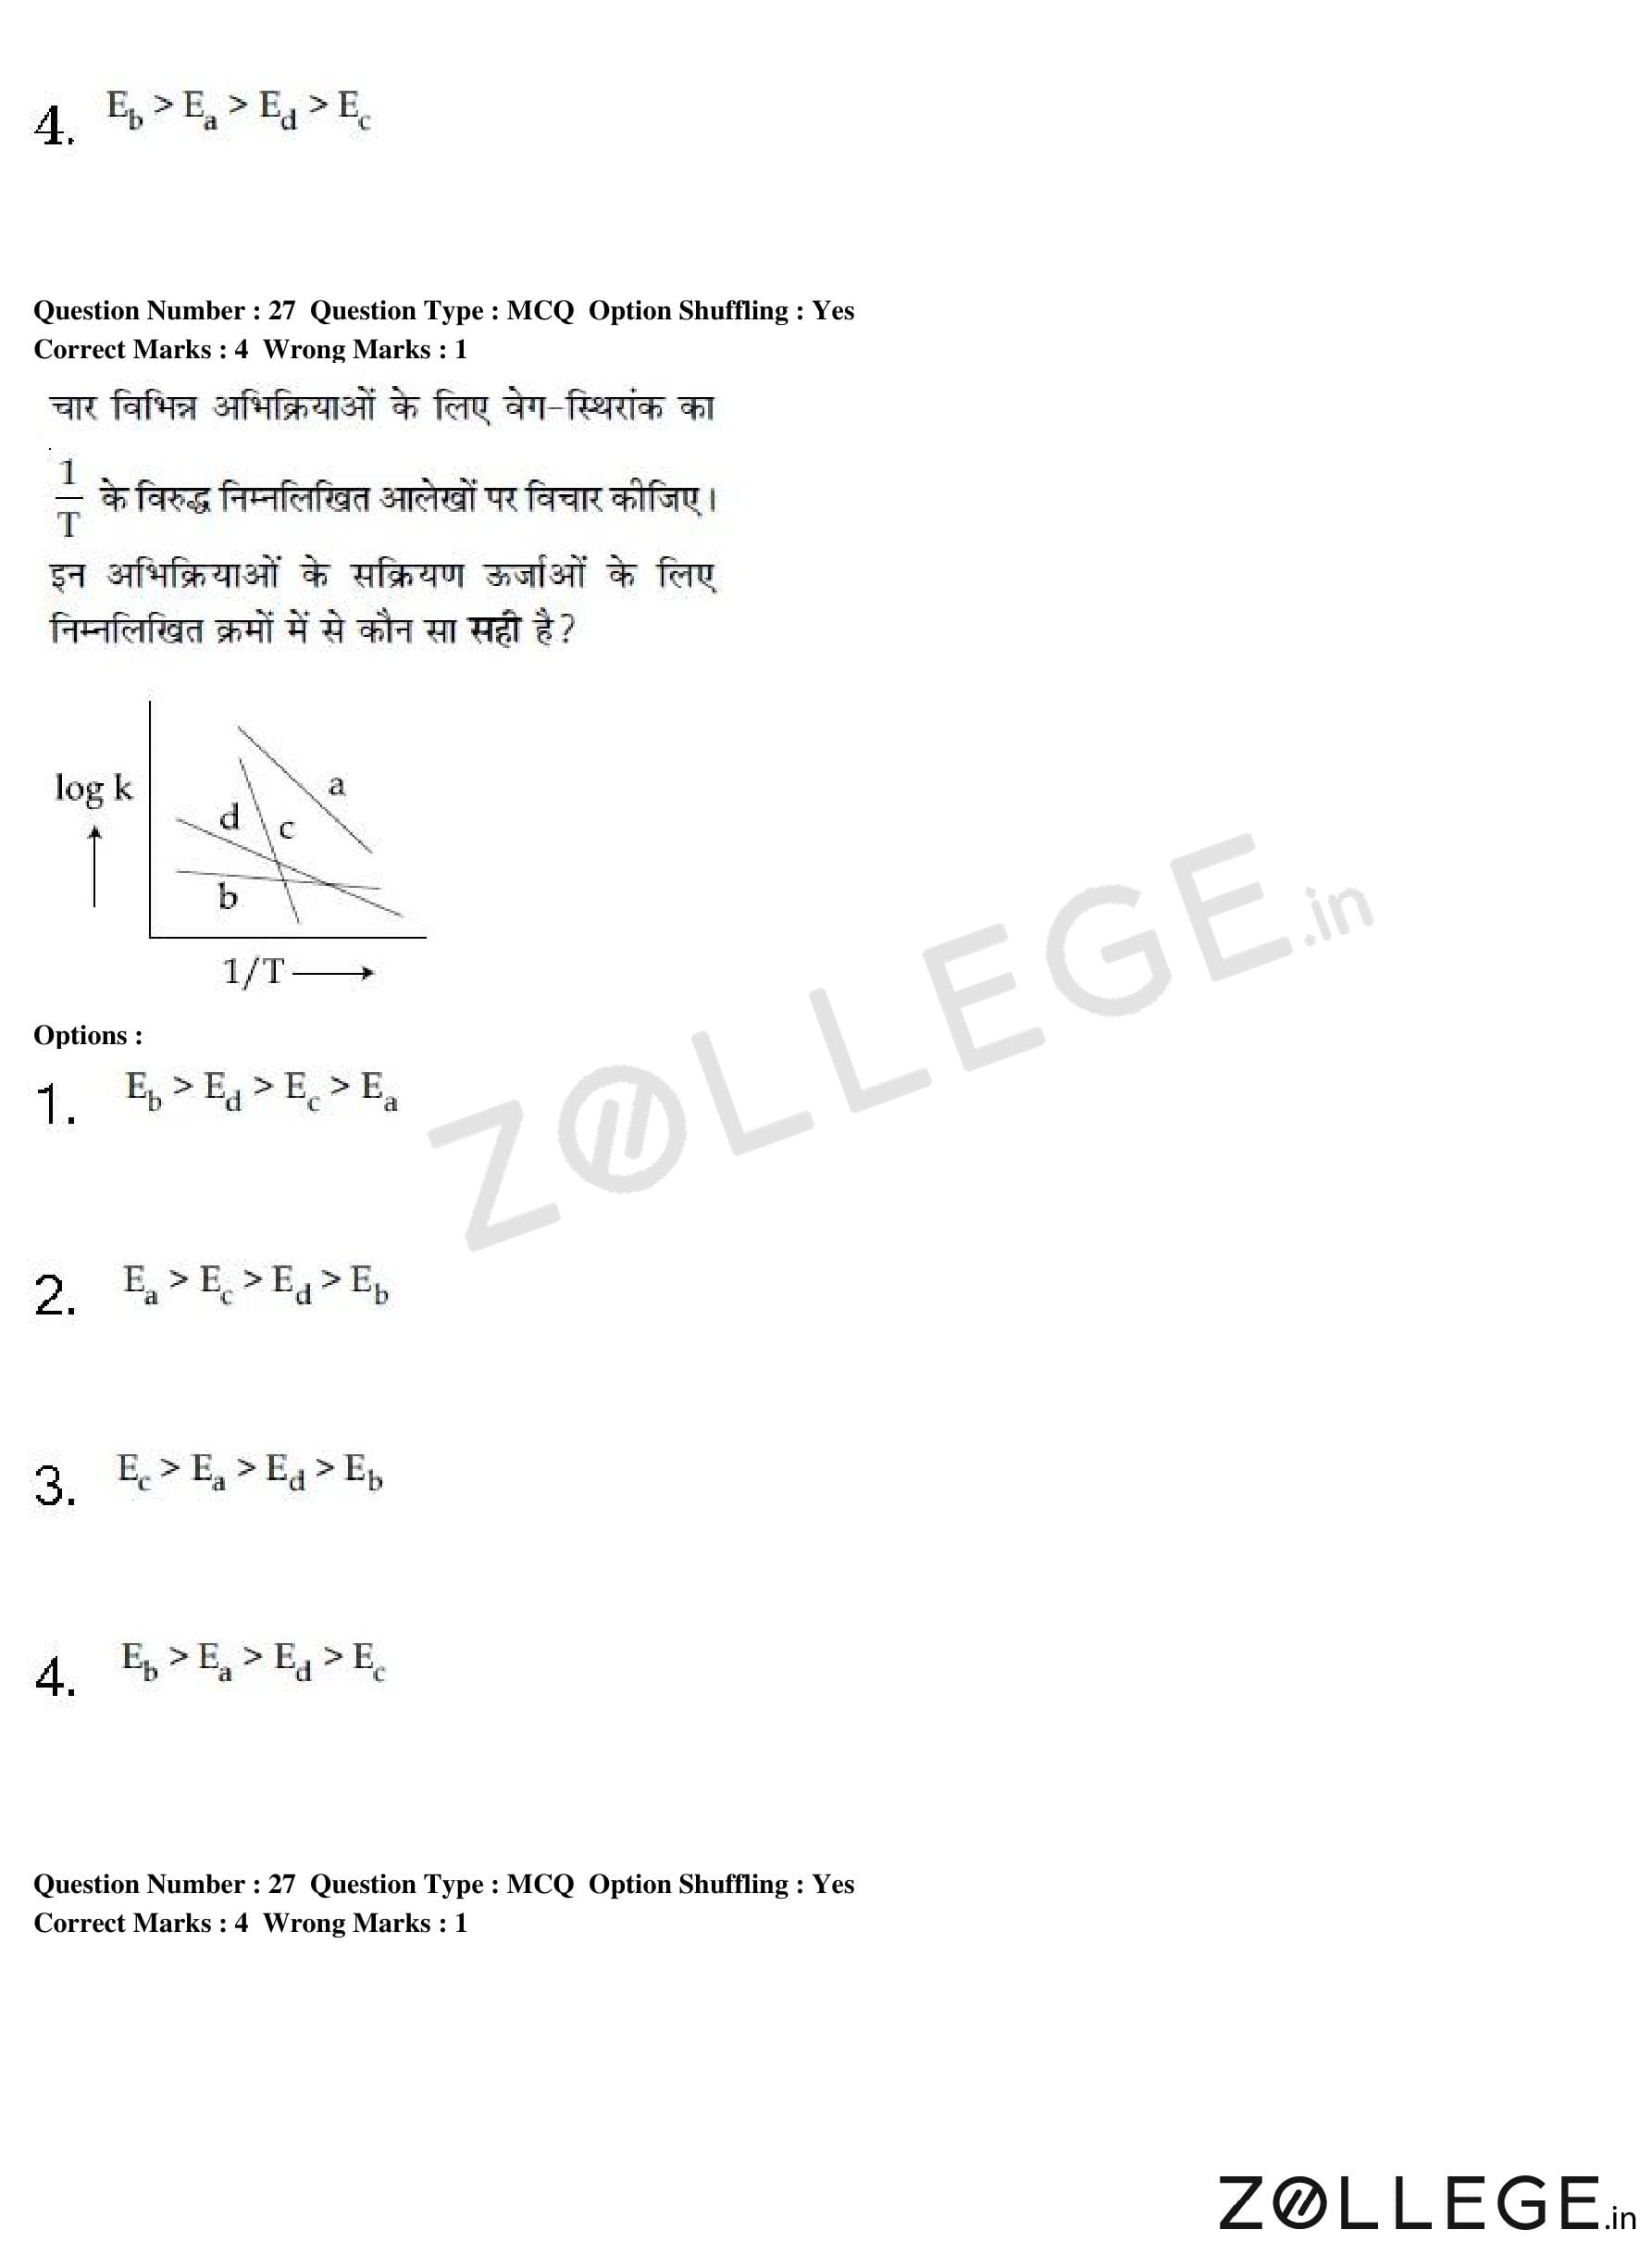
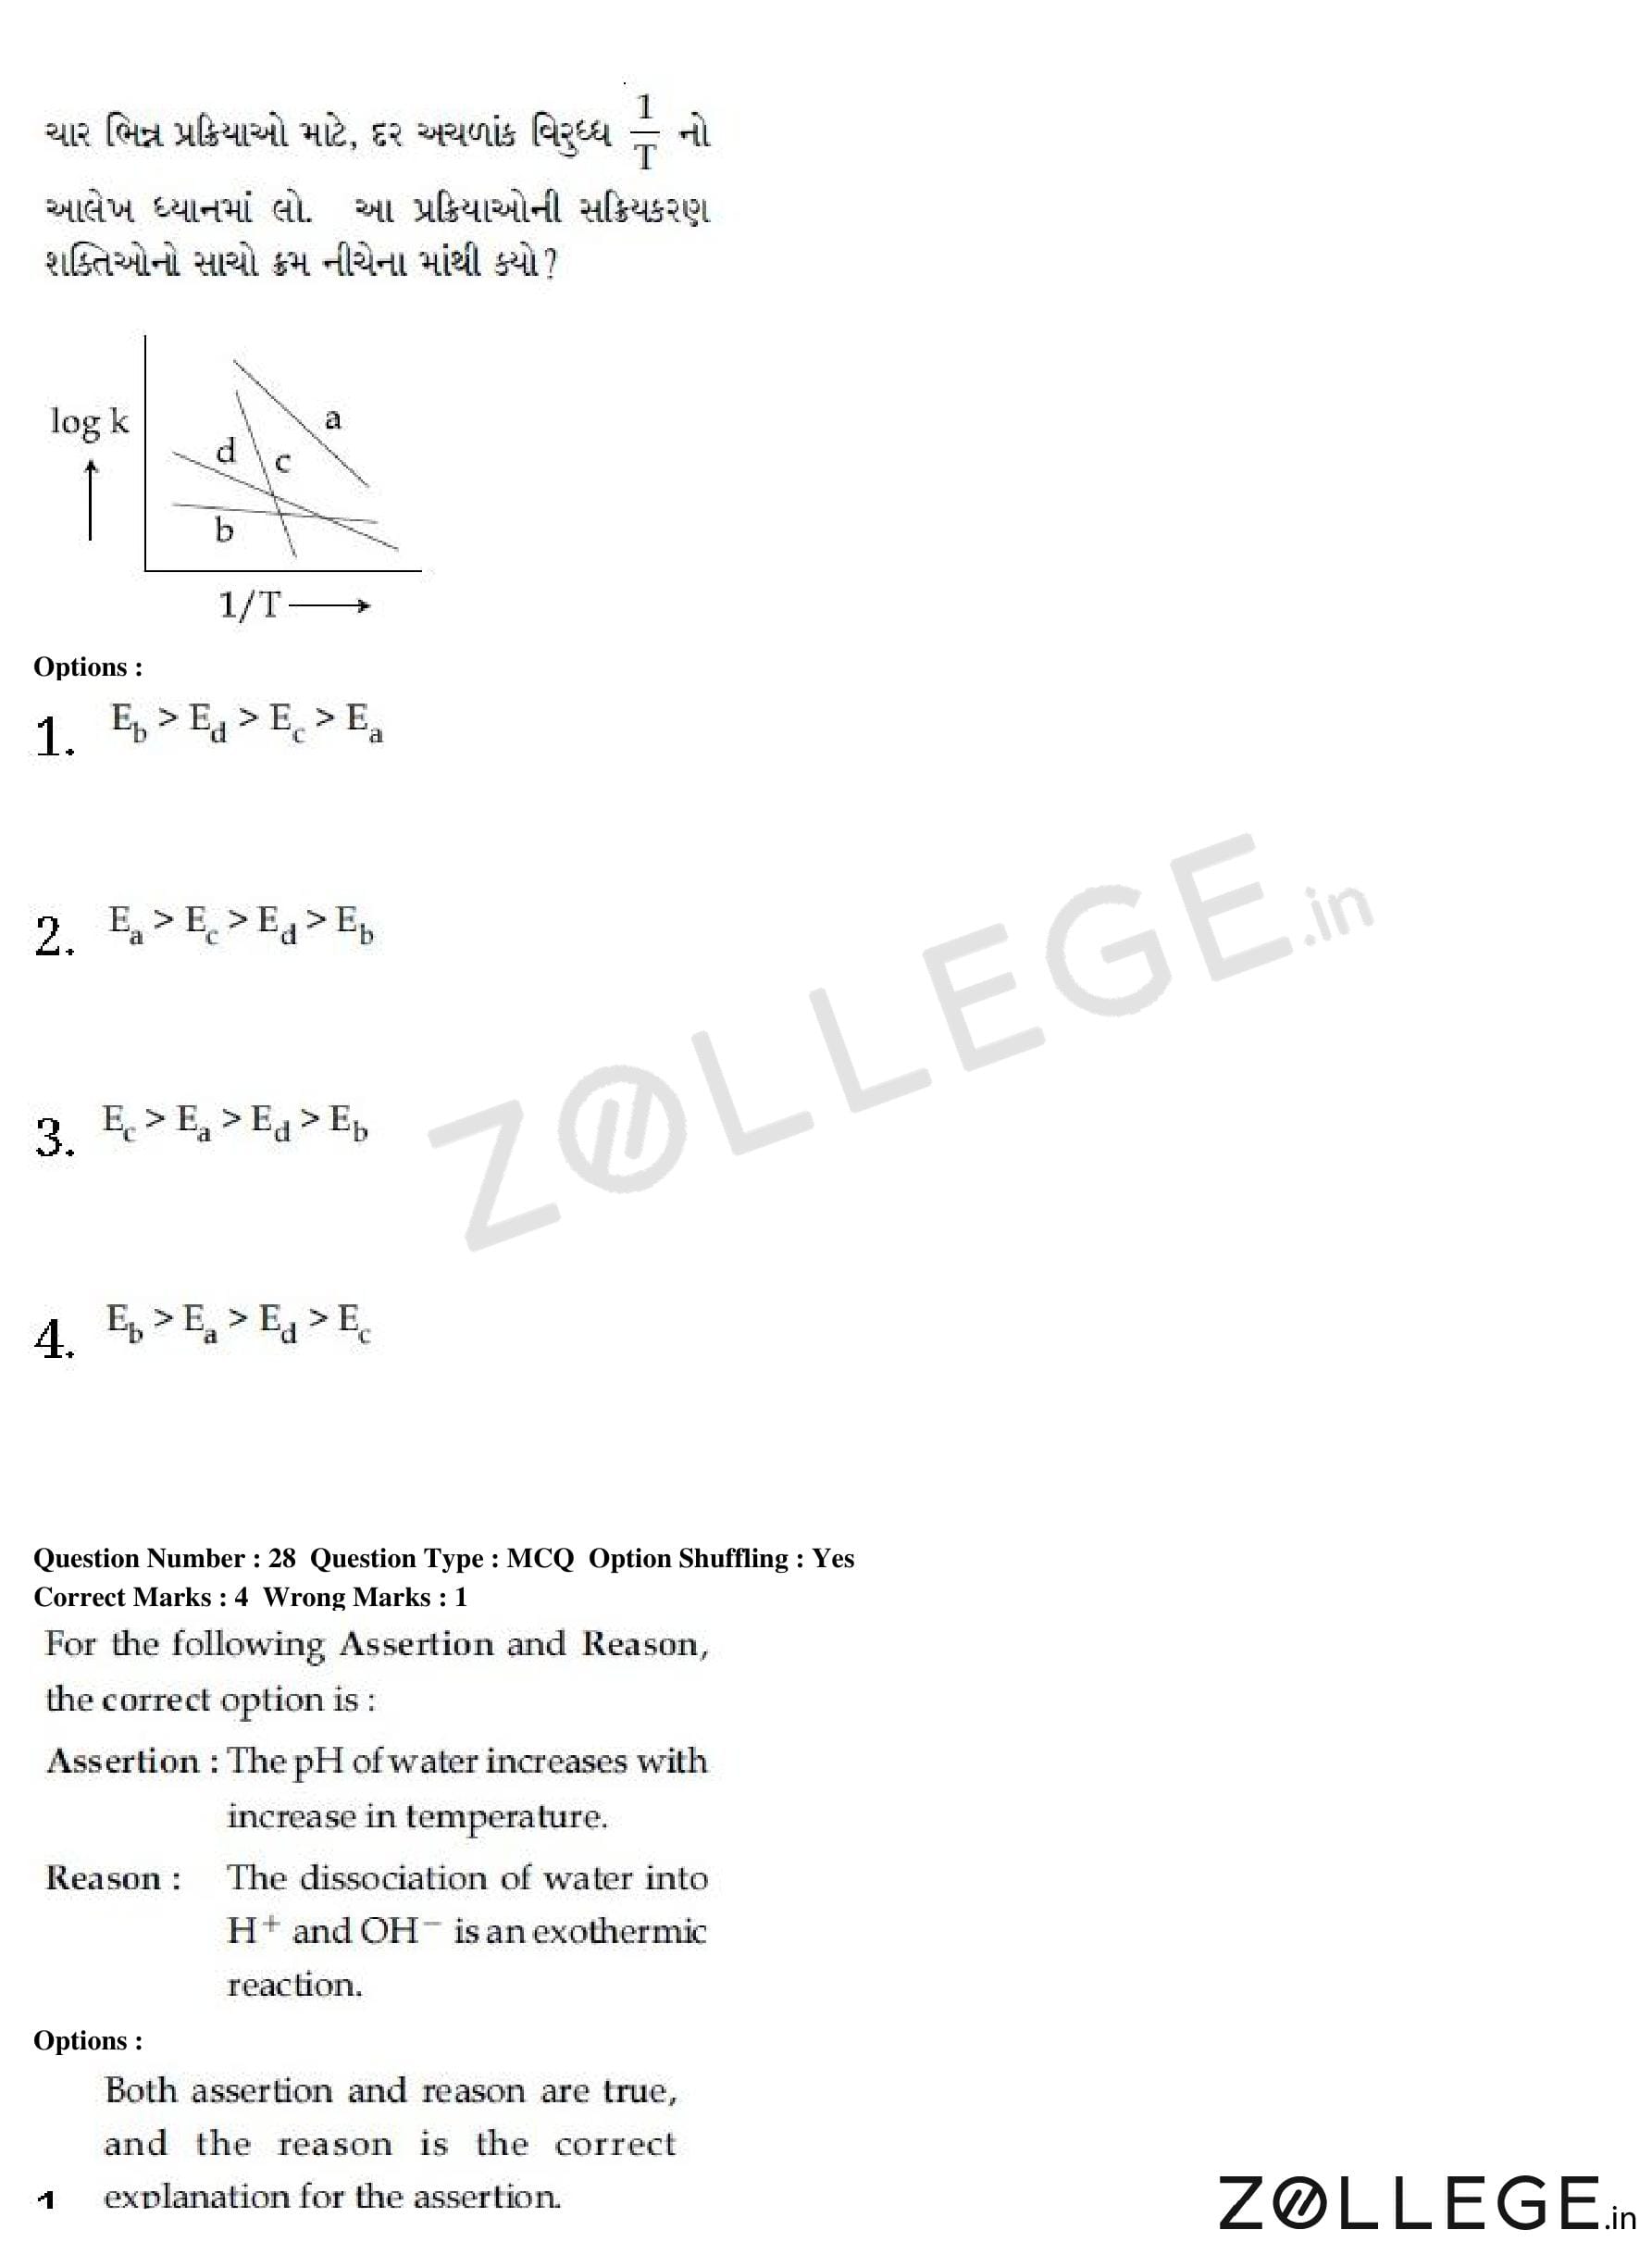
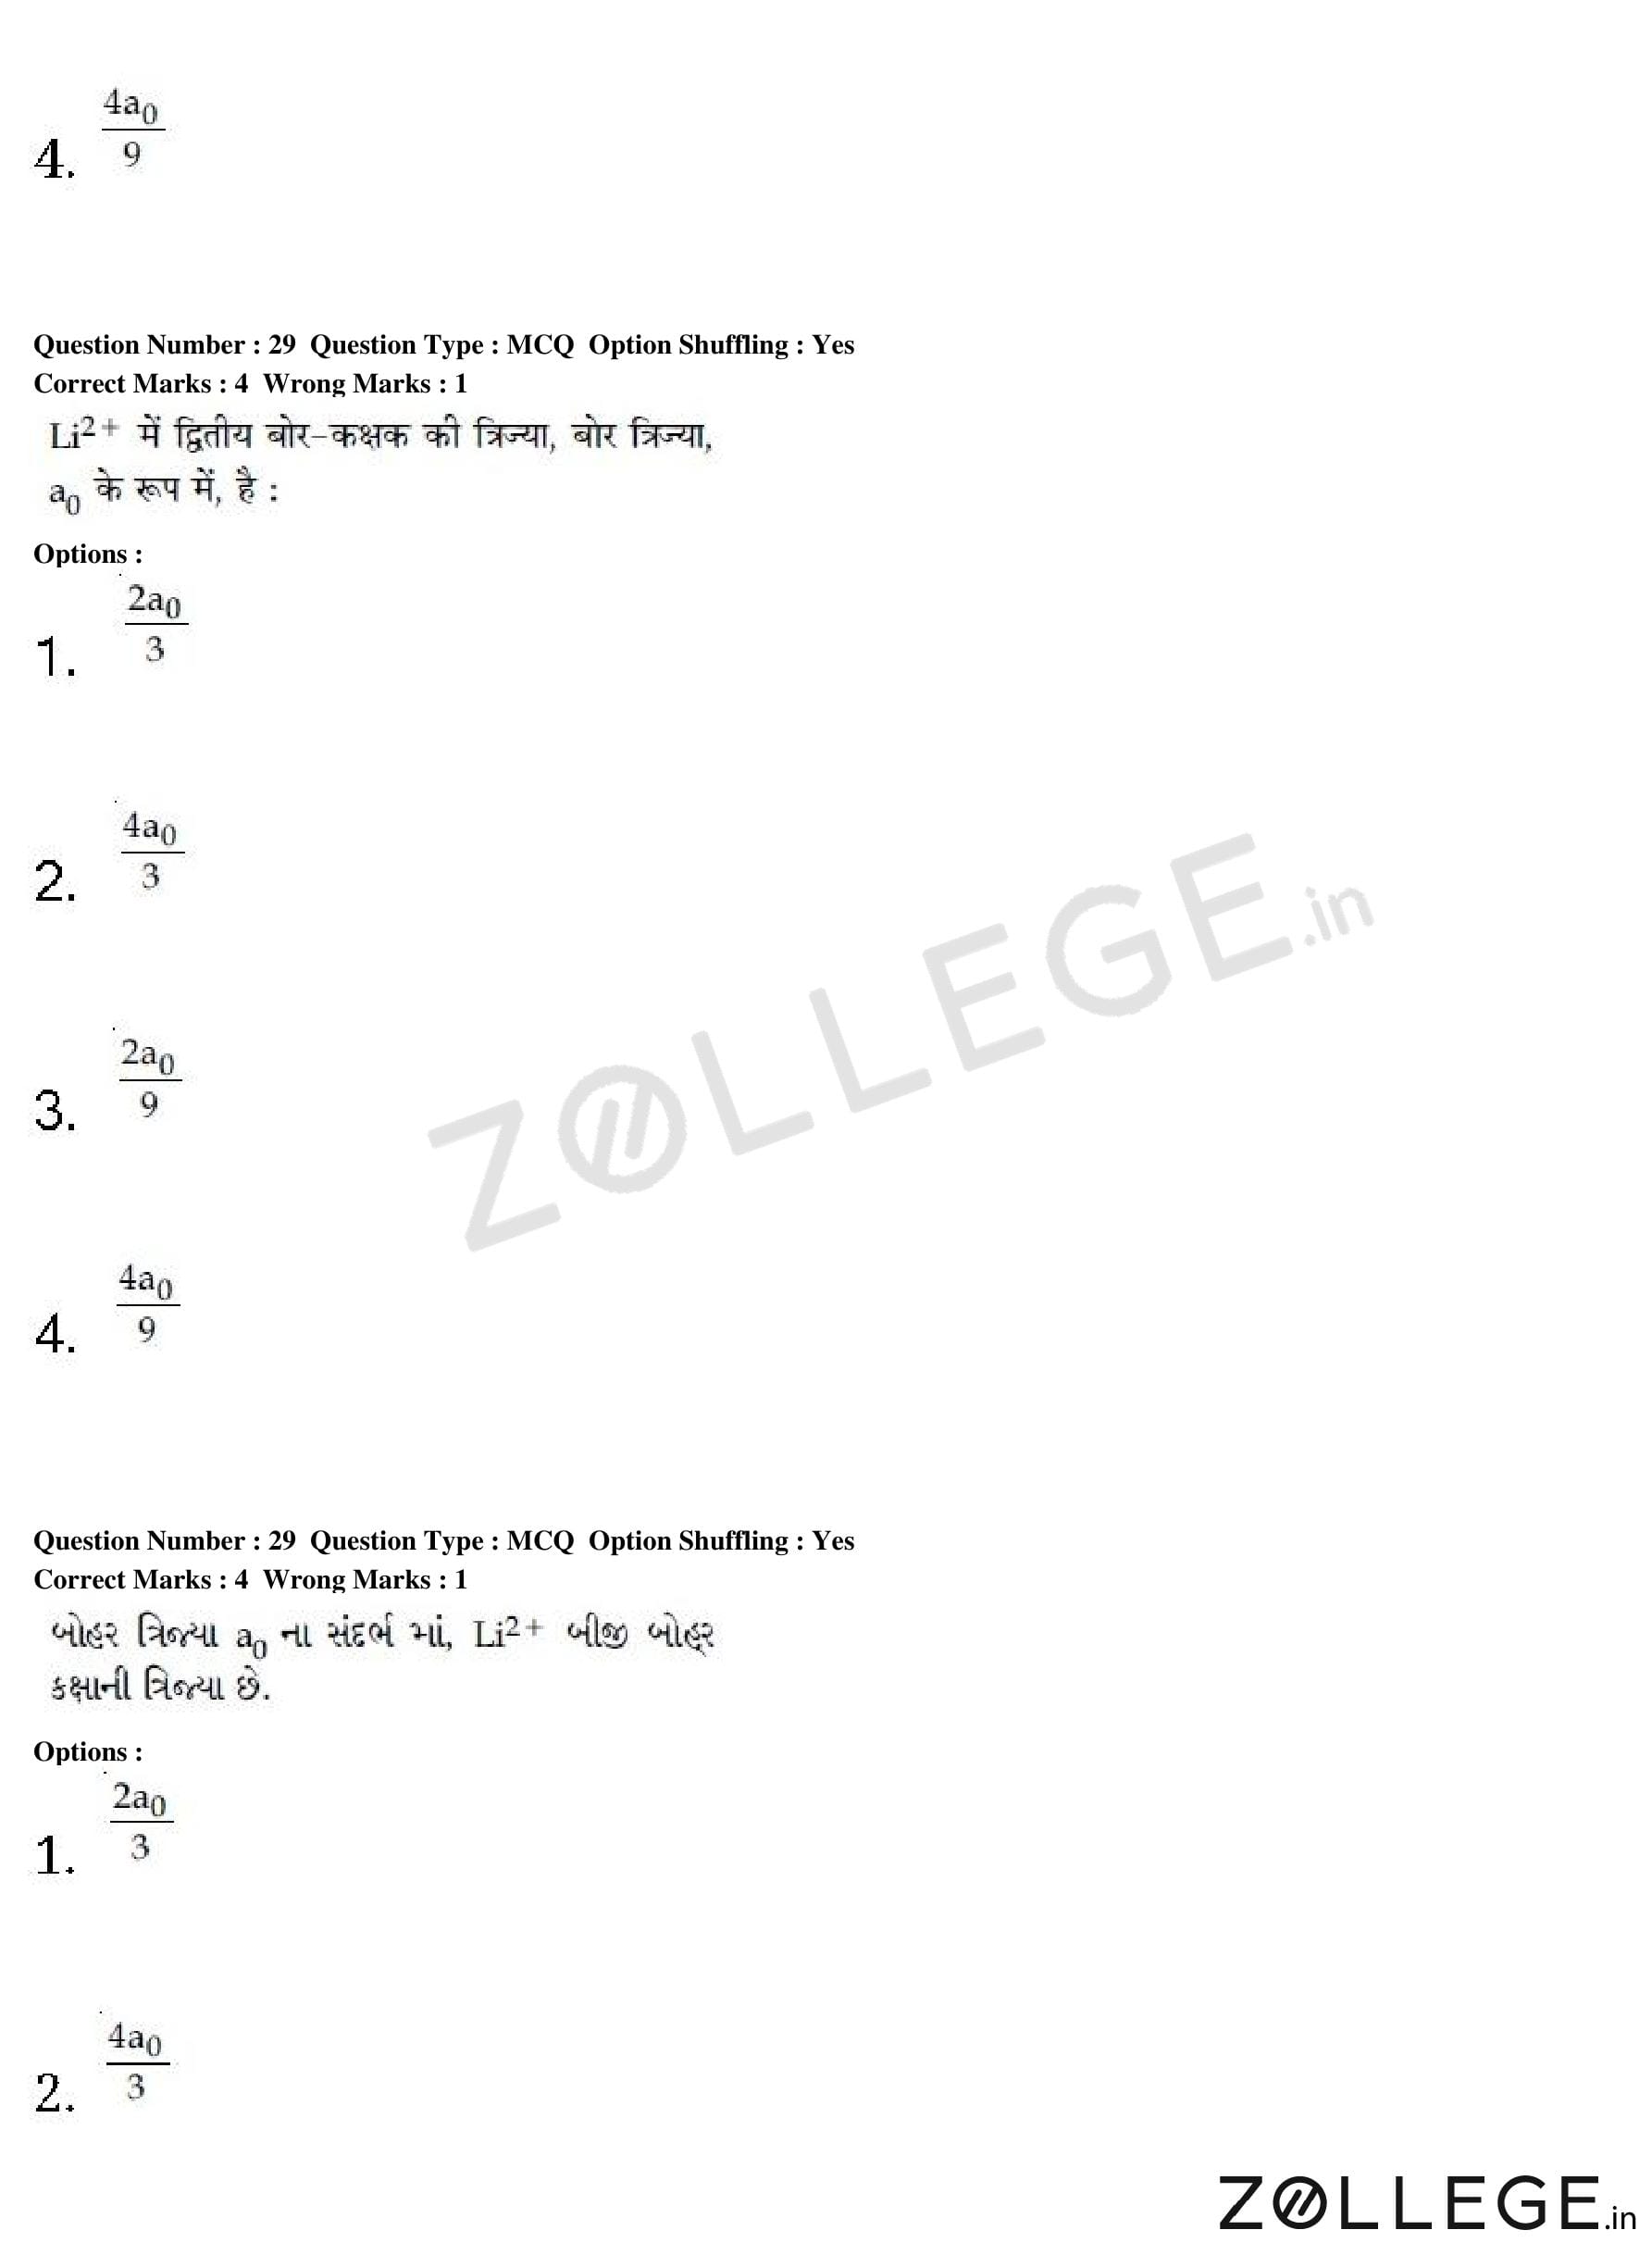
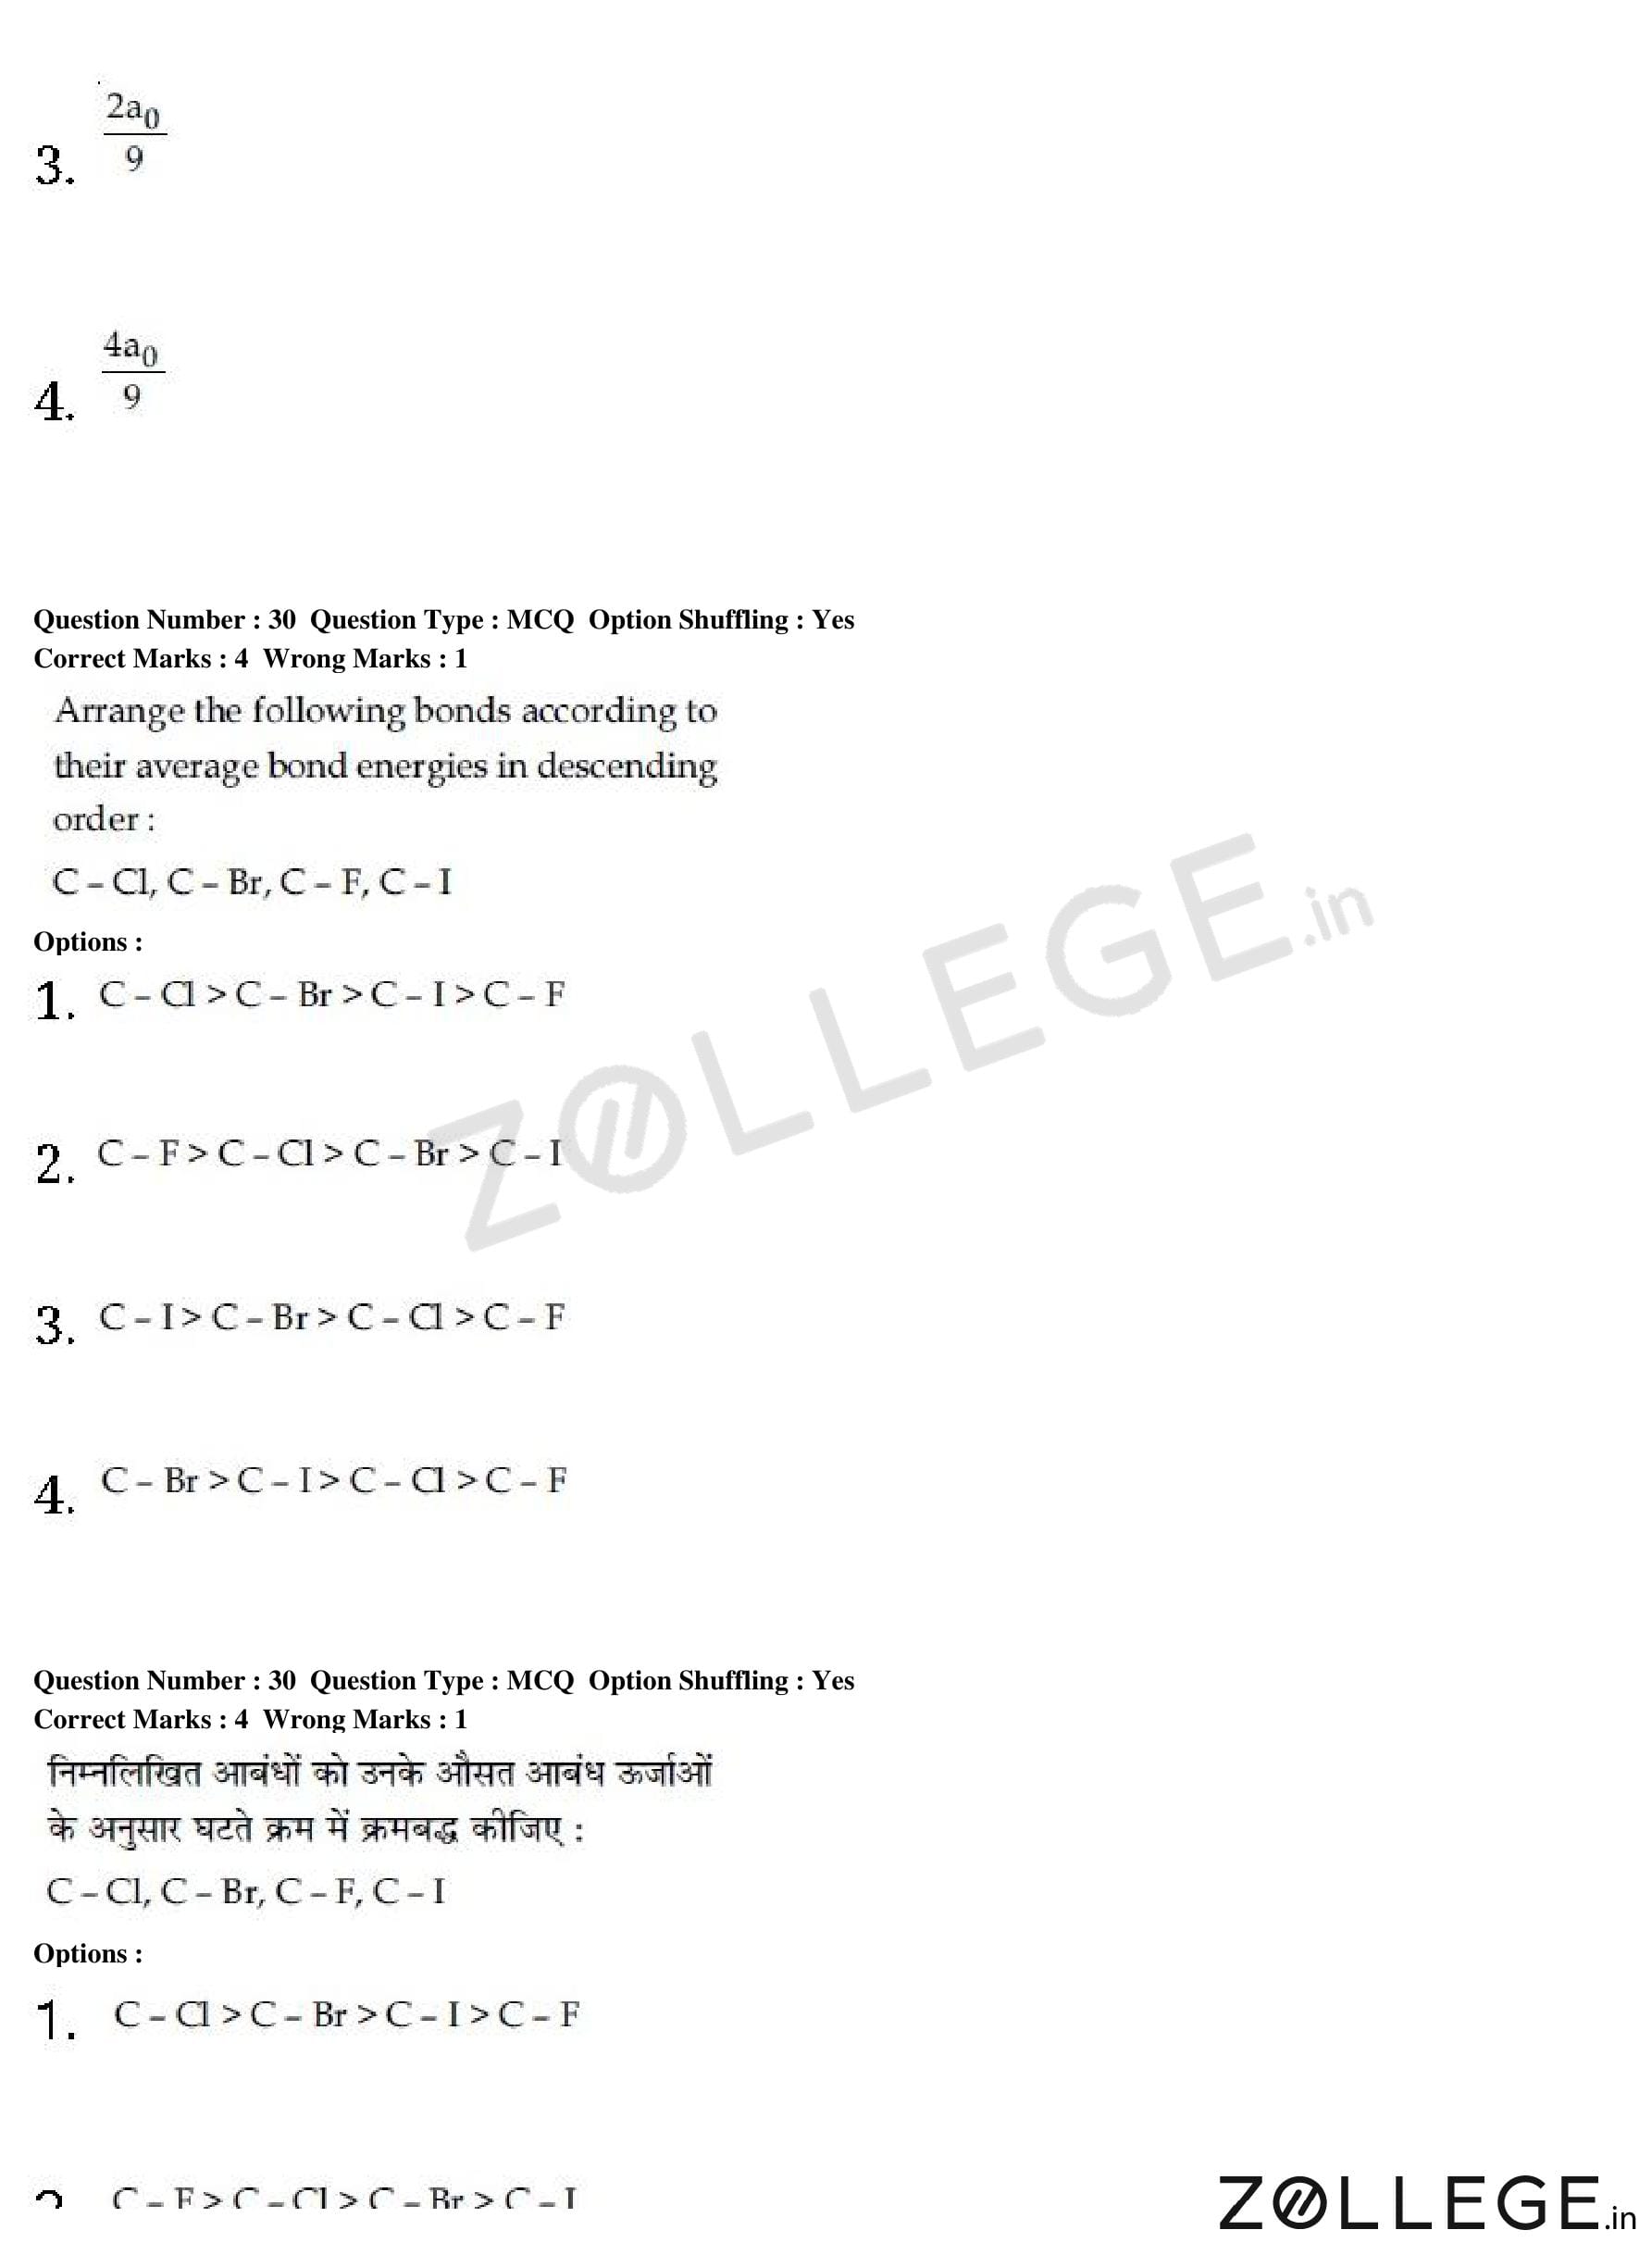
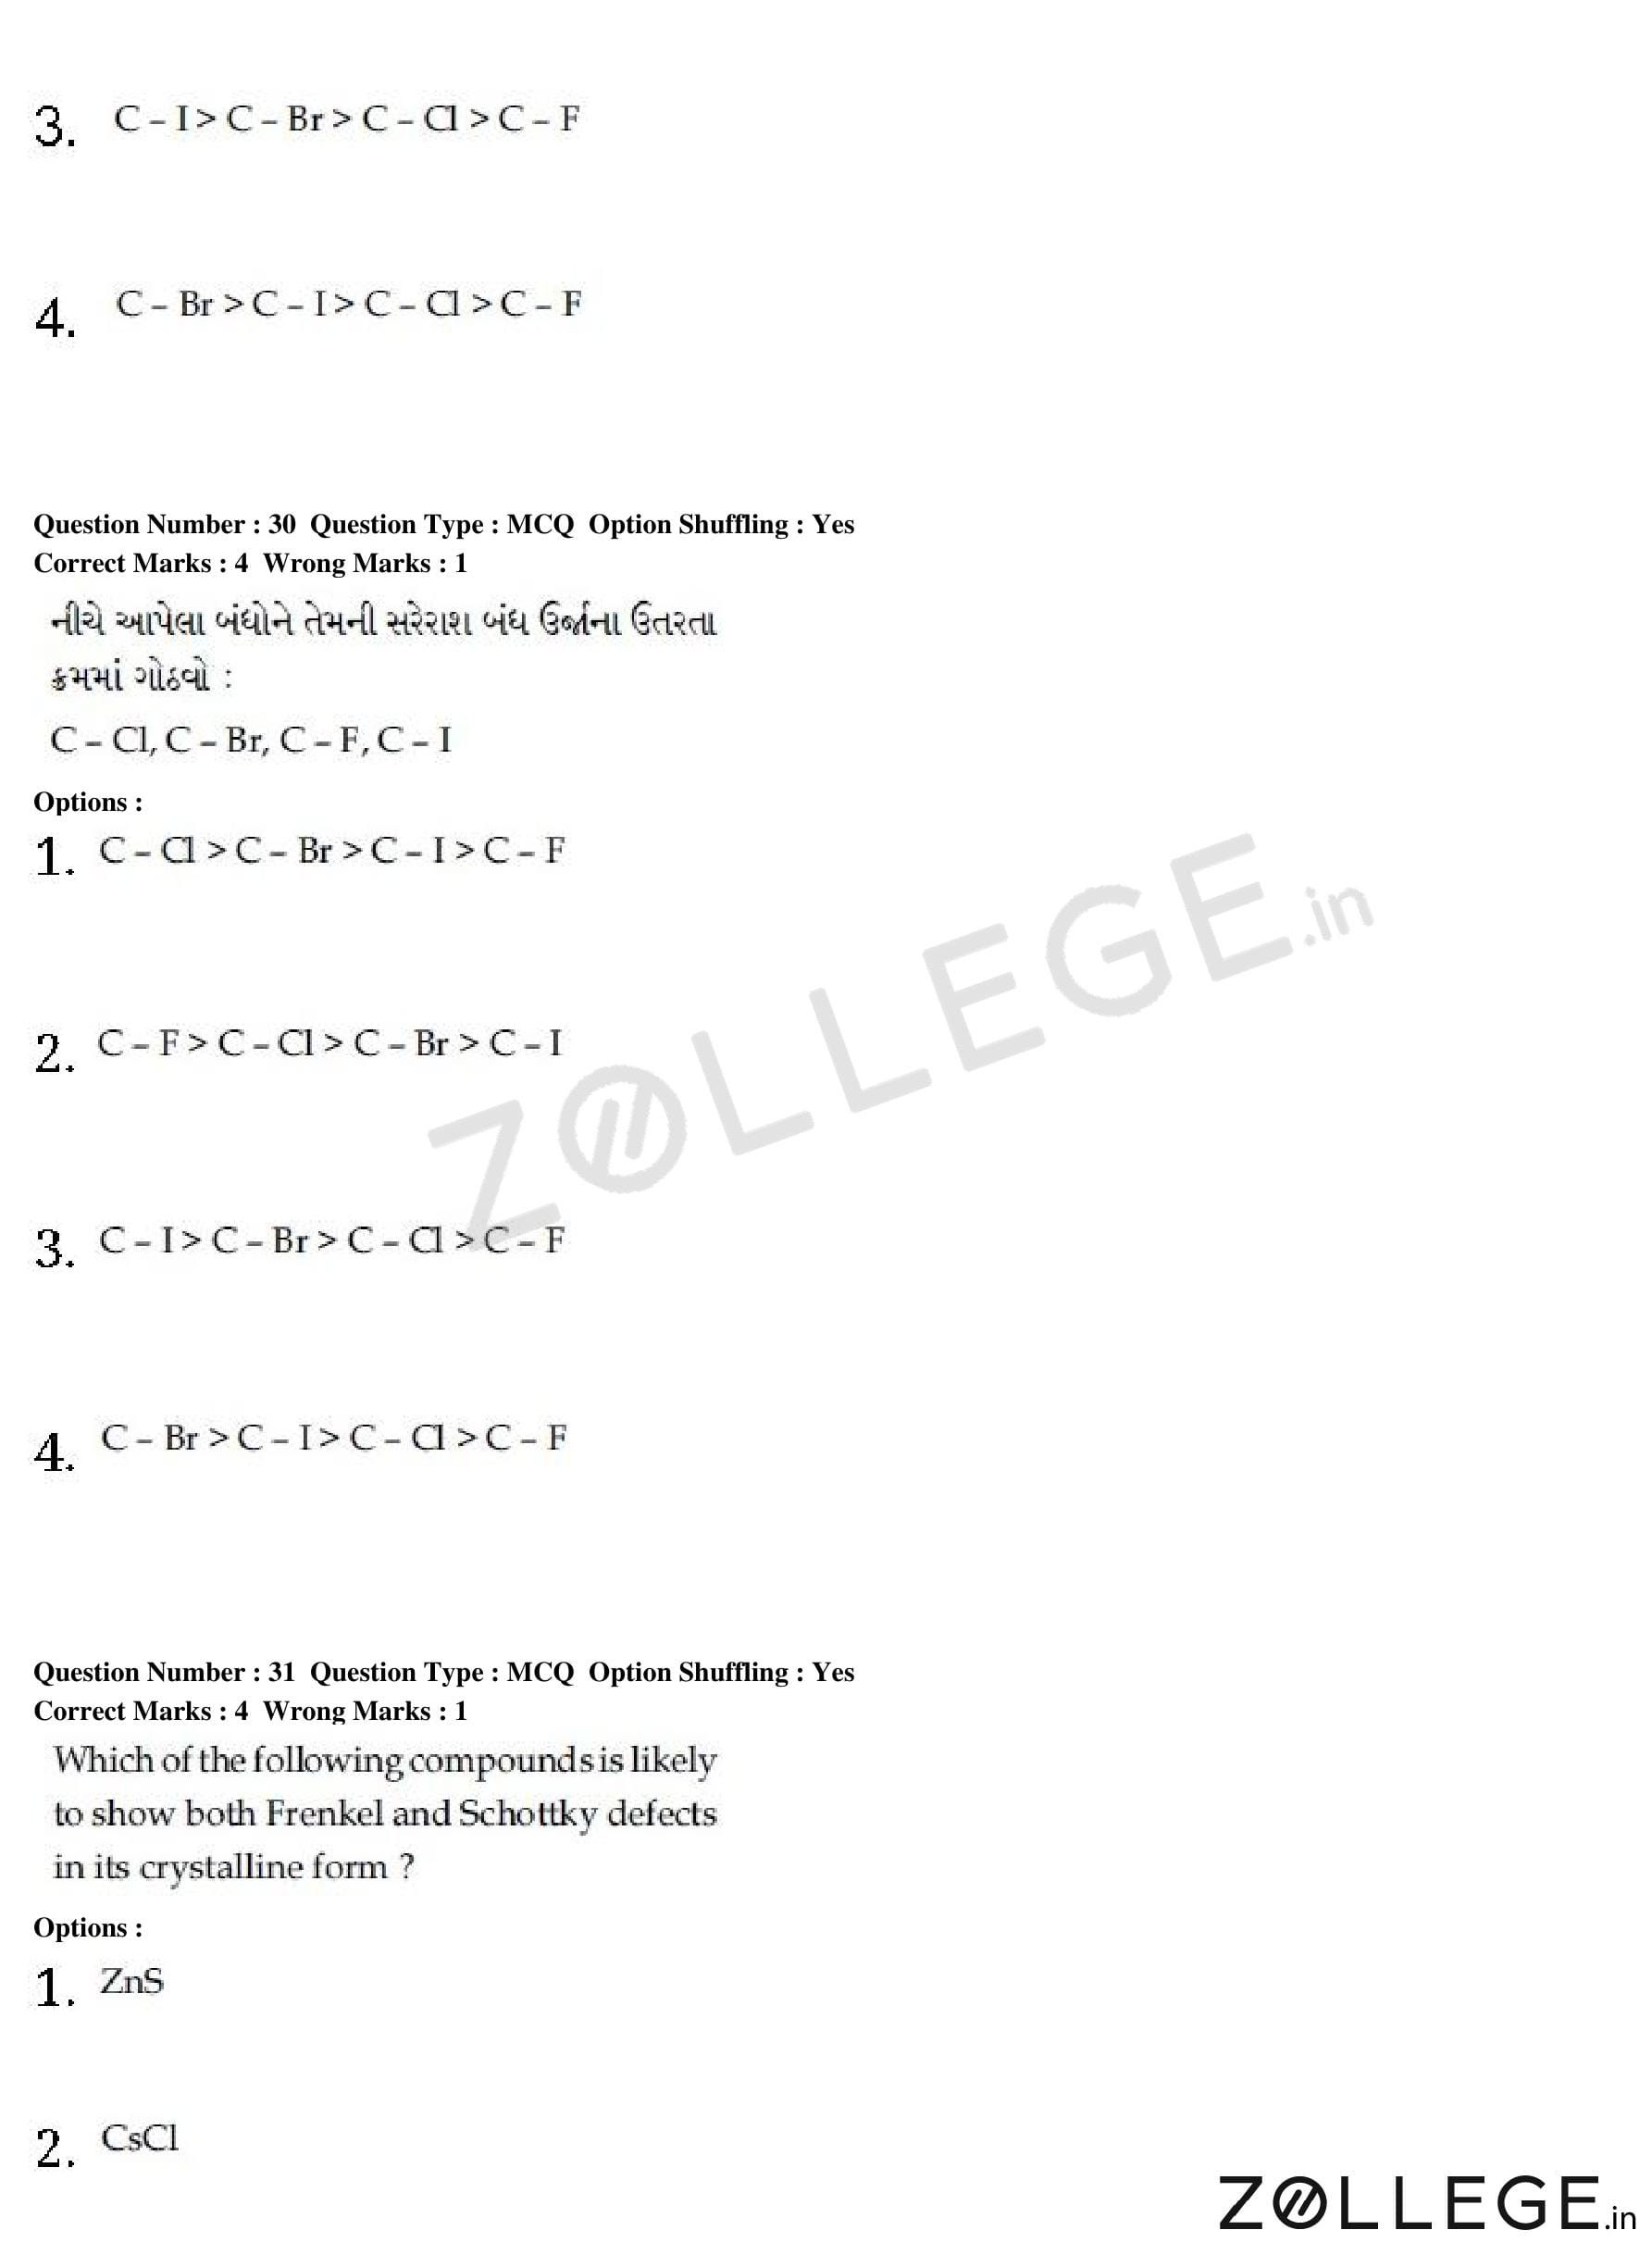
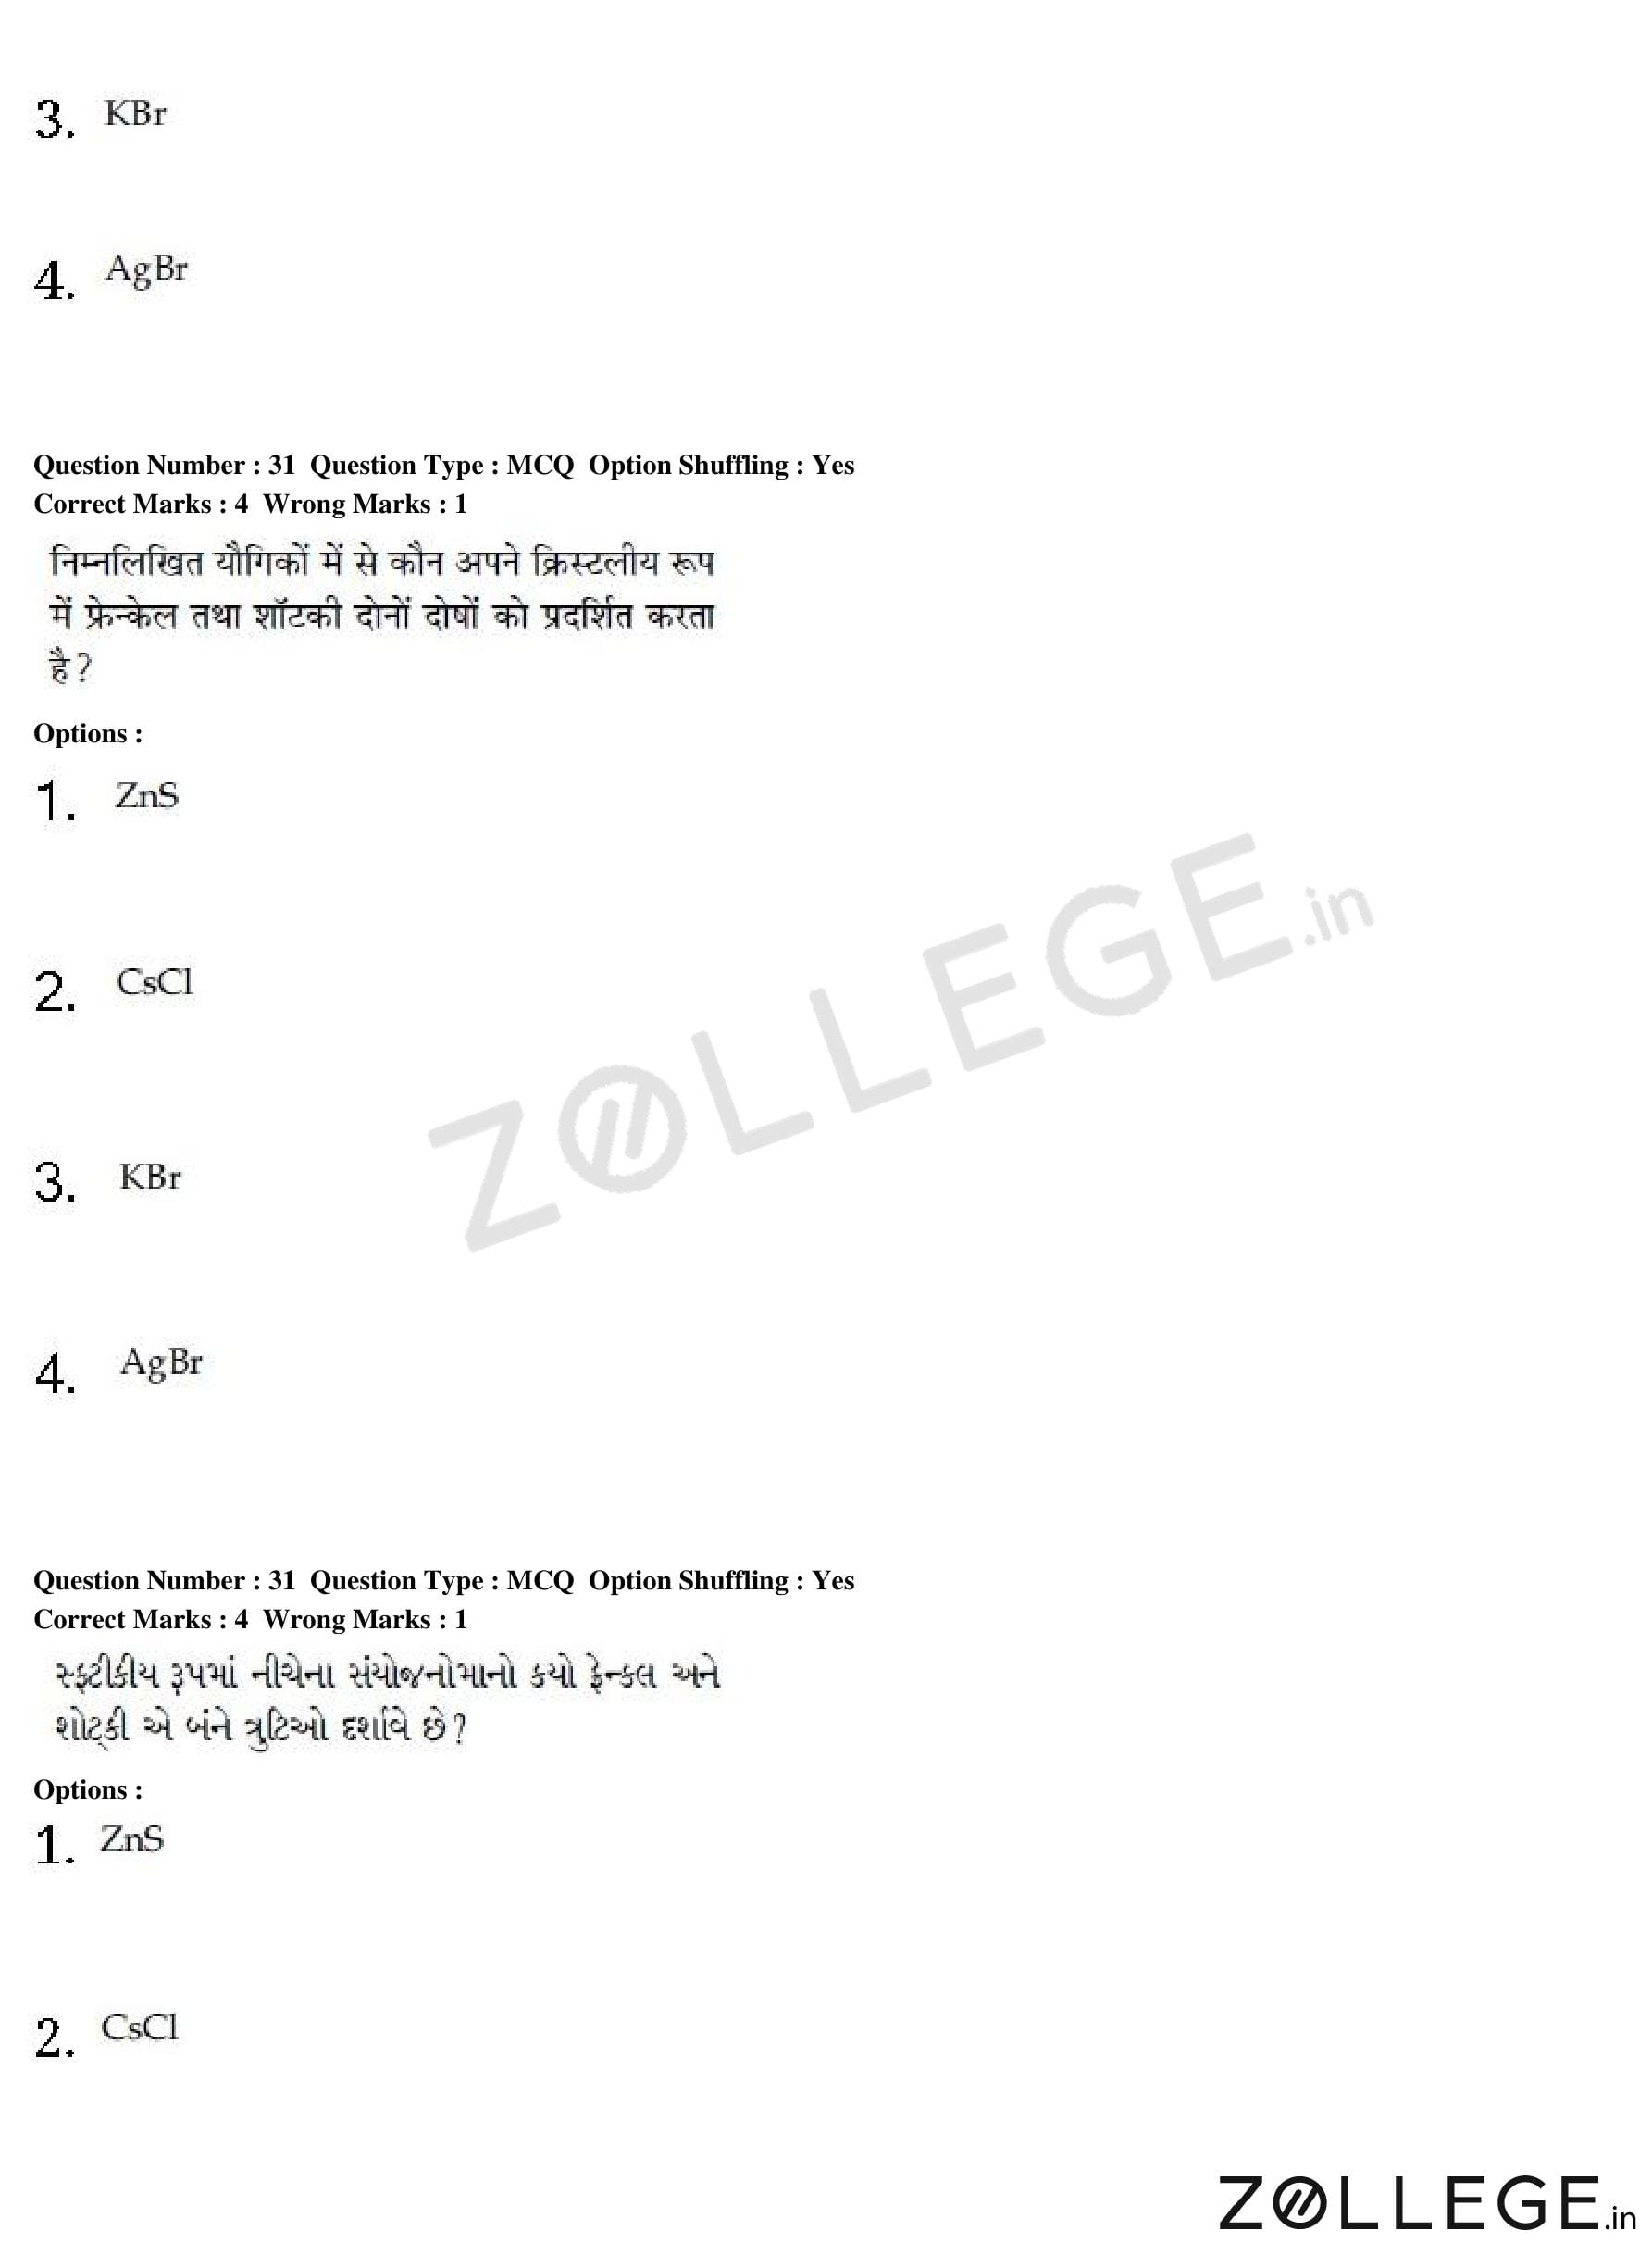
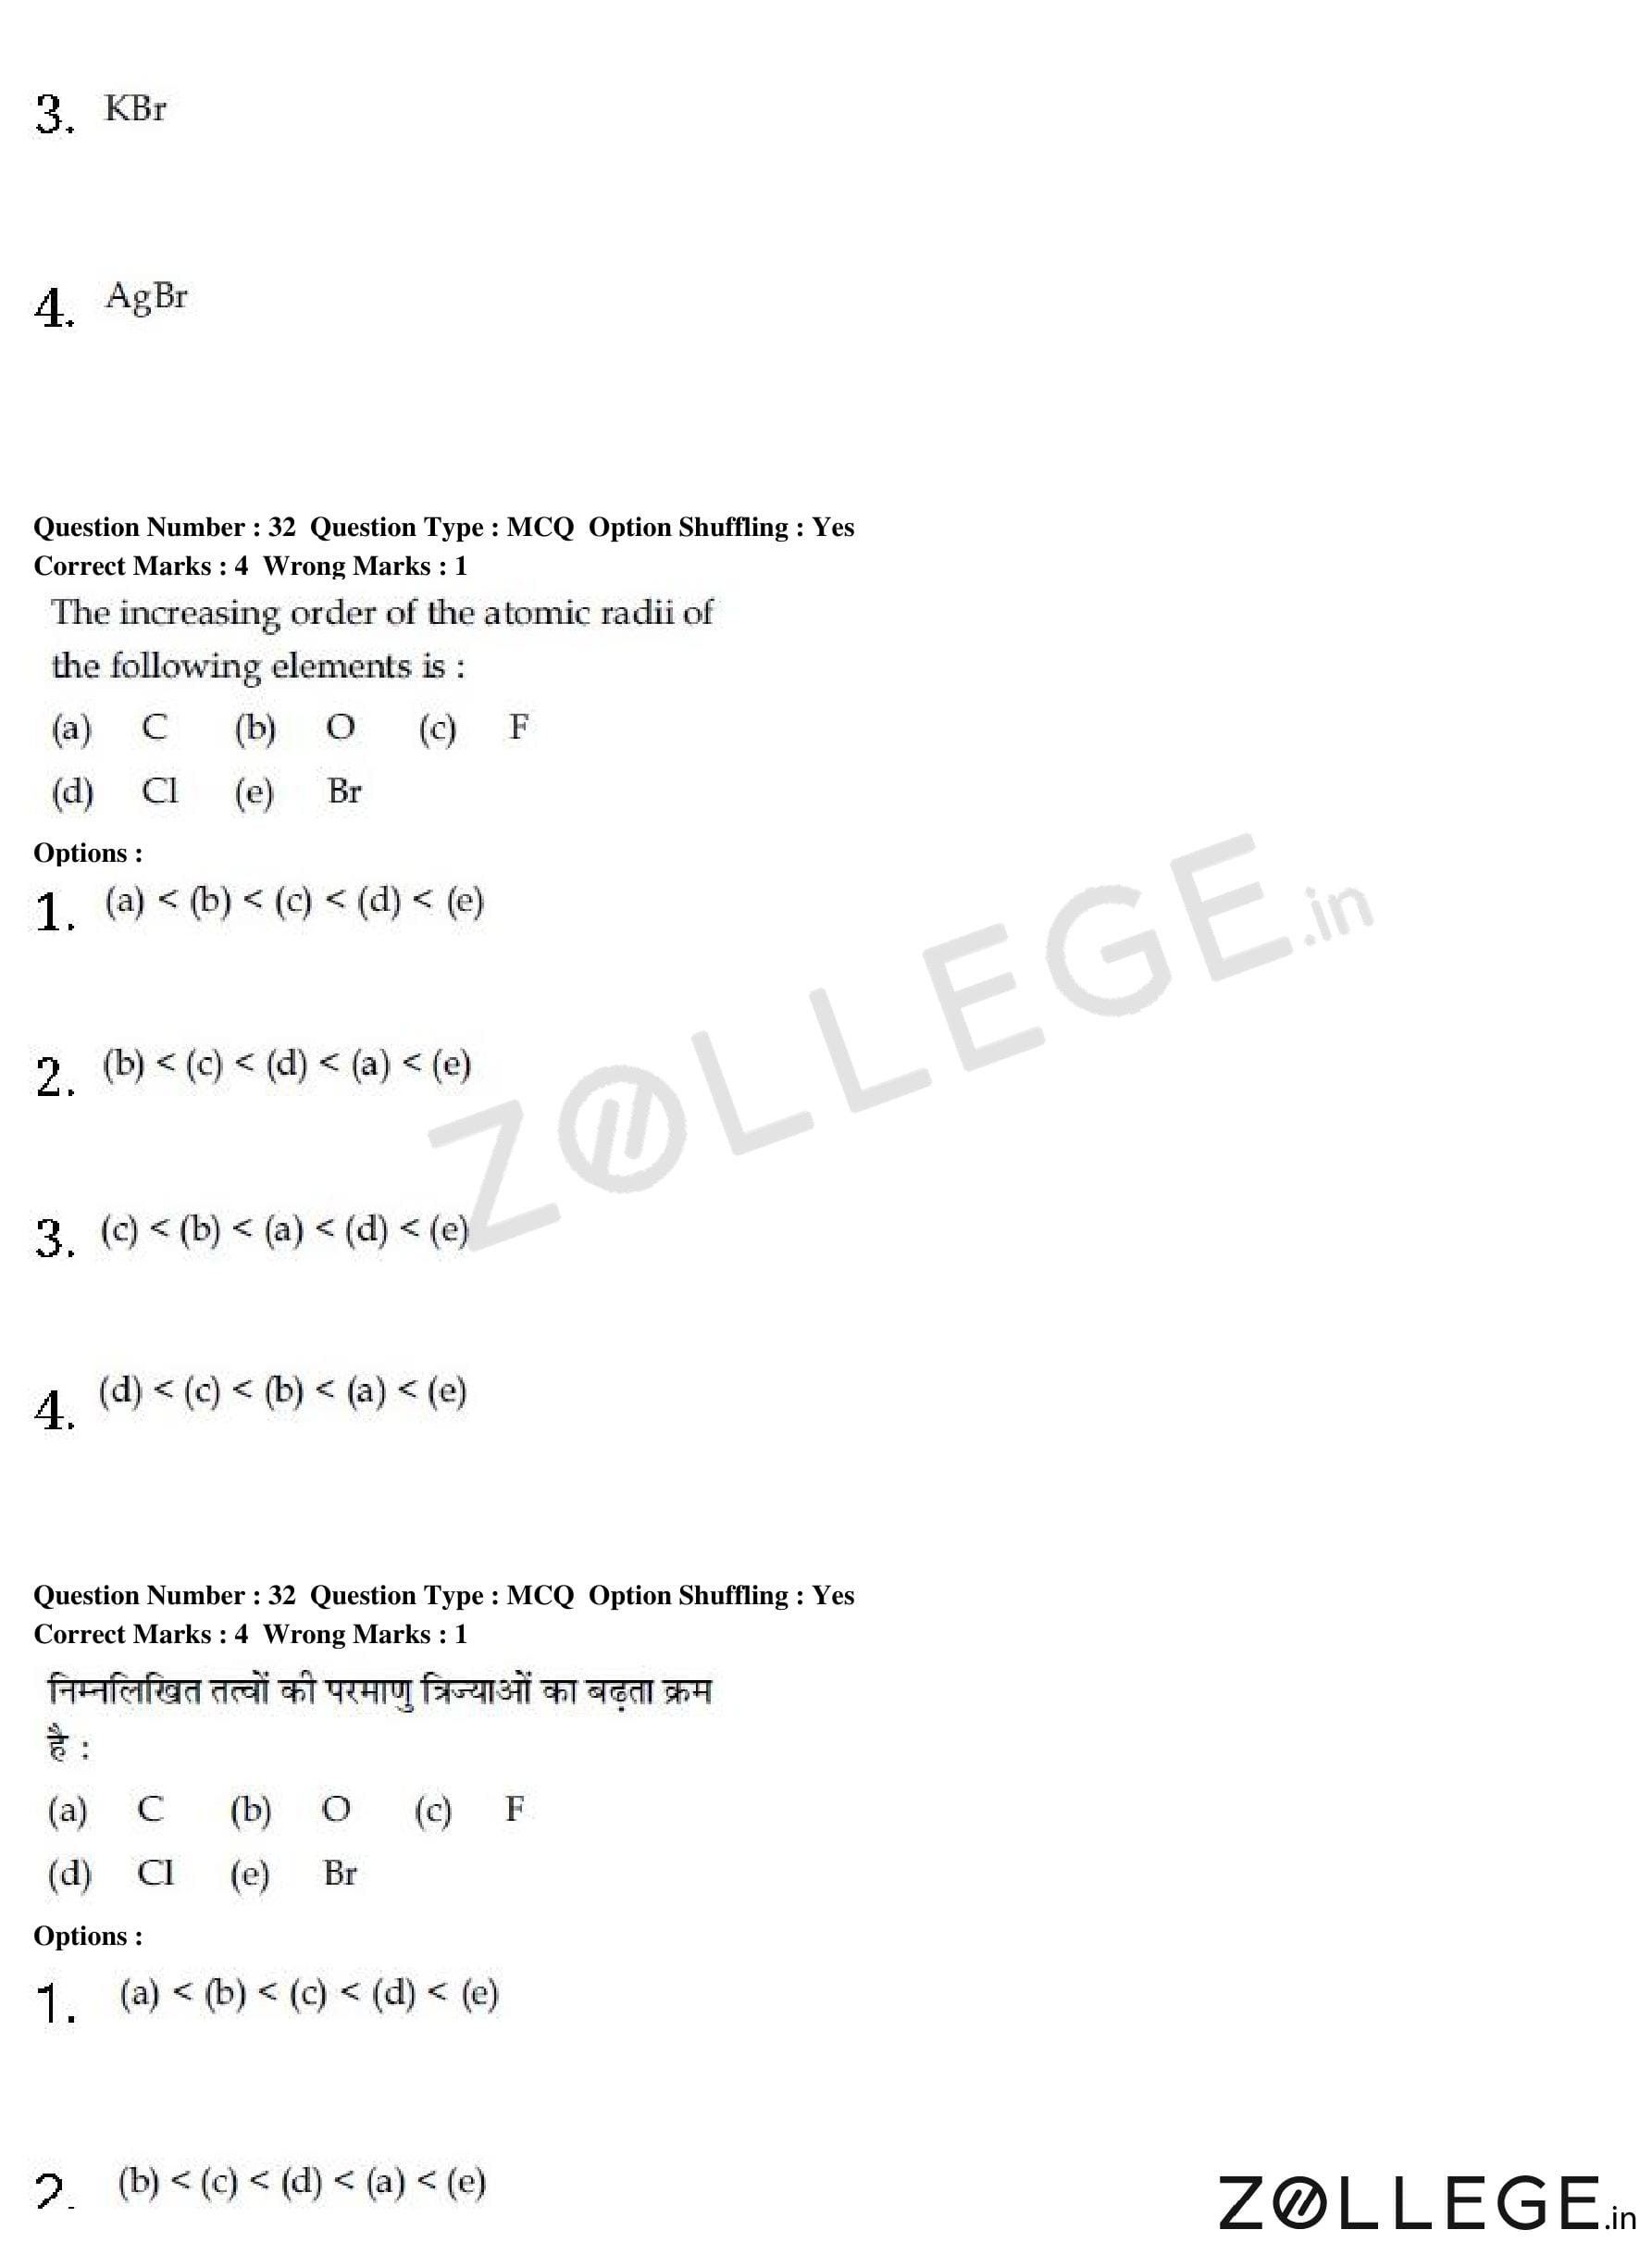
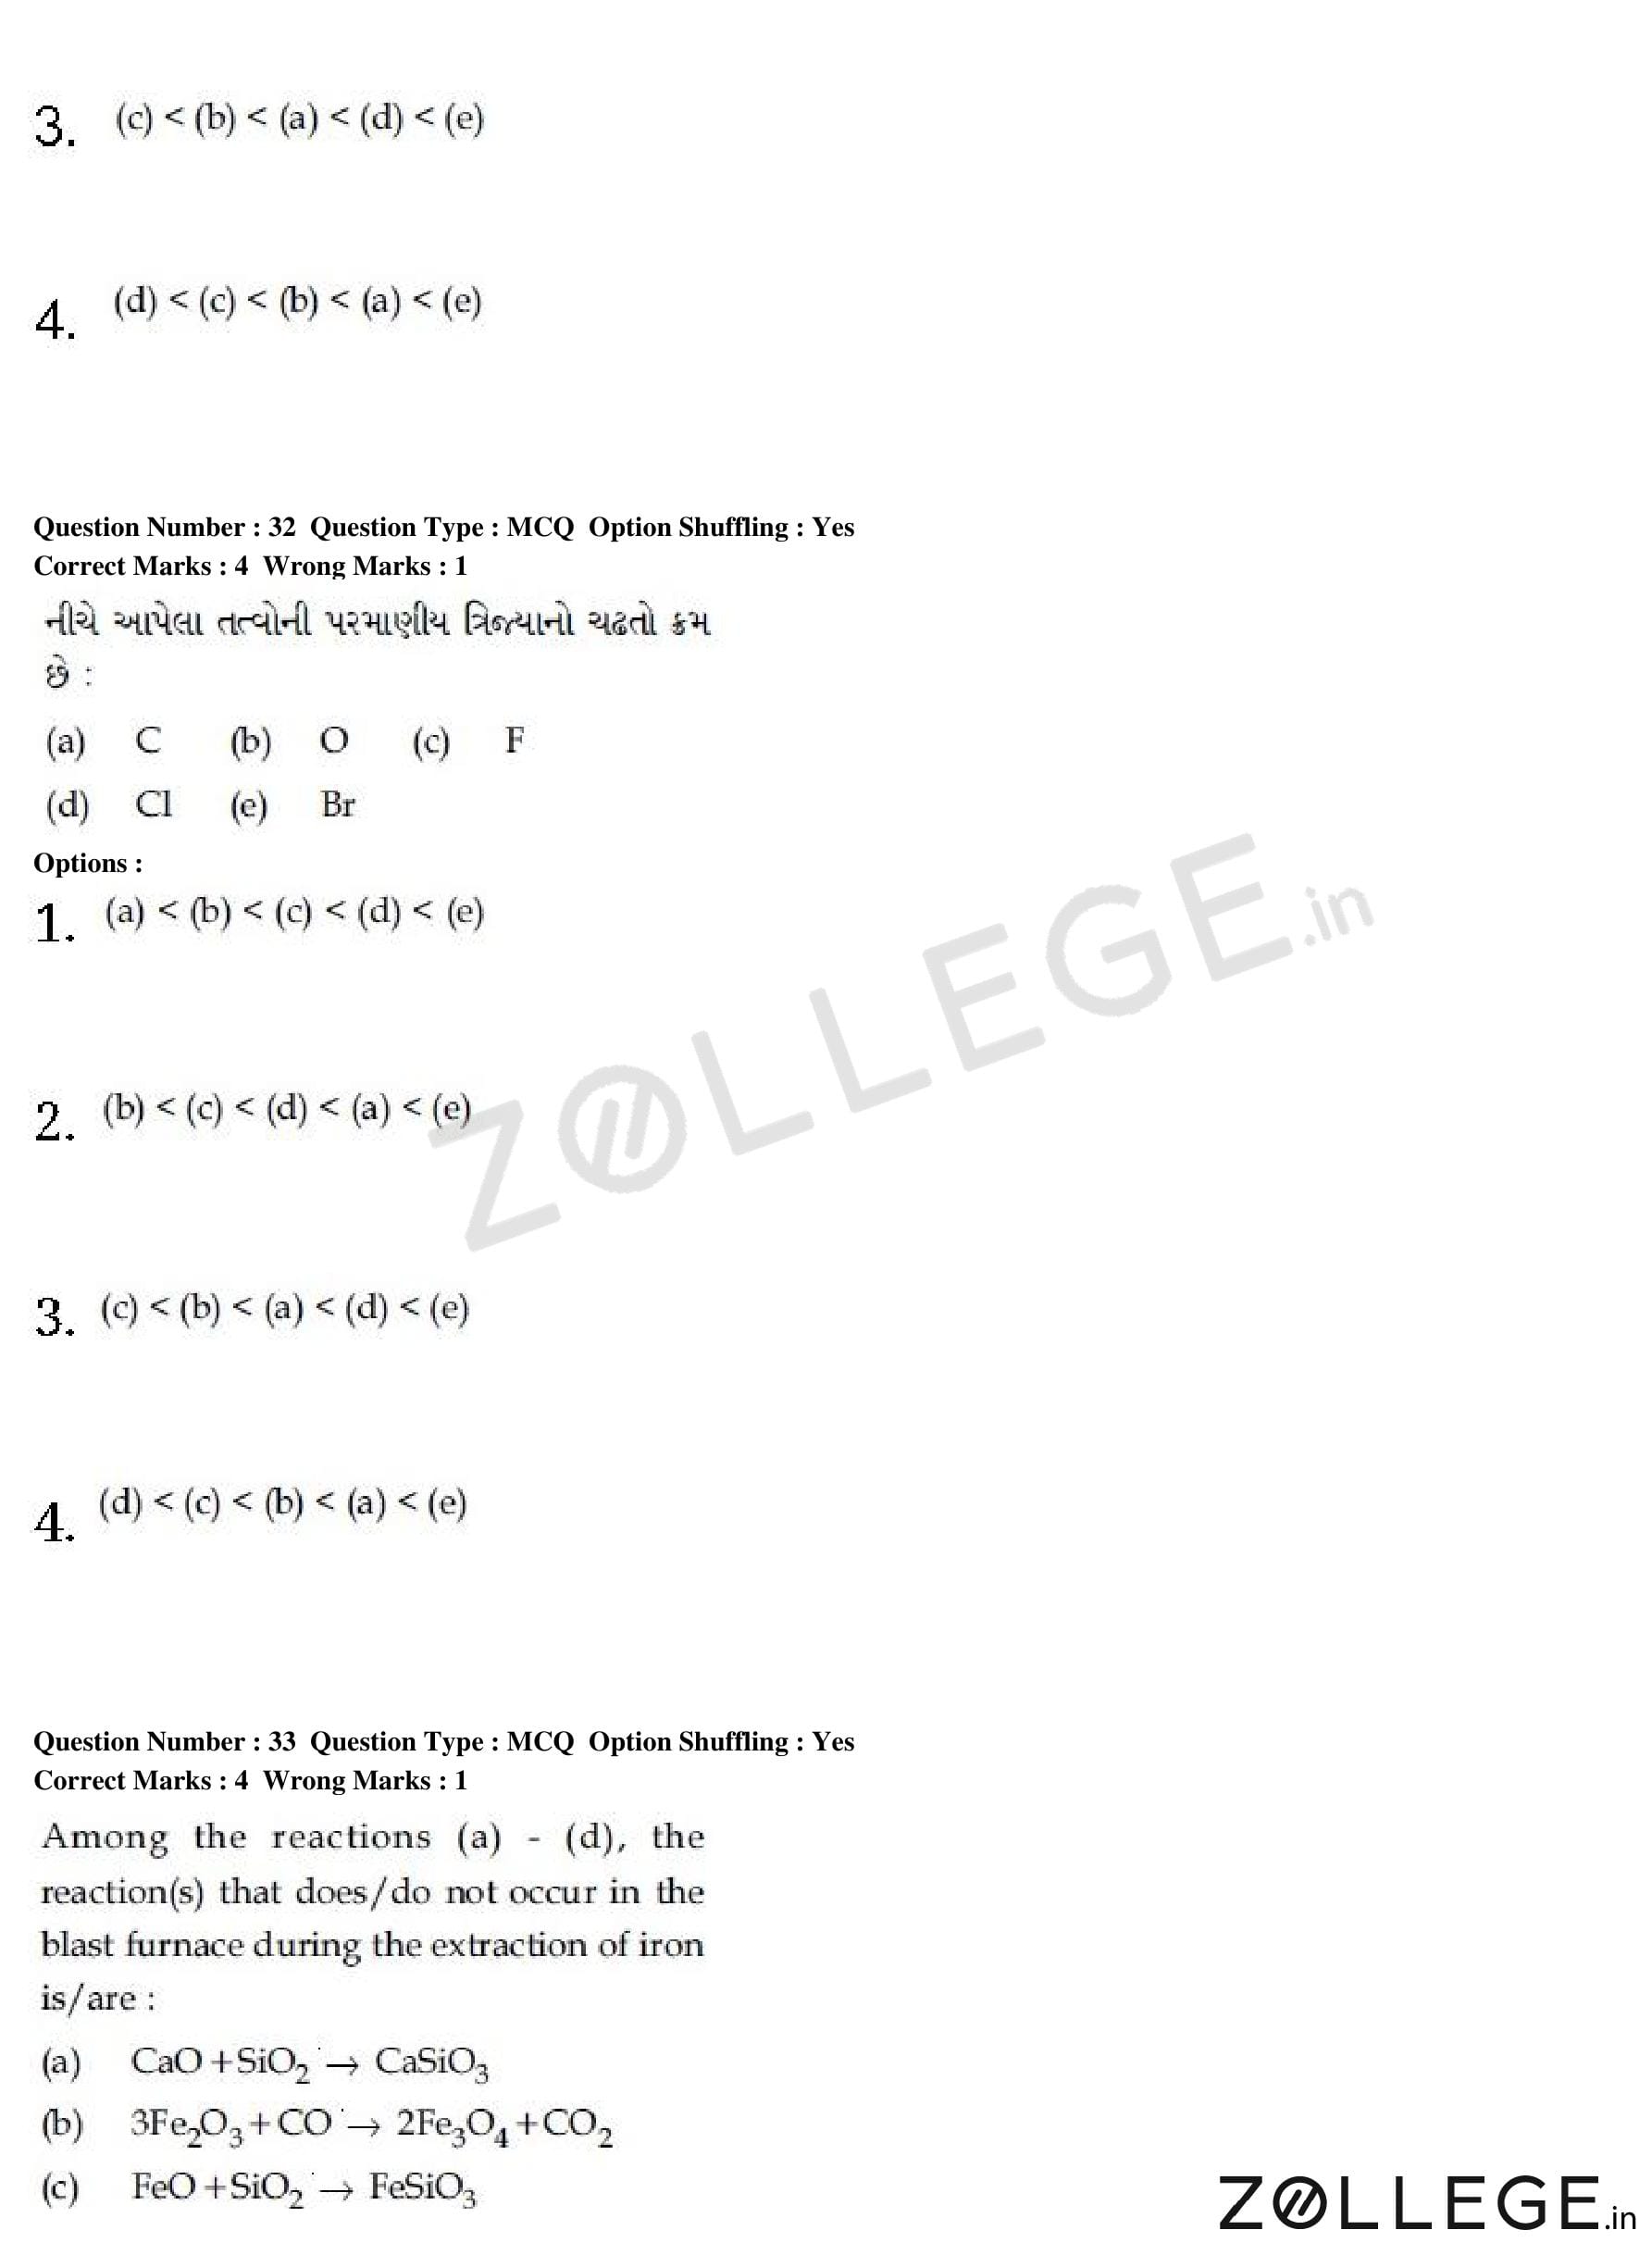
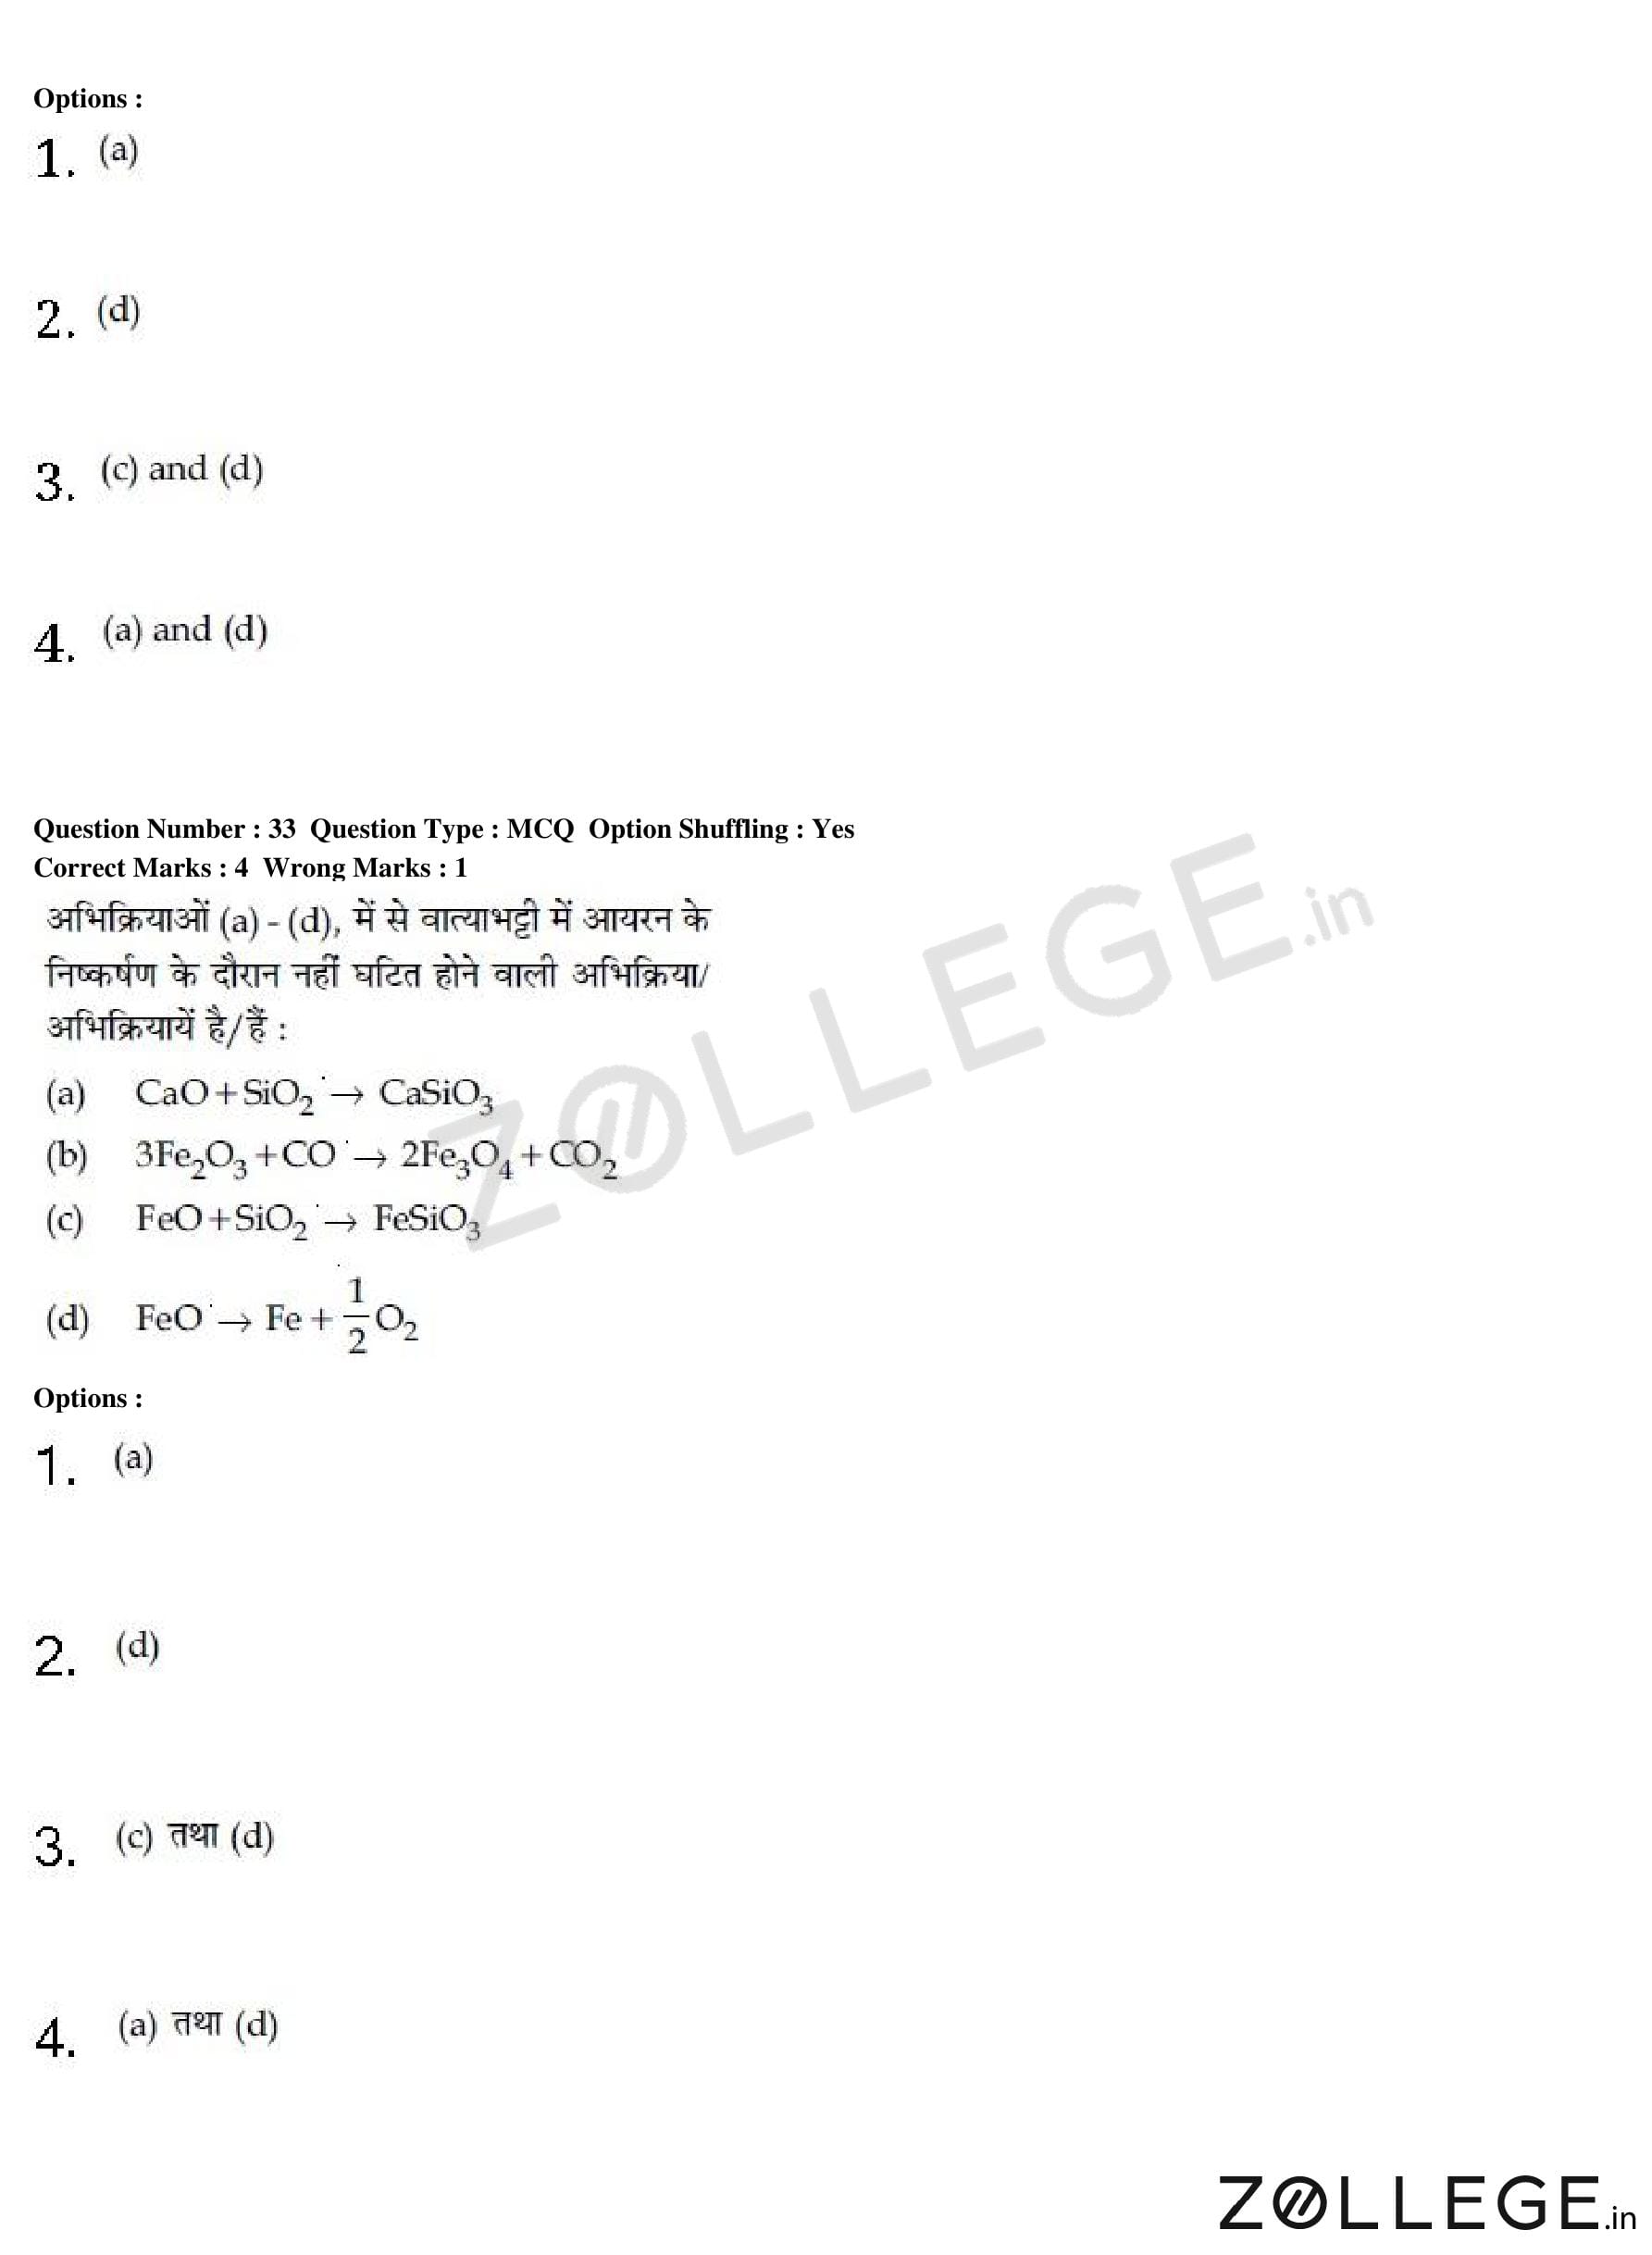
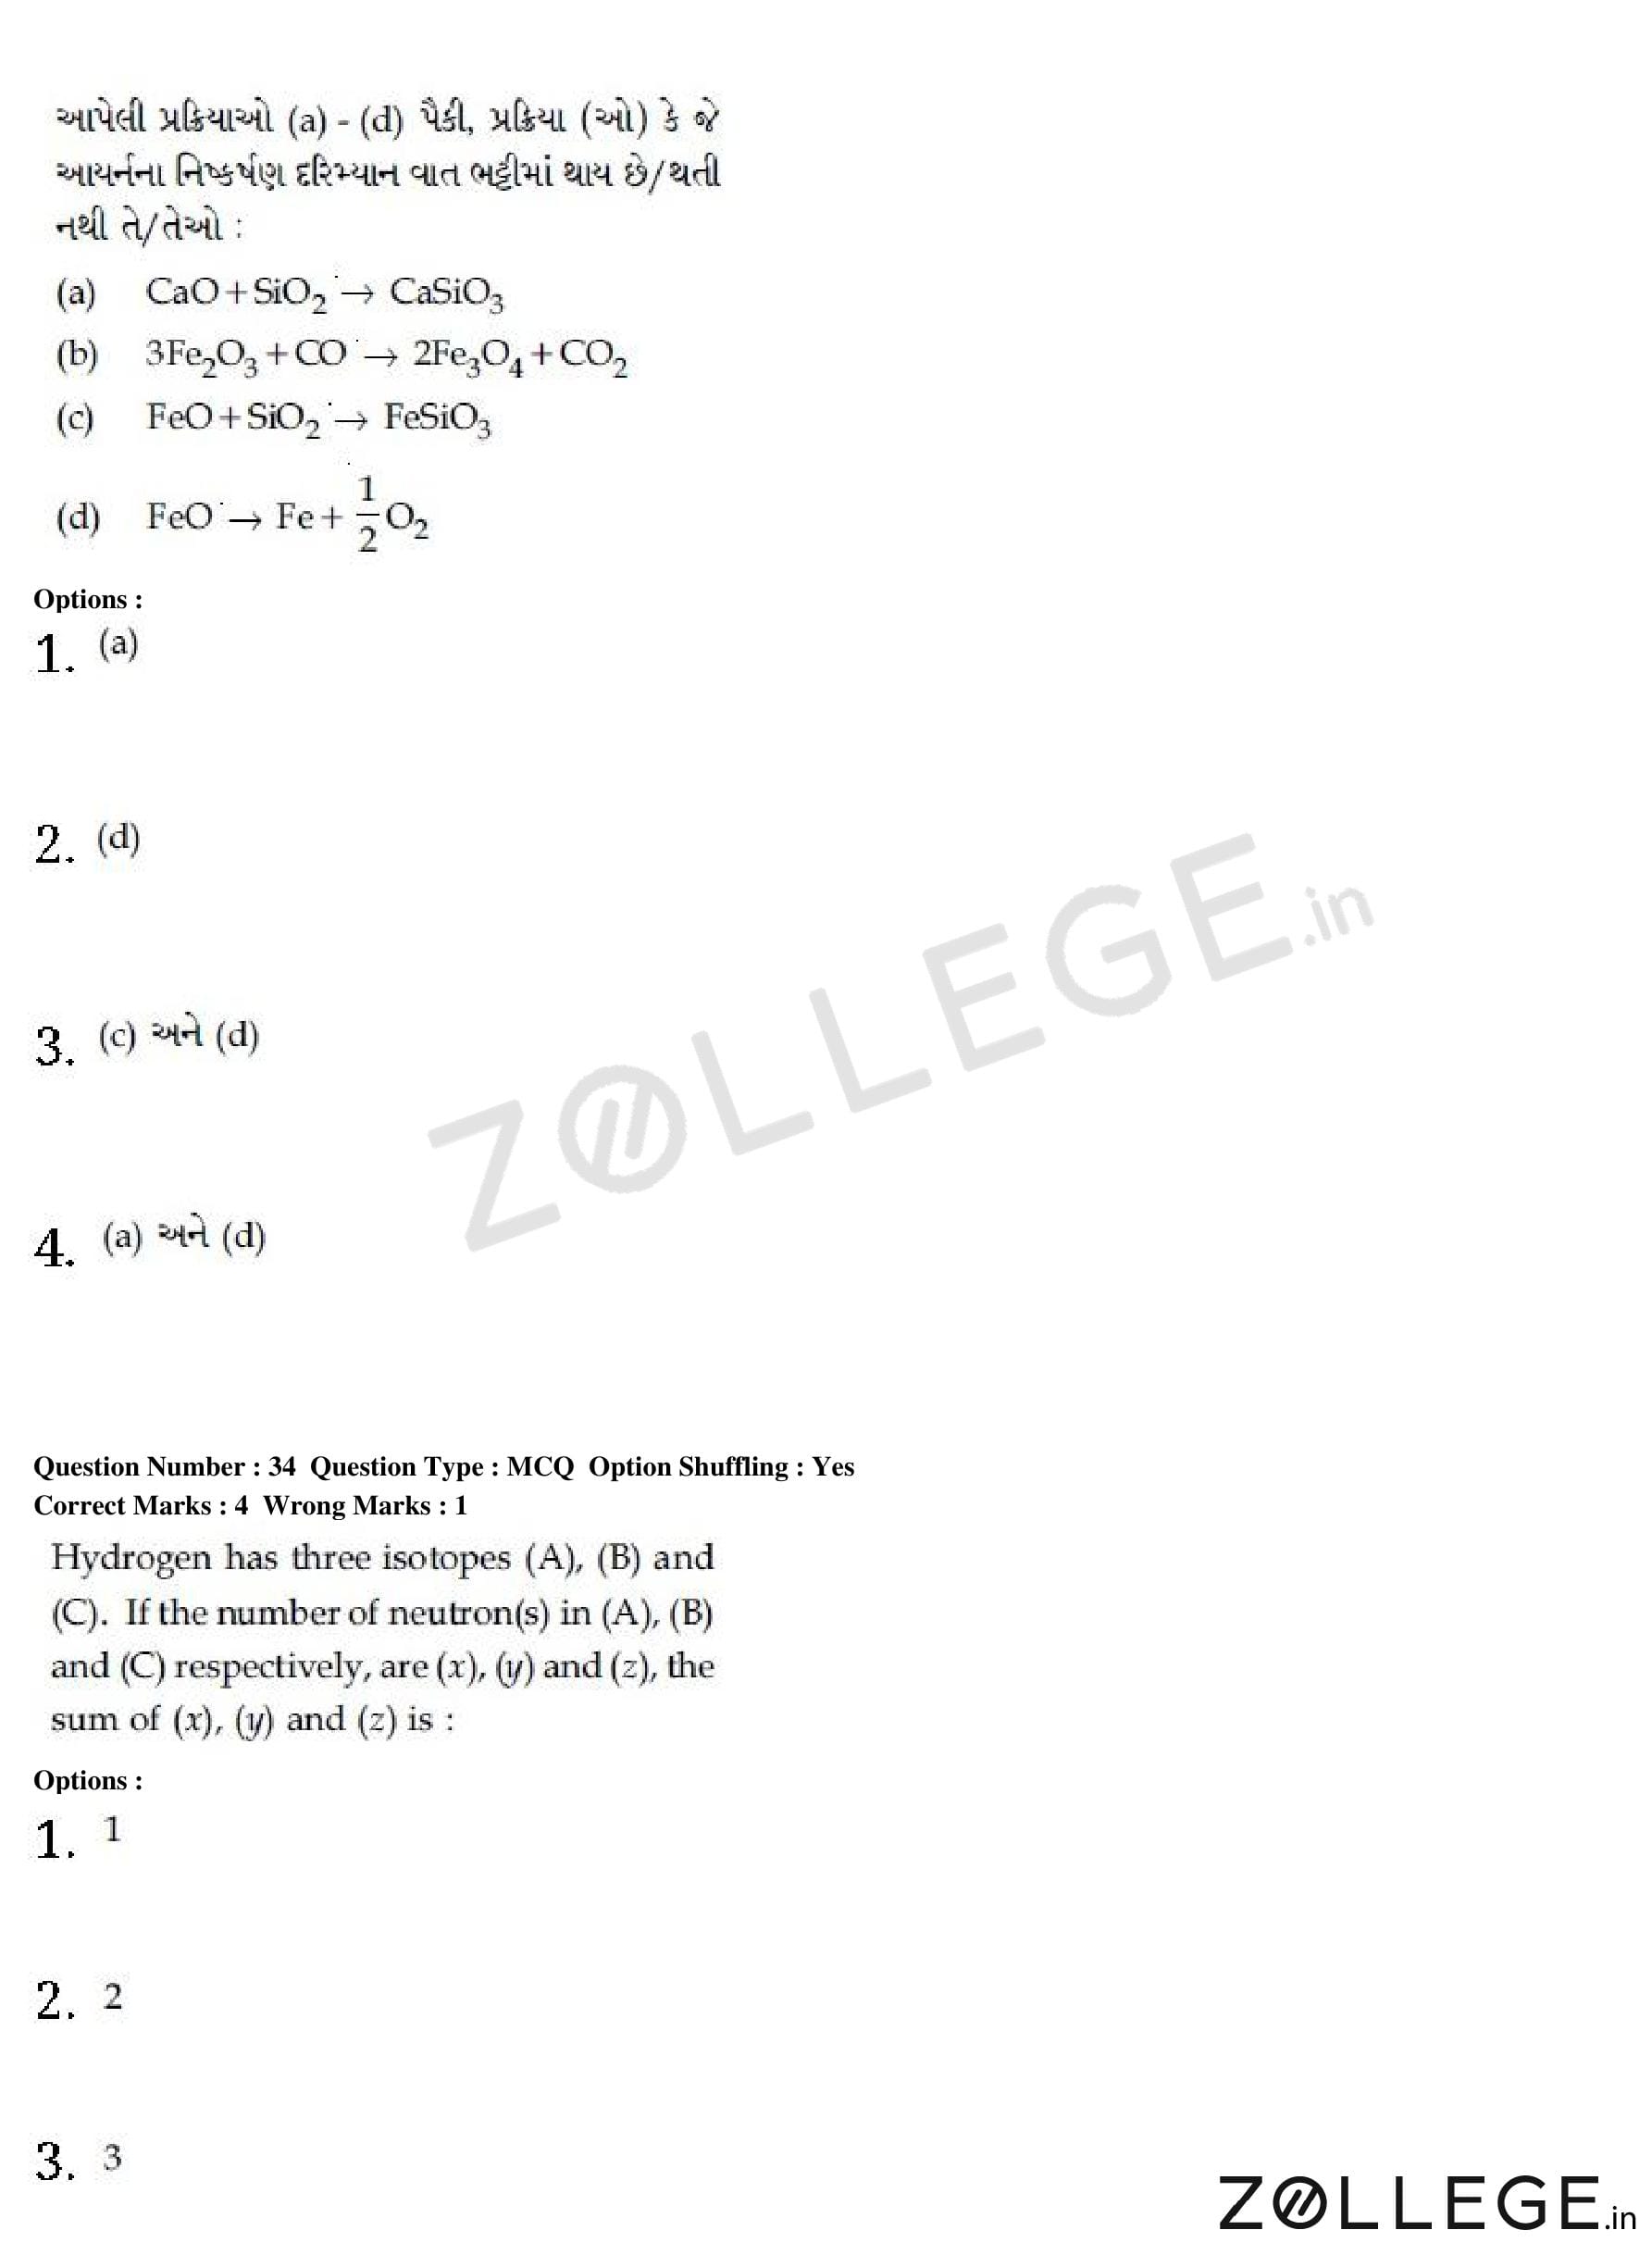
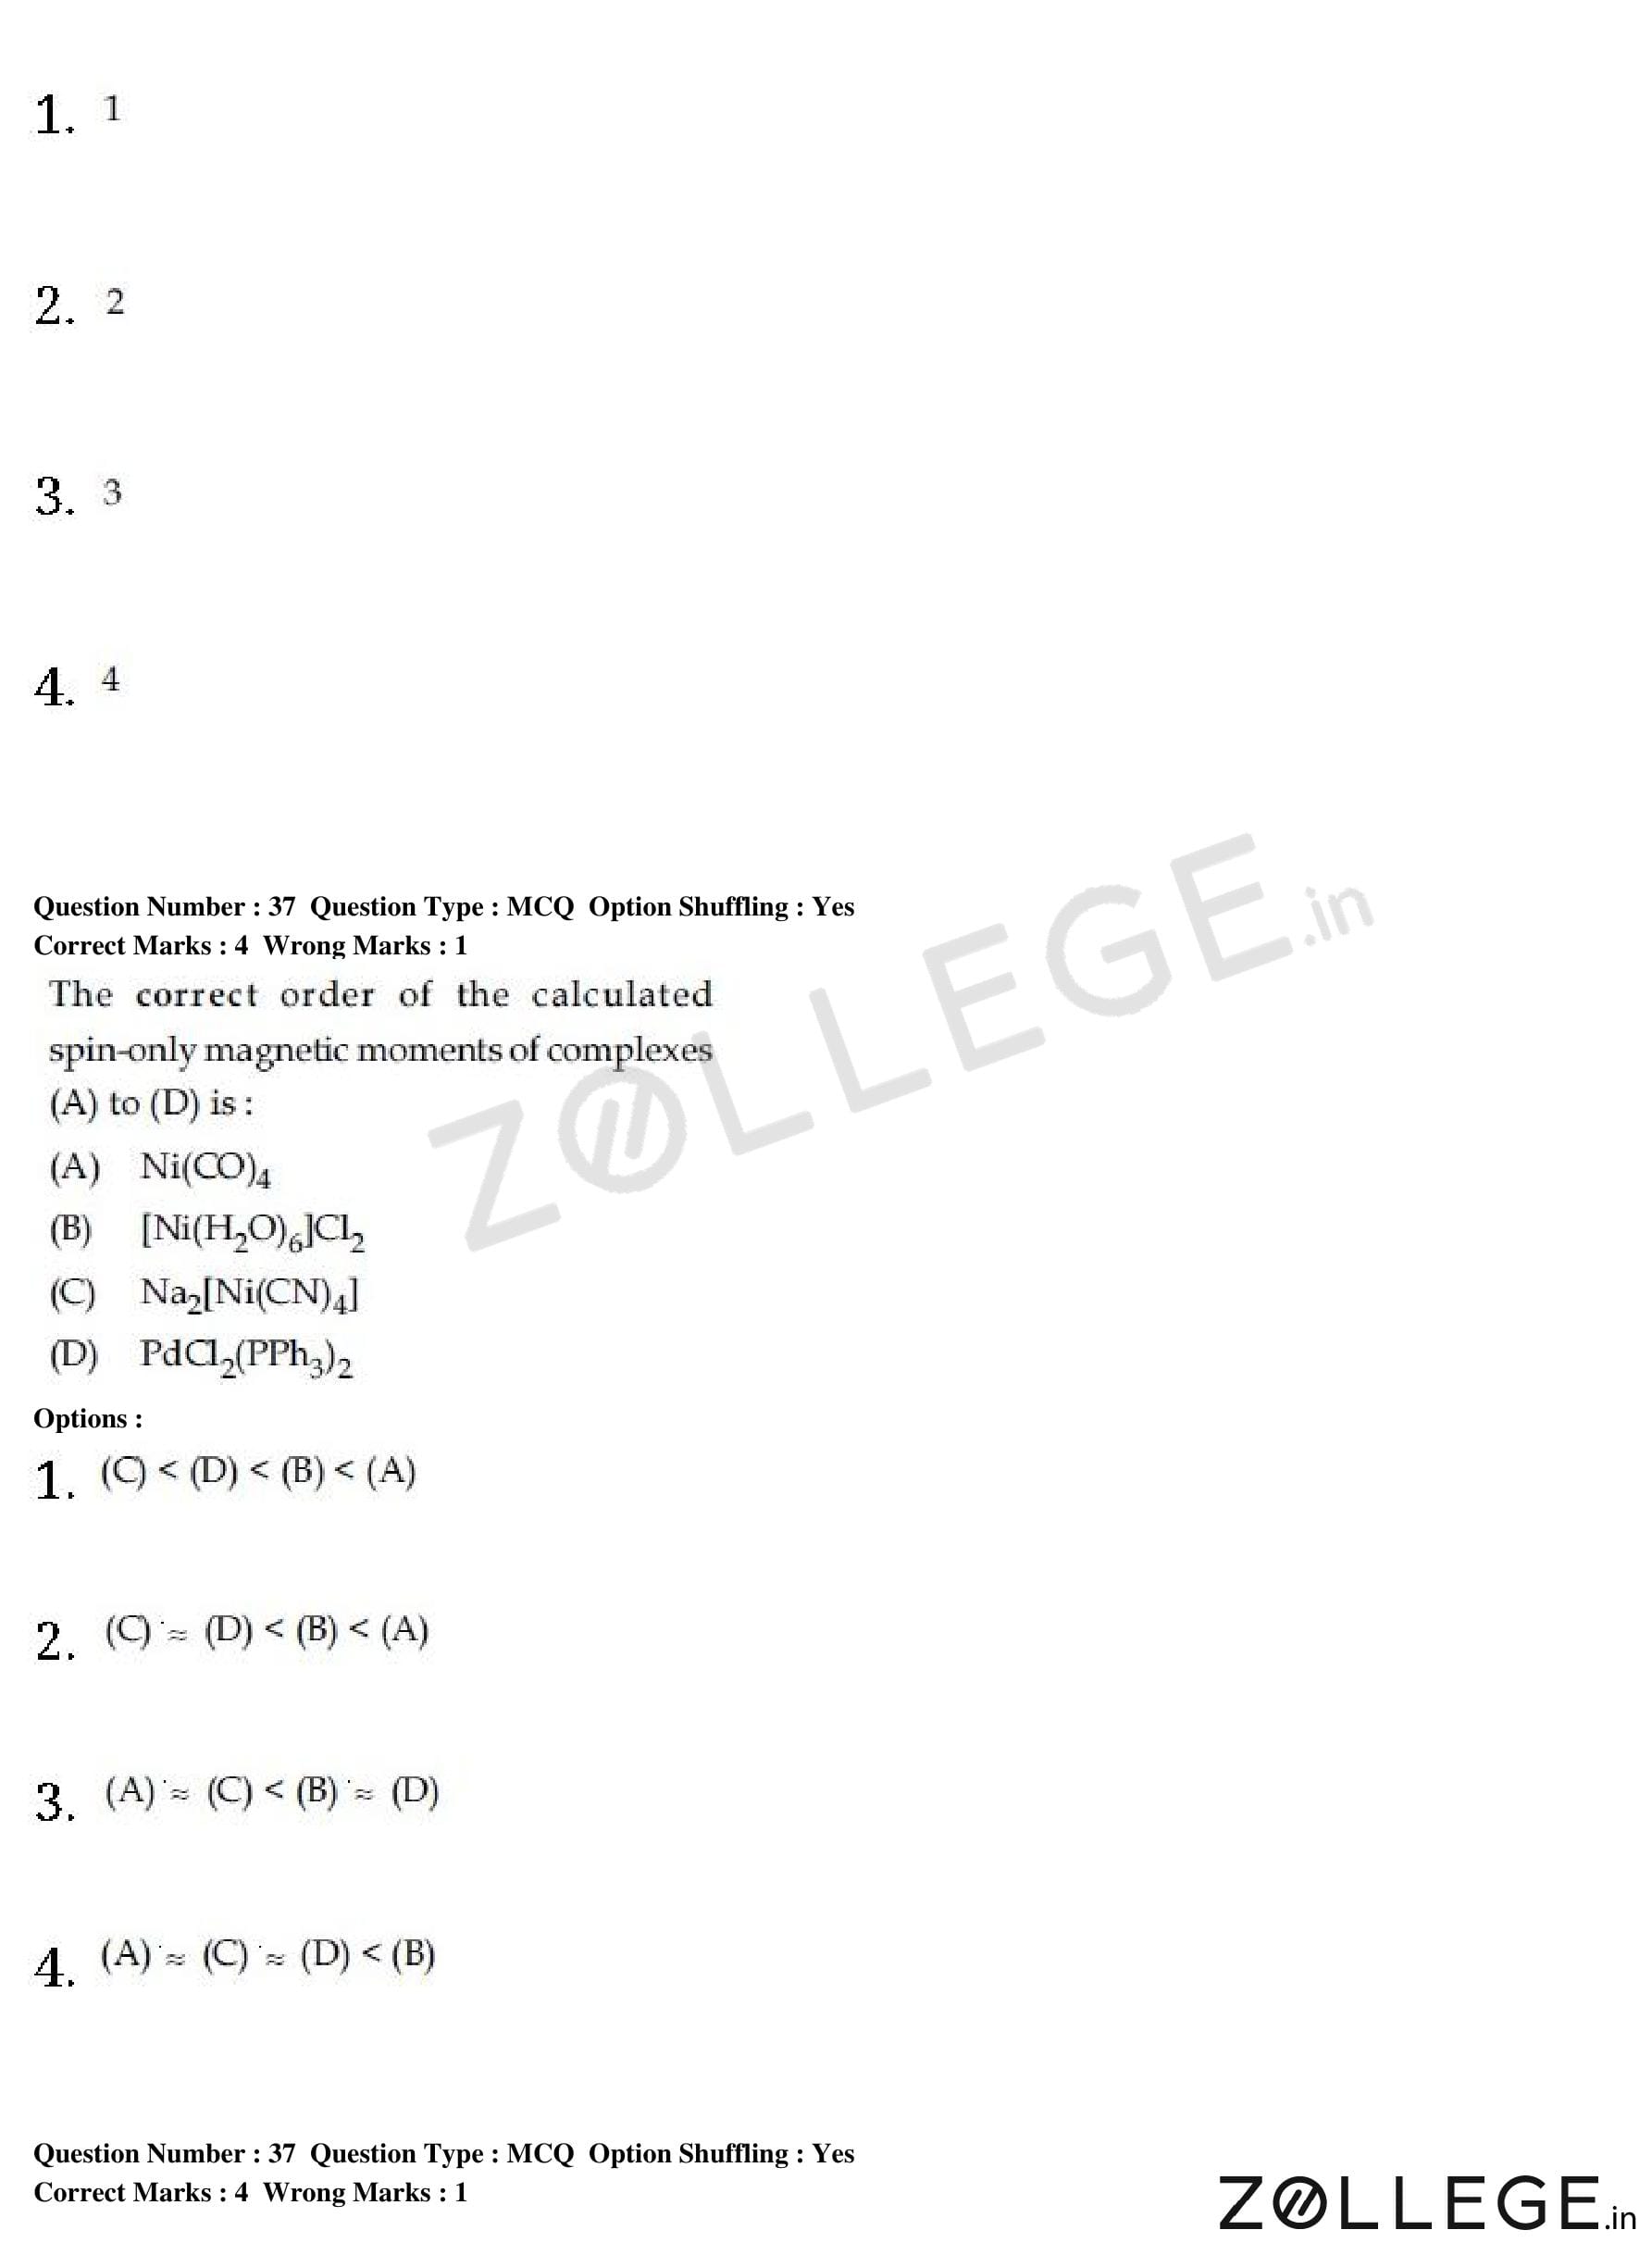
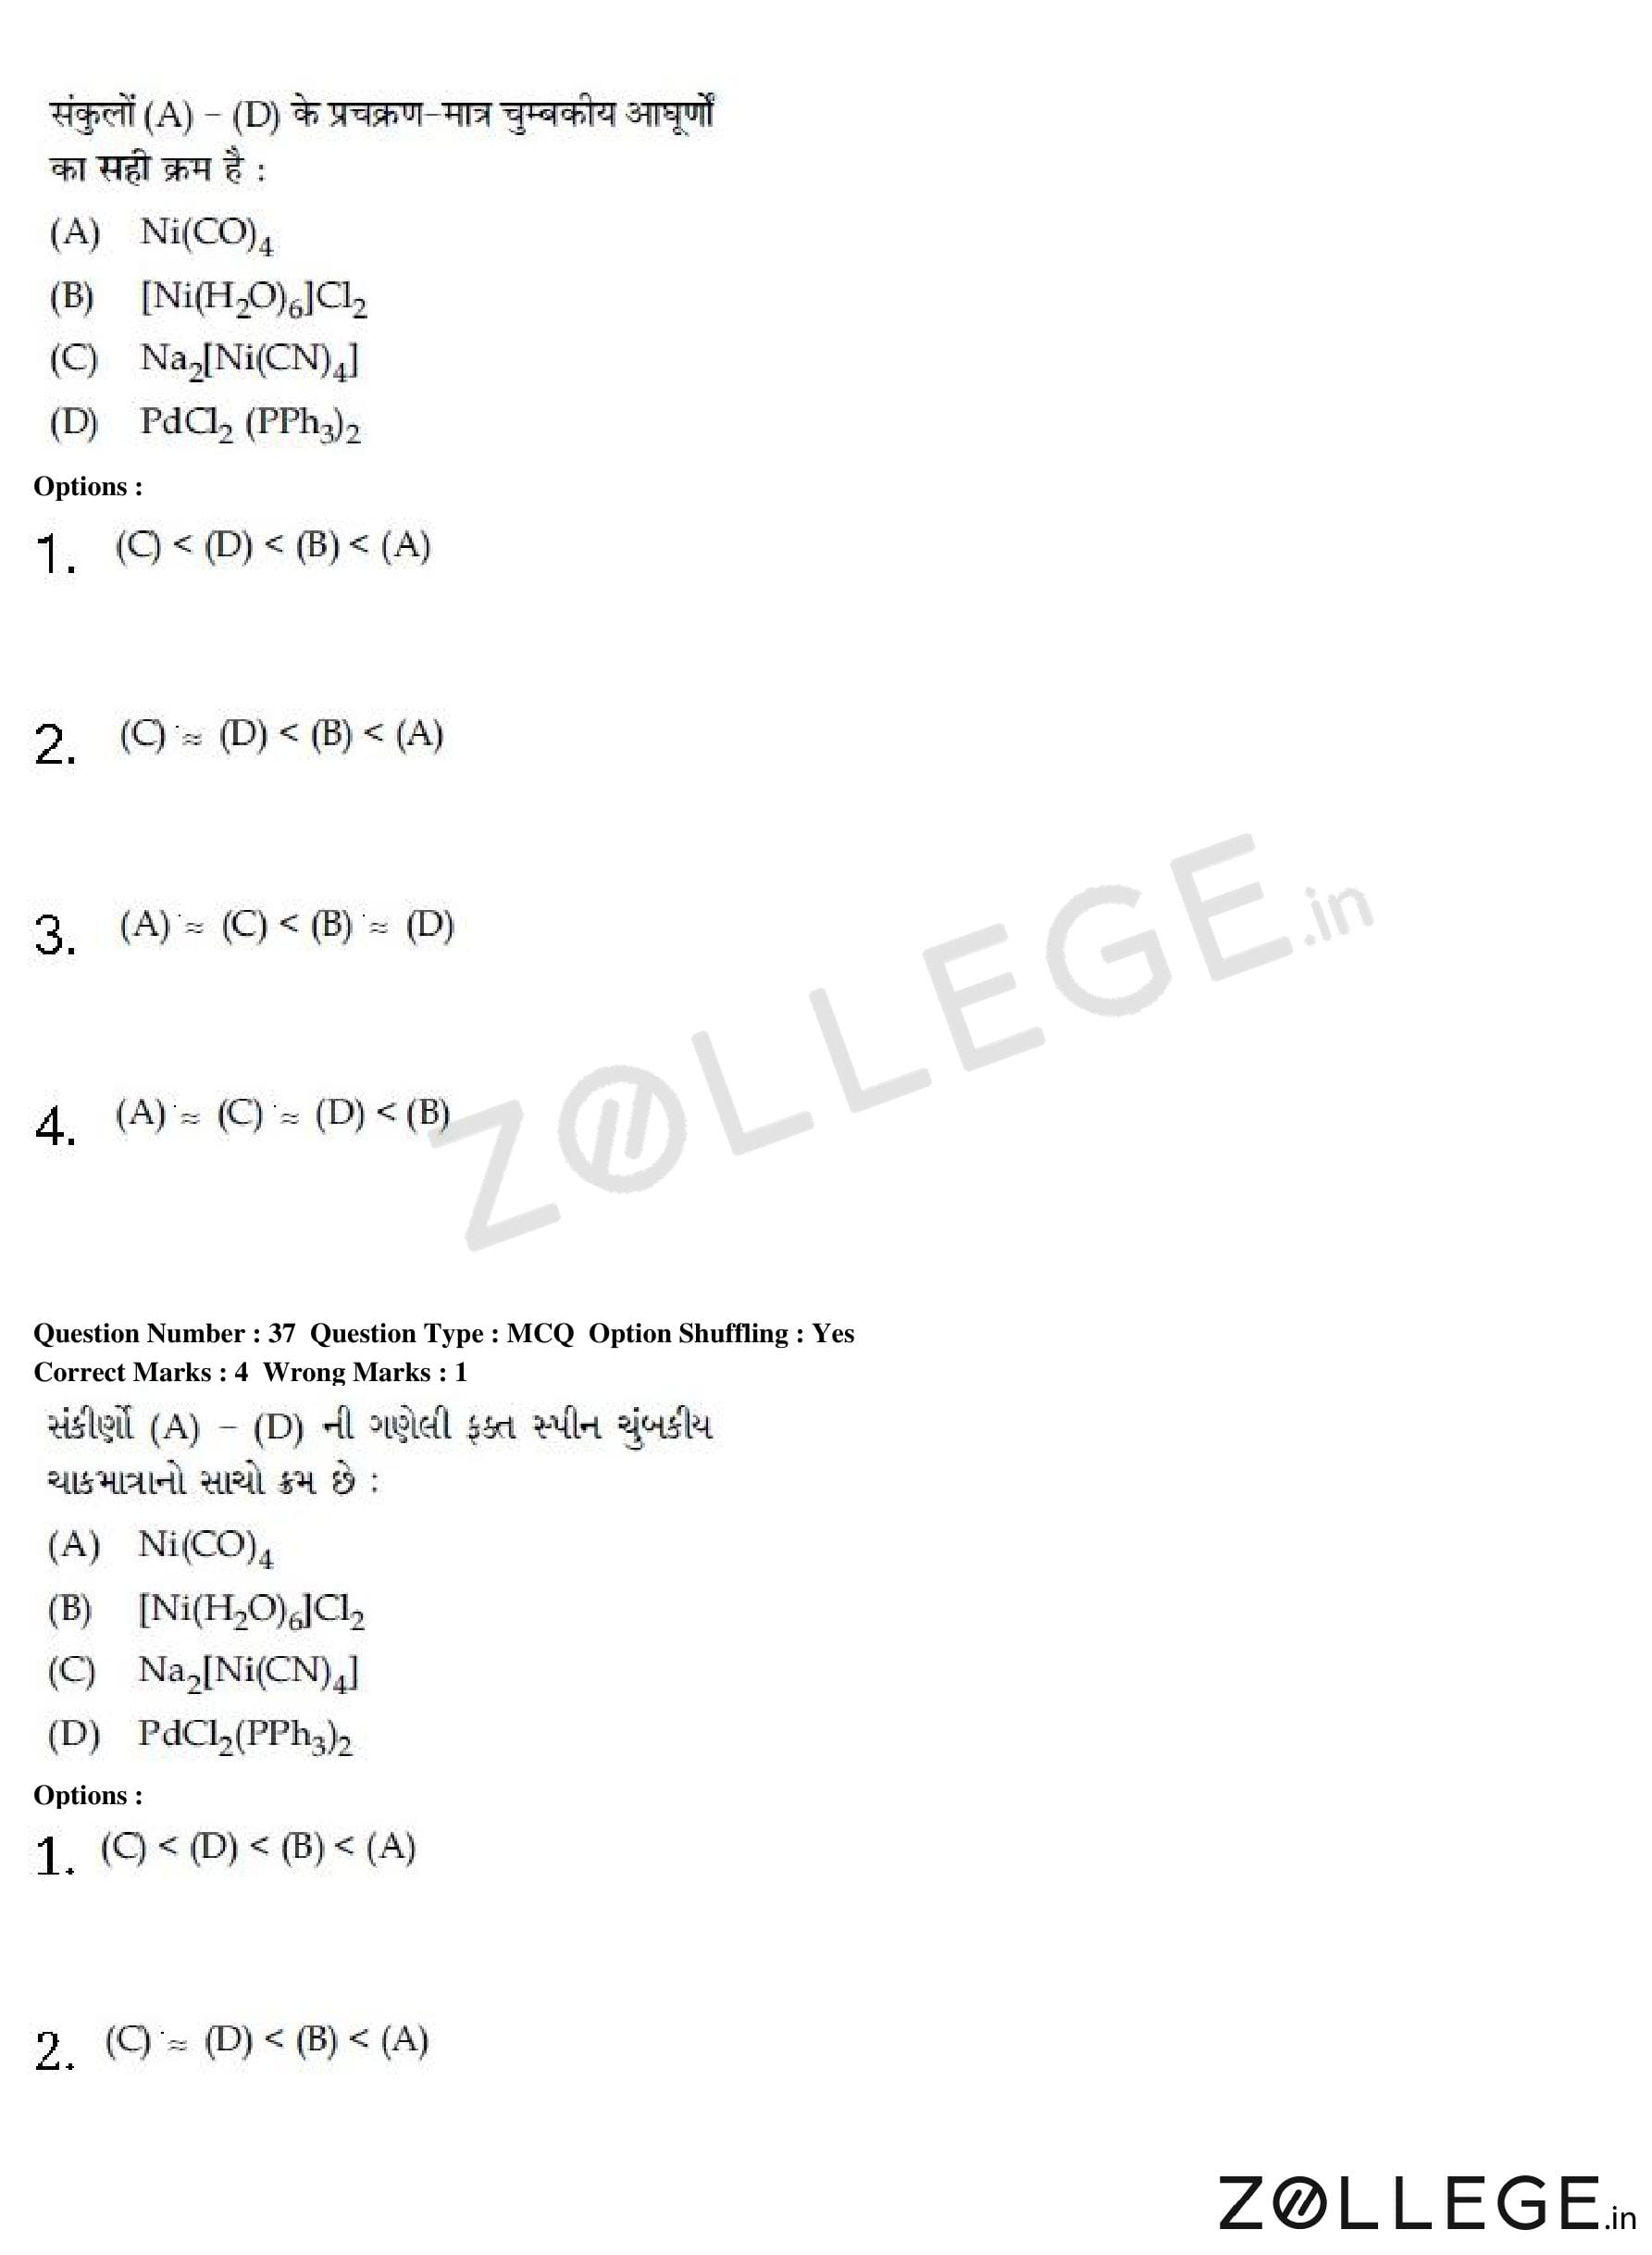
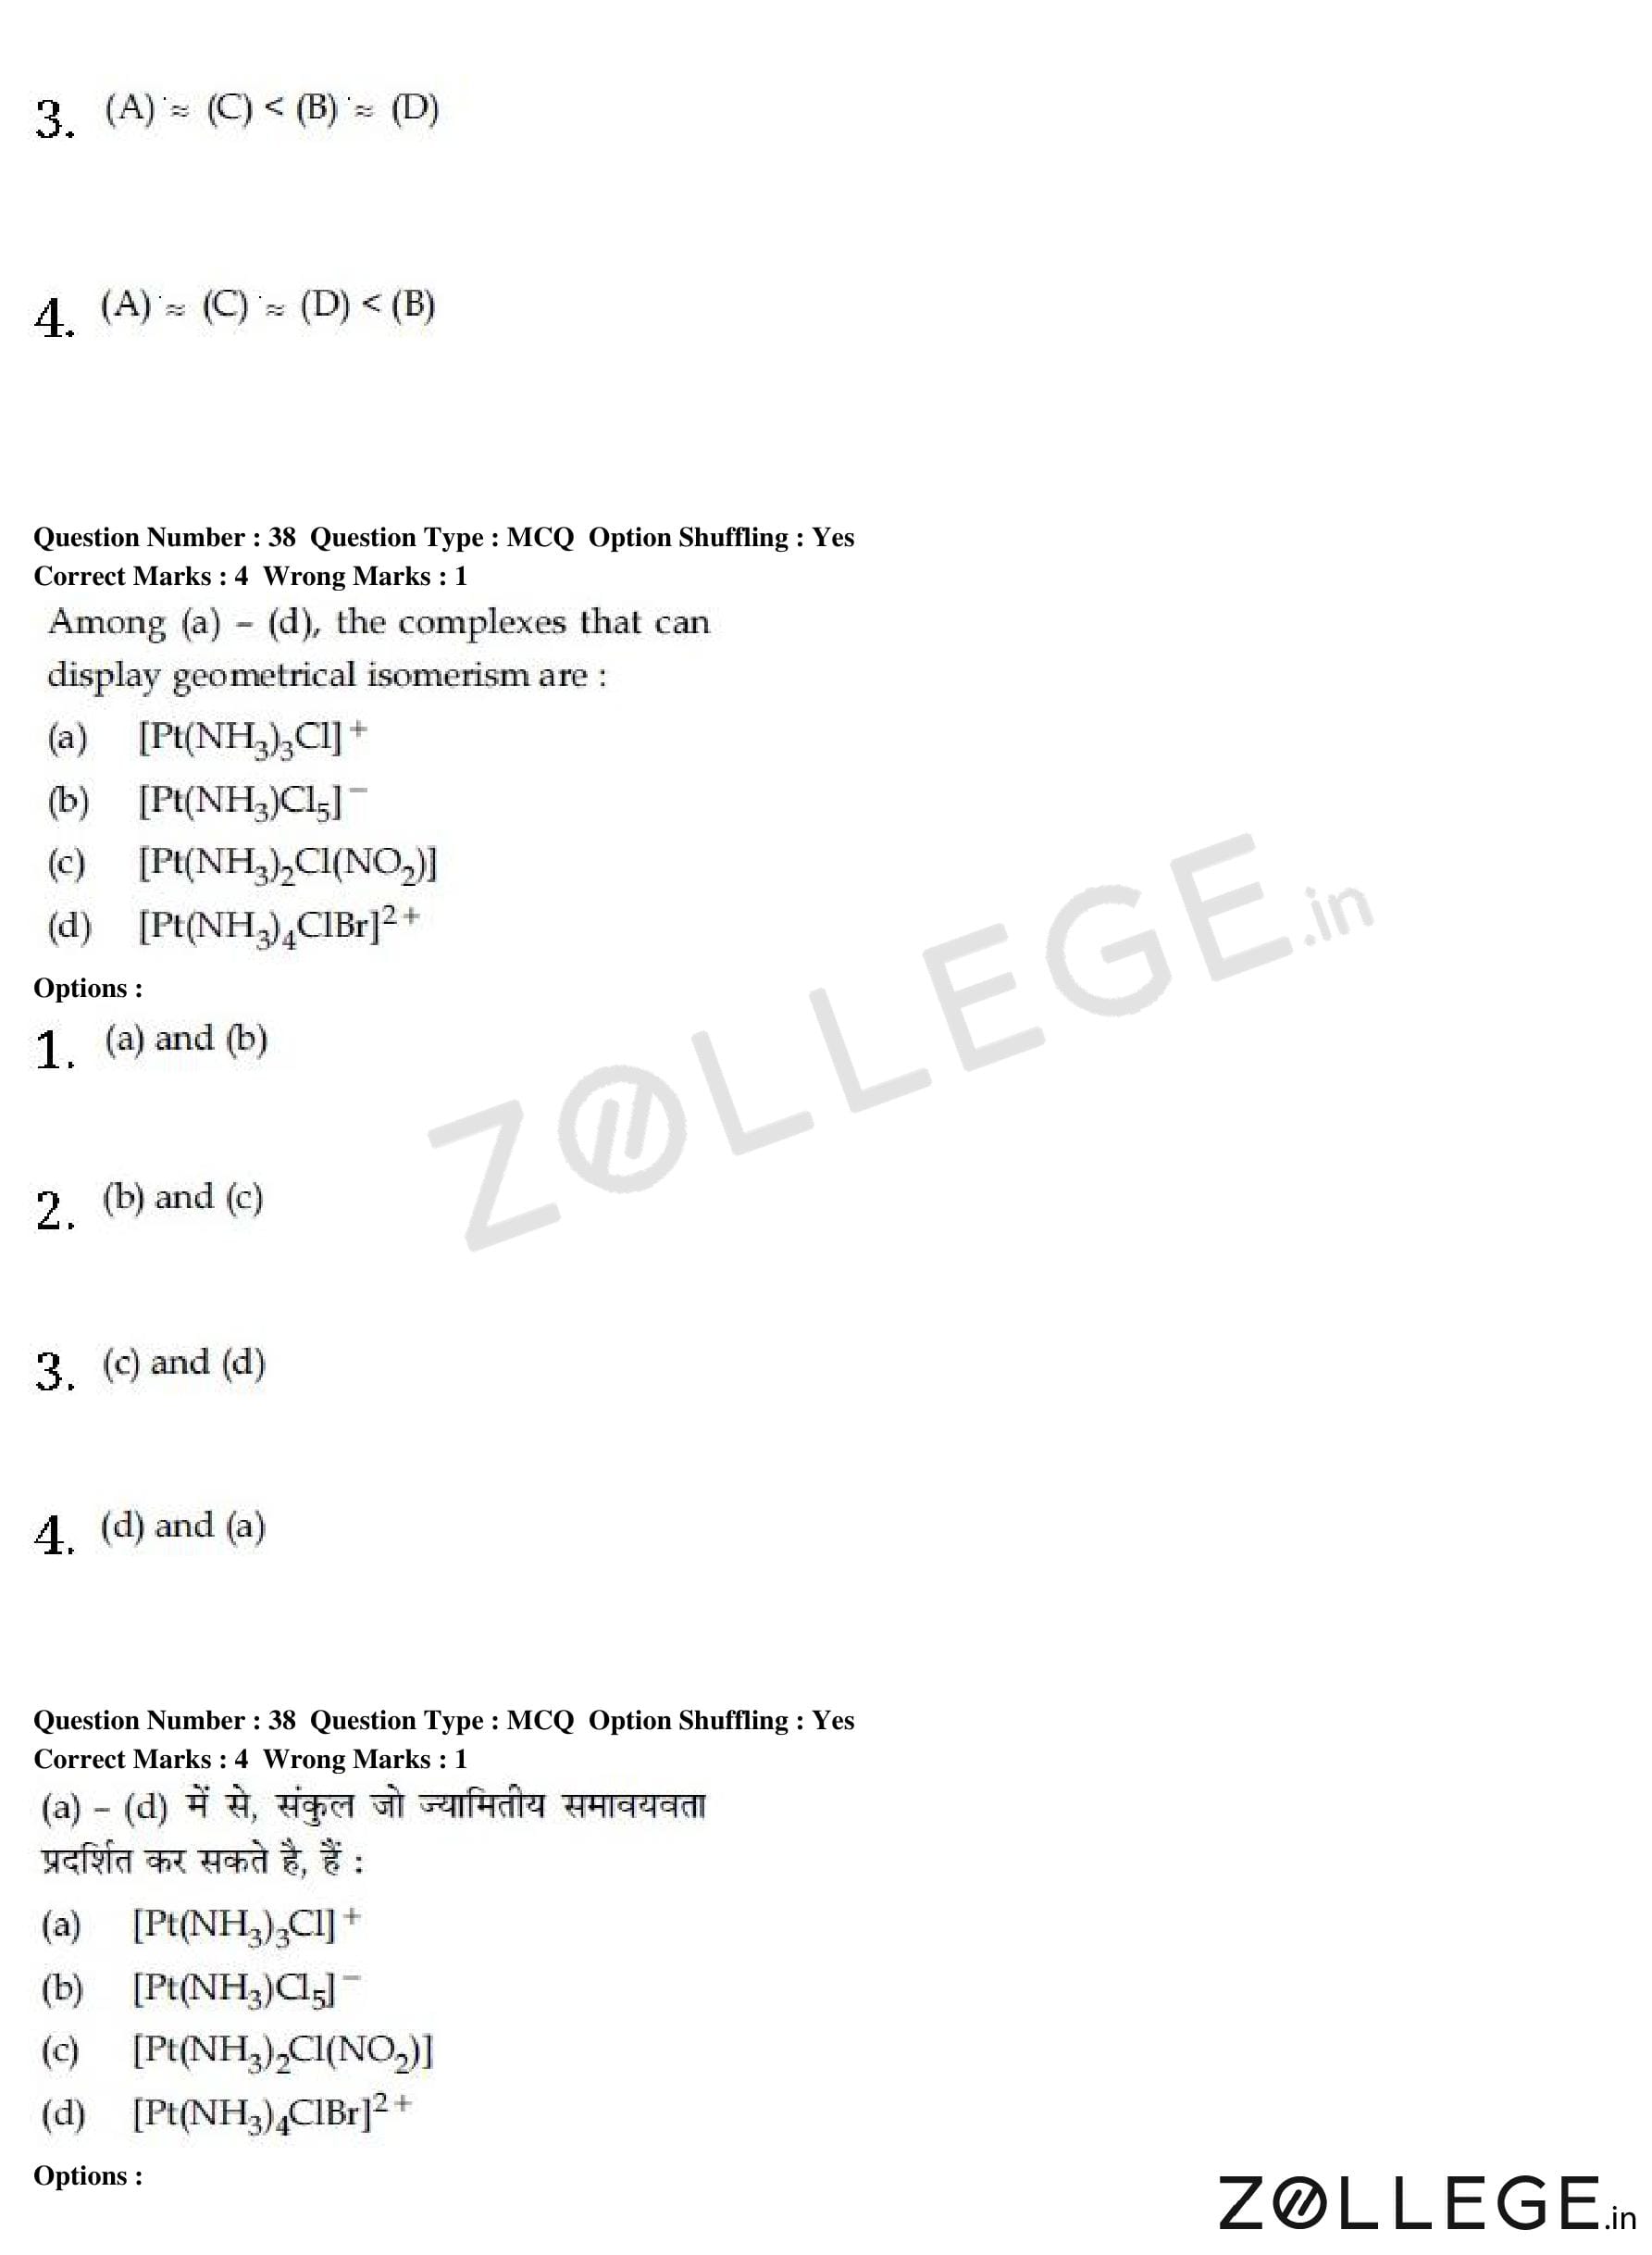
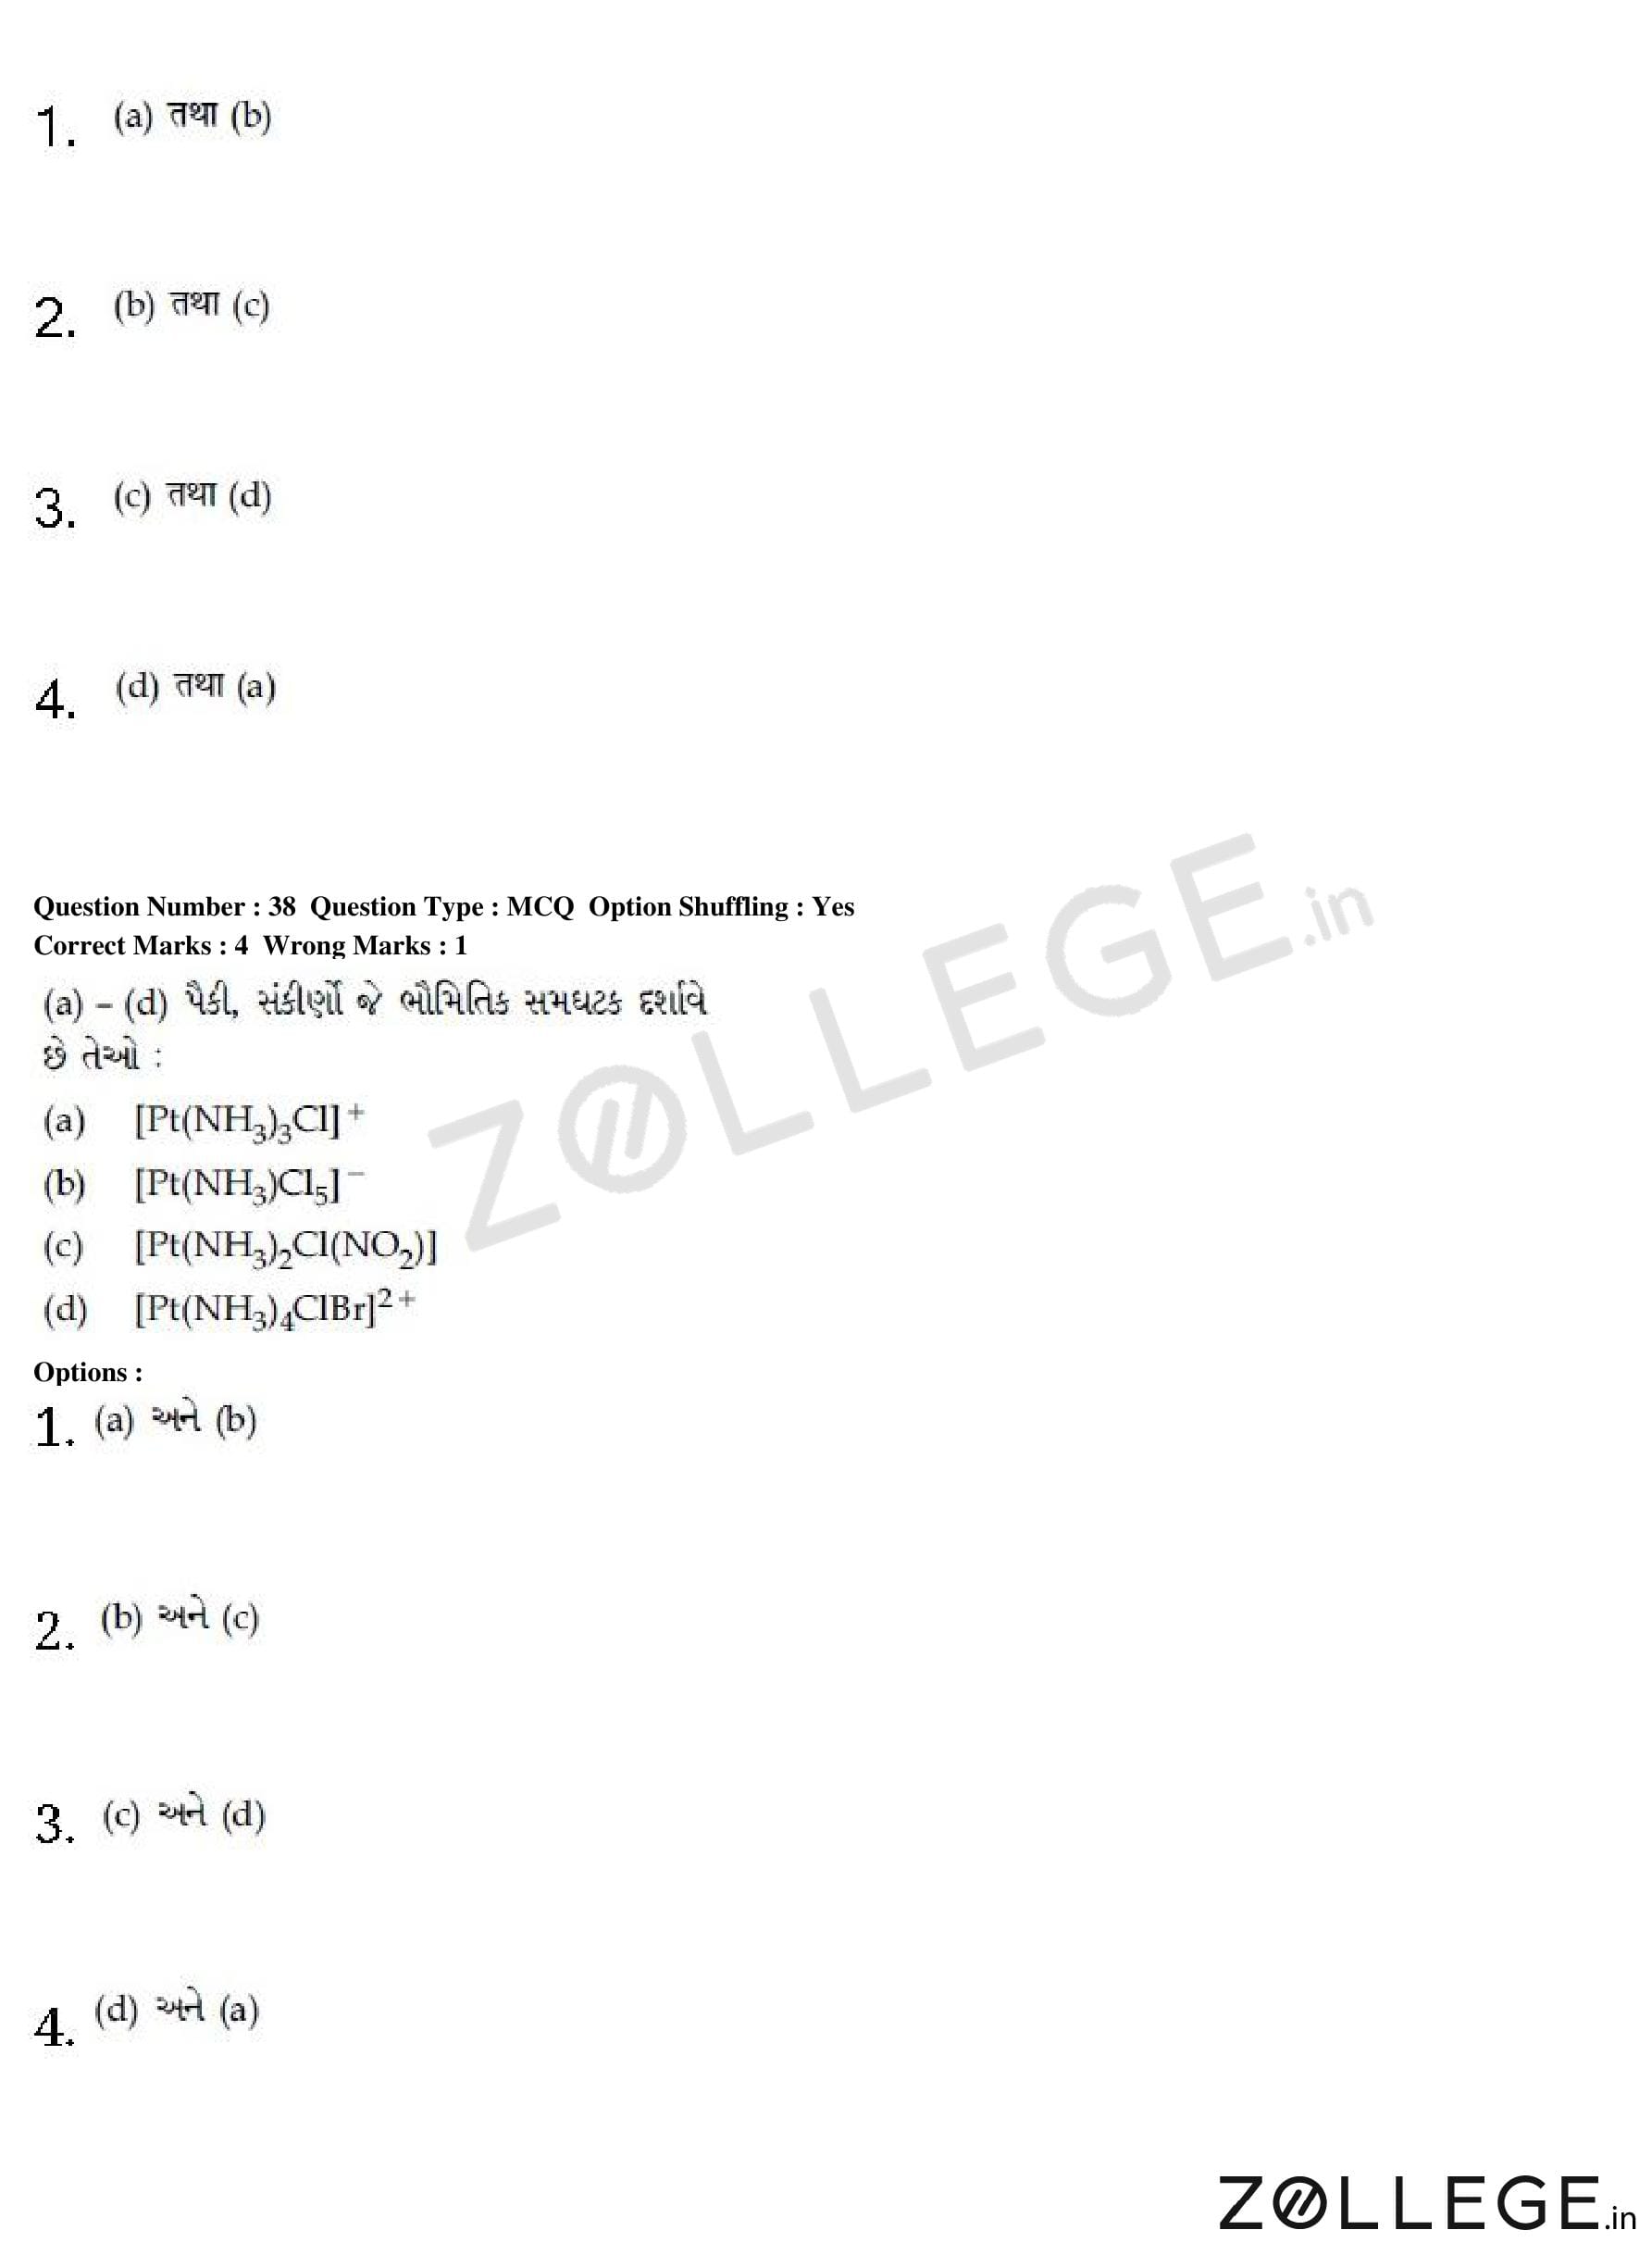
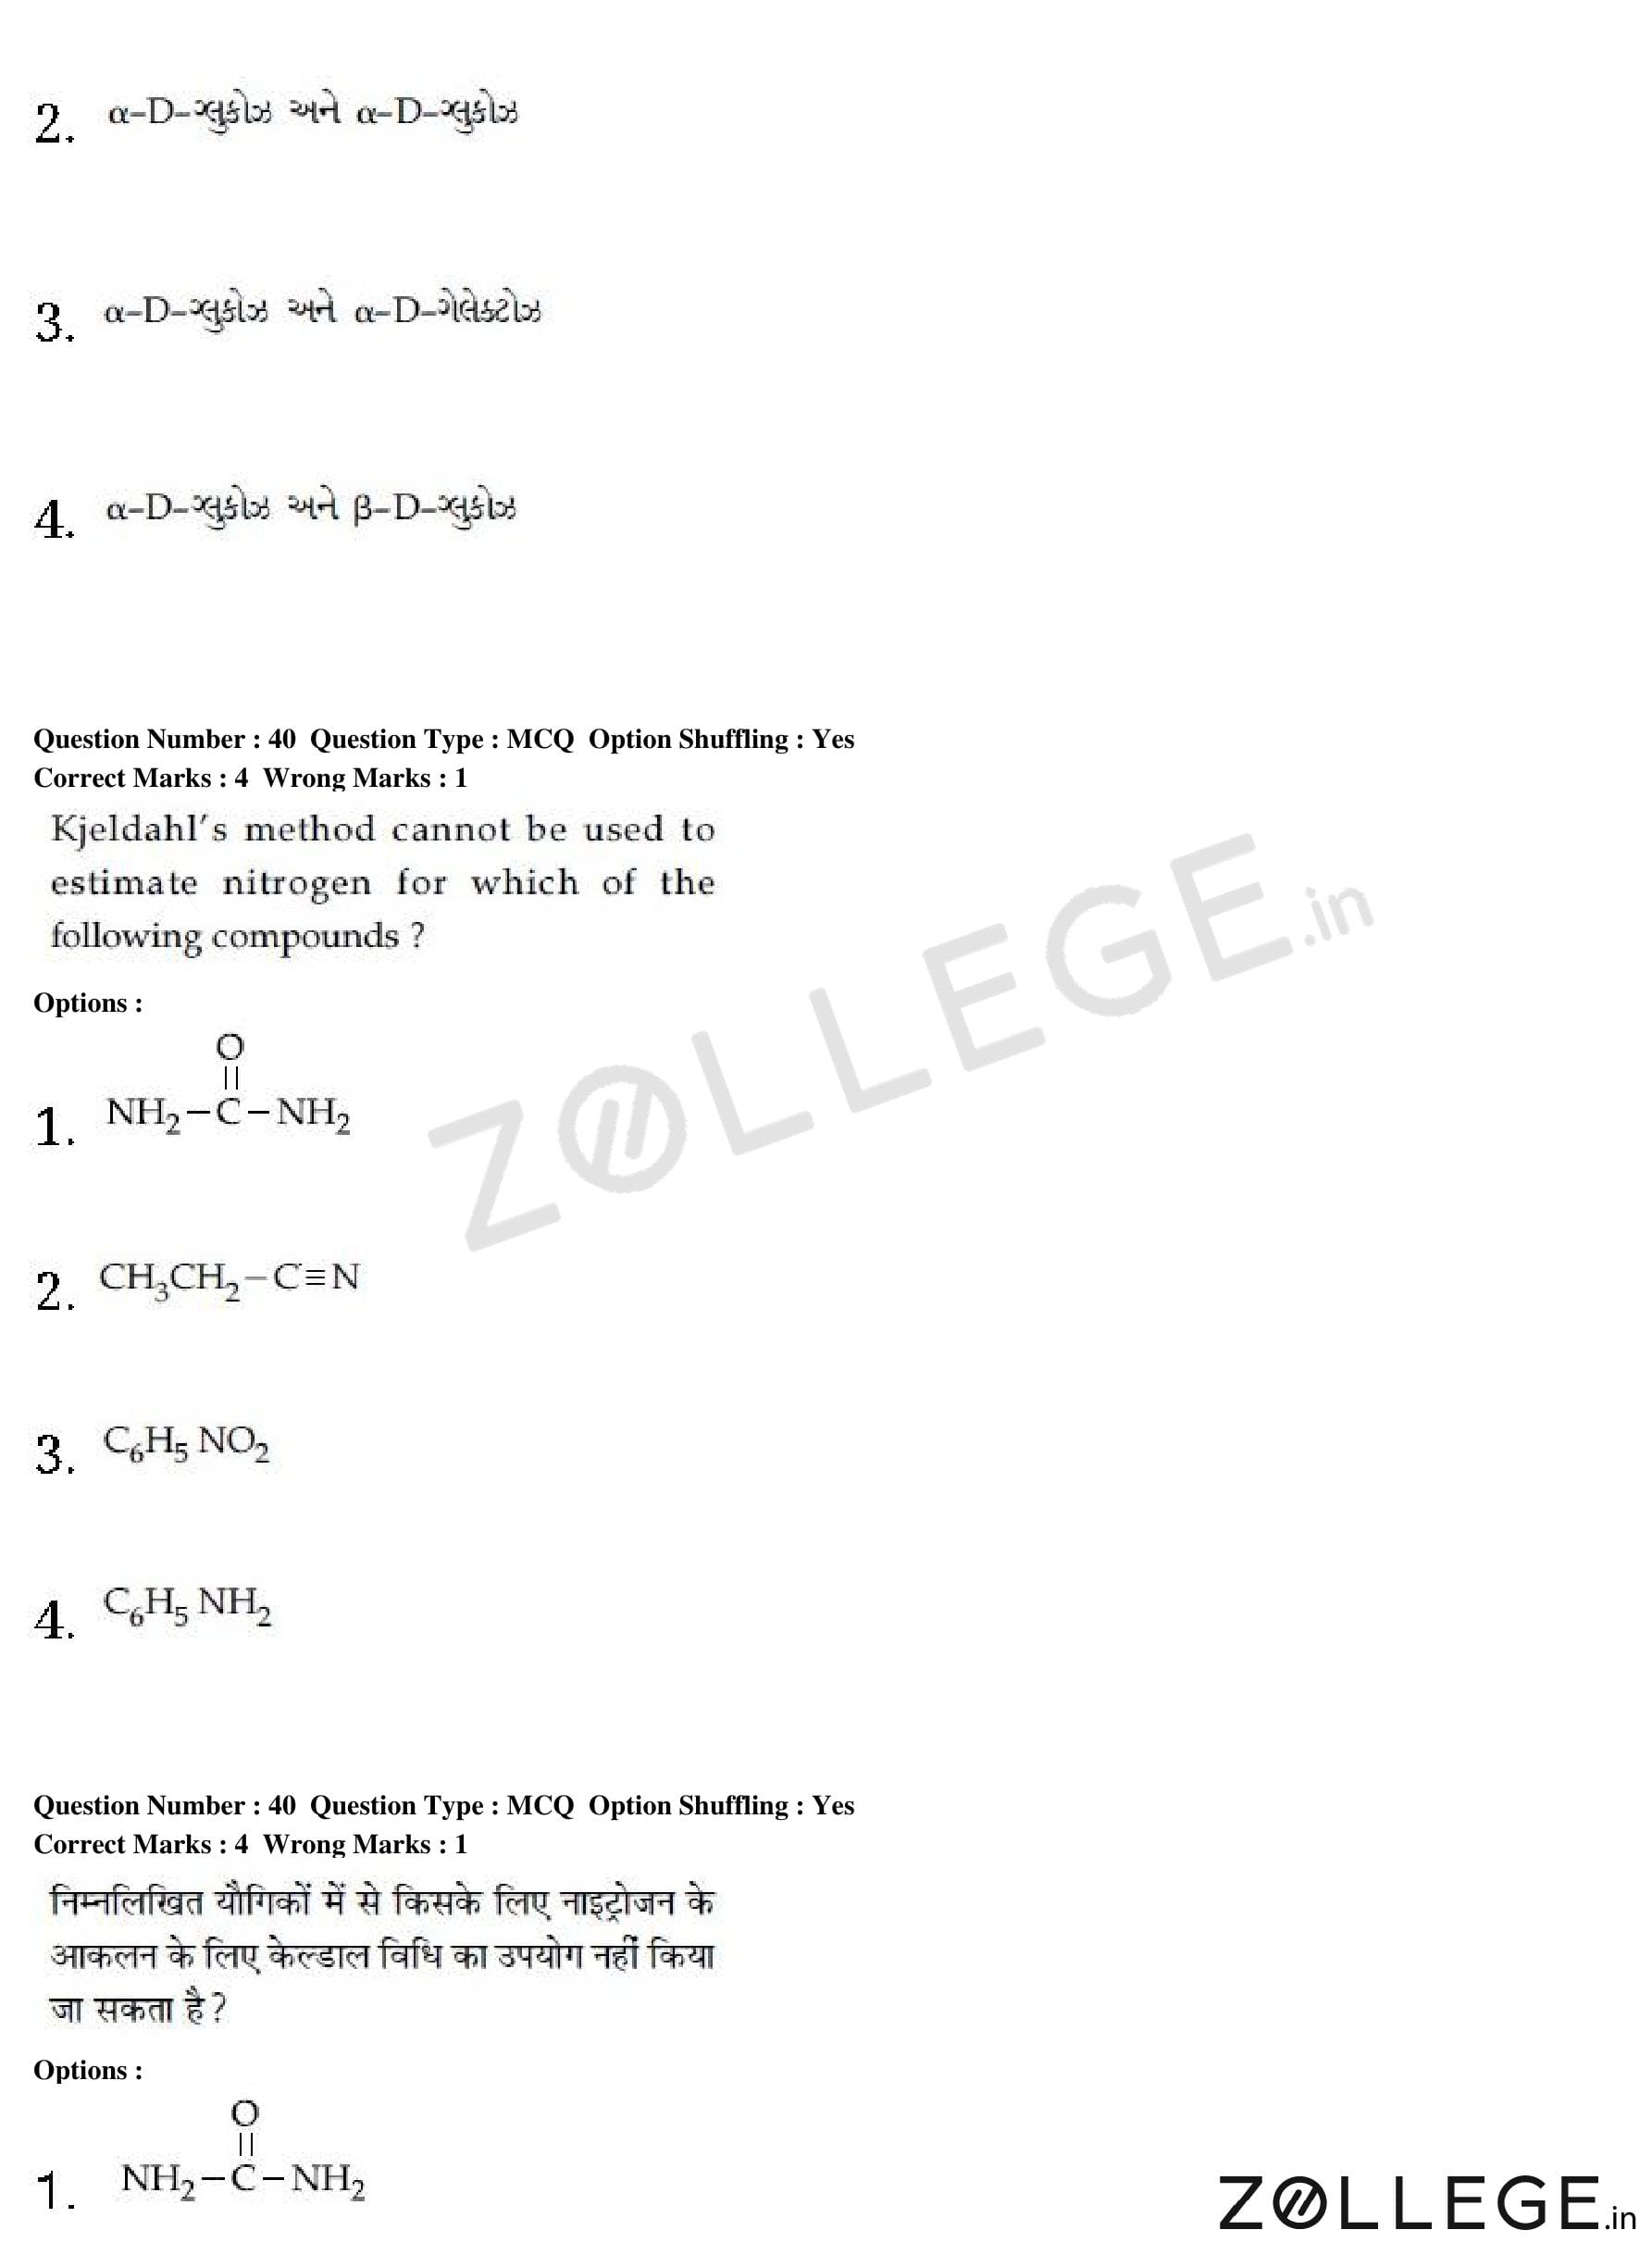
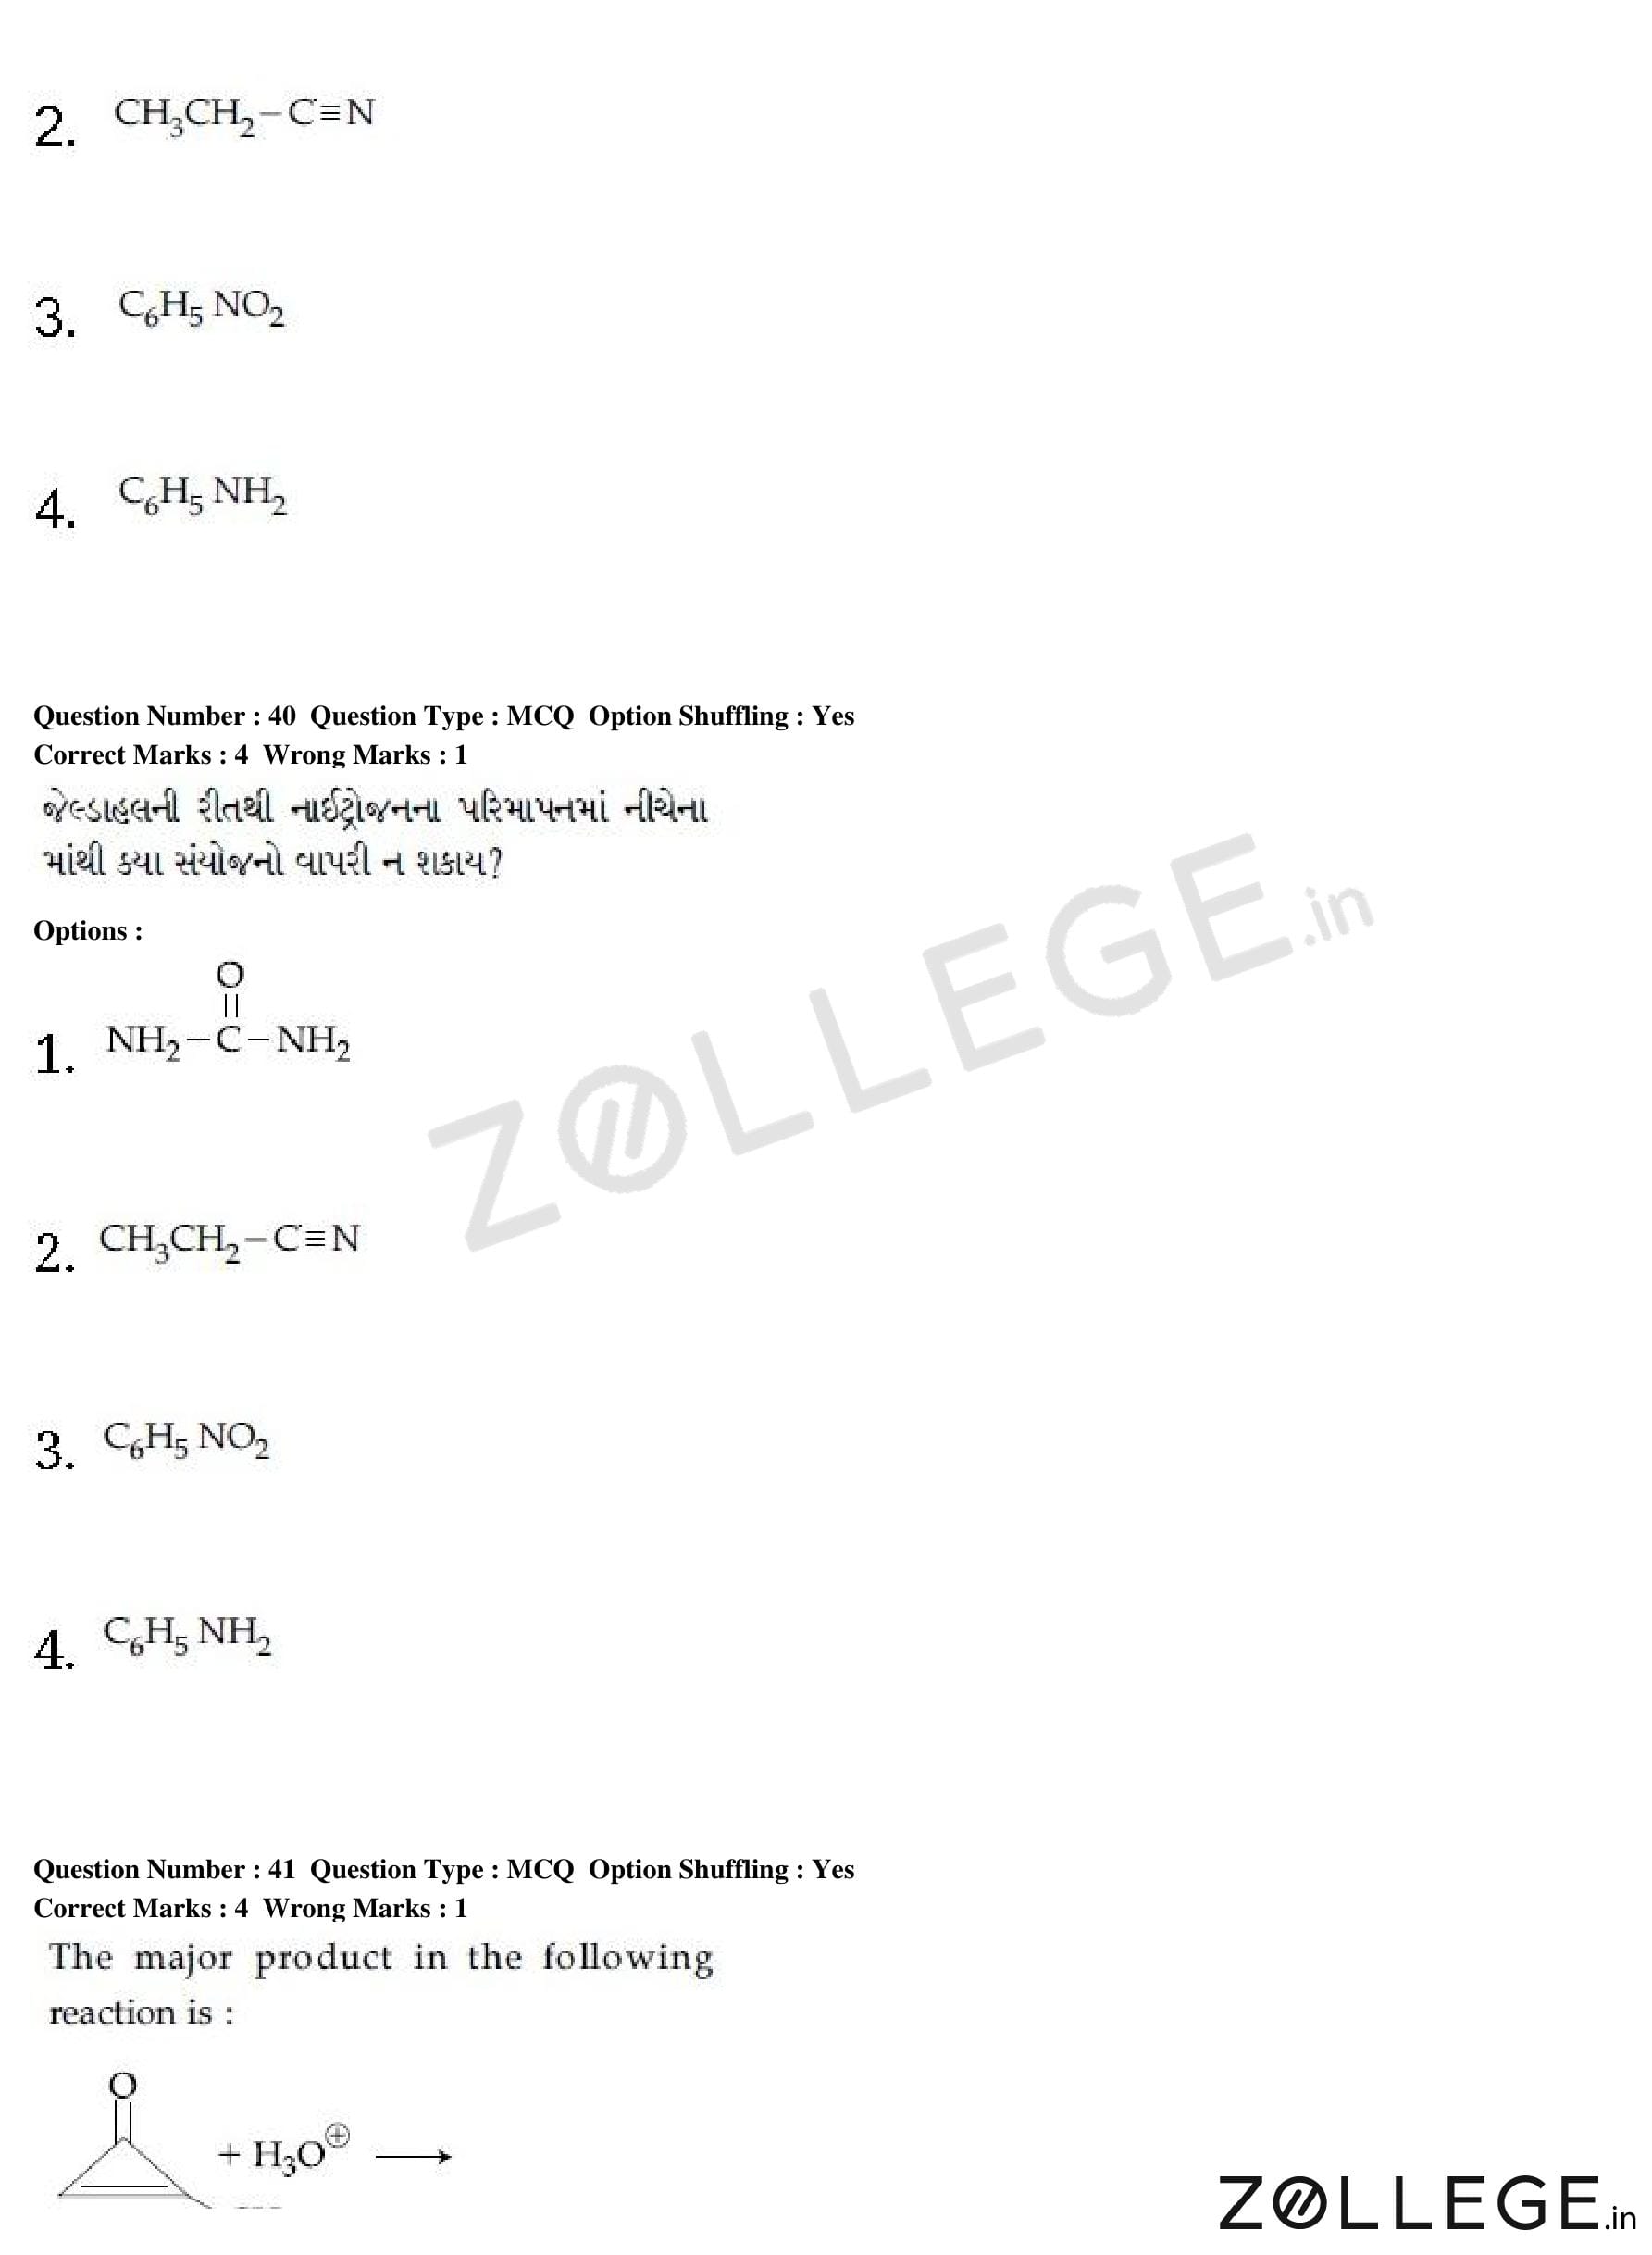
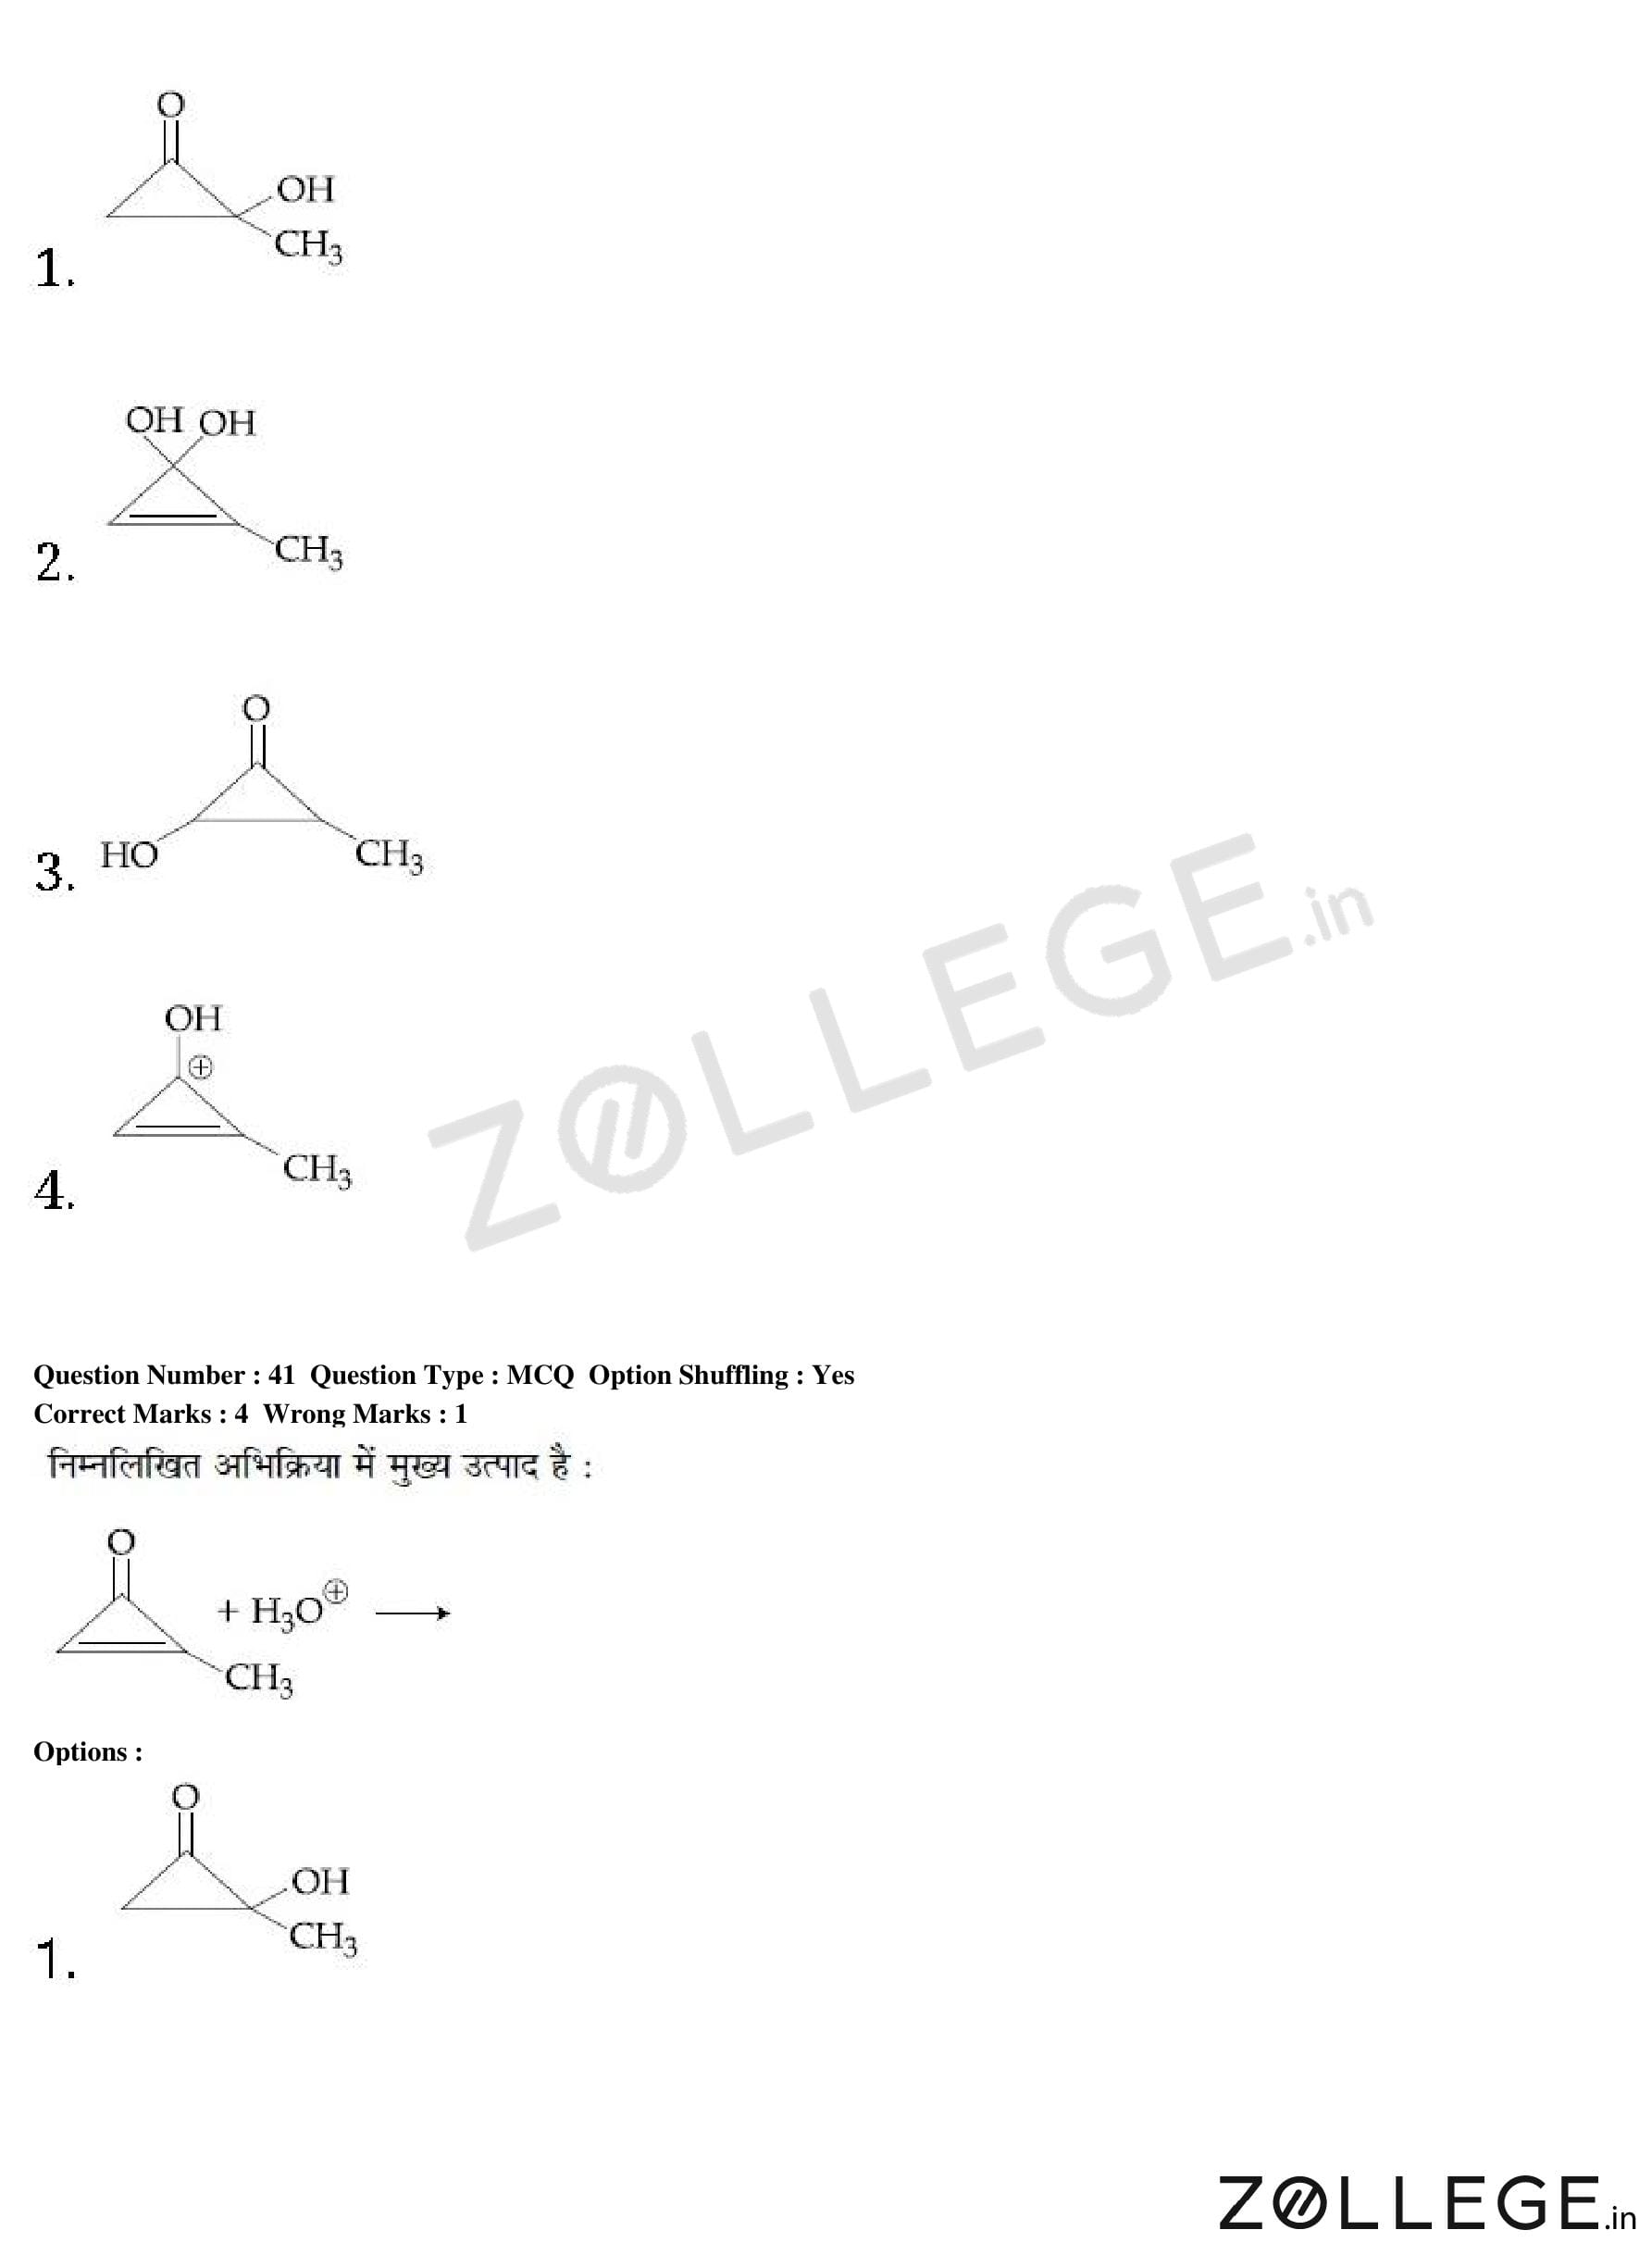
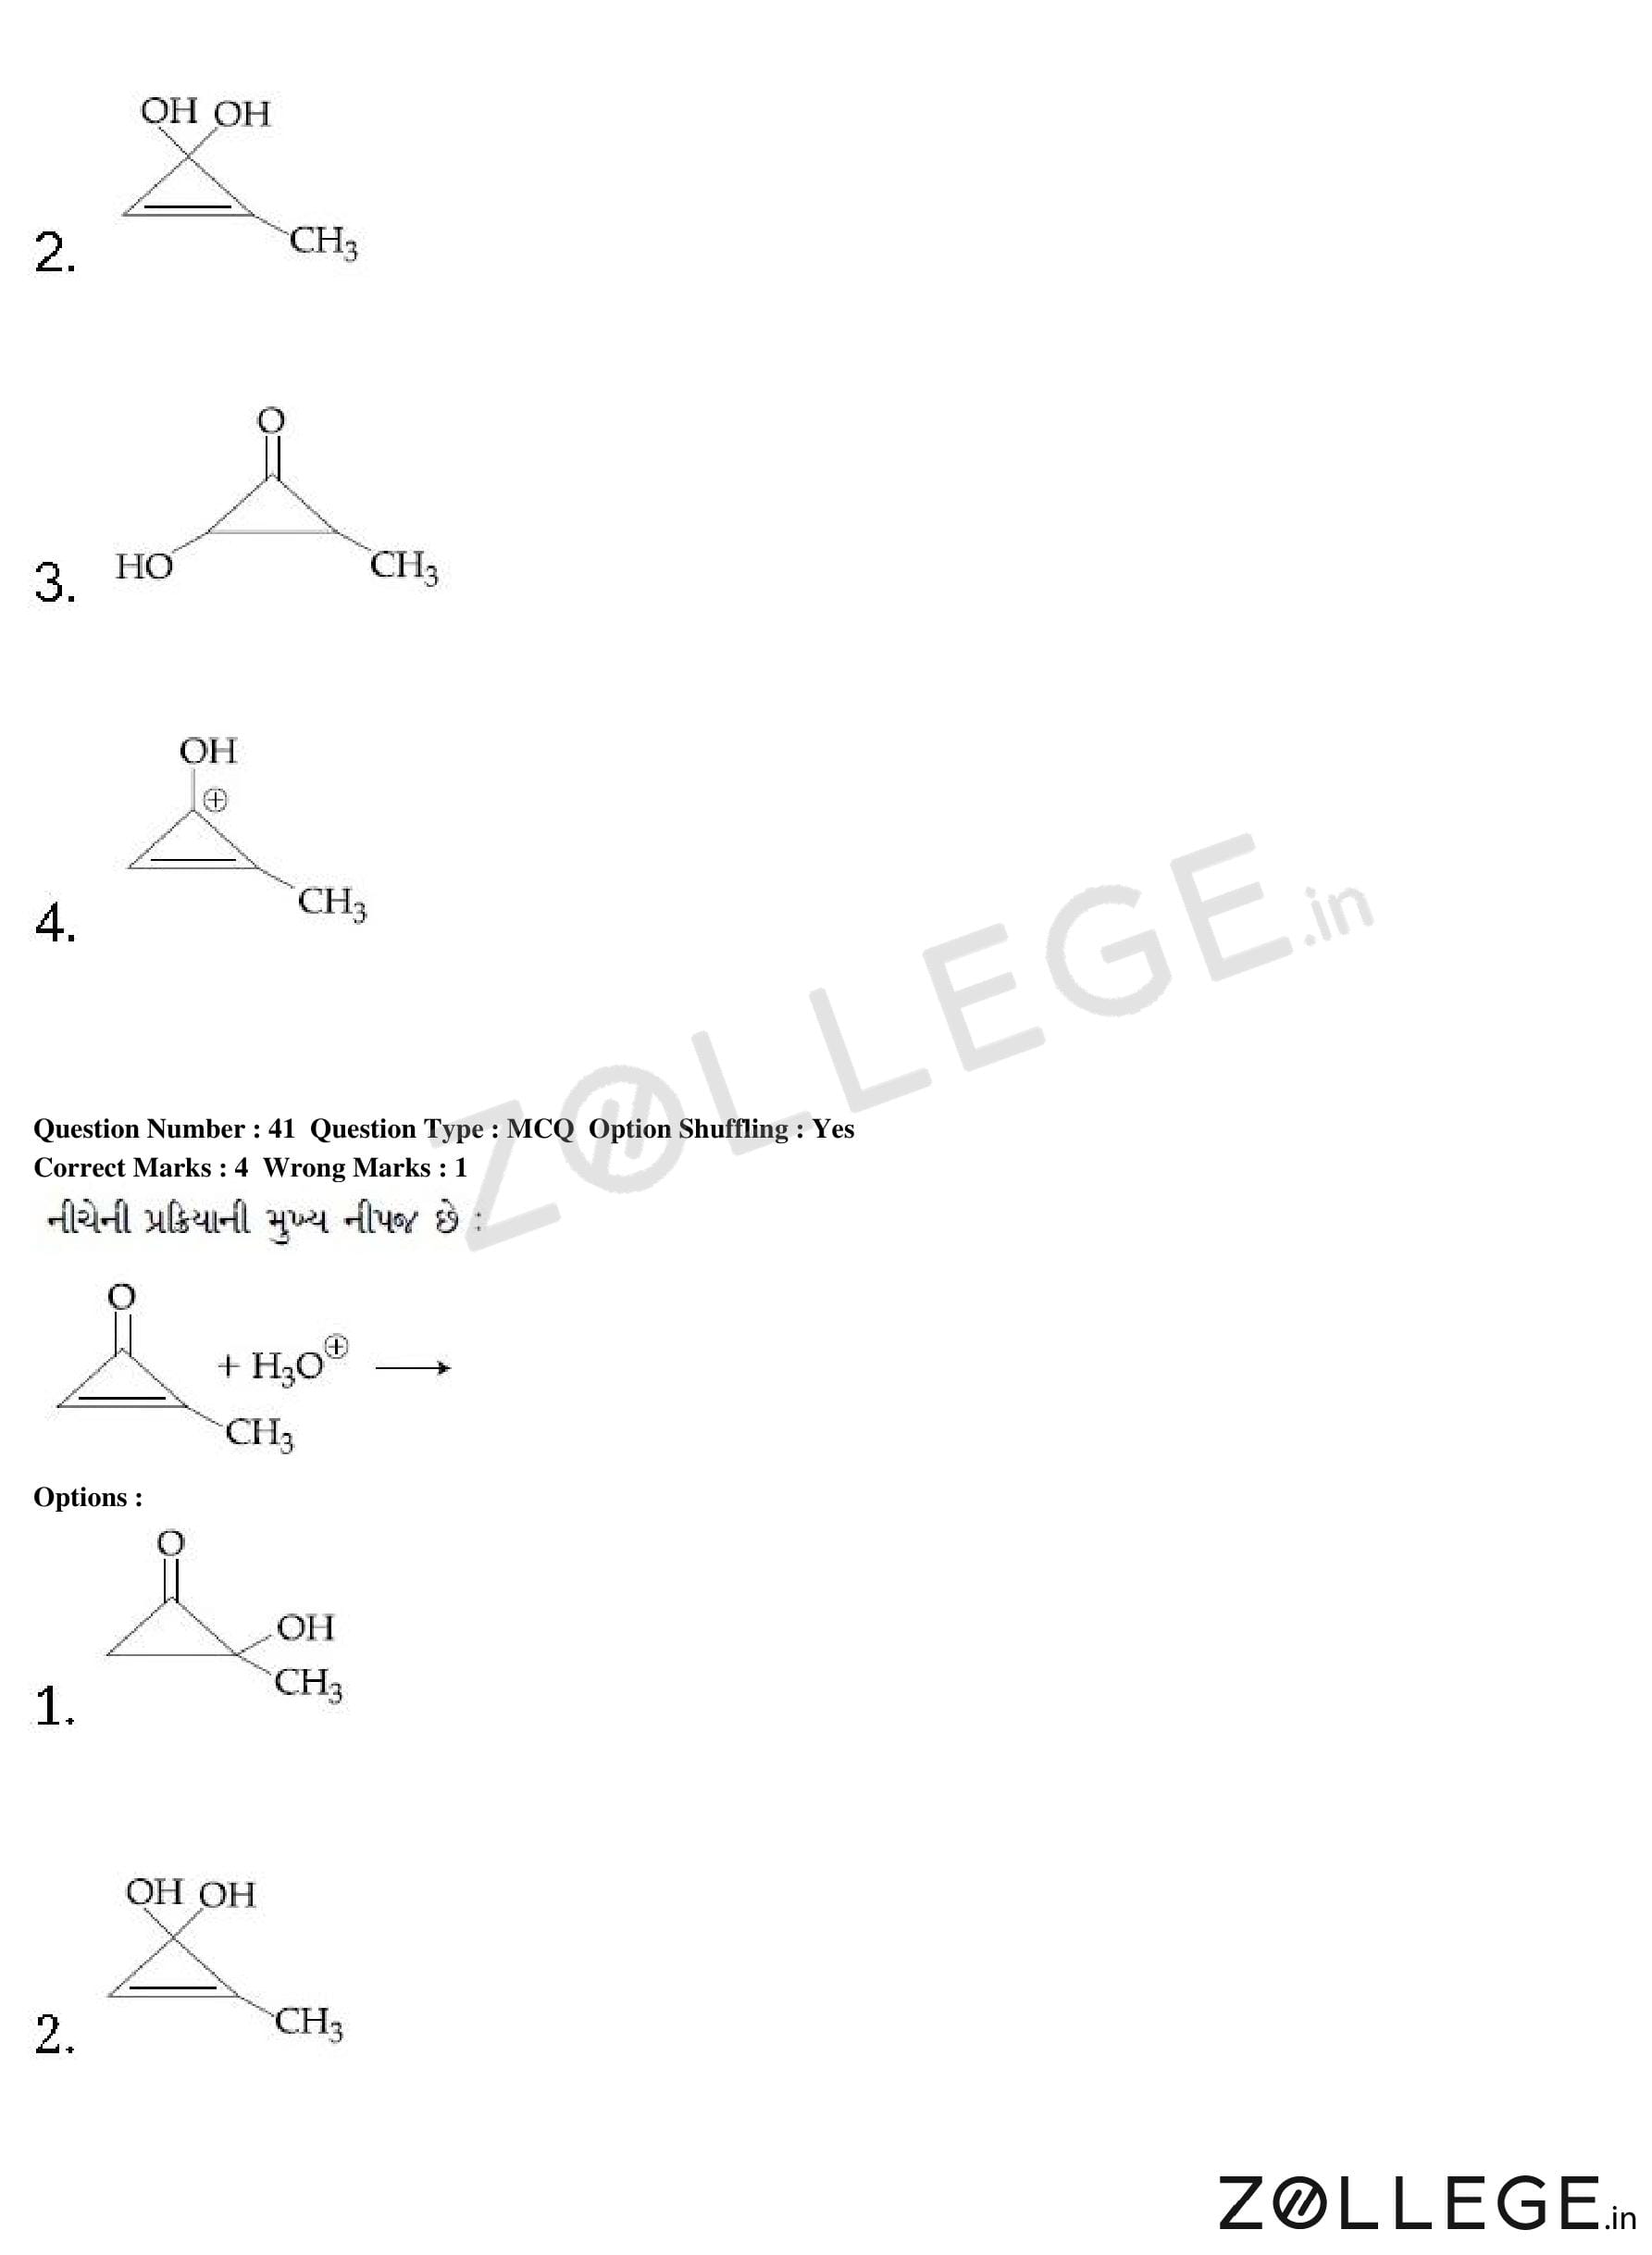
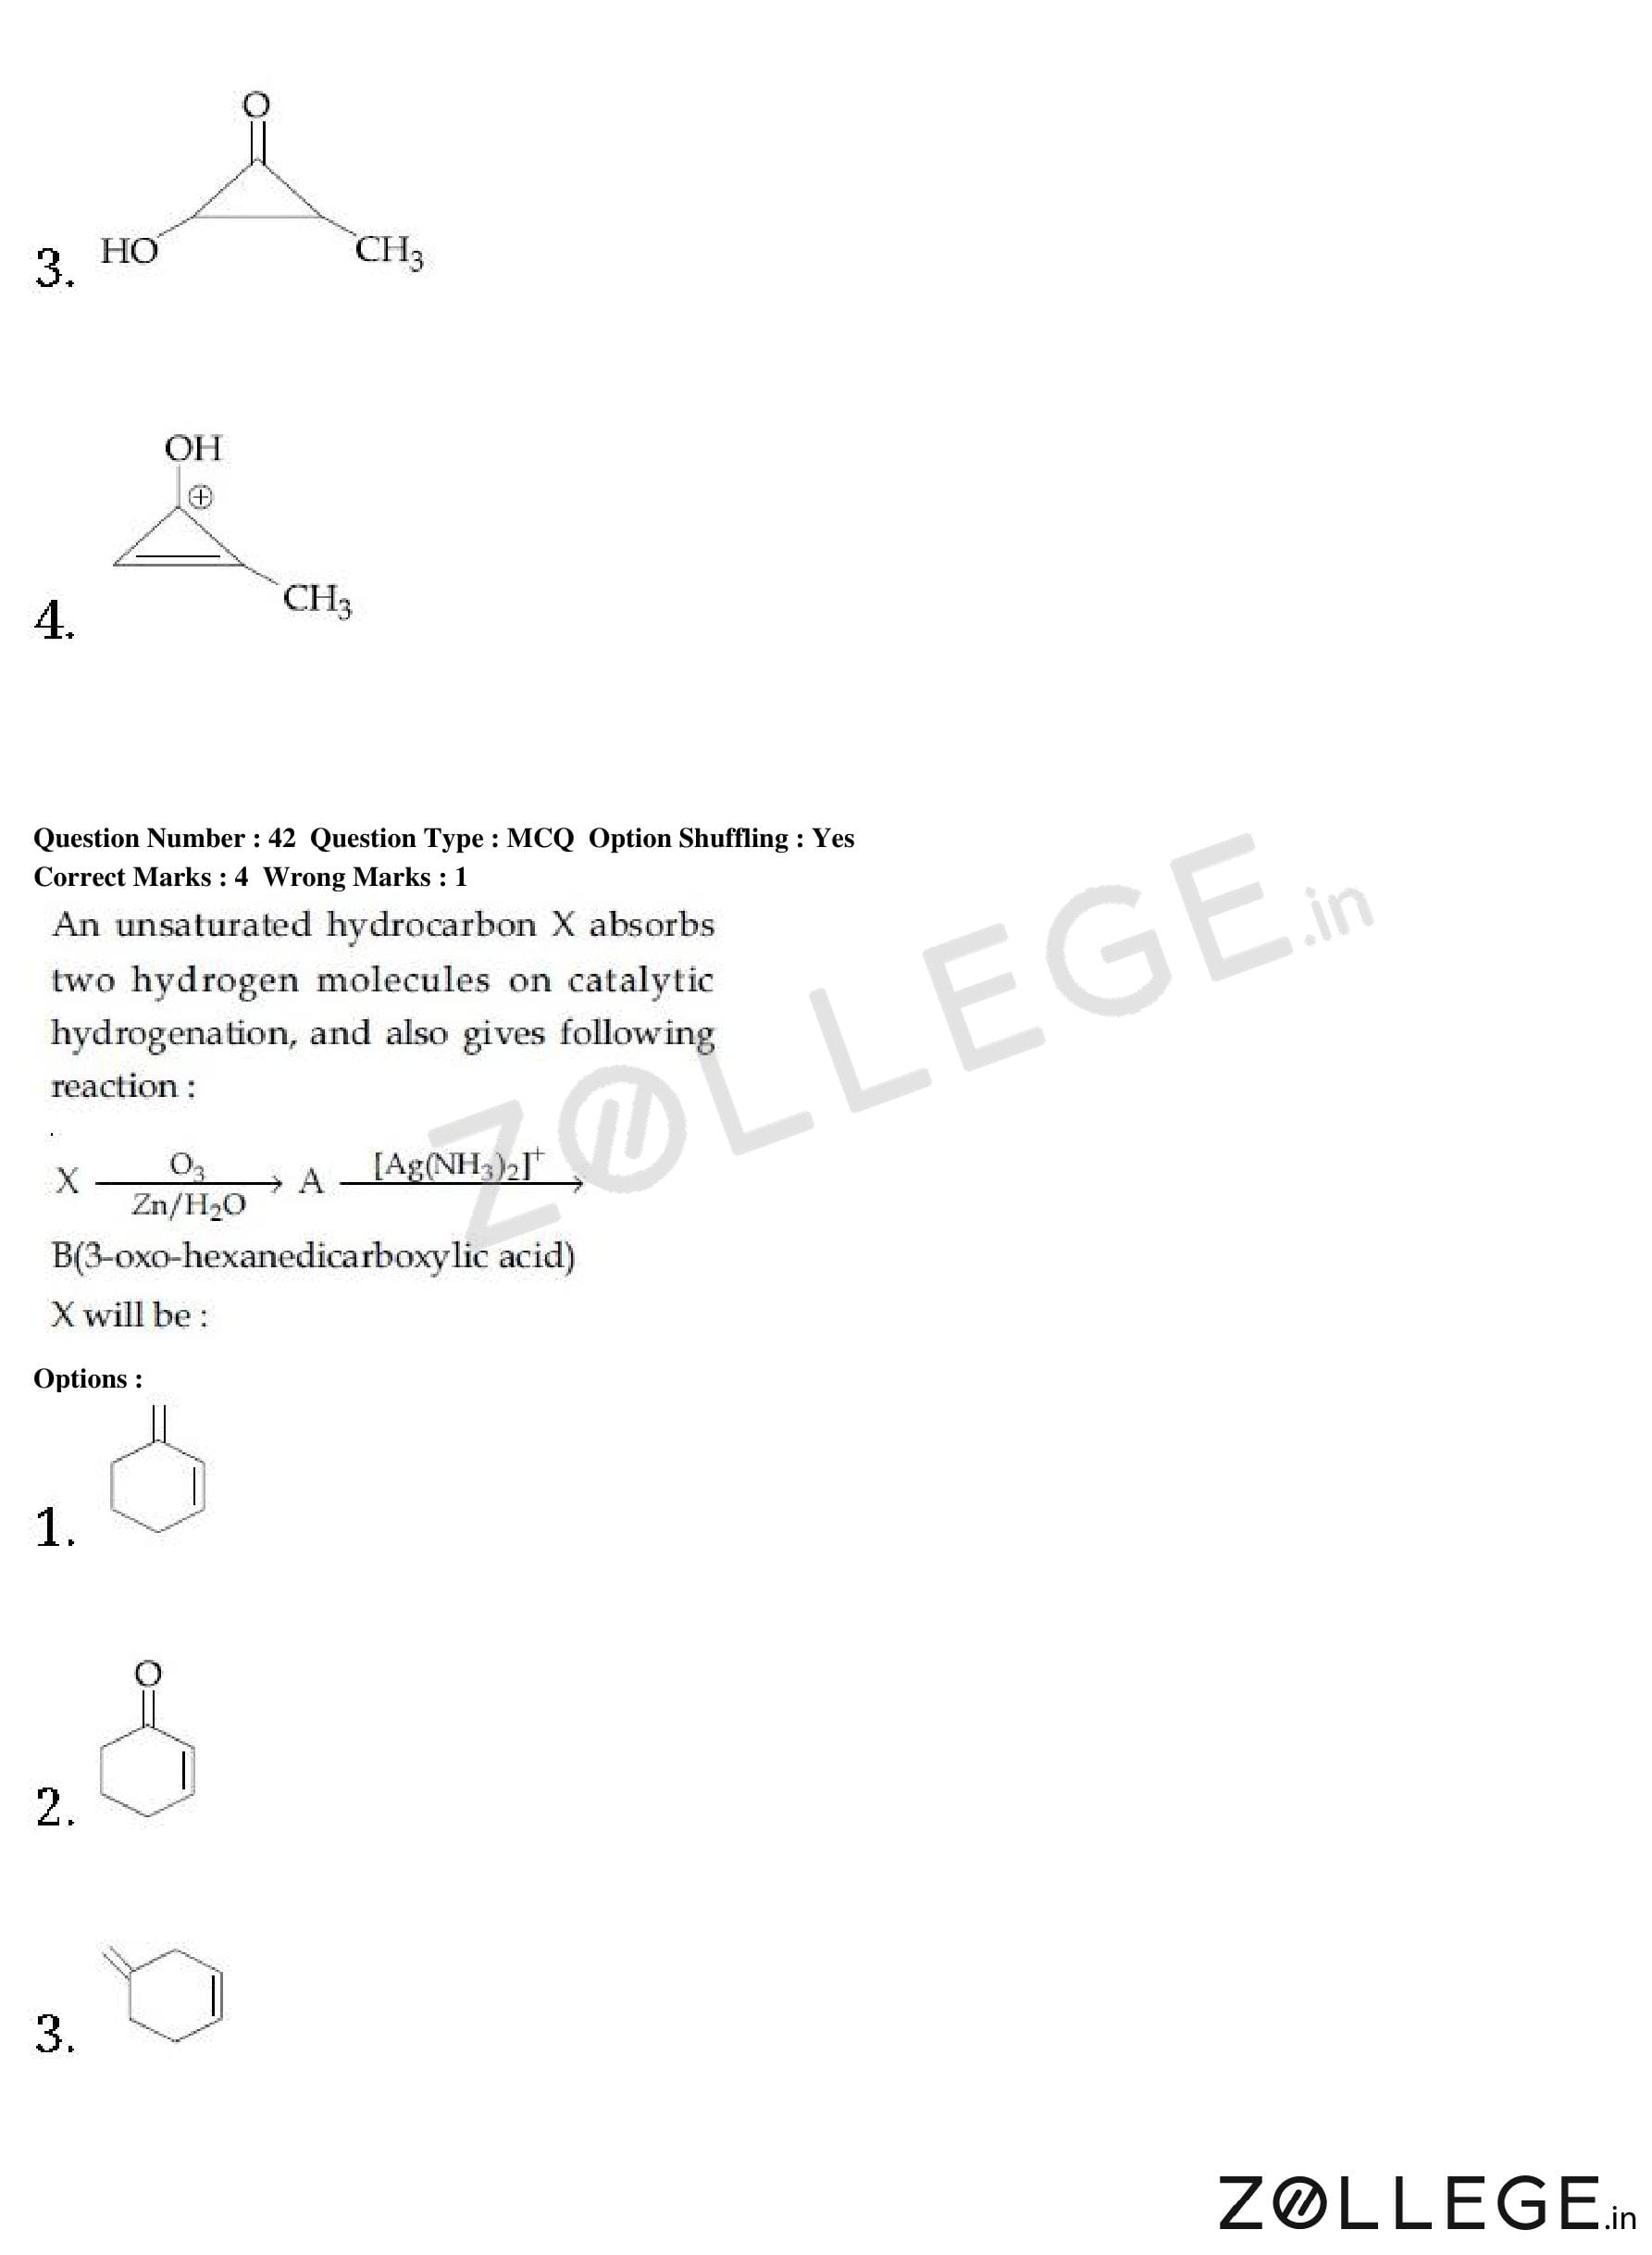
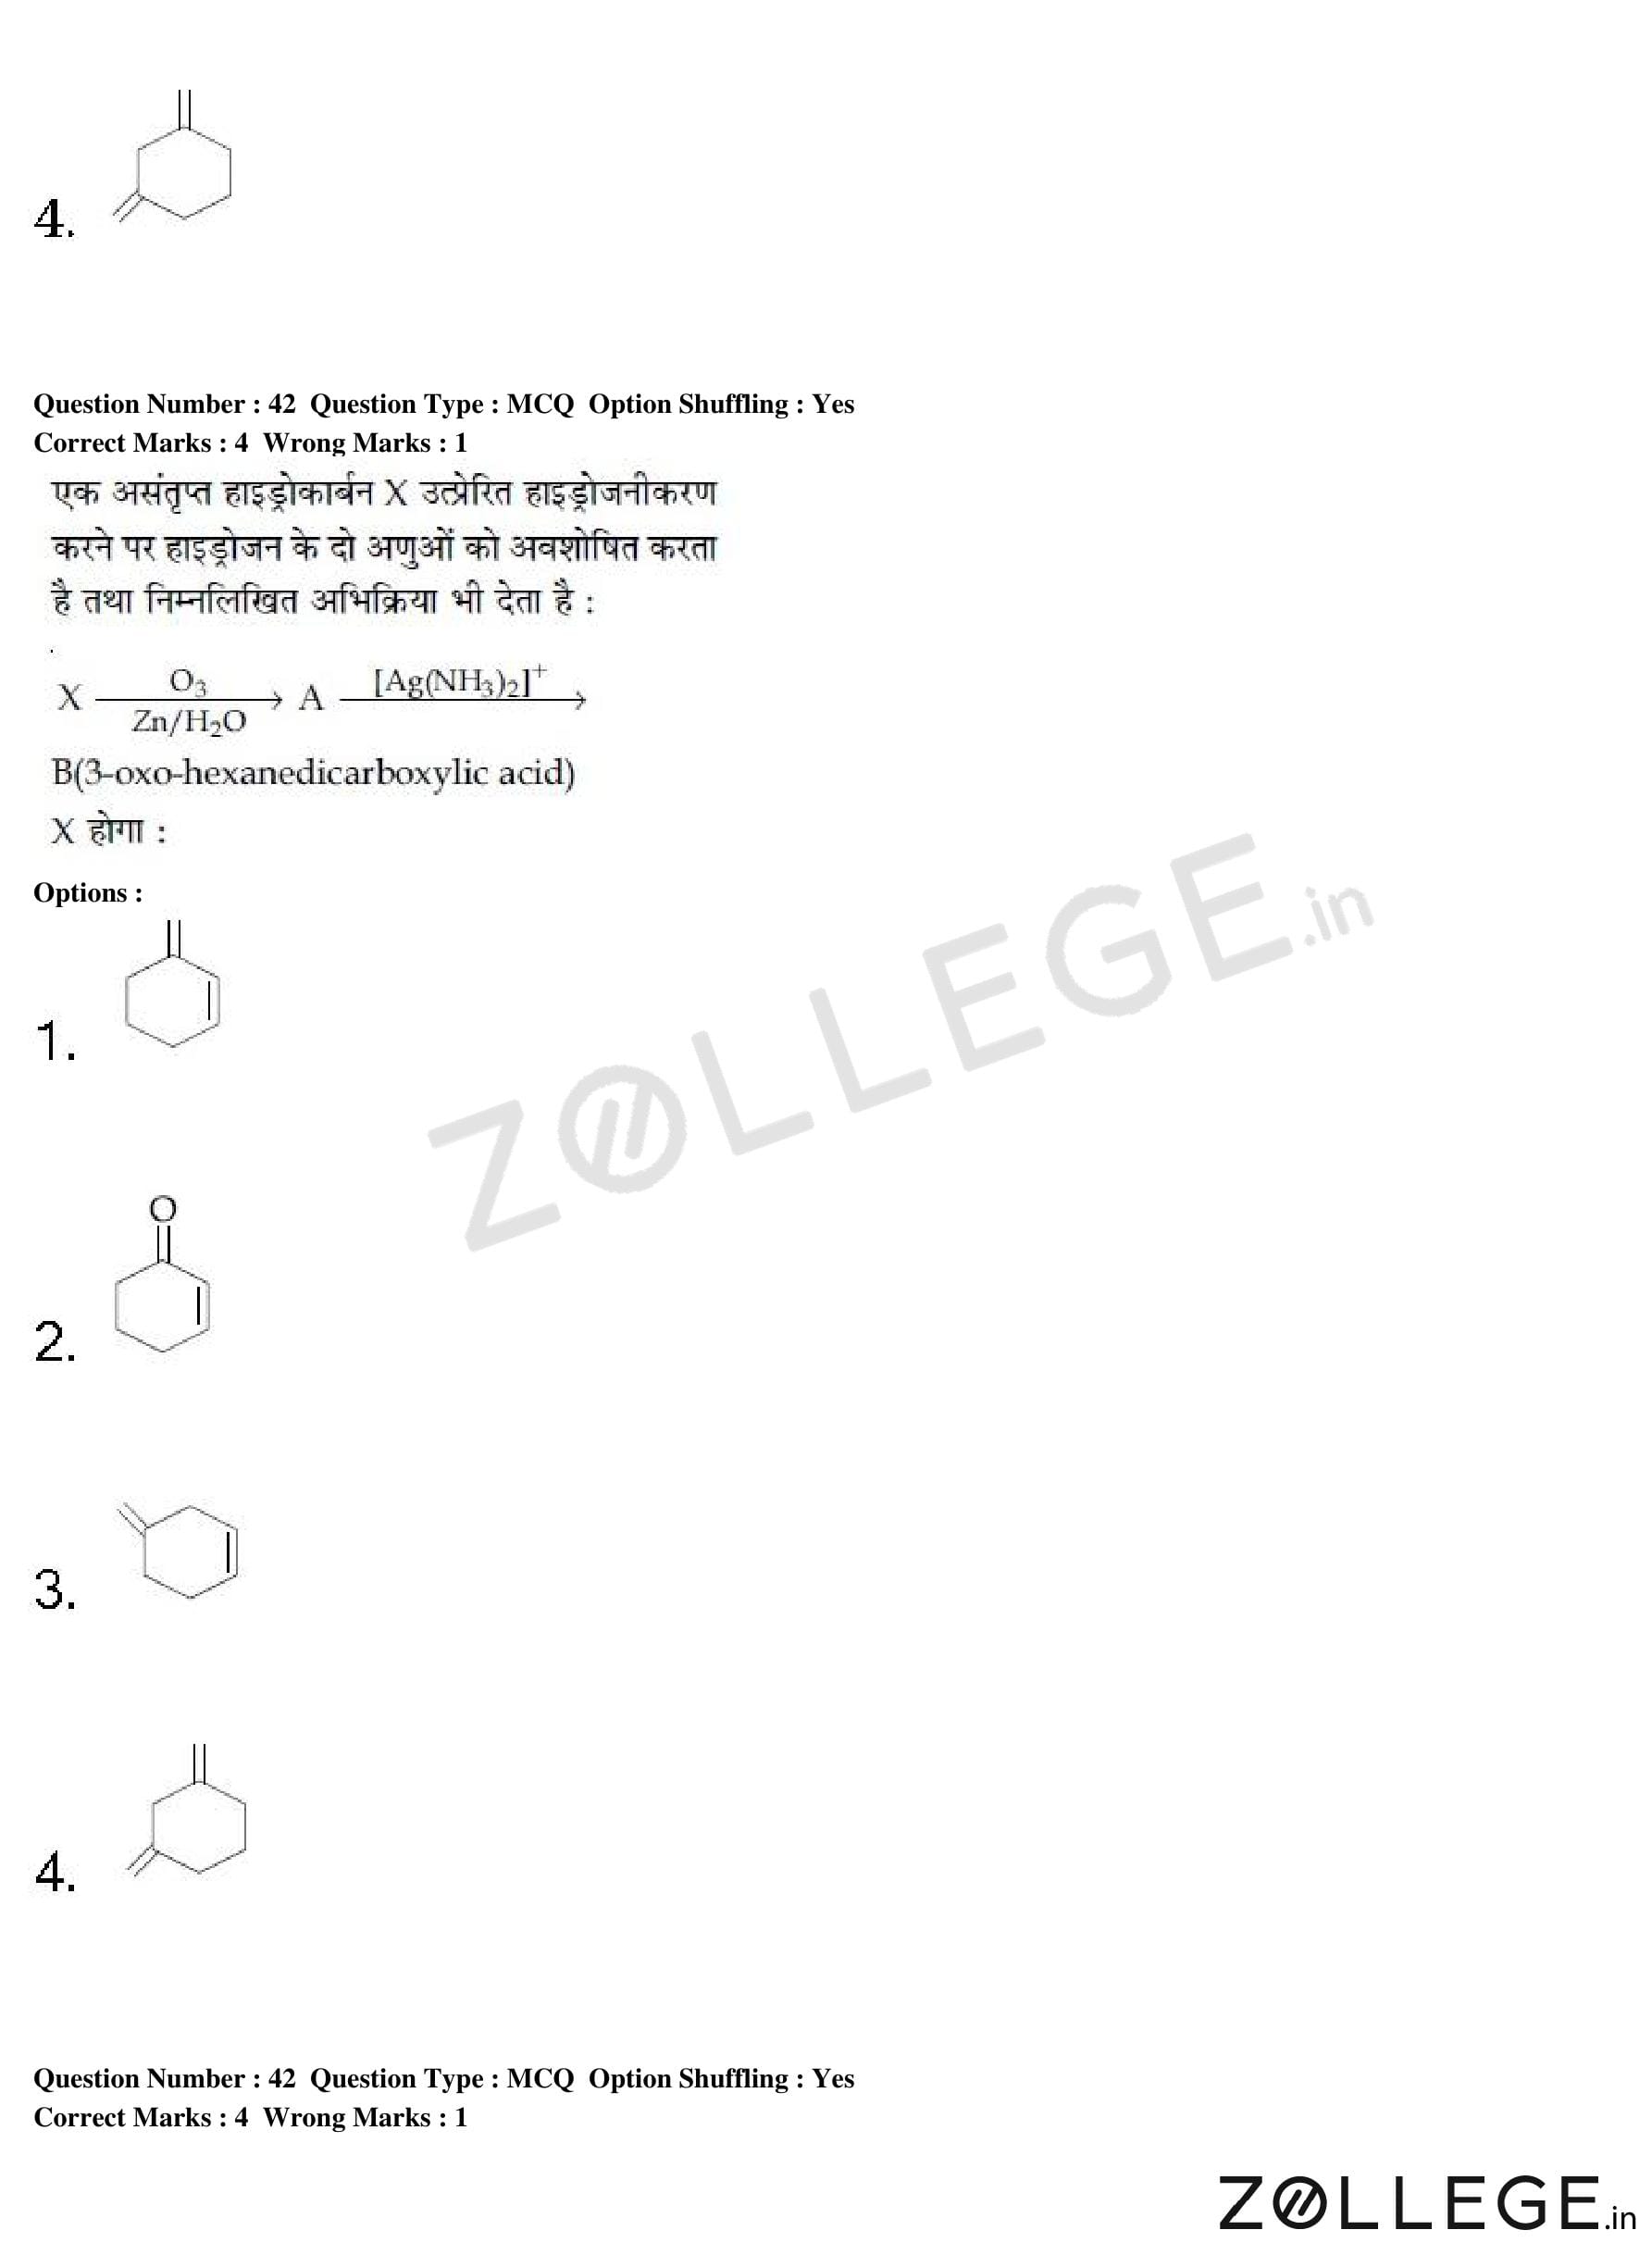
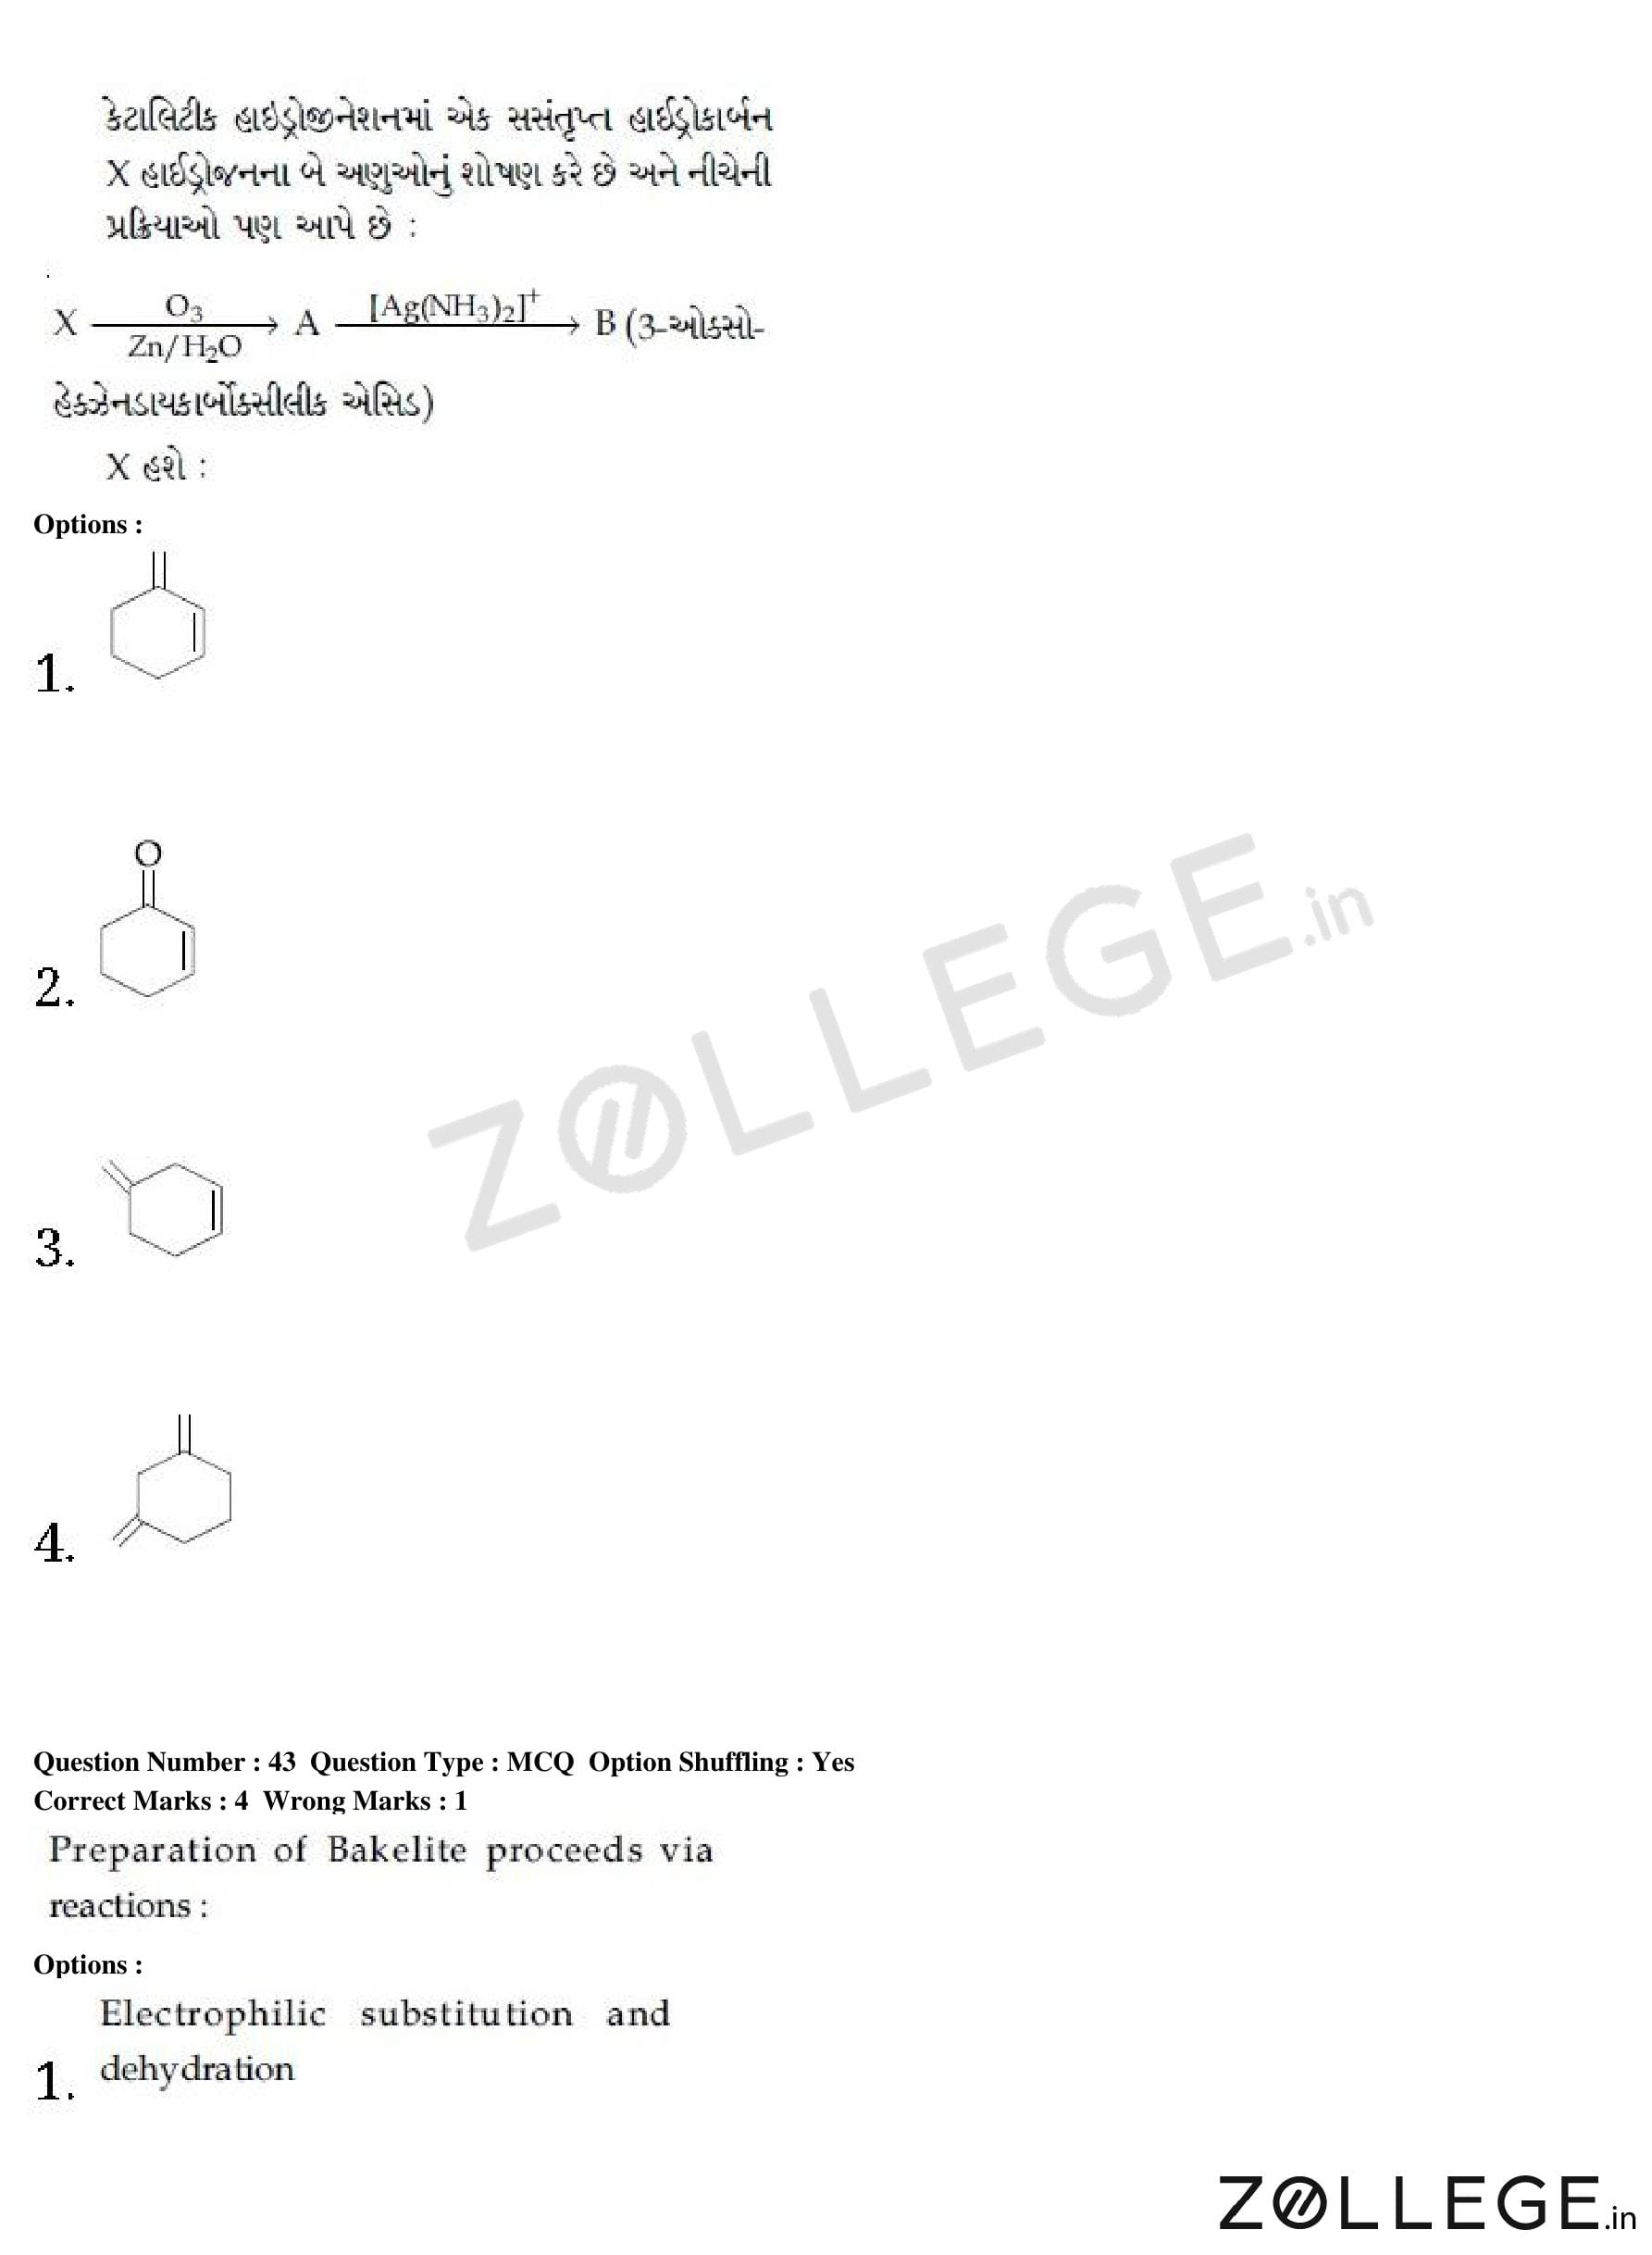
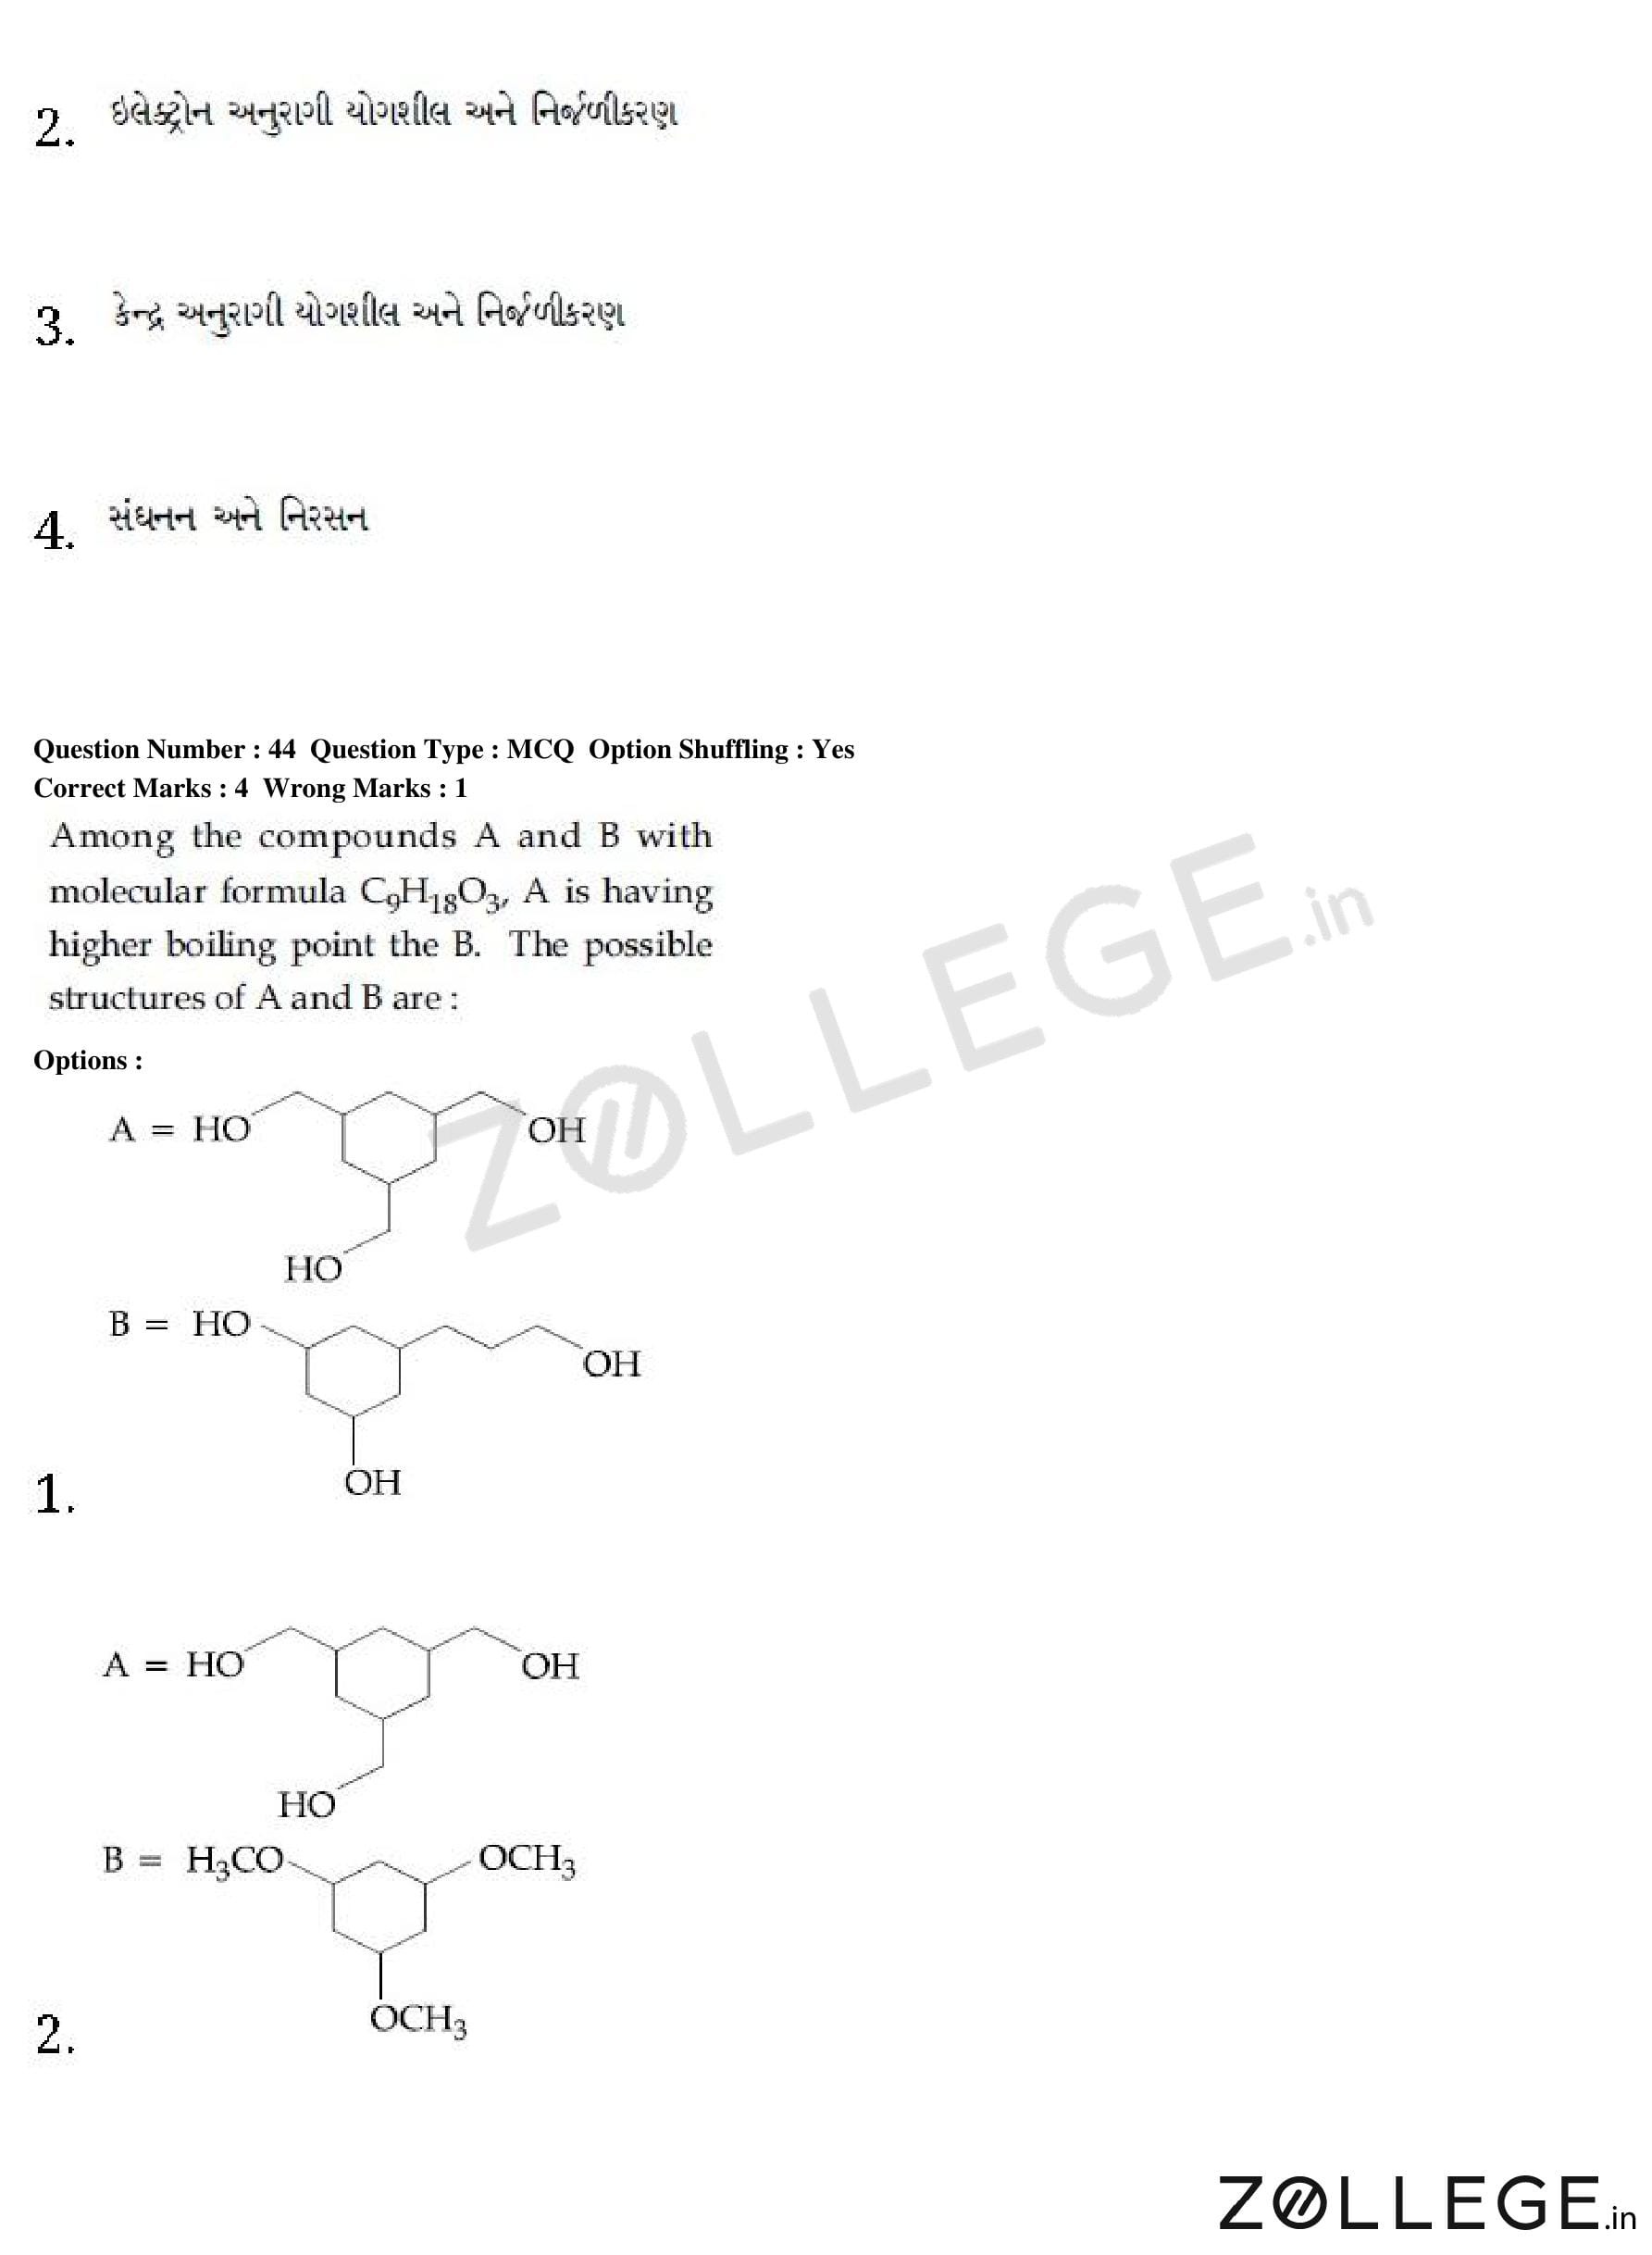
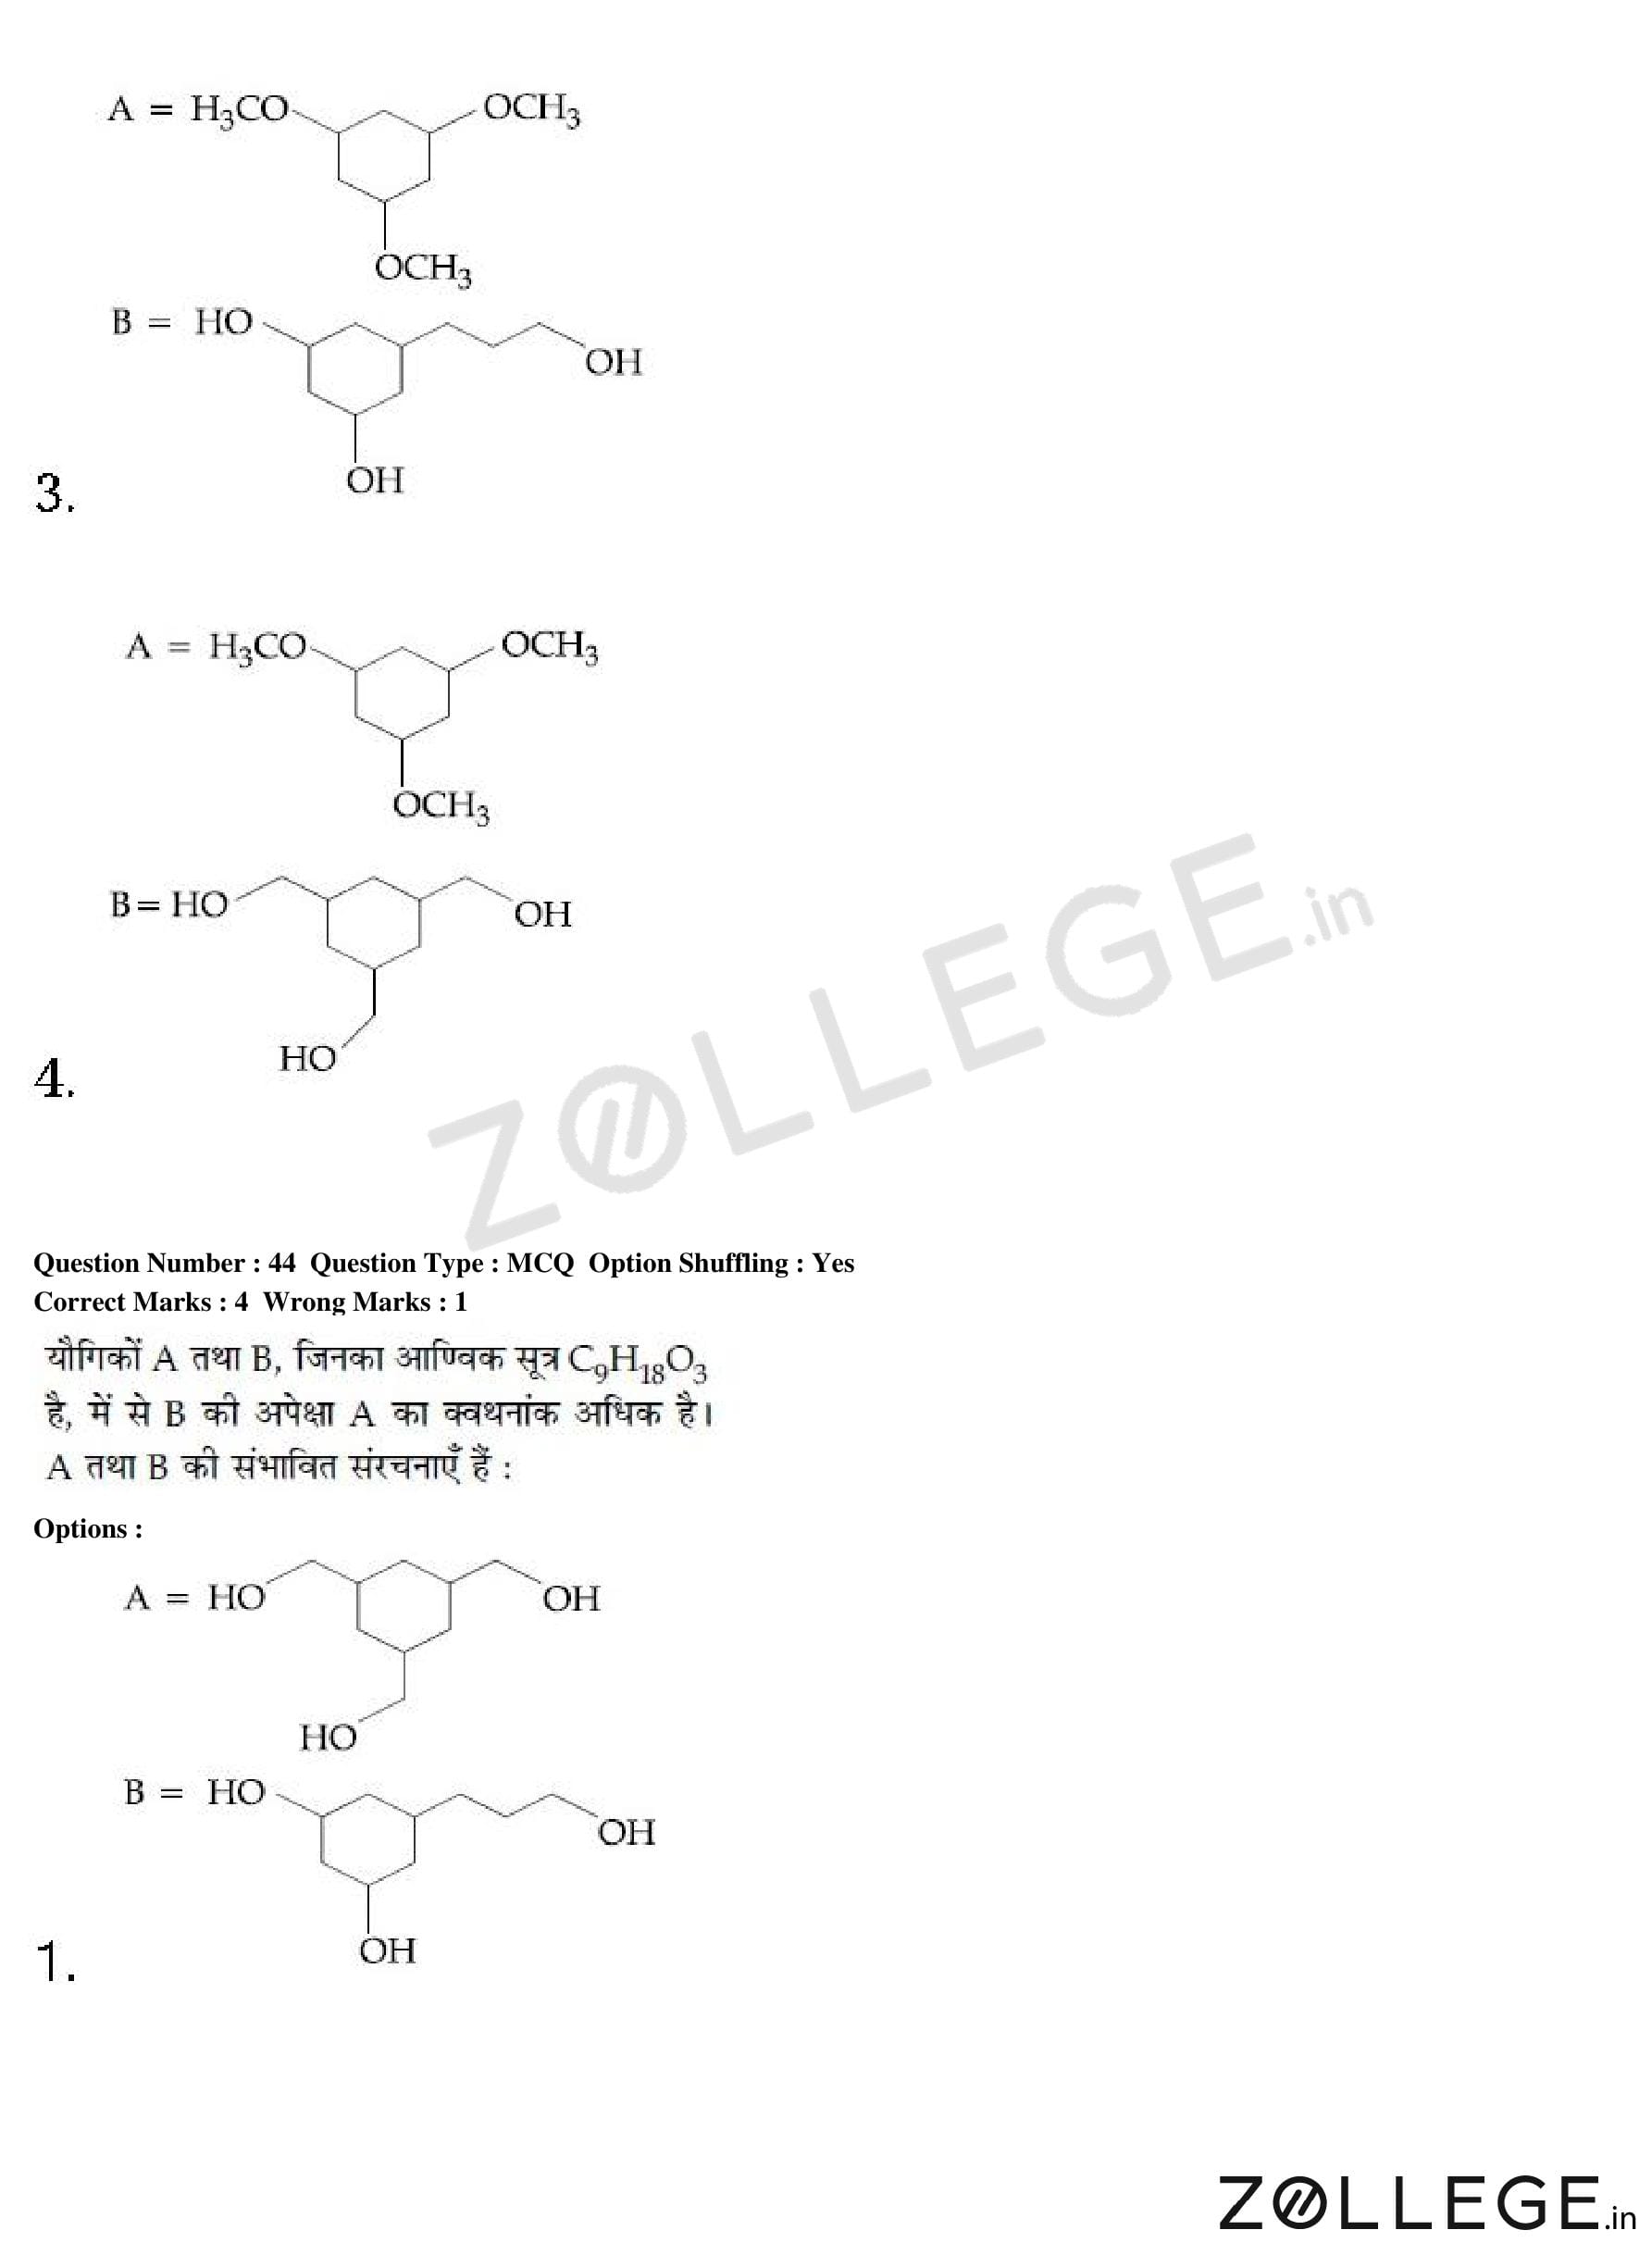
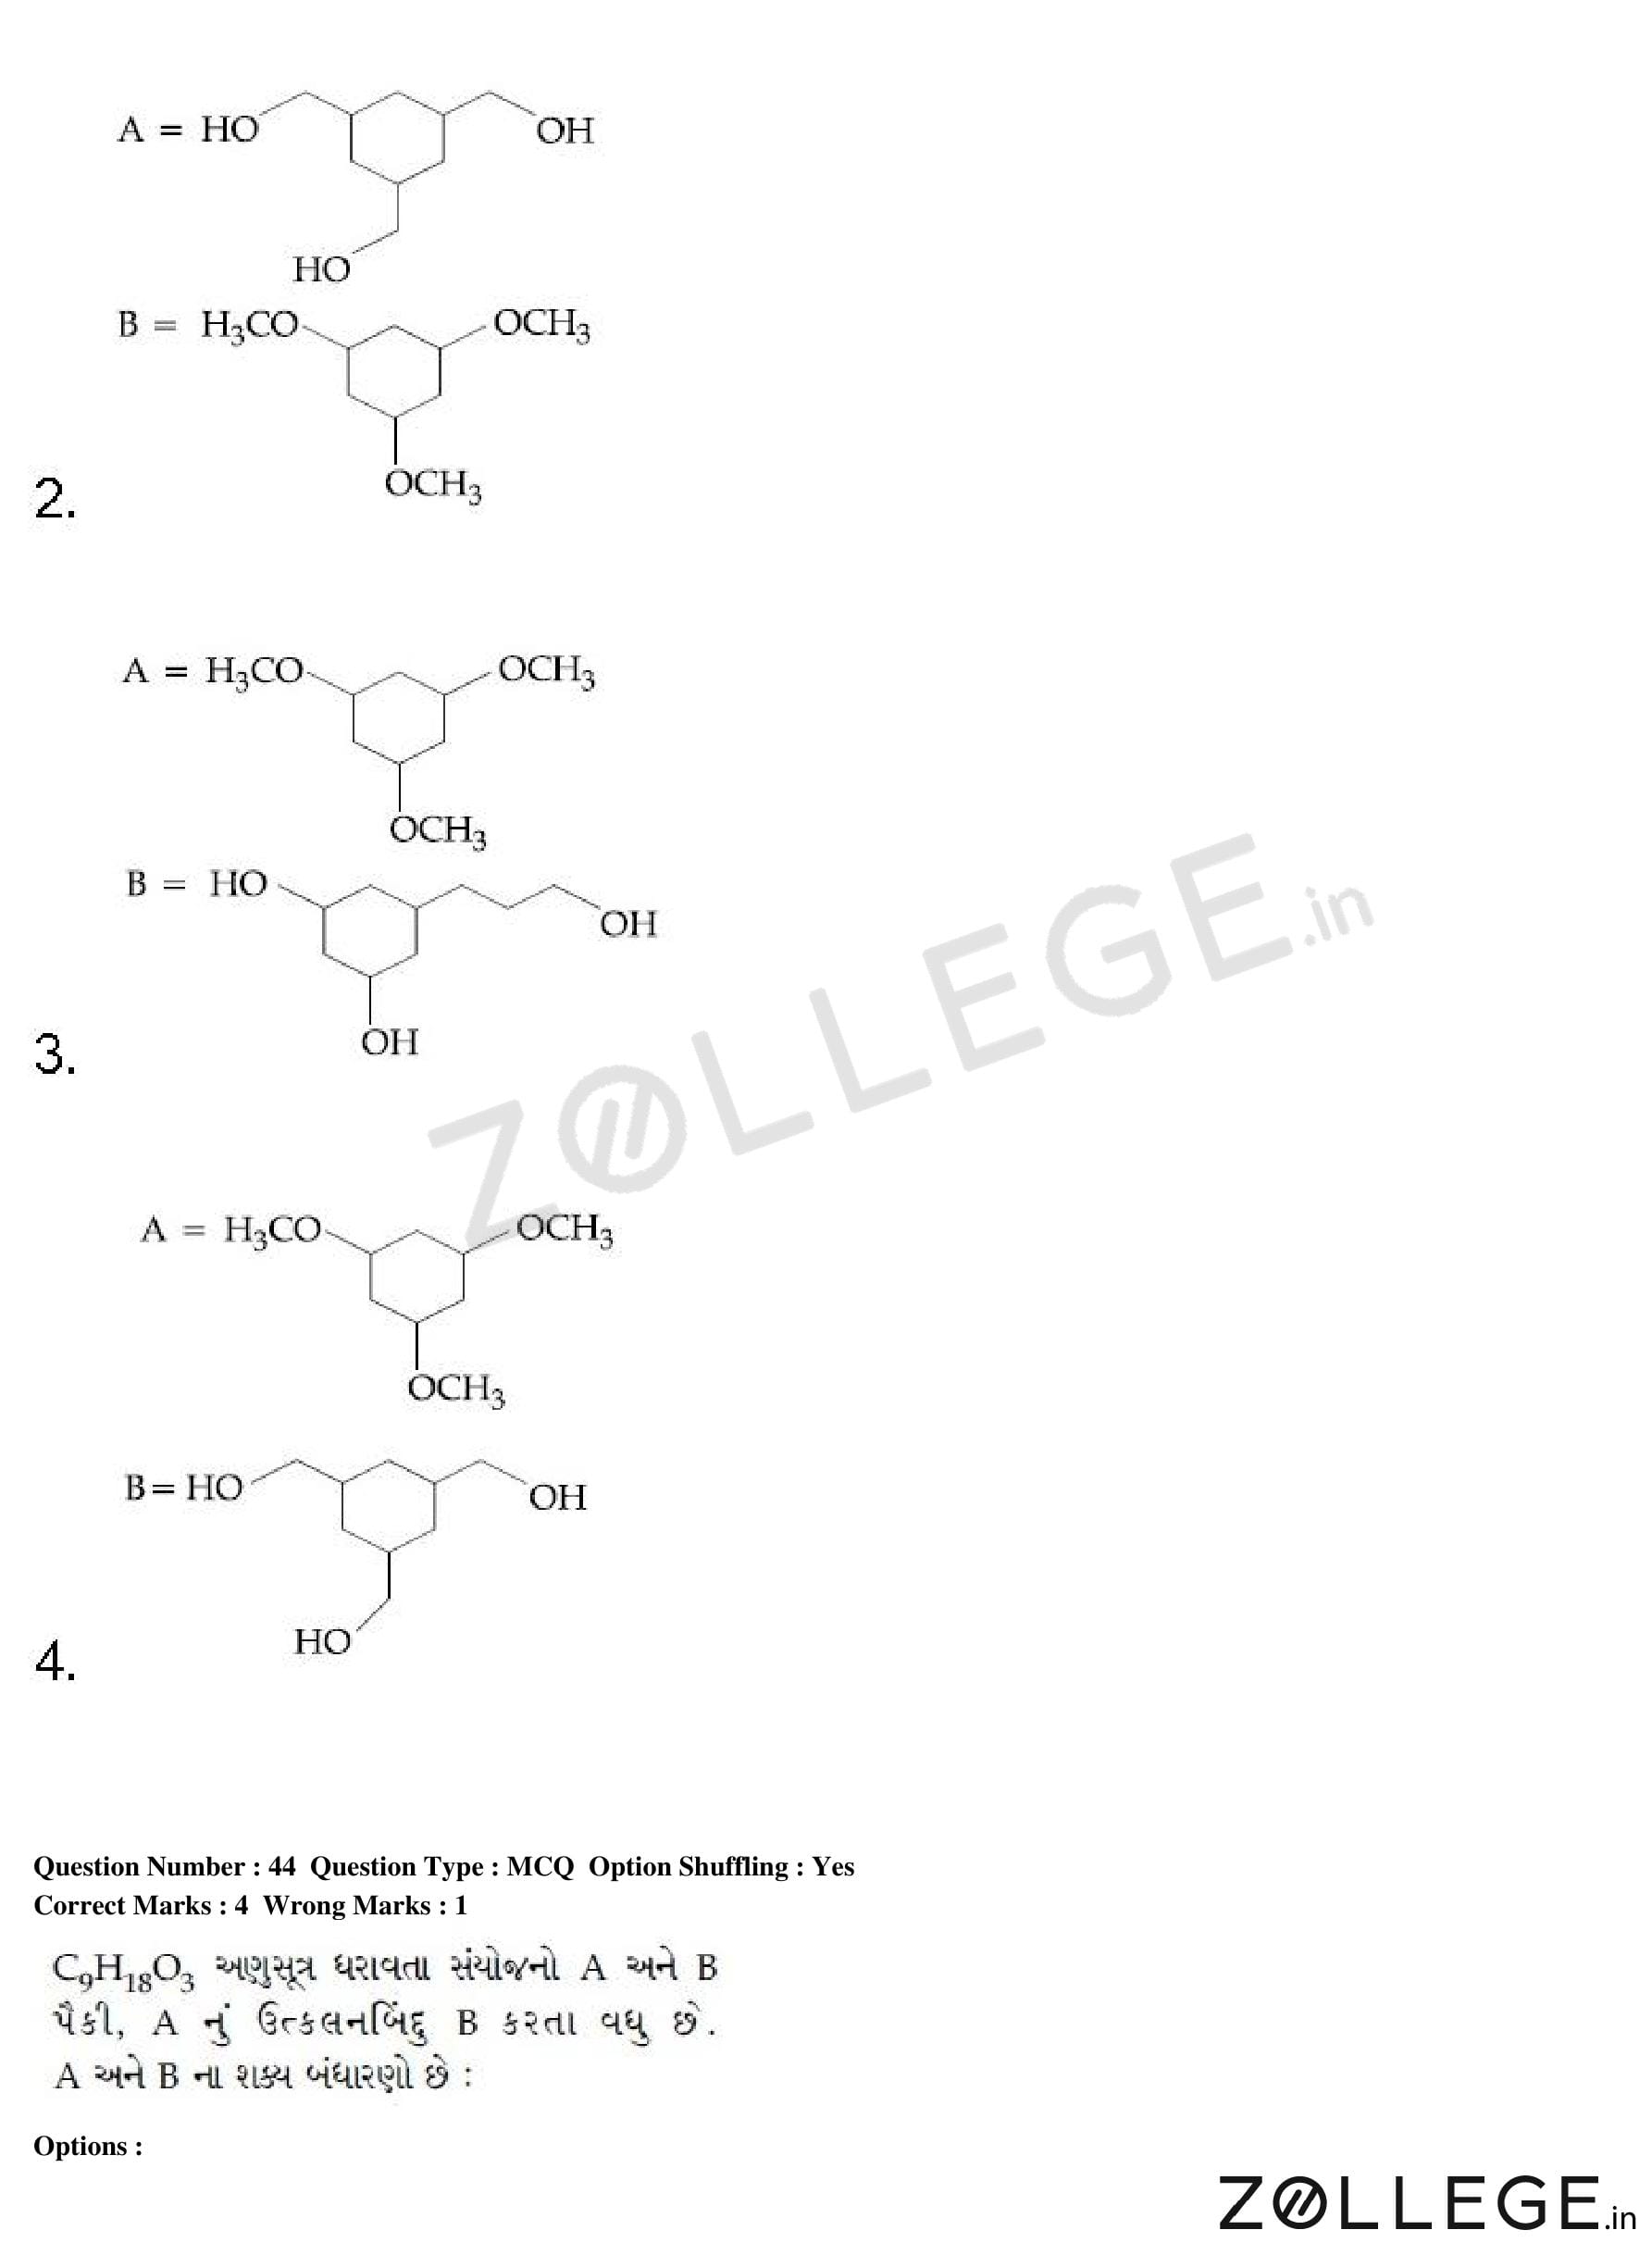
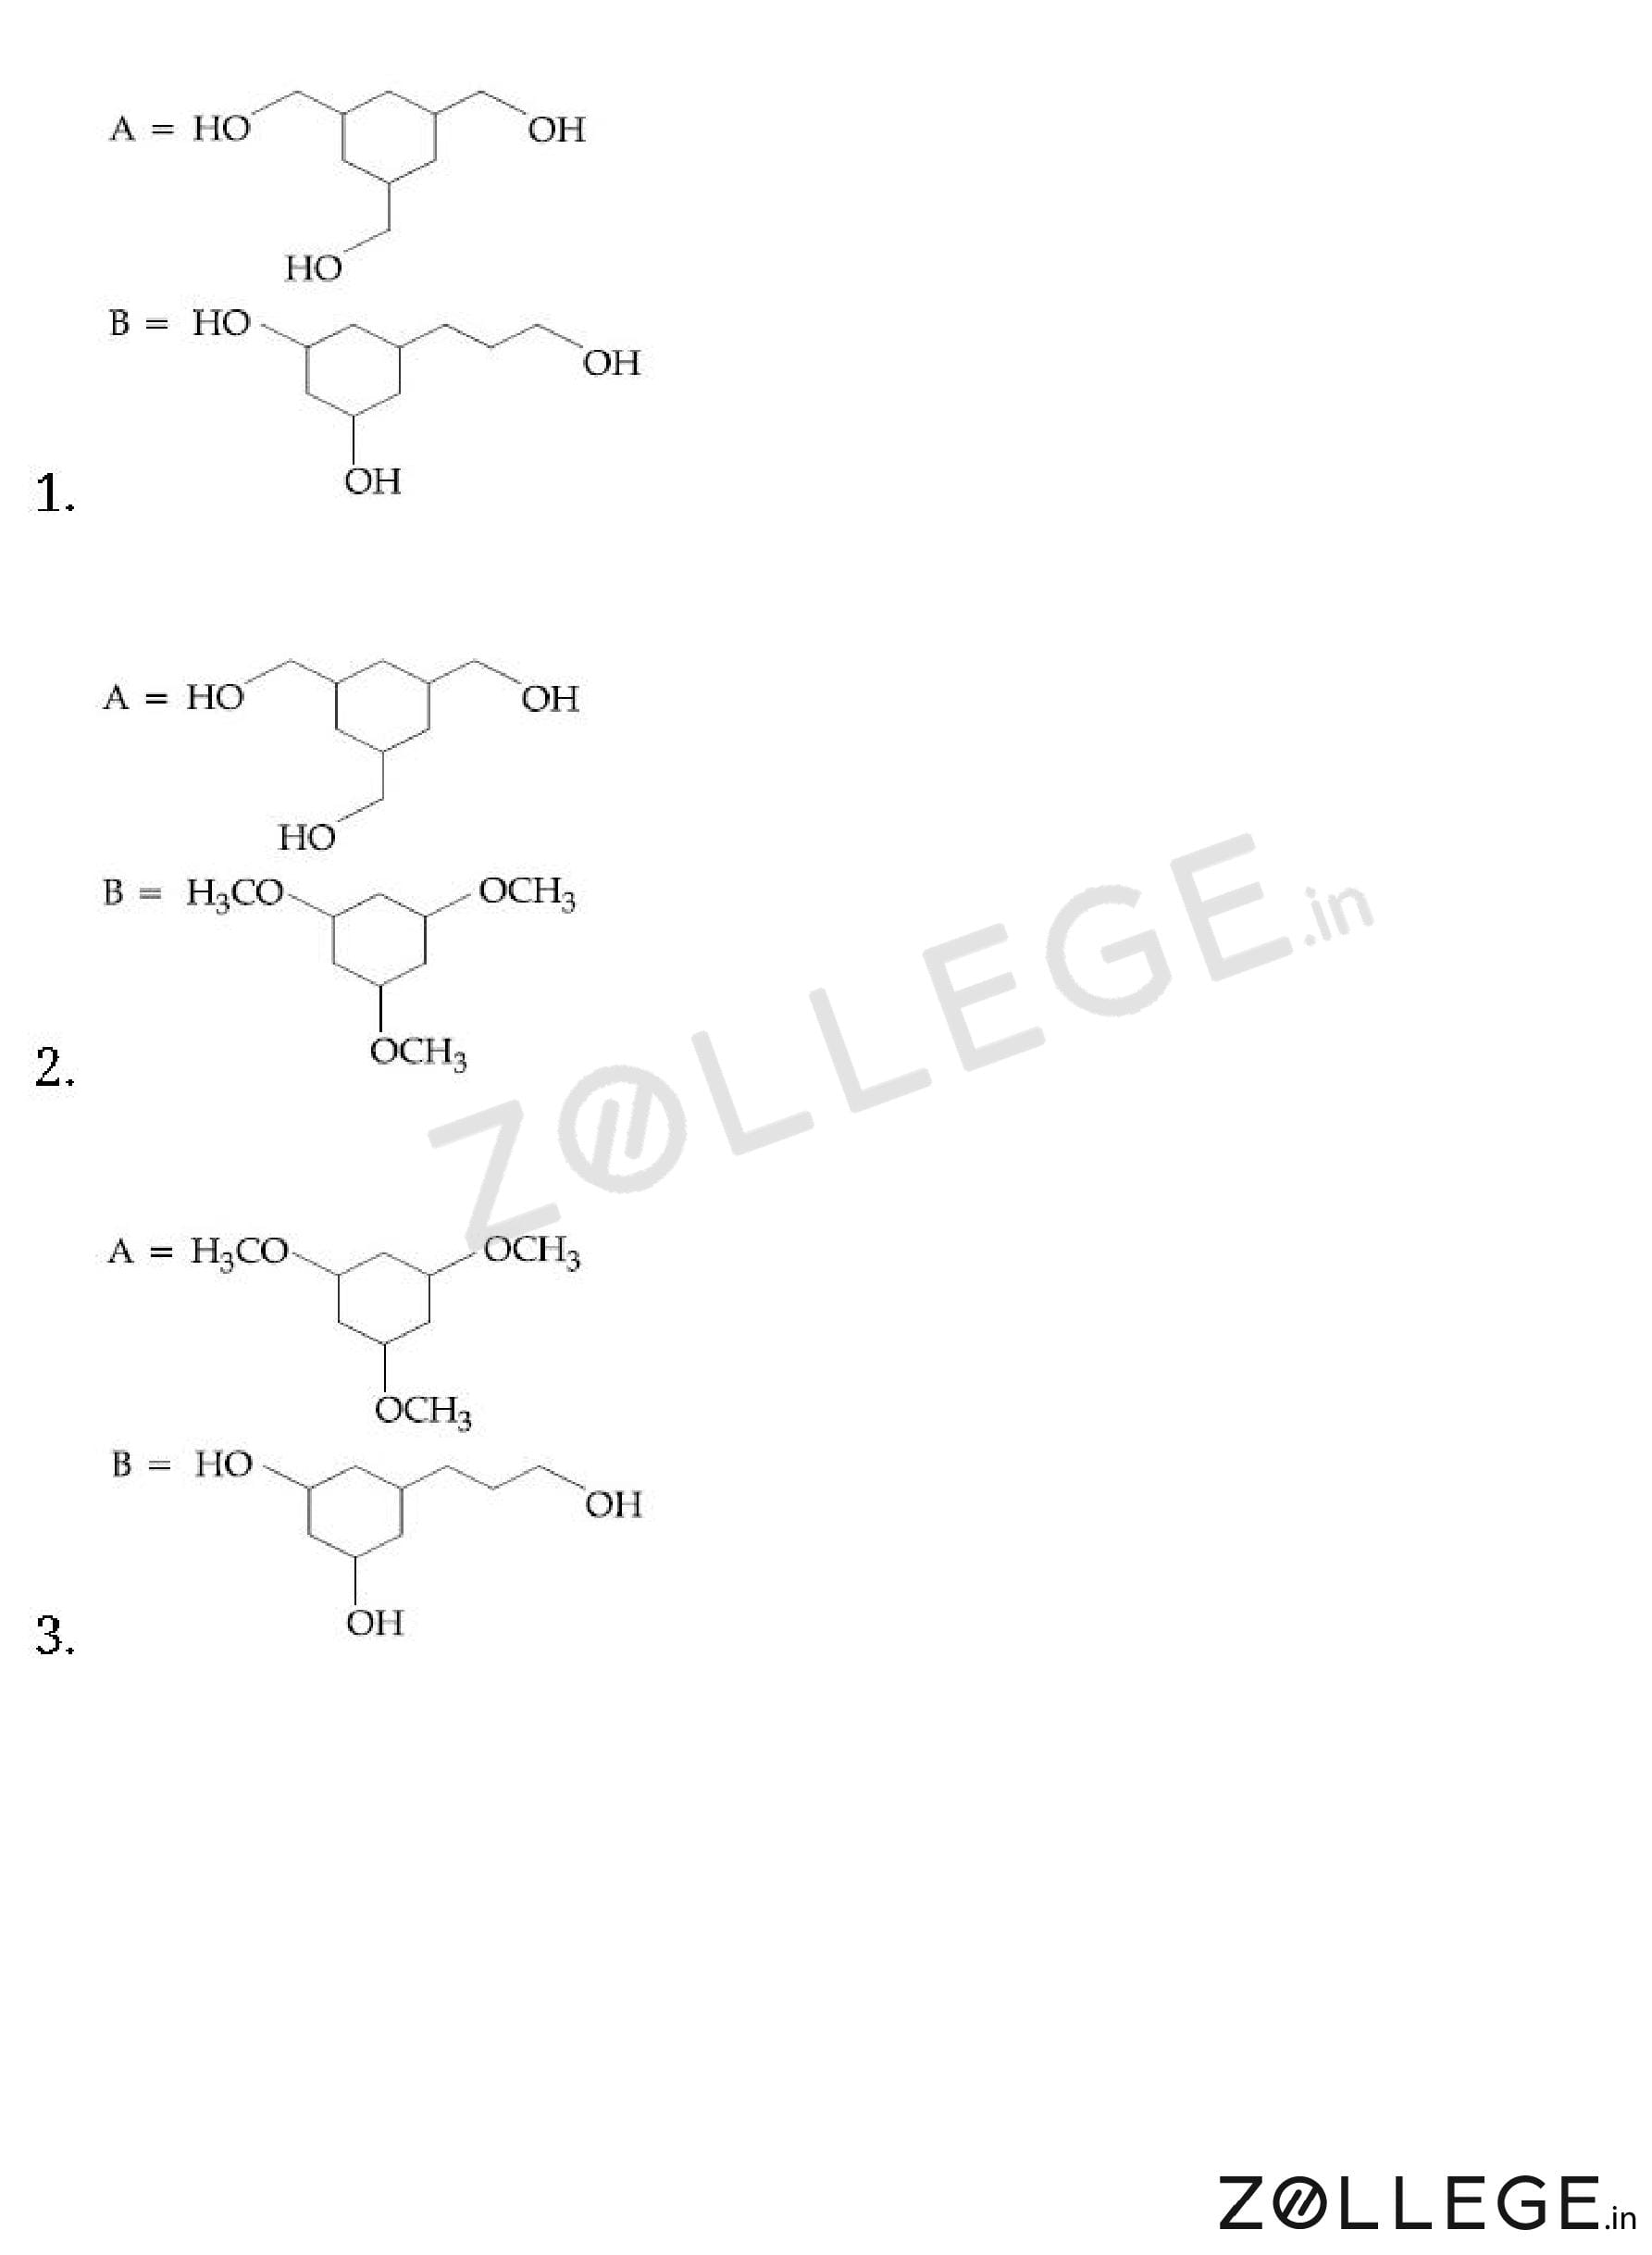
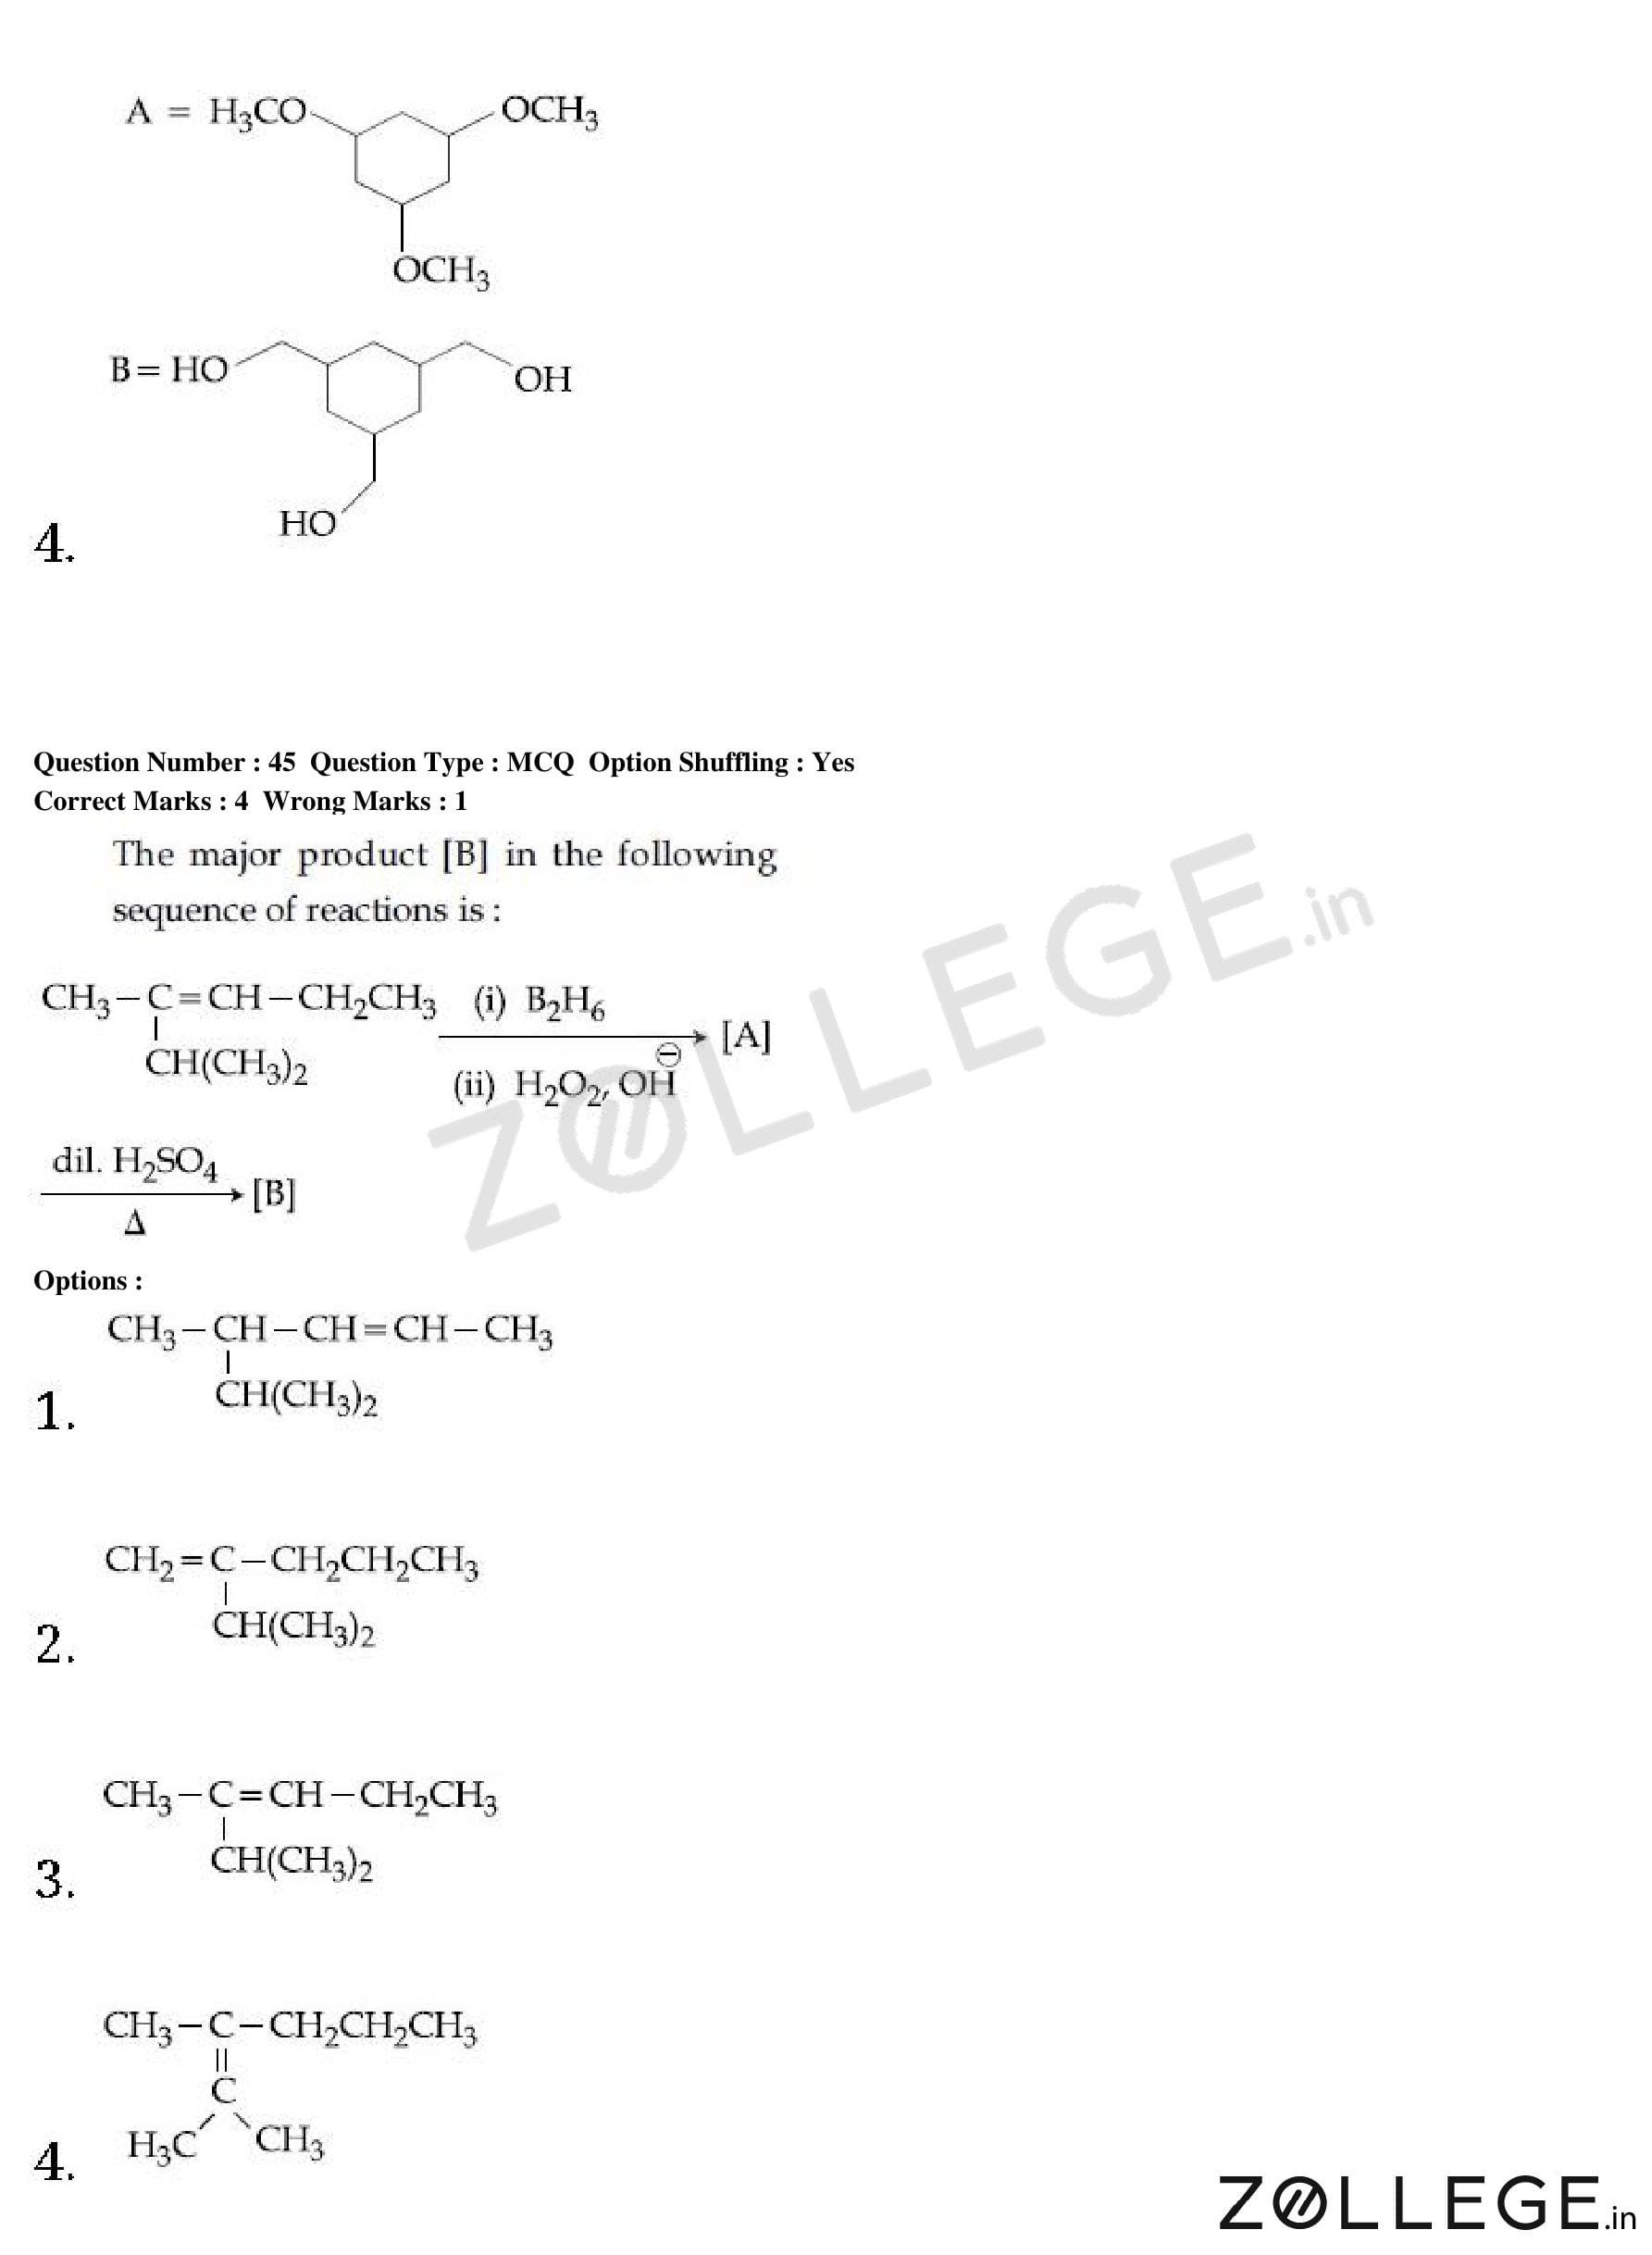
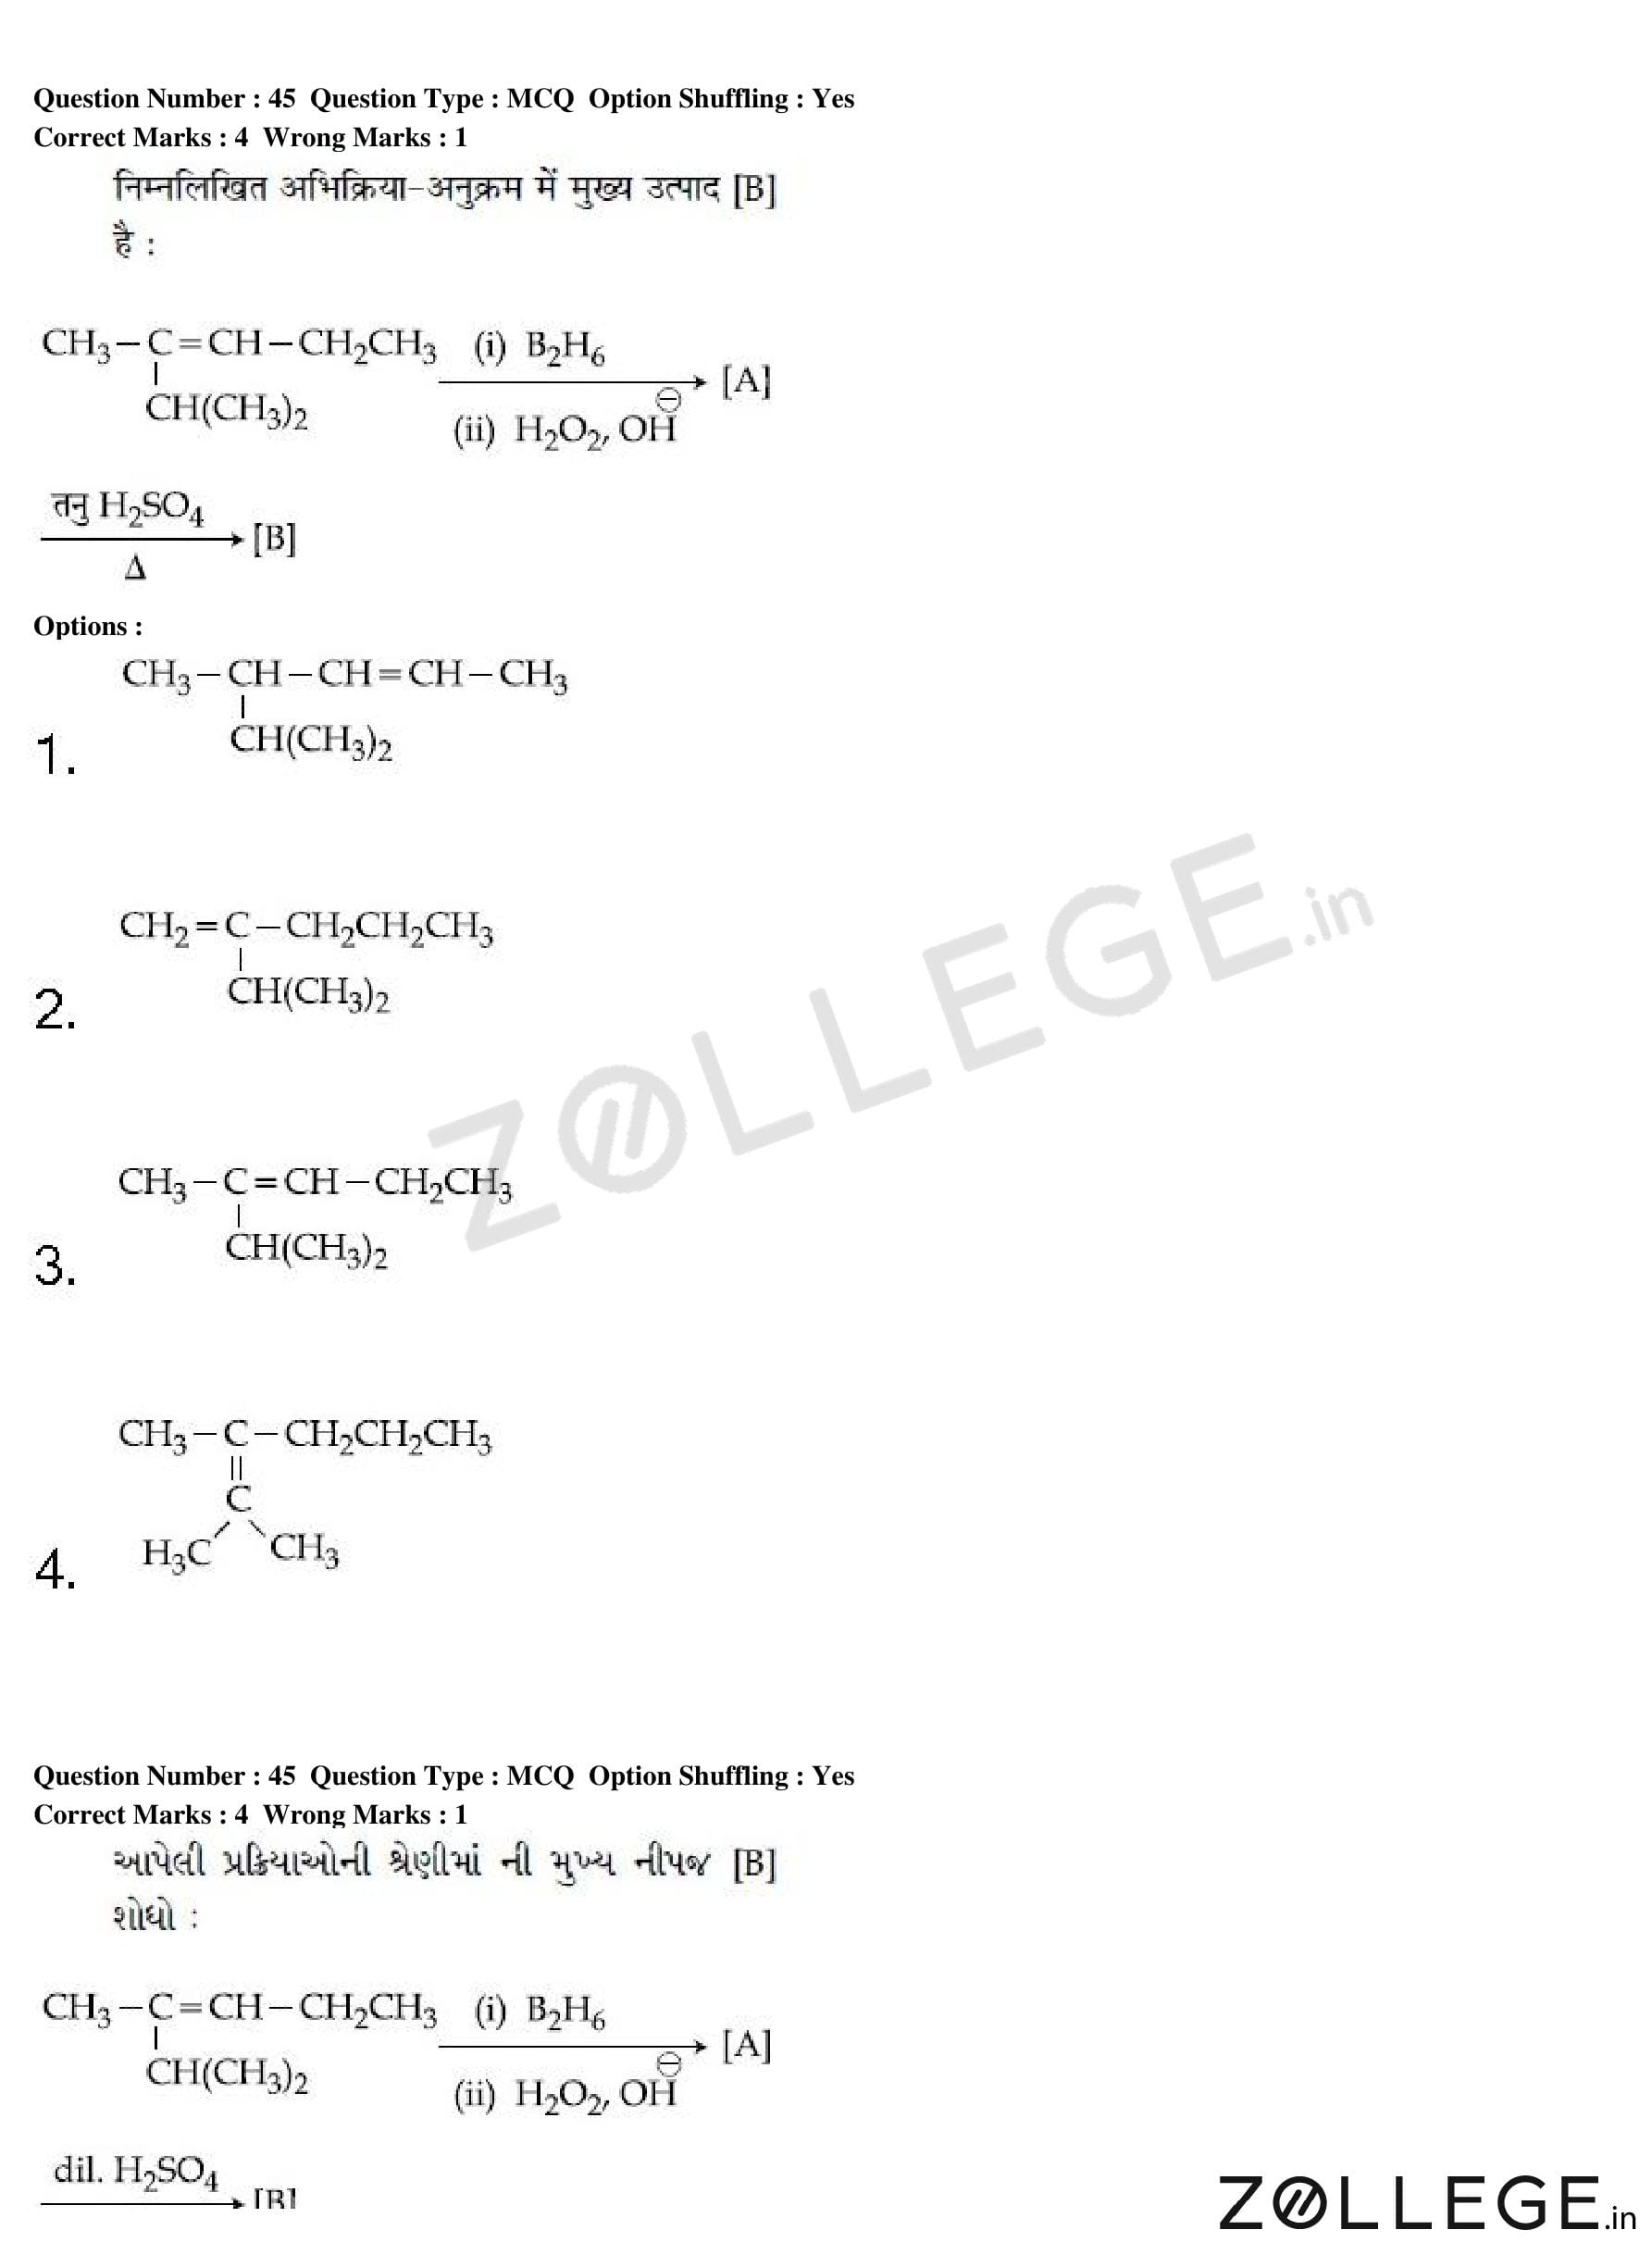
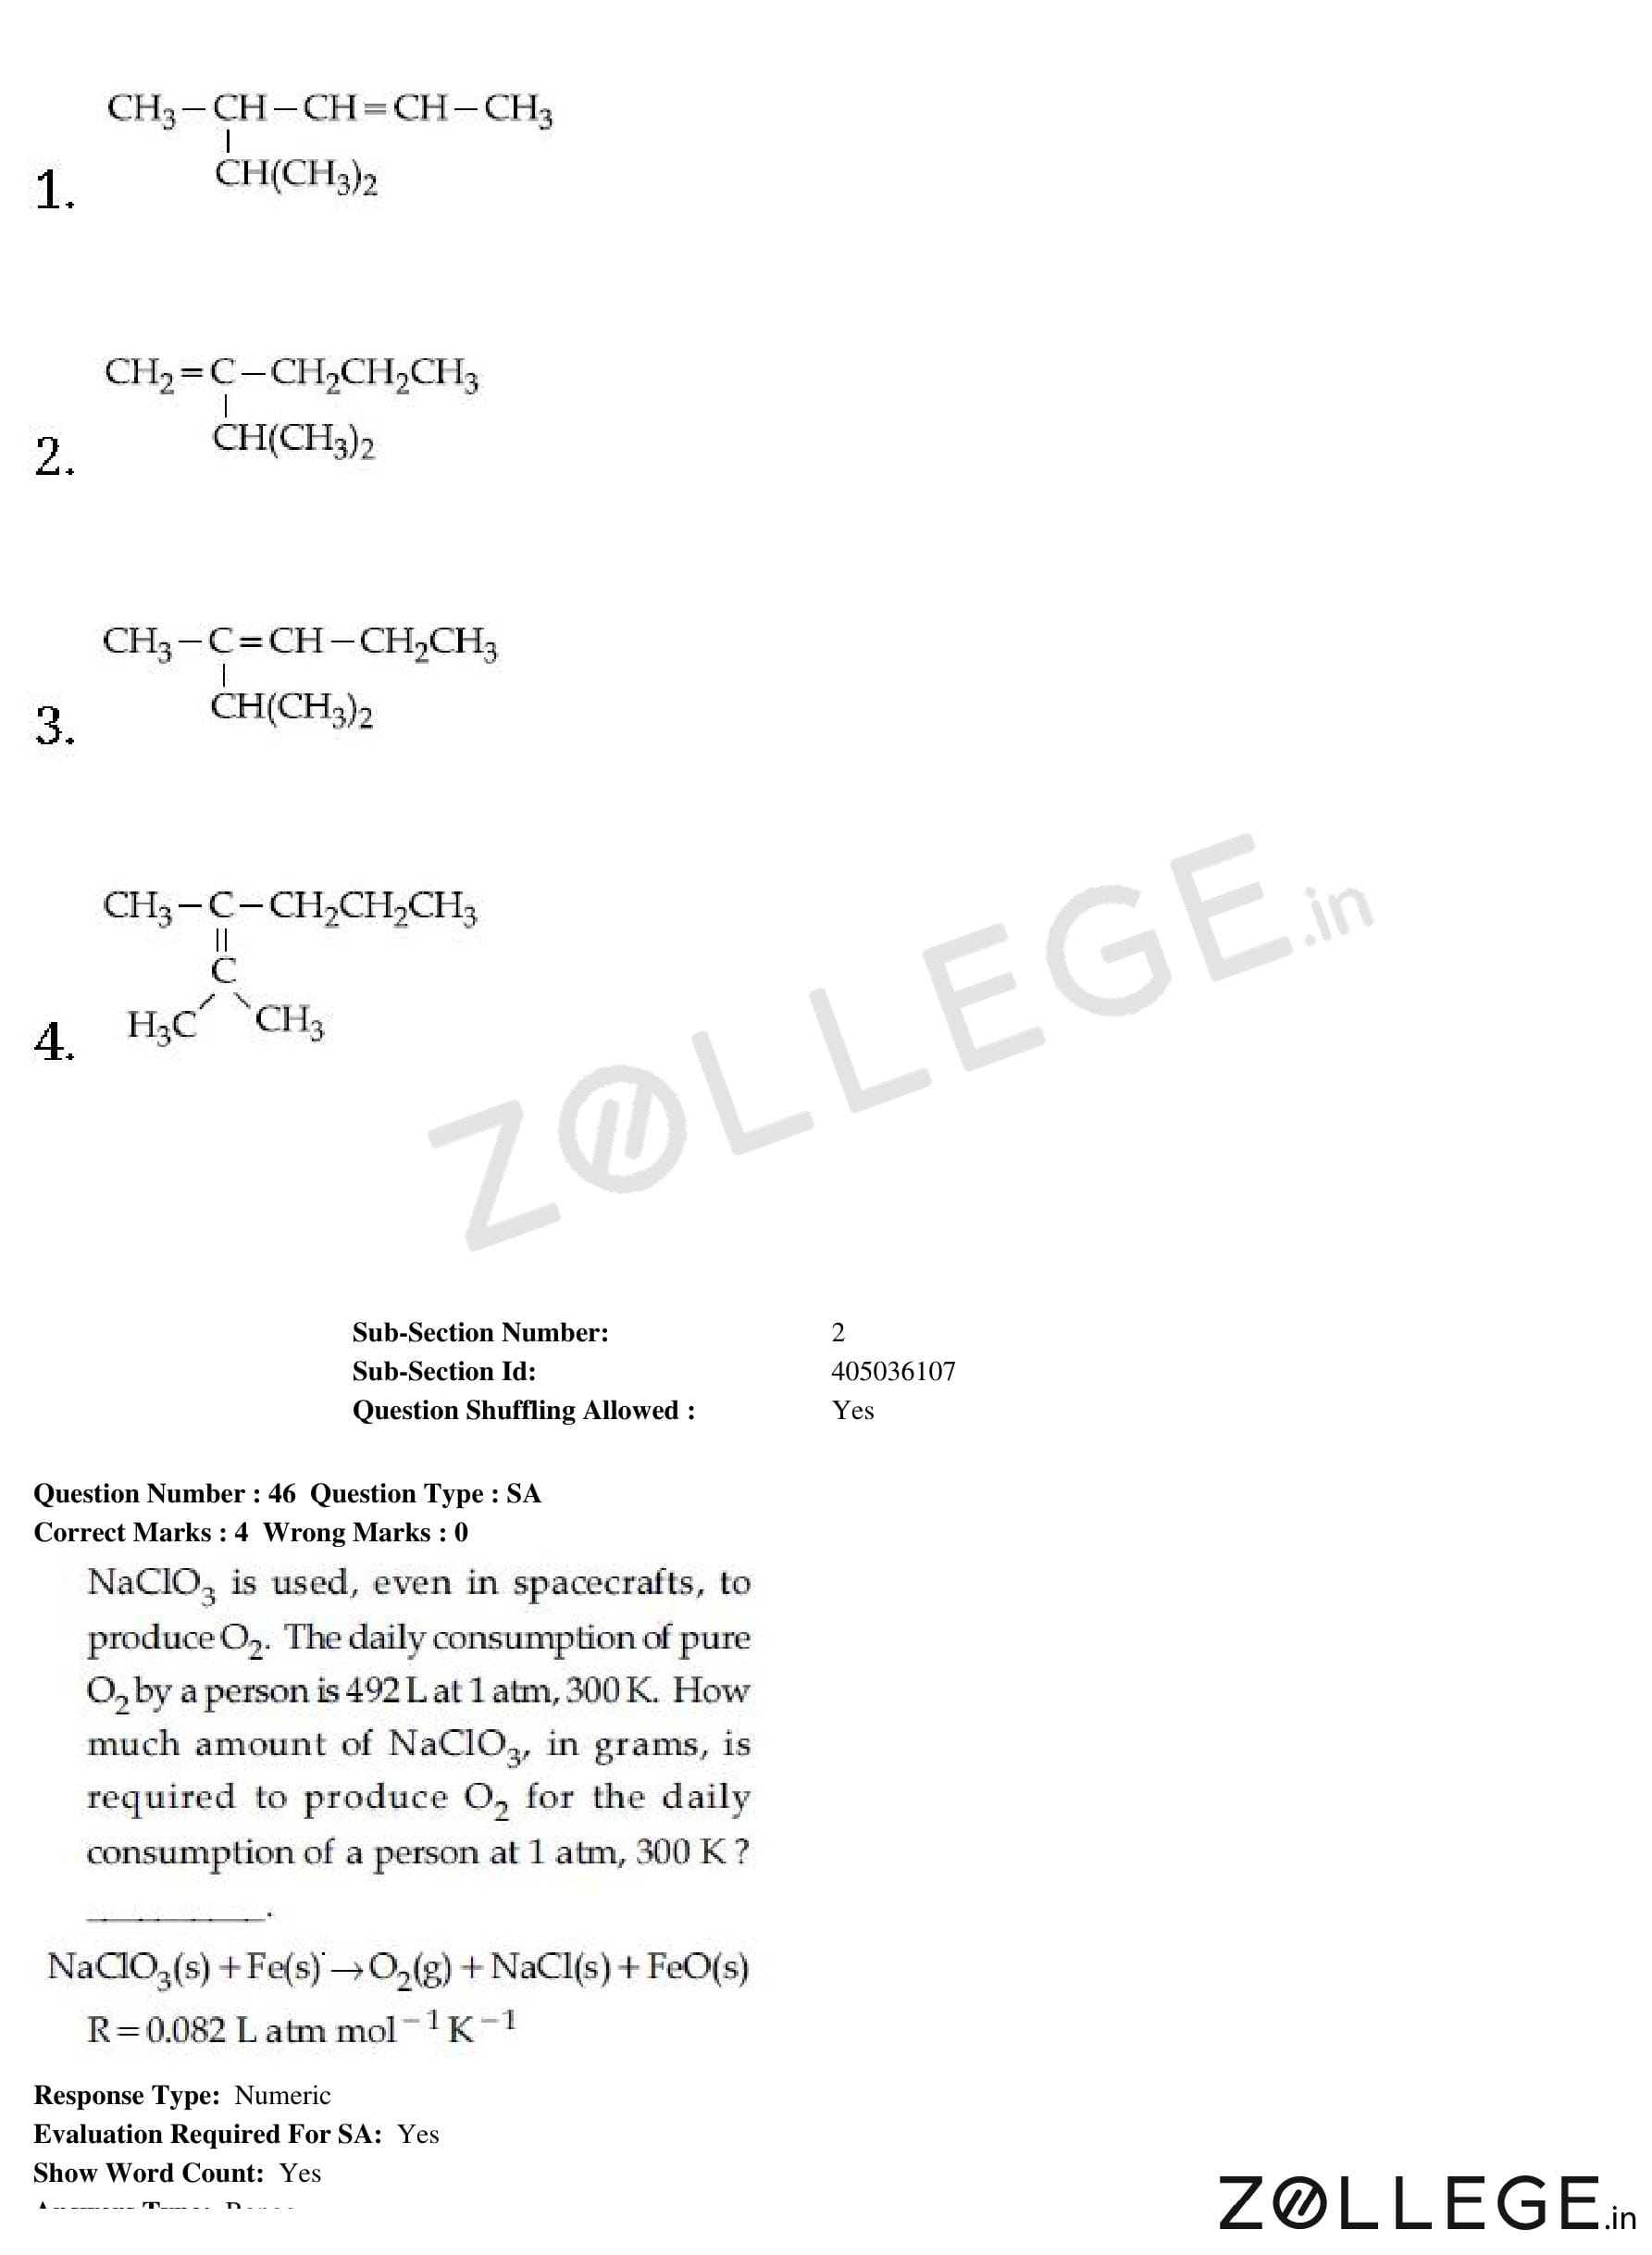
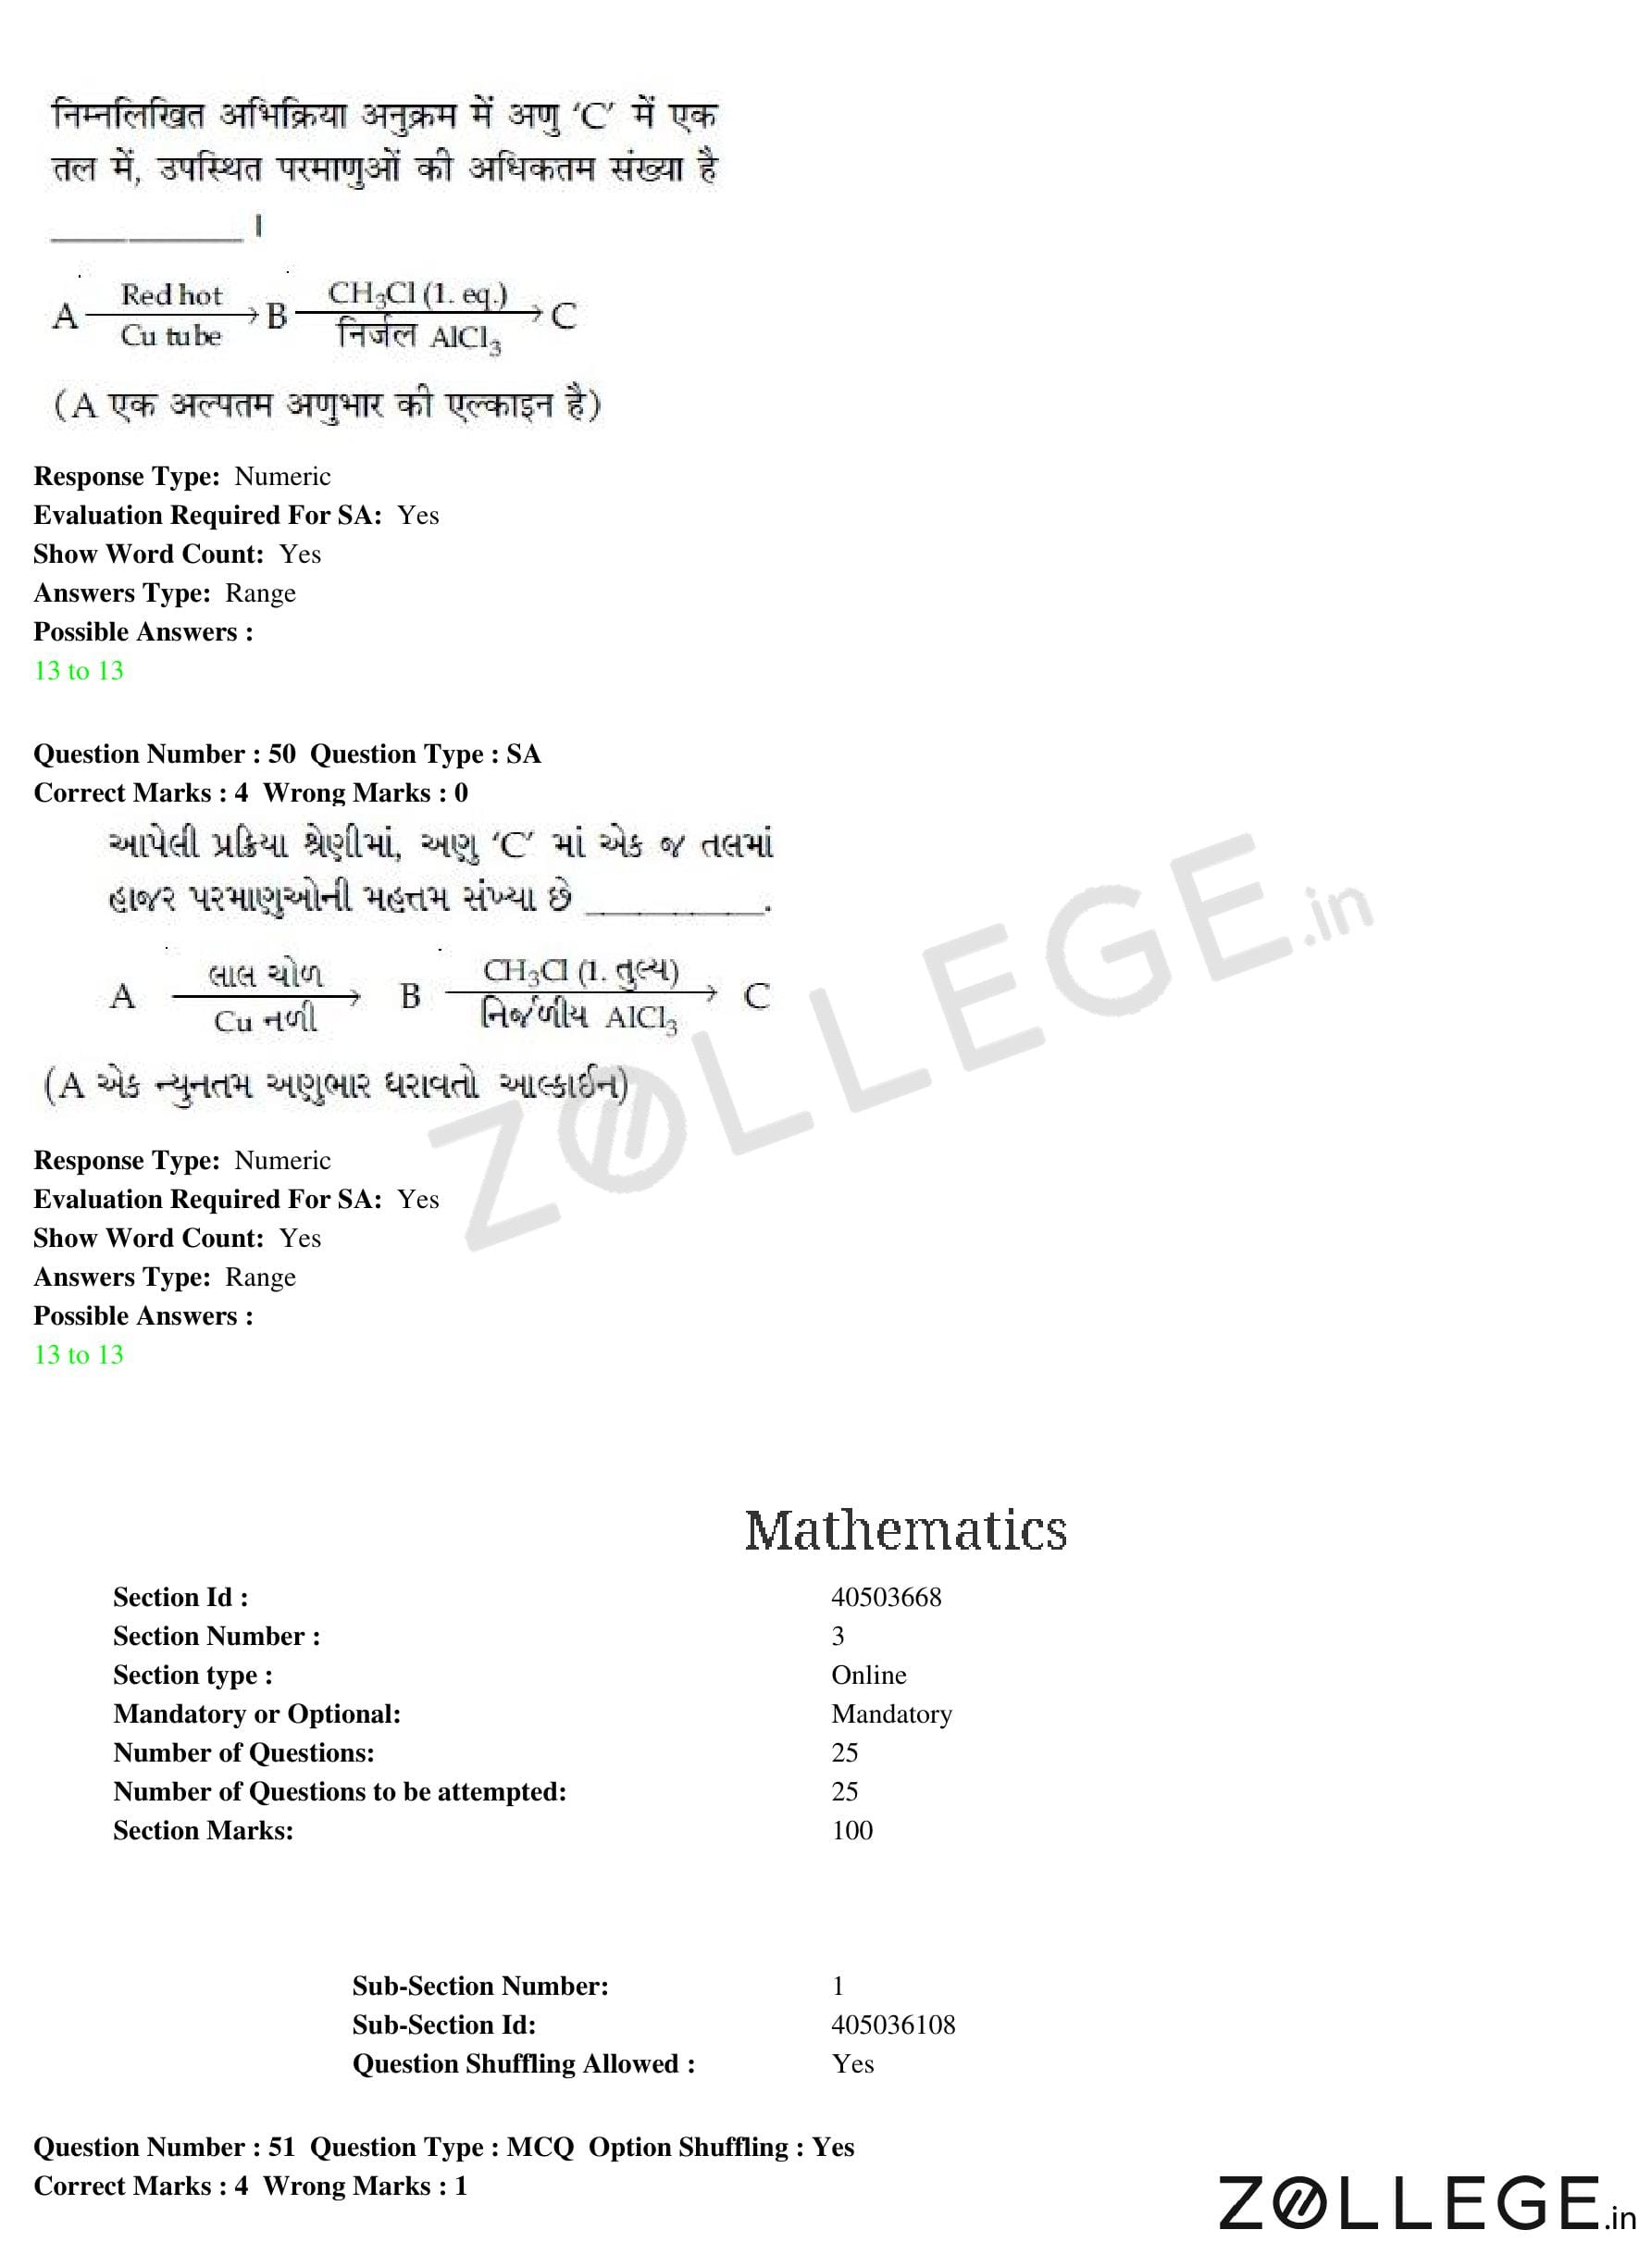
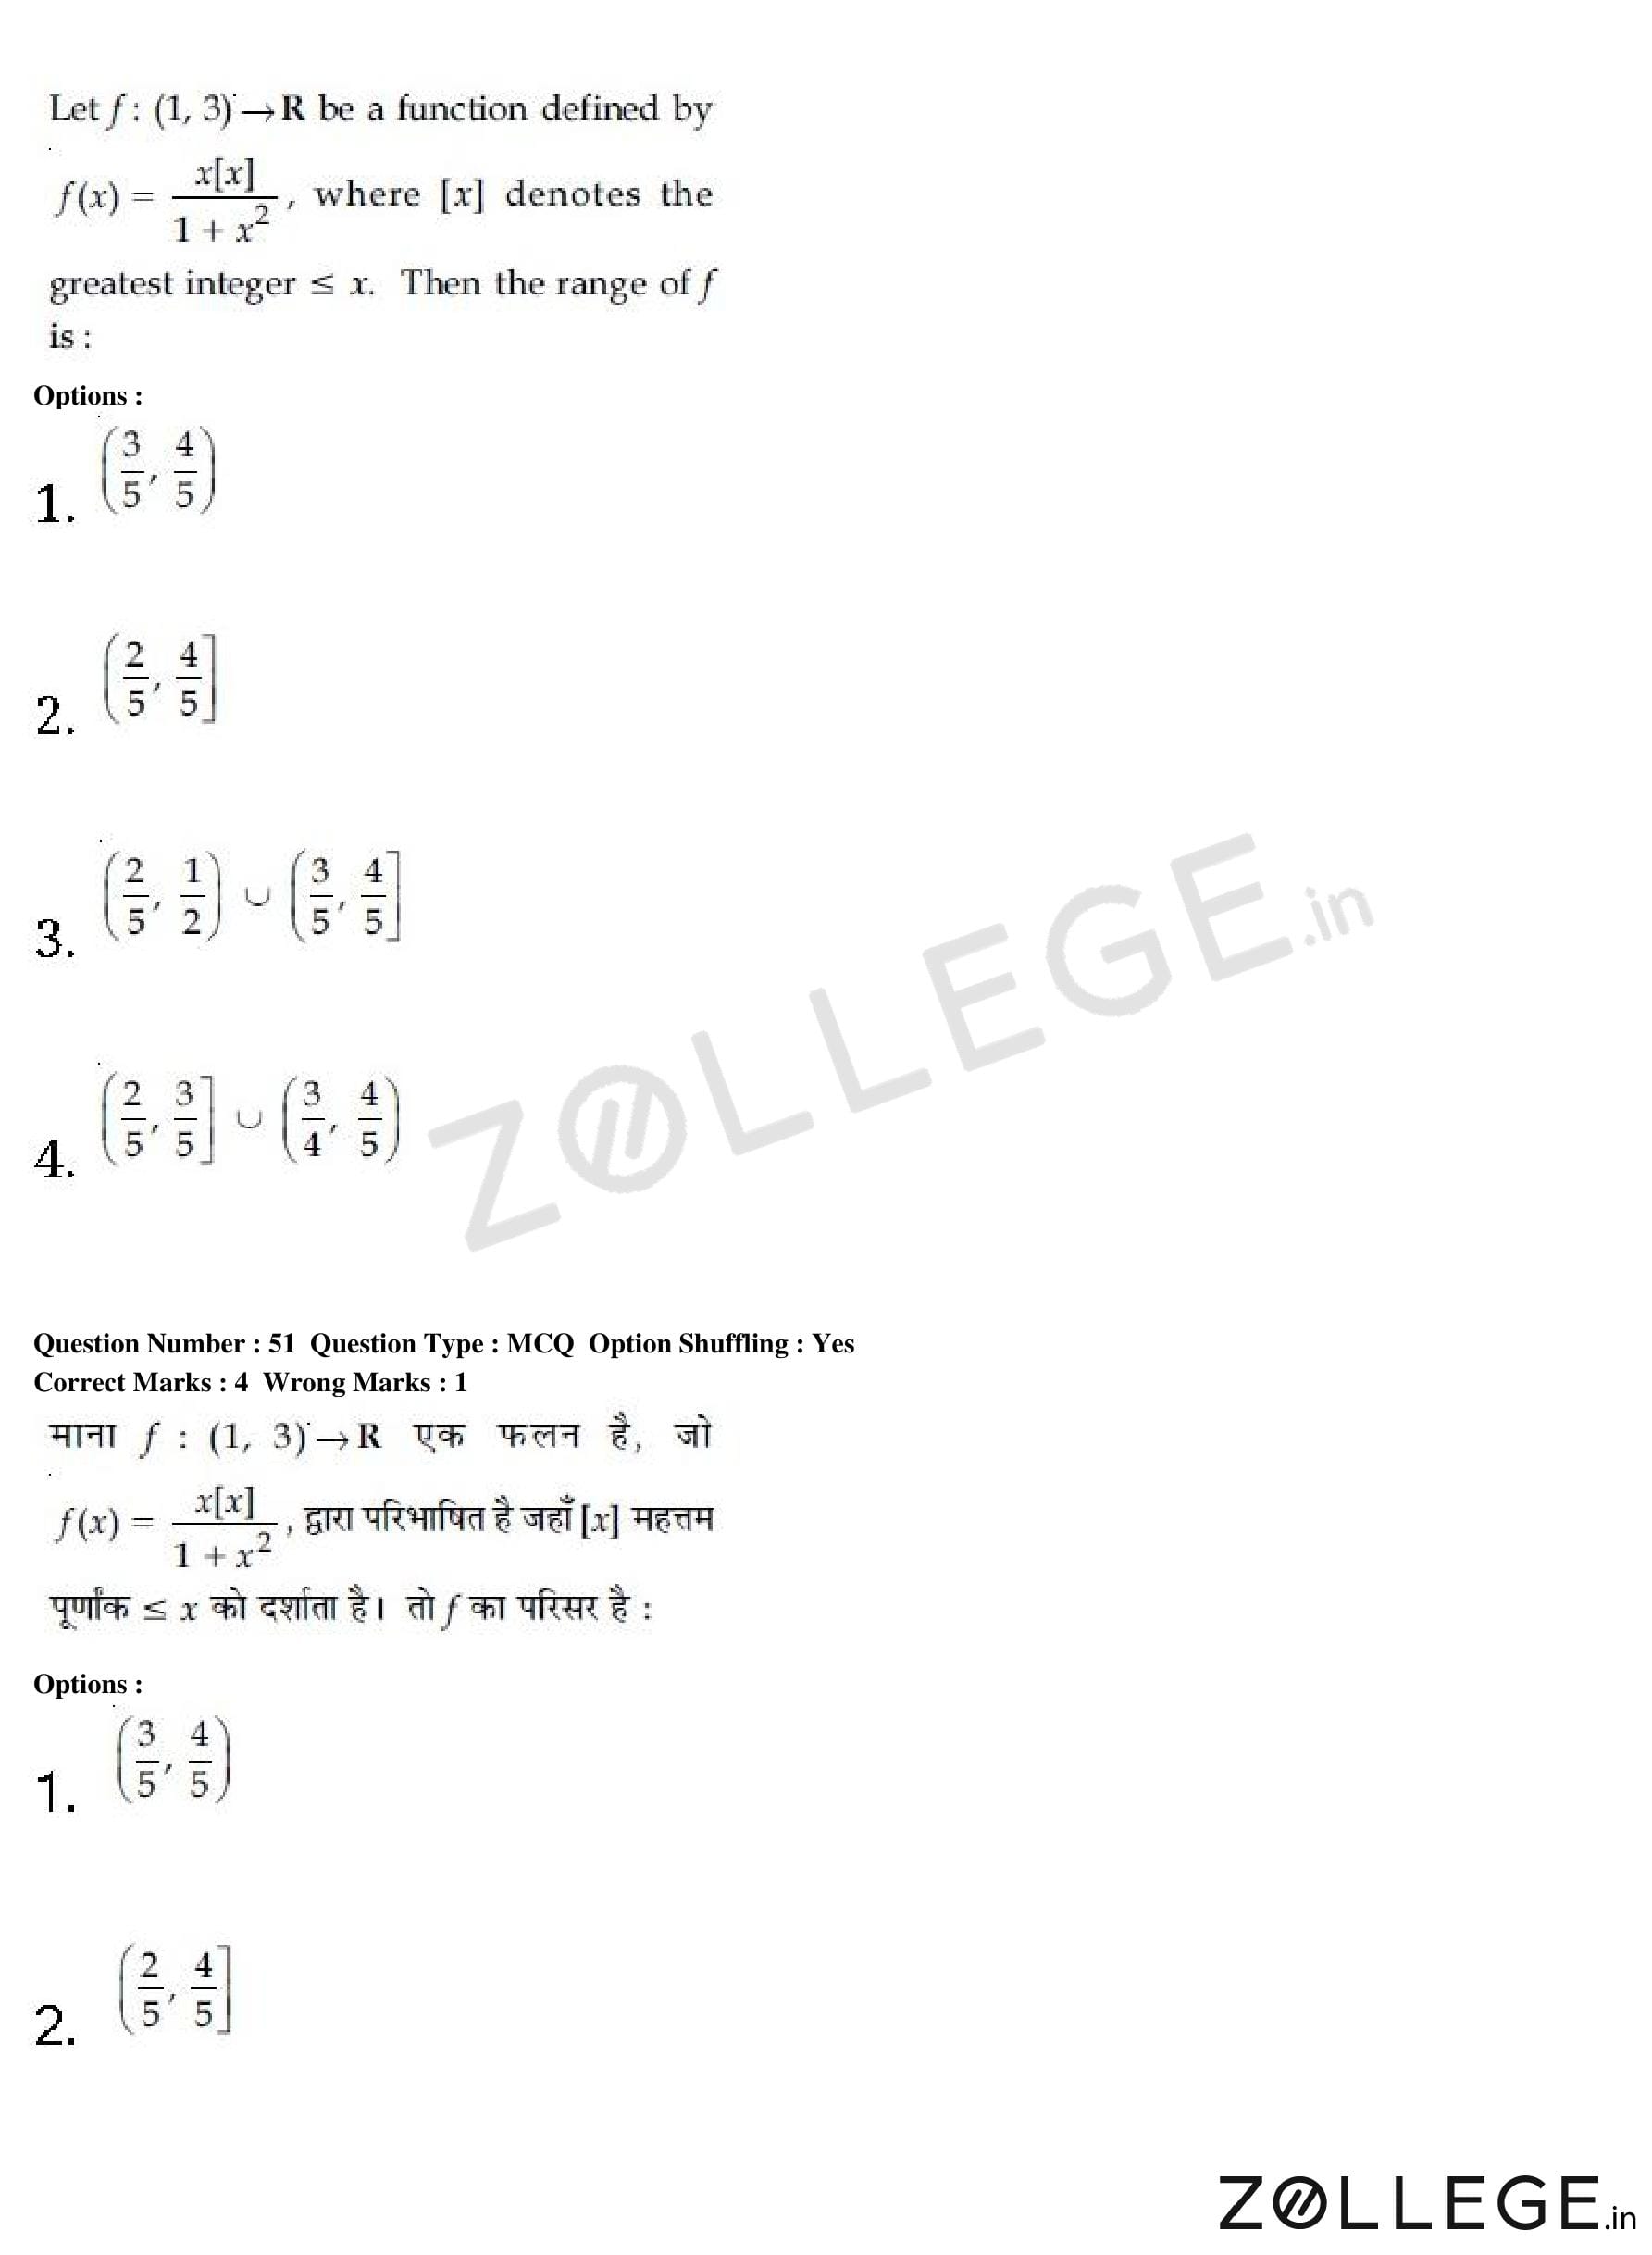
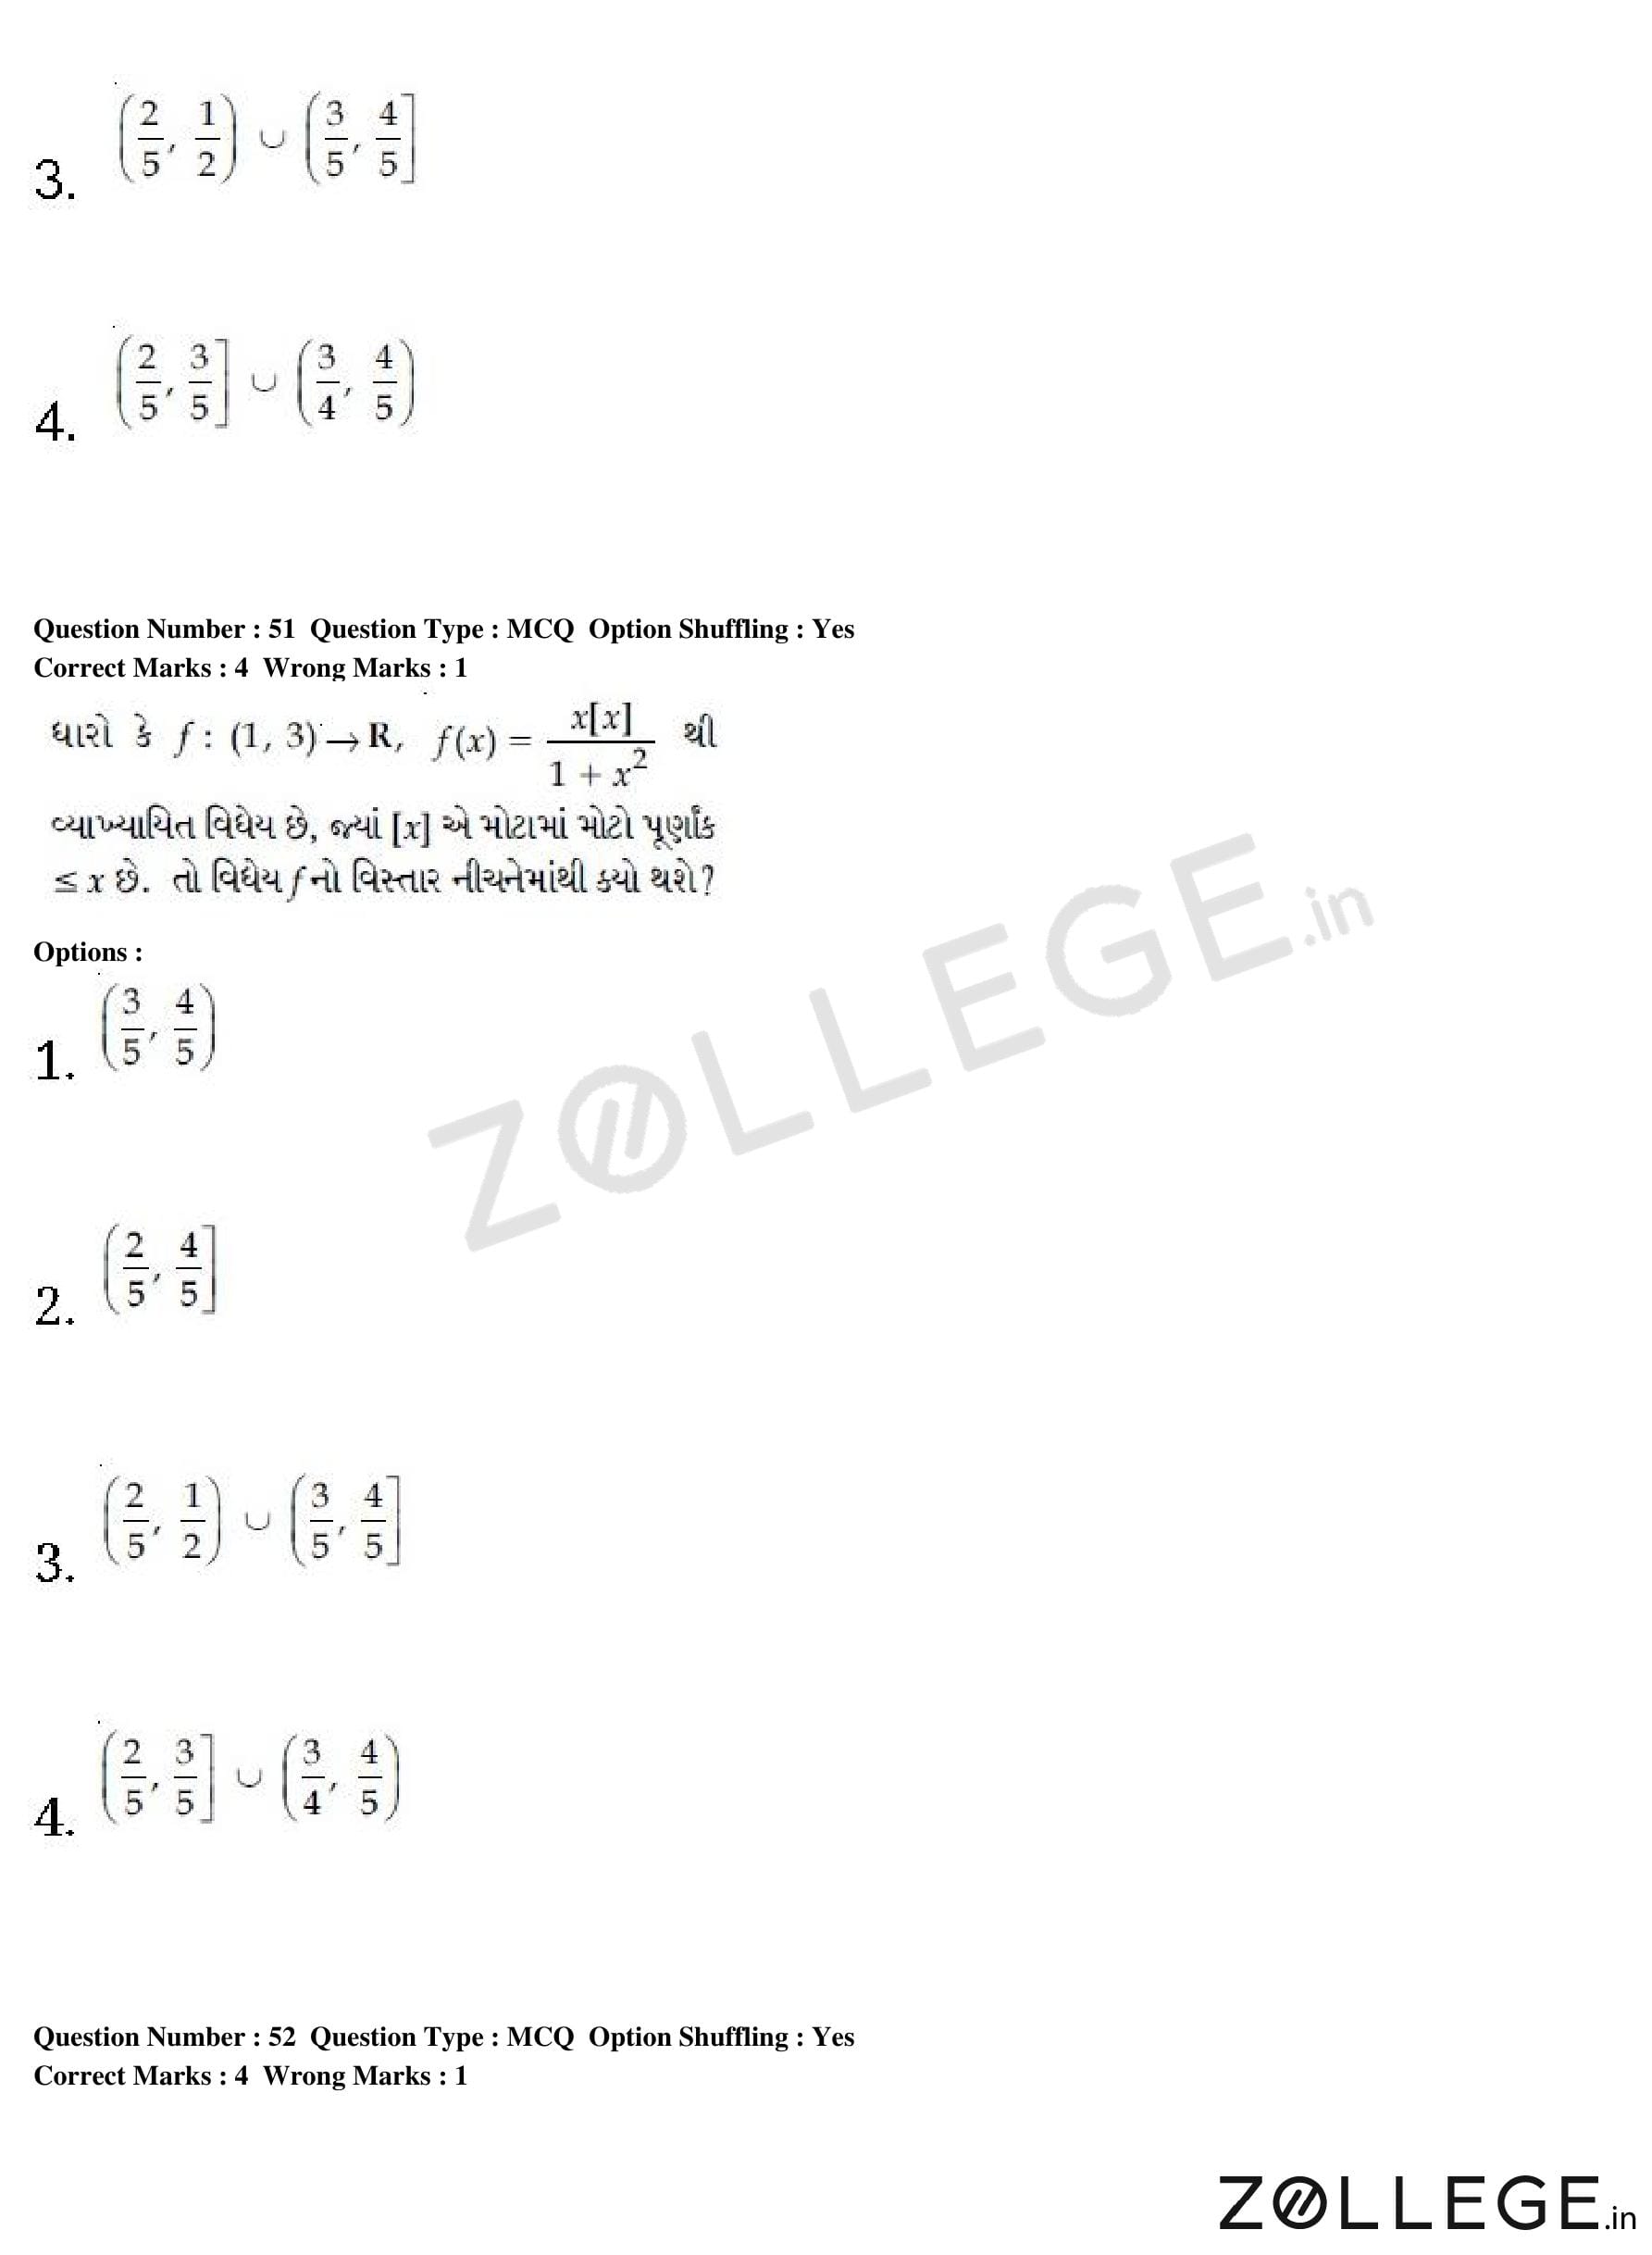
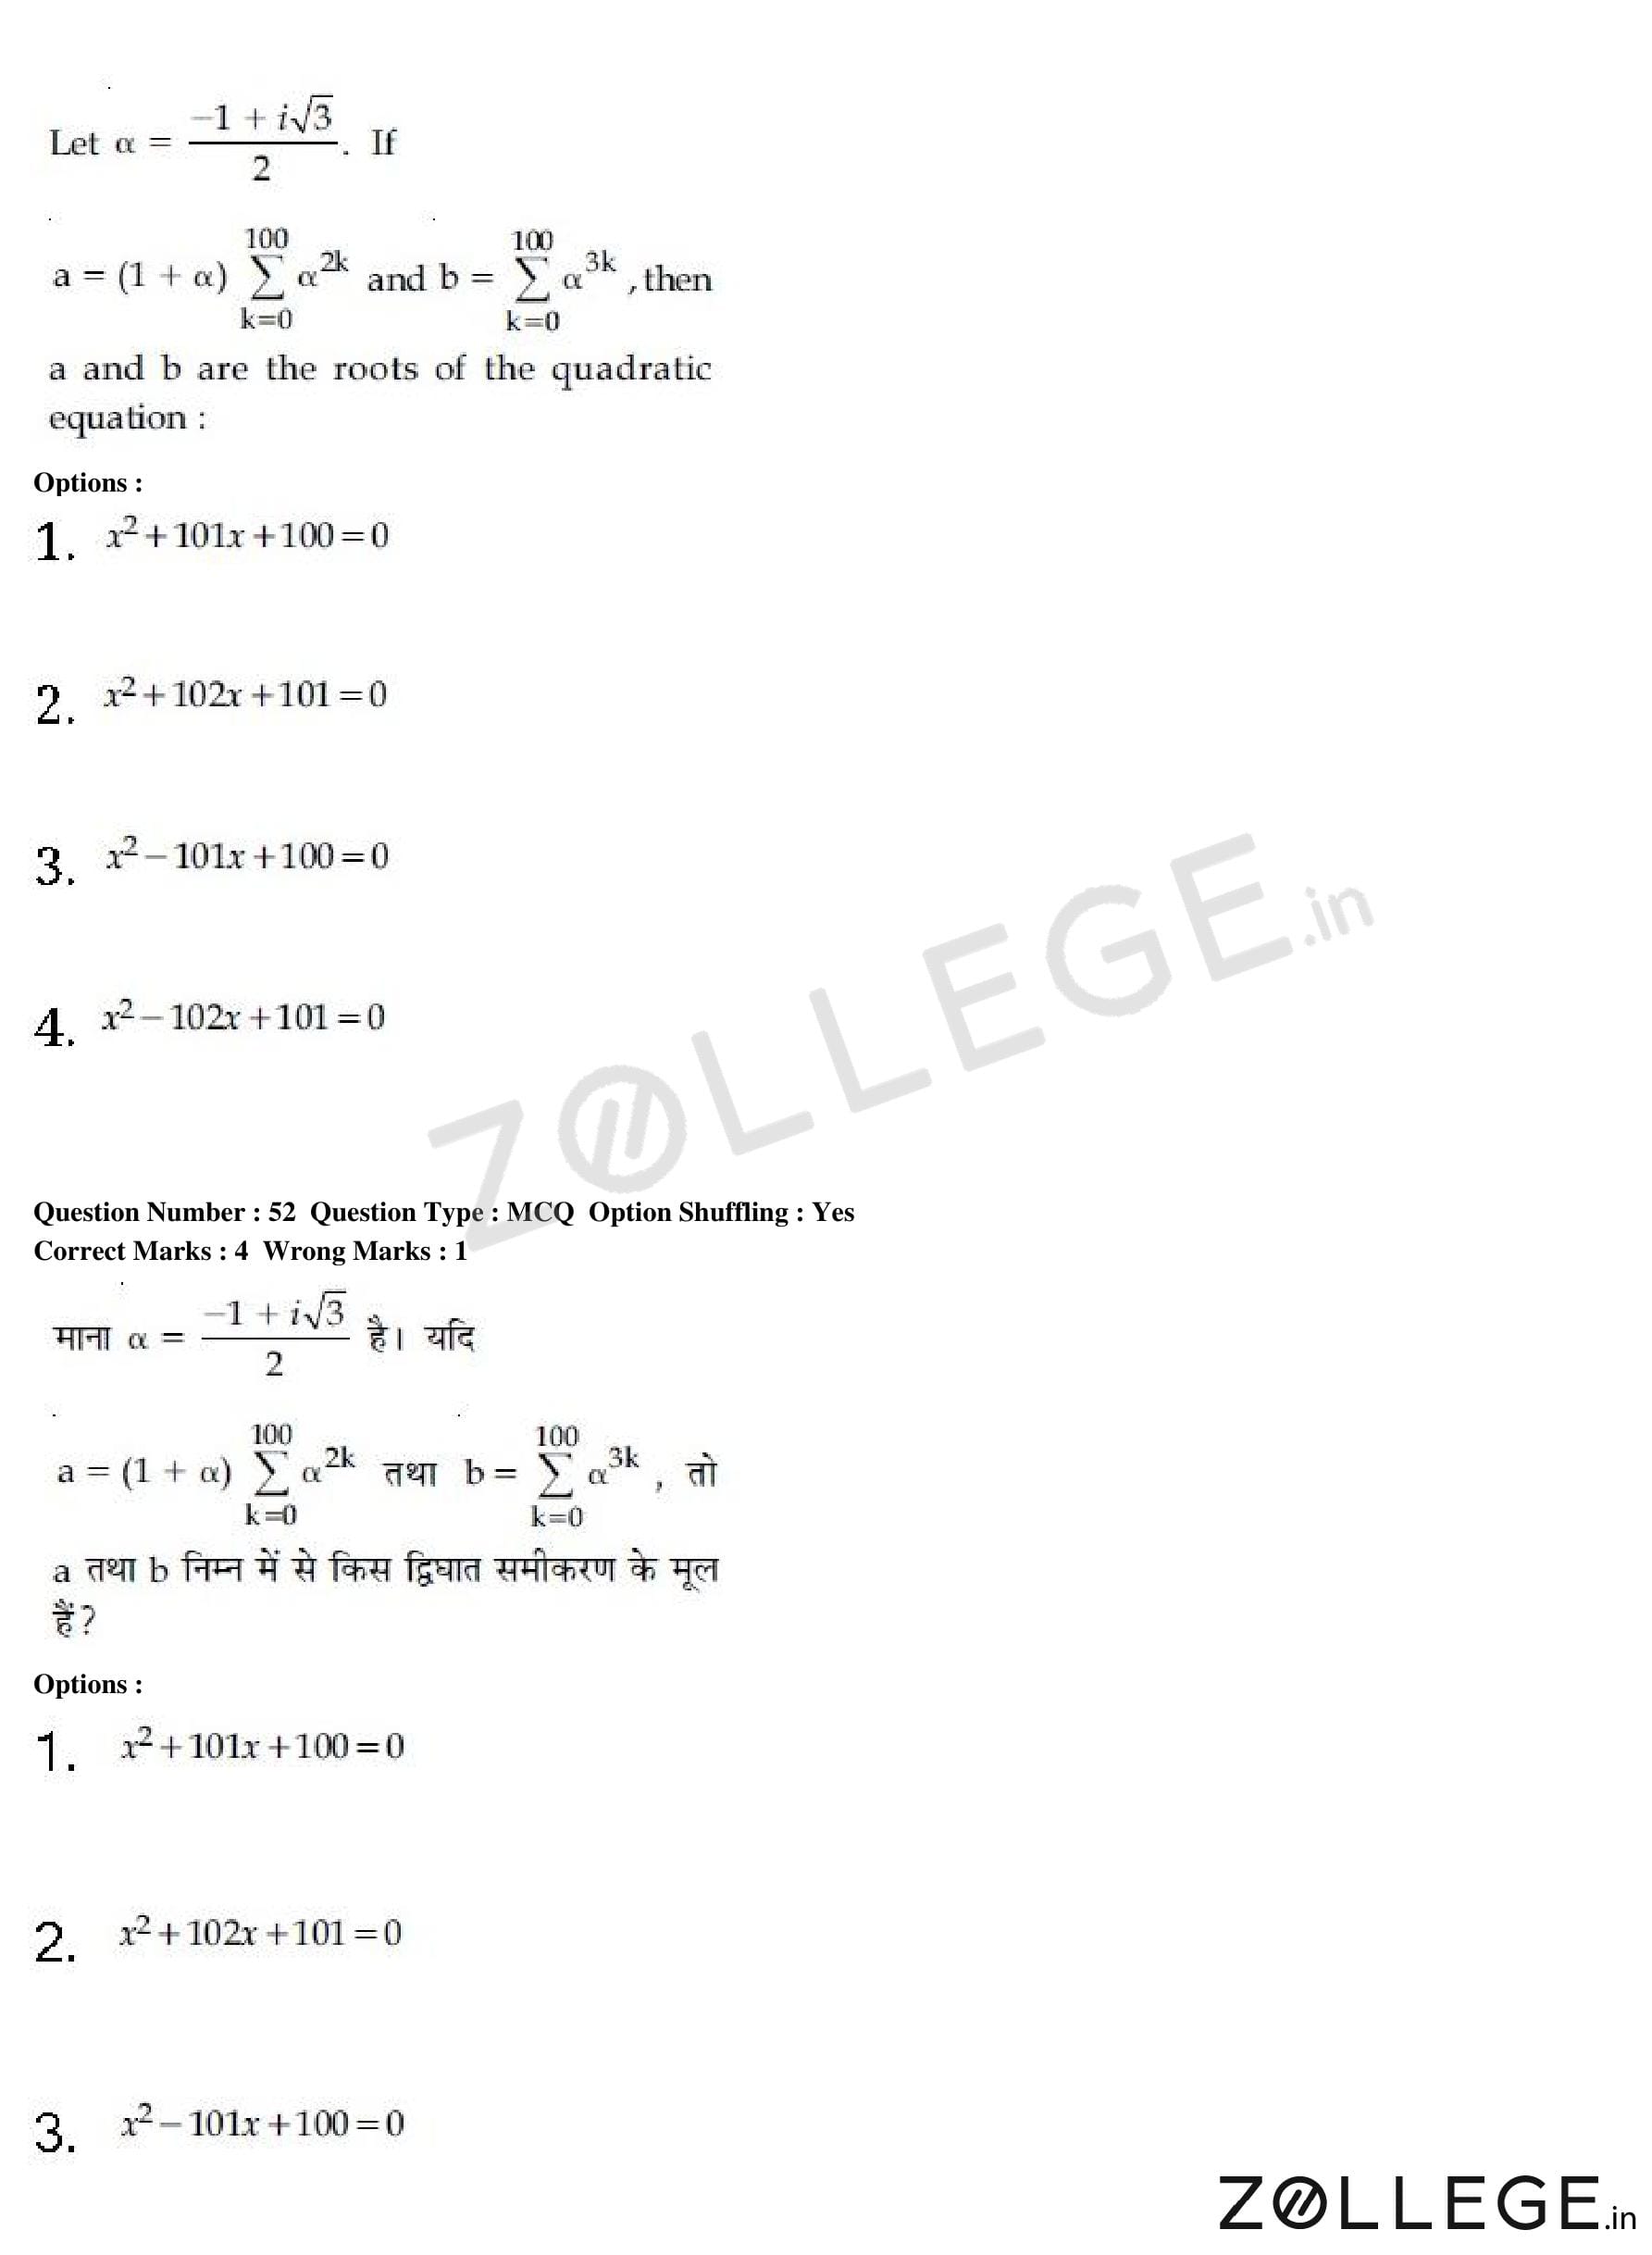
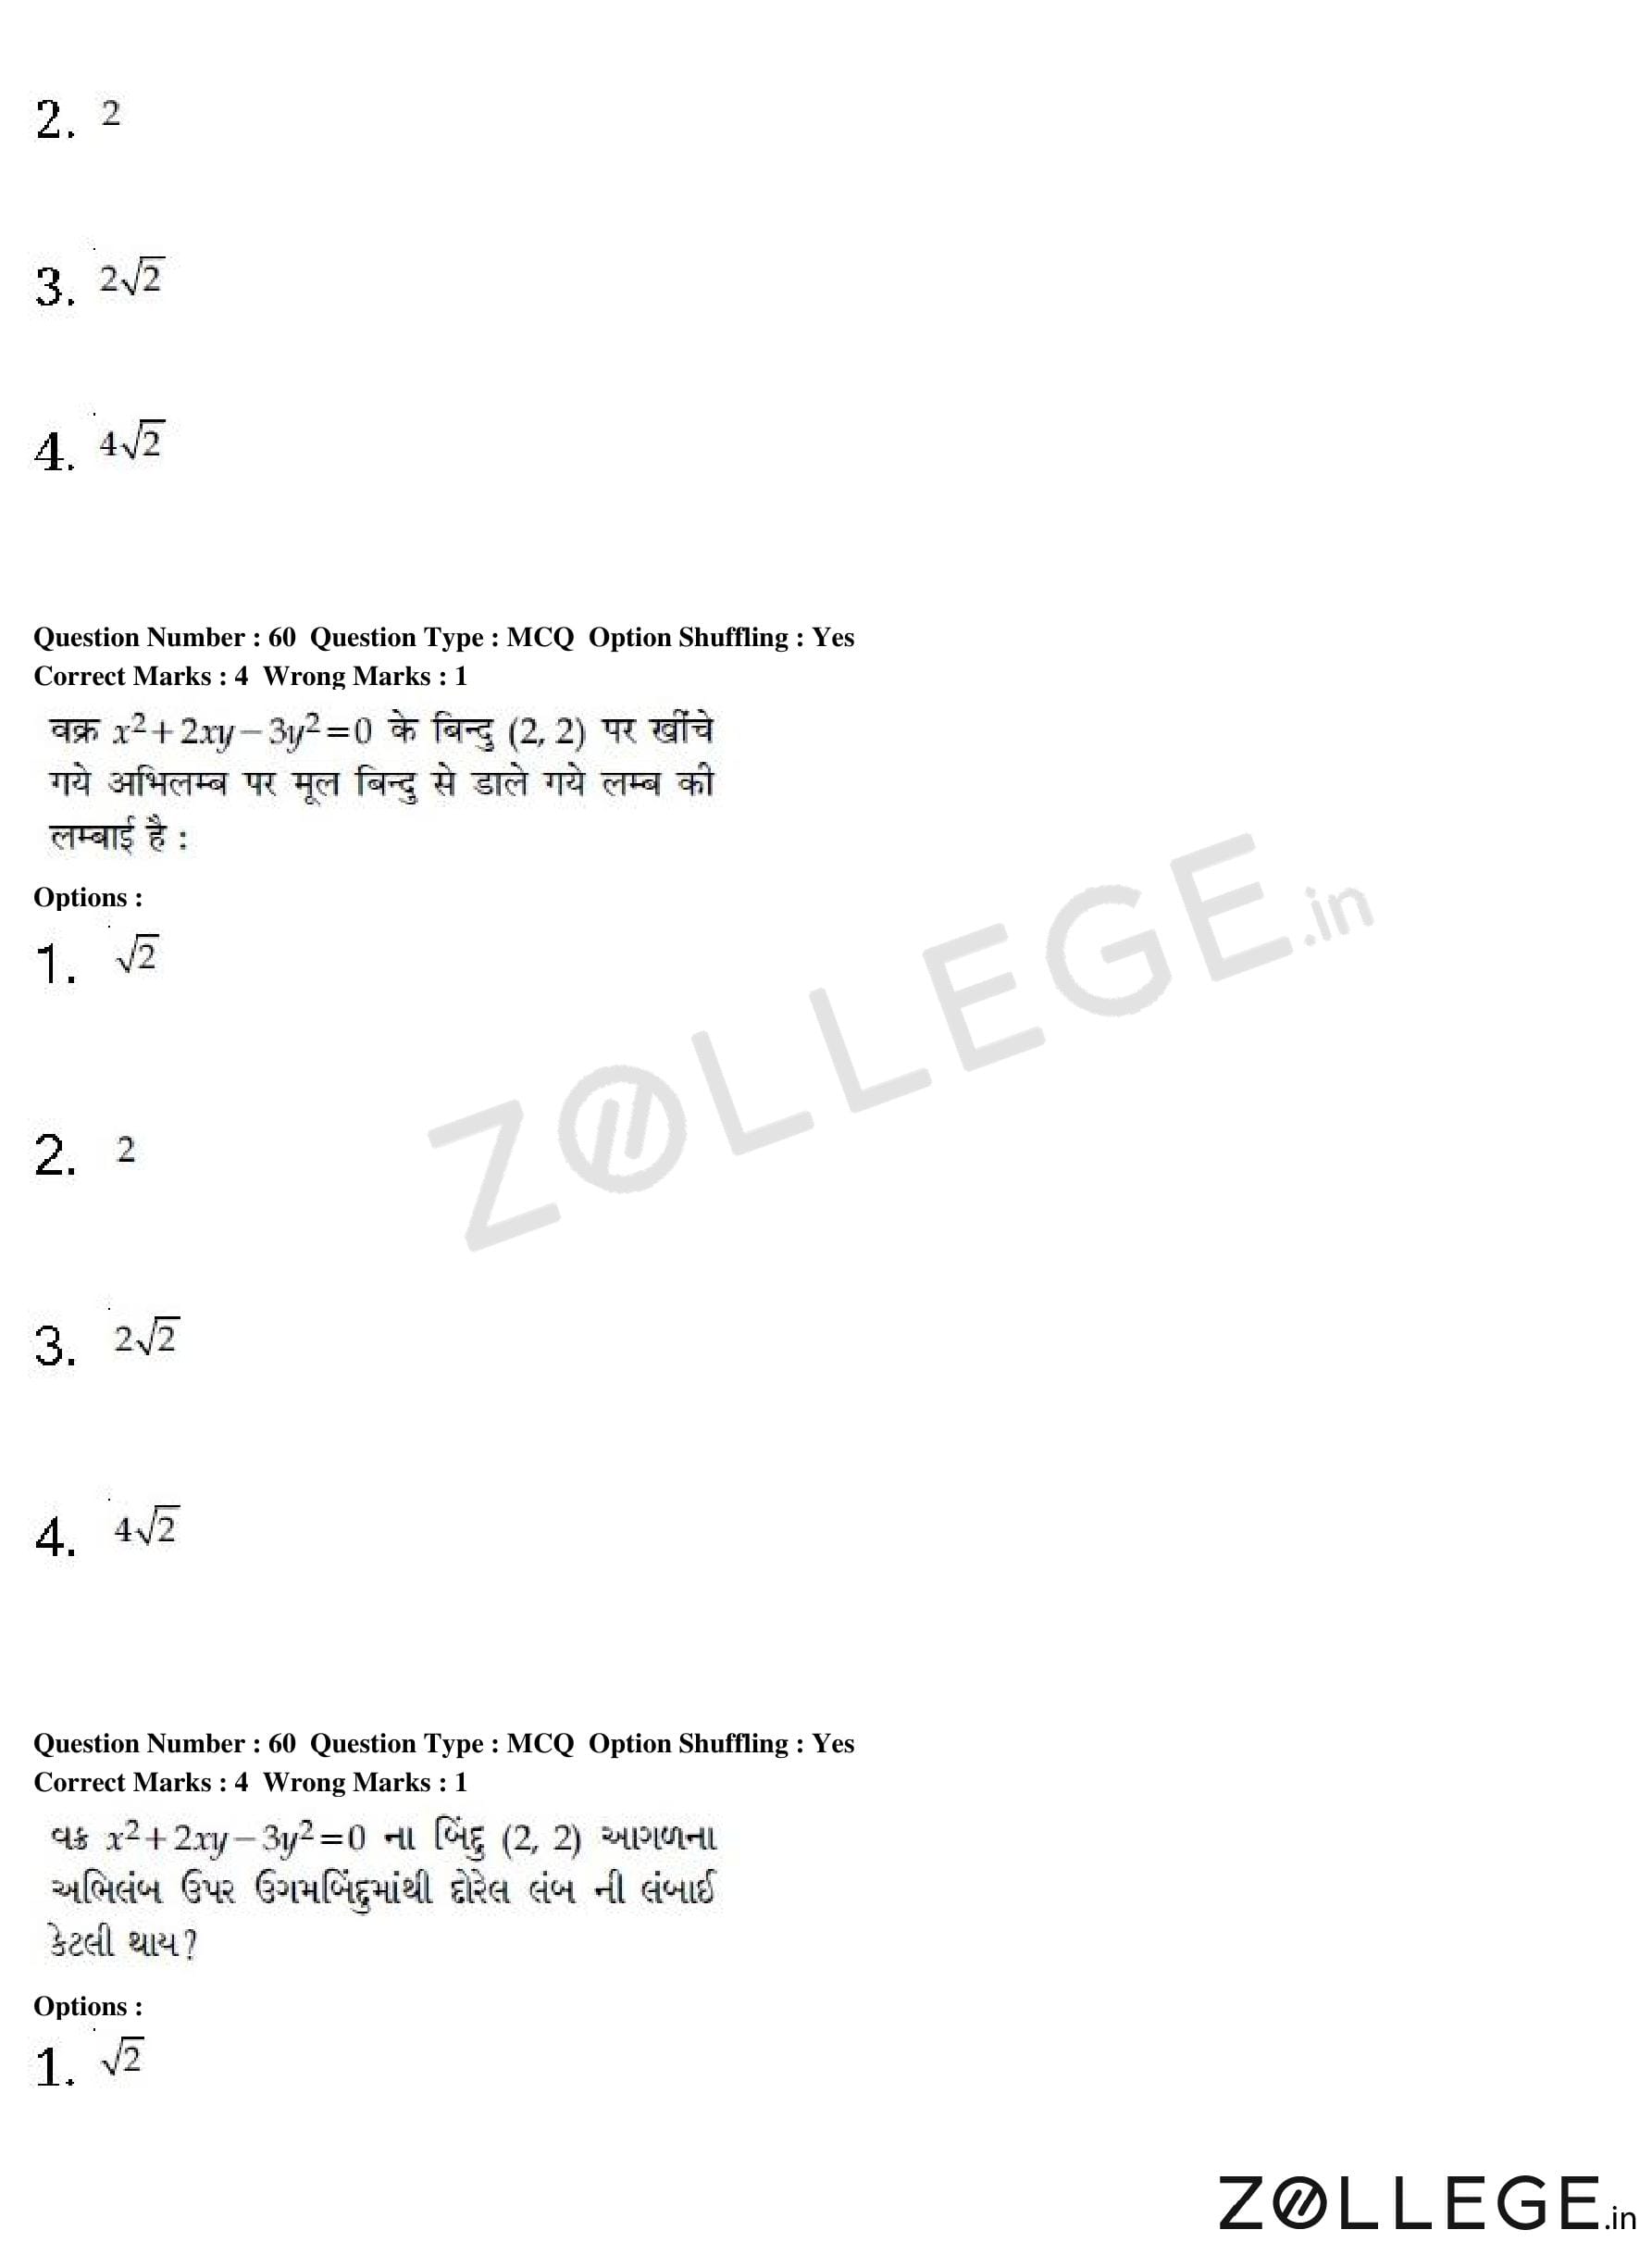
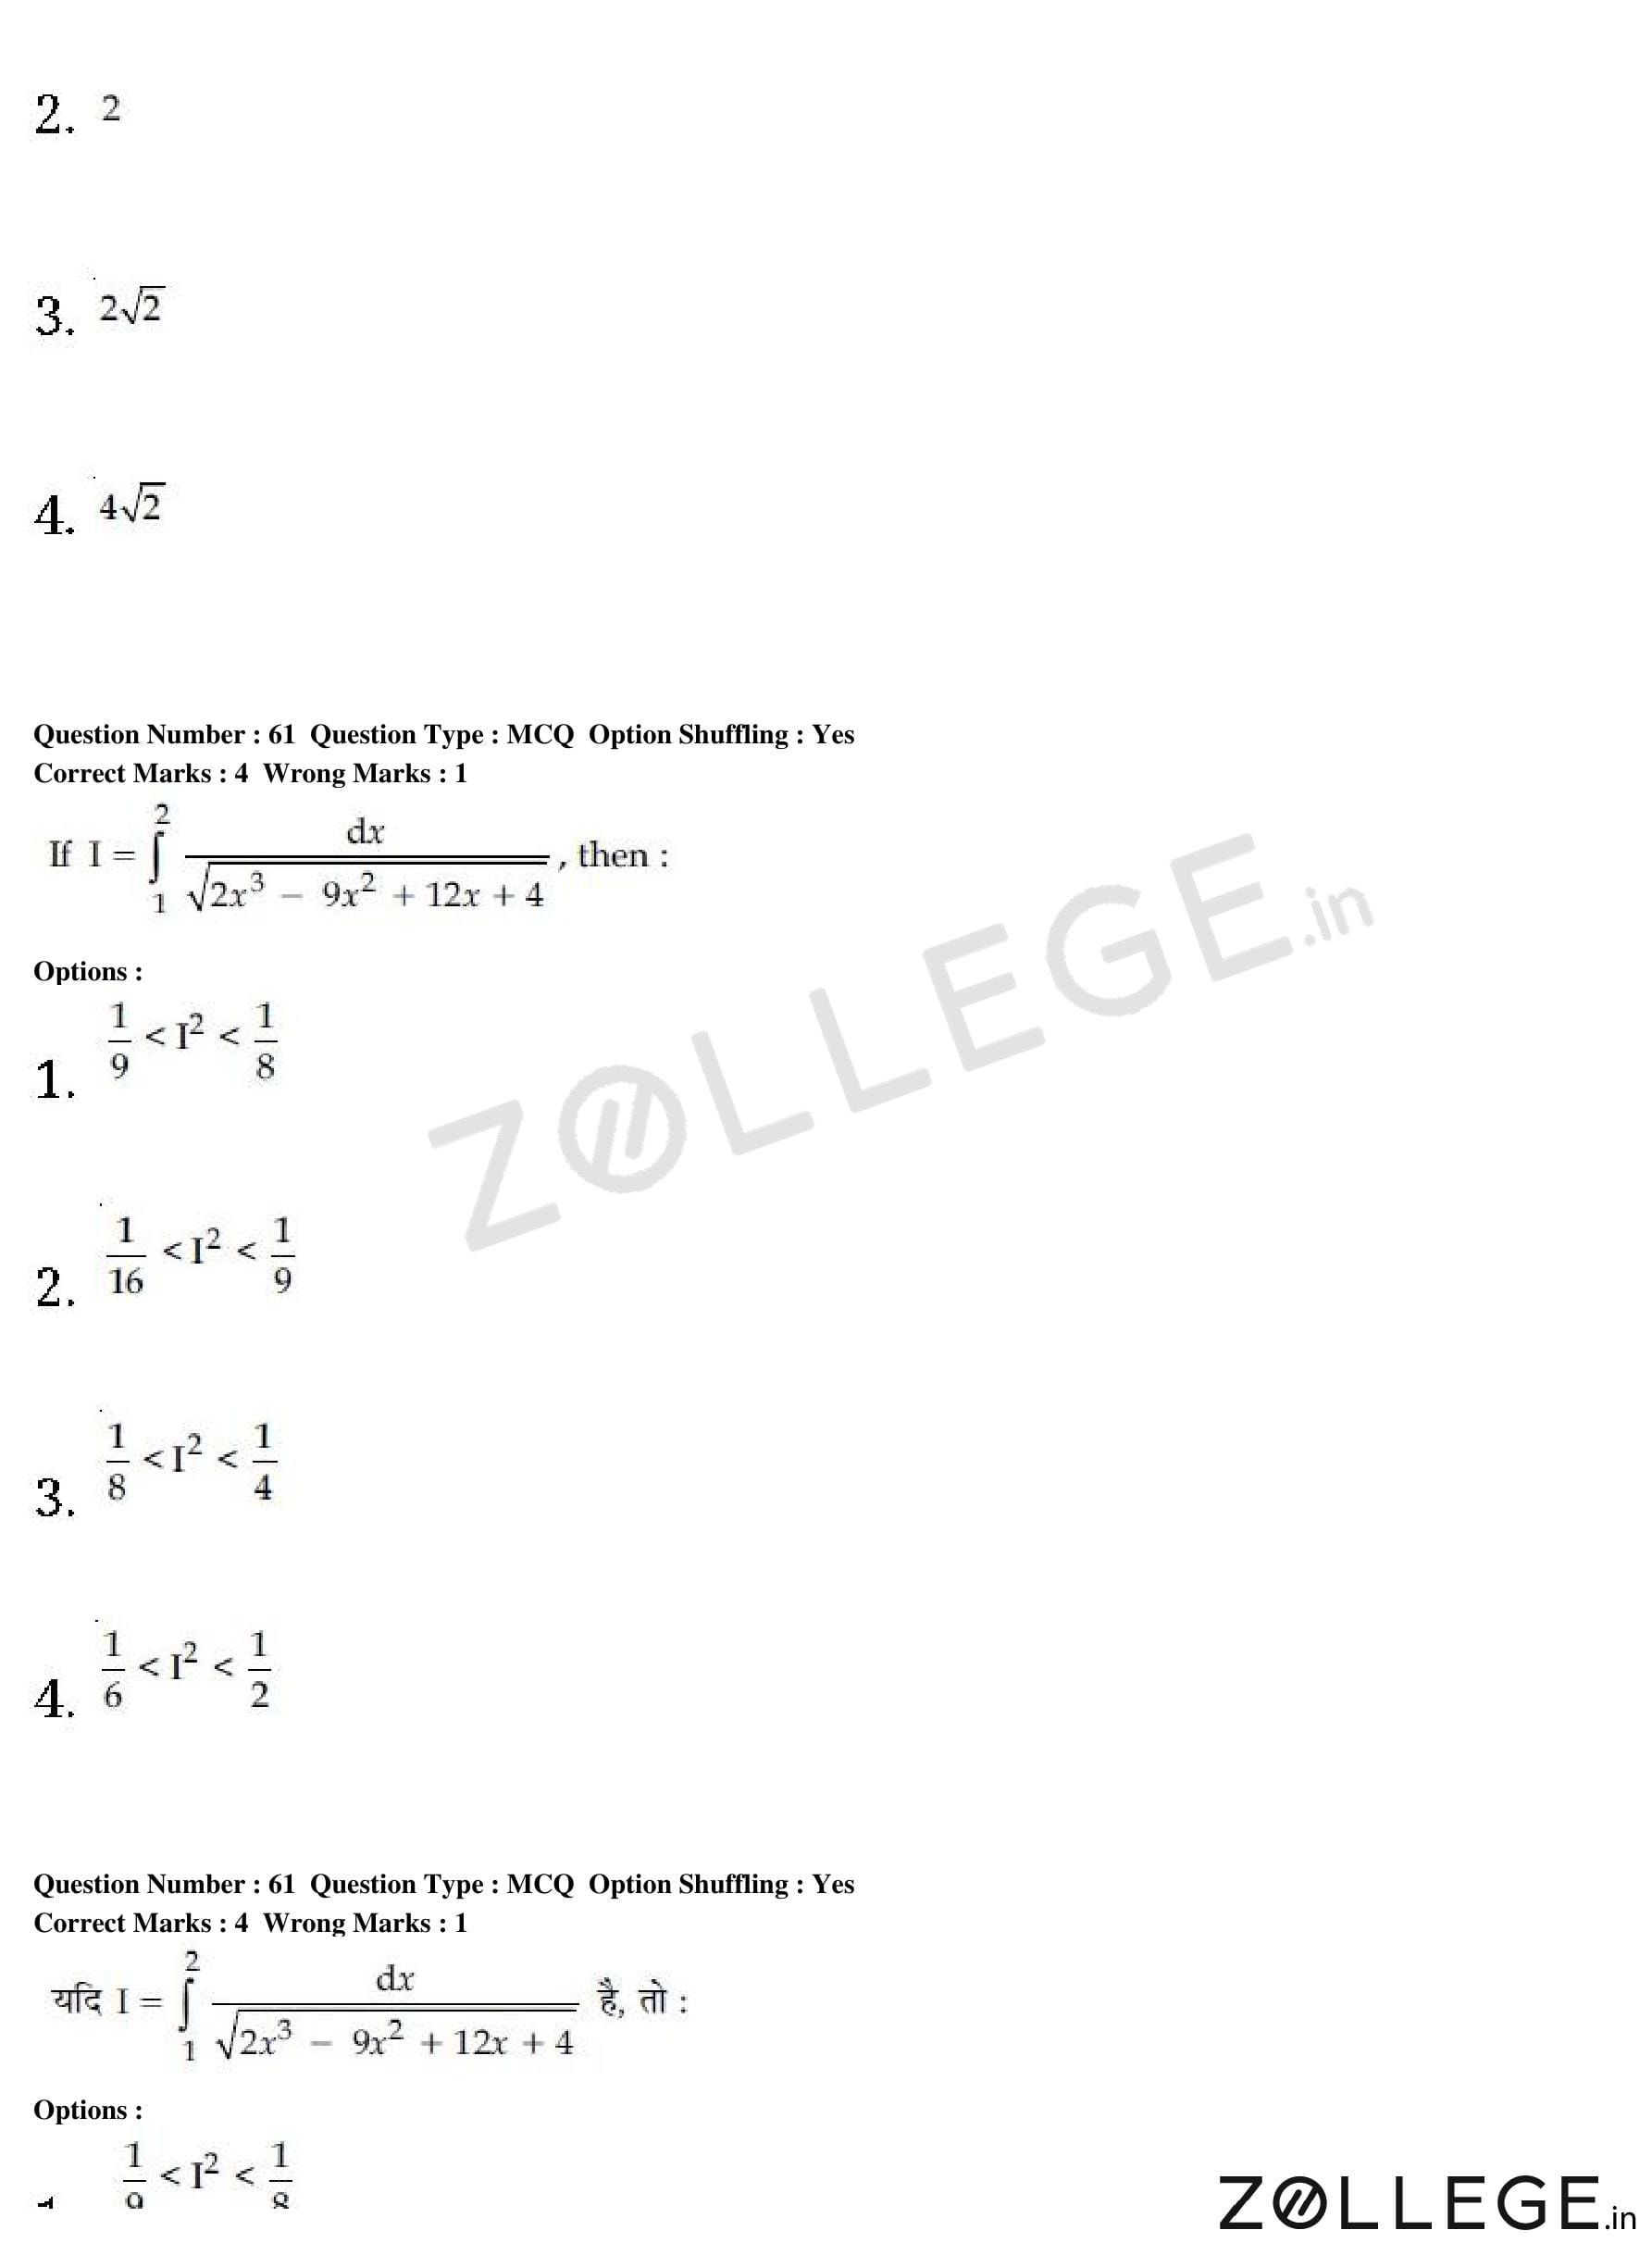
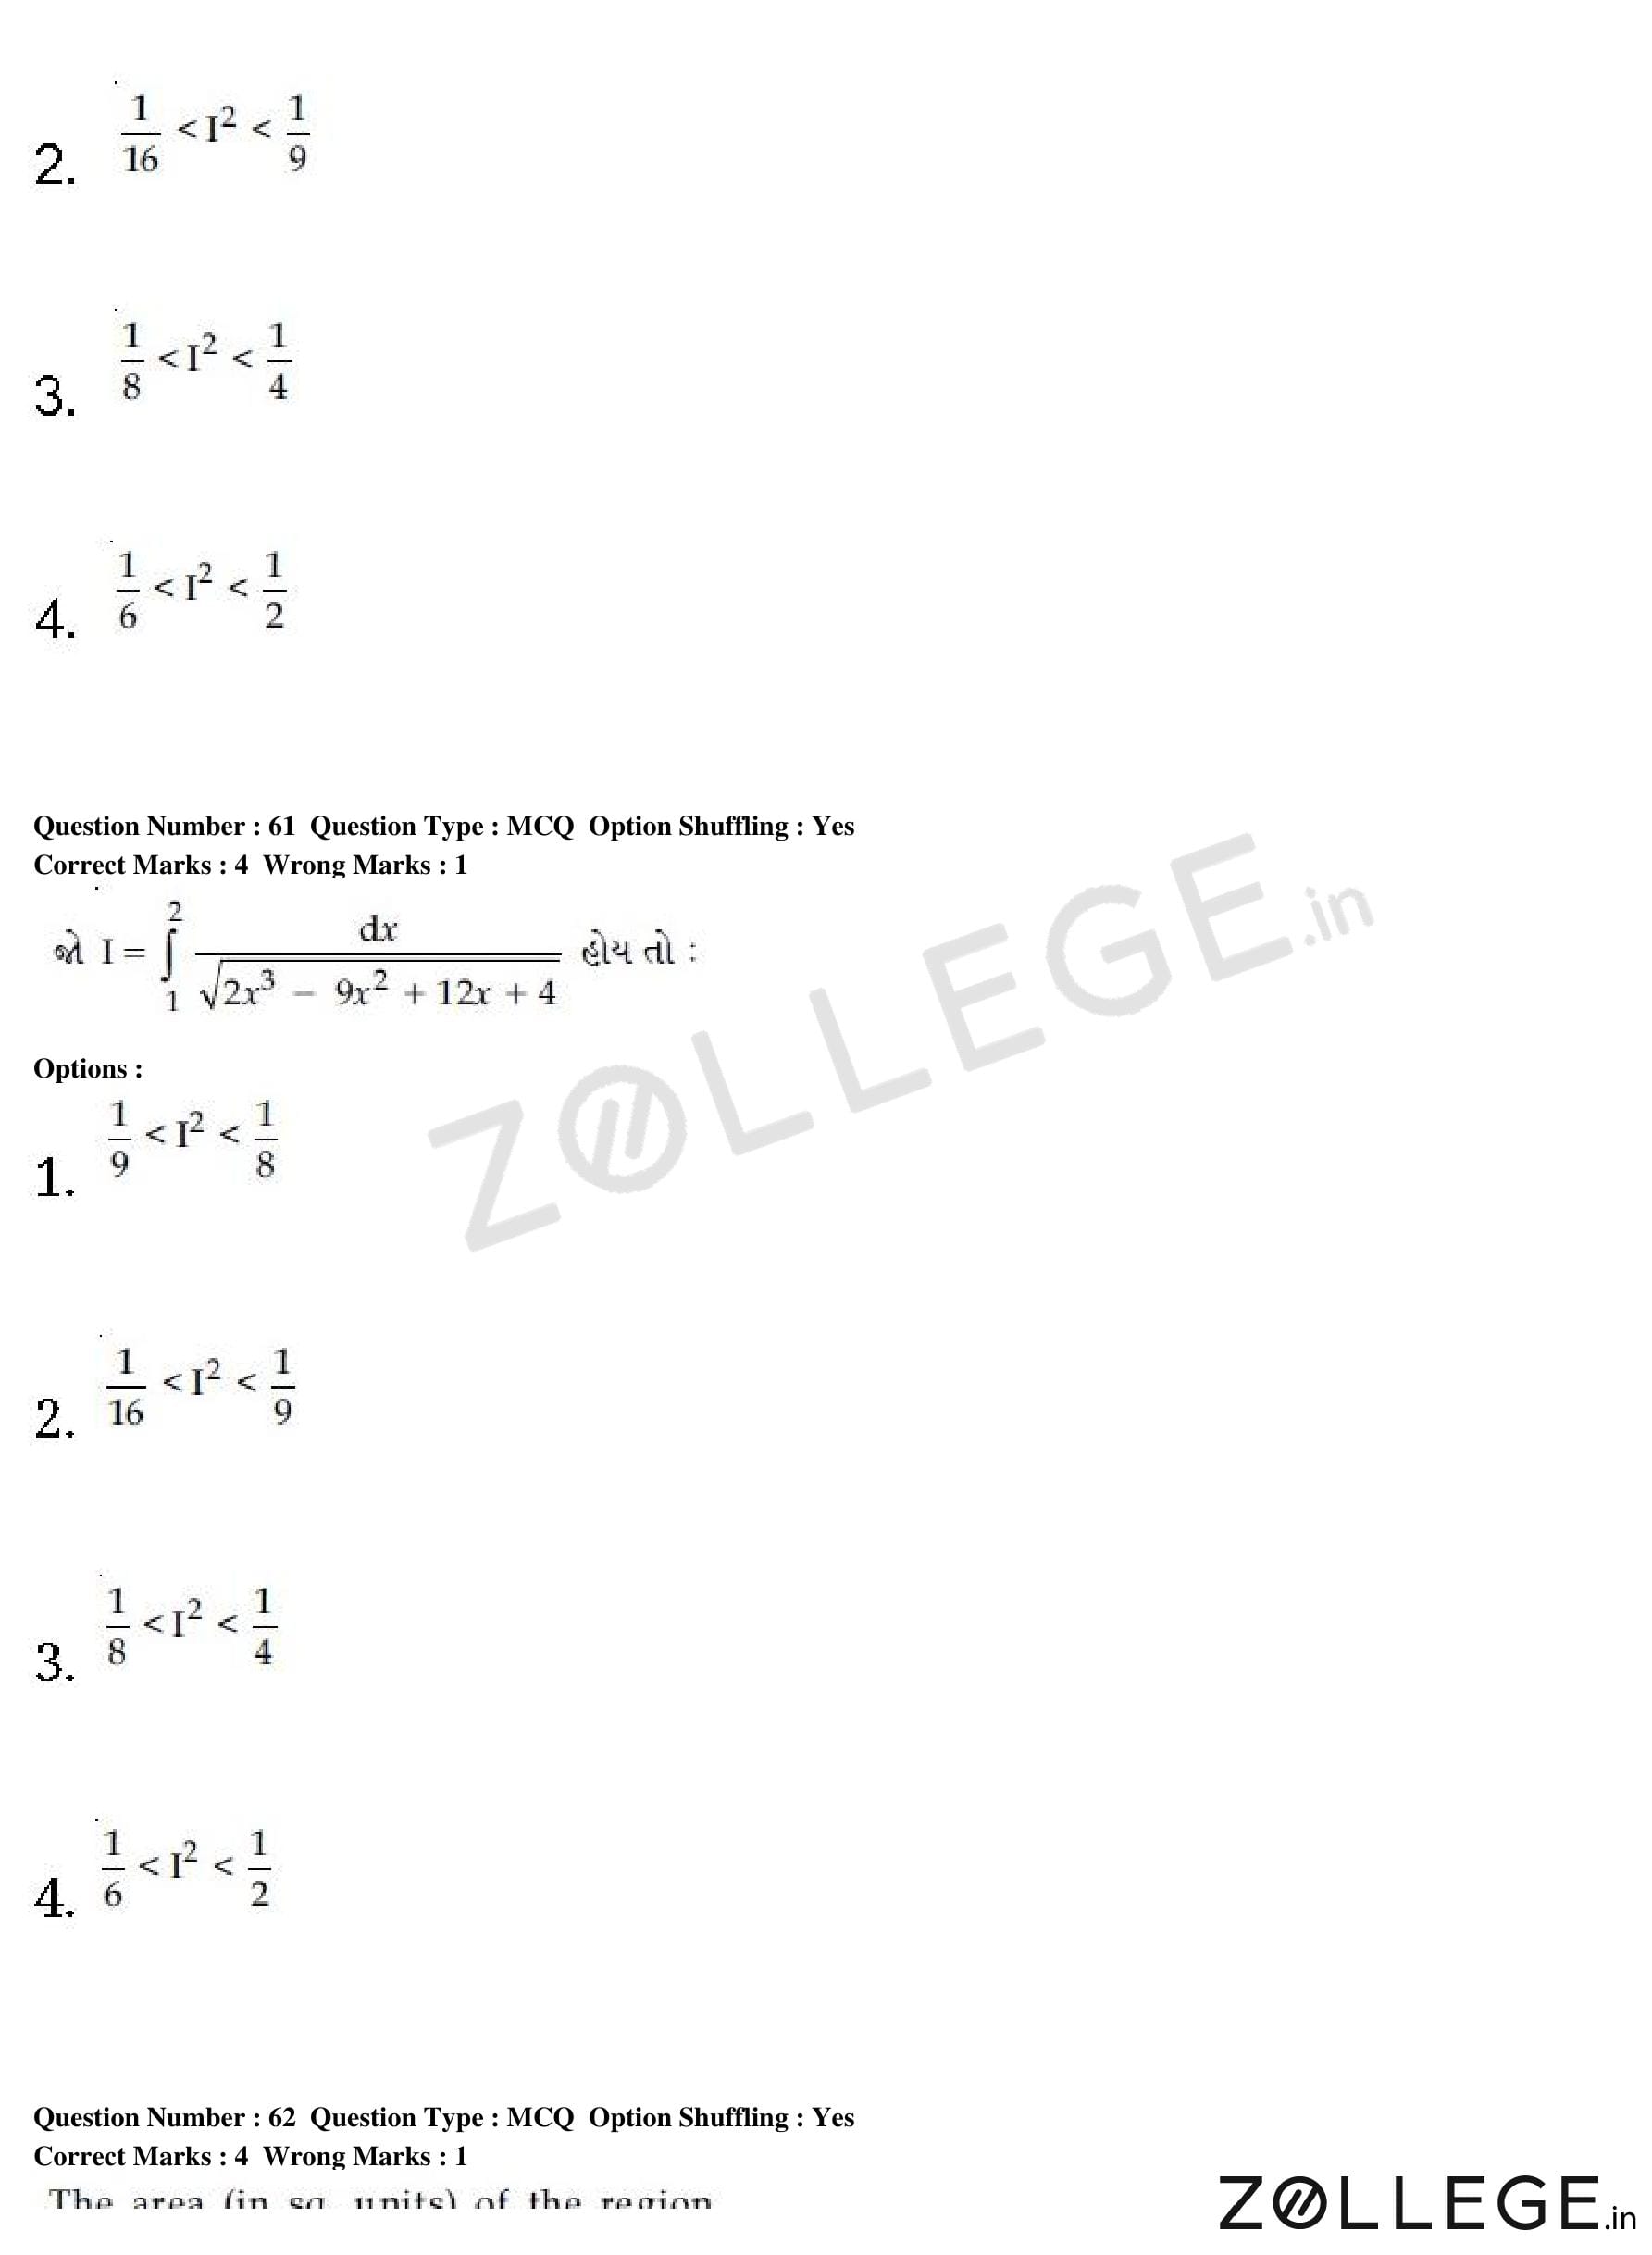
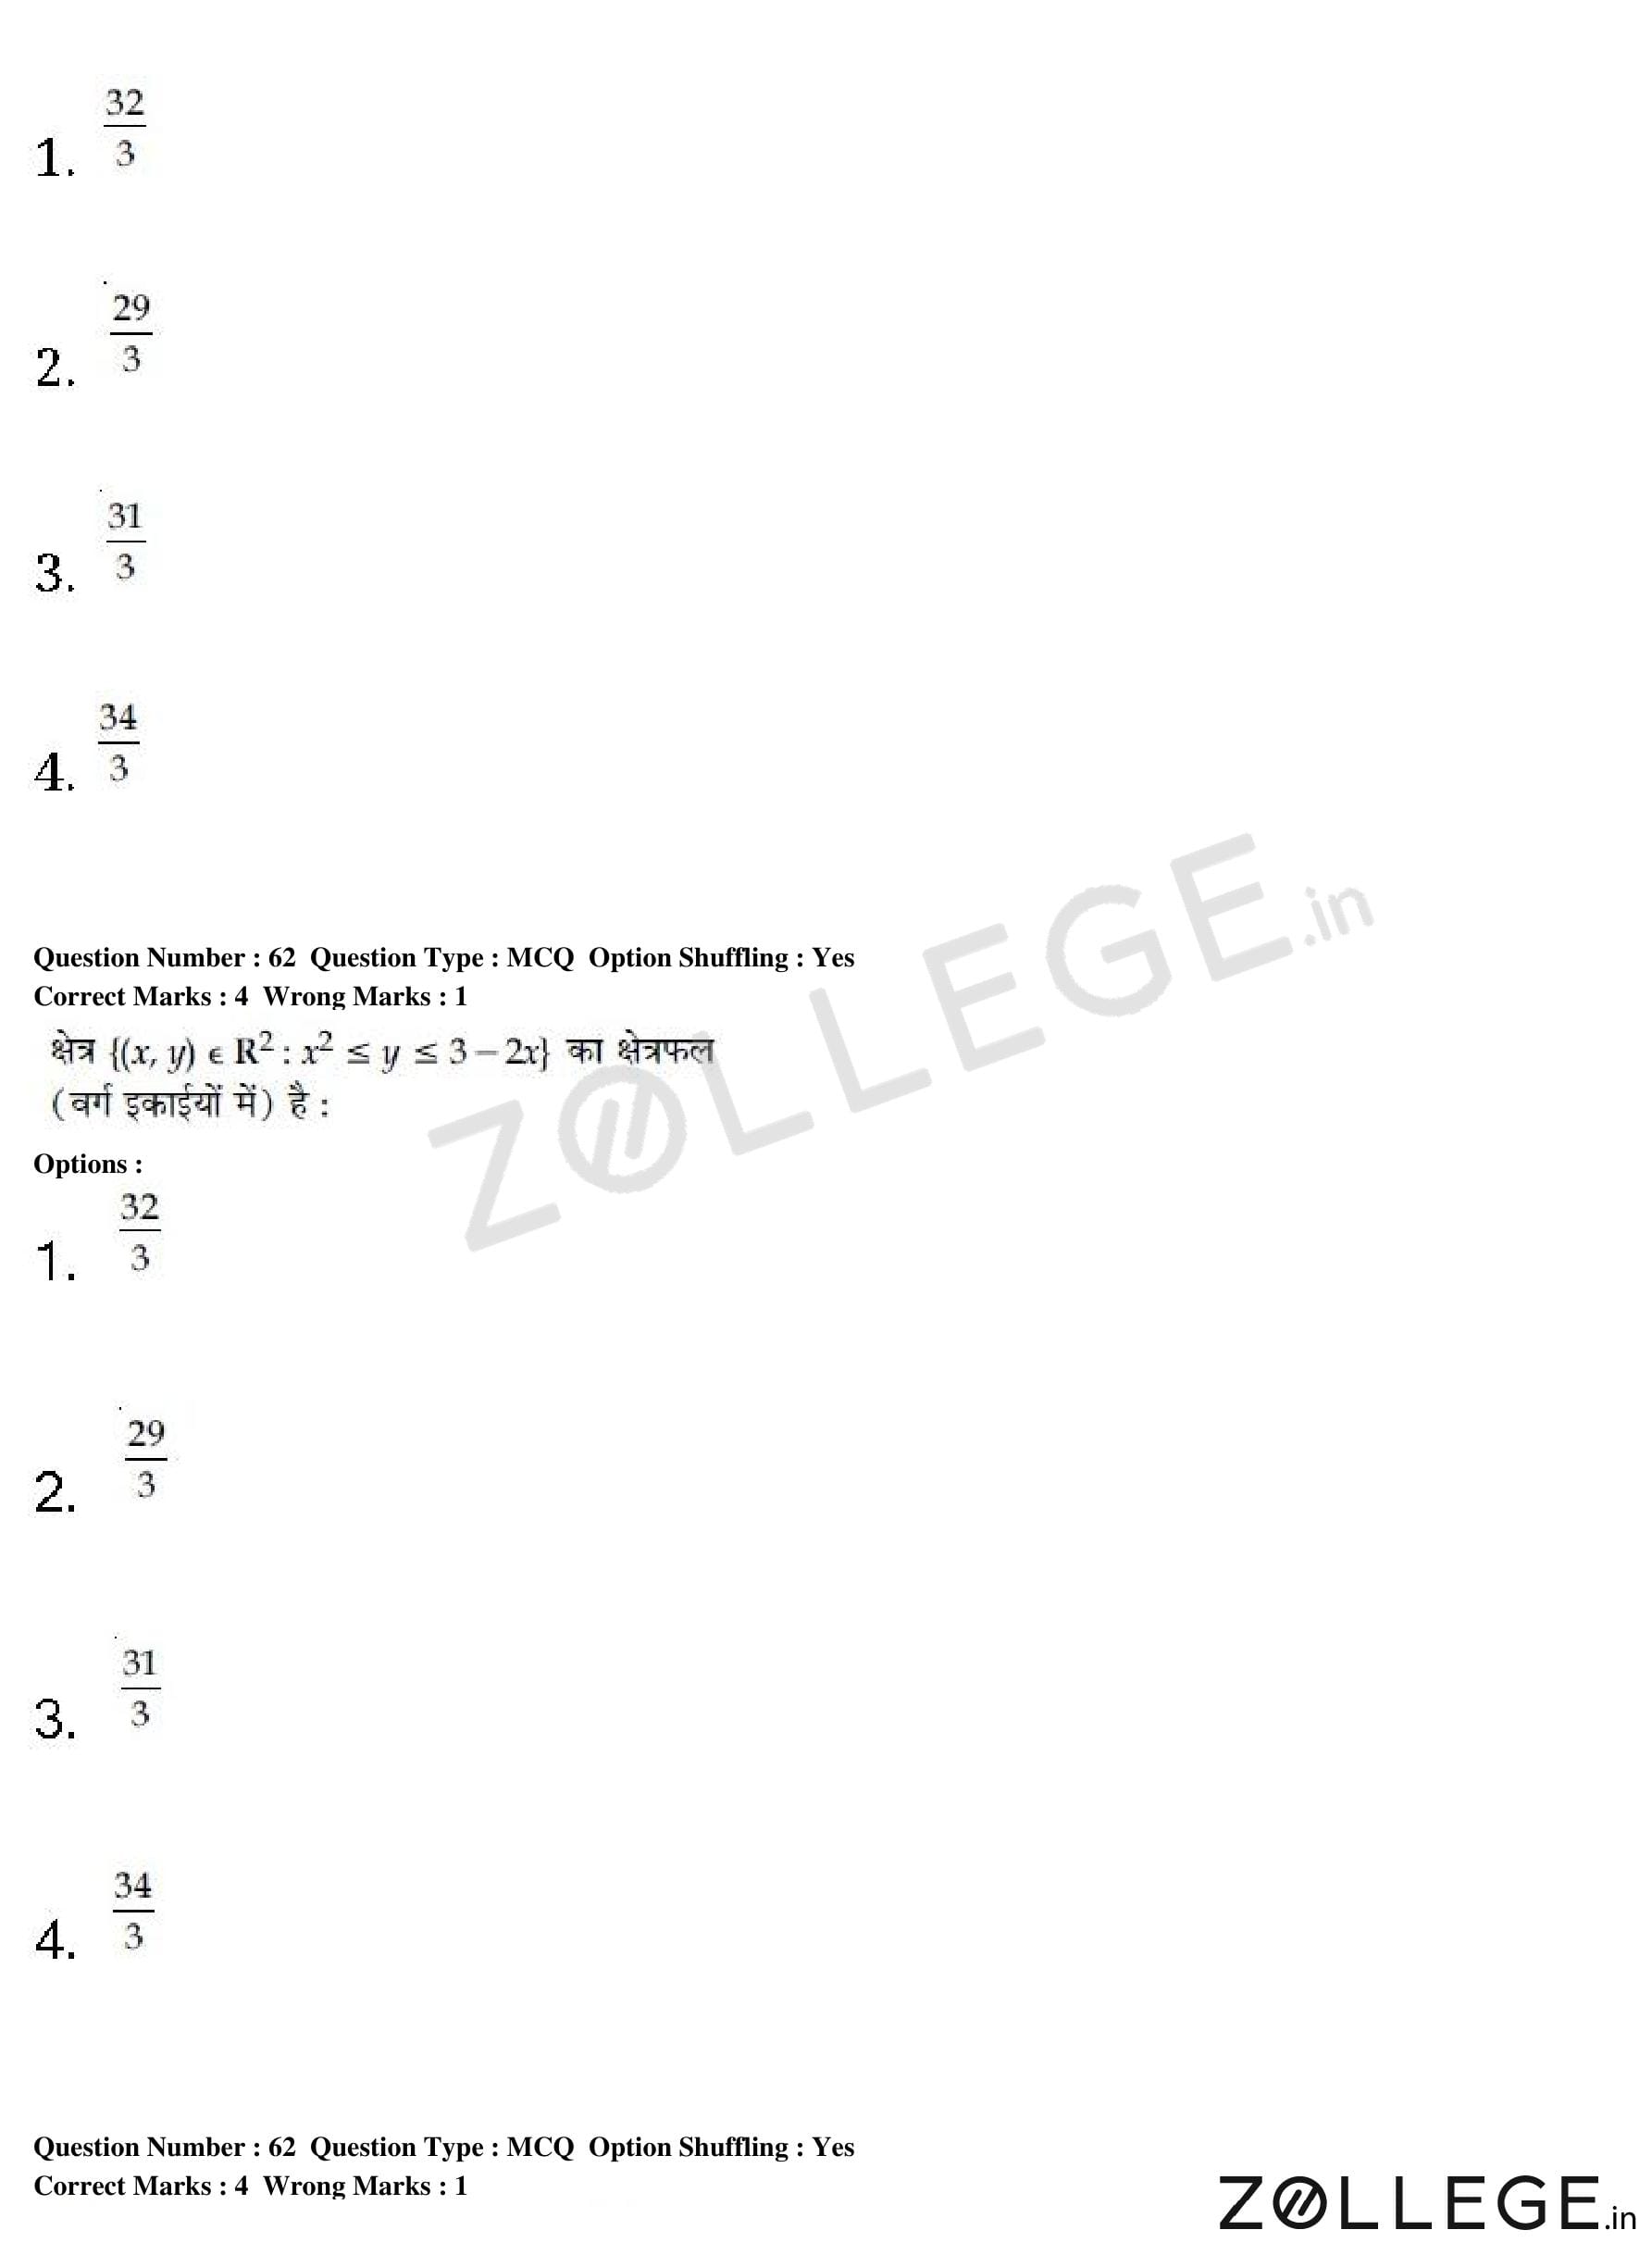
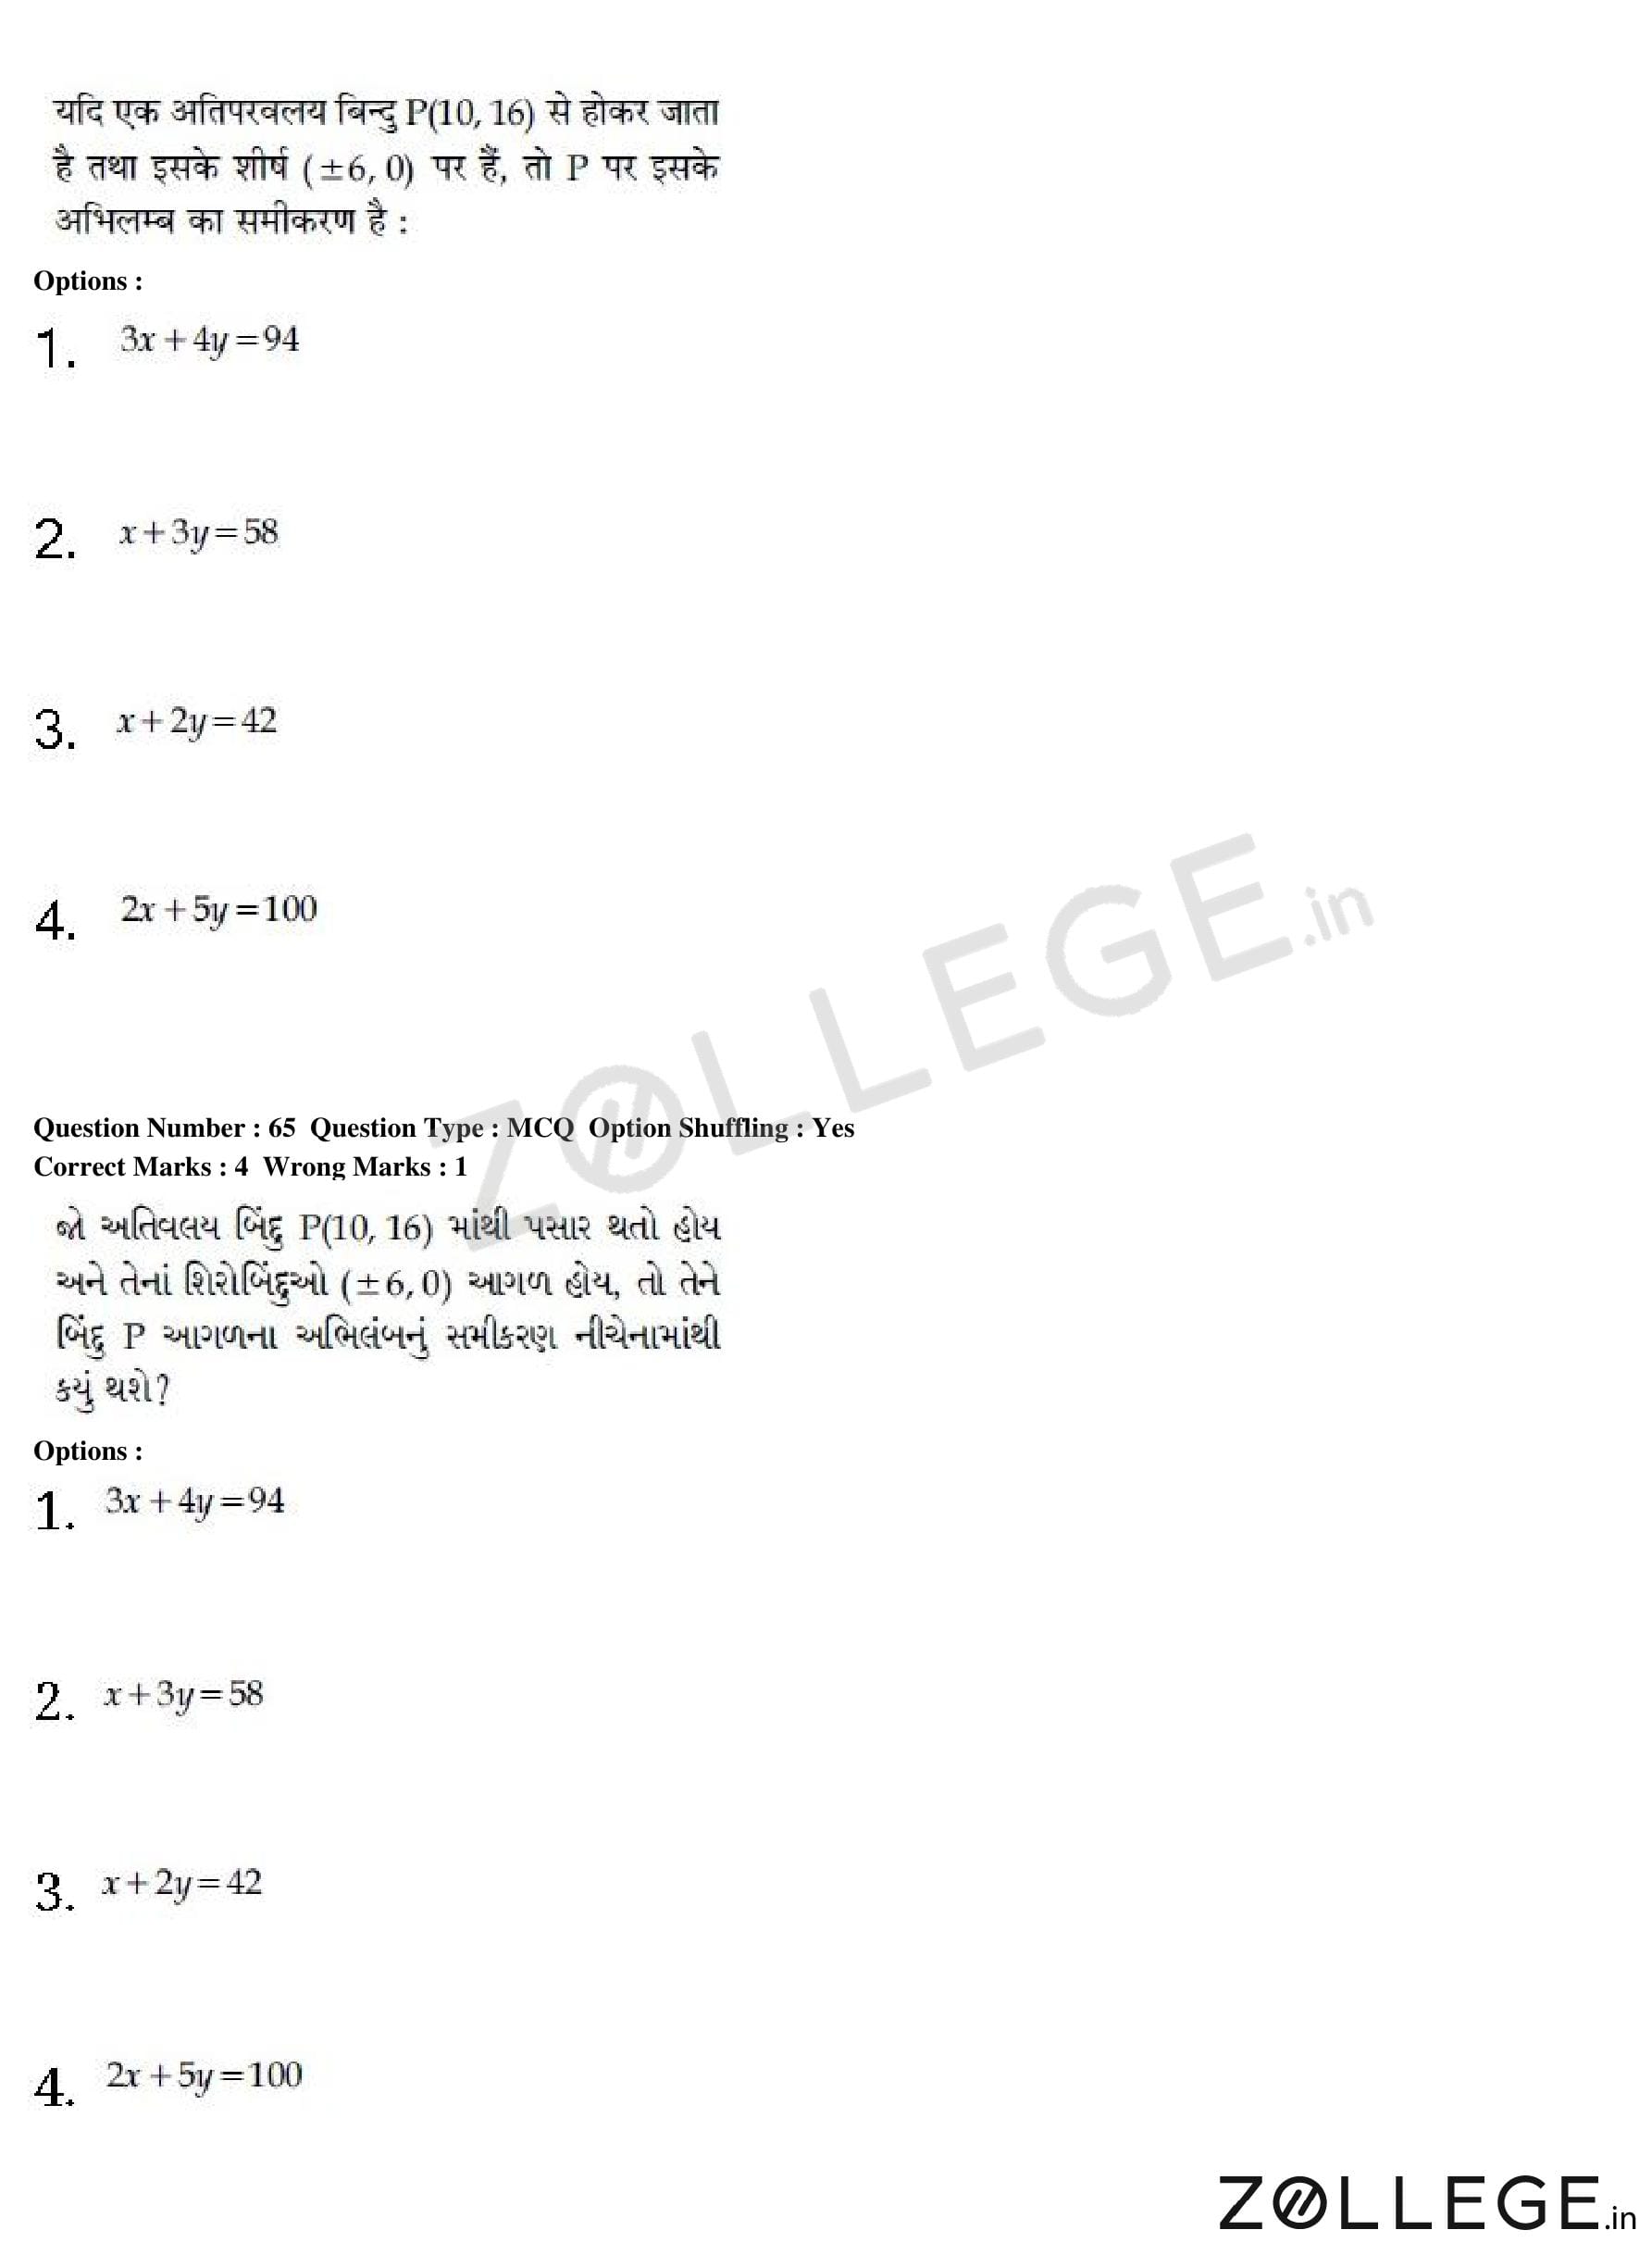
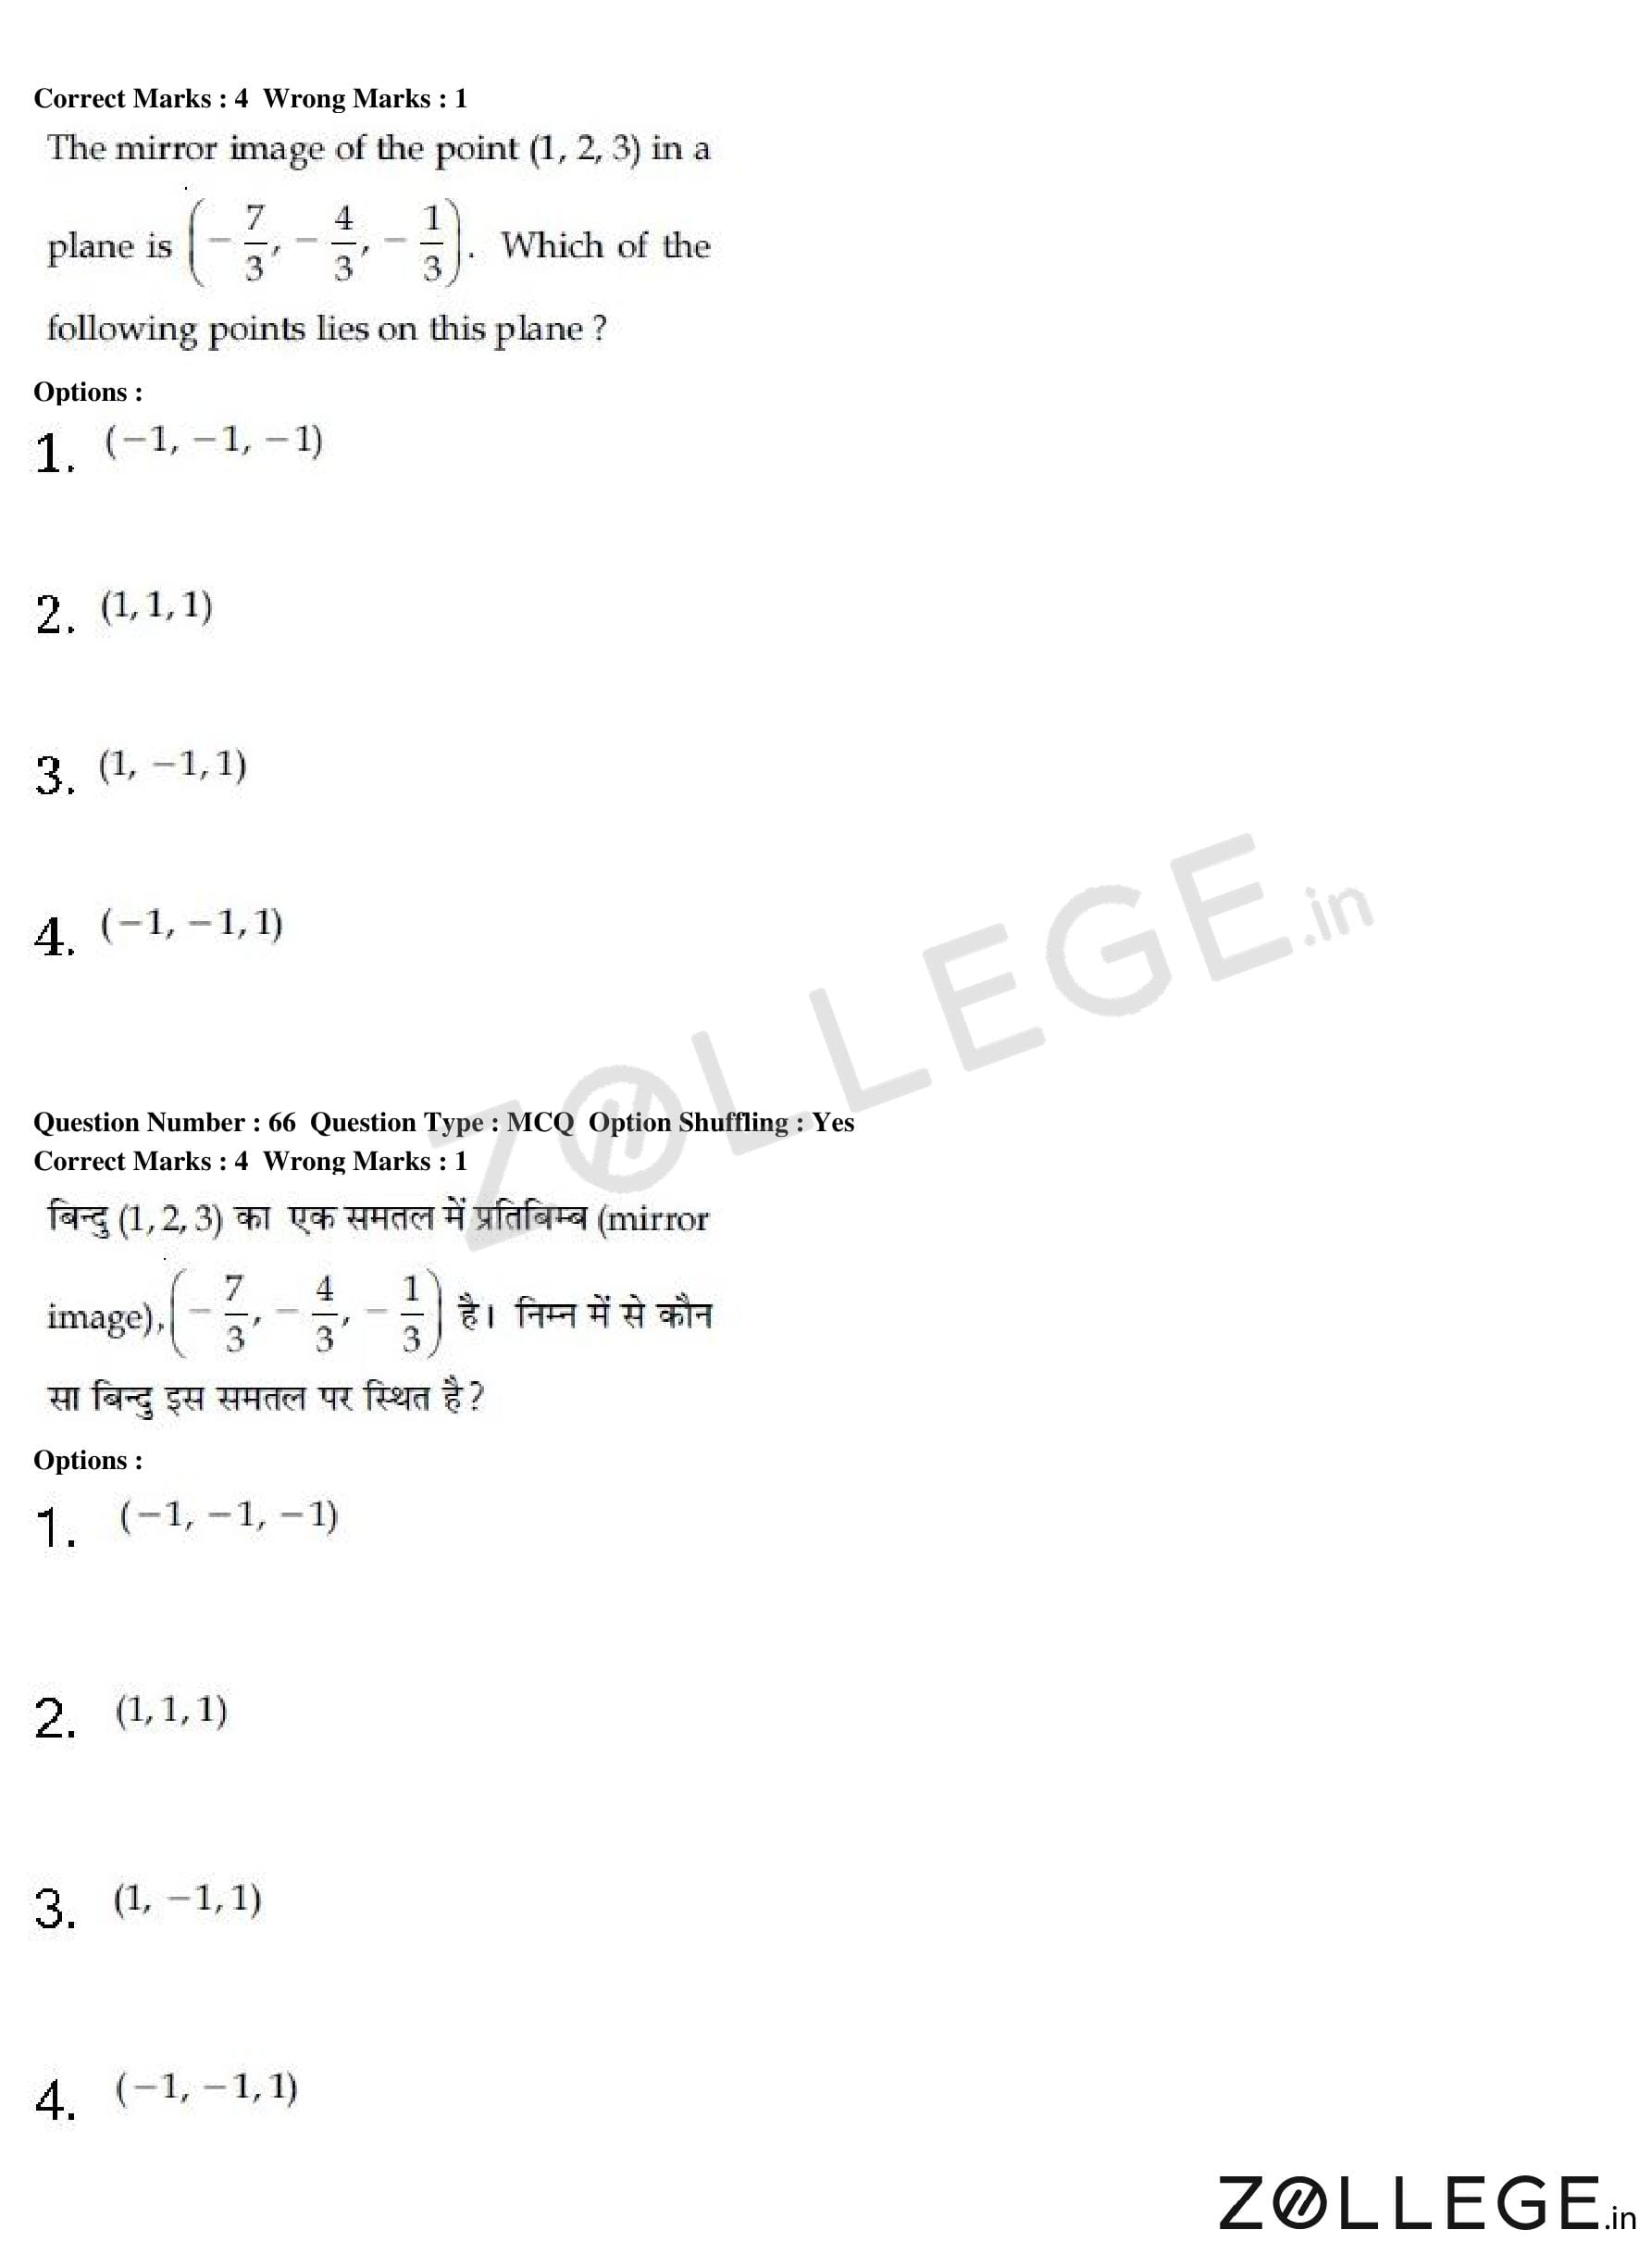
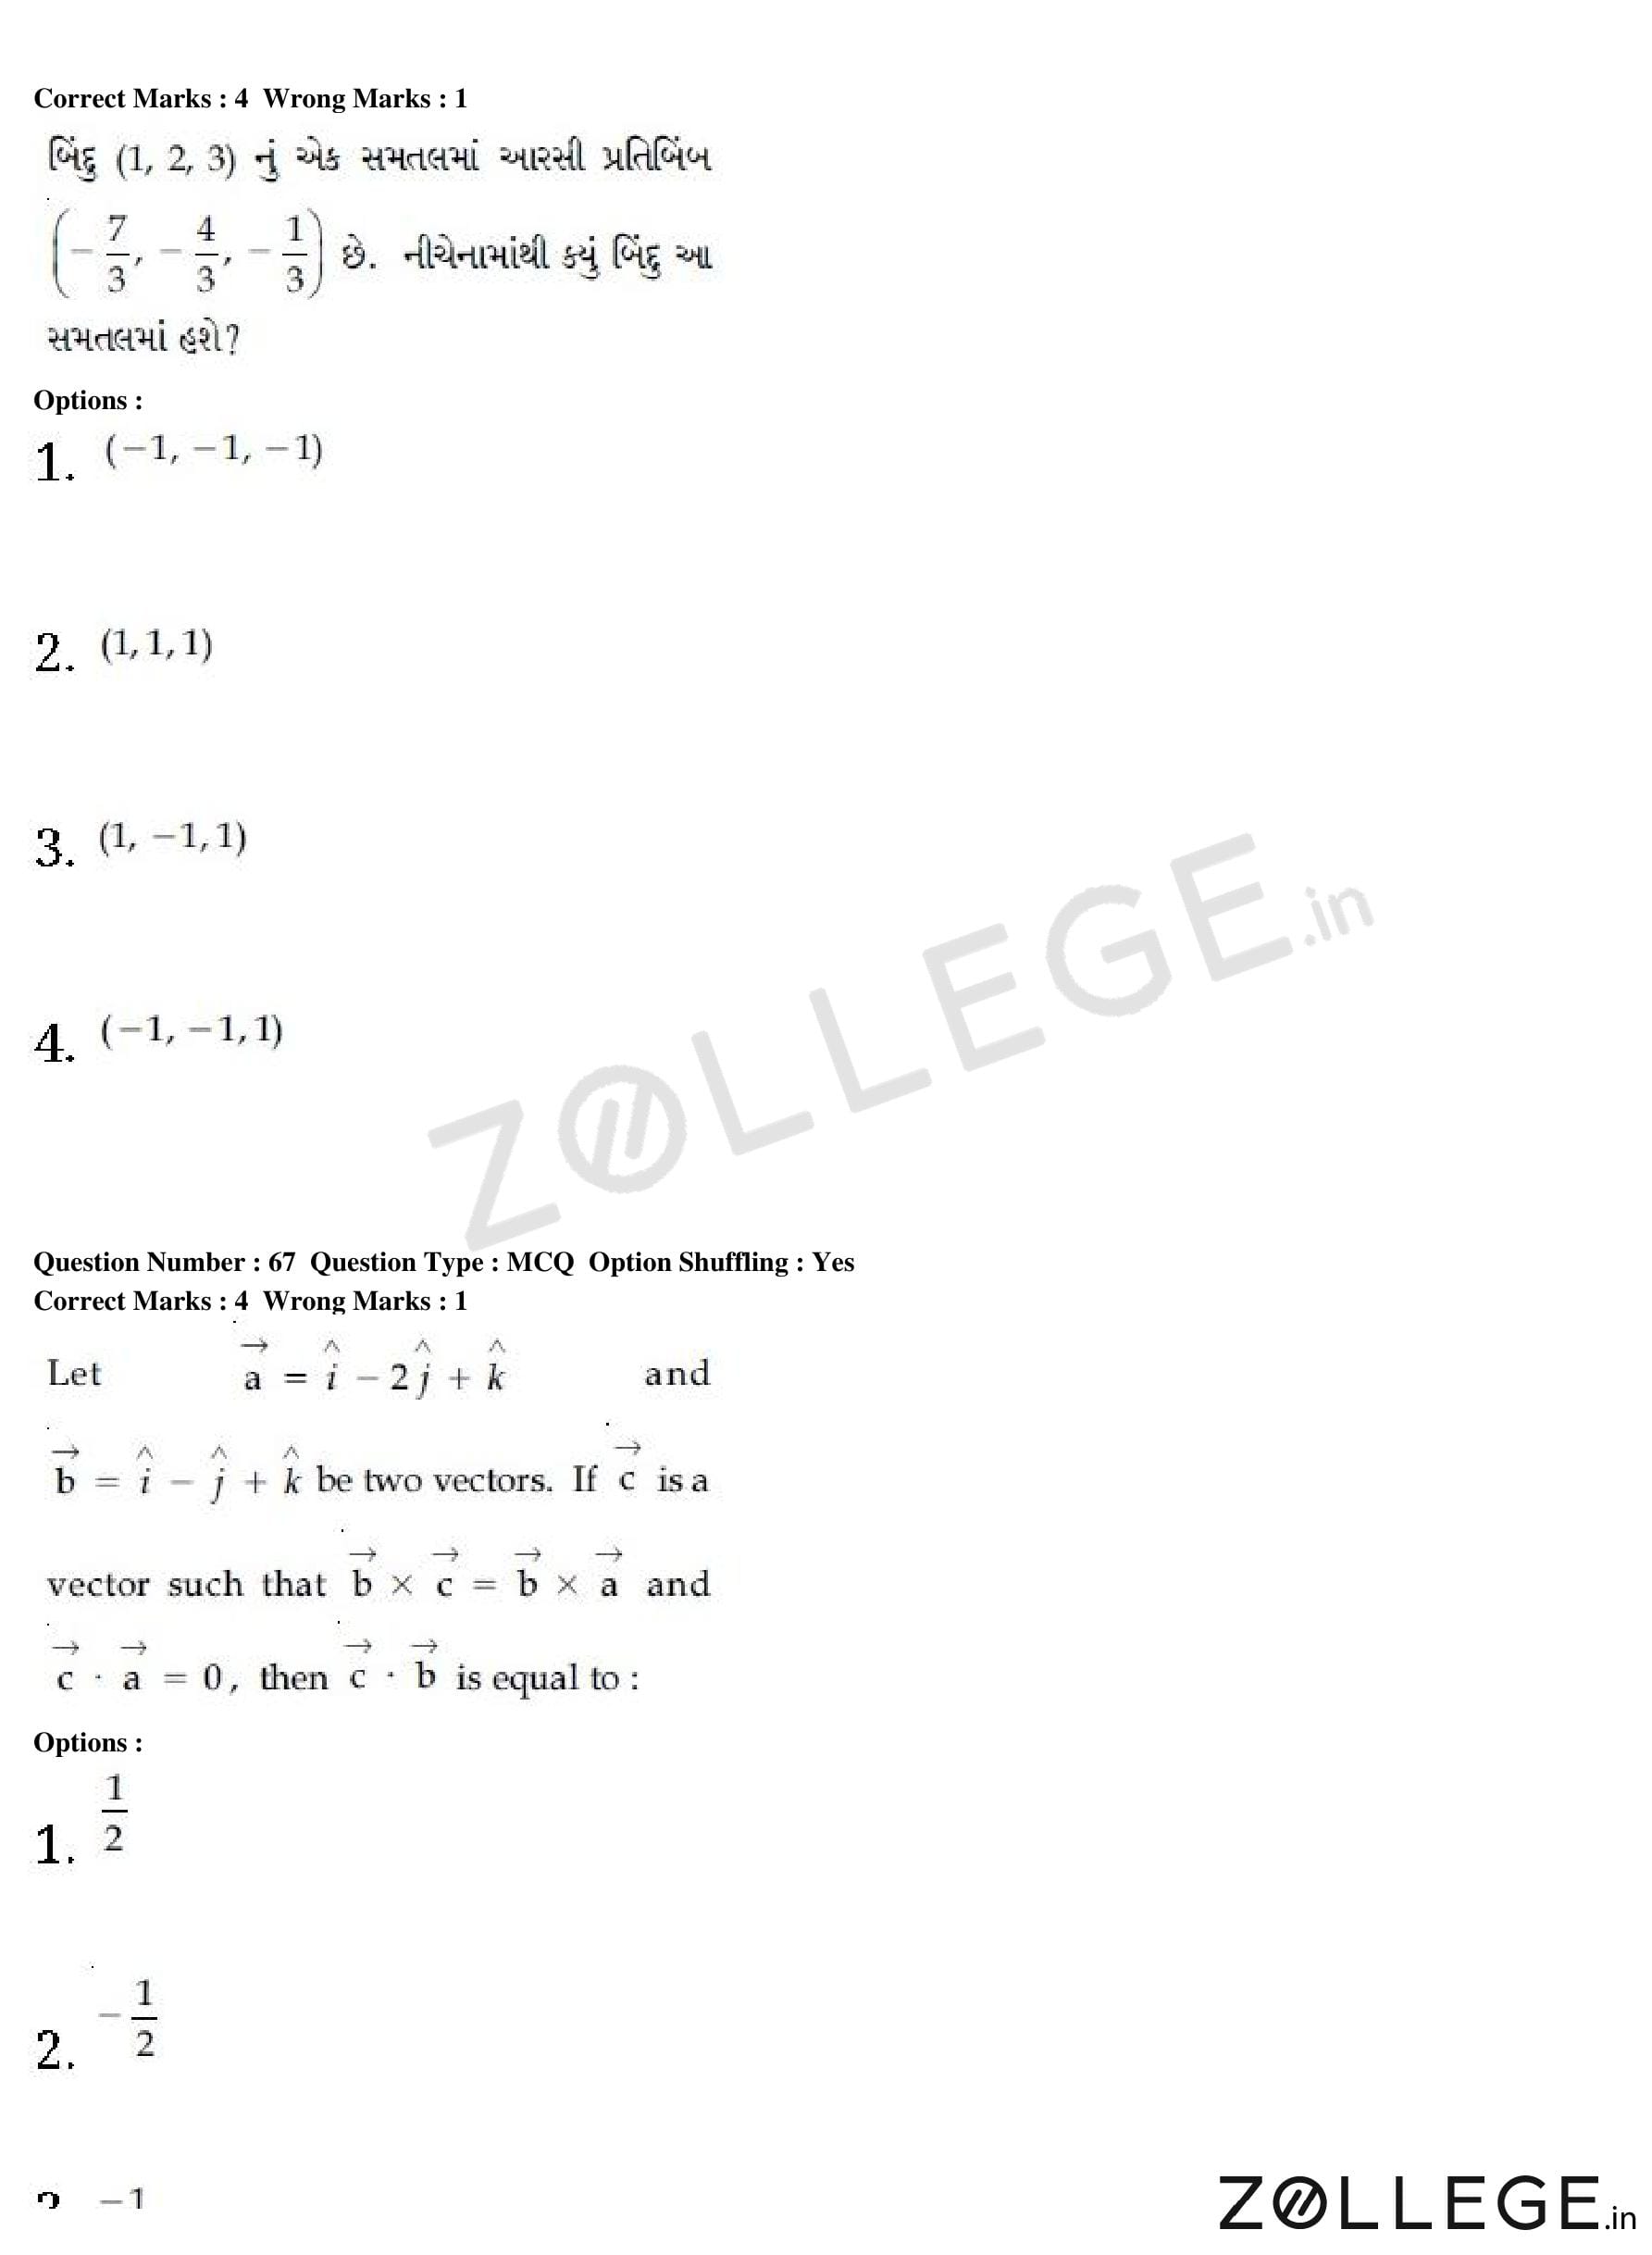
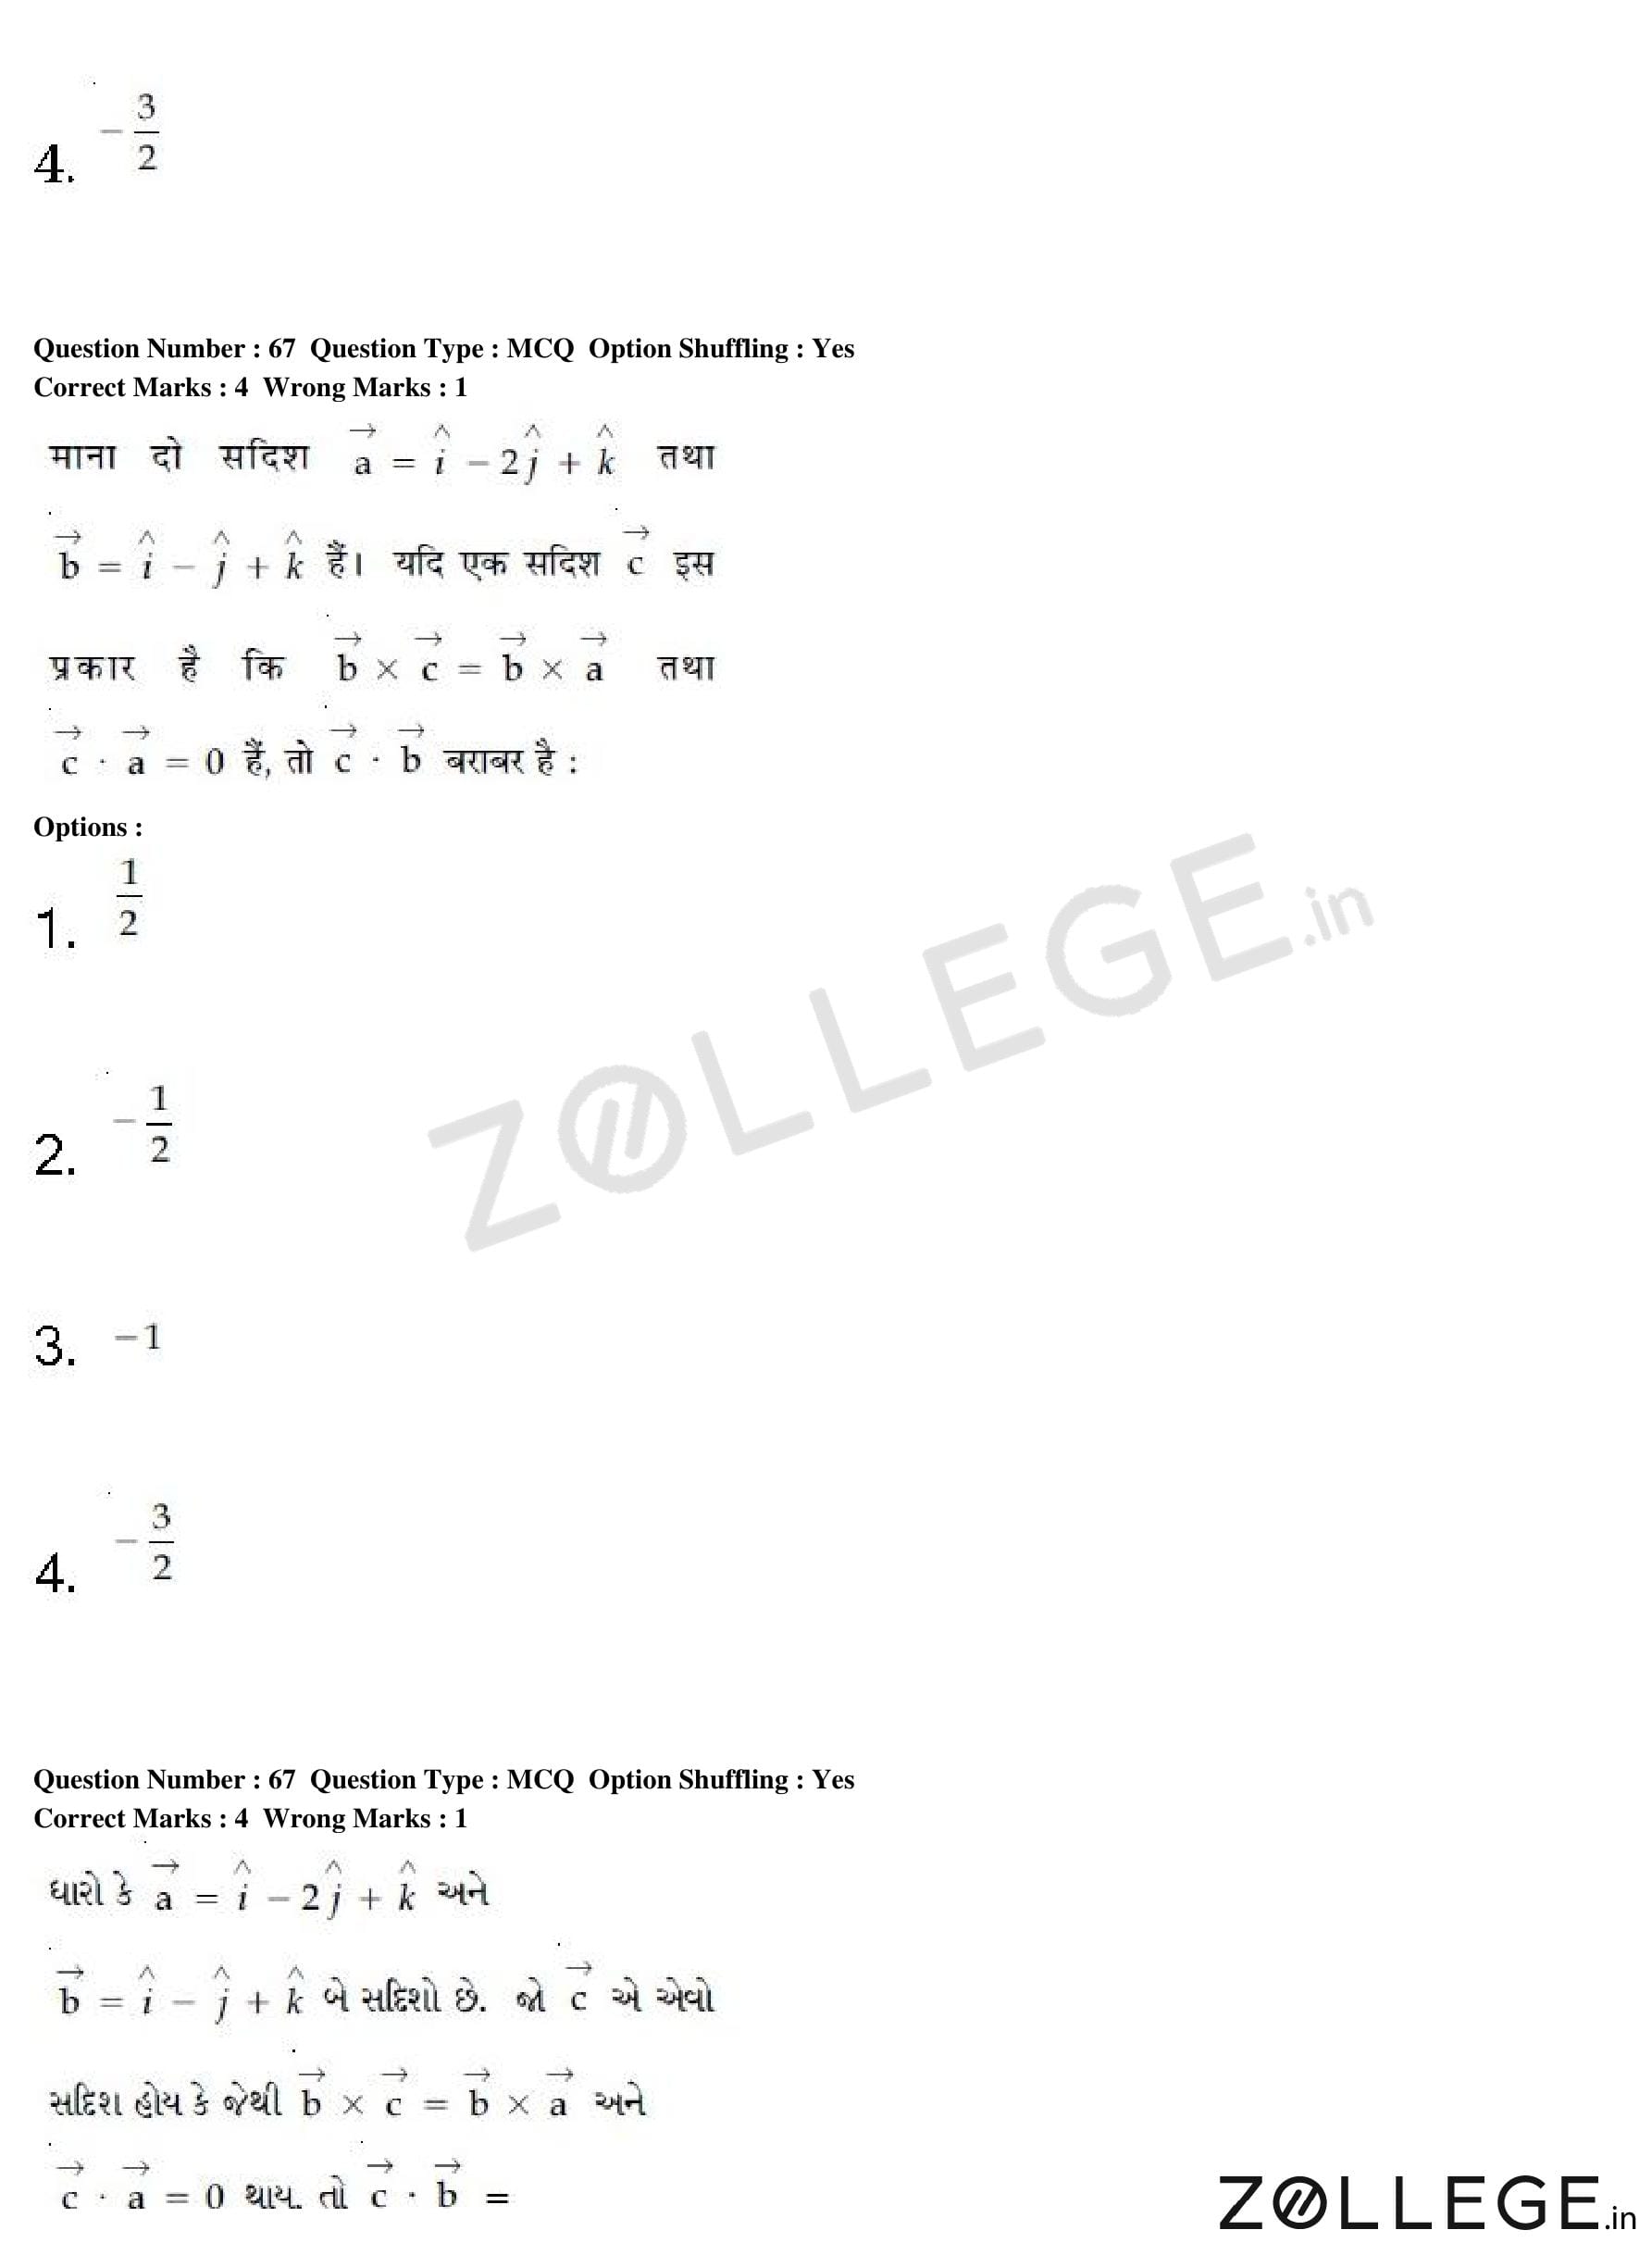
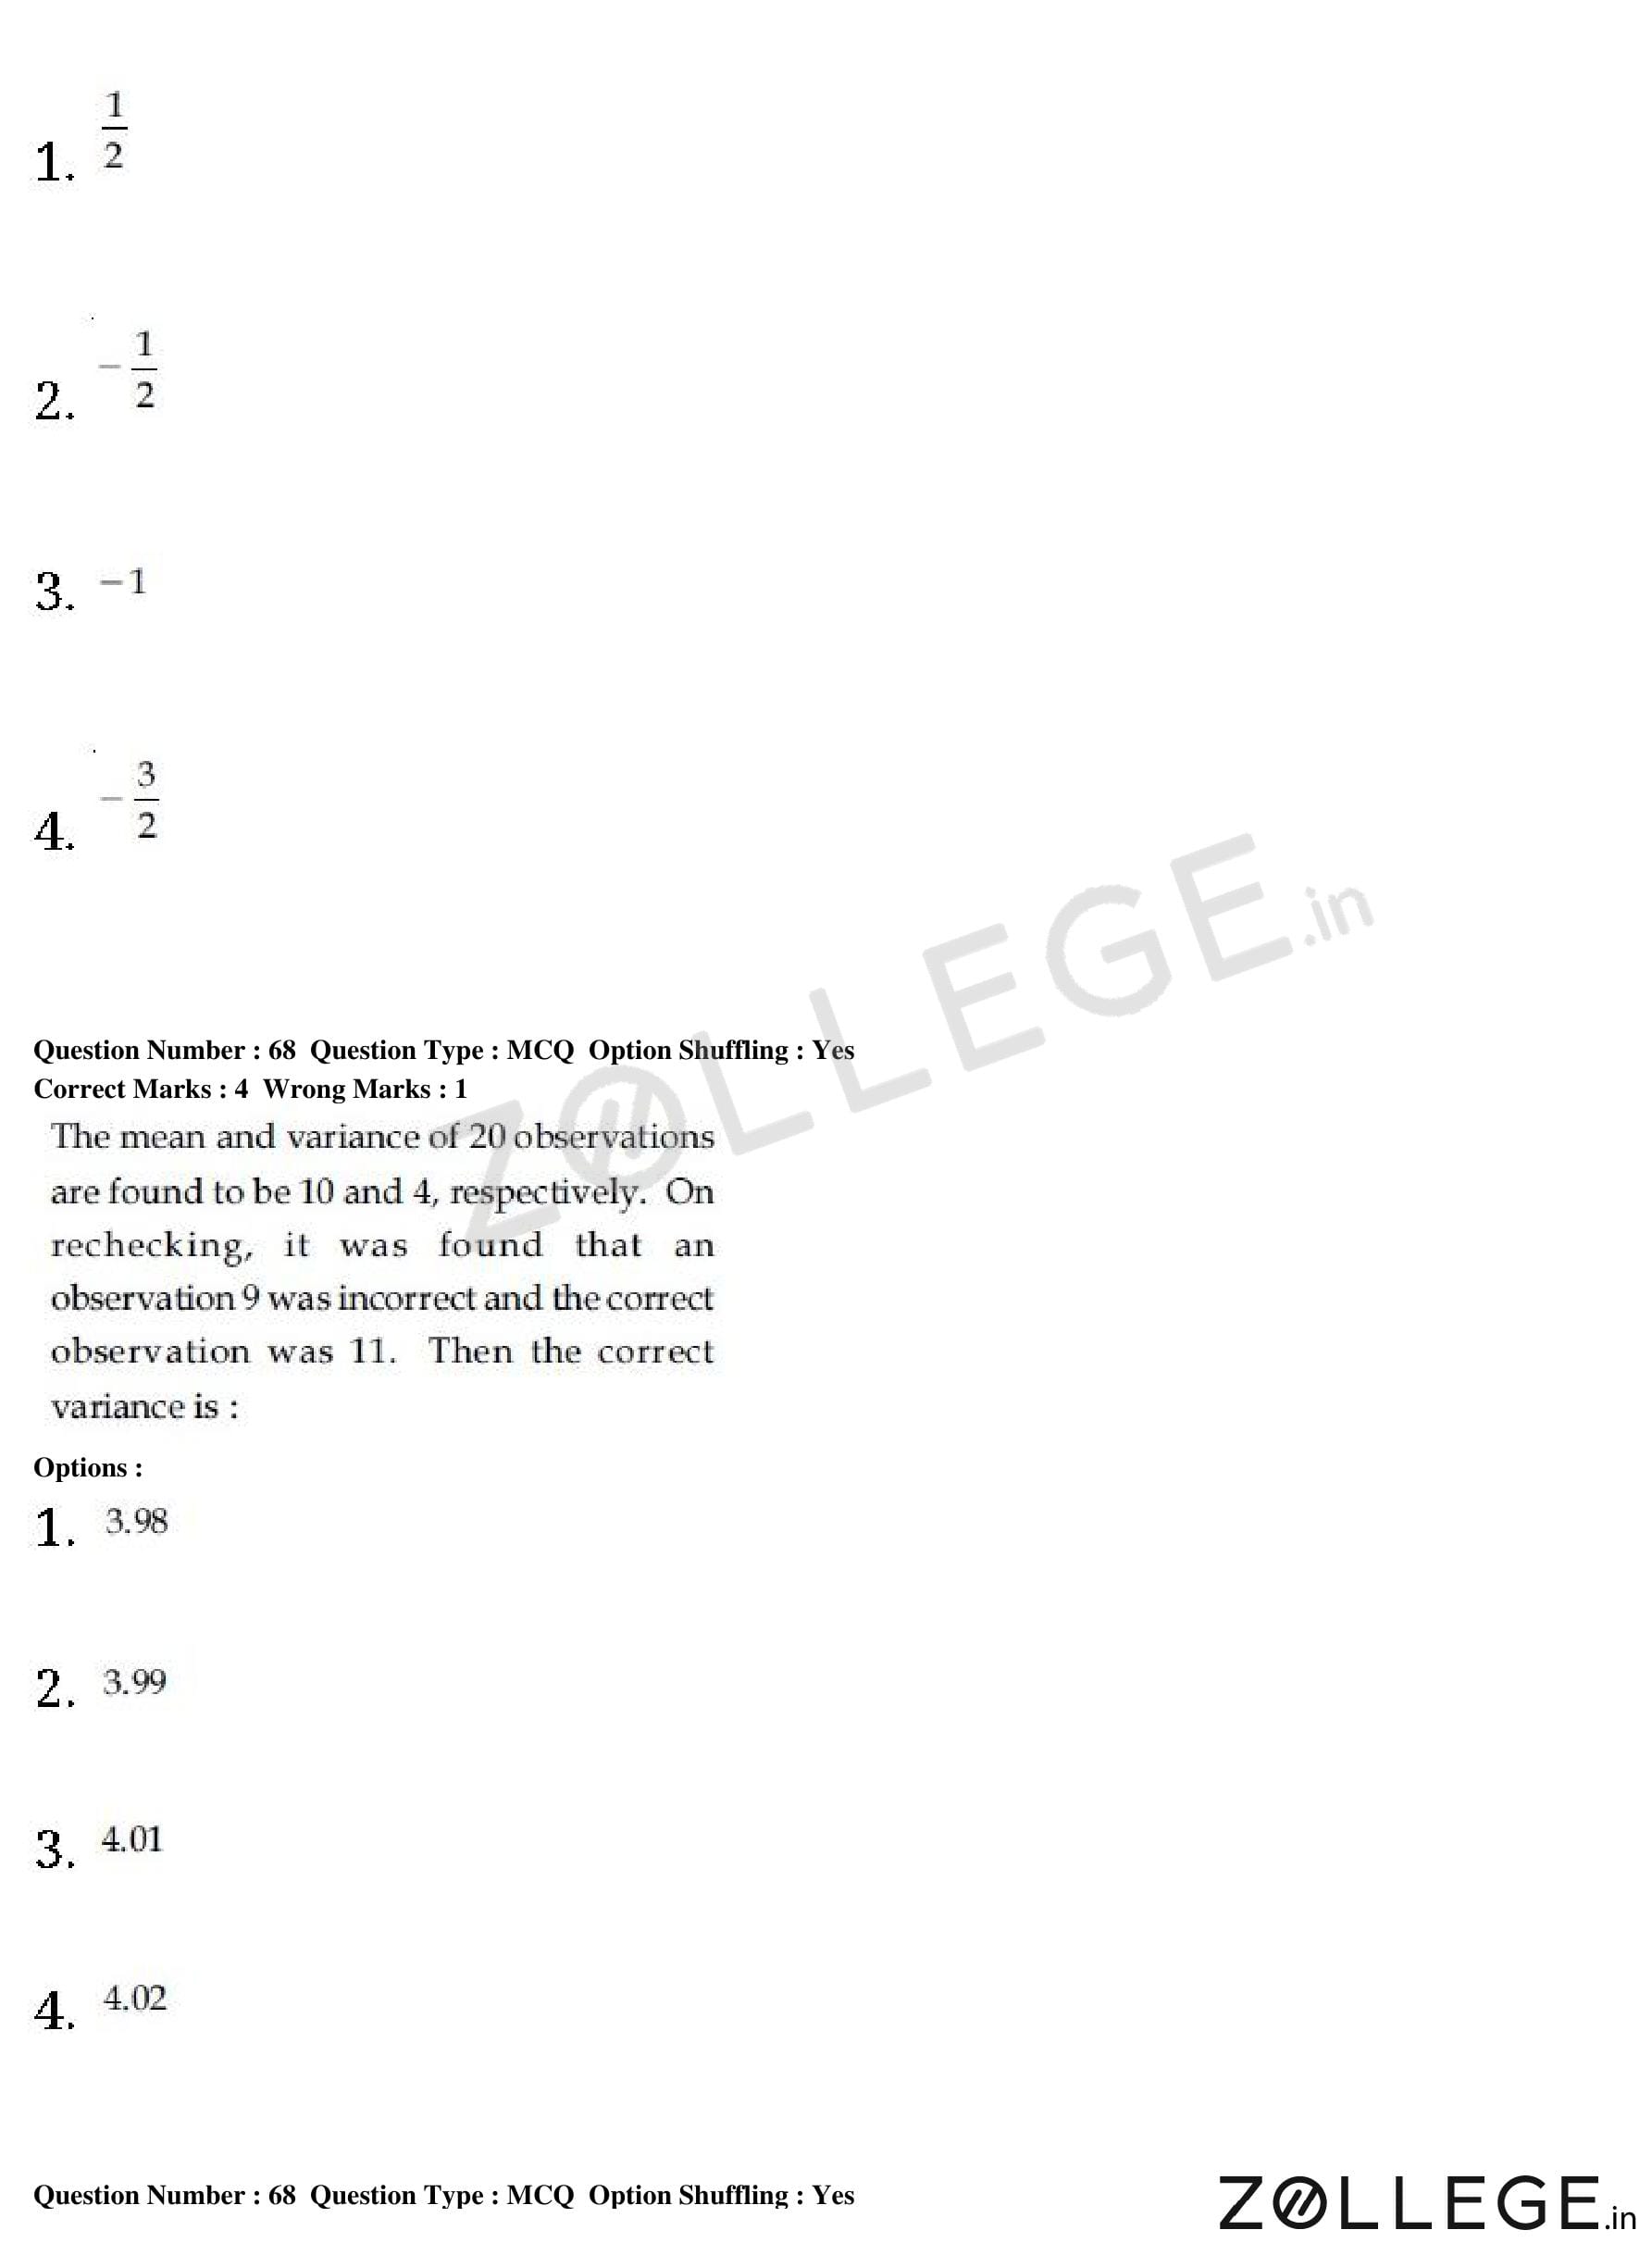
Previous Year JEE Main Question Papers
*The article might have information for the previous academic years, please refer the official website of the exam.