
JEE Main 2021 Question Paper with Answer Key PDF for B.Arch(February 23, 2021 - Shift 2)


Content Writer | Updated On - Jan 3, 2026
JEE Main Question Papers are the most important study material for effective exam preparation. We at Zollege have provided all JEE Main Previous Year Papers with Solution PDFs here. JEE Main 2021 B. Arch exam was conducted successfully on February 23, 2021. NTA conducted the exam in the Shift 2. According to student reactions and expert reviews, the paper was reported to be easy to moderate.
Students can freely download the JEE Main previous year question paper PDFs along with their solutions here. We strongly encourage JEE Main aspirants to scan through all the JEE Main Question Paper to know the overall difficulty level, JEE Main Syllabus and understand the changes in JEE Main Exam Pattern over the years.
JEE Main 2021 B.Arch Question Paper with Answer Key PDF (Shift 2)
| JEE Main 2021 B.Arch Question Paper PDF | JEE Main 2021 B.Arch Solutions PDF |
|---|---|
| Download PDF | Check Solutions |

The value of the integral \(\int_{-4}^{4} |9 - x^2| dx\) is :
View Solution
Step 1: Understanding the Question:
The objective is to evaluate the definite integral of an absolute value function over a symmetric interval \([-4, 4]\).
The function \(f(x) = |9 - x^2|\) is an even function, which means it is symmetric about the y-axis.
Step 2: Key Formula or Approach:
Since \(|9 - x^2|\) is an even function, we use the property:
\[ I = \int_{-4}^{4} |9 - x^2| dx = 2 \int_{0}^{4} |9 - x^2| dx \]
The expression inside the absolute value changes sign at \(x = 3\).
For \(0 \leq x < 3\), \(|9 - x^2| = 9 - x^2\).
For \(3 < x \leq 4\), \(|9 - x^2| = x^2 - 9\).
Step 3: Detailed Explanation:
Evaluating the integral in parts:
\[ I = 2 \left( \int_{0}^{3} (9 - x^2) dx + \int_{3}^{4} (x^2 - 9) dx \right) \]
\[ I = 2 \left( \left[ 9x - \frac{x^3}{3} \right]_0^3 + \left[ \frac{x^3}{3} - 9x \right]_3^4 \right) \]
\[ I = 2 \left( \left( 27 - 9 \right) + \left( \left( \frac{64}{3} - 36 \right) - \left( 9 - 27 \right) \right) \right) \]
\[ I = 2 \left( 18 + \left( \frac{64 - 108}{3} + 18 \right) \right) \]
\[ I = 2 \left( 36 - \frac{44}{3} \right) = 2 \left( \frac{108 - 44}{3} \right) = \frac{128}{3} \]
Step 4: Final Answer:
The value of the integral is \(\frac{128}{3}\).
Quick Tip: For even functions \(f(x) = f(-x)\), use \(\int_{-a}^{a} f(x) dx = 2 \int_{0}^{a} f(x) dx\) to halve the integration effort and reduce calculation errors.
The sum of infinite number of terms of a Geometric Progression is 3 and the sum of the squares of its terms is \(\frac{9}{2}\). The sum of the cubes of its terms is :
View Solution
Step 1: Understanding the Question:
We are given an infinite GP with first term \(a\) and common ratio \(r\). We need to find \(a\) and \(r\) to calculate the sum of the cubes.
Step 2: Key Formula or Approach:
Sum of infinite GP: \(S = \frac{a}{1-r}\).
Sum of squares: \(S_2 = \frac{a^2}{1-r^2}\).
Sum of cubes: \(S_3 = \frac{a^3}{1-r^3}\).
Step 3: Detailed Explanation:
Given:
1) \(\frac{a}{1-r} = 3 \Rightarrow a = 3(1-r)\).
2) \(\frac{a^2}{1-r^2} = \frac{9}{2}\).
Substitute (1) into (2):
\[ \frac{9(1-r)^2}{(1-r)(1+r)} = \frac{9}{2} \Rightarrow \frac{1-r}{1+r} = \frac{1}{2} \]
\[ 2 - 2r = 1 + r \Rightarrow 3r = 1 \Rightarrow r = \frac{1}{3} \].
Then \(a = 3(1 - 1/3) = 2\).
Sum of cubes:
\[ S_3 = \frac{2^3}{1 - (1/3)^3} = \frac{8}{1 - 1/27} = \frac{8 \times 27}{26} = \frac{108}{13} \]
Step 4: Final Answer:
The sum of the cubes is \(\frac{108}{13}\).
Quick Tip: If the original GP has terms \(a, ar, ar^2, \dots\), the GP formed by the \(k\)-th powers of these terms has first term \(a^k\) and common ratio \(r^k\).
Which of the following Boolean expression is a tautology ?
View Solution
Step 1: Understanding the Question:
A tautology is a statement that is true for all possible truth values of its variables.
Step 2: Key Formula or Approach:
Use Boolean laws: \(p \lor \sim p \equiv T\) (True) and \(T \land T \equiv T\).
Step 3: Detailed Explanation:
Check the options:
(A) If \(p = F, q = T\), then \(F \iff T\) is False.
(B) If \(p = T, q = F\), then \(F \iff T\) is False.
(C) \((p \land (\sim p \lor q)) \lor \sim q \equiv ((p \land \sim p) \lor (p \land q)) \lor \sim q \equiv (F \lor (p \land q)) \lor \sim q \equiv (p \land q) \lor \sim q \equiv p \lor \sim q\). This is not always true.
(D) \((p \lor \sim p) \land (q \lor \sim q) \equiv T \land T \equiv T\).
Step 4: Final Answer:
Expression (D) is always true, hence it is a tautology.
Quick Tip: Recognizing the Law of Excluded Middle (\(p \lor \sim p \equiv T\)) allows you to identify simple tautologies without building full truth tables.
Let \(|a| < 1, |b| < 1, |c| < 1\) and \(x = \sum_{n=0}^{\infty} a^n, y = \sum_{n=0}^{\infty} b^n, z = \sum_{n=0}^{\infty} c^n\). If \(\frac{1}{x}, \frac{1}{y}, \frac{1}{z}\) are in Arithmetic Progression, then :
View Solution
Step 1: Understanding the Question:
We are given sums of infinite geometric series and a condition about their reciprocals being in AP.
Step 2: Key Formula or Approach:
Infinite sum: \(S = \frac{1}{1-r}\).
AP condition: \(2q = p + r\).
Step 3: Detailed Explanation:
The sums are:
\(x = \frac{1}{1-a}\), \(y = \frac{1}{1-b}\), \(z = \frac{1}{1-c}\).
The reciprocals are:
\(\frac{1}{x} = 1-a\), \(\frac{1}{y} = 1-b\), \(\frac{1}{z} = 1-c\).
Since these are in AP:
\[ 2(1-b) = (1-a) + (1-c) \]
\[ 2 - 2b = 2 - a - c \]
\[ 2b = a + c \].
This is the condition for \(a, b, c\) to be in AP.
Step 4: Final Answer:
\(a, b, c\) are in Arithmetic Progression.
Quick Tip: If the terms \(k-a, k-b, k-c\) are in AP, then \(a, b, c\) are also in AP regardless of the constant \(k\).
\(\sum_{n=1}^{\infty} \frac{2n^2 + 7n + 5}{n!}\) is equal to :
View Solution
Step 1: Understanding the Question:
The task is to evaluate an infinite series involving factorials, which relates to the expansion of \(e\).
Step 2: Key Formula or Approach:
Expansion: \(e = \sum_{n=0}^{\infty} \frac{1}{n!}\).
Decomposition of numerator: \(2n^2 + 7n + 5 = 2n(n-1) + 9n + 5\).
Step 3: Detailed Explanation:
The general term is \(T_n = \frac{2n(n-1) + 9n + 5}{n!}\).
Sum \(= \sum_{n=1}^{\infty} \frac{2n(n-1)}{n!} + \sum_{n=1}^{\infty} \frac{9n}{n!} + \sum_{n=1}^{\infty} \frac{5}{n!}\)
\[ = 2\sum_{n=2}^{\infty} \frac{1}{(n-2)!} + 9\sum_{n=1}^{\infty} \frac{1}{(n-1)!} + 5\sum_{n=1}^{\infty} \frac{1}{n!} \]
\[ = 2e + 9e + 5(e-1) = 11e + 5e - 5 = 16e - 5 \].
Step 4: Final Answer:
The sum of the series is \(16e - 5\).
Quick Tip: To simplify sums with factorials, always express the polynomial numerator in terms of falling factorials \(n(n-1)(n-2)\dots\) to cancel terms with the denominator.
The least positive integral value of \(\lambda\) such that \(10^{50} + (3 \times (4)^{52}) + \lambda\) is divisible by 9 is :
View Solution
Step 1: Understanding the Question:
We need the remainder of the expression when divided by 9 to be zero.
Step 2: Key Formula or Approach:
Use modulo arithmetic: \(10 \equiv 1 \pmod 9\).
Step 3: Detailed Explanation: \(10^{50} \equiv (1)^{50} \equiv 1 \pmod 9\).
For \(4^{52} \pmod 9\):
\(4^1 \equiv 4\), \(4^2 \equiv 16 \equiv 7\), \(4^3 \equiv 64 \equiv 1 \pmod 9\).
Since \(52 = 3(17) + 1\), \(4^{52} \equiv (4^3)^{17} \cdot 4^1 \equiv 1^{17} \cdot 4 \equiv 4 \pmod 9\).
The expression is \(1 + 3(4) + \lambda \equiv 1 + 12 + \lambda \equiv 13 + \lambda \equiv 4 + \lambda \pmod 9\).
For divisibility, \(4 + \lambda \equiv 9 \Rightarrow \lambda = 5\).
Step 4: Final Answer:
The least positive integral value of \(\lambda\) is 5.
Quick Tip: Whenever dealing with divisibility by 9 or 3, \(10^k \equiv 1 \pmod{3 or 9}\) is the most powerful simplification tool.
There are 4, 5 and 6 points on the three parallel and co-planar lines. If no set of four or more points is cyclic and no set of three points lying on distinct lines is collinear, then the number of circles passing through exactly three points is :
View Solution
Step 1: Understanding the Question:
A circle is formed by any 3 non-collinear points. We have 15 points in total distributed on 3 lines.
Step 2: Key Formula or Approach:
Number of circles \(= \binom{Total Points}{3} - \binom{Collinear Points}{3}\).
Step 3: Detailed Explanation:
Total points \(= 4 + 5 + 6 = 15\).
Total combinations \(= \binom{15}{3} = \frac{15 \cdot 14 \cdot 13}{3 \cdot 2 \cdot 1} = 455\).
Subtract the cases where points are on the same line (collinear):
Line 1: \(\binom{4}{3} = 4\).
Line 2: \(\binom{5}{3} = 10\).
Line 3: \(\binom{6}{3} = 20\).
Total collinear \(= 4 + 10 + 20 = 34\).
Circles \(= 455 - 34 = 421\).
Step 4: Final Answer:
The number of circles is 421.
Quick Tip: Geometric counting often boils down to \(\binom{n}{k}\) minus the degenerate (collinear/coplanar) cases.
If \(y = \frac{ax - b}{(x-1)(x-4)}\) has an extremum at the point \((2, -1)\), then the values of \(a\) and \(b\) are :
View Solution
Step 1: Understanding the Question:
An extremum at \((2, -1)\) means the point lies on the curve and the derivative is zero there.
Step 2: Detailed Explanation:
1) Point on curve: \(-1 = \frac{2a - b}{(2-1)(2-4)} \Rightarrow -1 = \frac{2a - b}{-2} \Rightarrow 2a - b = 2\).
2) Derivative \(y' = 0\) at \(x=2\):
Using quotient rule on \(y = \frac{u}{v}\), \(y' = \frac{u'v - uv'}{v^2} = 0 \Rightarrow u'v - uv' = 0\).
\(u = ax-b, u'=a\).
\(v = x^2 - 5x + 4, v' = 2x - 5\).
At \(x=2\), \(v = -2, v' = -1\).
\(a(-2) - (2a-b)(-1) = 0 \Rightarrow -2a + 2a - b = 0 \Rightarrow b = 0\).
From (1), \(2a - 0 = 2 \Rightarrow a = 1\).
Step 3: Final Answer:
The values are \(a=1, b=0\).
Quick Tip: For any extremum \((x_0, y_0)\), you always get two independent equations: \(f(x_0) = y_0\) and \(f'(x_0) = 0\).
The distance between the planes \(\vec{r} \cdot (2\hat{i} + \hat{j} - 2\hat{k}) + 5 = 0\) and \(\vec{r} \cdot (6\hat{i} + 3\hat{j} - 6\hat{k}) + 2 = 0\) is :
View Solution
Step 1: Understanding the Question:
We need to find the distance between two parallel planes. The normals are \((2, 1, -2)\) and \((6, 3, -6) = 3(2, 1, -2)\).
Step 2: Key Formula or Approach:
Distance \(D = \frac{|d_1 - d_2|}{\sqrt{a^2 + b^2 + c^2}}\) after ensuring normal vectors are identical.
Step 3: Detailed Explanation:
Plane 1: \(2x + y - 2z + 5 = 0\).
Plane 2: \(6x + 3y - 6z + 2 = 0 \Rightarrow 2x + y - 2z + \frac{2}{3} = 0\).
Distance \(D = \frac{|5 - 2/3|}{\sqrt{2^2 + 1^2 + (-2)^2}} = \frac{13/3}{\sqrt{9}} = \frac{13}{9}\).
Step 4: Final Answer:
The distance is \(\frac{13}{9}\).
Quick Tip: Always divide or multiply the plane equations to make the \(x, y, z\) coefficients match before calculating the difference in constants.
The probability of solving a problem in Mathematics by two students X and Y are \(\frac{1}{4}\) and \(\frac{1}{5}\) respectively. If both of them try to solve the problem independently, then the probability that the problem will be solved by exactly one of them is equal to :
View Solution
Step 1: Understanding the Question:
"Exactly one" means (X solves and Y fails) OR (Y solves and X fails).
Step 2: Key Formula or Approach: \(P(Exactly one) = P(X)P(\bar{Y}) + P(\bar{X})P(Y)\).
Step 3: Detailed Explanation: \(P(X) = 1/4\), \(P(\bar{X}) = 3/4\).
\(P(Y) = 1/5\), \(P(\bar{Y}) = 4/5\).
Probability \(= (1/4 \cdot 4/5) + (3/4 \cdot 1/5) = 4/20 + 3/20 = 7/20\).
Step 4: Final Answer:
The probability is \(\frac{7}{20}\).
Quick Tip: For independent events \(A, B\), \(P(exactly one) = P(A) + P(B) - 2P(A \cap B)\).
The polar form of the complex number \(\frac{1+i}{1-i}\) is equal to :
View Solution
Step 1: Understanding the Question:
We need to simplify the complex number into \(a+ib\) form first.
Step 2: Detailed Explanation:
Rationalize: \(\frac{1+i}{1-i} \cdot \frac{1+i}{1+i} = \frac{(1+i)^2}{1 - i^2} = \frac{2i}{2} = i\).
For \(z = i\), modulus \(r = 1\) and argument \(\theta = \pi/2\).
Polar form: \(1(\cos\frac{\pi}{2} + i \sin\frac{\pi}{2})\).
Step 3: Final Answer:
The polar form is \(\cos\frac{\pi}{2} + i \sin\frac{\pi}{2}\).
Quick Tip: Standard result: \(\frac{1+i}{1-i} = i\) and \(\frac{1-i}{1+i} = -i\). Memorizing these saves time in exams.
If the equation of a line which divides the line segment joining the points \((1, 0)\) and \((3, 0)\) in the ratio \(2 : 1\) and is also perpendicular to it, is \(ax = 7\), then the value of \(a\) is equal to :
View Solution
Step 1: Understanding the Question:
The points are on the x-axis. A perpendicular line must be vertical.
Step 2: Key Formula or Approach:
Section formula: \(x = \frac{mx_2 + nx_1}{m+n}\).
Step 3: Detailed Explanation: \(x = \frac{2(3) + 1(1)}{2+1} = \frac{7}{3}\).
The line is \(x = 7/3 \Rightarrow 3x = 7\).
Comparing with \(ax = 7\), we get \(a = 3\).
Step 4: Final Answer:
The value of \(a\) is 3.
Quick Tip: Any line perpendicular to the x-axis is of the form \(x = constant\).
Equation of the circle, which is the mirror image of the circle \(x^2 + y^2 - 2x = 0\) with respect to the line \(x + y = 2\), is :
View Solution
Step 1: Understanding the Question:
The mirror image of a circle has the same radius. We only need the image of the center.
Step 2: Key Formula or Approach:
Center \(C_1 = (1, 0)\), radius \(r = 1\).
Image of \((x_1, y_1)\) in \(ax+by+c=0\): \(\frac{x-x_1}{a} = \frac{y-y_1}{b} = -2\frac{ax_1+by_1+c}{a^2+b^2}\).
Step 3: Detailed Explanation:
Image of \((1, 0)\) in \(x+y-2=0\): \(\frac{x-1}{1} = \frac{y-0}{1} = -2\frac{1+0-2}{2} = 1\).
\(x-1=1 \Rightarrow x=2\), \(y=1\). New center \((2, 1)\).
Equation: \((x-2)^2 + (y-1)^2 = 1^2 \Rightarrow x^2 + y^2 - 4x - 2y + 4 = 0\).
Step 4: Final Answer:
The mirrored circle is \(x^2 + y^2 - 4x - 2y + 4 = 0\).
Quick Tip: Reflection is an isometry; the radius of the circle remains invariant.
Equations of the common tangent of the ellipse \(\frac{(x+1)^2}{2^2} + \frac{(y-1)^2}{3^2} = 1\) and the circle \((x+1)^2 + (y-1)^2 = 4\) are :
View Solution
Step 1: Understanding the Question:
Both conics share the center \((-1, 1)\).
Step 2: Detailed Explanation:
Circle radius is 2. Ellipse semi-minor axis is 2.
The ellipse is vertical (\(b > a\)). The circle sits inside the ellipse, touching it at the endpoints of the minor axis.
Minor axis endpoints of ellipse: \((-1 \pm 2, 1) = (1, 1)\) and \((-3, 1)\).
Vertical tangents at these points: \(x = 1\) and \(x = -3\).
Equations: \(x-1=0\) and \(x+3=0\).
Step 3: Final Answer:
The common tangents are \(x+3=0\) and \(x-1=0\).
Quick Tip: Common tangents for concentric conics often align with the vertices or minor/major axis endpoints.
If \(A = \begin{bmatrix} 1 & a
0 & 1 \end{bmatrix}\), then \(A^k (k \in \mathbb{N})\) is :
0 & 1 \end{bmatrix}\)
View Solution
Step 1: Understanding the Question:
Observe the pattern of powers for an upper triangular matrix.
Step 2: Detailed Explanation: \(A^2 = \begin{bmatrix} 1 & a
0 & 1 \end{bmatrix} \begin{bmatrix} 1 & a
0 & 1 \end{bmatrix} = \begin{bmatrix} 1 & 2a
0 & 1 \end{bmatrix}\).
\(A^3 = \begin{bmatrix} 1 & 2a
0 & 1 \end{bmatrix} \begin{bmatrix} 1 & a
0 & 1 \end{bmatrix} = \begin{bmatrix} 1 & 3a
0 & 1 \end{bmatrix}\).
By induction, \(A^k = \begin{bmatrix} 1 & ka
0 & 1 \end{bmatrix}\).
Step 3: Final Answer:
The correct matrix is in option (A).
Quick Tip: For a matrix of form \(I + N\) where \(N^2 = O\), \((I+N)^k = I + kN\).
The values of \(s\) and \(t\), for which the system of equations \(x_1 + x_2 + x_3 = 5\)
\(x_1 + 2x_2 + 3x_3 = 9\)
\(x_1 + 3x_2 + sx_3 = t\)
has no solution, are :
View Solution
Step 1: Understanding the Question:
No solution occurs when the planes are inconsistent (parallel but not coincident).
Step 2: Detailed Explanation:
Row operations:
\(R_2 - R_1 \Rightarrow x_2 + 2x_3 = 4\).
\(R_3 - R_2 \Rightarrow x_2 + (s-3)x_3 = t-9\).
For inconsistency, the LHS coefficients must match while the RHS doesn't.
Match \(x_2 + 2x_3\) with \(x_2 + (s-3)x_3\): \(s-3 = 2 \Rightarrow s = 5\).
Constants must differ: \(4 \neq t-9 \Rightarrow t \neq 13\).
Step 3: Final Answer:
\(s=5, t \neq 13\).
Quick Tip: A \(3 \times 3\) system has no solution if the determinant of the coefficient matrix is zero but the augmented matrix rank is higher.
Derivative of \(\tan^{-1}\left(\frac{2x}{1-x^2}\right)\) with respect to \(\sin^{-1}\left(\frac{2x}{1+x^2}\right)\) in \((1, \infty)\), is :
View Solution
Step 1: Understanding the Question:
Both functions are variations of \(2 \tan^{-1}x\), but their behavior depends on the interval.
Step 2: Detailed Explanation:
For \(x > 1\), let \(x = \tan\theta \Rightarrow \theta \in (\pi/4, \pi/2)\).
\(u = \tan^{-1}(\tan 2\theta)\). Since \(2\theta \in (\pi/2, \pi)\), \(u = 2\theta - \pi\).
\(v = \sin^{-1}(\sin 2\theta)\). Since \(2\theta \in (\pi/2, \pi)\), \(v = \pi - 2\theta\).
\(\frac{du}{dv} = \frac{du/d\theta}{dv/d\theta} = \frac{2}{-2} = -1\).
Step 3: Final Answer:
The derivative is \(-1\).
Quick Tip: Standard inverse trig identities change based on the domain. Always check the interval before differentiating.
Let \(\vec{a}, \vec{b}\) and \(\vec{c}\) be three vectors such that \(|\vec{a}| = |\vec{b}| = \frac{|\vec{c}|}{2} = 1\). If \(\vec{a} \times (\vec{a} \times \vec{c}) + \vec{b} = 0\), then the acute angle between \(\vec{a}\) and \(\vec{c}\) is :
View Solution
Step 1: Understanding the Question:
We use the vector triple product property.
Step 2: Detailed Explanation: \((\vec{a} \cdot \vec{c})\vec{a} - (\vec{a} \cdot \vec{a})\vec{c} + \vec{b} = 0\).
Since \(|\vec{a}|=1\), \(\vec{b} = \vec{c} - (\vec{a} \cdot \vec{c})\vec{a}\).
Taking magnitude squared: \(1 = |\vec{c}|^2 + (\vec{a} \cdot \vec{c})^2 - 2(\vec{a} \cdot \vec{c})^2\).
\(1 = 4 - (\vec{a} \cdot \vec{c})^2 \Rightarrow (\vec{a} \cdot \vec{c})^2 = 3 \Rightarrow \vec{a} \cdot \vec{c} = \sqrt{3}\).
\(1 \cdot 2 \cdot \cos\theta = \sqrt{3} \Rightarrow \cos\theta = \sqrt{3}/2 \Rightarrow \theta = \pi/6\).
Step 3: Final Answer:
The acute angle is \(\pi/6\).
Quick Tip: Vector Triple Product Formula: \(\vec{a} \times (\vec{b} \times \vec{c}) = (\vec{a} \cdot \vec{c})\vec{b} - (\vec{a} \cdot \vec{b})\vec{c}\).
Solution of the differential equation \((1+y^2) dx = (\tan^{-1}y - x) dy\) is : (where \(c\) is an arbitrary constant)
View Solution
Step 1: Understanding the Question:
Rearrange as a linear differential equation in \(x\).
Step 2: Detailed Explanation: \(\frac{dx}{dy} + \frac{1}{1+y^2}x = \frac{\tan^{-1}y}{1+y^2}\).
\(IF = e^{\int \frac{1}{1+y^2} dy} = e^{\tan^{-1}y}\).
Solution: \(x e^{\tan^{-1}y} = \int \frac{\tan^{-1}y}{1+y^2} e^{\tan^{-1}y} dy + c\).
Let \(\tan^{-1}y = t \Rightarrow \int t e^t dt = e^t(t-1)\).
\(x e^{\tan^{-1}y} = e^{\tan^{-1}y}(\tan^{-1}y - 1) + c\).
\(x = \tan^{-1}y - 1 + c e^{-\tan^{-1}y}\).
Step 3: Final Answer:
The solution is option (C).
Quick Tip: If \(\frac{dy}{dx}\) isn't linear, try checking if \(\frac{dx}{dy}\) is.
The values of \(x\), for which the vectors \(\vec{a} = (x^2-16)\hat{i} + 4\hat{j} - (x^2-25)\hat{k}\) make acute angles with the (positive directions of) coordinate axes lie in :
View Solution
Step 1: Understanding the Question:
Acute angles with axes mean the direction cosines (and hence components) are positive.
Step 2: Detailed Explanation: \(a_x > 0 \Rightarrow x^2 - 16 > 0 \Rightarrow |x| > 4\).
\(a_y > 0 \Rightarrow 4 > 0\) (True).
\(a_z > 0 \Rightarrow -(x^2 - 25) > 0 \Rightarrow x^2 < 25 \Rightarrow |x| < 5\).
Intersection: \(4 < |x| < 5 \Rightarrow x \in (-5, -4) \cup (4, 5)\).
Step 3: Final Answer:
The range is \((-5, -4) \cup (4, 5)\).
Quick Tip: Direction cosines \(\cos\alpha, \cos\beta, \cos\gamma\) for a vector \((x, y, z)\) have the same signs as \(x, y, z\).
The value of the integral \(\int_{0}^{\pi} \sqrt{\frac{1 + \cos 2x}{2}} dx\) is :
View Solution
Step 1: Understanding the Question:
The goal is to evaluate a definite integral by simplifying the trigonometric expression under the square root.
Special care must be taken with the square root of a squared function, as it yields an absolute value.
Step 2: Key Formula or Approach:
We use the half-angle identity: \(\cos^2 x = \frac{1 + \cos 2x}{2}\).
Recall that \(\sqrt{u^2} = |u|\).
Step 3: Detailed Explanation:
Substitute the identity into the integral:
\[ I = \int_{0}^{\pi} \sqrt{\cos^2 x} dx = \int_{0}^{\pi} |\cos x| dx \]
The function \(\cos x\) changes sign at \(x = \frac{\pi}{2}\) within the interval \([0, \pi]\):
- For \(x \in [0, \frac{\pi}{2}]\), \(\cos x \geq 0\), so \(|\cos x| = \cos x\).
- For \(x \in [\frac{\pi}{2}, \pi]\), \(\cos x \leq 0\), so \(|\cos x| = -\cos x\).
Split the integral:
\[ I = \int_{0}^{\pi/2} \cos x dx + \int_{\pi/2}^{\pi} (-\cos x) dx \]
\[ I = [\sin x]_0^{\pi/2} - [\sin x]_{\pi/2}^{\pi} \]
\[ I = (\sin\frac{\pi}{2} - \sin 0) - (\sin\pi - \sin\frac{\pi}{2}) \]
\[ I = (1 - 0) - (0 - 1) = 1 + 1 = 2 \]
Step 4: Final Answer:
The value of the integral is 2.
Quick Tip: Always remember that \(\sqrt{f(x)^2} = |f(x)|\).
When integrating absolute value functions, split the limits at the points where the function inside the modulus changes its sign.
The minimum value of \(9\tan^2\theta + 4\cot^2\theta\) is :
View Solution
Step 1: Understanding the Question:
We need to find the minimum value of a trigonometric sum where the terms are reciprocals of each other (since \(\cot^2\theta = 1/\tan^2\theta\)).
Step 2: Key Formula or Approach:
The Arithmetic Mean-Geometric Mean (AM-GM) Inequality states that for positive numbers \(A\) and \(B\):
\[ \frac{A + B}{2} \geq \sqrt{AB} \Rightarrow A + B \geq 2\sqrt{AB} \]
Step 3: Detailed Explanation:
Let \(A = 9\tan^2\theta\) and \(B = 4\cot^2\theta\).
Since \(\tan^2\theta\) and \(\cot^2\theta\) are always non-negative, we apply AM-GM:
\[ 9\tan^2\theta + 4\cot^2\theta \geq 2\sqrt{(9\tan^2\theta)(4\cot^2\theta)} \]
Since \(\tan^2\theta \cdot \cot^2\theta = 1\):
\[ 9\tan^2\theta + 4\cot^2\theta \geq 2\sqrt{36} \]
\[ 9\tan^2\theta + 4\cot^2\theta \geq 2 \cdot 6 = 12 \]
The equality holds when \(9\tan^2\theta = 4\cot^2\theta\), which is possible for real \(\theta\).
Step 4: Final Answer:
The minimum value is 12.
Quick Tip: AM-GM inequality is the most efficient method for finding the minimum of expressions like \(a x^2 + \frac{b}{x^2}\) where the product of the terms is independent of the variable.
The length of the perpendicular from the point \((1, 2, 3)\) to the line \(\frac{-x + 6}{-3} = \frac{y - 7}{2} = \frac{z - 7}{-2}\) is :
View Solution
Step 1: Understanding the Question:
We are asked to find the shortest distance from a point to a 3D line.
First, we must express the line in the standard form \(\frac{x - x_1}{l} = \frac{y - y_1}{m} = \frac{z - z_1}{n}\).
Step 2: Detailed Explanation:
Standardize the line equation by multiplying the first term's numerator and denominator by \(-1\):
\[ \frac{x - 6}{3} = \frac{y - 7}{2} = \frac{z - 7}{-2} = \lambda \]
Any general point \(Q\) on this line is \((3\lambda + 6, 2\lambda + 7, -2\lambda + 7)\).
Let the given point be \(P(1, 2, 3)\).
The direction ratios of the line \(PQ\) are:
\[ (3\lambda + 6 - 1, 2\lambda + 7 - 2, -2\lambda + 7 - 3) = (3\lambda + 5, 2\lambda + 5, -2\lambda + 4) \]
Since \(PQ\) is perpendicular to the line (direction ratios \(3, 2, -2\)):
\[ 3(3\lambda + 5) + 2(2\lambda + 5) - 2(-2\lambda + 4) = 0 \]
\[ 9\lambda + 15 + 4\lambda + 10 + 4\lambda - 8 = 0 \]
\[ 17\lambda + 17 = 0 \Rightarrow \lambda = -1 \]
Coordinates of the foot of the perpendicular \(Q\):
\[ Q = (3(-1) + 6, 2(-1) + 7, -2(-1) + 7) = (3, 5, 9) \]
The length \(PQ\) is:
\[ PQ = \sqrt{(3-1)^2 + (5-2)^2 + (9-3)^2} = \sqrt{2^2 + 3^2 + 6^2} \]
\[ PQ = \sqrt{4 + 9 + 36} = \sqrt{49} = 7 \]
Step 3: Final Answer:
The length of the perpendicular is 7.
Quick Tip: For a point \(P\) and line \(\vec{r} = \vec{a} + \lambda \vec{d}\), the distance can also be found using the vector formula: \(D = \frac{|(\vec{a} - \vec{p}) \times \vec{d}|}{|\vec{d}|}\).
If \(\log_3 2, \log_3(2^x - 5)\) and \(\log_3(2^x - \frac{7}{2})\) are in Arithmetic Progression, then the value of \(x\) is :
View Solution
Step 1: Understanding the Question:
The terms are in AP, so the middle term multiplied by 2 equals the sum of the first and third terms.
Step 2: Detailed Explanation:
Condition for AP: \(2 \log_3(2^x - 5) = \log_3 2 + \log_3(2^x - \frac{7}{2})\).
Using log properties (\(\log a + \log b = \log ab\) and \(n \log a = \log a^n\)):
\[ \log_3 (2^x - 5)^2 = \log_3 \left[ 2(2^x - \frac{7}{2}) \right] \]
\[ (2^x - 5)^2 = 2(2^x) - 7 \]
Let \(2^x = y\):
\[ (y - 5)^2 = 2y - 7 \]
\[ y^2 - 10y + 25 = 2y - 7 \]
\[ y^2 - 12y + 32 = 0 \Rightarrow (y - 4)(y - 8) = 0 \]
So, \(y = 4\) or \(y = 8\).
Check domain constraints: For \(\log_3(2^x - 5)\) to be defined, \(2^x - 5 > 0 \Rightarrow y > 5\).
- If \(y = 4\), \(4 - 5 = -1 < 0\) (Invalid).
- If \(y = 8\), \(8 - 5 = 3 > 0\) (Valid).
Thus, \(2^x = 8 \Rightarrow 2^x = 2^3 \Rightarrow x = 3\).
Step 3: Final Answer:
The value of \(x\) is 3.
Quick Tip: In logarithmic equations, always verify your final answers against the original domain requirements (argument \(> 0\)).
Invalid roots (extraneous solutions) are common in these types of questions.
If \(x^2 + x + 1 = 0\), then the value of \(\left\{ (x - \frac{1}{x})^2 + (x^2 - \frac{1}{x^2})^2 + (x^3 - \frac{1}{x^3})^2 \right\}\) is :
View Solution
Step 1: Understanding the Question:
The equation \(x^2 + x + 1 = 0\) implies that \(x\) is a complex cube root of unity, i.e., \(x = \omega\) or \(x = \omega^2\).
Step 2: Key Formula or Approach:
Properties of cube roots of unity:
1) \(\omega^3 = 1\)
2) \(1 + \omega + \omega^2 = 0\)
3) \(\frac{1}{\omega} = \omega^2\) and \(\frac{1}{\omega^2} = \omega\)
Step 3: Detailed Explanation:
Let \(x = \omega\). Then:
1) \((x - \frac{1}{x})^2 = (\omega - \omega^2)^2 = \omega^2 + \omega^4 - 2\omega^3 = \omega^2 + \omega - 2 = -1 - 2 = -3\).
2) \((x^2 - \frac{1}{x^2})^2 = (\omega^2 - \omega)^2 = \omega^4 + \omega^2 - 2\omega^3 = \omega + \omega^2 - 2 = -1 - 2 = -3\).
3) \((x^3 - \frac{1}{x^3})^2 = (\omega^3 - \frac{1}{\omega^3})^2 = (1 - 1)^2 = 0\).
Sum \(= (-3) + (-3) + 0 = -6\).
Step 4: Final Answer:
The value of the expression is -6.
Quick Tip: Whenever you see the quadratic \(x^2 + x + 1 = 0\), immediately think of \(\omega\).
Similarly, \(x^2 - x + 1 = 0\) corresponds to \(-\omega\).
\(x^2 + y^2 - 4x - 2y - 11 = 0\) is a circle to which tangents are drawn from the point \((4, 5)\) which form a quadrilateral with a pair of radii. The area of this quadrilateral in square units is :
View Solution
Step 1: Understanding the Question:
The quadrilateral is formed by the external point \(P\), the center \(C\), and the two points of tangency \(T_1, T_2\).
This quadrilateral consists of two congruent right-angled triangles (\(\triangle PT_1C\) and \(\triangle PT_2C\)).
Step 2: Detailed Explanation:
Standardize the circle equation:
\[ x^2 + y^2 - 4x - 2y - 11 = 0 \Rightarrow (x - 2)^2 + (y - 1)^2 = 11 + 4 + 1 = 16 \]
Center \(C(2, 1)\), Radius \(R = 4\).
External point \(P(4, 5)\).
Length of tangent \(L = \sqrt{x_1^2 + y_1^2 + 2gx_1 + 2fy_1 + c}\):
\[ L = \sqrt{4^2 + 5^2 - 4(4) - 2(5) - 11} = \sqrt{16 + 25 - 16 - 10 - 11} = \sqrt{4} = 2 \]
The area of the quadrilateral \(PT_1CT_2\) is twice the area of \(\triangle PT_1C\):
\[ Area = 2 \times \left( \frac{1}{2} \times L \times R \right) = L \times R \]
\[ Area = 2 \times 4 = 8 square units \]
Step 3: Final Answer:
The area of the quadrilateral is 8.
Quick Tip: The area of a quadrilateral formed by tangents from a point and the corresponding radii is always \(R \cdot L\).
The length of the tangent \(L\) is simply \(\sqrt{S_1}\).
If the sum of mean and variance of a binomial distribution is 15 and the sum of their squares is 117, then the number of independent trials is equal to :
View Solution
Step 1: Understanding the Question:
In a Binomial Distribution \(B(n, p)\), Mean \(\mu = np\) and Variance \(\sigma^2 = npq\), where \(q = 1 - p\).
Step 2: Detailed Explanation:
Let \(np = X\) and \(npq = Y\).
Given:
1) \(X + Y = 15 \Rightarrow Y = 15 - X\)
2) \(X^2 + Y^2 = 117\)
Substitute (1) into (2):
\[ X^2 + (15 - X)^2 = 117 \]
\[ X^2 + 225 - 30X + X^2 = 117 \]
\[ 2X^2 - 30X + 108 = 0 \Rightarrow X^2 - 15X + 54 = 0 \]
\[ (X - 6)(X - 9) = 0 \Rightarrow X = 6 or X = 9 \]
Case 1: If \(X = 6\), then \(Y = 9\).
Since \(Y = Xq\), \(9 = 6q \Rightarrow q = 1.5\). This is impossible as \(q \leq 1\).
Case 2: If \(X = 9\), then \(Y = 6\).
\[ 6 = 9q \Rightarrow q = \frac{6}{9} = \frac{2}{3} \]
Then \(p = 1 - q = 1 - \frac{2}{3} = \frac{1}{3}\).
Using \(np = 9\):
\[ n(\frac{1}{3}) = 9 \Rightarrow n = 27 \]
Step 3: Final Answer:
The number of independent trials \(n\) is 27.
Quick Tip: For any Binomial Distribution, the Mean is always greater than the Variance (\(np > npq\)) because \(0 < q < 1\).
This fact helps in rejecting the incorrect case (\(X = 6\), \(Y = 9\)) immediately.
Let the equation of the plane passing through the points \((1, 2, 6), (2, 5, 7)\) and perpendicular to the plane \(4x - y + z = 15\) be \(ax + by + cz + d = 0\). If \(a, b, c, d \in \mathbb{Z}\) with \(gcd(|a|, |b|, |c|) = 1\), then \(|a + b + c + d|\) is equal to :
View Solution
Step 1: Understanding the Question:
The plane contains two points and is perpendicular to another plane. This means the required normal vector is perpendicular to the vector joining the two points and also perpendicular to the normal of the given plane.
Step 2: Detailed Explanation:
Vector joining \((1, 2, 6)\) and \((2, 5, 7)\): \(\vec{u} = (2-1, 5-2, 7-6) = (1, 3, 1)\).
Normal vector of given plane \(4x - y + z = 15\): \(\vec{n} = (4, -1, 1)\).
Normal vector of required plane \(\vec{N} = \vec{u} \times \vec{n}\):
\[ \vec{N} = \begin{vmatrix} \hat{i} & \hat{j} & \hat{k}
1 & 3 & 1
4 & -1 & 1 \end{vmatrix} = \hat{i}(3 + 1) - \hat{j}(1 - 4) + \hat{k}(-1 - 12) \]
\[ \vec{N} = (4, 3, -13) \]
Equation of the plane passing through \((1, 2, 6)\):
\[ 4(x - 1) + 3(y - 2) - 13(z - 6) = 0 \]
\[ 4x - 4 + 3y - 6 - 13z + 78 = 0 \]
\[ 4x + 3y - 13z + 68 = 0 \]
Parameters: \(a = 4, b = 3, c = -13, d = 68\).
\(gcd(4, 3, 13) = 1\).
Calculation: \(|a + b + c + d| = |4 + 3 - 13 + 68| = |62| = 62\).
Step 3: Final Answer:
The value is 62.
Quick Tip: If a plane is perpendicular to another plane, their normals are perpendicular. Use the cross product of two vectors lying in/parallel to the plane to find the normal vector.
The number of real solutions in the interval \([\frac{3\pi}{2}, \frac{7\pi}{2}]\) of the equation \(4\sin^2x - 8\sin x + 3 = 0\) is :
View Solution
Step 1: Understanding the Question:
We solve a quadratic equation in \(\sin x\) and count how many roots lie within the specified interval.
Step 2: Detailed Explanation:
Given: \(4\sin^2x - 8\sin x + 3 = 0\).
Let \(\sin x = t\):
\[ 4t^2 - 8t + 3 = 0 \Rightarrow (2t - 1)(2t - 3) = 0 \]
\[ t = \frac{1}{2} or t = \frac{3}{2} \]
Since \(|\sin x| \leq 1\), \(\sin x = \frac{3}{2}\) is impossible.
We need to find values of \(x\) in \([\frac{3\pi}{2}, \frac{7\pi}{2}]\) such that \(\sin x = \frac{1}{2}\).
Converting boundaries: \(\frac{3\pi}{2} = 1.5\pi\) and \(\frac{7\pi}{2} = 3.5\pi\).
In the range \([1.5\pi, 3.5\pi]\):
- In the interval \([1.5\pi, 2\pi]\), \(\sin x\) is negative.
- In the interval \([2\pi, 2.5\pi]\) (1st quadrant), \(\sin x = \frac{1}{2} \Rightarrow x = 2\pi + \frac{\pi}{6} = \frac{13\pi}{6}\).
- In the interval \([2.5\pi, 3\pi]\) (2nd quadrant), \(\sin x = \frac{1}{2} \Rightarrow x = 3\pi - \frac{\pi}{6} = \frac{17\pi}{6}\).
- In the interval \([3\pi, 3.5\pi]\), \(\sin x\) is negative.
Both \(\frac{13\pi}{6}\) and \(\frac{17\pi}{6}\) are within \([1.5\pi, 3.5\pi]\).
Step 3: Final Answer:
The number of real solutions is 2.
Quick Tip: For trigonometric equations over large intervals, use a unit circle or a graph to visualize the solutions. Each revolution (\(2\pi\)) typically yields two solutions for \(\sin x = k\) if \(|k| < 1\).
Let \(A_1, A_2, A_3, \dots\) be an increasing geometric progression. If \(\frac{1}{A_4} + \frac{1}{A_8} = \frac{10}{63}\) and \(A_5 A_7 = 441\), then \(3(A_2 + A_4)\) is equal to :
View Solution
Step 1: Understanding the Question:
We use properties of GP terms. In any GP, \(A_m A_n = A_{mid}^2\) if indices are symmetric.
Step 2: Detailed Explanation:
Given \(A_5 A_7 = 441\). Since \(A_5 A_7 = A_6^2\), we have \(A_6^2 = 441 \Rightarrow A_6 = 21\) (increasing GP, so terms are positive).
Also, \(A_4 A_8 = A_6^2 = 441\).
From the sum: \(\frac{1}{A_4} + \frac{1}{A_8} = \frac{A_4 + A_8}{A_4 A_8} = \frac{10}{63}\).
\[ \frac{A_4 + A_8}{441} = \frac{10}{63} \Rightarrow A_4 + A_8 = \frac{10 \times 441}{63} = 70 \]
We have \(A_4 A_8 = 441\) and \(A_4 + A_8 = 70\).
Roots of \(x^2 - 70x + 441 = 0\) are 9 and 49.
Since it is an increasing GP, \(A_4 = 9\) and \(A_8 = 49\).
Now, \(A_6 = A_4 r^2 \Rightarrow 21 = 9 r^2 \Rightarrow r^2 = \frac{7}{3}\).
\(A_4 = A_2 r^2 \Rightarrow 9 = A_2 (\frac{7}{3}) \Rightarrow A_2 = \frac{27}{7}\).
Required value: \(3(A_2 + A_4) = 3(\frac{27}{7} + 9)\).
\[ 3(\frac{27 + 63}{7}) = 3(\frac{90}{7}) ... checking calculation... \]
Wait, re-calculating \(\frac{1}{A_4} + \frac{1}{A_8} = \frac{10}{63}\) using \(A_4=7, A_8=49\) doesn't yield \(10/63\).
Let's re-solve: \(1/A_6(1/r^2 + r^2) = 1/21(1/r^2 + r^2) = 10/63 \Rightarrow r^2 + 1/r^2 = 10/3\).
Let \(r^2 = t\), then \(t + 1/t = 10/3 \Rightarrow 3t^2 - 10t + 3 = 0 \Rightarrow (3t - 1)(t - 3) = 0\).
Increasing GP means \(r > 1\), so \(r^2 = 3\).
\(A_4 = A_6/r^2 = 21/3 = 7\).
\(A_2 = A_4/r^2 = 7/3\).
Sum \(= 3(7/3 + 7) = 3(\frac{7 + 21}{3}) = 28\).
Step 3: Final Answer:
The value is 28.
Quick Tip: In a Geometric Progression, the product of terms equidistant from the middle is constant (\(A_1 A_n = A_2 A_{n-1} = \dots\)).
This "Product Property" is key to simplifying GP equations quickly.
Which among the following is the full form of the ‘UNESCO’ ?
View Solution
Step 1: Understanding the Question:
The question asks for the correct expansion of the acronym UNESCO, which is a specialized agency of the United Nations.
Step 2: Detailed Explanation:
UNESCO stands for United Nations Educational, Scientific and Cultural Organization.
It was established in 1945 with the aim of promoting world peace and security through international cooperation in education, the sciences, and culture.
It is famously known for designating World Heritage Sites to preserve cultural and natural heritage around the world.
Step 3: Final Answer:
The accurate full form matches Option (A).
Quick Tip: Acronyms of major international bodies like UNICEF, WHO, and UNESCO are frequent in aptitude tests.
Note the '&' or 'and' in the name; standard official titles often use 'and'.
Match List - I with List - II.

View Solution
Step 1: Understanding the Question:
The task is to match famous architectural landmarks listed in List I with their corresponding visual representations in List II.
Step 2: Detailed Explanation:
(I) Hall of Nations: Designed by Raj Rewal in Delhi, characterized by its large concrete space-frame structure. This matches image (b).
(II) Falling Water: A world-renowned house designed by Frank Lloyd Wright in Pennsylvania, known for its cantilevered balconies over a waterfall. This matches image (a).
(III) Petronas Towers: The iconic twin skyscrapers in Kuala Lumpur, Malaysia, joined by a skybridge. This matches image (d).
(IV) Secretariat: Part of the Capitol Complex in Chandigarh, designed by Le Corbusier, featuring long horizontal concrete forms. This matches image (c).
Step 3: Final Answer:
The correct matching sequence is (I)-(b), (II)-(a), (III)-(d), (IV)-(c), which is Option (A).
Quick Tip: Familiarize yourself with the works of Masters of Modern Architecture like Le Corbusier (Chandigarh) and Frank Lloyd Wright (Fallingwater).
Geometric silhouettes are often enough to identify these major landmarks.
Match List - I with List - II.

View Solution
Step 1: Understanding the Question:
Match the locations in List I with the specific historic or cultural monuments located there in List II.
Step 2: Detailed Explanation:
(I) Kamru: Located in the Sangla Valley of Himachal Pradesh, it is famous for the Kamru Fort and the ancient Badrinath Temple within its premises. Thus, (I) matches (b).
(II) Delhi: Khirki Masjid is a fortified mosque built during the Tughlaq dynasty in South Delhi. Thus, (II) matches (c).
(III) Fatehpur Sikri: This Mughal city built by Akbar is famous for the Buland Darwaja, which serves as the main entrance to the Jama Masjid. Thus, (III) matches (d).
(IV) Kolkata: The Victoria Memorial Hall is a magnificent marble building dedicated to Queen Victoria. Thus, (IV) matches (a).
Step 3: Final Answer:
The matching pairs result in the sequence (I)-(b), (II)-(c), (III)-(d), (IV)-(a).
Quick Tip: While Badrinath is a major pilgrimage in Uttarakhand, several local temples in Himalayan villages like Kamru also bear the same name.
Always match the most obvious ones (Kolkata-Victoria Memorial) first to eliminate wrong options.
Match List - I with List - II.

View Solution
Step 1: Understanding the Question:
Match the names of historical Indian monuments with their respective architectural images.
Step 2: Detailed Explanation:
(I) Agra Fort: A massive 16th-century red sandstone fortress. It matches image (b) showing the high-walled ramparts and gateway.
(II) Atala Masjid: A 15th-century mosque in Jaunpur, known for its unique pylon-like entrance and arches. It matches image (c).
(III) Nalanda University: The ruins of the ancient Buddhist center of learning in Bihar, characterized by its brick viharas and stupas. It matches image (a).
(IV) Jagannatha Temple: The famous temple in Puri, Odisha, with its distinct tall 'Shikhara' (tower). It matches image (d).
Step 3: Final Answer:
Matching gives: (I)-(b), (II)-(c), (III)-(a), (IV)-(d), which is Option (A).
Quick Tip: Nalanda is easily identified by its extensive brickwork ruins.
Jagannath Temple is unique due to its Dravidian-style curved tower topped with a 'Chakra'.
Match List - I with List - II.

View Solution
Step 1: Understanding the Question:
Match the listed cultural sites and temples with their corresponding geographical locations.
Step 2: Detailed Explanation:
(I) Yadvindra Garden: Also known as Pinjore Gardens, located in Pinjore, Haryana. It is a 17th-century Mughal-style garden. Thus, (I) matches (c).
(II) Vishnu Temple: There is a significant ancient stone temple dedicated to Vishnu in Buniyar, Jammu and Kashmir. Thus, (II) matches (d).
(III) Hidimba Temple: A famous wooden pagoda-style temple located in a cedar forest in Manali, Himachal Pradesh. Thus, (III) matches (a).
(IV) Hari Mandir: Specifically referring to the Harmandir Sahib (Golden Temple), the holiest shrine of Sikhism, located in Amritsar. Thus, (IV) matches (b).
Step 3: Final Answer:
The resulting sequence is (I)-(c), (II)-(d), (III)-(a), (IV)-(b).
Quick Tip: Hidimba Devi Temple (Manali) is a very common landmark in architecture exams due to its unique vernacular wooden construction.
Match List - I with List - II.

View Solution
Step 1: Understanding the Question:
The task is to match historical forts in India with the cities where they are situated.
Step 2: Detailed Explanation:
(I) Mehrangarh Fort: One of the largest forts in India, built around 1459 by Rao Jodha, located in Jodhpur, Rajasthan. It matches (d).
(II) Siri Fort: Part of the seven cities of Delhi, built by Alauddin Khalji. It matches (c).
(III) Golconda Fort: A citadel and fort in Hyderabad, Telangana, famous for its acoustic effects and history with the Koh-i-Noor diamond. It matches (a).
(IV) Fort William: A fort in Kolkata, built during the early years of the British Bengal Presidency. It matches (b).
Step 3: Final Answer:
The correct matching sequence is (I)-(d), (II)-(c), (III)-(a), (IV)-(b).
Quick Tip: Rajasthan is the land of forts. Associating Jodhpur with Mehrangarh and Jaipur with Amer/Jaigarh is essential static GK for B.Arch exams.
Book ‘God of small things’ is written by which Indian Architect ?
View Solution
Step 1: Understanding the Question:
The question asks for the author of the Booker Prize-winning novel 'The God of Small Things' who also happens to be a trained architect.
Step 2: Detailed Explanation:
Arundhati Roy is a world-renowned Indian author and social activist.
She studied architecture at the School of Planning and Architecture (SPA), Delhi.
Her debut novel, 'The God of Small Things' (1997), won the Man Booker Prize for Fiction.
While she is famous as a writer, her background in architecture is a significant part of her academic profile.
Step 3: Final Answer:
Arundhati Roy is the architect who wrote the book. Thus, Option (B) is correct.
Quick Tip: Don't get confused by the names of practicing architects like B.V. Doshi or Bimal Patel. The question specifically focuses on the author of this particular novel.
‘Jharokha’ is a type of window mostly found in :
View Solution
Step 1: Understanding the Question:
Identify the geographical region in India where the 'Jharokha' architectural feature is most prevalent.
Step 2: Detailed Explanation:
A Jharokha is a type of overhanging enclosed balcony or stone window used in Indian architecture.
It is a prominent feature in Indo-Islamic architecture and is very common in the palaces and 'havelis' of Rajasthan.
Architecturally, it served to allow women in purdah to observe the street without being seen, and provided ventilation in the arid climate.
Step 3: Final Answer:
Rajasthan is the primary region for Jharokhas. Thus, Option (D) is correct.
Quick Tip: Terms like 'Chhatri', 'Jharokha', and 'Jaali' are characteristic of Rajasthani and Mughal architectural styles.
The monsoon wind enters in Indian sub-continent from which direction ?
View Solution
Step 1: Understanding the Question:
The goal is to identify the direction from which the primary monsoon winds approach the Indian mainland.
Step 2: Detailed Explanation:
The Southwest Monsoon is the main rainy season in India.
As the landmass of India heats up during summer, a low-pressure area is created.
This draws in moisture-laden winds from the Indian Ocean, specifically from the South-West direction.
These winds first hit the Western Ghats (Kerala coast) before spreading across the rest of the subcontinent.
Step 3: Final Answer:
The direction is South-West, making Option (D) the correct choice.
Quick Tip: Remember: Southwest Monsoon = Entry. Northeast Monsoon = Retreating (Rain in Tamil Nadu).
Which of the following building represents the colonial Architectural pattern in India ?
View Solution
Step 1: Understanding the Question:
Identify the building among the choices that was built during the British colonial period and reflects colonial (Indo-Saracenic or European) styles.
Step 2: Detailed Explanation:
(A) Bharat Bhavan is a modern multi-arts complex designed by Charles Correa.
(B) LIC Building is a post-independence modern office building.
(C) Charminar is a 16th-century monument of the Qutb Shahi dynasty.
(D) Victoria Memorial was built between 1906 and 1921 to commemorate Queen Victoria. It is a prime example of British colonial architecture, blending European classical styles with Mughal influences.
Step 3: Final Answer:
Victoria Memorial represents the colonial pattern. Thus, Option (D) is correct.
Quick Tip: Colonial architecture in India often uses white marble or red sandstone in a Neo-Classical or Gothic style. Major examples are in Mumbai, Kolkata, and New Delhi.
What is the size of A2 Drawing sheet ?
View Solution
Step 1: Understanding the Question:
The question asks for the standard dimensions of an A2 size paper according to the ISO 216 international standard.
Step 2: Detailed Explanation:
The A-series paper sizes are based on a constant aspect ratio of \(1 : \sqrt{2}\).
A0 has an area of exactly 1 square meter (\(841 \times 1189\) mm).
Each subsequent size is half the area of the previous one:
- A1: \(594 \times 841\) mm
- A2: \(420 \times 594\) mm
- A3: \(297 \times 420\) mm
- A4: \(210 \times 297\) mm
Step 3: Final Answer:
The dimensions for A2 are \(420\) mm \(\times\) \(594\) mm, matching Option (B).
Quick Tip: To remember: Halving the long side of the previous sheet gives the short side of the next.
\(841/2 \approx 420\) (short side of A1), \(1189/2 \approx 594\) (short side of A0).
Victory Tower belongs to which of the following fort :
View Solution
Step 1: Understanding the Question:
Locate the specific Rajasthan fort that contains the historical landmark known as the 'Victory Tower' or 'Vijay Stambha'.
Step 2: Detailed Explanation:
The Victory Tower (Vijay Stambha) was built by Maharana Kumbha of Mewar to commemorate his victory over the armies of Malwa and Gujarat in 1448.
It is situated within the massive Chittorgarh Fort complex in Rajasthan.
The tower is dedicated to Lord Vishnu and is a fine example of medieval Rajput architecture.
Step 3: Final Answer:
Victory Tower is in Chittor Fort. Thus, Option (A) is correct.
Quick Tip: Chittorgarh is a UNESCO World Heritage site and also home to another famous tower, the 'Kirti Stambha' (Tower of Fame).
Which amongst the following Architect has designed the famous Temple “Akshardham” ?
View Solution
Step 1: Understanding the Question:
Identify the architect responsible for the traditional design of the Swaminarayan Akshardham temple in New Delhi.
Step 2: Detailed Explanation:
Chandrakanth Sompura (C. Sompura) is a veteran architect known for designing traditional Hindu temples in the 'Nagara' style.
He belongs to a family of architects that has been designing temples for generations.
Apart from Akshardham (Delhi and Gandhinagar), he is also the designer of the Somnath Temple and the new Ram Mandir in Ayodhya.
Step 3: Final Answer:
The architect is C. Sompura. Thus, Option (D) is correct.
Quick Tip: The Sompura family specialized in 'Shilpa Shastras', the ancient Indian texts on architecture and temple design.
‘Volume Zero’ Documentary is on which Architect ?
View Solution
Step 1: Understanding the Question:
The question asks for the subject of the biographical documentary titled 'Volume Zero'.
Step 2: Detailed Explanation:
'Volume Zero' is a well-known documentary film directed by Arun Khopkar.
It explores the life, philosophy, and architectural works of India's master architect, Charles Correa.
The title refers to Correa’s idea of creating "open-to-sky" spaces and his focus on low-income housing and urban planning.
Step 3: Final Answer:
The documentary is on Charles Correa. Thus, Option (A) is correct.
Quick Tip: Charles Correa is one of the most important figures in modern Indian architecture. His works include the Gandhi Smarak Sangrahalaya and Navi Mumbai's planning.
‘Agenda 21’ is declaration related with :
View Solution
Step 1: Understanding the Question:
Identify the primary environmental theme addressed by the 'Agenda 21' declaration.
Step 2: Detailed Explanation:
Agenda 21 is a comprehensive plan of action to be taken globally, nationally, and locally by organizations of the United Nations System, Governments, and Major Groups in every area in which humans impact the environment.
It was adopted at the Earth Summit in Rio de Janeiro, Brazil, in 1992.
Its central goal is achieving global sustainable development in the 21st century.
Step 3: Final Answer:
Agenda 21 is related to sustainable development. Thus, Option (C) is correct.
Quick Tip: Sustainable architecture often draws from international frameworks like Agenda 21 or the Brundtland Report.
Gold mines are situated in which state of India ?
View Solution
Step 1: Understanding the Question:
Identify the Indian state that is traditionally known for its gold mining industry.
Step 2: Detailed Explanation:
Karnataka is the leading producer of gold in India.
The Kolar Gold Fields (KGF) and the Hutti Gold Mines are both located in Karnataka.
Hutti is currently the only operational gold mine in the country that produces gold at a significant scale.
Step 3: Final Answer:
Gold mines are primarily in Karnataka. Thus, Option (A) is correct.
Quick Tip: Always associate specific minerals with Indian states: Gold-Karnataka, Iron-Odisha/Chhattisgarh, Copper-Rajasthan.
In the Southern Hemisphere shadowless light is from which direction ?
View Solution
Step 1: Understanding the Question:
This is a climatology question related to lighting design. We need to identify from which cardinal direction soft, diffuse (shadowless) light is obtained in the Southern Hemisphere.
Step 2: Detailed Explanation:
In the Southern Hemisphere, the sun's path is predominantly across the northern sky.
This means direct sunlight (which creates harsh shadows) always comes from the North.
Architects seeking cool, consistent, and shadowless light (ideal for studios or libraries) look towards the opposite direction of the sun's path.
Therefore, in the Southern Hemisphere, soft diffuse light enters from the South.
Step 3: Final Answer:
The direction is South, matching Option (B).
Quick Tip: Reverse the logic for the Northern Hemisphere (like India). We seek shadowless northern light because the sun is in the South.
The first Indian Architect who has won Pritzker Prize in 2018 is :
View Solution
Step 1: Understanding the Question:
Identify the recipient of the Pritzker Architecture Prize (the 'Nobel of Architecture') from India in 2018.
Step 2: Detailed Explanation:
Balkrishna Vithaldas Doshi (B.V. Doshi) became the first Indian architect to be awarded the Pritzker Prize in 2018.
He was recognized for his outstanding contribution to architecture, his ethical design philosophy, and his work in low-cost housing (e.g., Aranya Housing Project).
Doshi worked under both Le Corbusier and Louis Kahn earlier in his career.
Step 3: Final Answer:
The architect is B.V. Doshi. Thus, Option (A) is correct.
Quick Tip: B.V. Doshi's famous works include the IIM Bangalore campus and Sangath (his office). He is a very prominent name in almost all architecture entrance exams.
Word “Bungalow” has originated from :
View Solution
Step 1: Understanding the Question:
Identify the etymological origin of the architectural term "Bungalow".
Step 2: Detailed Explanation:
The term "Bungalow" originates from the Hindi/Bengali word 'bangla', which literally means "belonging to Bengal".
It was used during the colonial era to describe the detached, single-storey cottages built in the Bengal region for British officers.
These structures were inspired by the traditional thatched huts of the Bengal countryside.
Step 3: Final Answer:
The origin is Bengal, matching Option (C).
Quick Tip: Many English architectural terms have Indian roots, like 'Veranda' or 'Bungalow'.
The IIM - Ahmedabad is designed by which of the following Architect ?
View Solution
Step 1: Understanding the Question:
Identify the architect of the Indian Institute of Management (IIM) Ahmedabad campus.
Step 2: Detailed Explanation:
IIM Ahmedabad is an world-renowned example of modern brick architecture.
It was designed by the American architect Louis Kahn between 1962 and 1974.
The campus is famous for its use of exposed red brick, massive geometric cutouts in walls for ventilation, and vaulted corridors.
Step 3: Final Answer:
The architect is Louis Kahn. Thus, Option (B) is correct.
Quick Tip: Do not confuse IIM Ahmedabad (Kahn) with IIM Bangalore (Doshi) or IIM Calcutta (Kanvinde). These are frequent comparison questions.
In the given figure, how many squares are present ?

View Solution
Step 1: Understanding the Question:
The task is to count all possible squares of different sizes (\(1 \times 1\), \(2 \times 2\), \(3 \times 3\)) in the given cross-shaped grid.
Step 2: Detailed Explanation:
Let's analyze the figure which consists of a central \(3 \times 3\) grid with one extra square on each side (top, bottom, left, right).
1. Individual \(1 \times 1\) squares:
- Central \(3 \times 3\) block has \(9\) squares.
- Adding the \(4\) extra squares on the outer sides: \(9 + 4 = 13\) small squares.
2. \(2 \times 2\) squares:
- Within the central \(3 \times 3\) grid, there are \(4\) possible \(2 \times 2\) squares.
3. \(3 \times 3\) squares:
- There is \(1\) large \(3 \times 3\) square in the center.
Step 3: Final Answer:
Total number of squares = \(13\) (\(1 \times 1\)) + \(4\) (\(2 \times 2\)) + \(1\) (\(3 \times 3\)) = \(18\).
Therefore, Option (D) is correct.
Quick Tip: To avoid mistakes in counting squares, always proceed by size: first all \(1 \times 1\), then \(2 \times 2\), and so on.
A square grid of \(n \times n\) contains \(1^2 + 2^2 + \dots + n^2\) total squares.
A drawing is provided with all the folds to construct the following three Dimensional object. Select the correct one.

- (A)
![]()
- (B)
![]()
- (C)
![]()
- (D)
![]()


View Solution
Step 1: Understanding the Question:
The task is to identify the correct 2D "net" (unfolded surface) which, when folded along the internal lines, will produce the 3D object shaped like the number '4'.
Step 2: Detailed Explanation:
1. Analysis of the 3D Object: The object is a prism with a cross-section in the shape of the numeral '4'. It consists of two identical parallel faces (the front and back '4' shapes) and several rectangular side panels that define its thickness.
2. Net Characteristics: A valid net for such a prism must contain two identical '4'-shaped profiles. These profiles should be connected by a series of rectangles whose widths correspond to the lengths of the various segments of the perimeter of the '4'.
3. Evaluation of Options:
- Option (A) shows two '4' shaped profiles connected along their long vertical back edge. This is a standard and efficient way to represent a prism's net. The orientation allows the side tabs to fold and enclose the volume perfectly.
- Other options either have incorrectly oriented faces or lack the necessary rectangular segments to account for all edges of the 3D model.
Step 3: Final Answer:
Option (A) is the only net that provides the correct geometry and connectivity required to reconstruct the given 3D figure.
Quick Tip: To solve net-folding problems quickly, count the number of faces and vertices on the 3D object.
Ensure the 2D layout has the exact same count.
Check if "mirroring" or "translation" of the complex faces is handled correctly so they face each other once folded.
The problem figure shows the top view of an object. Identify the correct view looking in the direction of arrow, amongst the answer figures.

- (A)
![]()
- (B)
![]()
- (C)
![]()
- (D)
![]()


View Solution
Step 1: Understanding the Question:
We are provided with a plan view (top view) containing several geometric shapes and must determine the correct front elevation as seen from the direction of the horizontal arrow (from left to right).
Step 2: Detailed Explanation:
1. Spatial Arrangement in Plan: From left to right along the line of sight of the arrow, we see:
- A rectangle located in the top-left region.
- A square with cross-diagonals (indicating a pyramid) in the center.
- A circle (indicating a cylinder or cone) on the right side.
2. Projecting to Elevation: When viewed from the left:
- The rectangle at the top-left will appear as a block on the viewer's left.
- The square with diagonals will appear as a pyramid in the middle of the view.
- The circle on the right will appear as a cylindrical or conical pillar on the far right.
3. Comparing Options: Option (C) correctly arranges these three distinct elements from left to right: a lower rectangular block, a central pyramid, and a taller cylindrical column.
Step 3: Final Answer:
The relative positions and projected forms of the components in Option (C) match the plan view exactly.
Quick Tip: To identify elevations from a plan, mentally draw vertical projection lines from every corner in the plan view.
The "depth" (left-to-right distance in the plan relative to the arrow) becomes the foreground/background relationship in the elevation.
The problem figure shows the top view of an object. Identify the correct elevation amongst the answer figures looking in the direction of arrow.

- (A)
![]()
- (B)
![]()
- (C)
![]()
- (D)
![]()


View Solution
Step 1: Understanding the Question:
Identify the elevation of a tiered object from a plan view, looking from the bottom towards the top (indicated by the arrow).
Step 2: Detailed Explanation:
1. Analysis of Plan: The top view shows a large outer rectangle and a smaller inner rectangle. This indicates a stepped or tiered block.
2. Proportions and Alignment: The smaller rectangle is centered horizontally within the larger one but is aligned towards the top edge.
3. Projection: Looking from the bottom, the larger rectangle represents a wide base in the foreground. The smaller rectangle represents a narrower, taller block sitting on that base. Since it is centered horizontally in the plan, it must appear centered in the front elevation.
4. Selection: Option (A) depicts a wide rectangular base with a taller, narrower rectangle centered perfectly on top of it.
Step 3: Final Answer:
Option (A) is the correct orthographic projection from the specified direction.
Quick Tip: If an object is centered along the axis of view in the plan, it must also be centered in the elevation.
Use symmetry to quickly eliminate off-center options like (B) or (C).
The problem figure shows the top view of an object. Identify the correct elevation amongst the answer figures in the direction of arrow.

- (A)
![]()
- (B)
![]()
- (C)
![]()
- (D)
![]()


View Solution
Step 1: Understanding the Question:
The goal is to determine the side elevation of a complex, tiered star-shaped structure from the direction indicated by the arrow.
Step 3: Detailed Explanation:
1. Analysis of Plan Geometry: The plan shows a six-pointed star shape with nested internal polygons (a diamond and a smaller square). This represents a pyramid-like structure with multiple tiered levels.
2. Level Identification: The outermost star boundary represents the base level. The inner diamond represents the middle level, and the central square/point is the highest level.
3. Visualizing Elevation: Looking from the arrow, we see the front-facing point of the star. The elevation should show the profile of the stepped facets. It will look like a ziggurat or a tiered pyramid with three distinct horizontal stages.
4. Selection: Option (B) shows exactly three vertical tiers: a wide base, a narrower middle block, and a small top block, which corresponds to the nested layers seen in the top view.
Step 4: Final Answer:
Option (B) accurately reflects the tiered height progression indicated by the plan.
Quick Tip: In plan-to-elevation problems, count the number of nested "rings" or boundaries.
Each boundary usually indicates a change in height. Match this count with the number of "steps" in the elevation options.
One of the following answer figures is hidden in problem figure in same size and direction. Select correct one.

- (A)
![]()
- (B)
![]()
- (C)
![]()
- (D)
![]()


View Solution
Step 1: Understanding the Question:
This is an embedded figures problem. We need to find which of the four provided shapes (A-D) is present within the lines of the complex mosaic problem figure, maintaining its original orientation and size.
Step 2: Detailed Explanation:
1. Analysis of Target Shapes: Option (A) is a triangle with one very sharp acute angle and a longer side.
2. Scanning the Mosaic: By carefully examining the top-right quadrant of the problem mosaic, we can trace the exact outlines of the triangle shown in Option (A). The diagonal and vertical lines of the grid intersect to form this specific shape.
3. Elimination: Other options like the thin parallelogram or the bird-shaped polygon do not find an exact line-for-line match in the provided grid.
Step 3: Final Answer:
The triangular shape in Option (A) is the only one hidden in the problem figure.
Quick Tip: To solve embedded figures, focus on the unique "junctions" or angles of the target shape.
Mentally superimpose each option onto various parts of the grid until the lines align perfectly.
One of the following answer figures is hidden in problem figure in same size and direction. Select correct one.

- (A)
![]()
- (B)
![]()
- (C)
![]()
- (D)
![]()


View Solution
Step 1: Understanding the Question:
Identify which small polygonal shape is exactly contained within the given complex multi-faceted problem figure.
Step 2: Detailed Explanation:
1. Analyzing Option (B): Option (B) is an irregular five-sided polygon (pentagon) with specific internal angles.
2. Verification in the Mosaic: Look at the middle-right section of the problem figure. The lines forming the facets in that area trace the exact perimeter of shape (B).
3. Cross-check: The other options have different proportions or angles that do not match any subset of lines in the main figure.
Step 3: Final Answer:
Option (B) is the correctly embedded figure.
Quick Tip: Break down complex mosaics into simpler regions.
Check the outer boundaries of the main figure first, as embedded shapes are frequently located near the edges.
One of the following answer figures is hidden in the problem figure in same size and direction. Select the correct one.

- (A)
![]()
- (B)
![]()
- (C)
![]()
- (D)
![]()


View Solution
Step 1: Understanding the Question:
Find the specific irregular polygon from the options that is hidden within the lines of the problem mosaic.
Step 2: Detailed Explanation:
1. Analyzing Option (C): Shape (C) is a four-sided irregular polygon with a distinct inward "notch" or obtuse angle on one side.
2. Locating in Problem Figure: Scanning the left-central region of the problem figure, we find a set of lines that form this exact shape. The proportions of the segments and the specific interior angles match perfectly.
Step 3: Final Answer:
Option (C) is correctly embedded in the problem figure.
Quick Tip: Look for the longest straight edge of the target shape first.
Search the problem figure for a matching line segment, then check if the adjacent angles follow the same pattern.
One of the following answer figures is hidden in the problem figure in same size and direction. Select the correct one.

- (A)
![]()
- (B)
![]()
- (C)
![]()
- (D)
![]()


View Solution
Step 1: Understanding the Question:
Identify the correct sub-figure hidden within the complex geometric pattern provided.
Step 3: Detailed Explanation:
1. Analyzing Option (D): This shape is a right-angled triangle with a specific height-to-base ratio.
2. Discovery: In the bottom-right corner of the problem figure, the intersection of the horizontal base line and a slanted interior line creates this exact triangular form.
Step 4: Final Answer:
Option (D) is found hidden within the problem pattern.
Quick Tip: Hidden triangles are usually found at the corners or edges of large composite figures where diagonal structural lines meet the outer frame.
Which one of the answer figures is correct mirror image of problem figure with respect to X-X ?

- (A)
![]()
- (B)
![]()
- (C)
![]()
- (D)
![]()


View Solution
Step 1: Understanding the Question:
The task is to find the mirror image (lateral inversion) of the provided irregular polygon with a square cutout across a vertical axis X-X situated on the right side.
Step 2: Detailed Explanation:
1. Principles of Reflection: In a vertical mirror image, the left and right positions are swapped, while top and bottom remain identical.
2. Proximity Rule: Features closest to the mirror line in the original figure must stay closest to the mirror line in the reflection.
3. Applying the Rule:
- The original figure is to the left of X-X, so the image will be to the right.
- The square cutout is on the "right" side of the original shape (near the mirror). In the image, it should be on the "left" side of the new shape.
- The jagged, 'C'-shaped indentation on the left of the original must flip to point towards the right in the image.
4. Selection: Option (A) correctly reflects the silhouette and shifts the internal square cutout to the corresponding inverted position.
Step 3: Final Answer:
Option (A) is the geometrically correct mirror reflection.
Quick Tip: "Near stays near, far stays far."
The part of the object nearest to the mirror line must appear nearest to the mirror line in its reflection. Use this to eliminate incorrect orientations immediately.
Which one of the answer figures is the correct mirror image of the problem figure with respect to X-X ?

- (A)
![]()
- (B)
![]()
- (C)
![]()
- (D)
![]()


View Solution
Step 1: Understanding the Question:
The task is to find the mirror image of the given circular figure across a horizontal axis \( X-X \) placed at the bottom. This transformation is equivalent to finding the "Water Image" of the figure.
Step 2: Detailed Explanation:
In a horizontal mirror reflection (water image):
1. The top and bottom positions of all elements are interchanged (vertical inversion).
2. The left and right positions remain the same.
3. Analyzing the problem figure:
- The small circle at the top-center will move to the bottom-center.
- The horizontal line passing through the center remains in place.
- The semi-circular arcs at the bottom-left and bottom-right will flip to appear at the top-left and top-right respectively.
Step 3: Final Answer:
By comparing these transformations with the options, Option (B) correctly represents the vertically inverted image.
Quick Tip: Remember: A mirror at the bottom/top causes a vertical flip (Water Image), while a mirror at the side causes a lateral flip (Mirror Image).
Which one of the answer figures is the correct mirror image of the problem figure with respect to X-X ?

- (A)
![]()
- (B)
![]()
- (C)
![]()
- (D)
![]()


View Solution
Step 1: Understanding the Question:
We need to identify the correct mirror image of a complex square pattern across a vertical axis \( X-X \) situated on the right side of the figure.
Step 2: Detailed Explanation:
In a vertical mirror reflection (lateral inversion):
1. Left and right positions are interchanged.
2. Top and bottom positions remain unchanged.
3. Proximity Rule: Elements closest to the mirror line in the original figure must stay closest to the mirror line in the reflected image.
- The rightmost column of the grid in the problem figure becomes the leftmost column in the answer figure.
- The diagonal lines within each small cell will change their orientation (e.g., a top-left to bottom-right diagonal becomes a top-right to bottom-left diagonal).
Step 3: Final Answer:
Option (C) accurately follows the principles of lateral inversion for the entire grid pattern.
Quick Tip: Focus on a single unique cell (like one with a specific shading or a distinct diagonal) near the mirror line. Use its reflected position to quickly eliminate incorrect options.
Which one of the answer figures completes the sequence of the problem figure ? Select the correct one.

- (A)
![]()
- (B)
![]()
- (C)
![]()
- (D)
![]()


View Solution
Step 1: Understanding the Question:
The problem presents a series of three squares with moving internal elements (a shaded triangle, a small square, and a circle). We must find the fourth square that continues the logic.
Step 2: Detailed Explanation:
Let's track the movement of each element:
1. Shaded Triangle: It rotates \( 90^{\circ} \) clockwise in each step.
- Step 1: Top-Left pointing Right.
- Step 2: Top-Right pointing Down.
- Step 3: Bottom-Right pointing Left.
- Step 4 (Expected): Bottom-Left pointing Up.
2. Internal symbols (Circle/Square): These also follow a systematic rotation or alternating pattern between the quadrants. In Step 3, the circle is at the top-left. In Step 4, it should move clockwise to the top-right.
Step 3: Final Answer:
Comparing these movements with the options, Option (B) is the only one where the shaded triangle is correctly positioned and oriented at the bottom-left corner.
Quick Tip: Isolate elements. First, track only the shaded part. If that eliminates three options, you don't need to waste time analyzing the smaller symbols.
The 3D figure shows the view of an object. Identify the correct view looking in the direction of arrow, amongst the answer figures.

- (A)
![]()
- (B)
![]()
- (C)
![]()
- (D)
![]()


View Solution
Step 1: Understanding the Question:
We need to find the correct 2D elevation (front view) of the provided 3D tiered block from the direction indicated by the bottom-left arrow.
Step 2: Detailed Explanation:
Looking from the arrow's direction:
1. We see the side profile of a "staircase" like structure.
2. There are three distinct steps of increasing height.
3. Behind the second step, there is a taller vertical pillar.
4. In a direct 2D projection, the taller pillar will appear as a rectangle protruding above the second step level.
Step 3: Final Answer:
Option (A) correctly depicts the tiered base and the relative height and position of the tall vertical member.
Quick Tip: Count the "steps" or height changes in the 3D model. The correct elevation must have the same number of vertical and horizontal boundary lines in the correct sequence.
The 3D figure shows the view of an object. Identify the correct view looking in the direction of arrow, amongst the answer figures.

- (A)
![]()
- (B)
![]()
- (C)
![]()
- (D)
![]()


View Solution
Step 1: Understanding the Question:
Identify the side elevation of the multi-level 3D block as seen from the direction of the arrow.
Step 2: Detailed Explanation:
1. Foreground Elements: From the arrow's perspective, the lowest, wide base block is in the immediate foreground.
2. Step Progression: Above the base, there is a set of three steps forming a staircase profile on the left.
3. Tall Elements: On the right side, there is a tall vertical square column.
4. Orthographic Projection: The final 2D shape will show a horizontal base, a three-step profile on the left, and a taller rectangular silhouette on the right.
Step 3: Final Answer:
Option (B) is the only one that correctly captures the three-step profile adjacent to the taller vertical section.
Quick Tip: When multiple blocks overlap in your line of sight, always draw the silhouette of the tallest/widest part that is not obscured.
The 3D figure shows the view of an object. Identify the correct view looking in the direction of arrow, amongst the answer figures.

- (A)
![]()
- (B)
![]()
- (C)
![]()
- (D)
![]()


View Solution
Step 1: Understanding the Question:
Identify the correct side elevation for the hollowed-out "U" shaped block with a tall vertical protrusion.
Step 2: Detailed Explanation:
Looking from the arrow:
1. The main body is a "U" shaped wall on a flat base. From the side, this wall appears as a wide rectangle.
2. There is a tall, slender vertical bar located at the back-left corner of the structure.
3. In a 2D side view, this bar will appear as a narrow rectangle on the left side of the wider main block.
Step 3: Final Answer:
Option (A) correctly shows the tall, narrow vertical segment on the left attached to a lower, wider rectangular base.
Quick Tip: Mentally "flatten" the object against a wall perpendicular to the arrow. Hidden internal lines are usually not shown in these aptitude questions unless specified.
The 3D figure shows the view of an object. Identify the correct view looking in the direction of arrow, amongst the answer figures.

- (A)
![]()
- (B)
![]()
- (C)
![]()
- (D)
![]()


View Solution
Step 1: Understanding the Question:
Determine the side elevation of a stepped block with a wide base.
Step 2: Detailed Explanation:
Looking in the direction of the arrow:
1. The base is the widest part and sits at the bottom.
2. There are two distinct steps or levels above the base.
3. The first step is wider than the top step.
4. This results in a "L-stair" profile on a horizontal platform.
Step 3: Final Answer:
Option (A) correctly represents the wide base and the two-level stepped profile above it.
Quick Tip: Check the number of horizontal surfaces. In the 3D model, there are 3 different height levels (base, step 1, top). The answer must show these 3 levels.
The 3D figure shows the view of an object. Identify the correct view looking in the direction of arrow, amongst the answer figures.

- (A)
![]()
- (B)
![]()
- (C)
![]()
- (D)
![]()


View Solution
Step 1: Understanding the Question:
Identify the elevation of the complex faceted prism from the specified direction.
Step 2: Detailed Explanation:
1. The object is a prism with a sloped or faceted front.
2. Looking from the arrow, the silhouette is rectangular.
3. The internal lines represent the edges of the triangular and trapezoidal facets.
4. Specifically, you see a central rectangular "step" and slanted planes on either side.
Step 3: Final Answer:
Option (A) captures the correct division of the front face into sections, showing the central vertical block and the slanted corner.
Quick Tip: For faceted objects, draw every visible edge that is not parallel to your line of sight. Slanted edges will appear as vertical or horizontal lines in a direct orthographic view.
The 3D figure shows the view of an object. Identify the correct view looking in the direction of arrow, from the answer figures.

- (A)
![]()
- (B)
![]()
- (C)
![]()
- (D)
![]()


View Solution
Step 1: Understanding the Question:
Find the 2D side elevation of the L-shaped tiered block from the direction of the arrow.
Step 2: Detailed Explanation:
1. Analysis: The object consists of a tall vertical arm and a shorter horizontal arm extending to the right.
2. Proportions: Looking from the arrow (bottom-left), the tall arm is in the foreground. It obscures part of the base behind it.
3. Projection: We see a tall rectangle on the left and a shorter rectangular section extending to the right.
Step 3: Final Answer:
Option (C) correctly shows the "L" silhouette where the vertical part is significantly taller than the horizontal protrusion.
Quick Tip: Pay attention to the height-to-width ratio of the blocks. Option (B) and (C) look similar, but the proportions in (C) better match the provided isometric view.
The 3D figure shows the view of an object. Identify the correct view looking in the direction of arrow, amongst the answer figures.

- (A)
![]()
- (B)
![]()
- (C)
![]()
- (D)
![]()


View Solution
Step 1: Understanding the Question:
Identify the side elevation of the "U" channel block from the direction indicated by the arrow.
Step 2: Detailed Explanation:
1. Silhouette: Looking from the bottom-left arrow, we are looking at the side profile of one of the vertical walls of the "U" shape.
2. View: The outer boundary will be a simple rectangle.
3. Internal Details: Since it is a hollow channel, the base connects the two walls. From this side, we see the rectangular face of the side wall and a horizontal line where it meets the base.
Step 3: Final Answer:
Option (B) correctly represents the rectangular side profile with the appropriate dividing line for the base.
Quick Tip: When looking at a hollow object from the side, the view often simplifies into a solid silhouette. Use the outer proportions as your primary guide.
The 3D figure shows the view of an object. Identify the correct view looking in the direction of arrow, amongst the answer figures.

- (A)
![]()
- (B)
![]()
- (C)
![]()
- (D)
![]()


View Solution
Step 1: Understanding the Question:
The task is to identify the side elevation of the tiered "staircase" block from the direction indicated by the arrow (bottom-left).
Step 2: Detailed Explanation:
By observing the 3D model:
1. Number of Tiers: The object consists of a wide rectangular base and four distinct steps on top, making a total of five horizontal levels.
2. Profile Analysis: Looking from the direction of the arrow, we see the side profile of these steps. This will appear as a series of rectangles stacked vertically, where the width of each segment corresponds to the width of that step's side face.
3. Alignment: All steps are aligned to the back edge. In a 2D side view, this creates a "staircase" silhouette.
4. Matching: Option (D) correctly depicts five vertical segments (including the base) with the correct staircase-like progression.
Step 3: Final Answer:
Option (D) is the correct orthographic side view.
Quick Tip: In tiered object problems, count the number of horizontal surfaces in the 3D model.
This number must match the number of "steps" or levels visible in the elevation view.
The 3D figure shows the view of an object. Identify the correct view looking in the direction of arrow, amongst the answer figures.

- (A)
![]()
- (B)
![]()
- (C)
![]()
- (D)
![]()


View Solution
Step 1: Understanding the Question:
Identify the front elevation of the block with a sloped support and a window-like cutout from the direction of the arrow.
Step 2: Detailed Explanation:
1. Composition: The object has a tall vertical back wall, a wide base, and a sloped triangular buttress on the left.
2. Key Feature: There is a small square window (cutout) located on the right side of the vertical wall.
3. Projection: From the arrow's perspective, the sloped side on the left appears as a simple rectangle, the main wall is in the center, and the window is visible on the right.
4. Matching: Option (A) correctly places the window cutout in the upper-right section of the main vertical block.
Step 3: Final Answer:
Option (A) accurately represents the orthographic projection of all visible features.
Quick Tip: When a sloped surface is viewed from the front, it projects as a simple flat rectangle.
Focus on the position of internal "holes" or cutouts to distinguish between similar-looking options.
The 3D figure shows the view of an object. Identify the correct view looking in the direction of arrow, amongst the answer figures.

- (A)
![]()
- (B)
![]()
- (C)
![]()
- (D)
![]()


View Solution
Step 1: Understanding the Question:
Determine the side elevation of the notched tiered block with a cylindrical cutout.
Step 2: Detailed Explanation:
1. Form Analysis: The block has a stepped base and a taller upper section with a semi-circular or U-shaped notch in the middle.
2. Viewing Angle: From the arrow (side view), the U-shaped cutout will appear as a rectangular notch at the top.
3. Hierarchy: We will see the lower base protrusion on the left and the main tall body on the right.
4. Selection: Option (B) correctly shows the "L" shaped profile of the base and the rectangular notch at the top center of the taller section.
Step 3: Final Answer:
Option (B) is the correct side view based on the provided geometry.
Quick Tip: In orthographic projection, curved surfaces like a cylinder or a semi-circular notch appear as rectangles if viewed perpendicular to their axis.
The 3D figure shows the view of an object. Identify the correct view looking in the direction of arrow, from the answer figure's.

- (A)
![]()
- (B)
![]()
- (C)
![]()
- (D)
![]()


View Solution
Step 1: Understanding the Question:
Identify the elevation of the hollow tapered prism (hopper-like shape) looking from the direction of the arrow.
Step 2: Detailed Explanation:
1. Exterior Shape: The outer silhouette of the object is a rectangle with a smaller rectangle representing the base plate.
2. Internal Details: Since the object is hollow with sloping internal walls, looking from the front (arrow) will reveal the internal "stairs" or tapered edges.
3. Analysis: You see the outer rectangular frame, and the internal tapered planes project as a nested rectangle with diagonal ridge lines.
4. Matching: Option (A) shows the correct nested rectangular layout with the vertical divider representing the bottom floor of the hopper.
Step 3: Final Answer:
The correct elevation view is Option (A).
Quick Tip: For hollowed-out objects, the elevation must account for the thickness of the walls and the lines created by internal corners.
The 3D figure shows the view of an object. Identify the correct top view, amongst the answer figures.

- (A)
![]()
- (B)
![]()
- (C)
![]()
- (D)
![]()


View Solution
Step 1: Understanding the Question:
The goal is to determine the 2D plan view (top view) of the provided "H" shaped 3D block.
Step 2: Detailed Explanation:
1. Object Geometry: The object consists of two tall vertical rectangular columns connected by a thinner horizontal bridge at the center.
2. Plan Mapping: From directly above, we see the top surfaces of the two columns as rectangles and the top surface of the connecting bridge as a smaller rectangle.
3. Arrangement: This forms a distinct "H" shape. The thickness of the vertical bars in the plan must match the width of the columns in 3D.
4. Selection: Option (B) accurately reflects the plan of an "H" block with a central connecting member.
Step 3: Final Answer:
Option (B) is the correct top view.
Quick Tip: To find the top view, imagine "flattening" the object vertically against the ground.
Every horizontal surface must be represented as a bounded area in your 2D plan.
The 3D figure shows the view of an object. Identify the correct top view, amongst the answer figures.

- (A)
![]()
- (B)
![]()
- (C)
![]()
- (D)
![]()


View Solution
Step 1: Understanding the Question:
Identify the plan view of a tiered block with two different height levels on a base.
Step 2: Detailed Explanation:
1. Base Layer: The 3D model sits on a rectangular base plate.
2. Upper Layers: There are two distinct blocks on top. One is a taller L-shaped segment, and the other is a lower rectangular step.
3. Plan Projection: Looking from above, you will see three main regions: the large base rectangle, and the internal dividing lines representing the boundaries of the upper tiers.
4. Selection: Option (A) shows the base rectangle divided into an L-shape and two adjacent rectangles, perfectly matching the footprint of the tiered structure.
Step 3: Final Answer:
Option (A) represents the correct top view.
Quick Tip: In plan views, height is not visible, but the "edges" where height changes occur are drawn as solid lines.
Count the number of such edges in the 3D model to verify the lines in the plan.
The 3D figure shows the view of an object. Identify the correct top view, amongst the answer figures.

- (A)
![]()
- (B)
![]()
- (C)
![]()
- (D)
![]()


View Solution
Step 1: Understanding the Question:
Find the top view of a block with an "S" or "Z" shaped notched path.
Step 2: Detailed Explanation:
1. Analysis: The object is a rectangular block with a series of stepped cutouts forming a winding path.
2. Proportions: The overall footprint is rectangular. Within this rectangle, there are vertical and horizontal lines representing the various steps.
3. Visualizing the Plan: You will see the main outer boundary and a nested "U" or "S" shaped series of lines depending on the specific geometry of the cutouts.
4. Selection: Option (A) [70819137555] correctly depicts the arrangement of internal lines that form the steps seen in the 3D model.
Step 3: Final Answer:
The matching plan view is Option (A).
Quick Tip: For objects with cutouts, the top view often looks like a simplified diagram of the "path" or "void."
Follow the lines along the top surfaces to trace out the 2D pattern.
Identify the building compositions of having less visual tension amongst the following figures.


View Solution
Step 1: Understanding the Question:
Visual tension is an architectural concept where certain arrangements of forms create a sense of instability or "effort." Forms that are symmetrical, stable, and firmly grounded have less visual tension.
Step 3: Detailed Explanation:
1. Composition (A): Shows two similar trapezoidal forms joined at a central axis. It is balanced and symmetrical, resulting in very low visual tension.
2. Composition (B): Shows a larger form "connected" to a smaller one in a simple, straightforward manner. While asymmetric, the forms are aligned and stable, keeping tension low.
3. Compositions (C) and (D): These show tilted or "sliding" masses. The diagonal orientation creates a high sense of dynamic movement and instability, which translates to high visual tension.
Step 4: Final Answer:
Compositions (A) and (B) are the most stable and balanced. Thus, the correct option is (A).
Quick Tip: Stability = Low Tension.
Symmetry = Low Tension.
Tilted lines or precarious connections = High Tension.
The problem figure shows the top view of an object. Identify the correct elevation amongst the answer figures looking in the direction of arrow.

- (A)
![]()
- (B)
![]()
- (C)
![]()
- (D)
![]()


View Solution
Step 1: Understanding the Question:
Identify the elevation from a plan view containing multiple shapes (rectangles and triangles).
Step 2: Detailed Explanation:
1. Scan lines: From the direction of the arrow, we see a row of objects.
2. Component Breakdown:
- On the far left: A large rectangle.
- In the middle: Two triangles (which represent pyramids in 3D).
- On the far right: A square/rectangle.
3. Elevation Projection: The pyramids (triangles in plan) will show as peaked shapes in the elevation. The rectangular blocks will show as vertical rectangles.
4. Matching: Option (B) [70819137564] correctly shows the sequence: block, two pyramid peaks, and another block.
Step 3: Final Answer:
Option (B) is the correct projection.
Quick Tip: In plan-to-elevation conversion, triangles usually indicate pyramids or wedges.
Count the distinct objects in the plan and check if they all appear in the elevation.
The problem figure shows the top view of an object. Identify the correct elevation amongst the answer figures looking in the direction of arrow.

- (A)
![]()
- (B)
![]()
- (C)
![]()
- (D)
![]()


View Solution
Step 1: Understanding the Question:
Identify the elevation of a faceted star-shaped pyramid looking from the direction of the arrow.
Step 2: Detailed Explanation:
1. Plan Analysis: The plan is a six-pointed star. The internal lines meeting at a central point indicate it is a faceted pyramid.
2. Viewing Direction: The arrow points directly at one of the "arms" of the star.
3. Profile: From this side, the arm pointing towards the viewer will be a central ridge. You will see the triangular facets on either side of this central ridge.
4. Matching: Option (B) [70819137568] correctly depicts the peaked central point and the sloping facets of the star's points in a 2D orthographic projection.
Step 3: Final Answer:
The correct elevation is Option (B).
Quick Tip: For symmetrical star pyramids, the elevation usually looks like a polygon with internal lines representing the ridges of the points.
Count the visible points in your line of sight to confirm.
Draw a proportionate sketch of given reference image by using any black and white rendering techniques of your own choice.

View Solution
Step 1: Understanding the Question:
The task is to replicate the provided reference portrait (a sketch of a young person) with a focus on accurate proportions and tonal rendering using monochrome media (pencil, charcoal, or pen).
Step 2: Detailed Explanation:
1. Proportions: Start by lightly sketching the basic shapes. Use the "grid method" or "eye-balling" to ensure the head, facial features, and torso are correctly placed. Note the angle of the head and the positioning of the hand.
2. Structural Outlining: Refine the contours of the face, the folds of the cap, and the drapes of the clothing. Accuracy in the line of the nose and the expression in the eyes is crucial for a likeness.
3. Tonal Values: Identify the light source. In the reference, light seems to come from the side. Use rendering techniques like hatching, cross-hatching, or blending to create depth.
- High Highlights: Keep the areas on the forehead and nose light.
- Mid-tones: Apply light pressure for the skin and general folds of the cloth.
- Darkest Shadows: Use darker pencils (e.g., 4B or 6B) for the hair under the cap, deep folds in the sleeve, and the areas behind the figure to make it pop.
Step 3: Final Answer:
A well-rendered, proportionate sketch should maintain the character of the original while demonstrating a clear understanding of light, shadow, and anatomy.
Quick Tip: When sketching from a reference, start with light, faint lines. It is much easier to correct a light pencil mark than a dark one. Focus on "negative spaces" (the shapes around the person) to help get the outer silhouette right.
Decode image and prepare balanced composition in a frame of your choice by using any black and white rendering techniques.
View Solution
Step 1: Understanding the Question:
"Decoding" an image involves identifying its core elements (e.g., the figure, the cap, the specific hand gesture, the drapery) and re-organizing them into a new, aesthetically balanced composition.
Step 2: Detailed Explanation:
1. Analysis (Decoding): Identify the vertical and diagonal lines created by the original figure's pose. The cap adds a unique soft triangular mass at the top, while the arm creates a diagonal leading line.
2. Compositional Planning: Within a chosen frame (rectangular or square), place these elements to create "balance." This doesn't mean perfect symmetry; you can use "asymmetrical balance" by placing the figure on one third and a background element on the other.
3. Creative Application: You might zoom in on specific textures of the cloth or use a more abstract approach where the "essence" of the portrait is kept but the background is modernized.
4. Rendering: Use black and white techniques like stippling (dots) or bold ink washes to differentiate foreground from background and guide the viewer's eye.
Step 3: Final Answer:
A successful composition will feel "stable" yet dynamic, using the decoded elements of the original image to tell a new visual story within the frame.
Quick Tip: Use the "Rule of Thirds" for a balanced composition. Place your focal points at the intersections of a 3x3 grid within your frame to create a more natural and engaging look than centering everything.
Draw a scene of a Kite festival by using colors.
View Solution
Step 1: Understanding the Question:
The task is to illustrate a lively, cultural scene of a kite festival, emphasizing movement, depth, and vibrant color usage.
Step 2: Detailed Explanation:
1. Foreground Elements: Draw human figures in action—holding reels (firki), running with kites, or standing on rooftops. This establishes the scale and human connection to the festival.
2. Midground and Background: Create depth by drawing many kites of various sizes. Larger, detailed kites should be lower in the frame, while smaller, simpler ones are high up to simulate distance.
3. Sky and Environment: Use the sky as a canvas. A bright blue or a sunset orange/yellow background provides great contrast for colorful kites. Add birds or a distant cityscape to ground the scene.
4. Coloring Technique: Use warm, bright colors (red, yellow, orange) for the kites to make them energetic against a cool sky. Use shading on the kites to show they are stretched by the wind.
Step 3: Final Answer:
The final illustration should capture the "spirit" of the festival through a busy, colorful sky and active participants, showing a clear sense of atmosphere.
Quick Tip: To show movement, draw the kite strings as thin, slightly curved diagonal lines. Adding "tails" to the kites with wispy strokes also helps convey the direction and force of the wind.
Draw a Harmonic three dimensional composition with the following two types of objects: (i) CUBOID A: SIZE 2 cm \(\times\) 2 cm \(\times\) 2 cm, 5 Nos. (ii) CUBOID B: SIZE 5 cm \(\times\) 2 cm \(\times\) 2 cm, 4 Nos. Use 'Cool Colorscheme' for composition.
View Solution
Step 1: Understanding the Question:
This requires a spatial arrangement of geometric solids (5 cubes and 4 long cuboids) that feels "harmonic" (organized and pleasing). The color palette is restricted to "cool colors" (blues, greens, purples).
Step 2: Detailed Explanation:
1. 3D Visualization: Draw the objects in isometric or perspective view. Cuboid A is a 2cm cube; Cuboid B is a 5cm long bar.
2. Compositional Harmony: Arrange the objects to have a focal point. You can stack them, lean them against each other, or create a rhythmic sequence. Avoid scattering them randomly. Use concepts like "overlapping" and "varying heights" to create interest.
3. Shadow and Light: Even within a color scheme, use lighter and darker shades to show the three sides of each object (top, front, side). This creates the 3D effect.
4. Color Scheme: Apply different shades of blue, cyan, emerald green, and violet. For example, use a light cyan for top surfaces, a mid-blue for front surfaces, and a dark navy for side surfaces in shadow.
Step 3: Final Answer:
A successful composition will clearly show the correct number and types of cuboids arranged in a stable, creative structure with a consistent cool-color treatment.
Quick Tip: "Cool colors" have a calming effect. To make the composition more harmonic, use a "monochromatic" cool scheme (different shades of just one color, like Blue) or an "analogous" one (colors next to each other on the wheel, like Blue, Blue-Green, and Green).
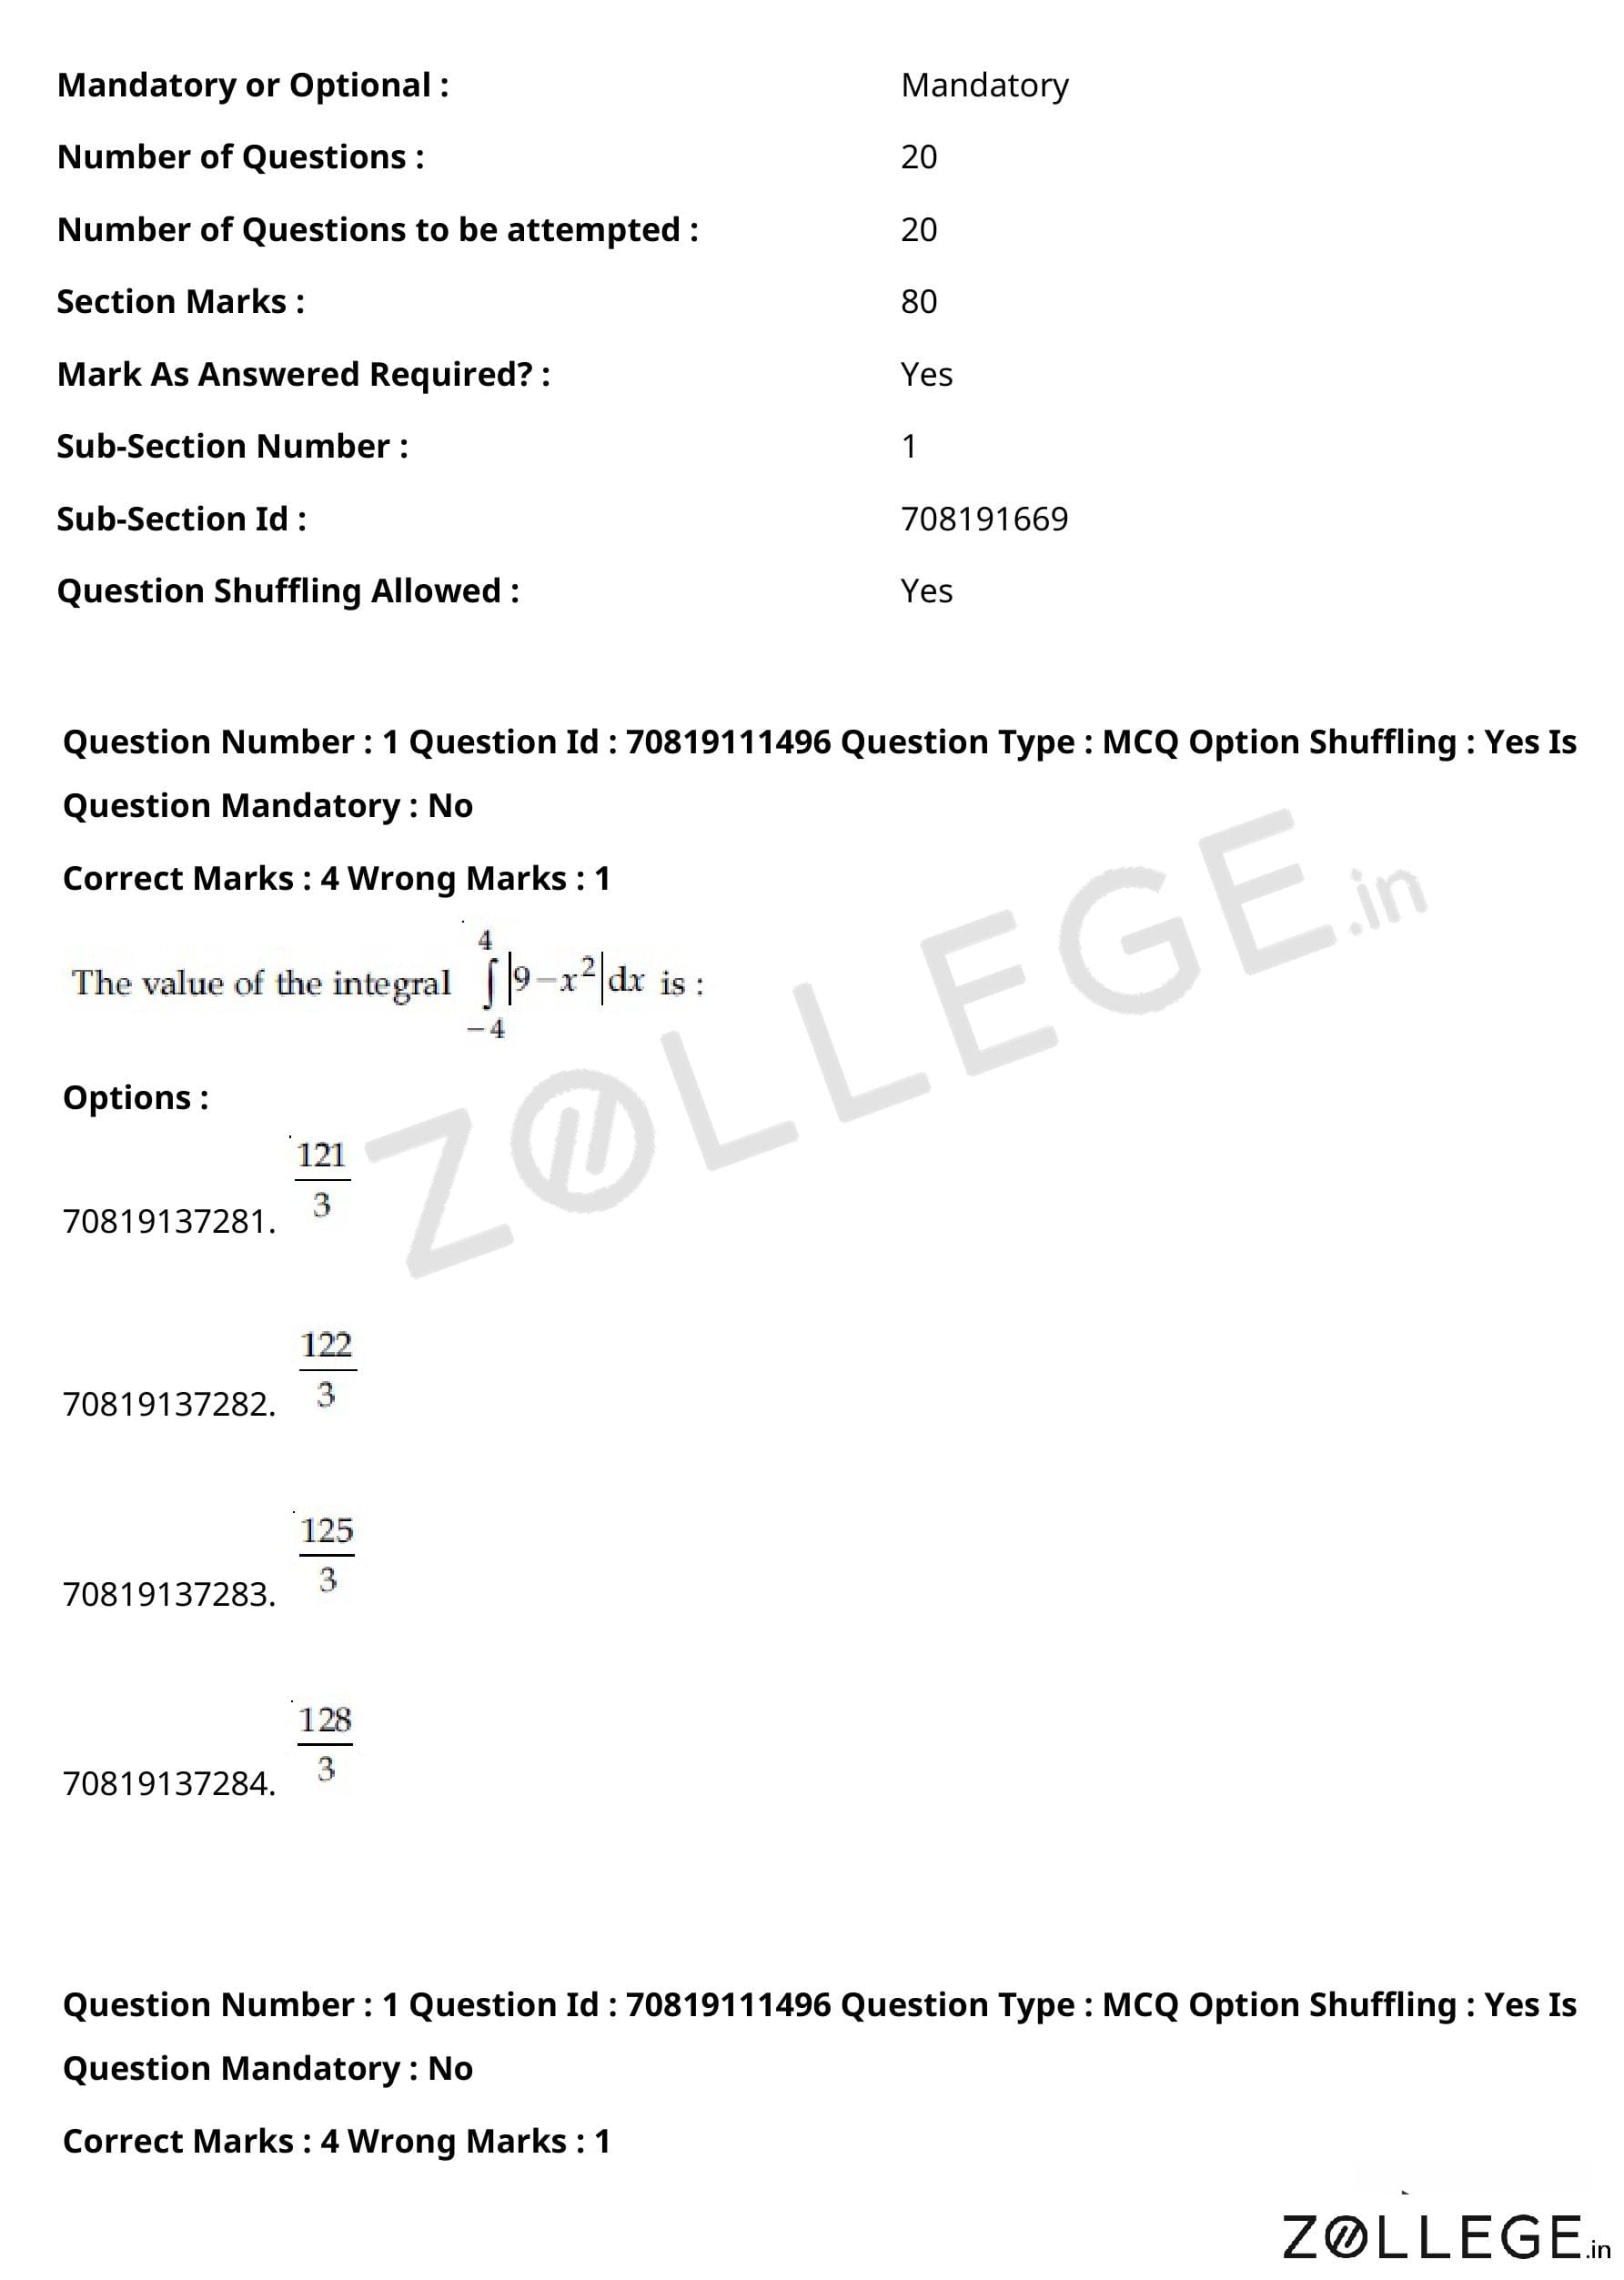
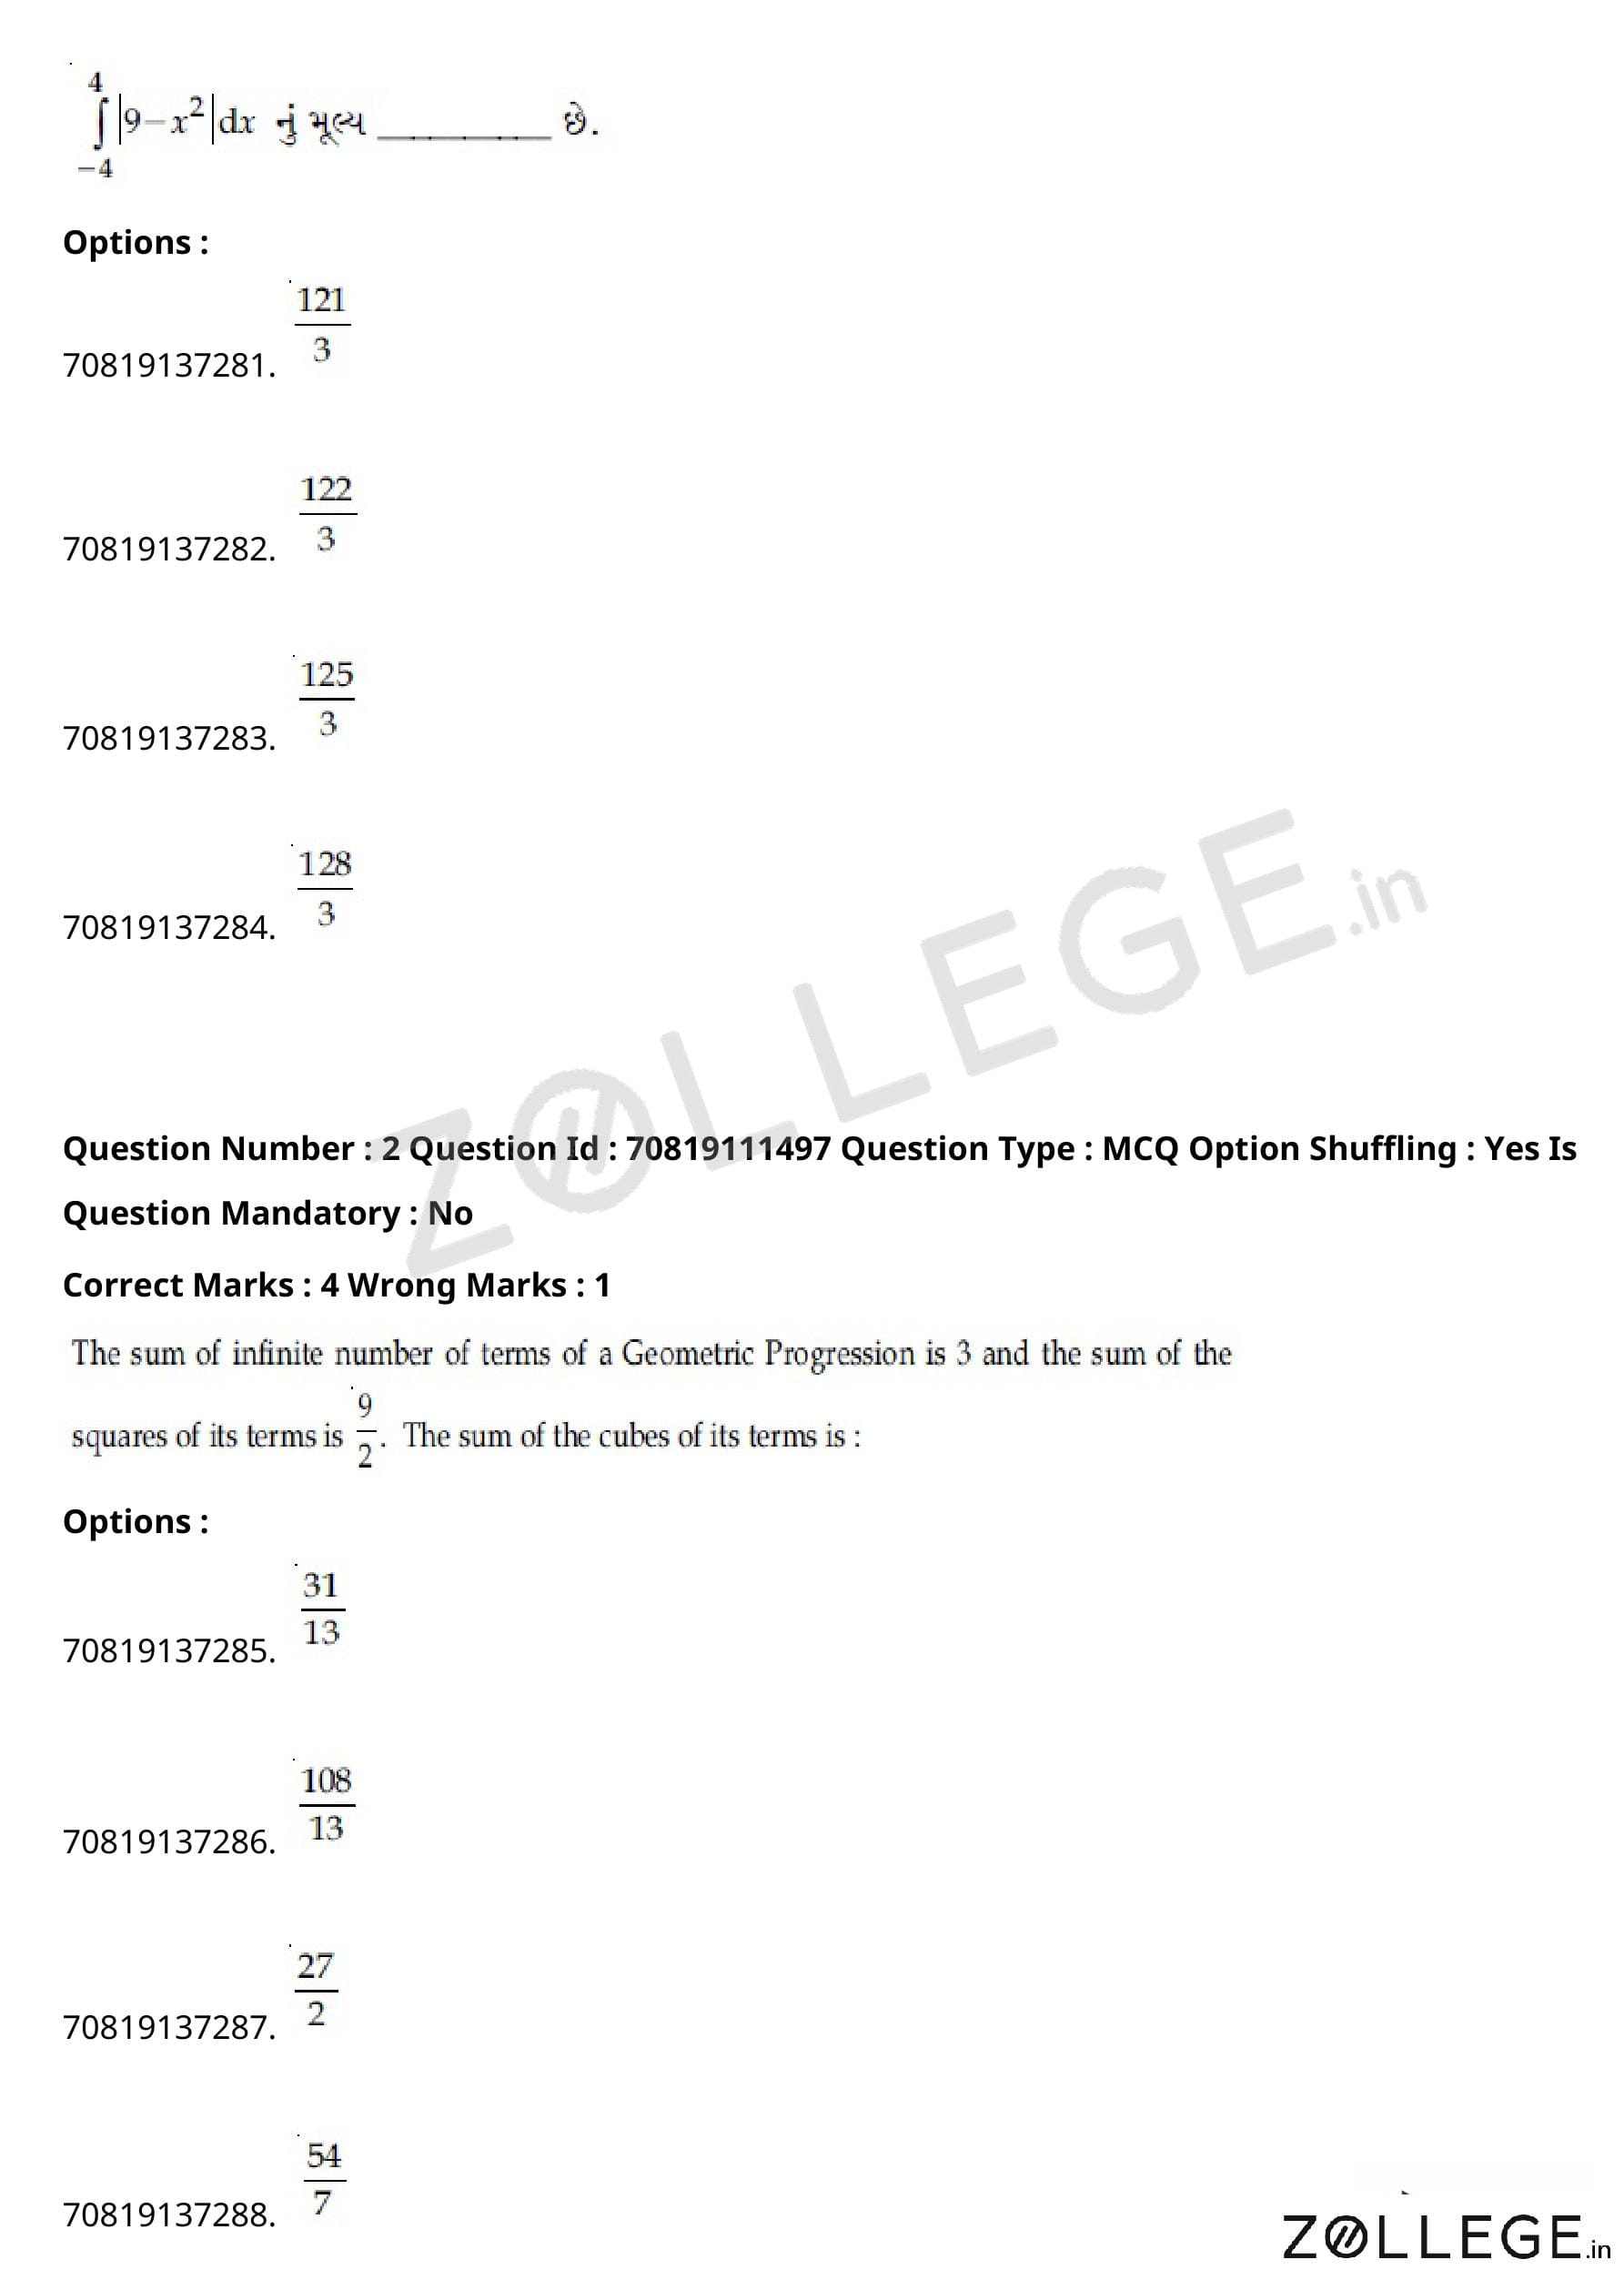
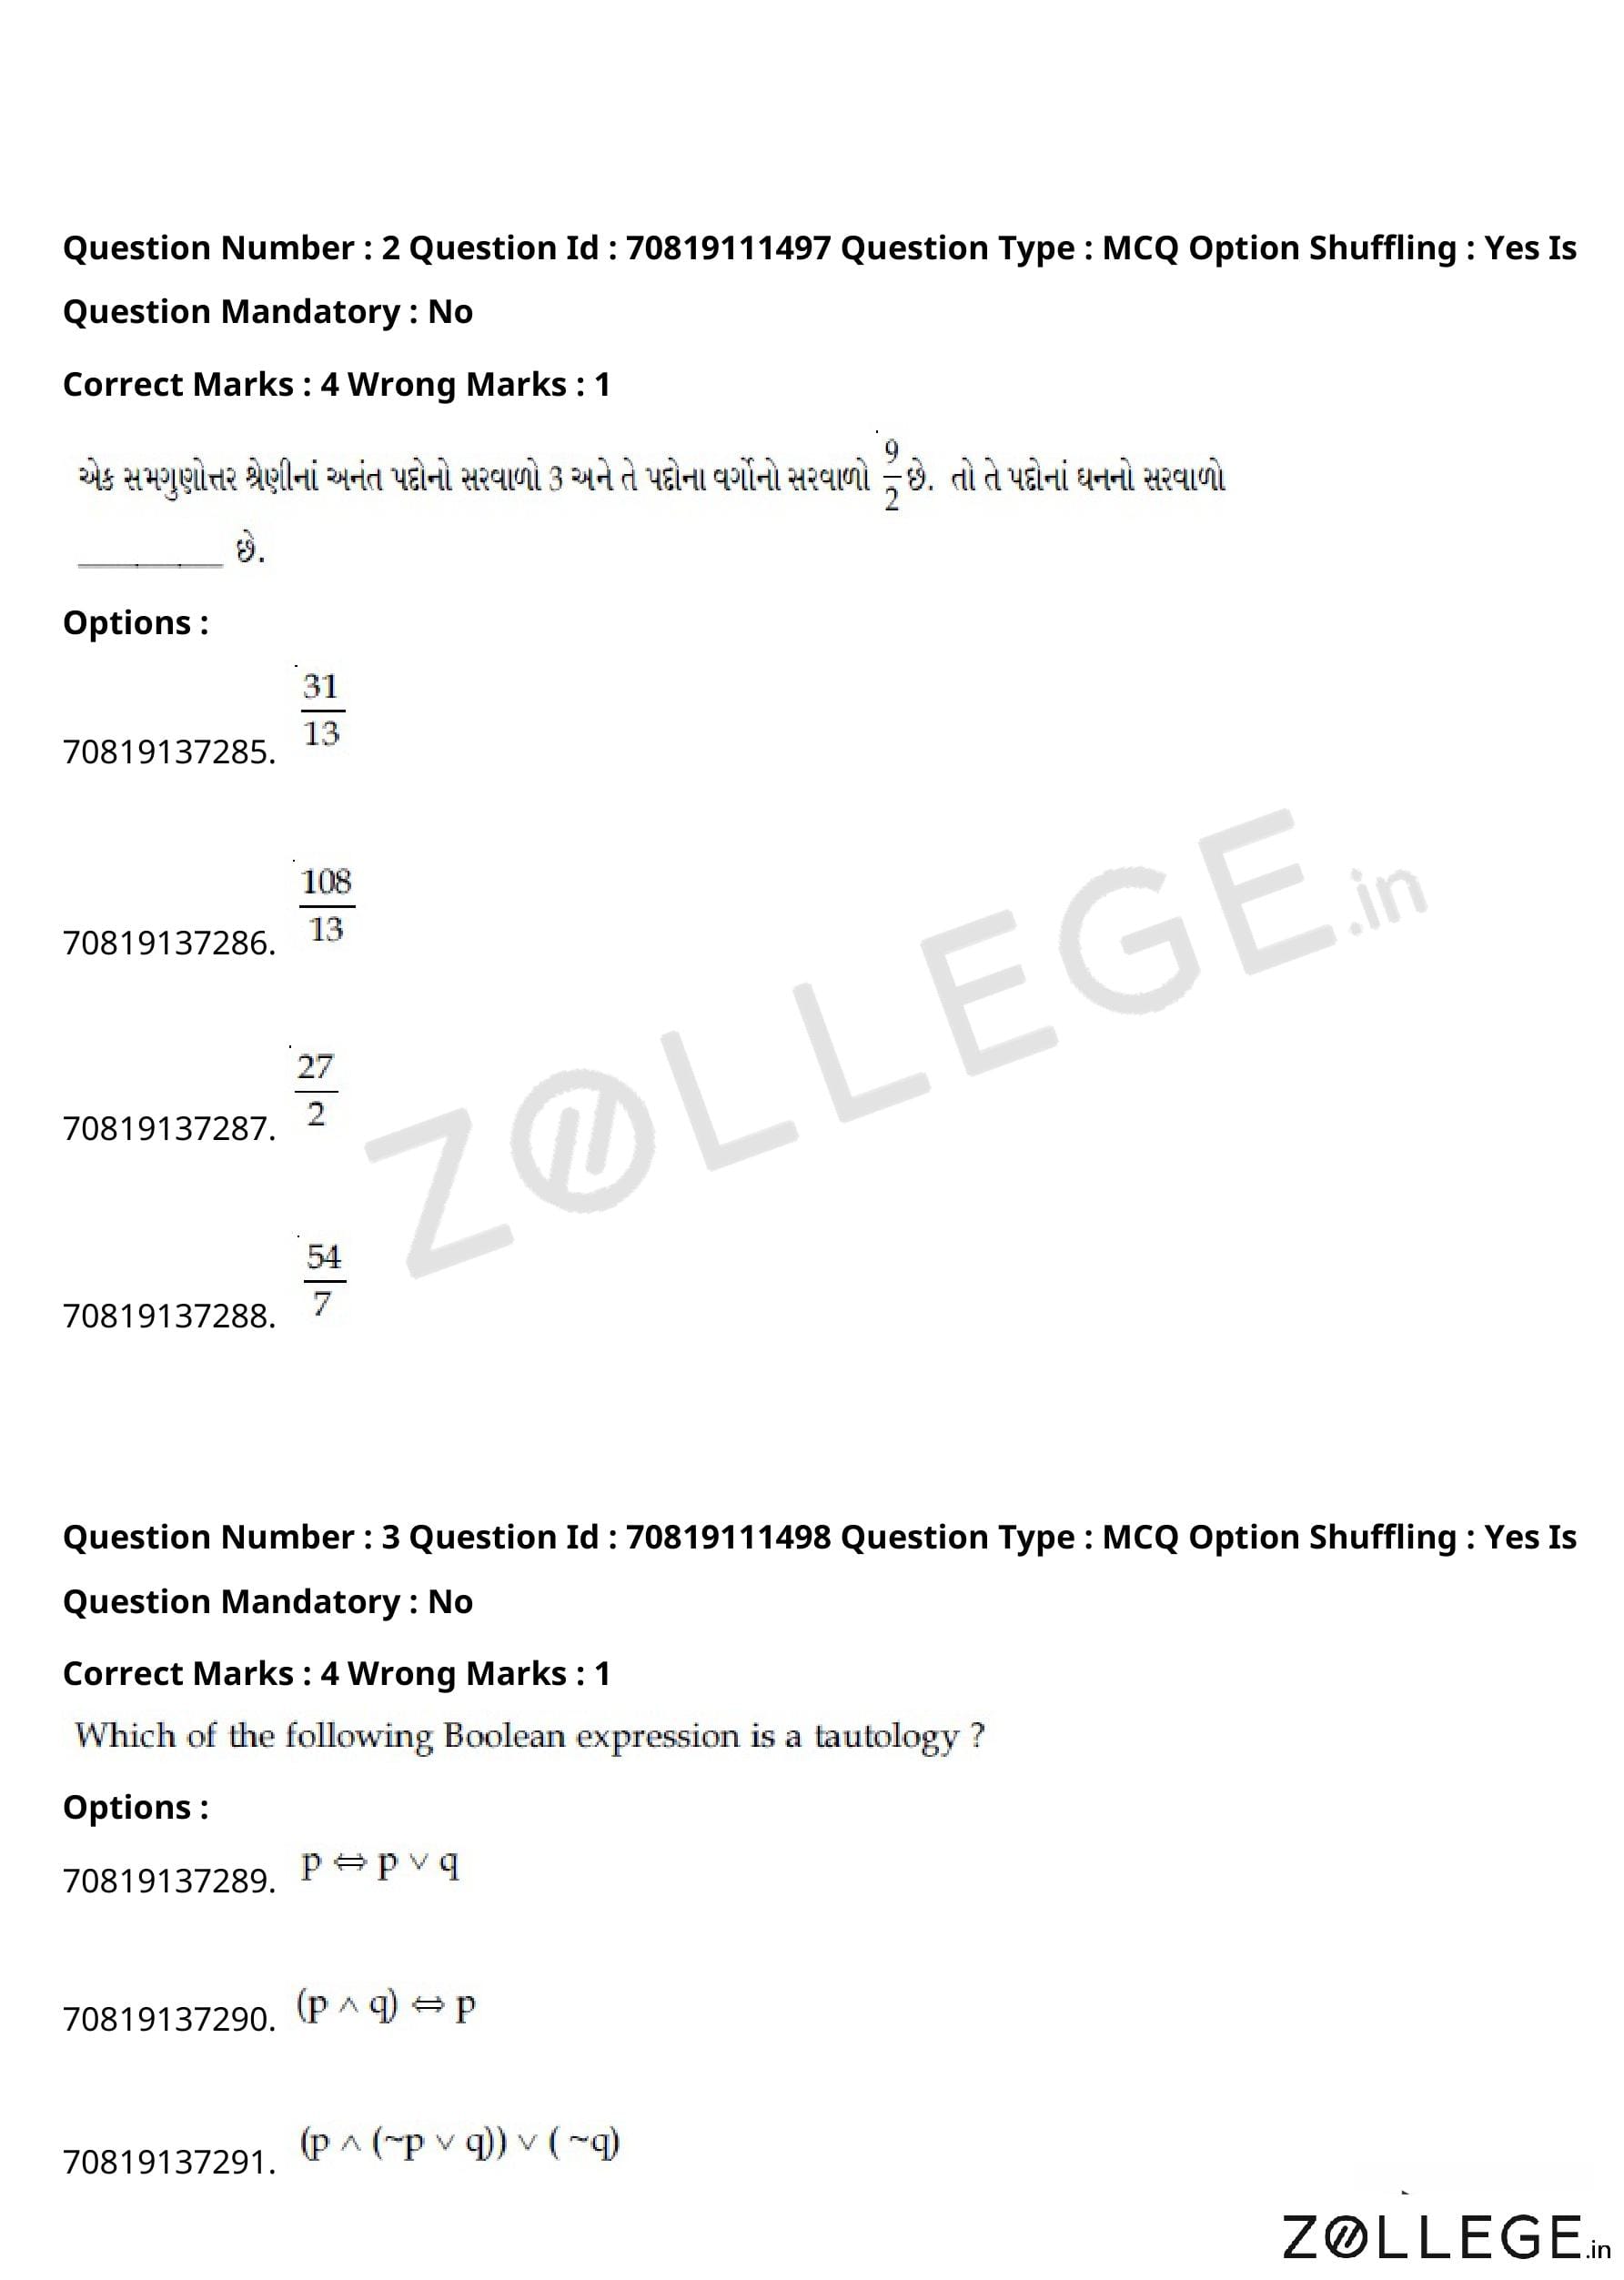
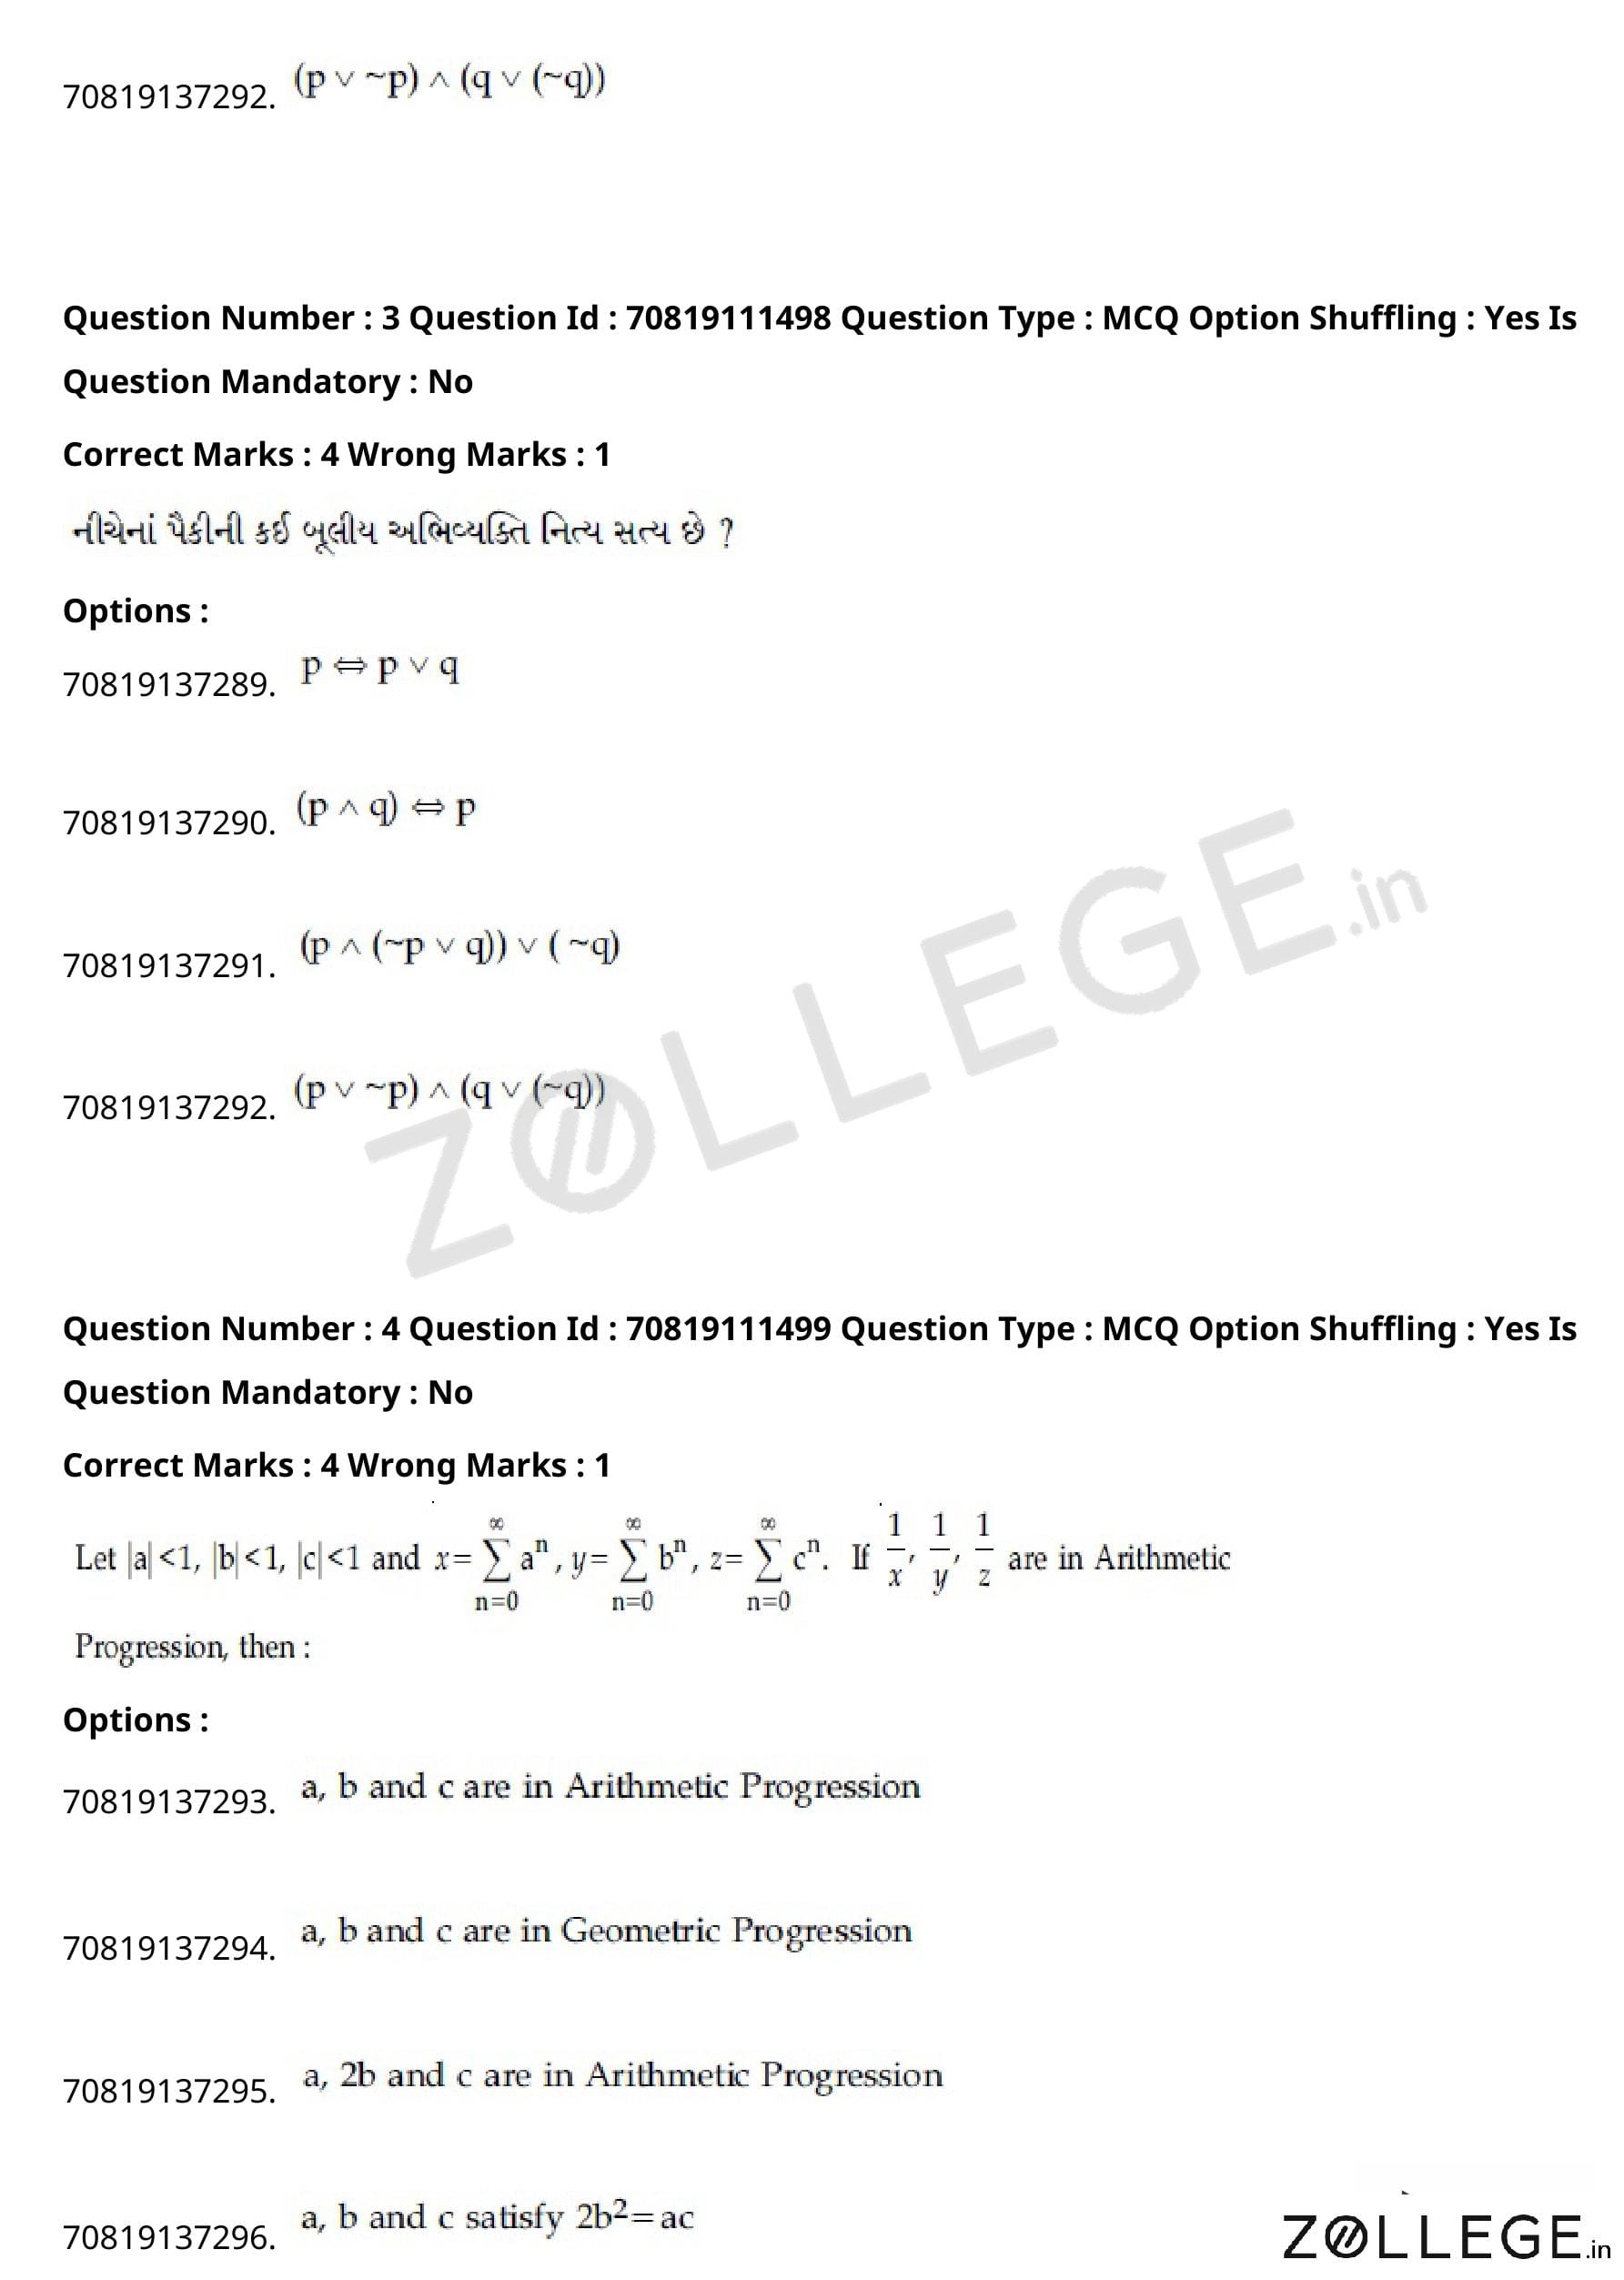
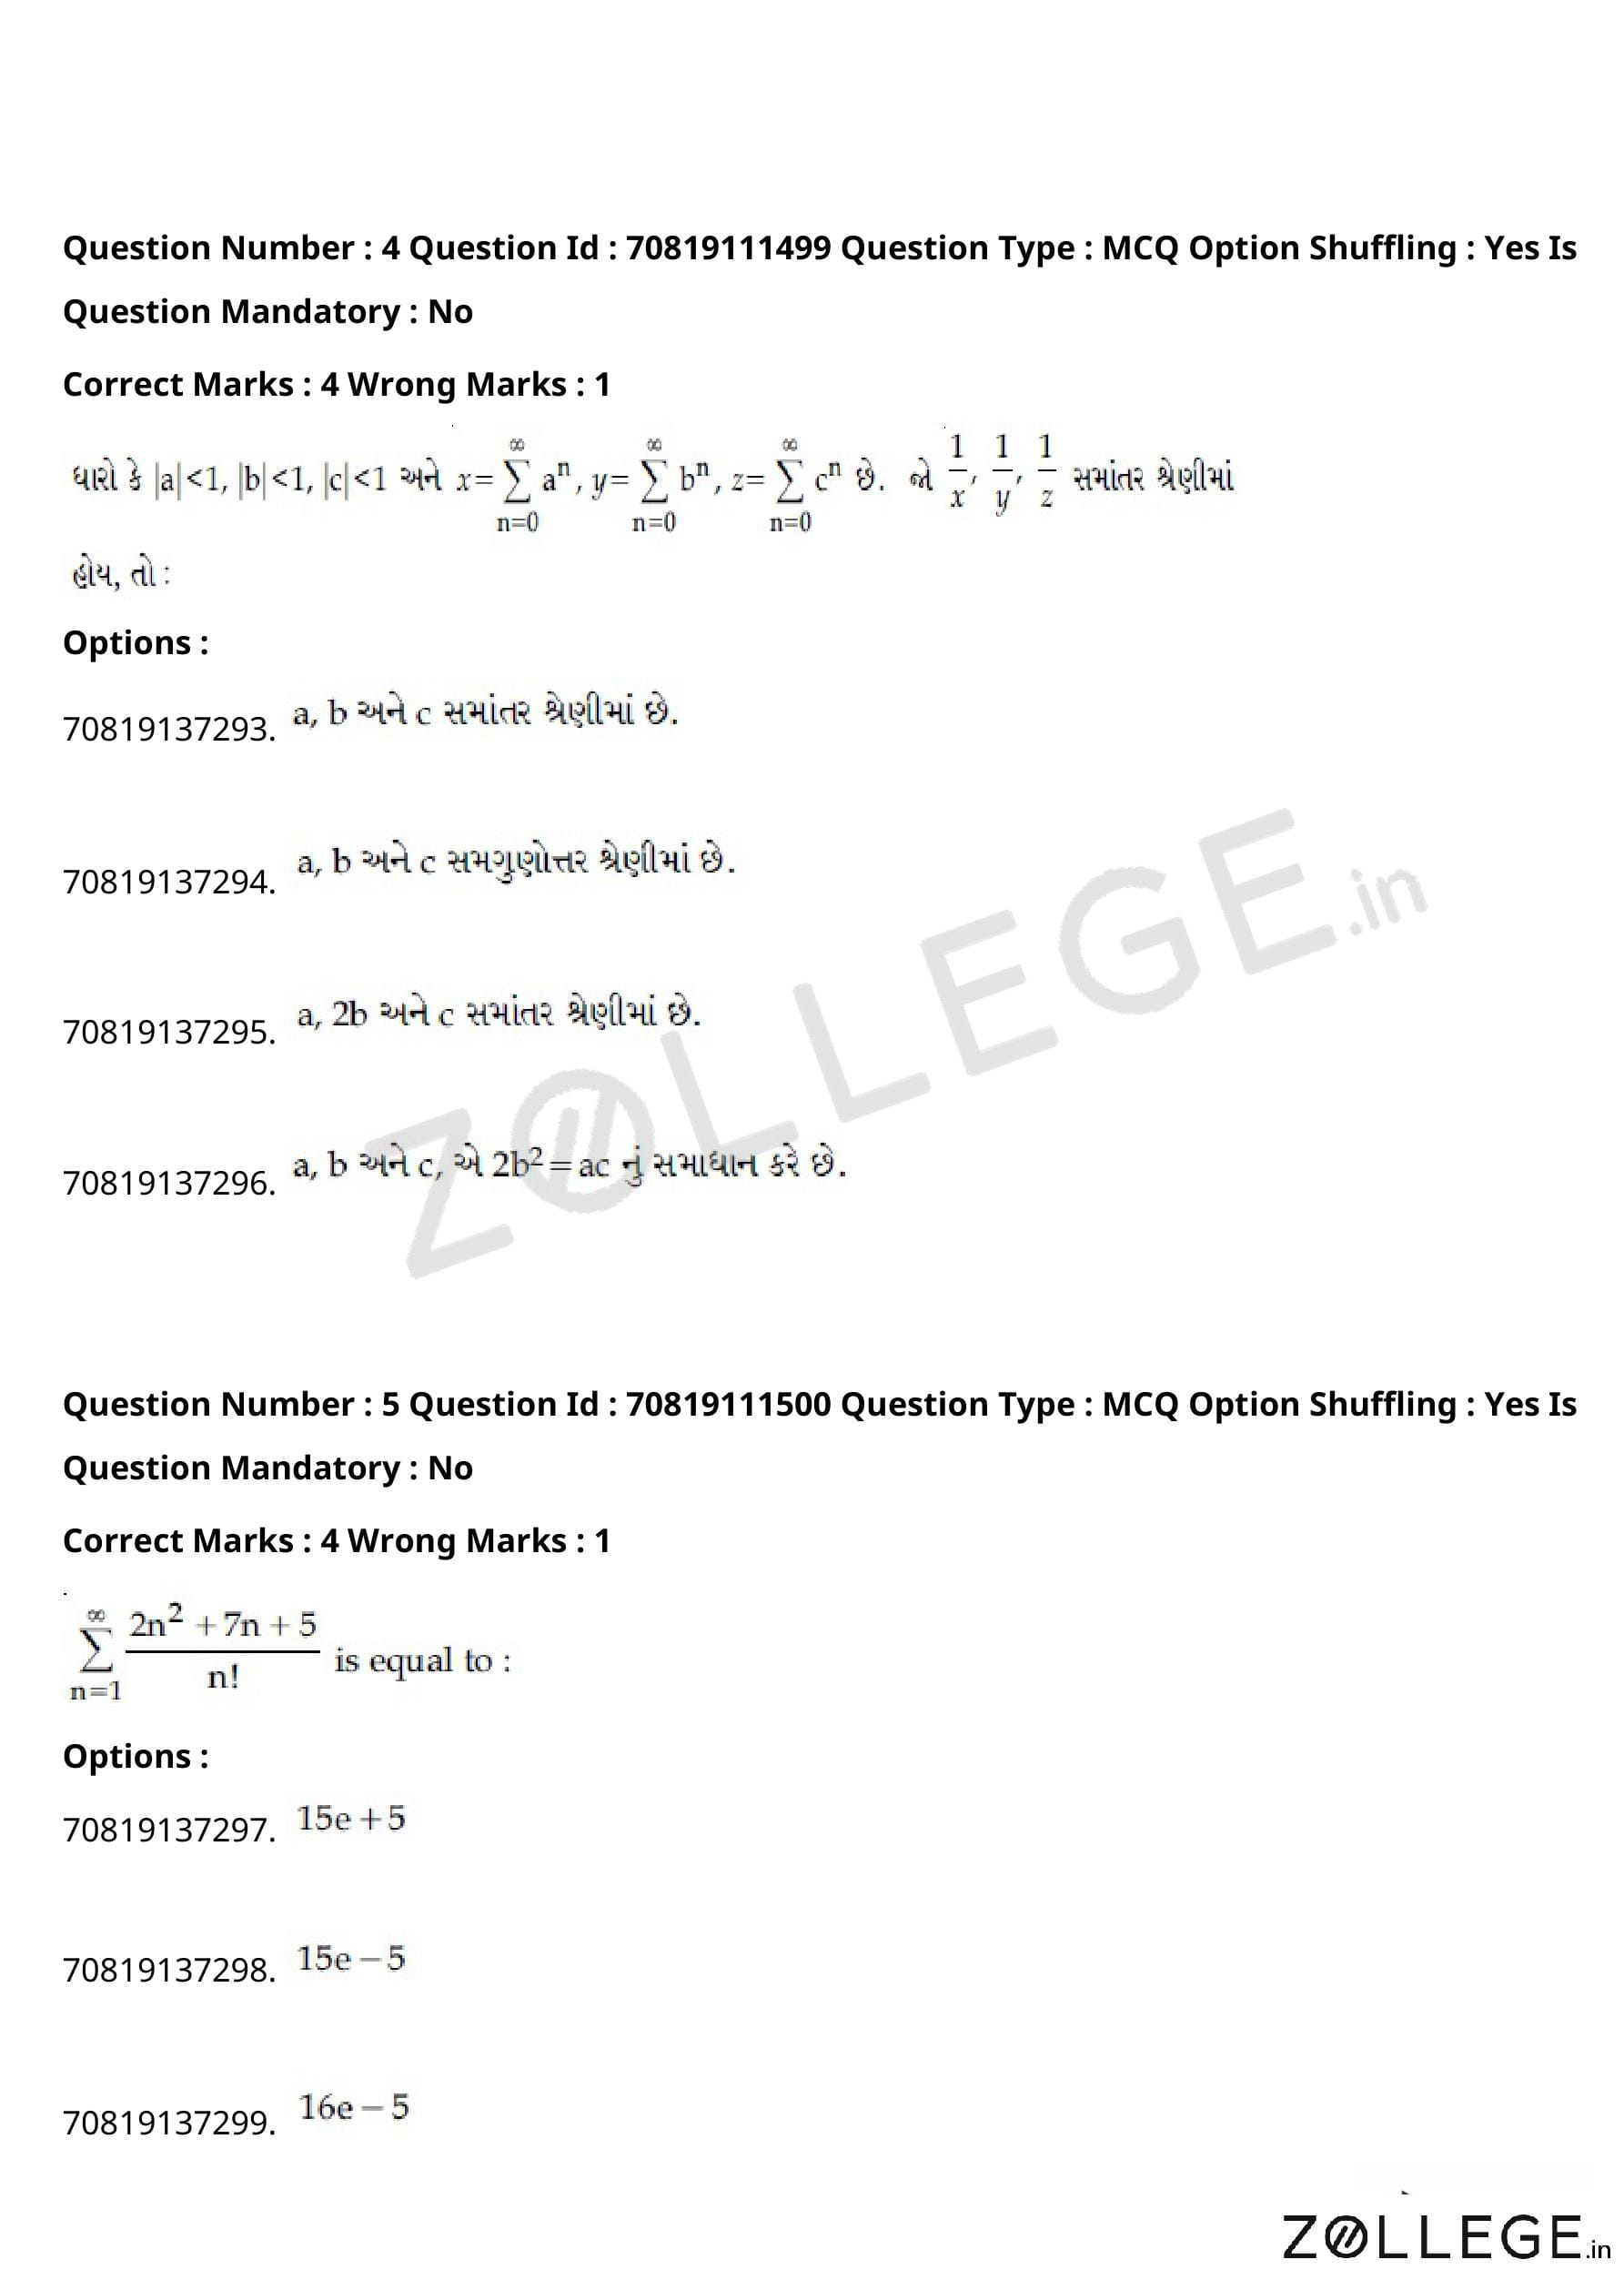
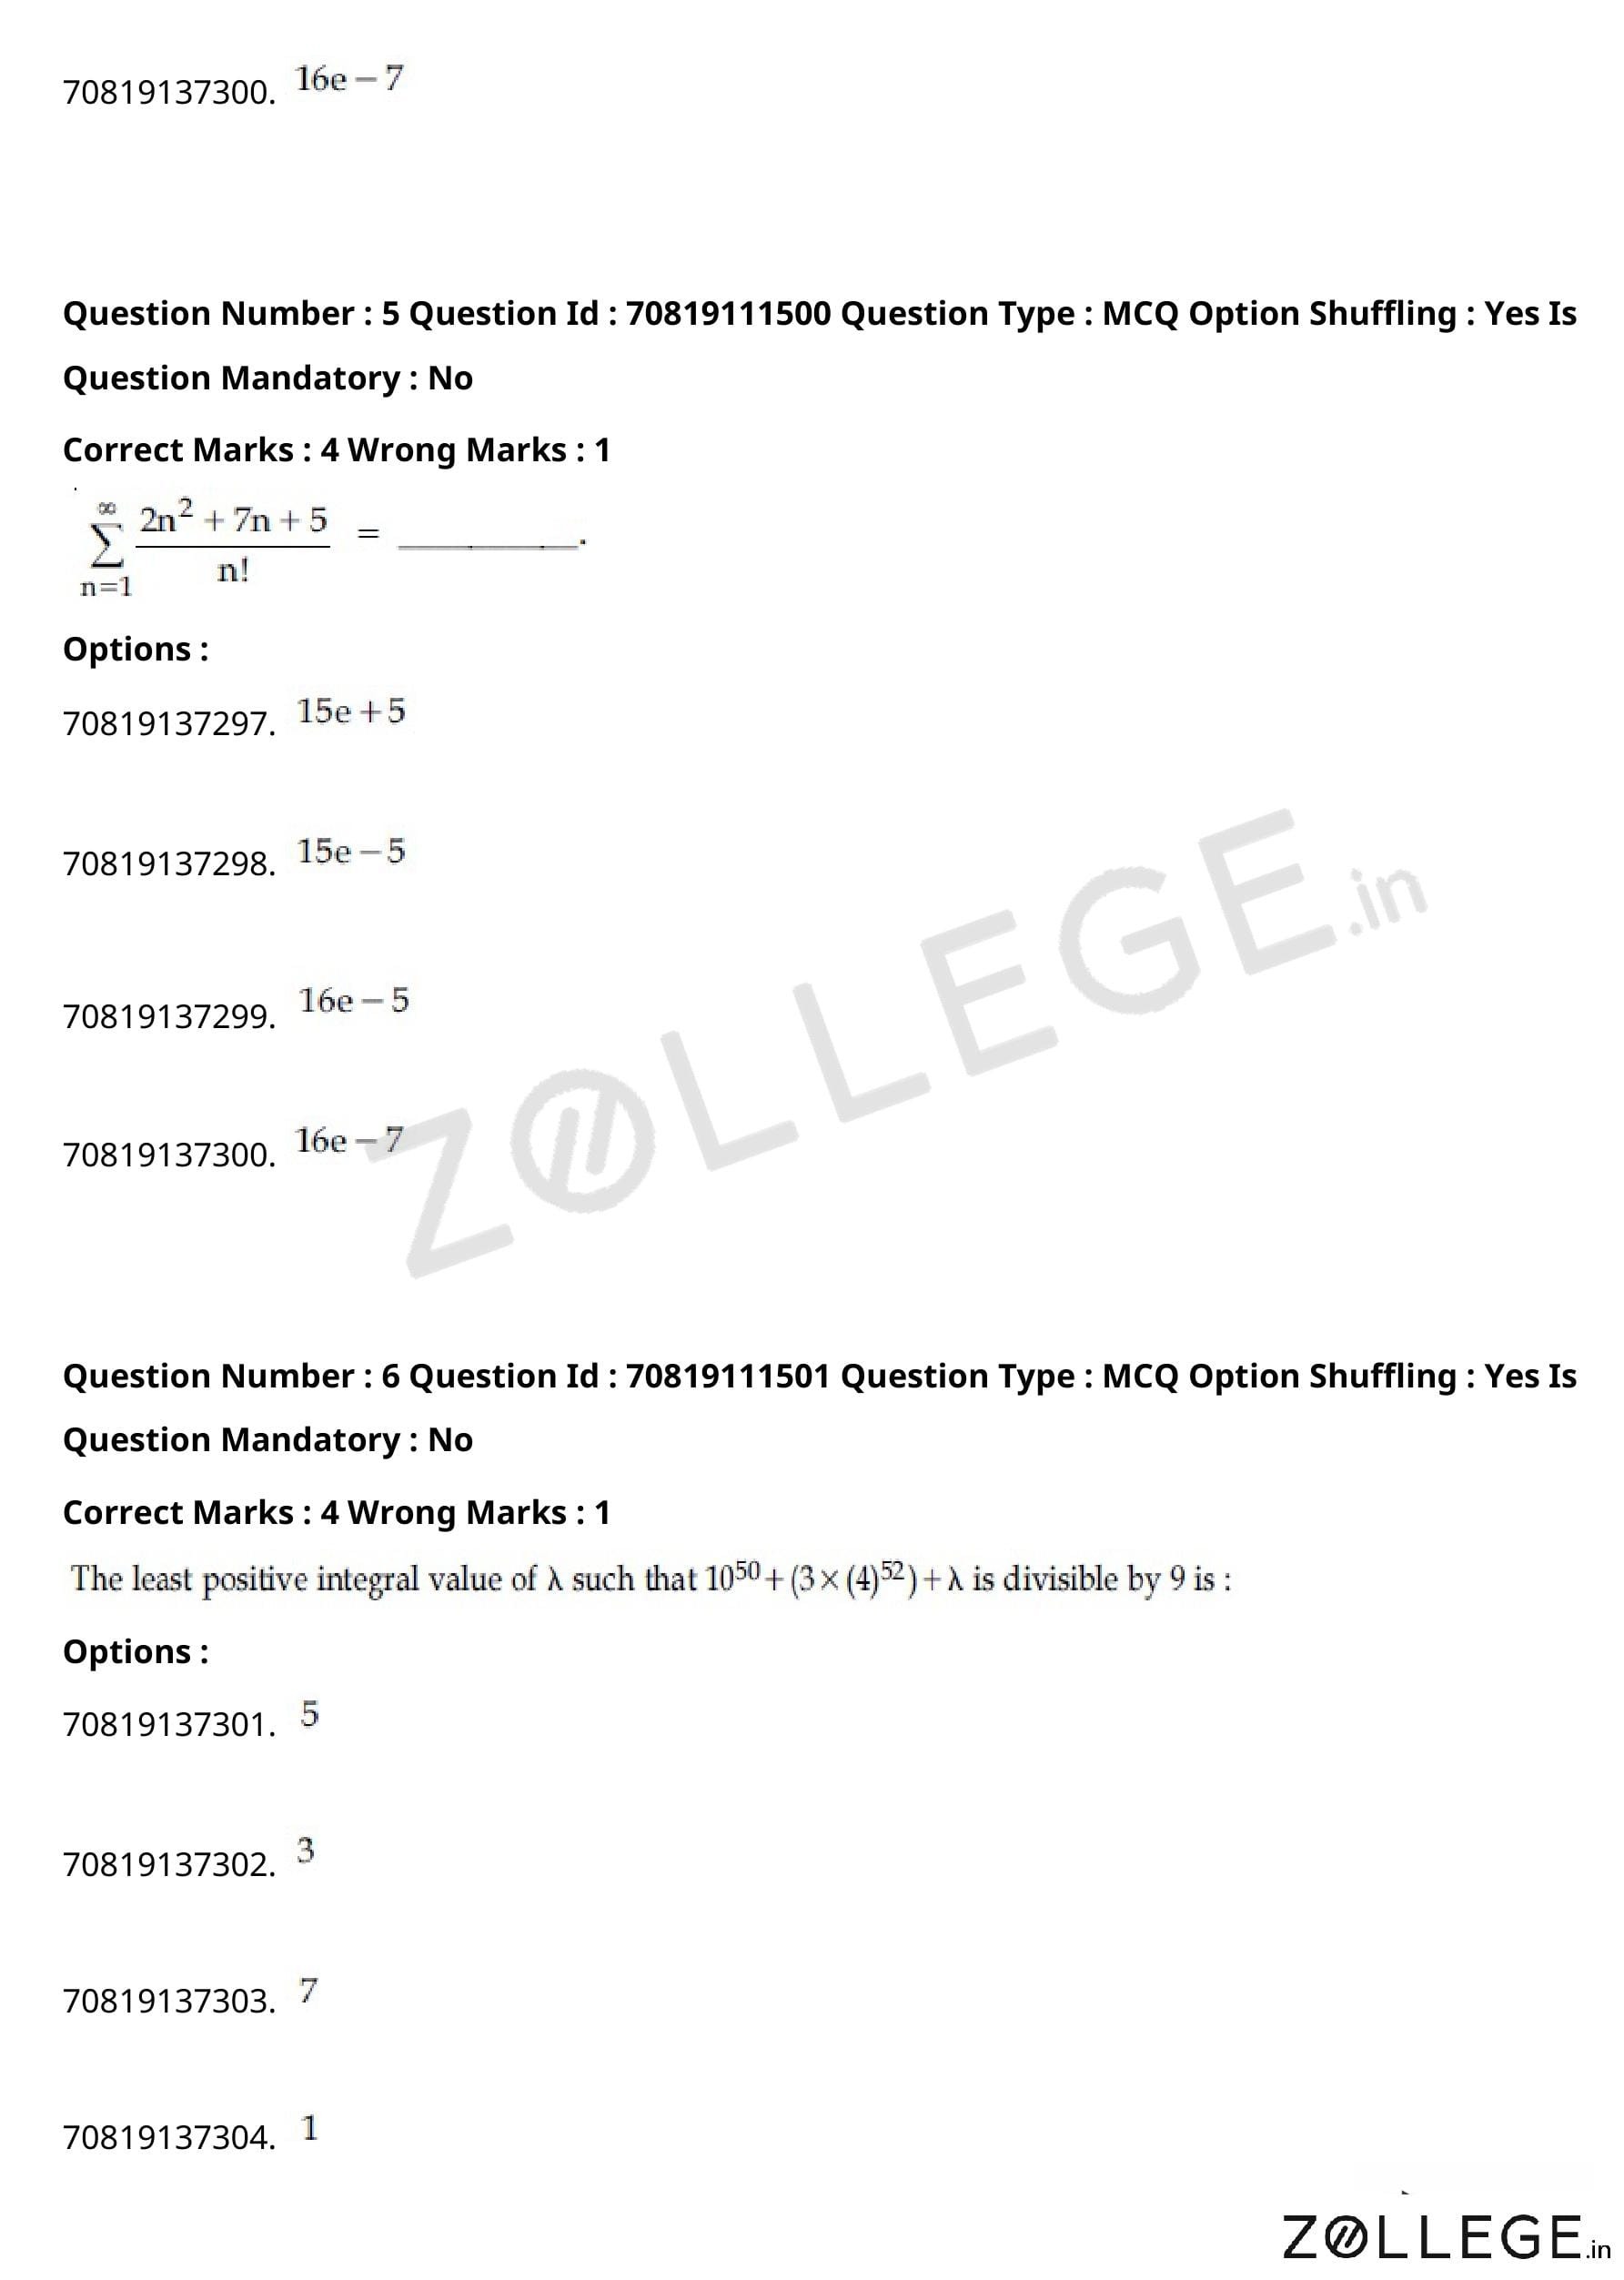
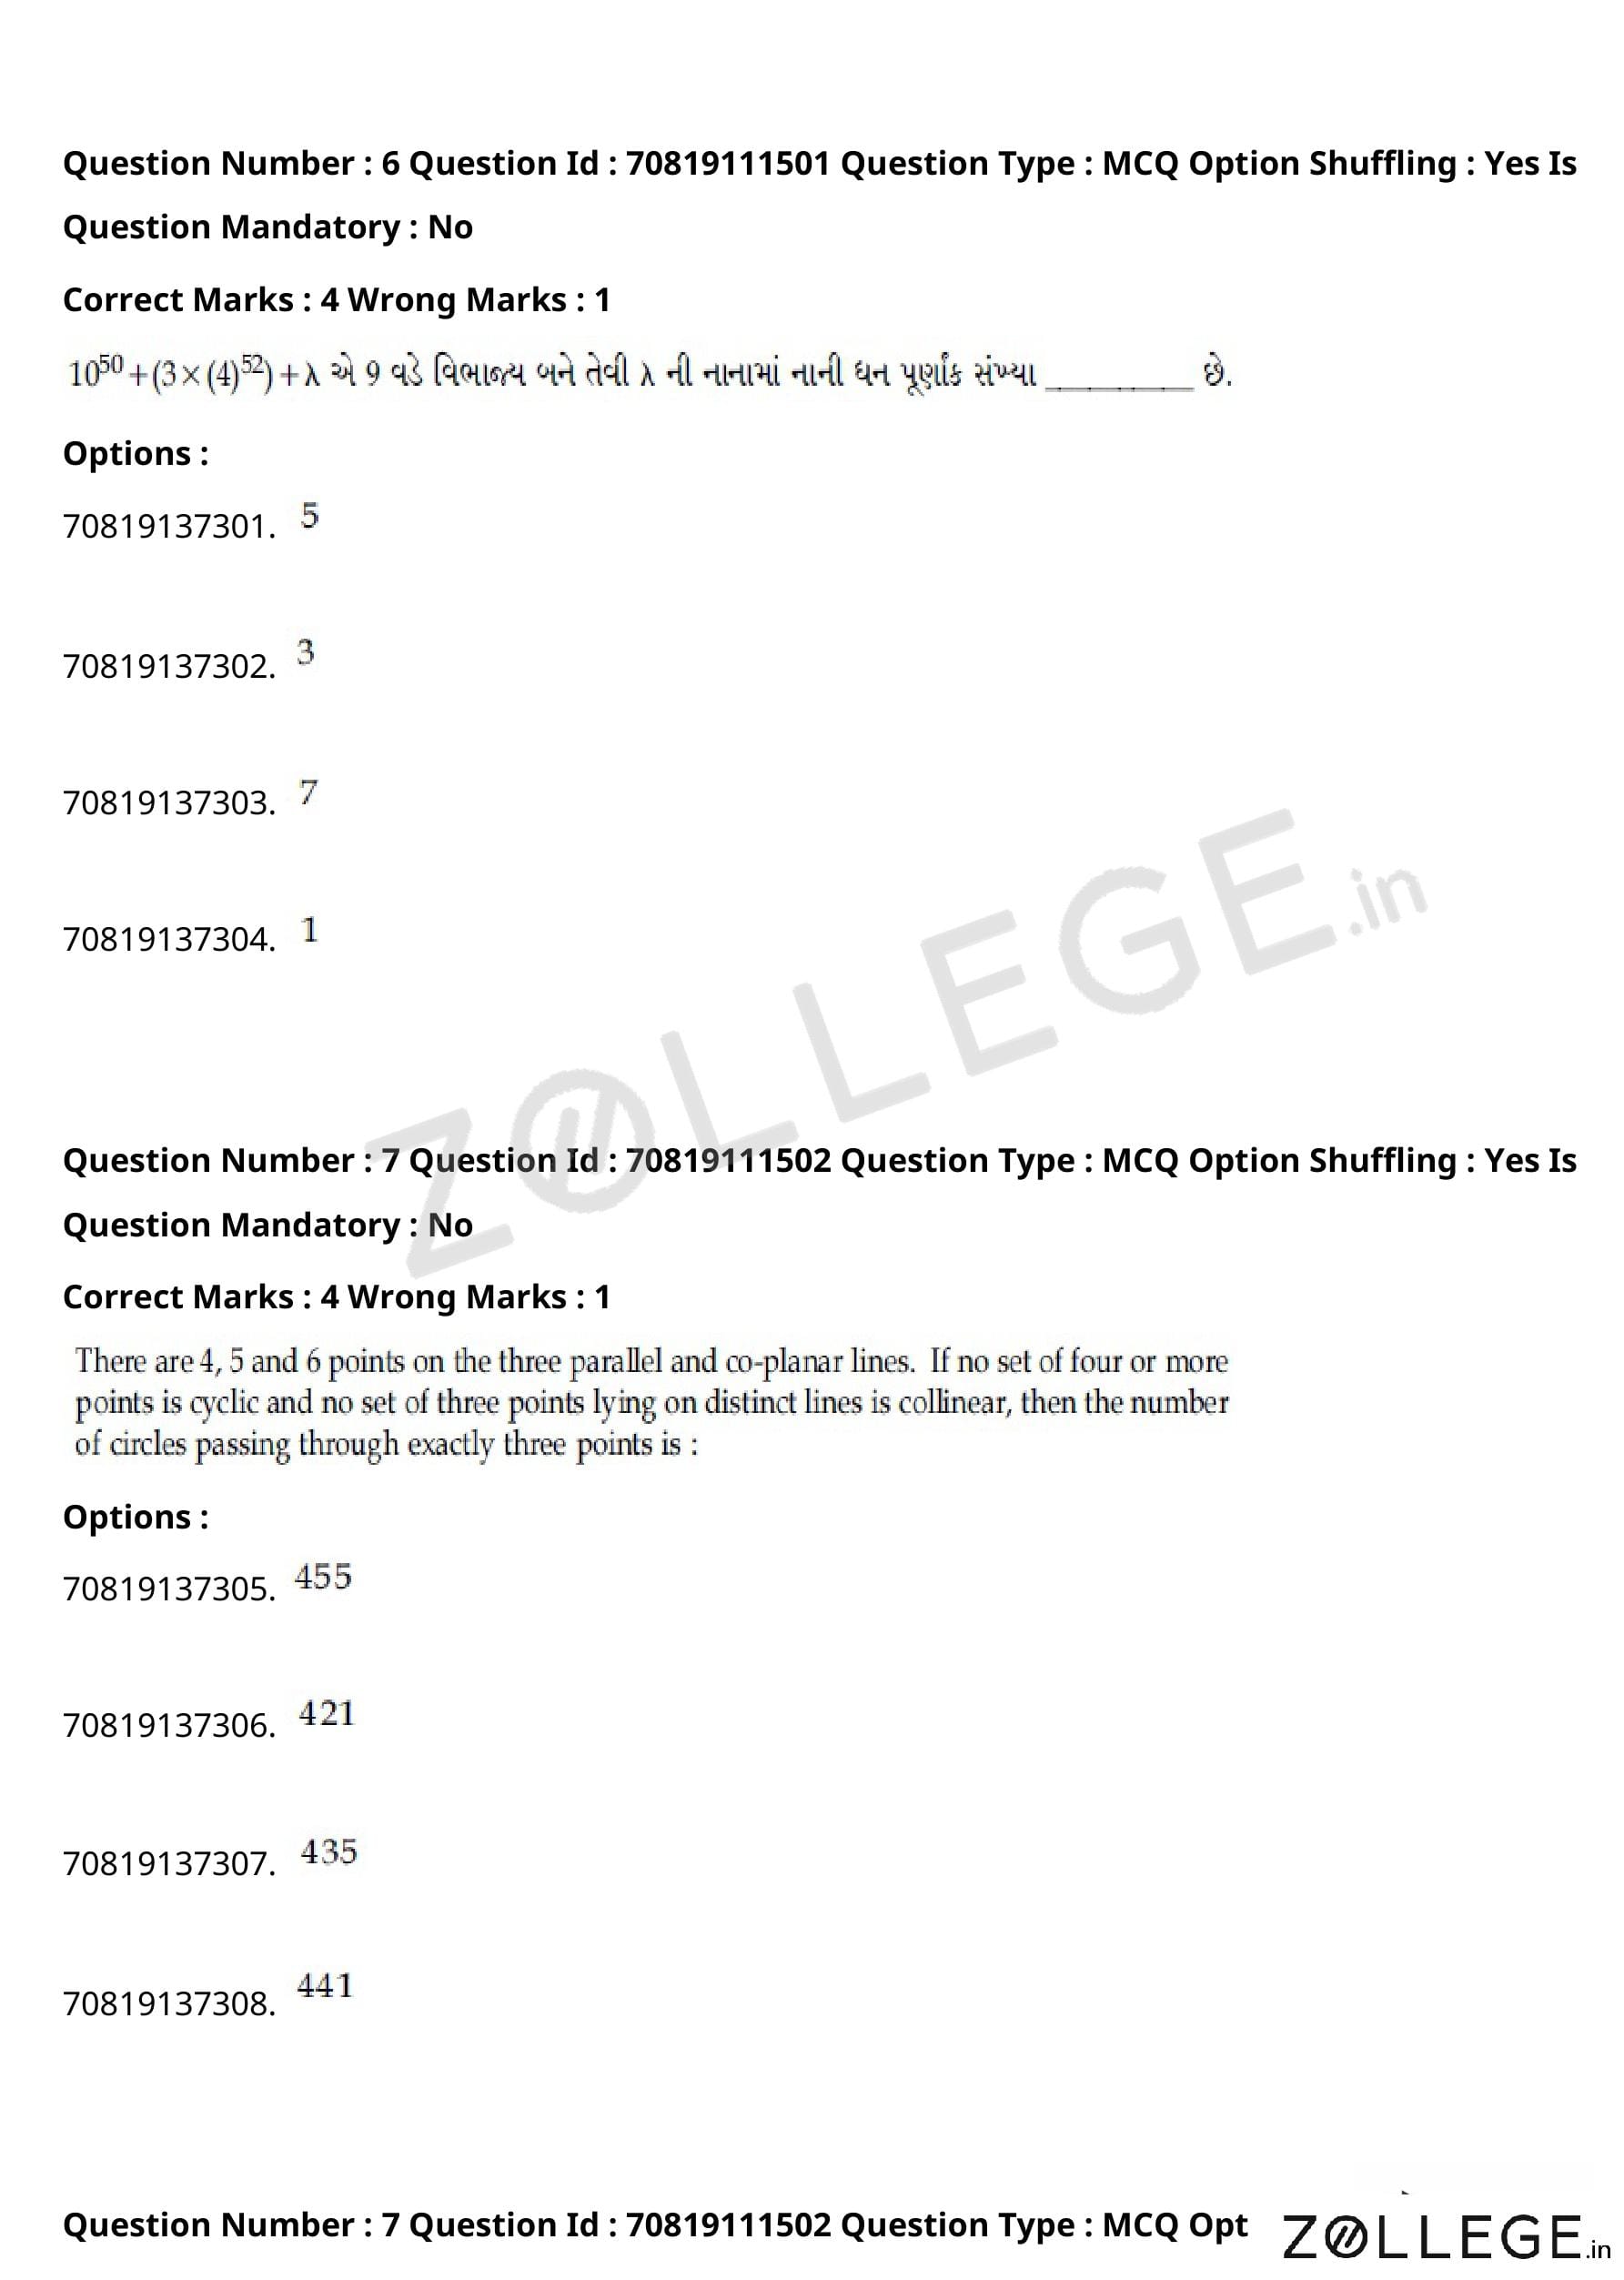
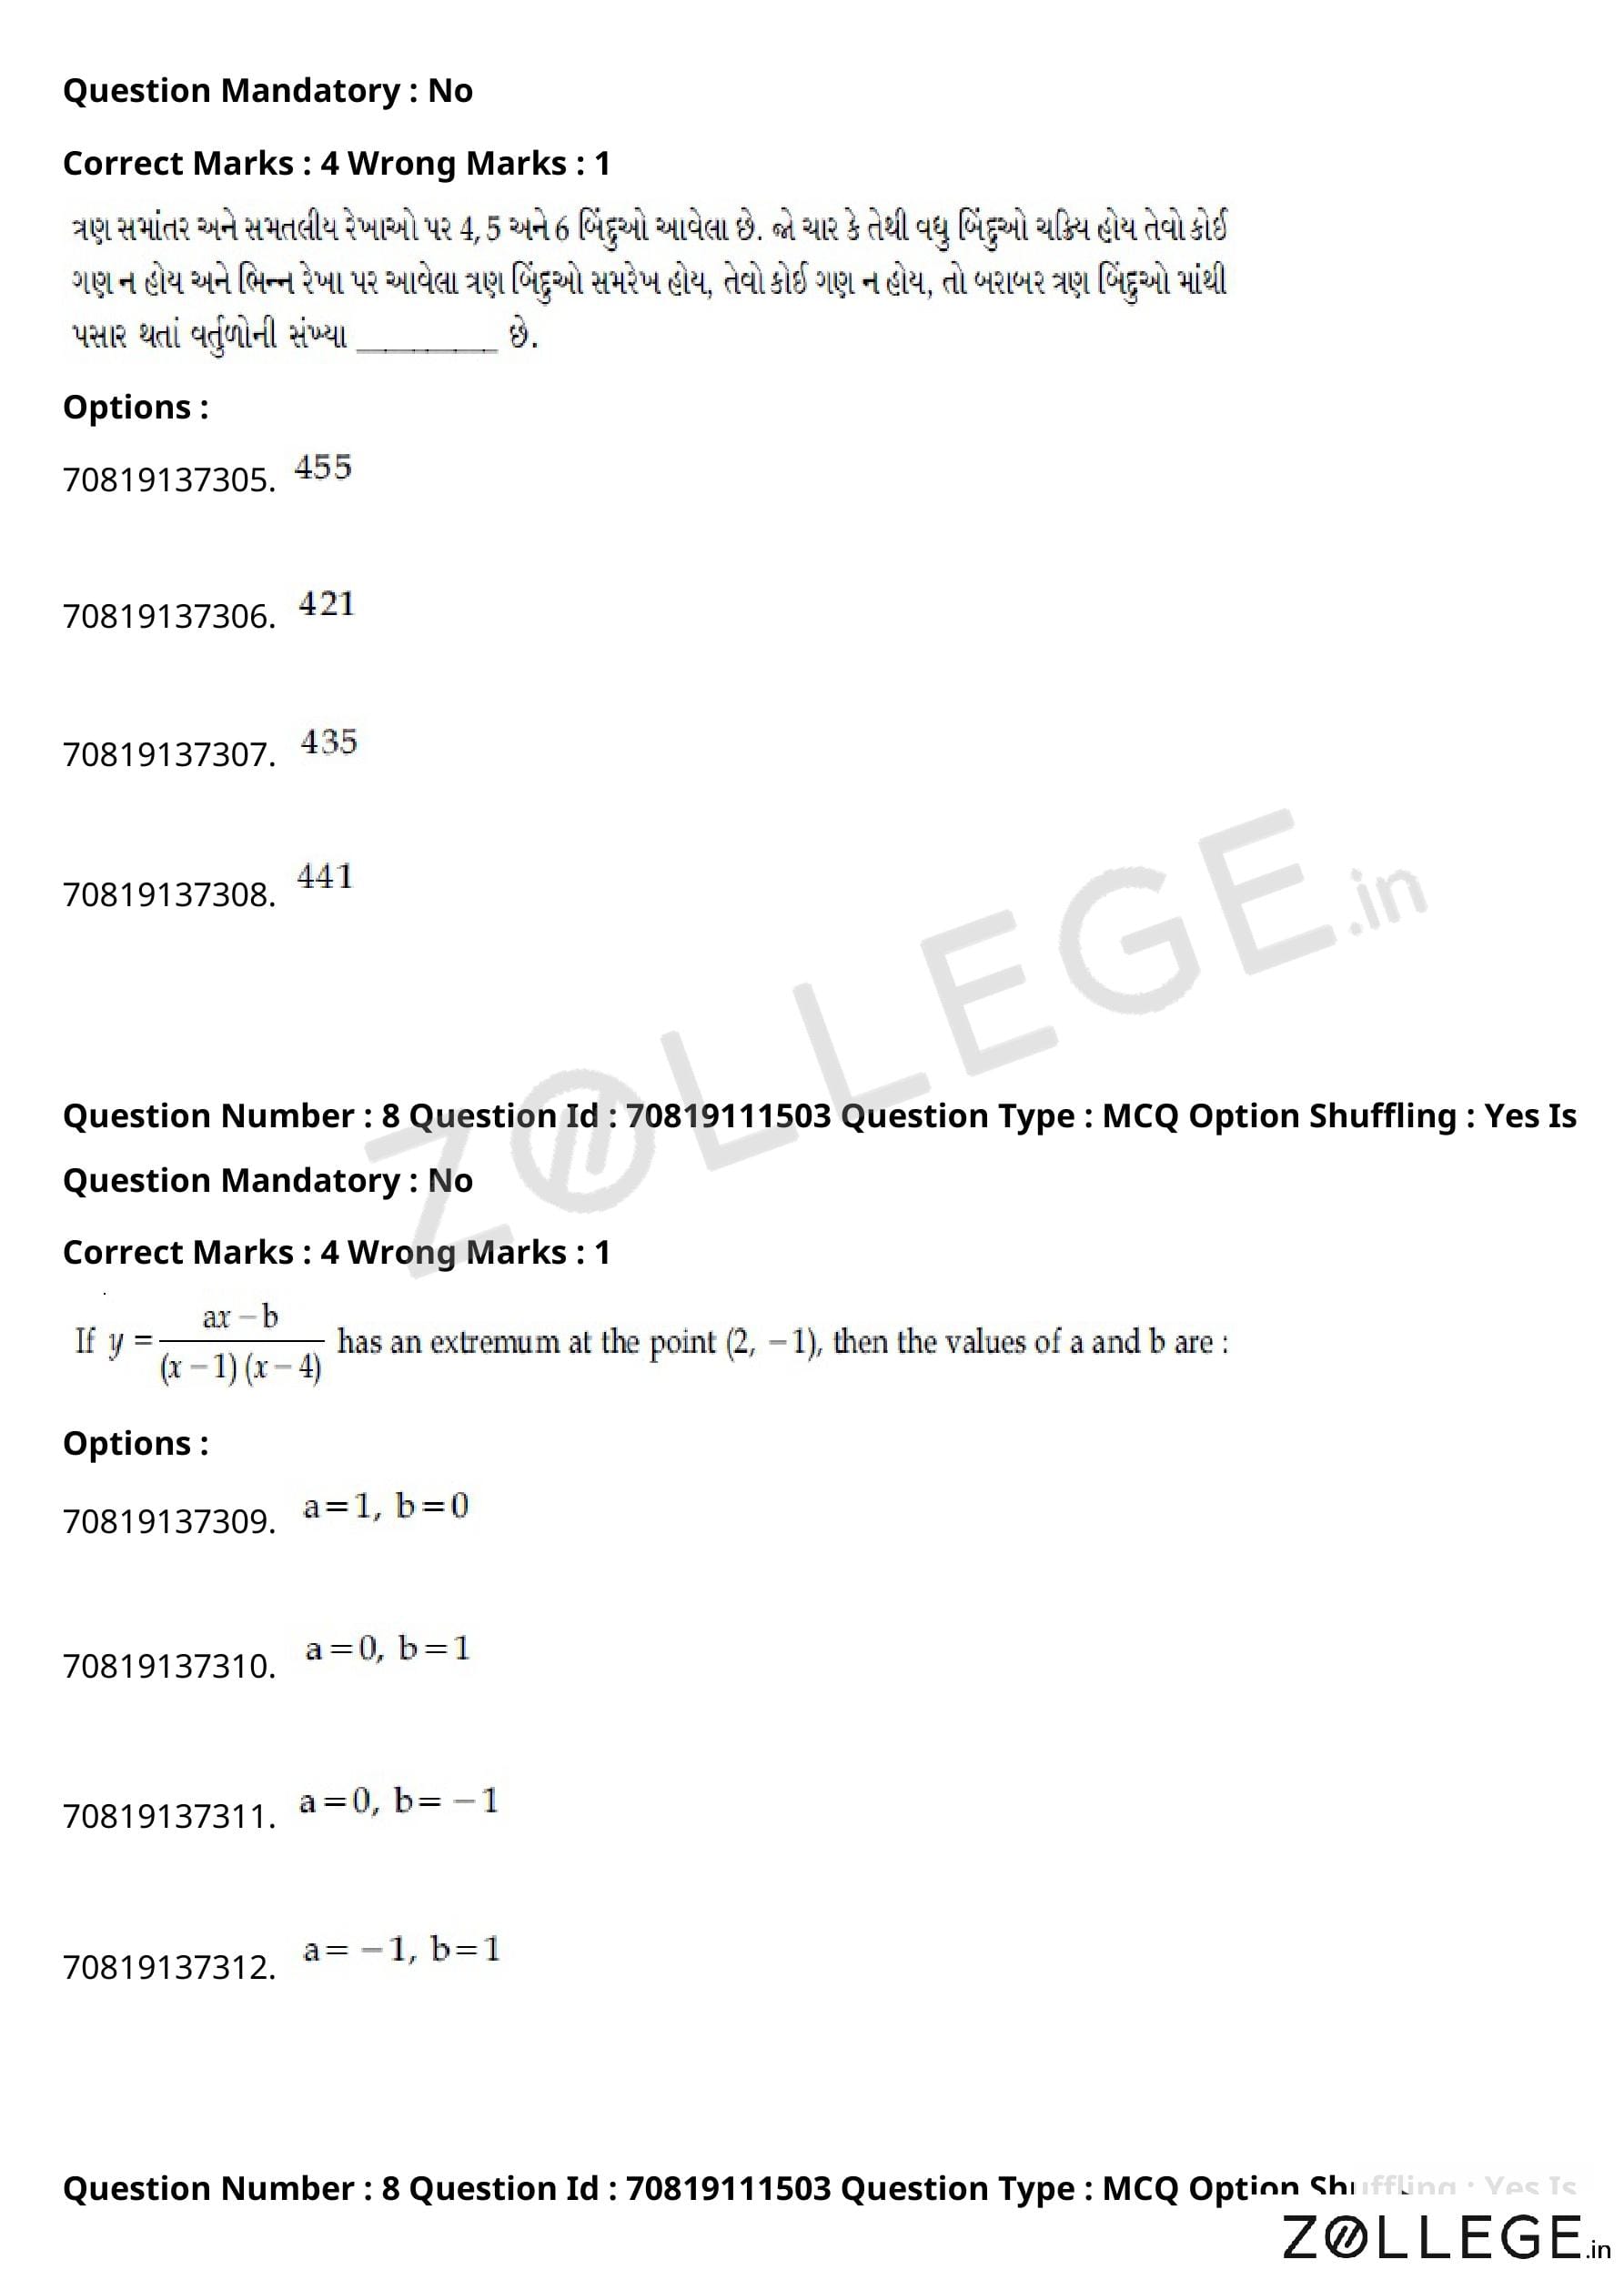
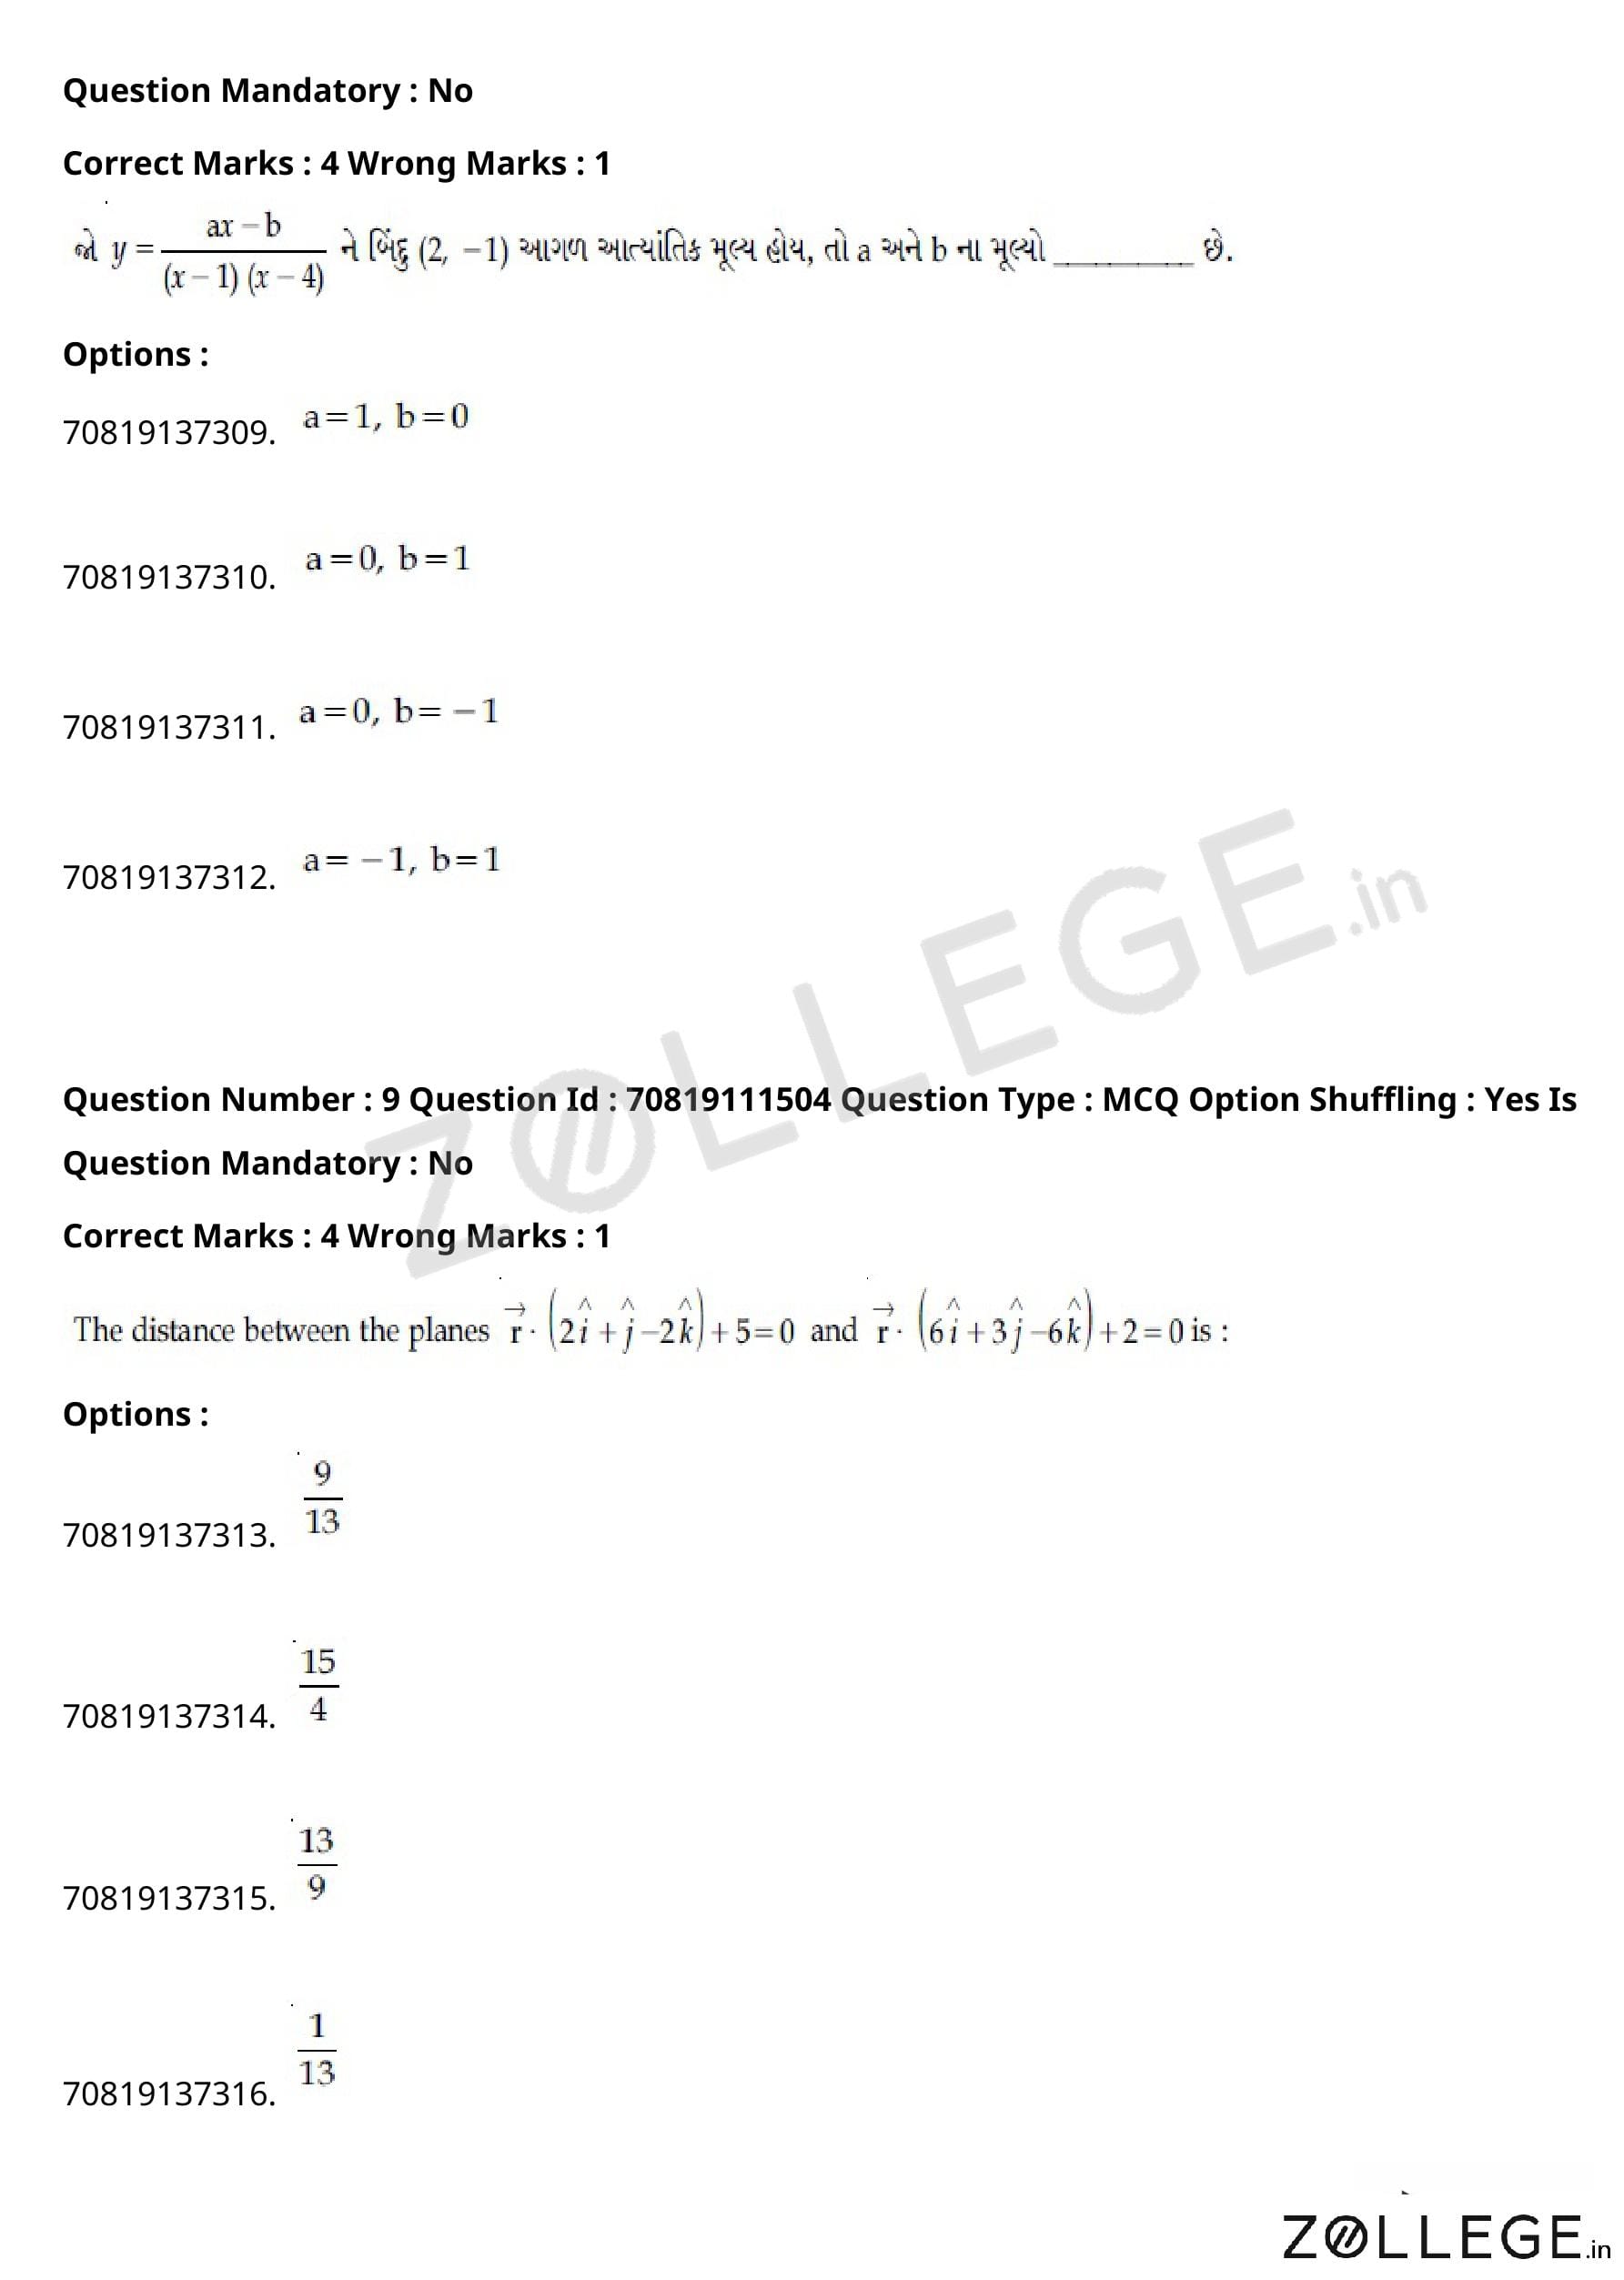
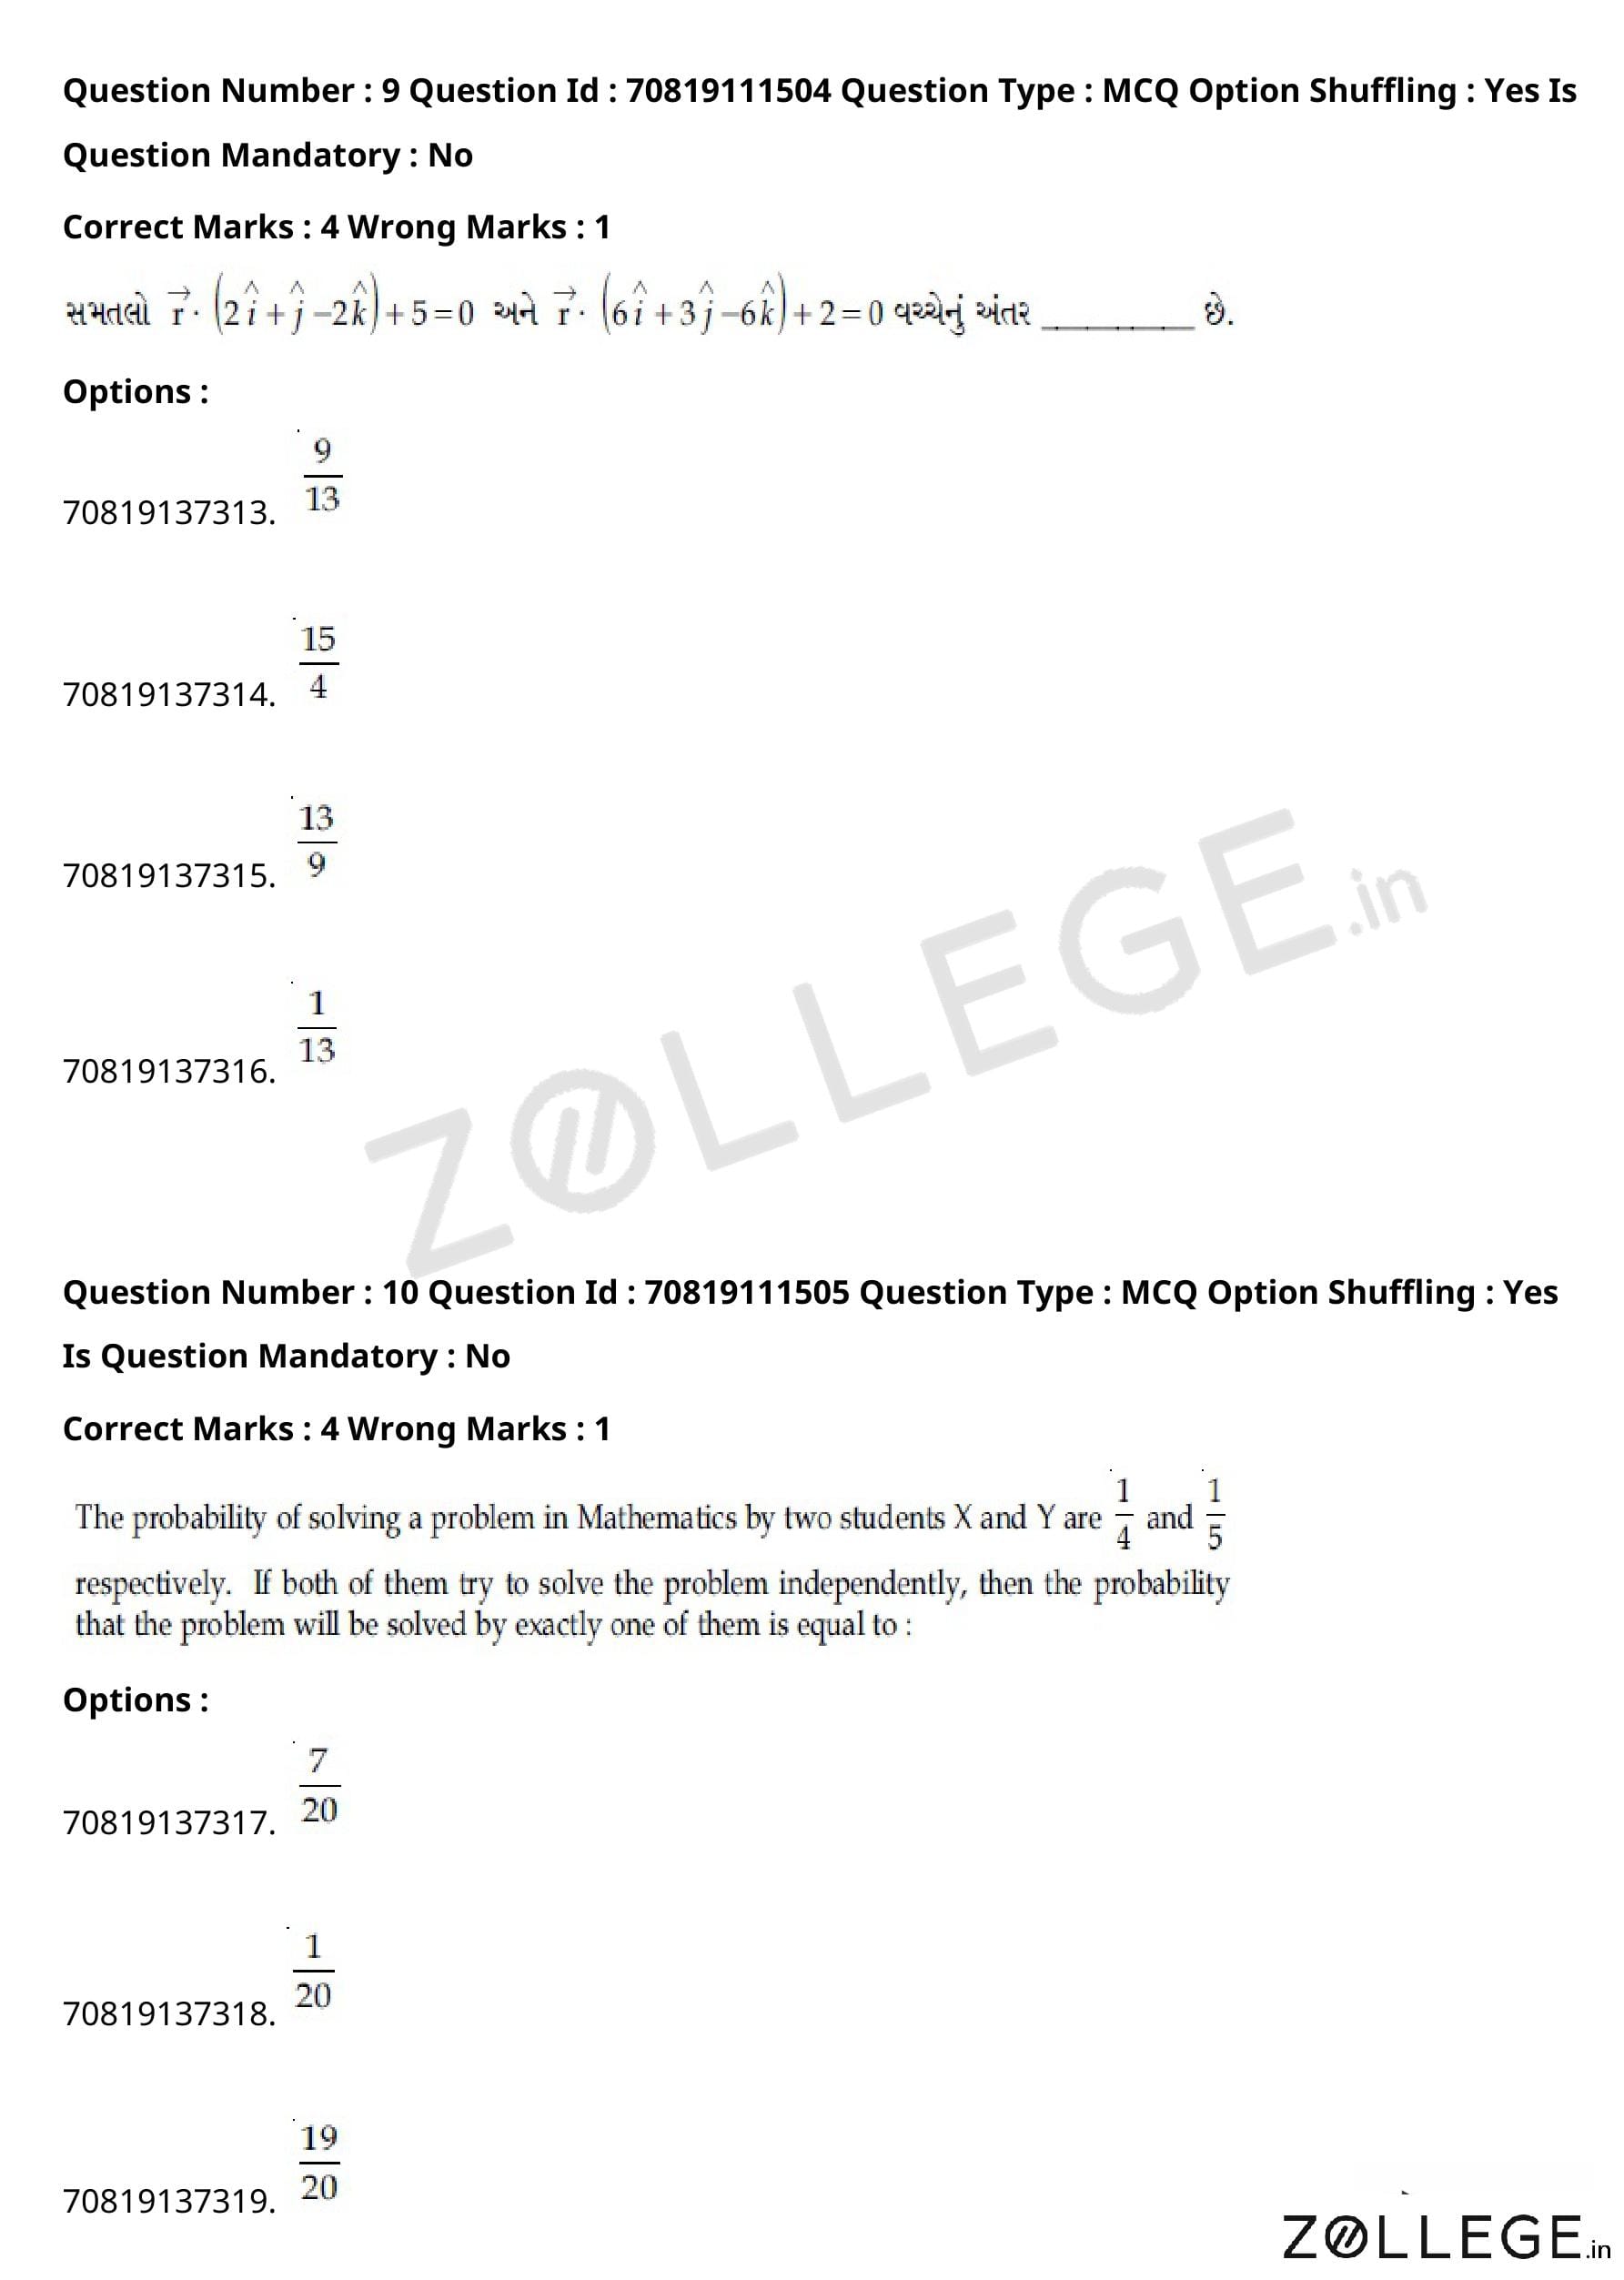
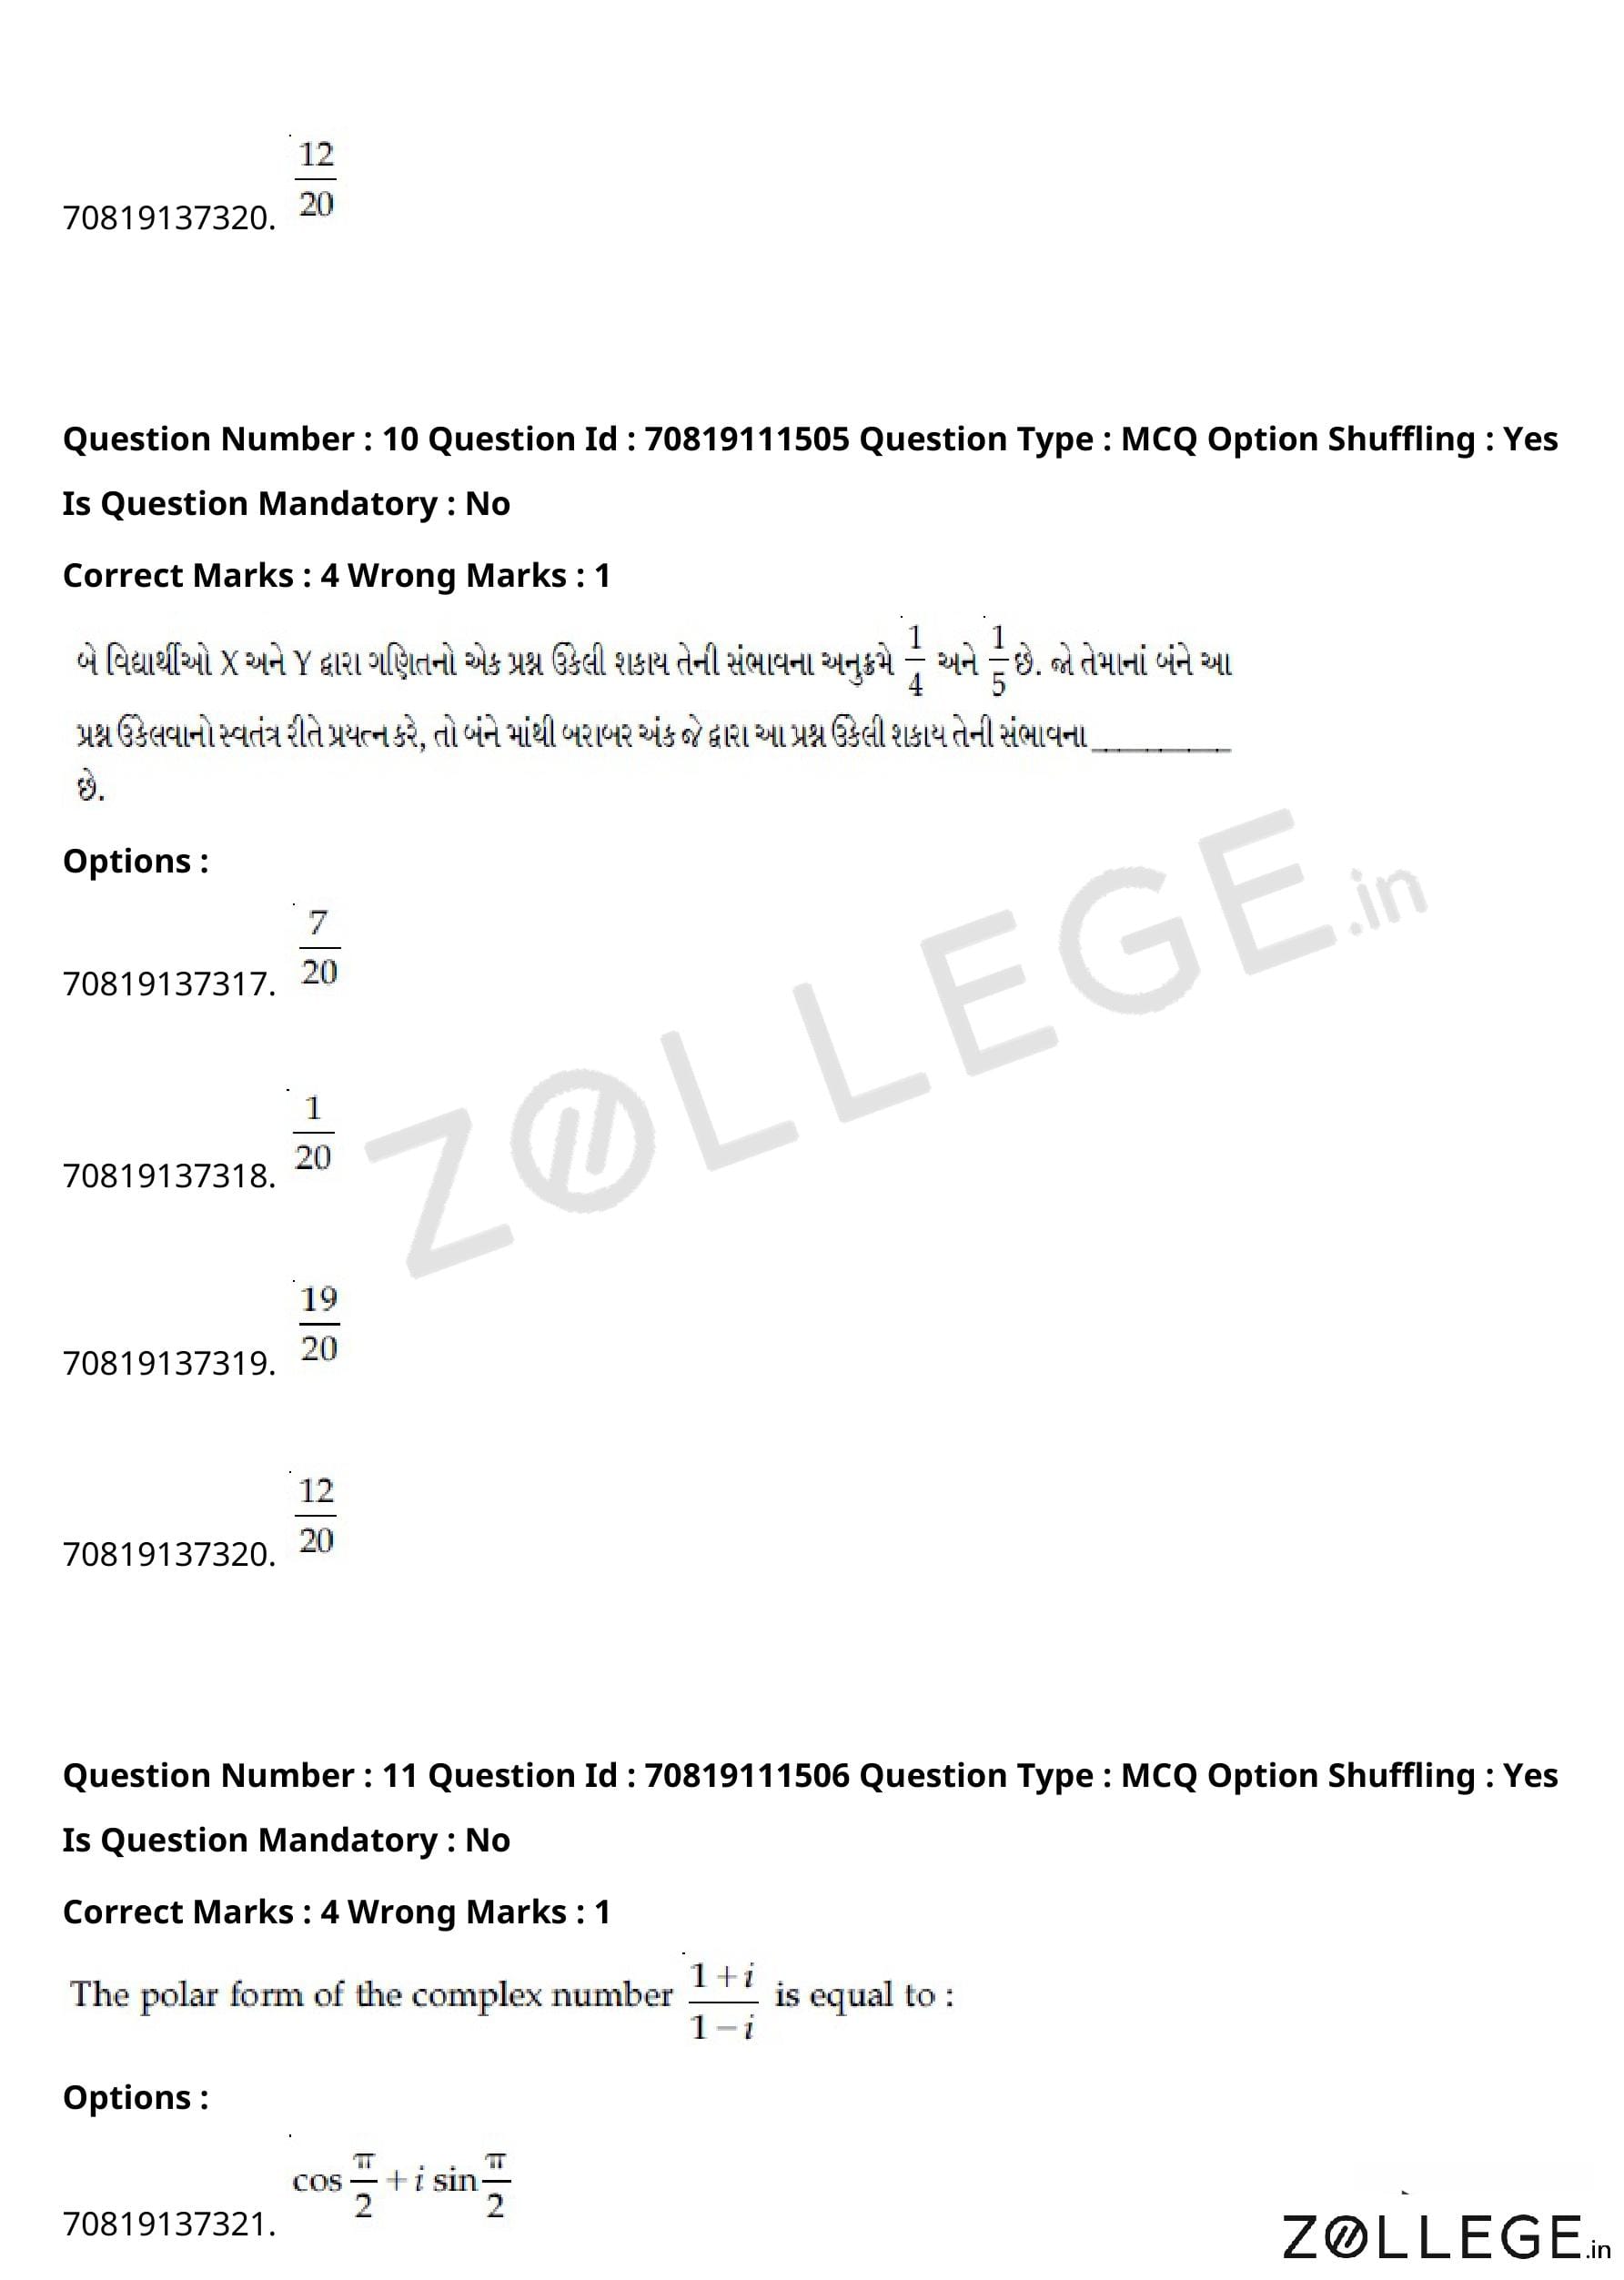
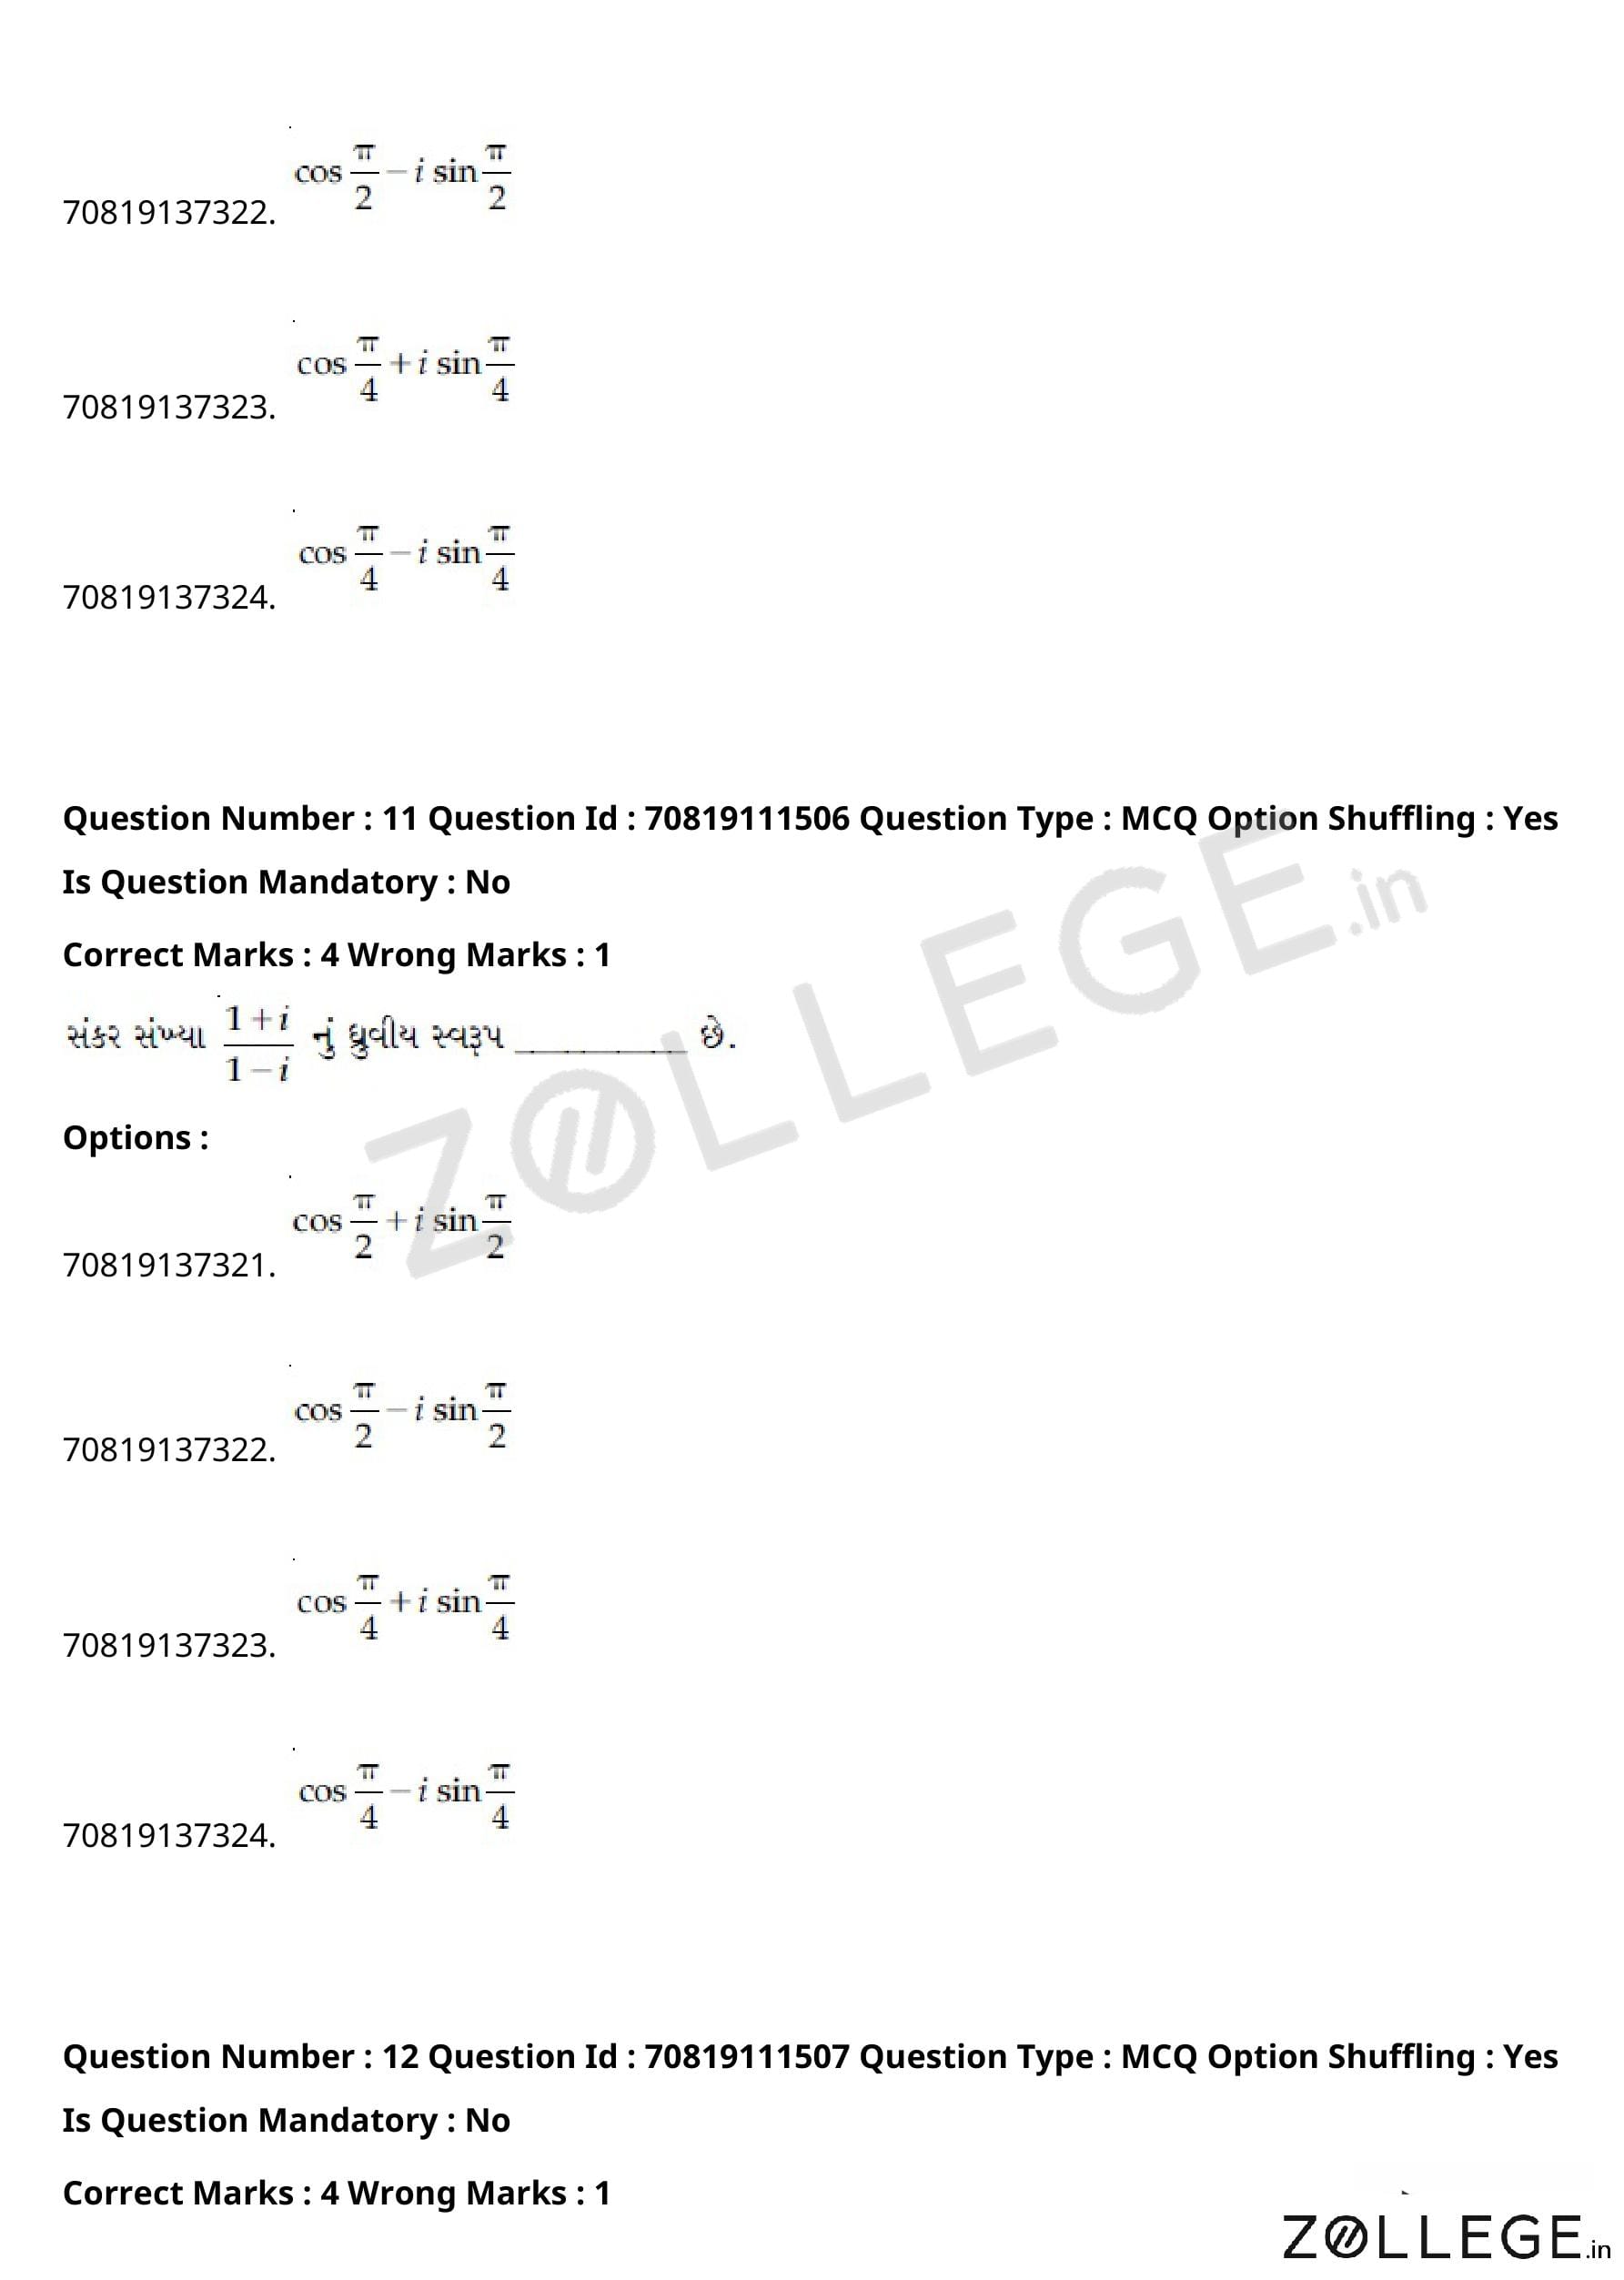
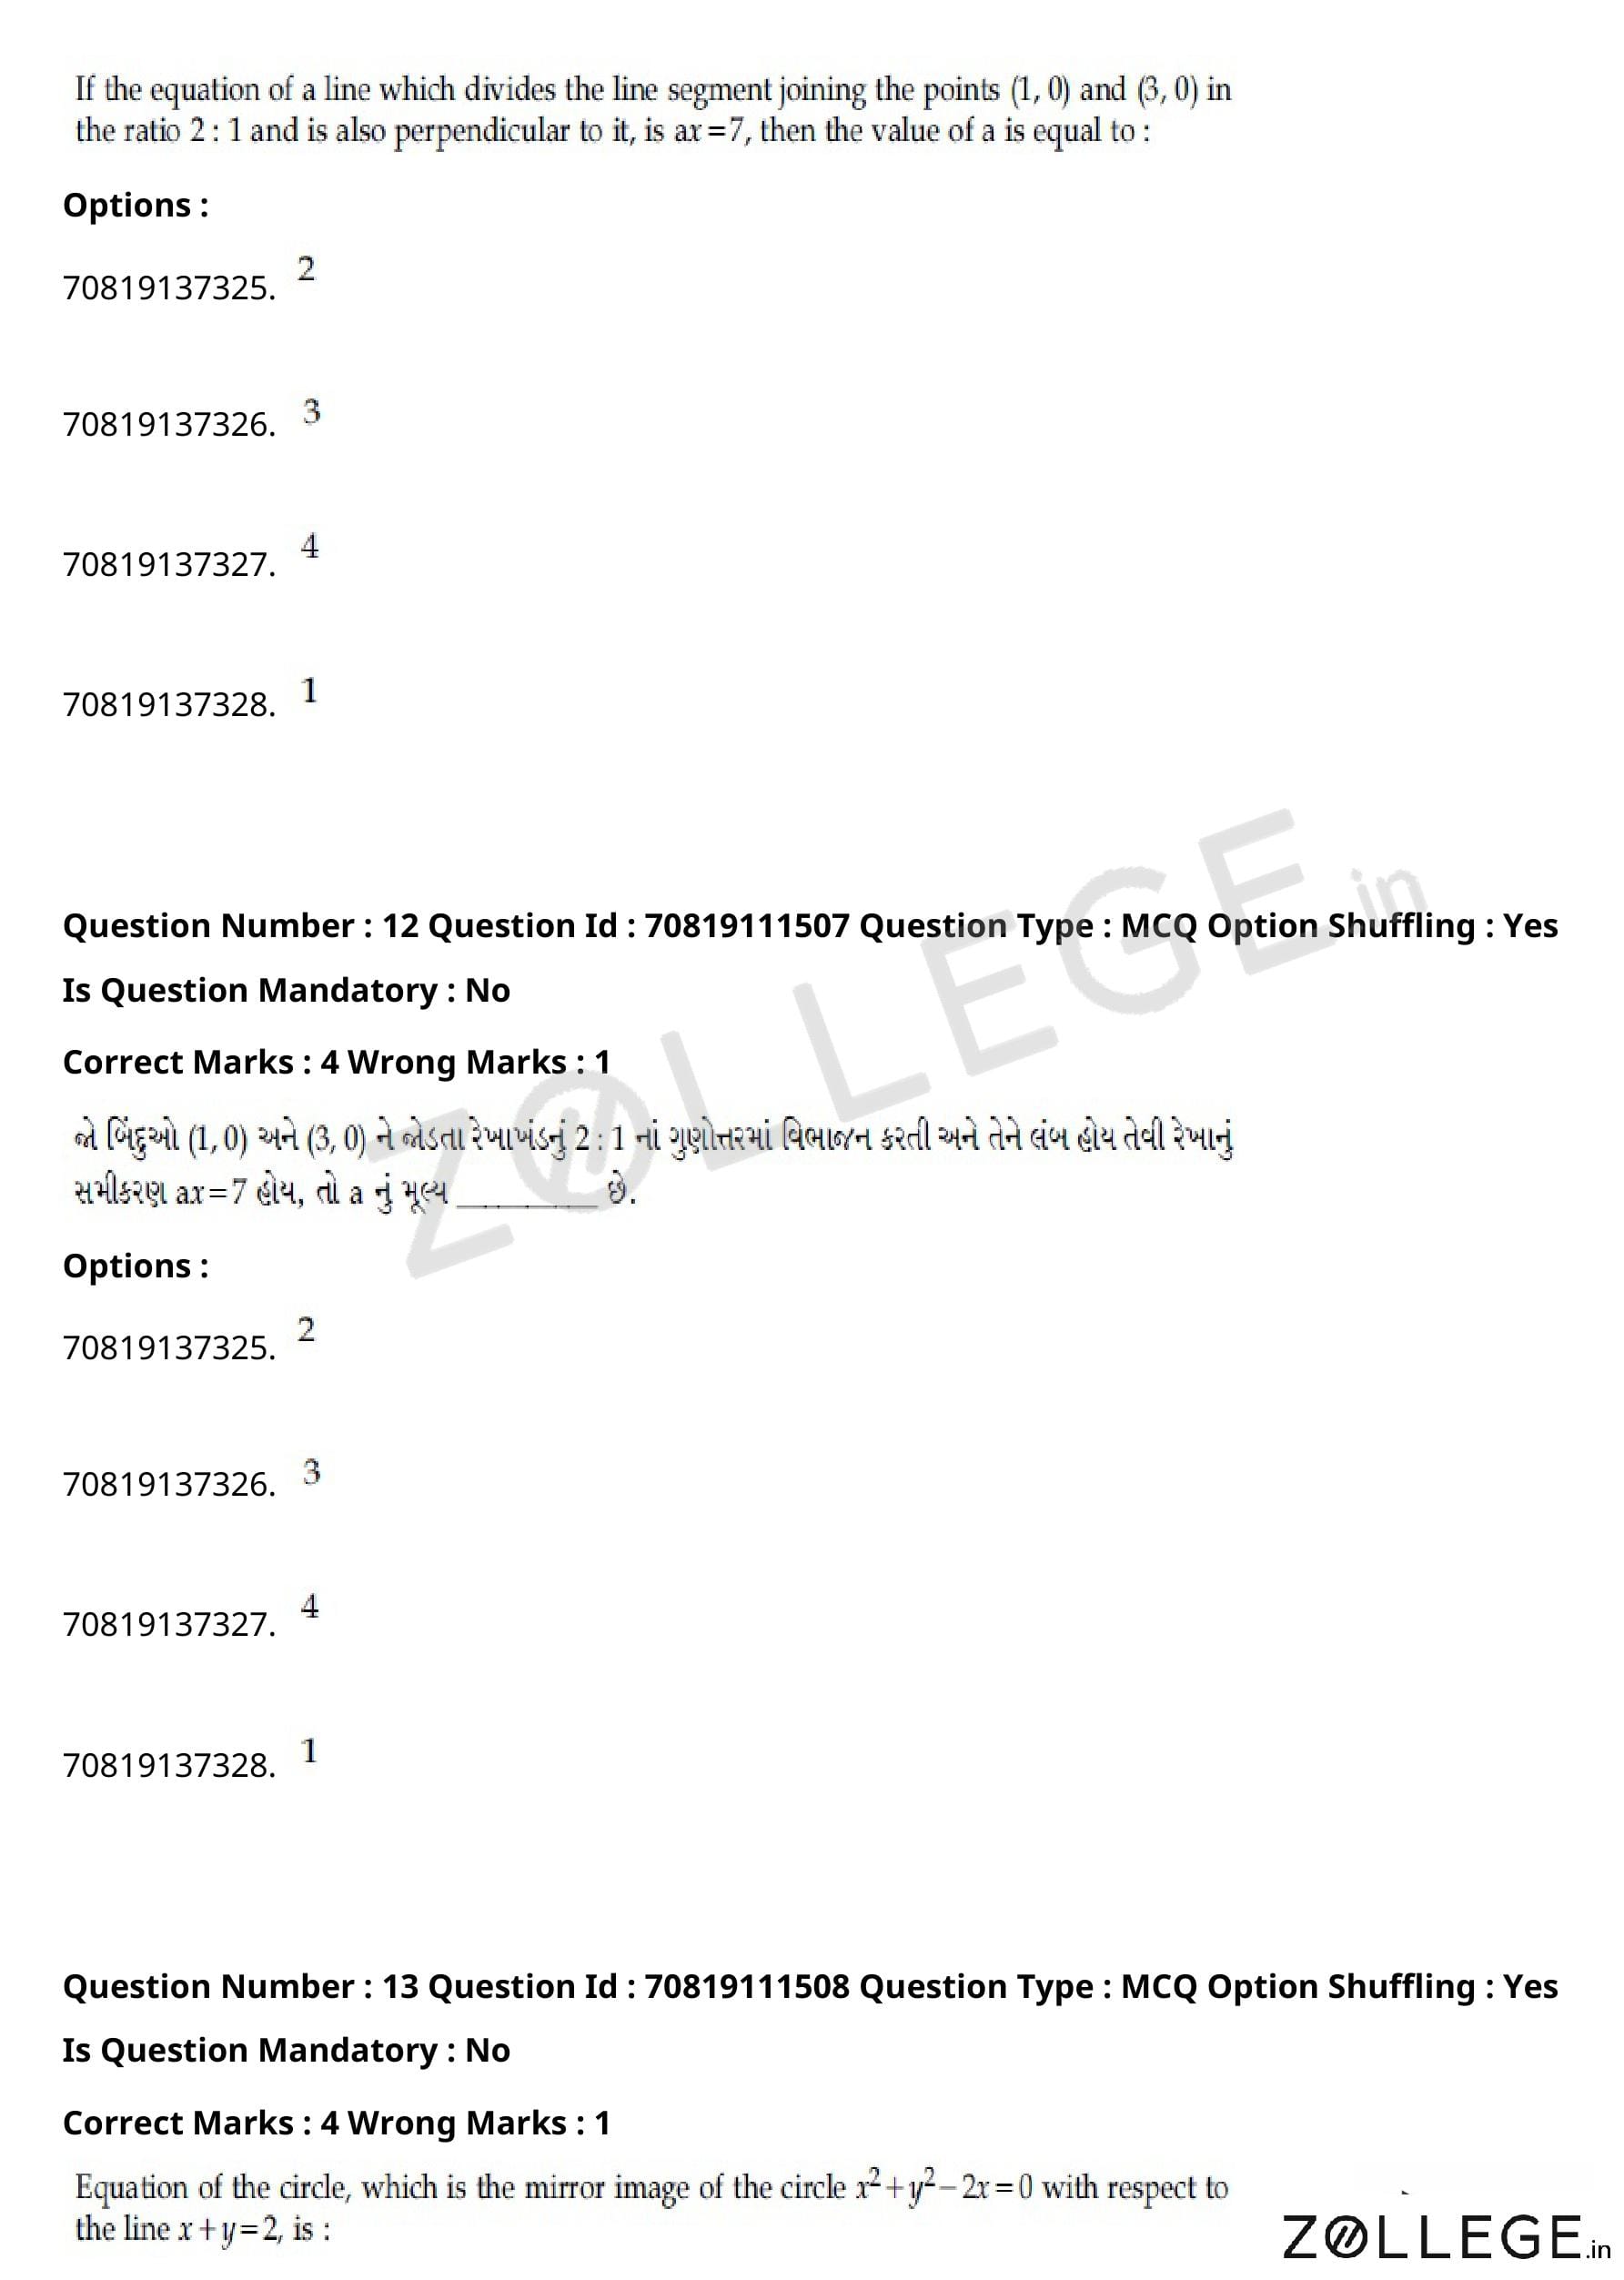
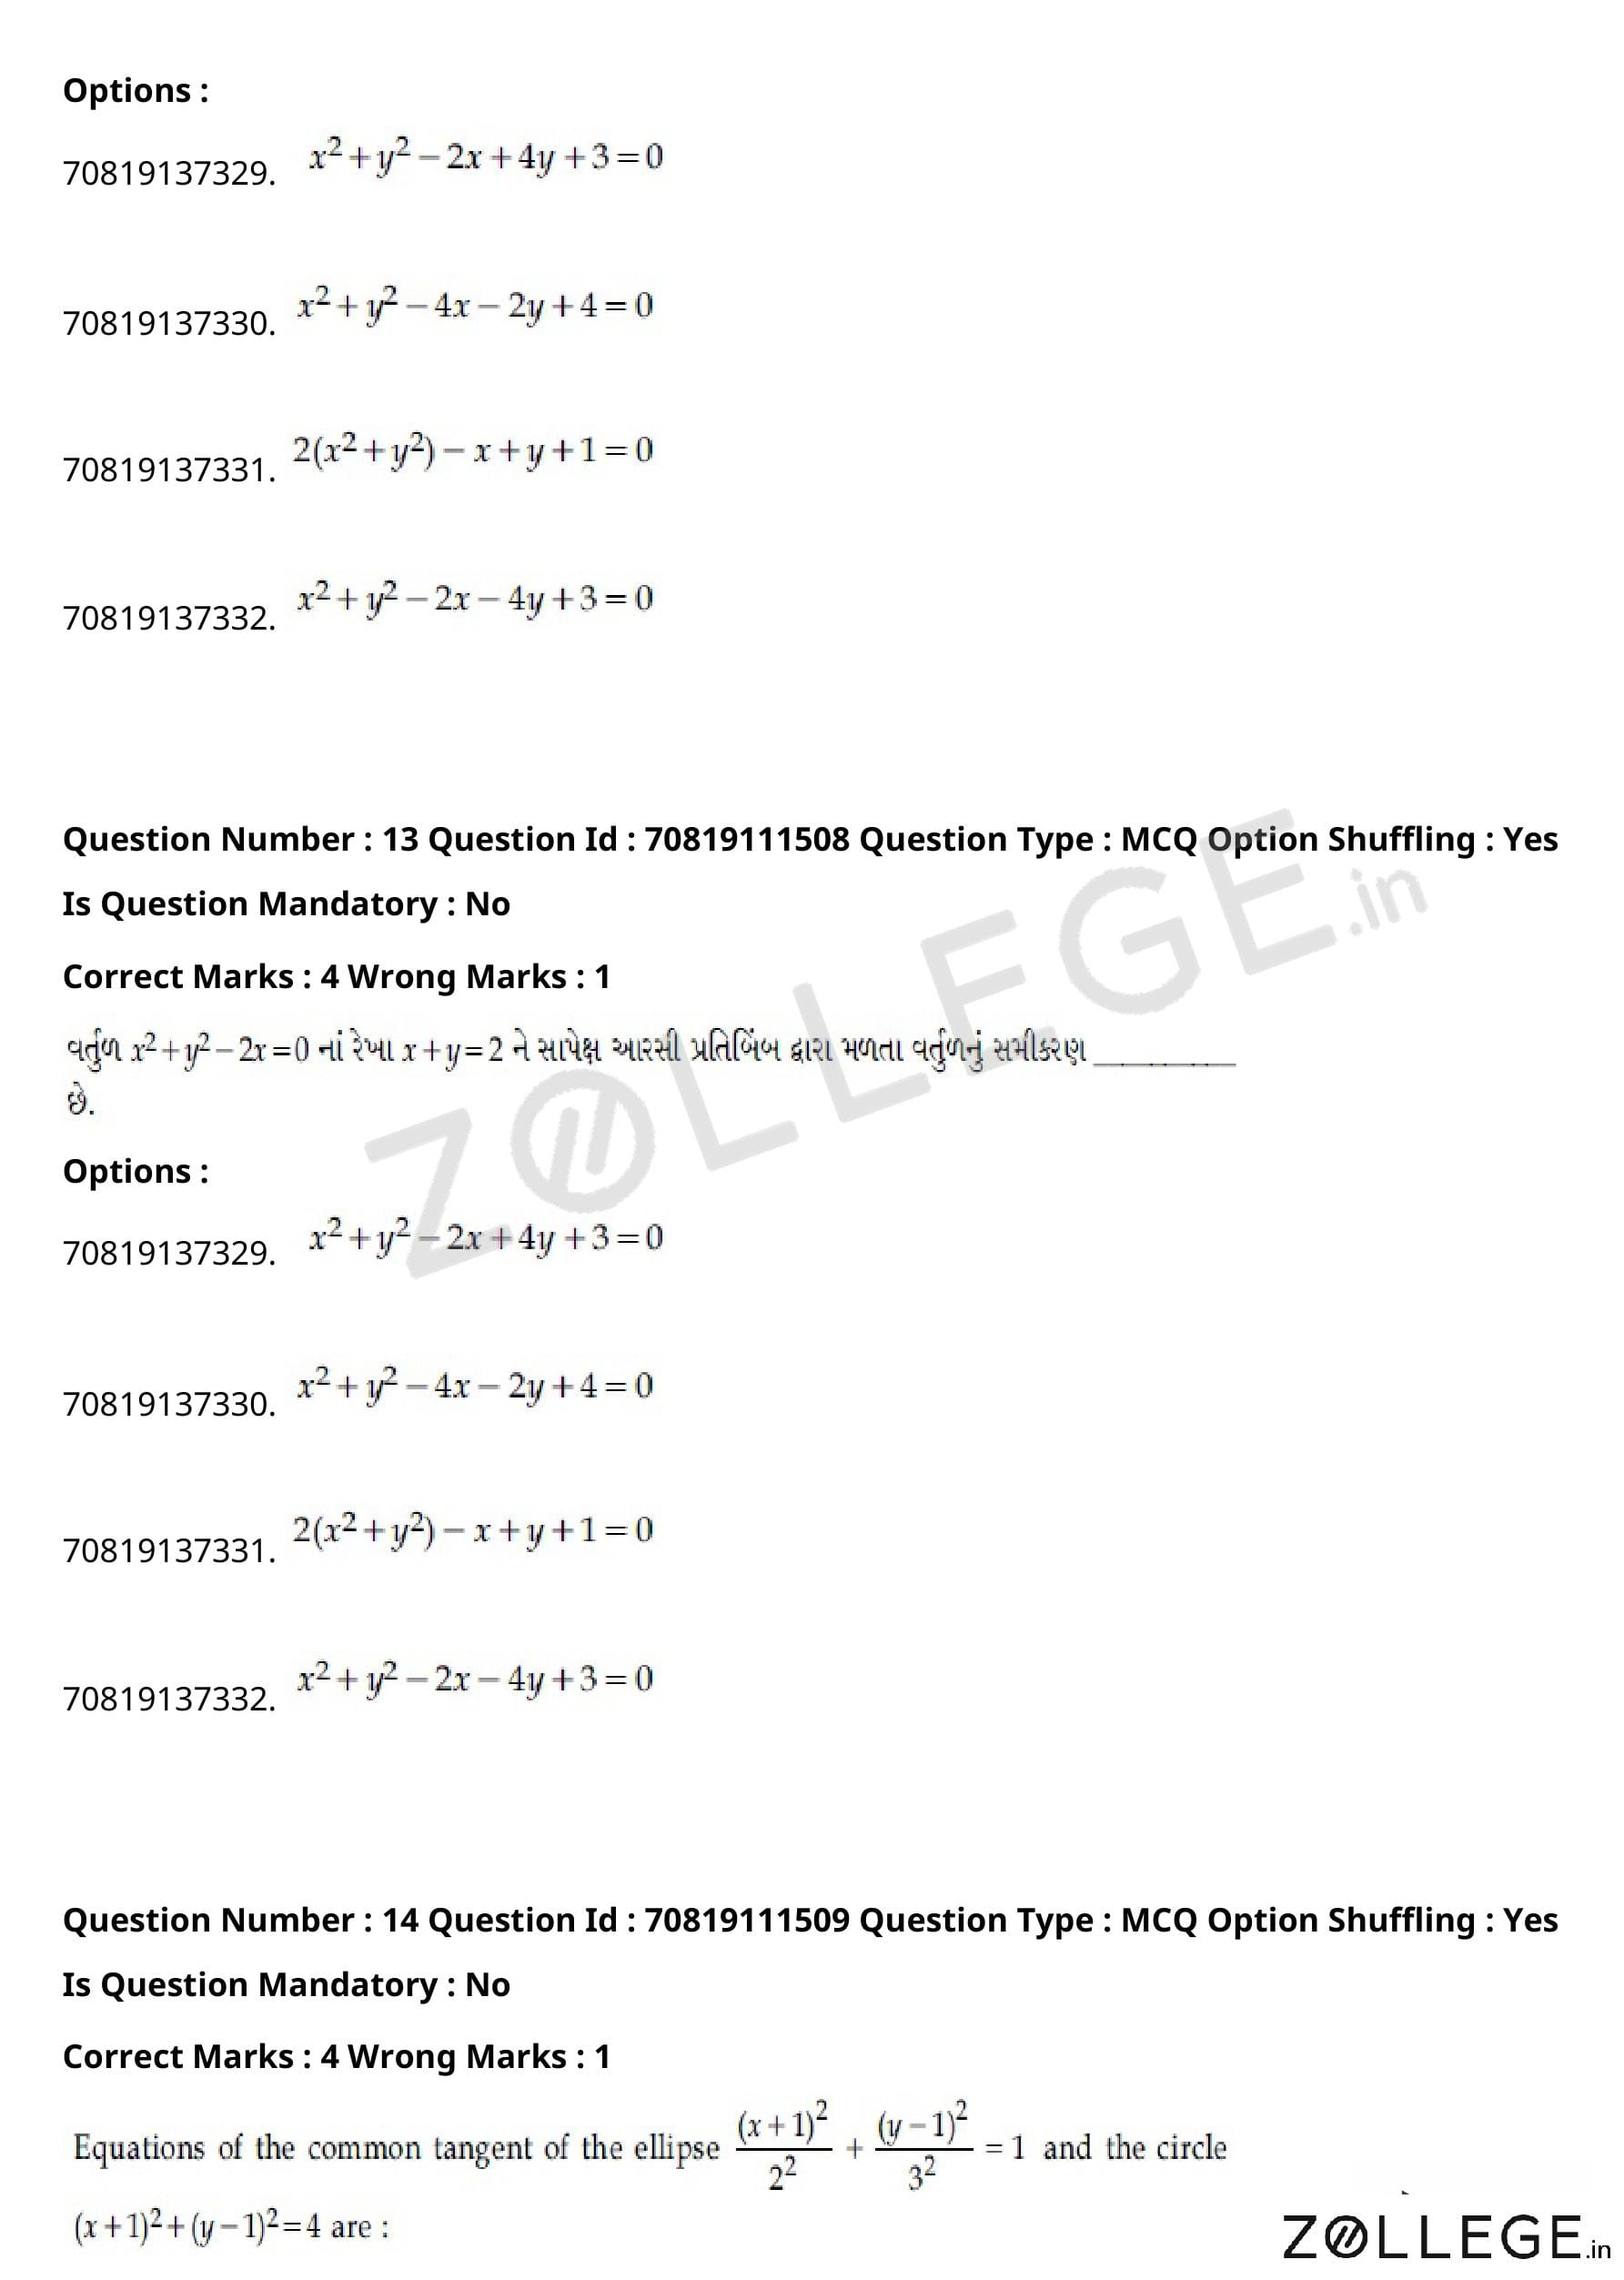
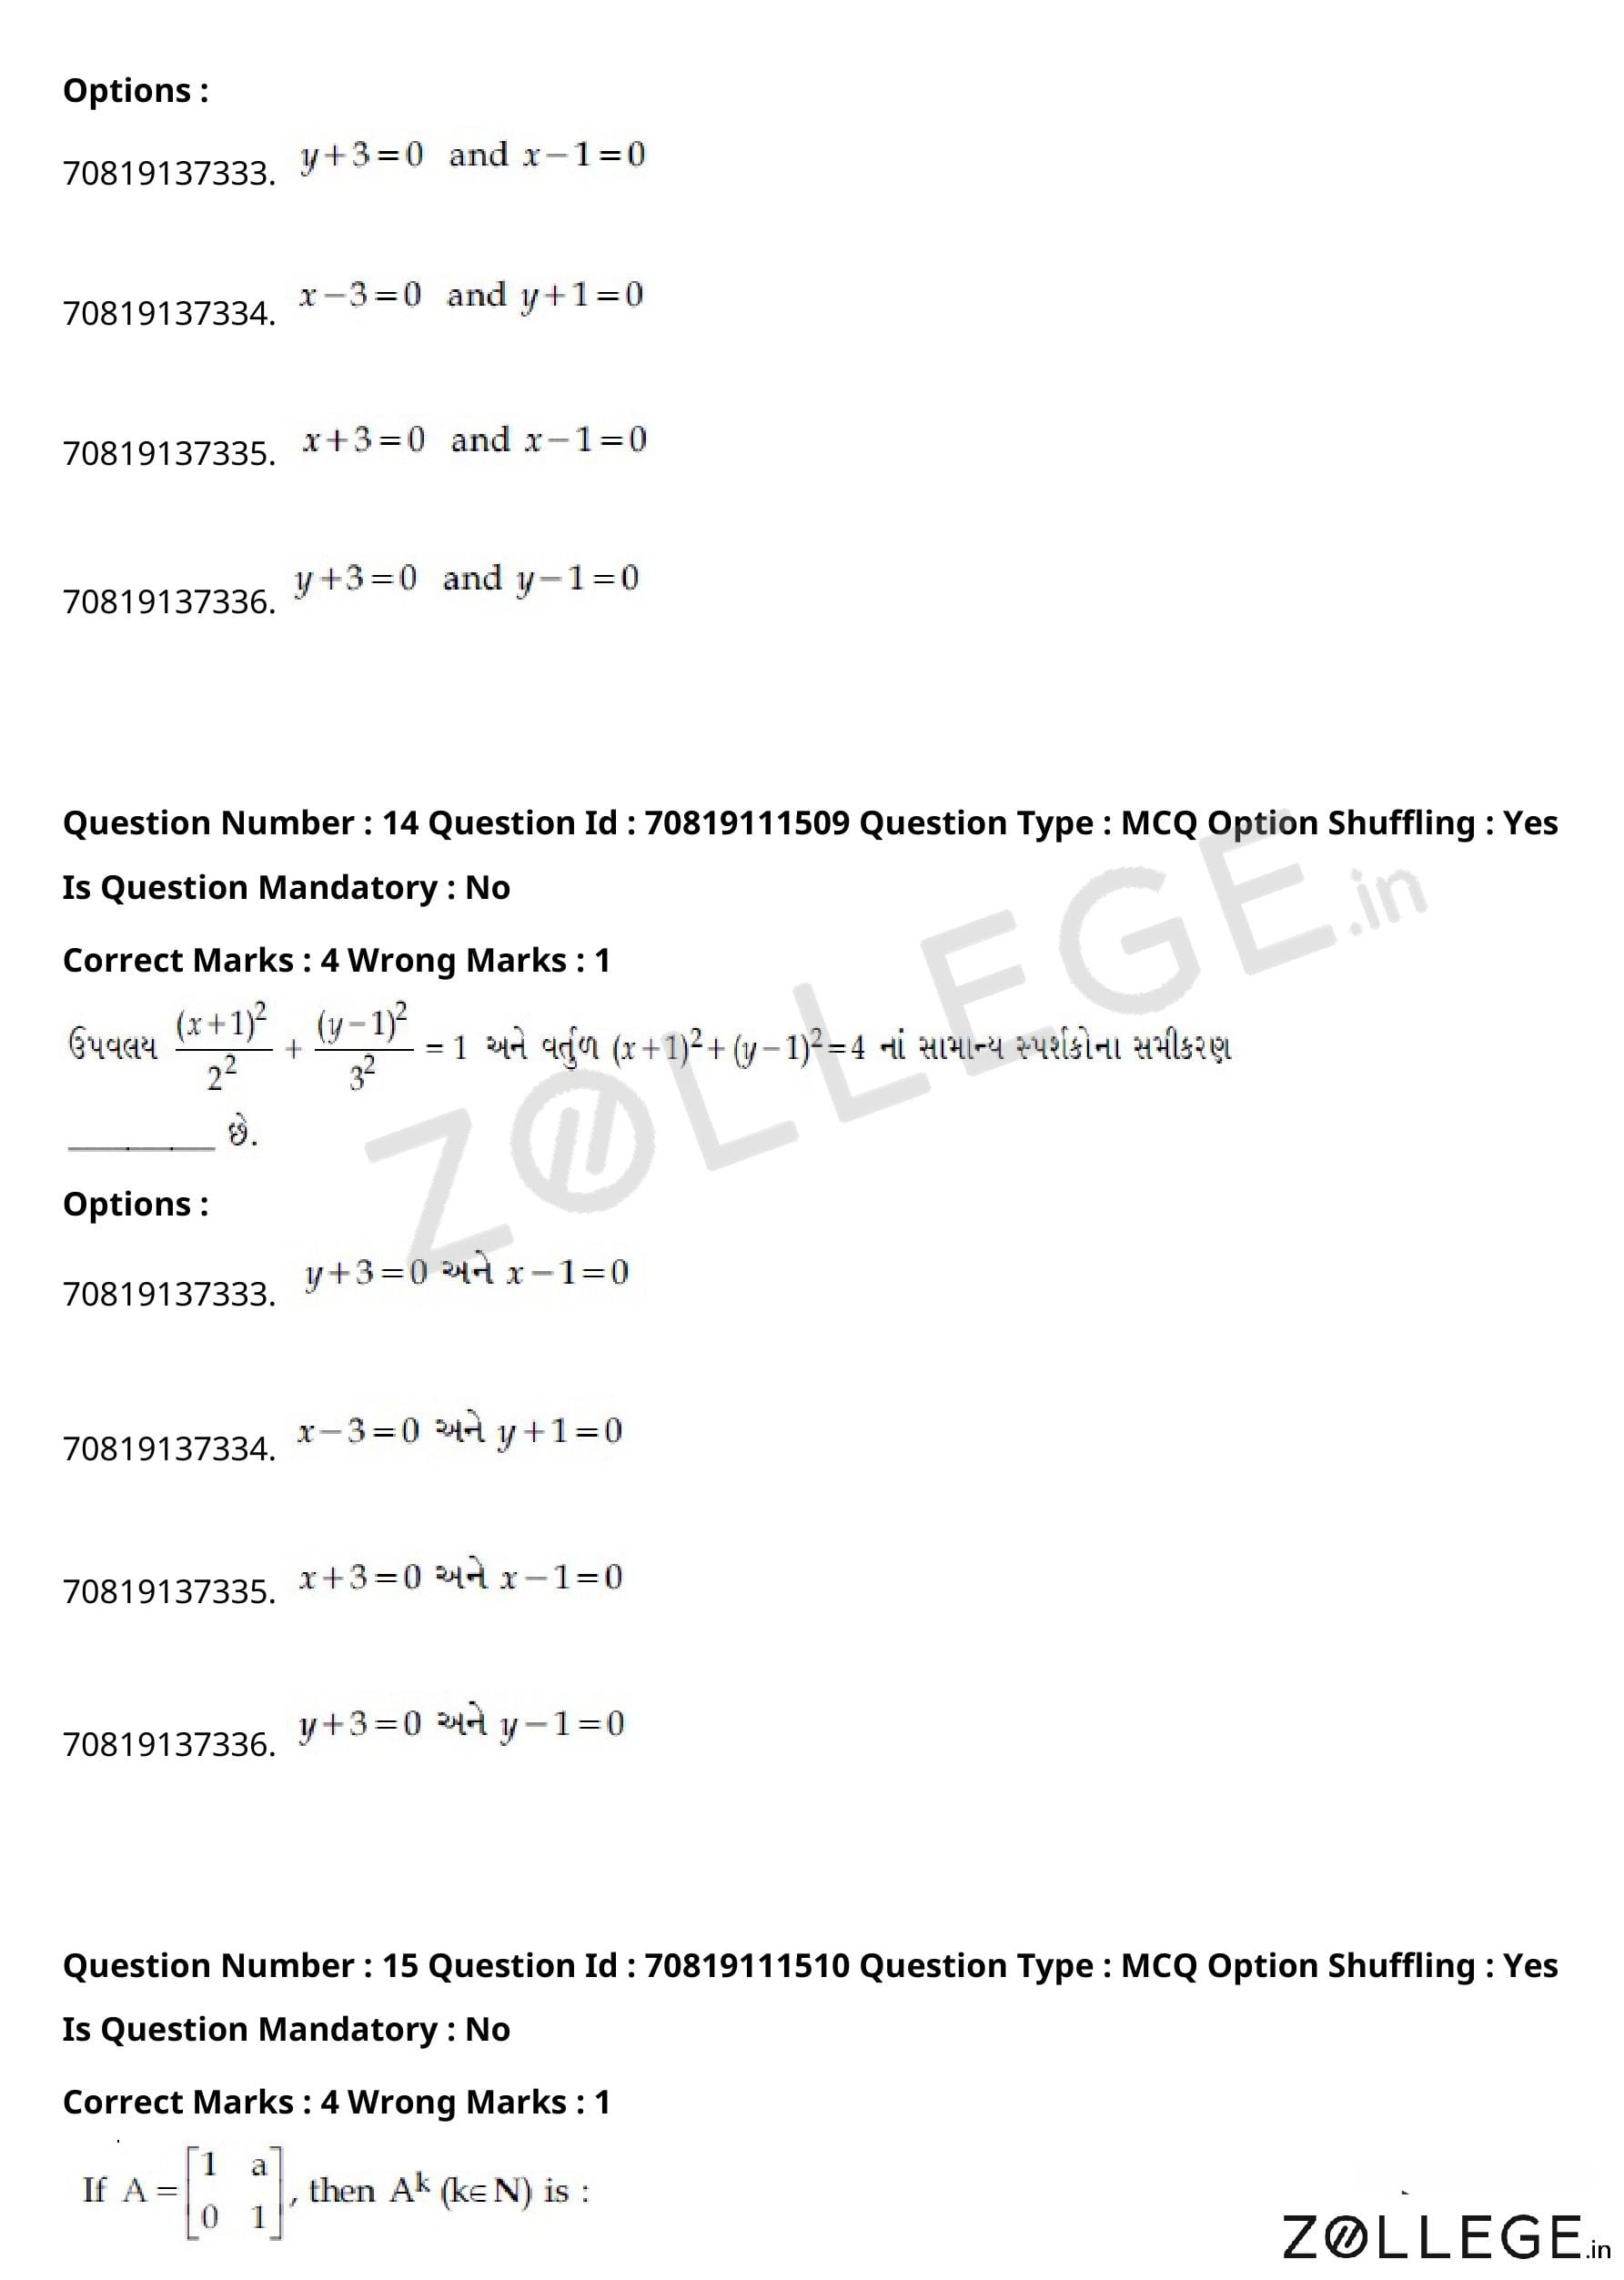
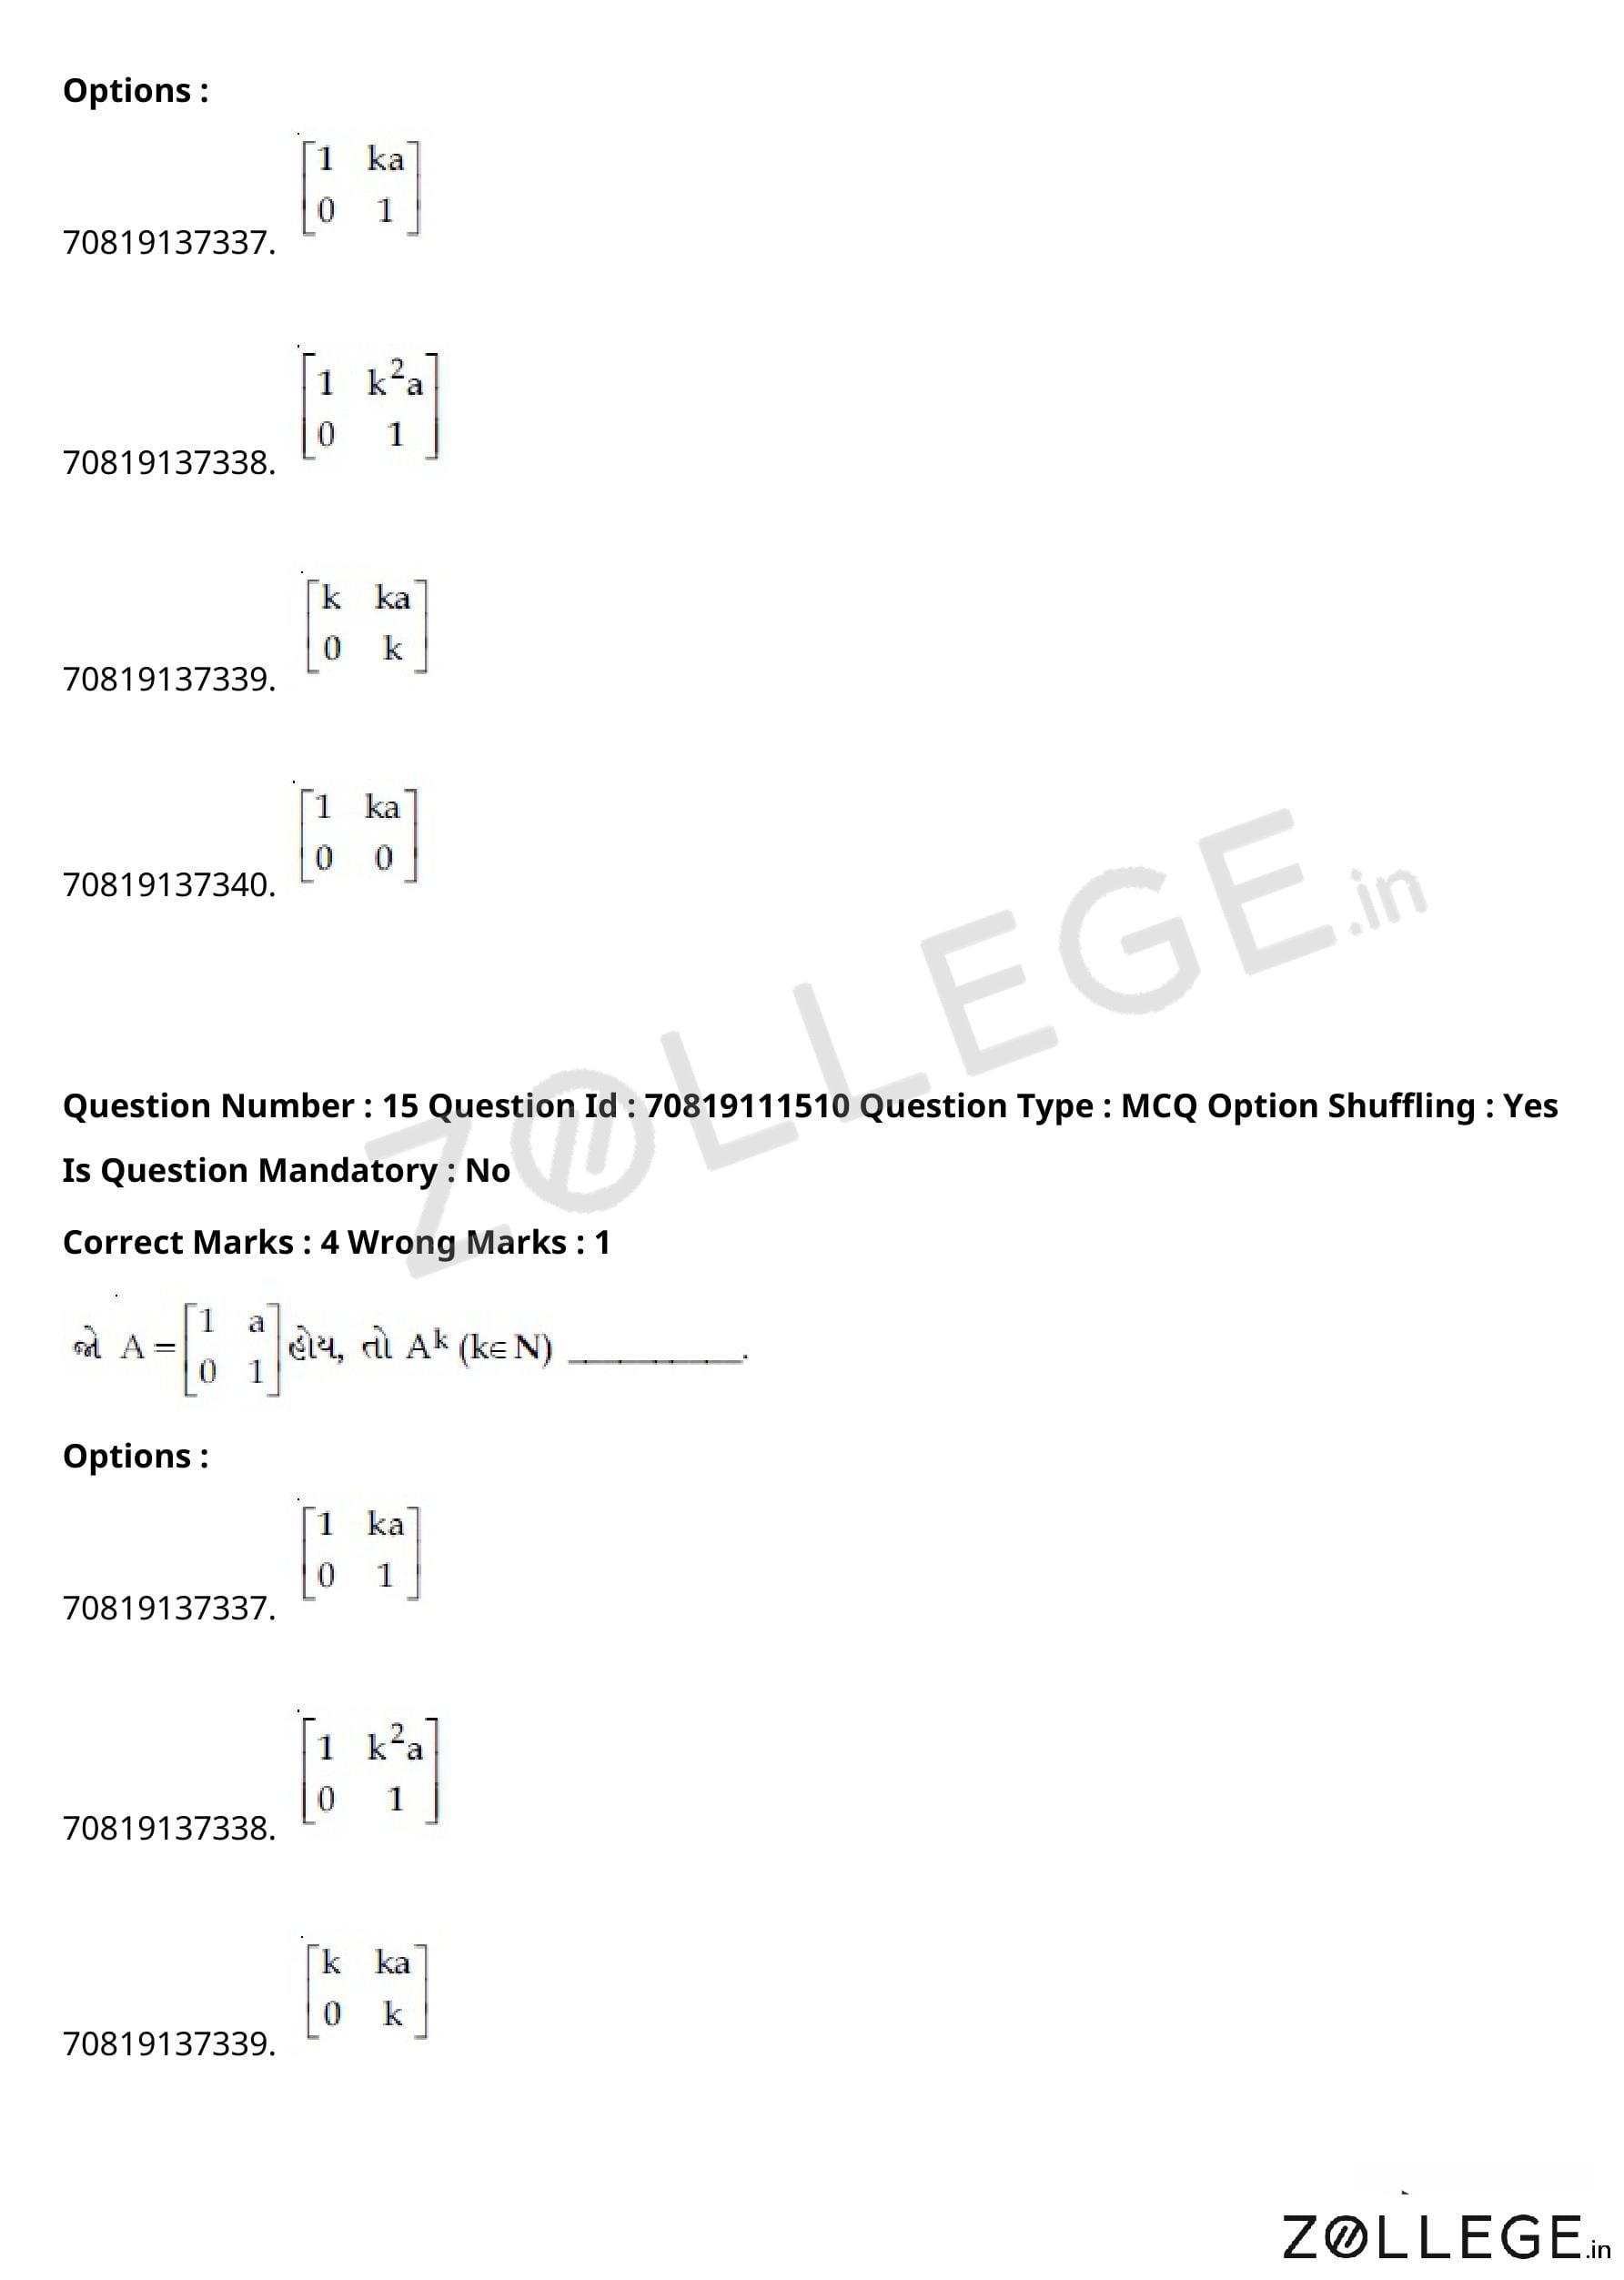
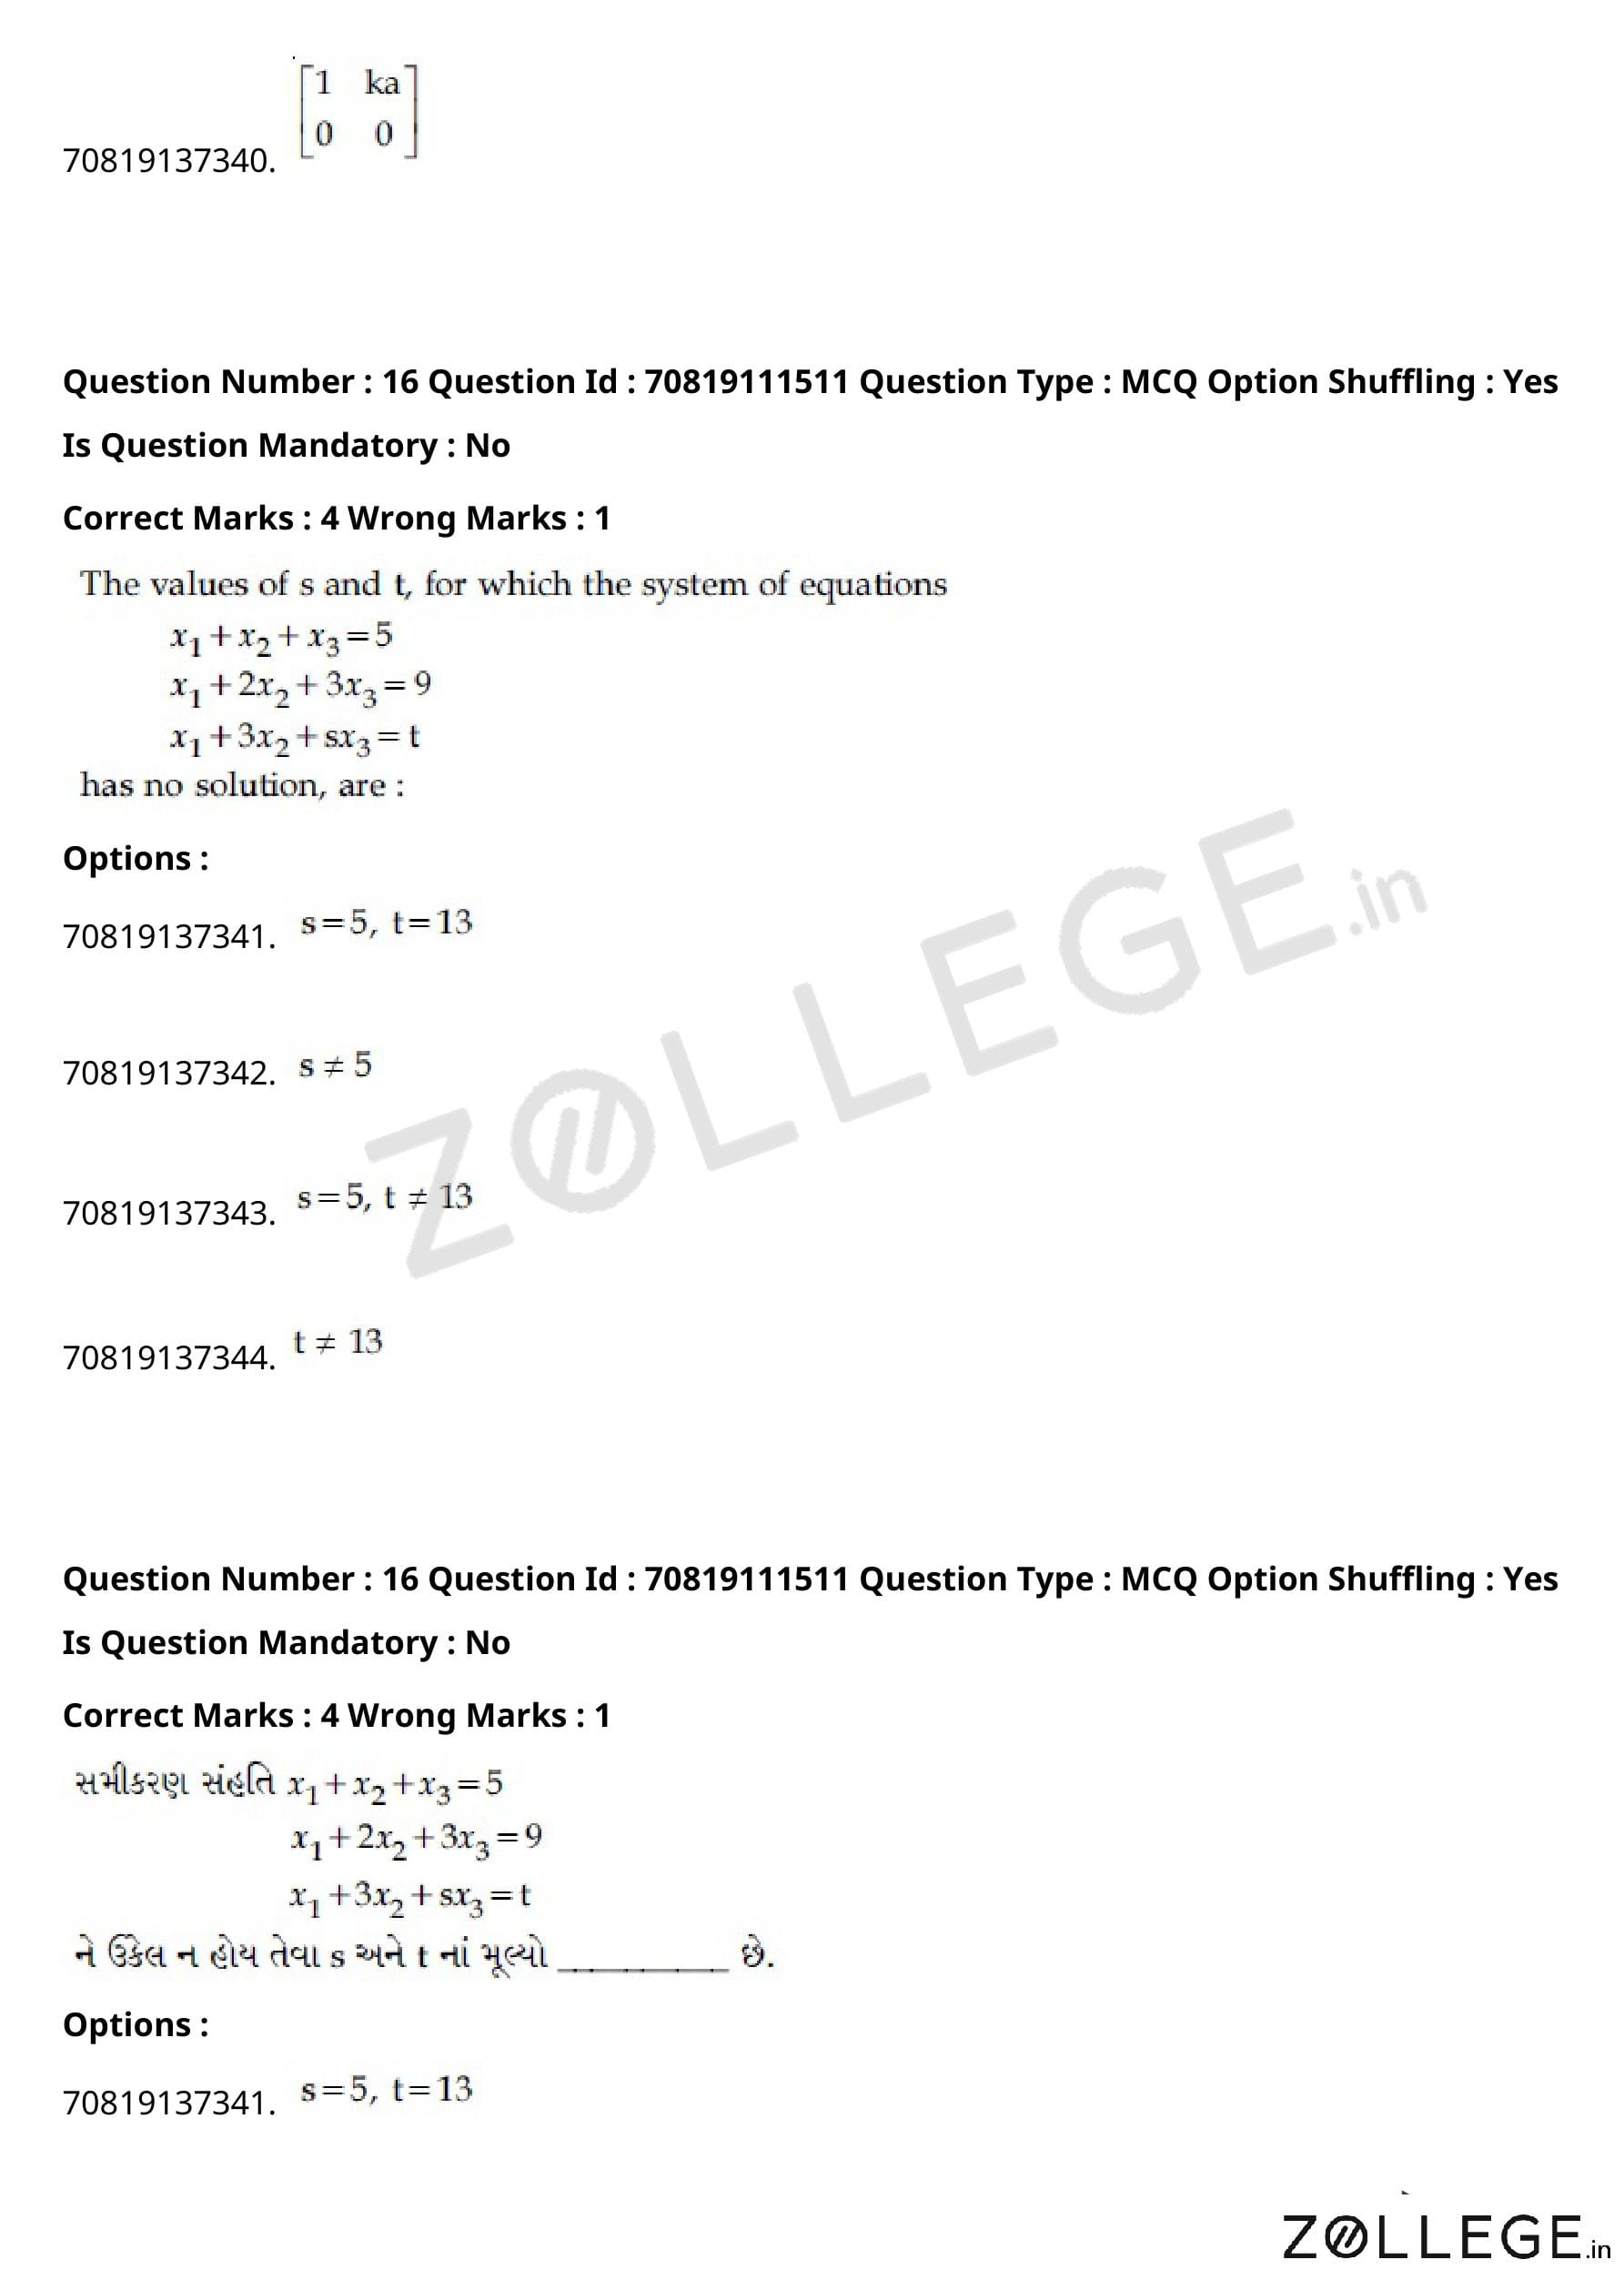
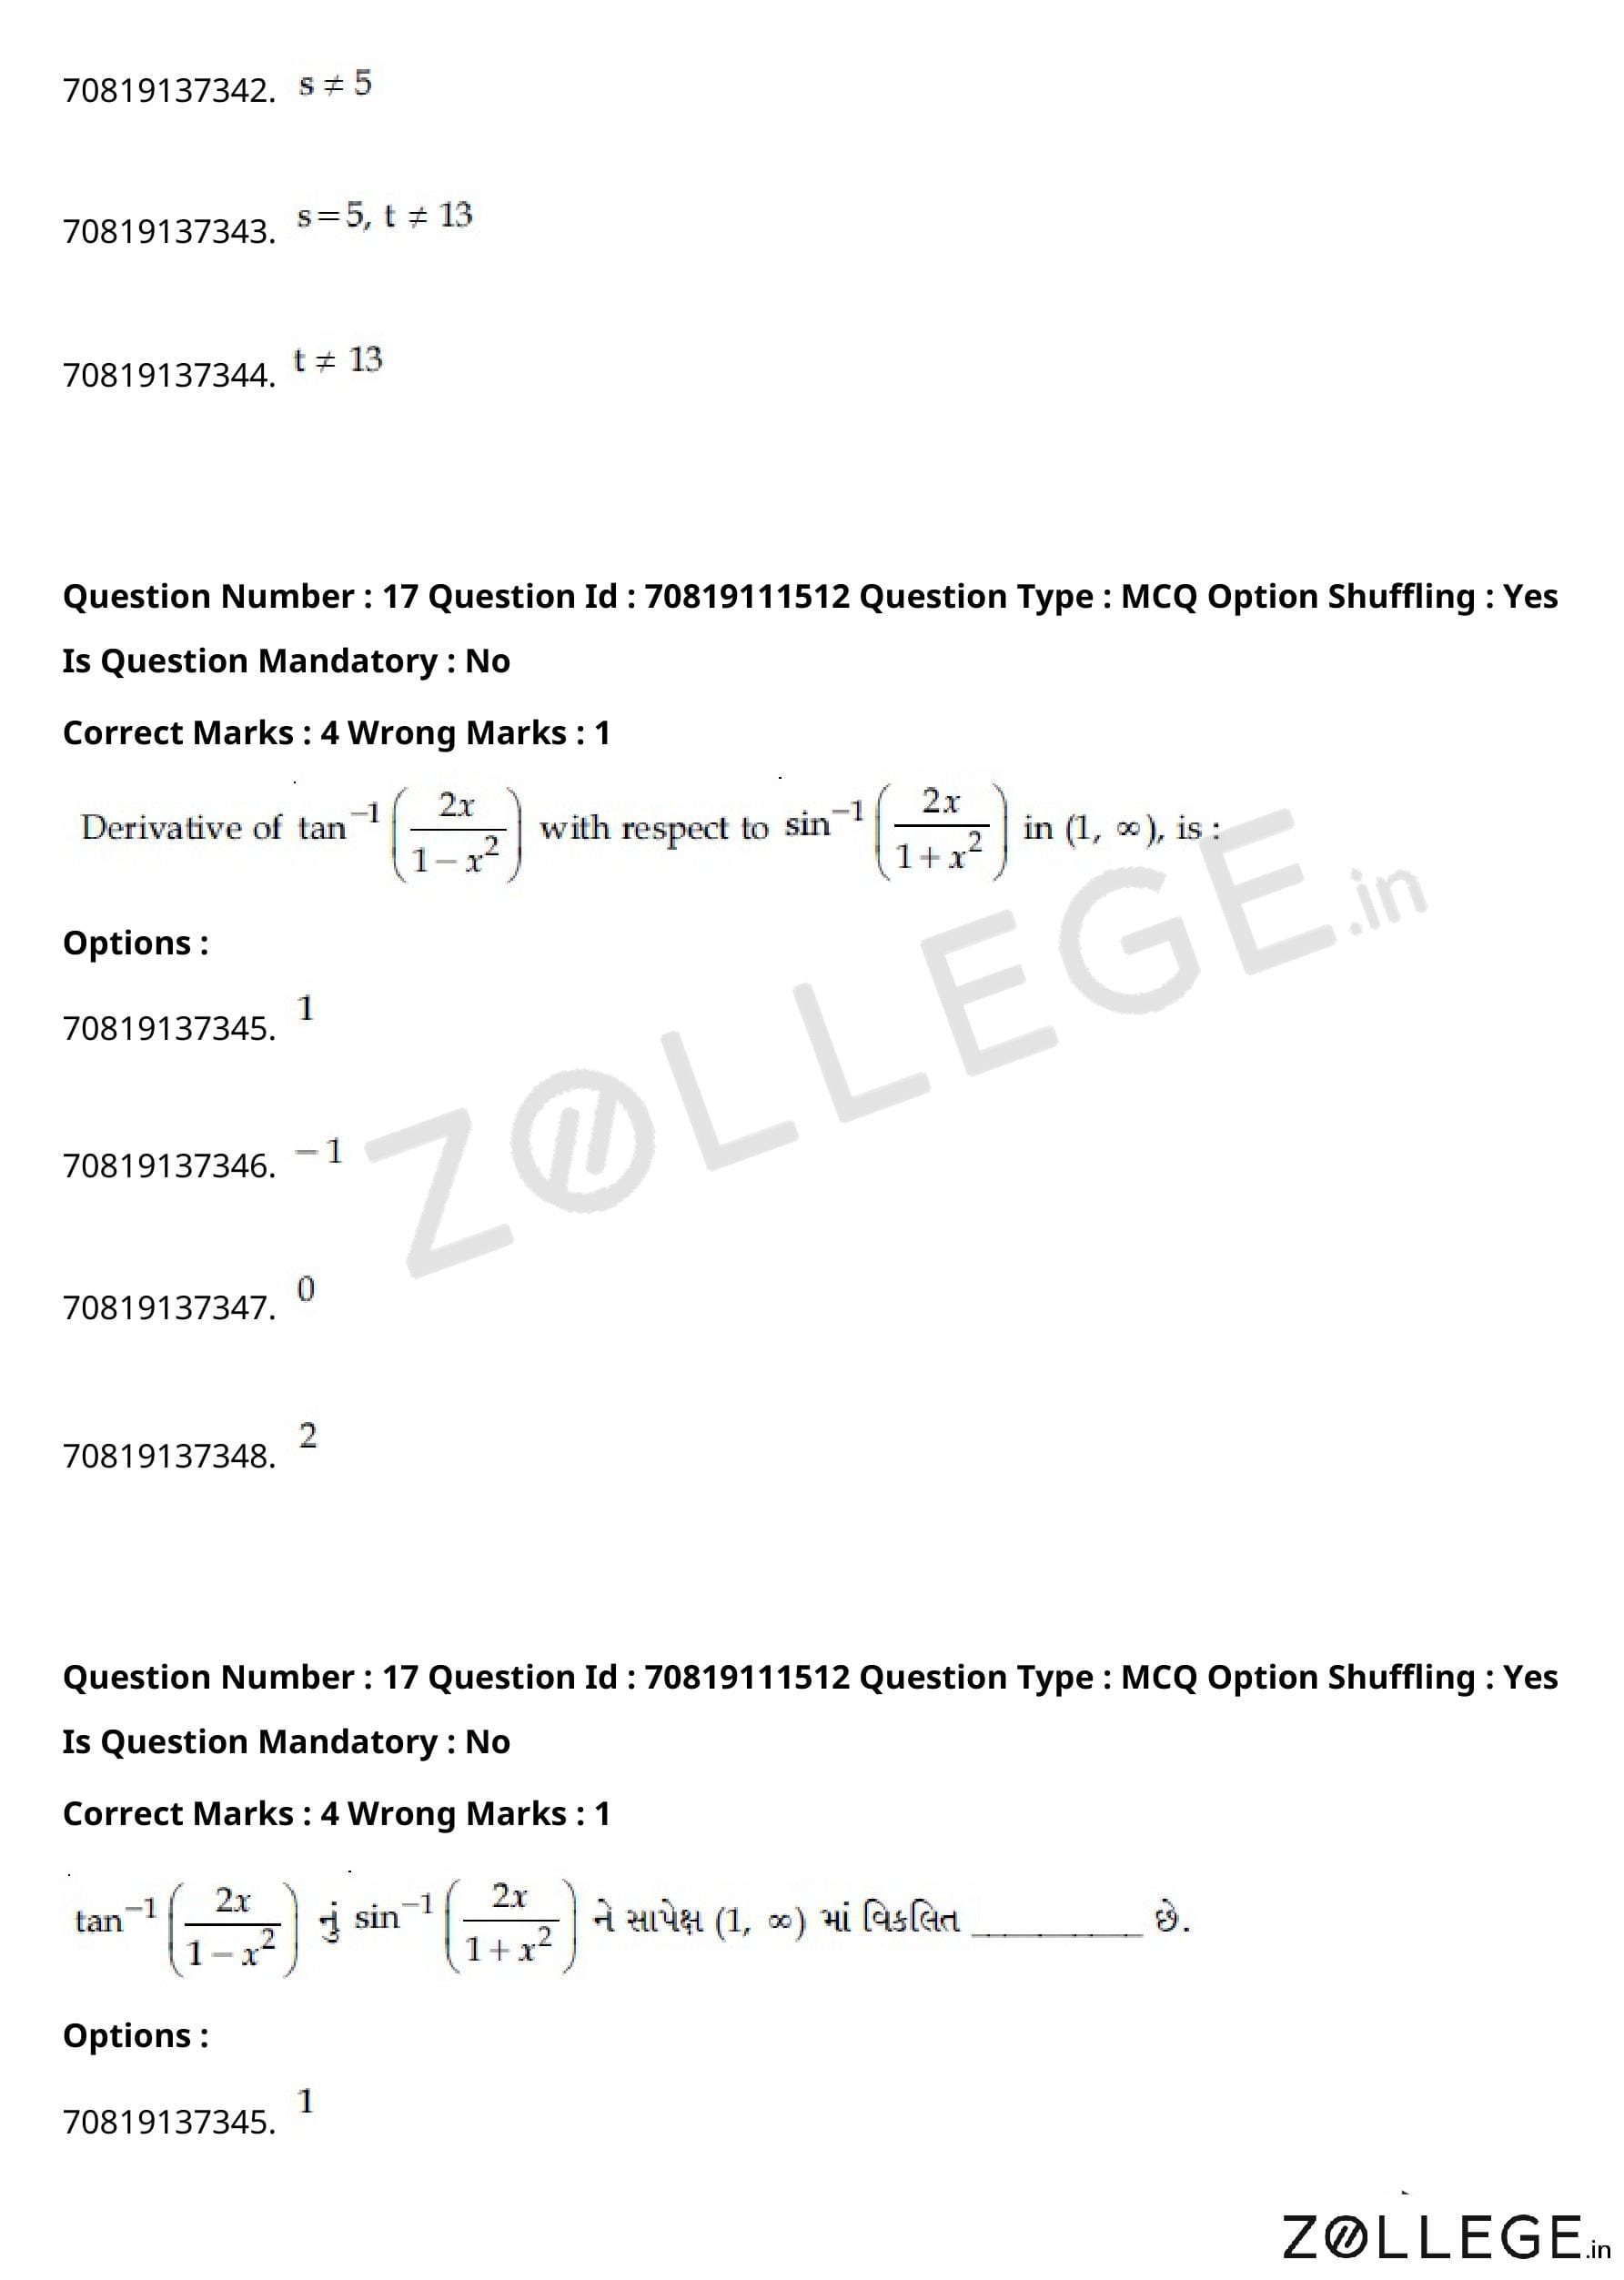
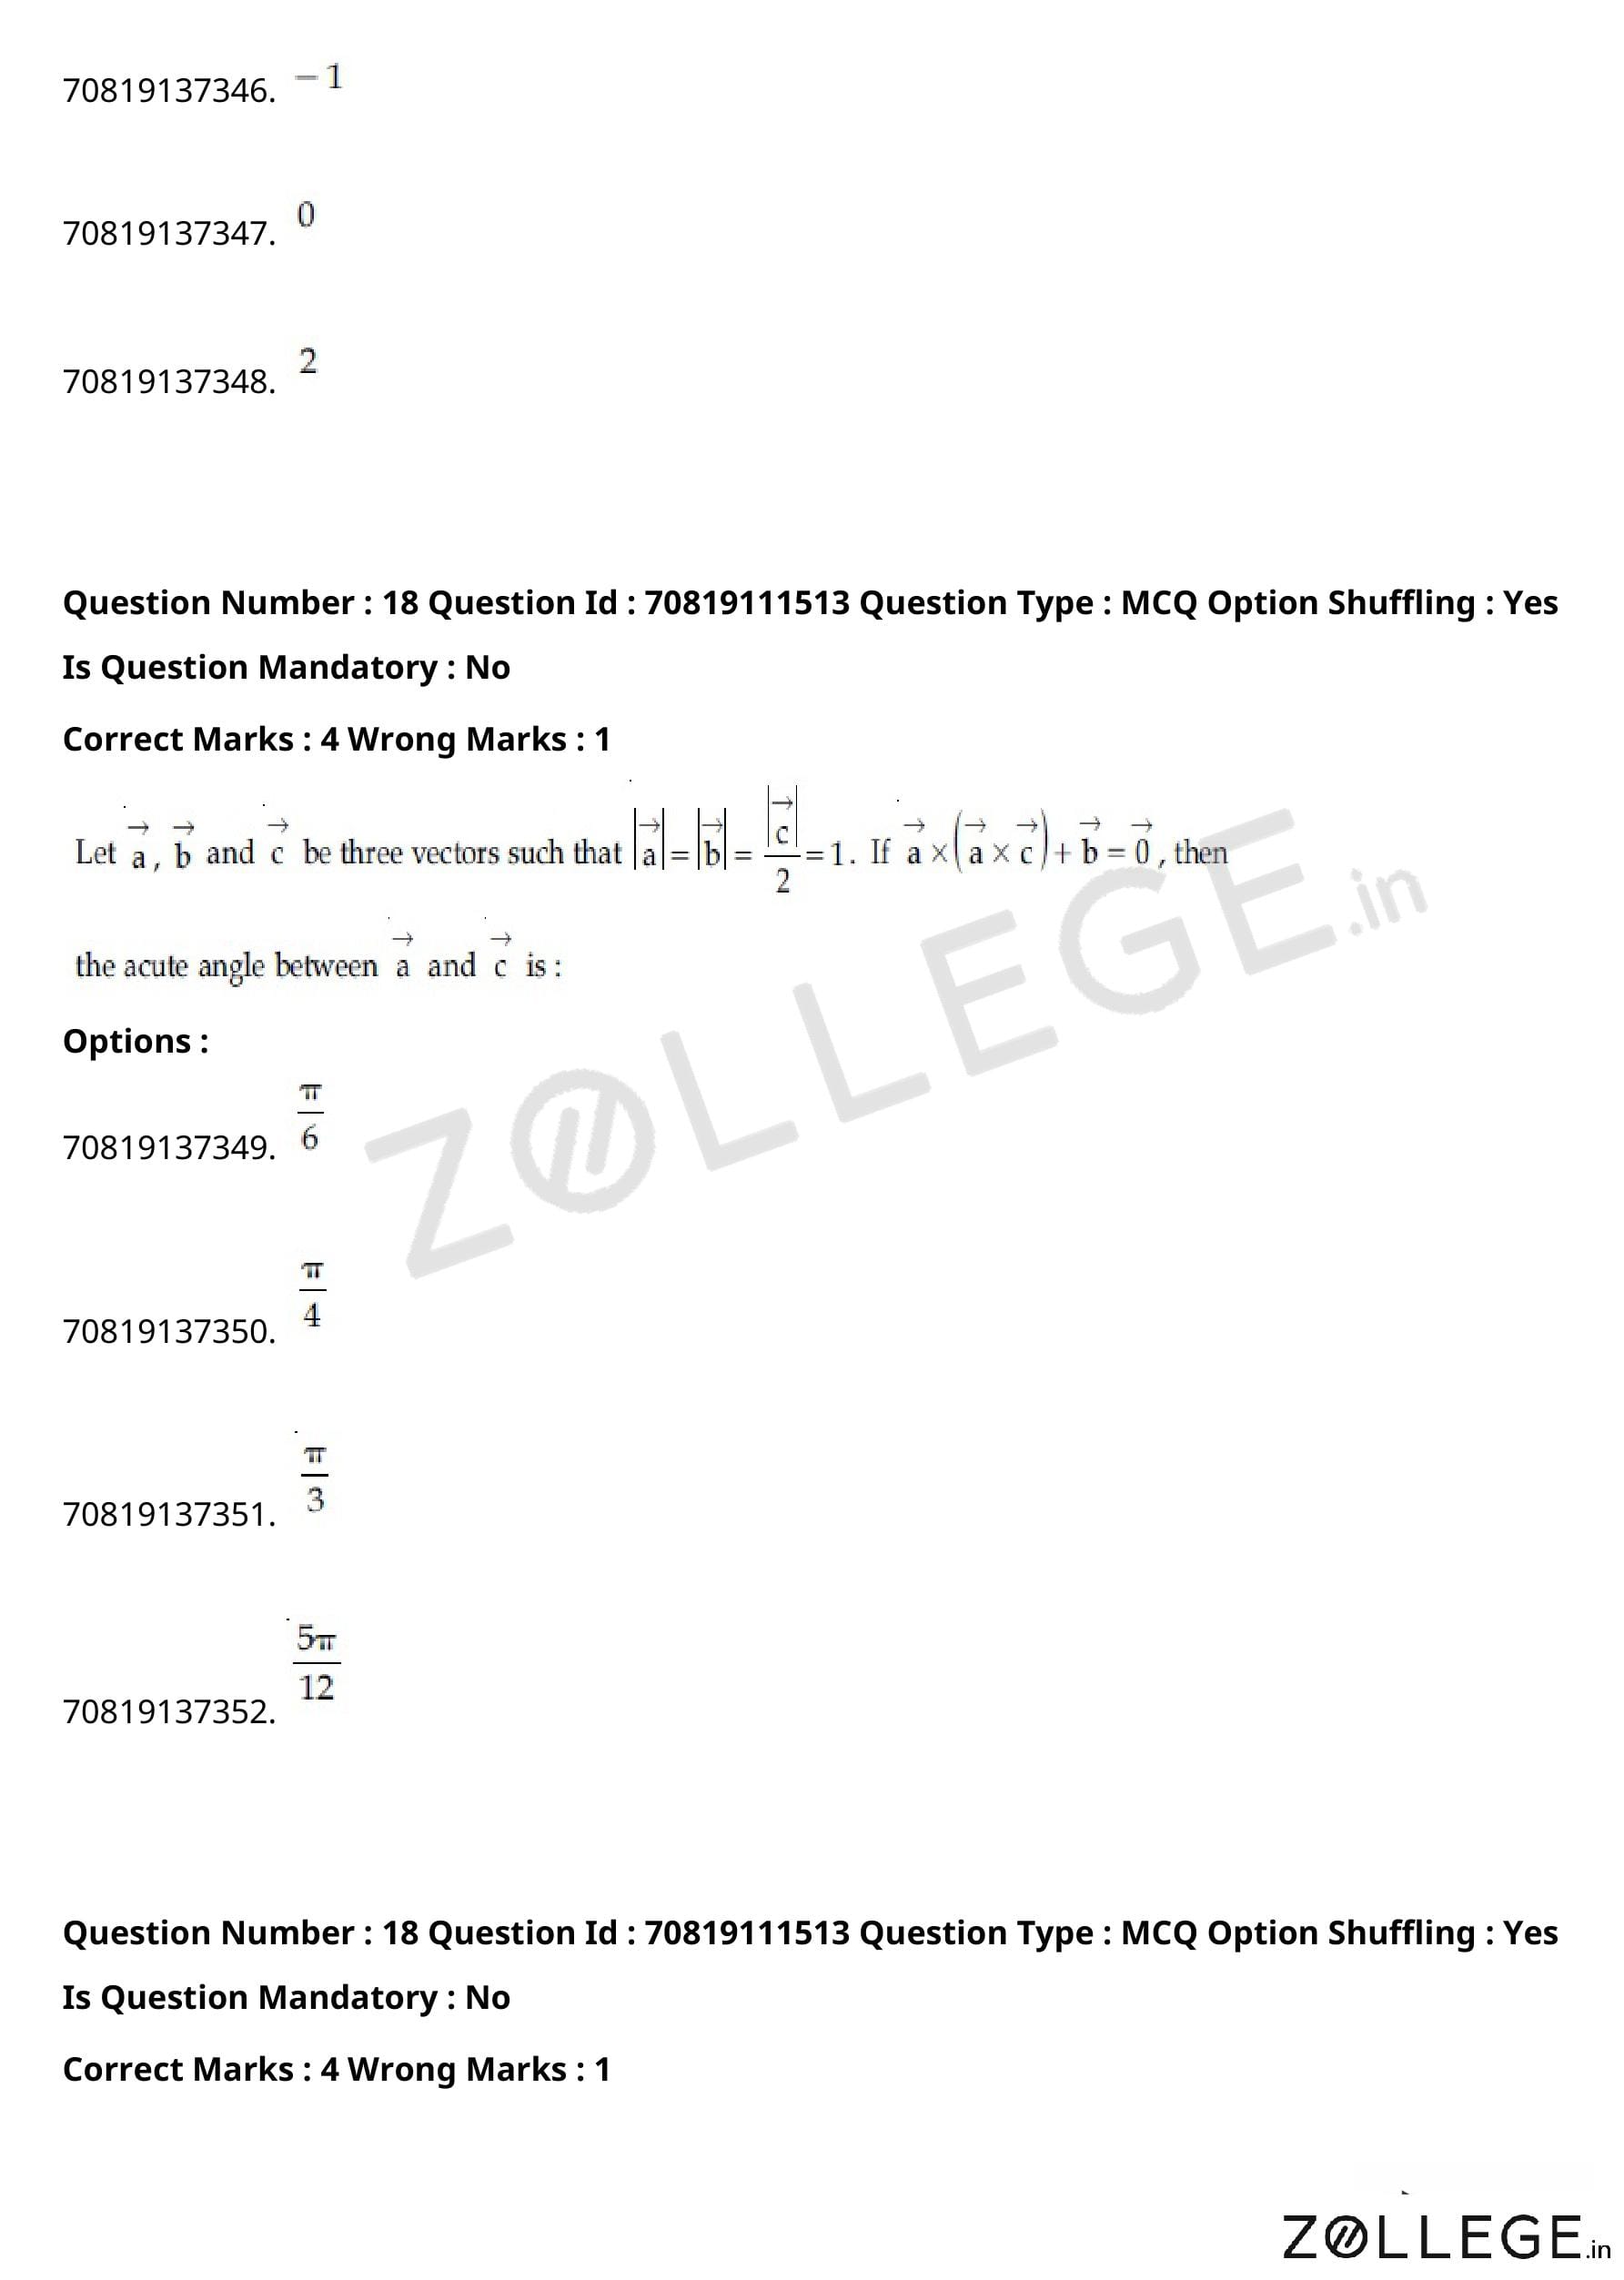
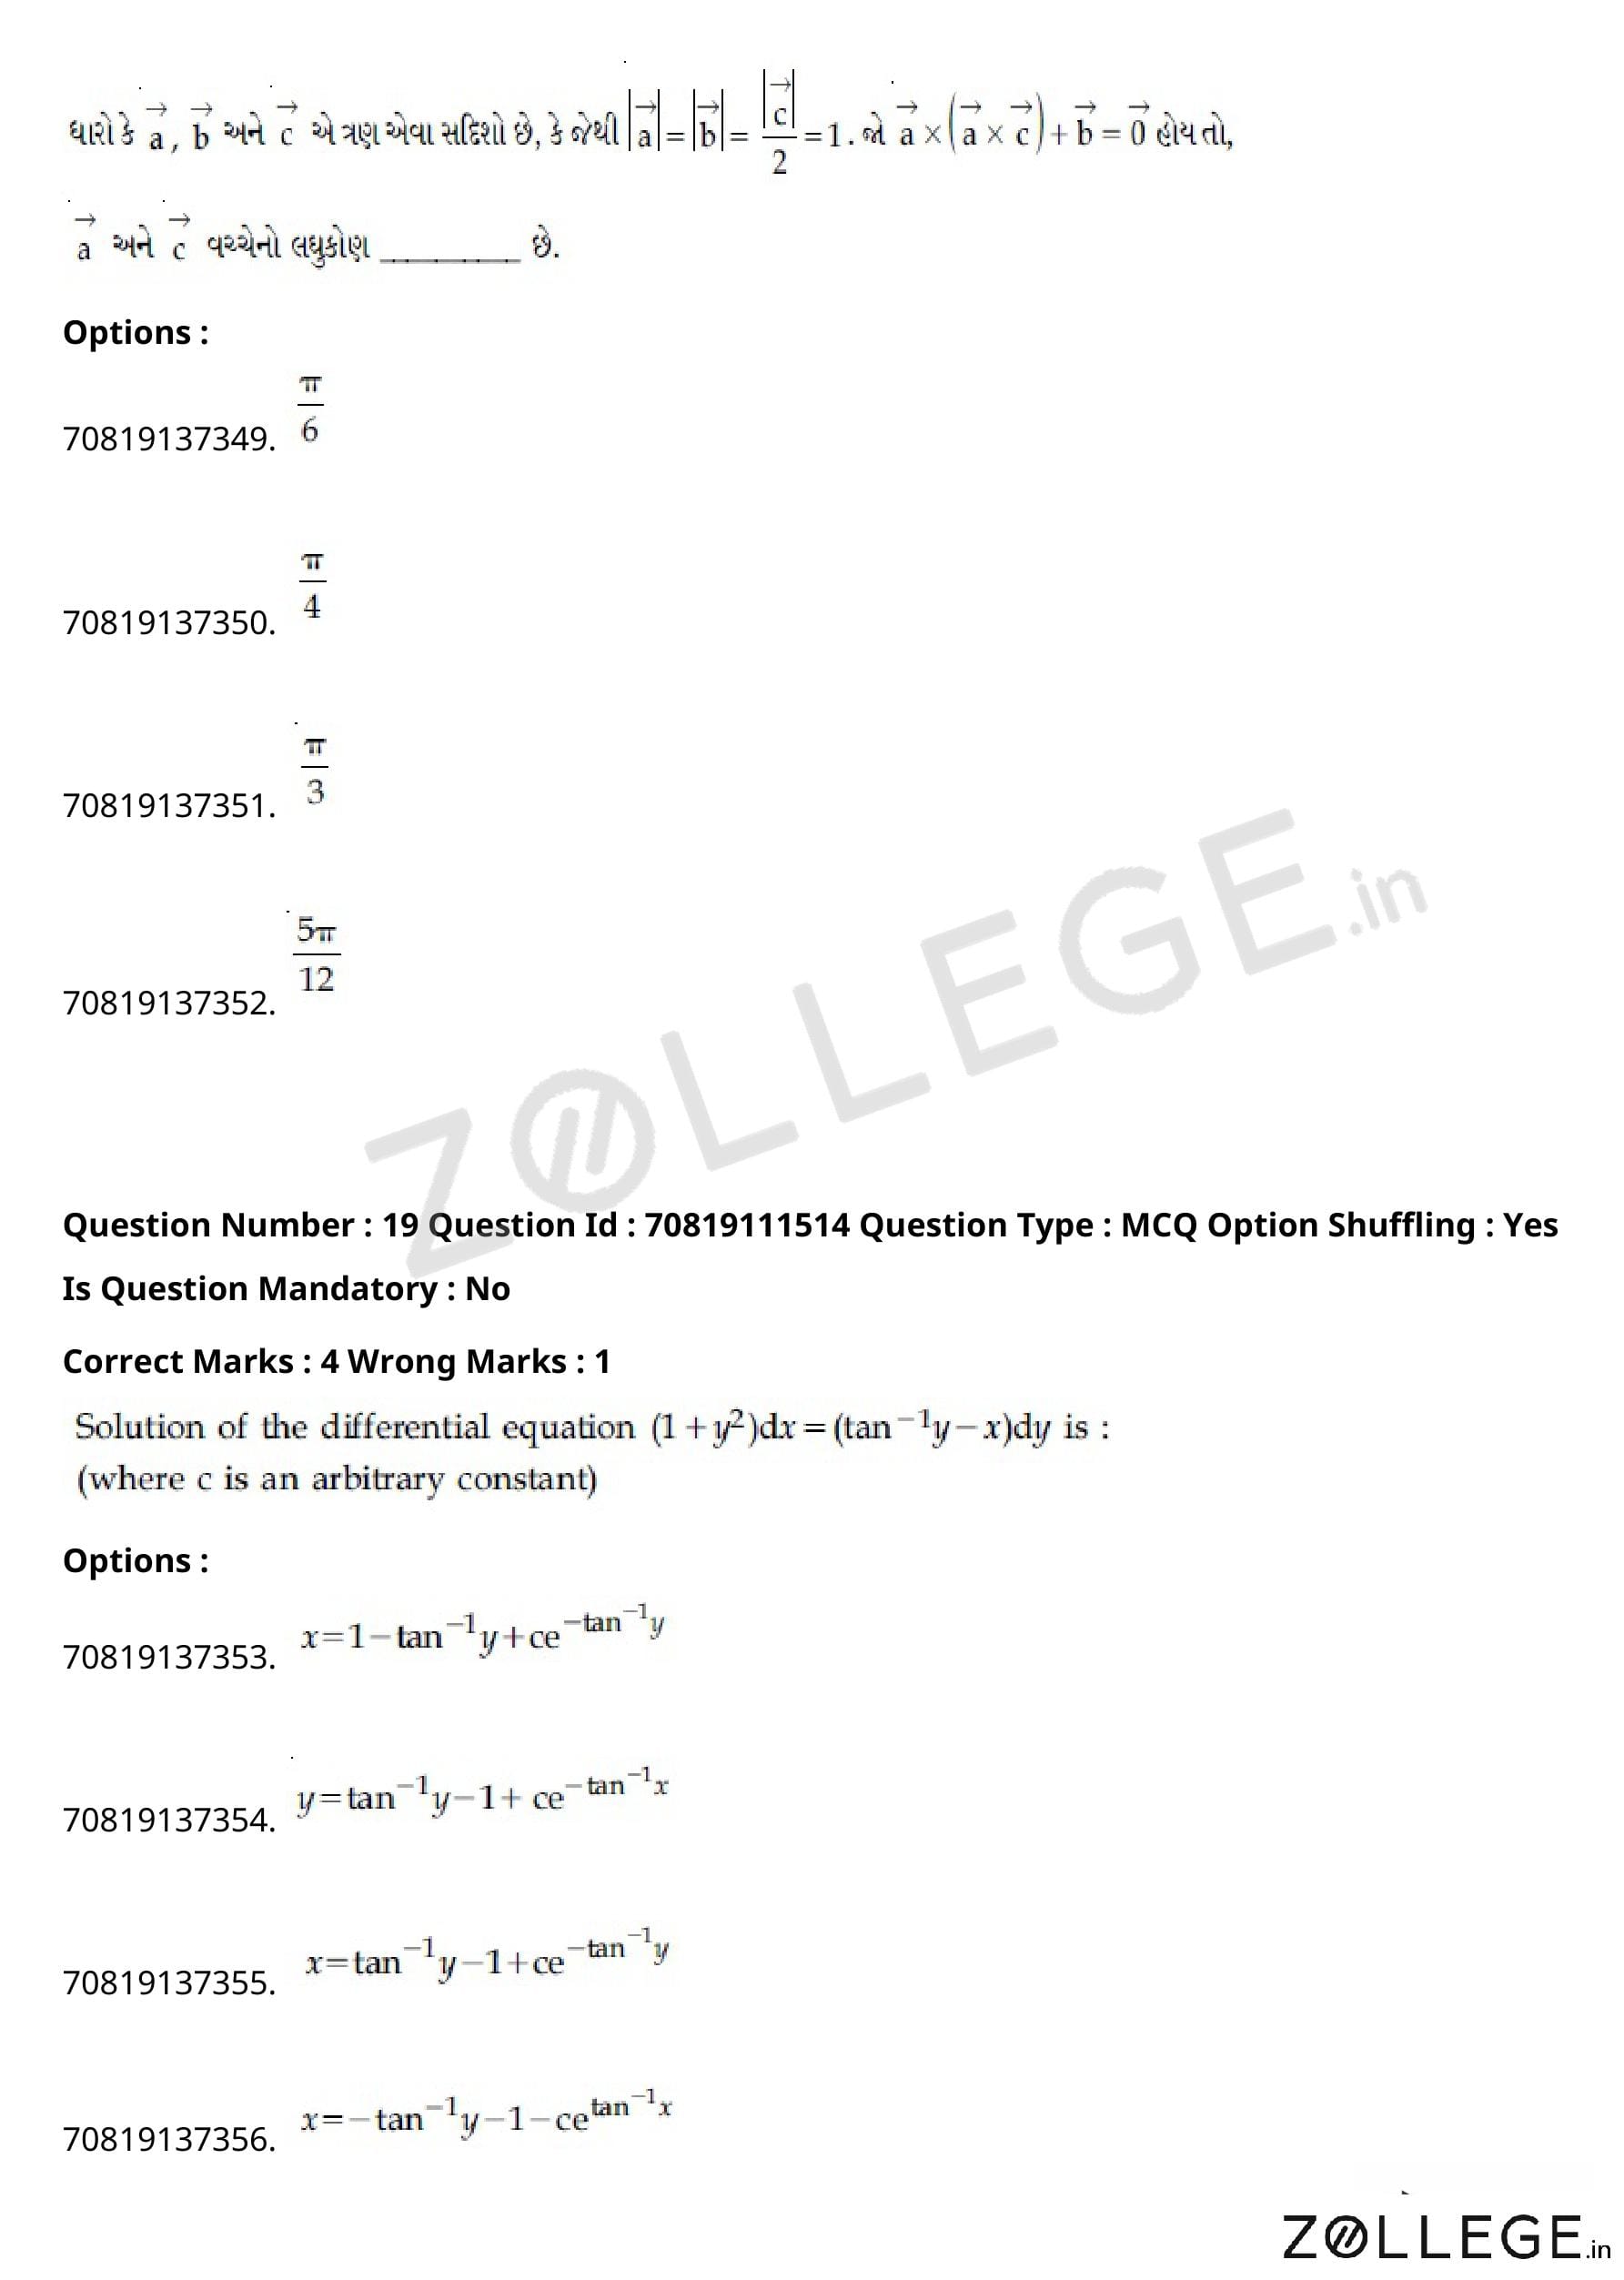
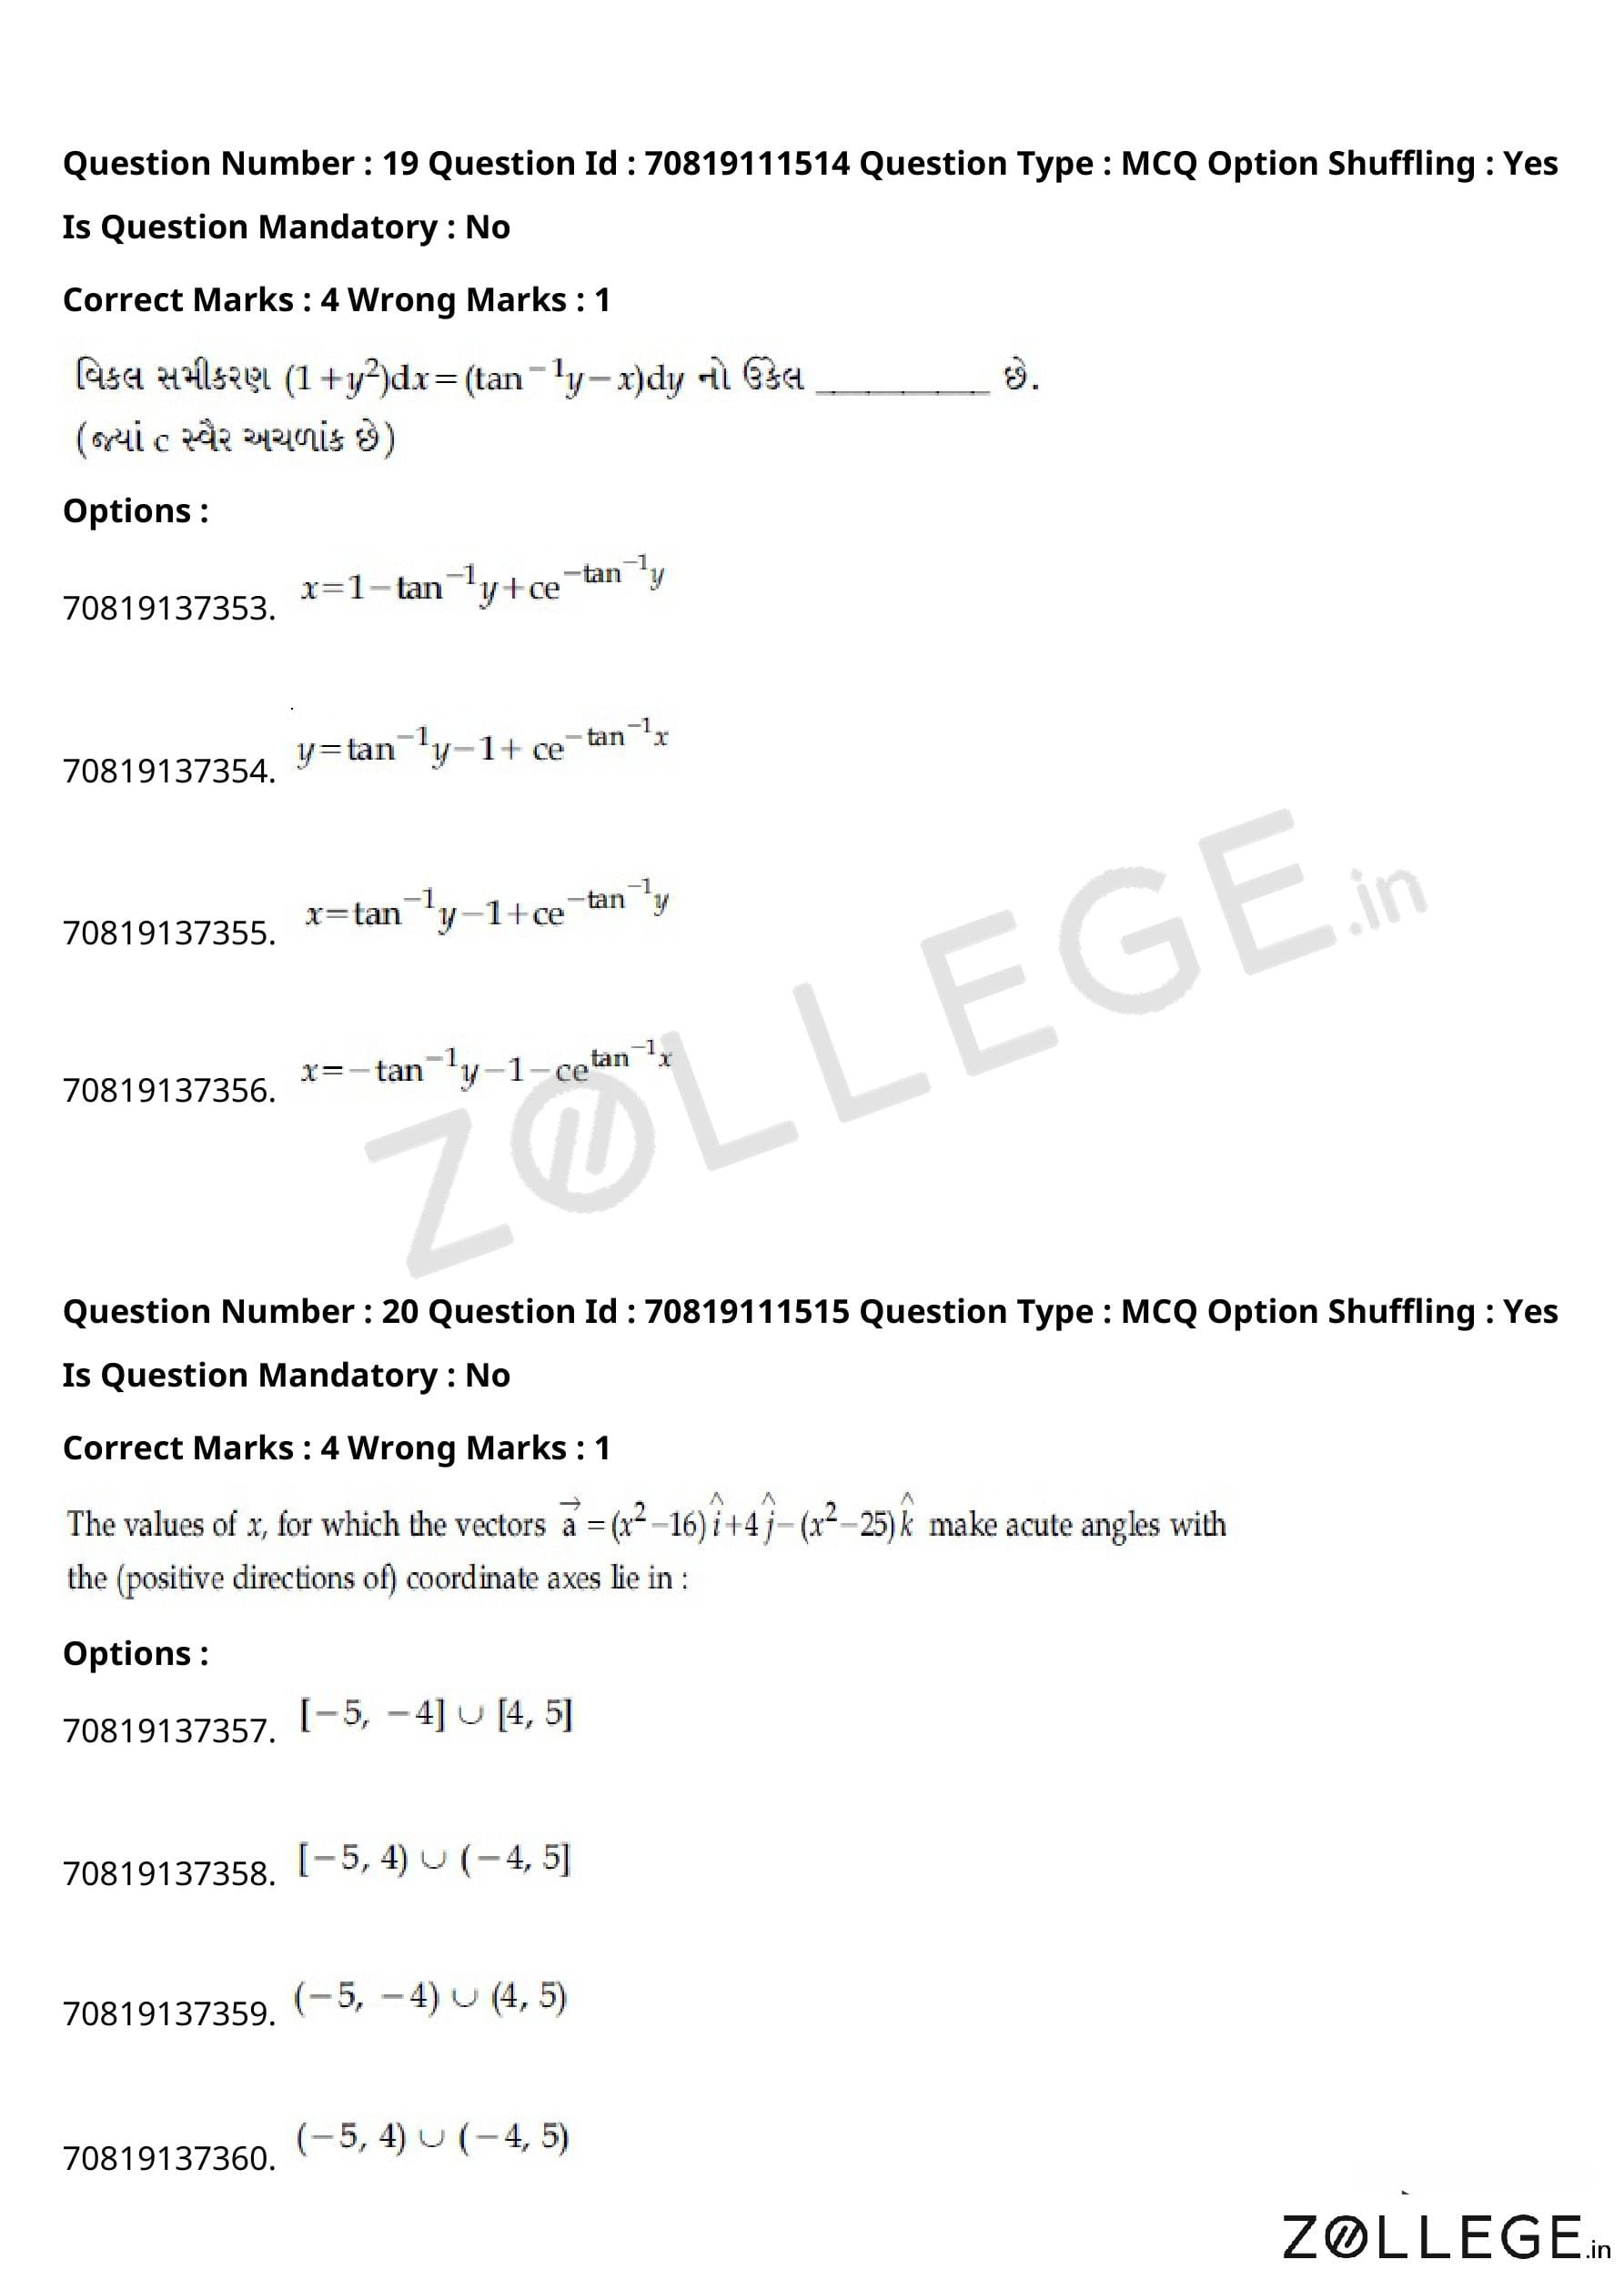
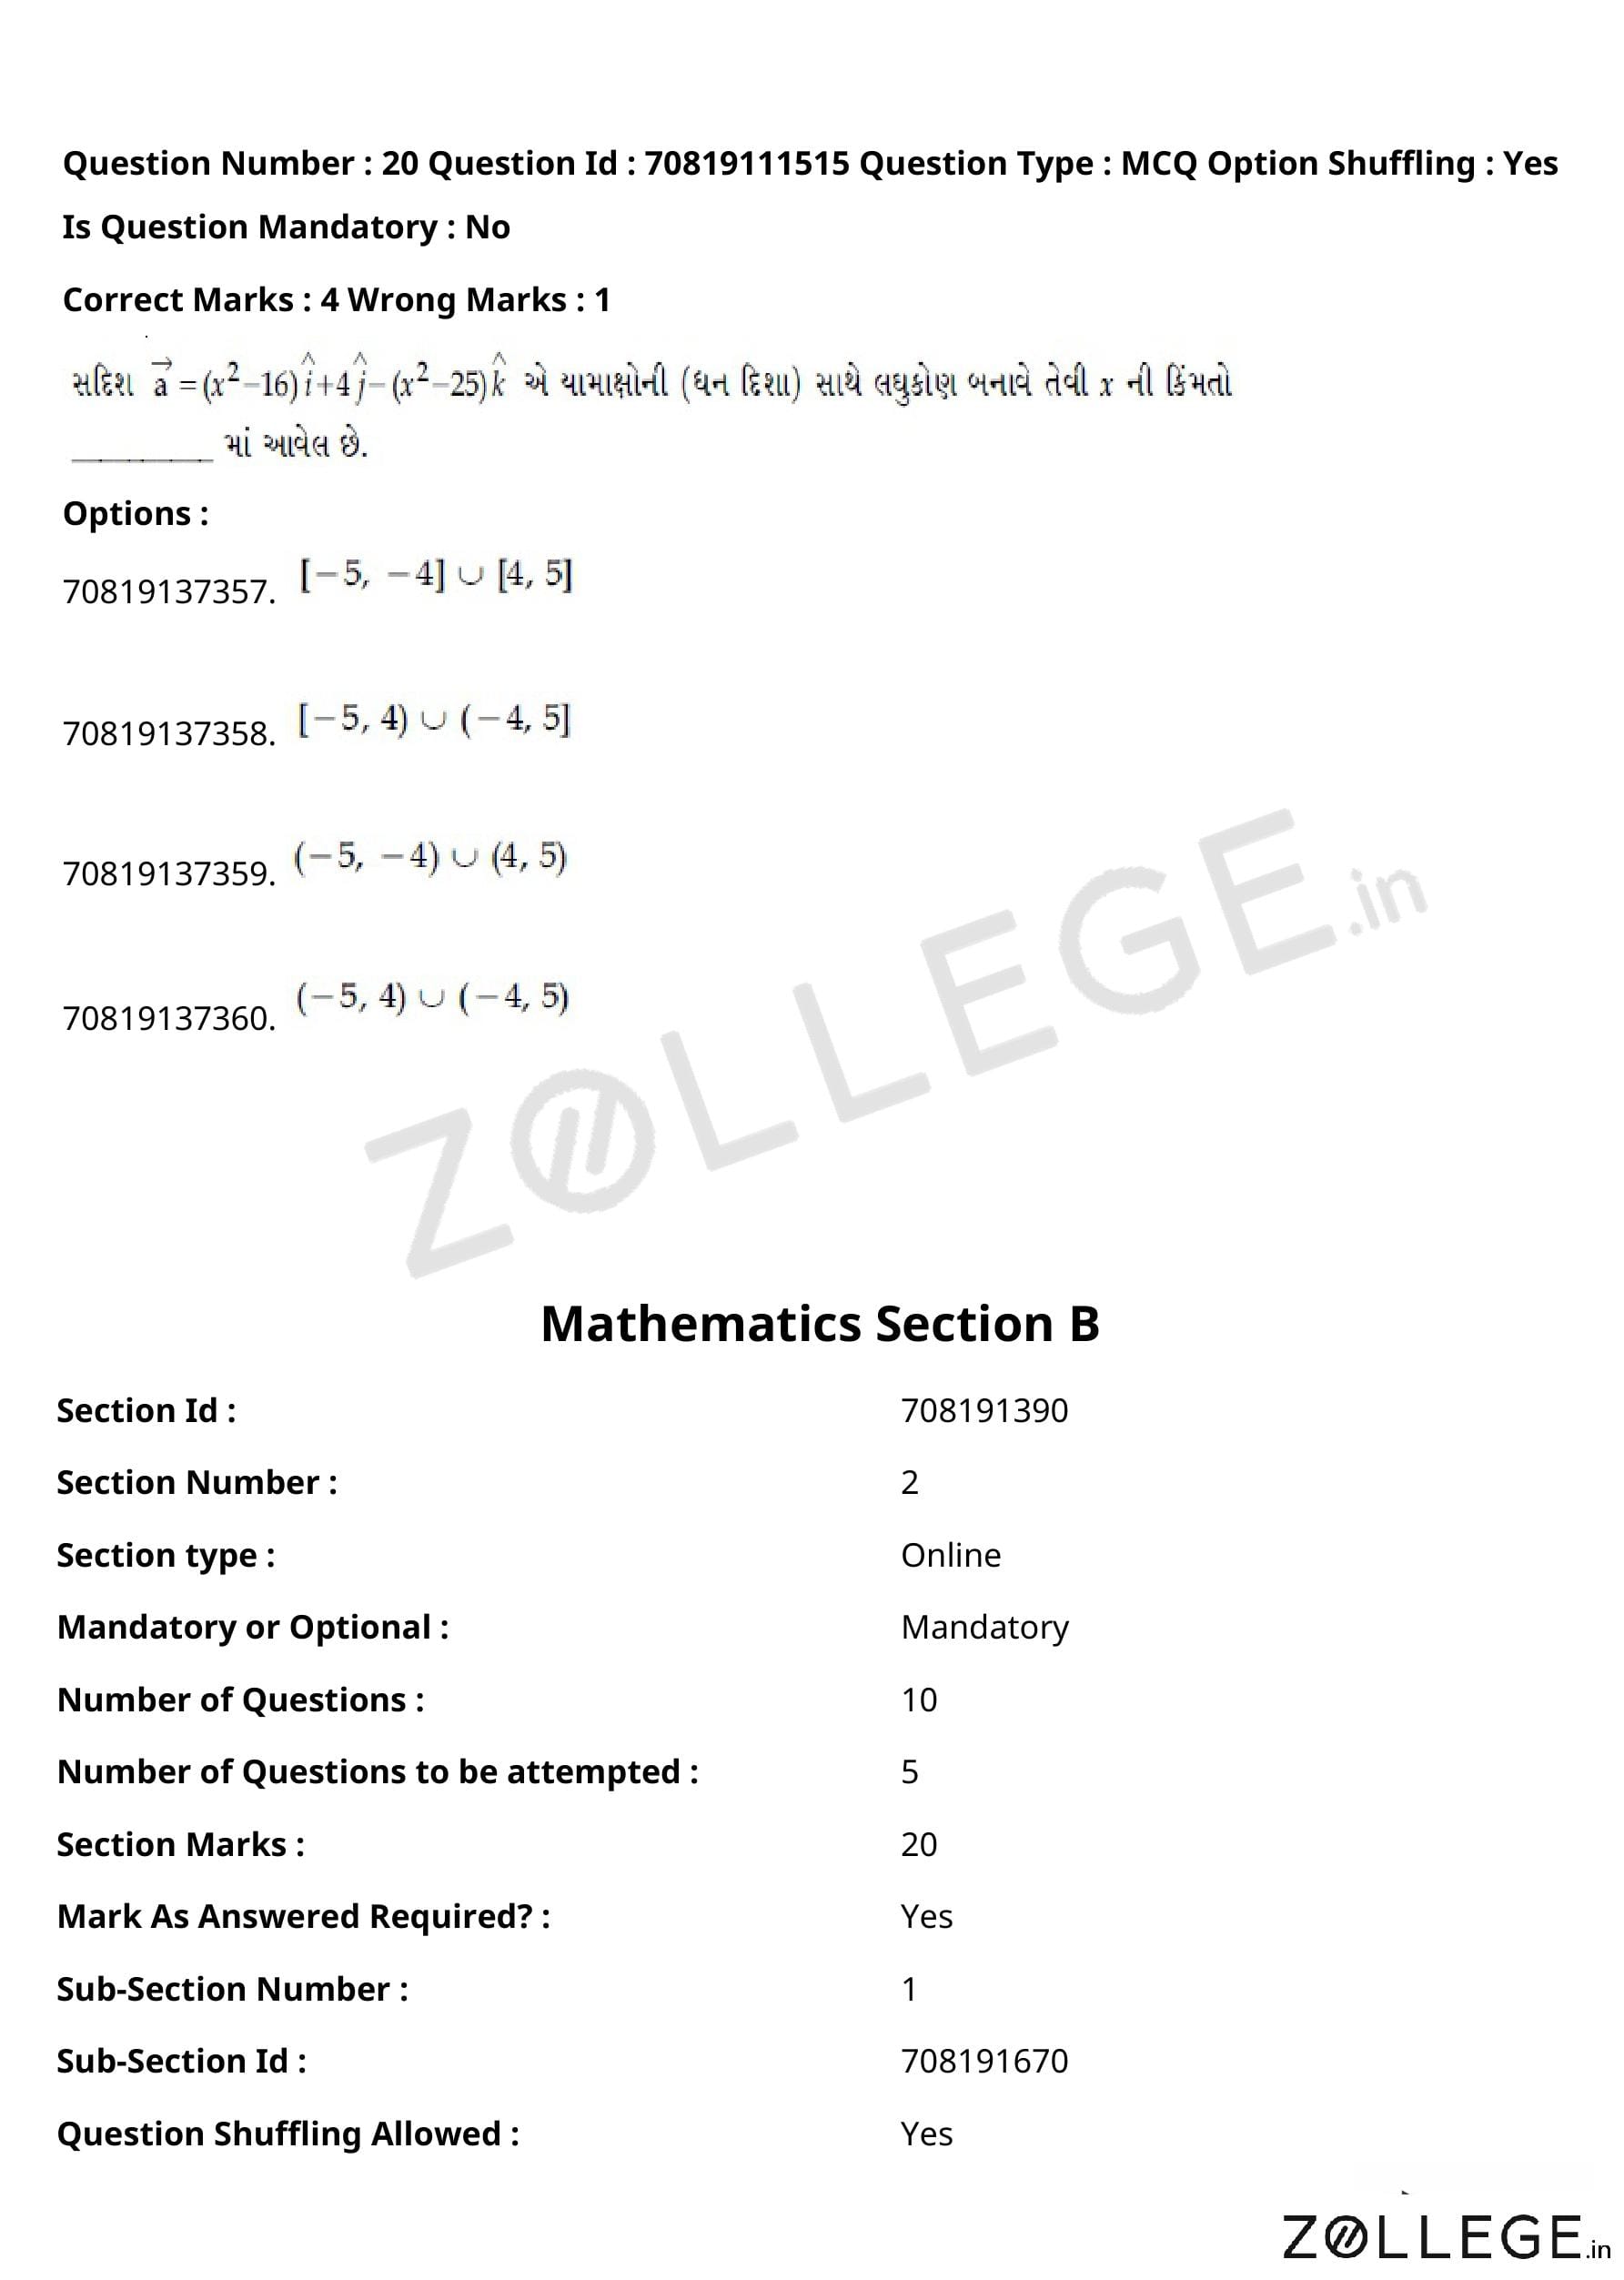
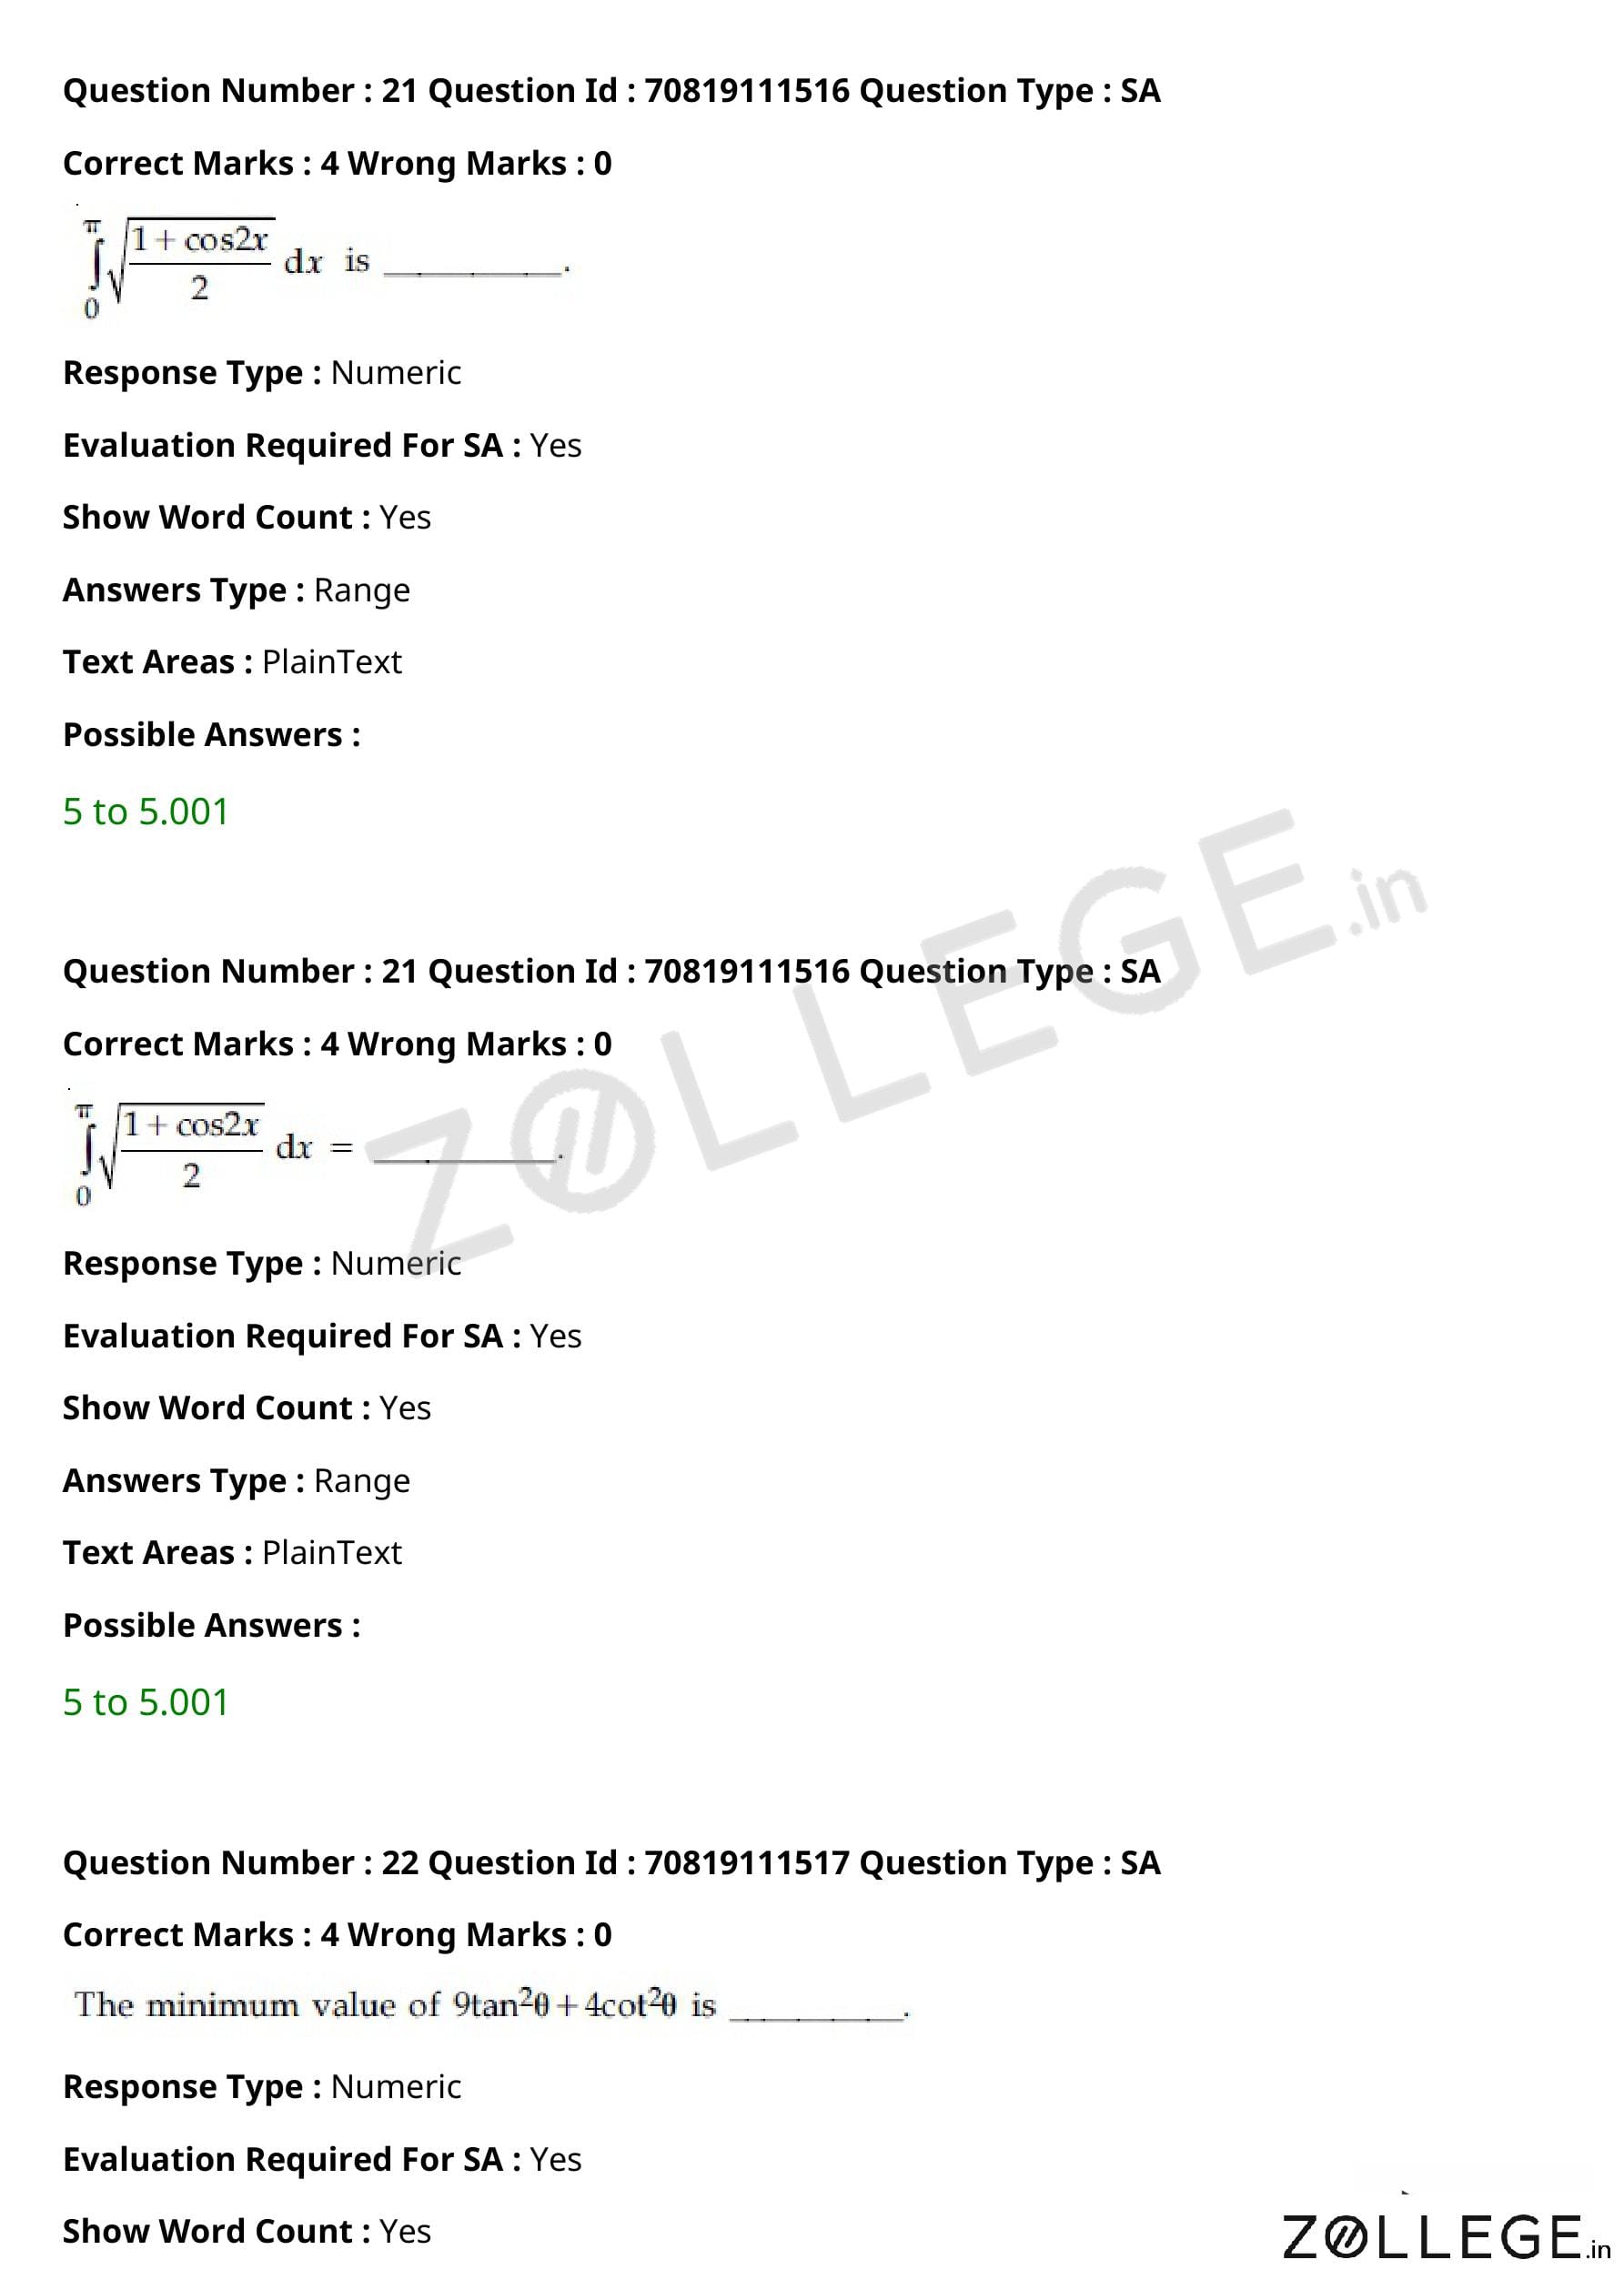
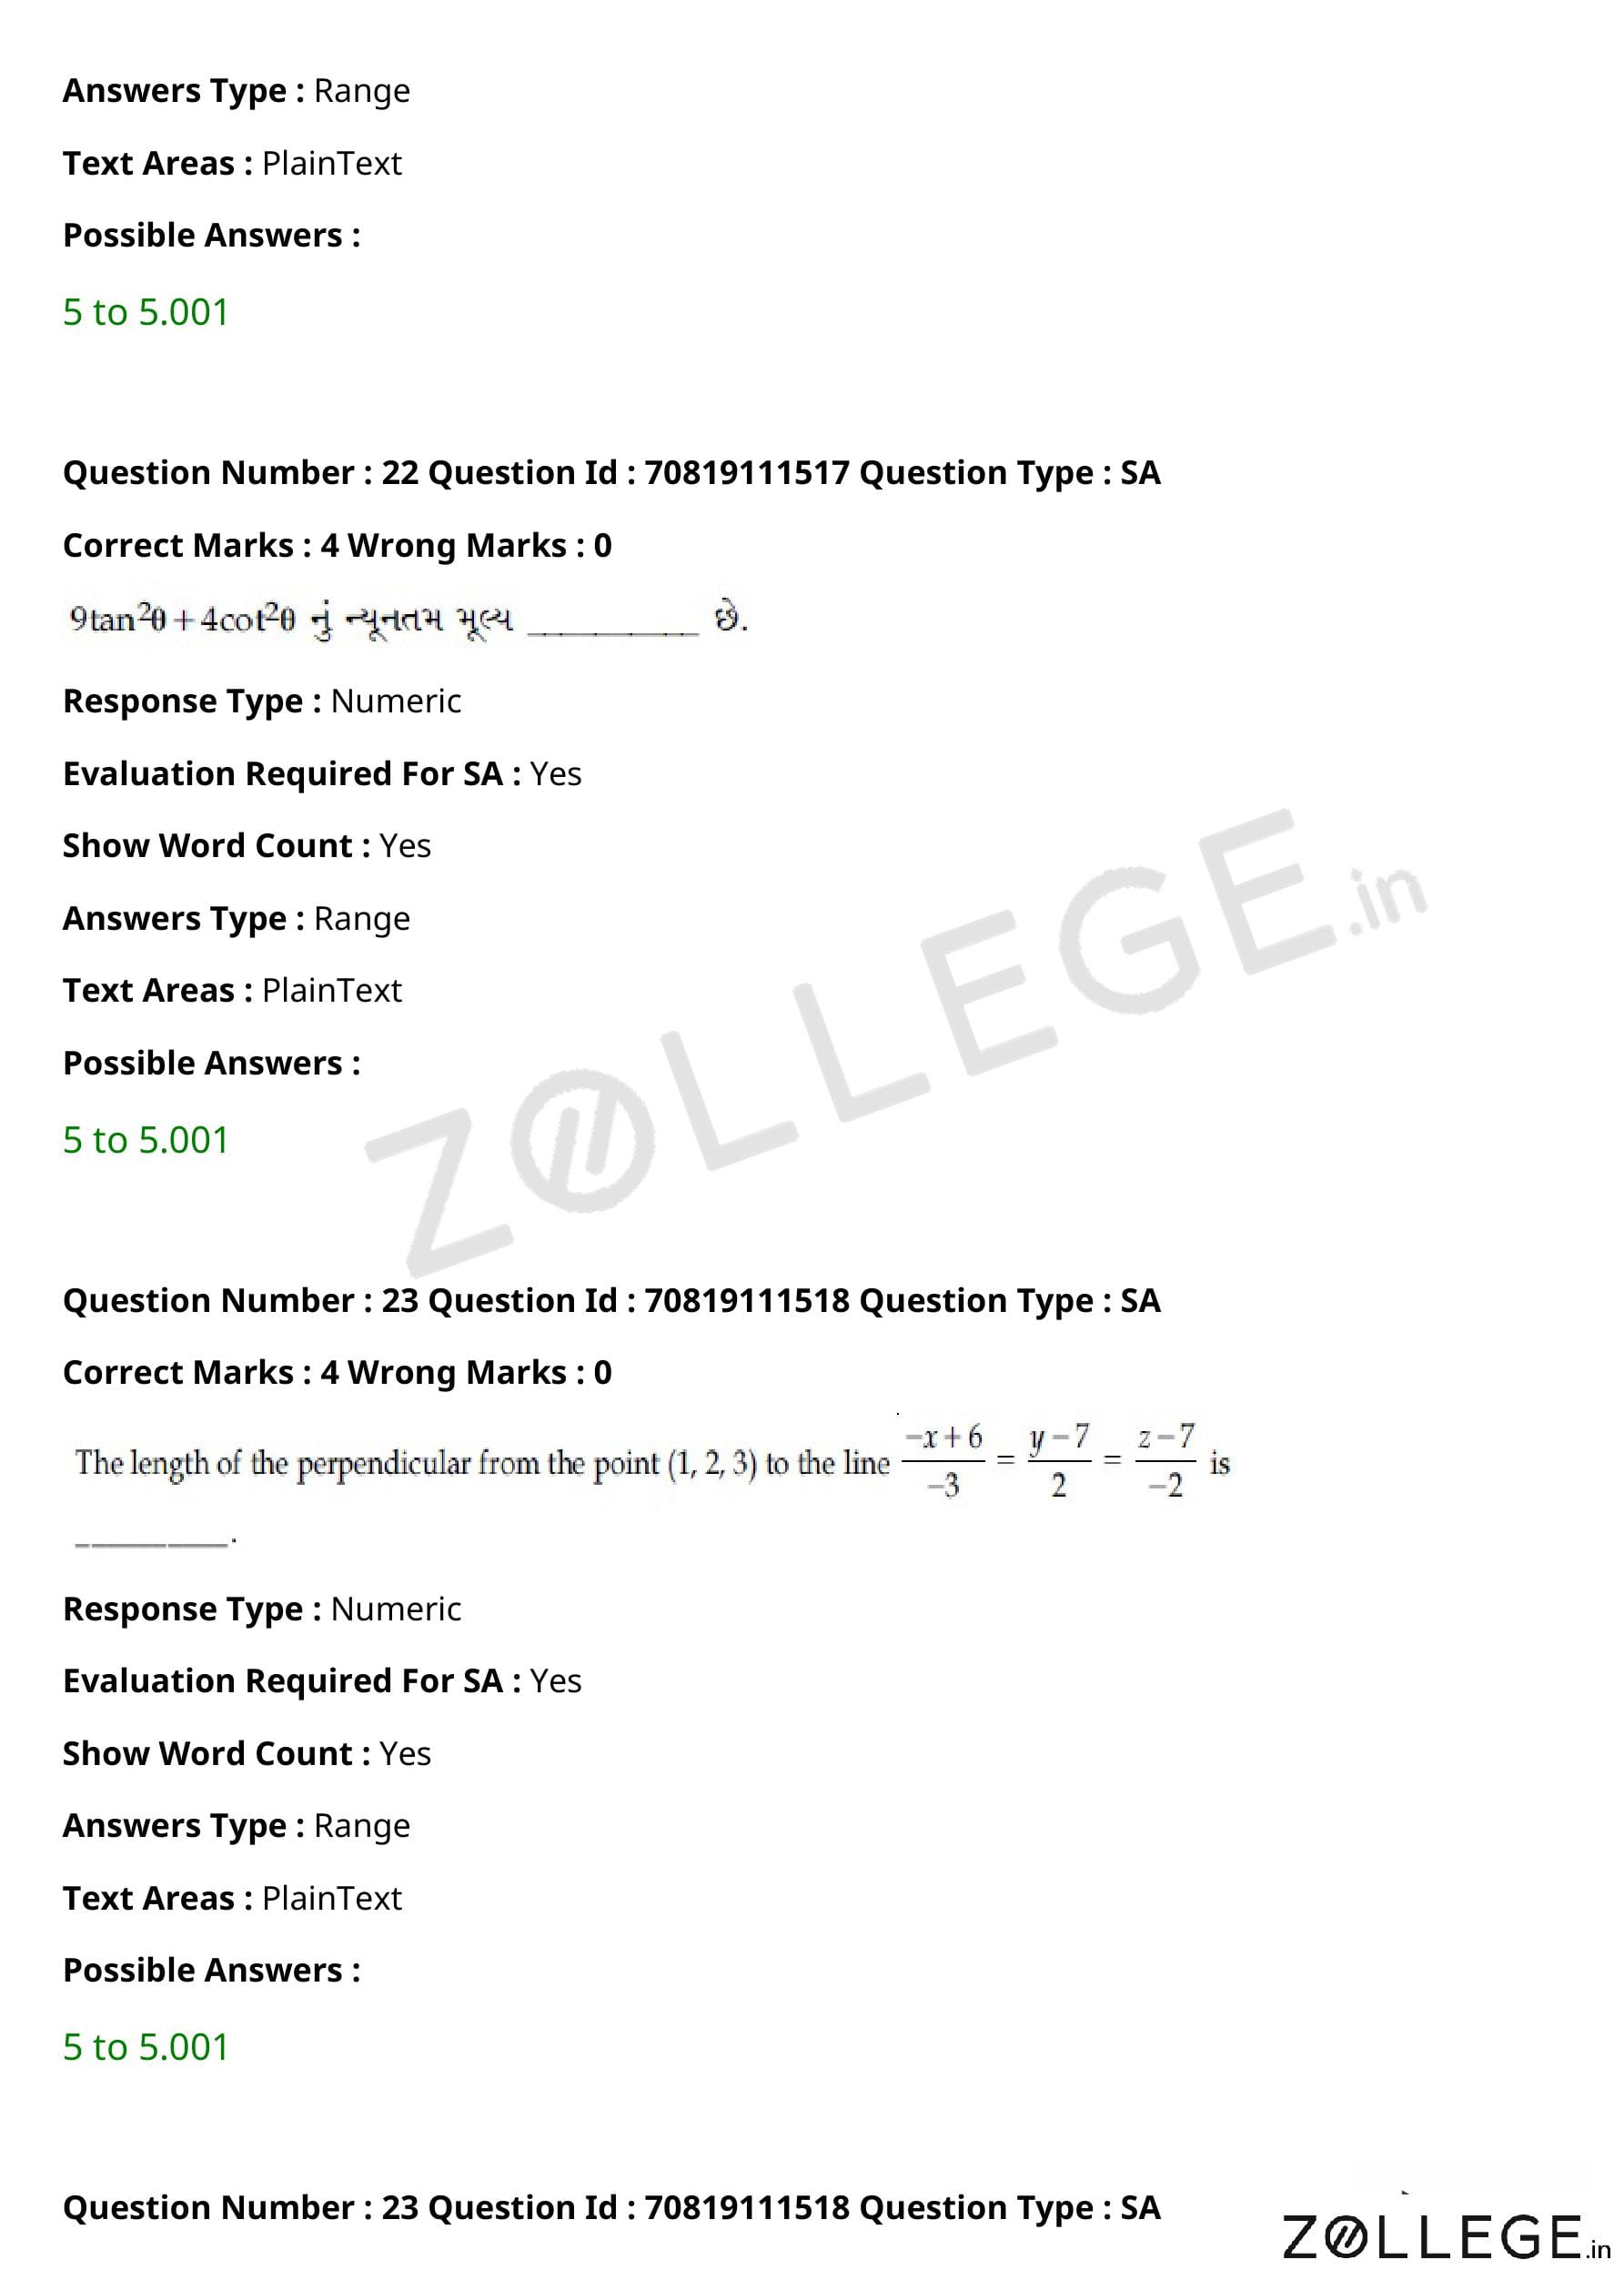
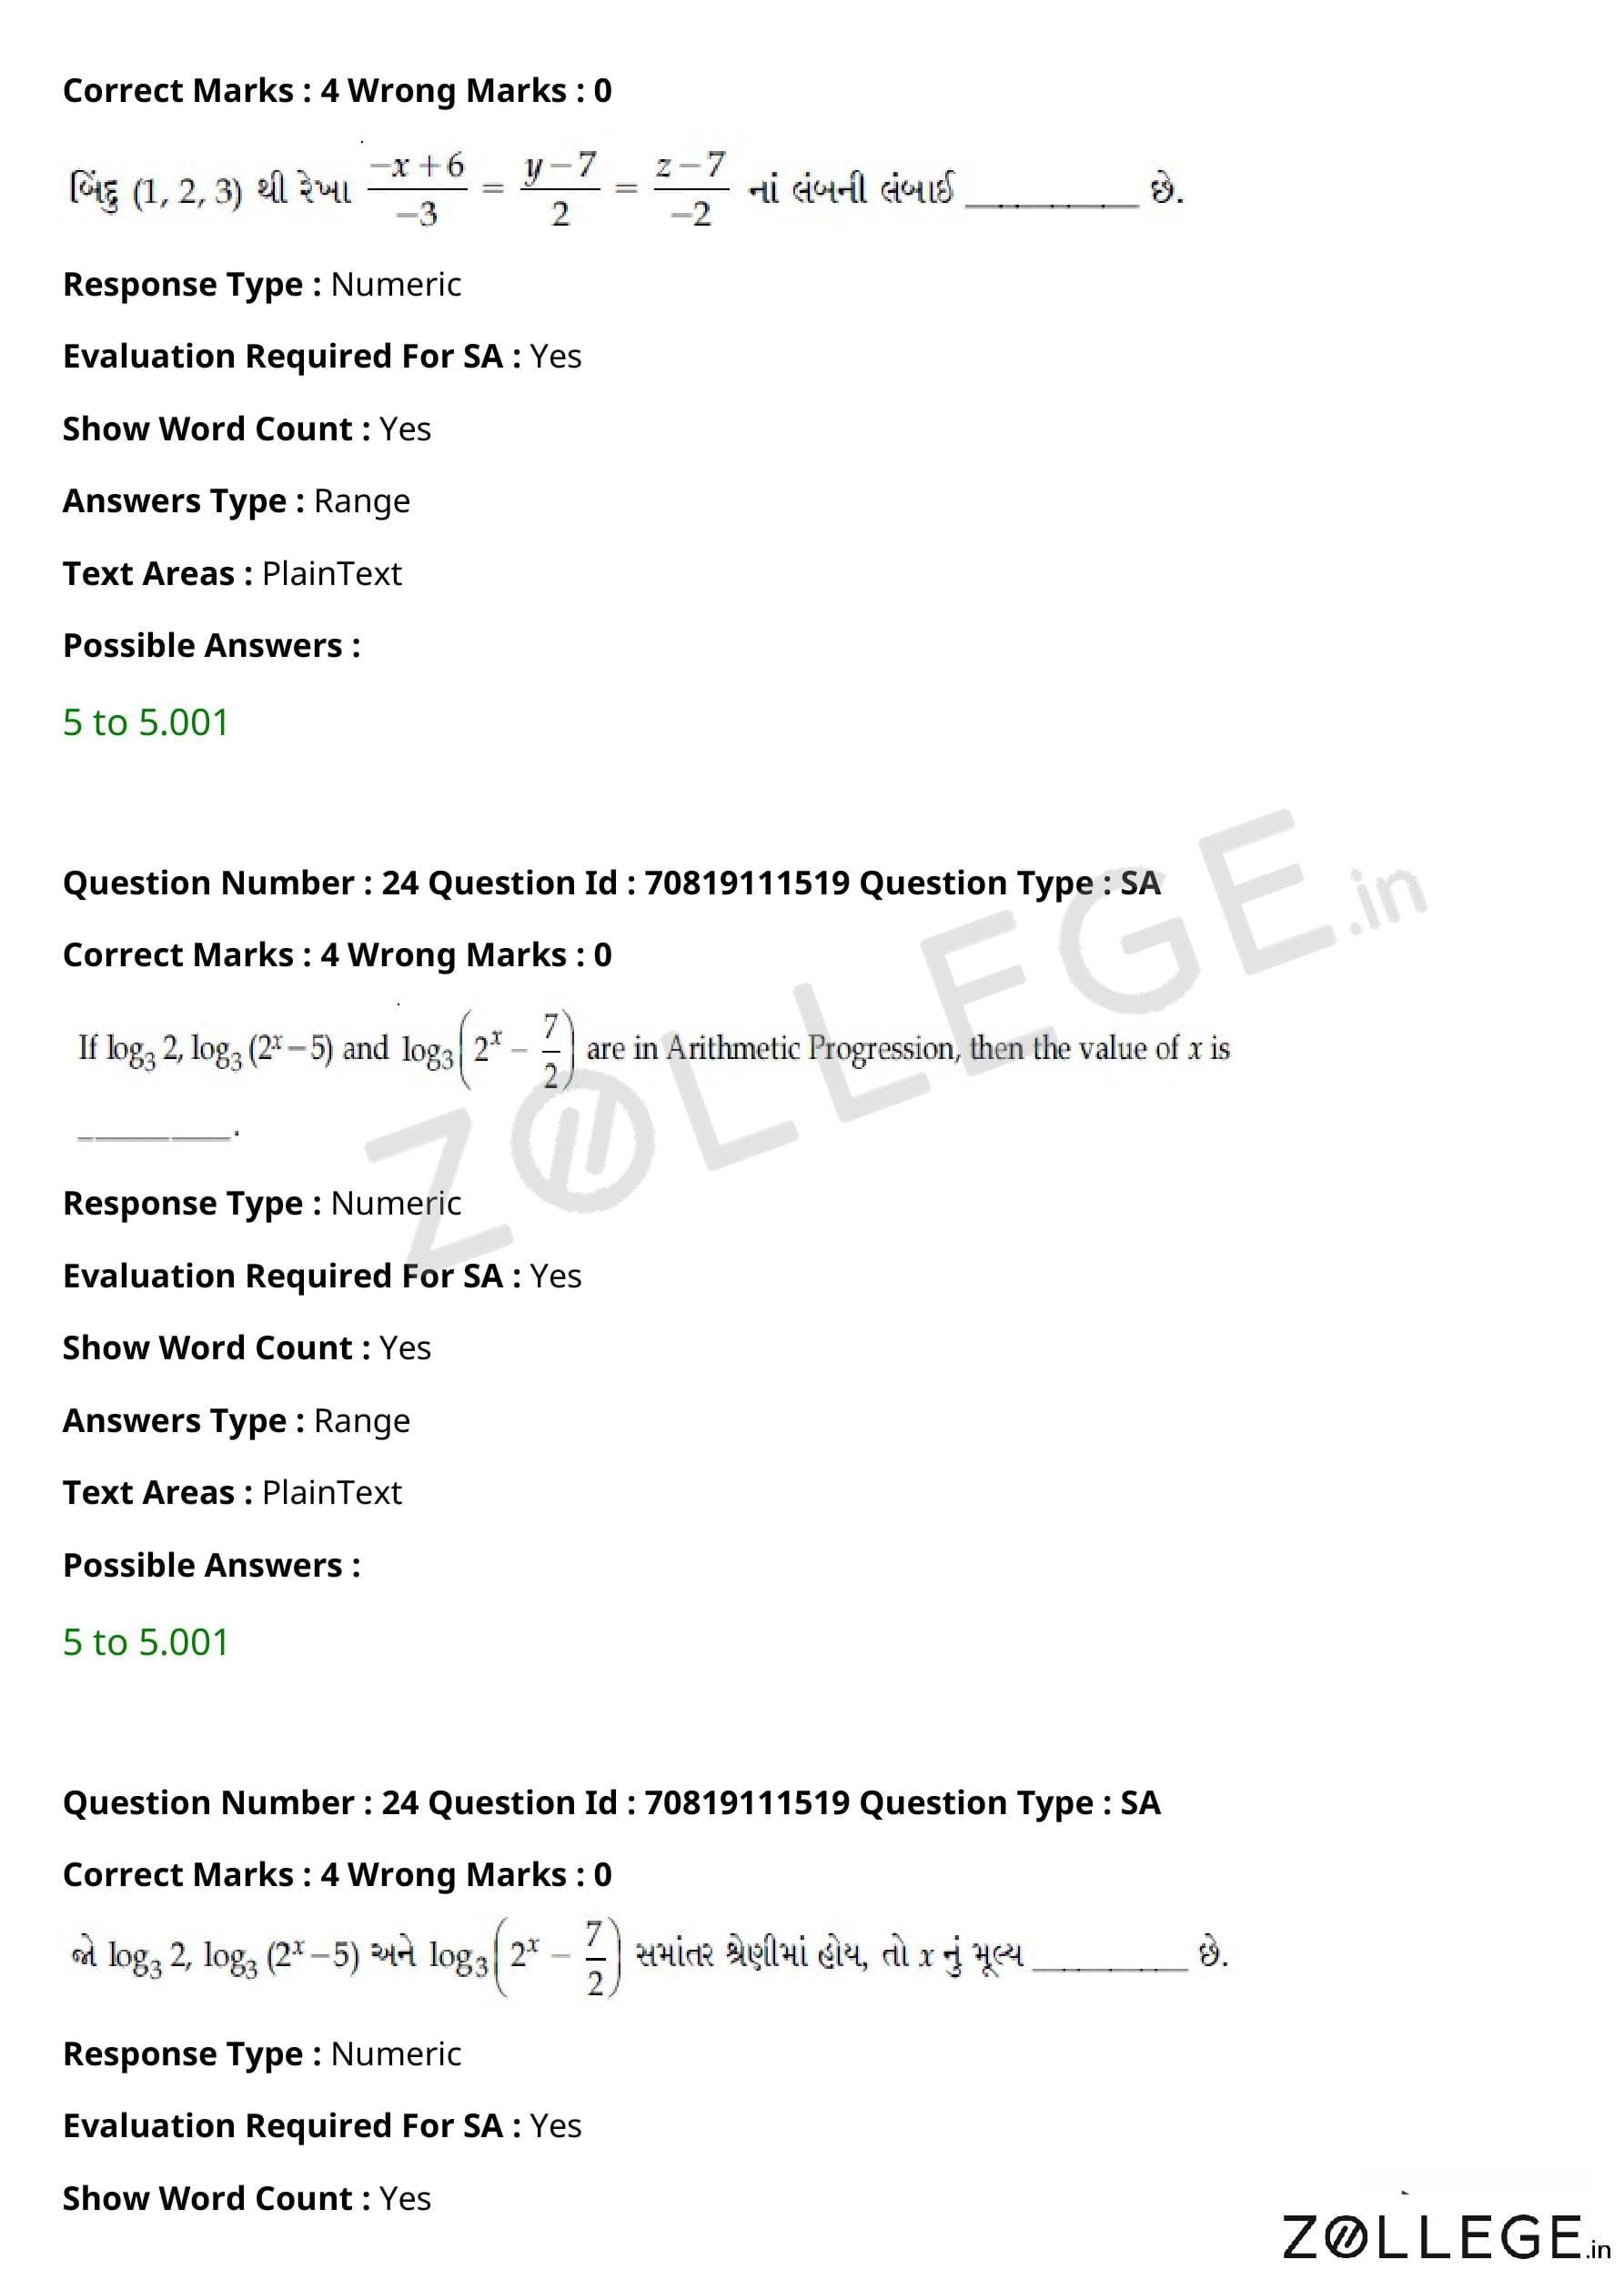
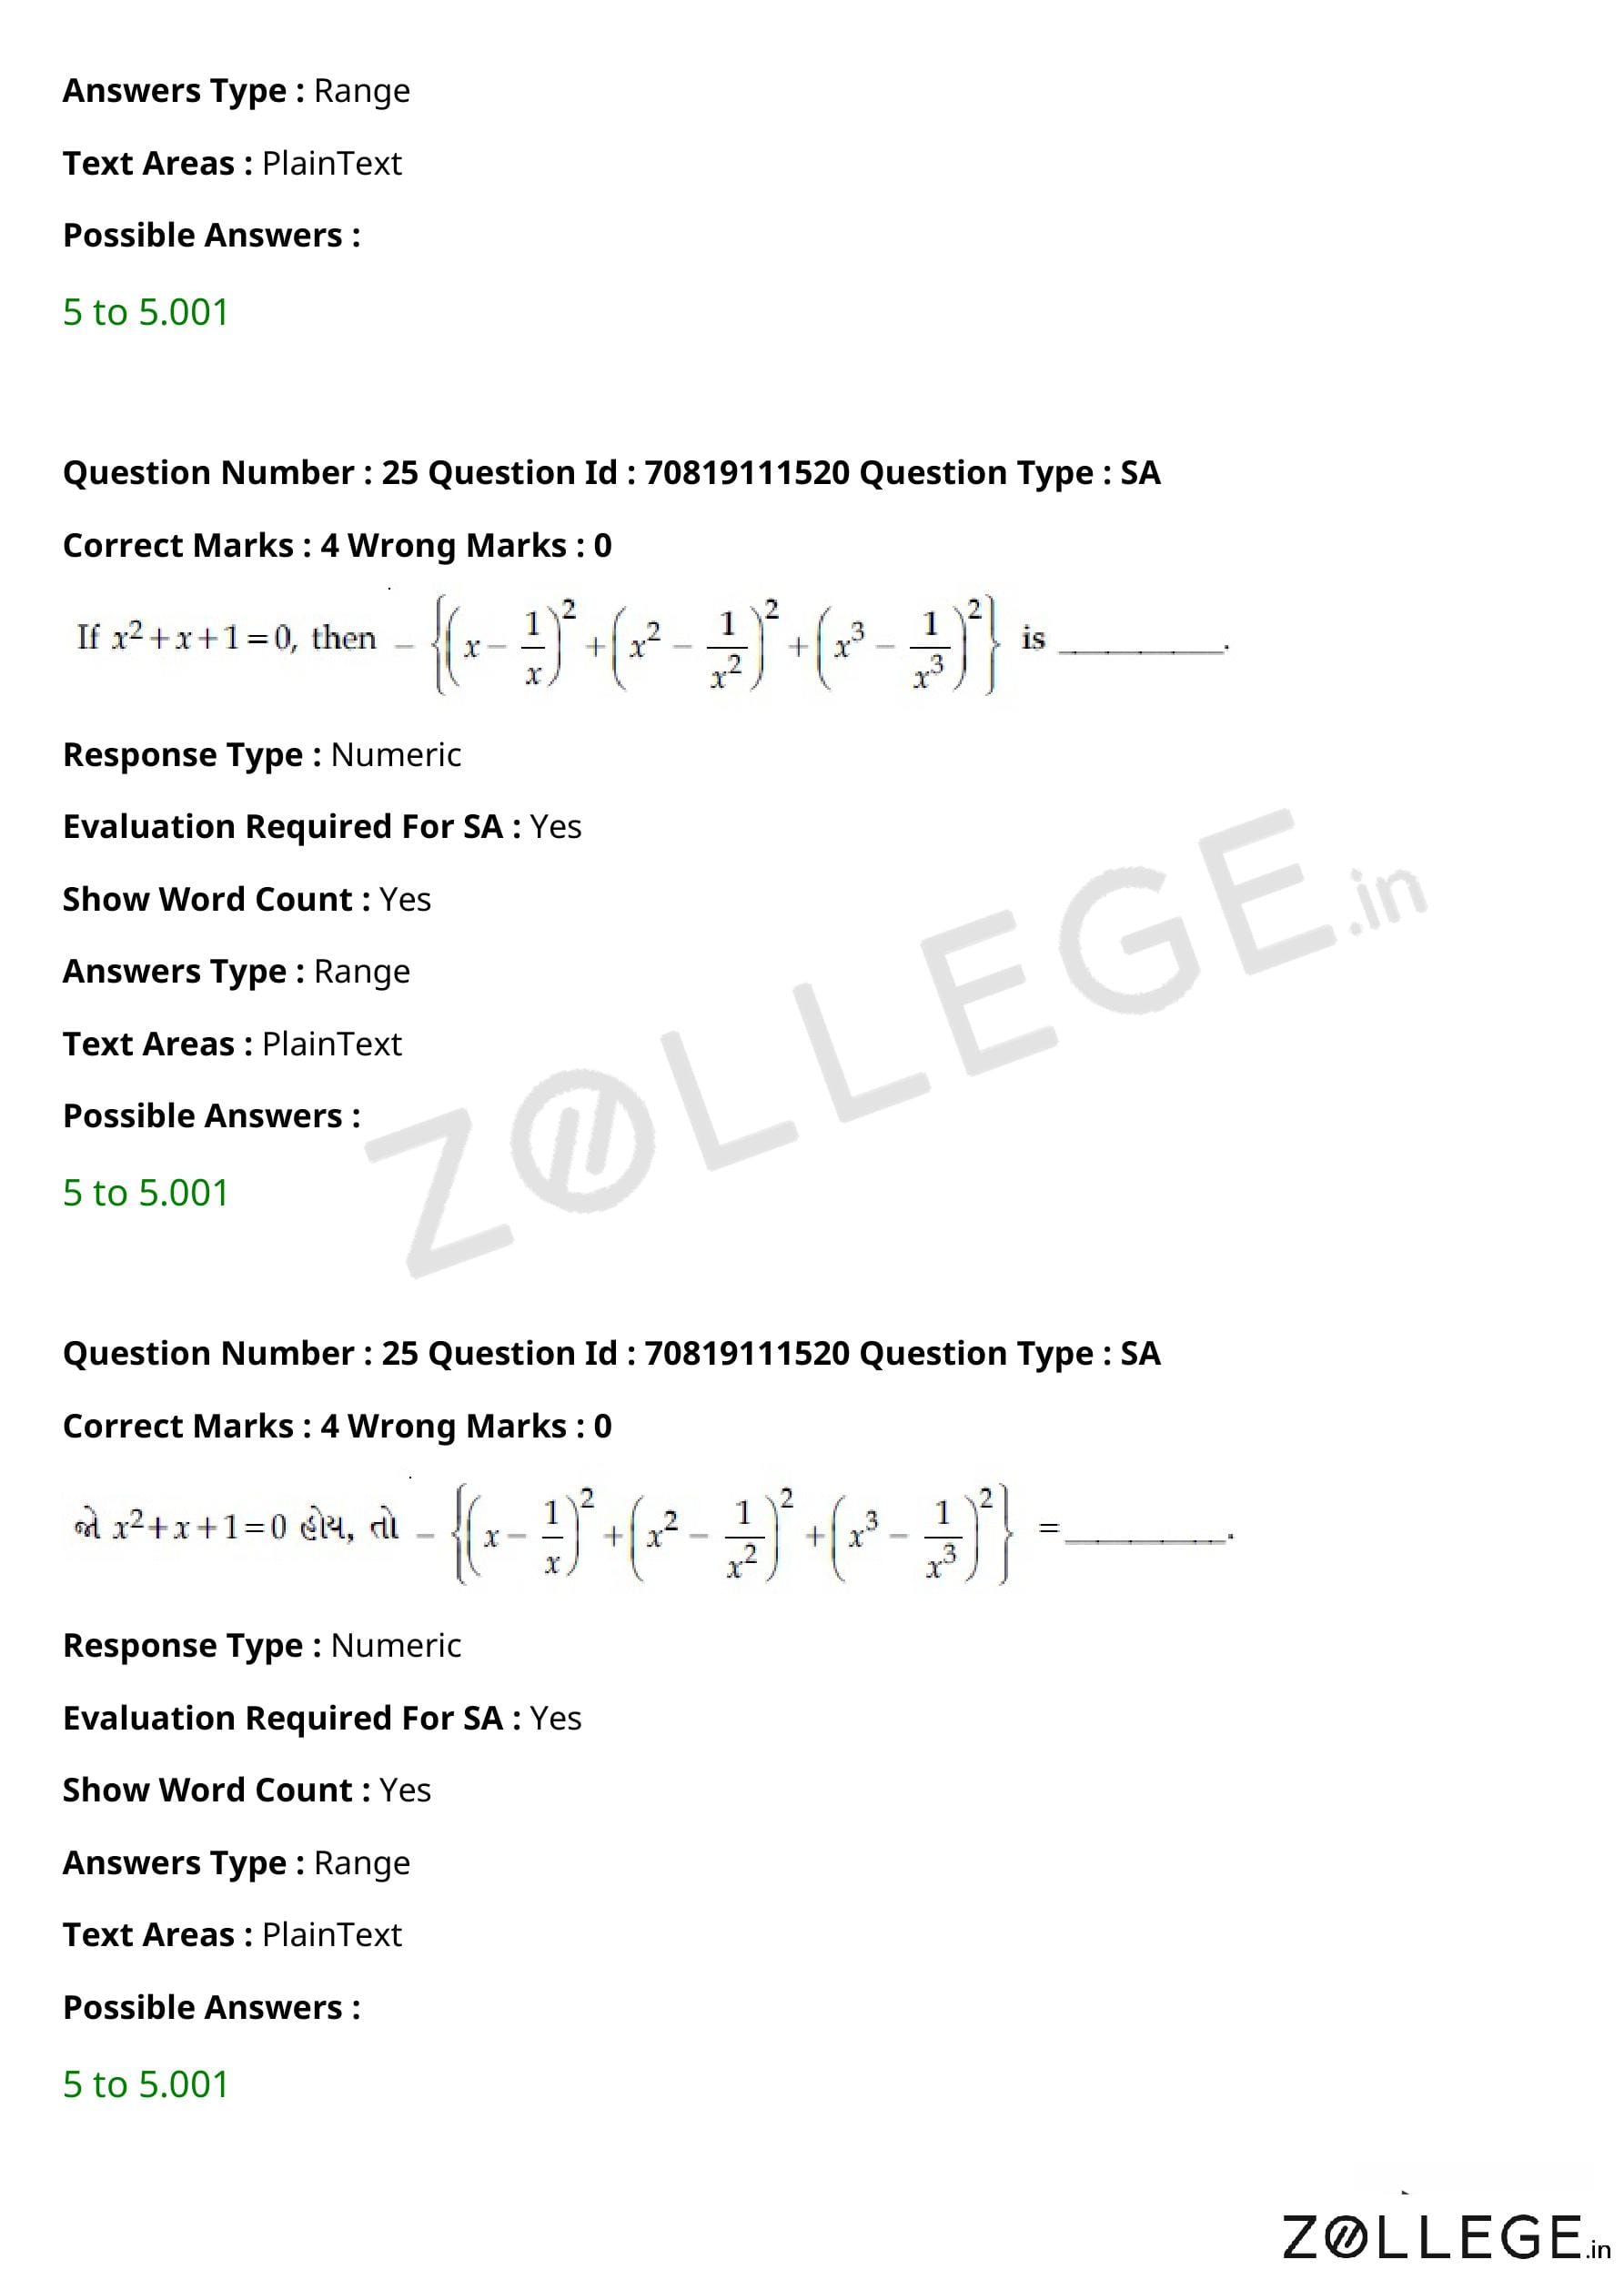
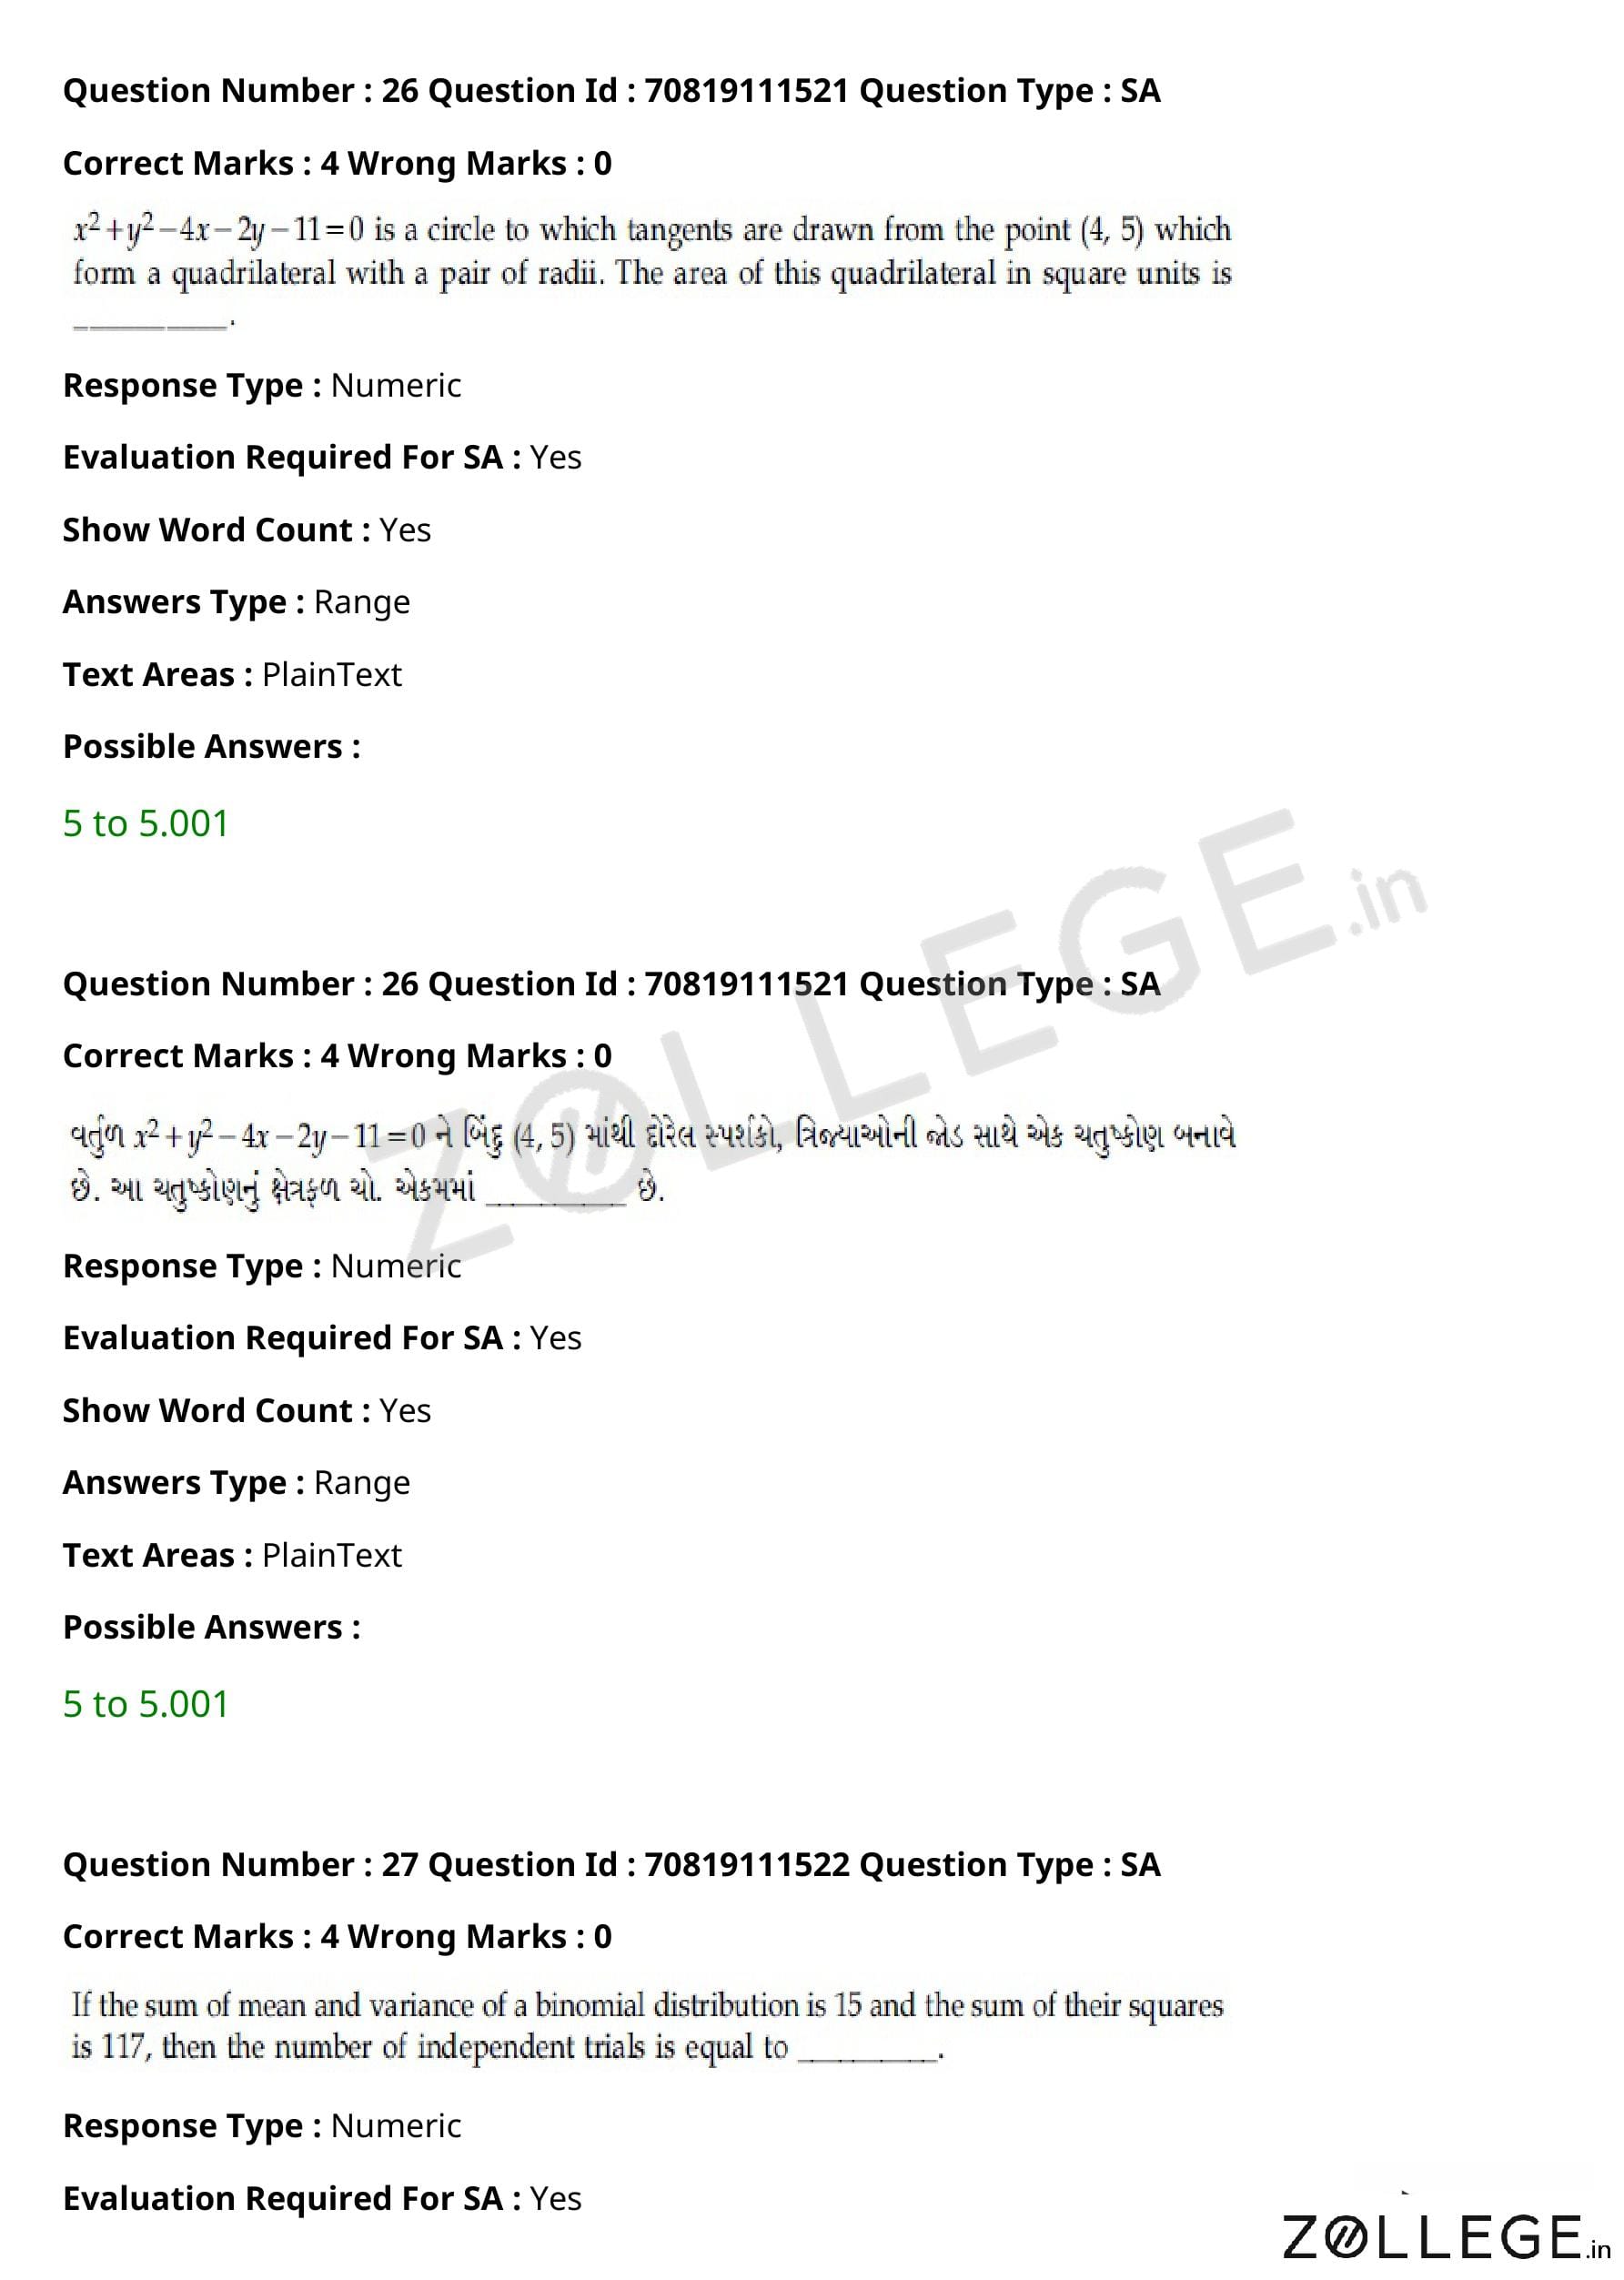
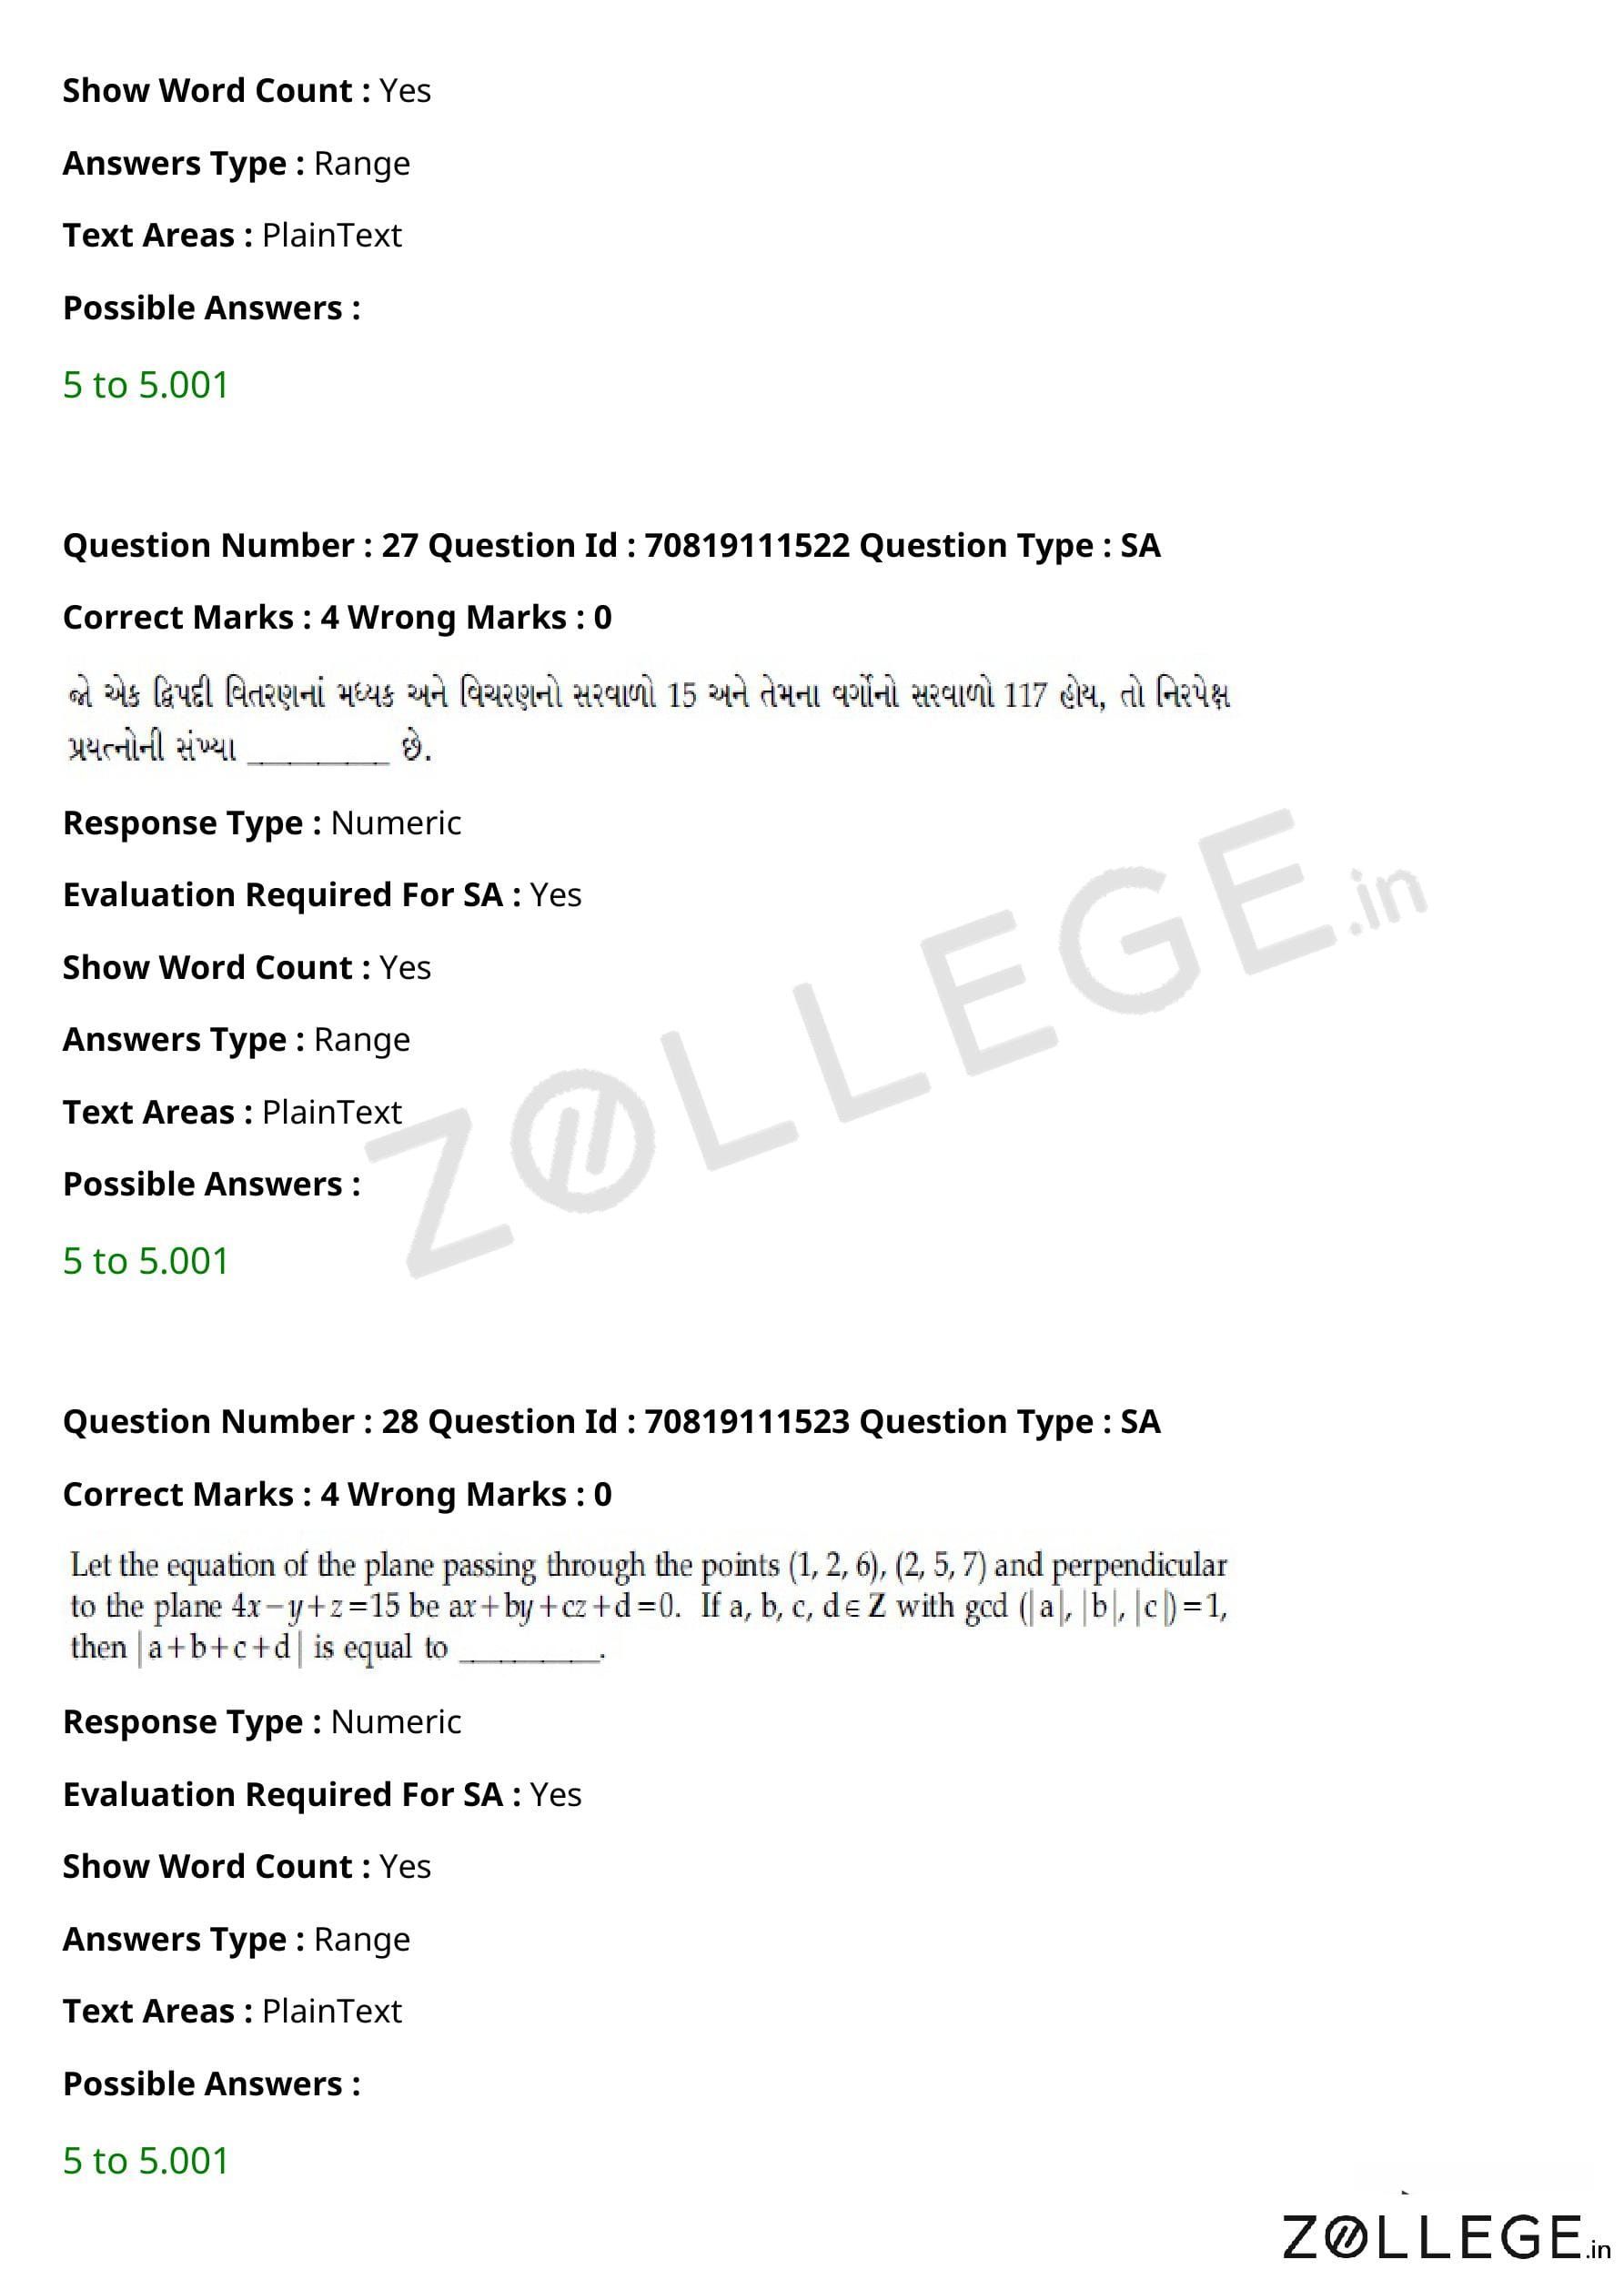
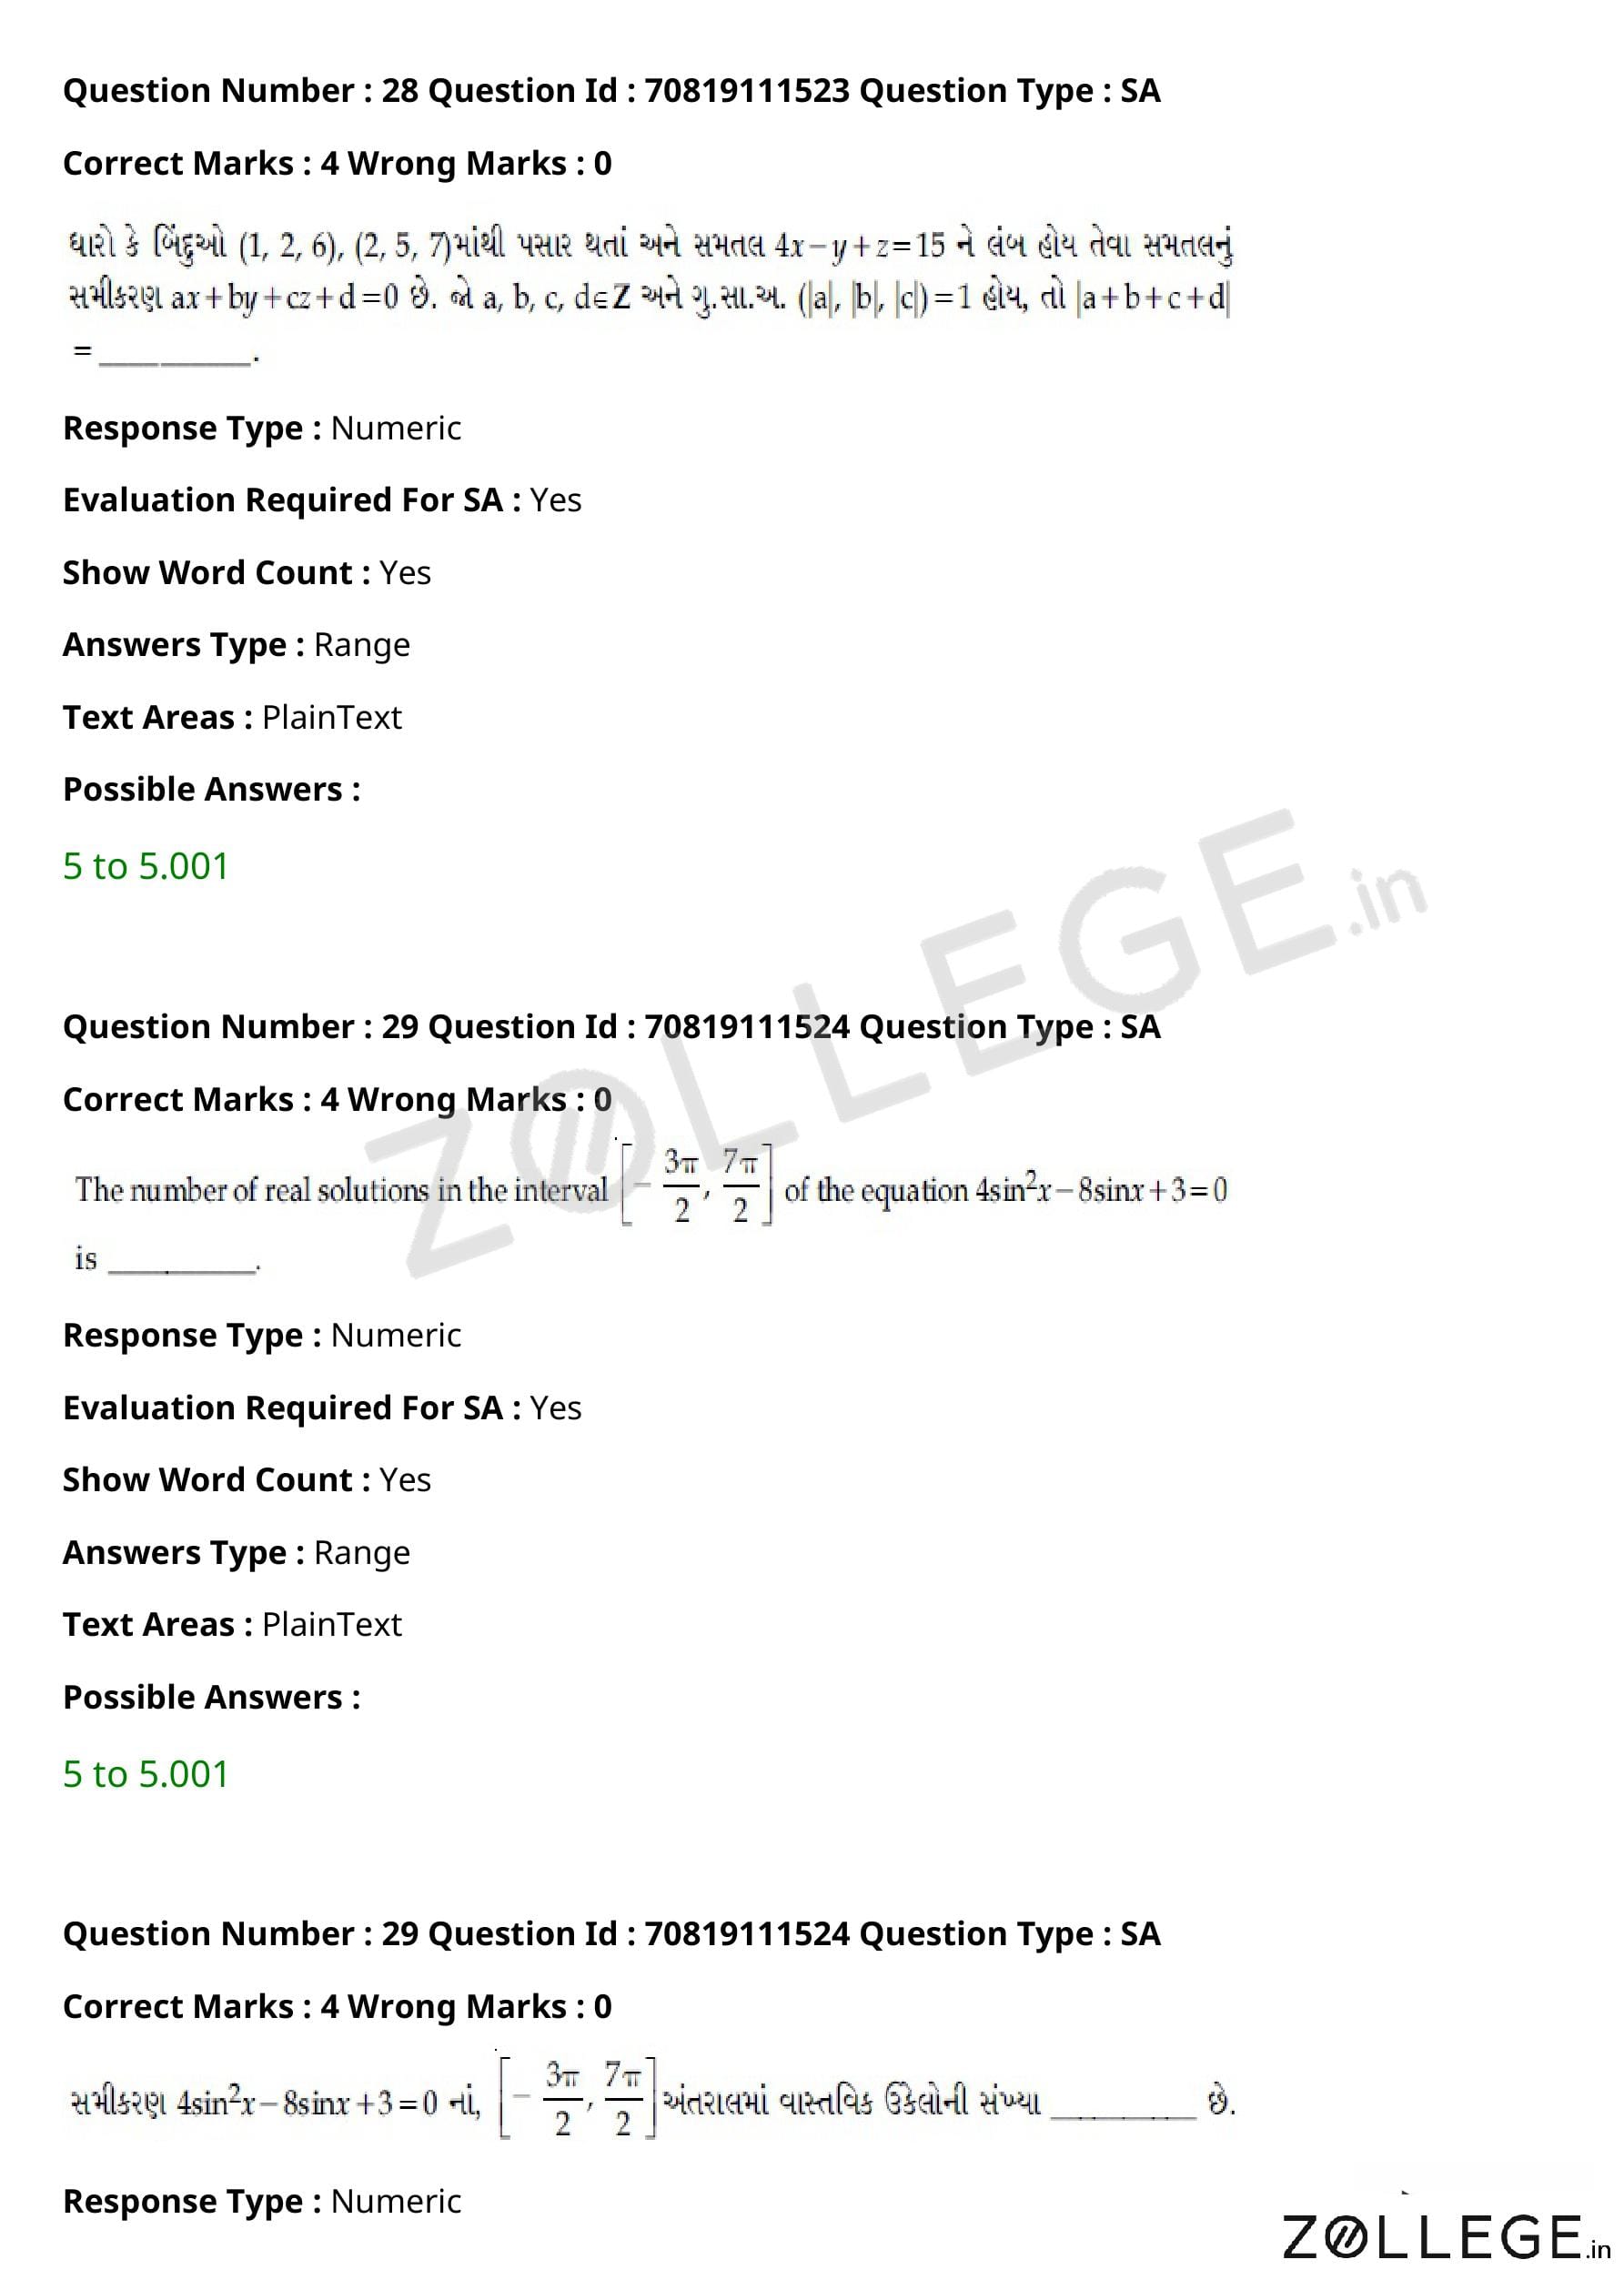
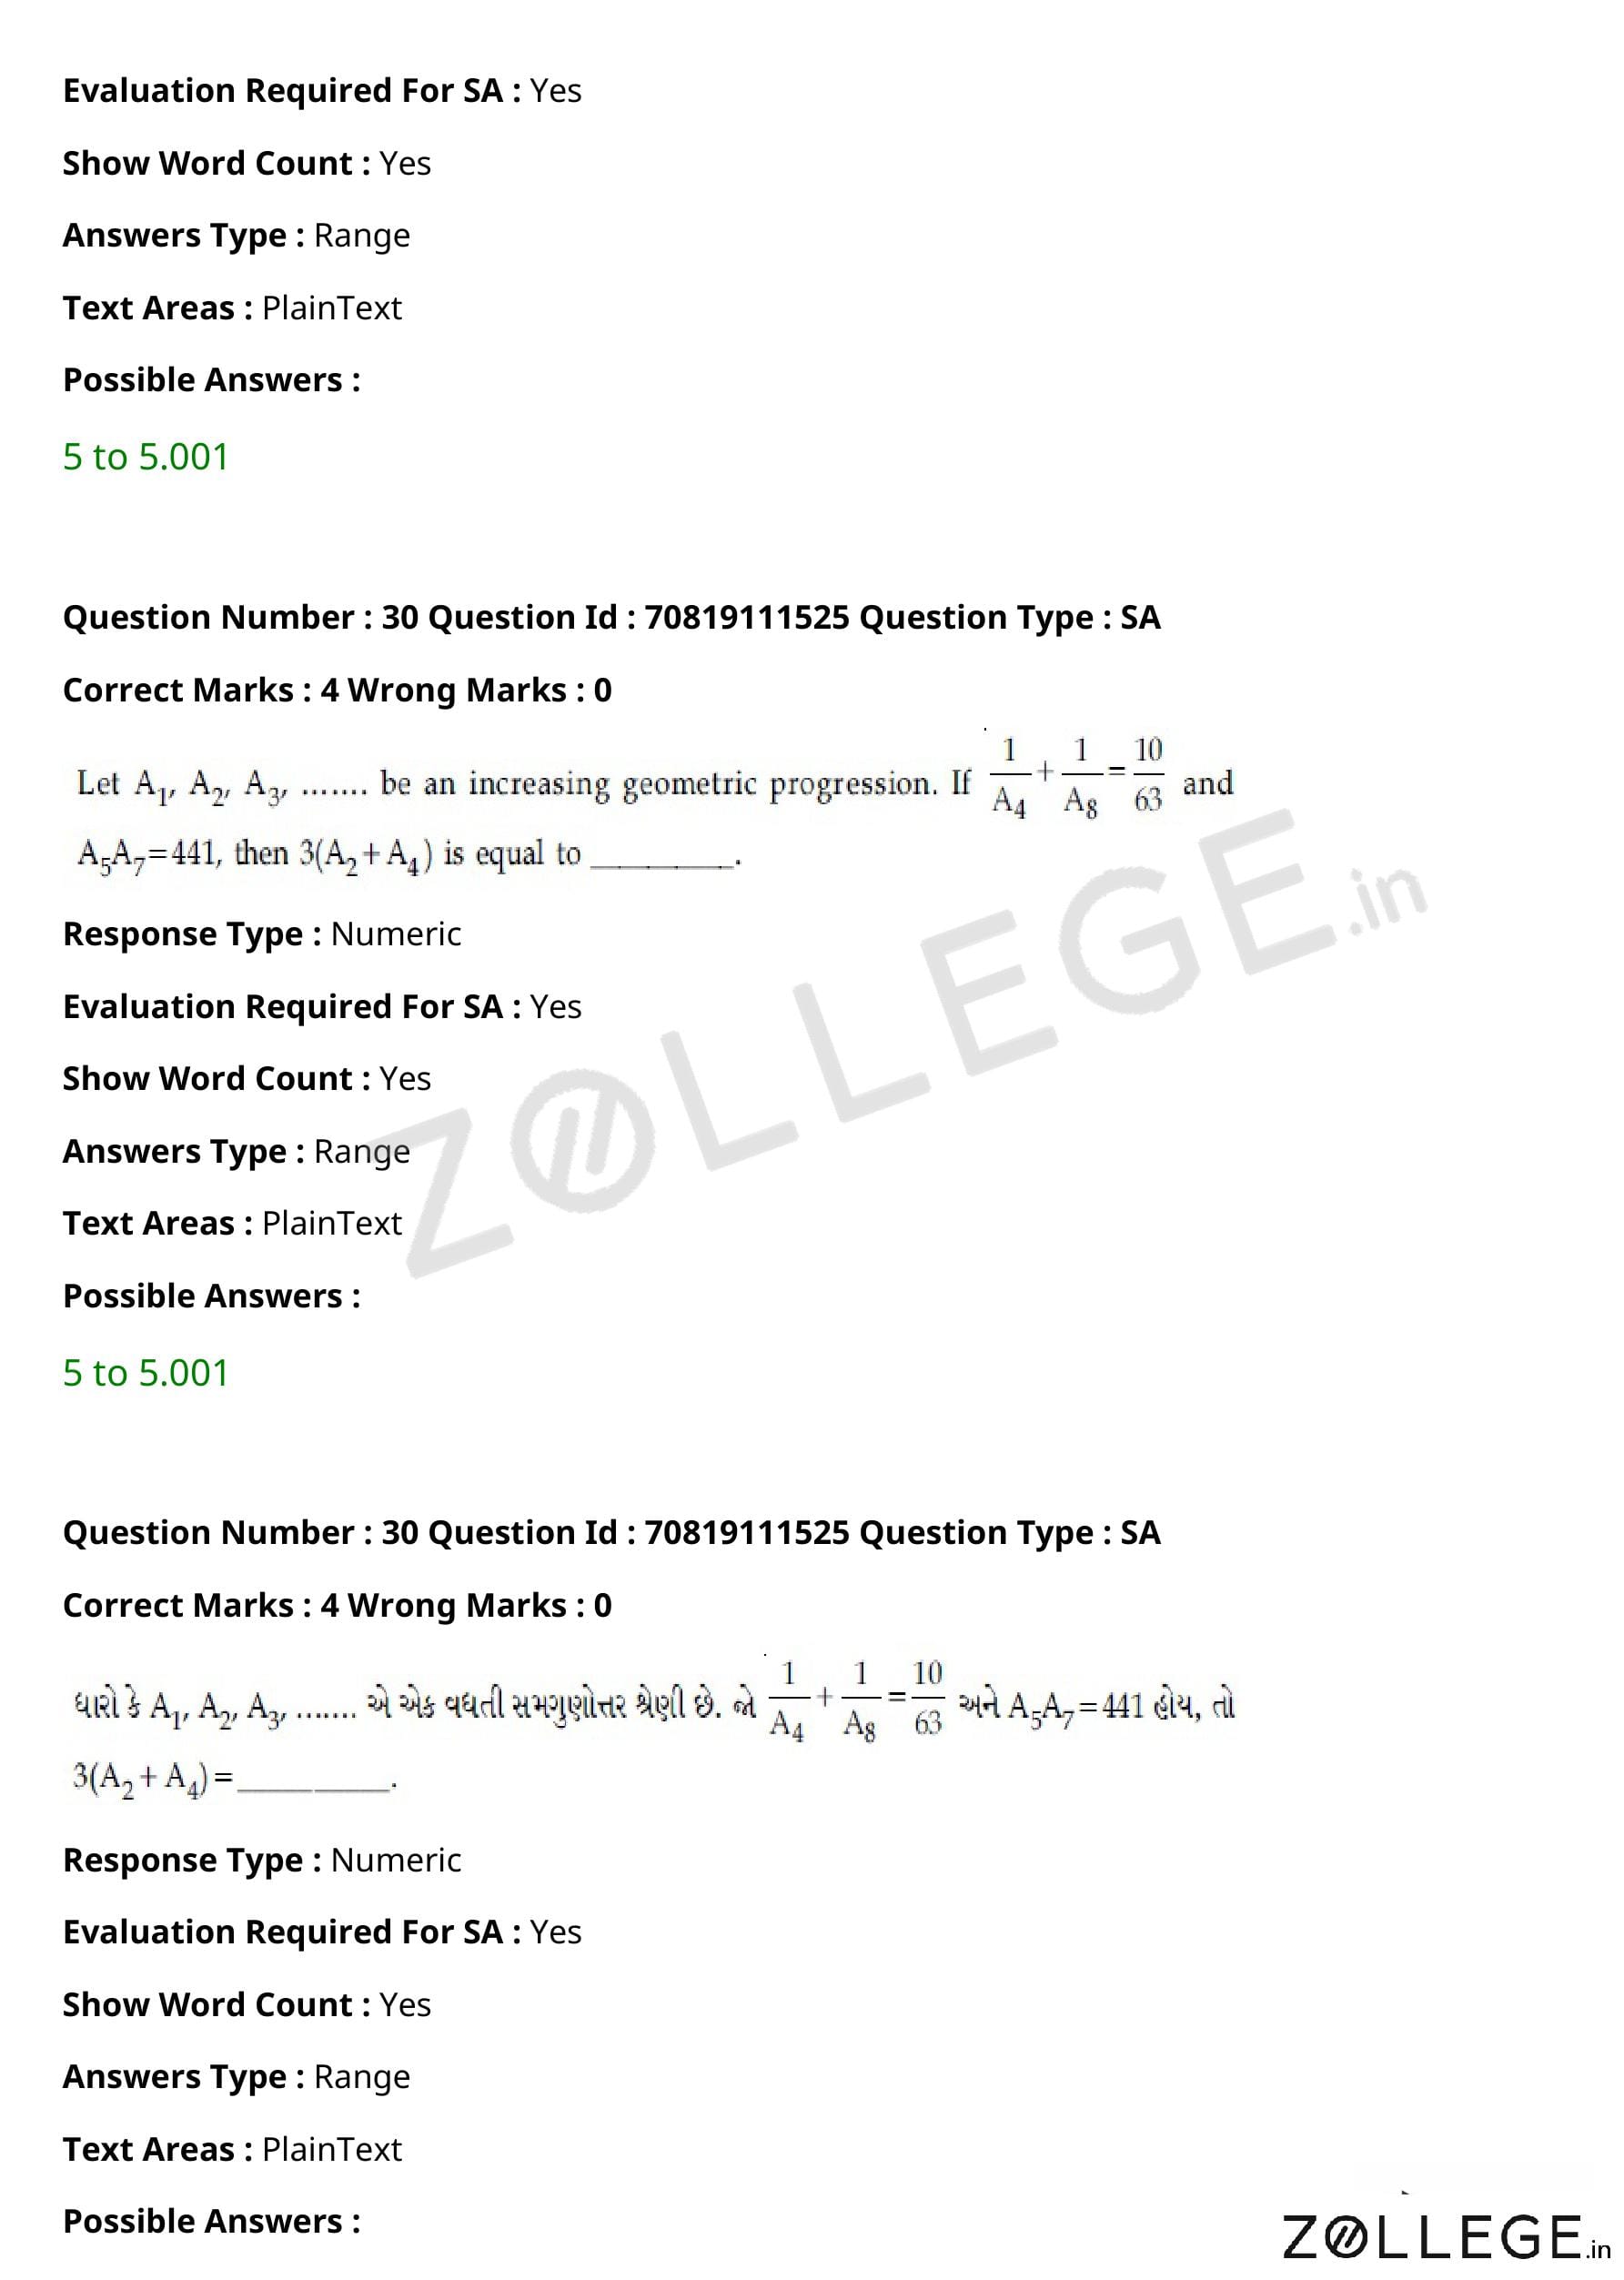


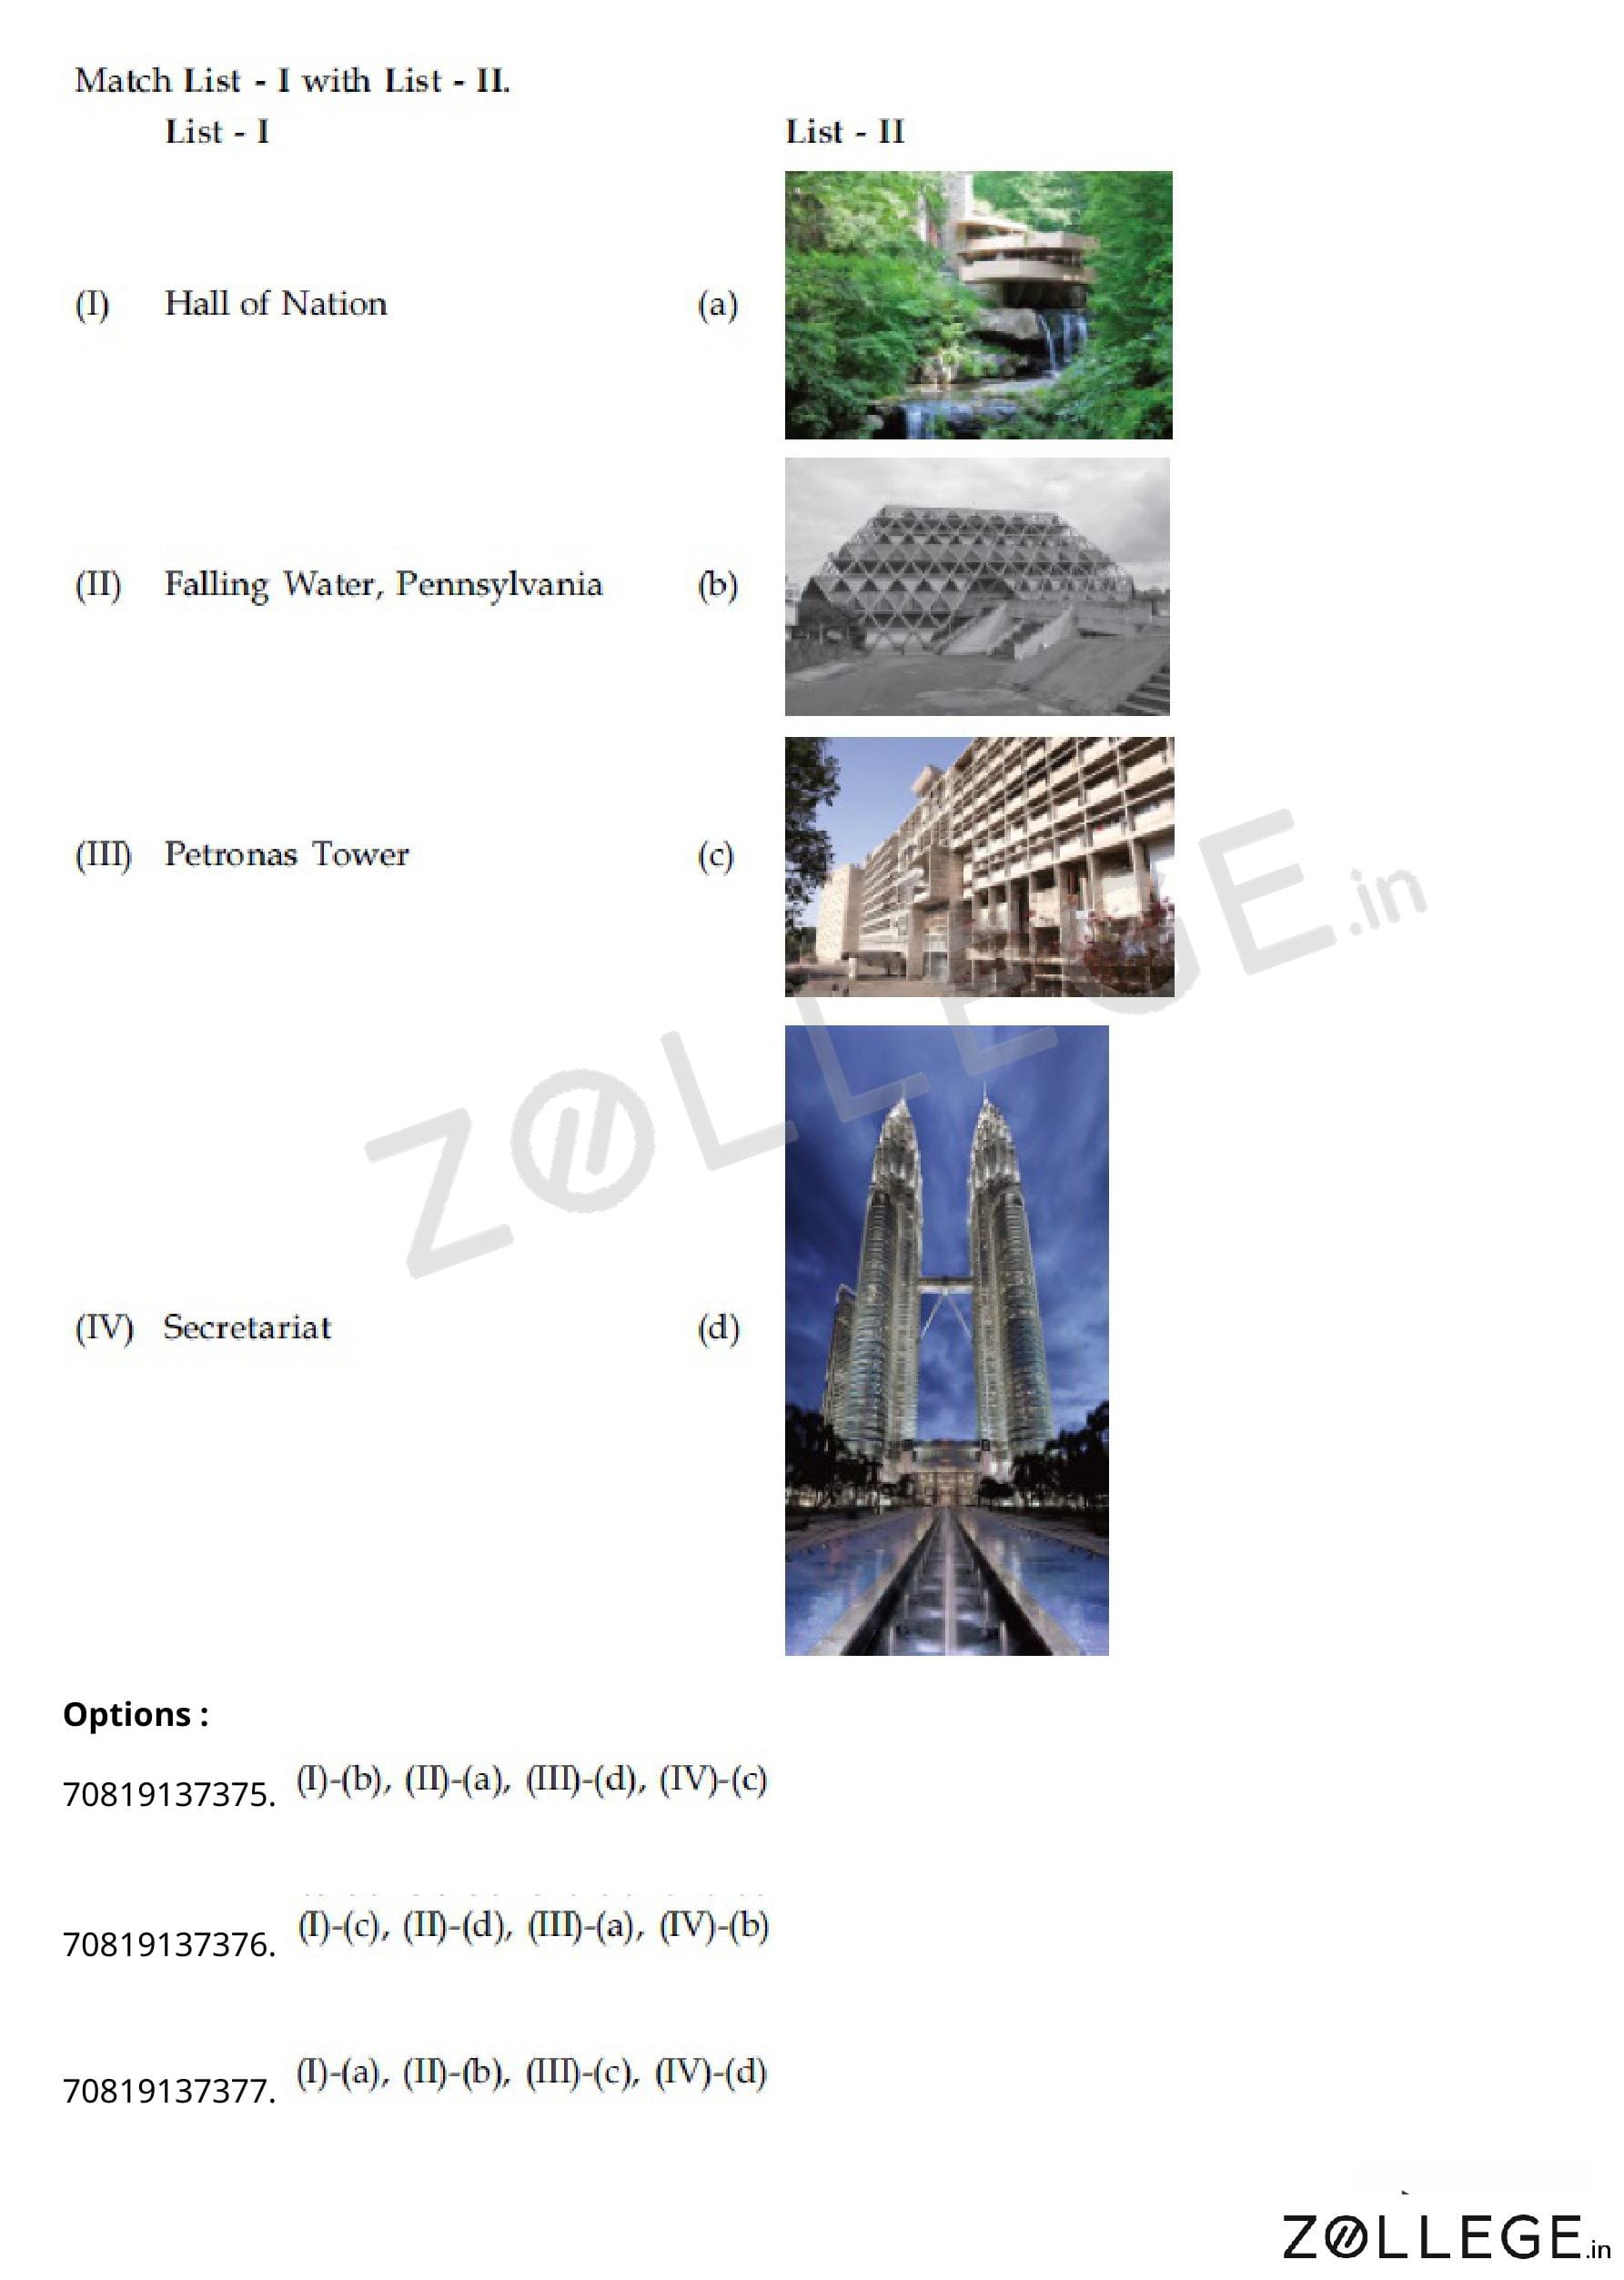
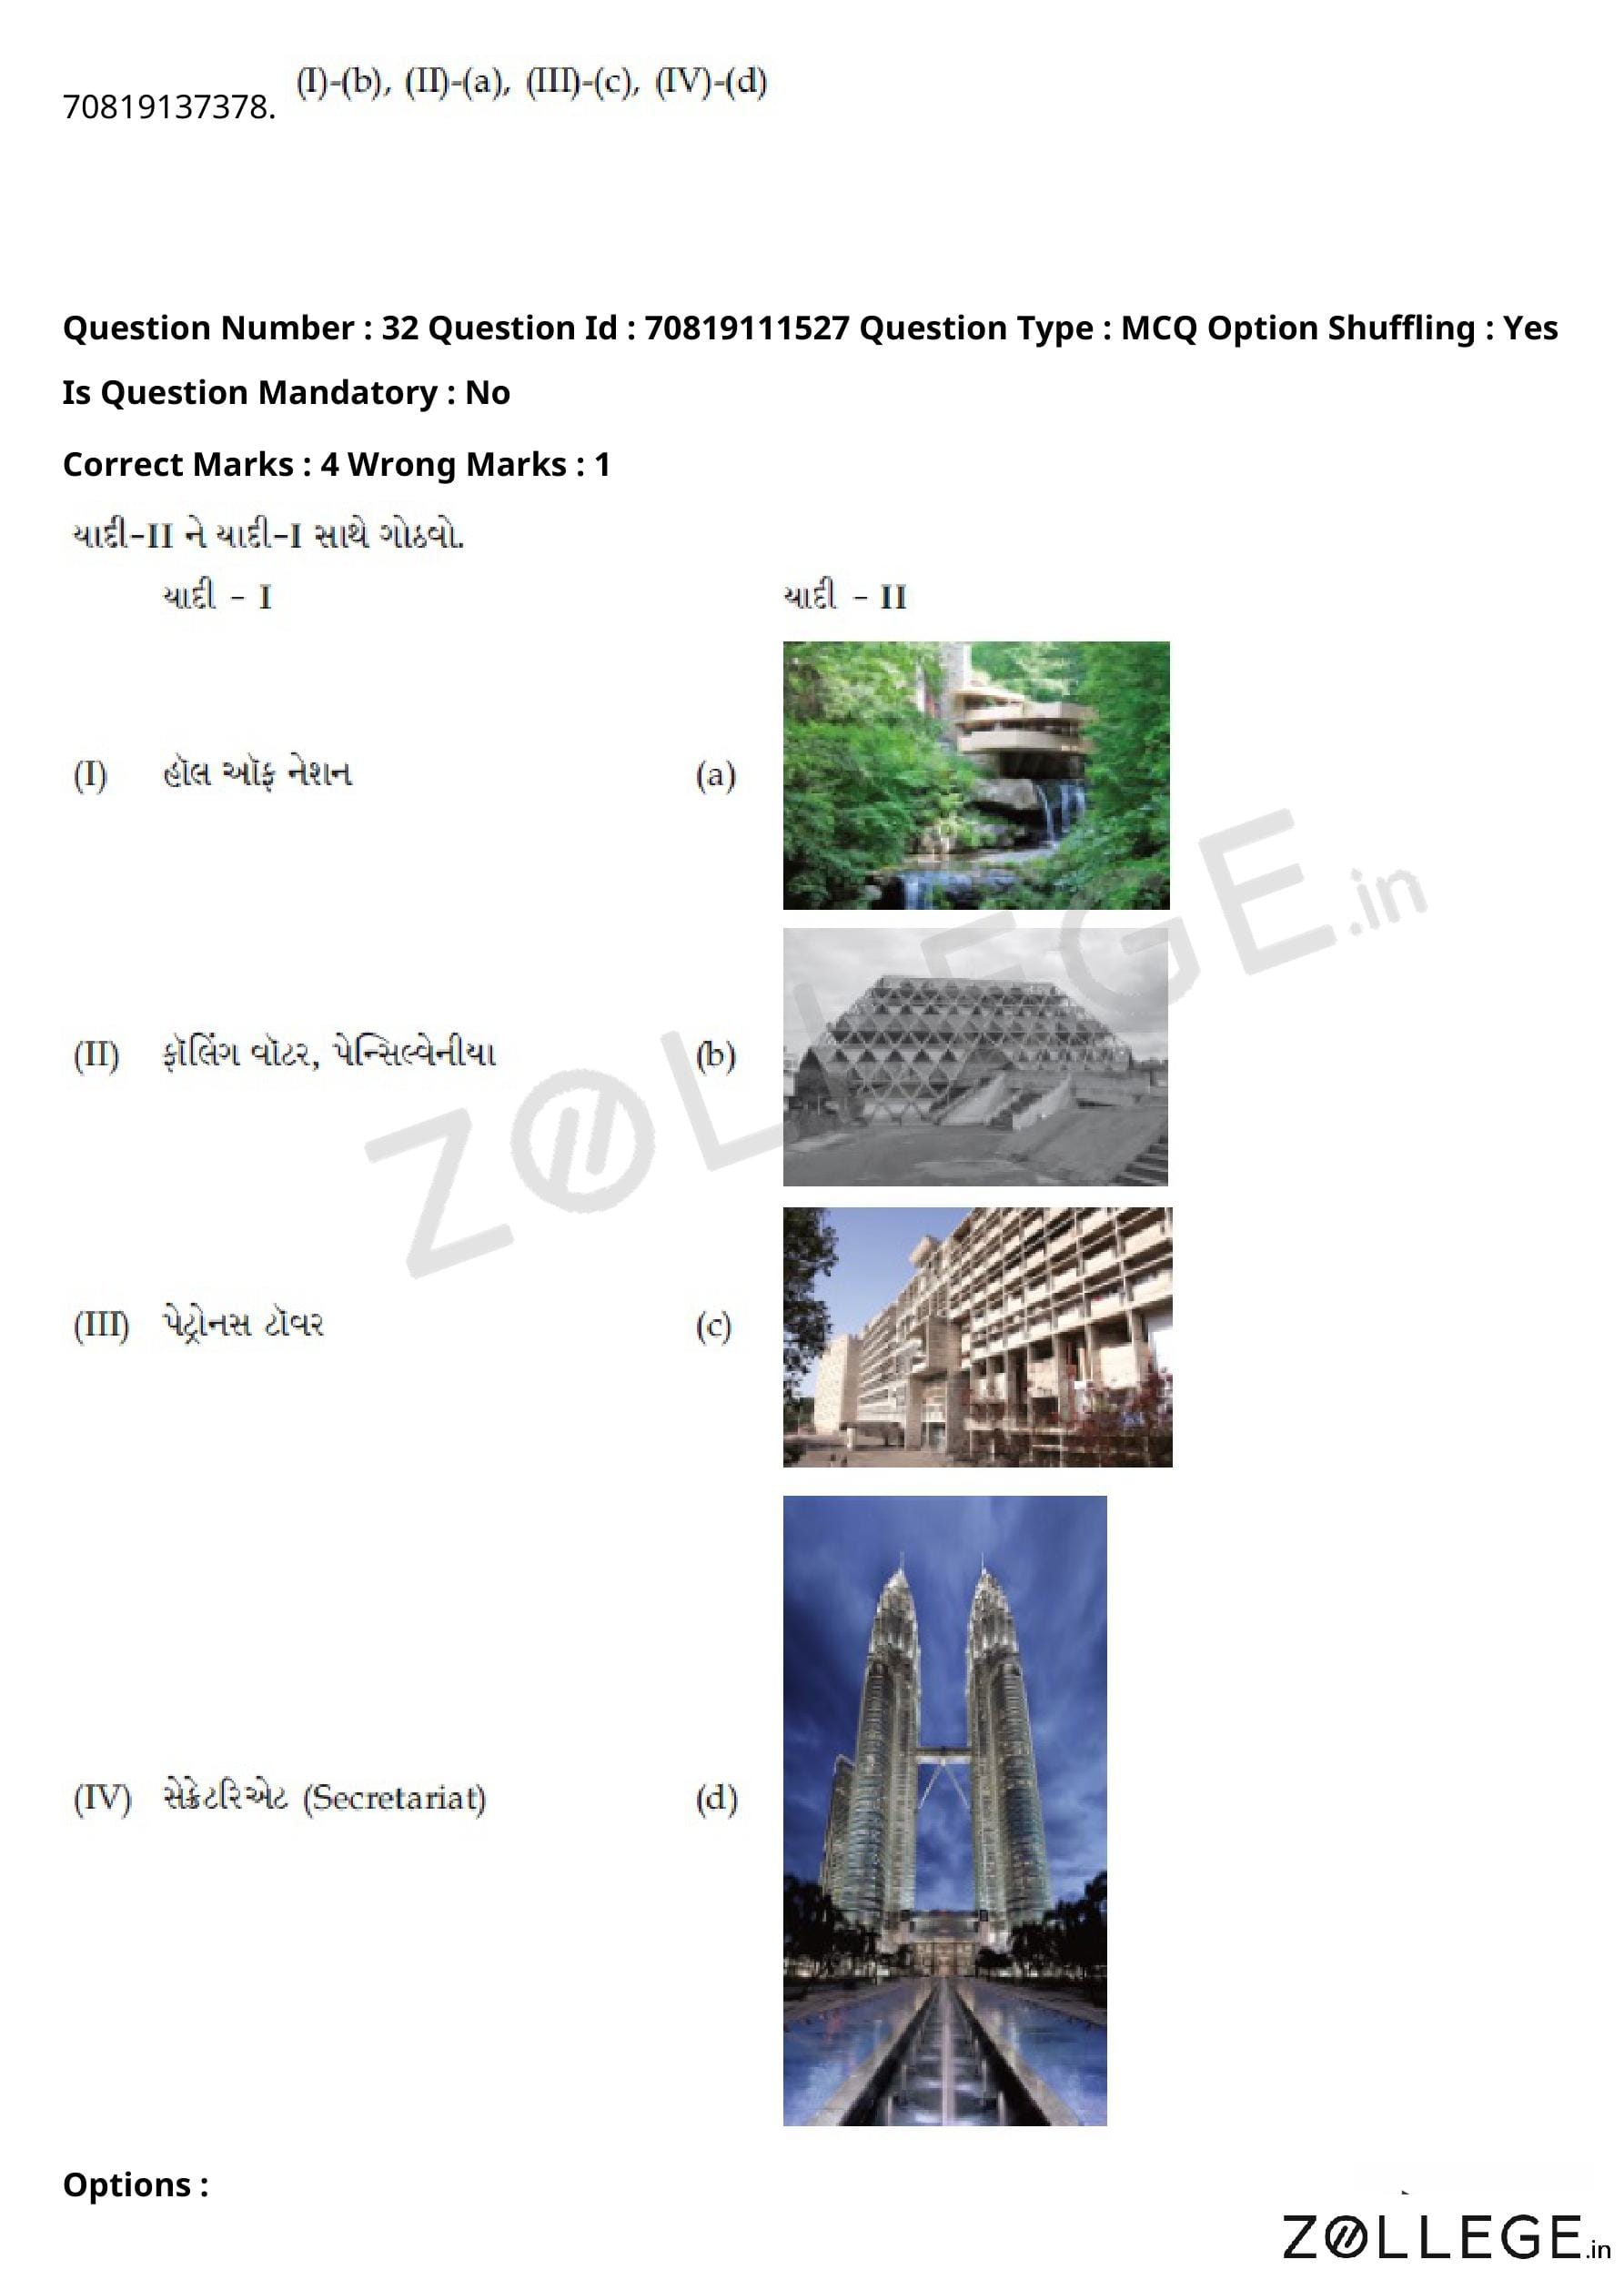
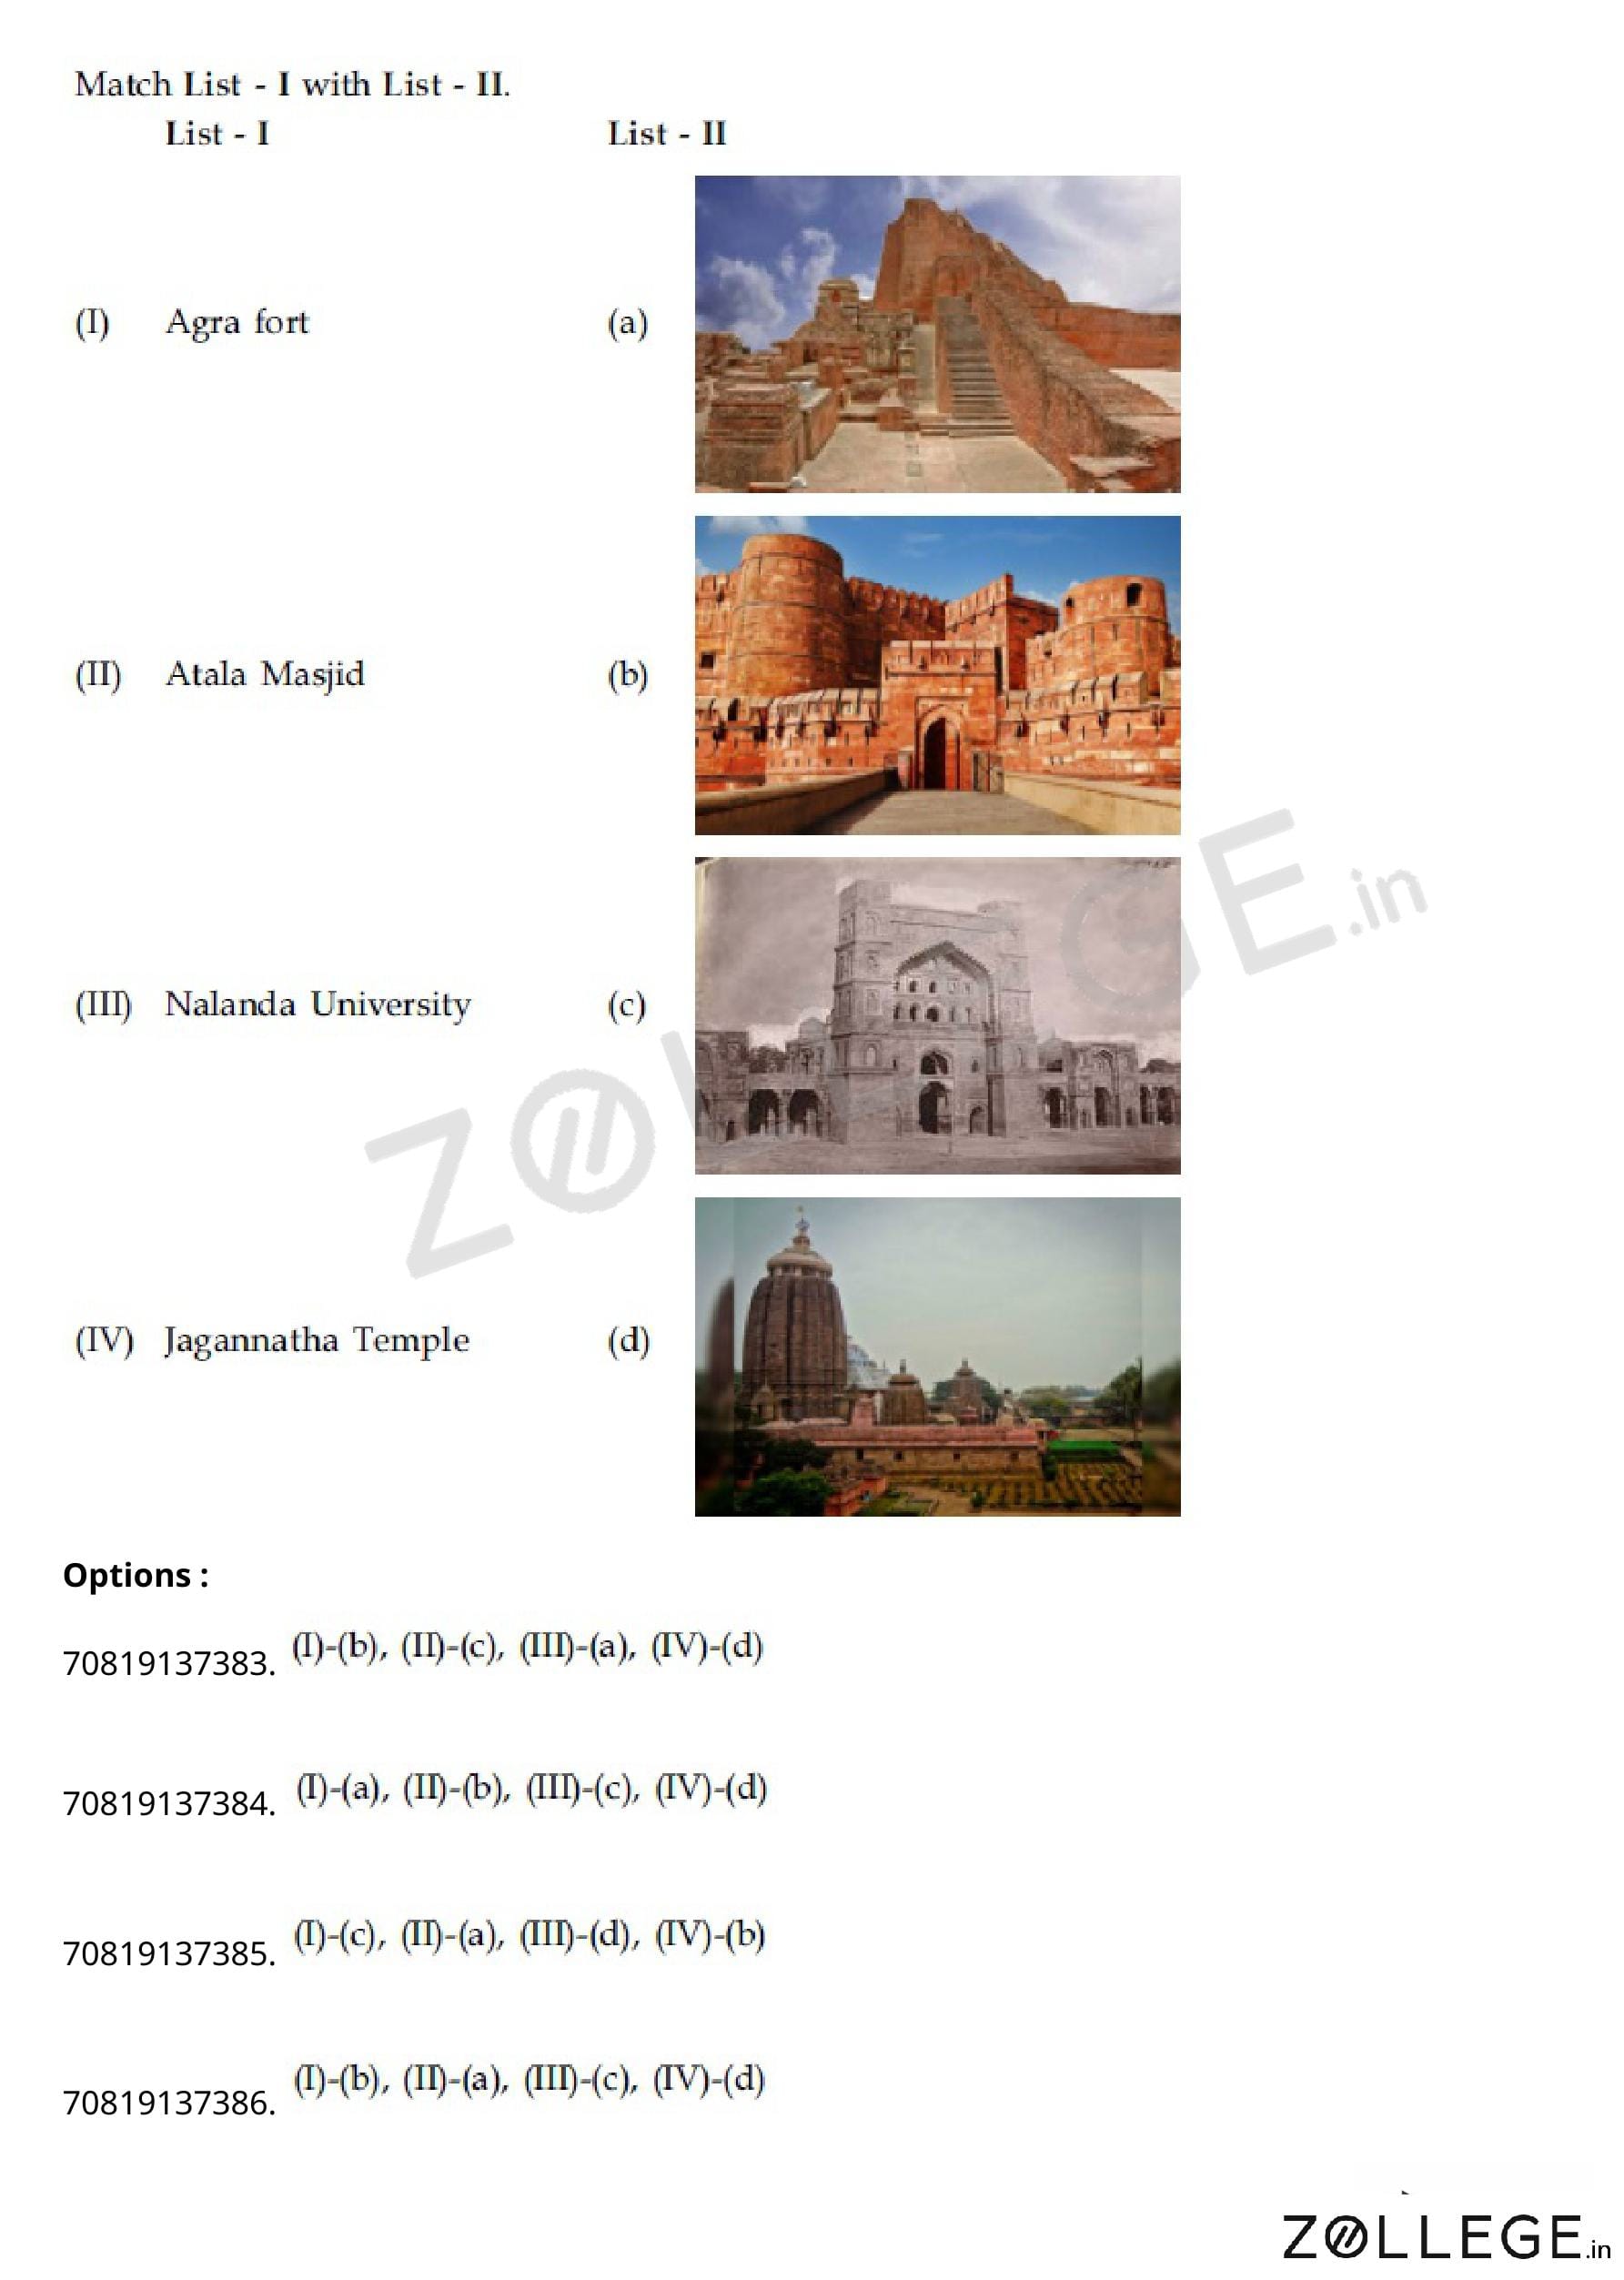
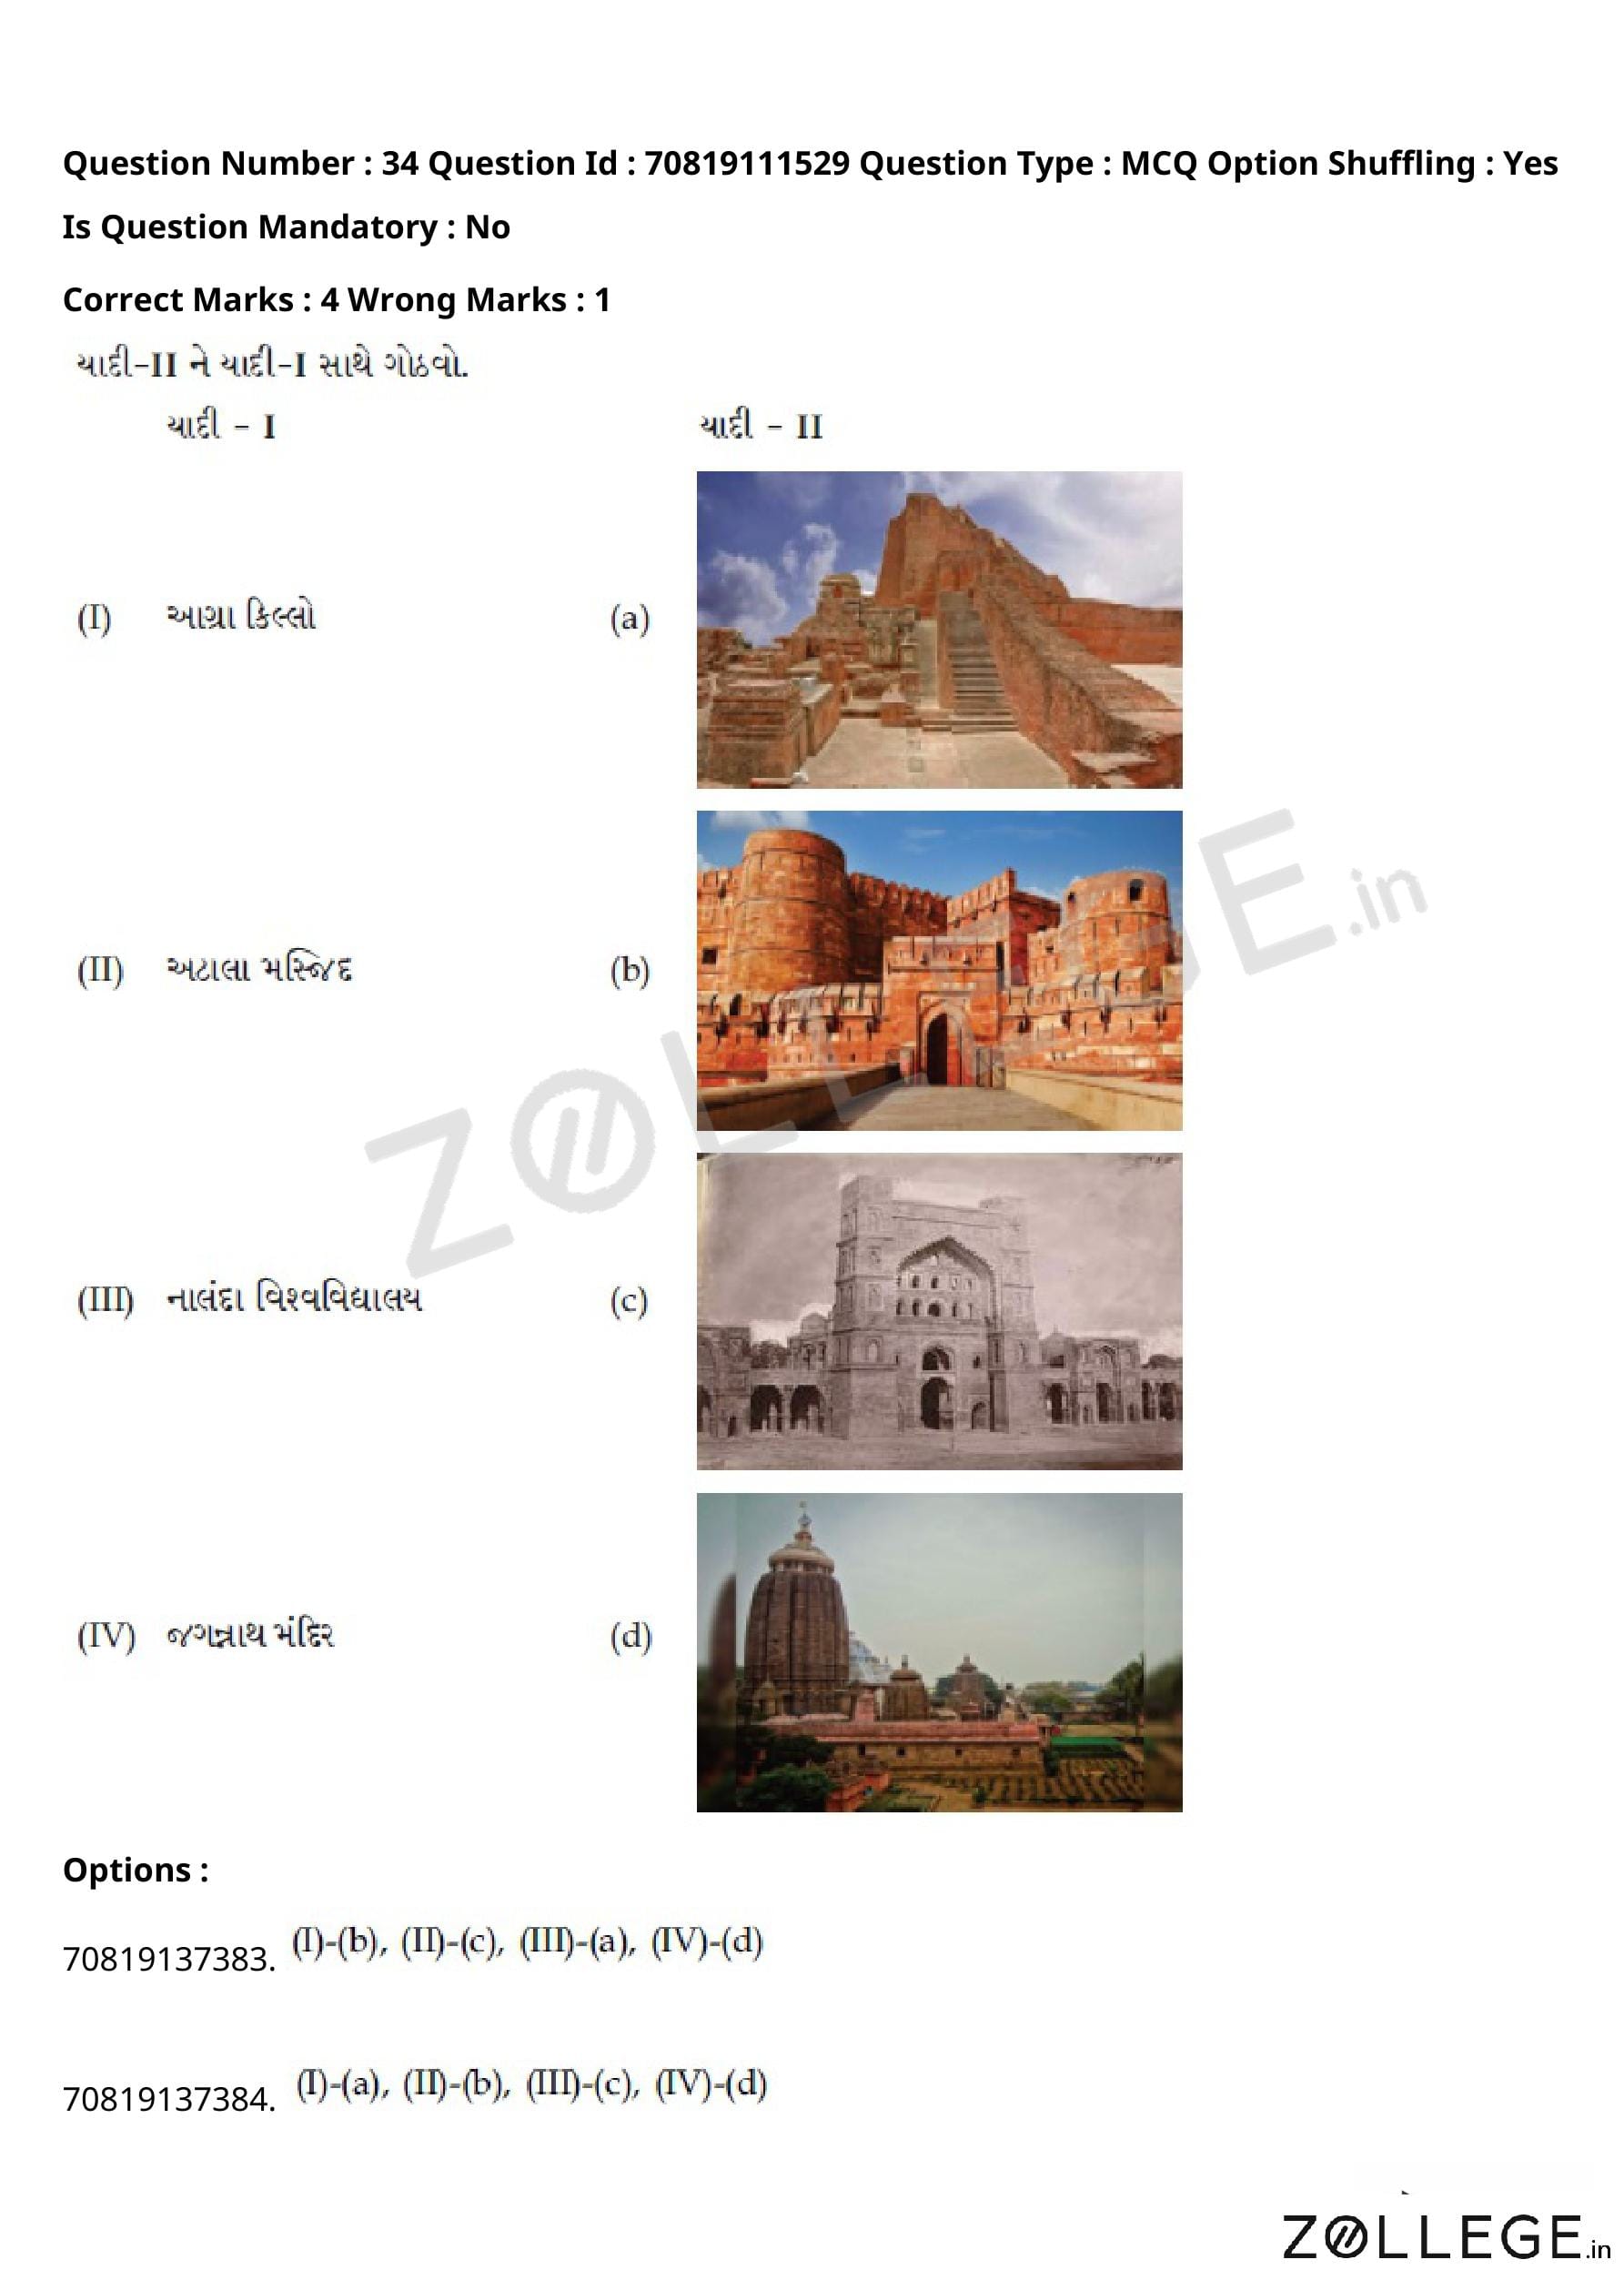
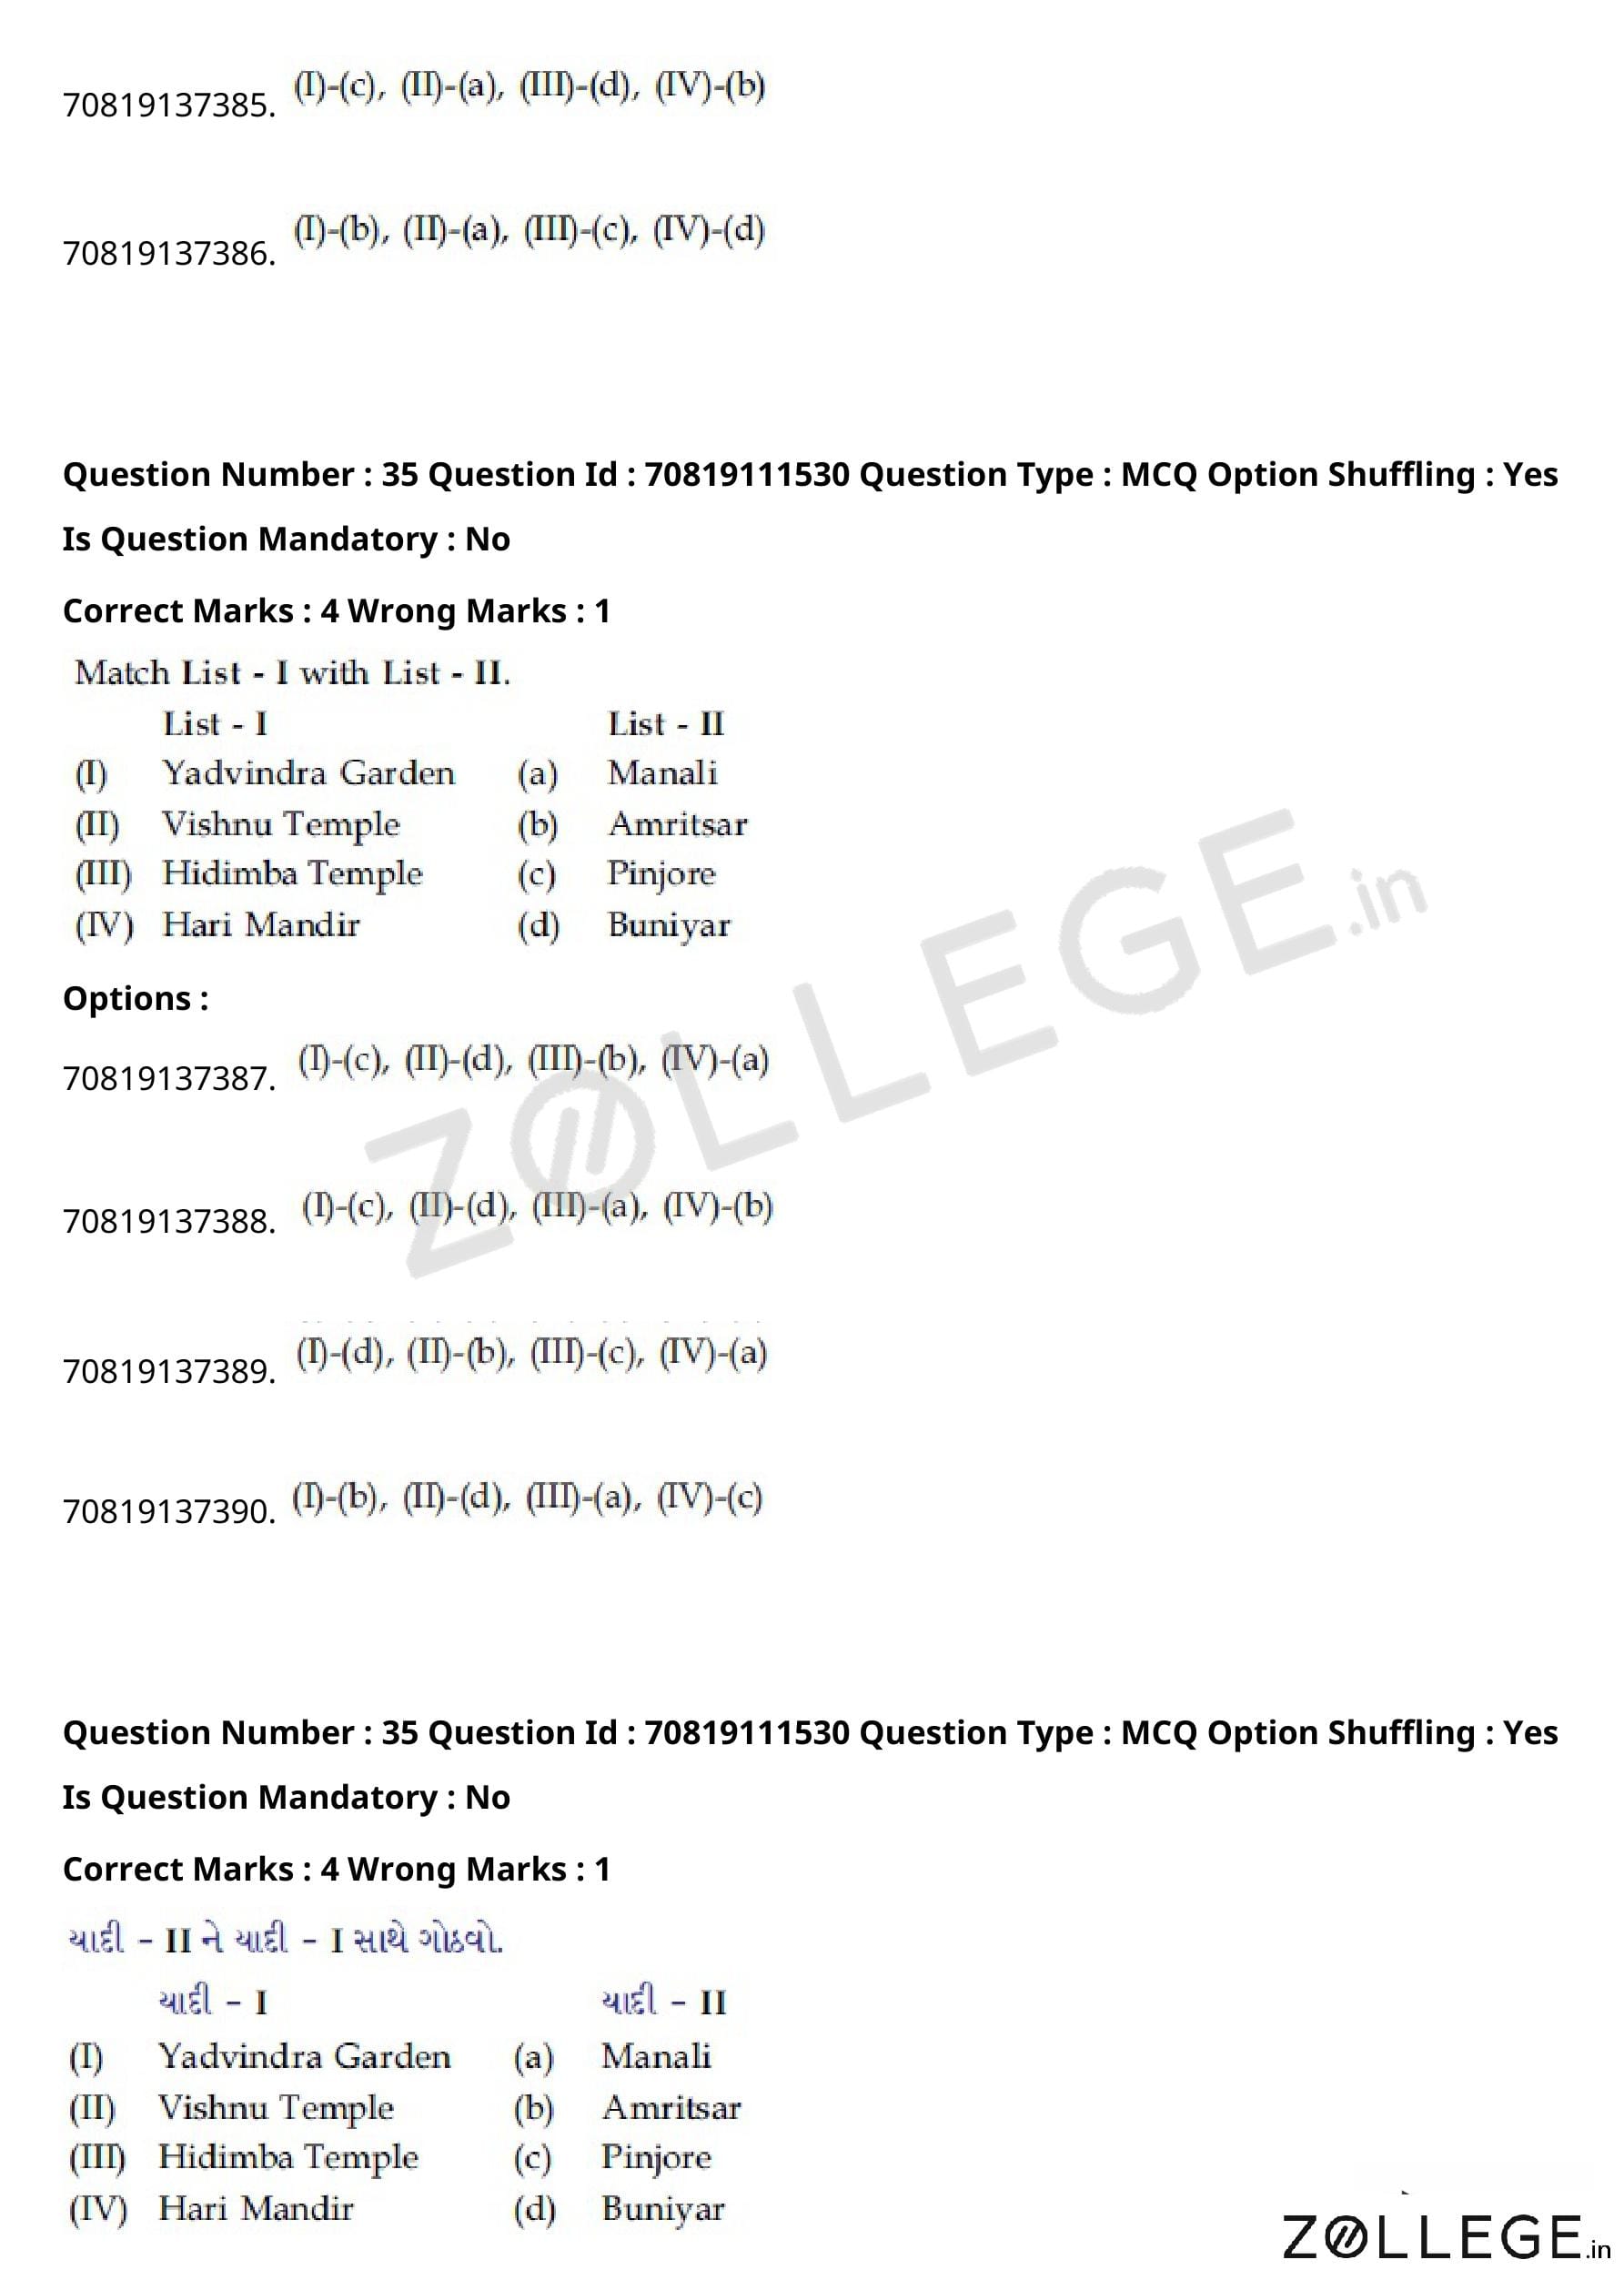
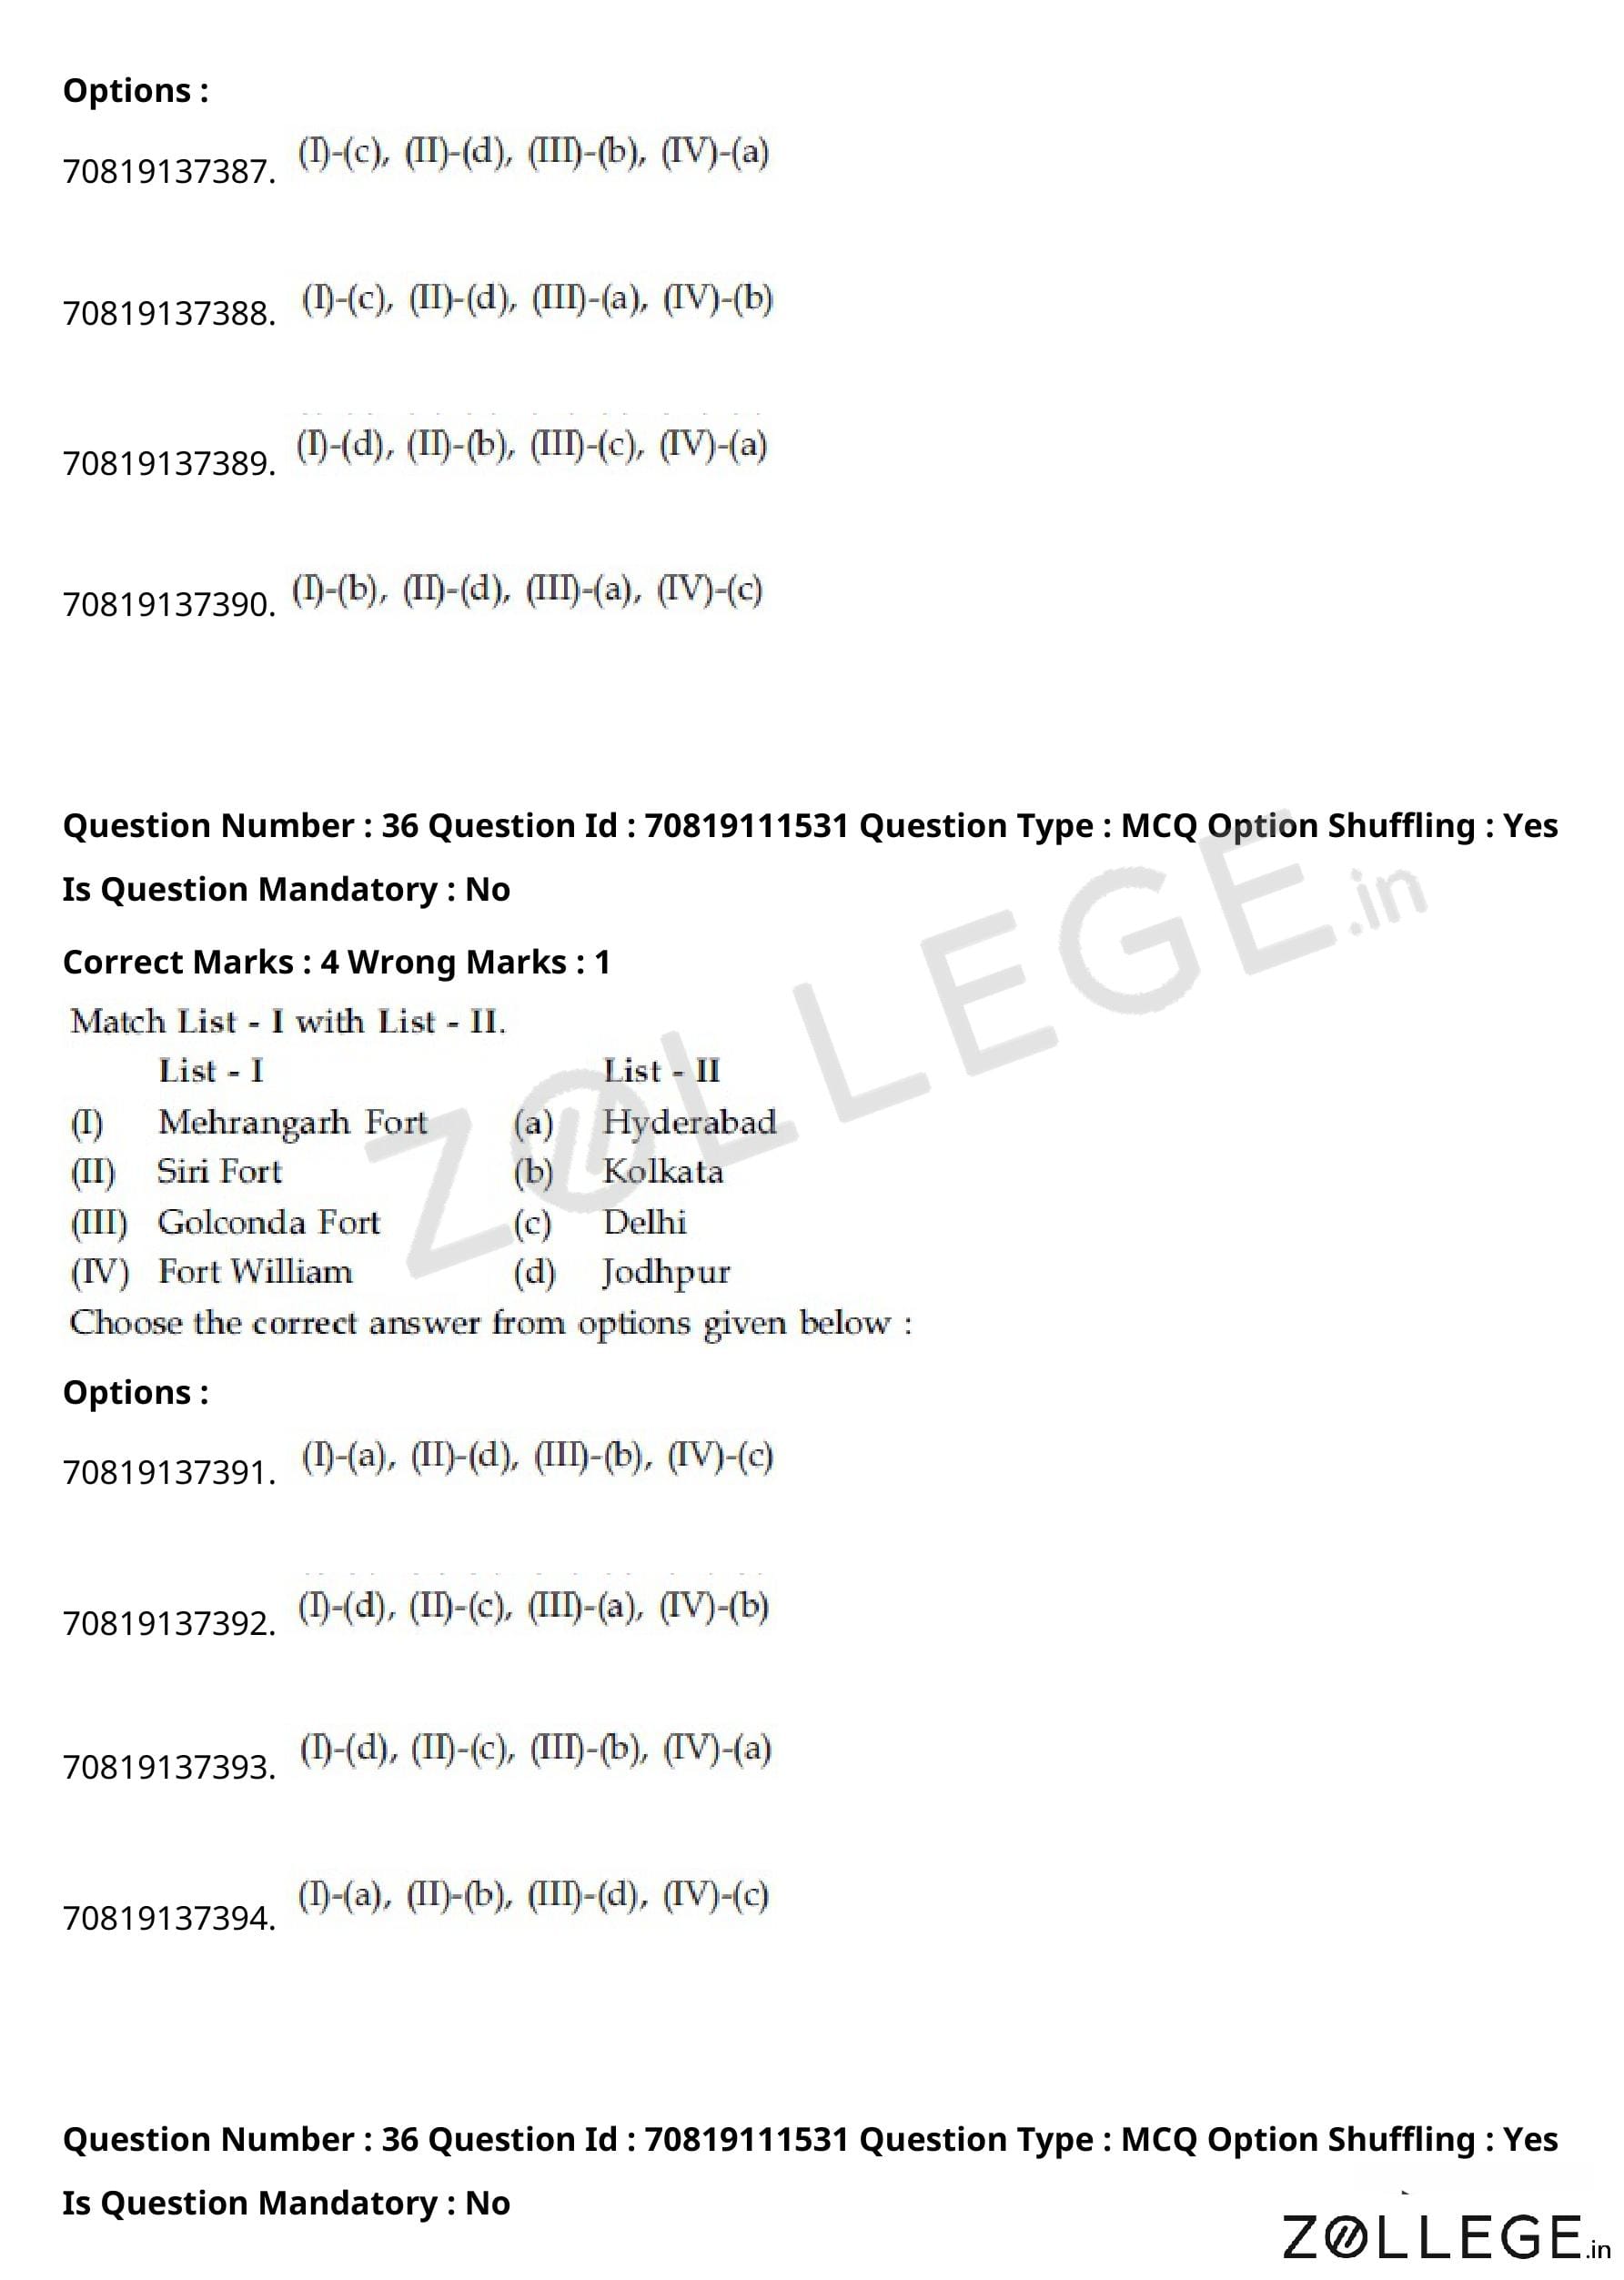
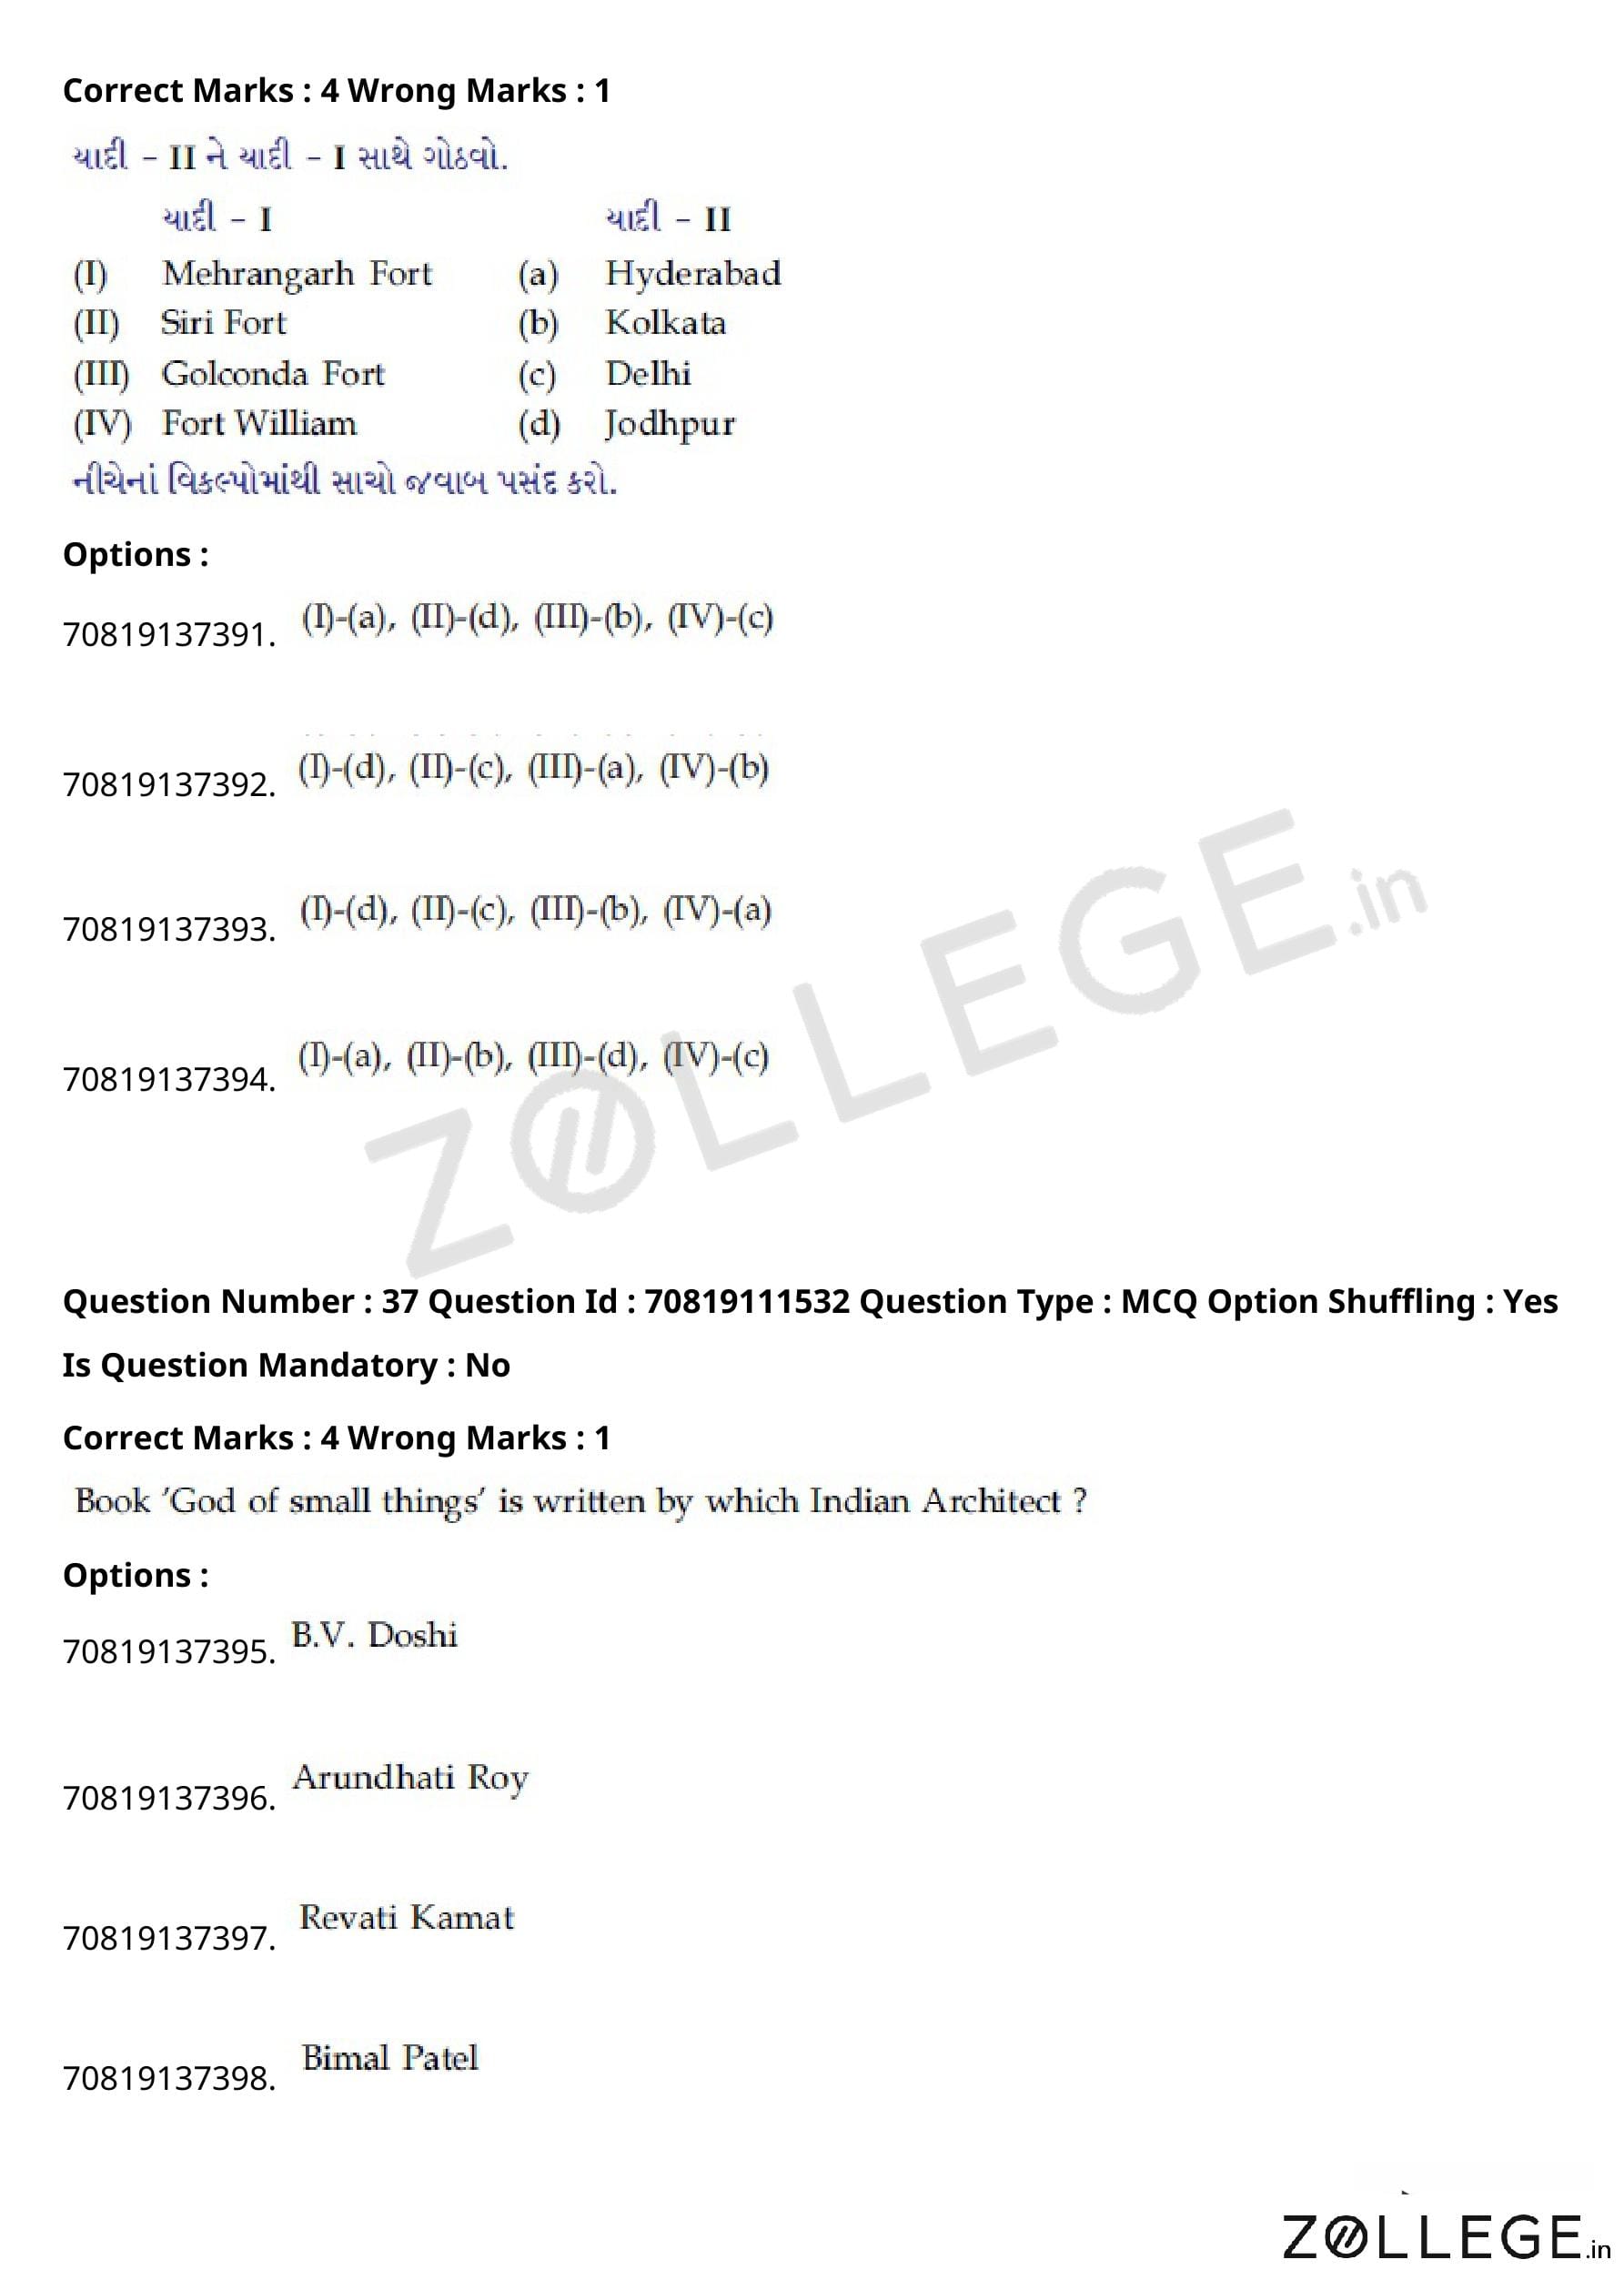
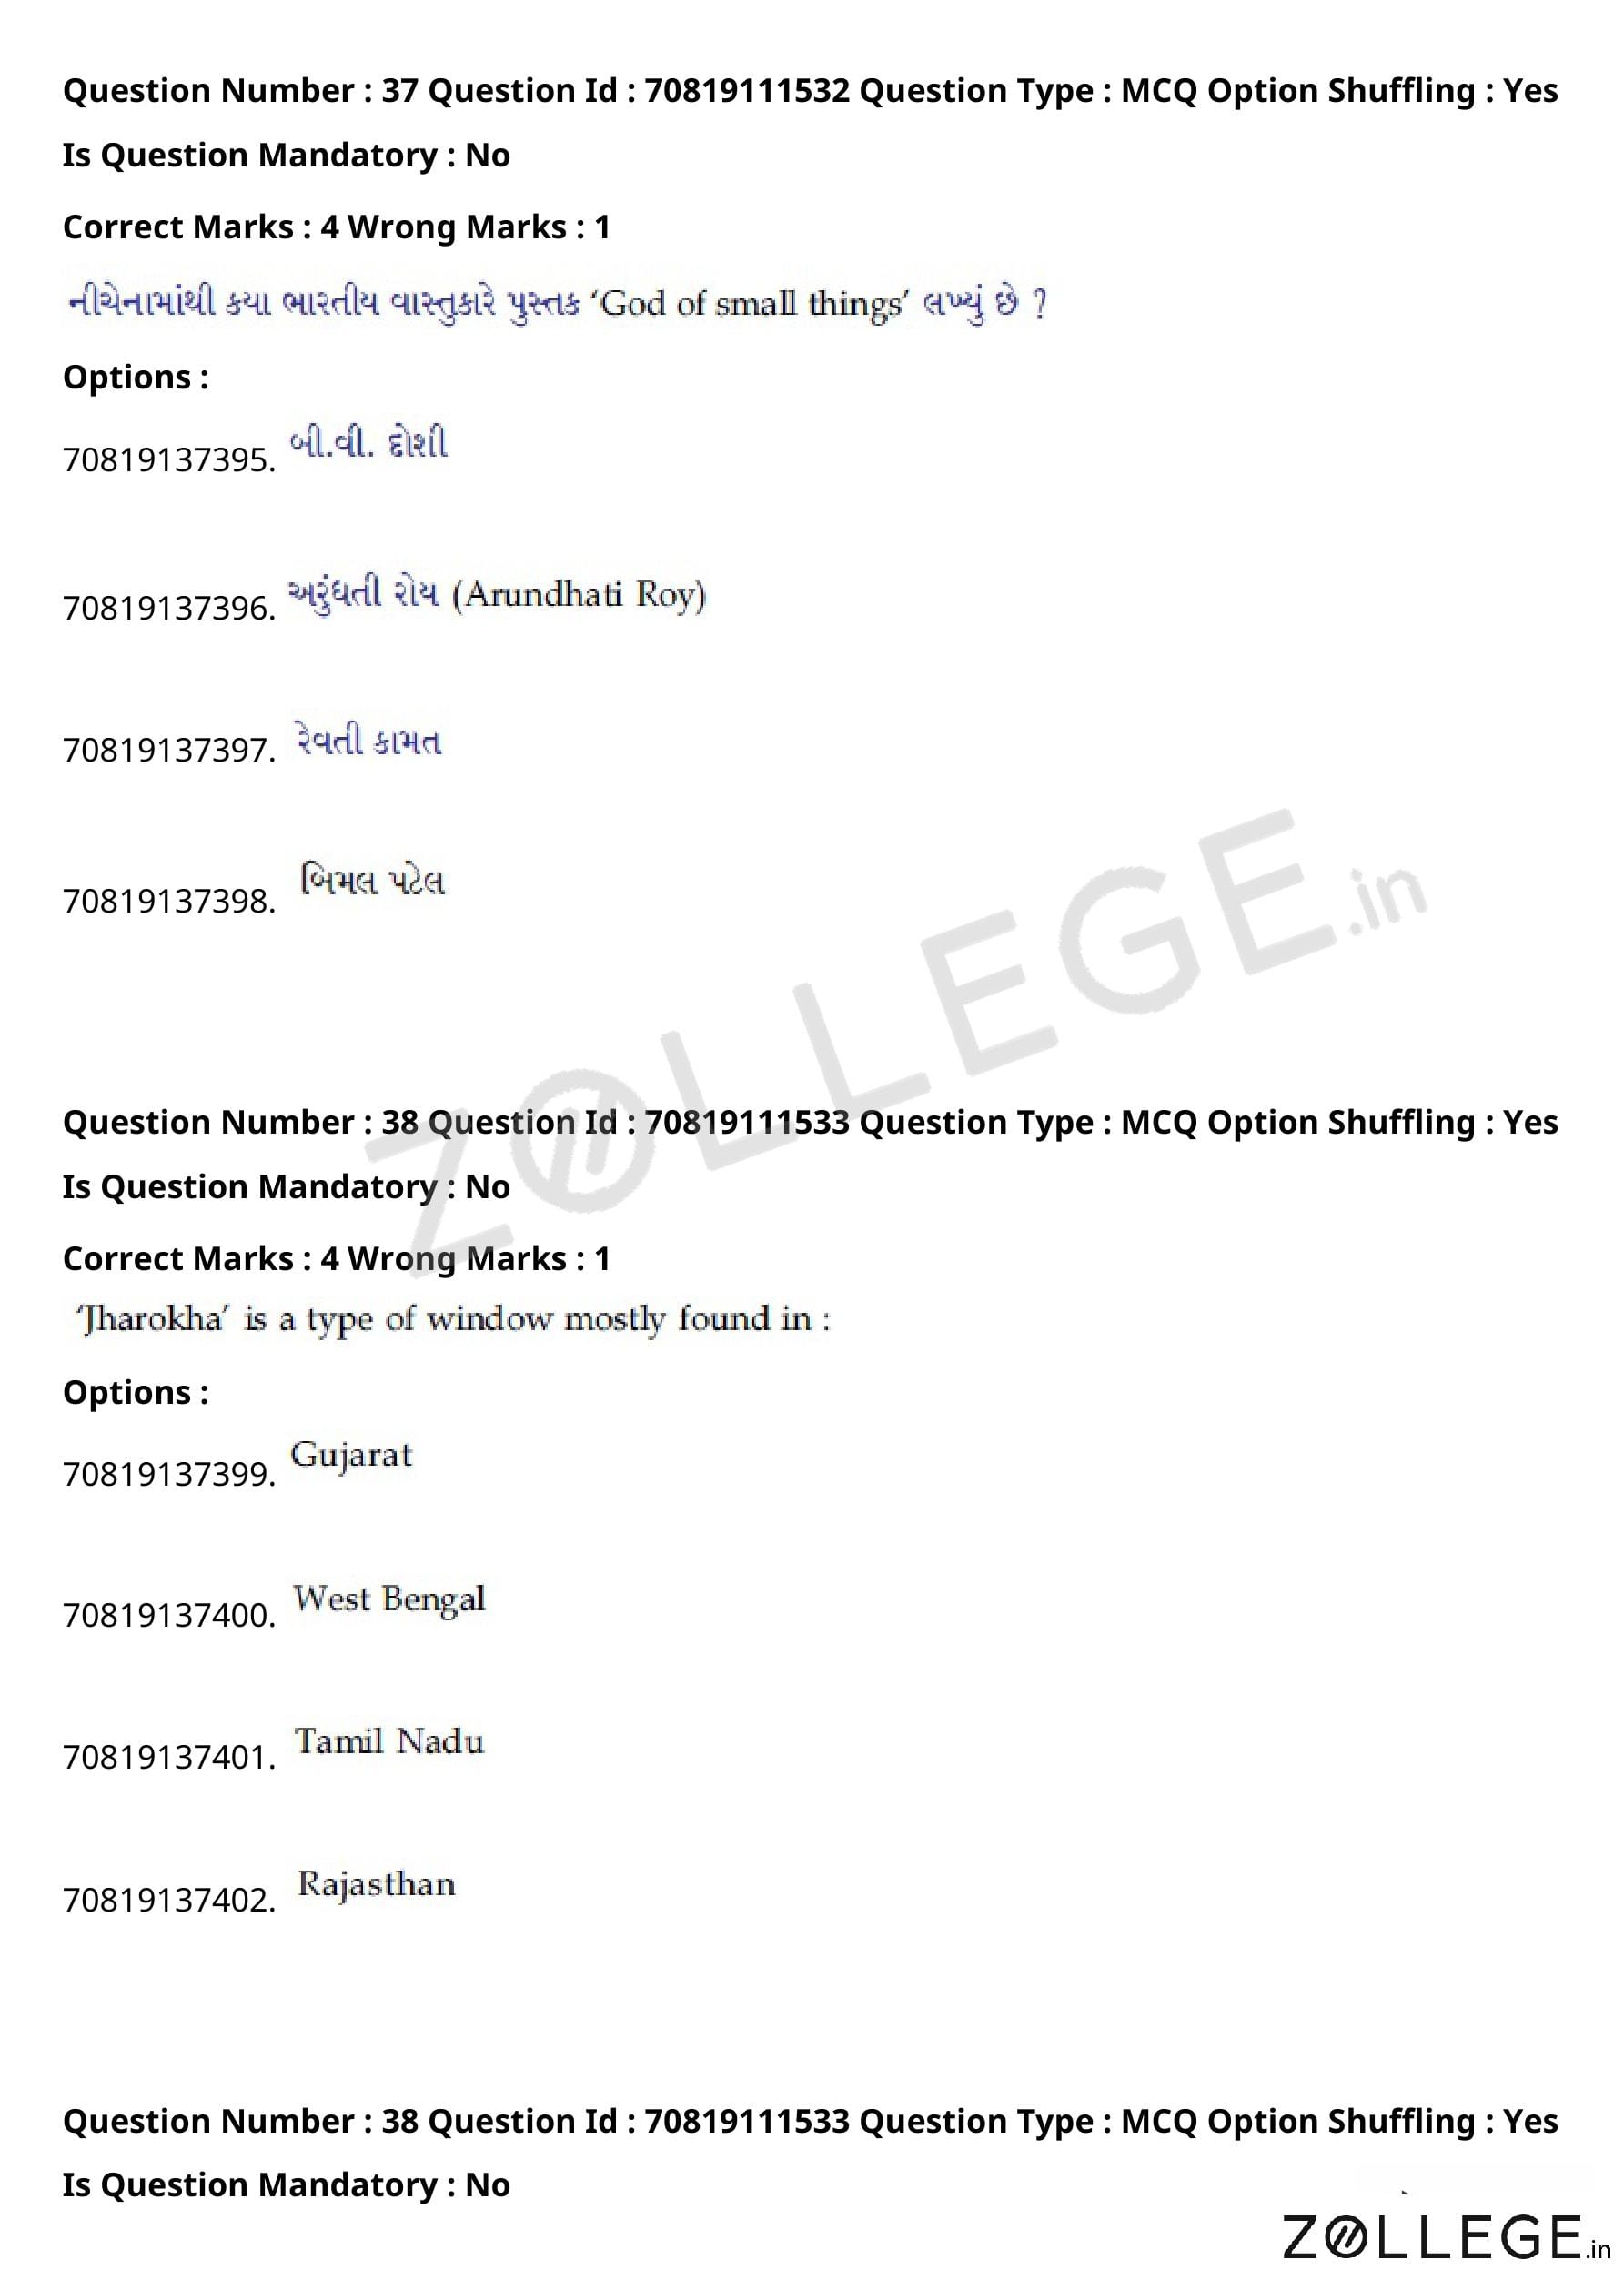
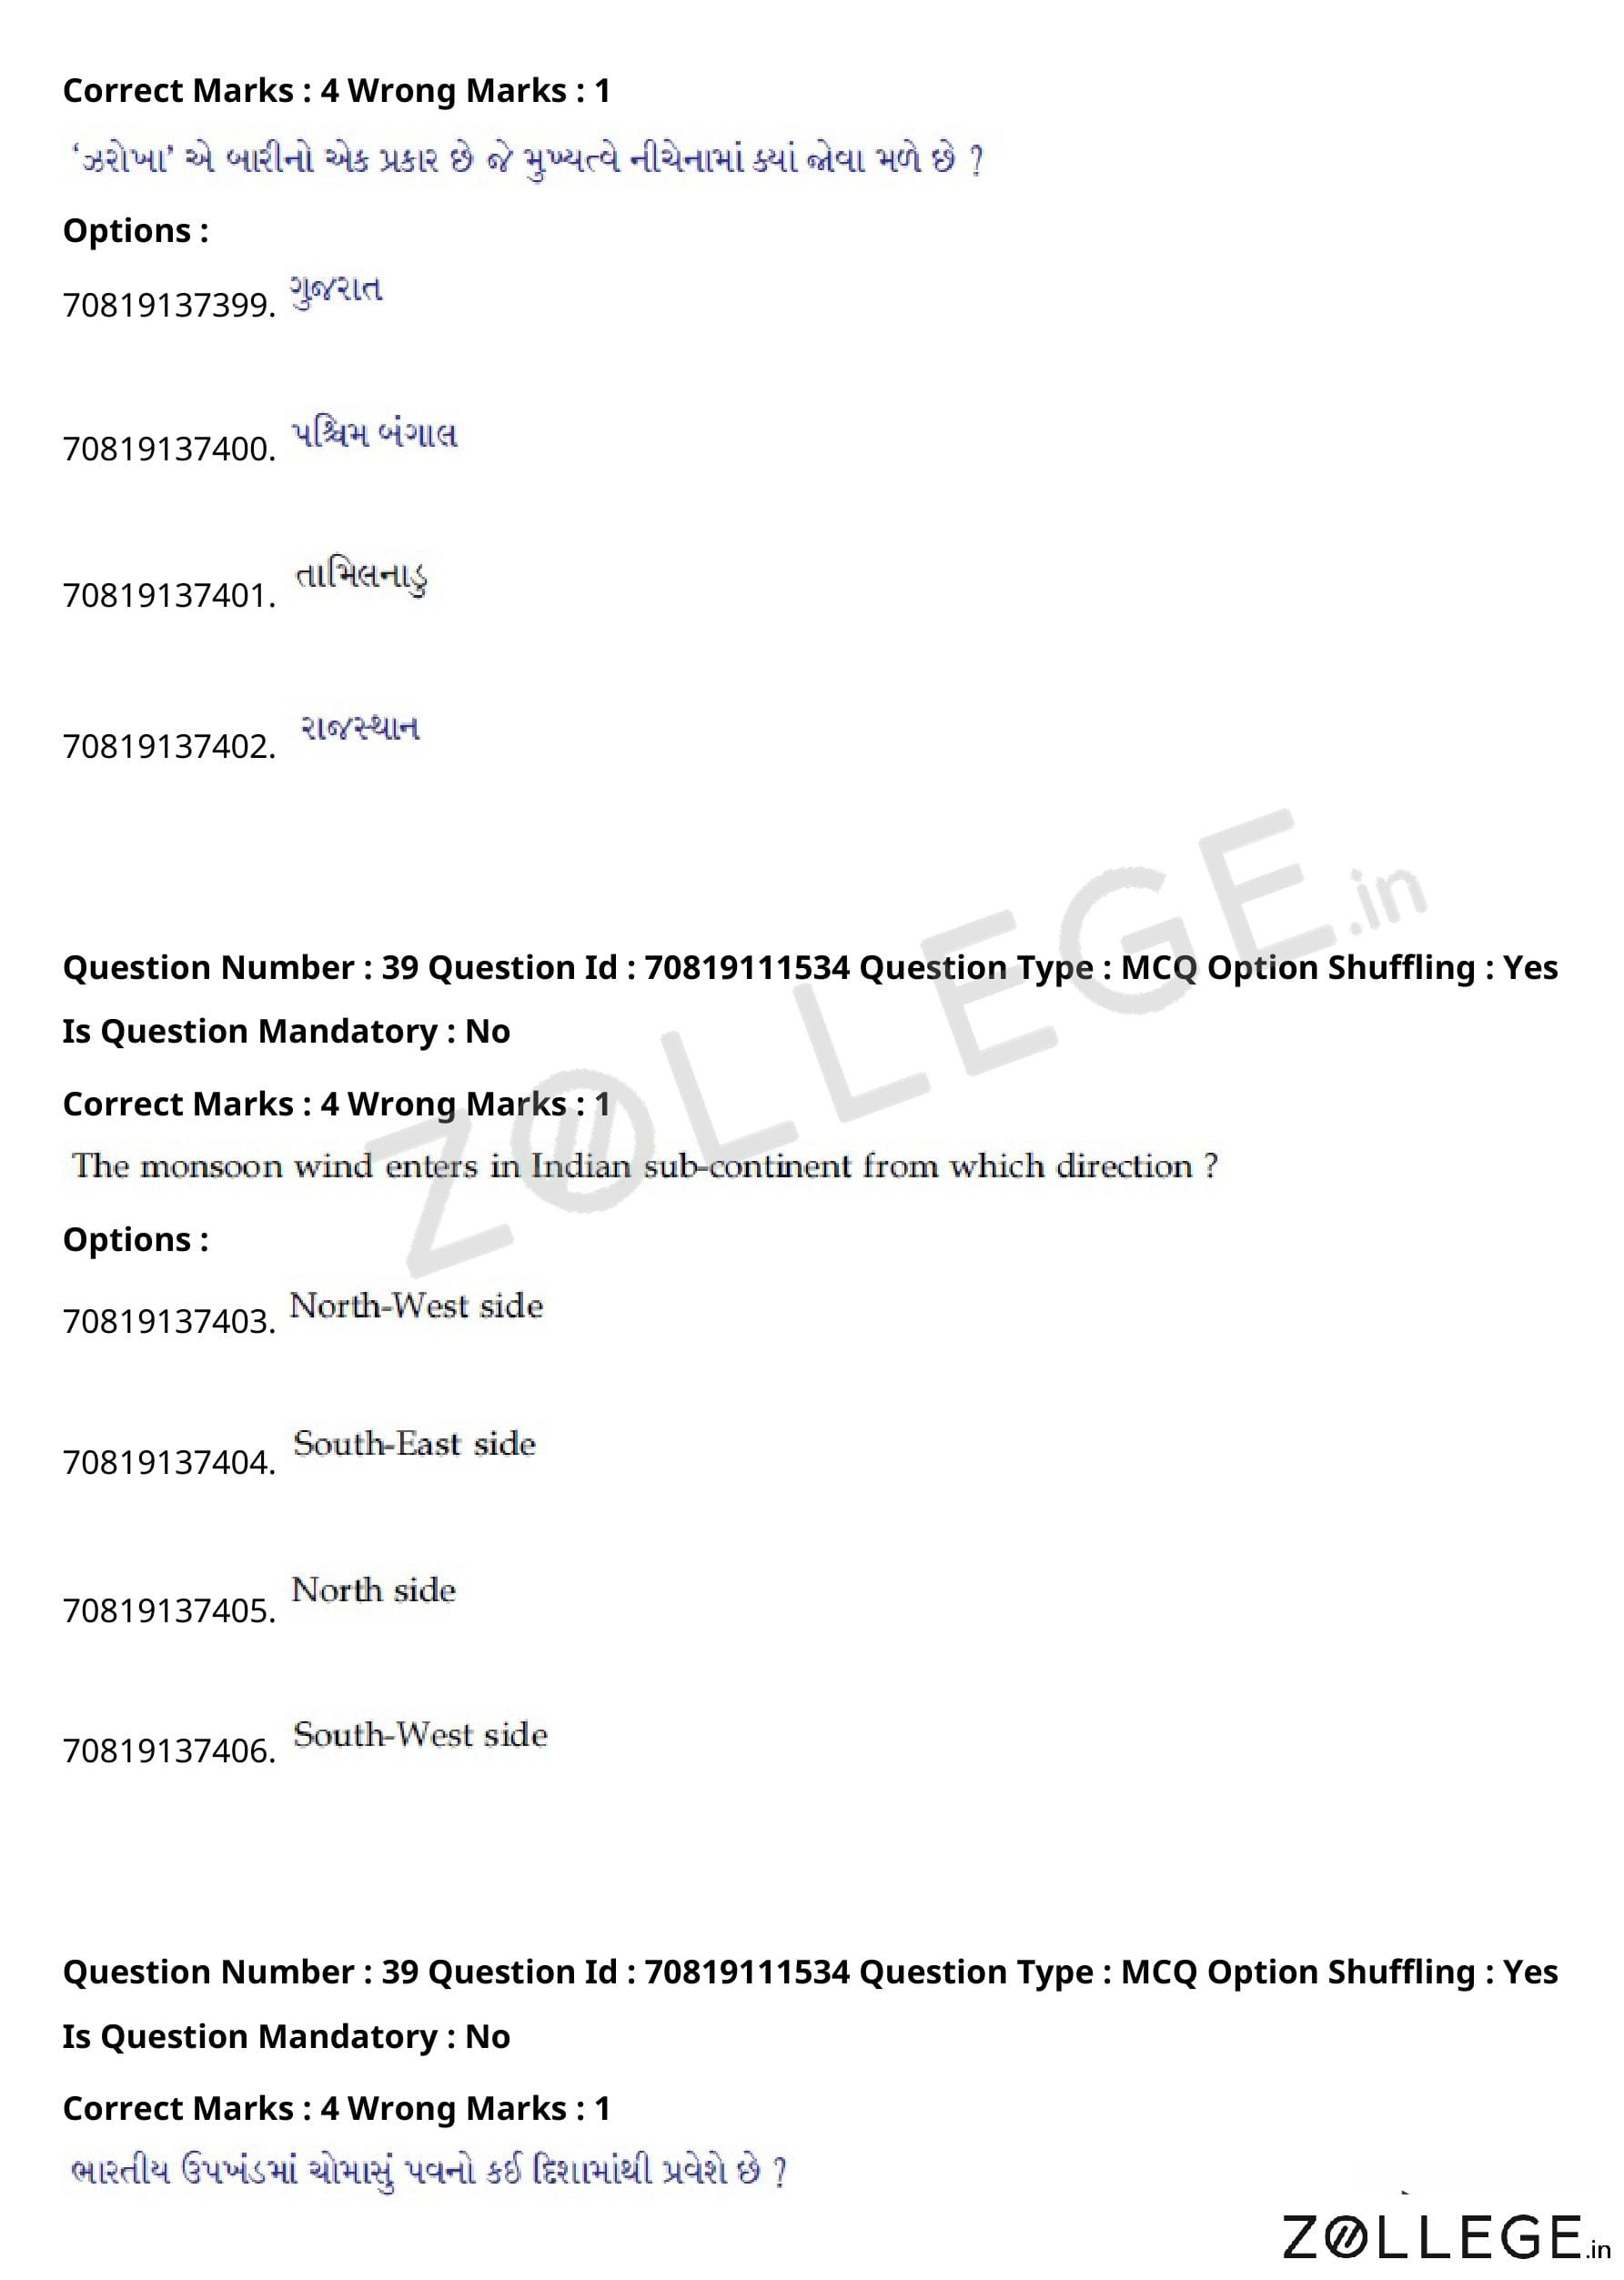
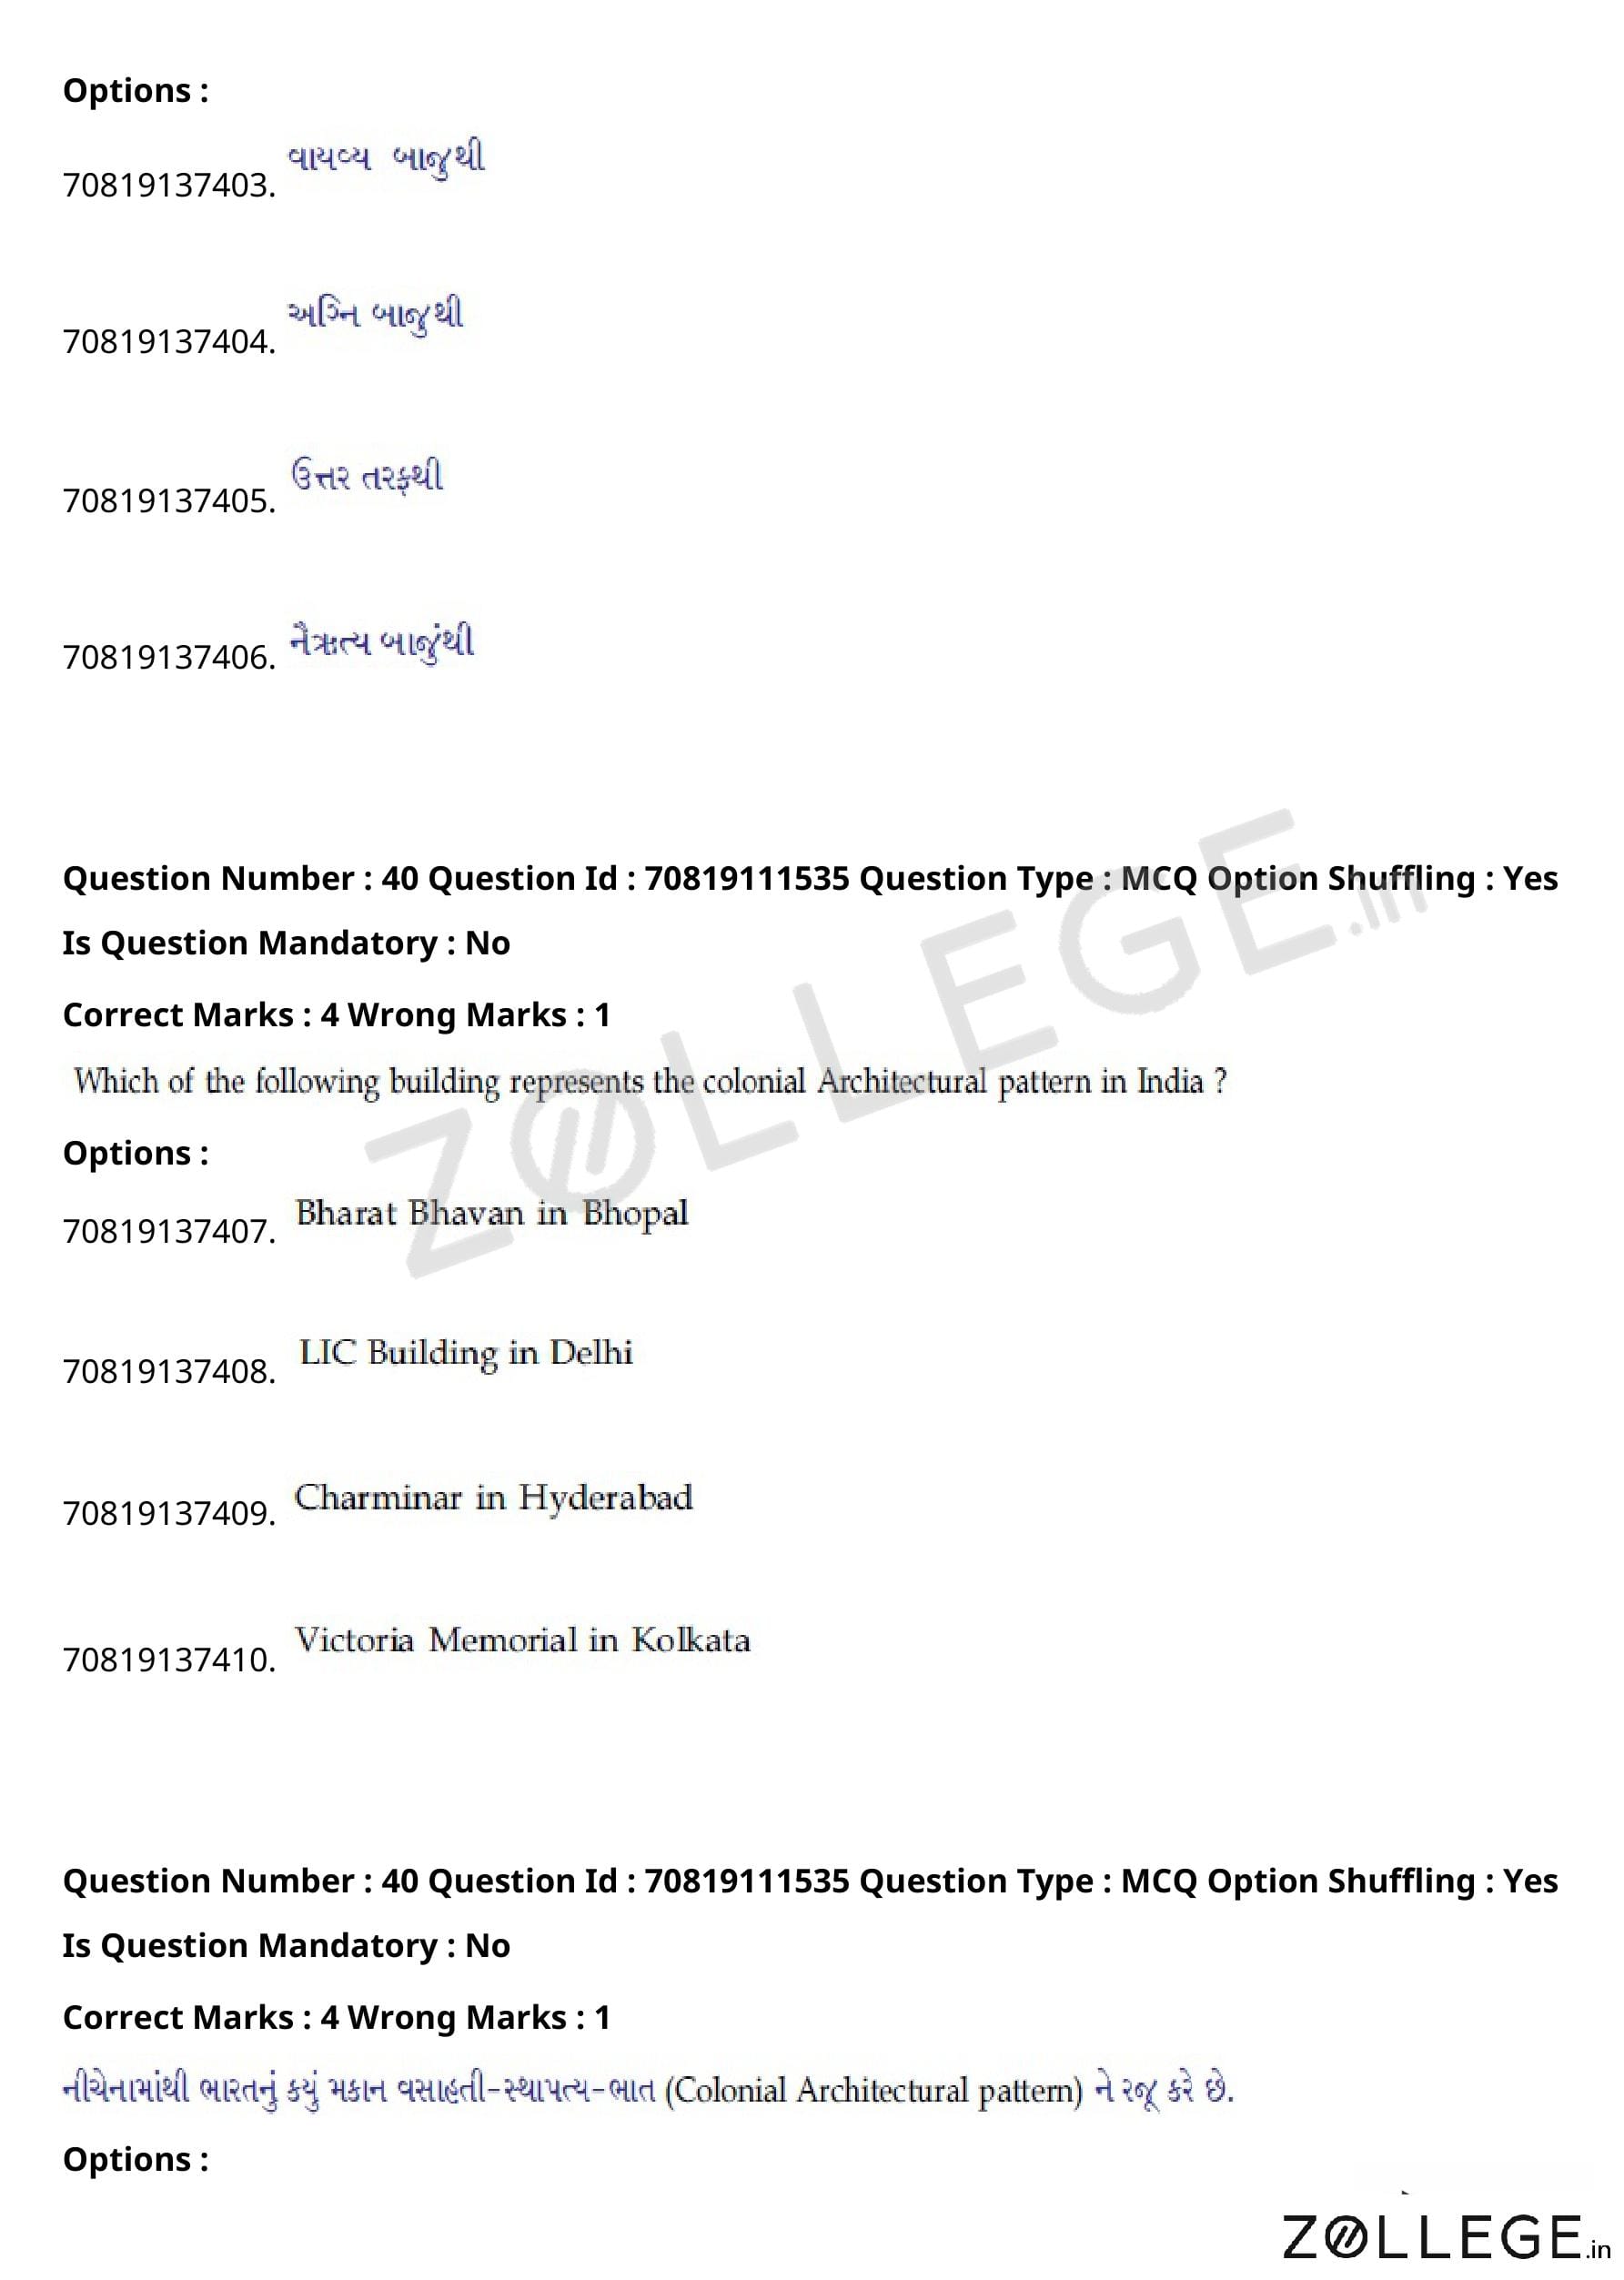
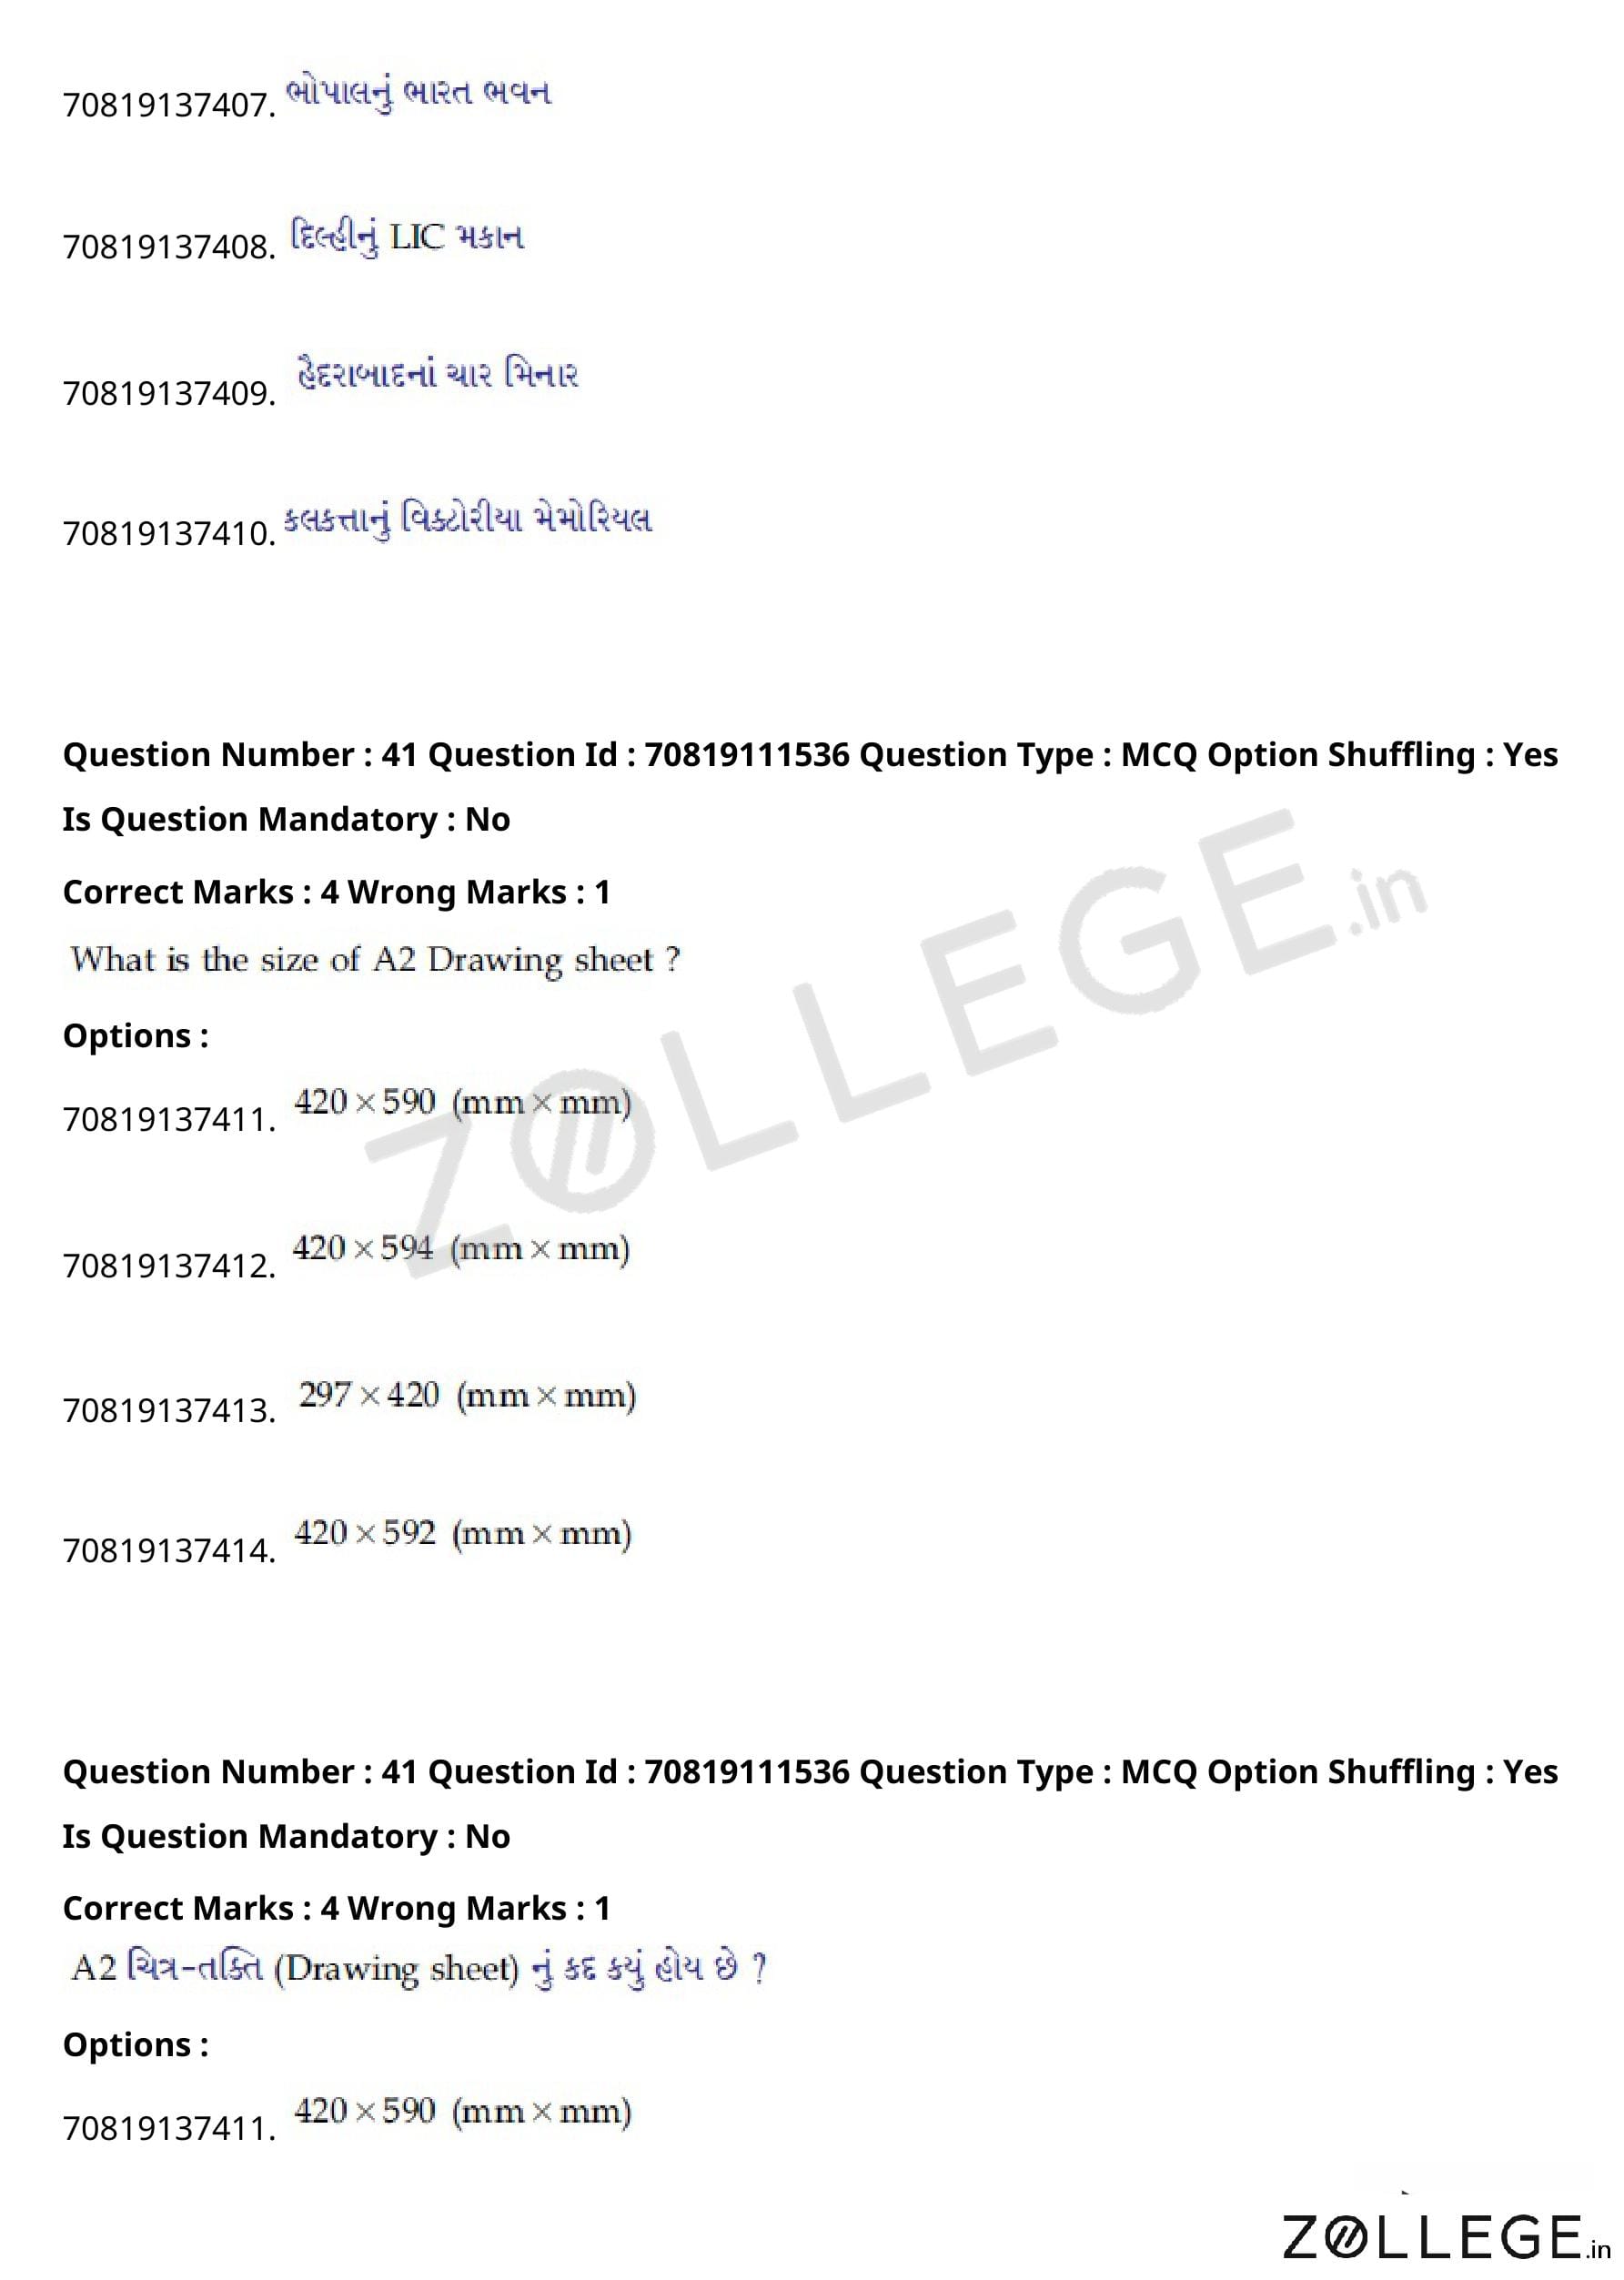
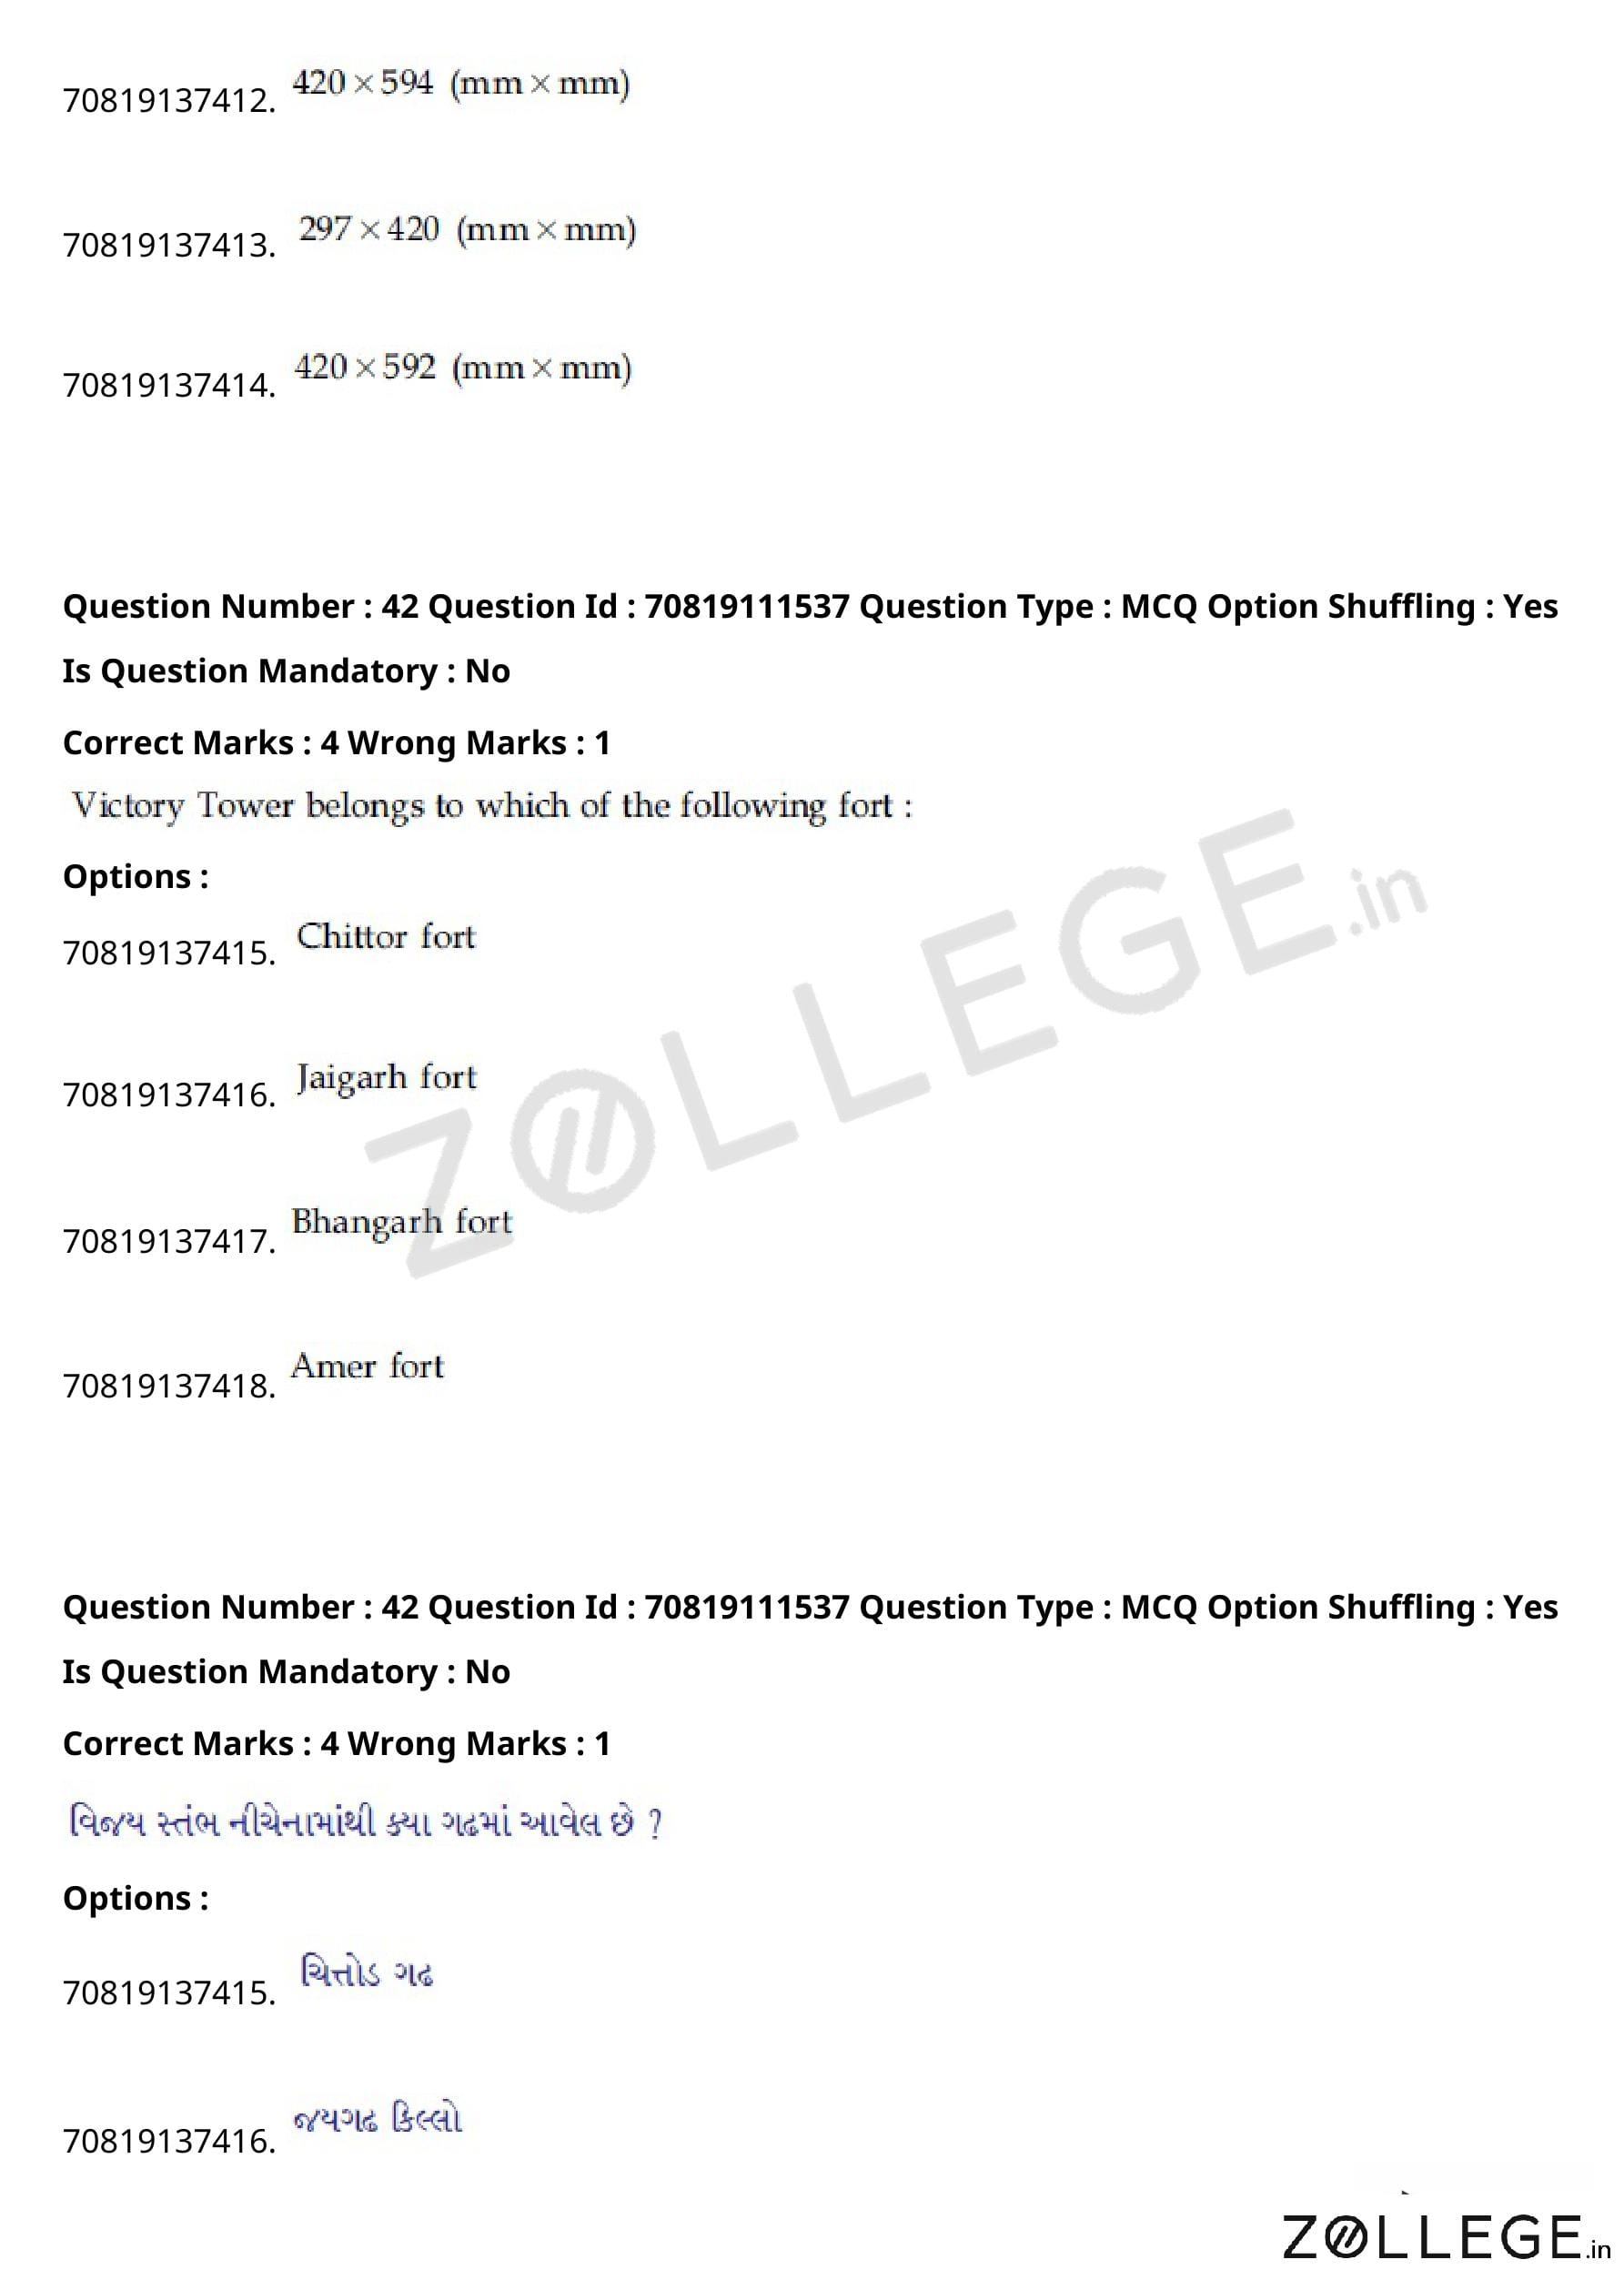
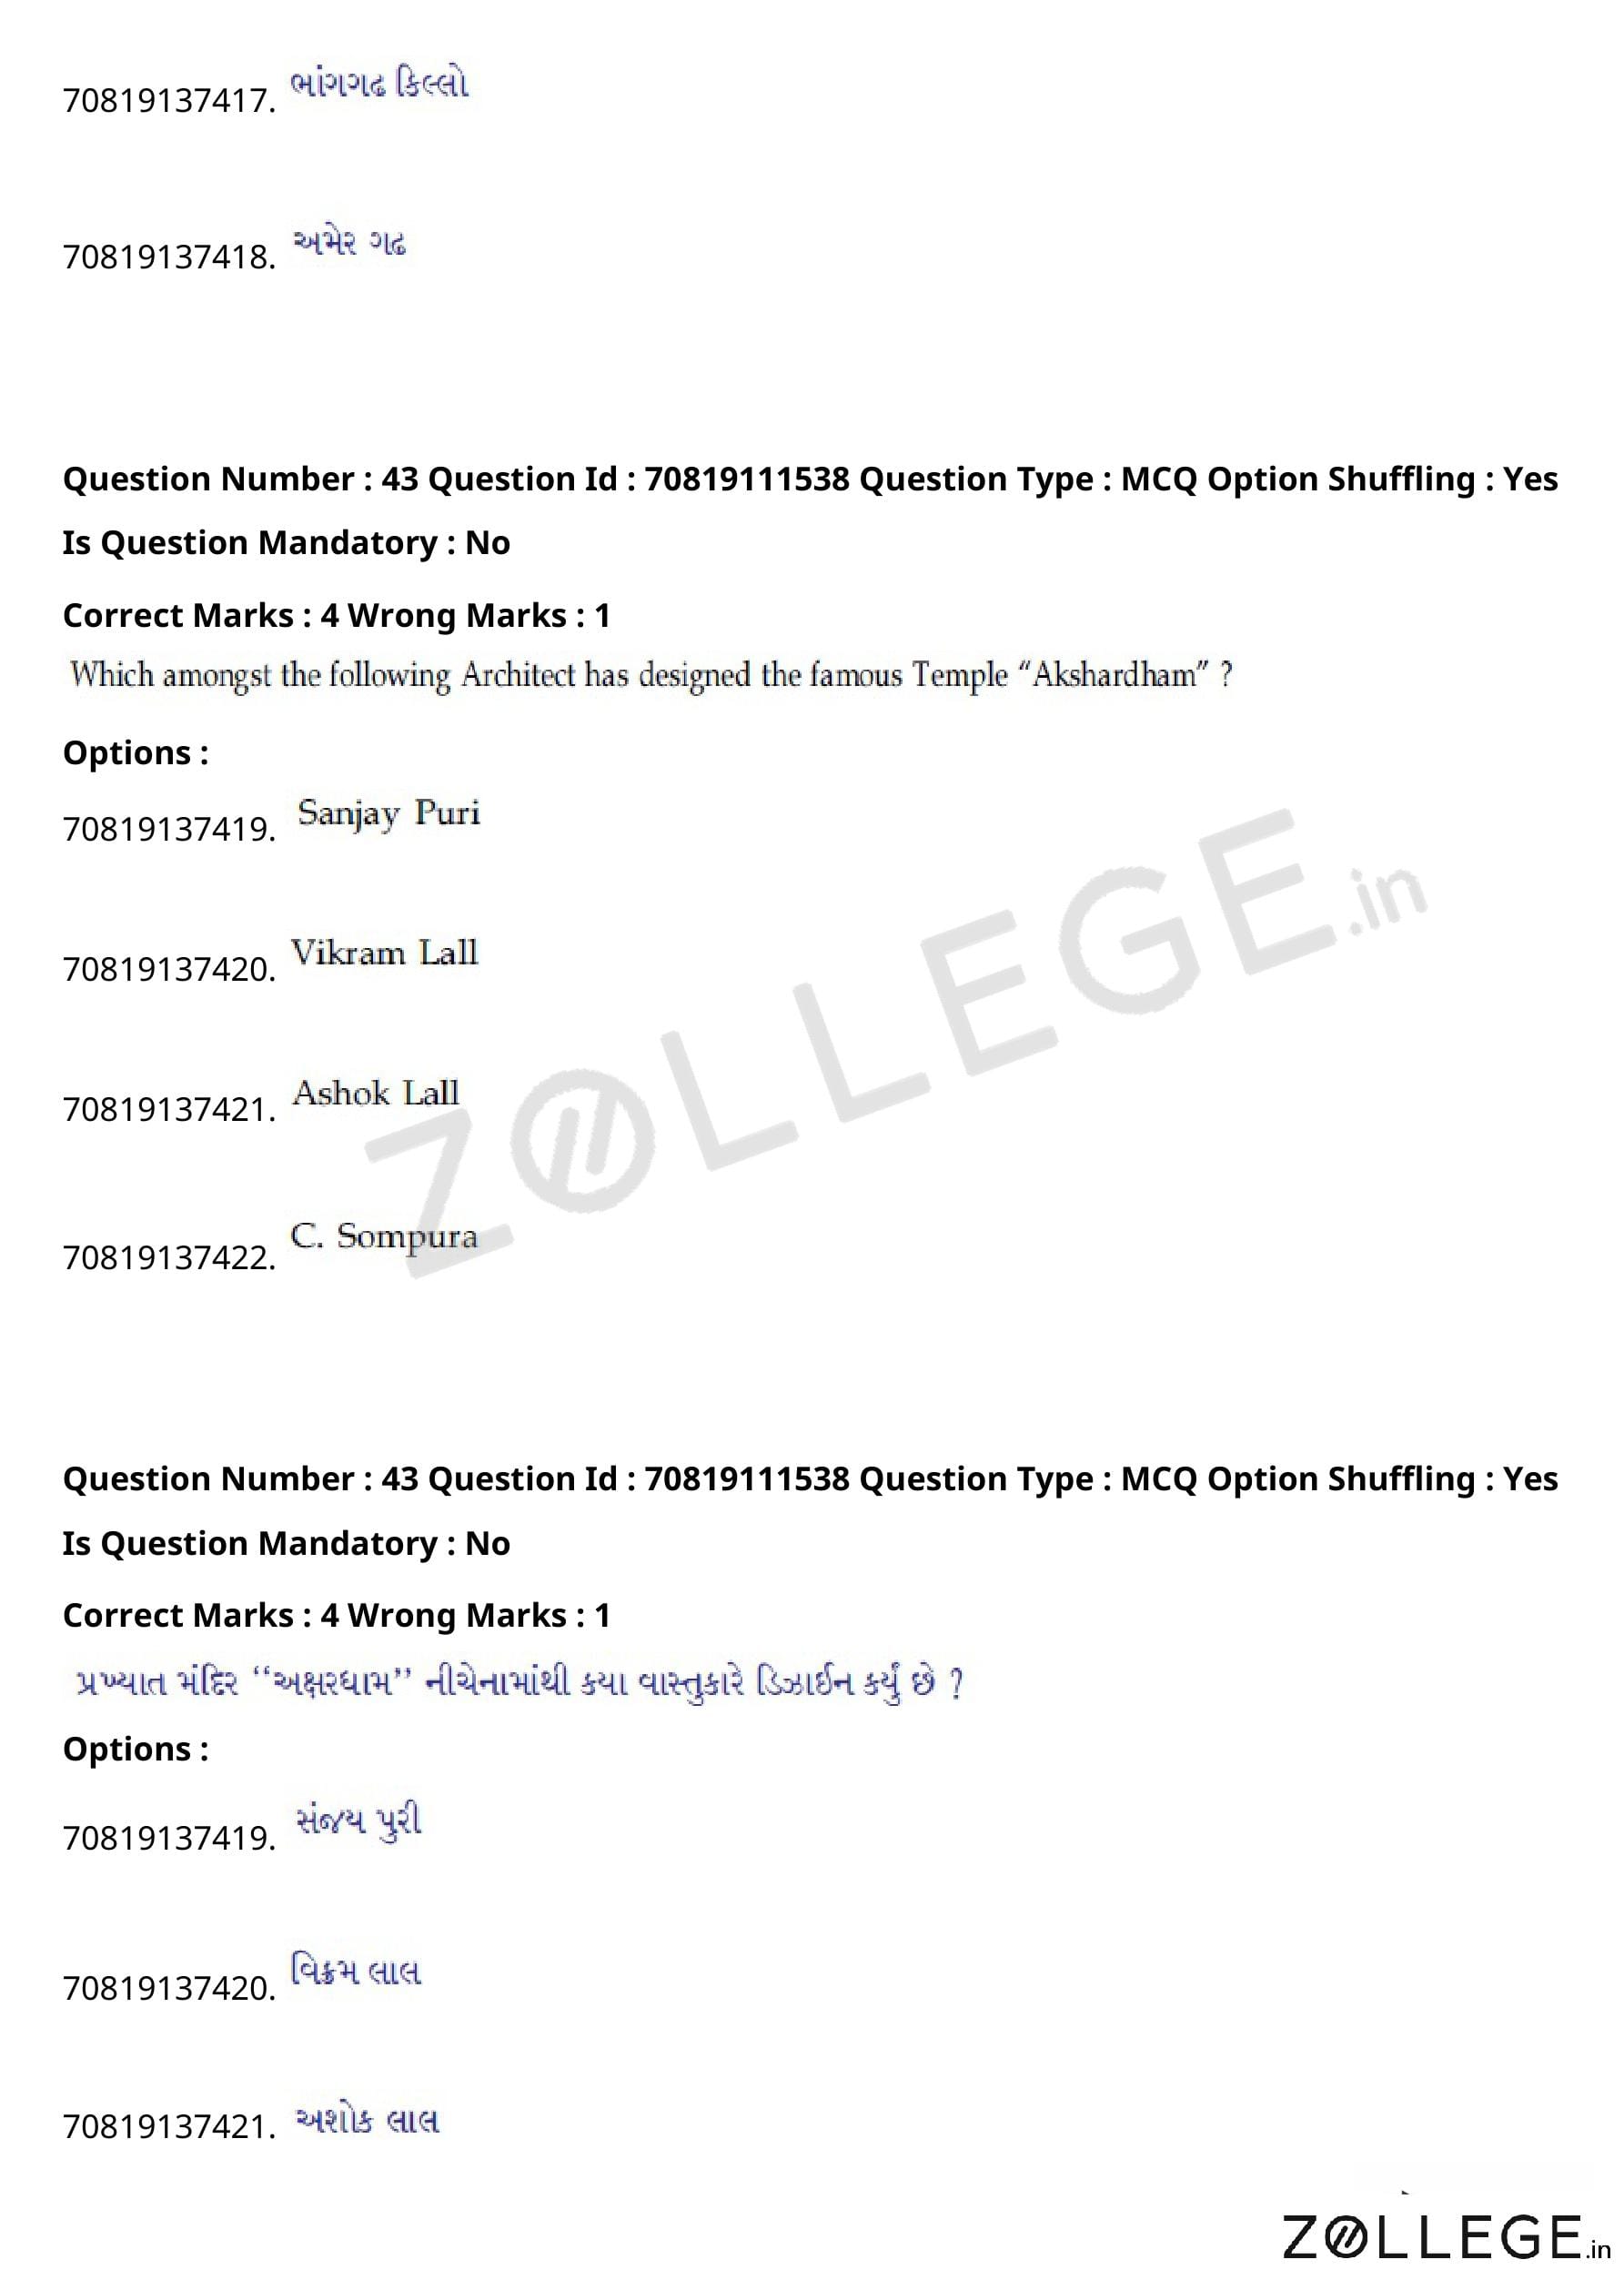
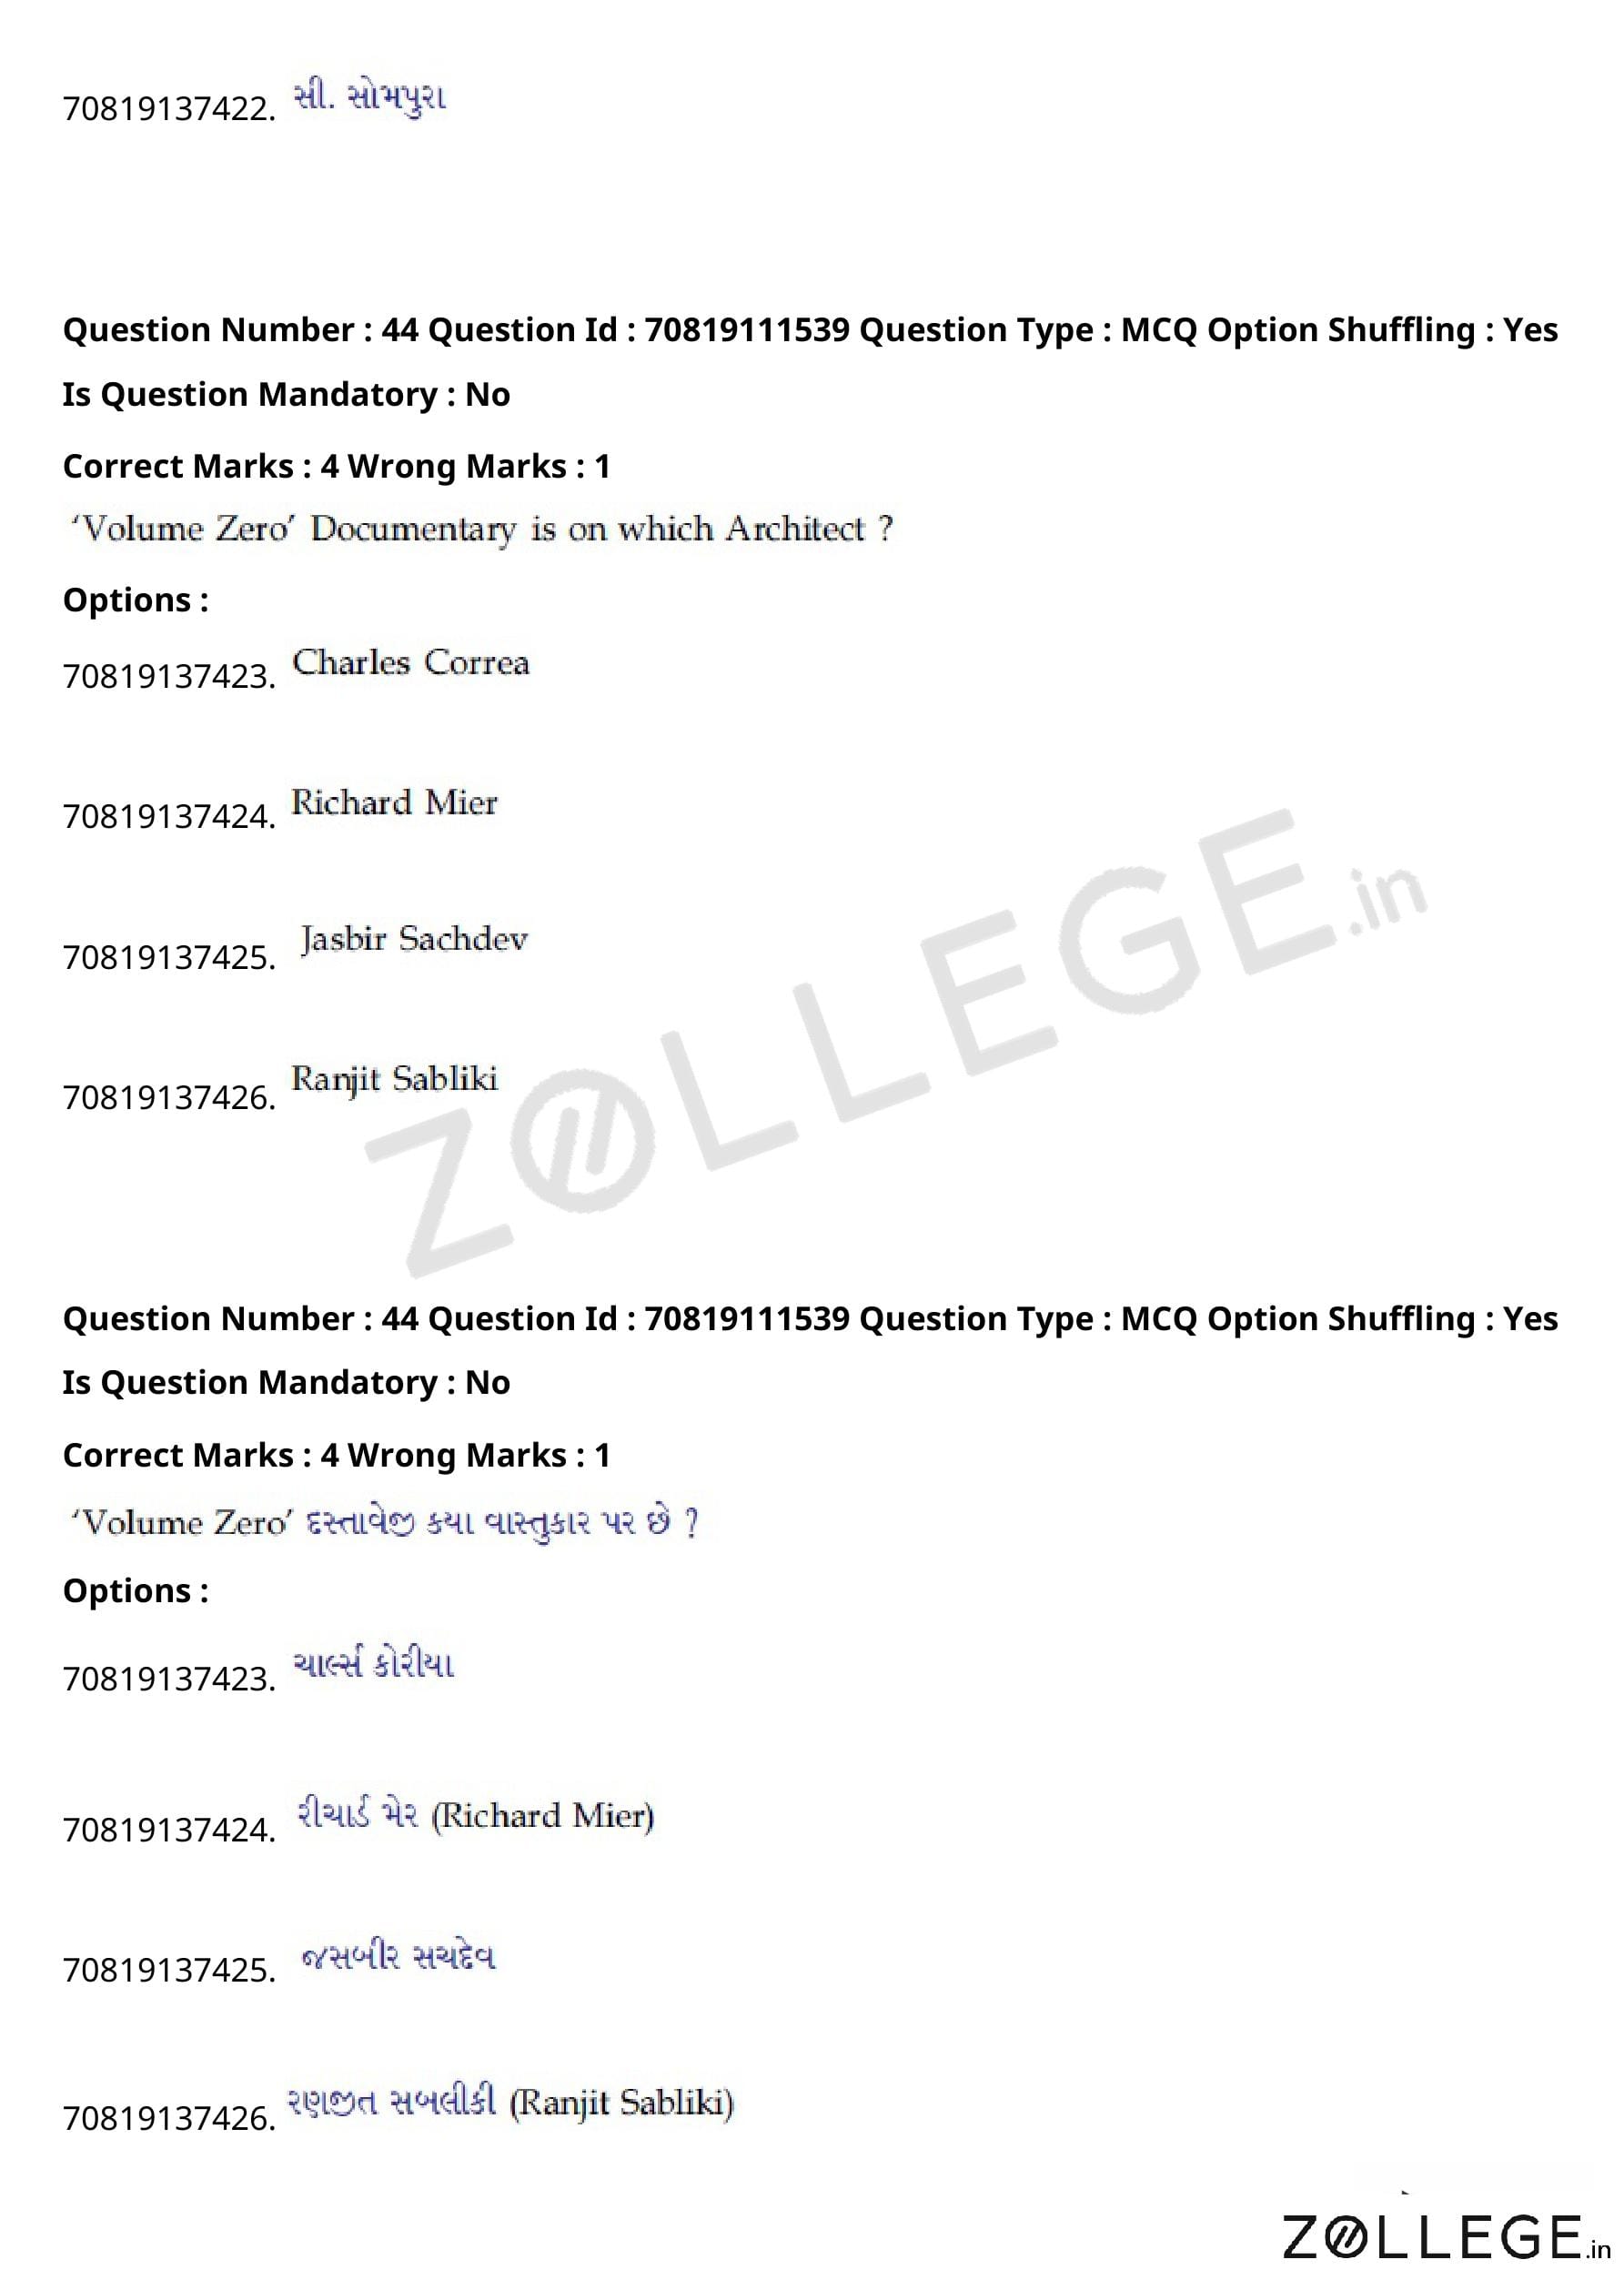
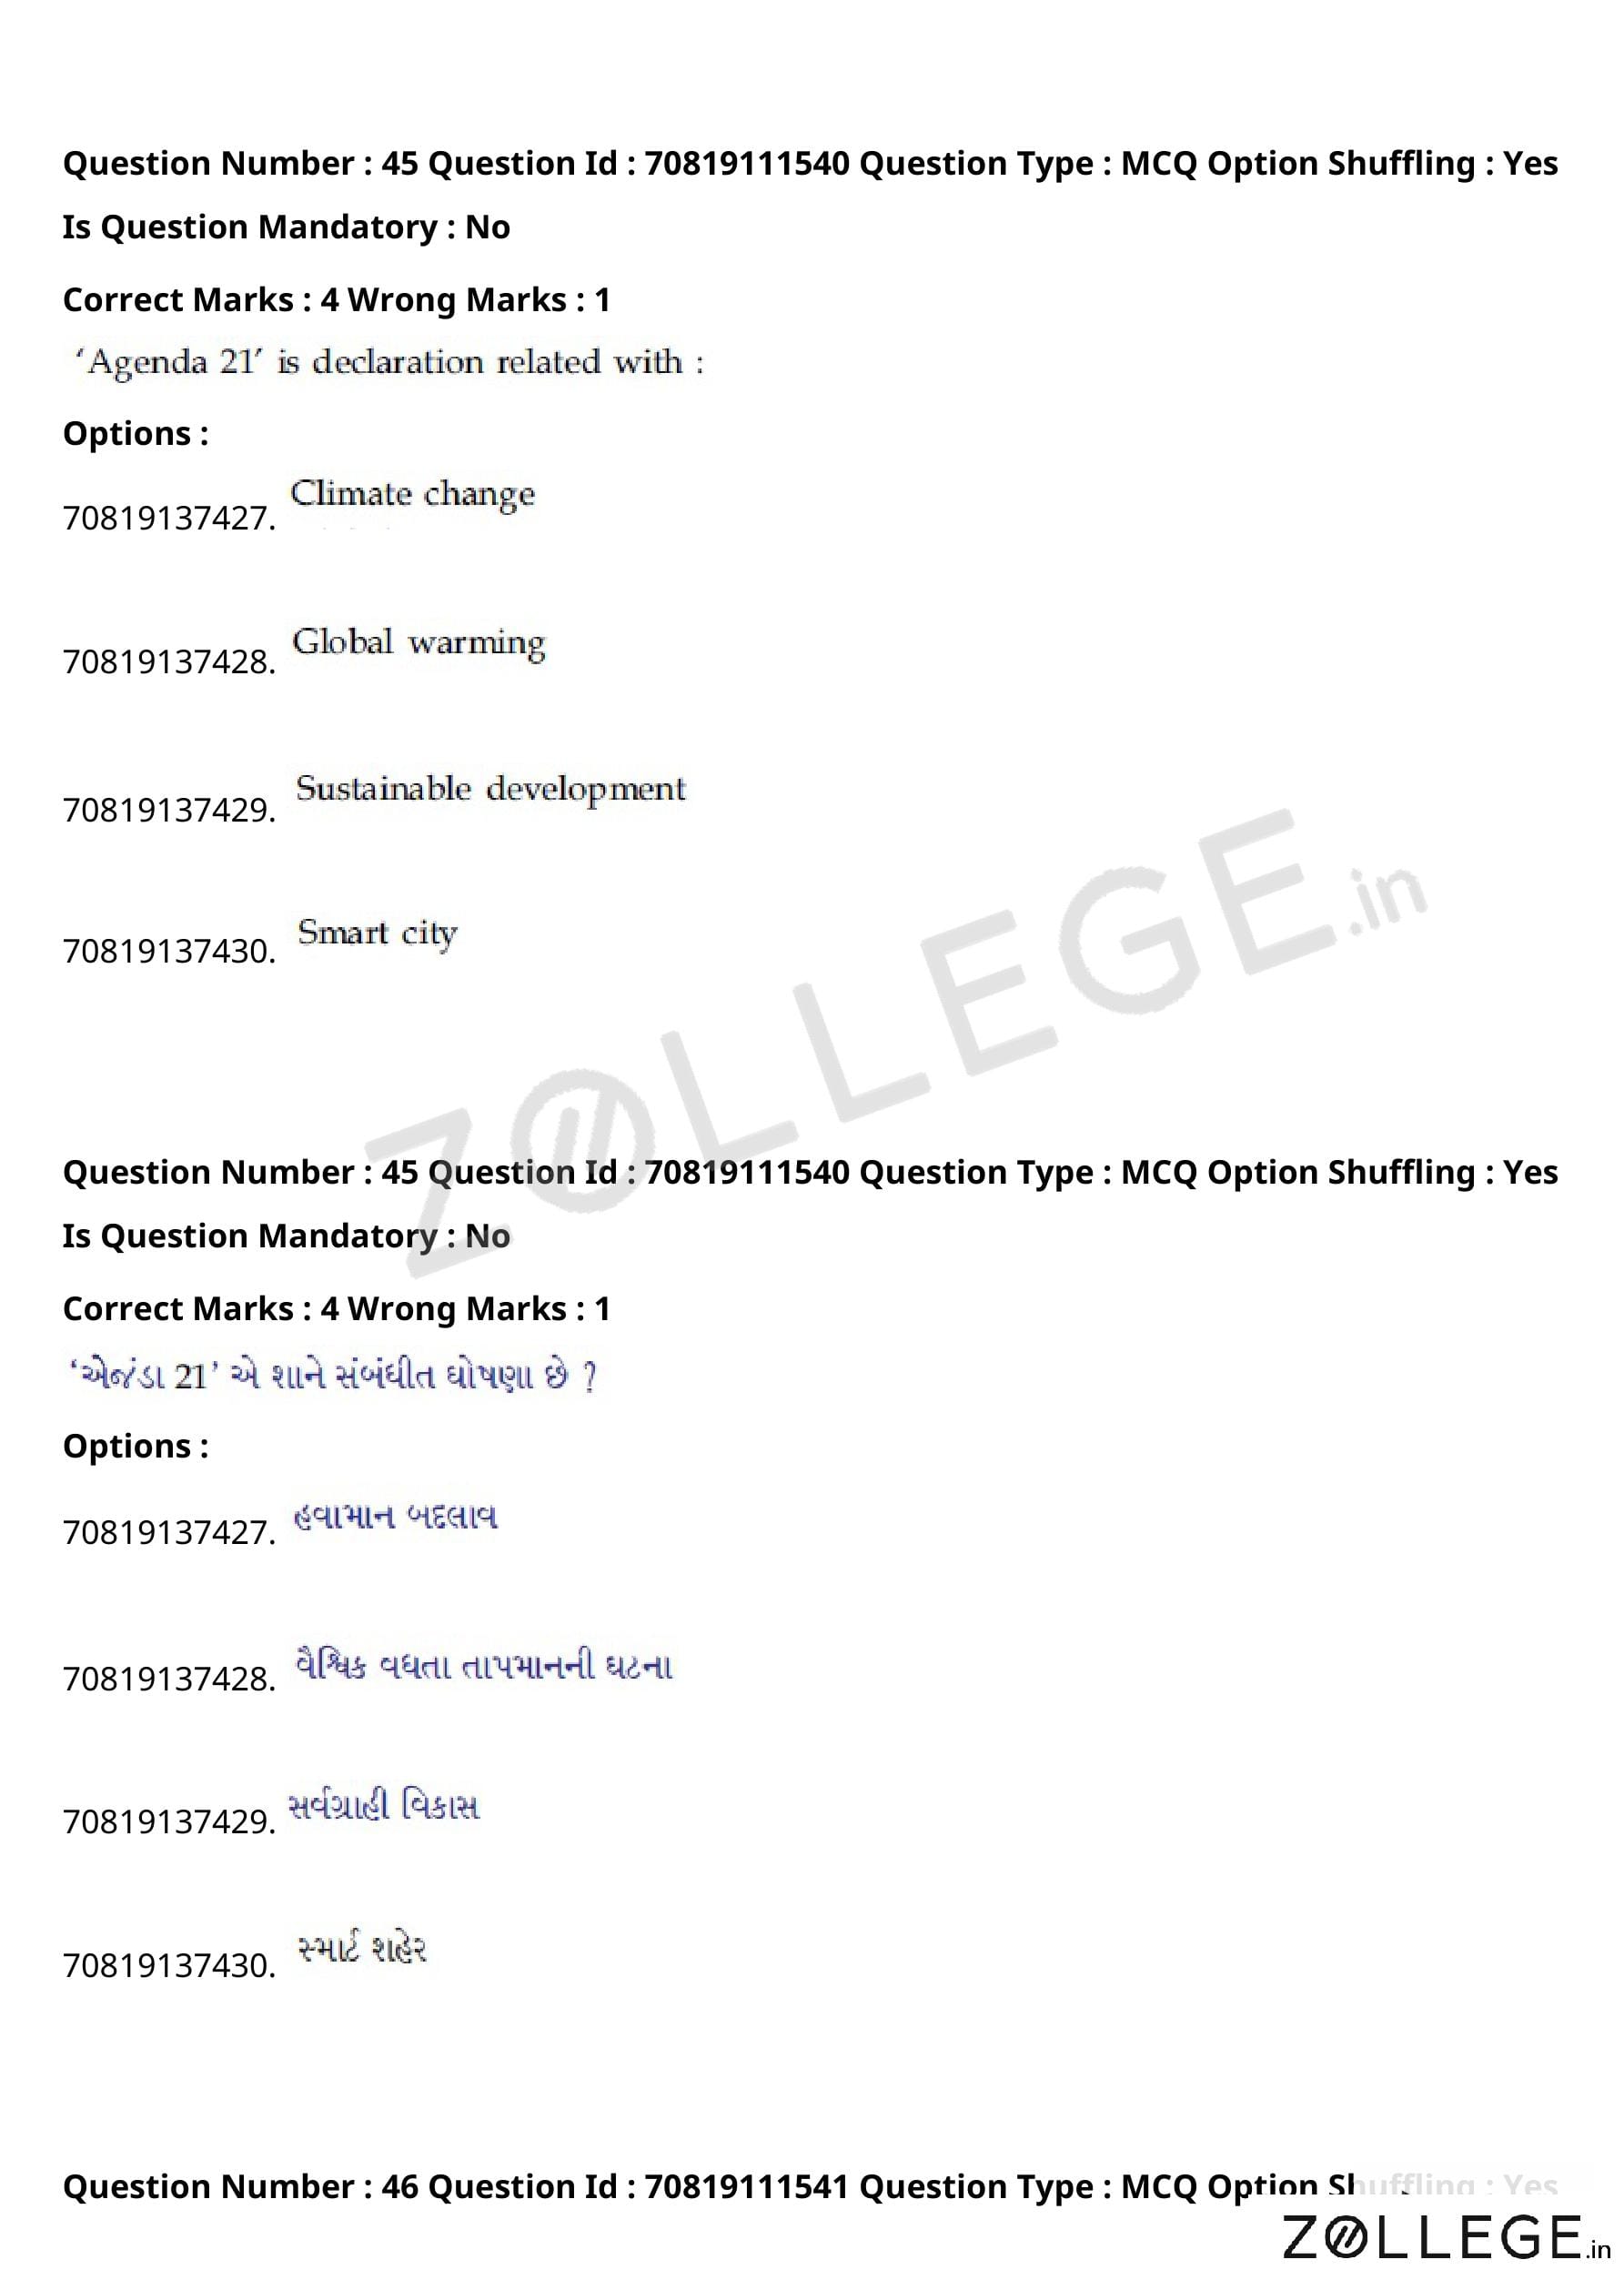
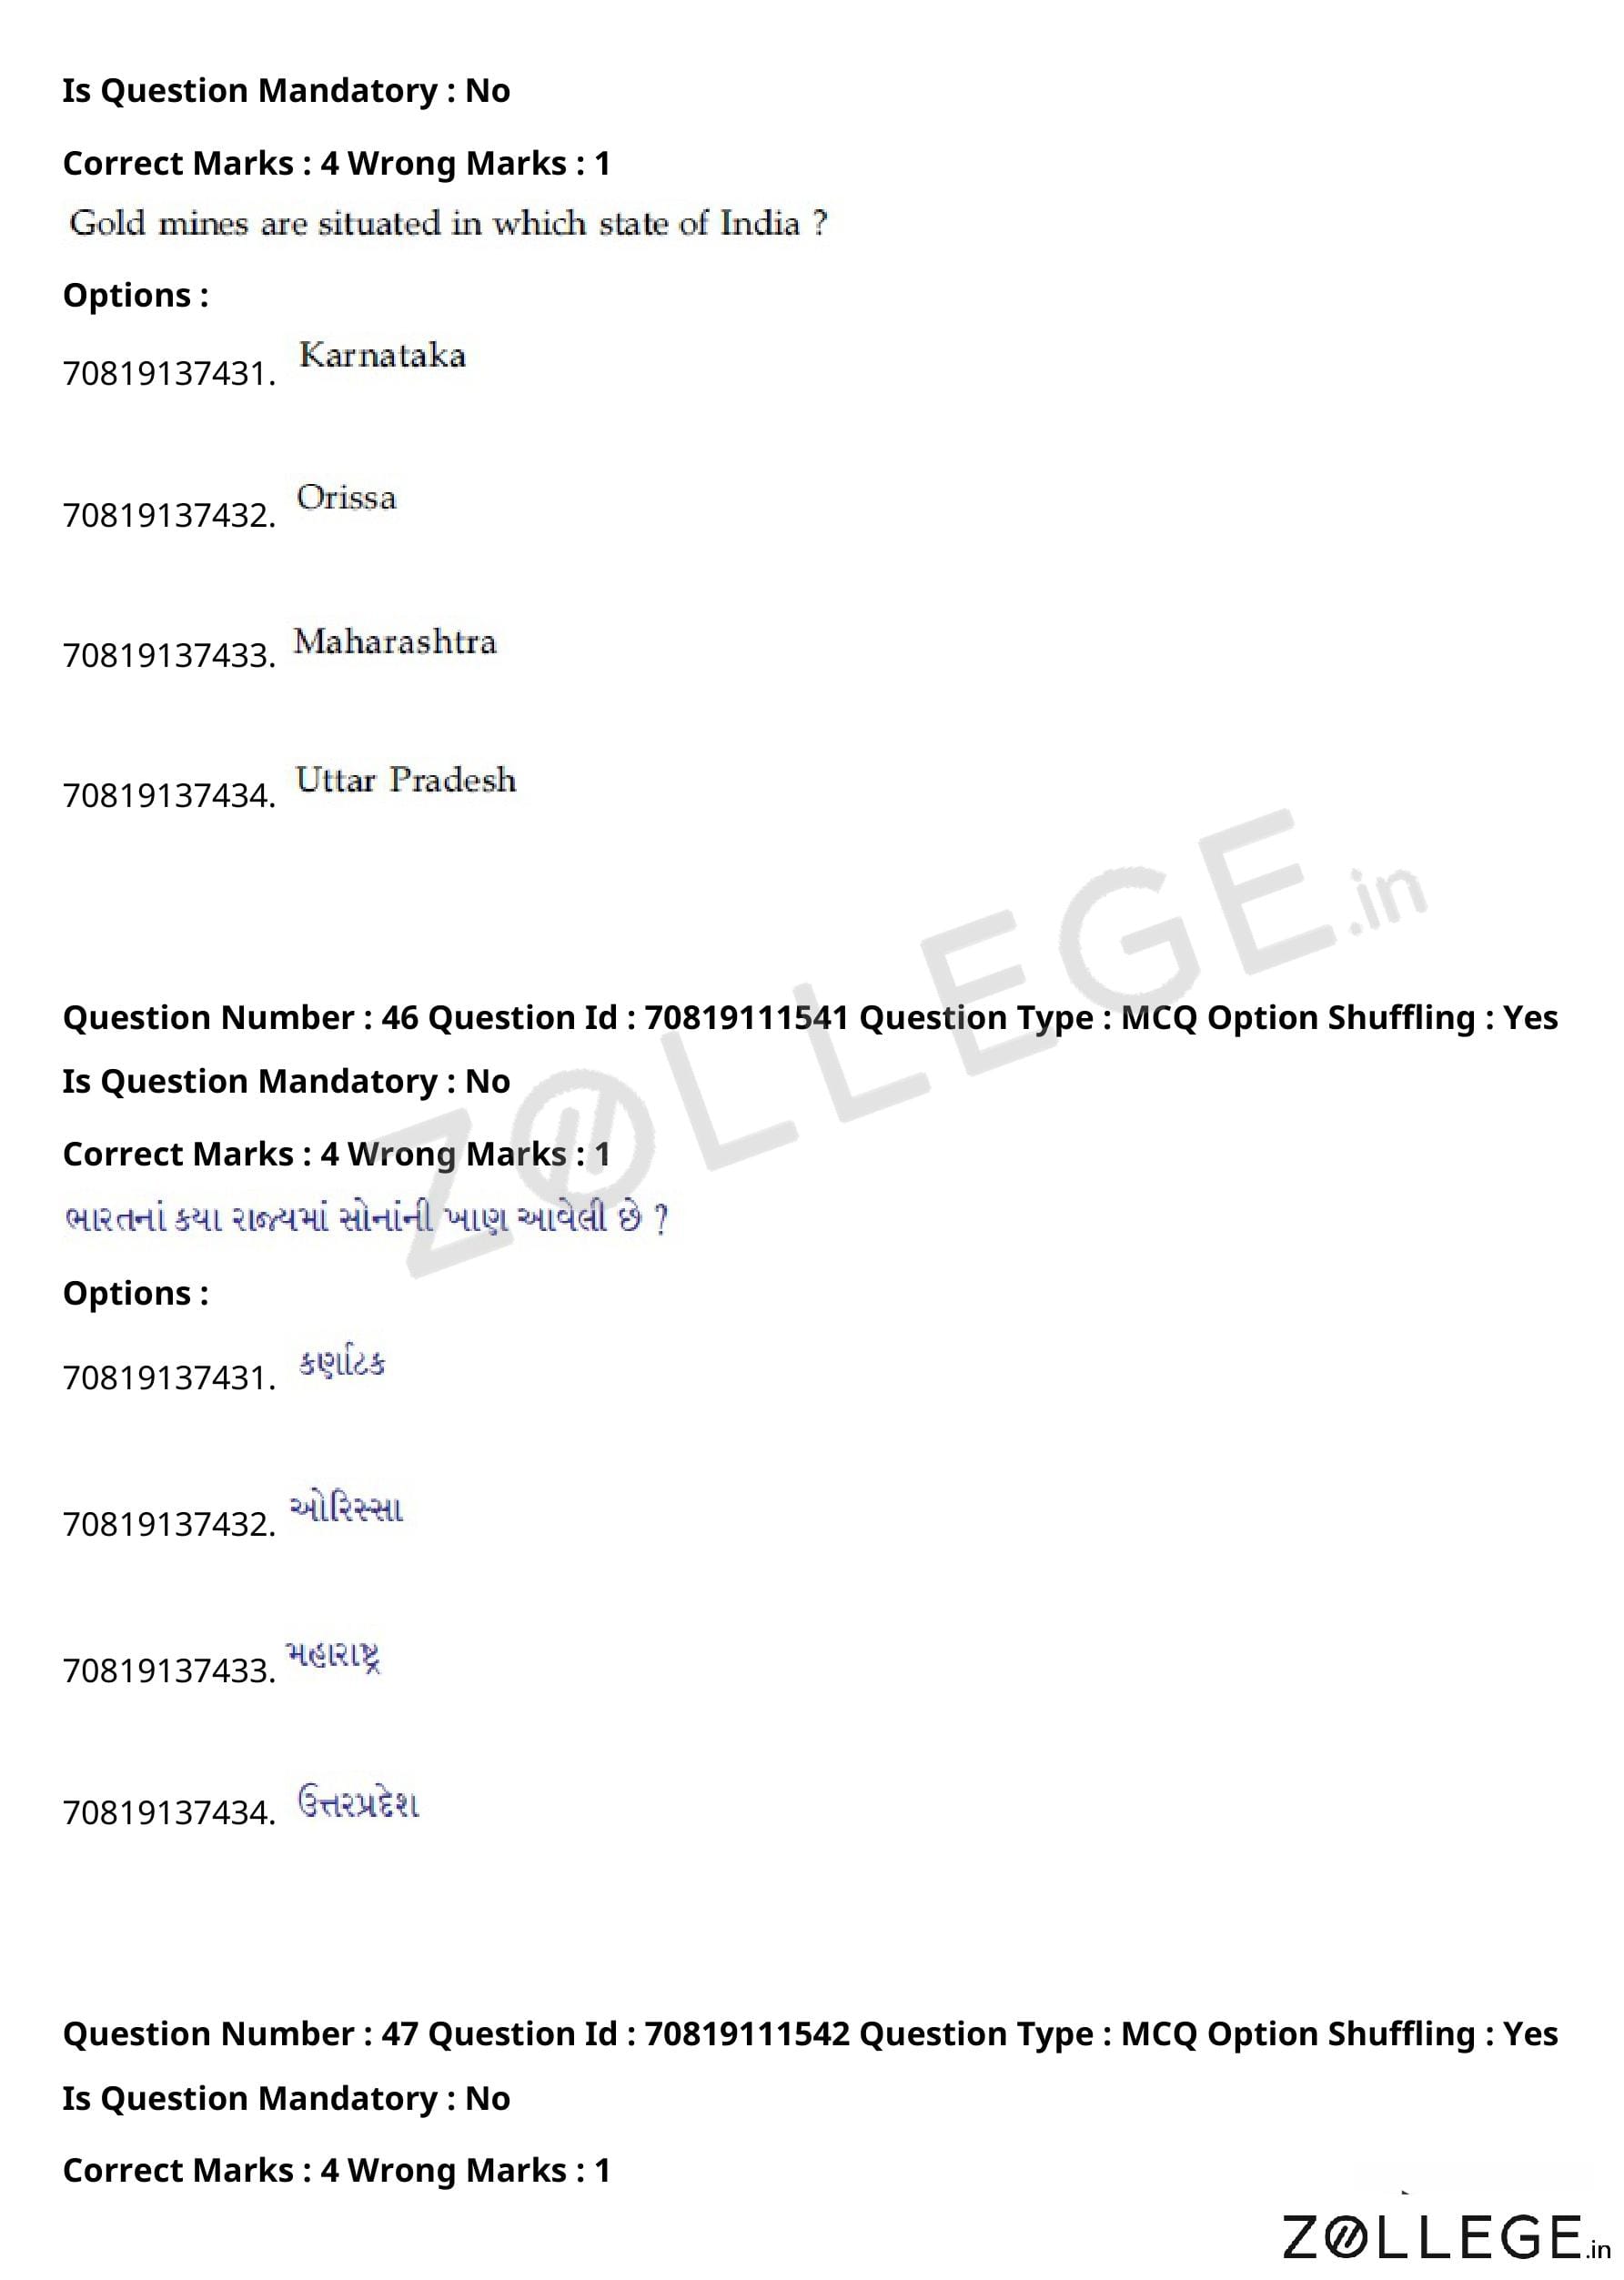
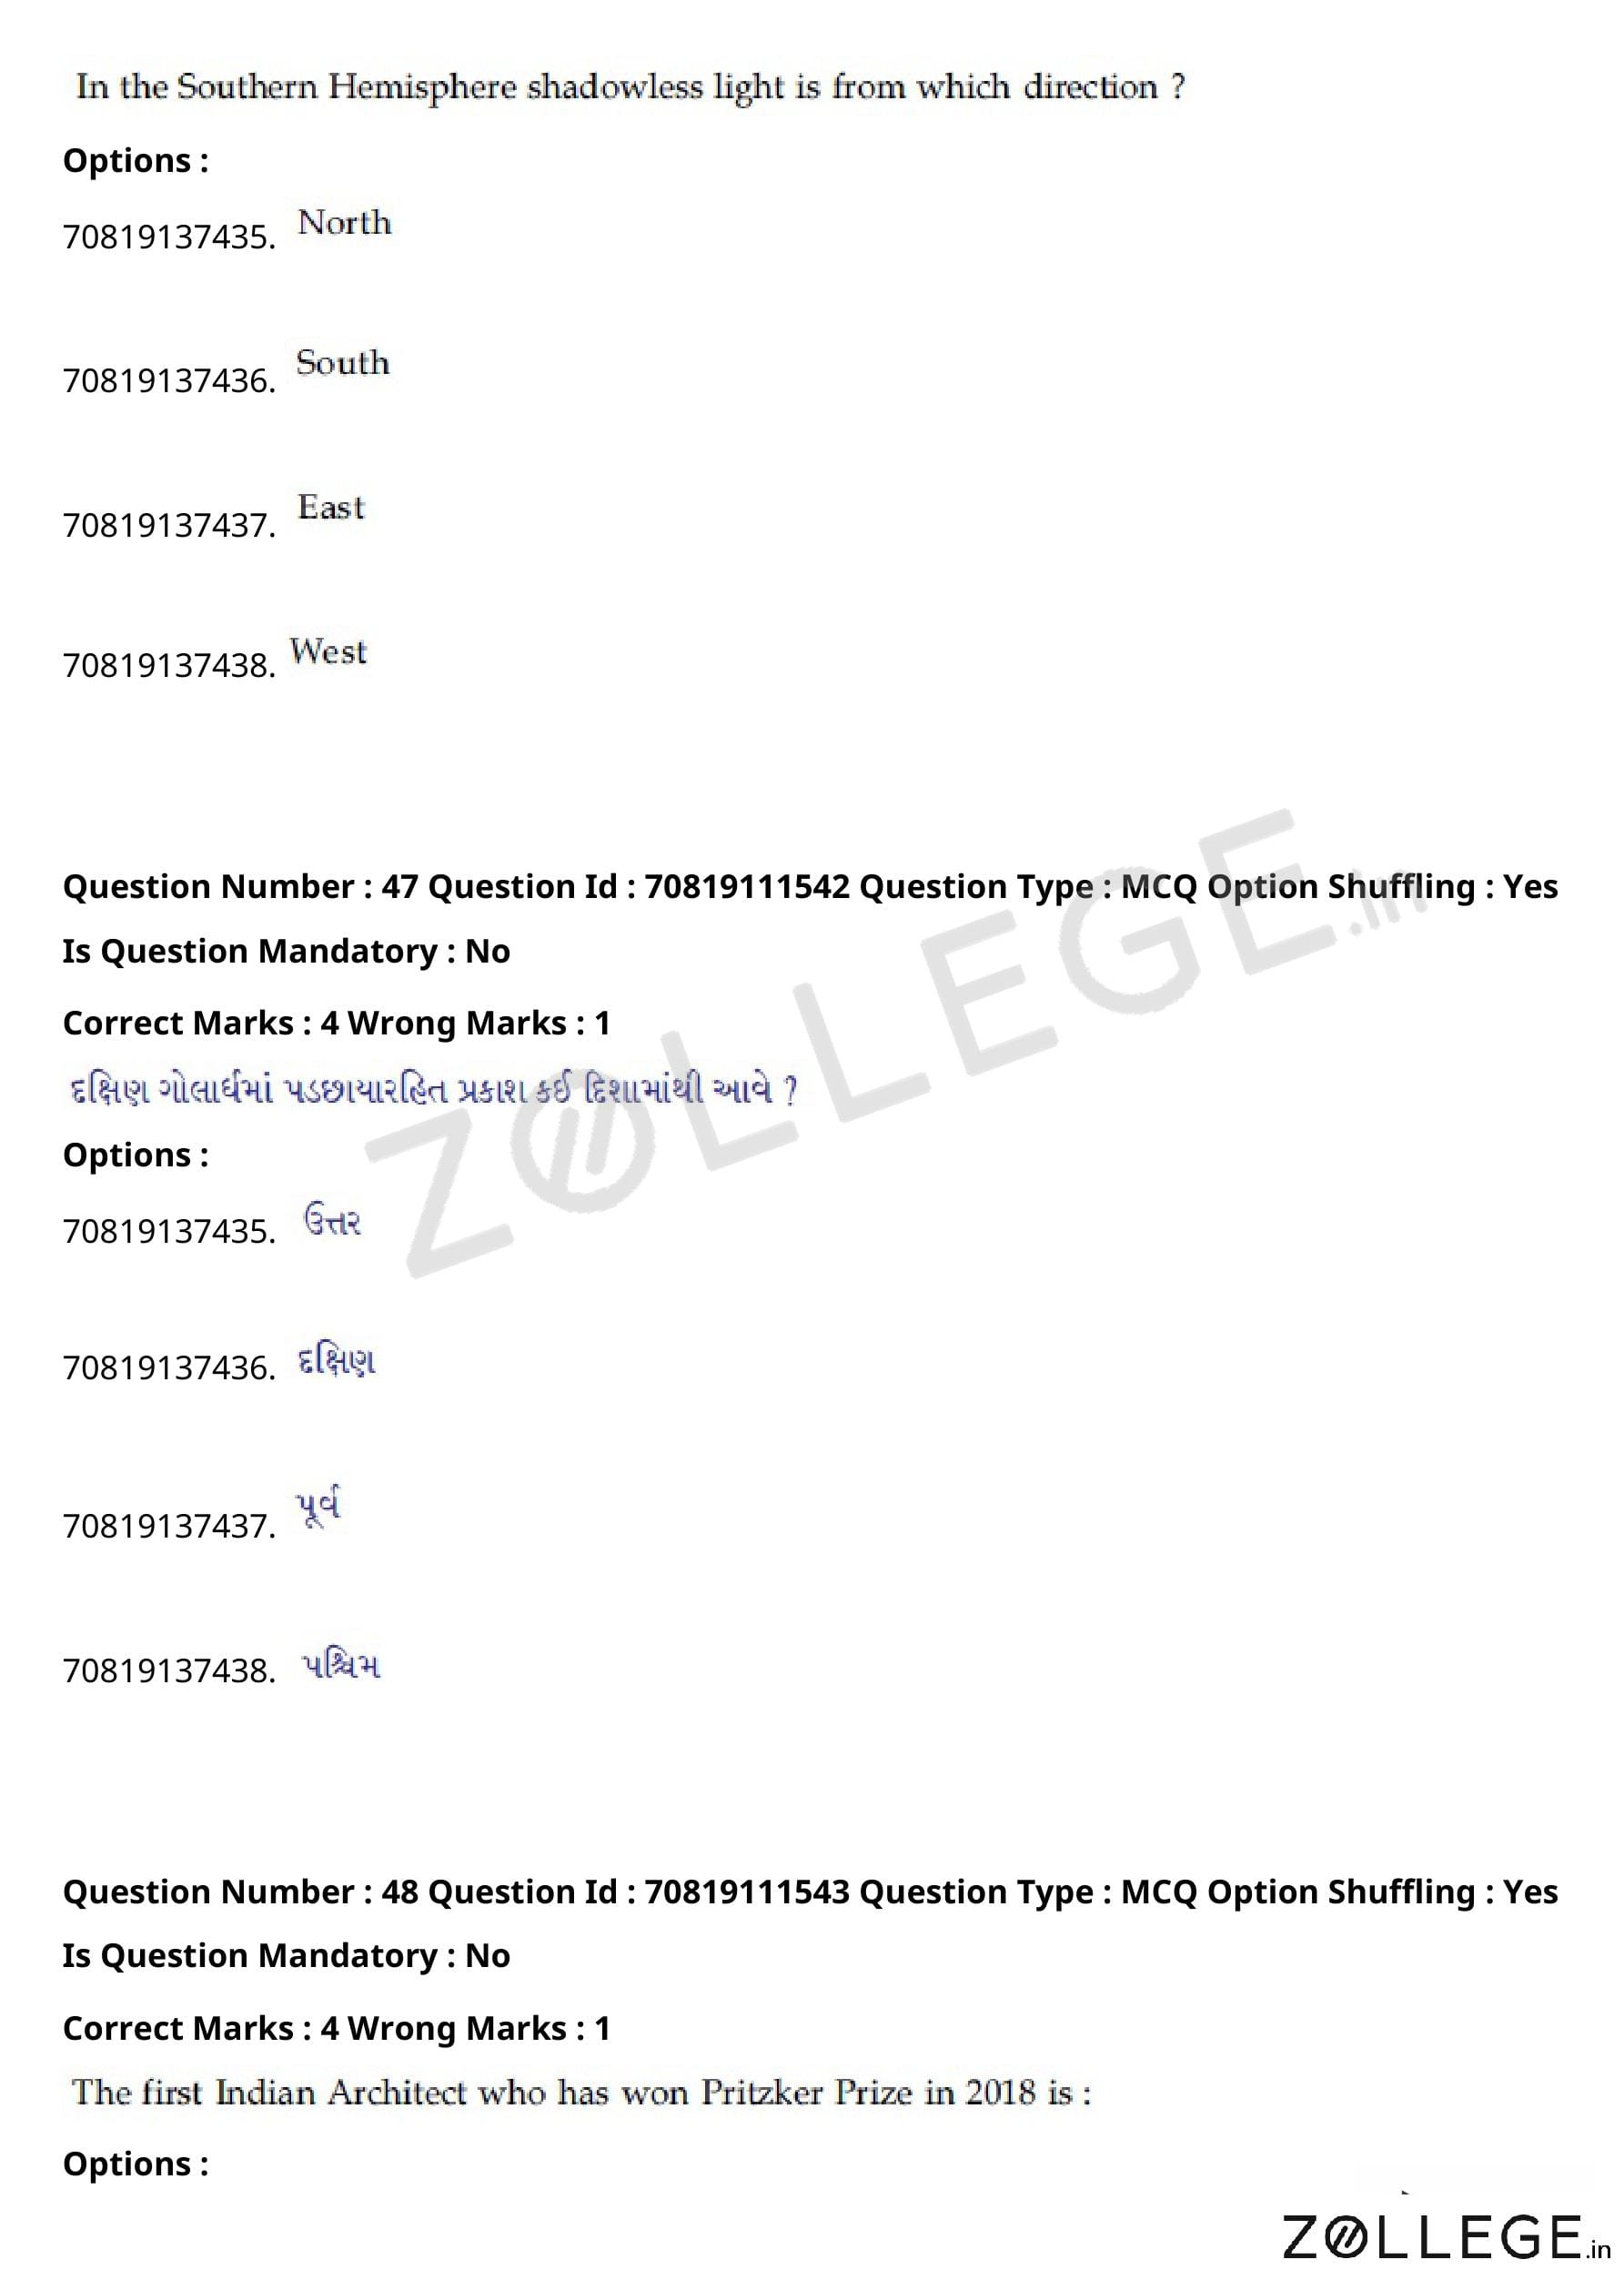
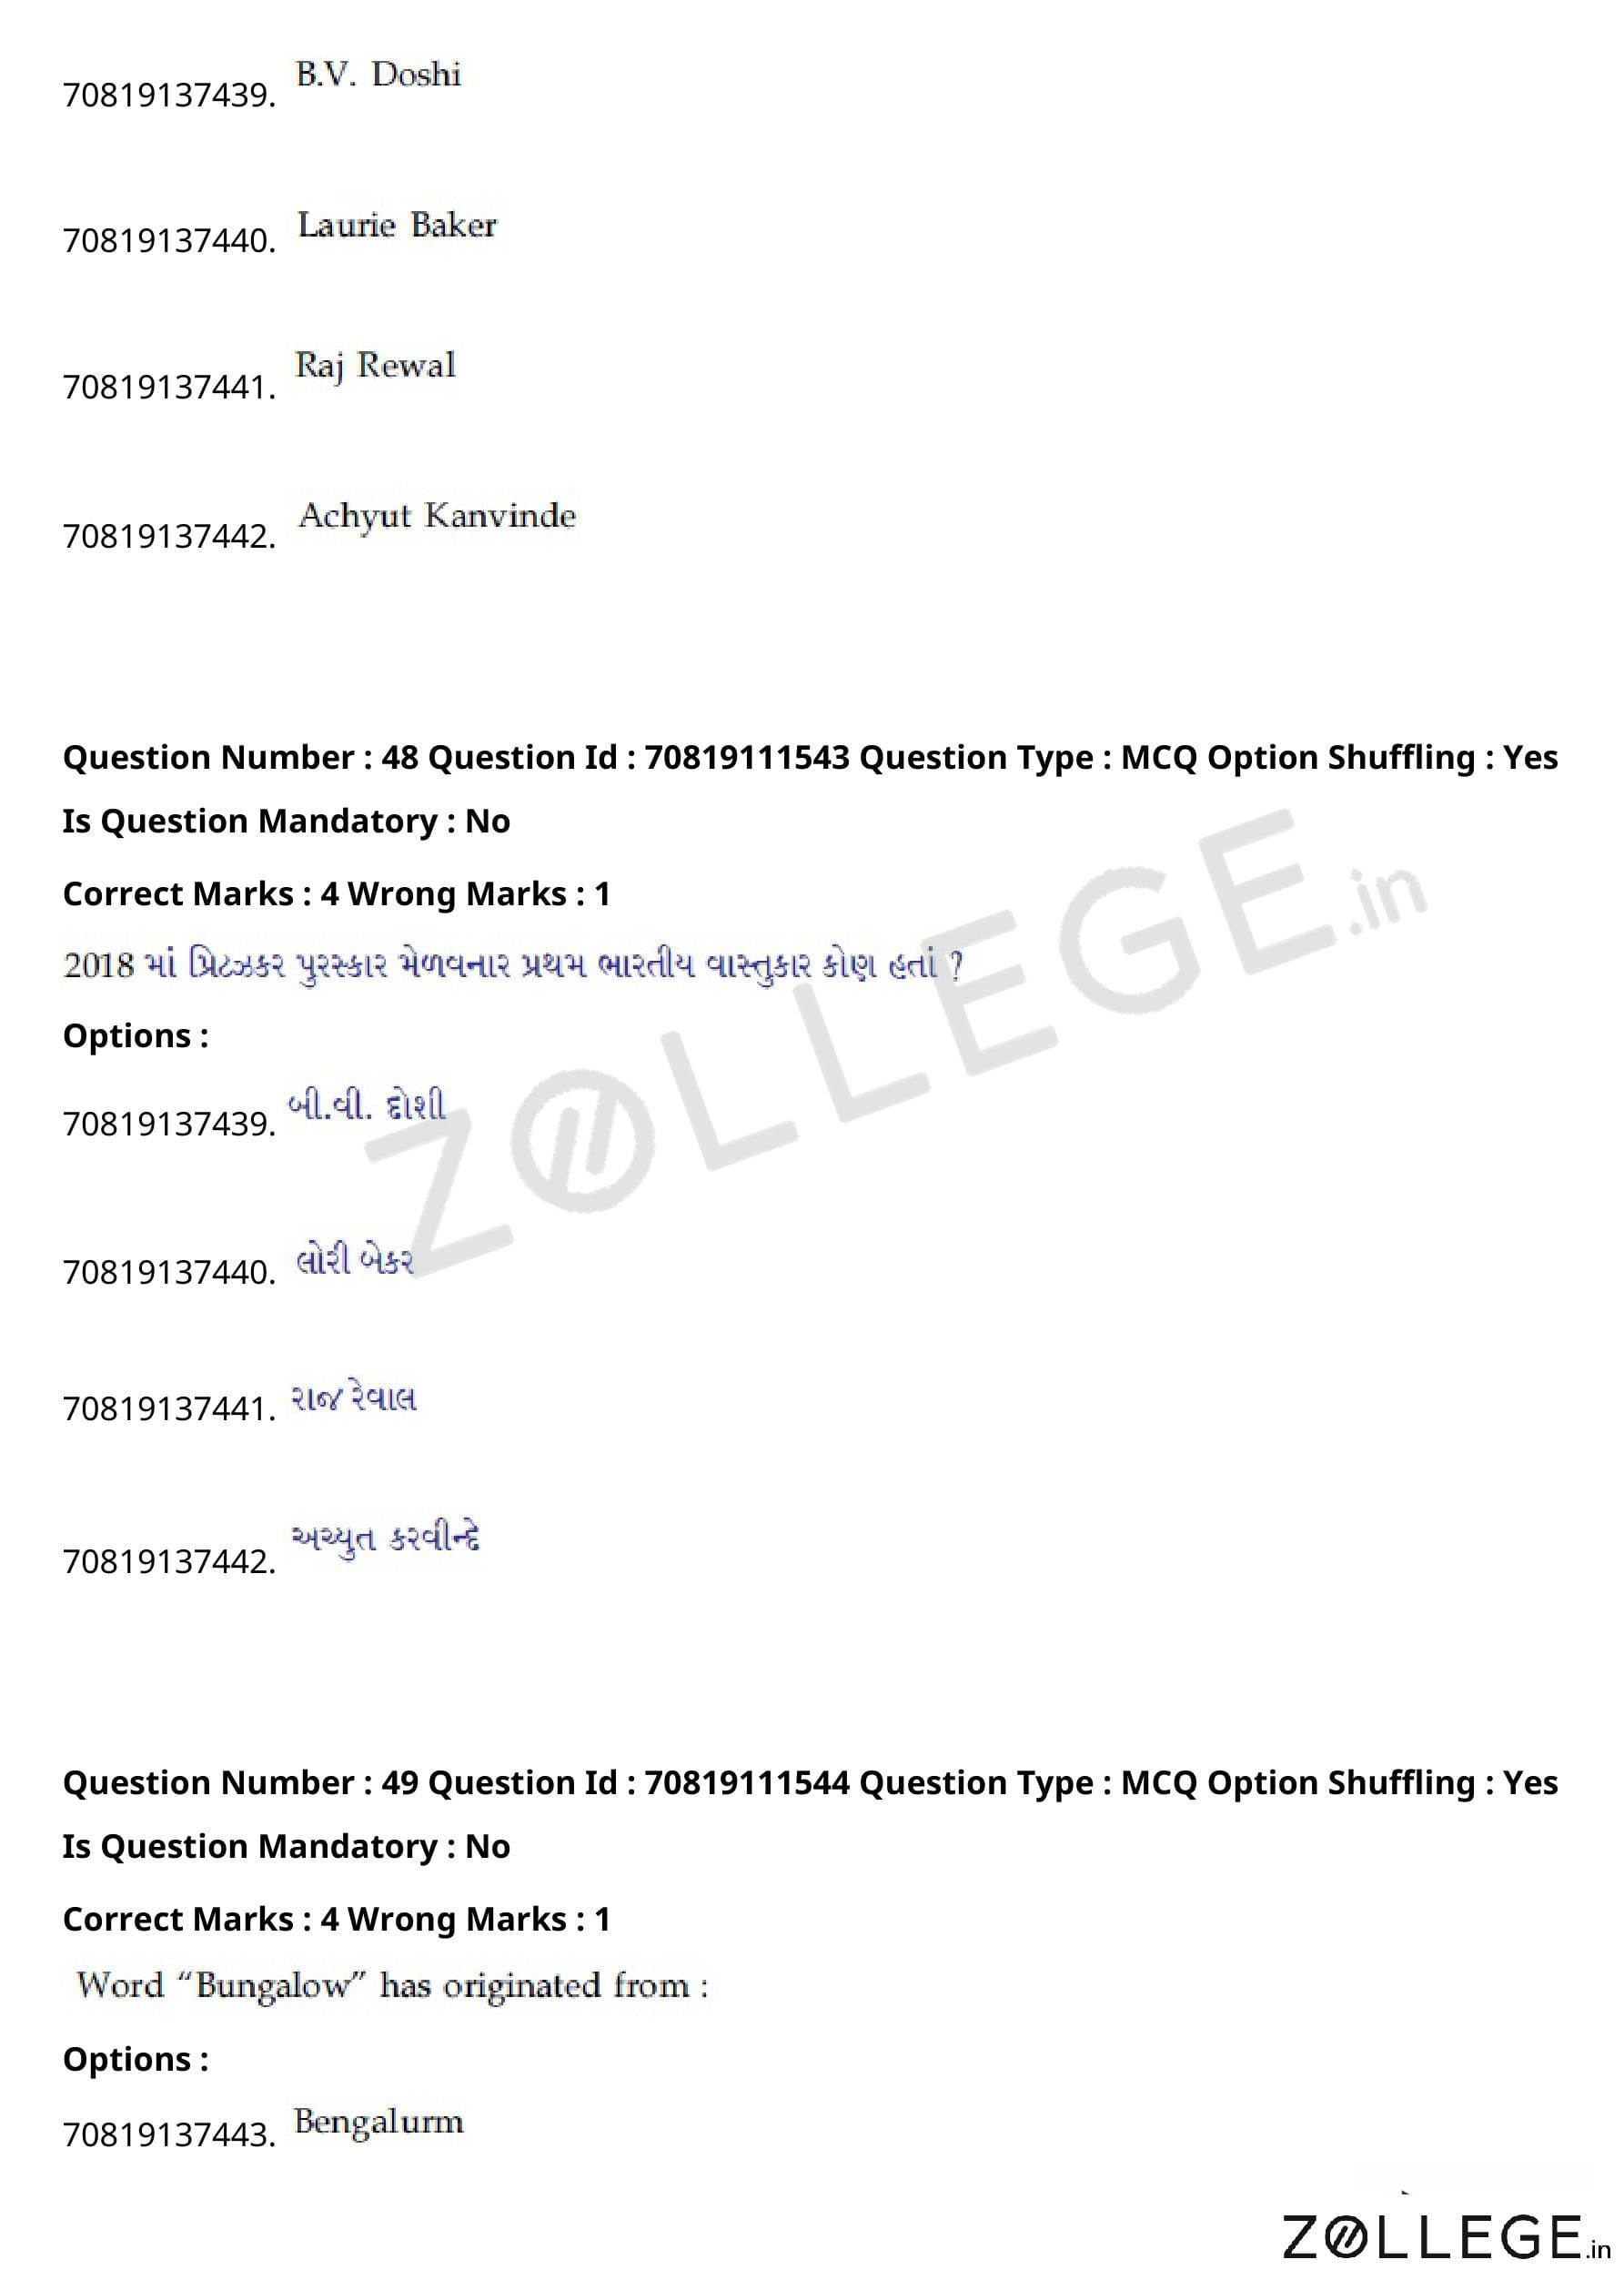
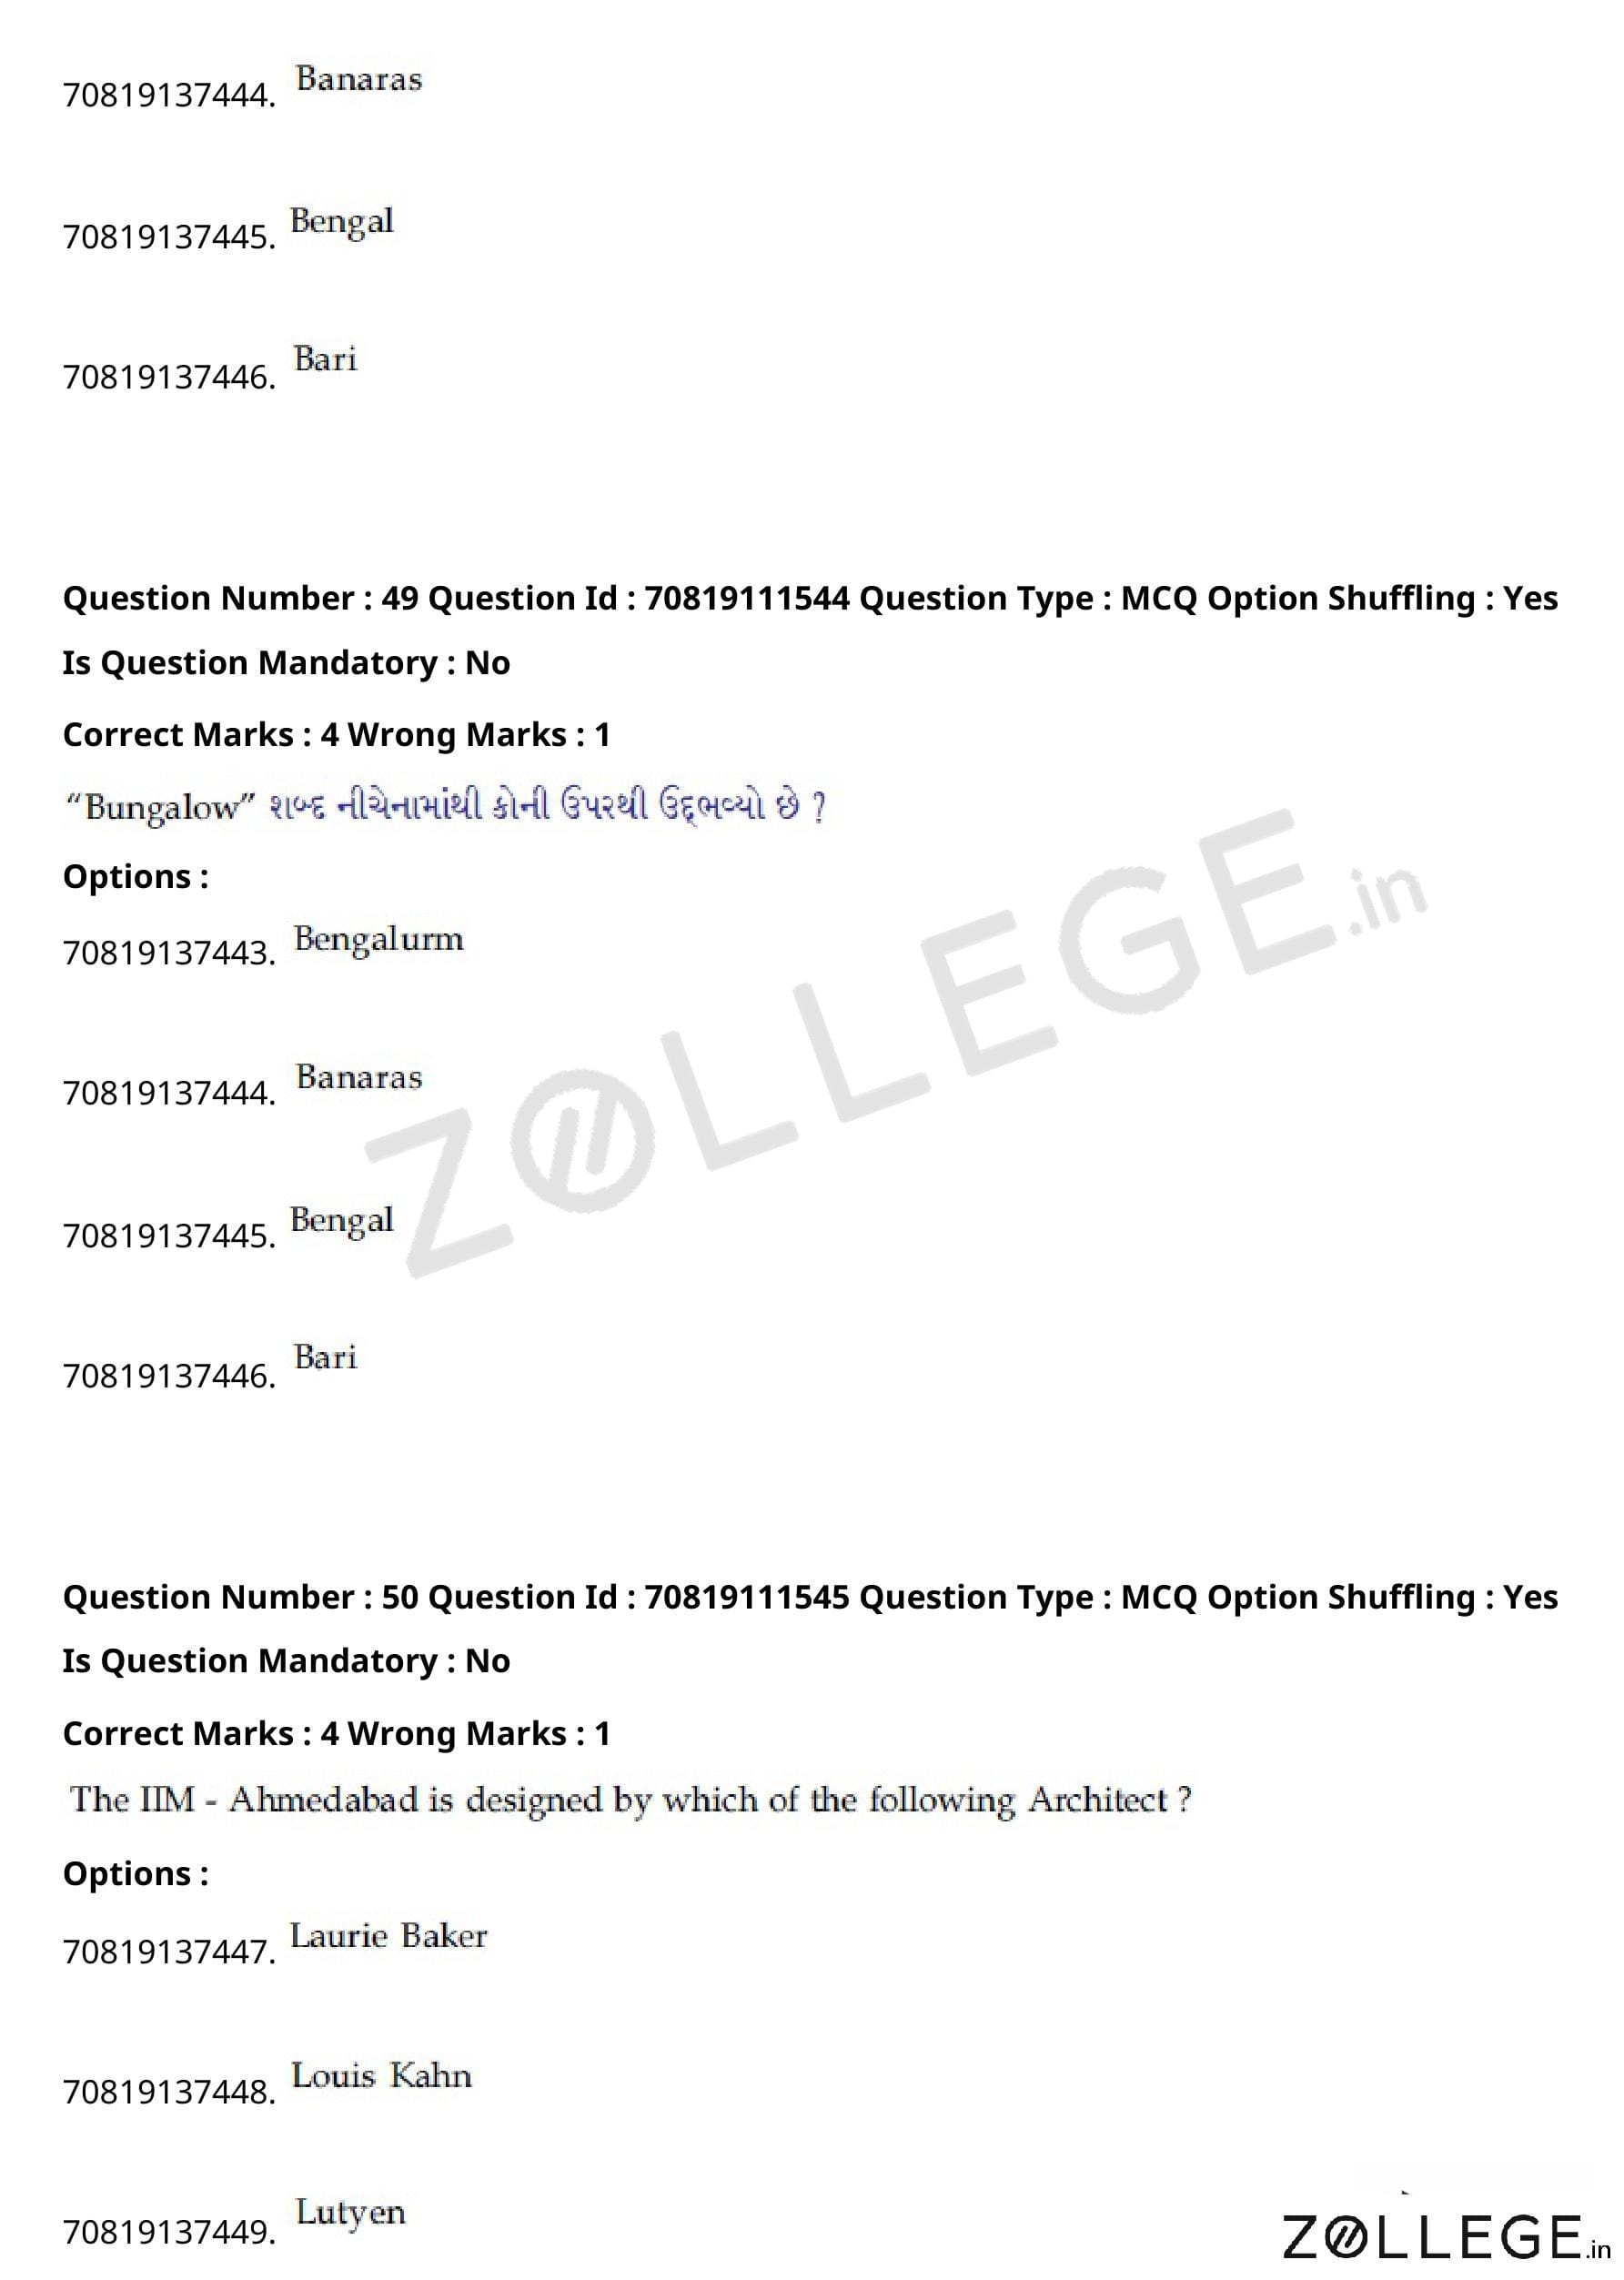
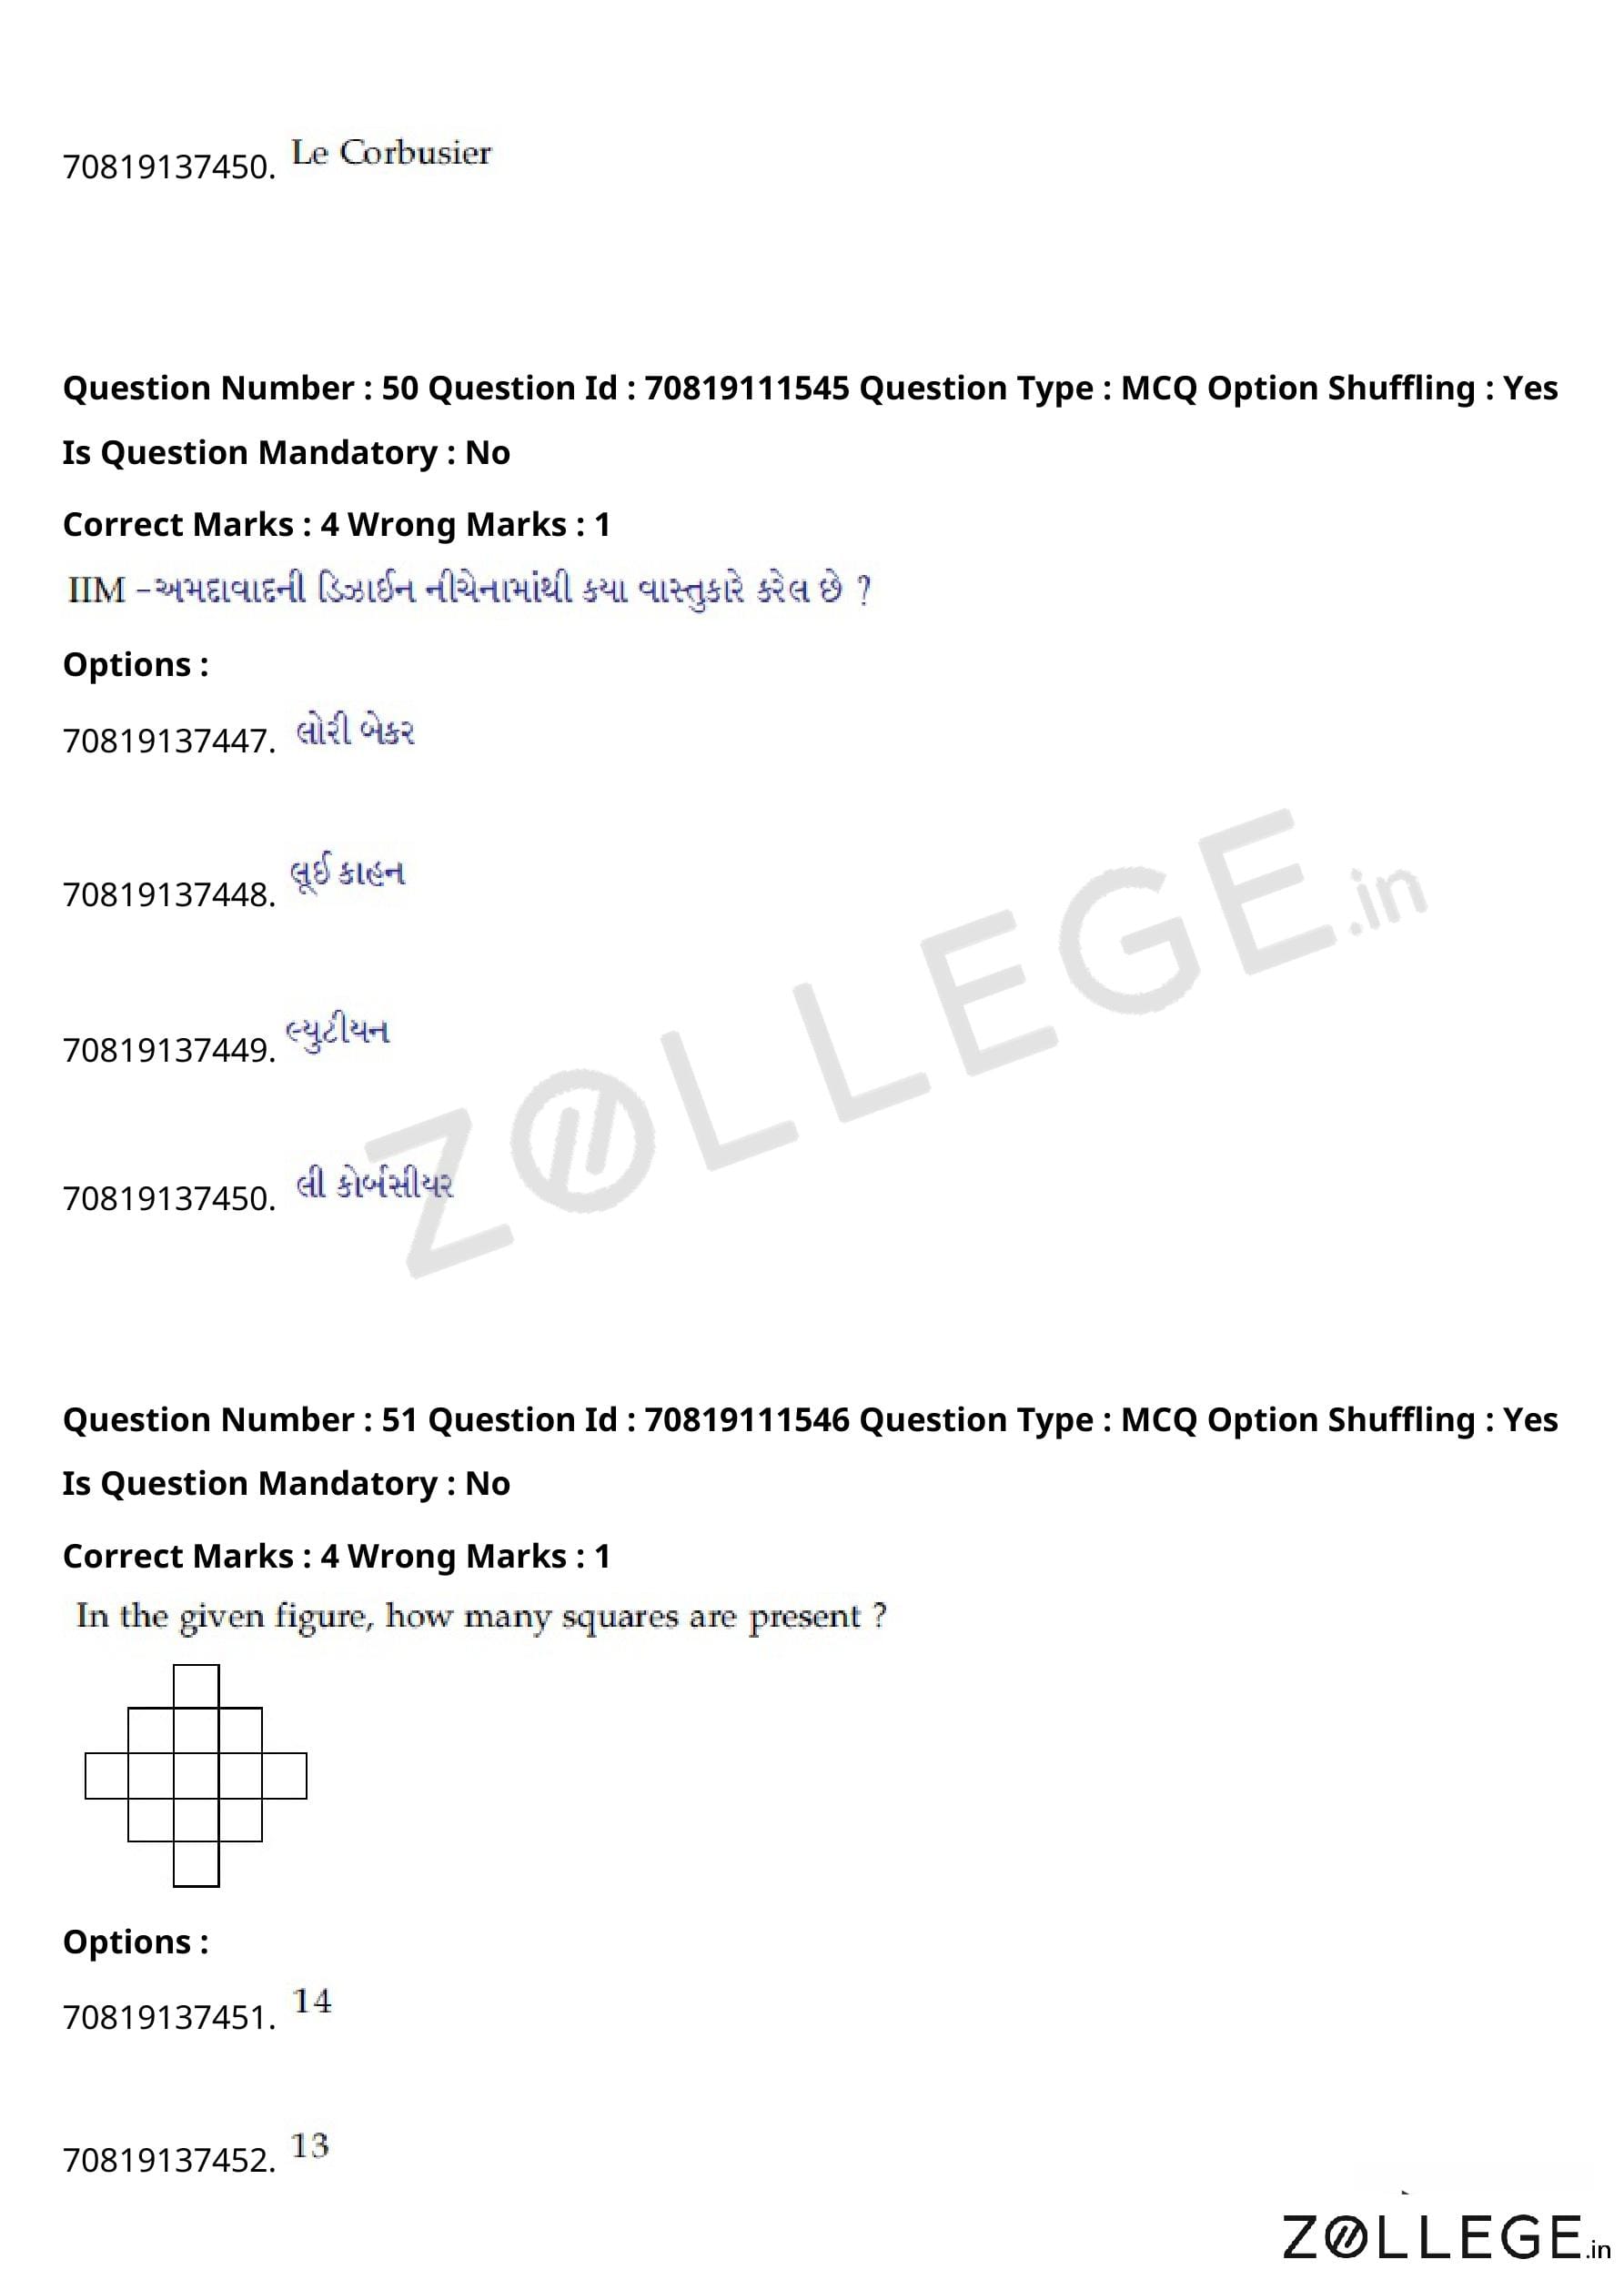
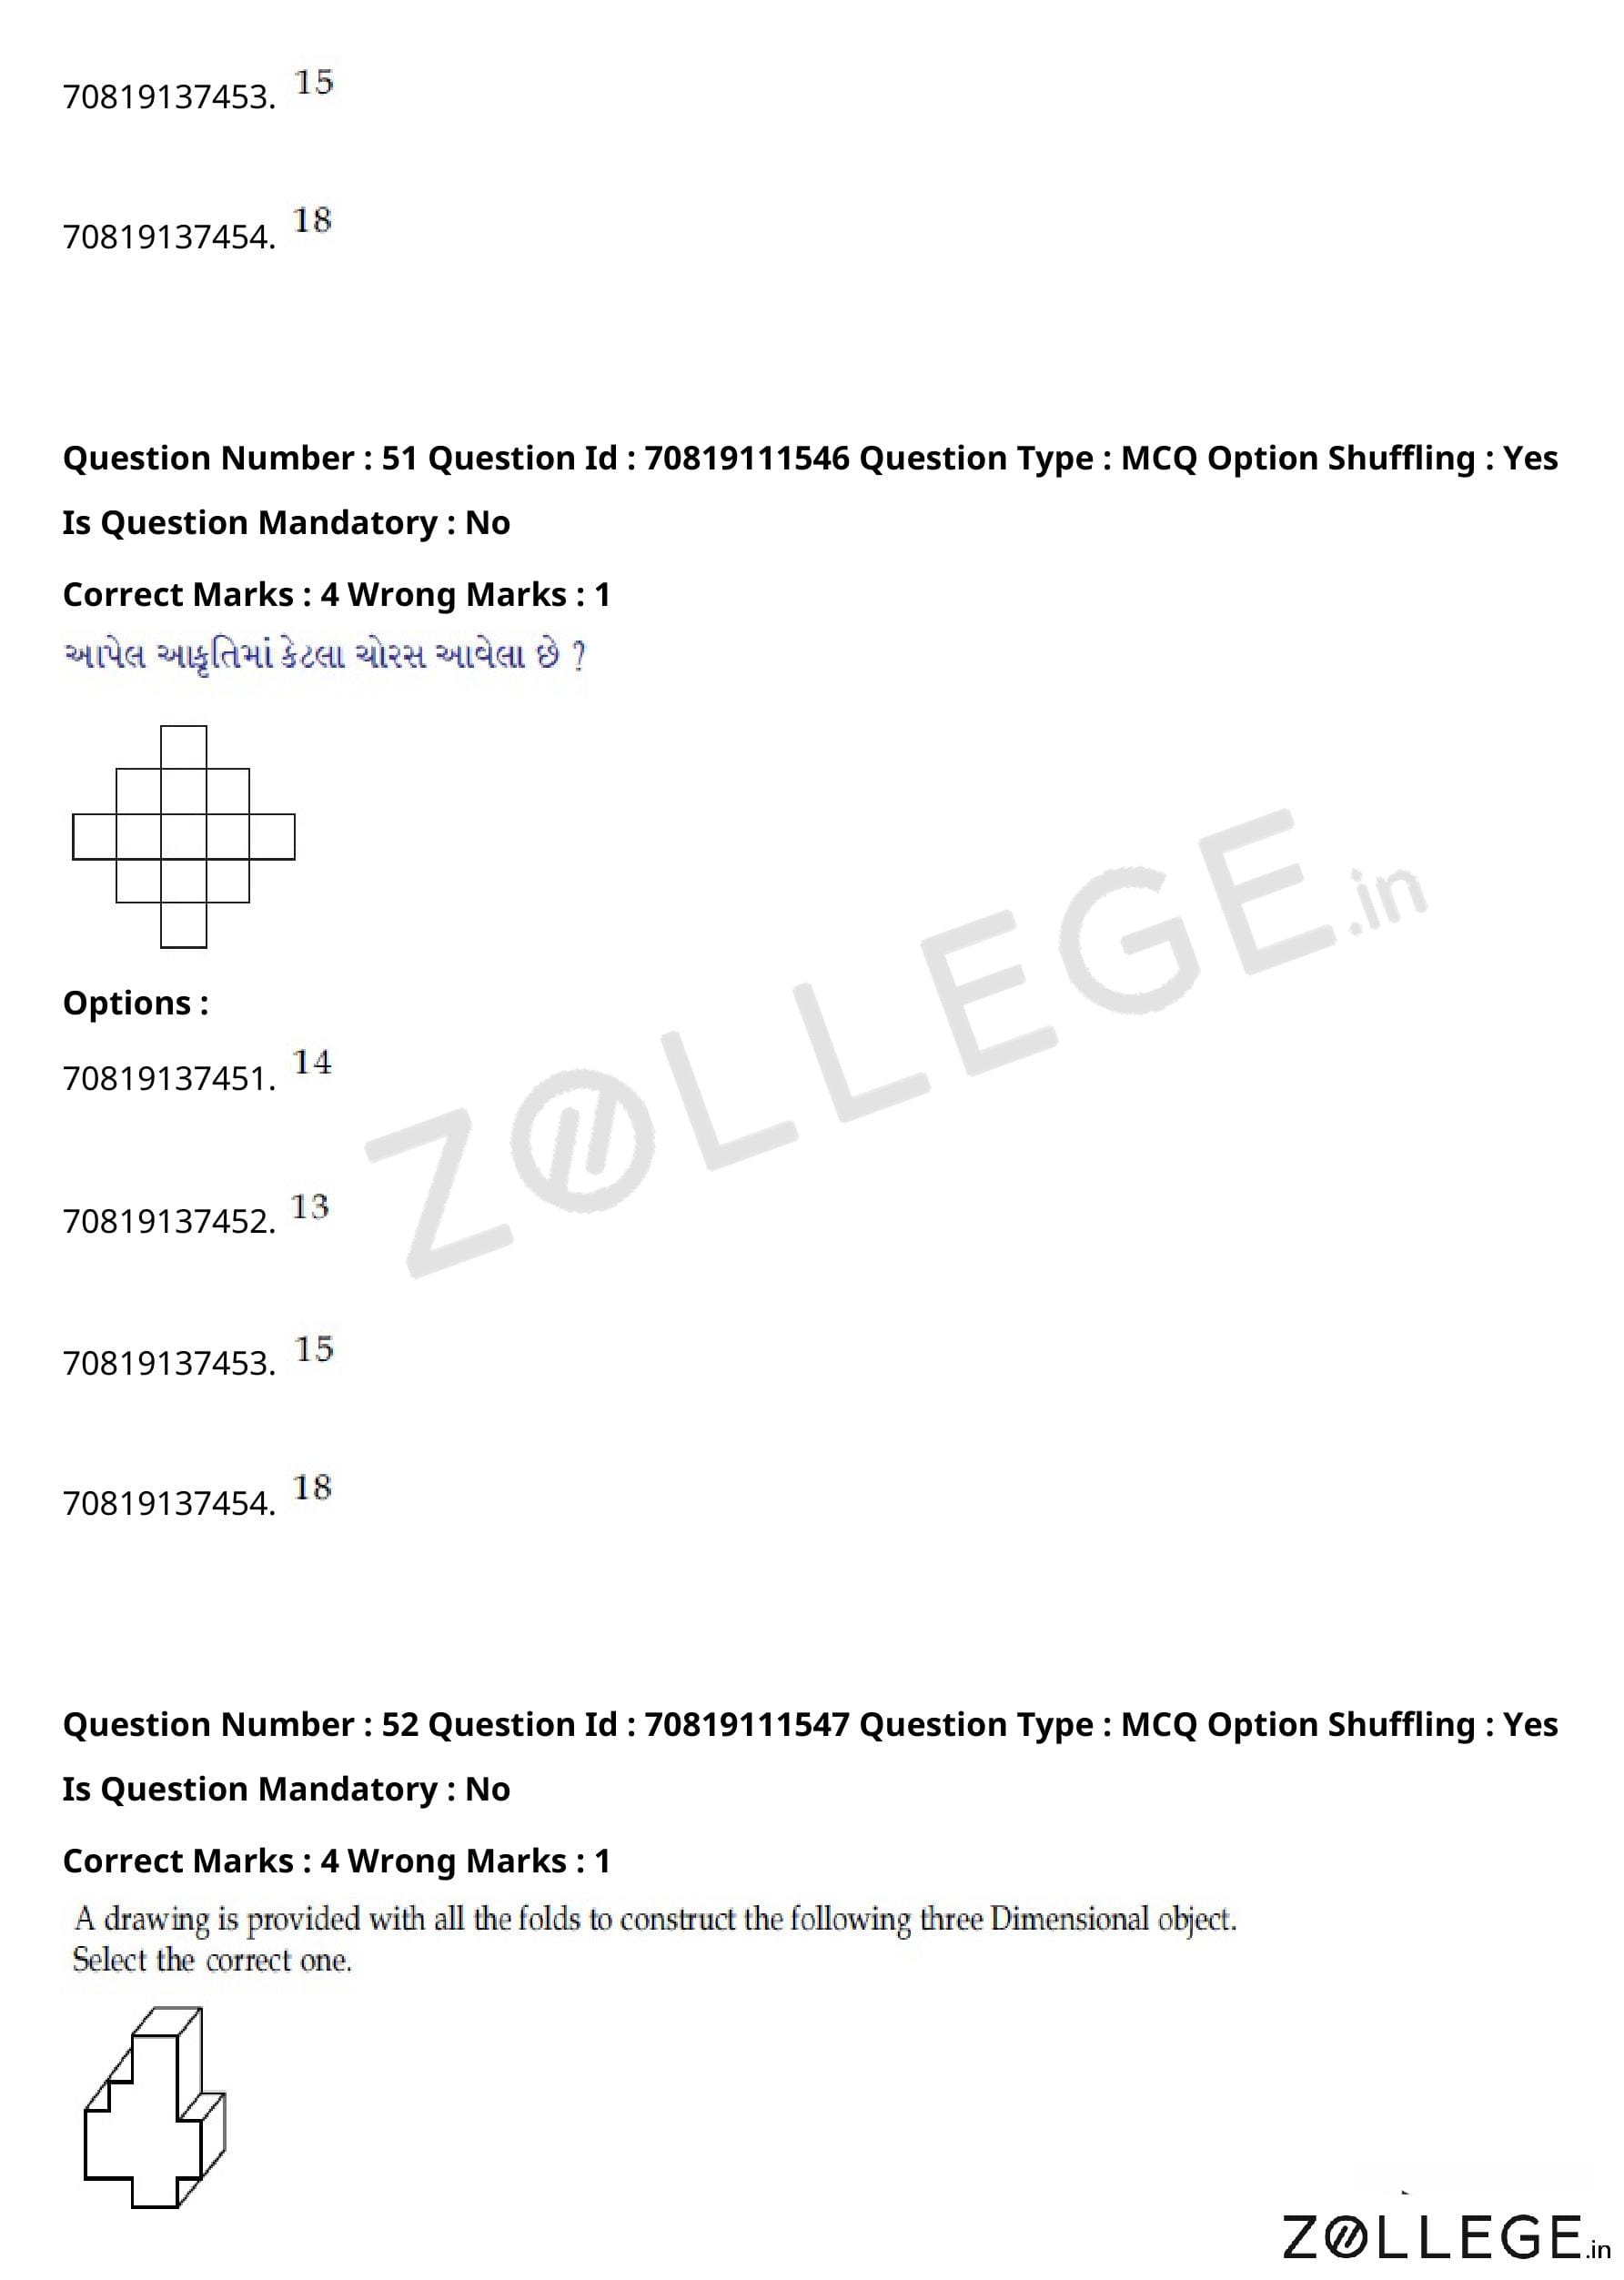
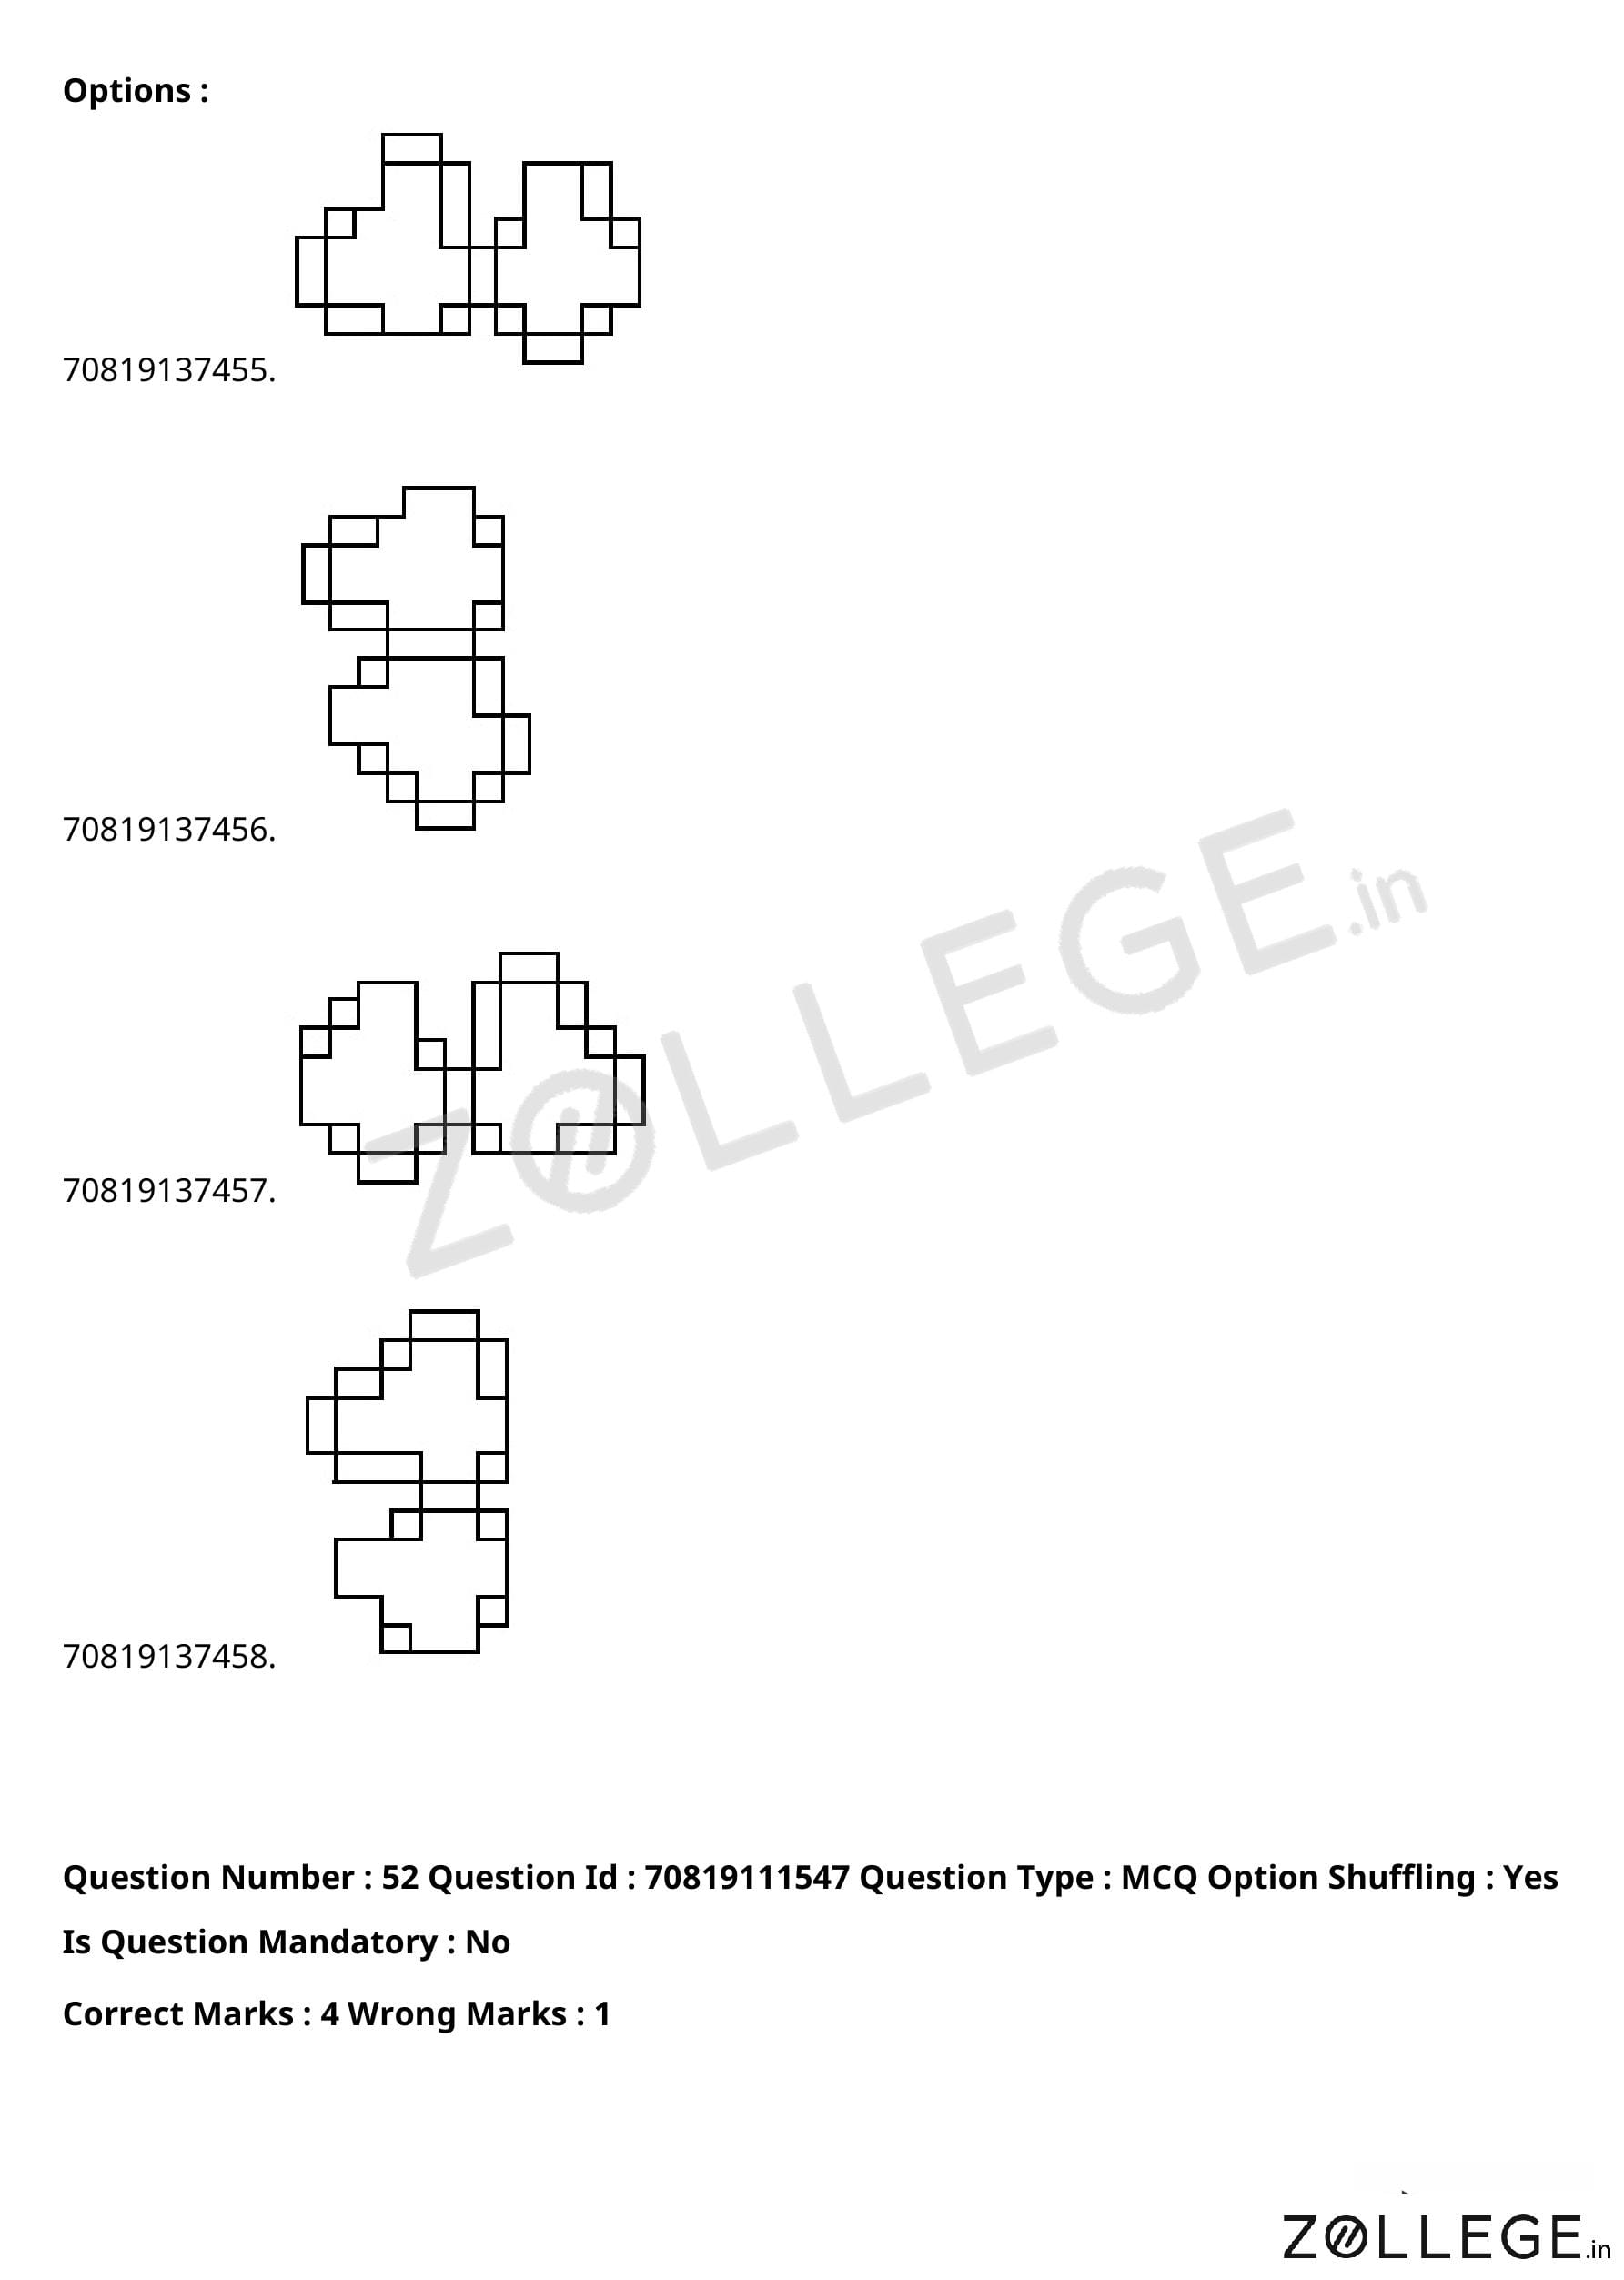
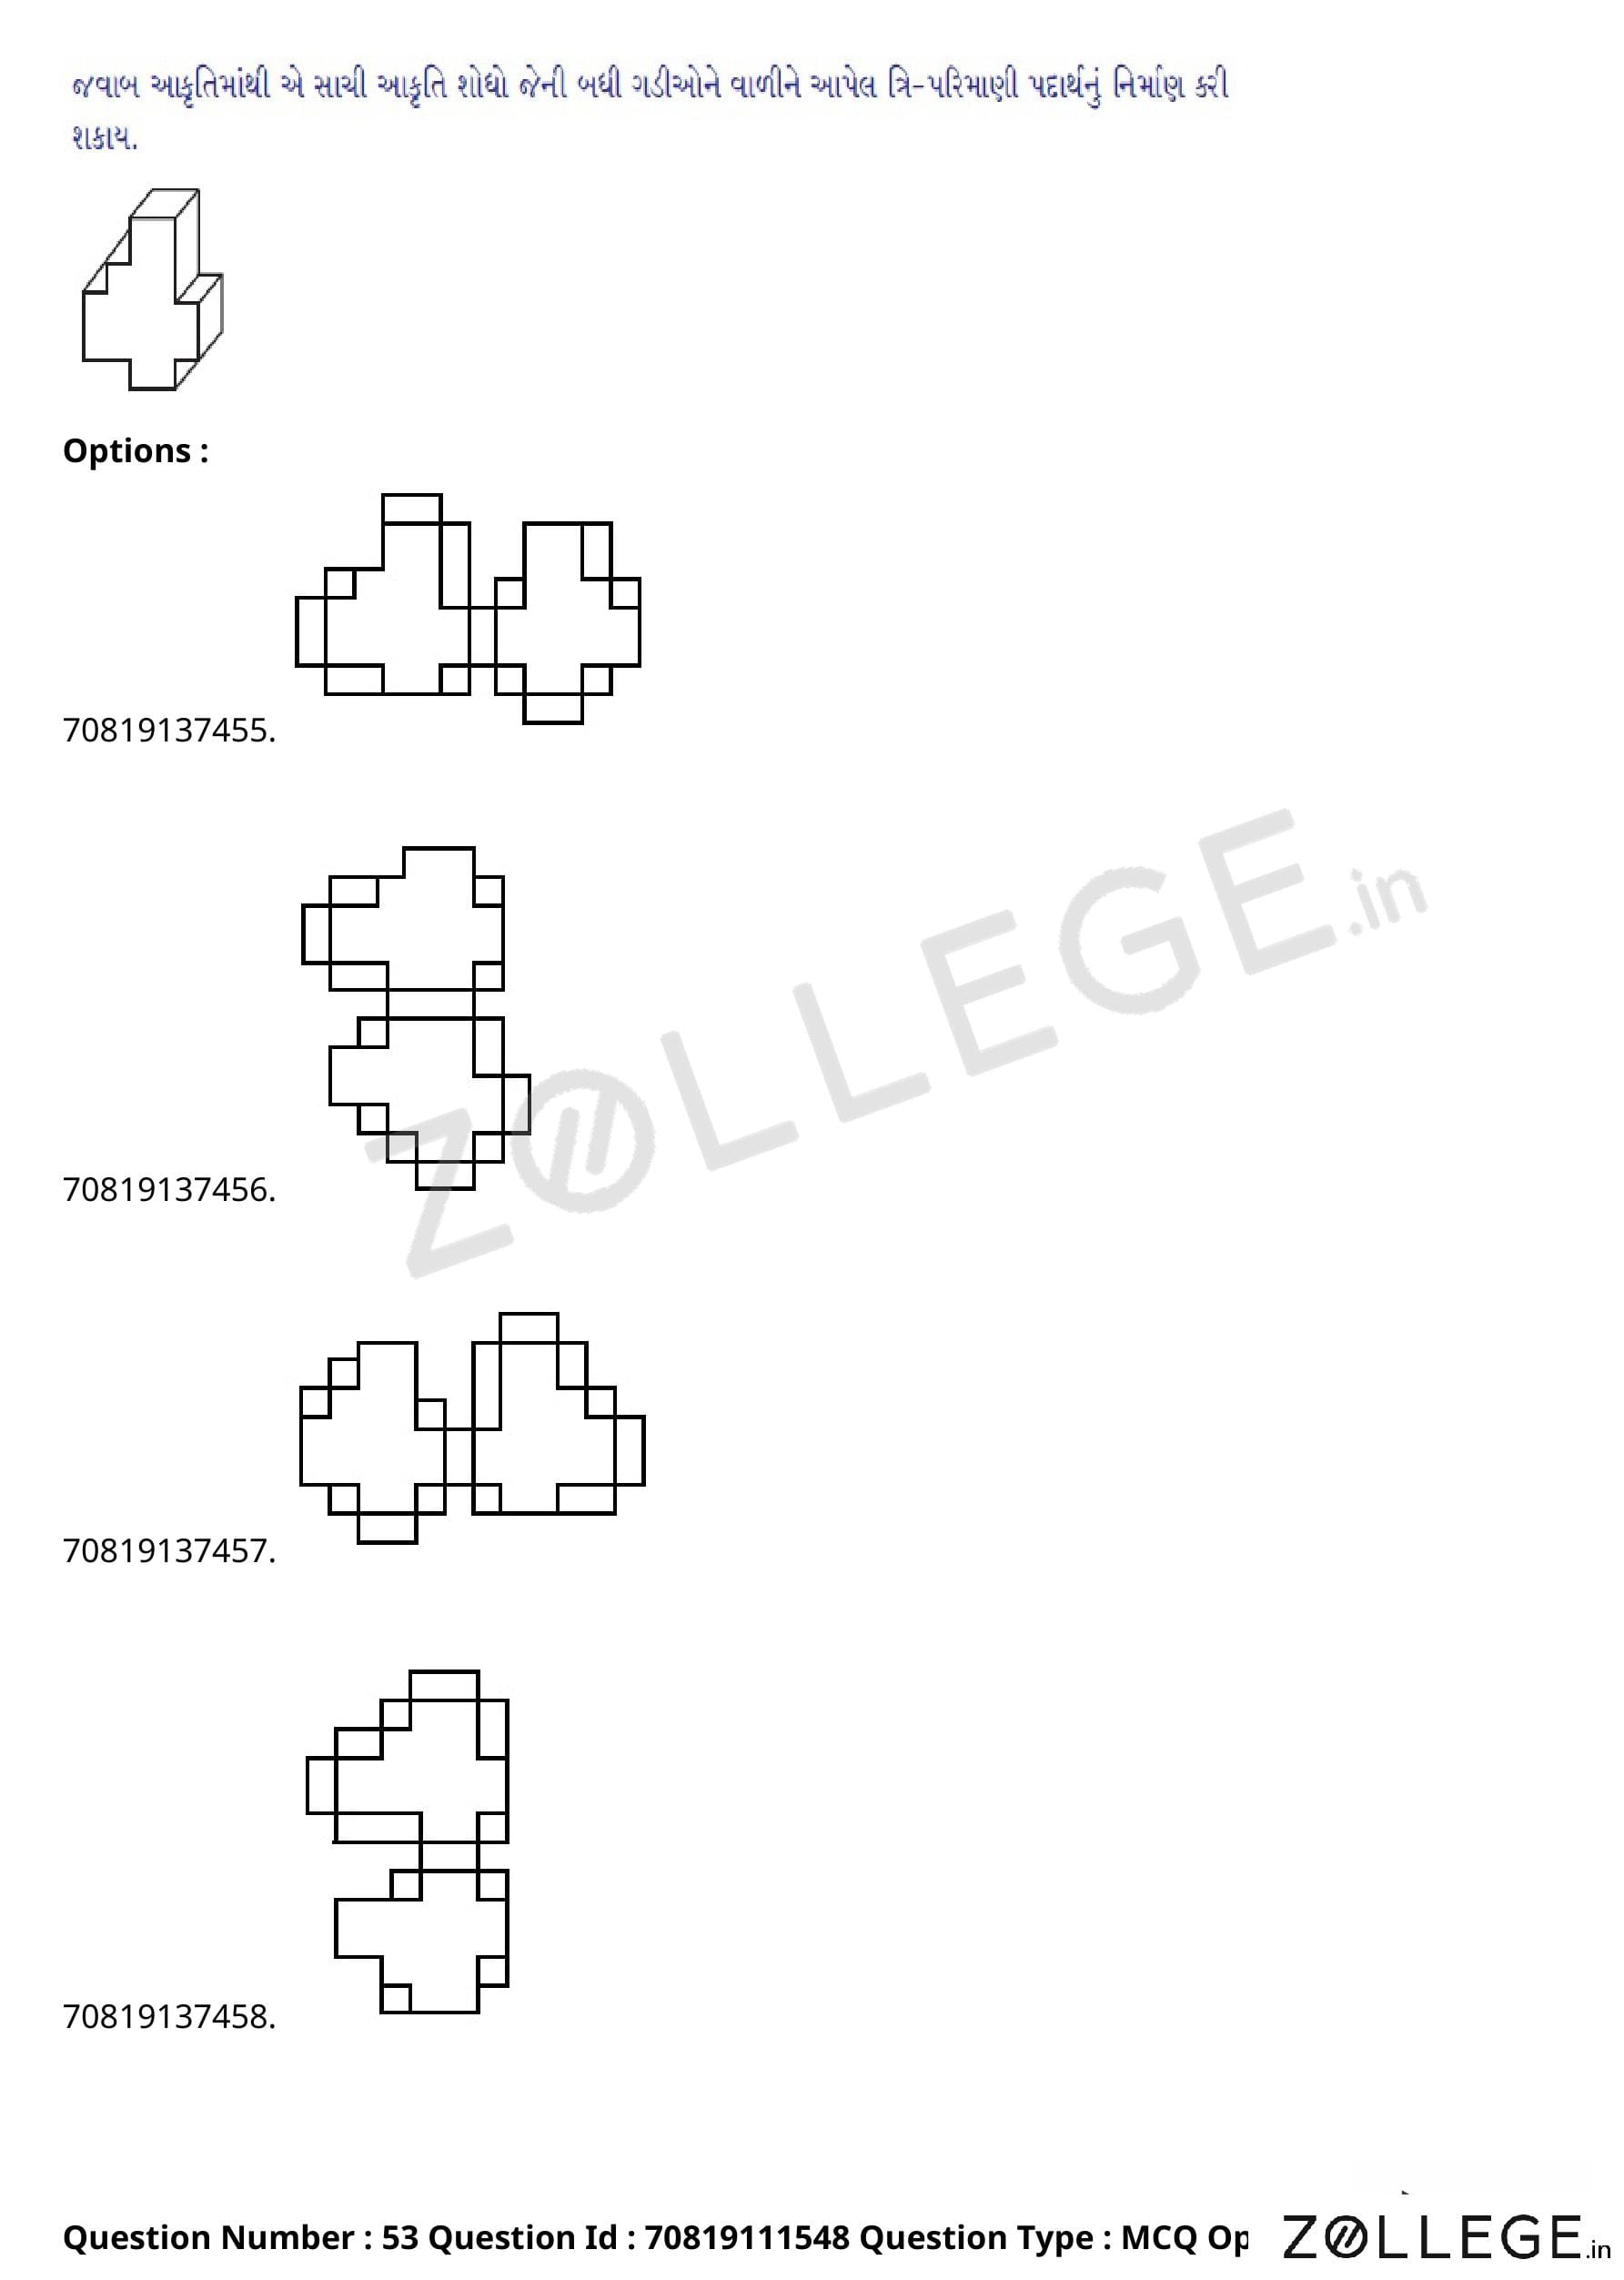
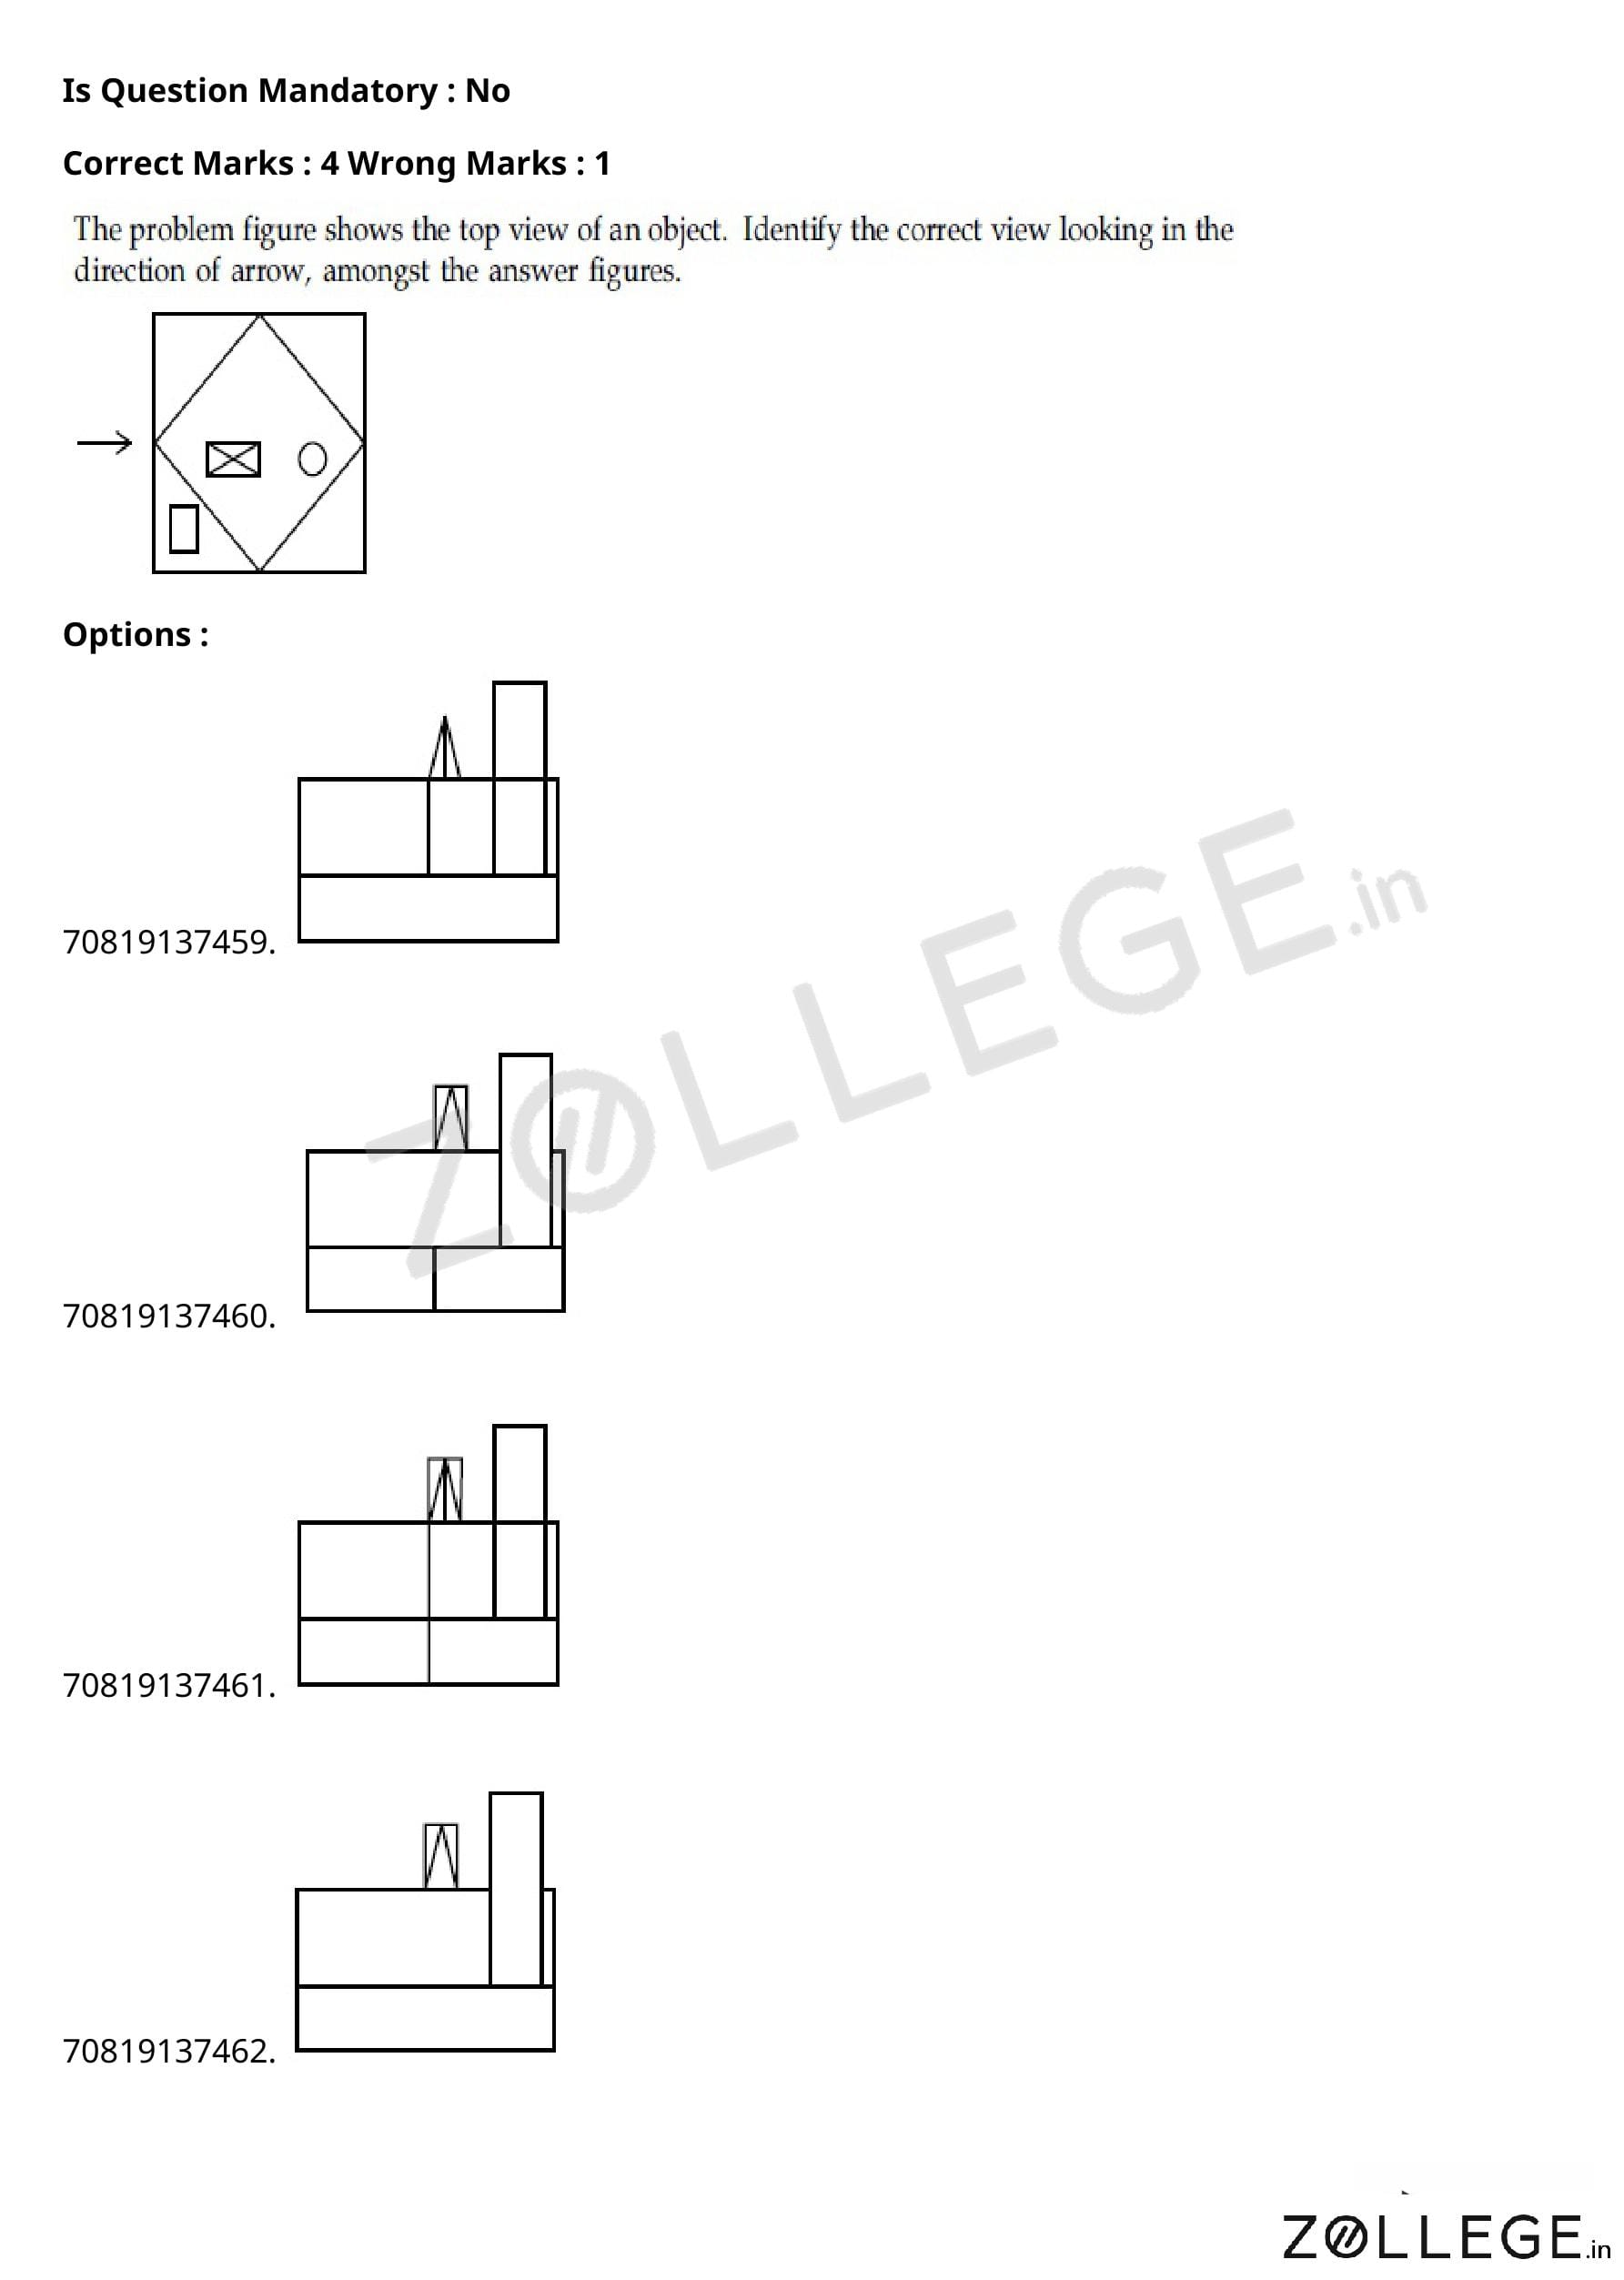
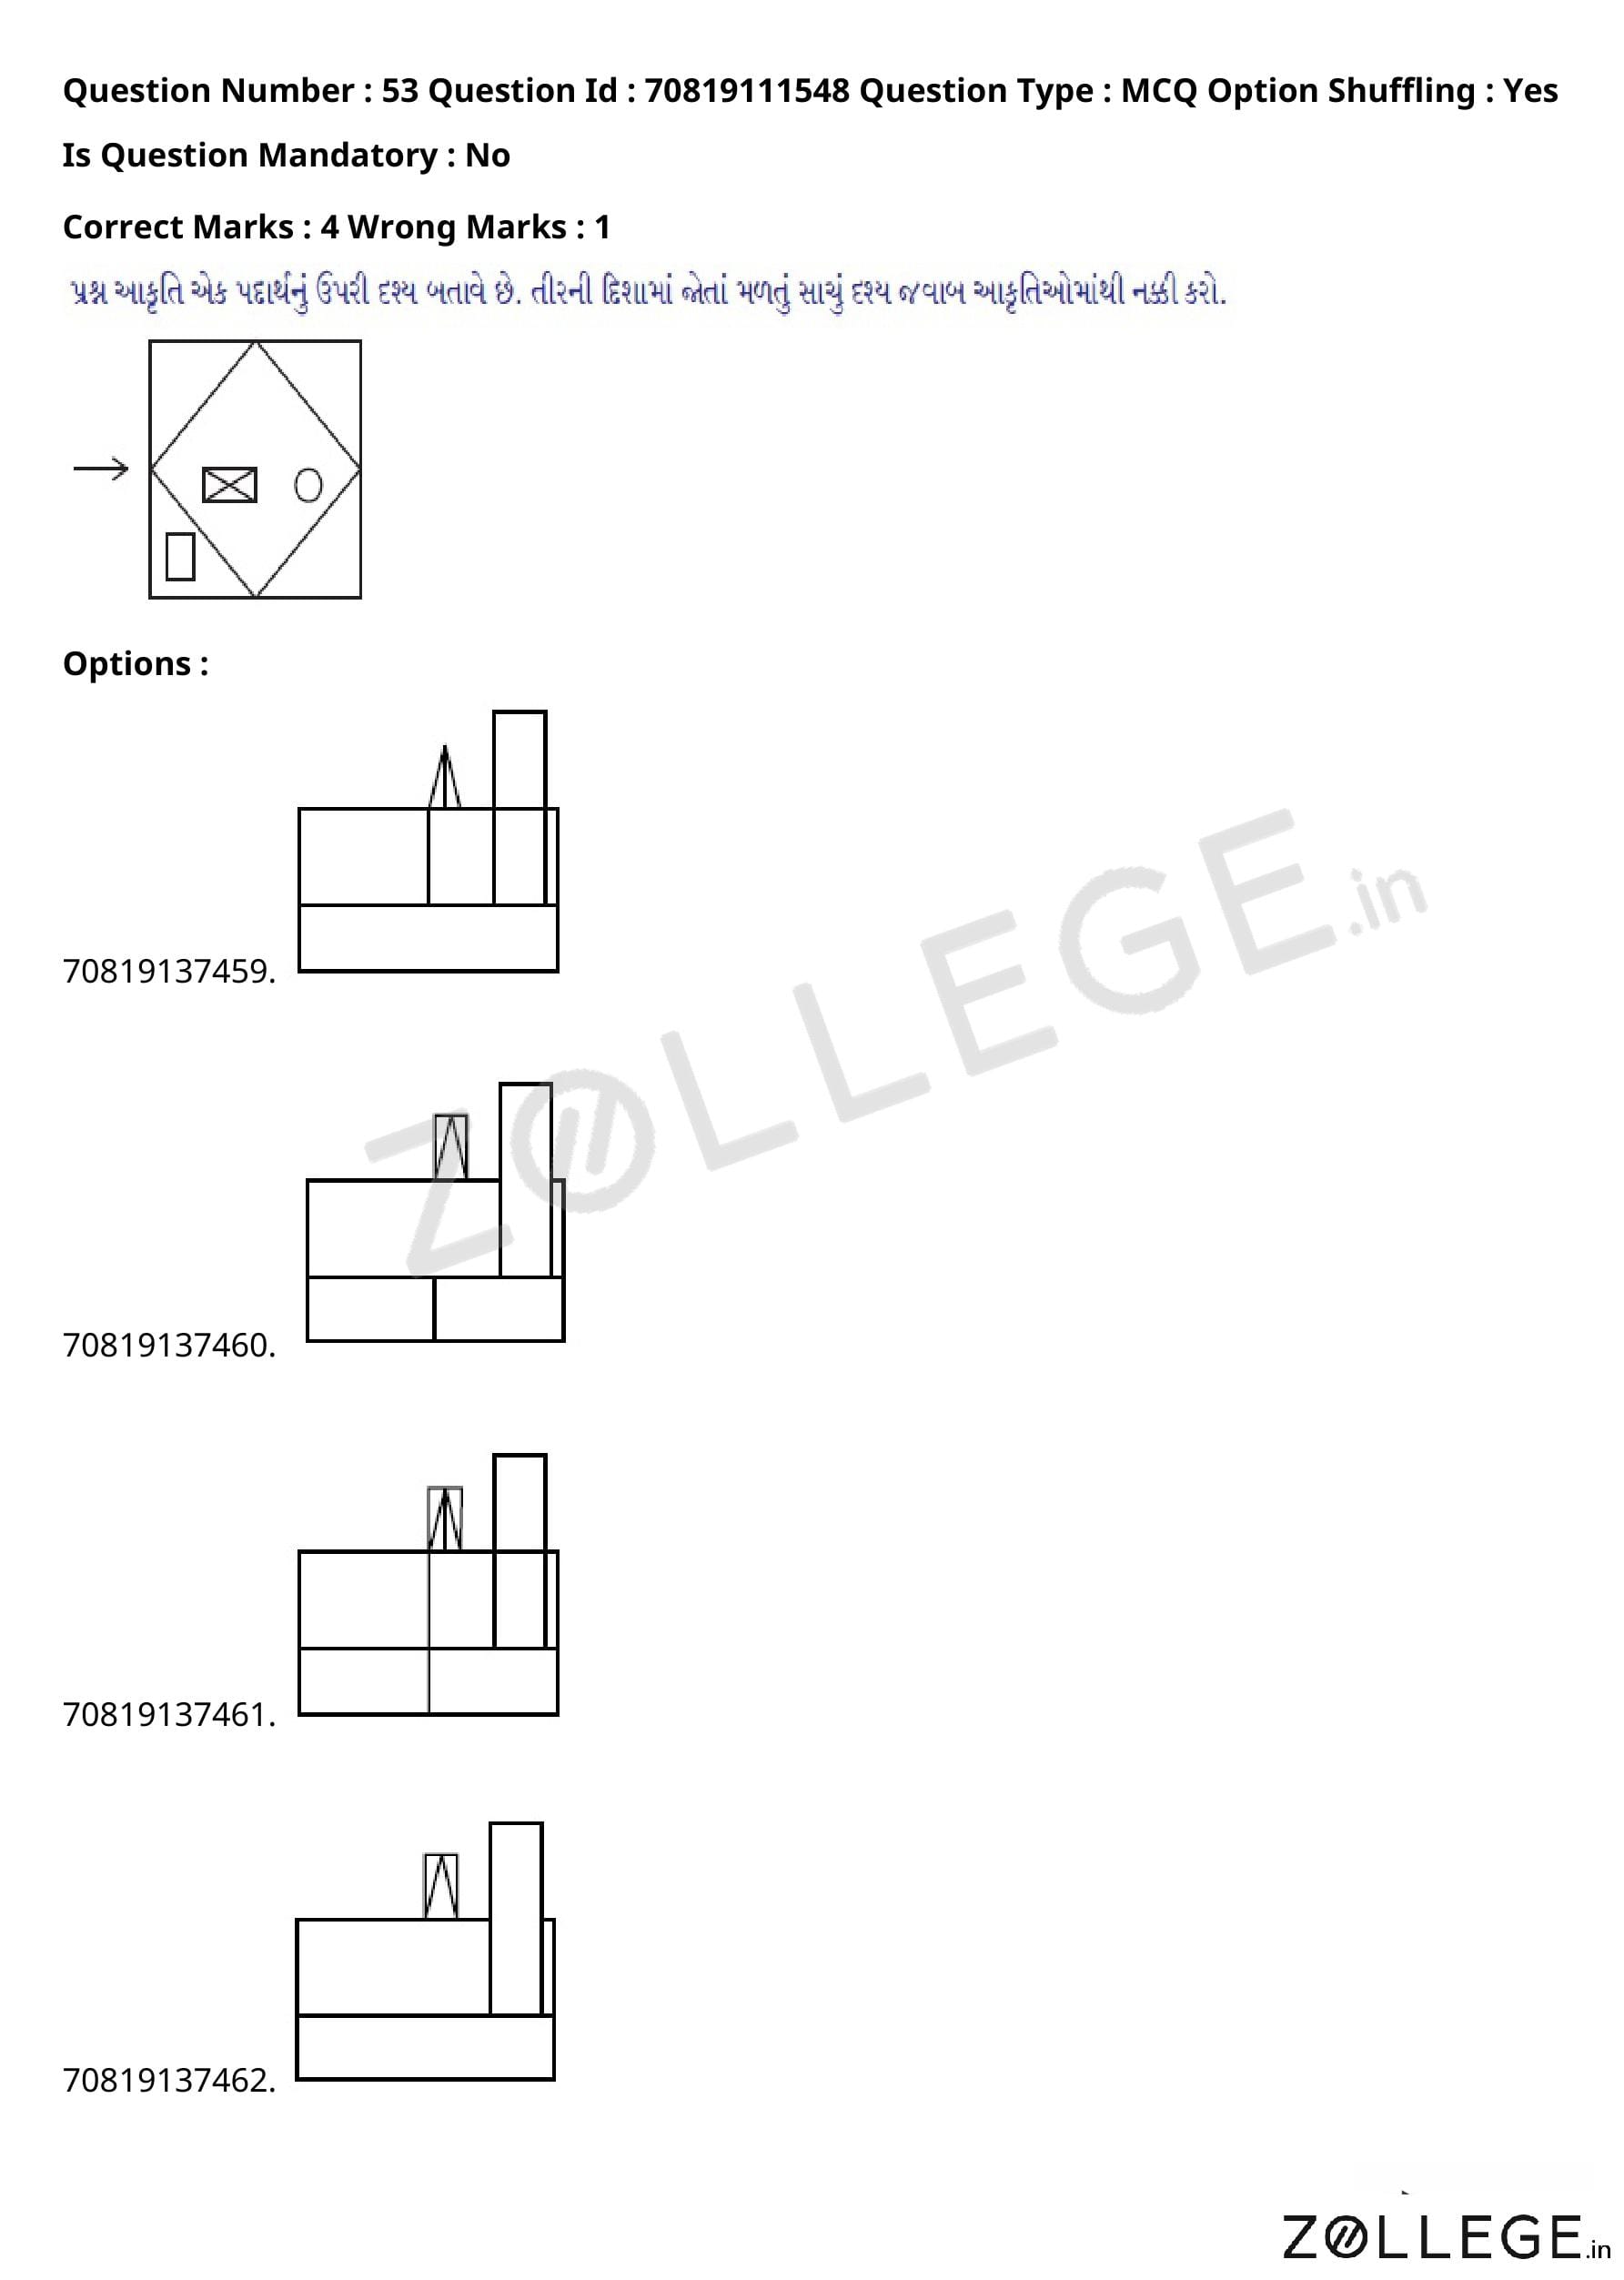
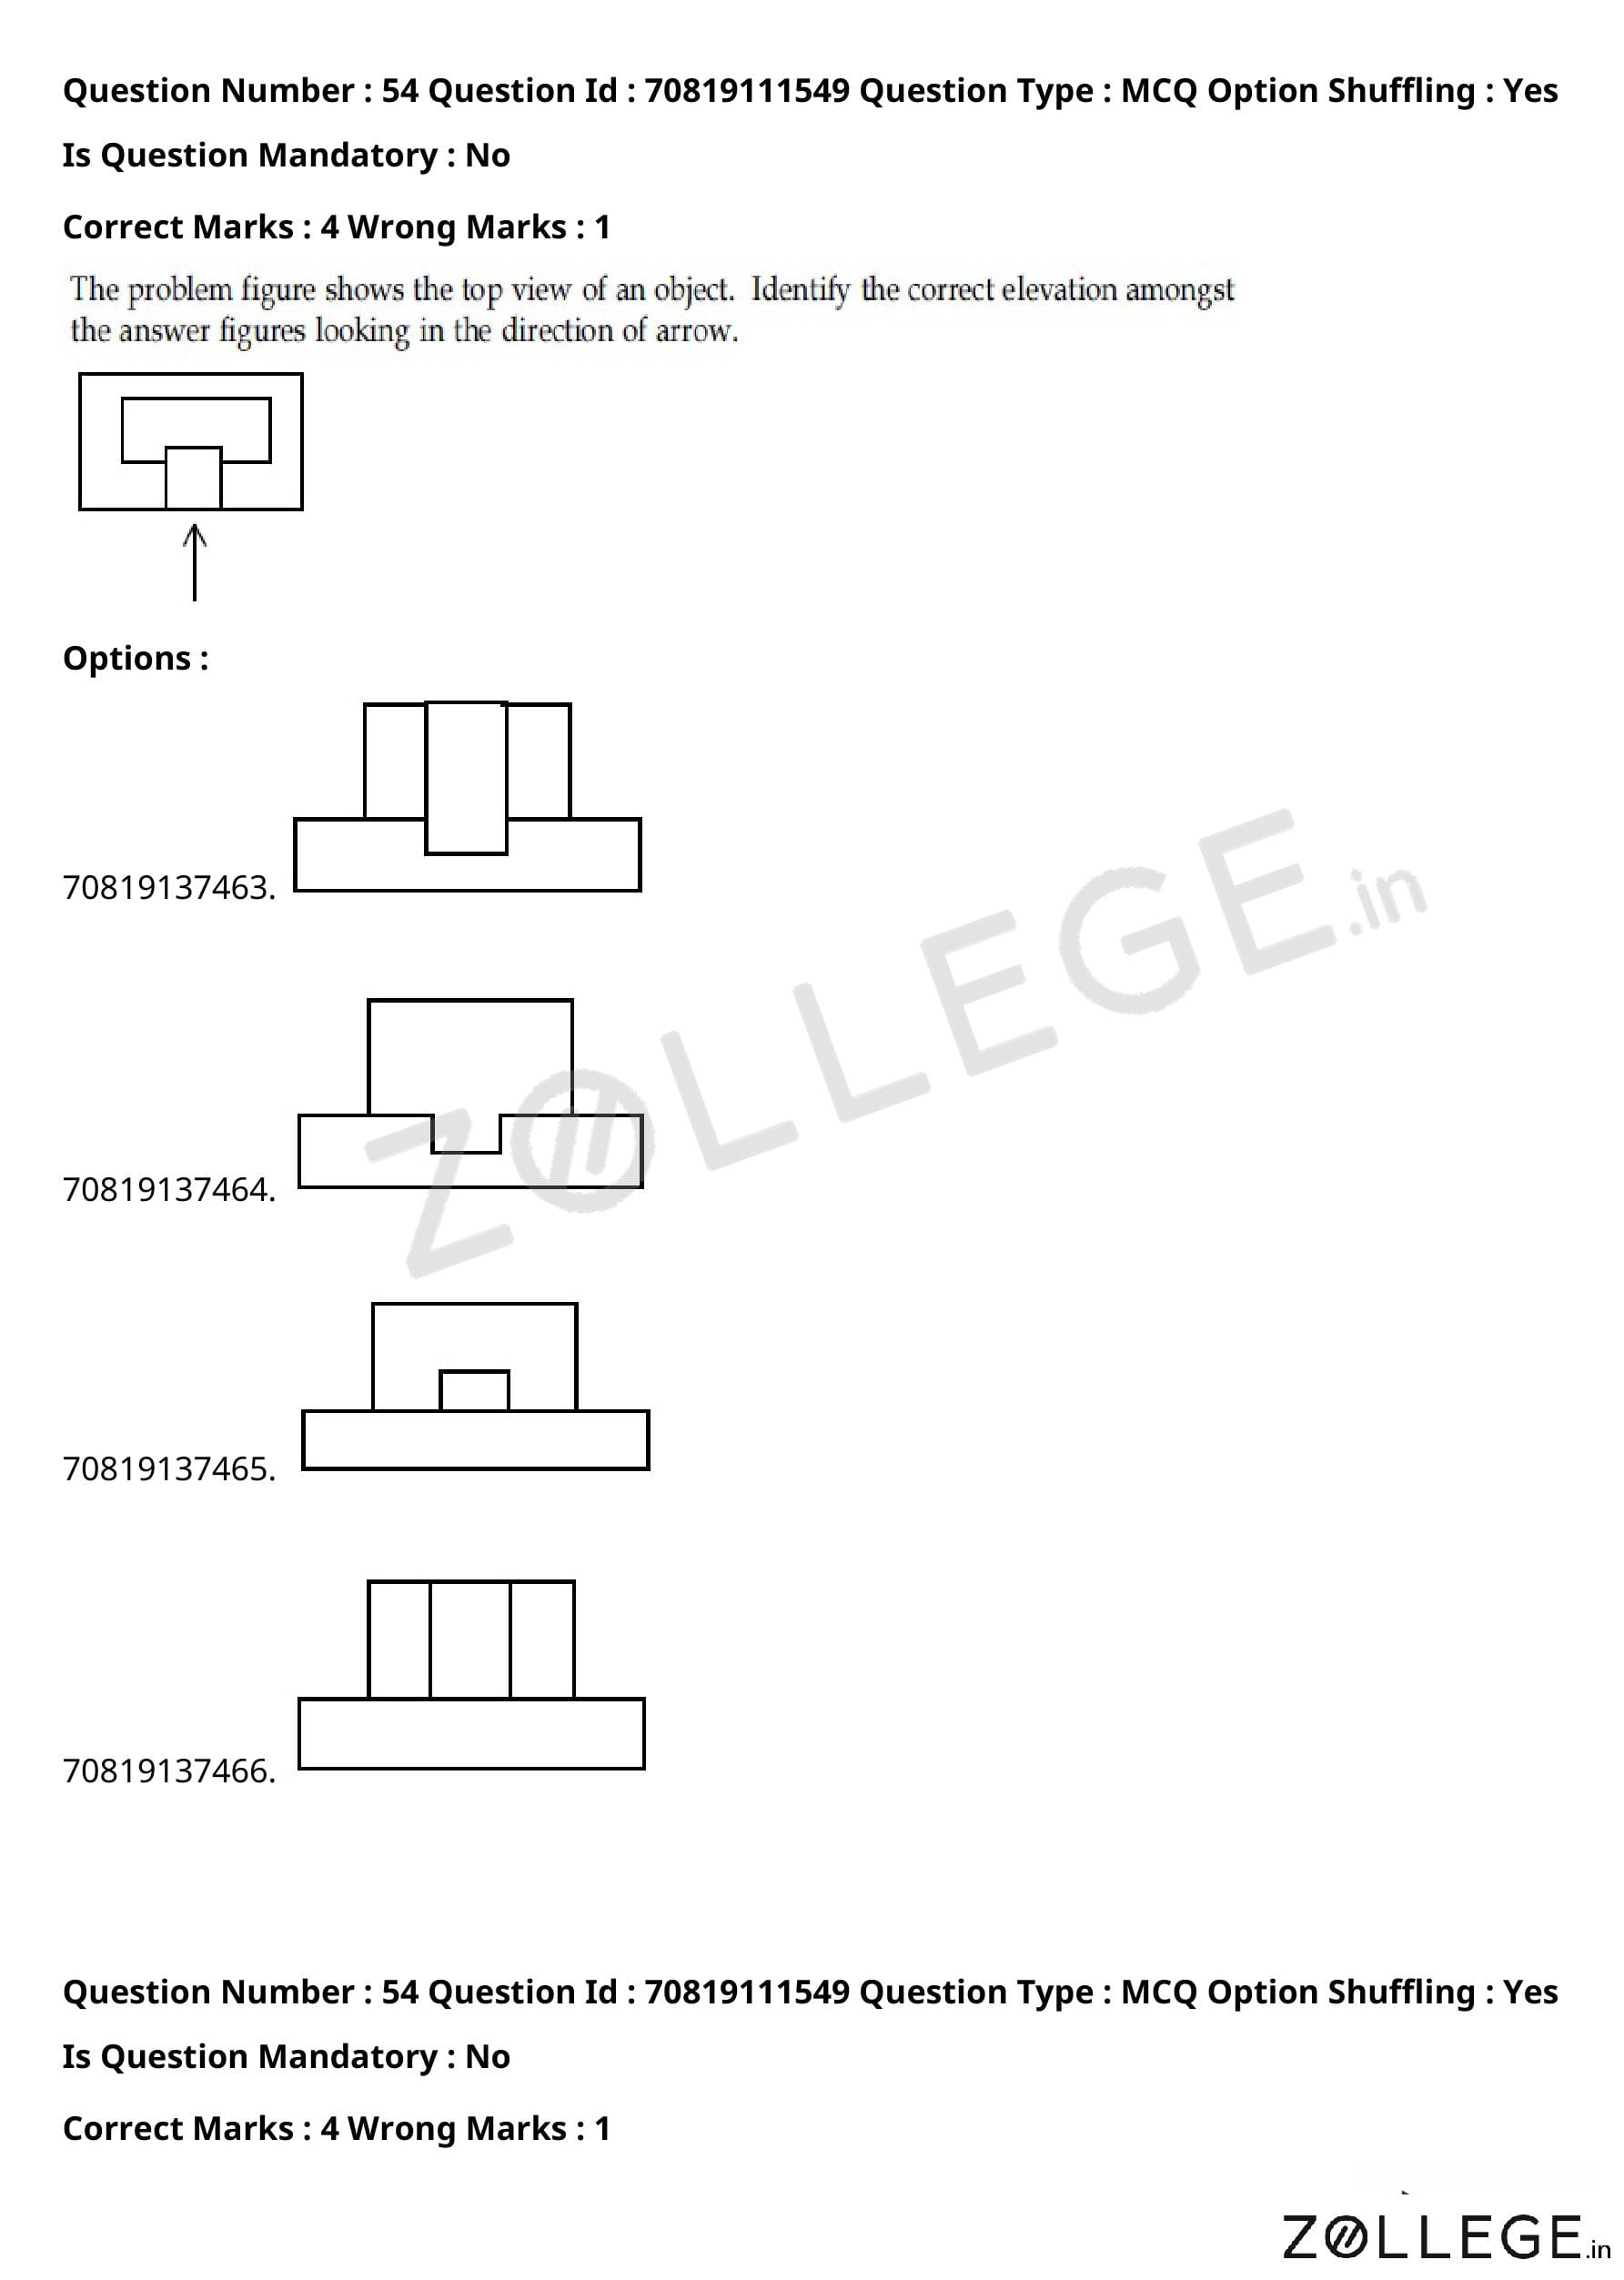
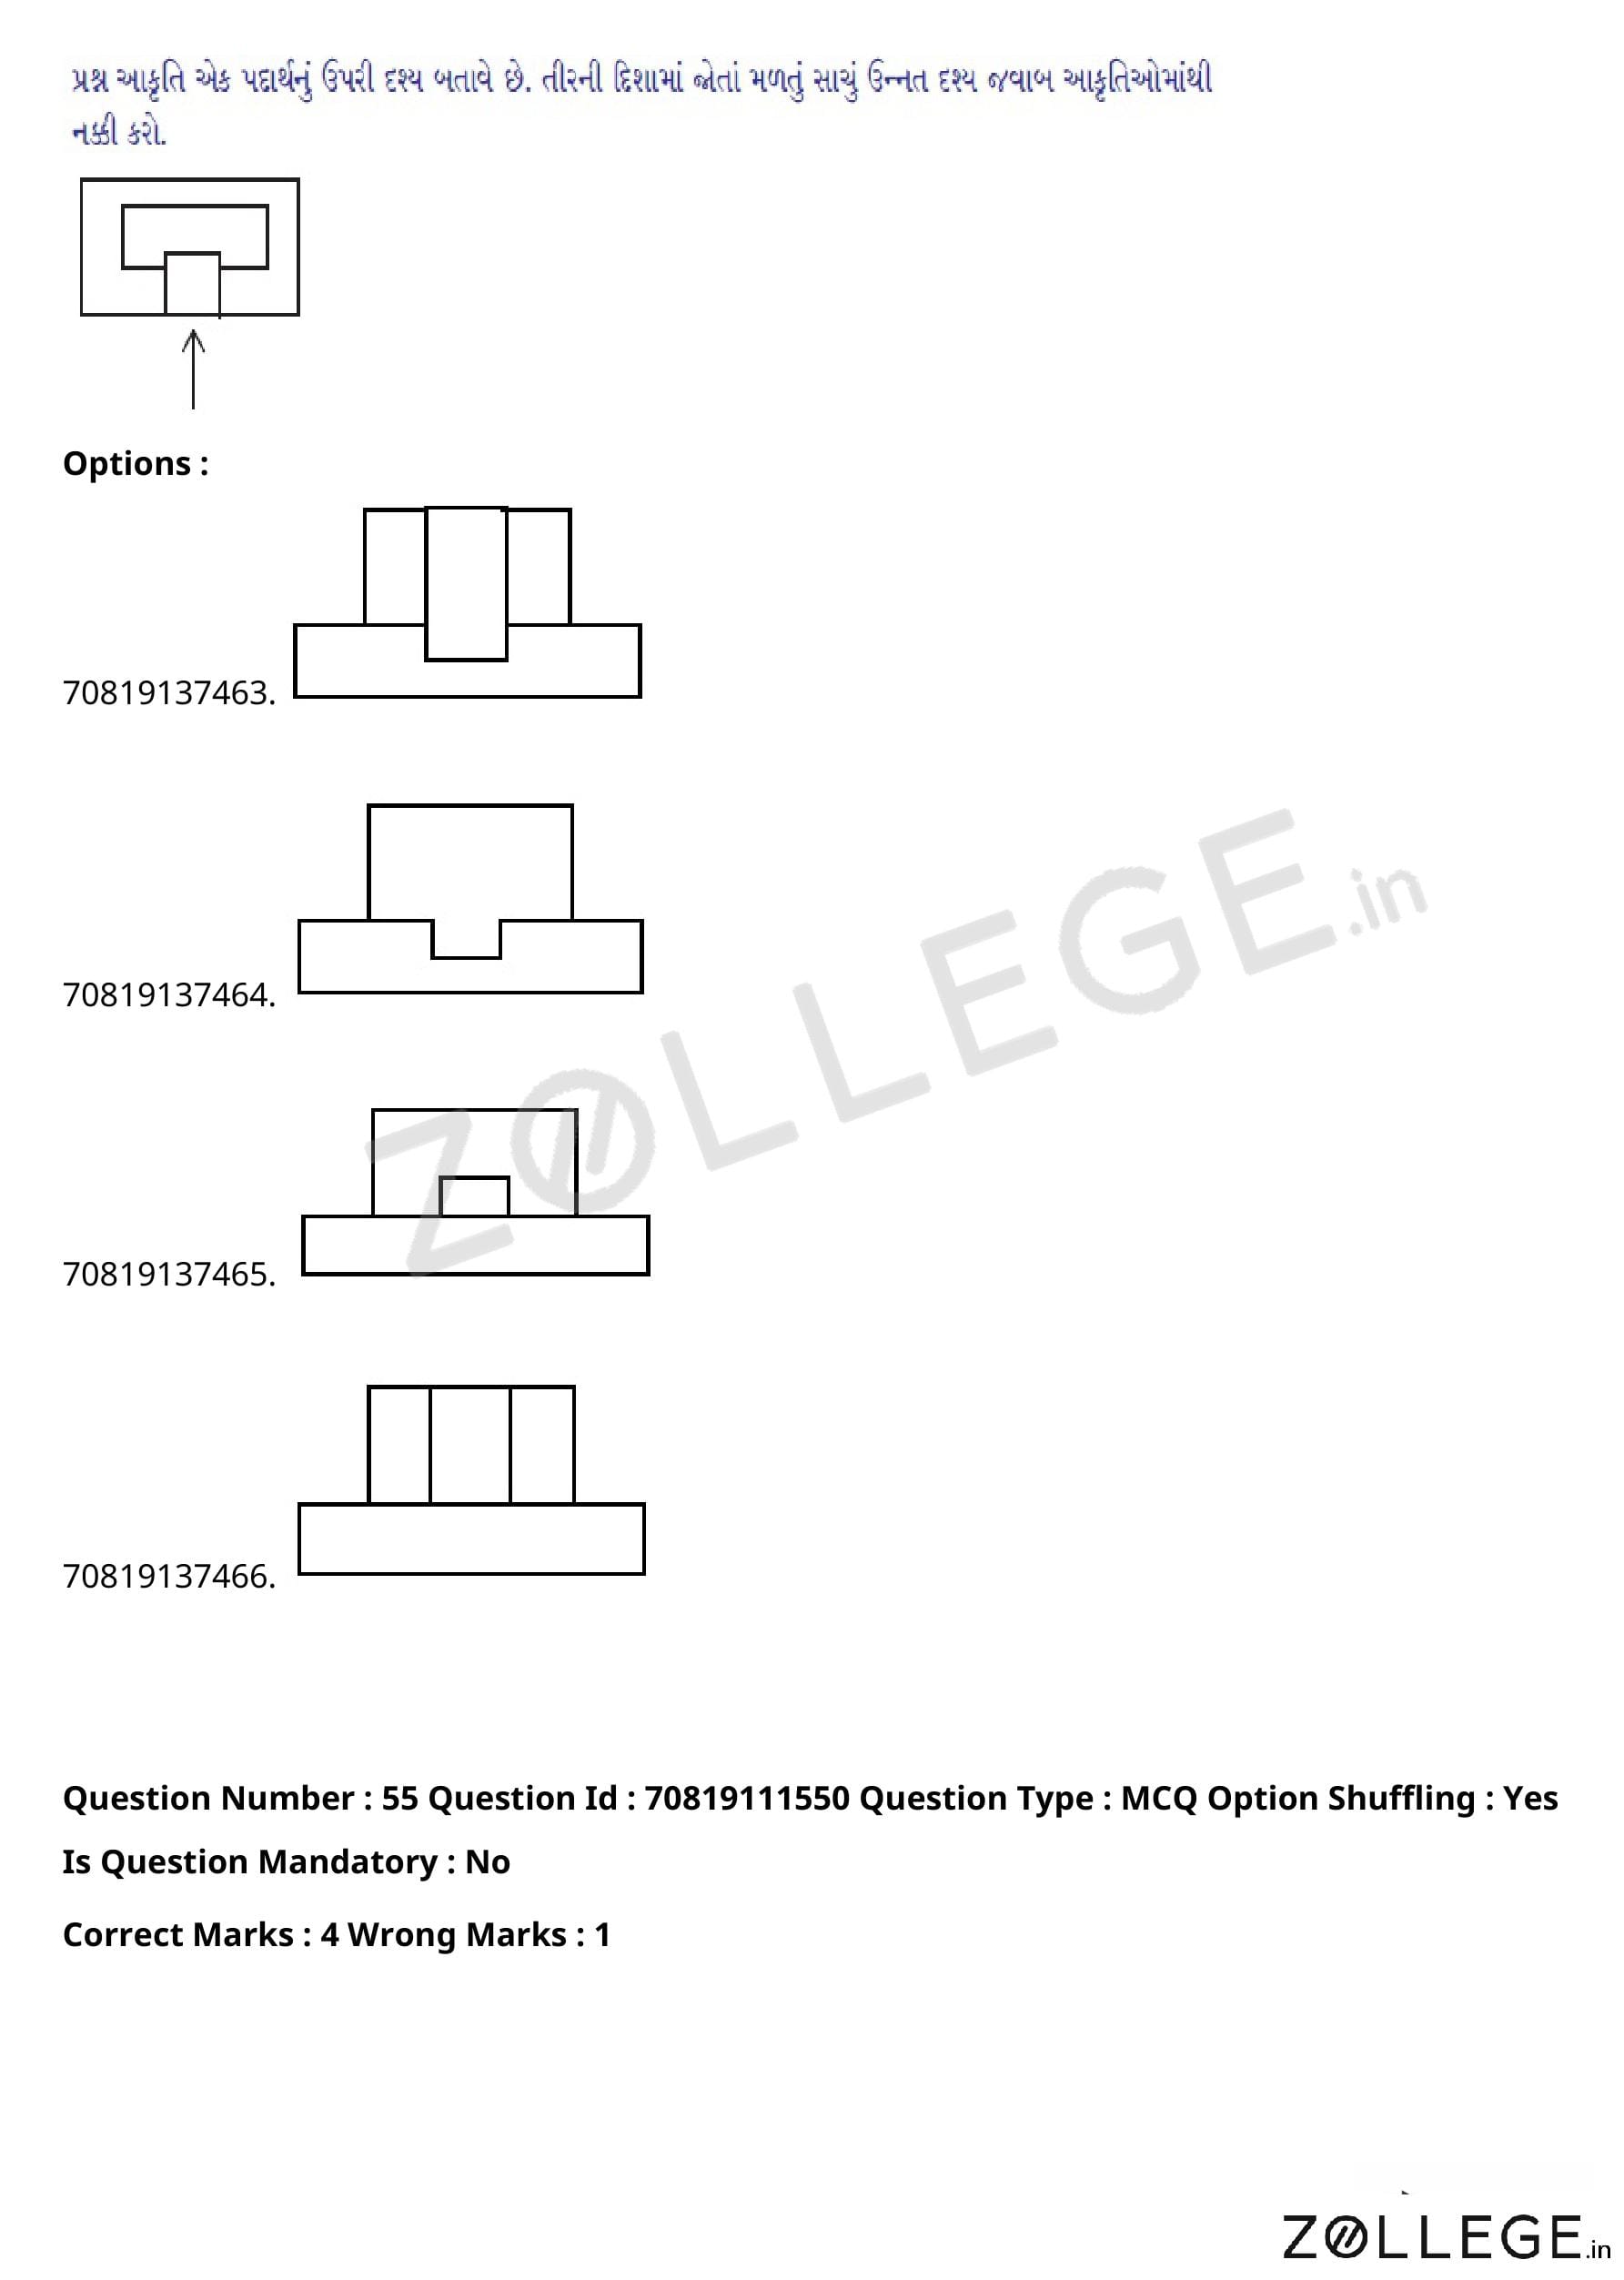
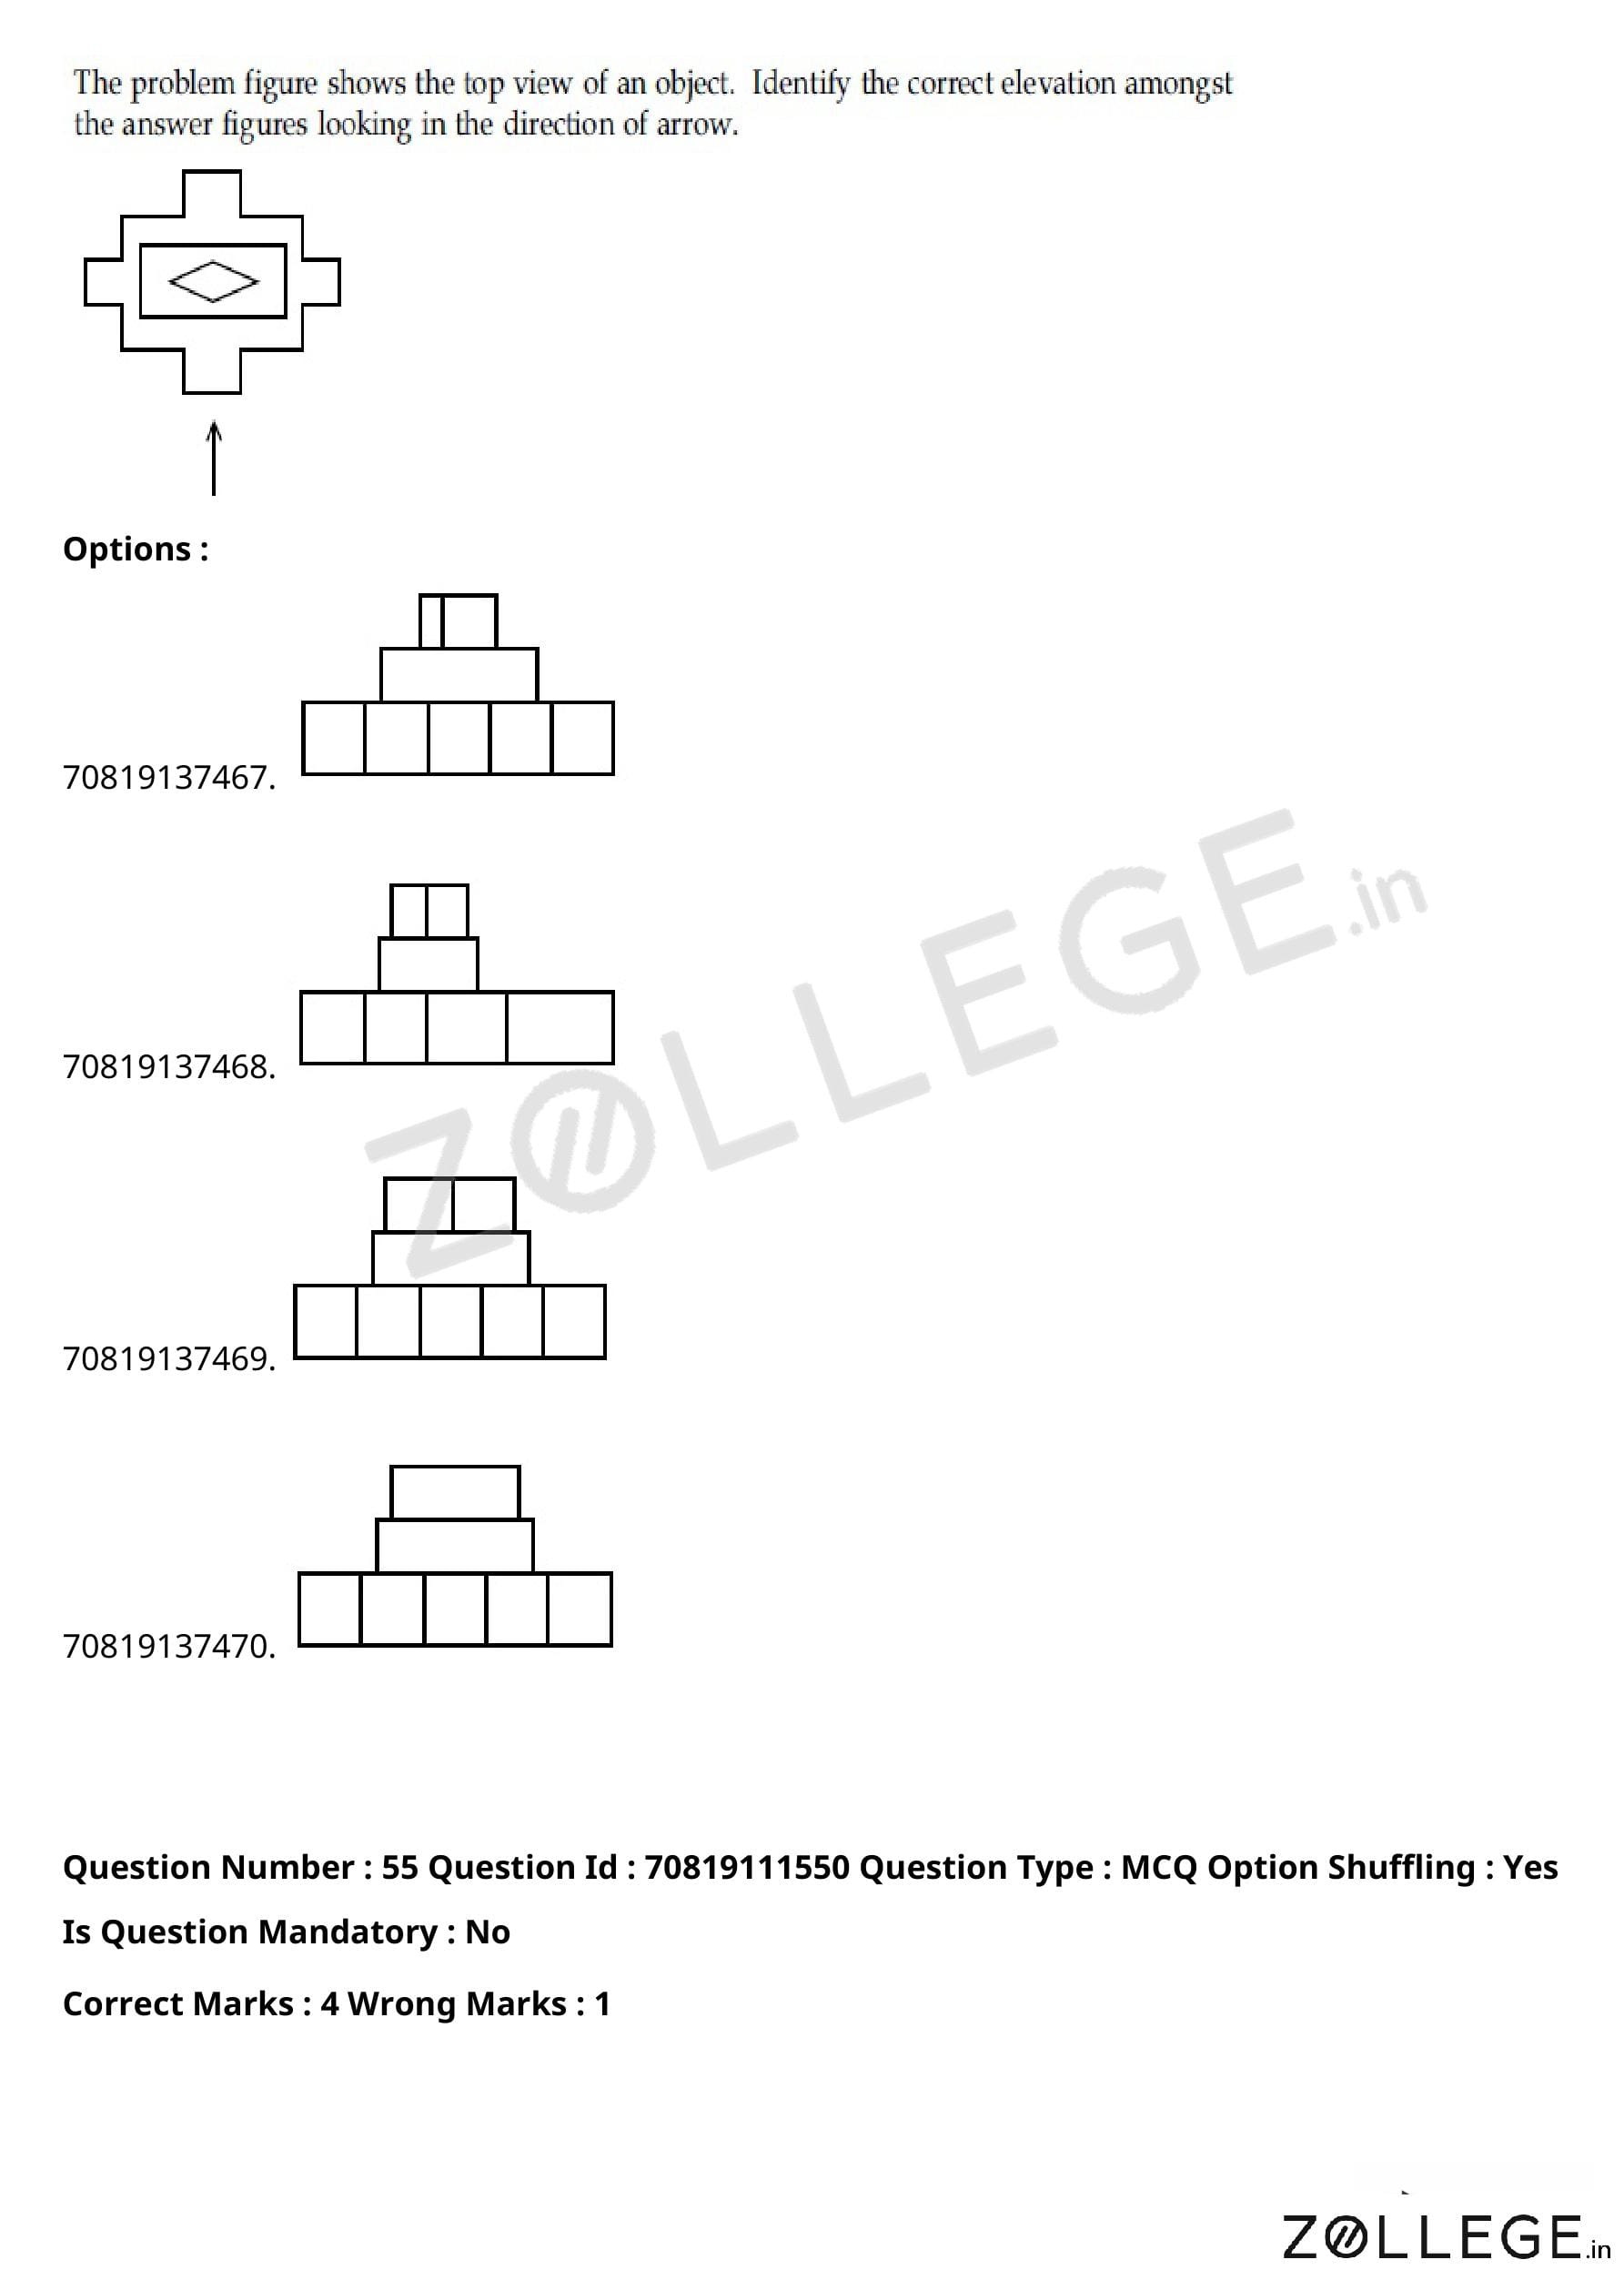
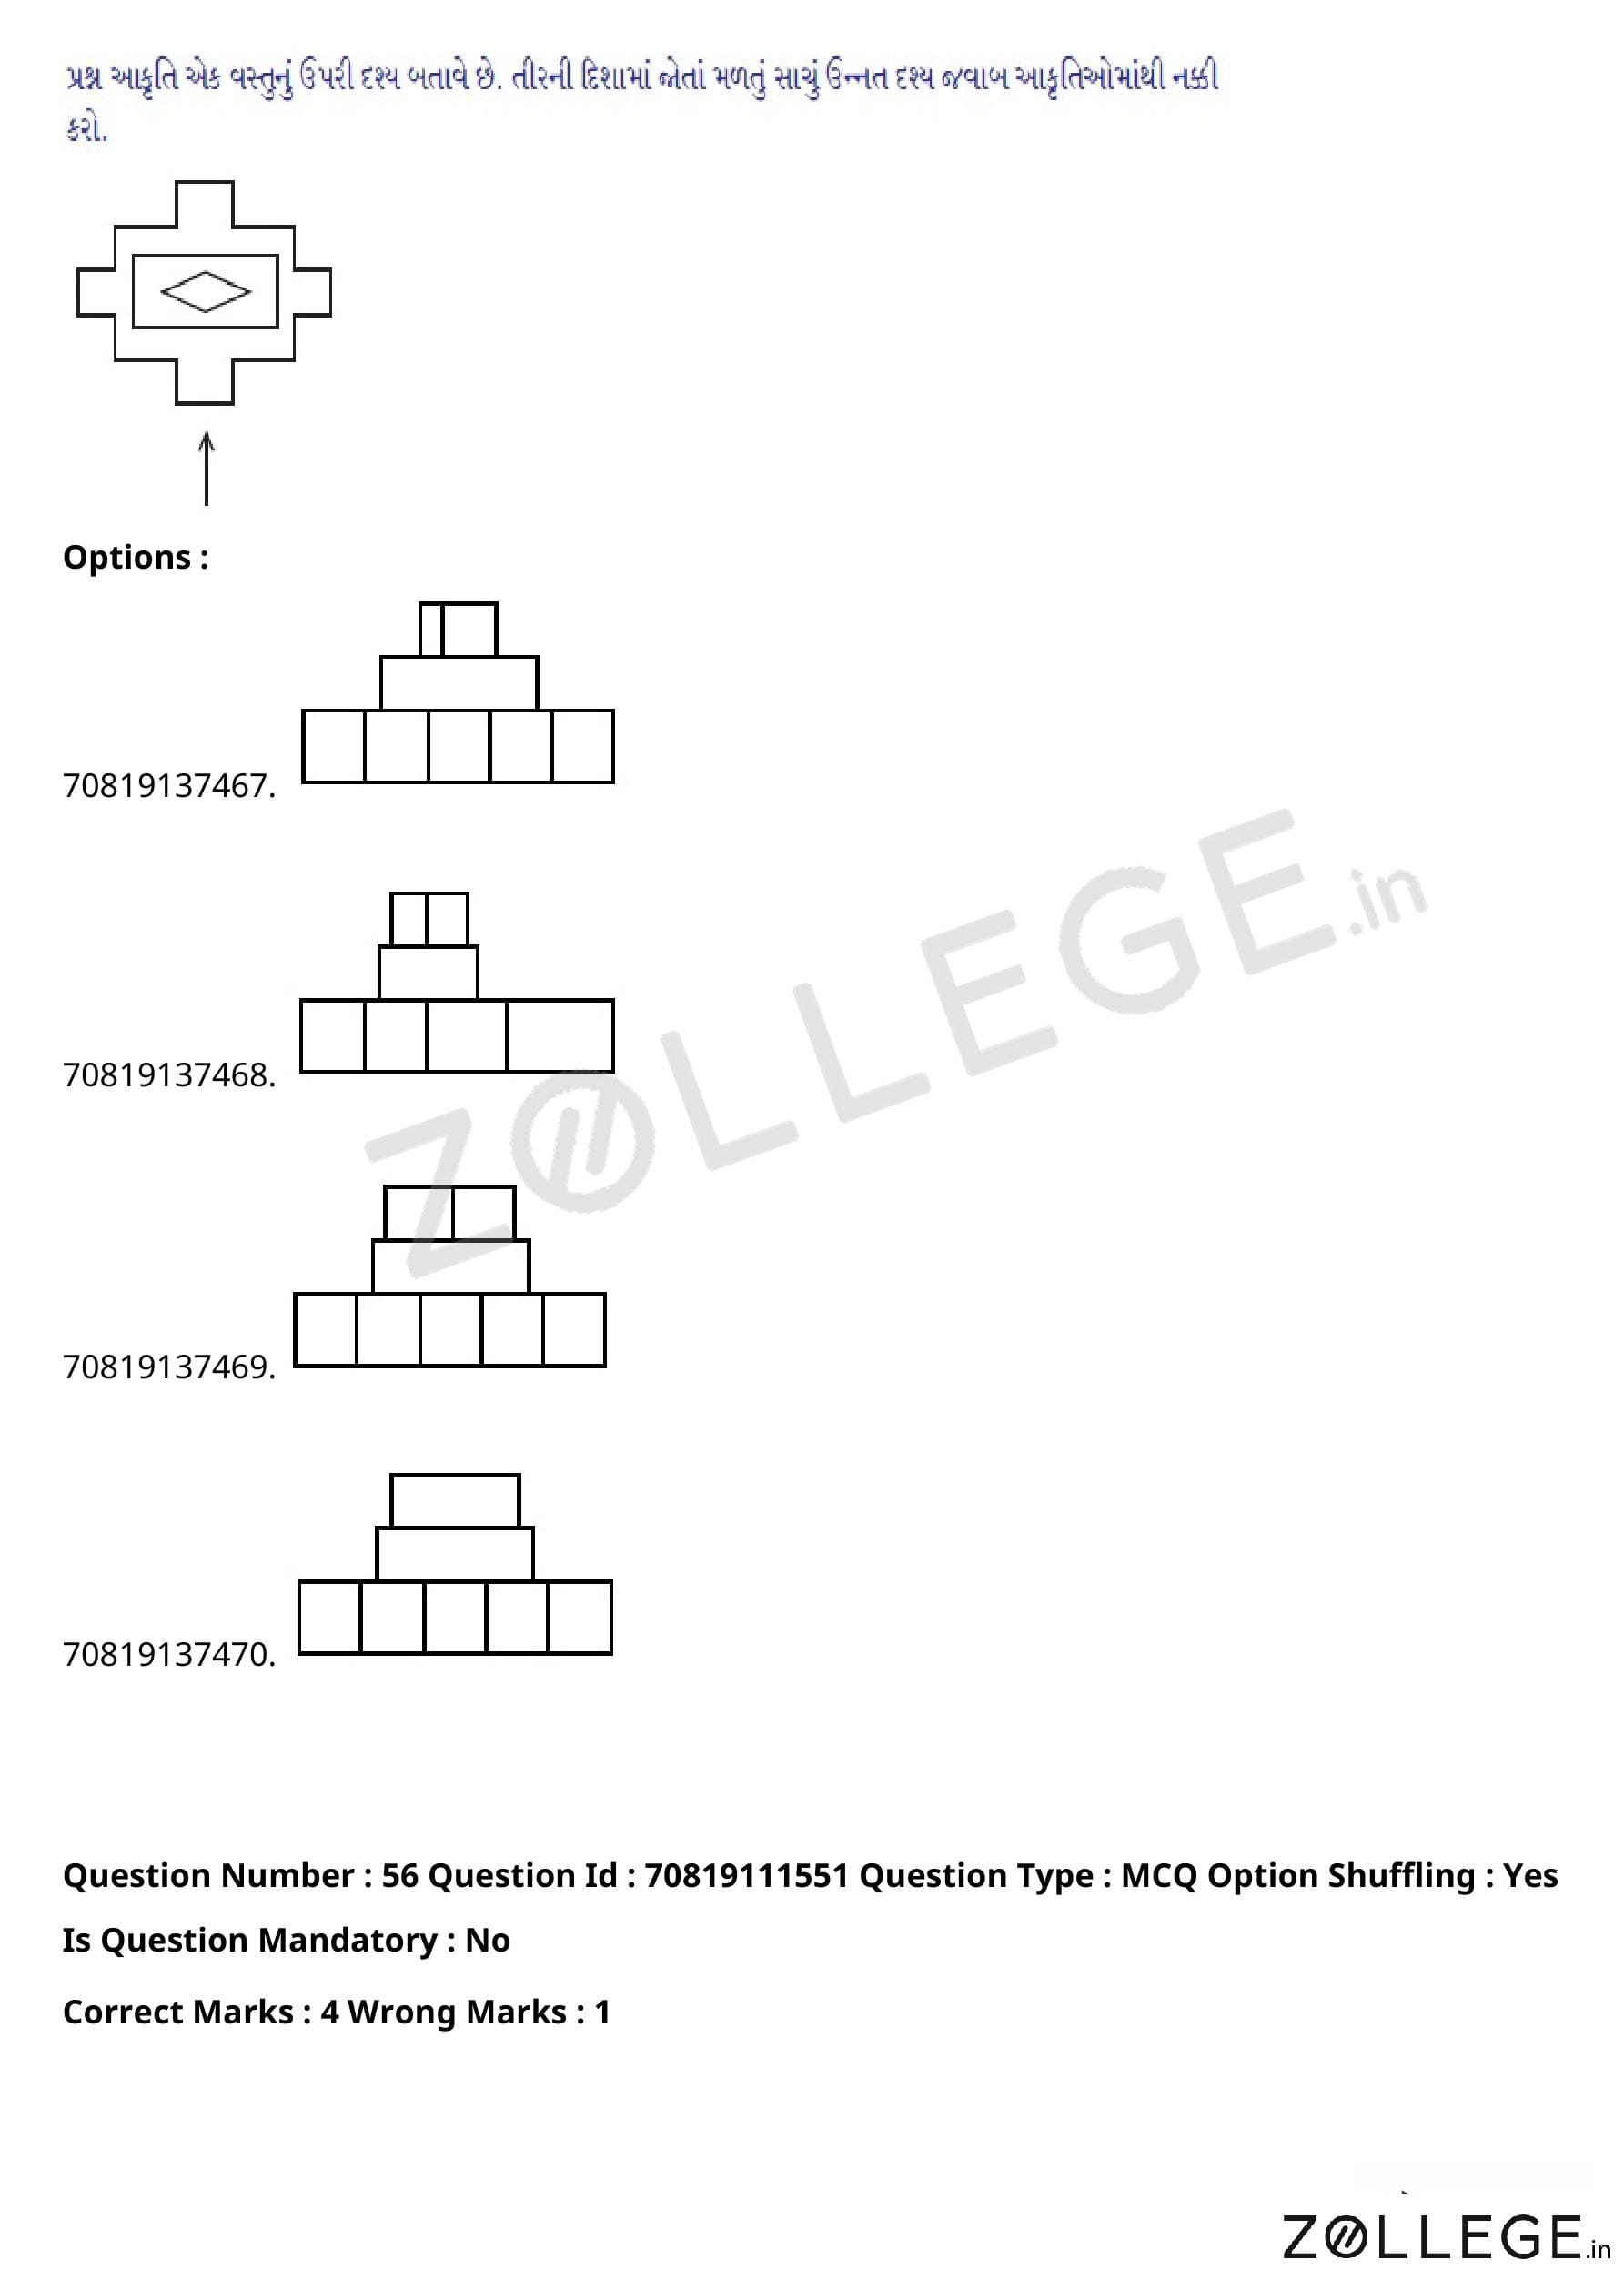
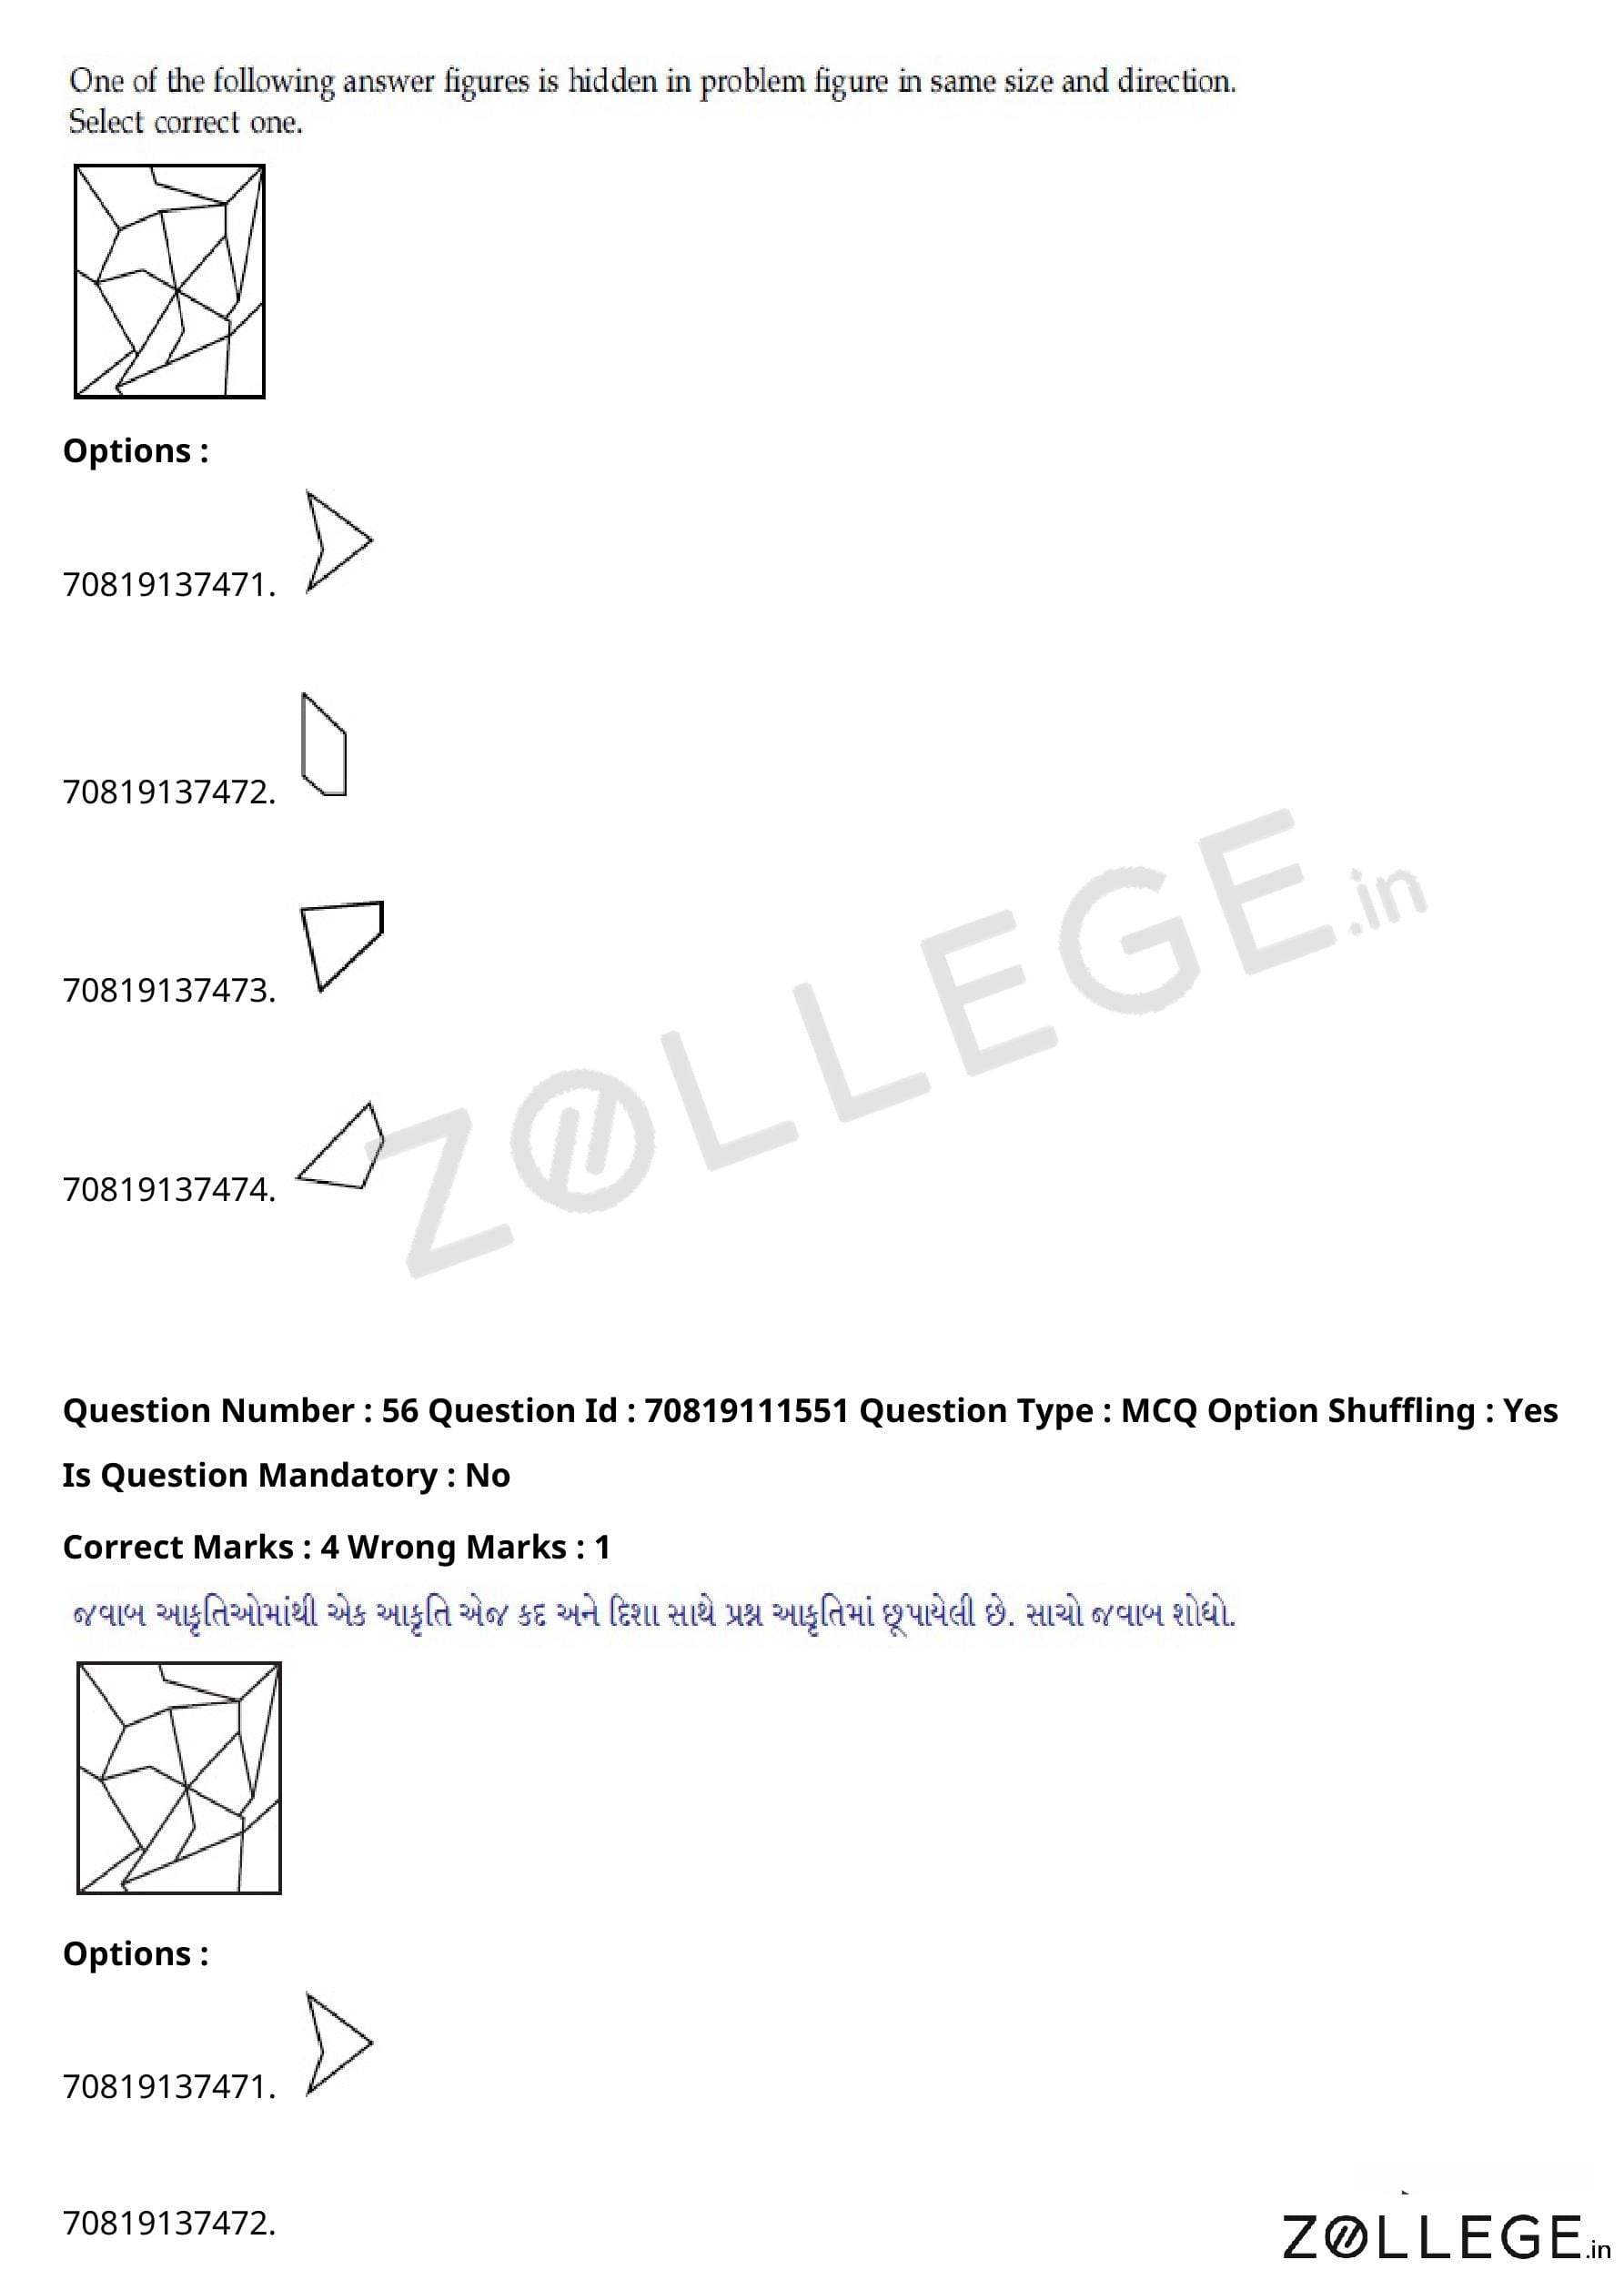
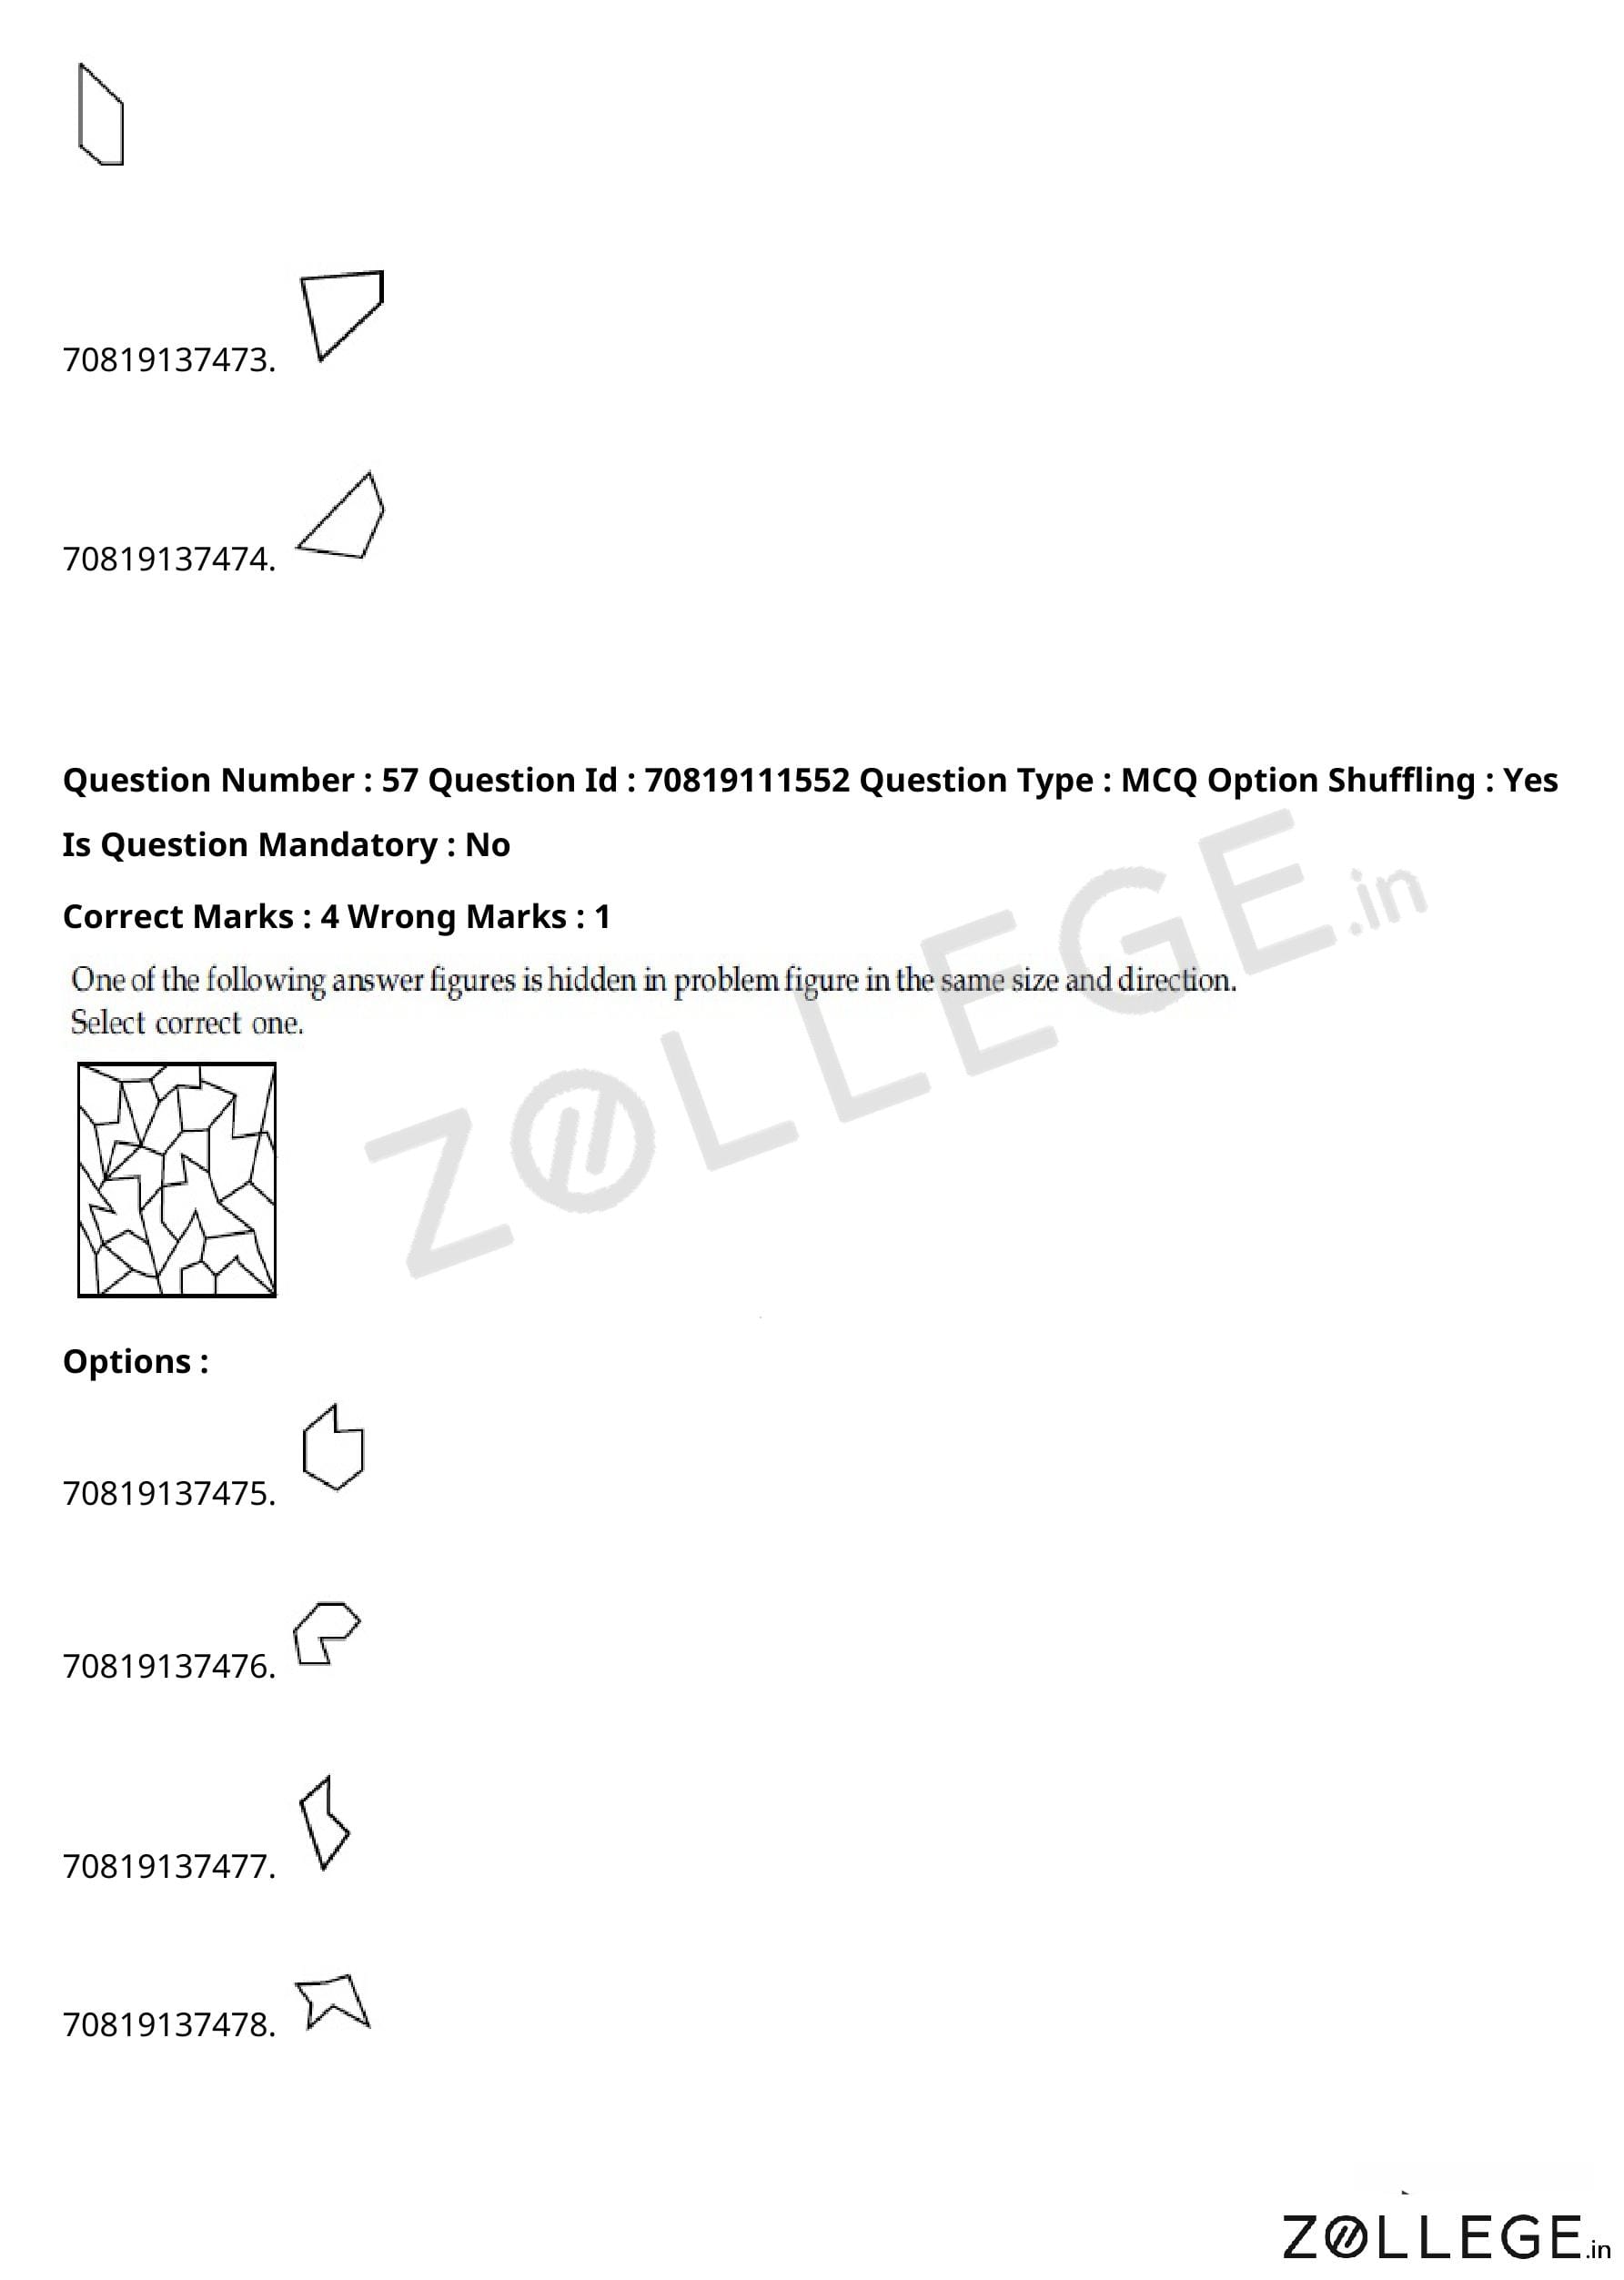
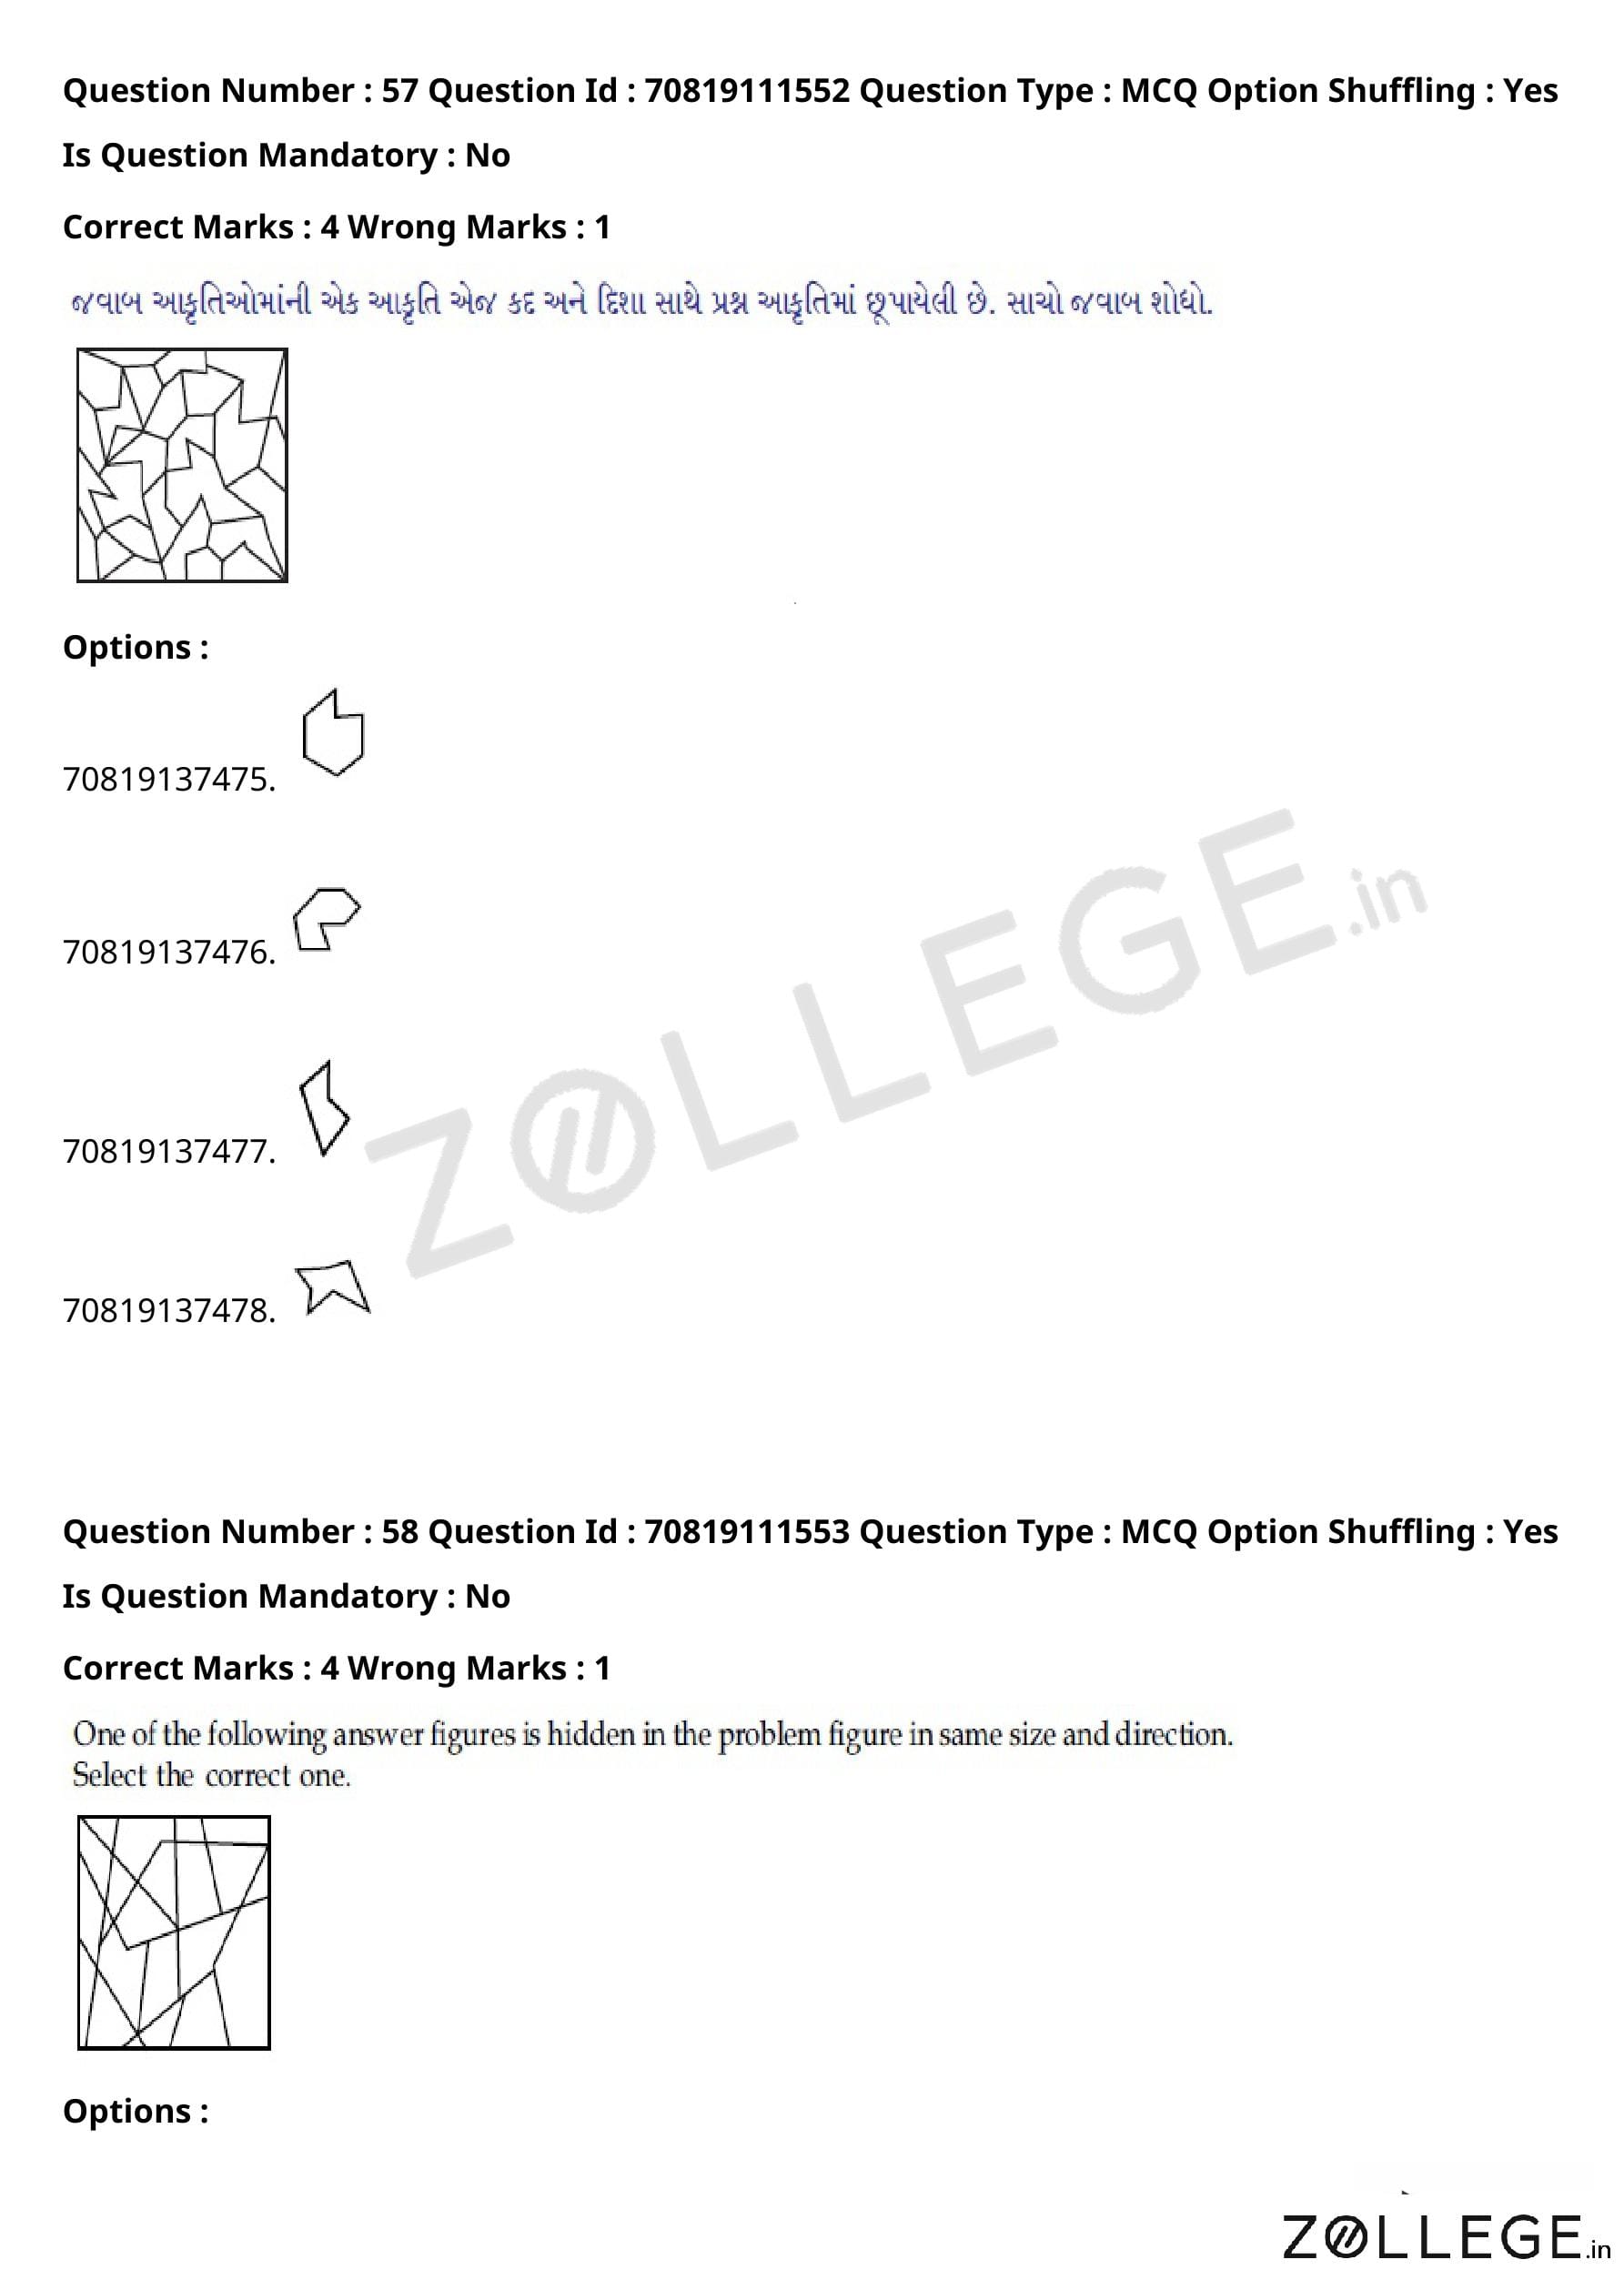
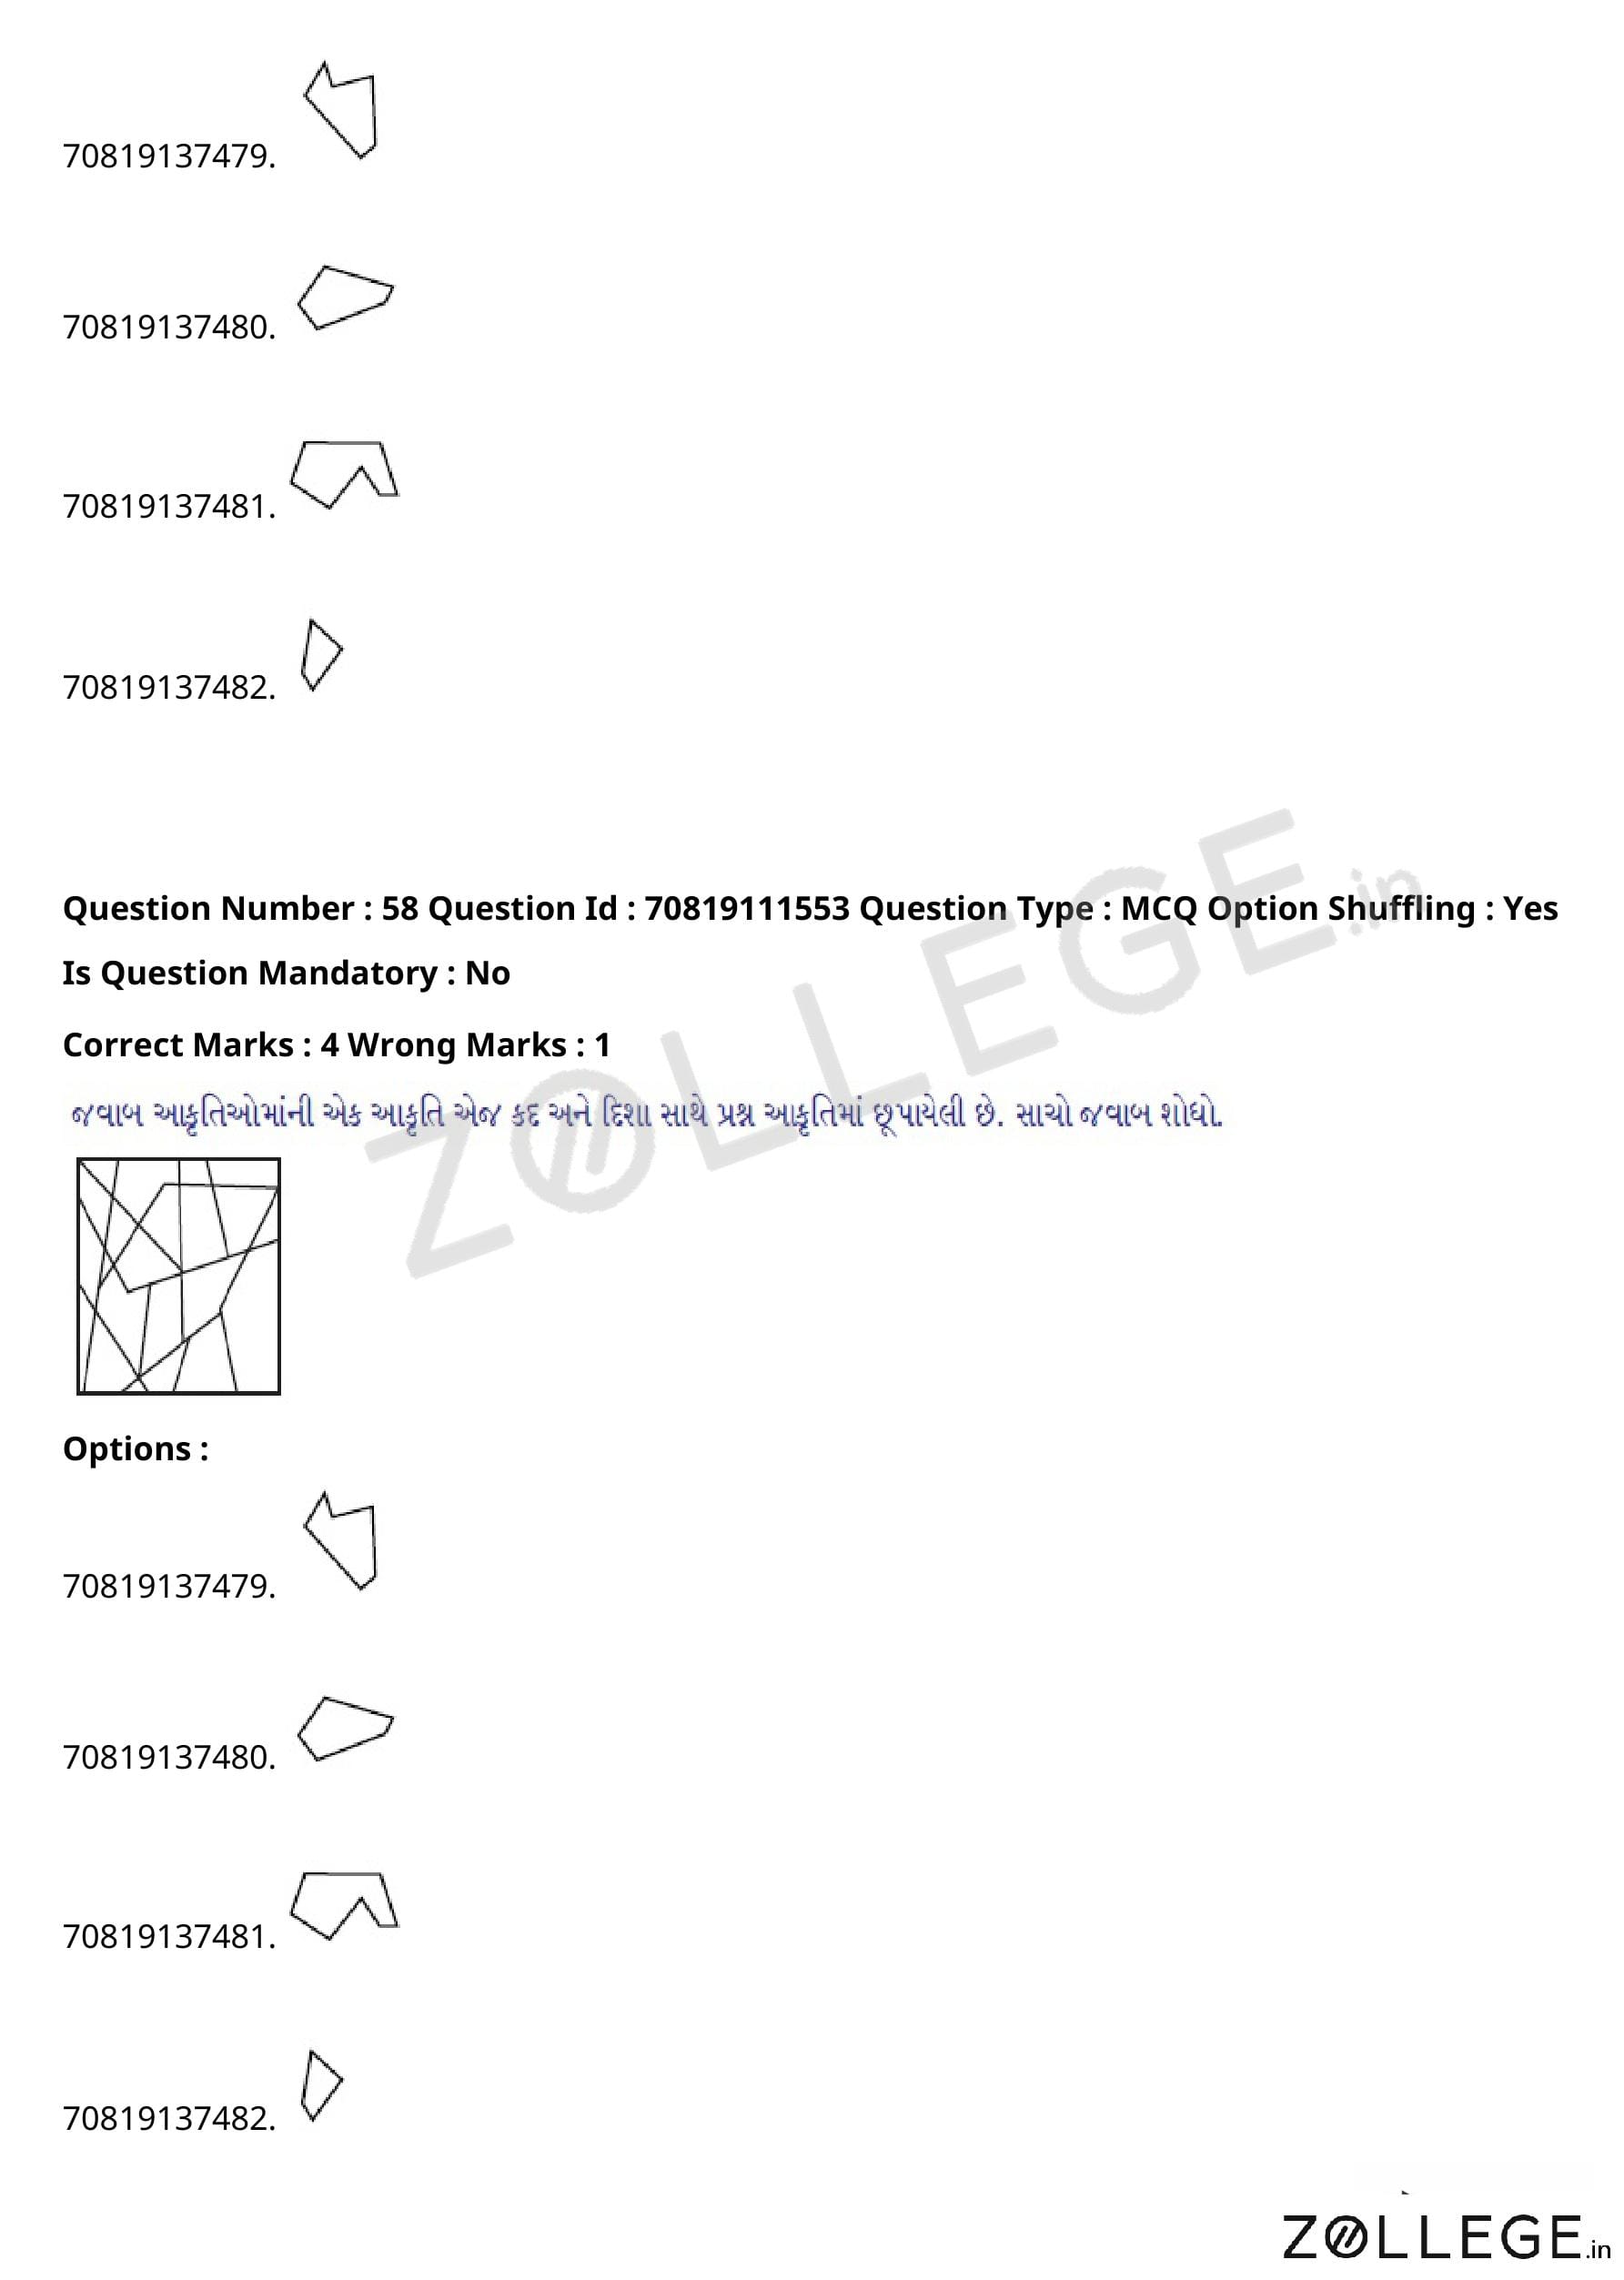
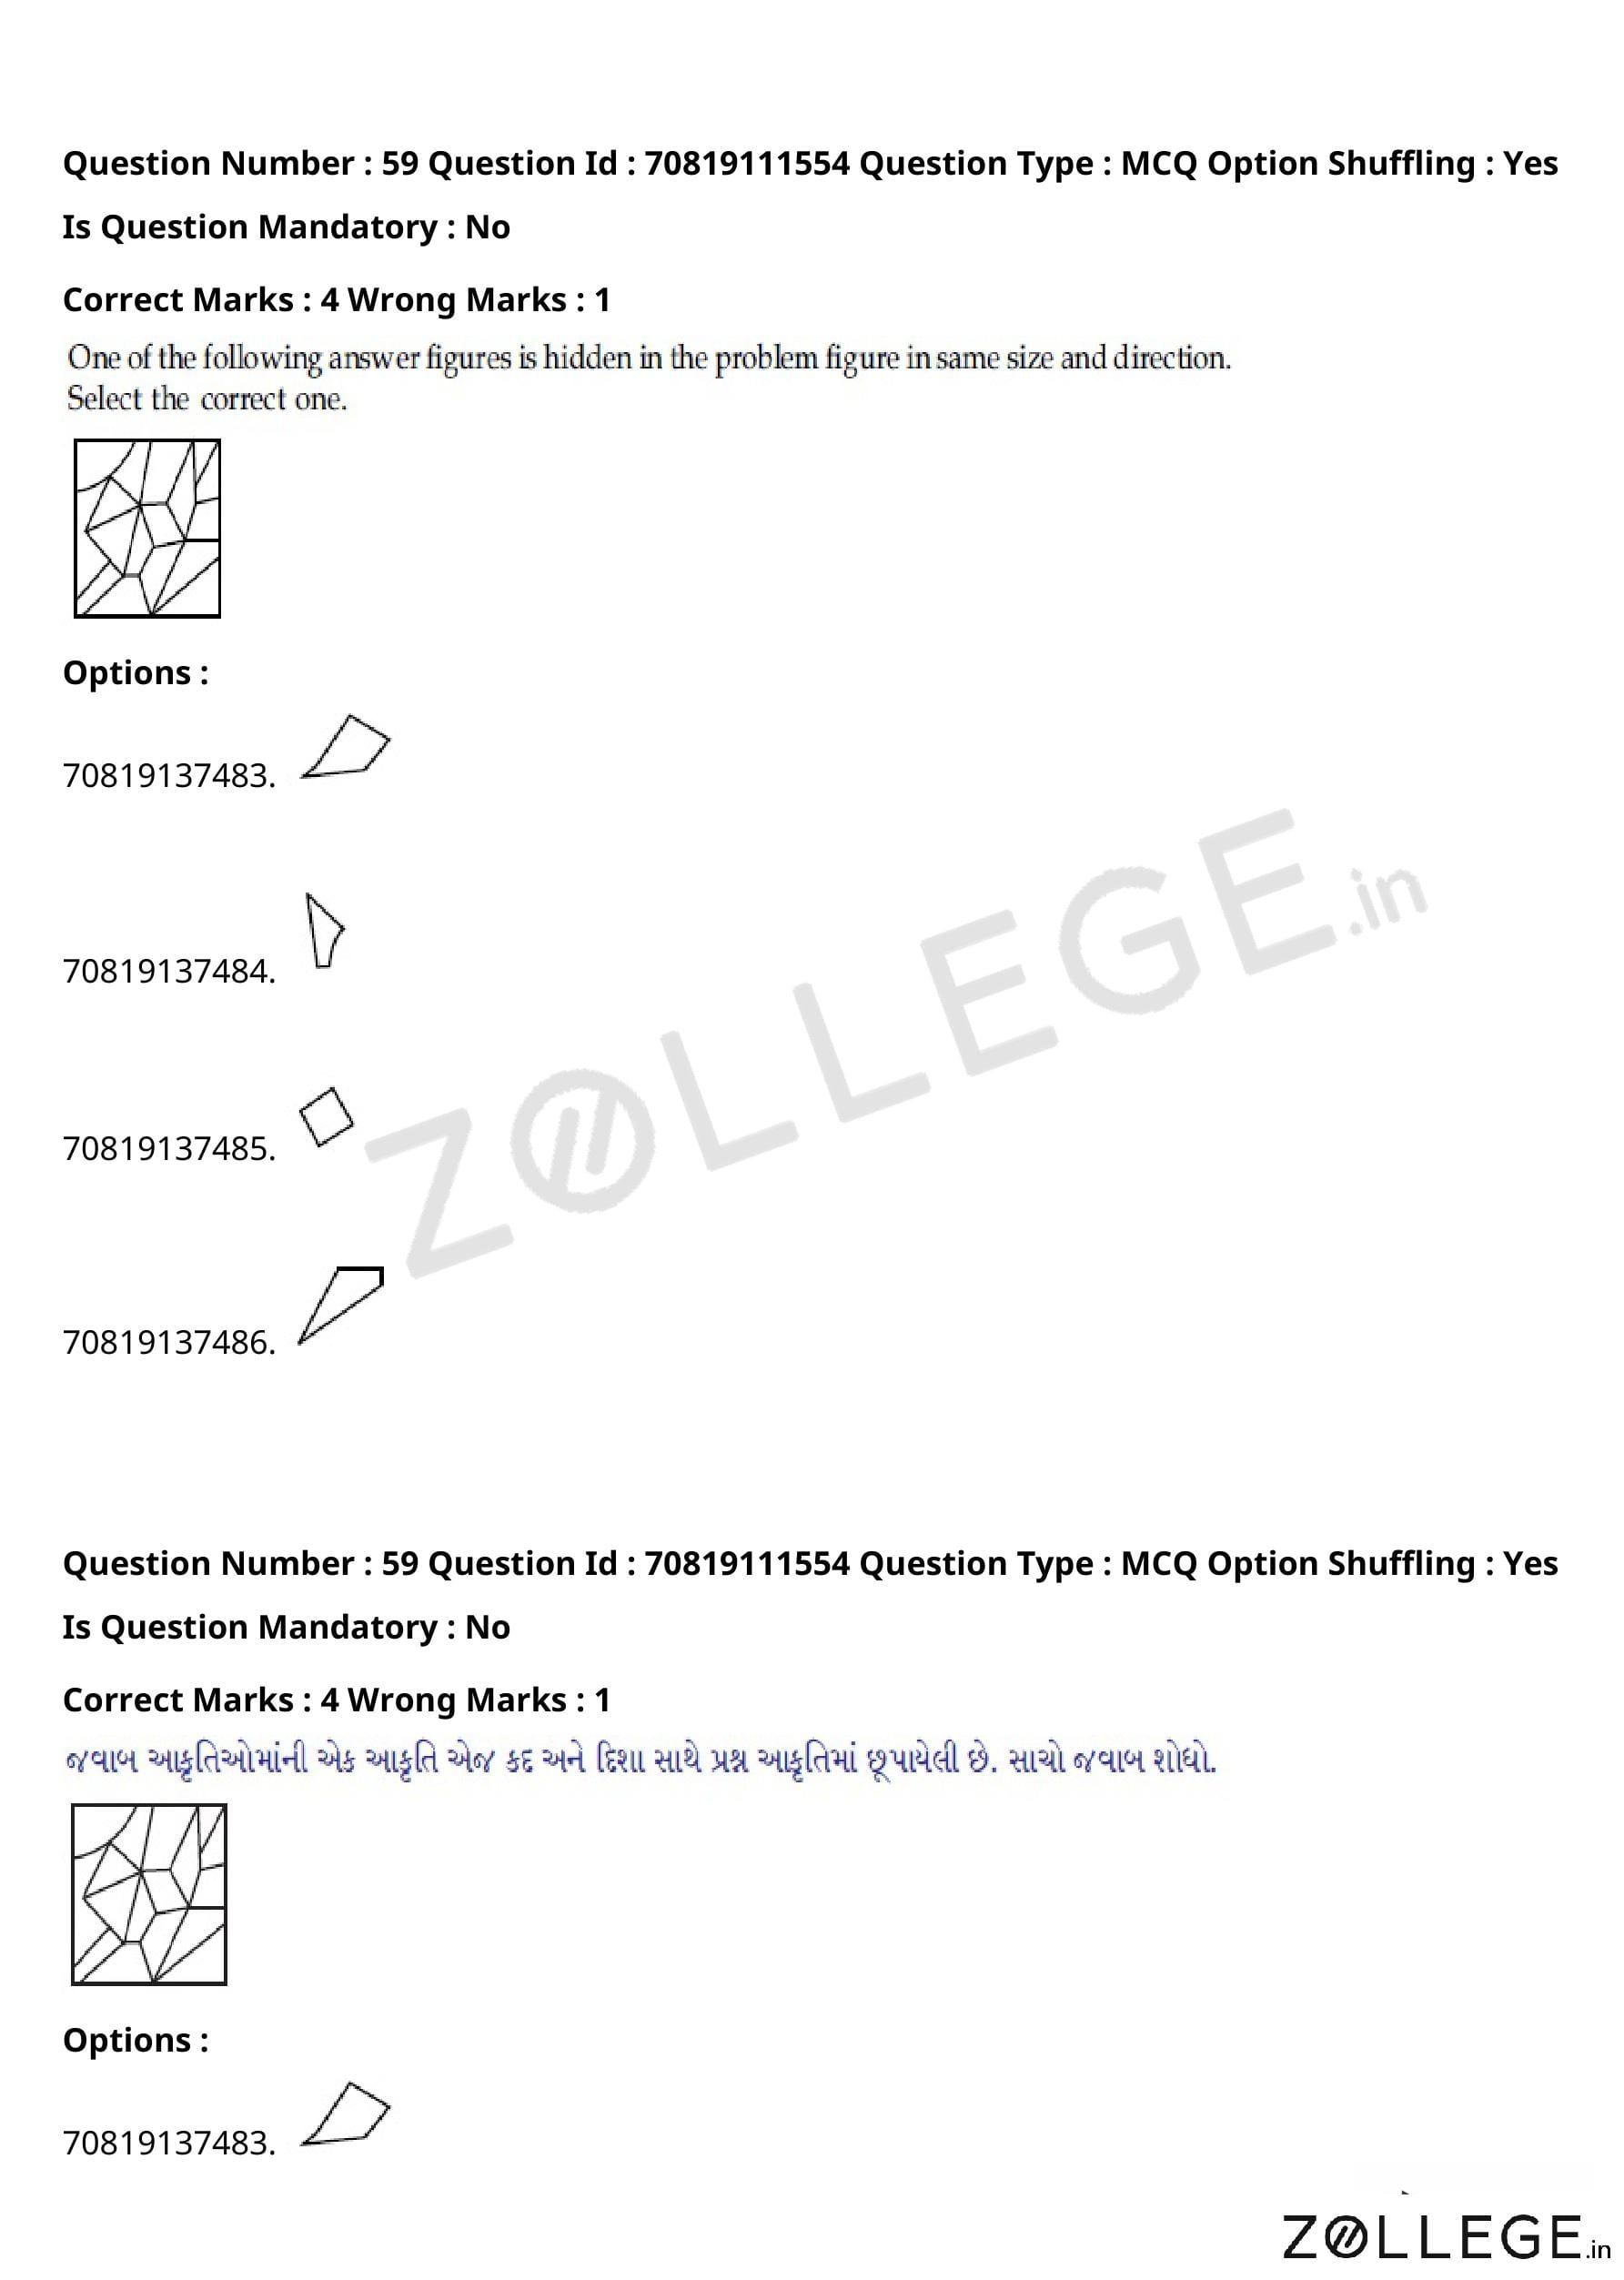
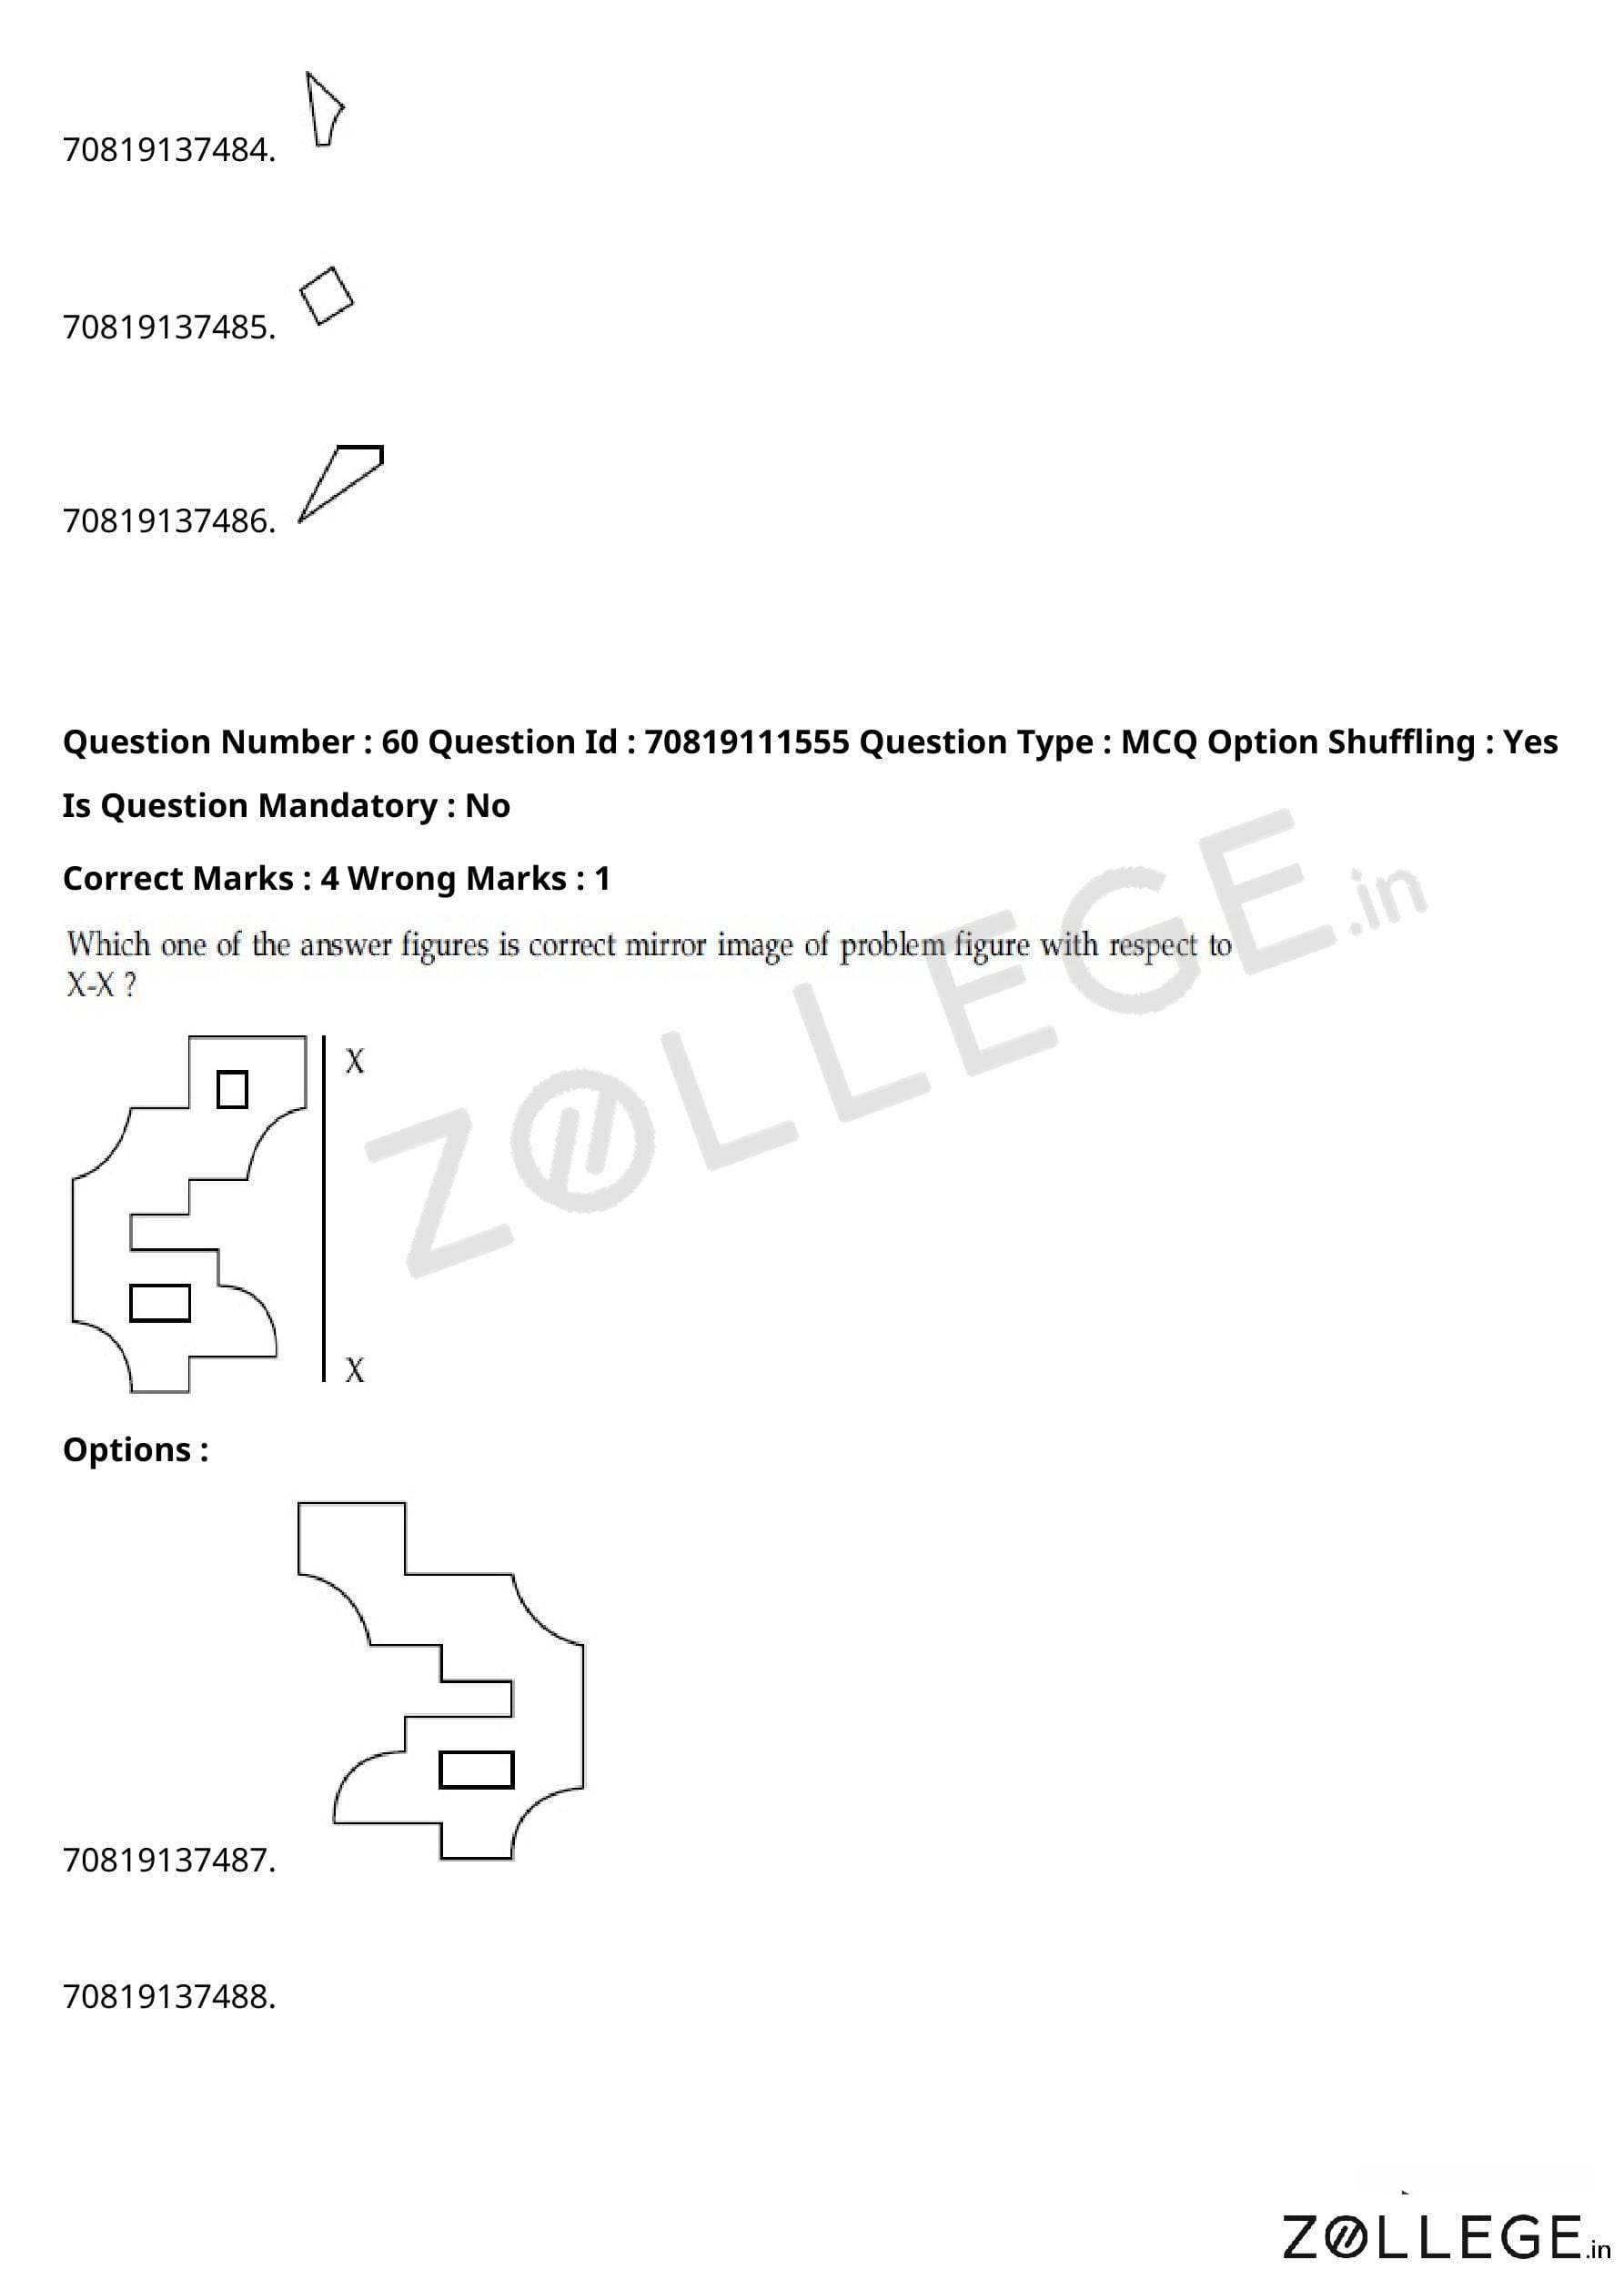
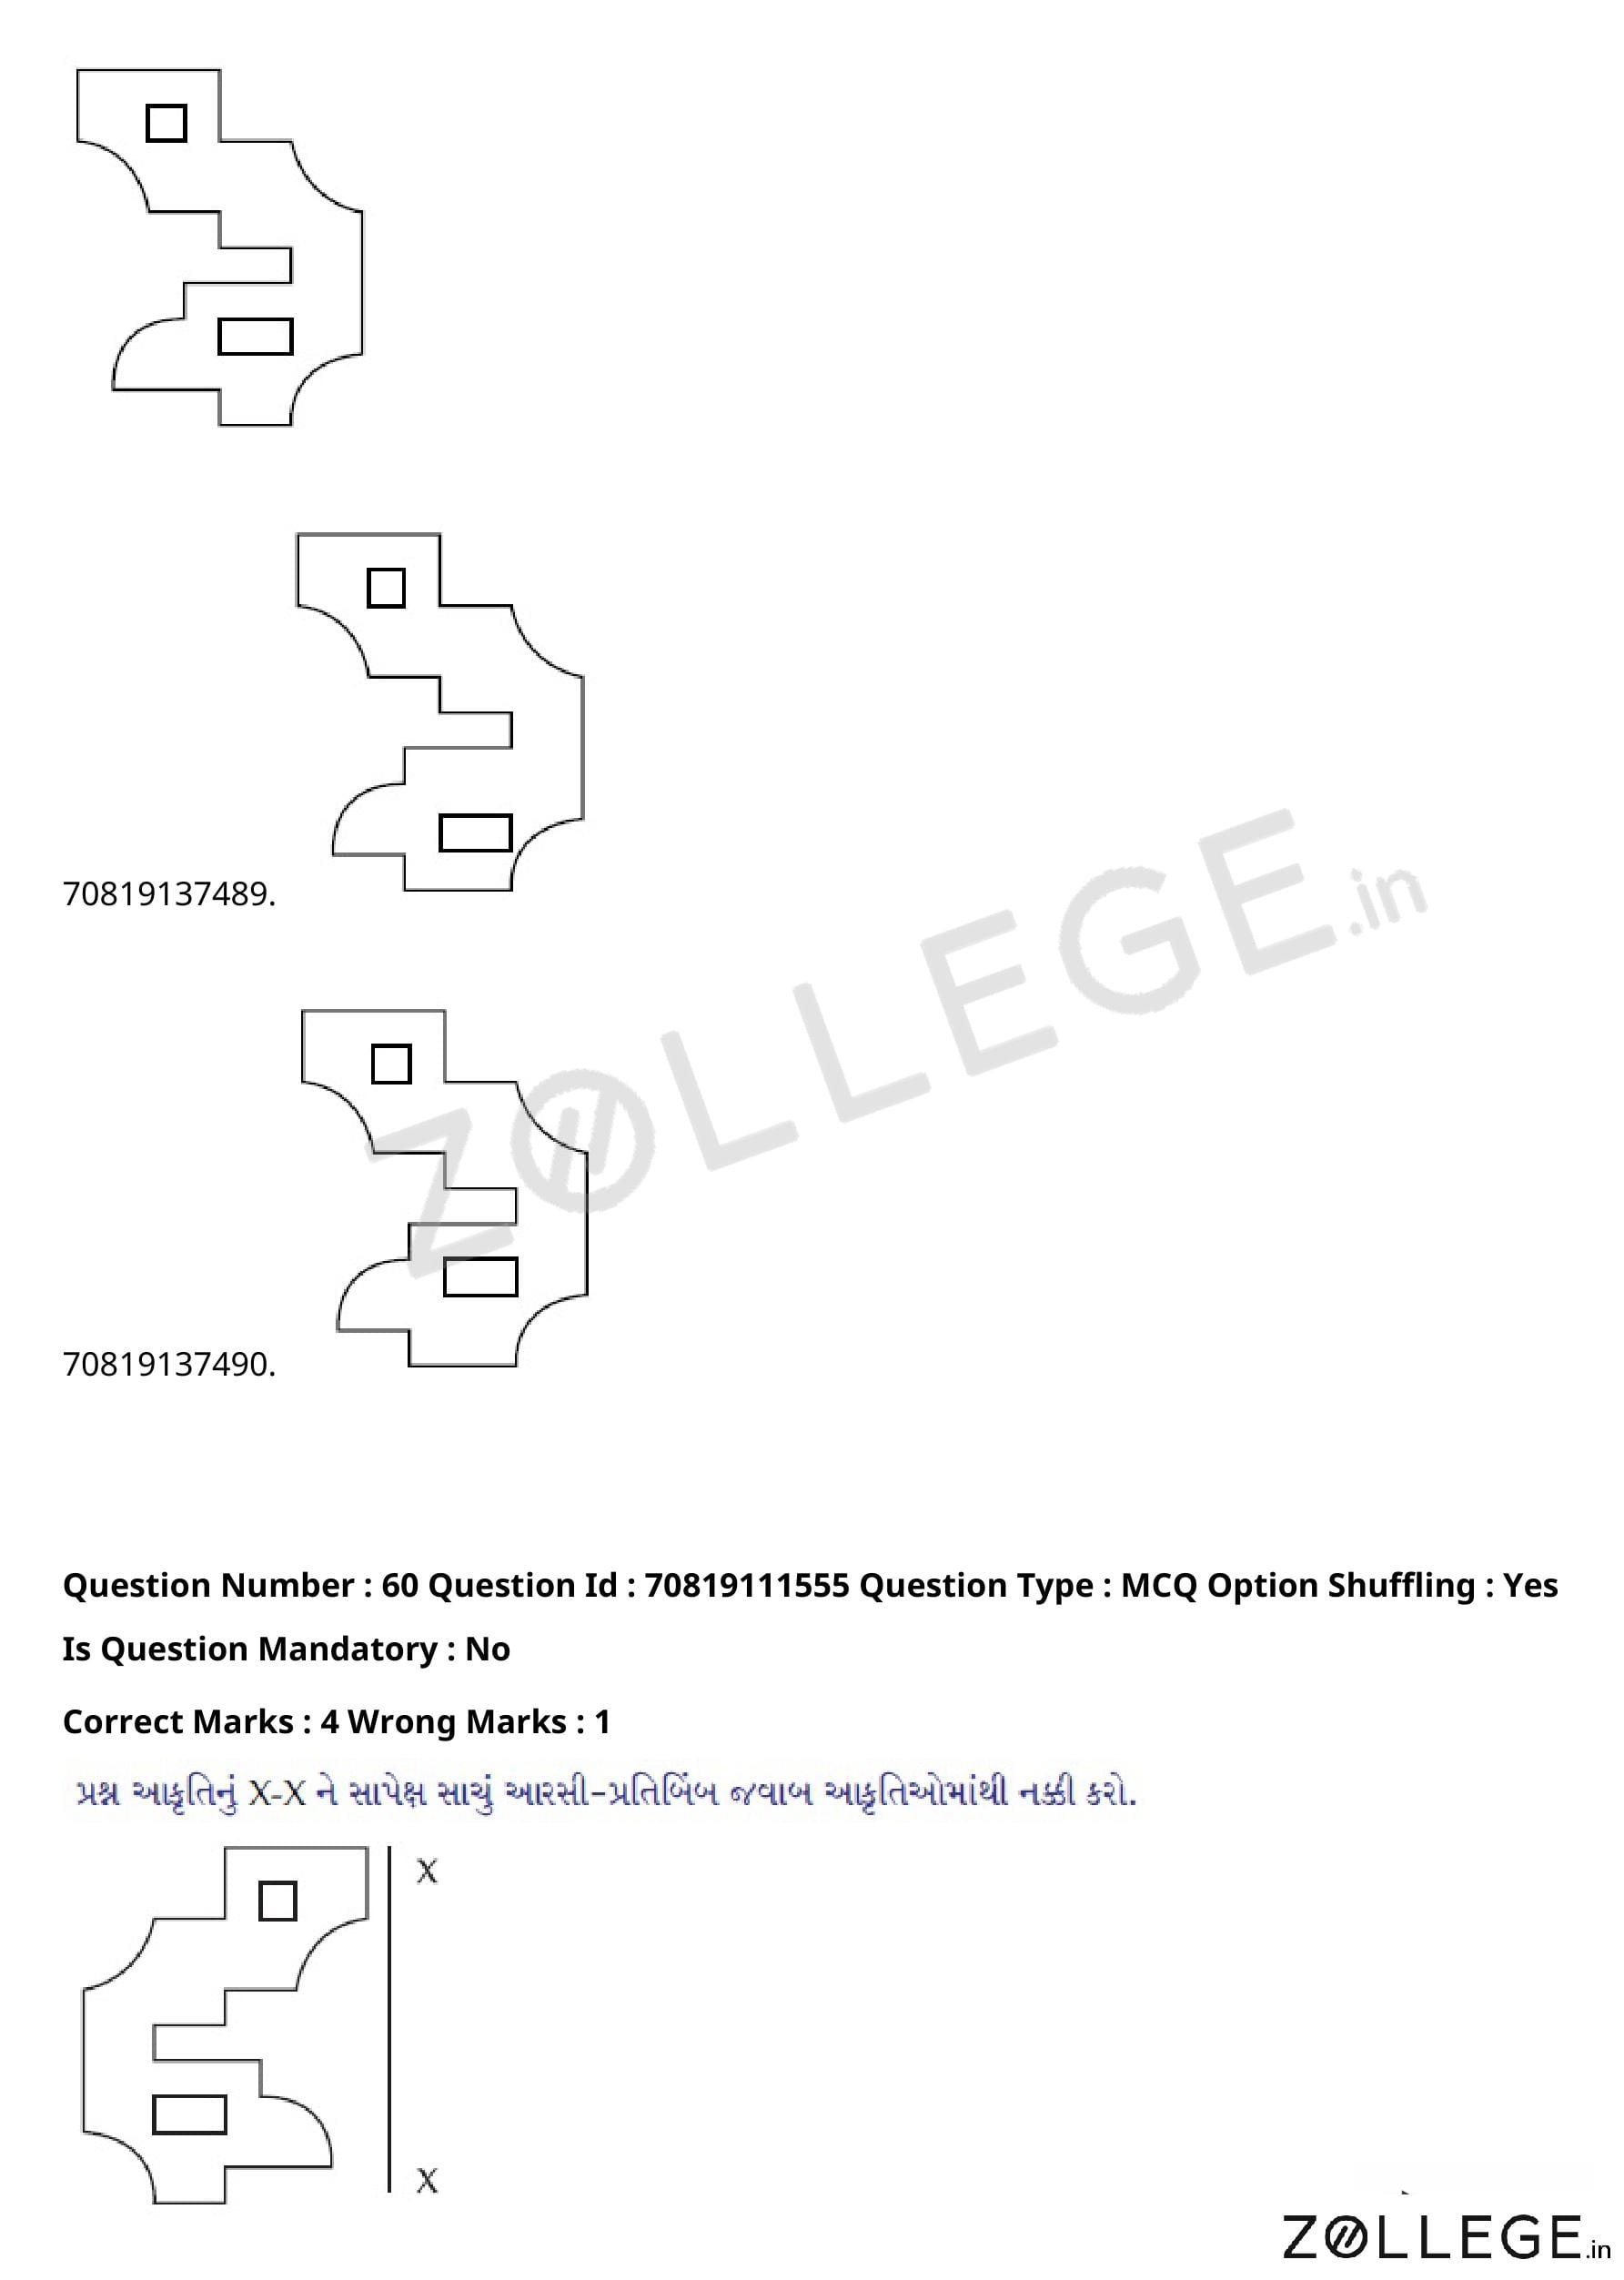
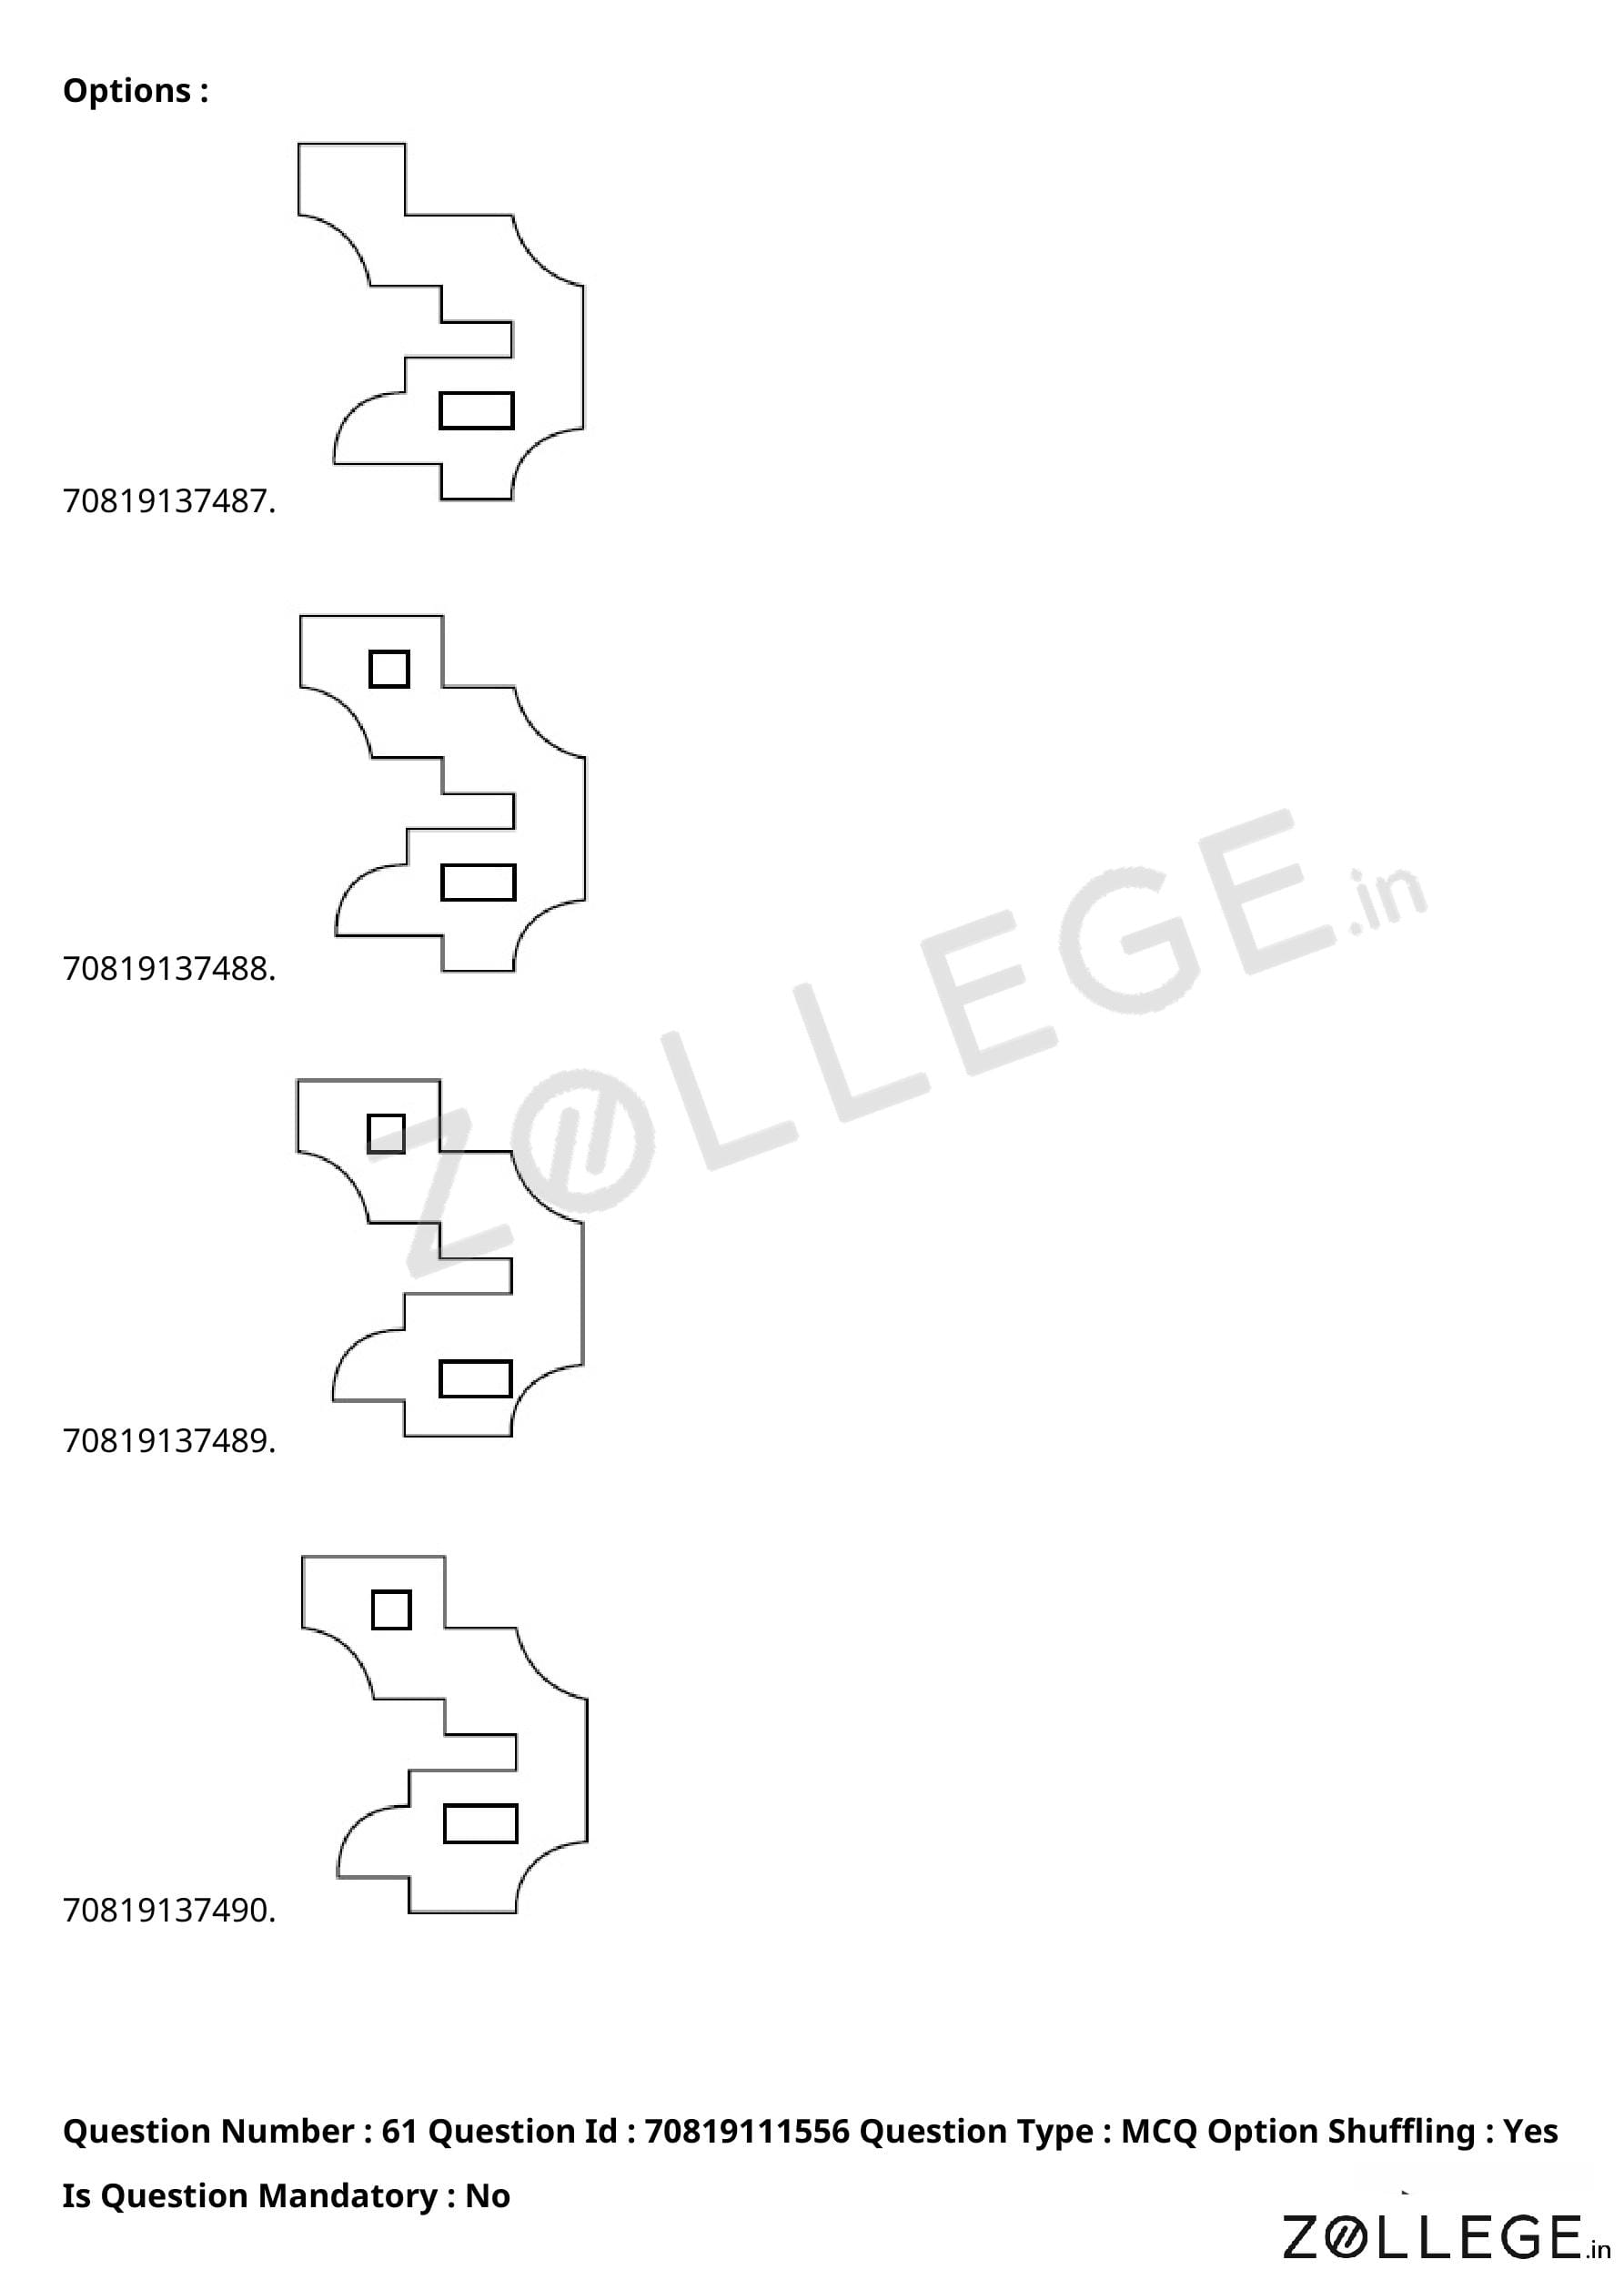
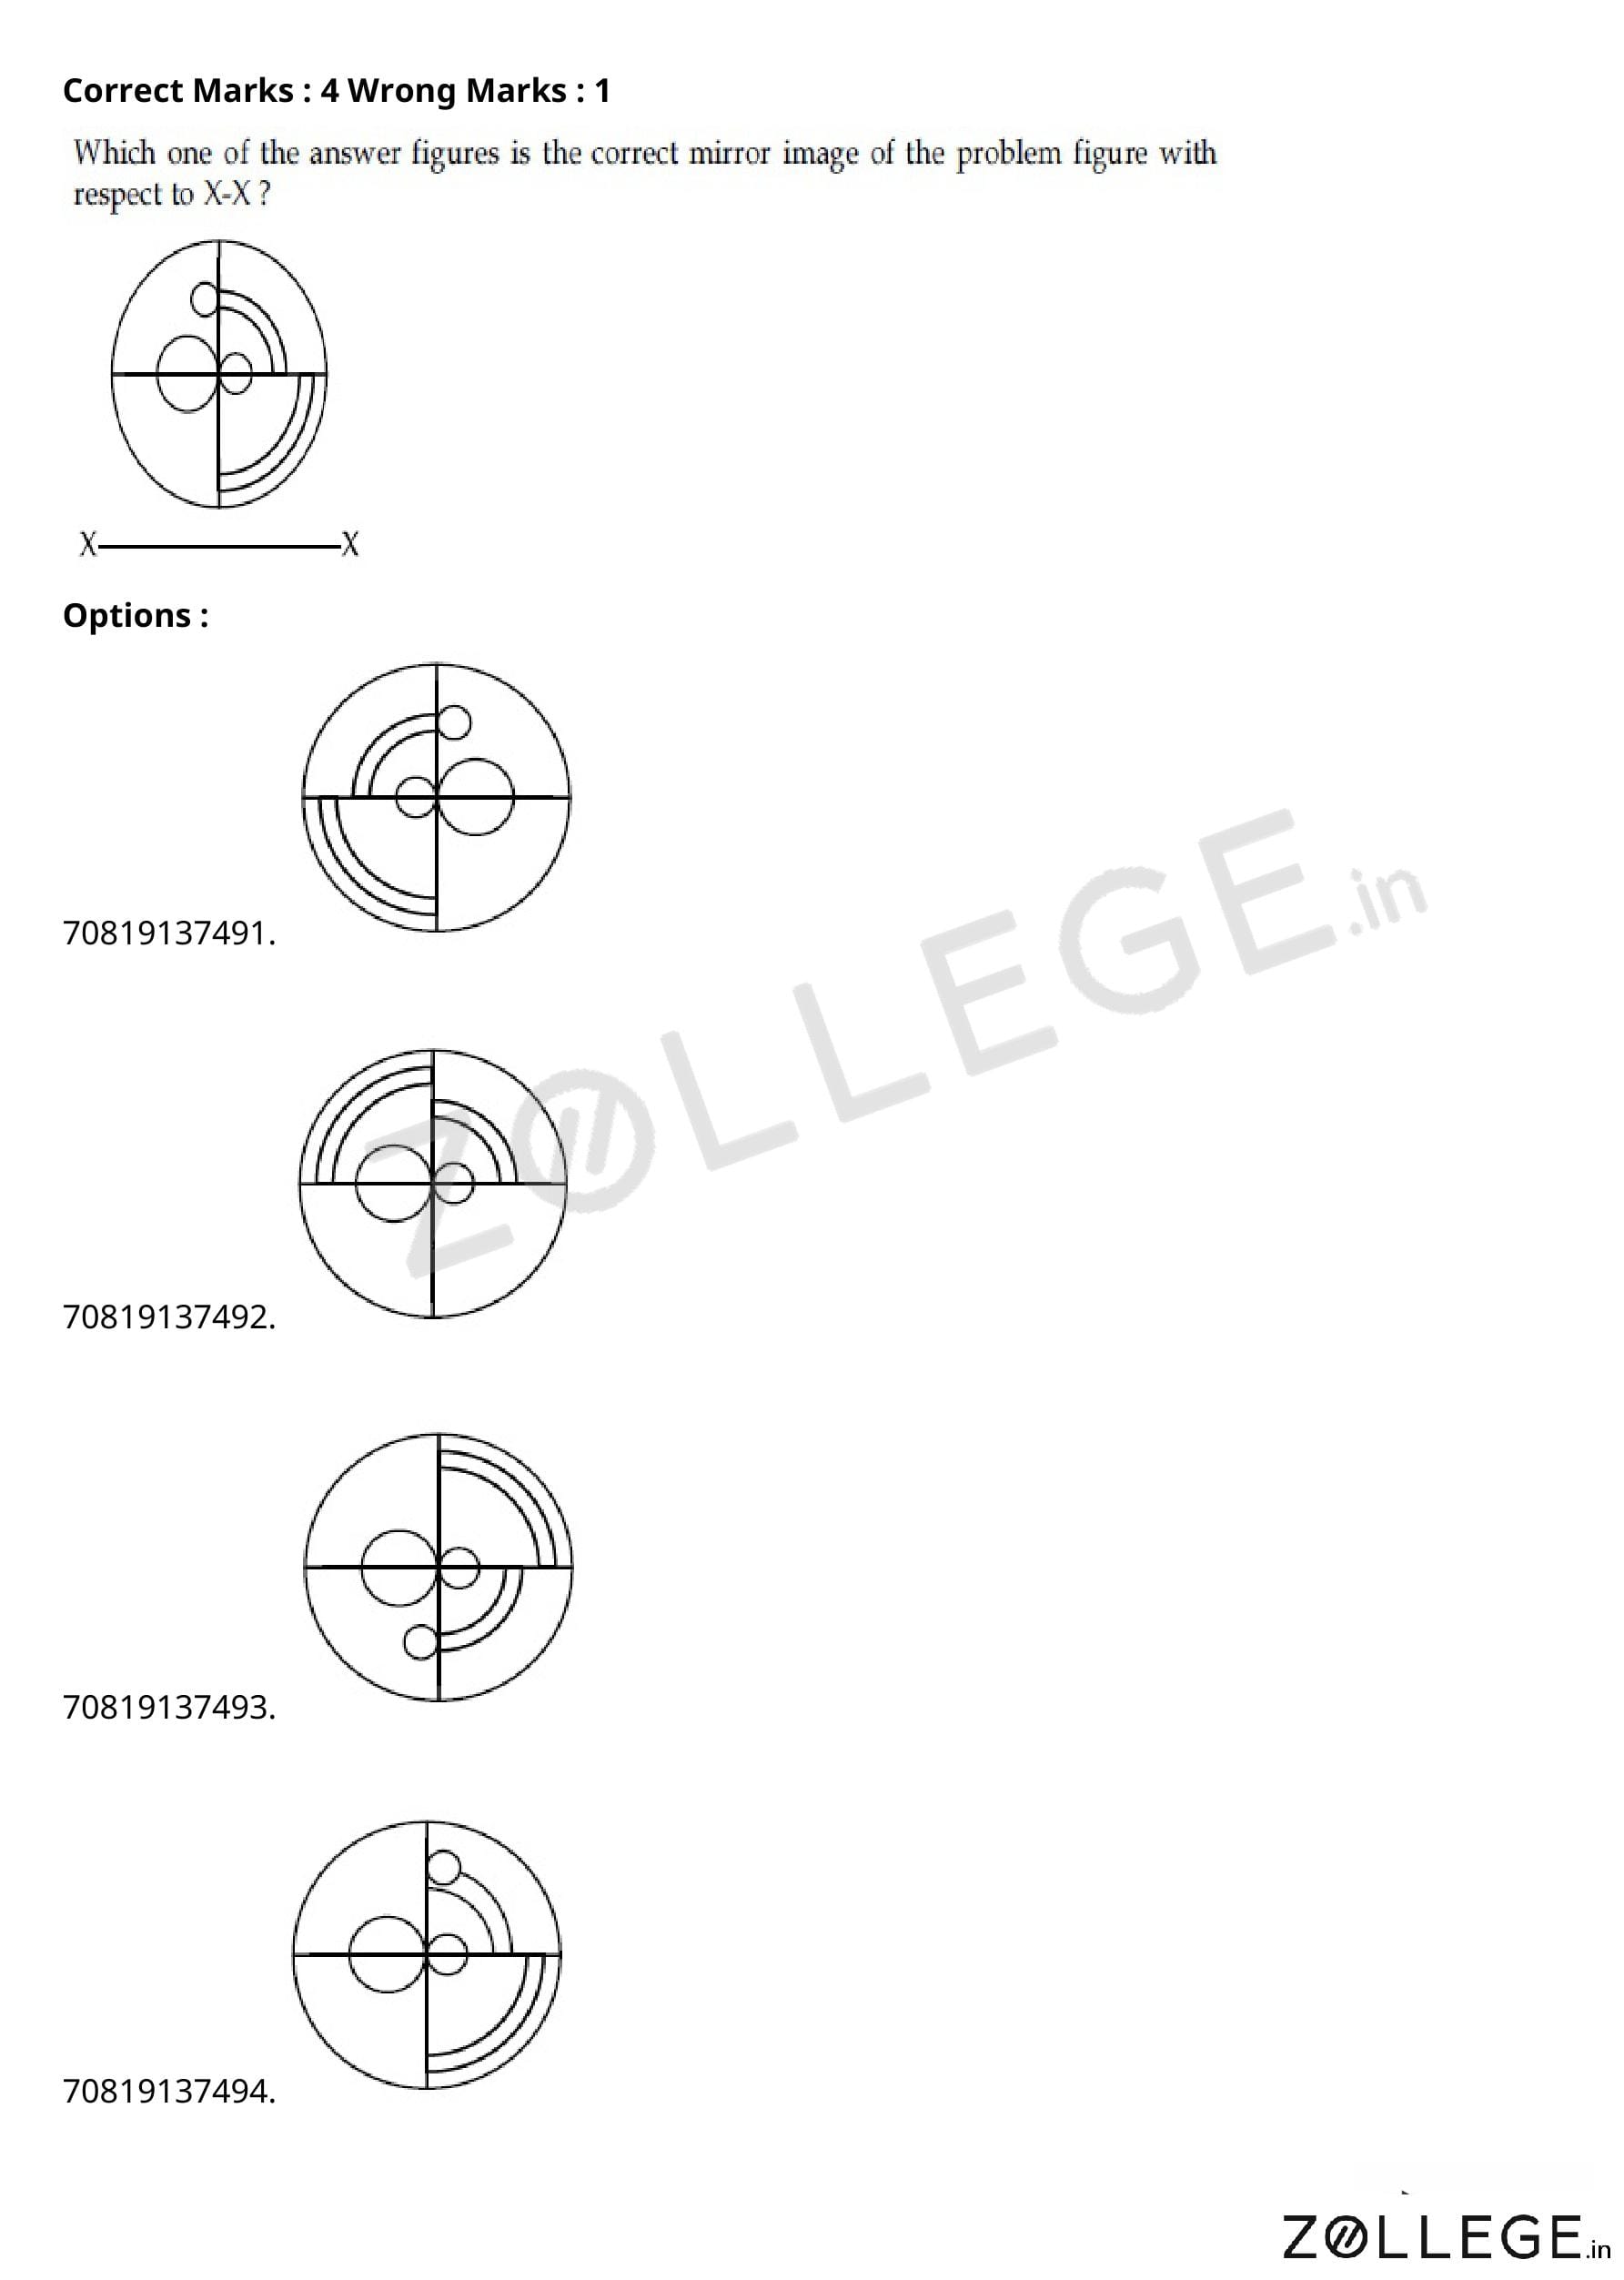
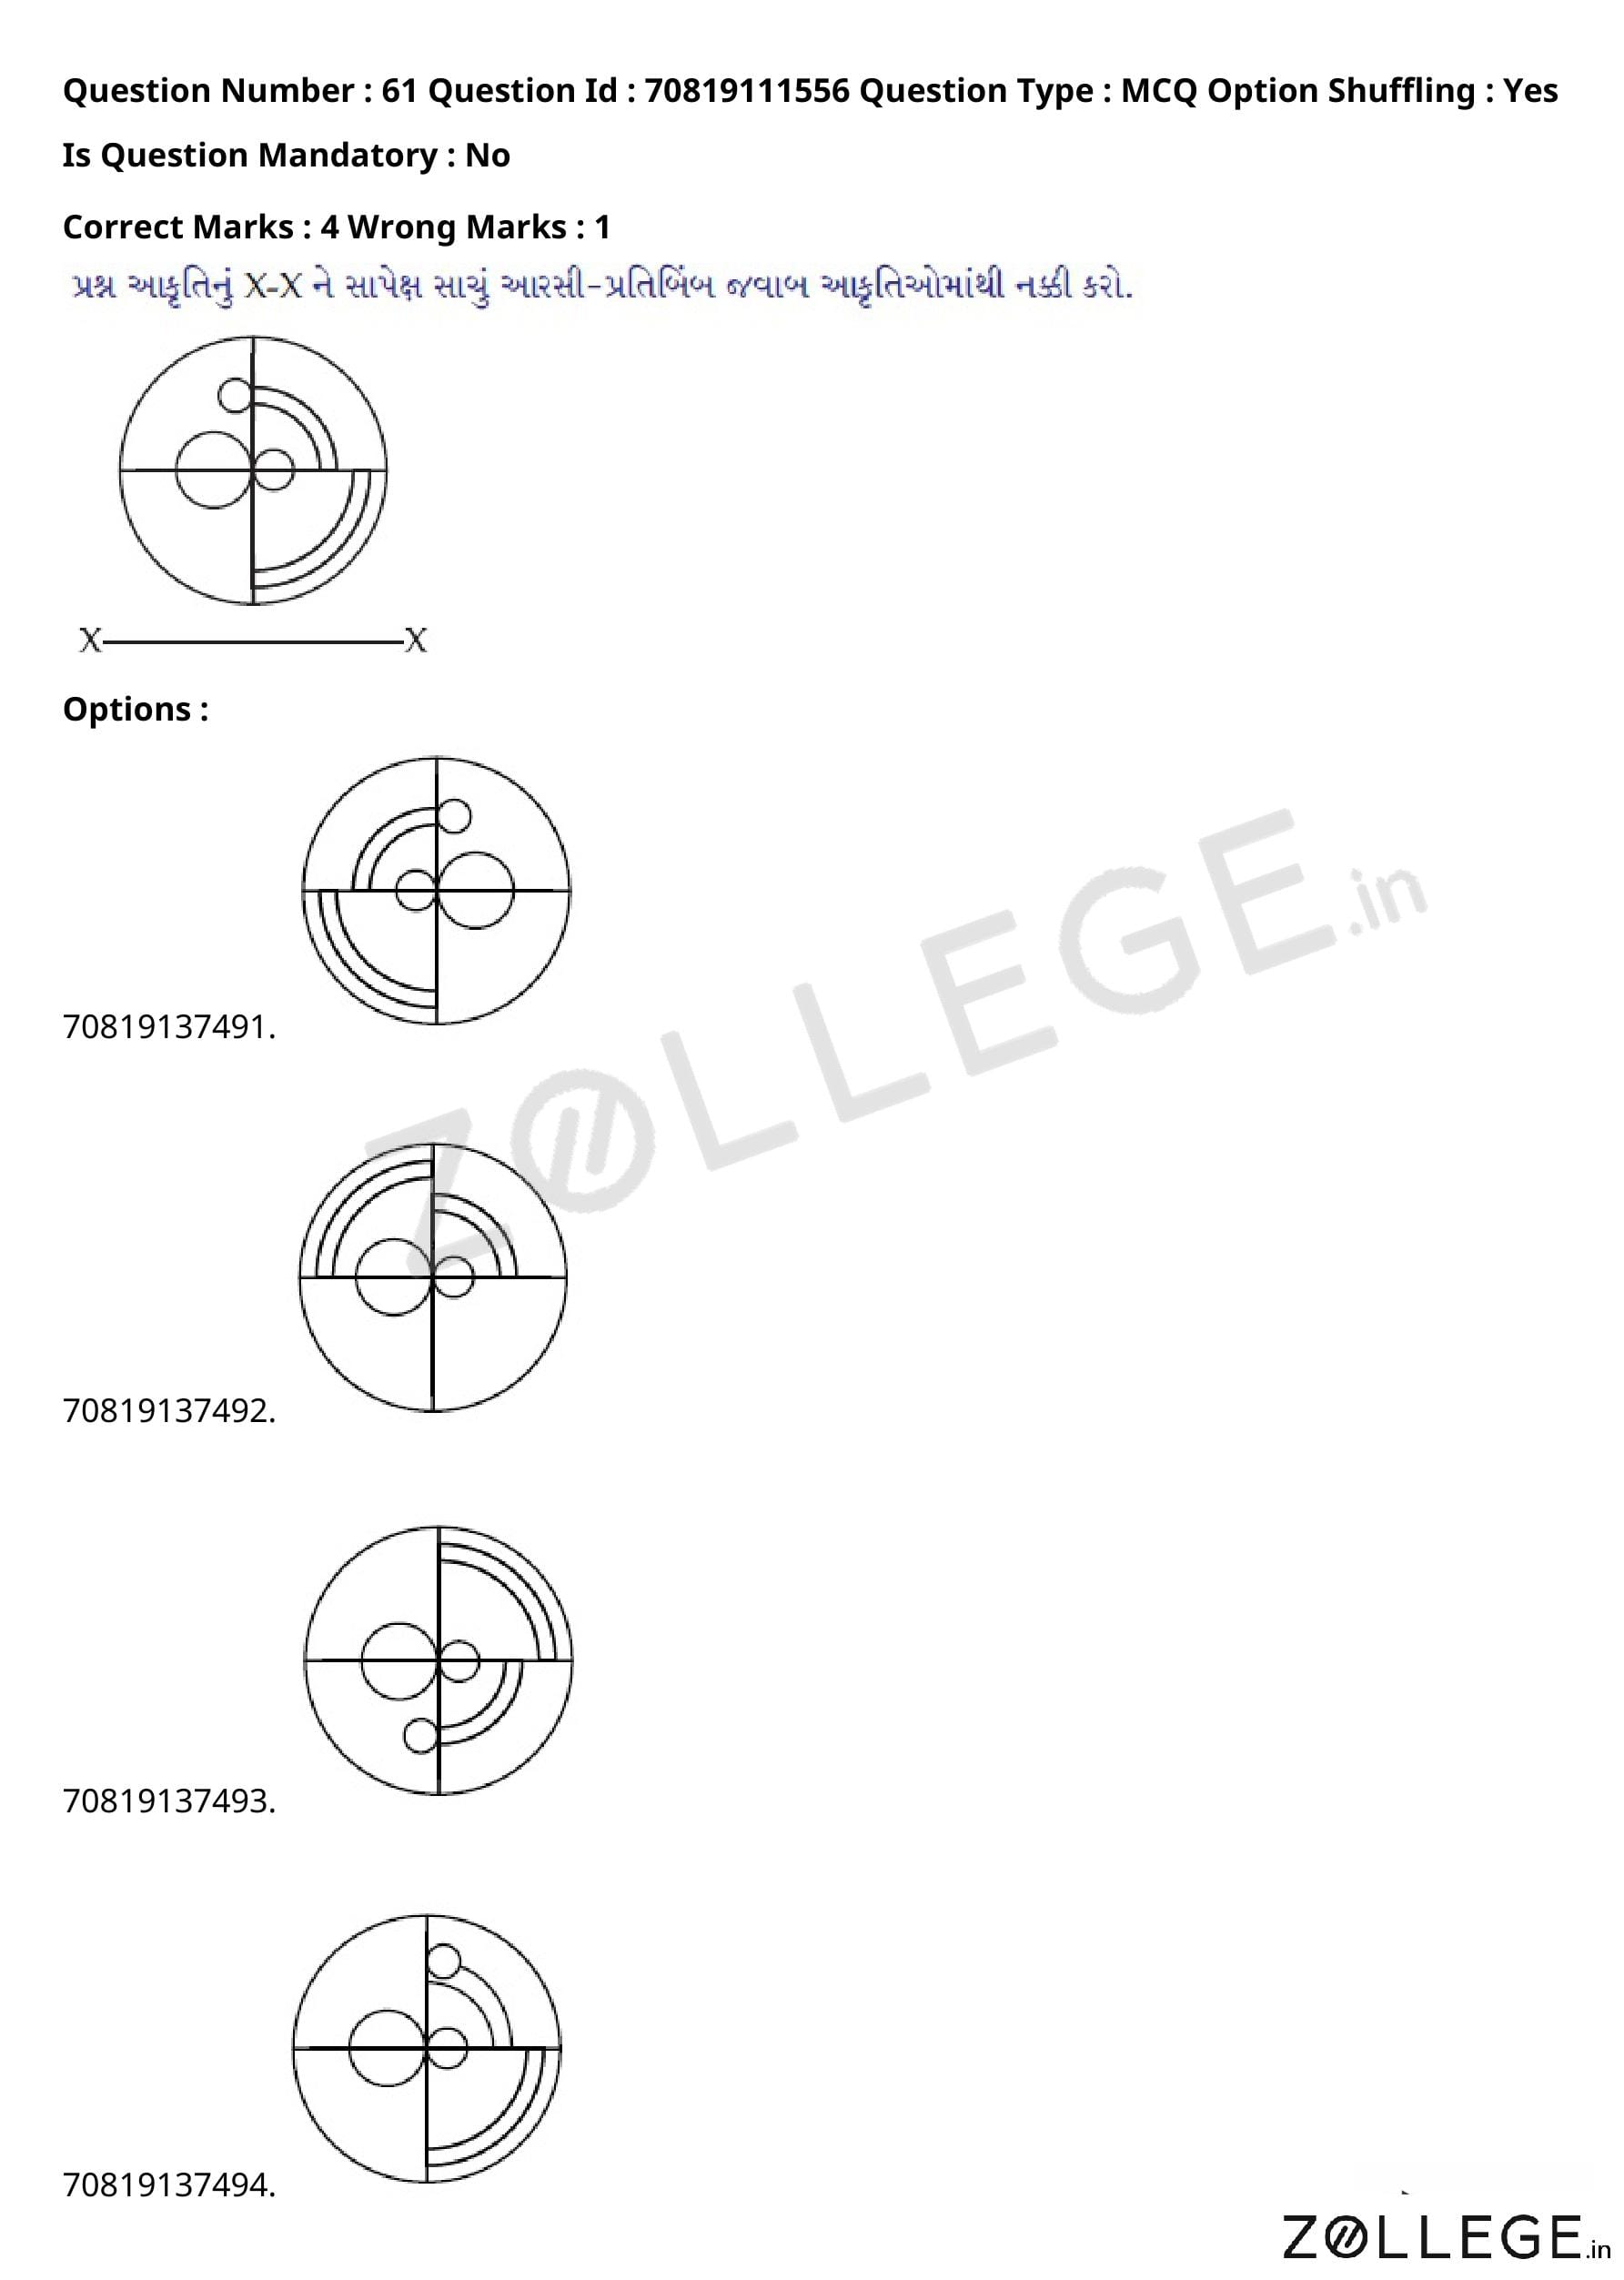
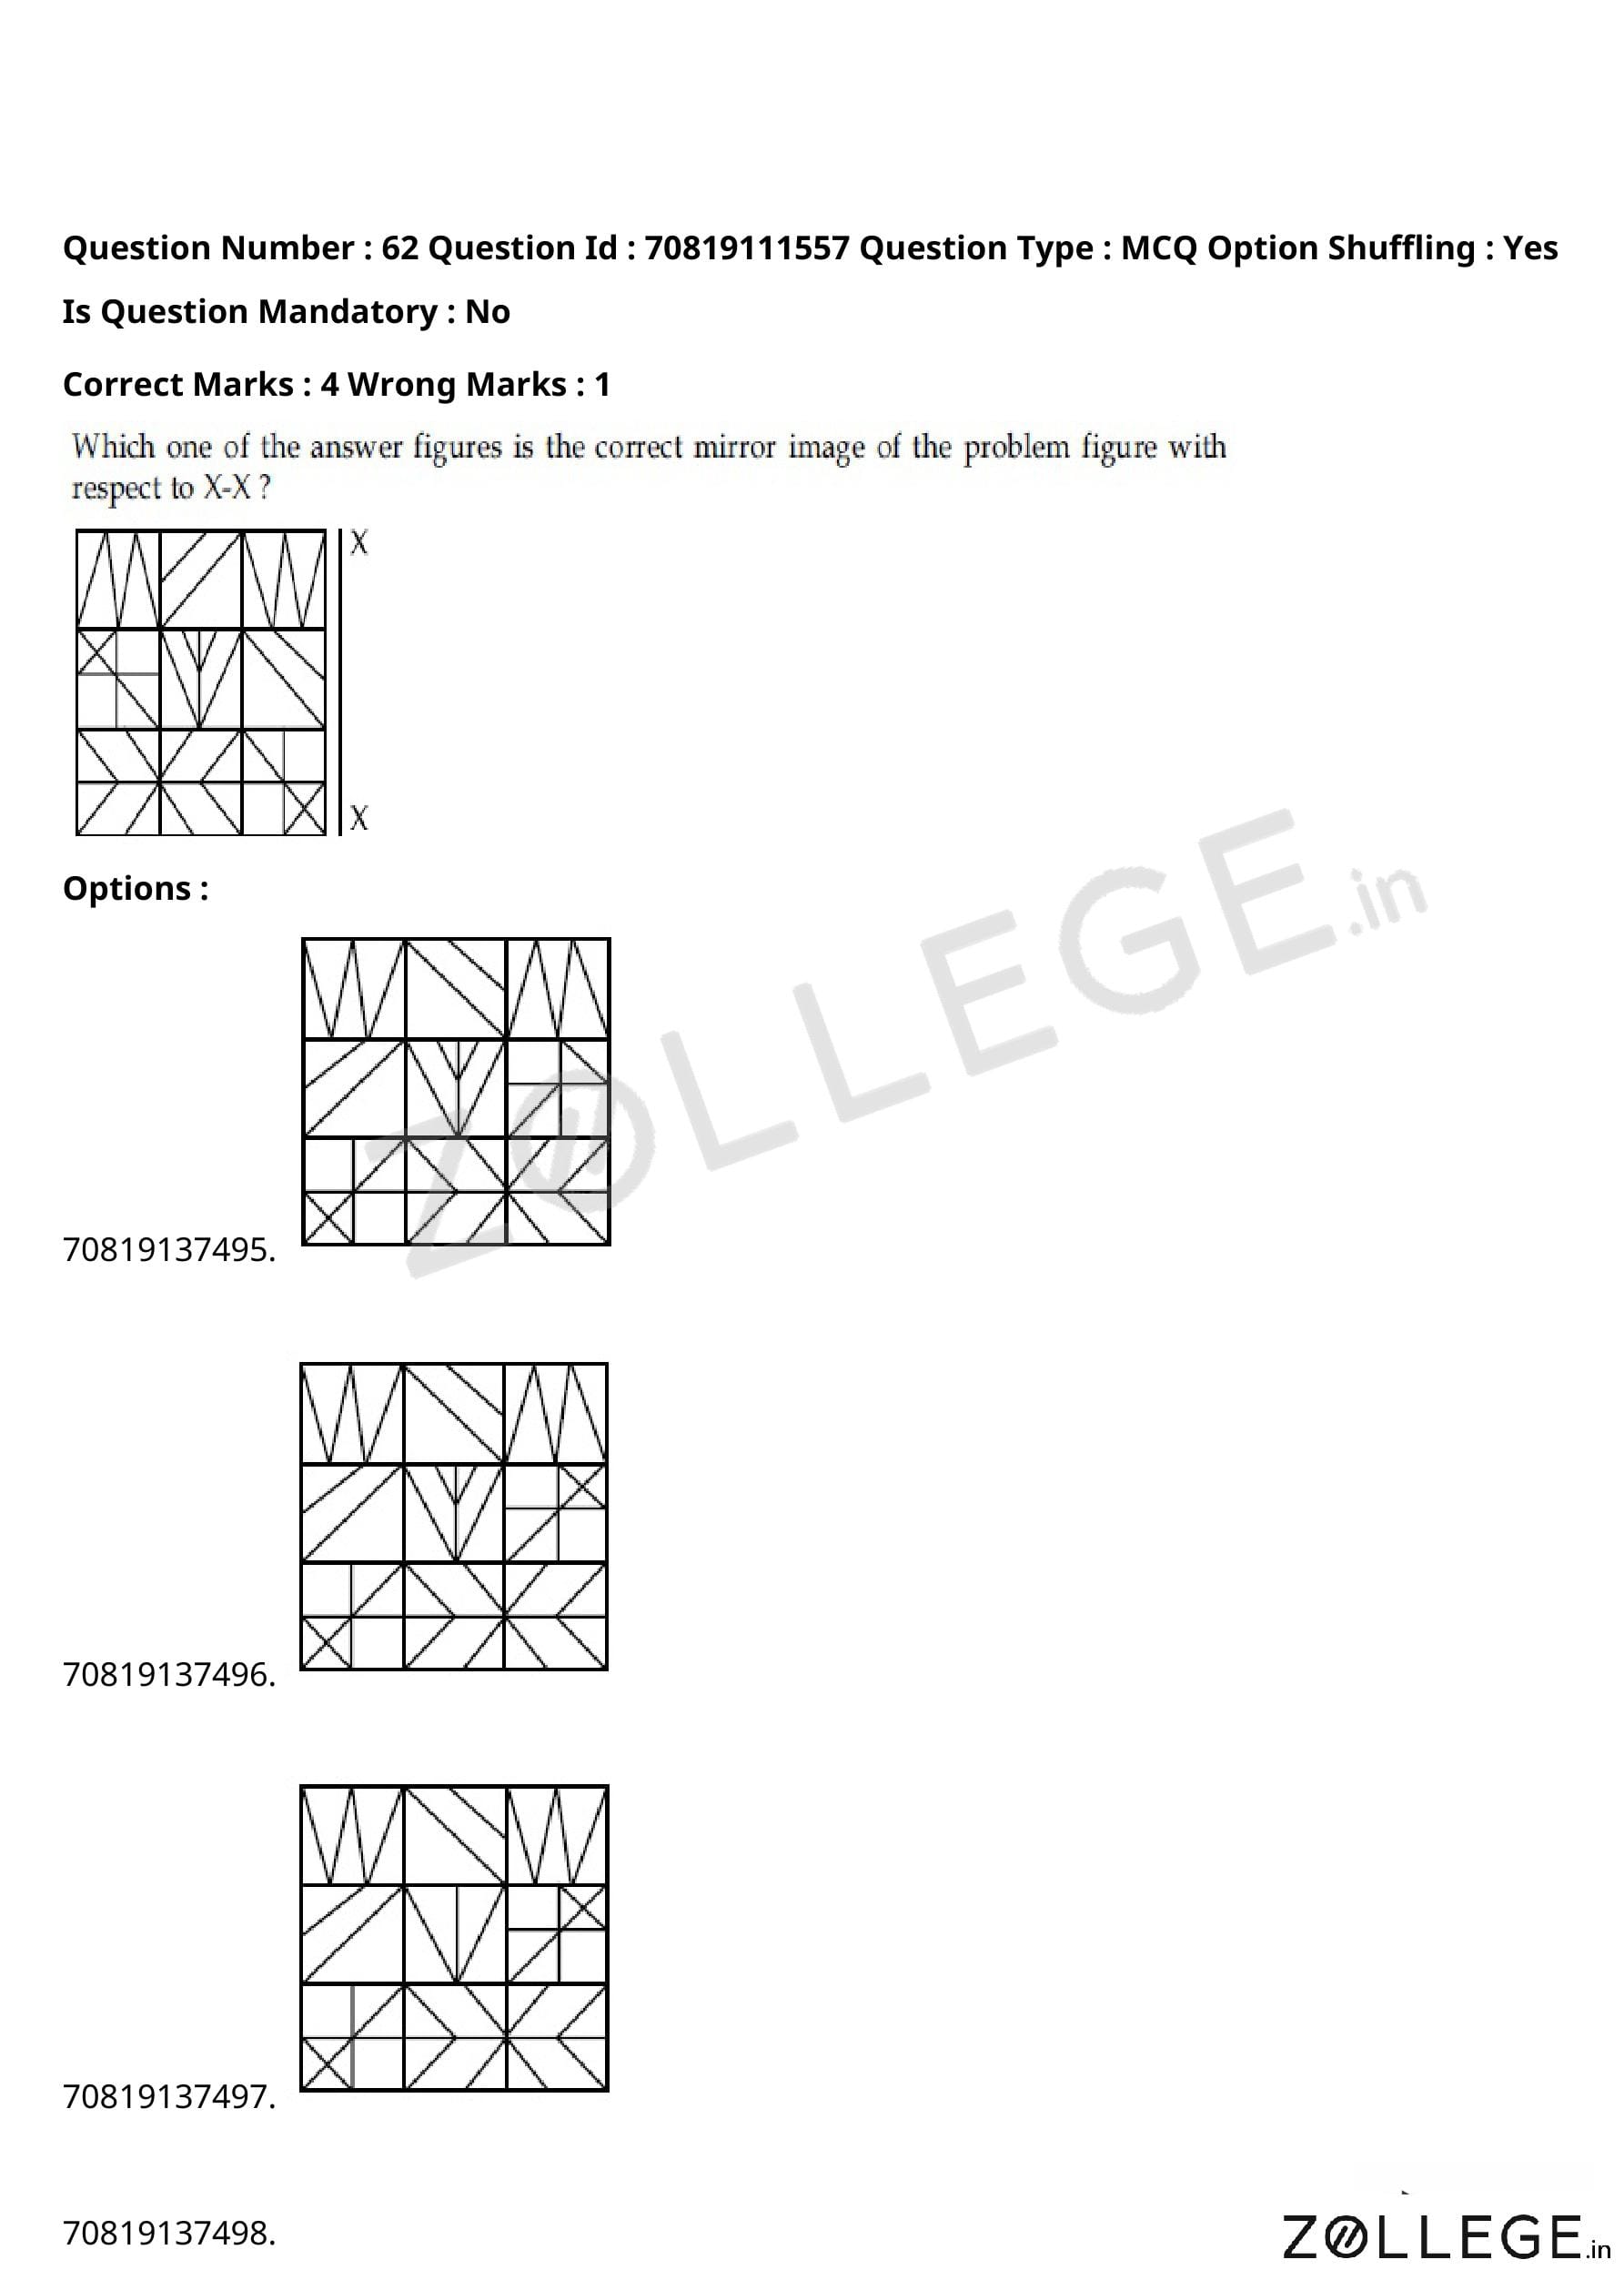
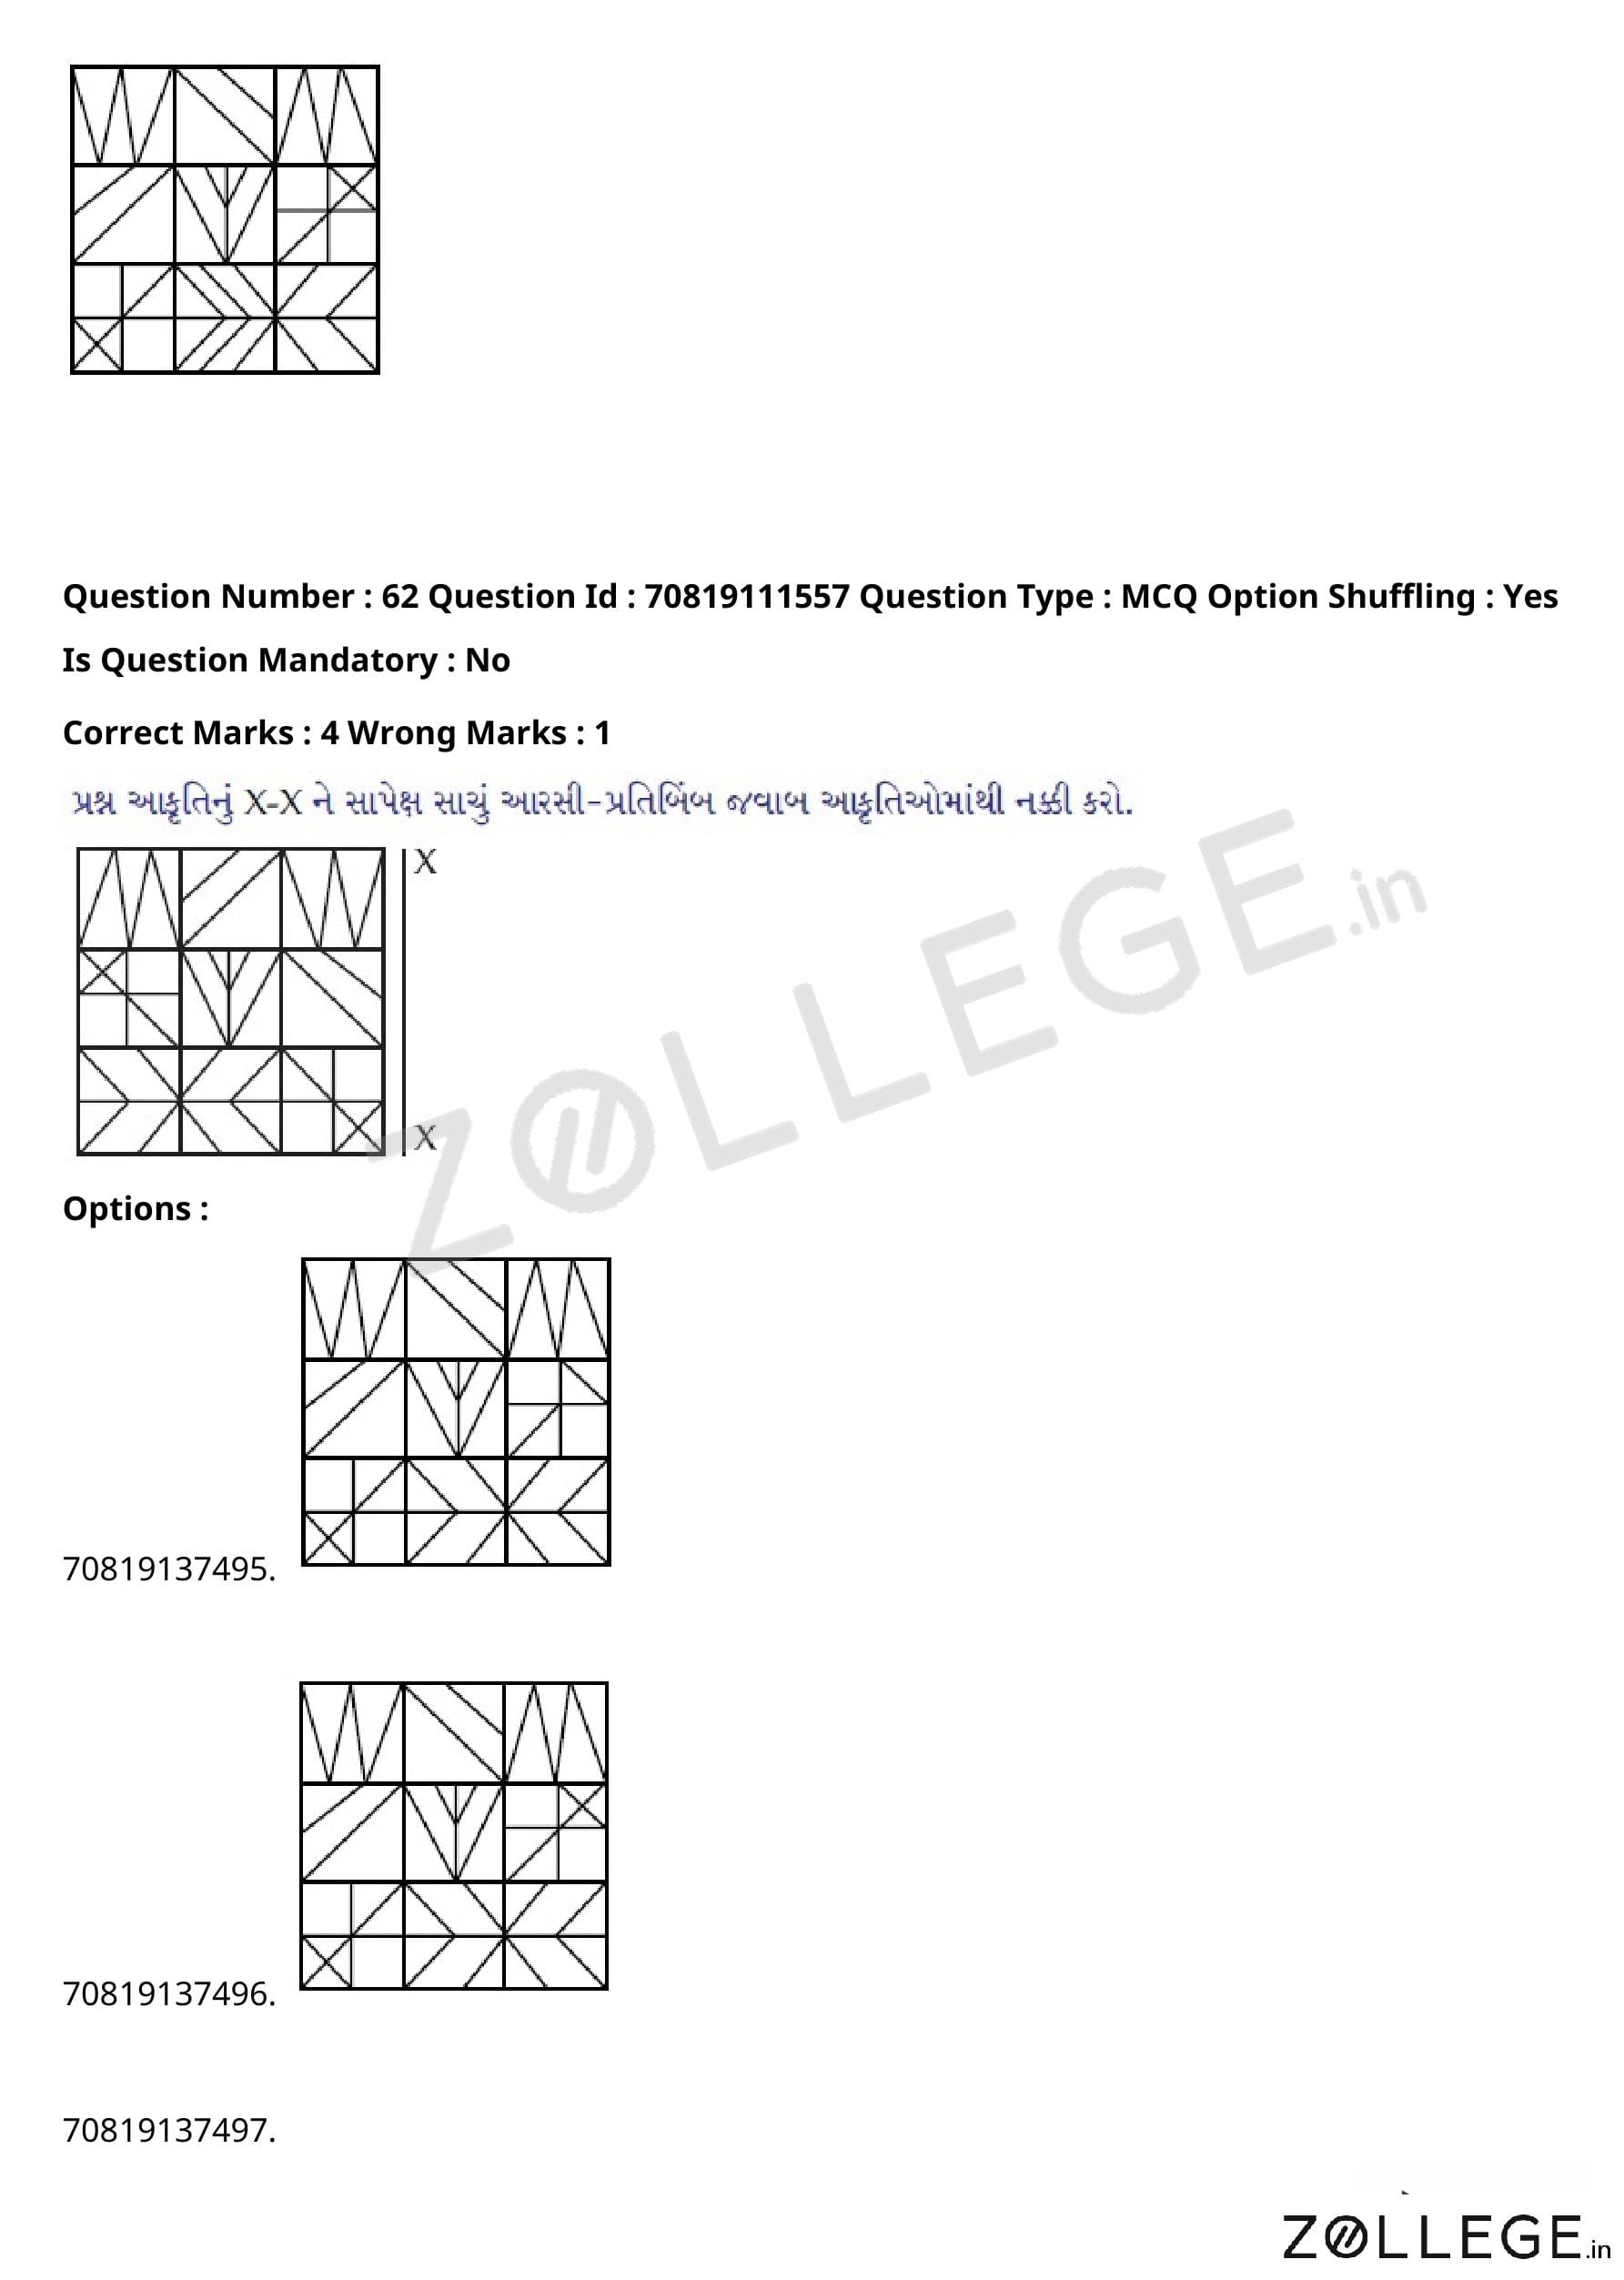
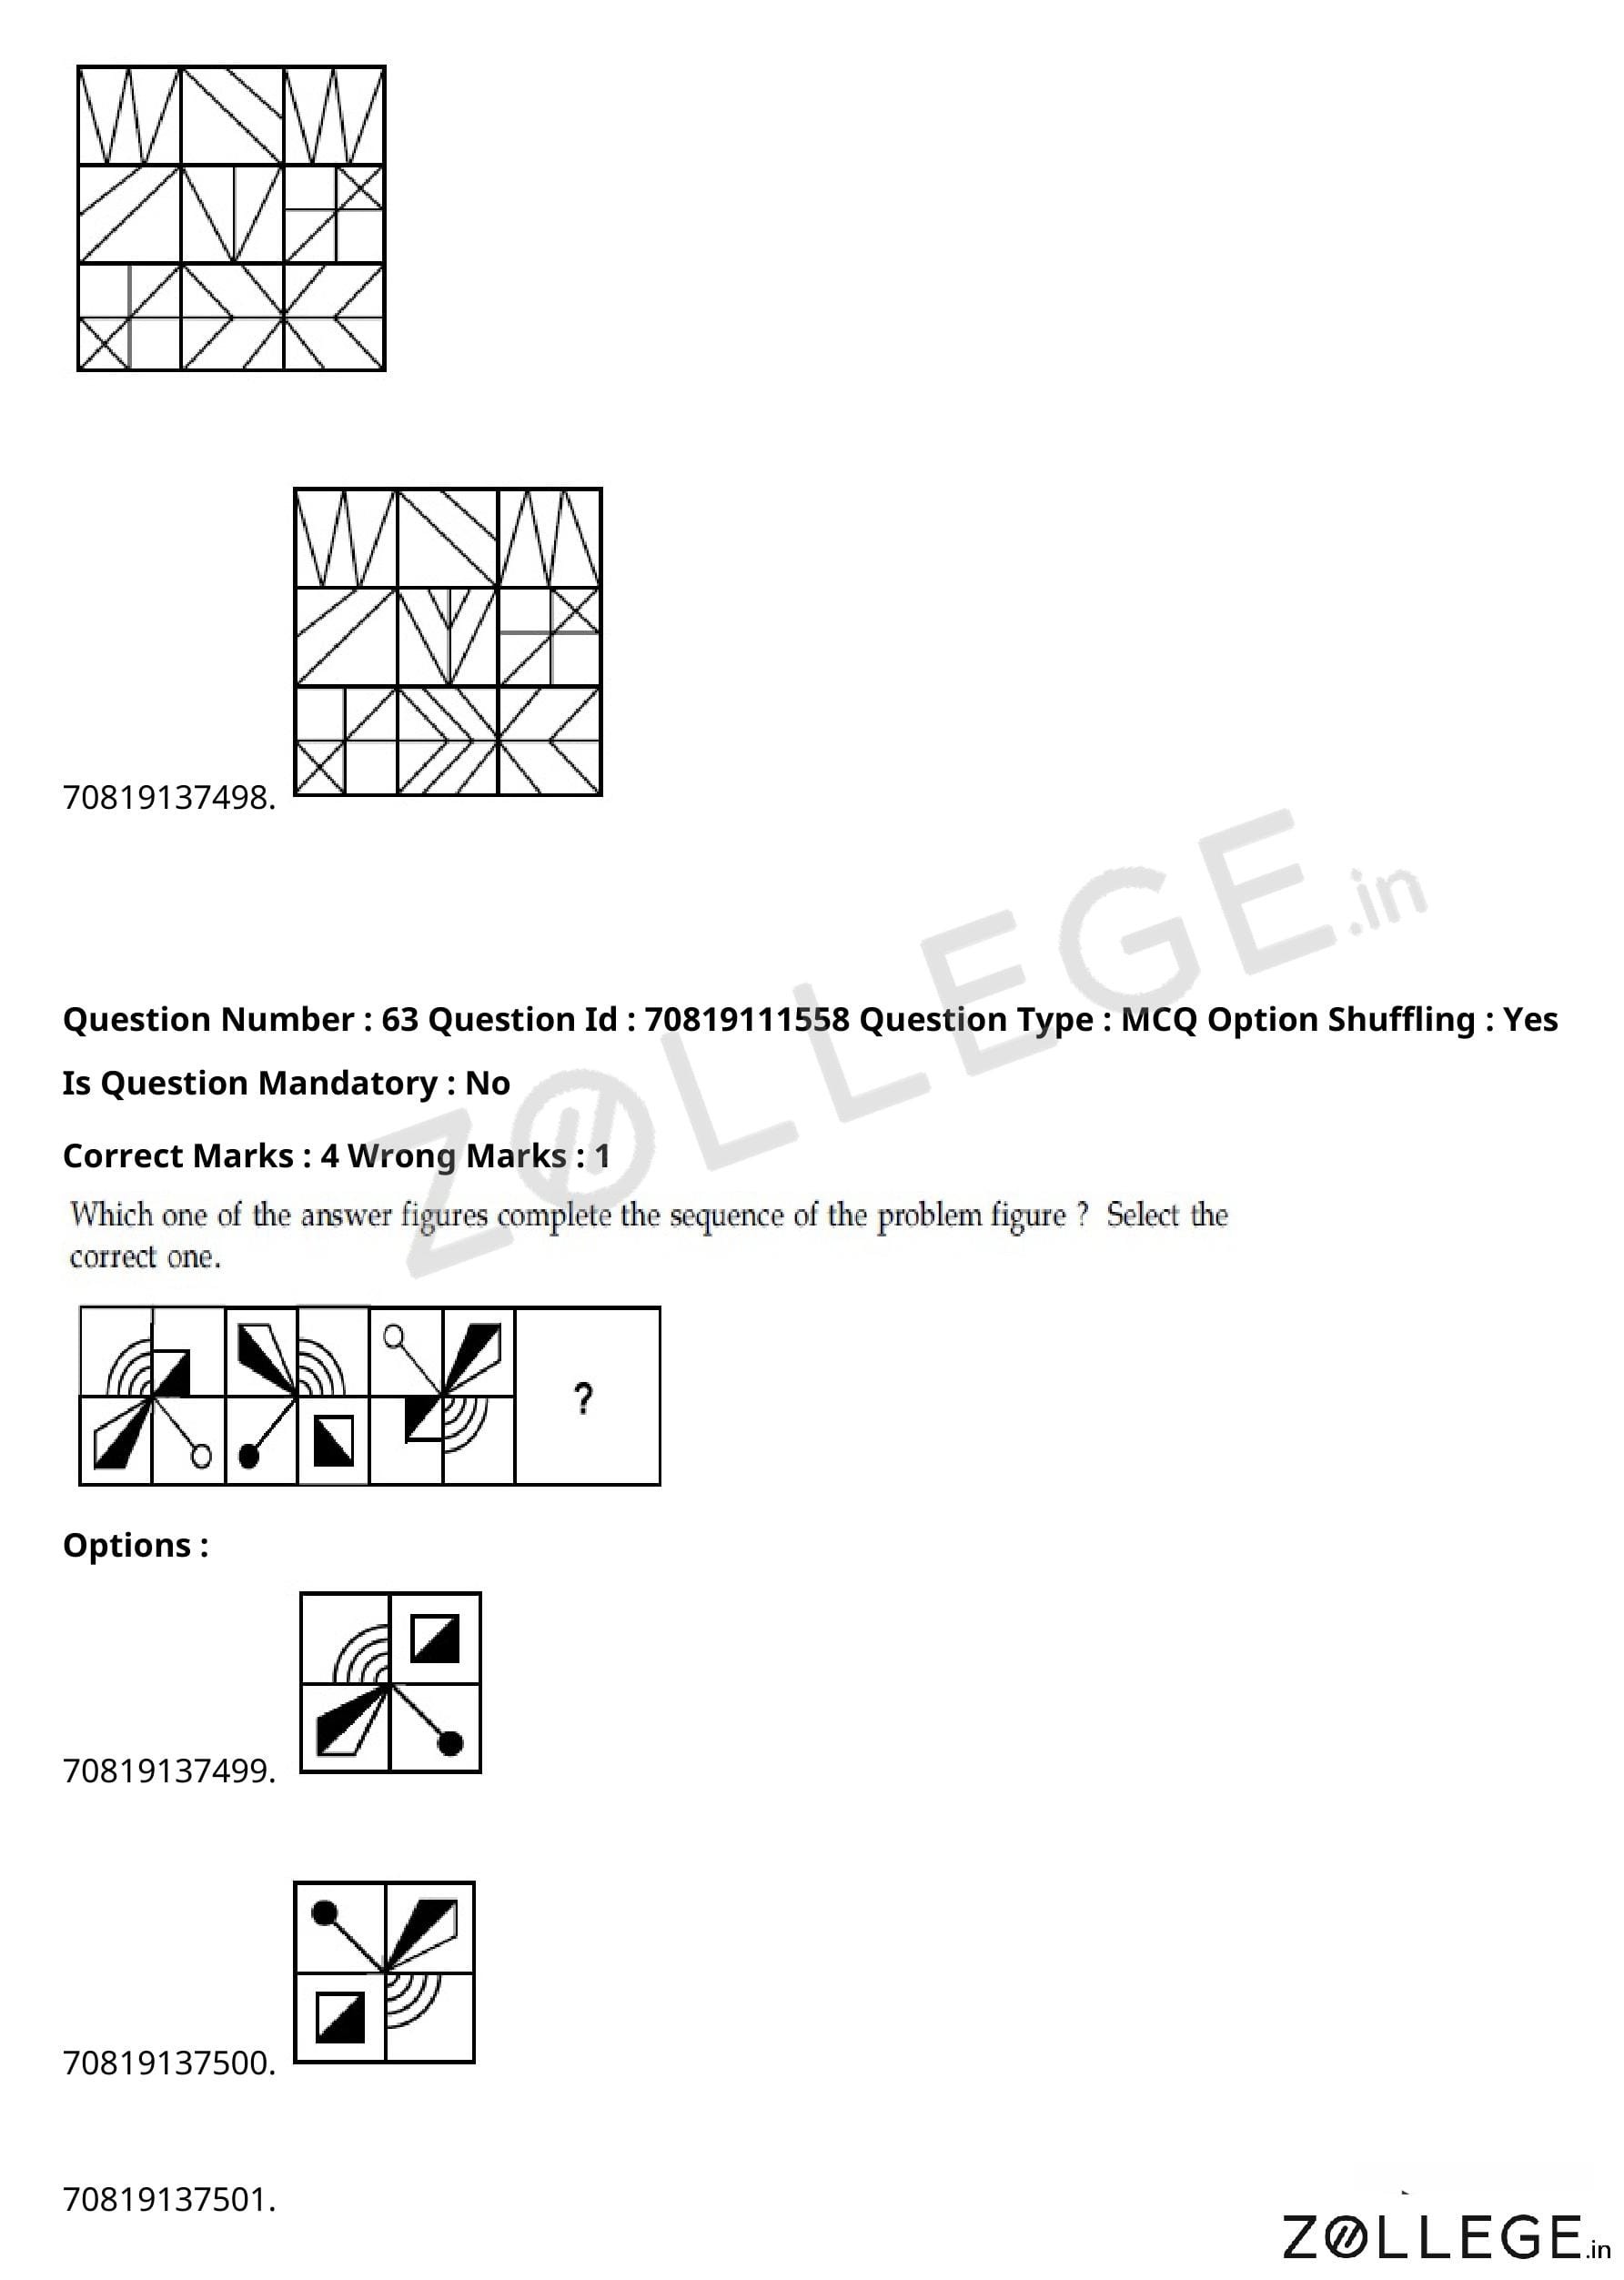
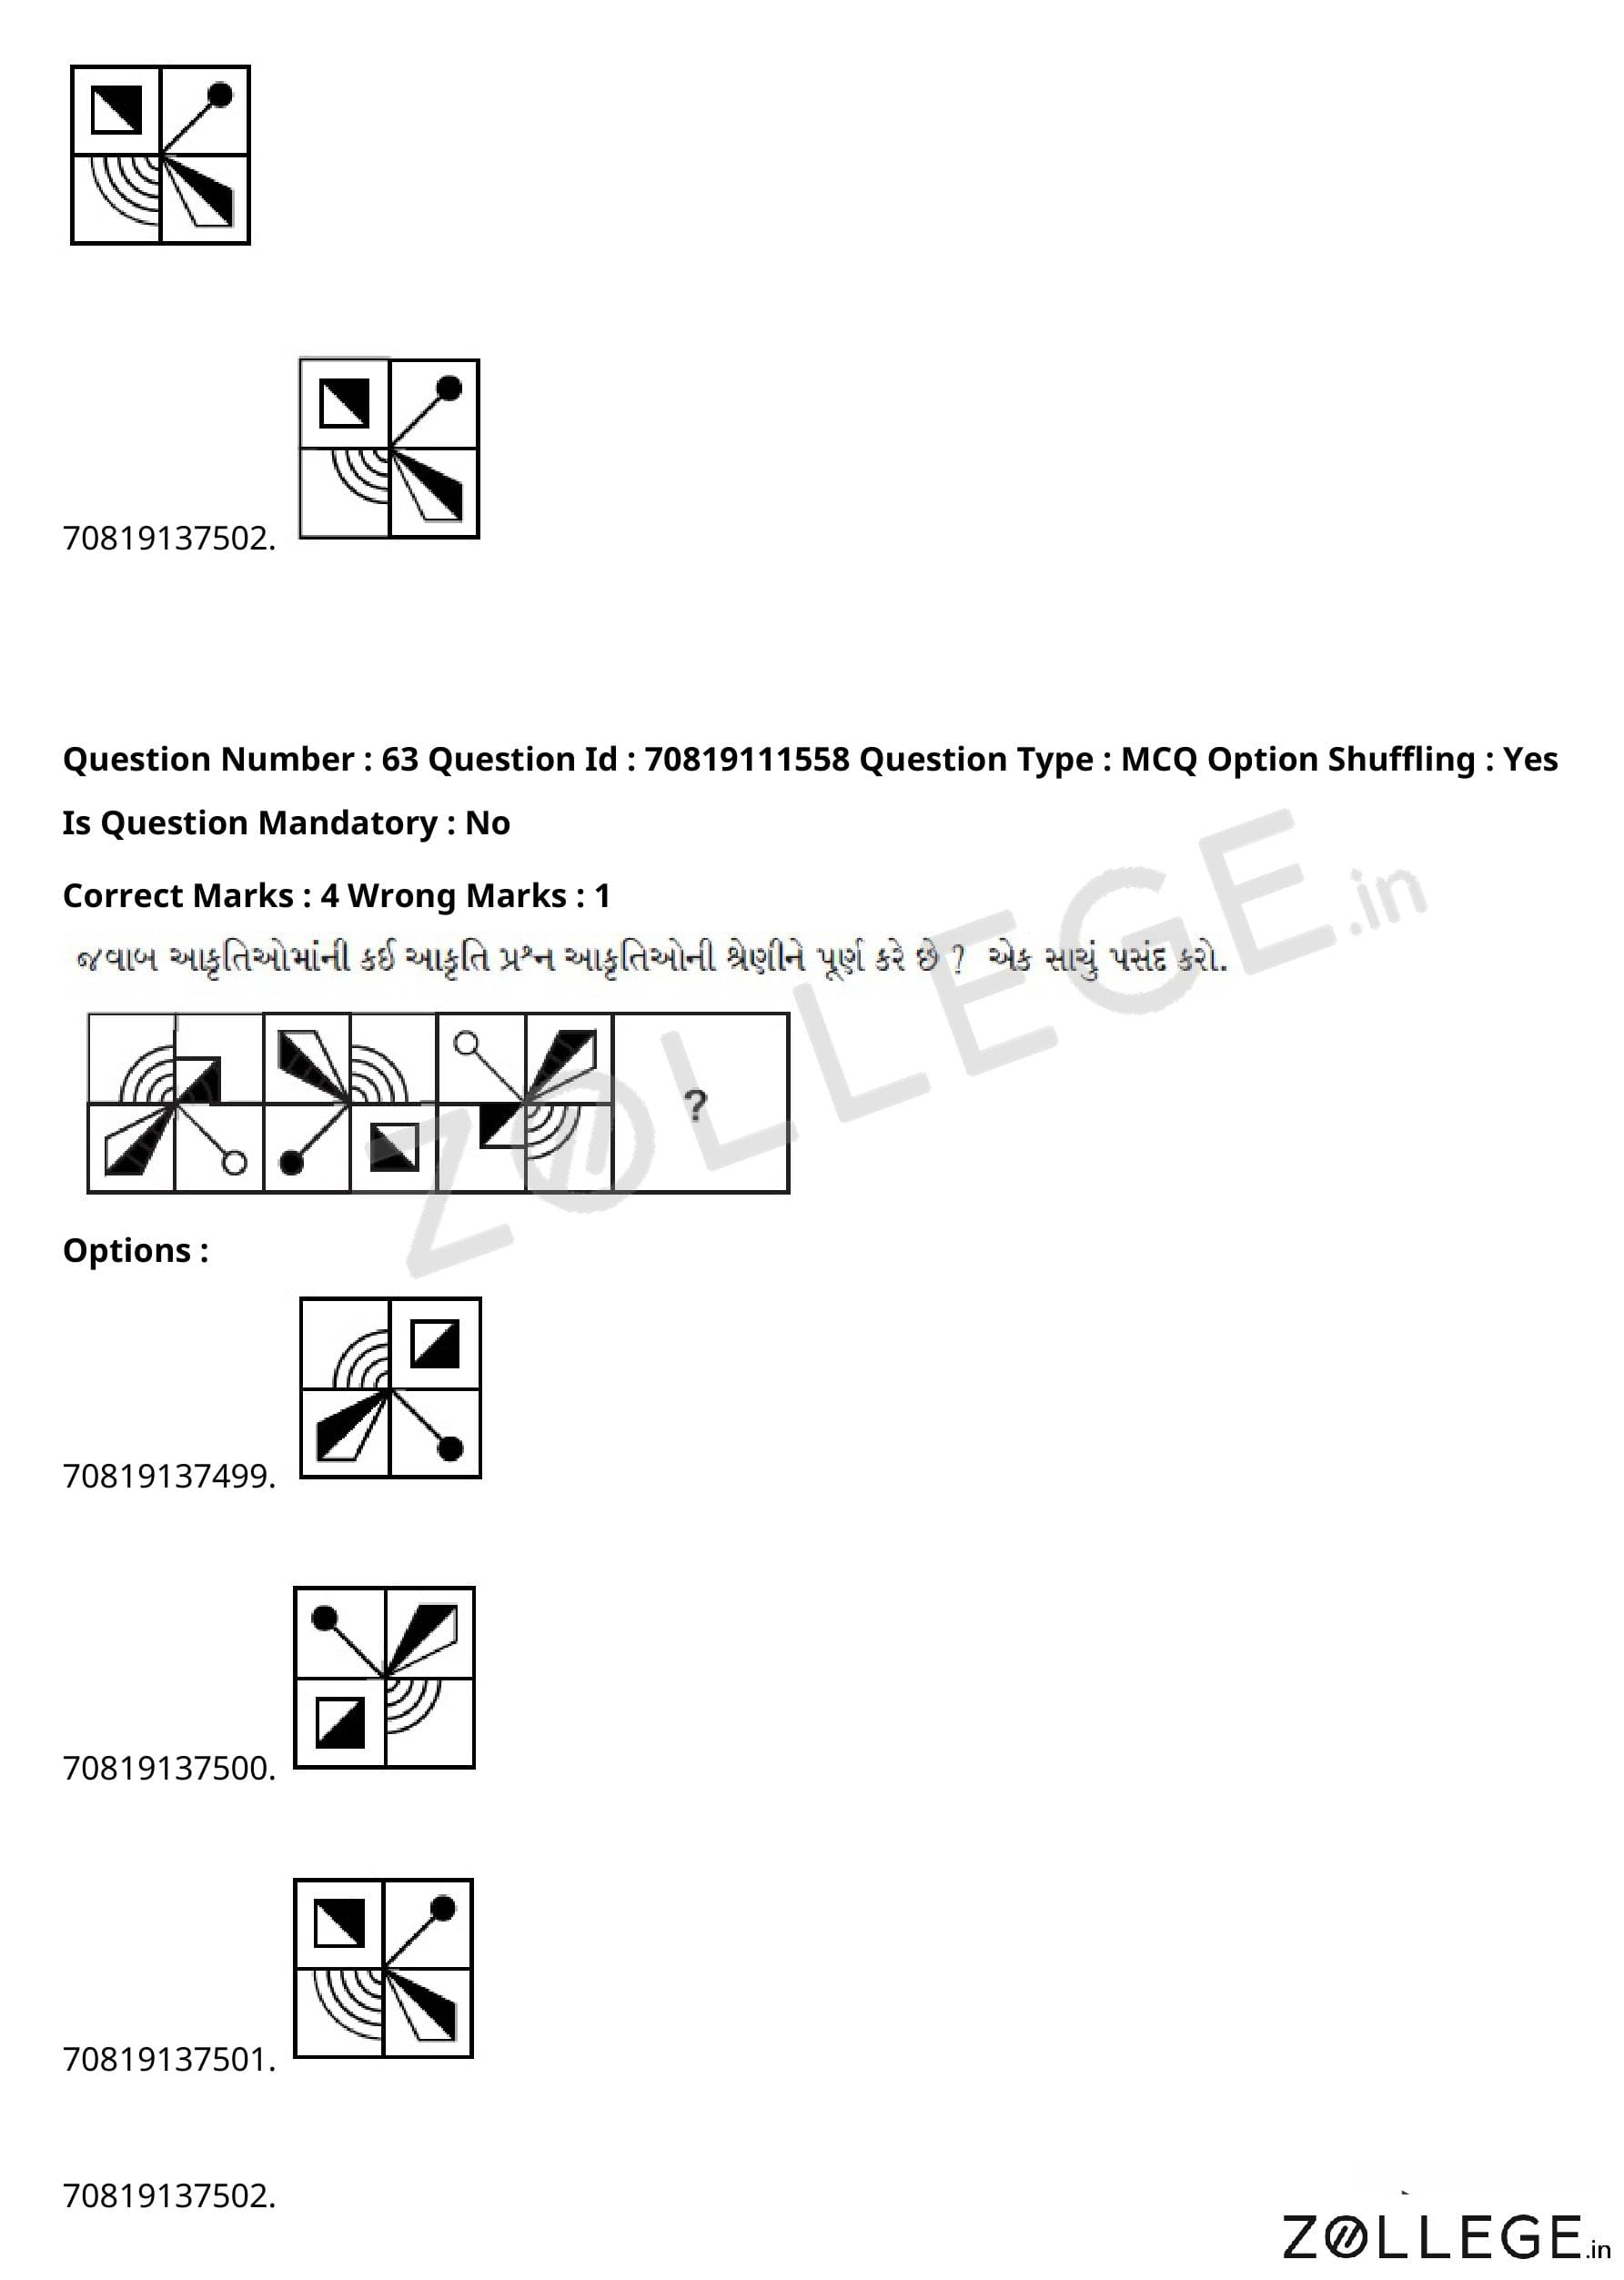
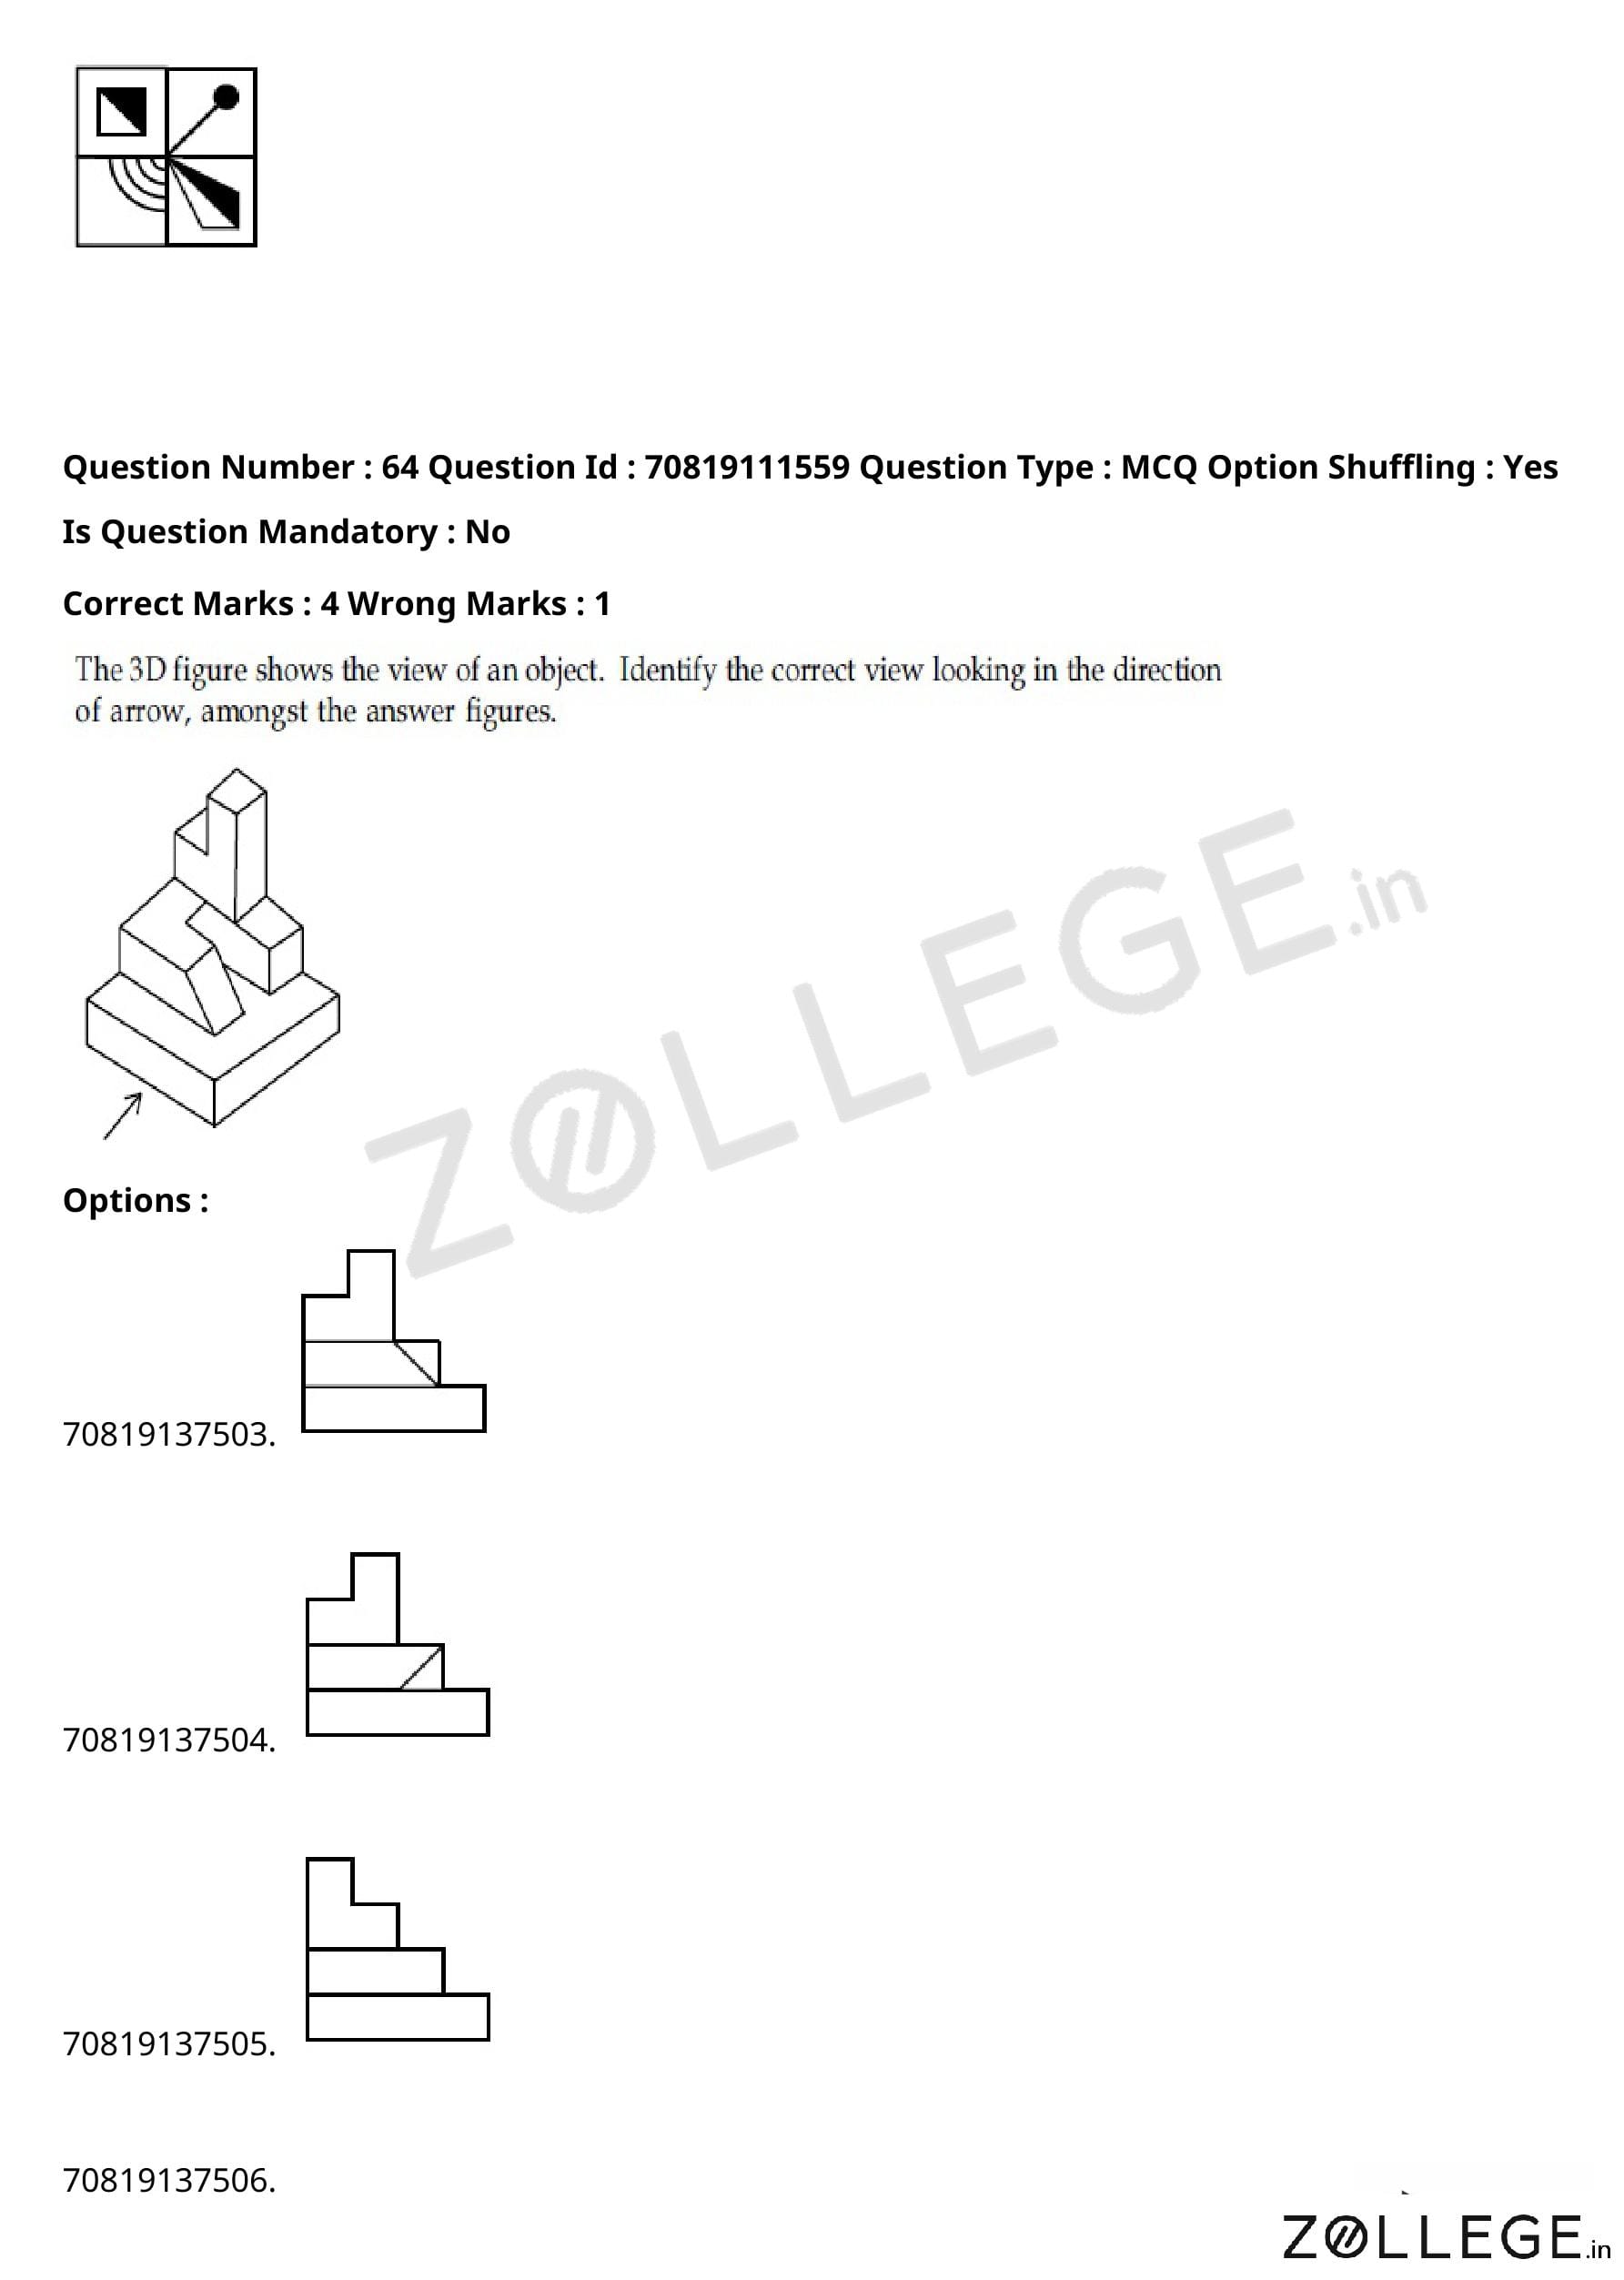
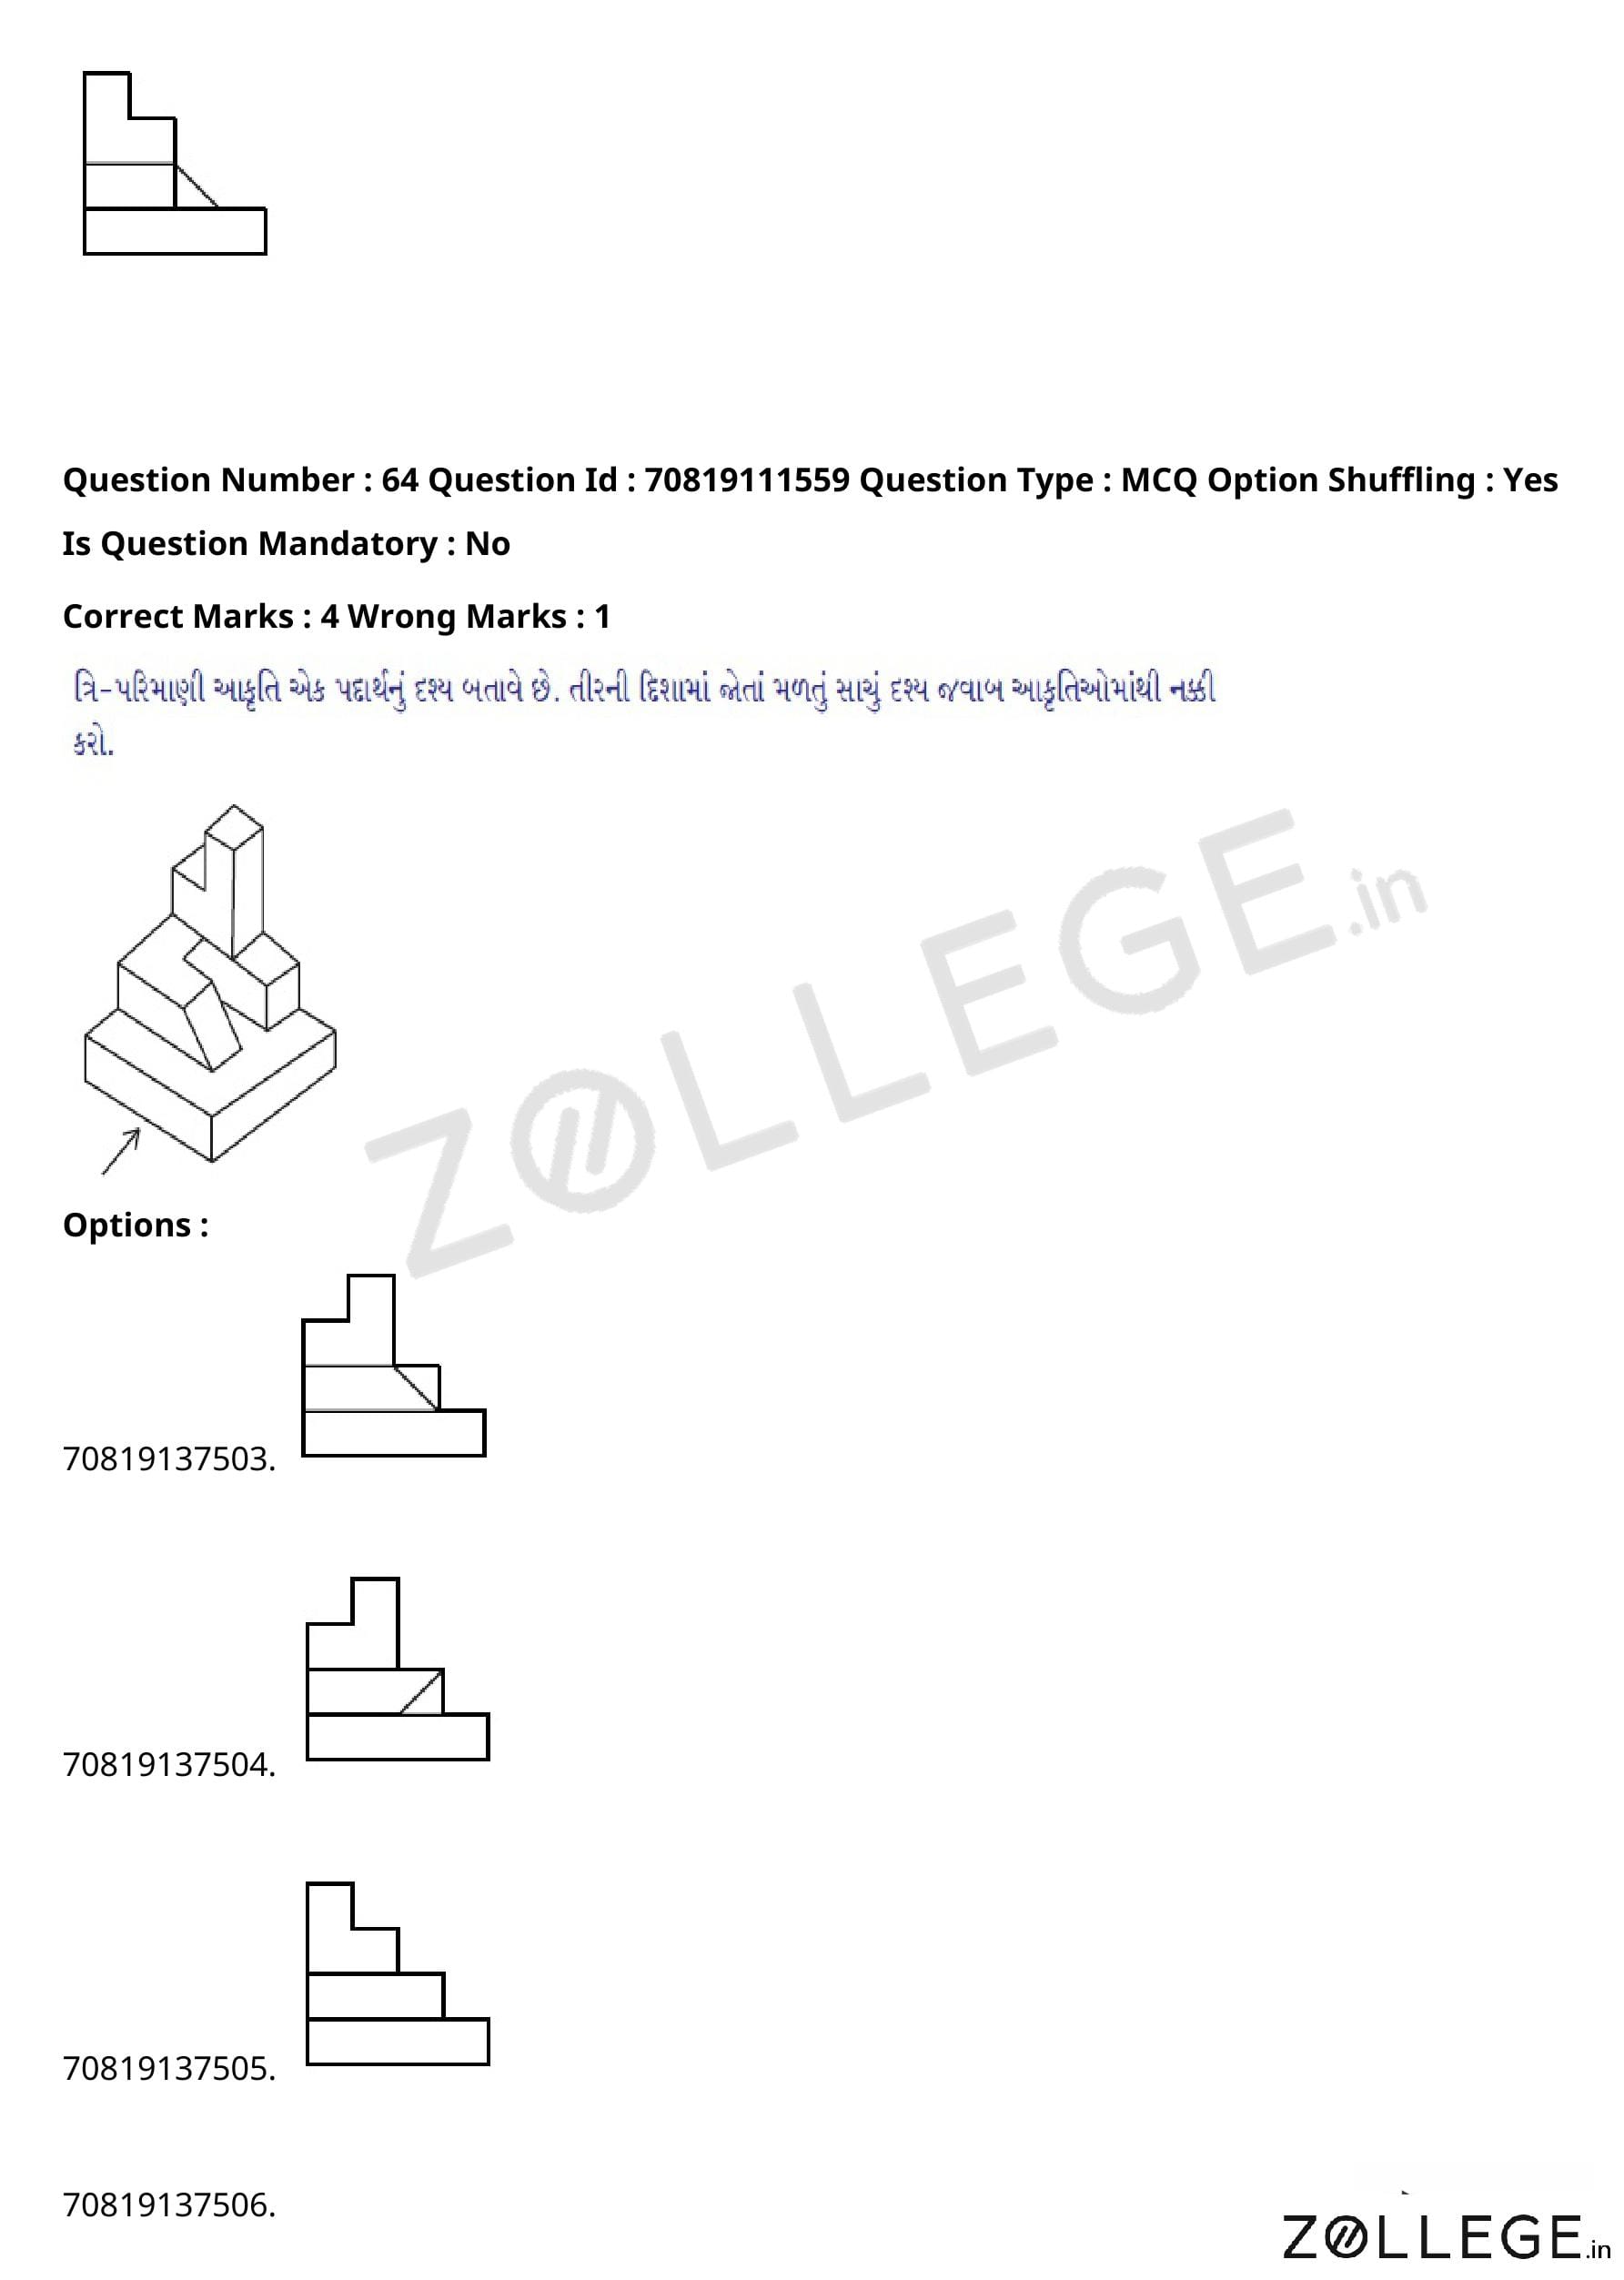
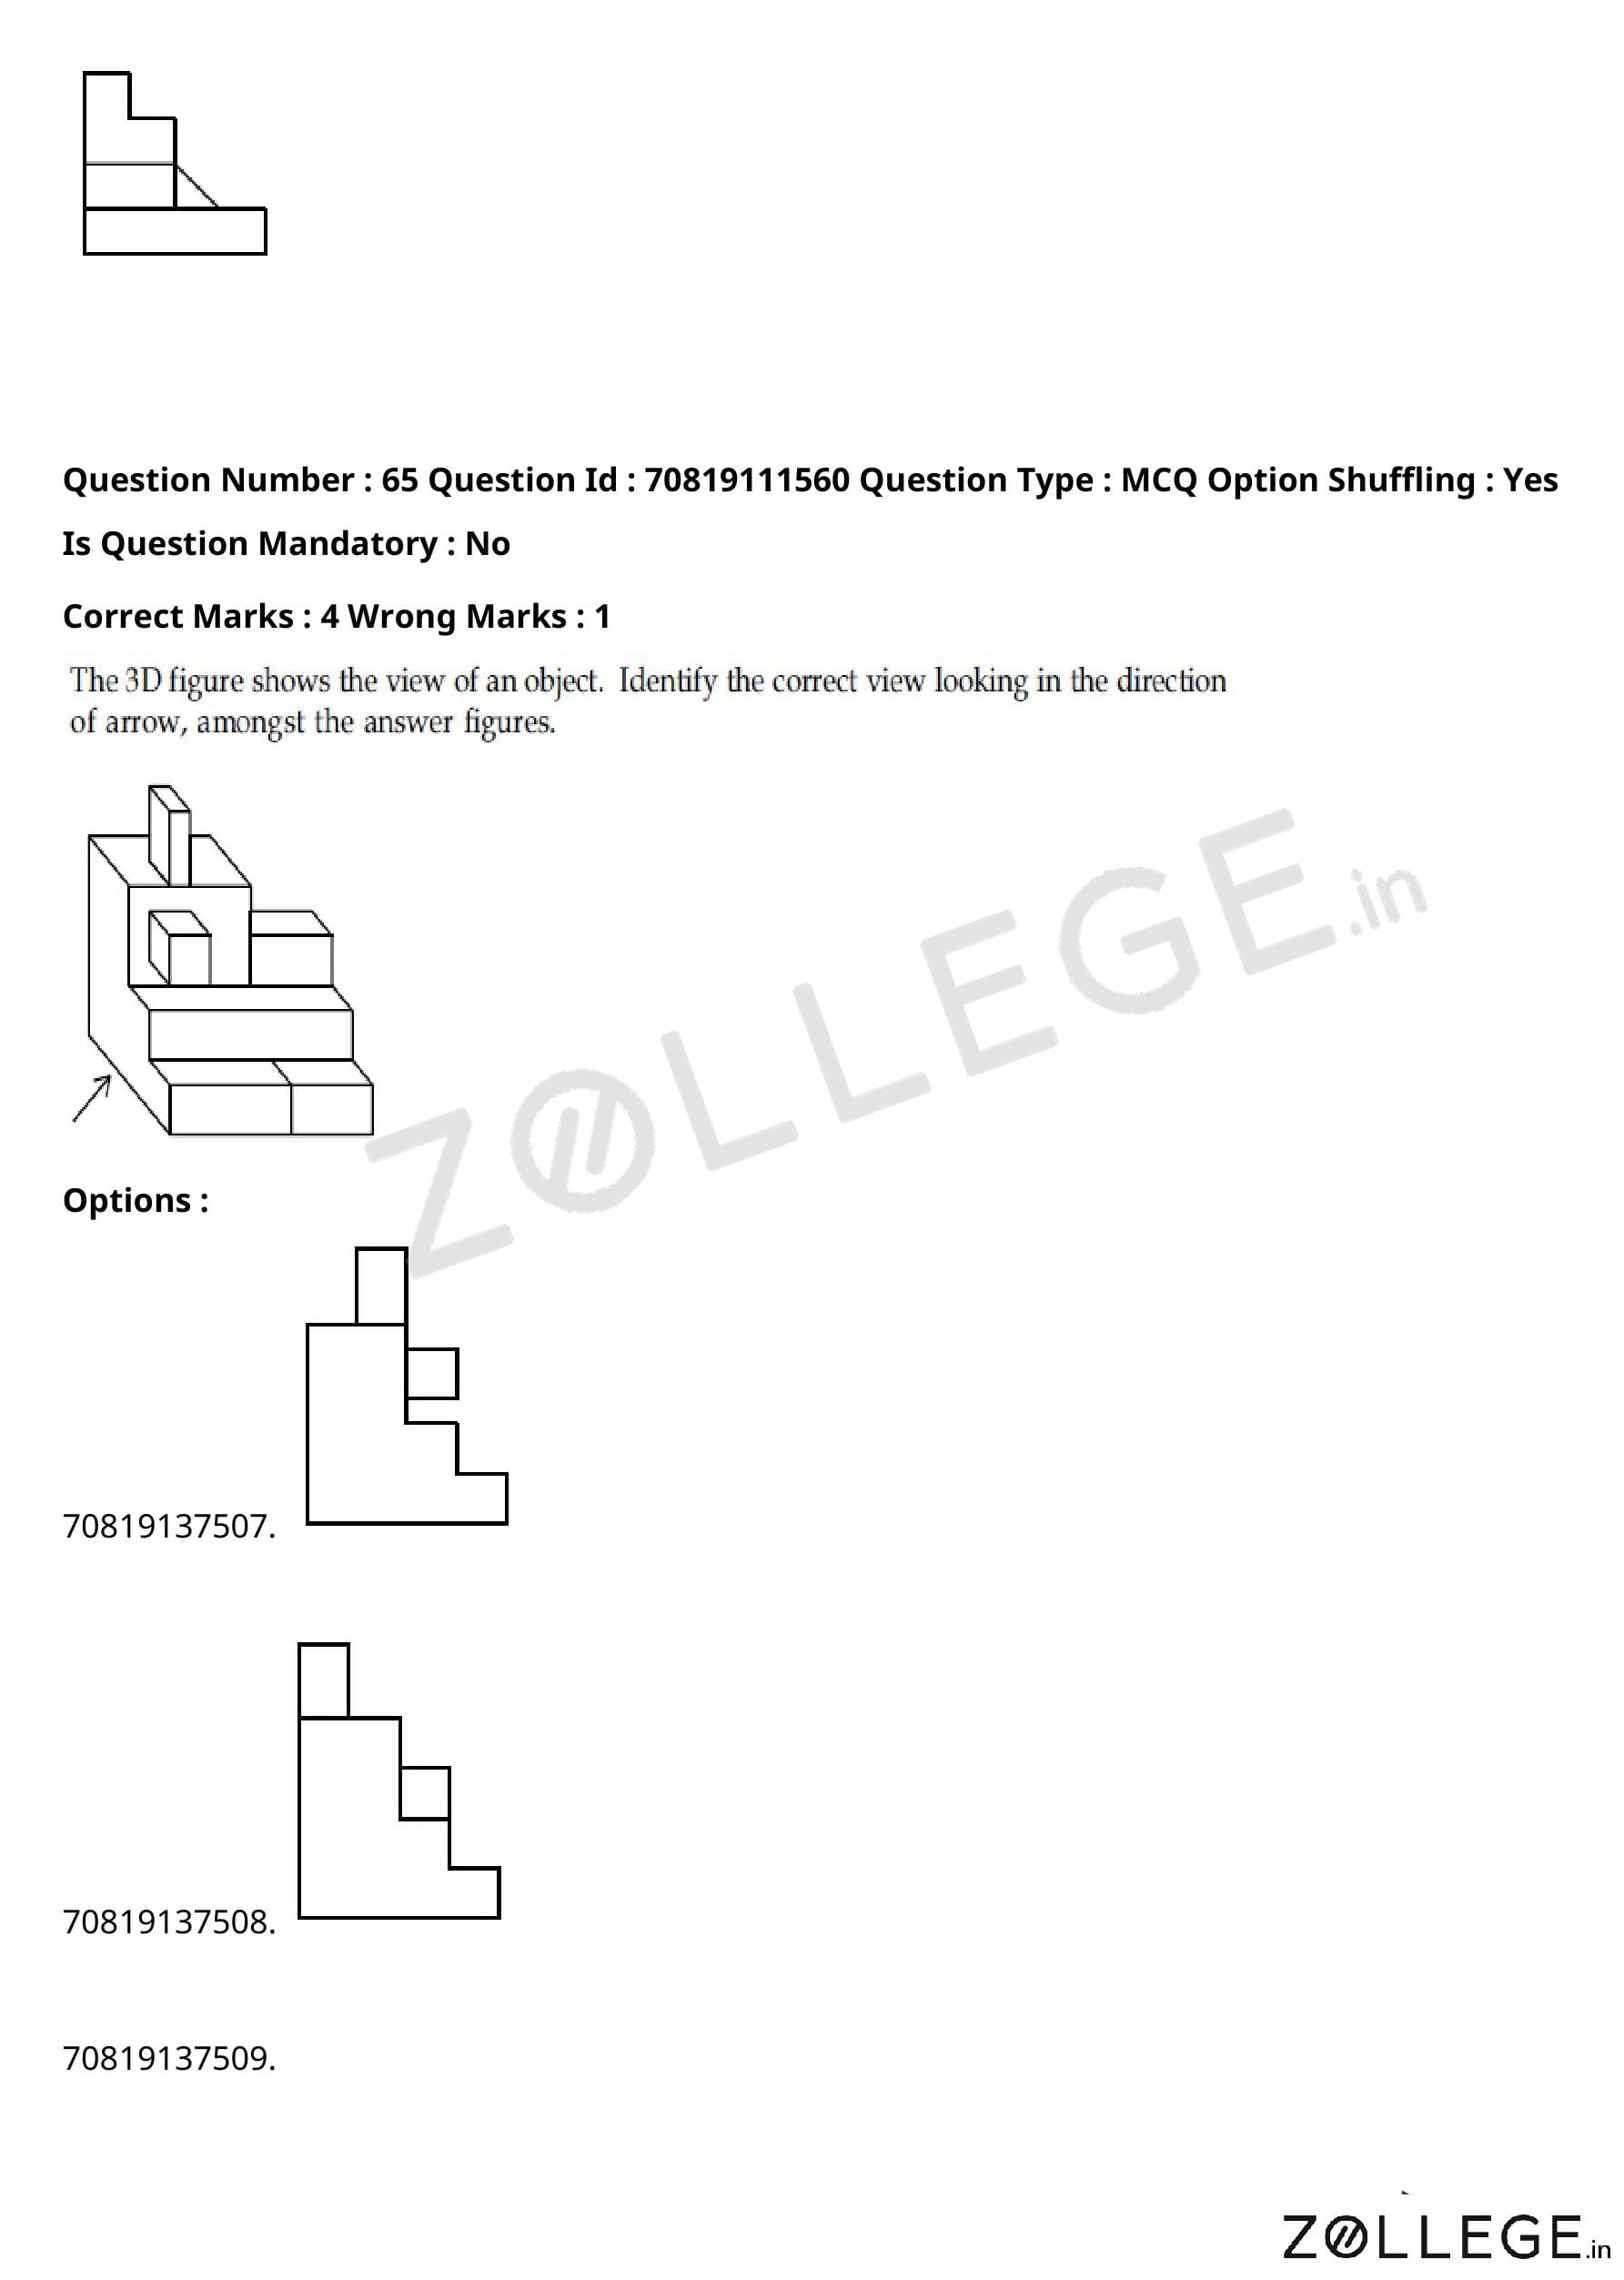
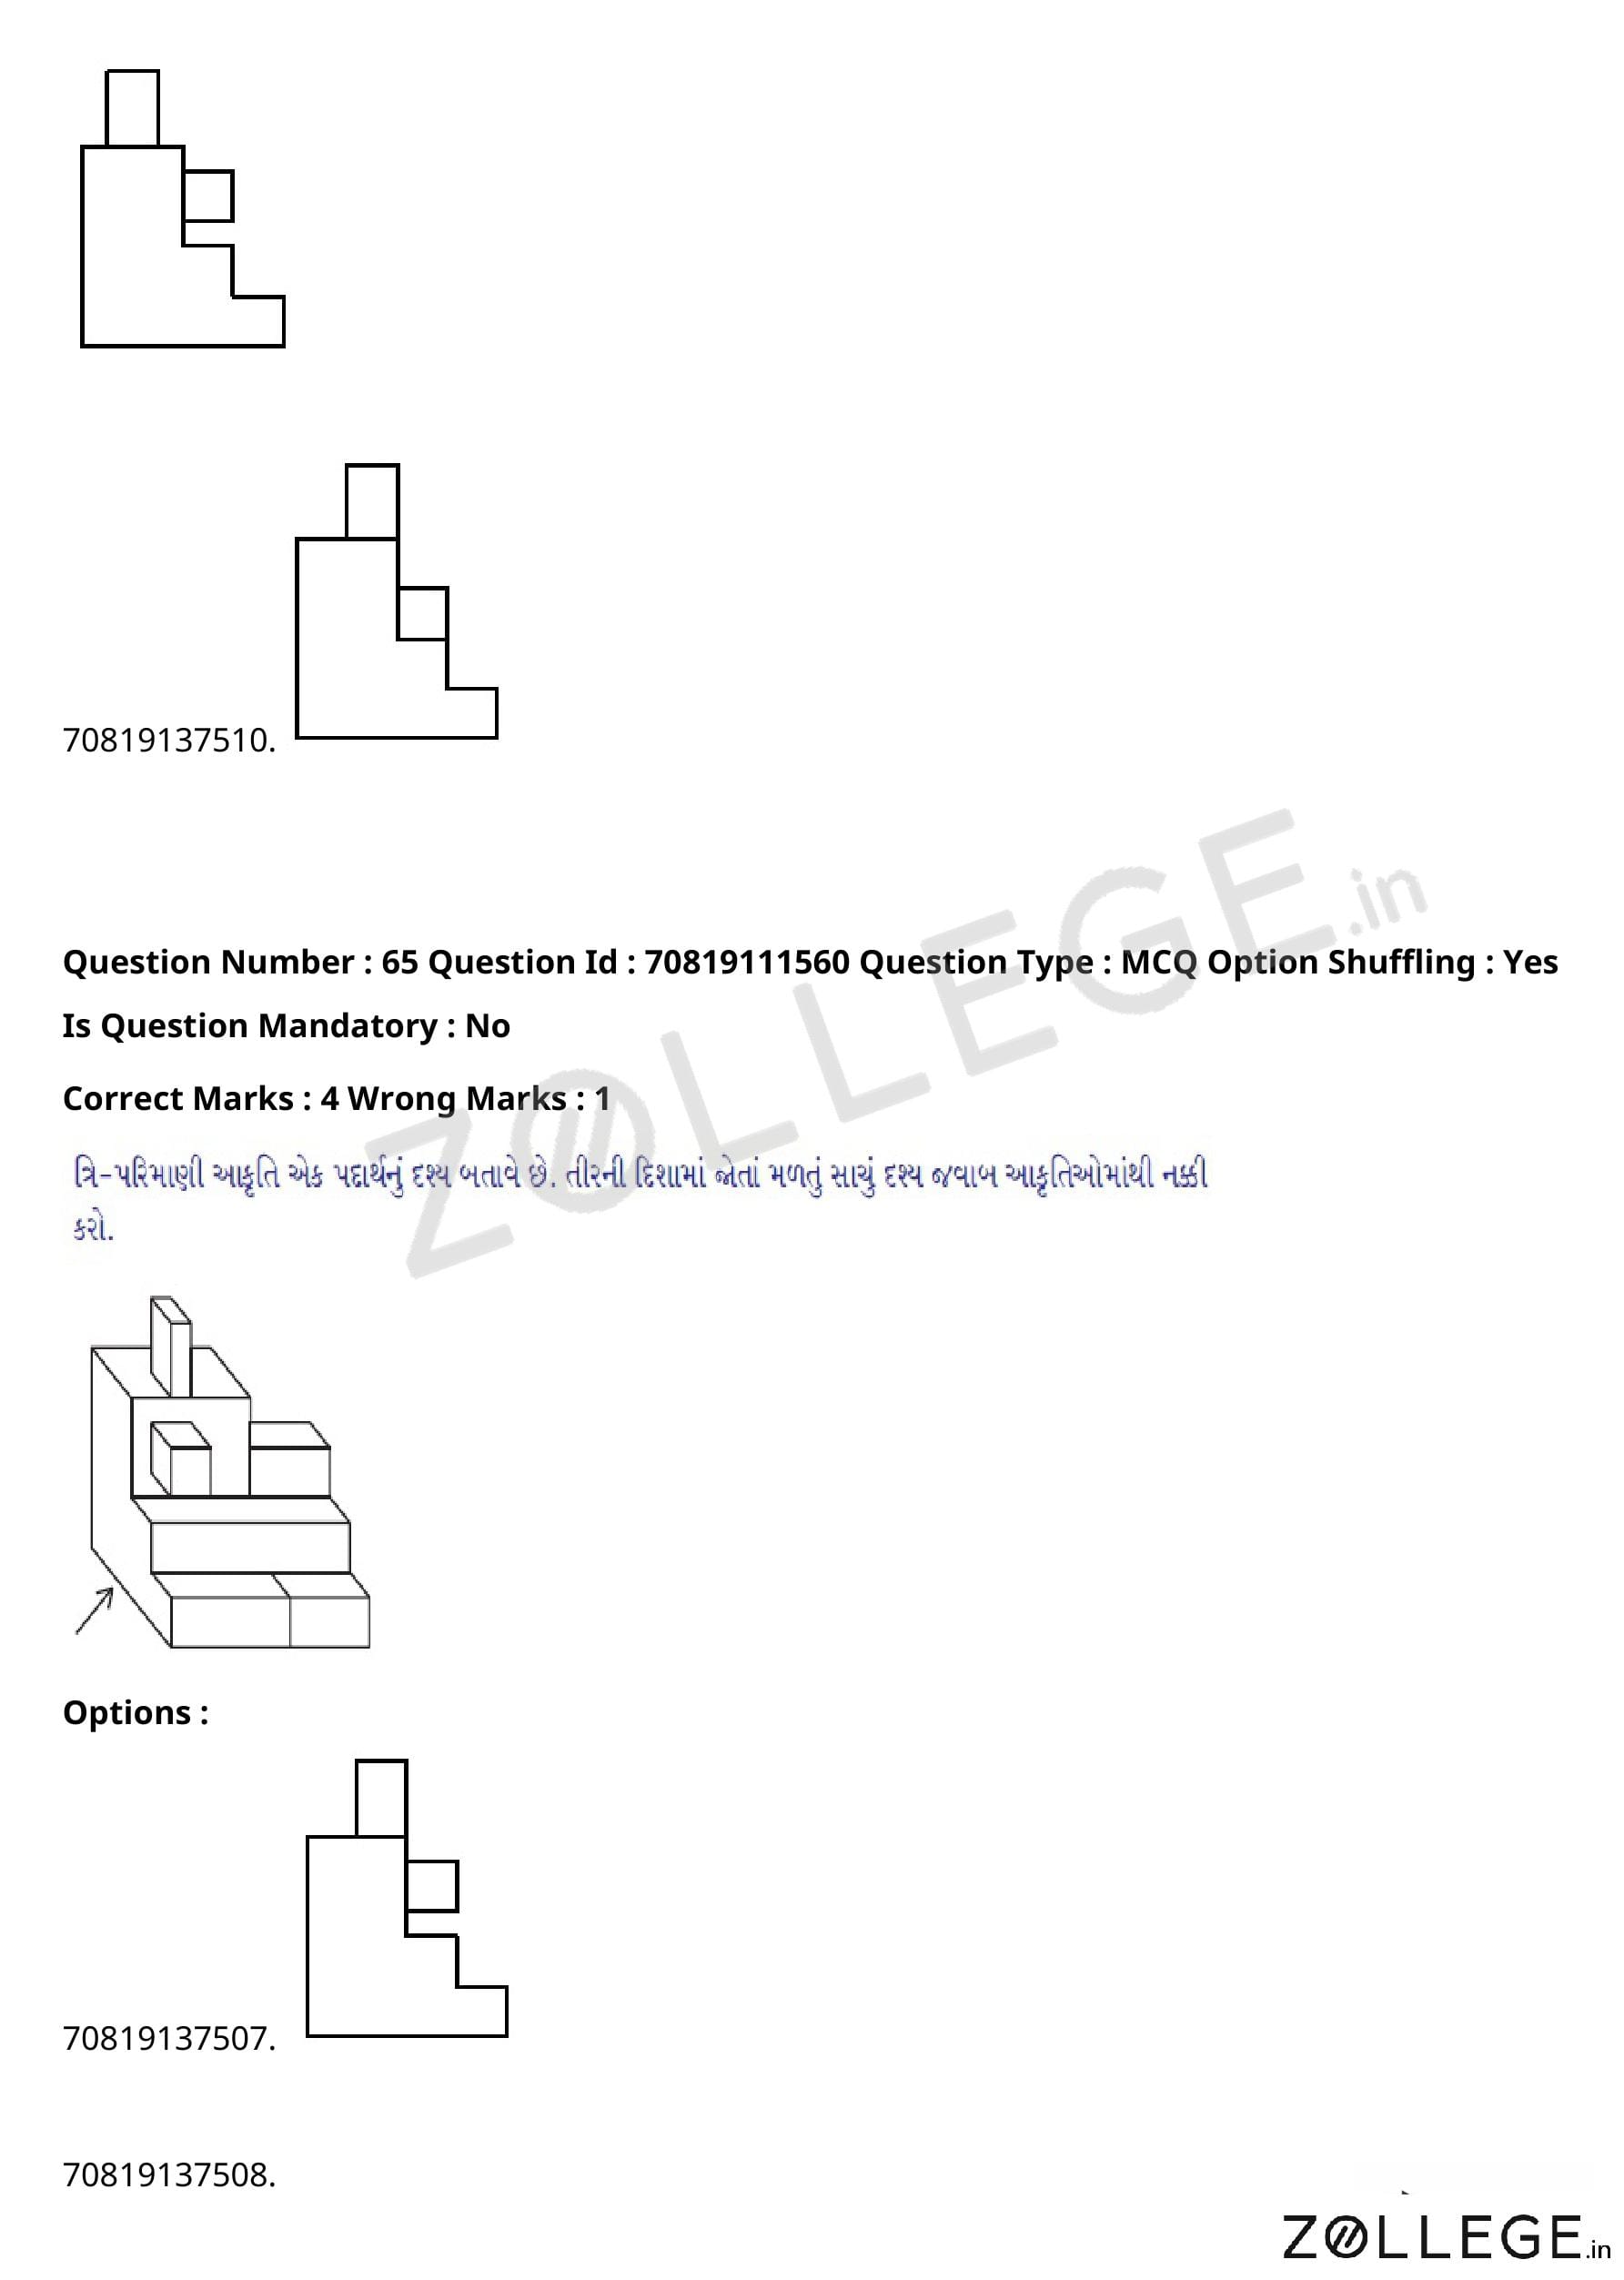
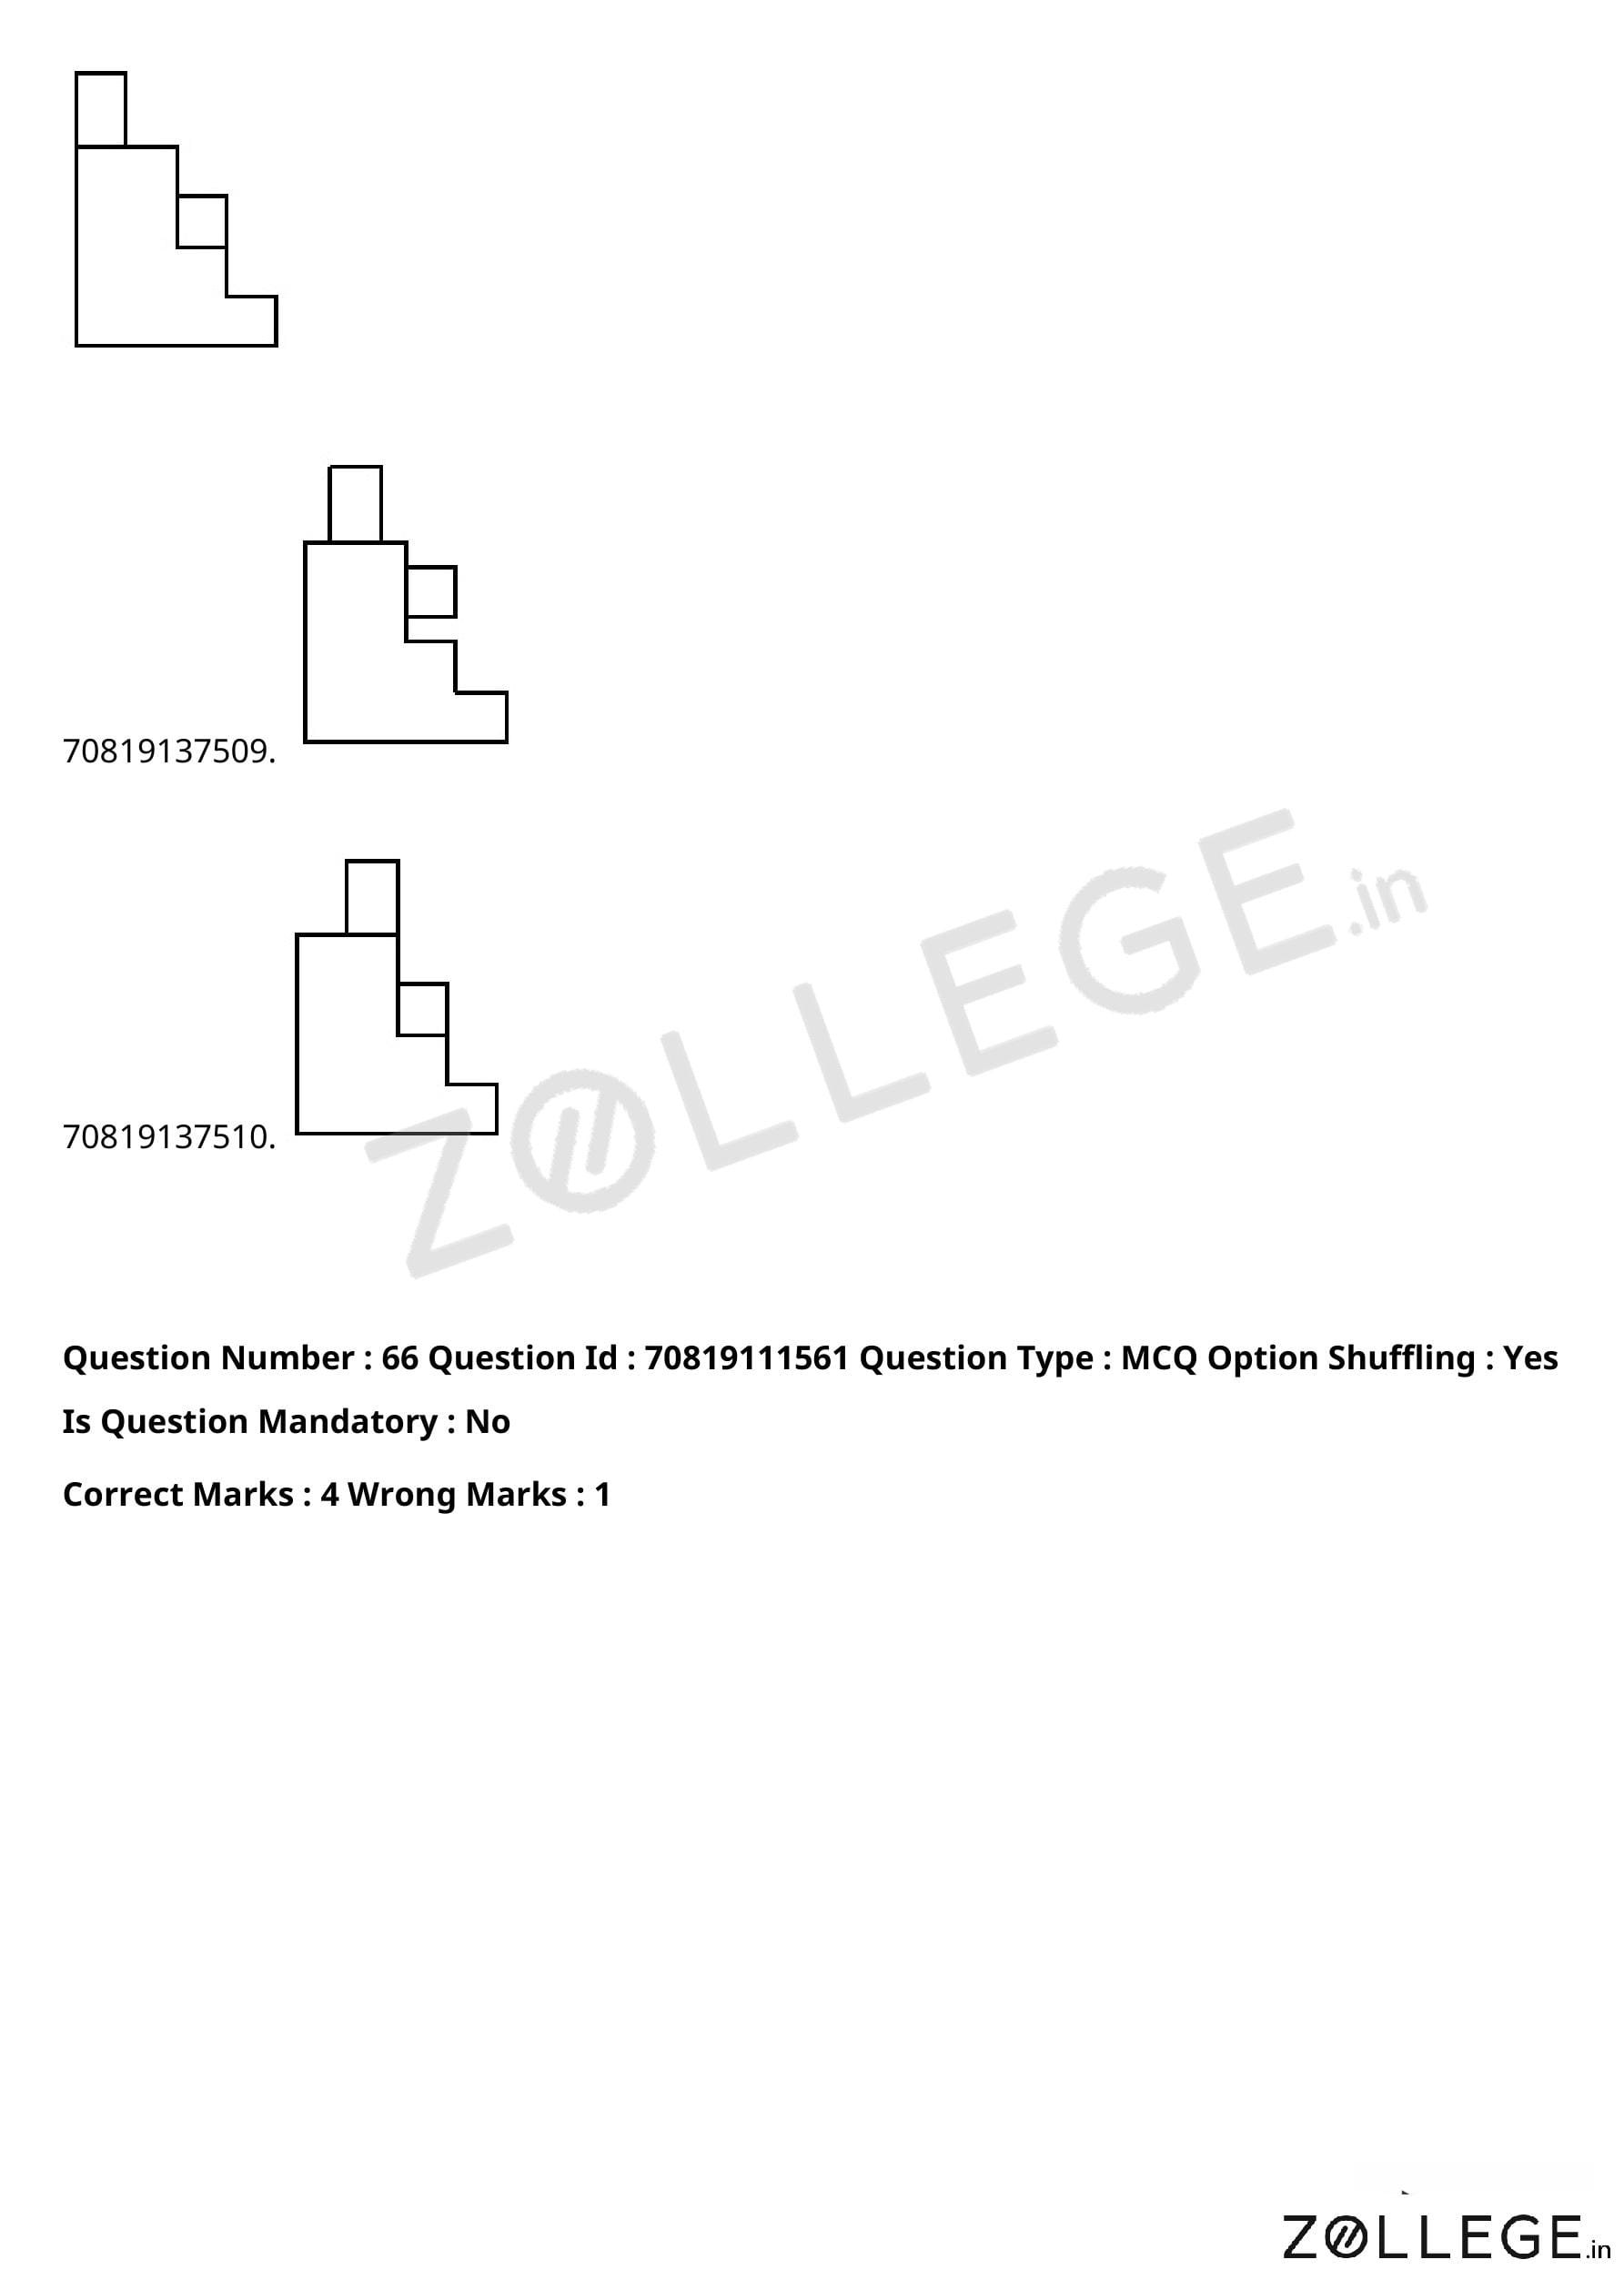
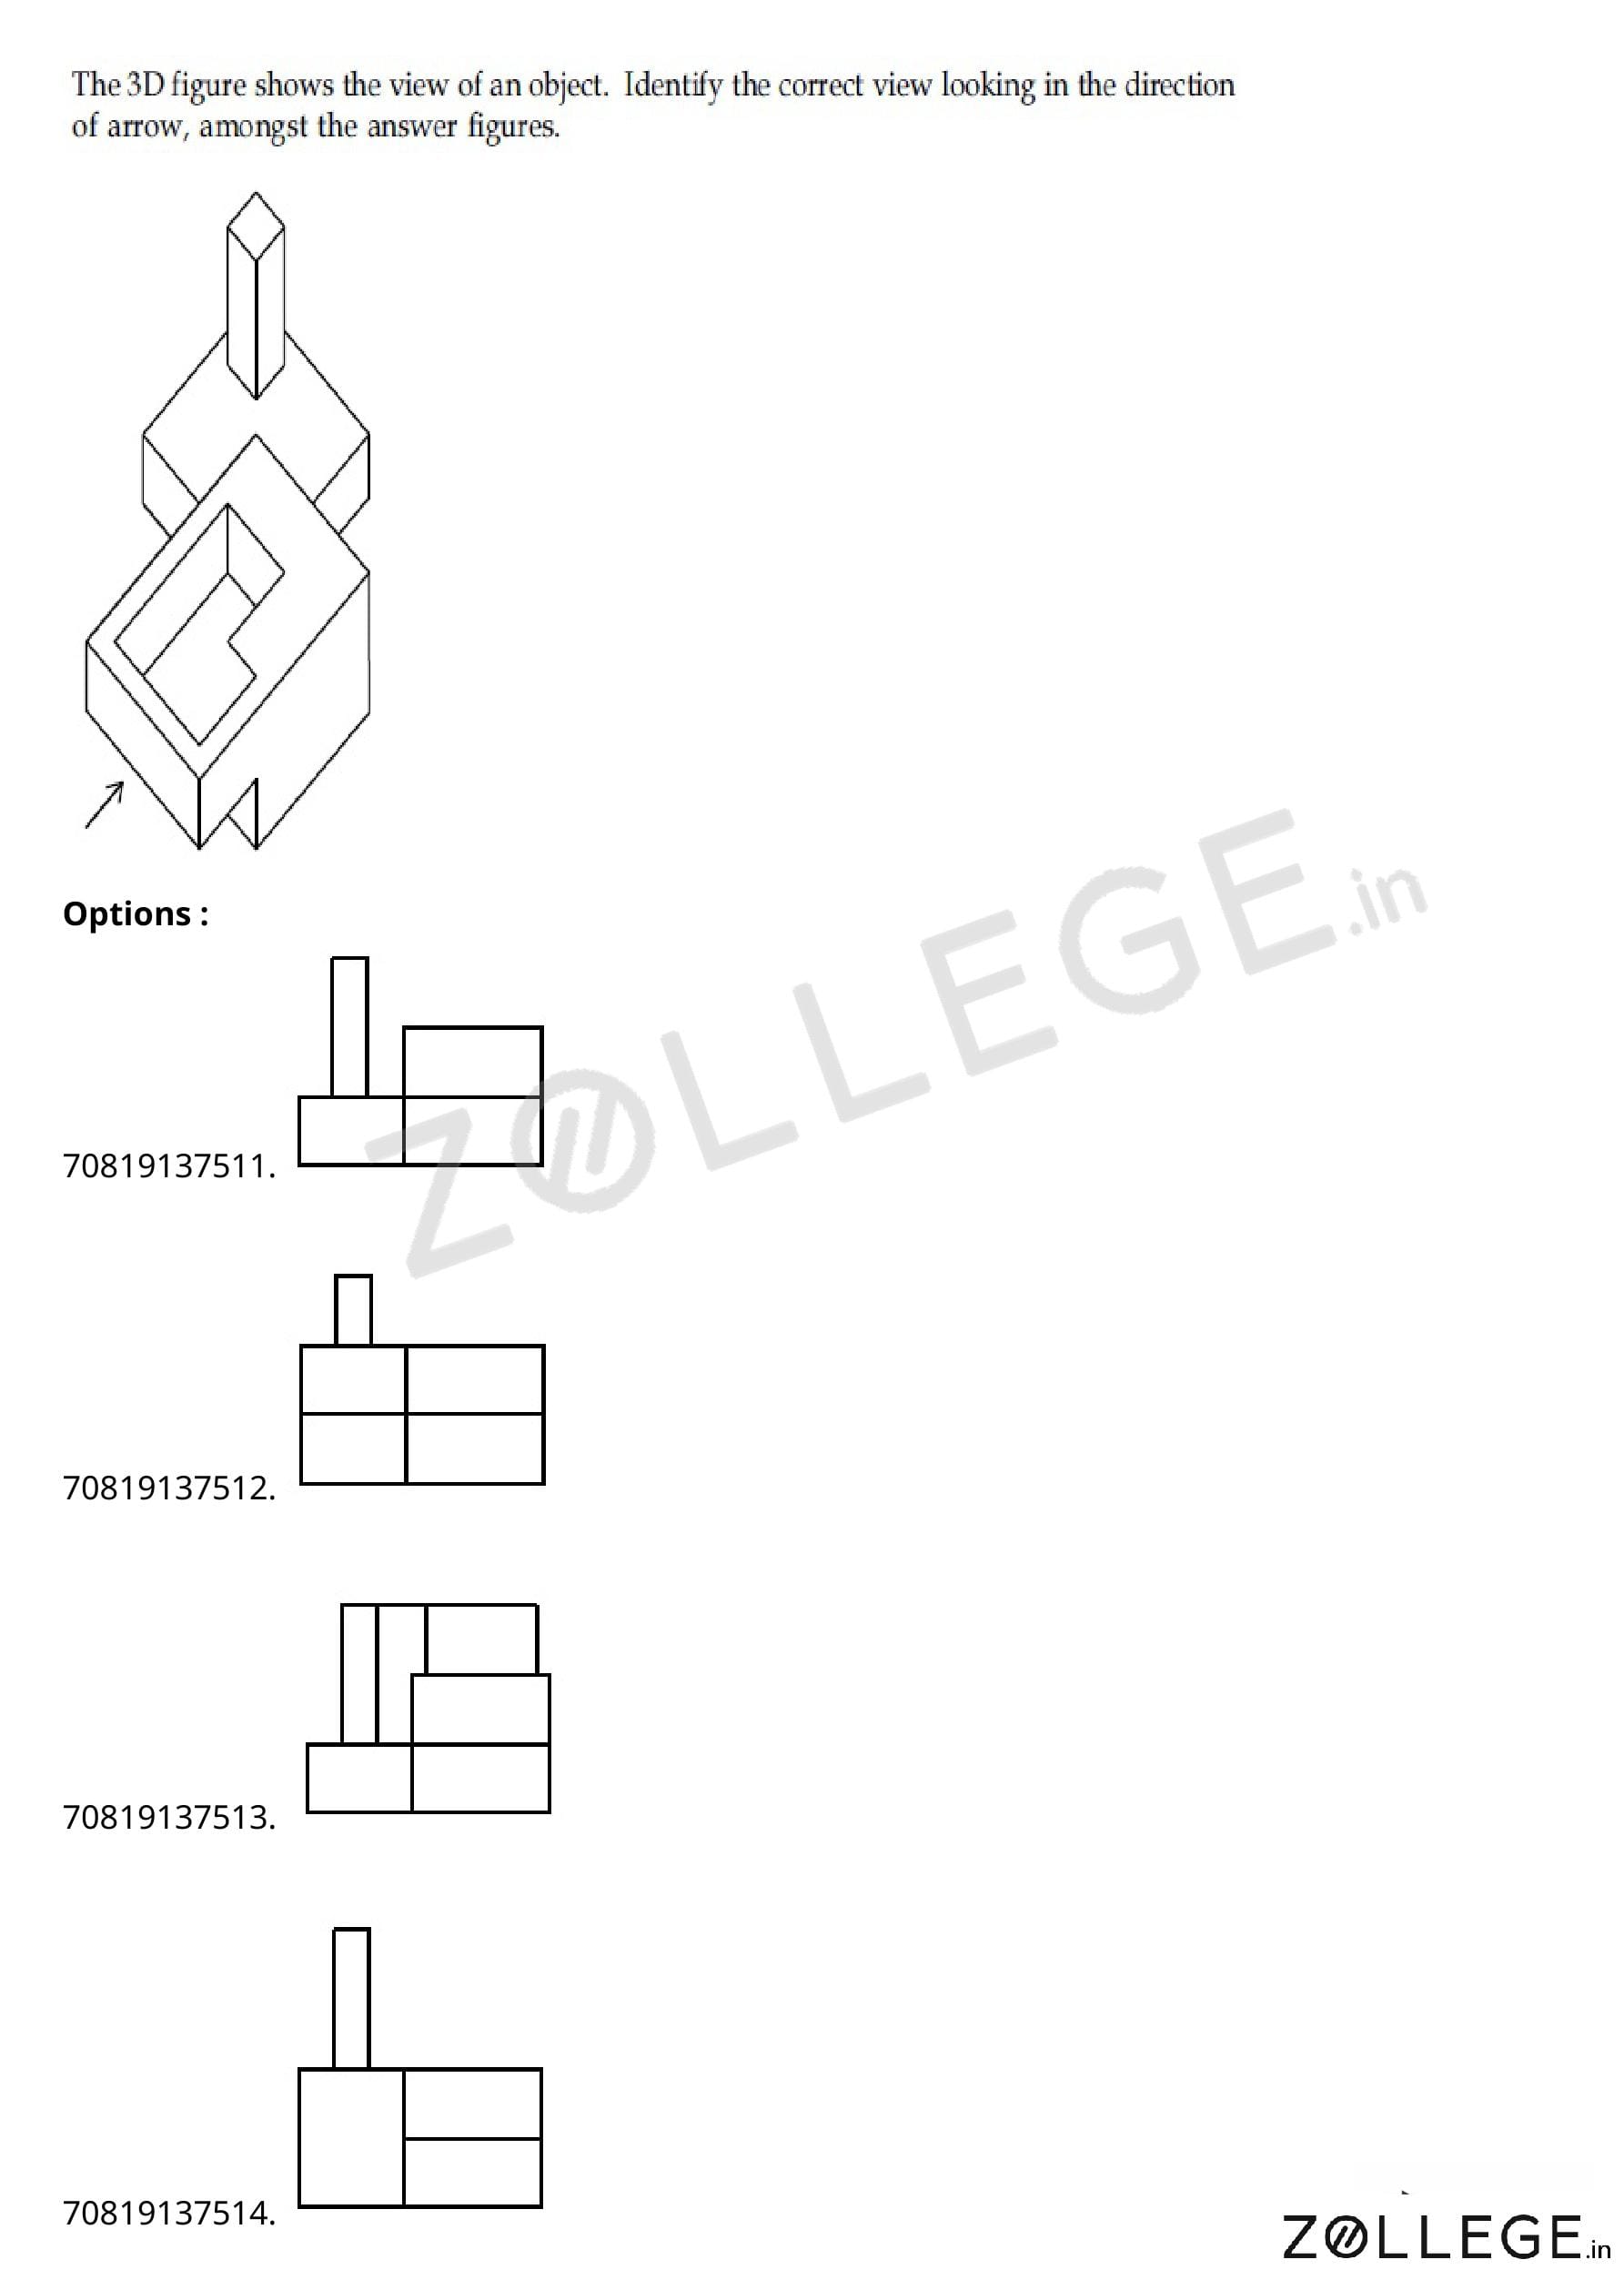
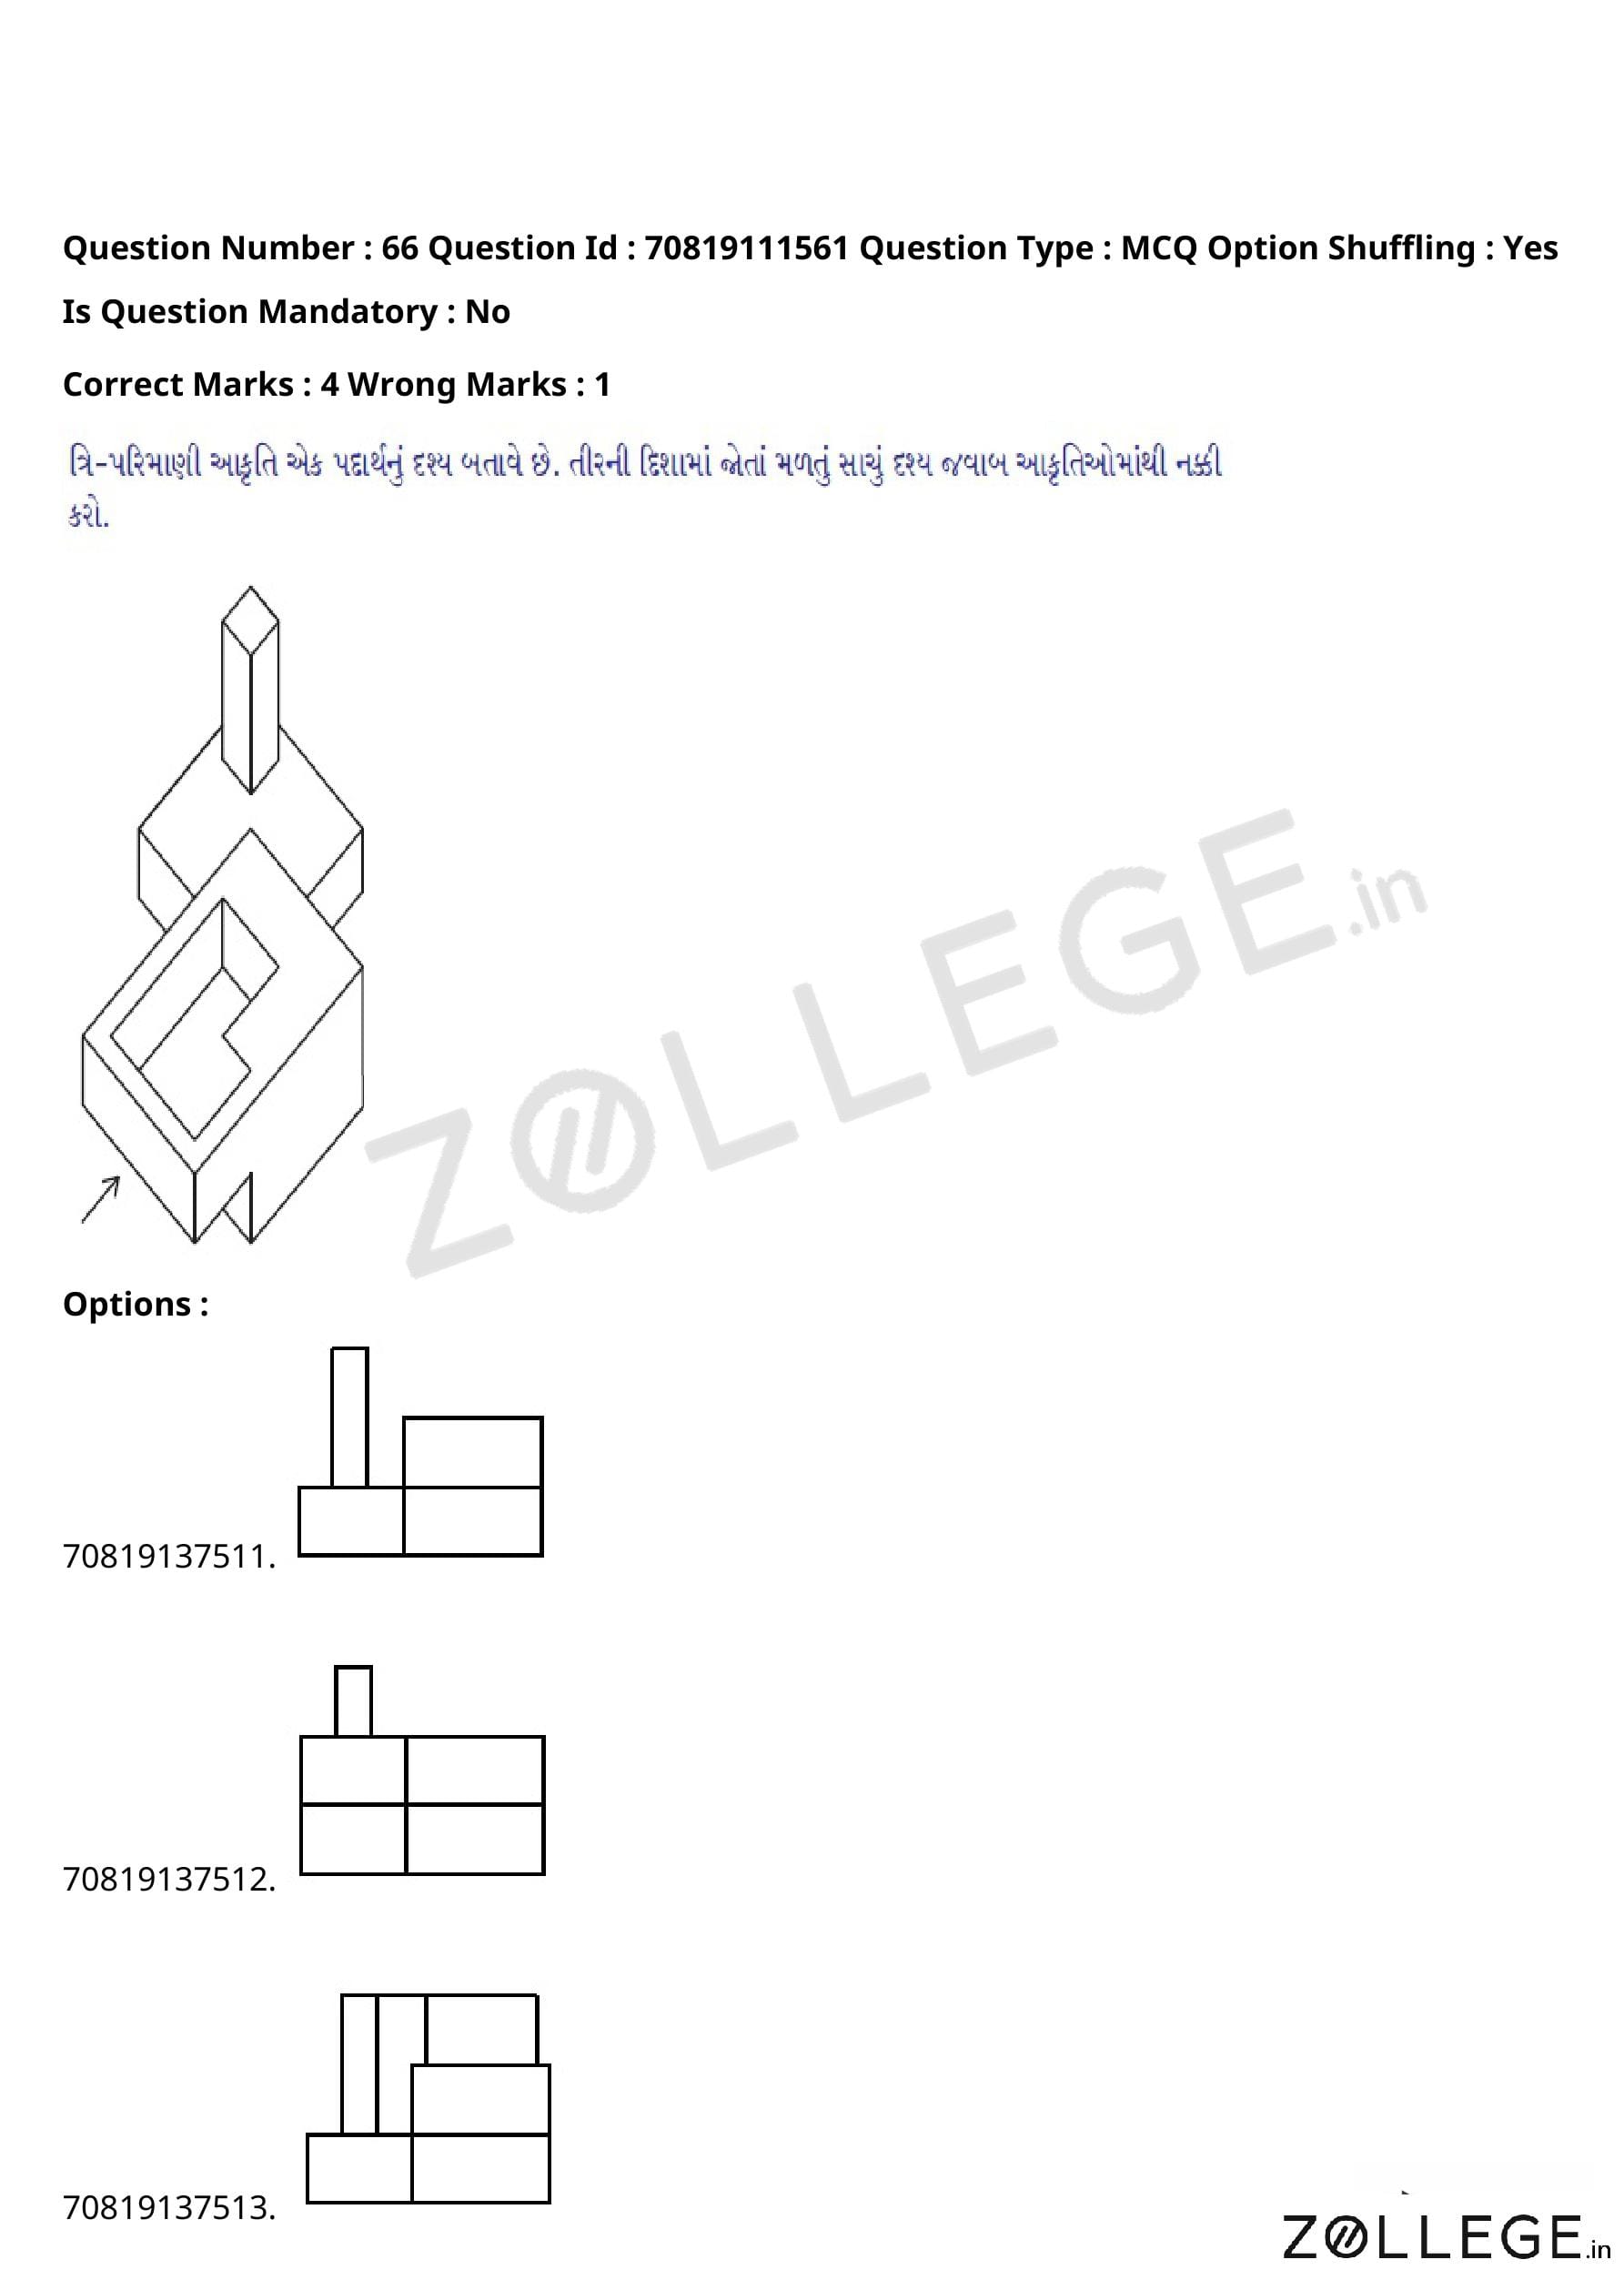
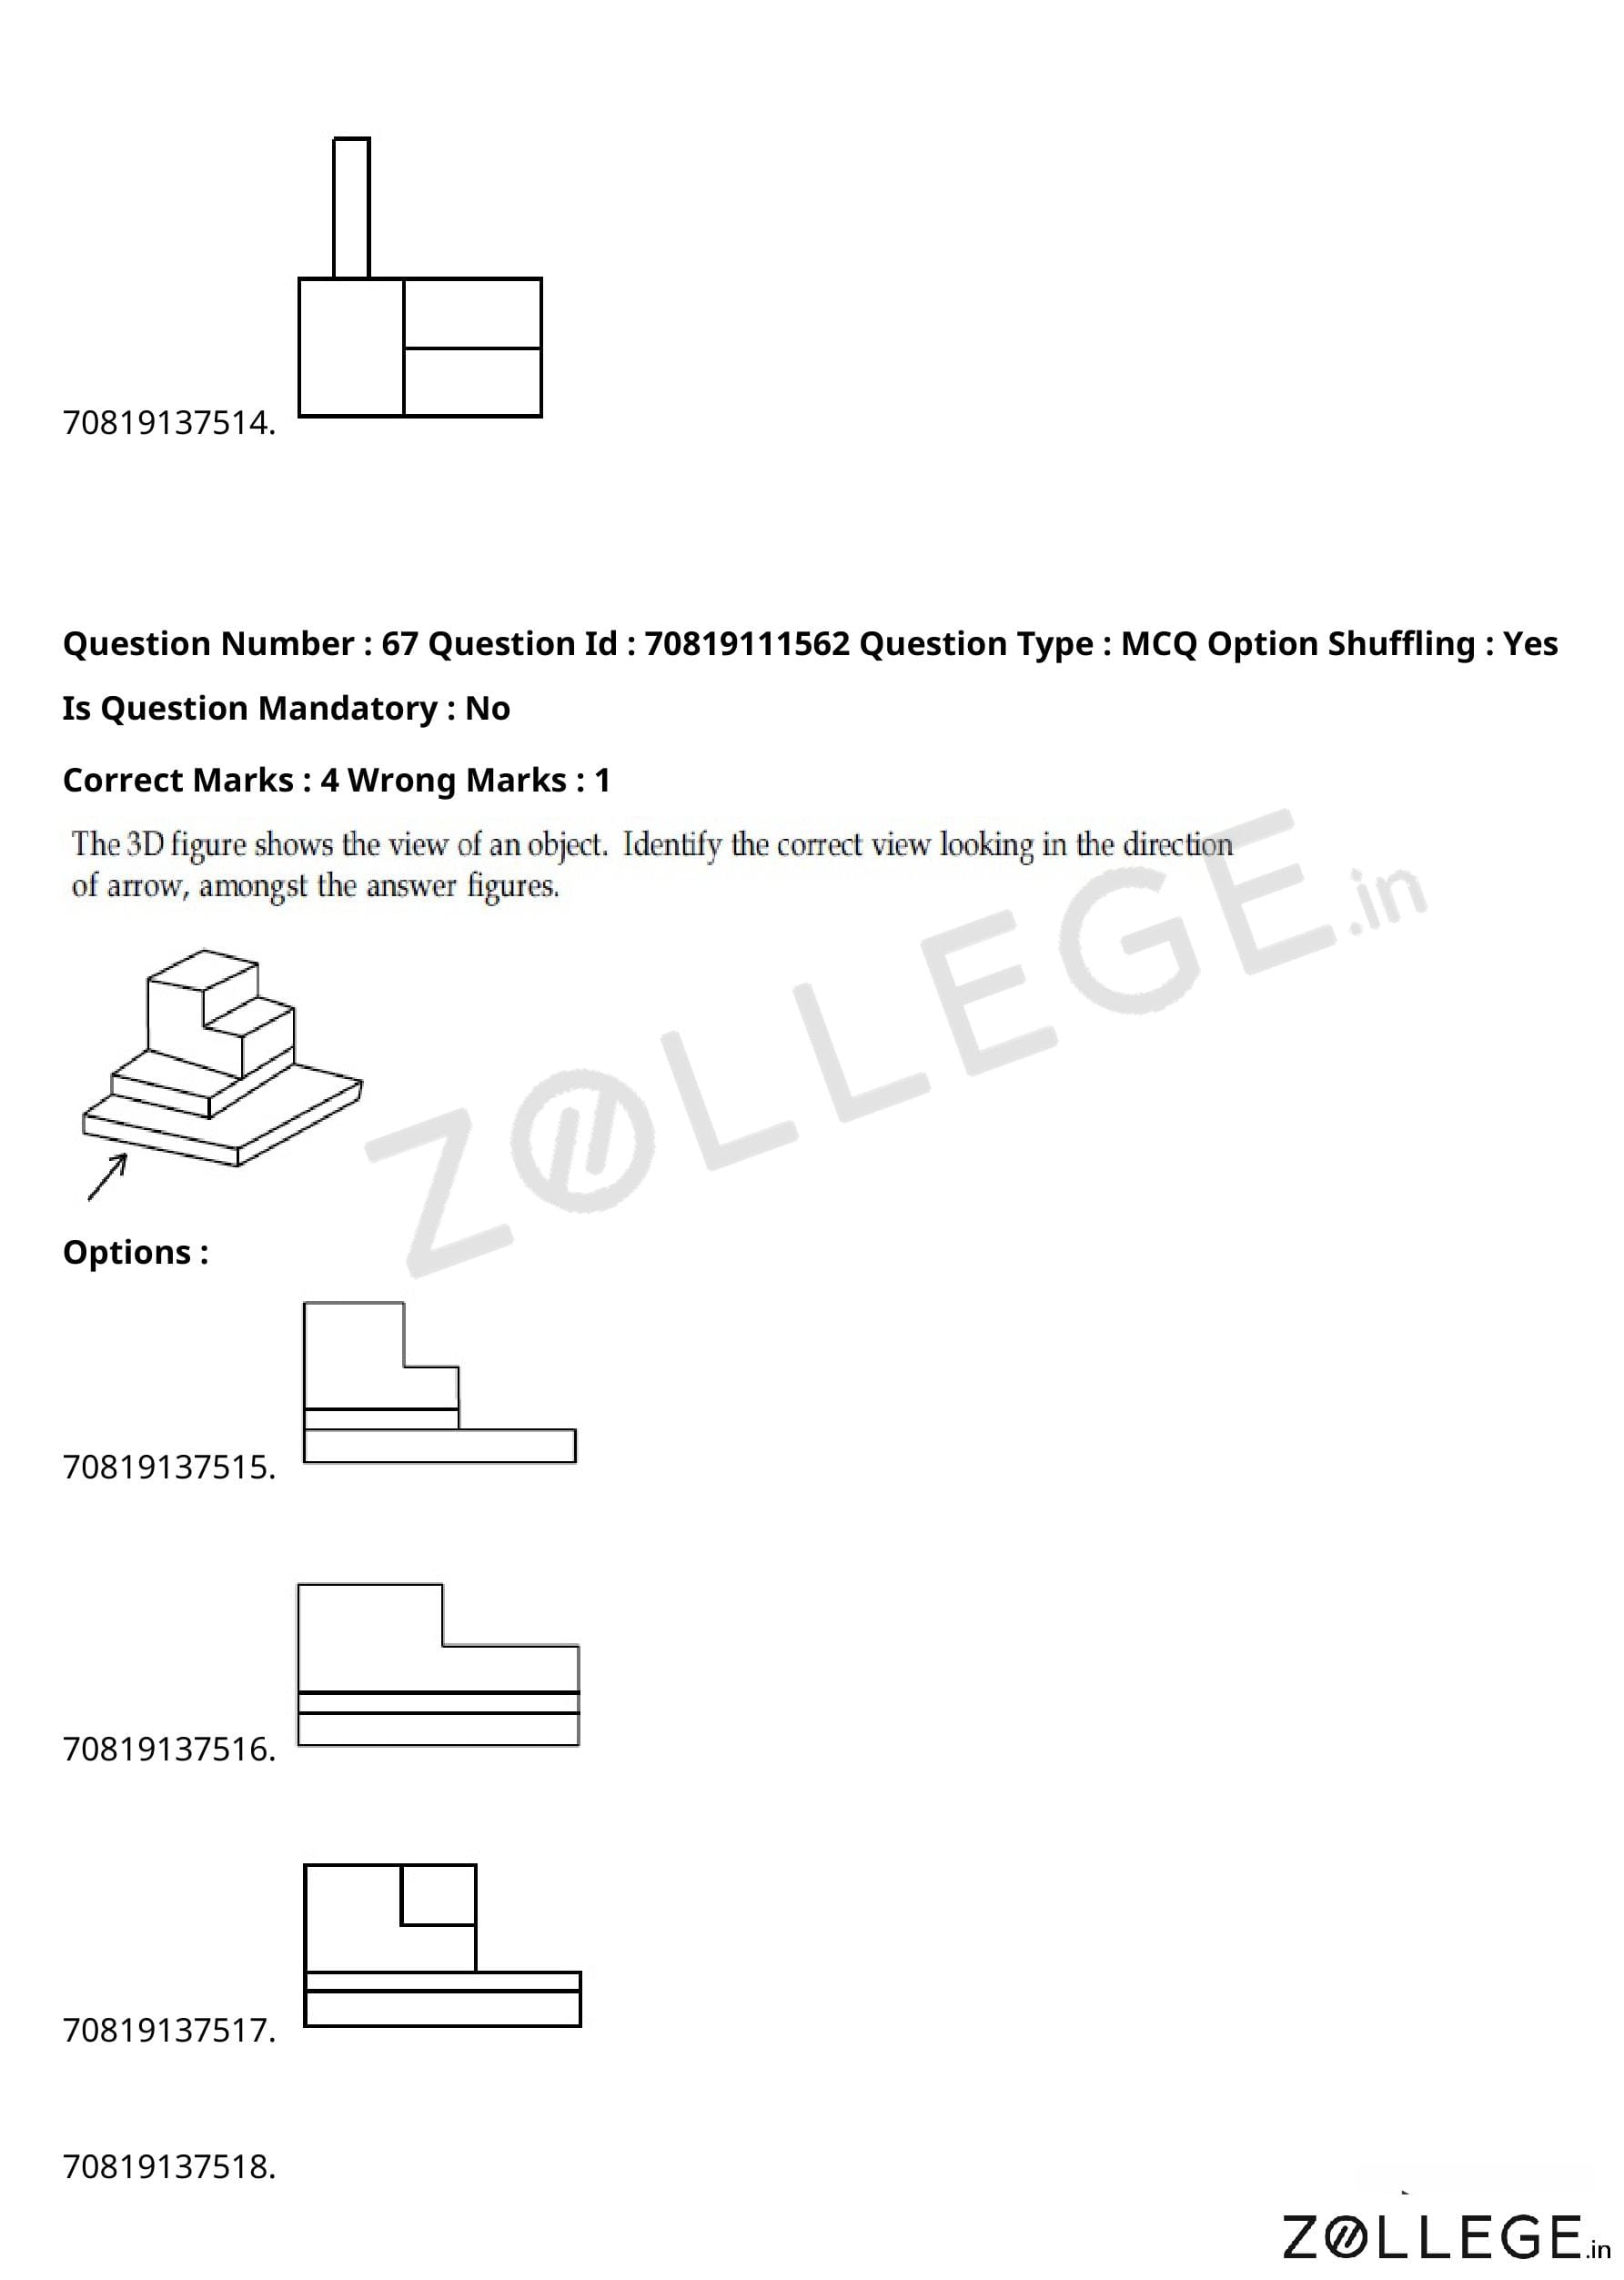
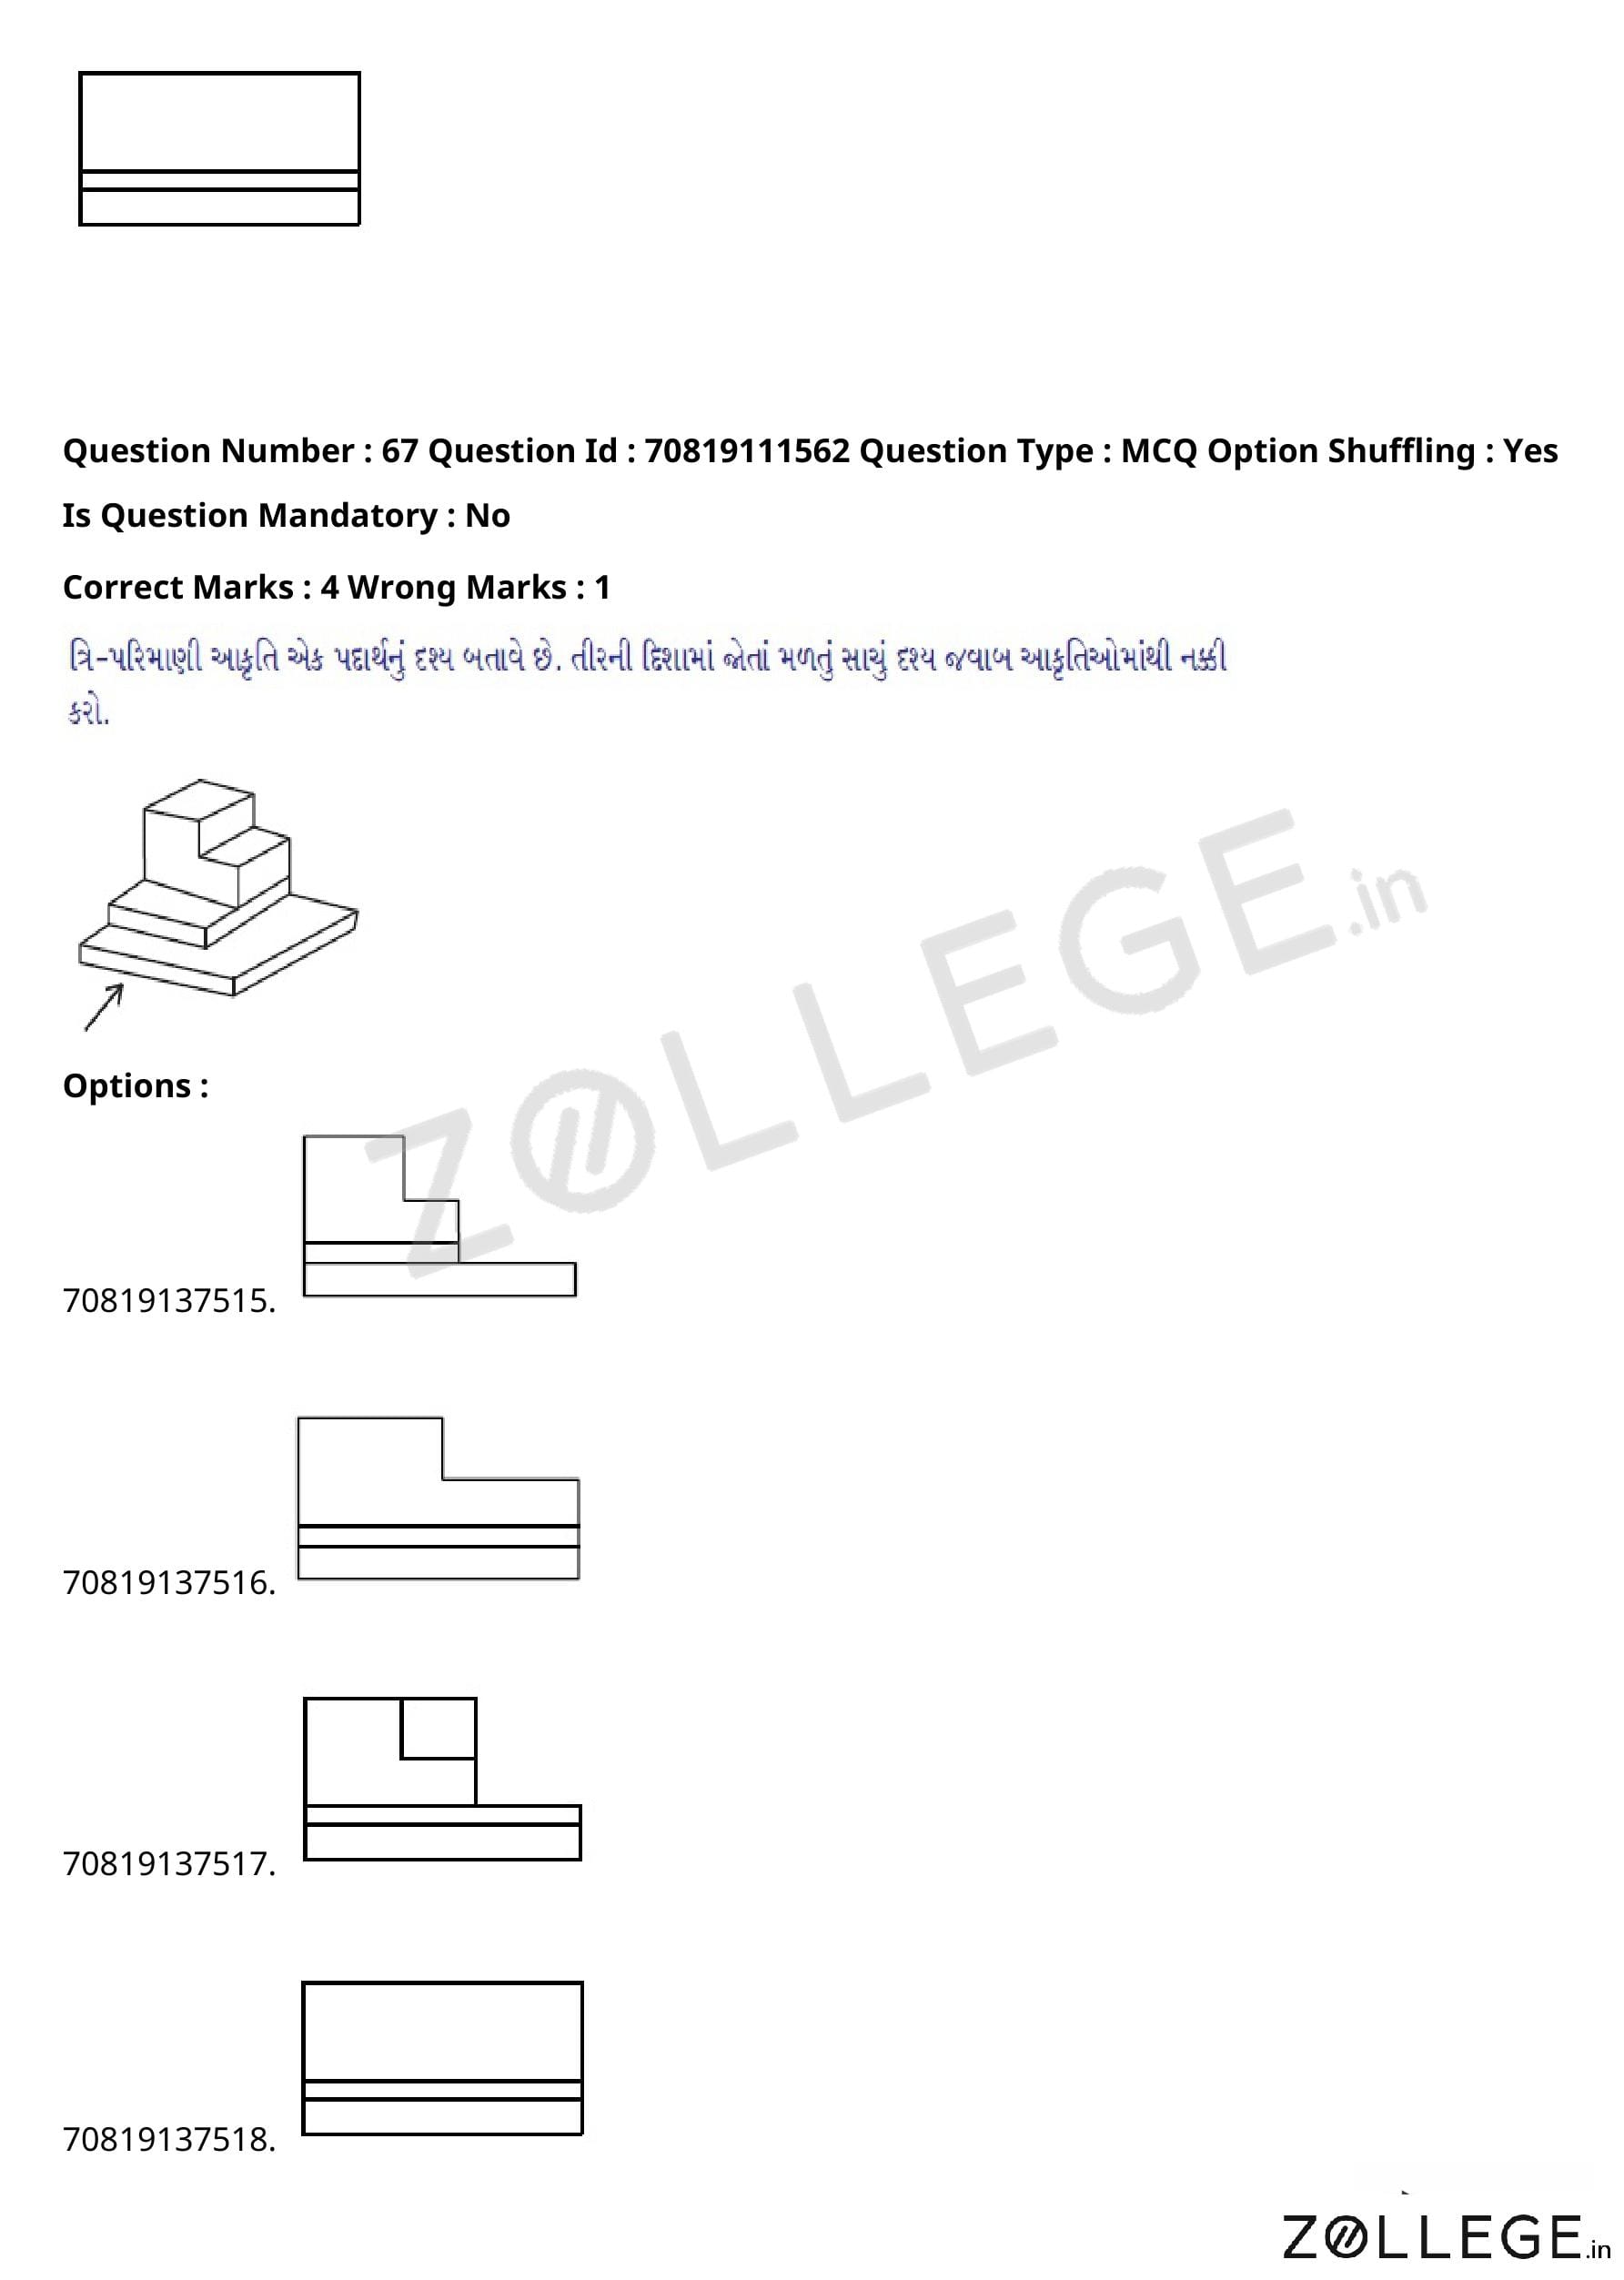
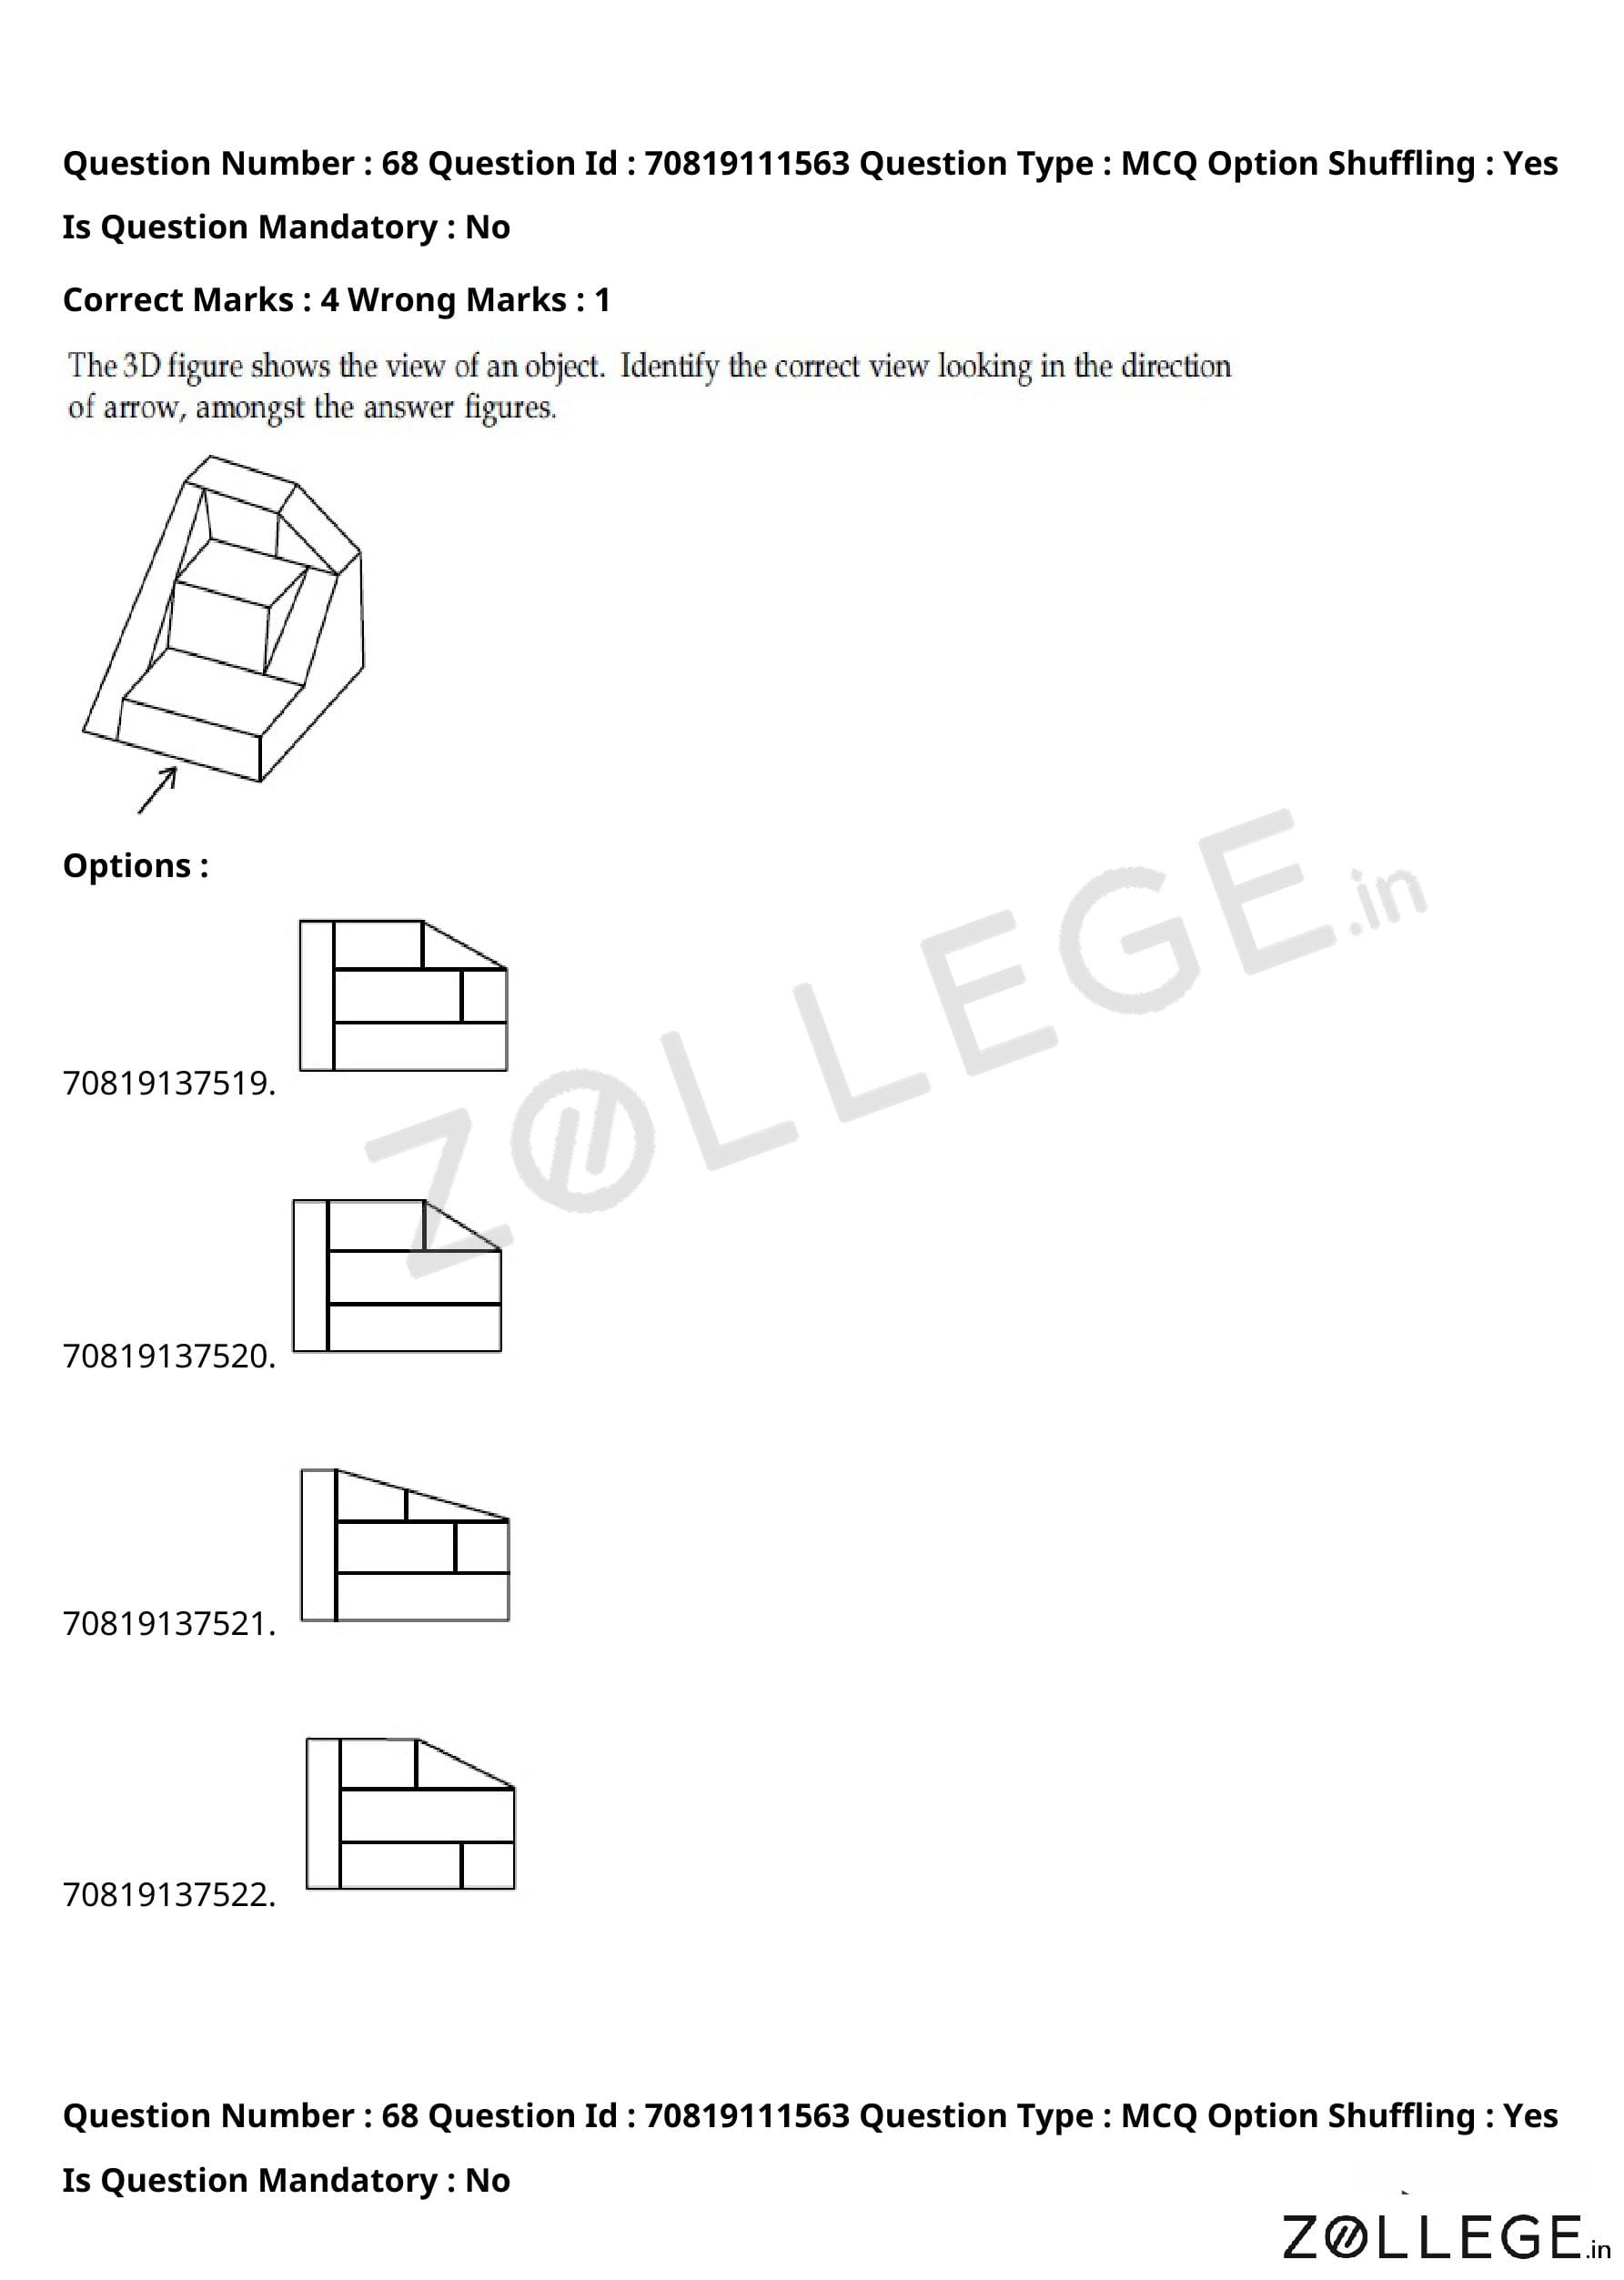
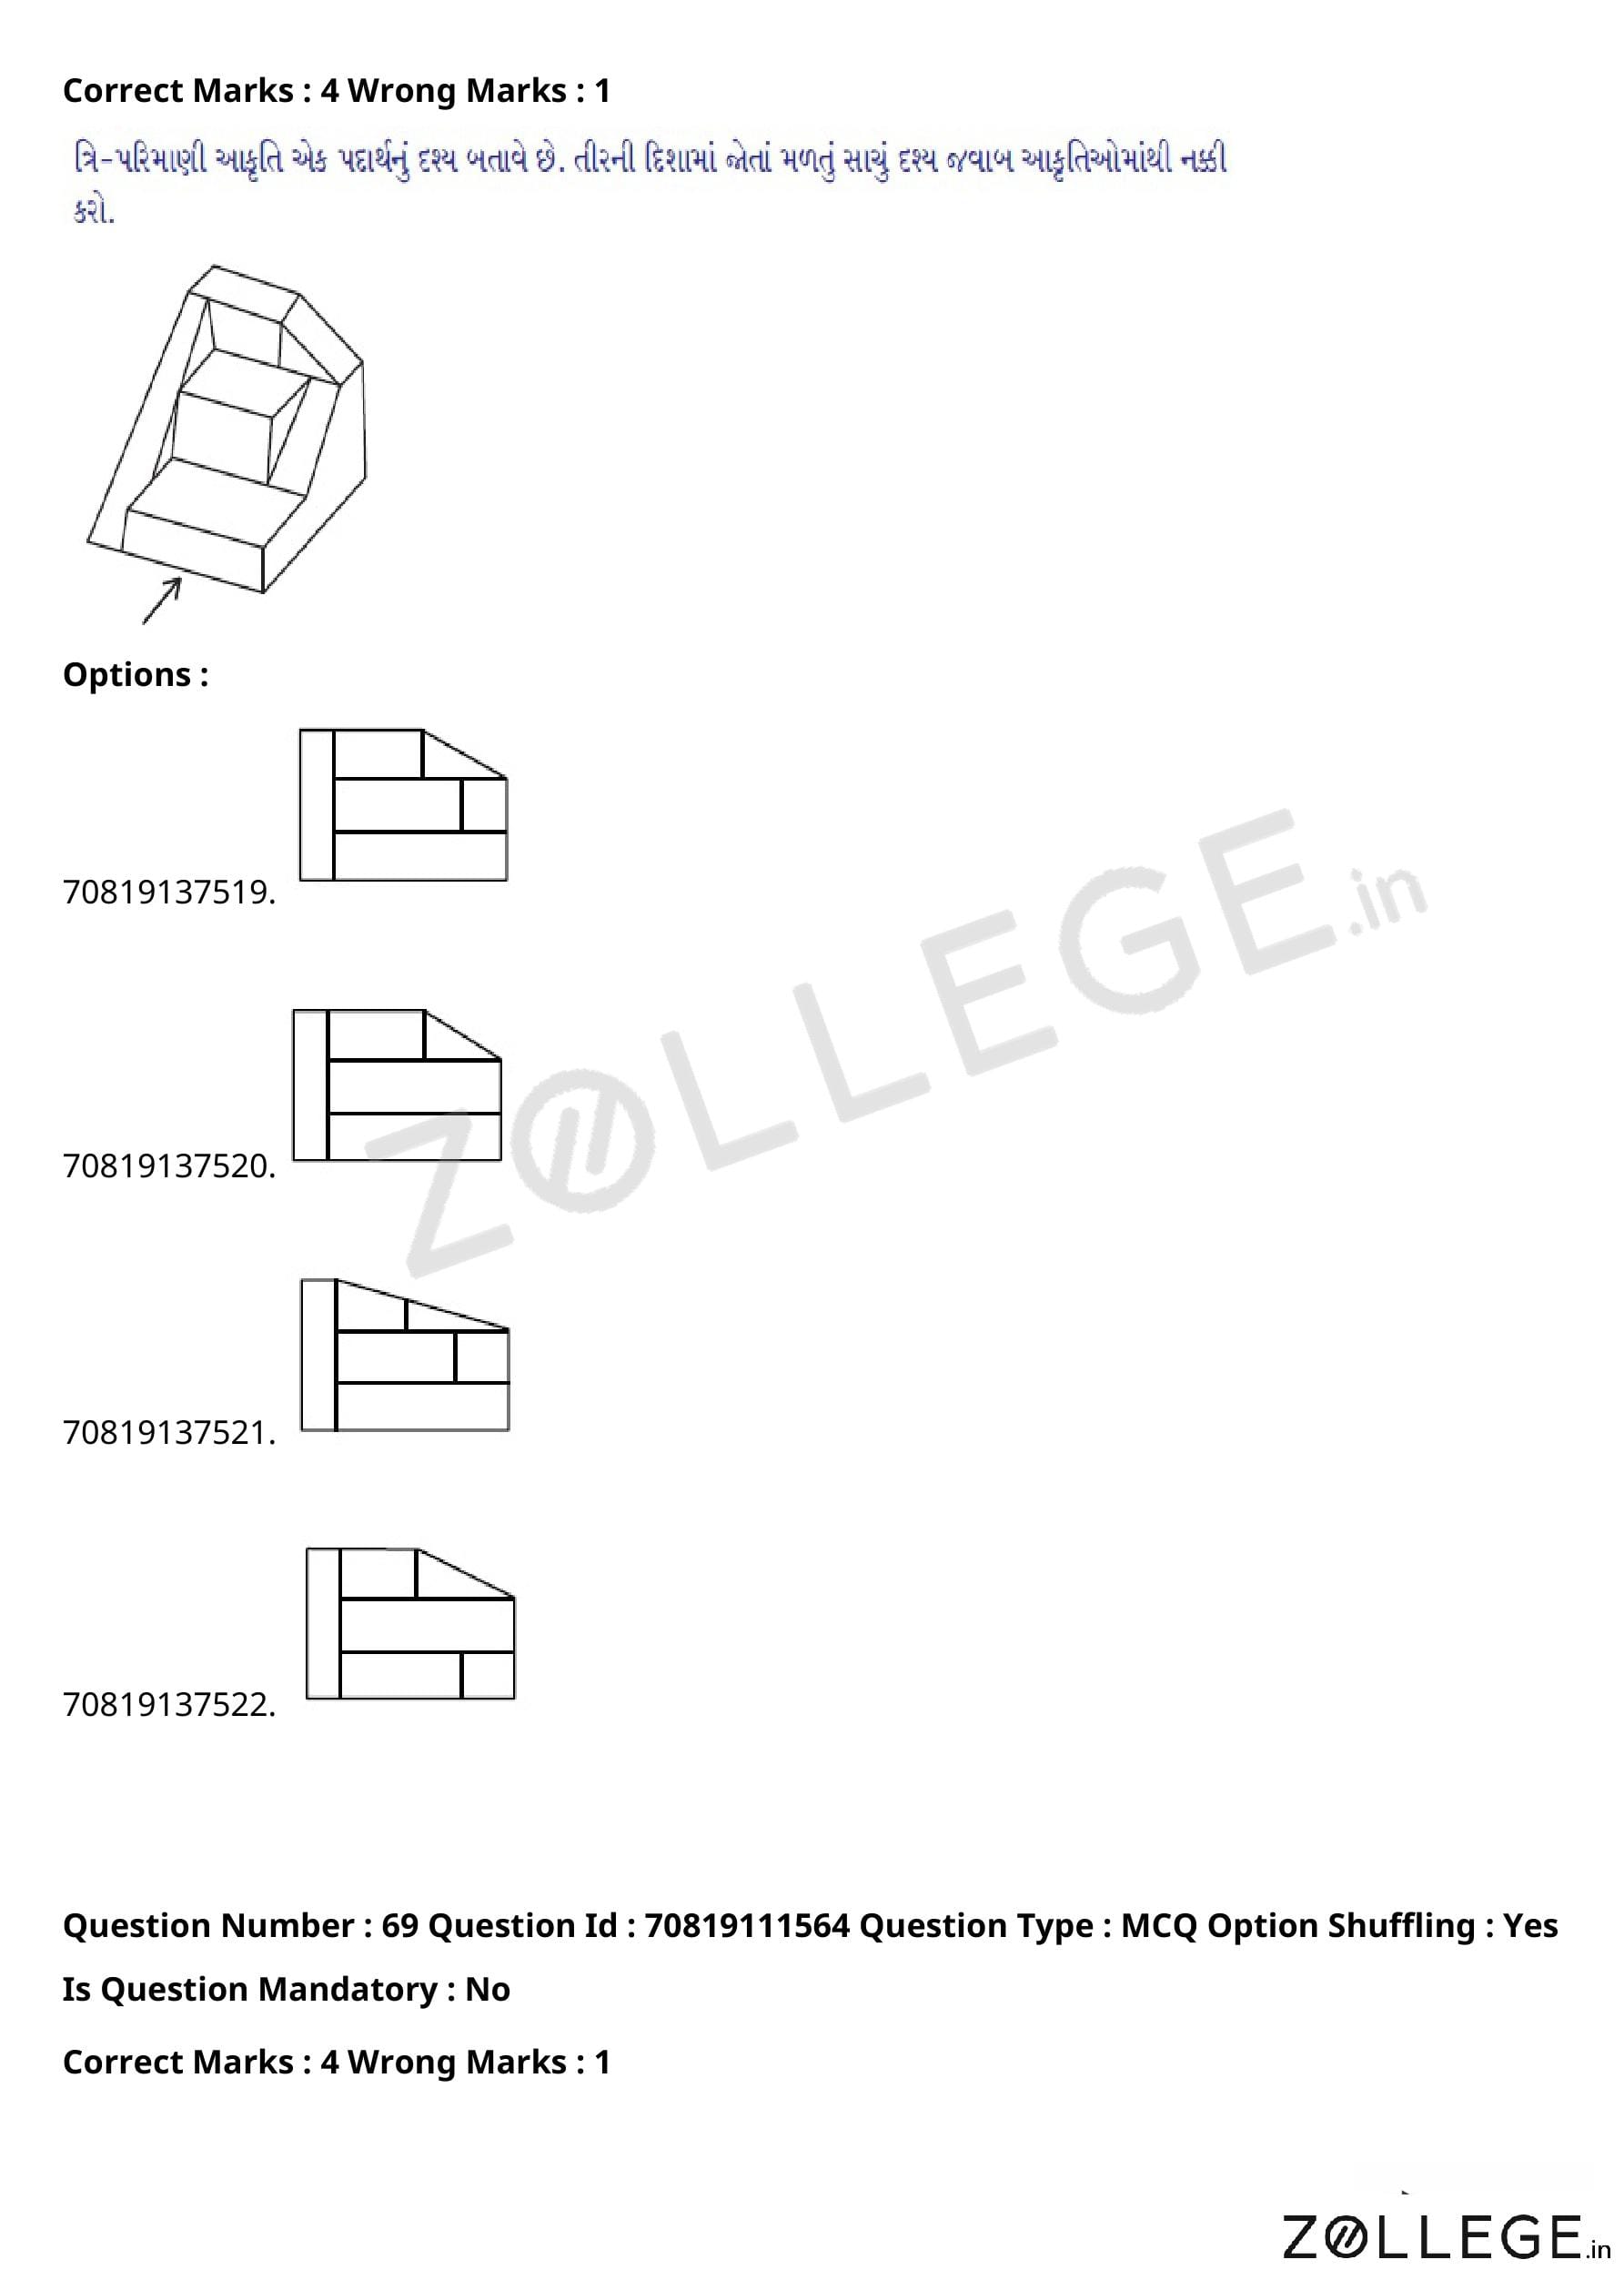
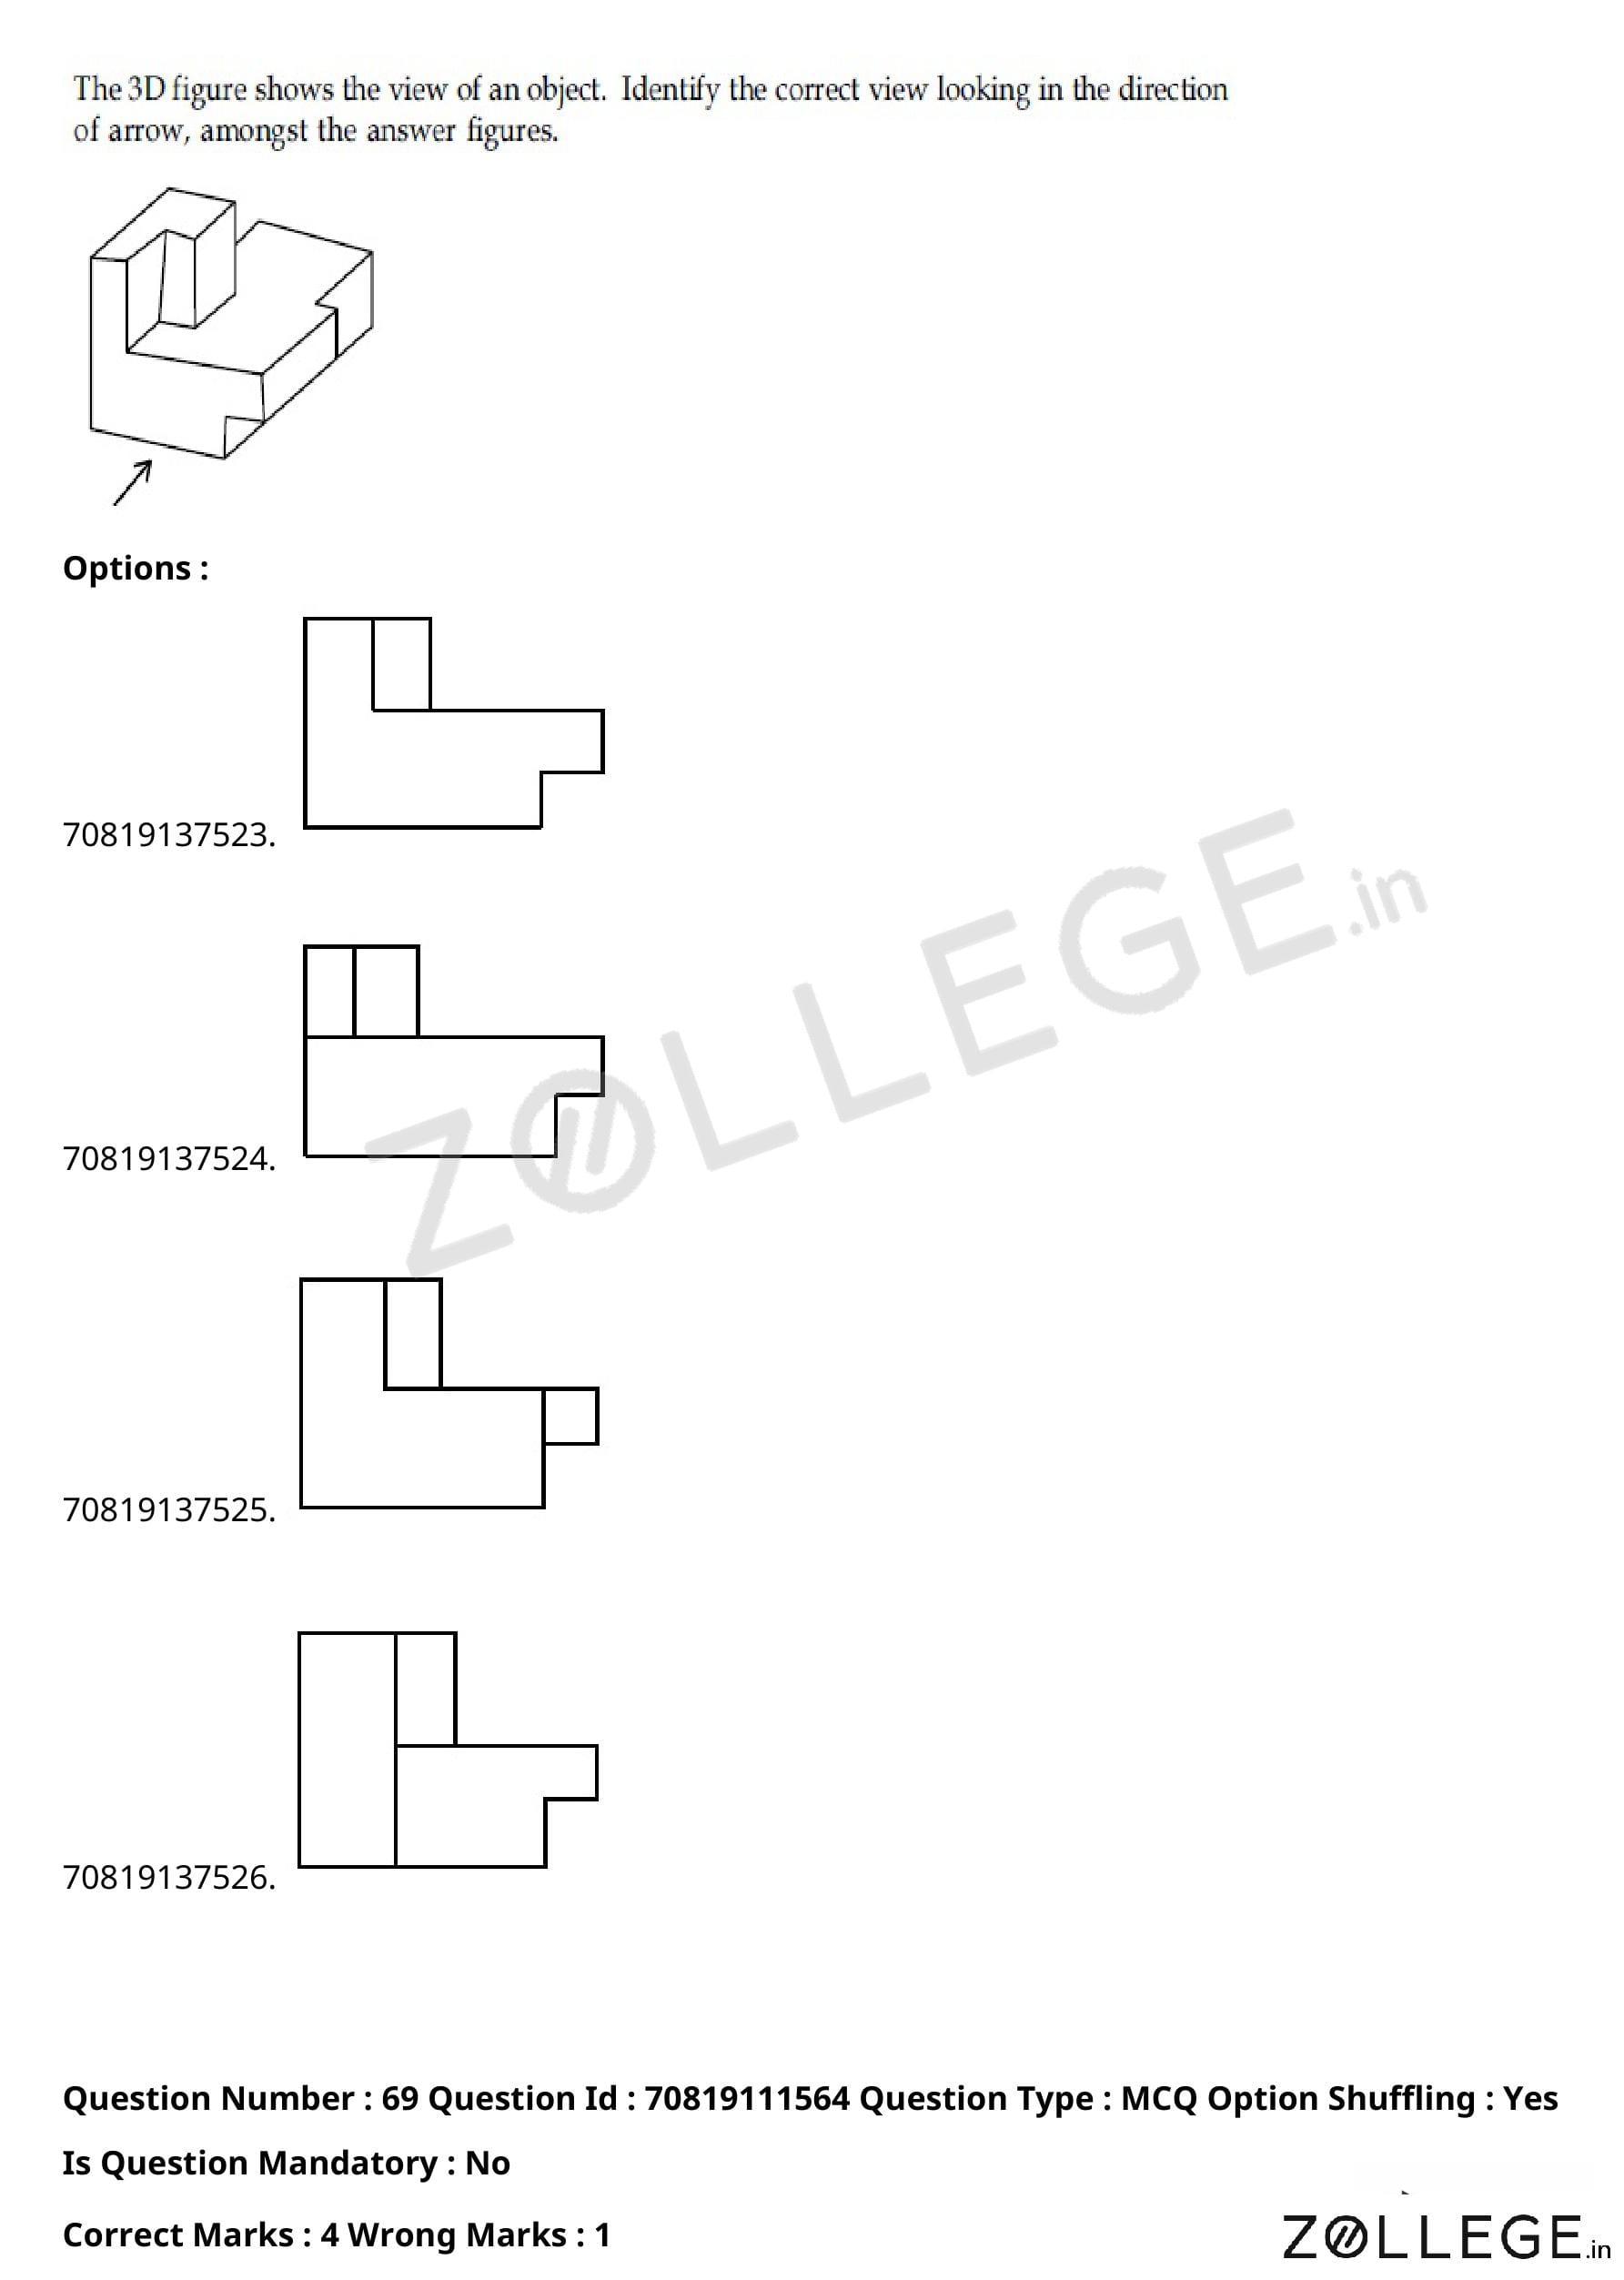
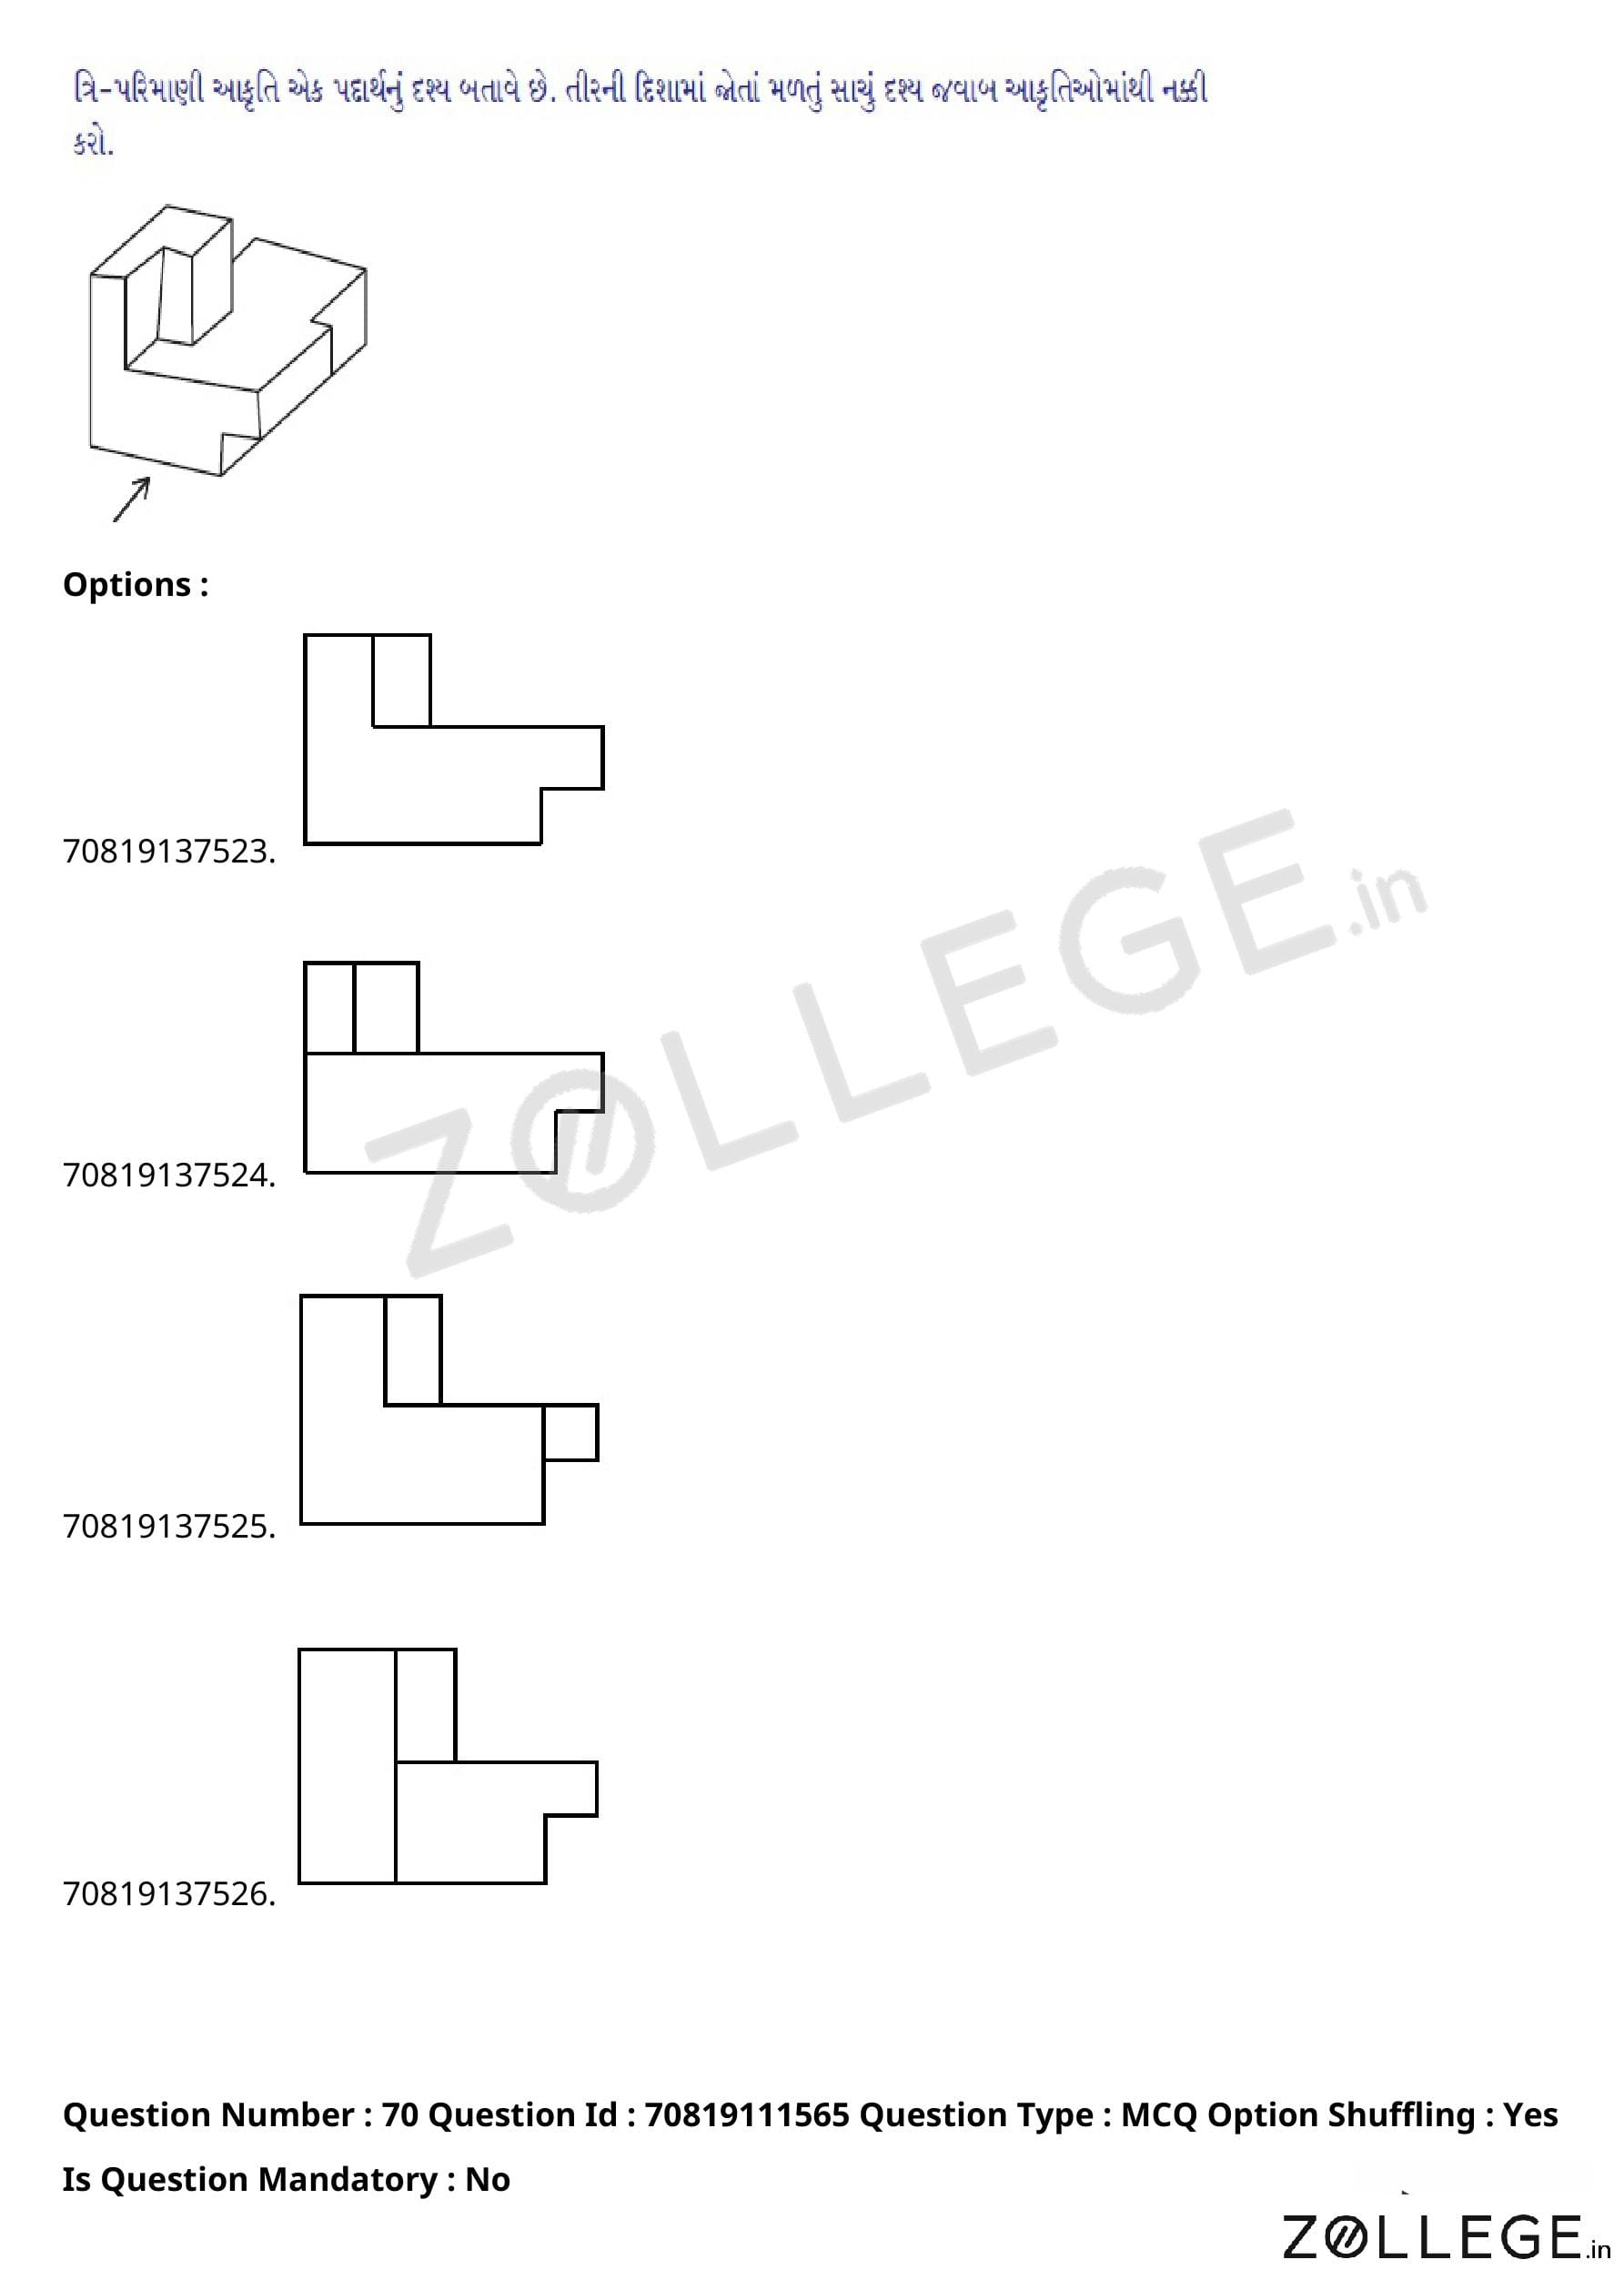
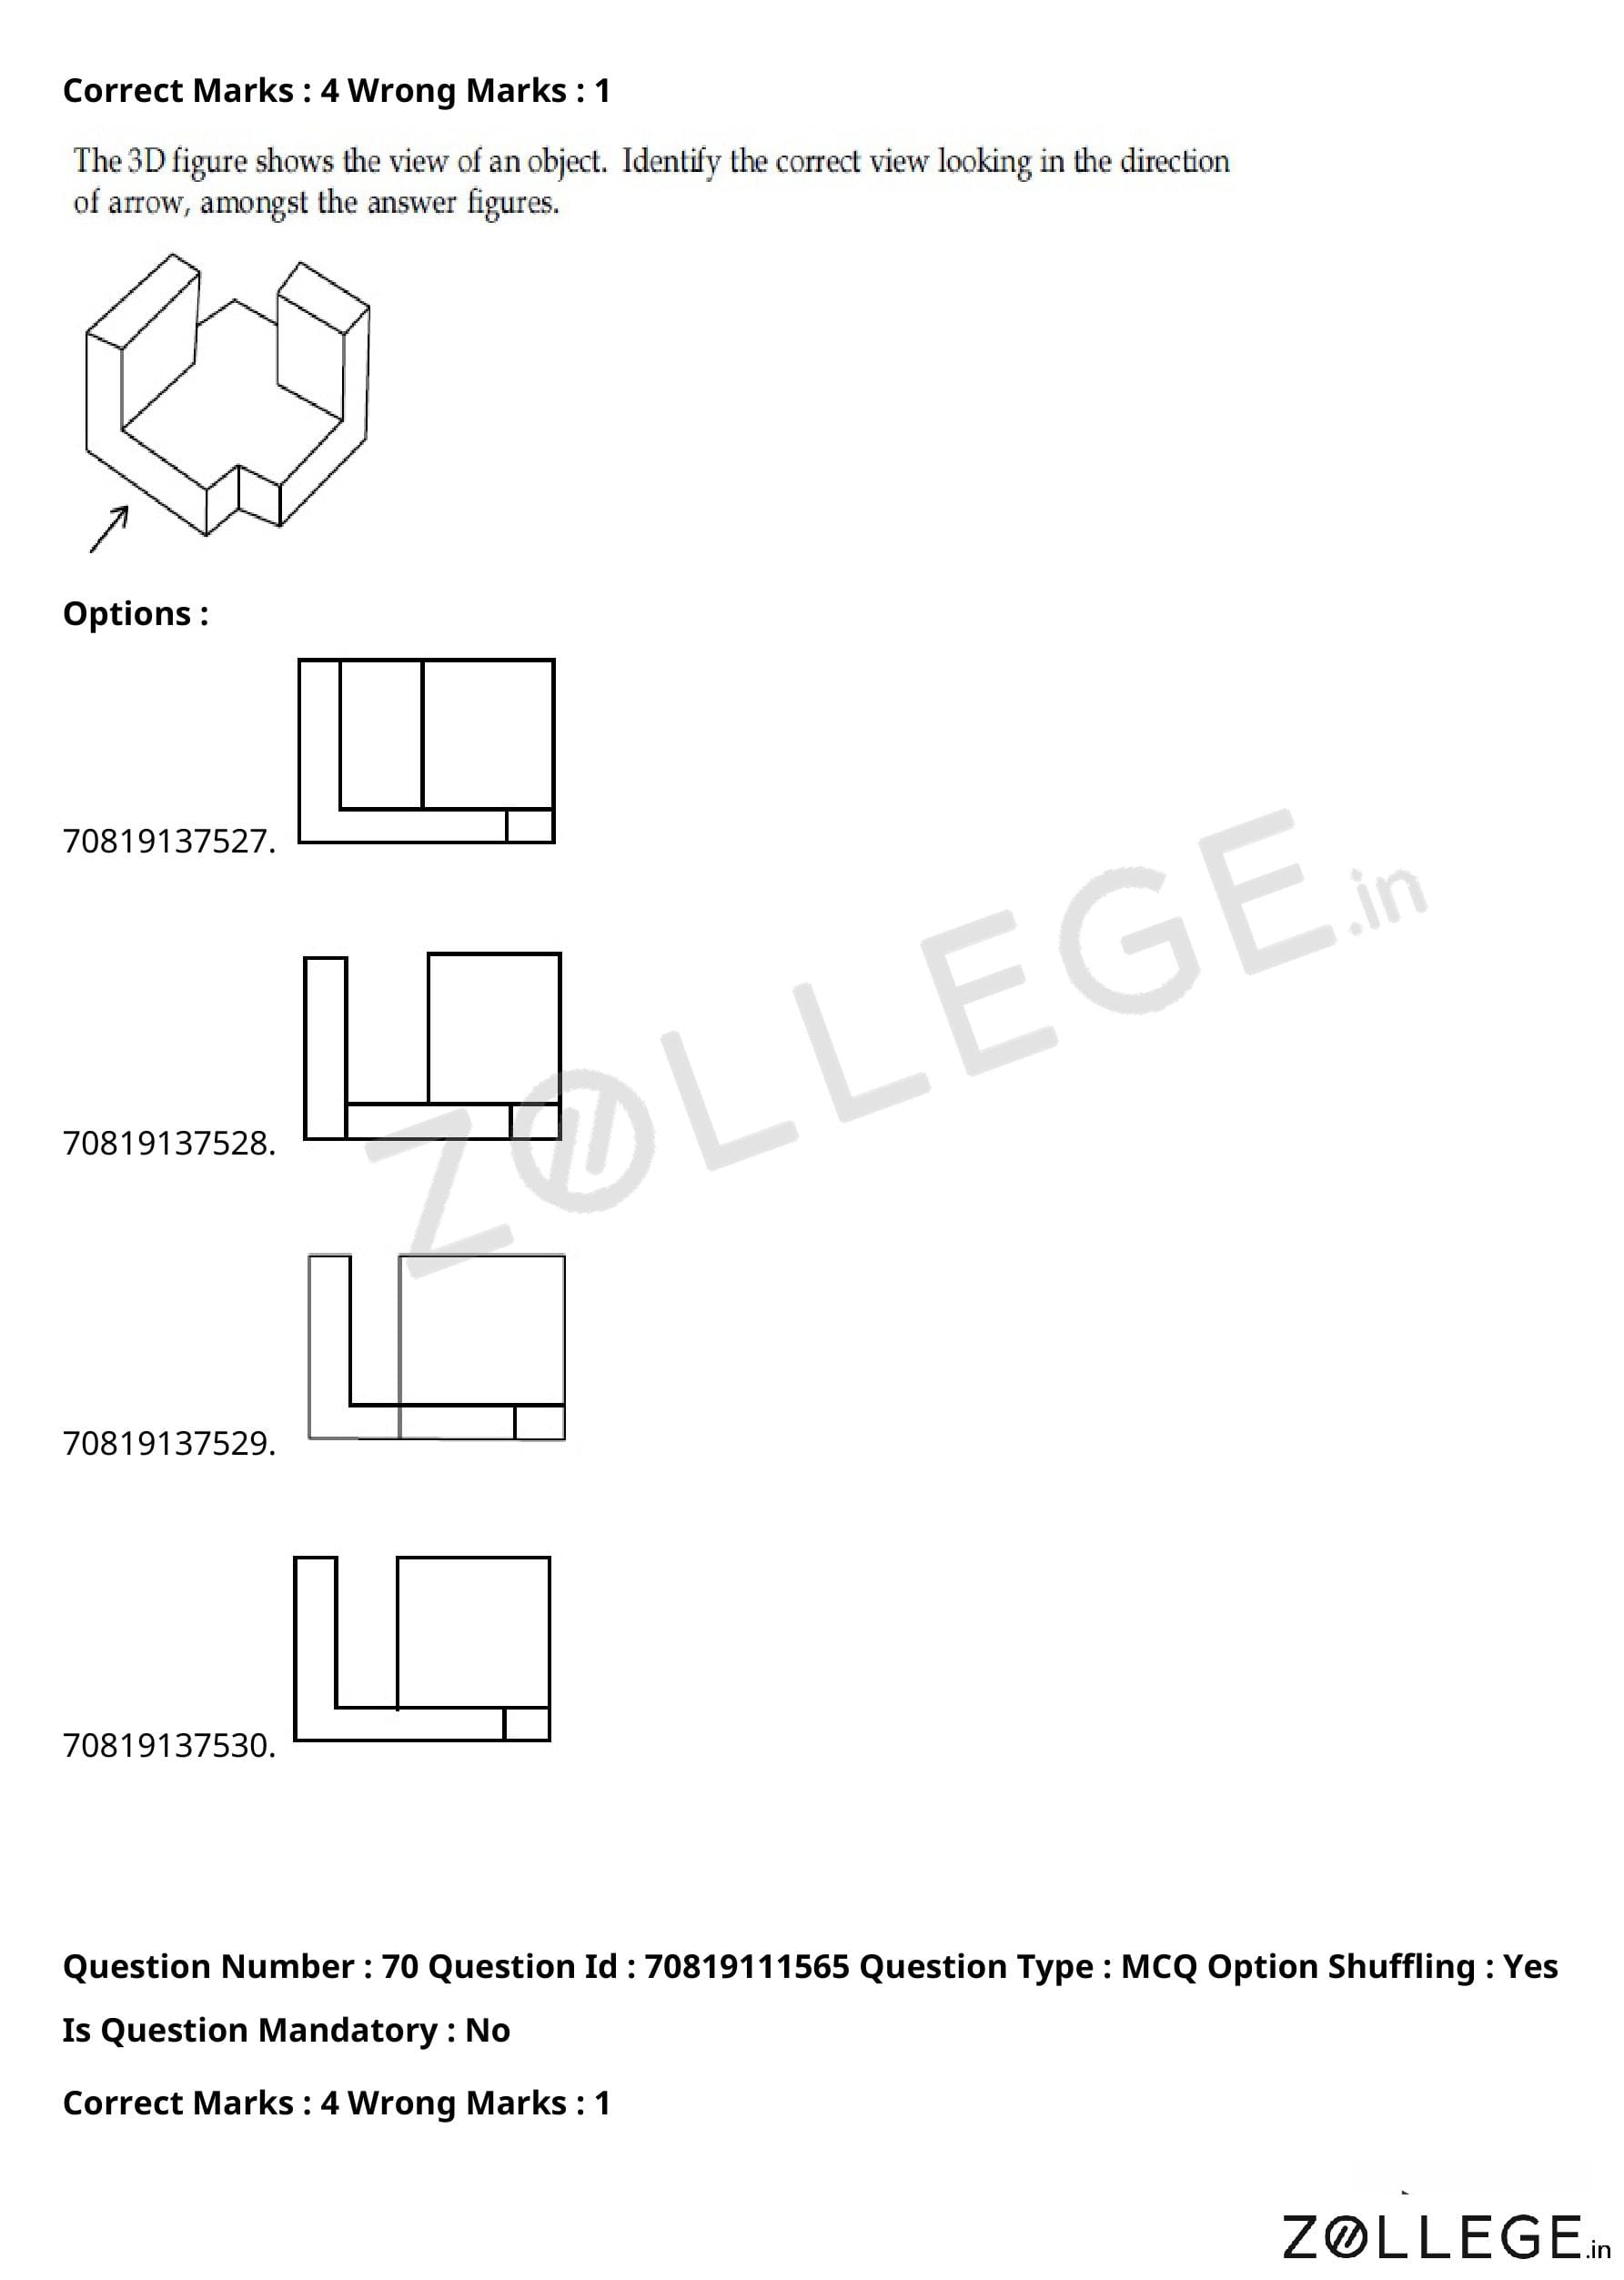
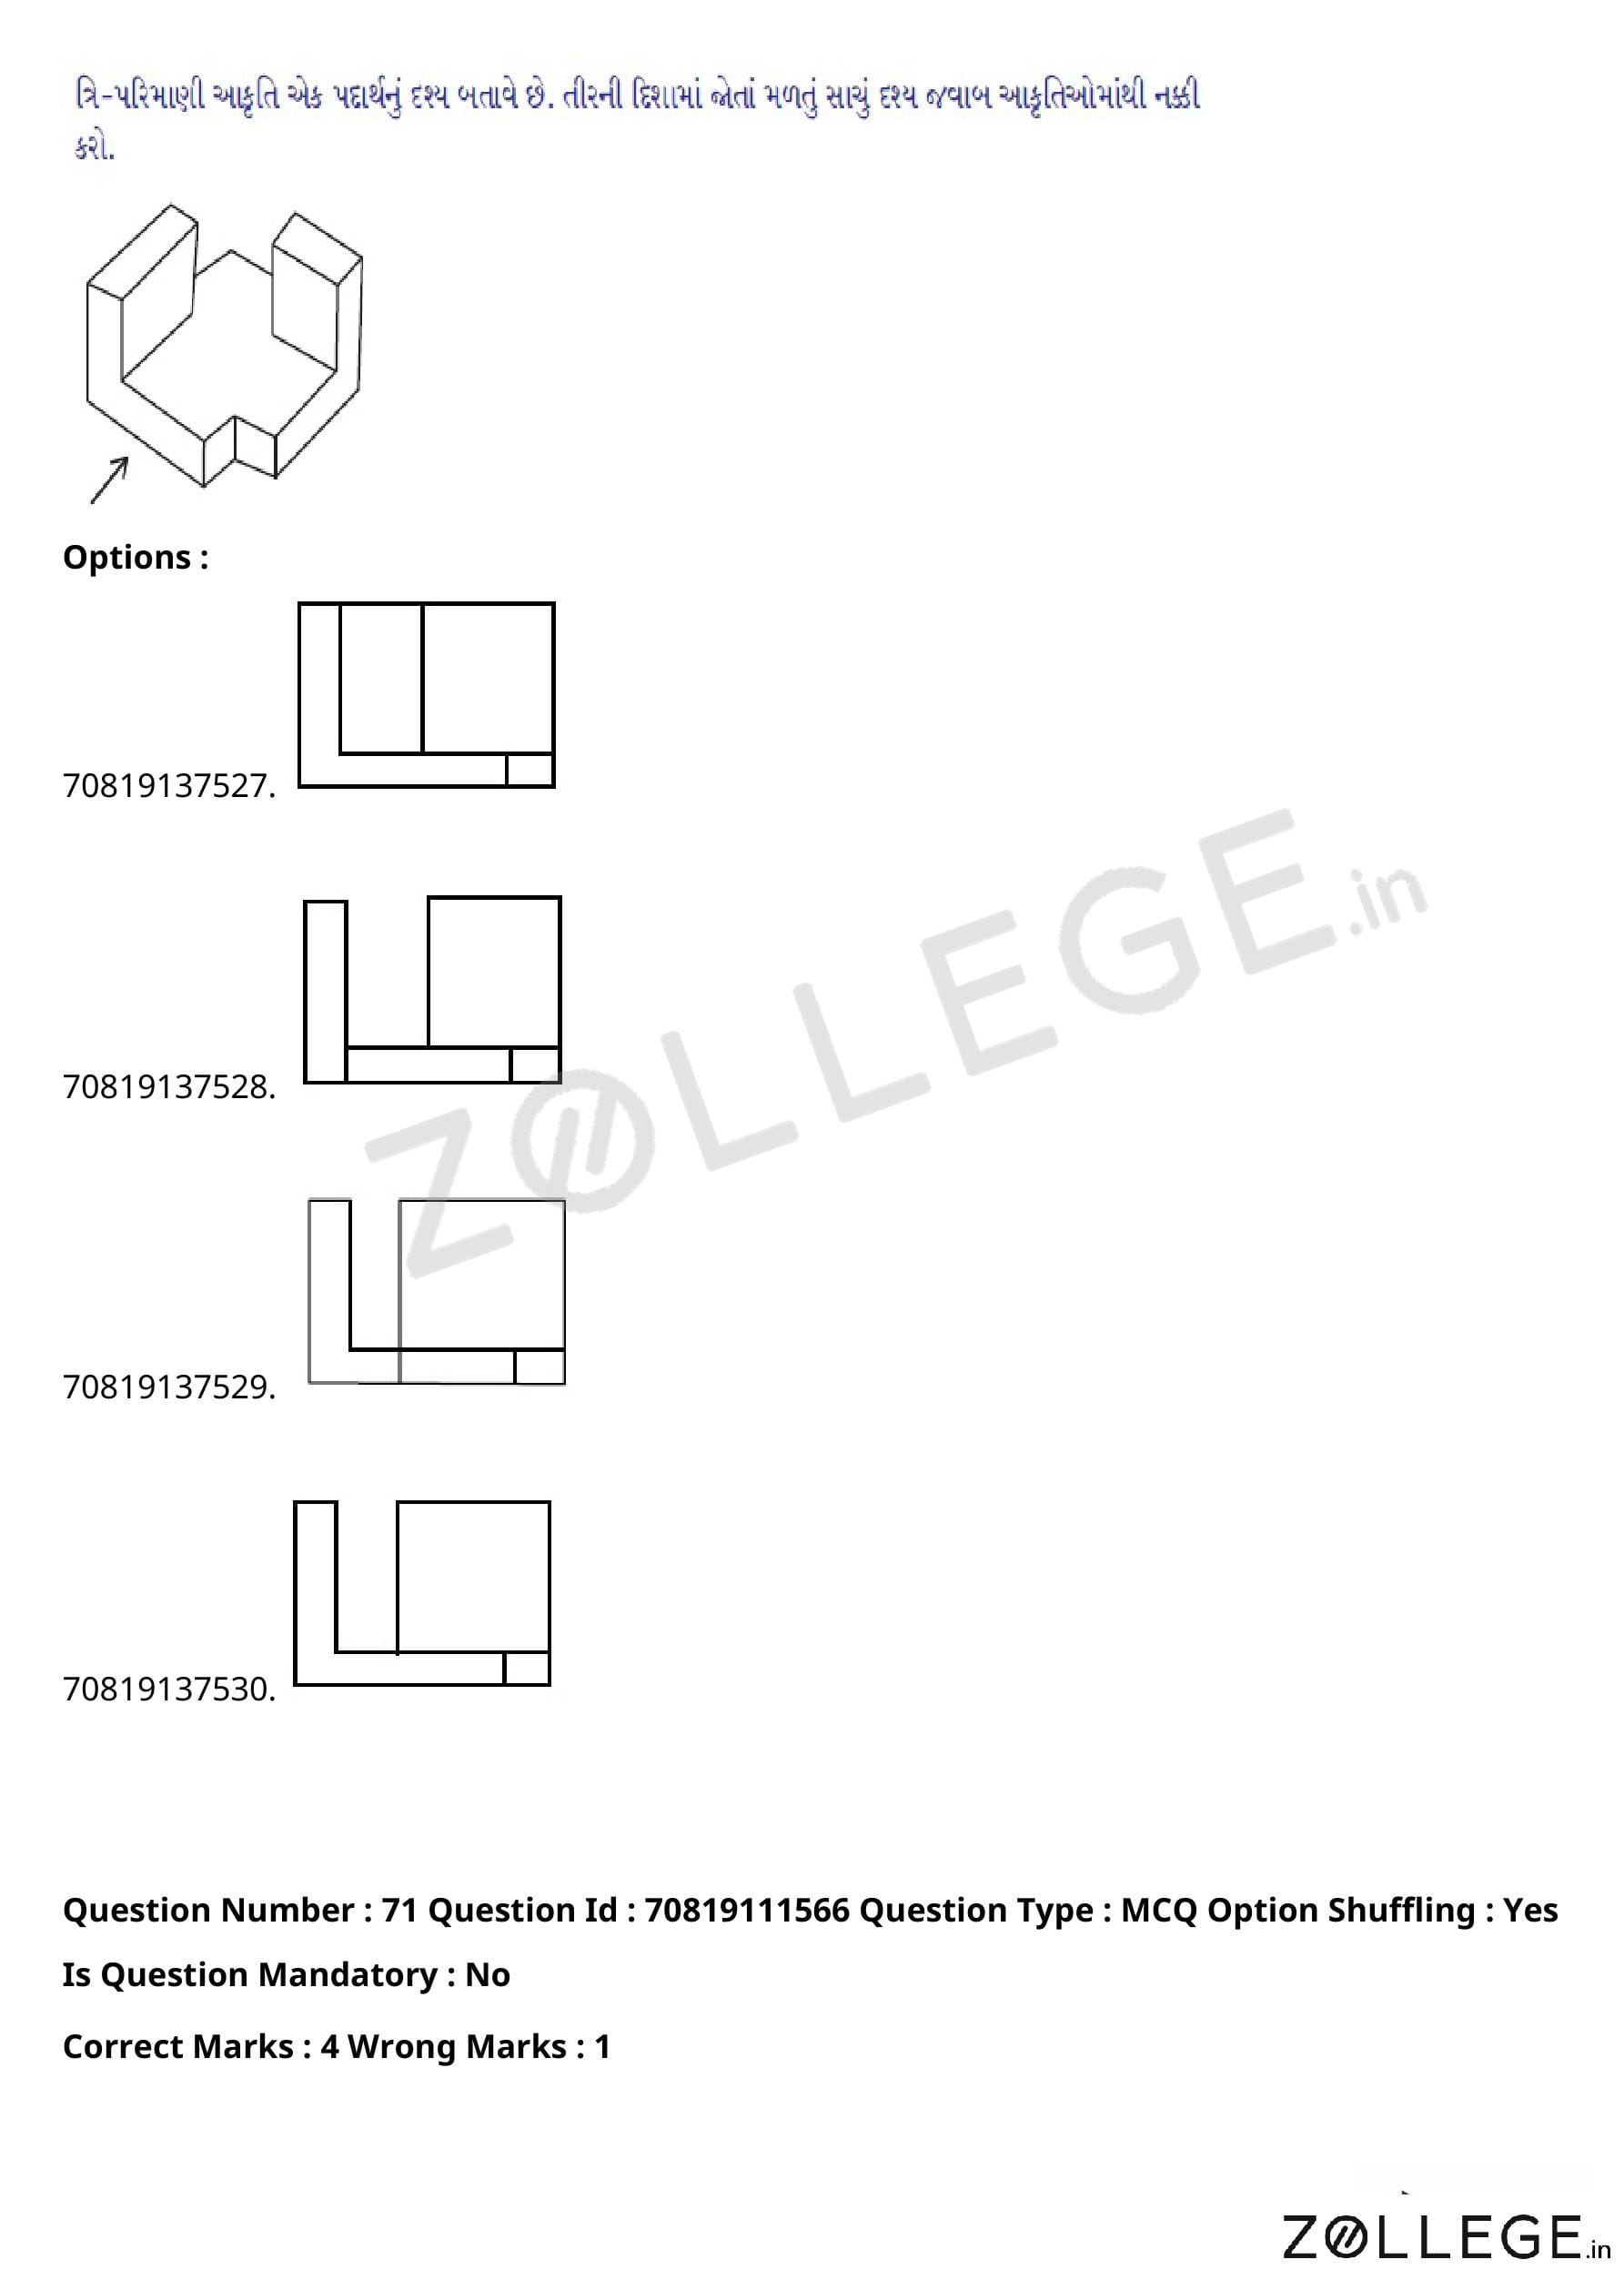
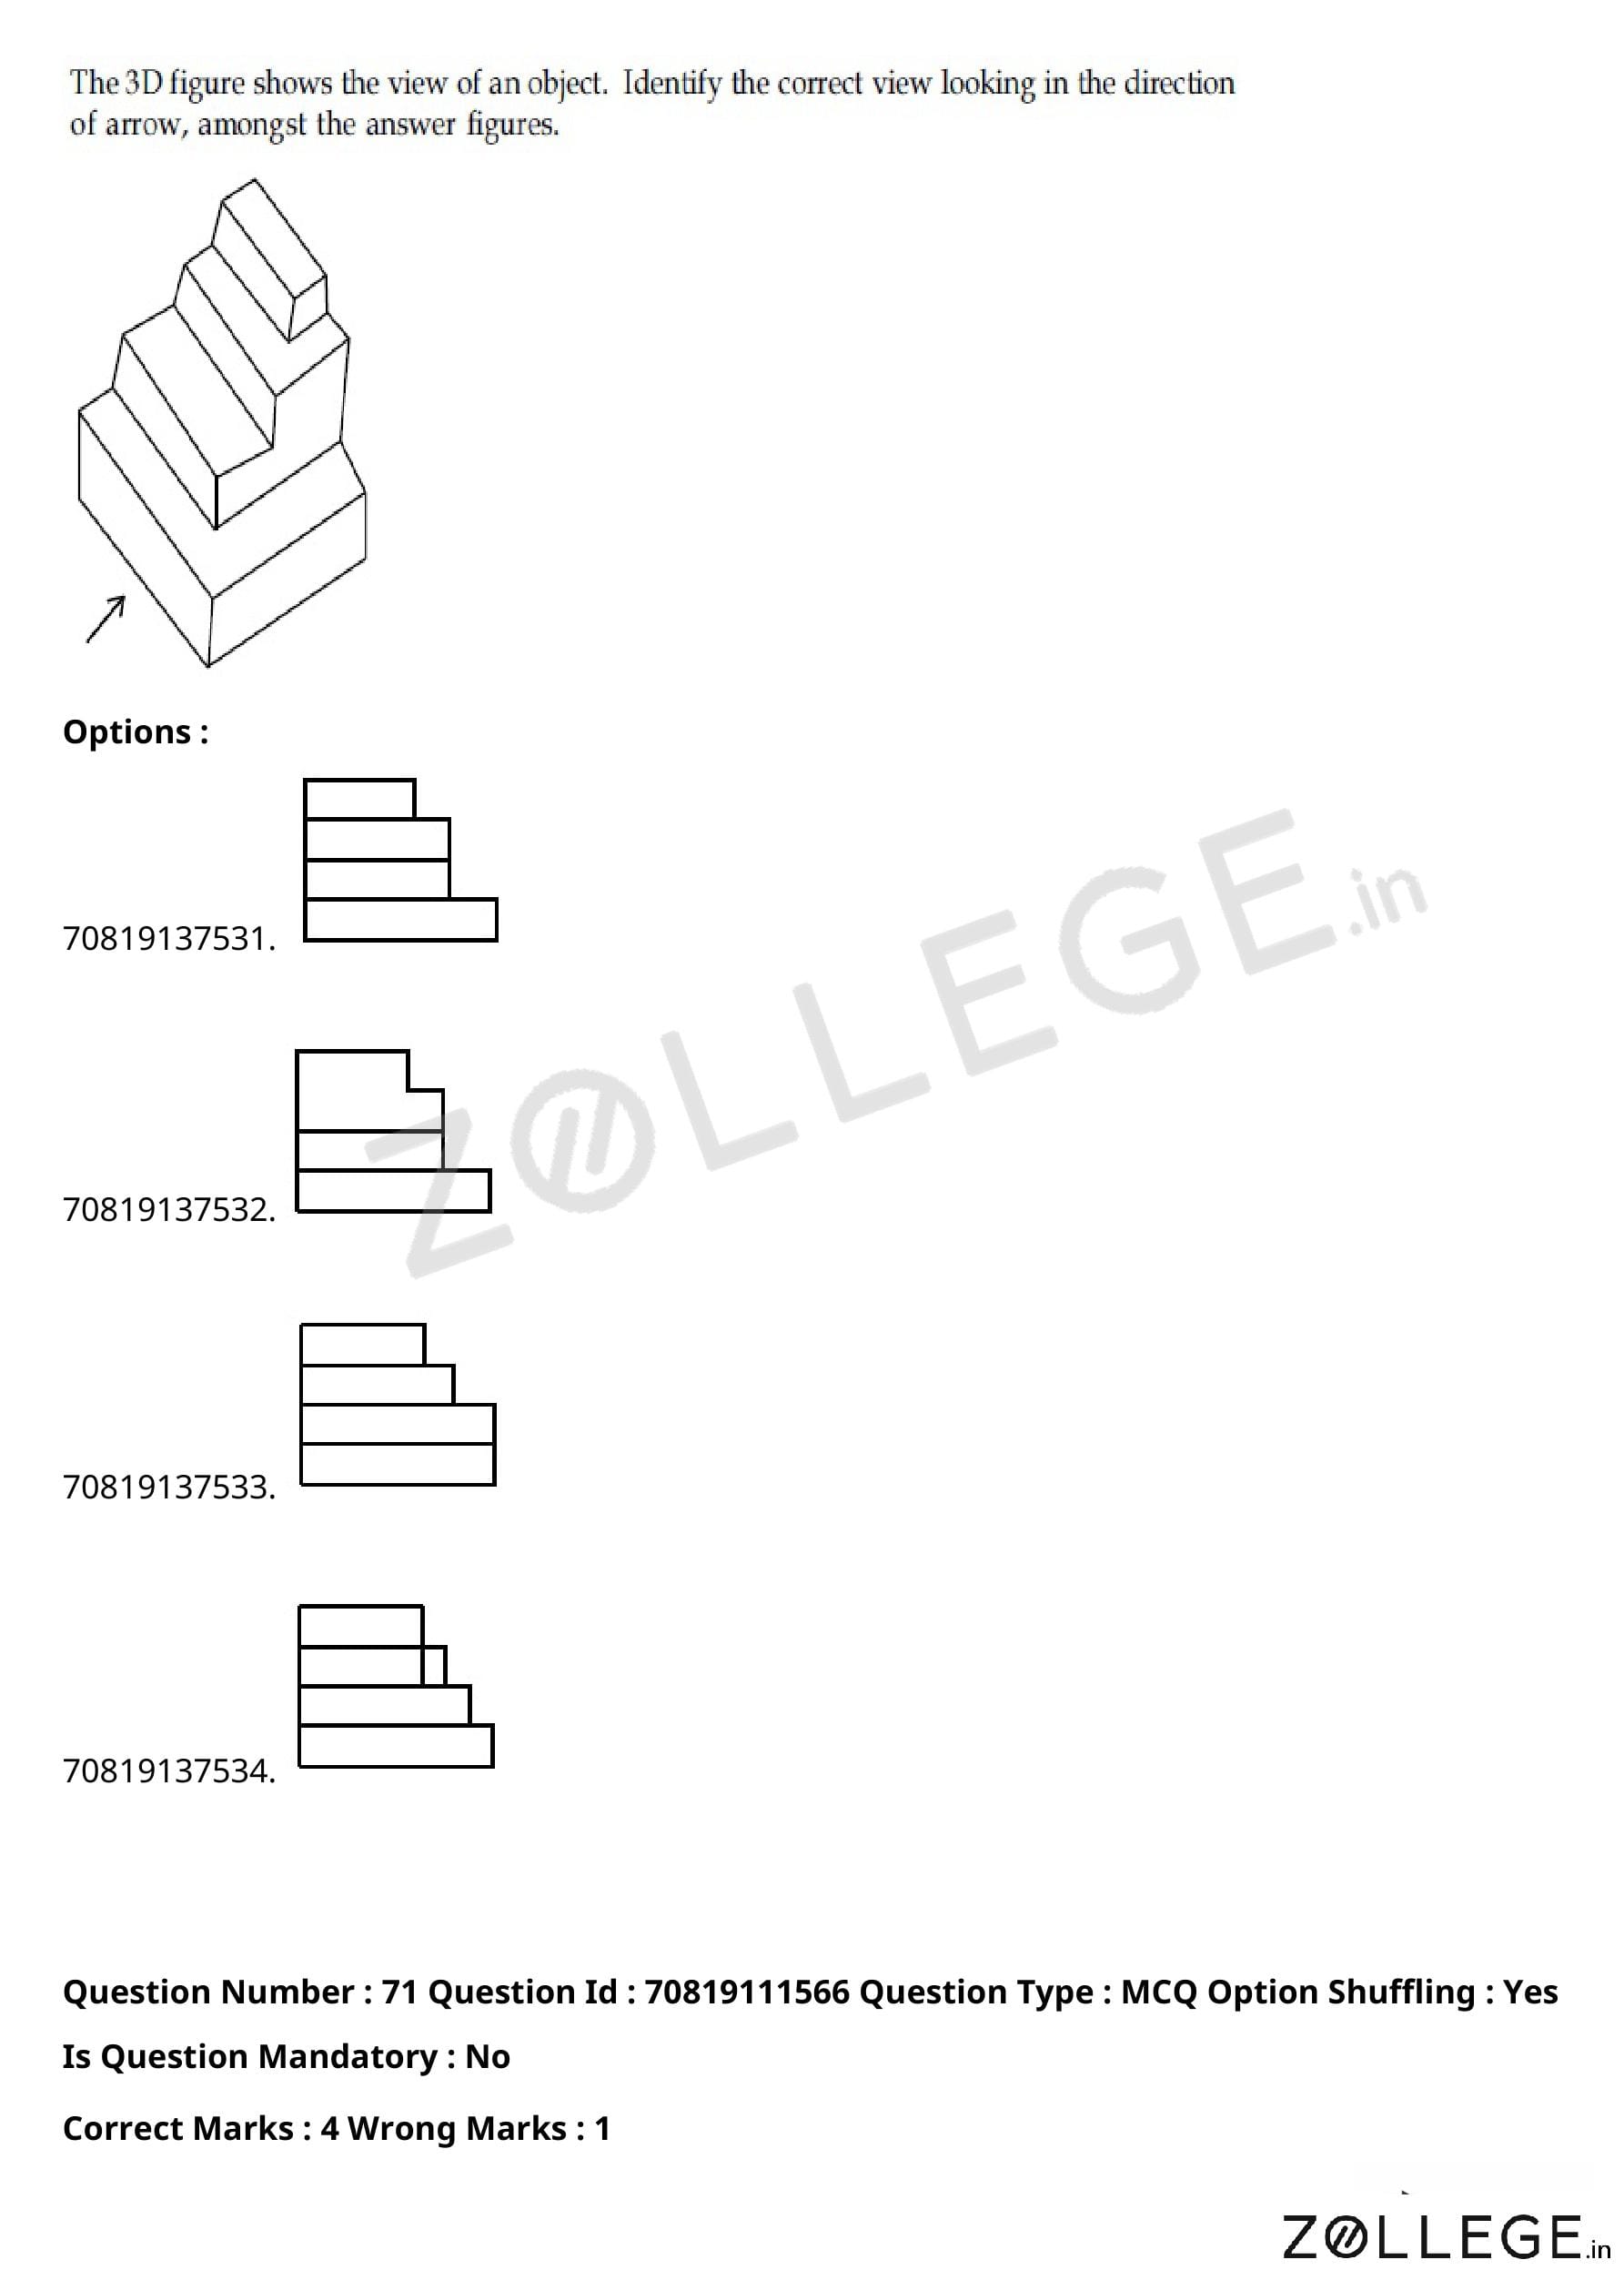
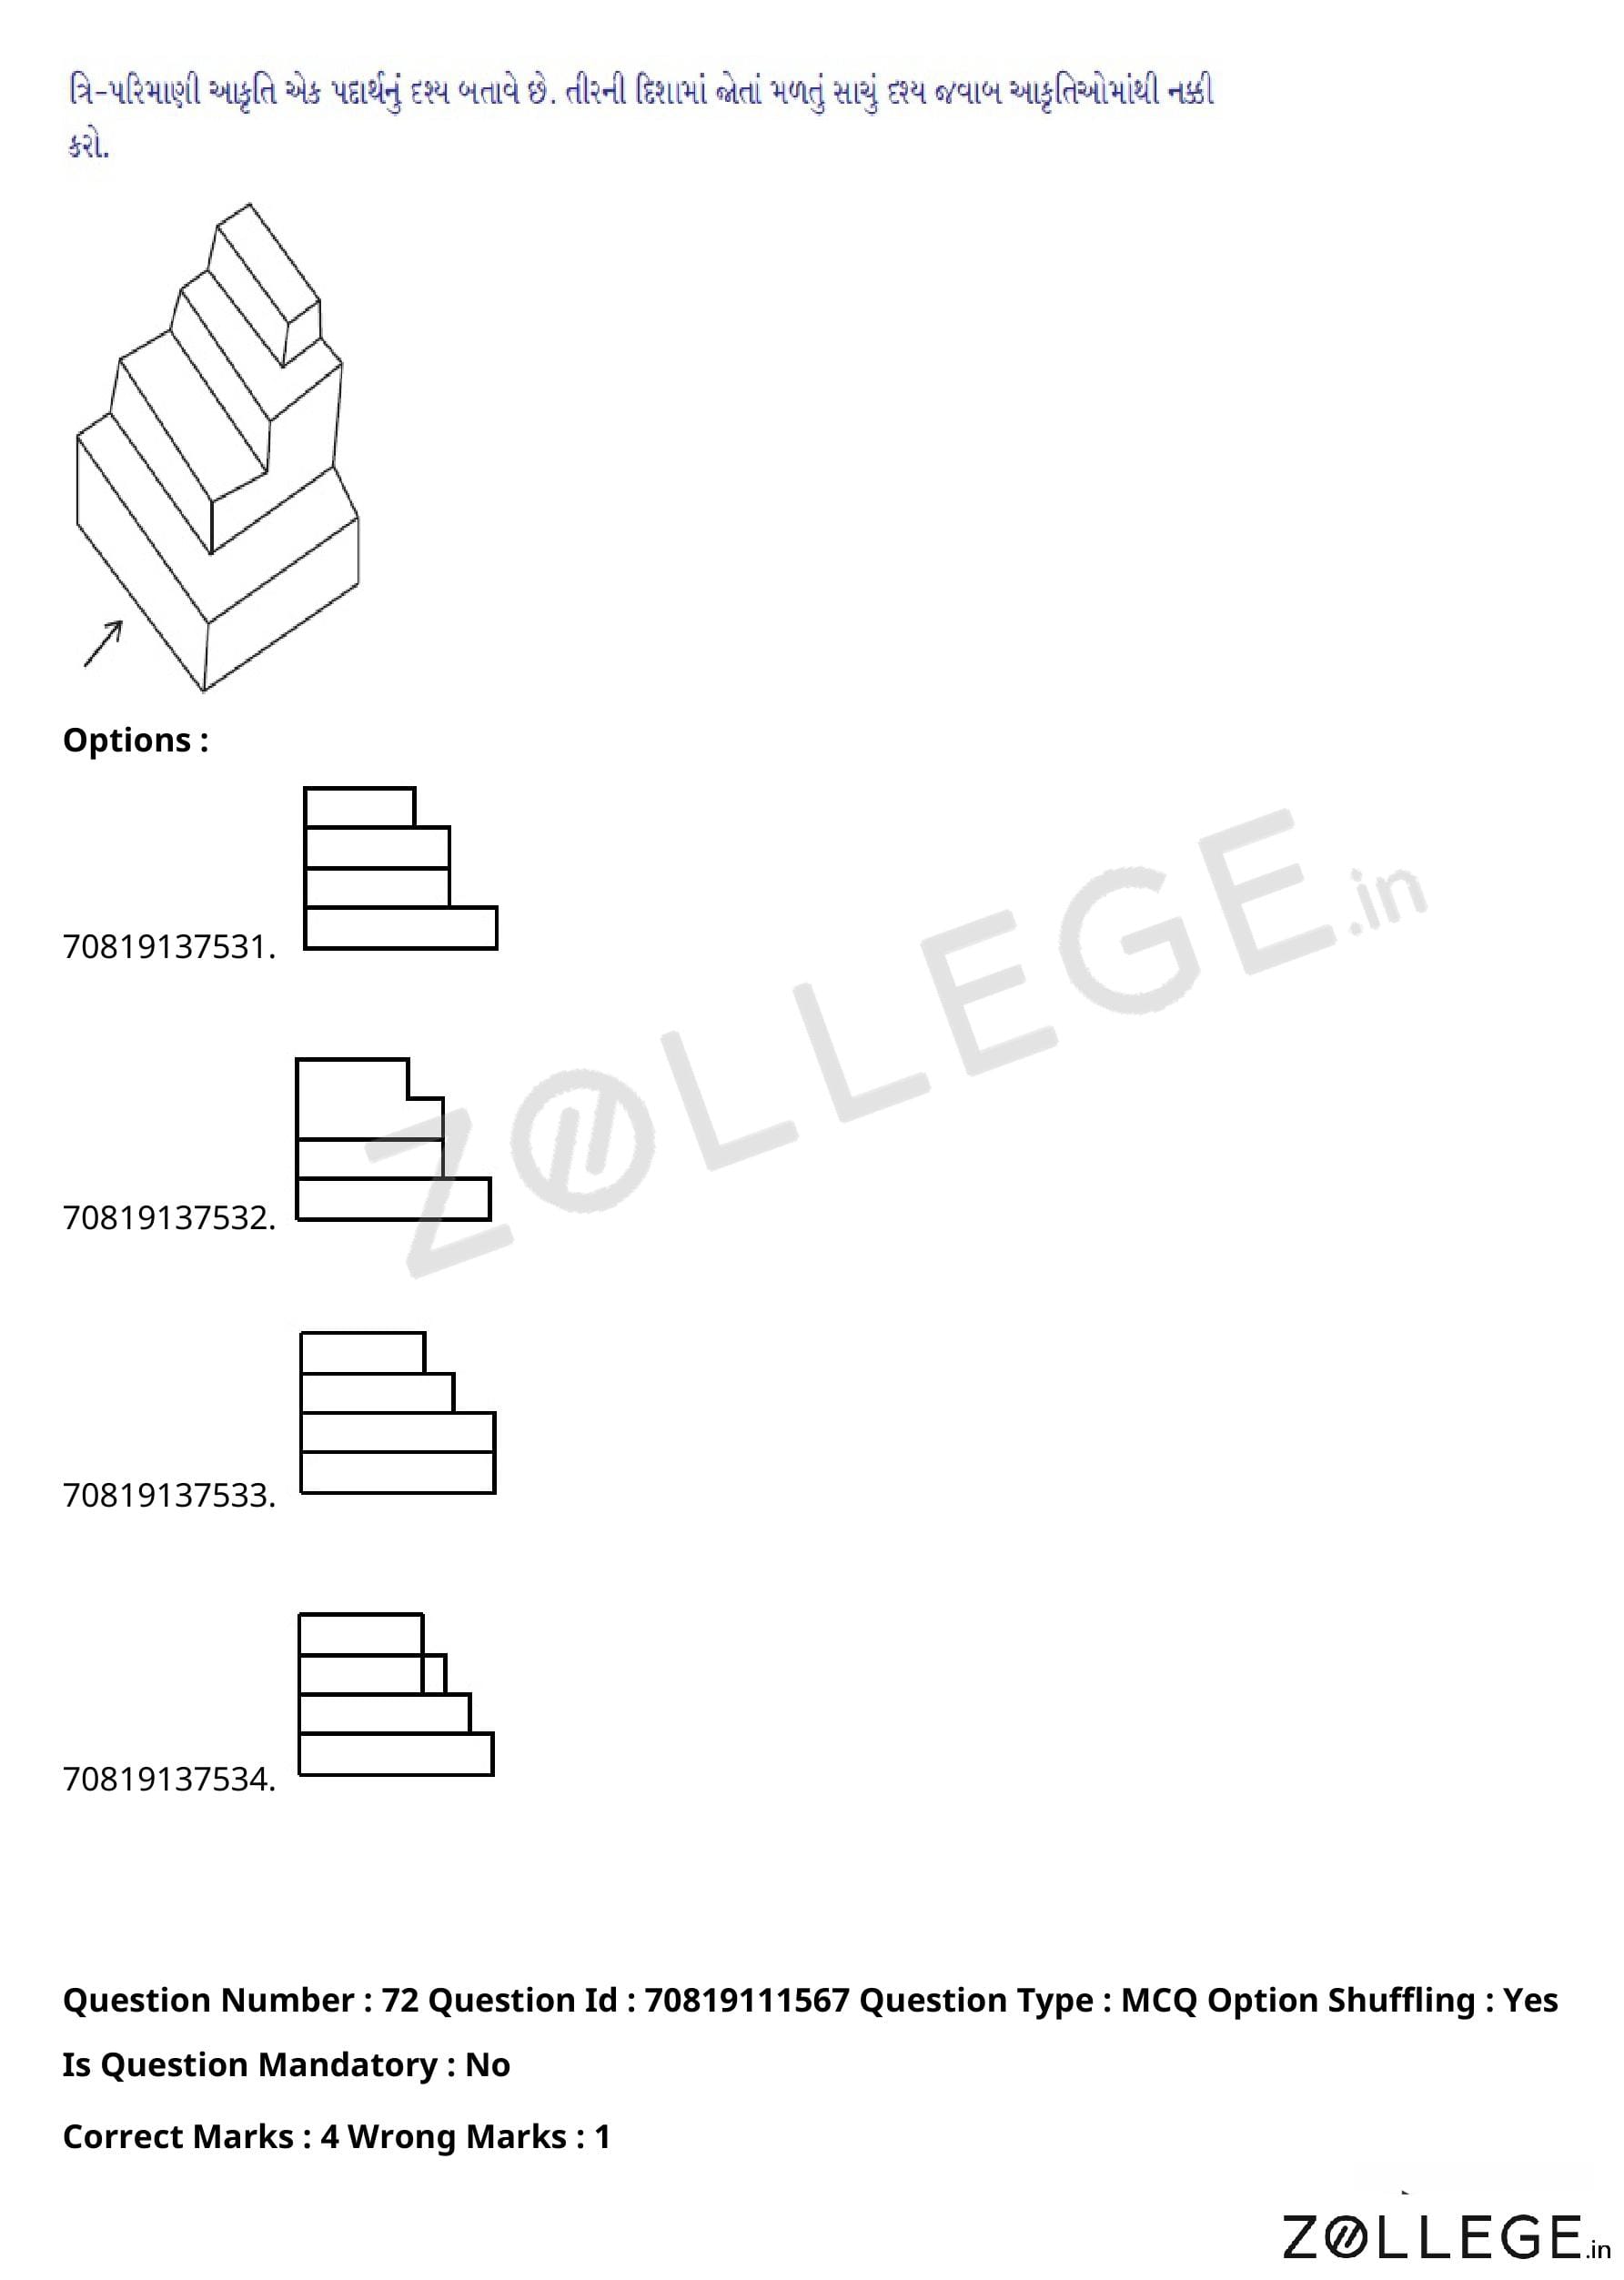
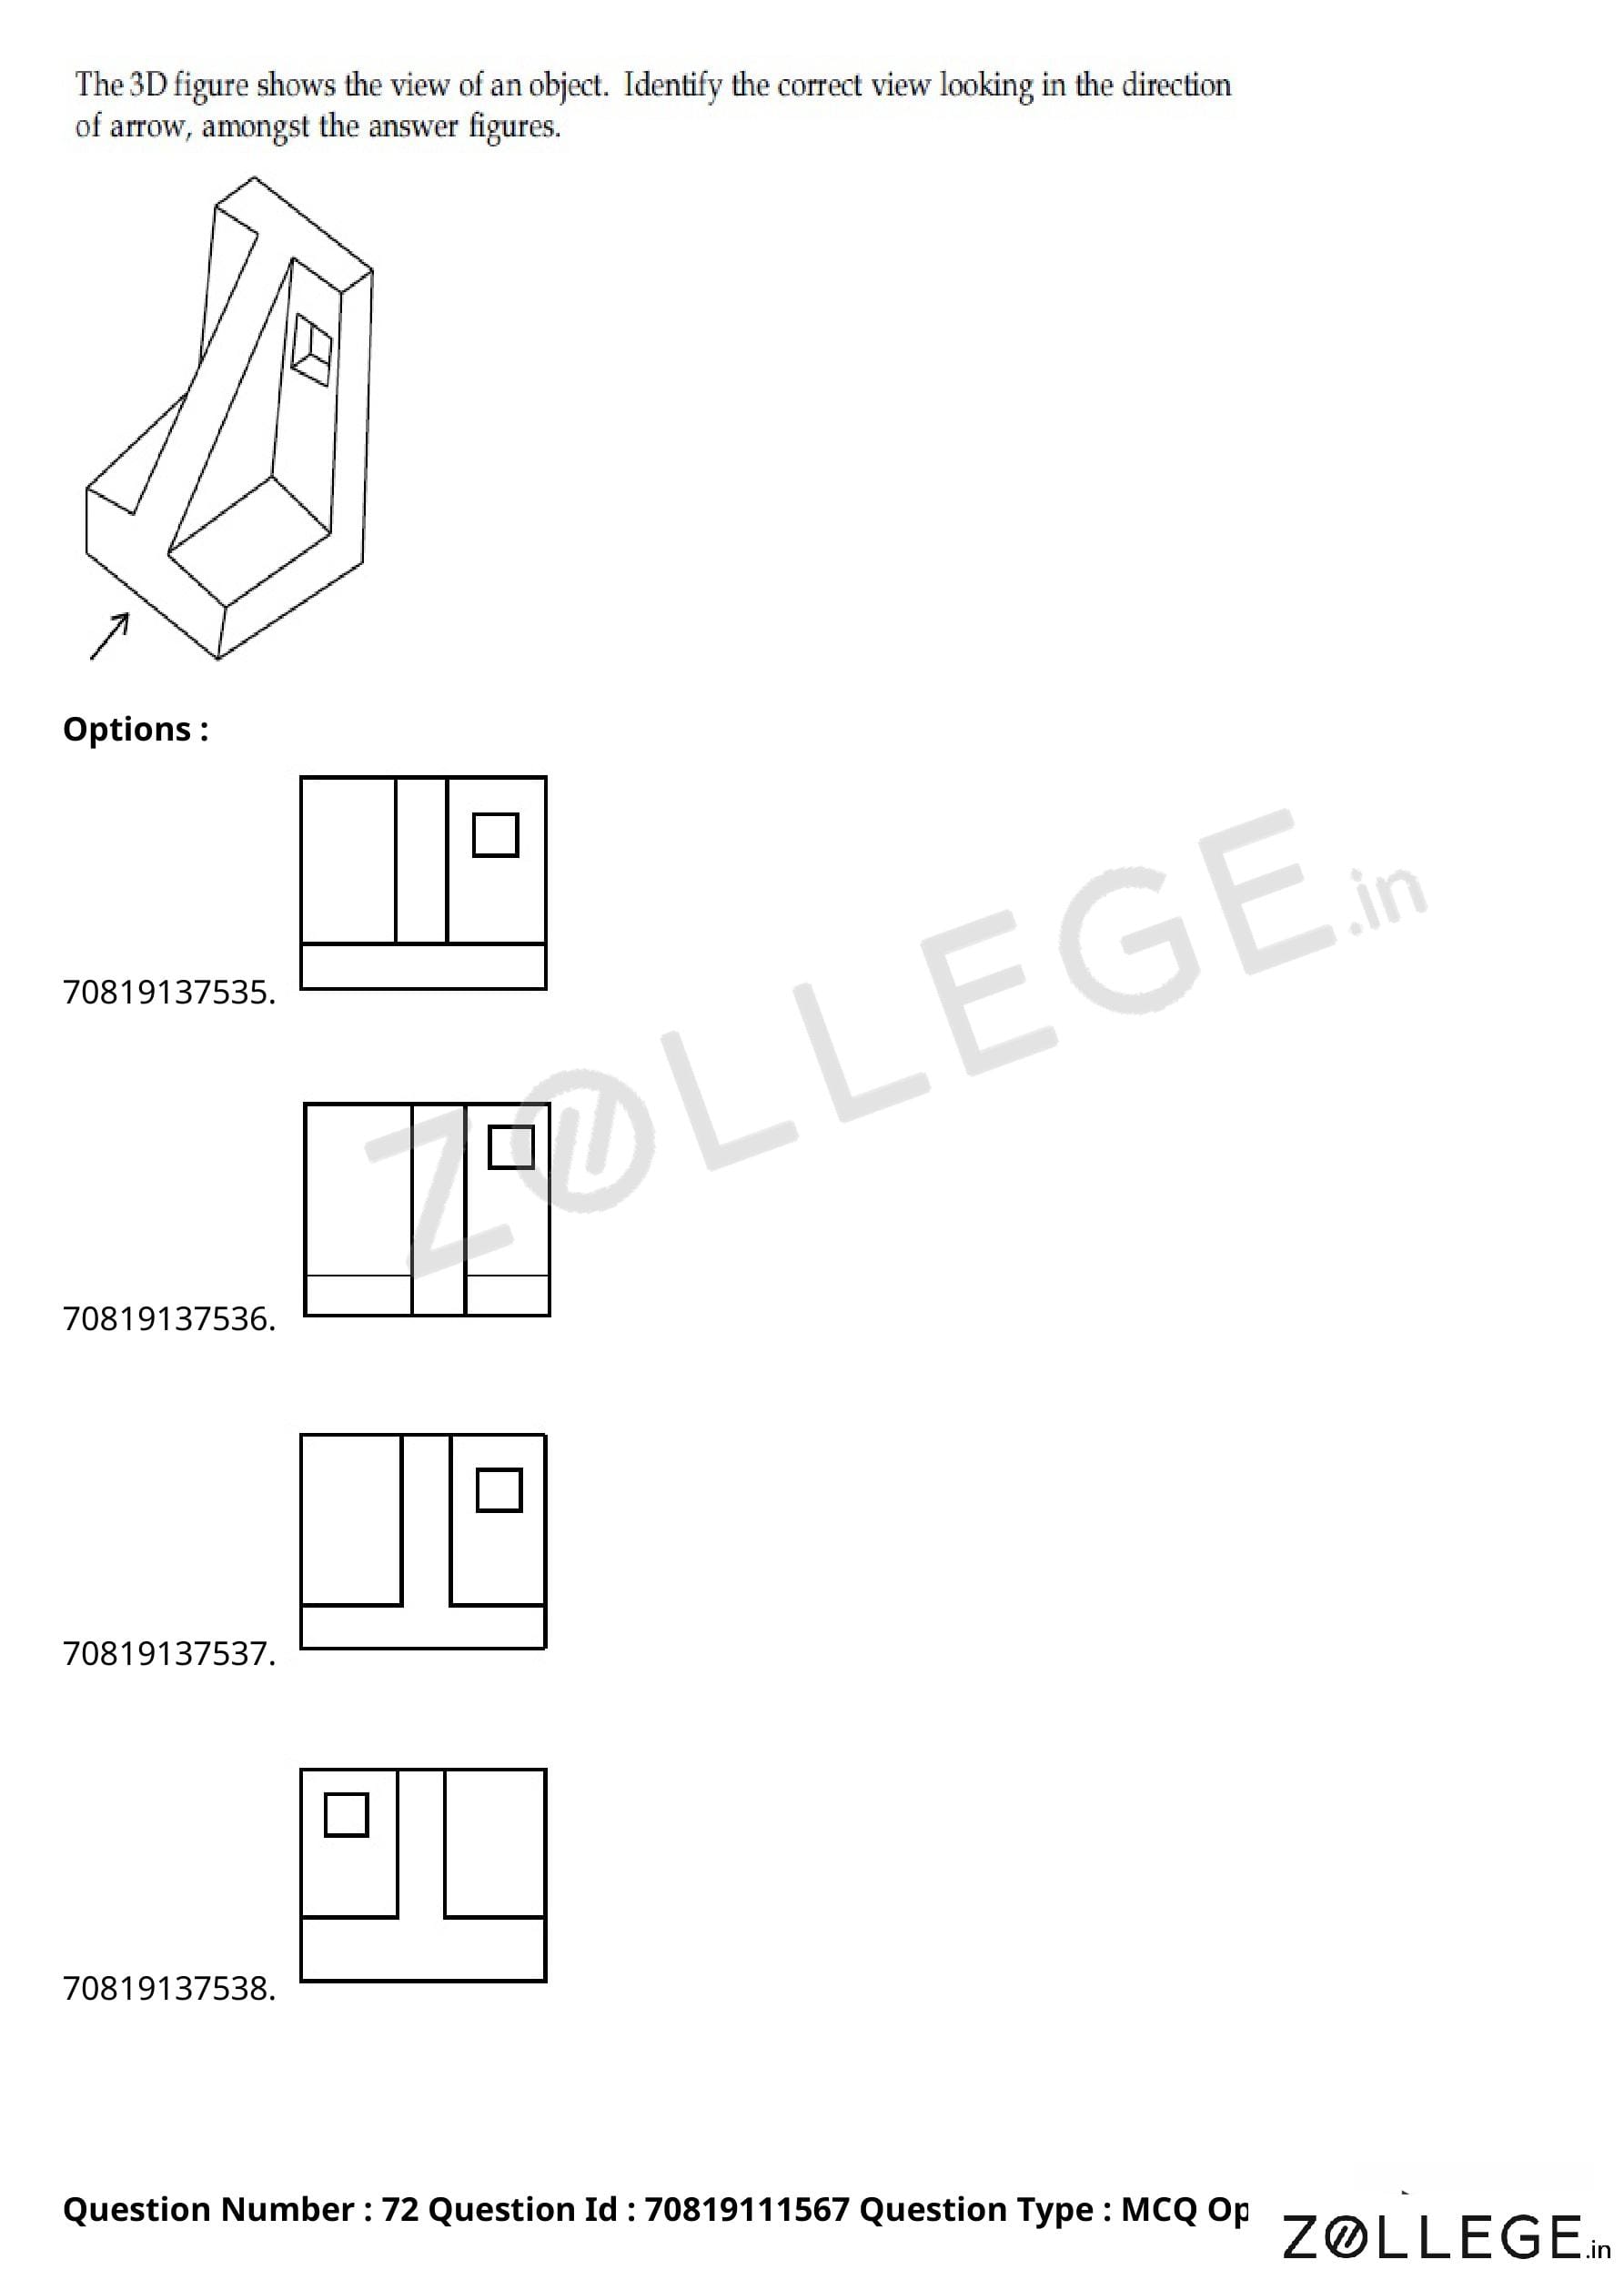
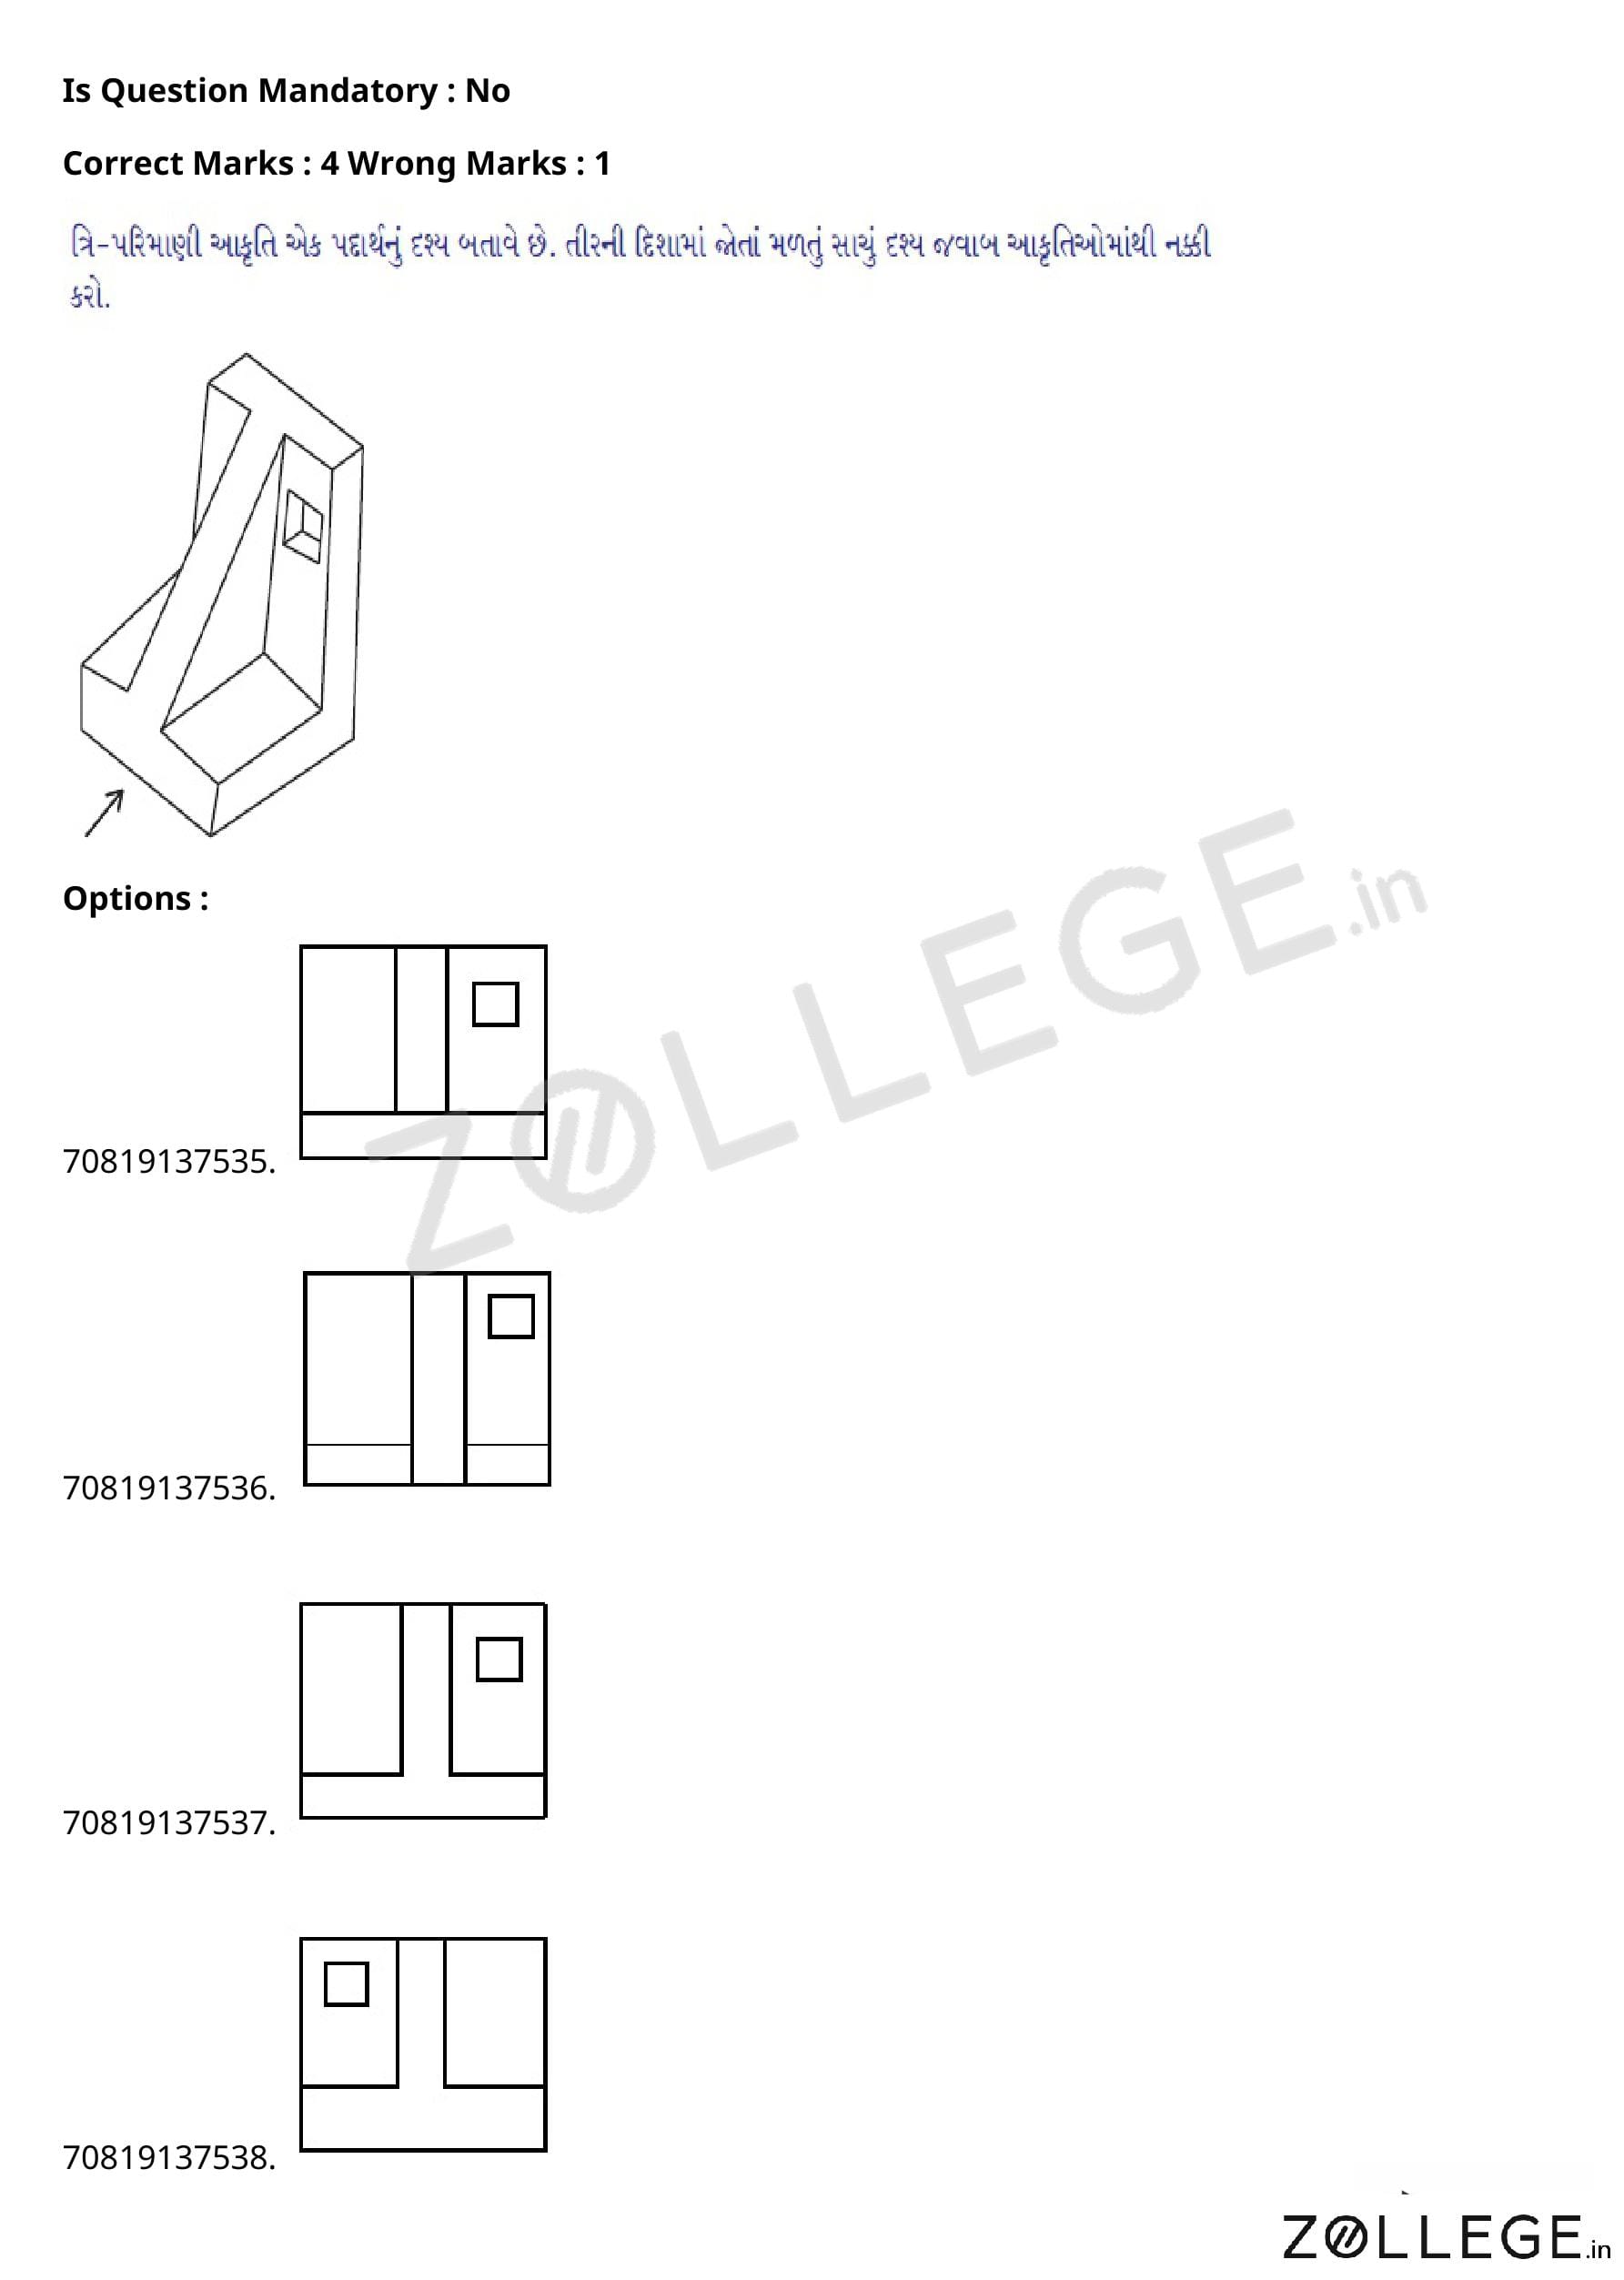
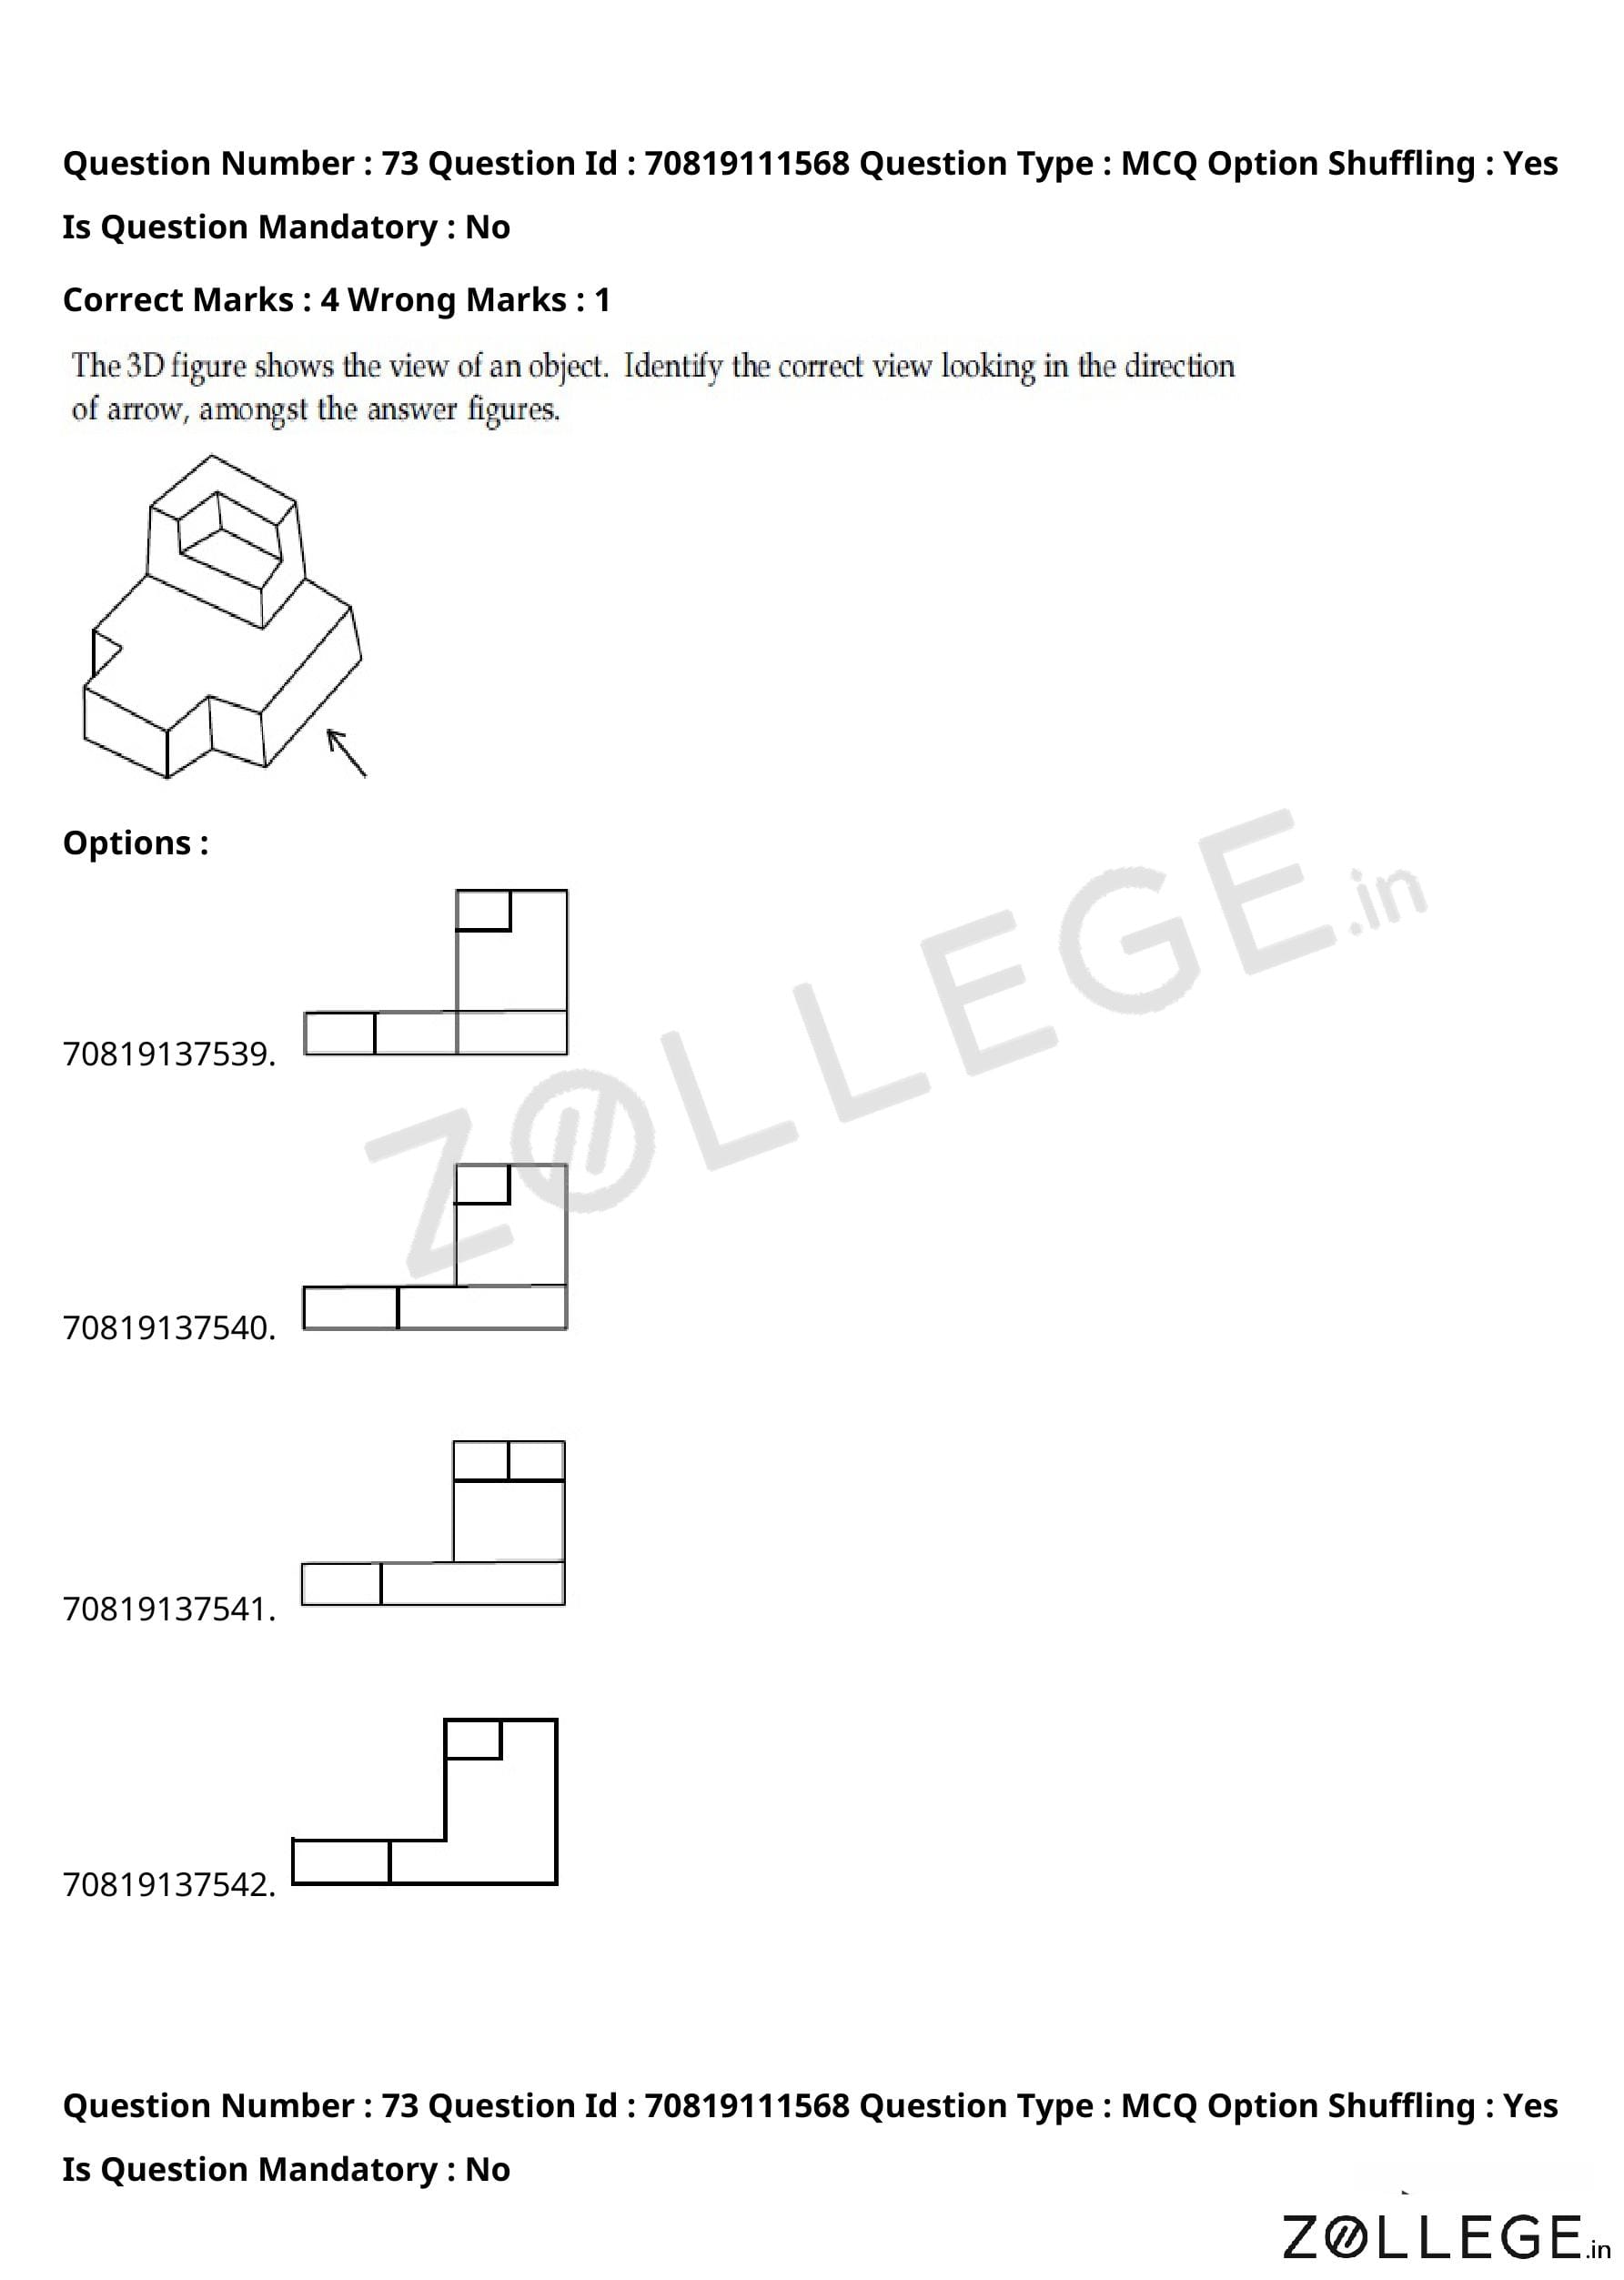
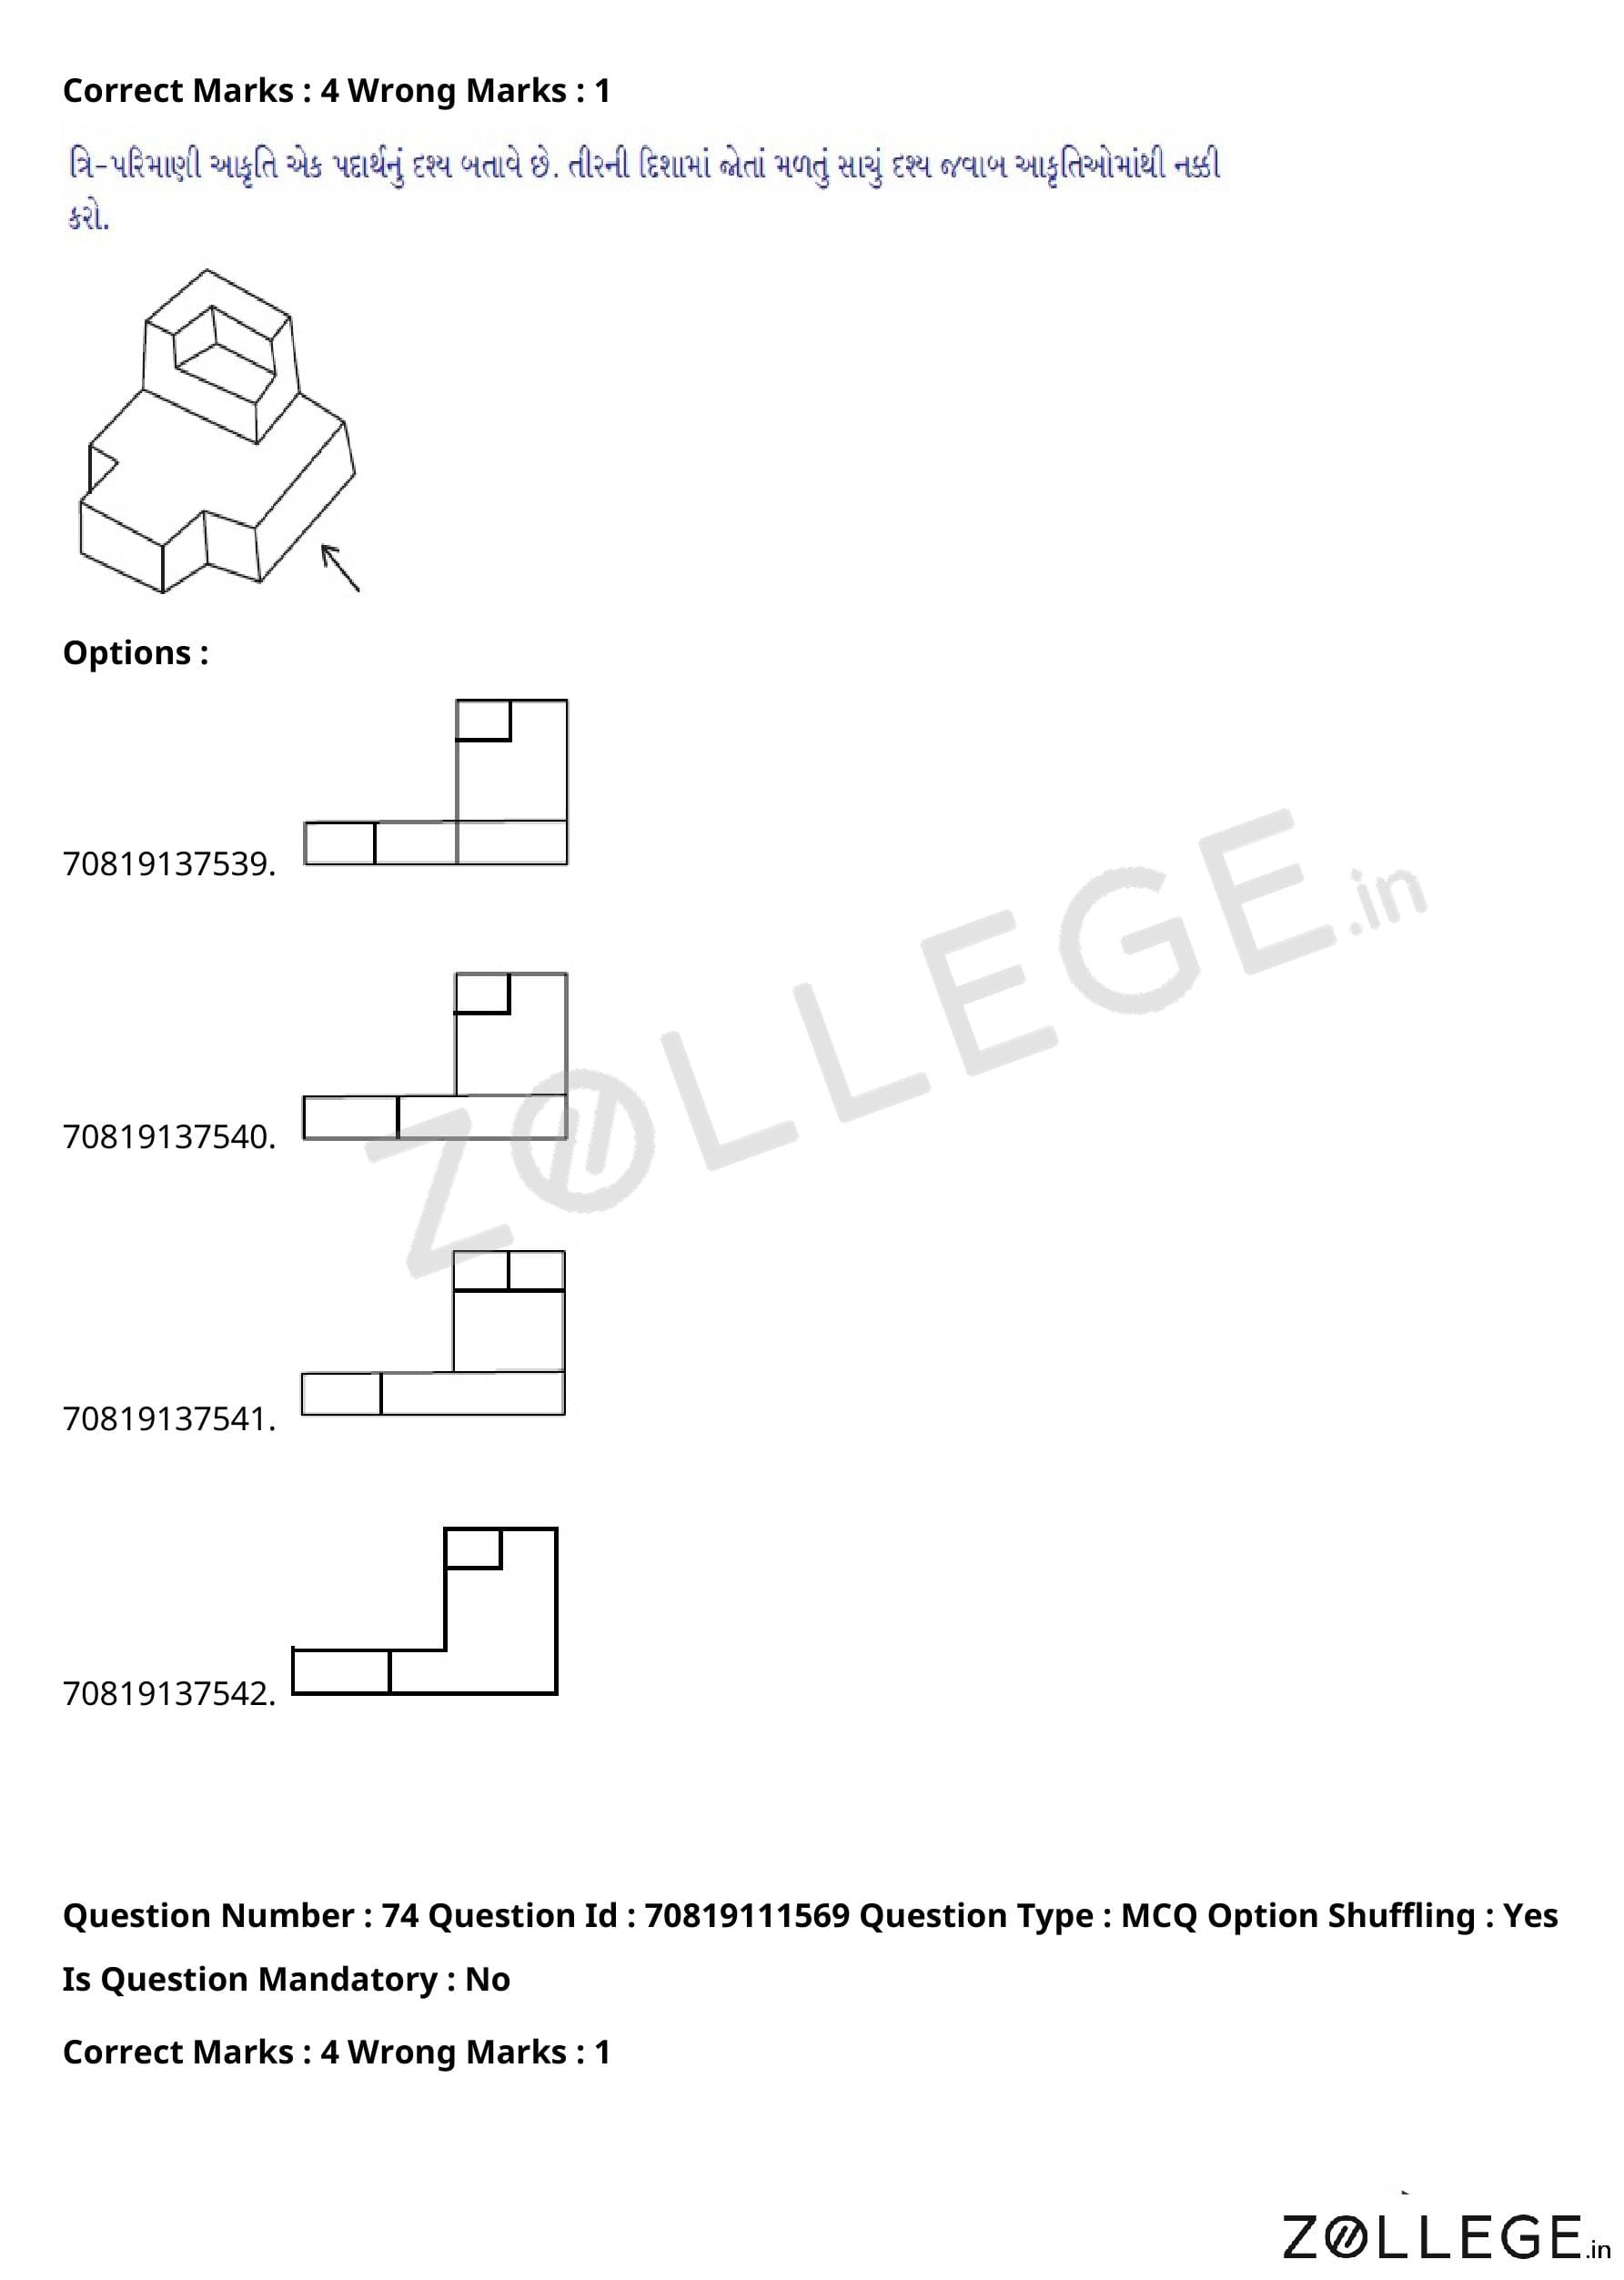
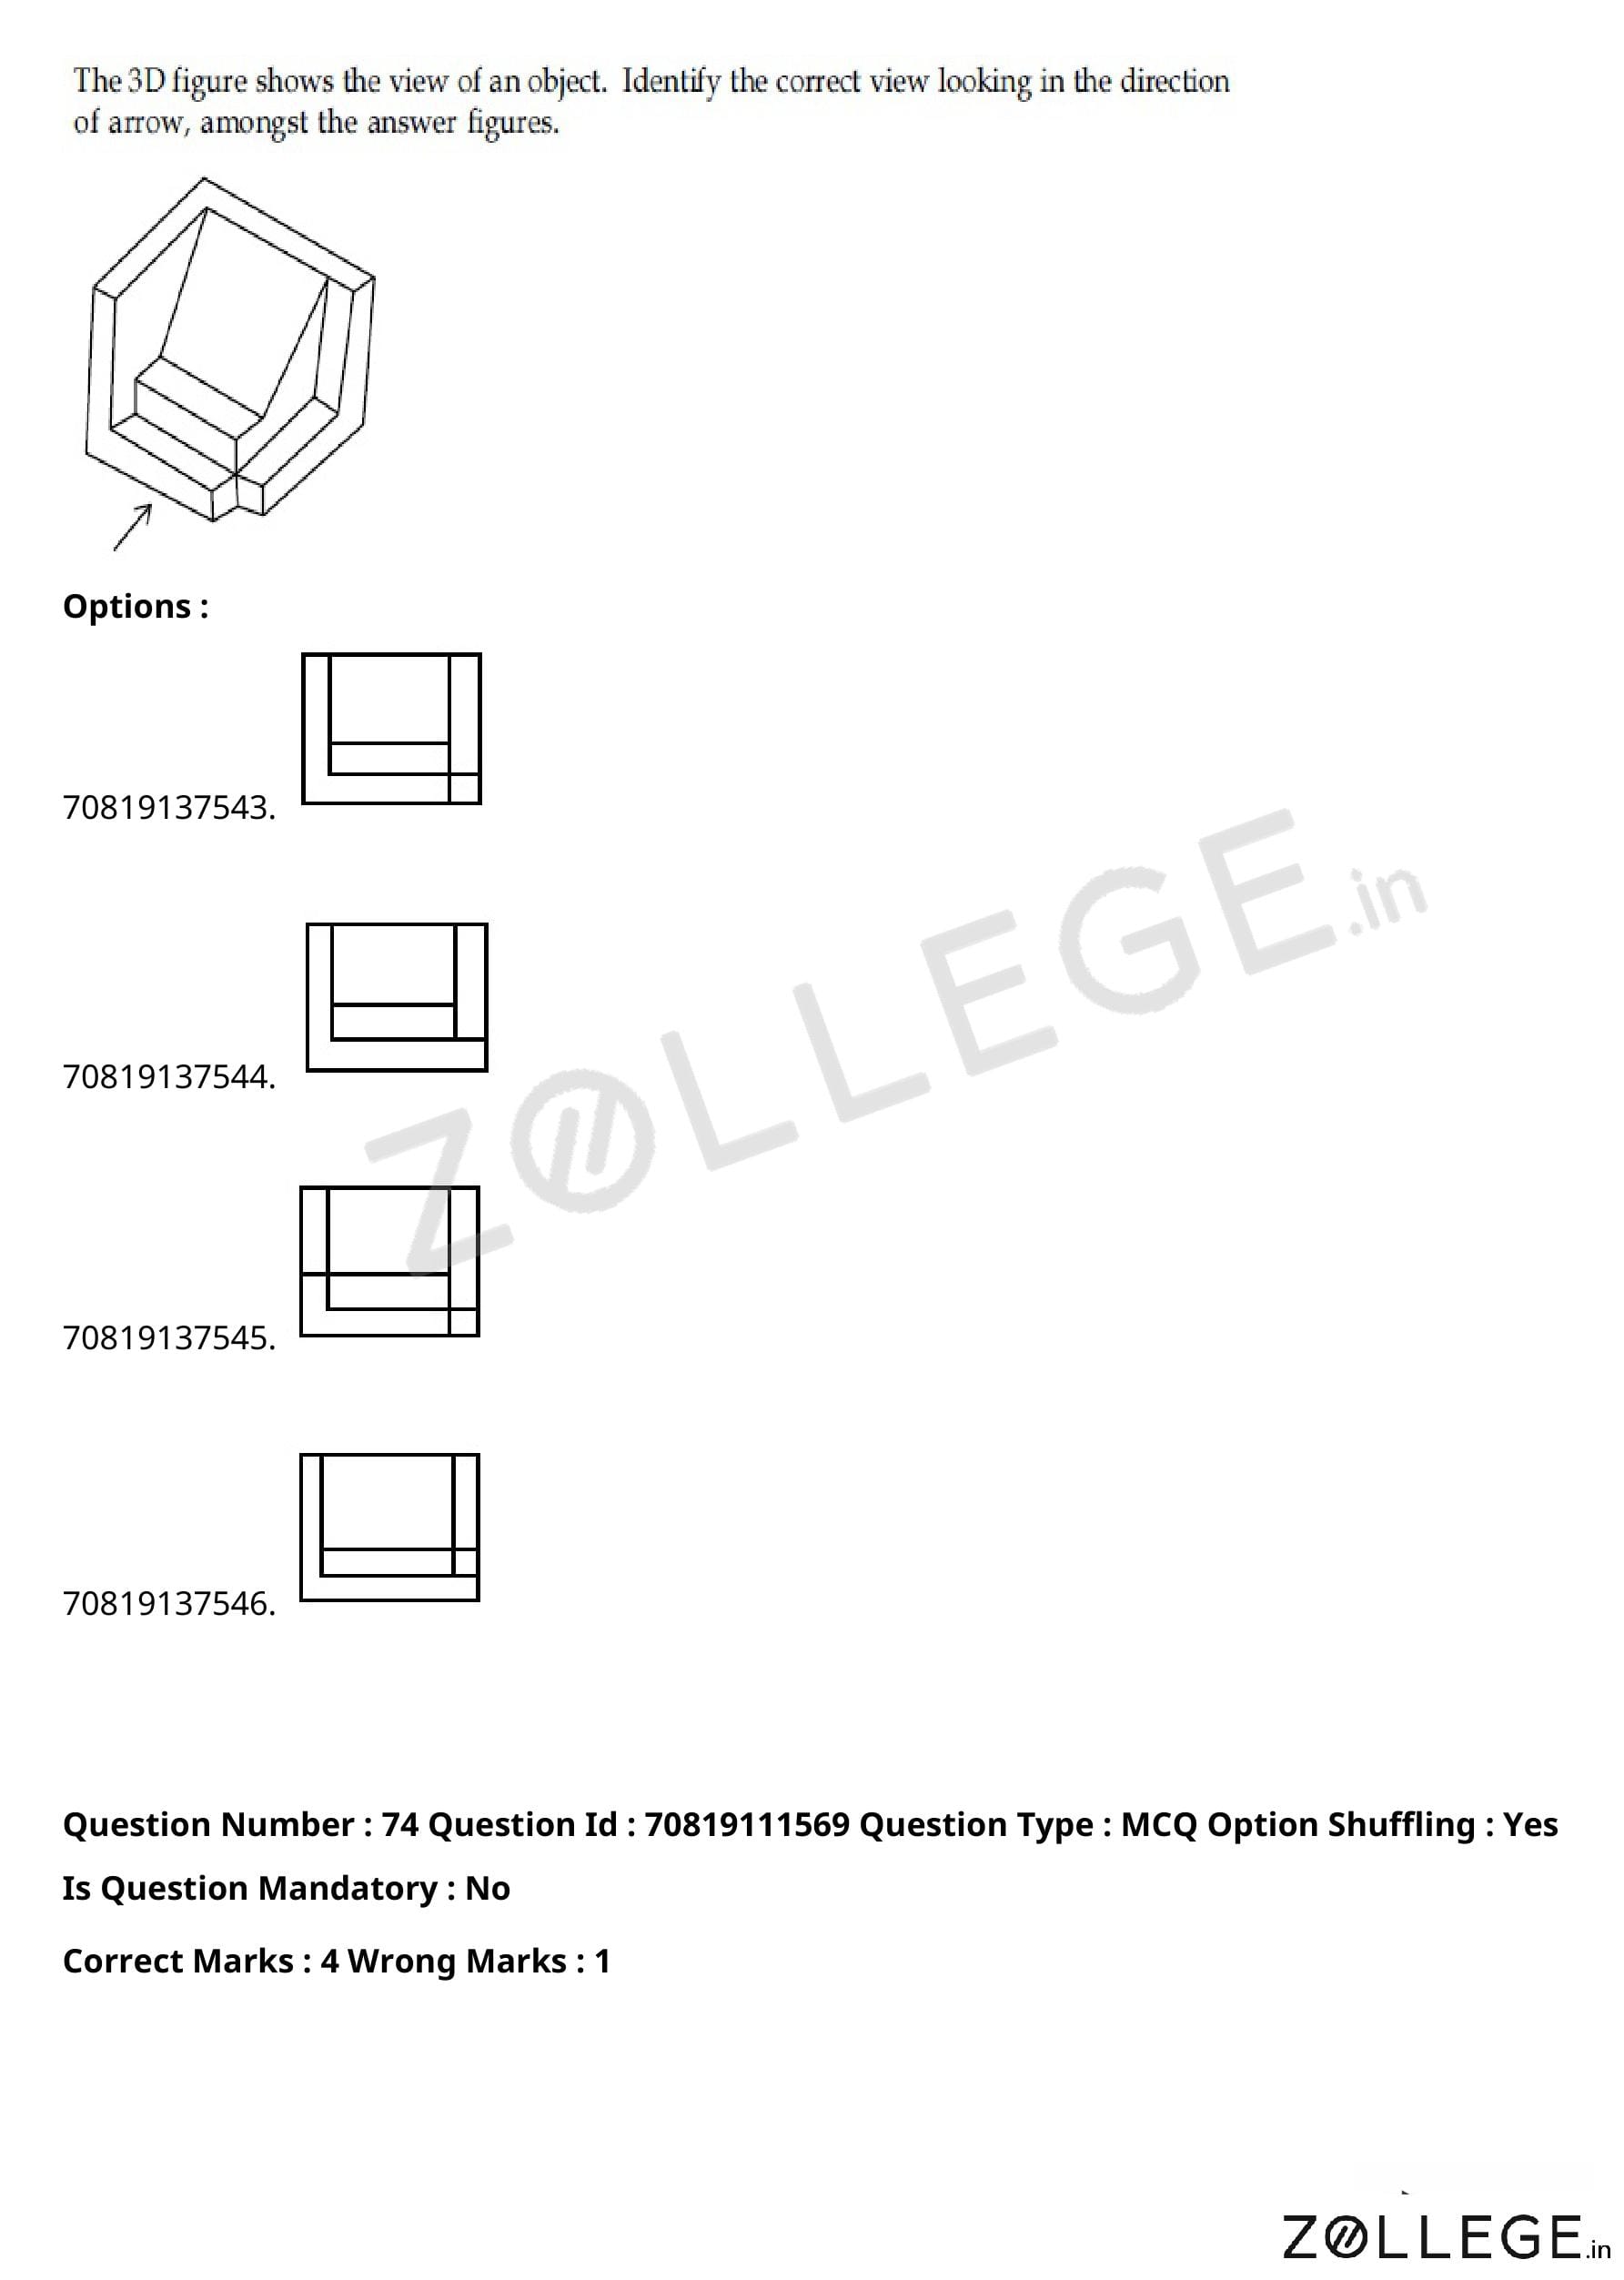
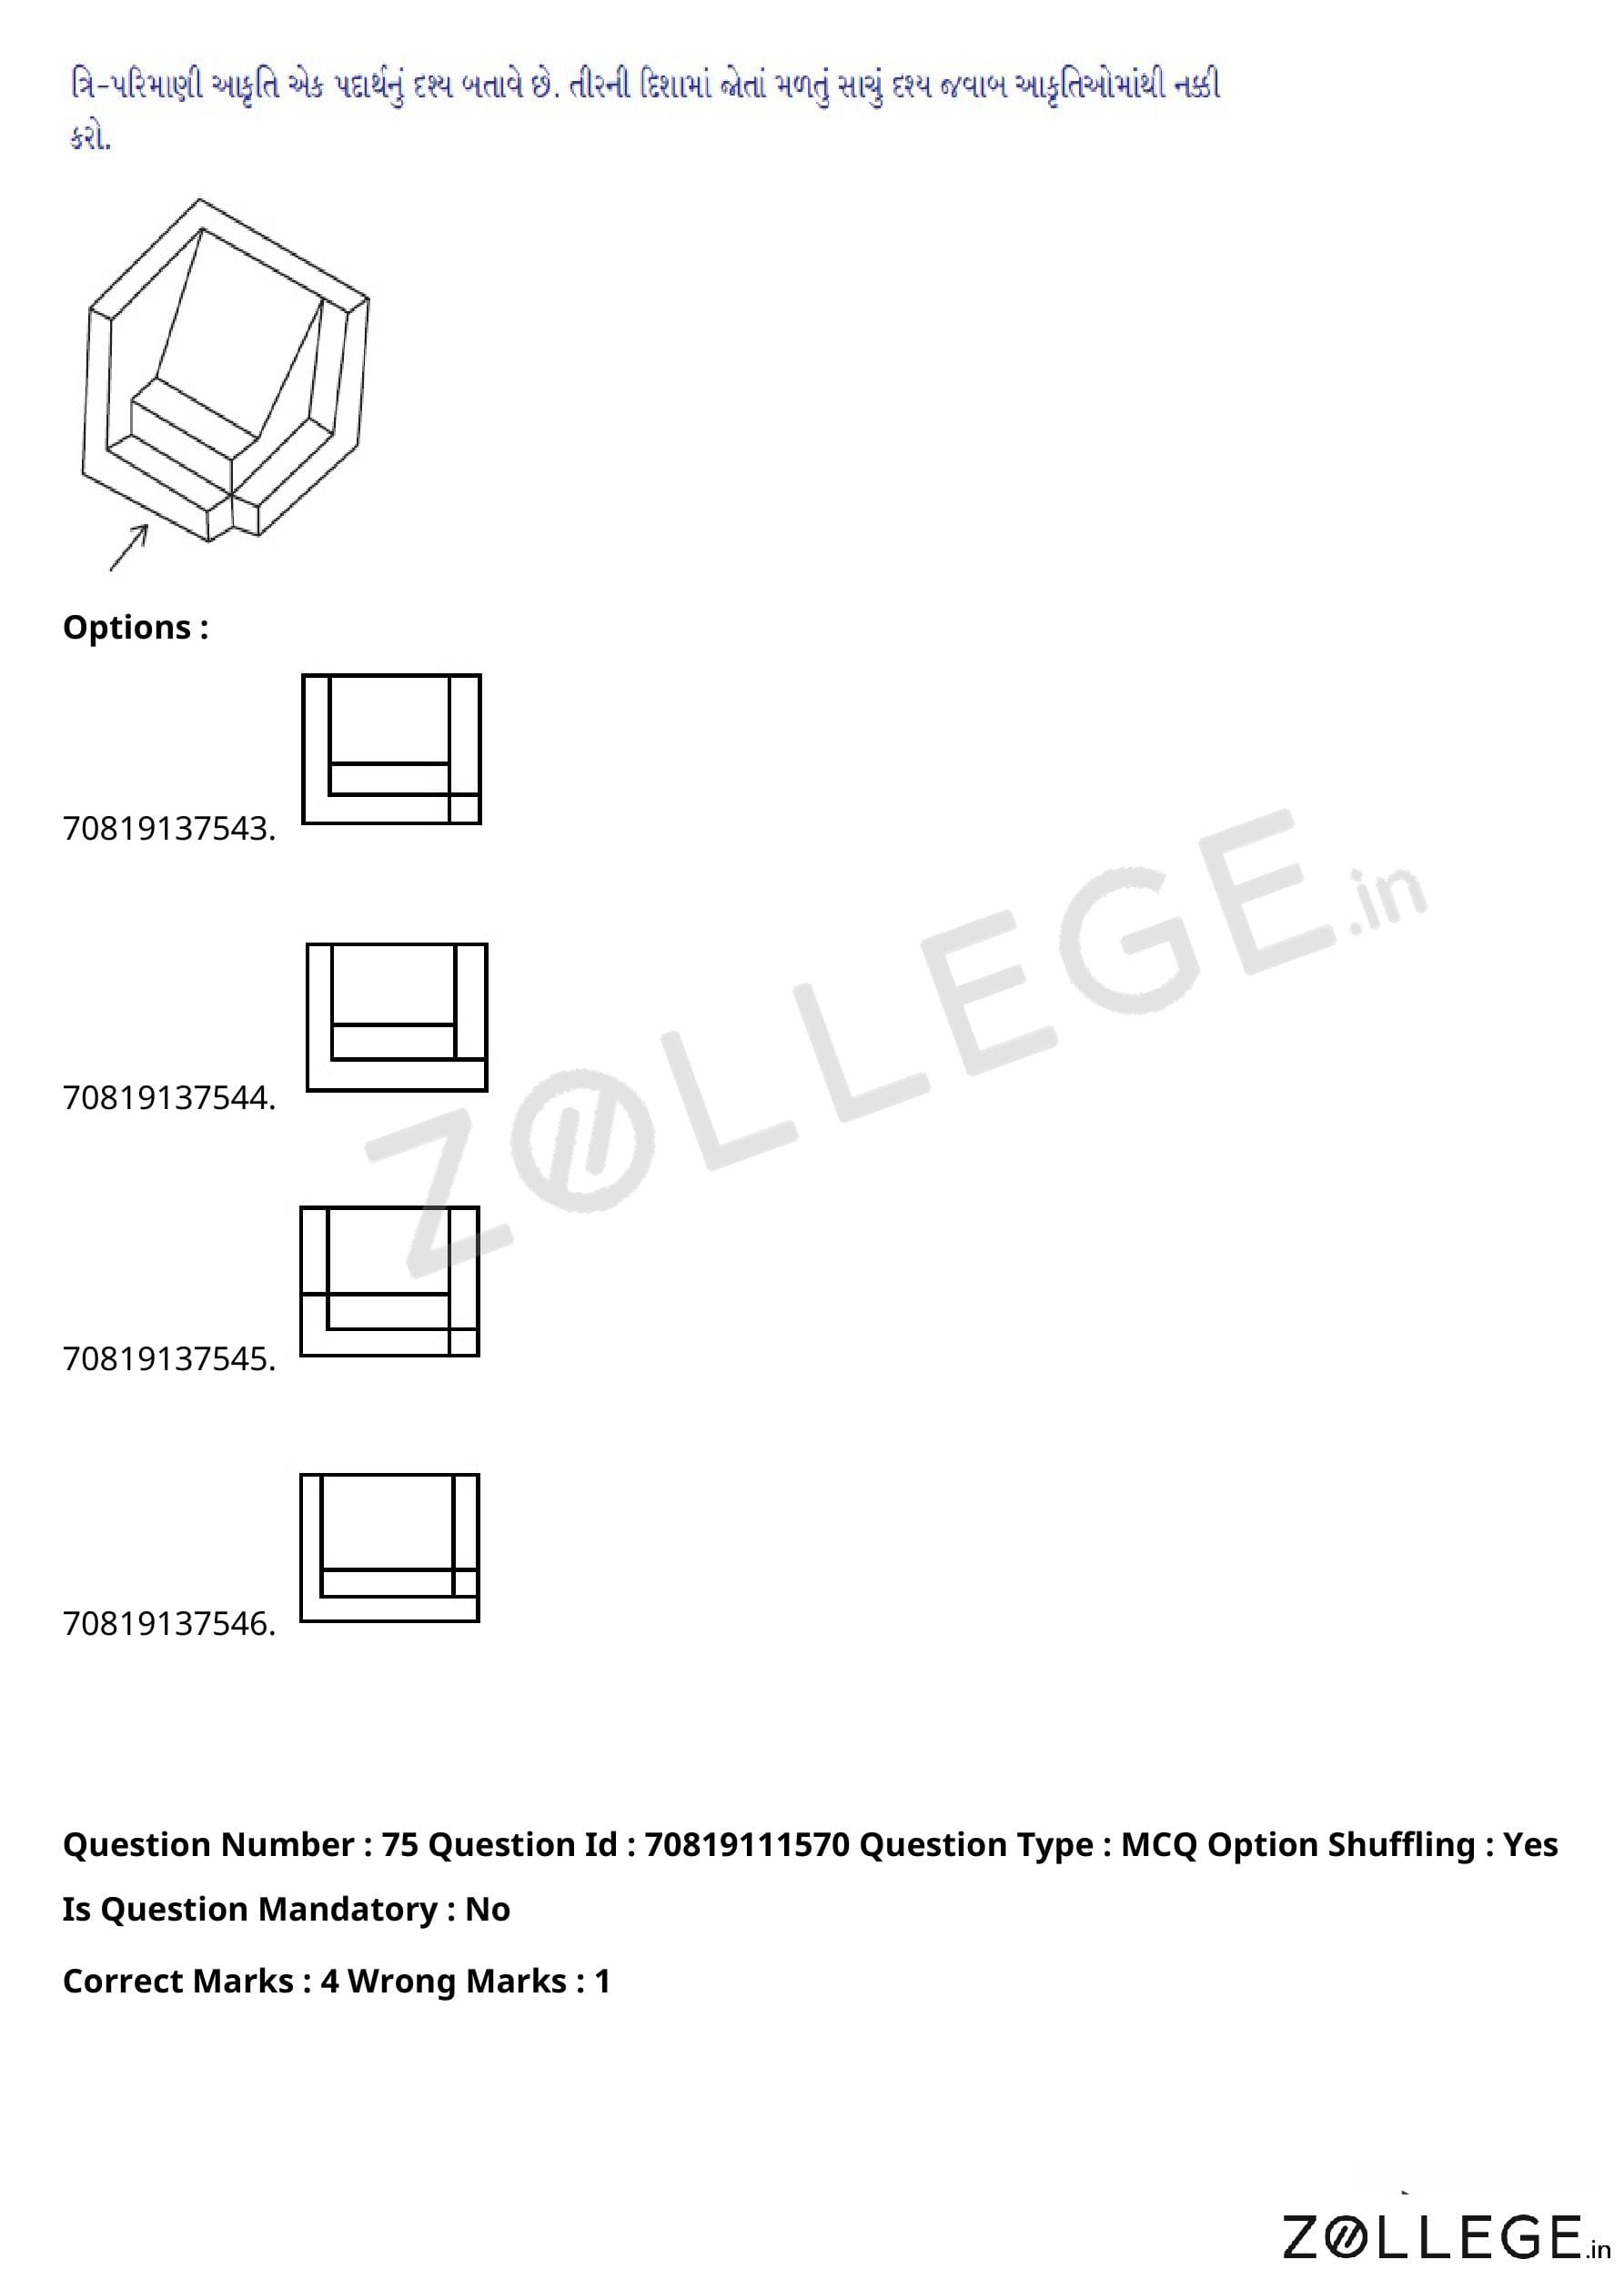
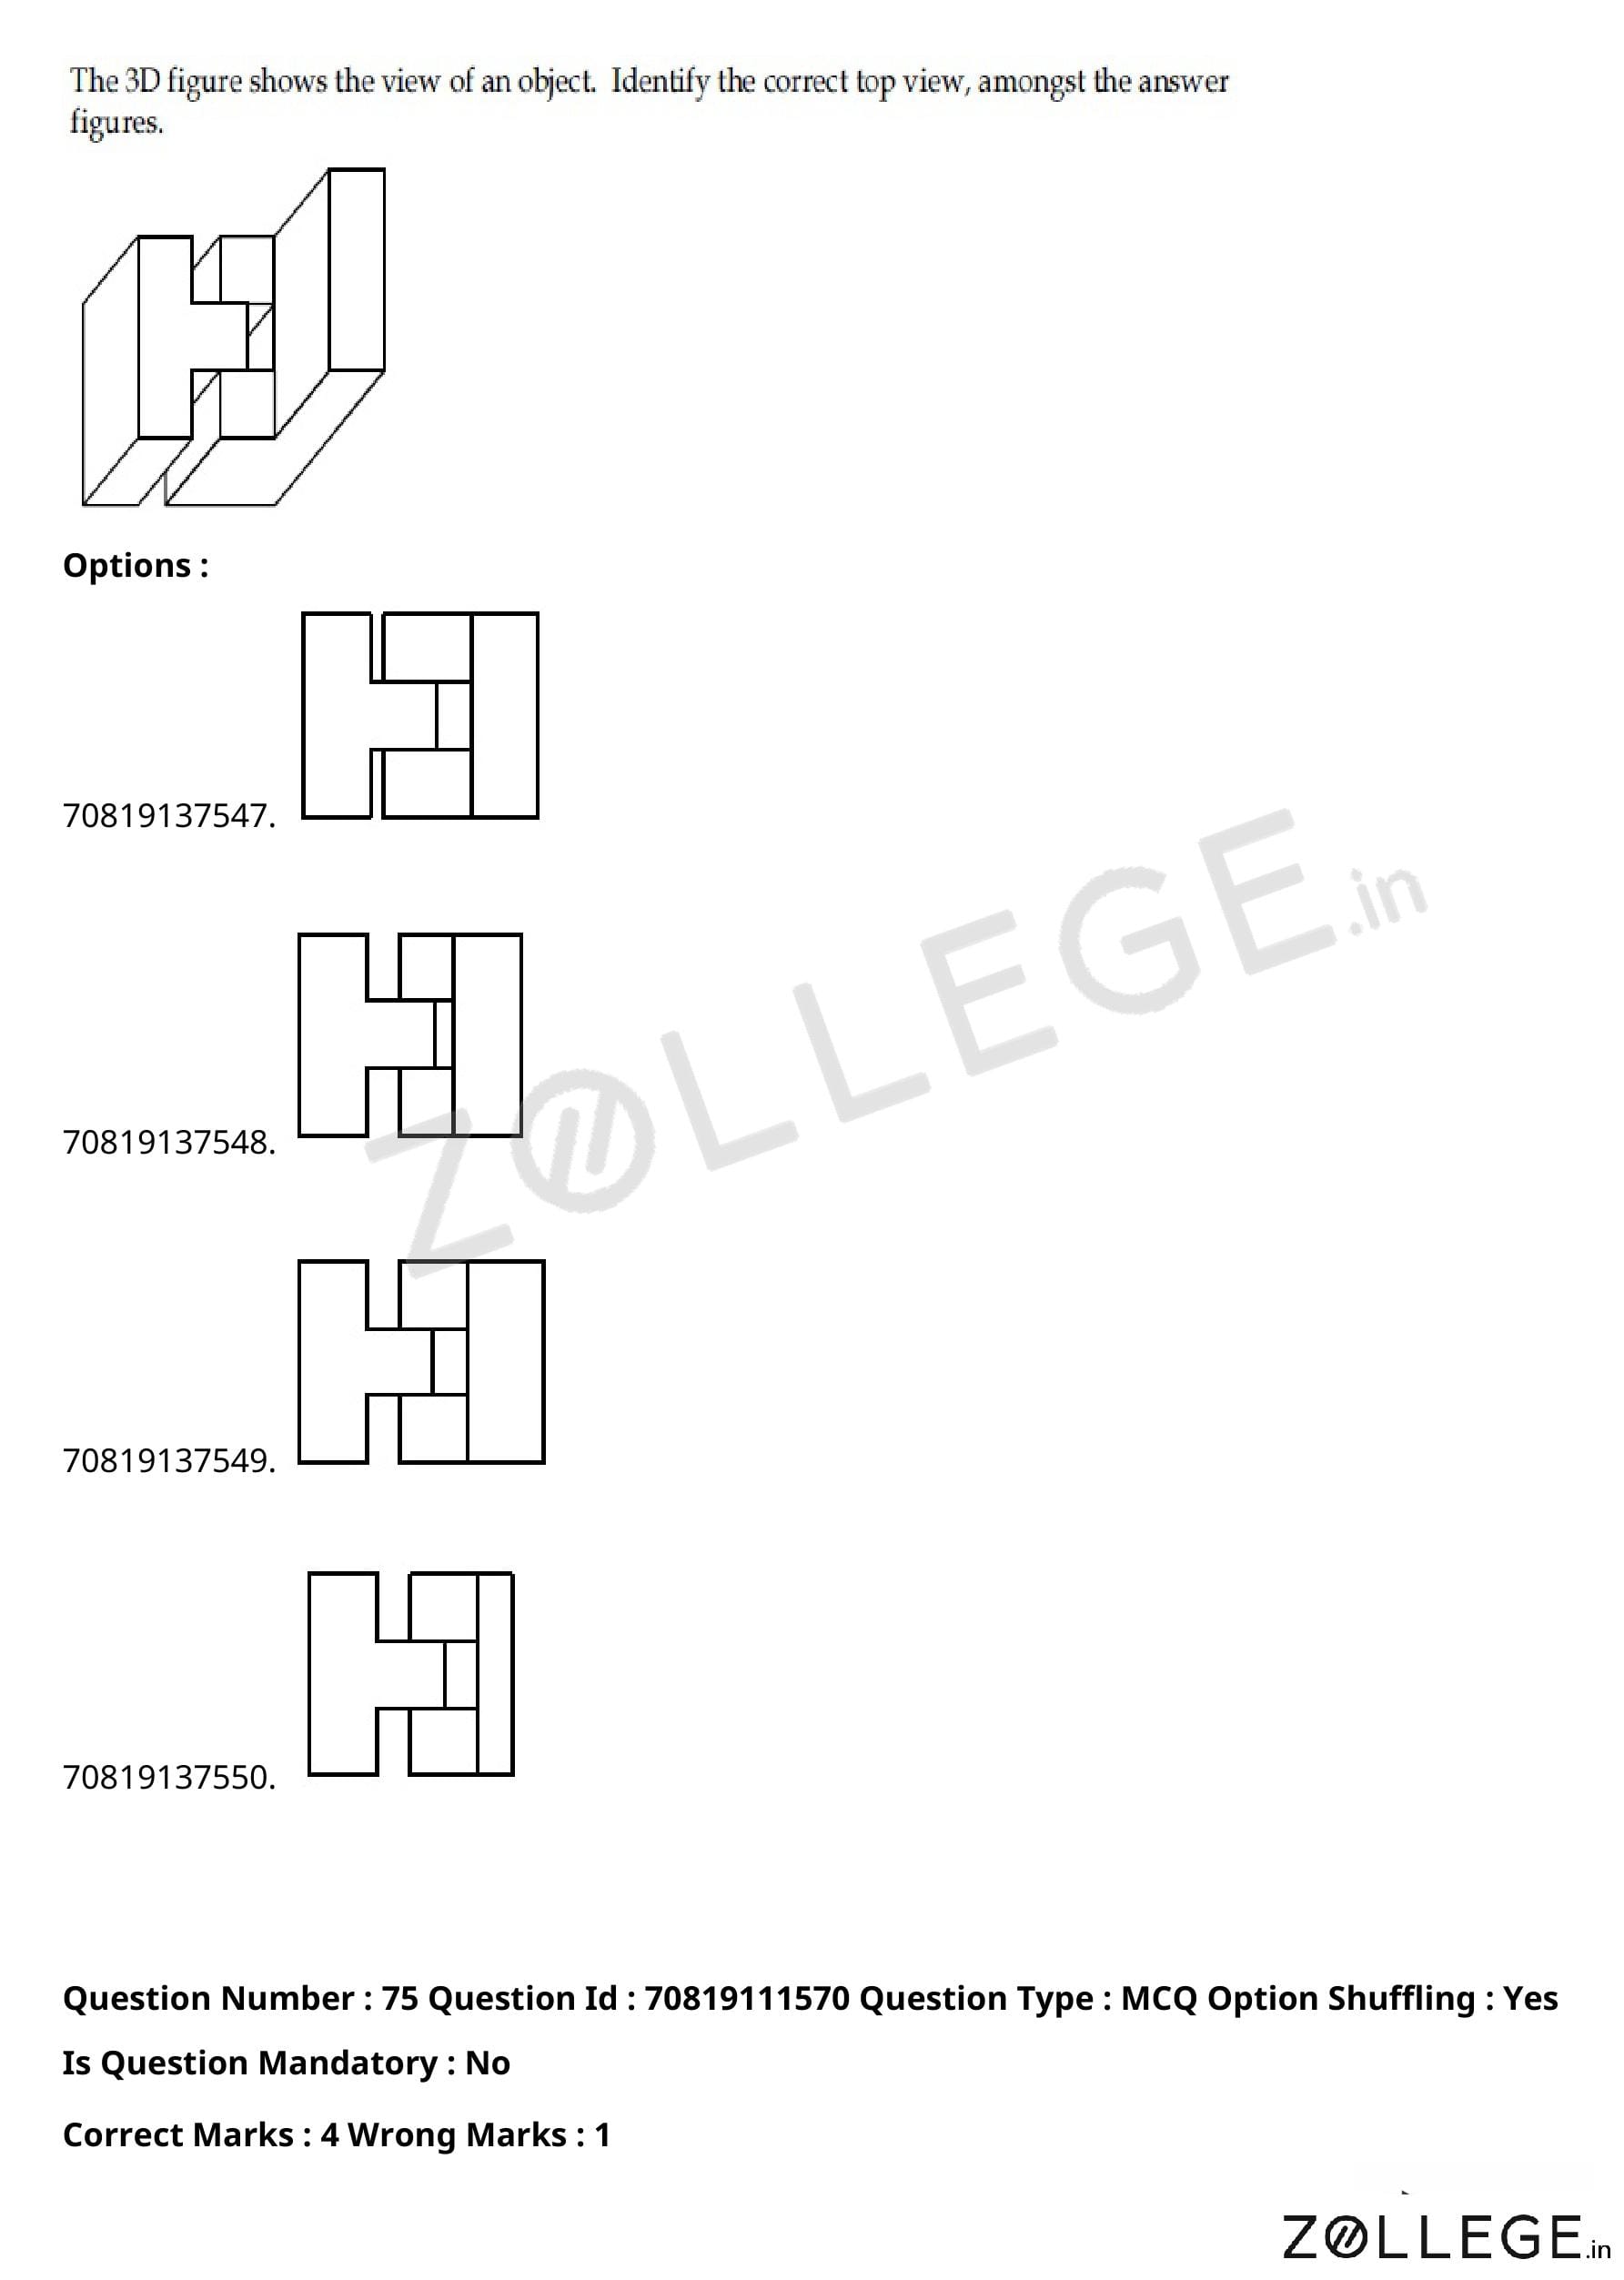
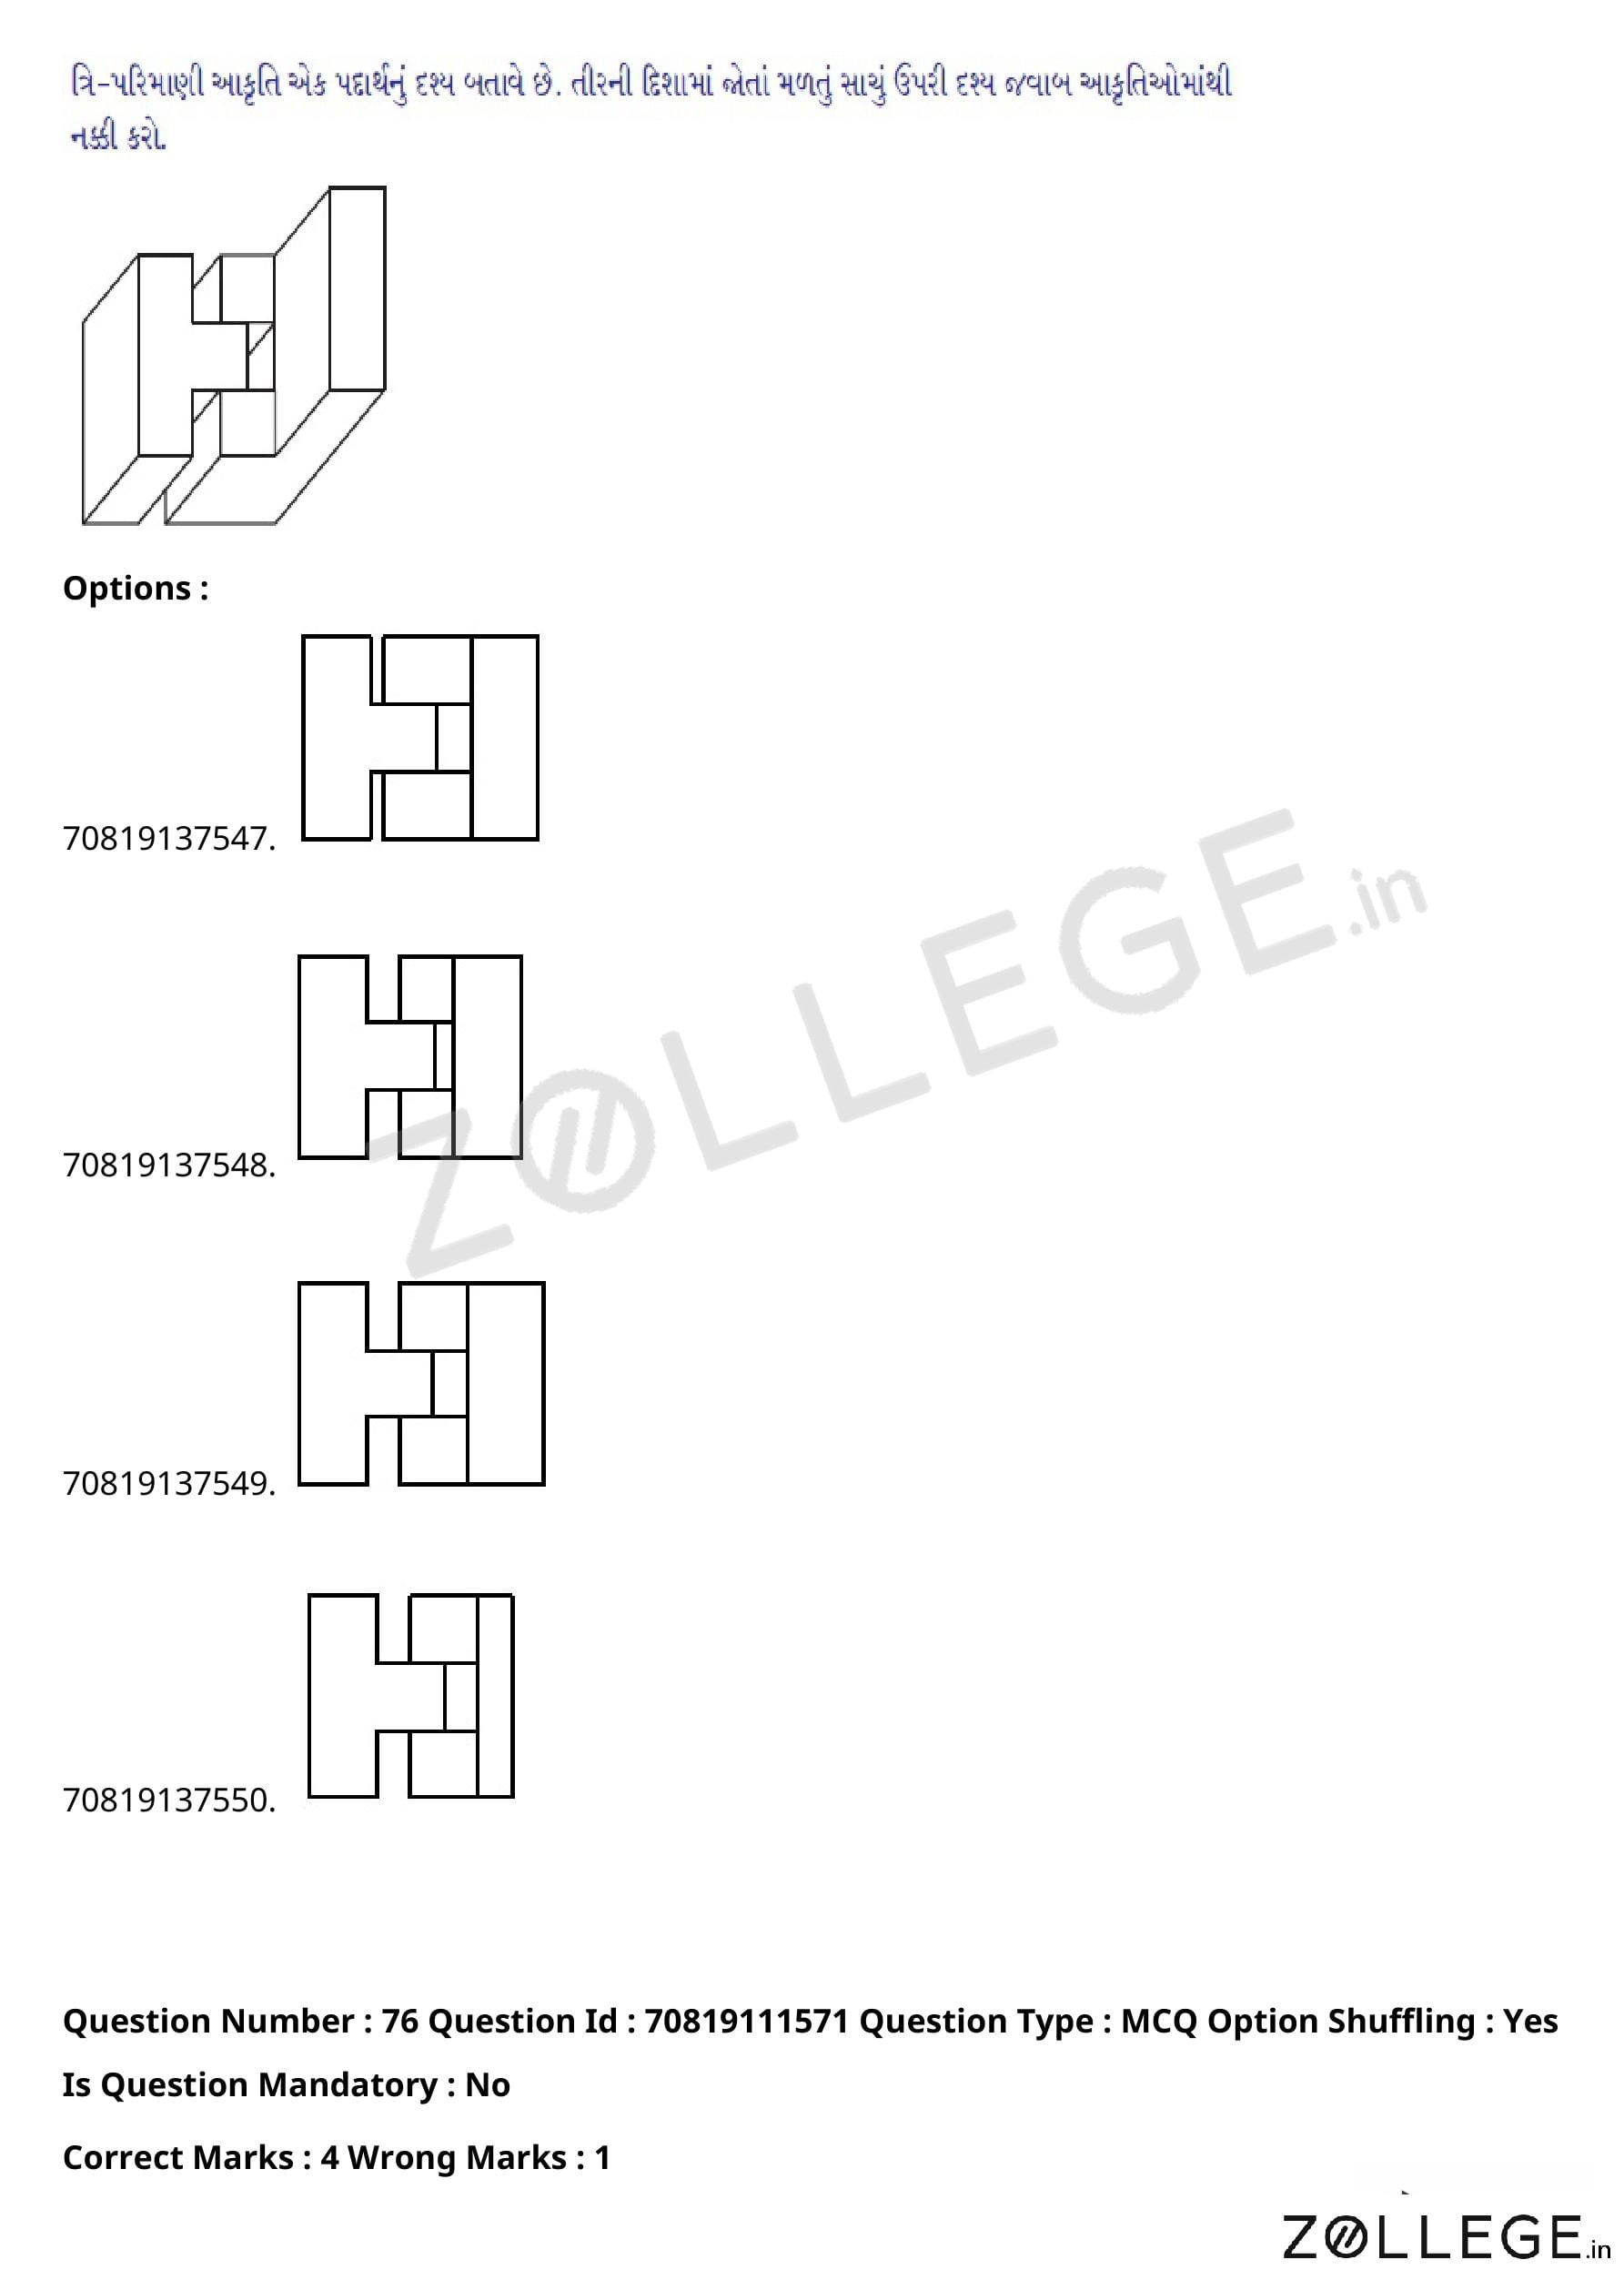
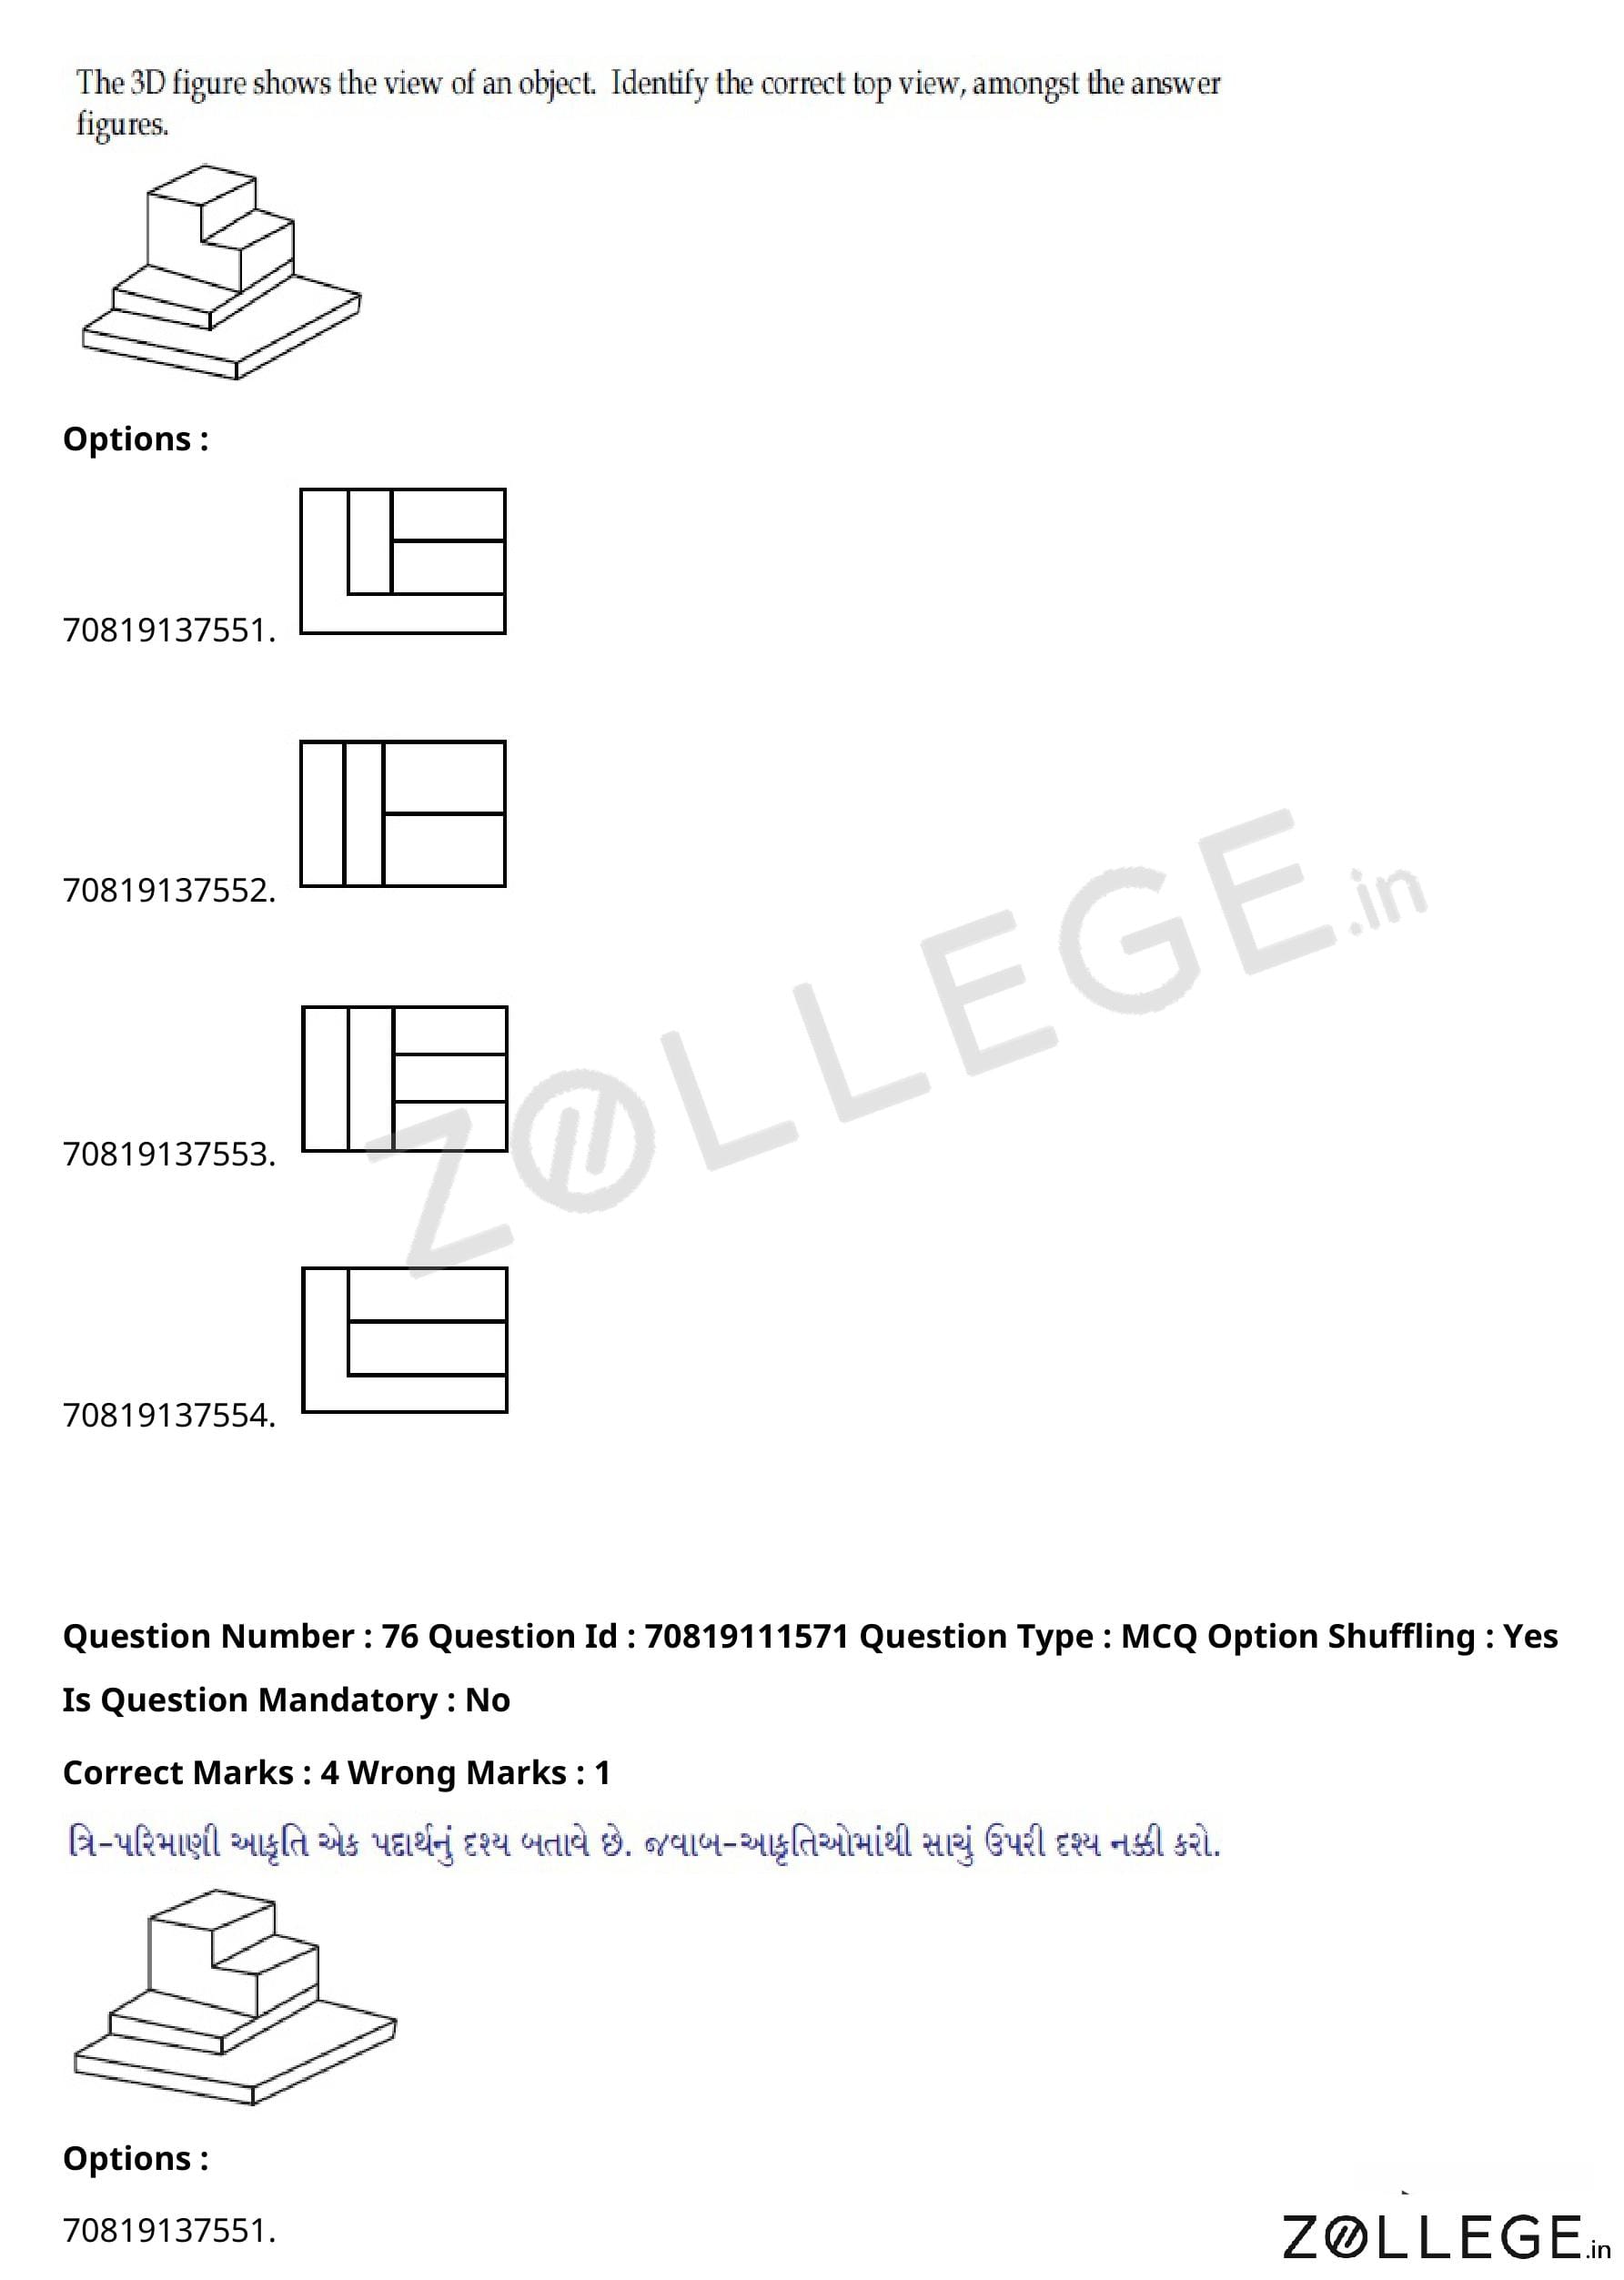
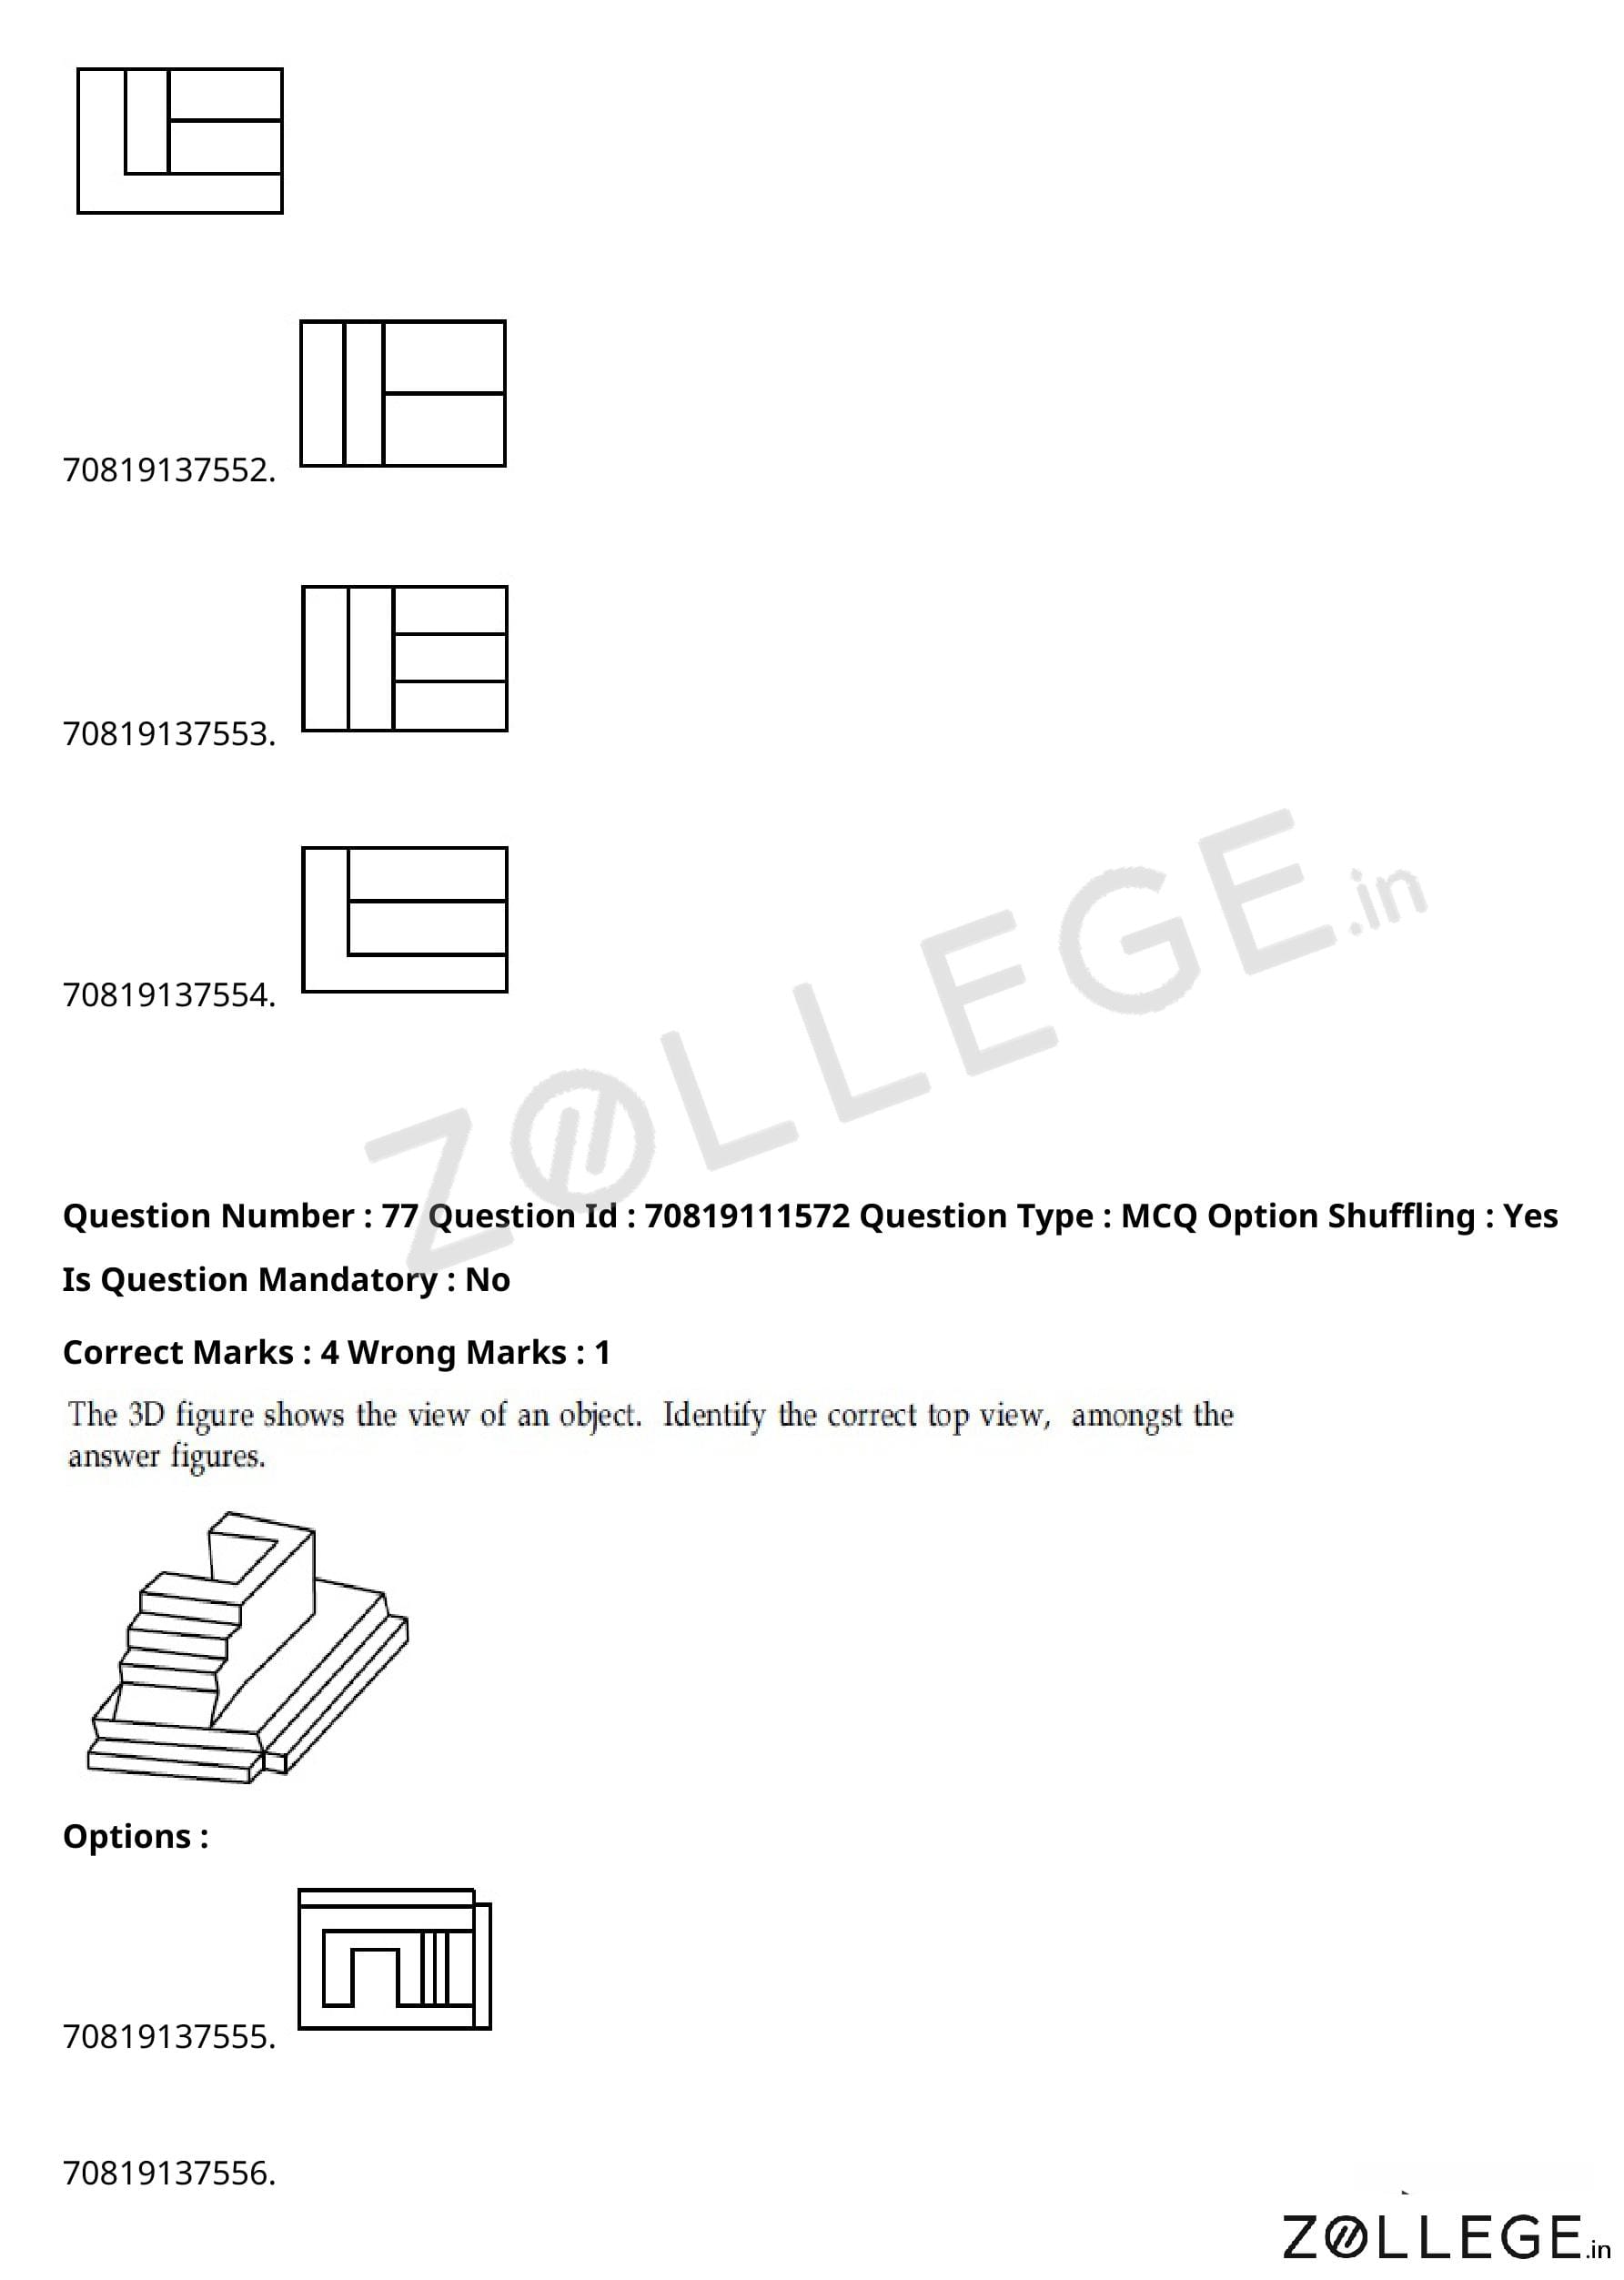
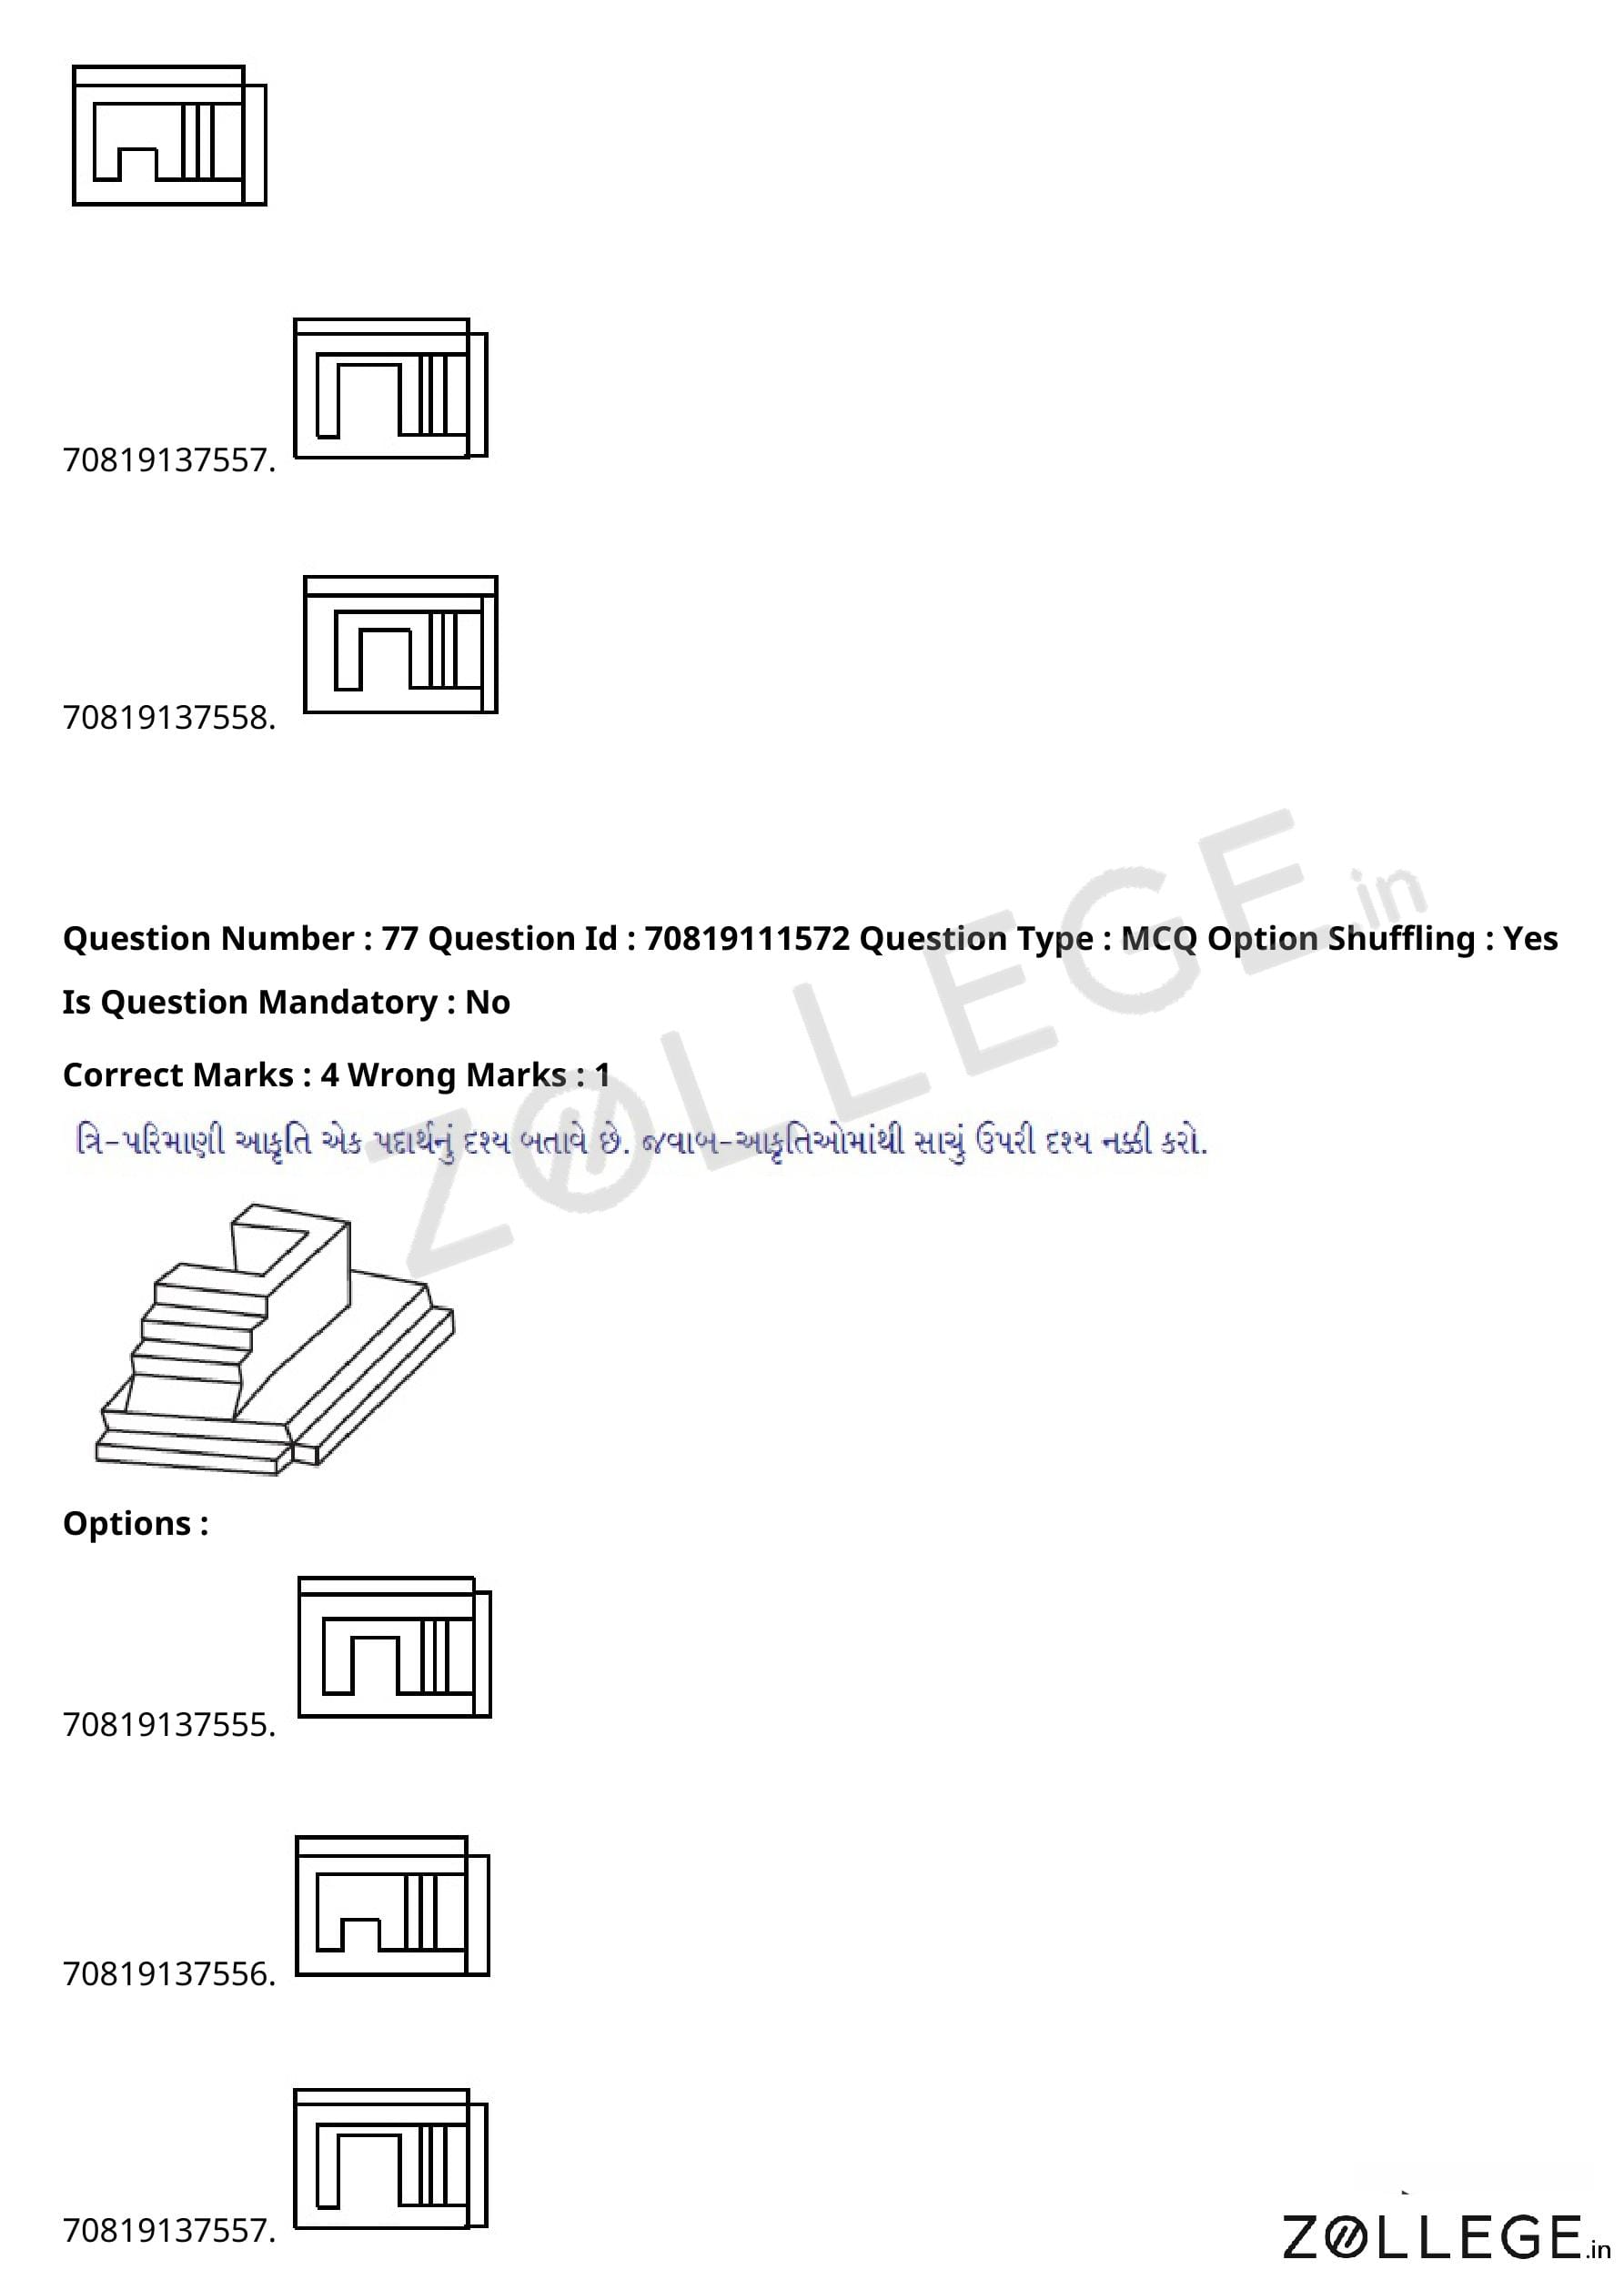
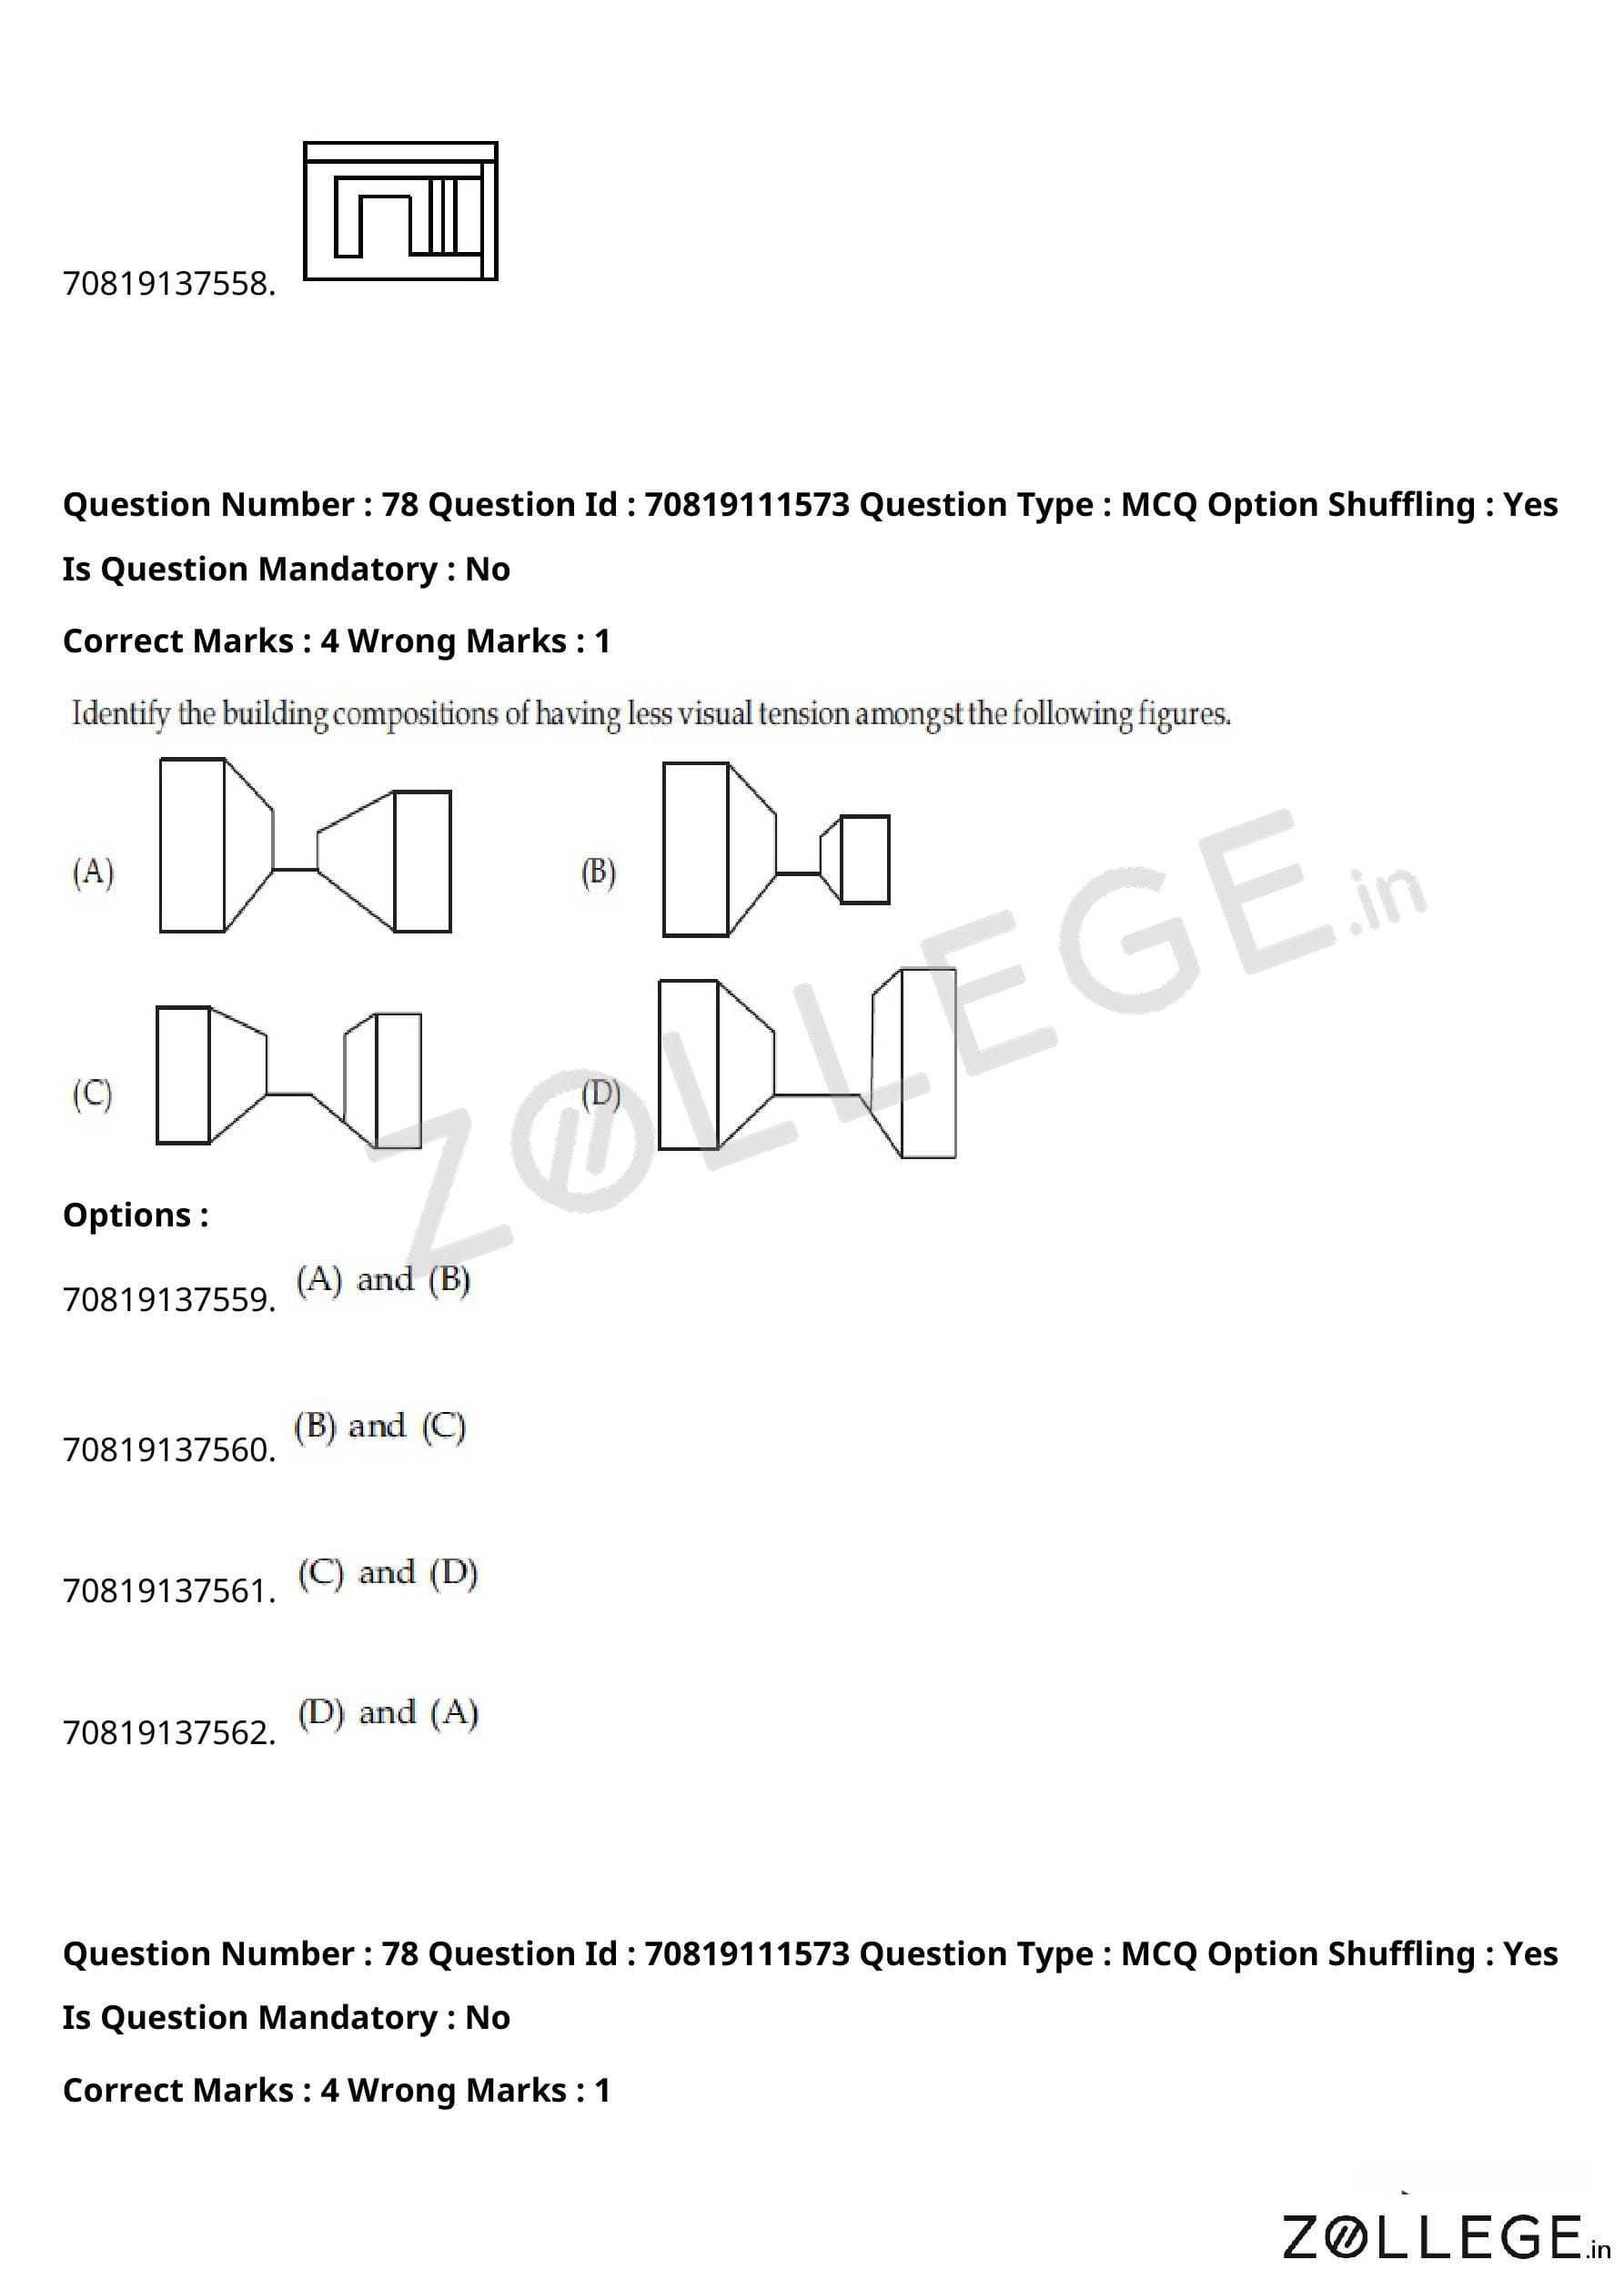
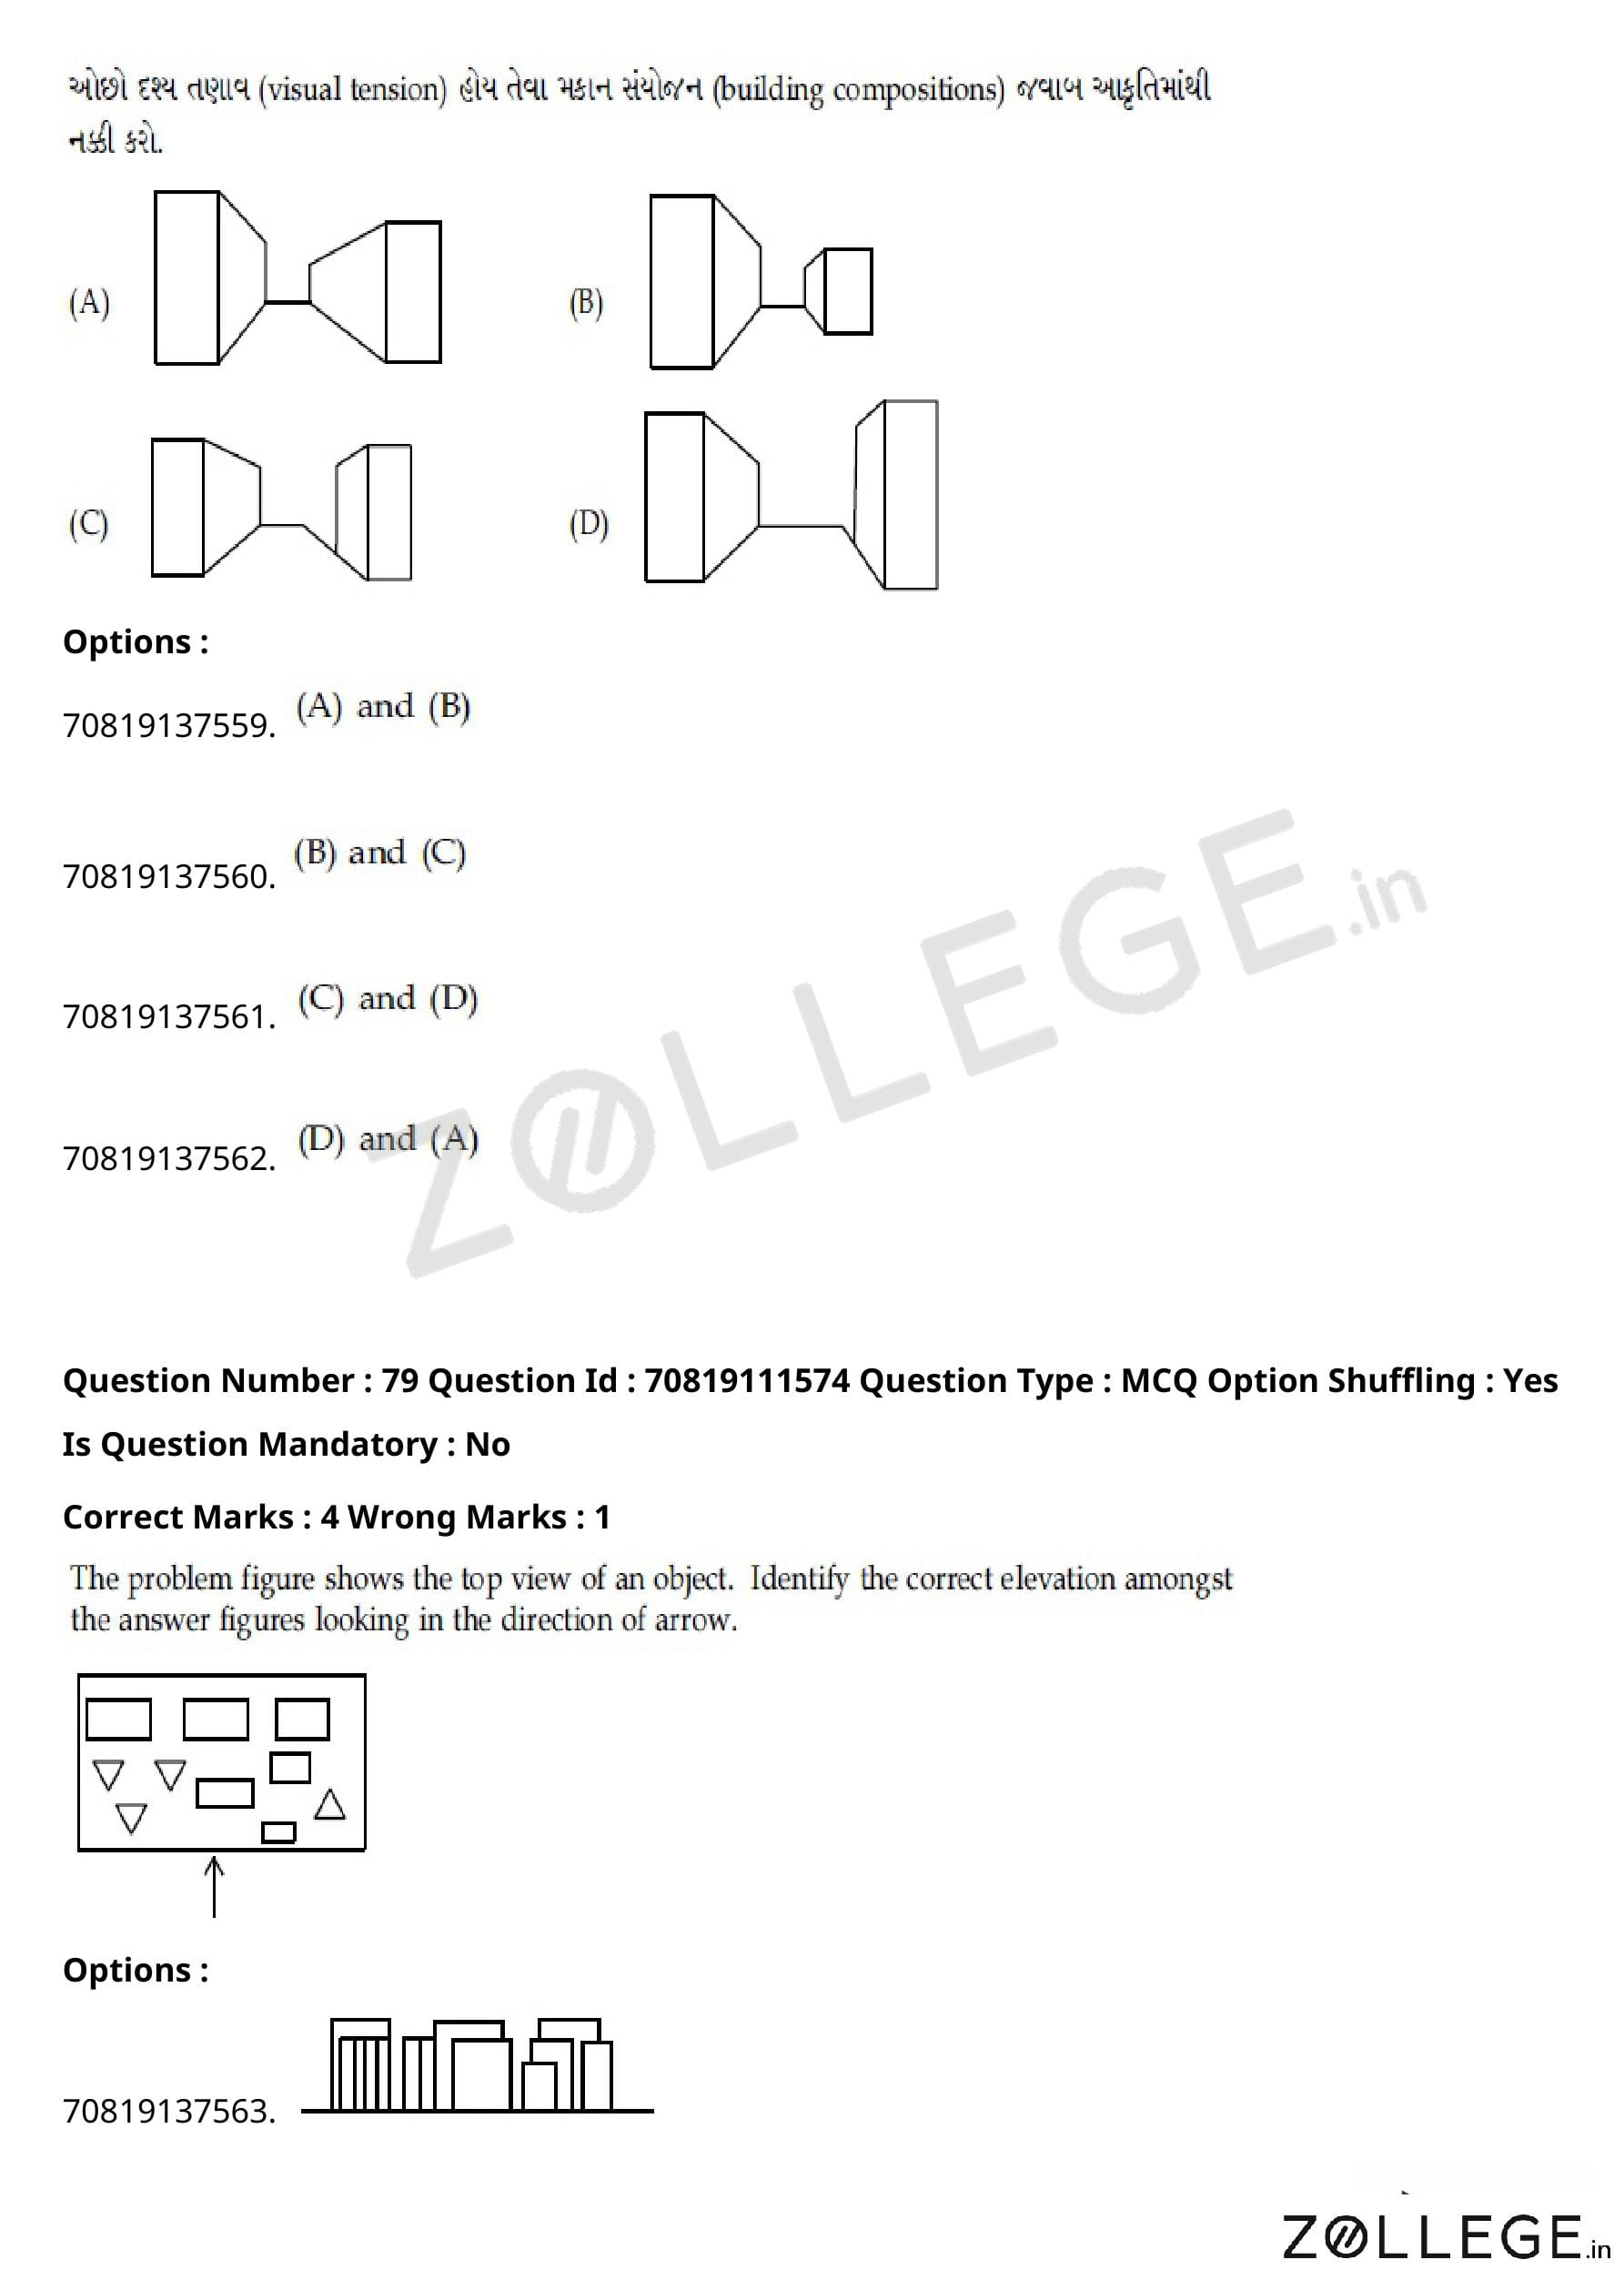
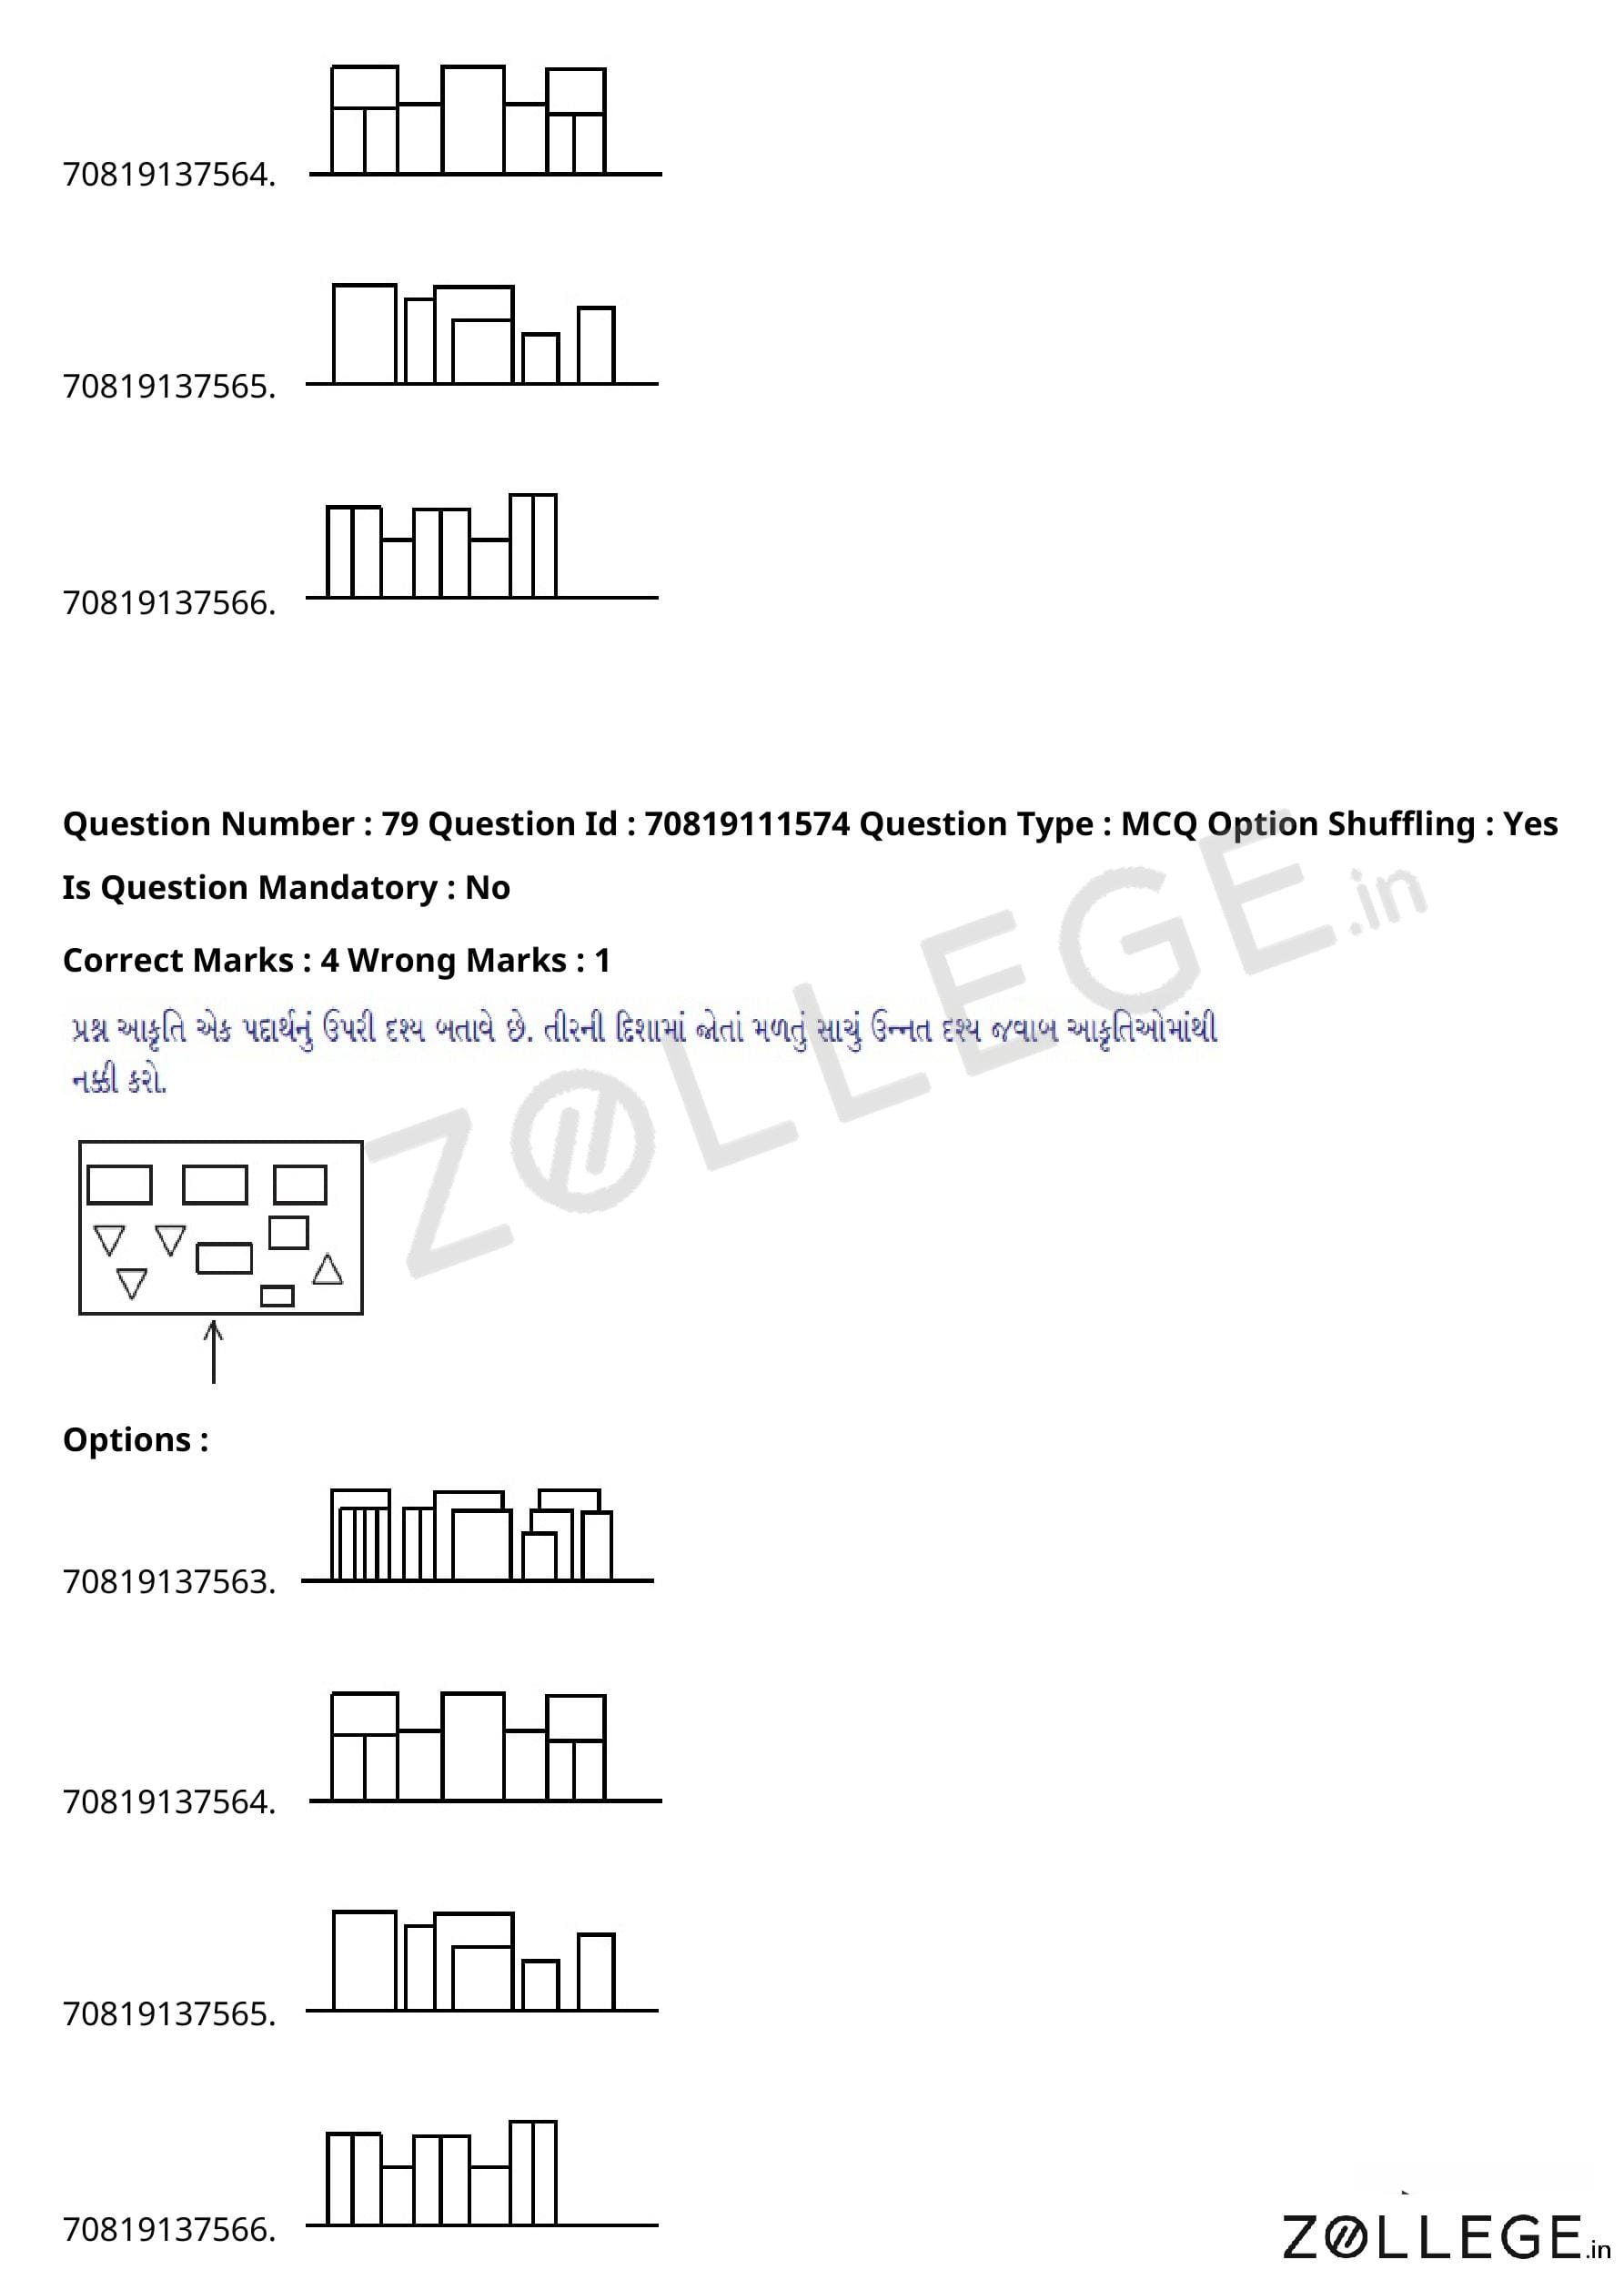
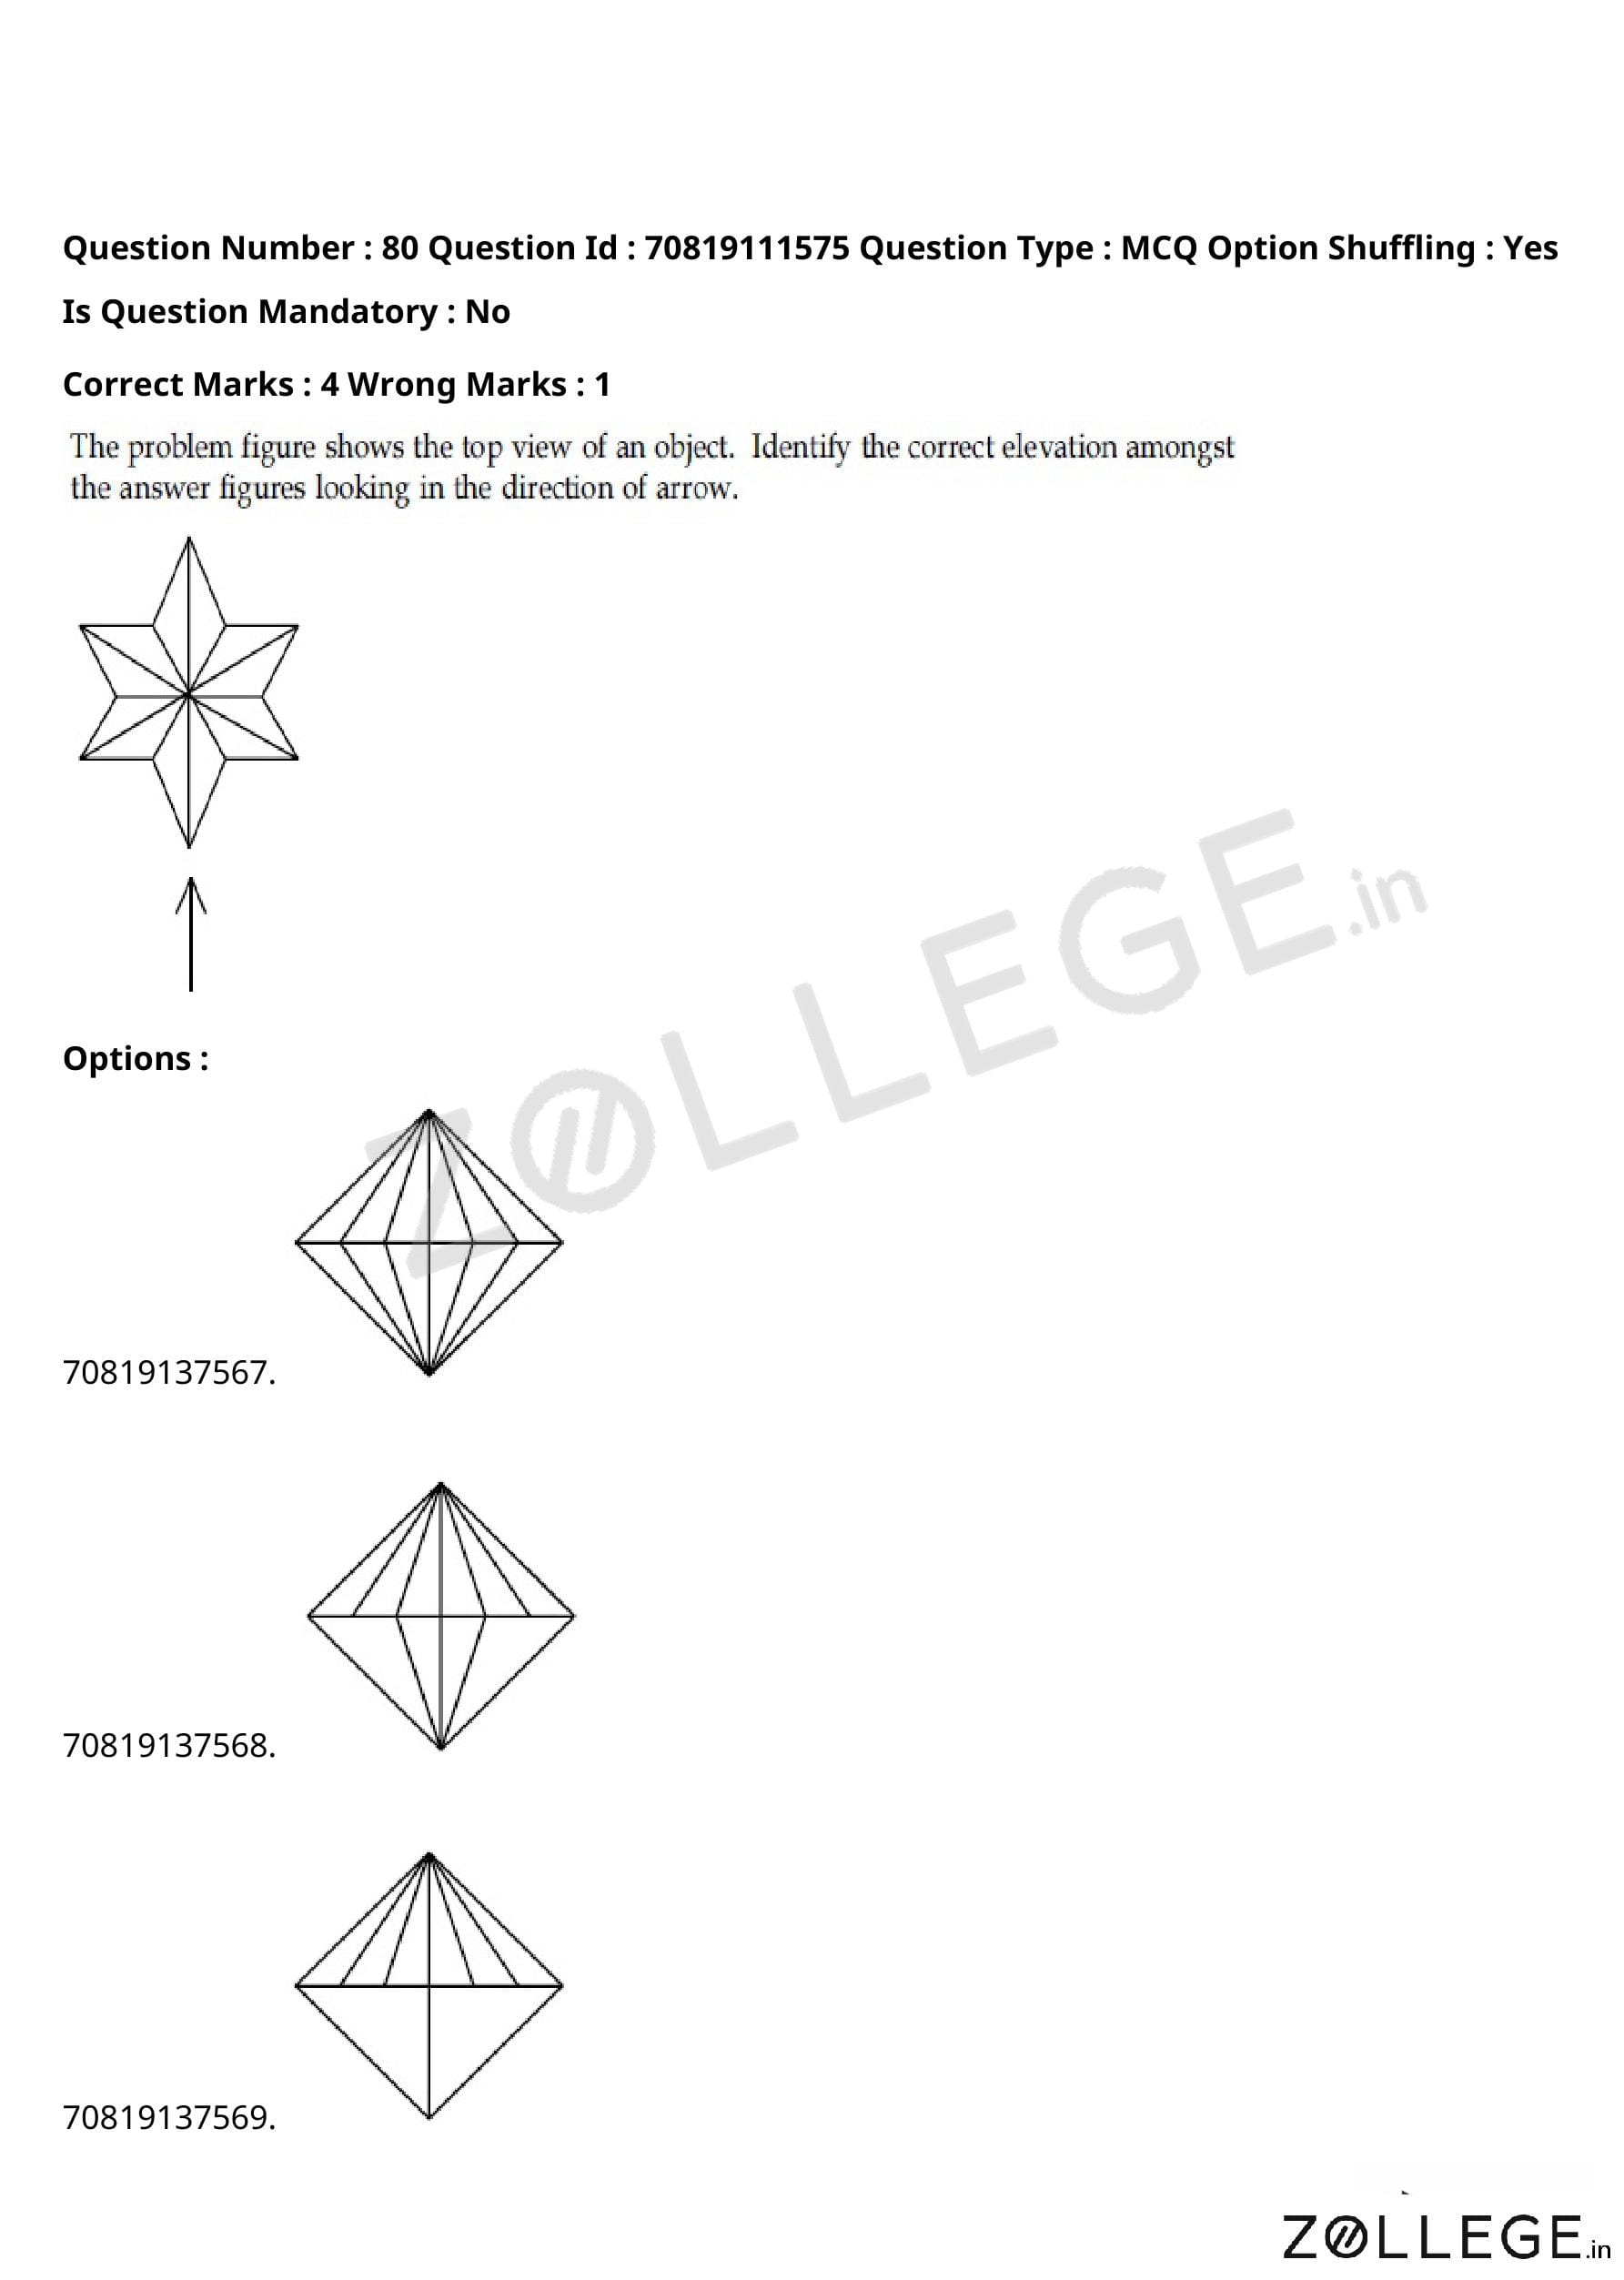
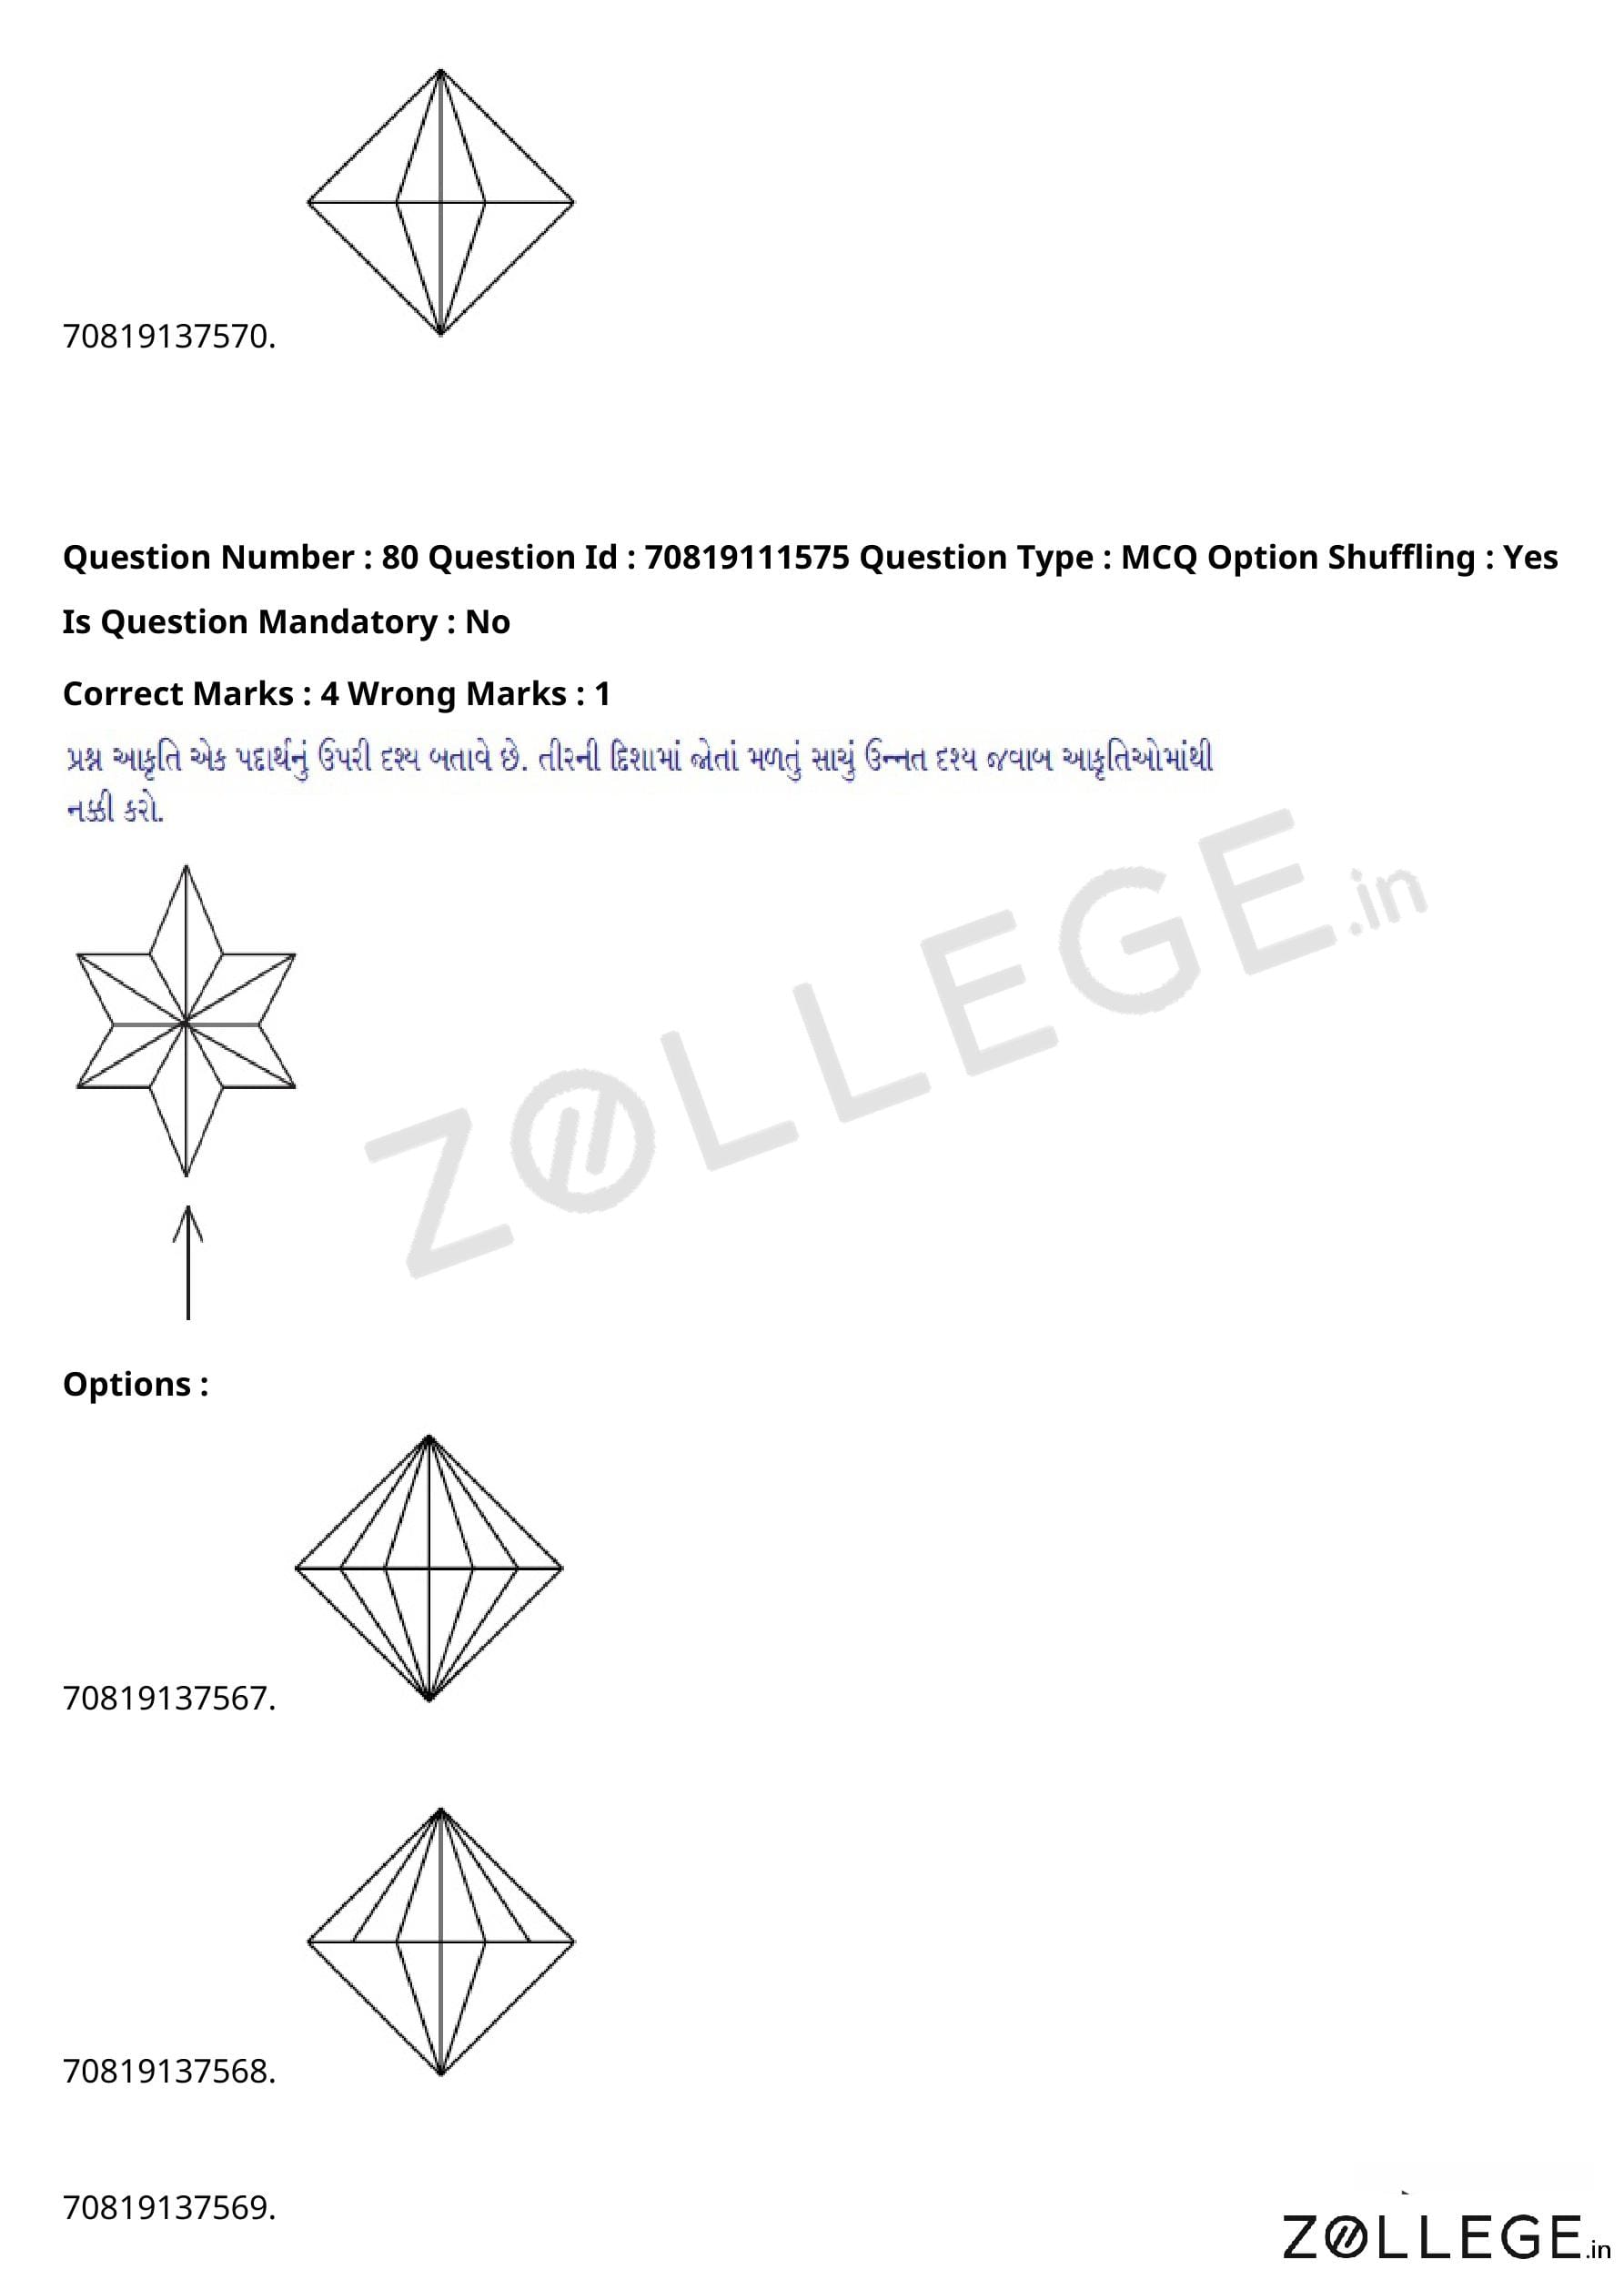
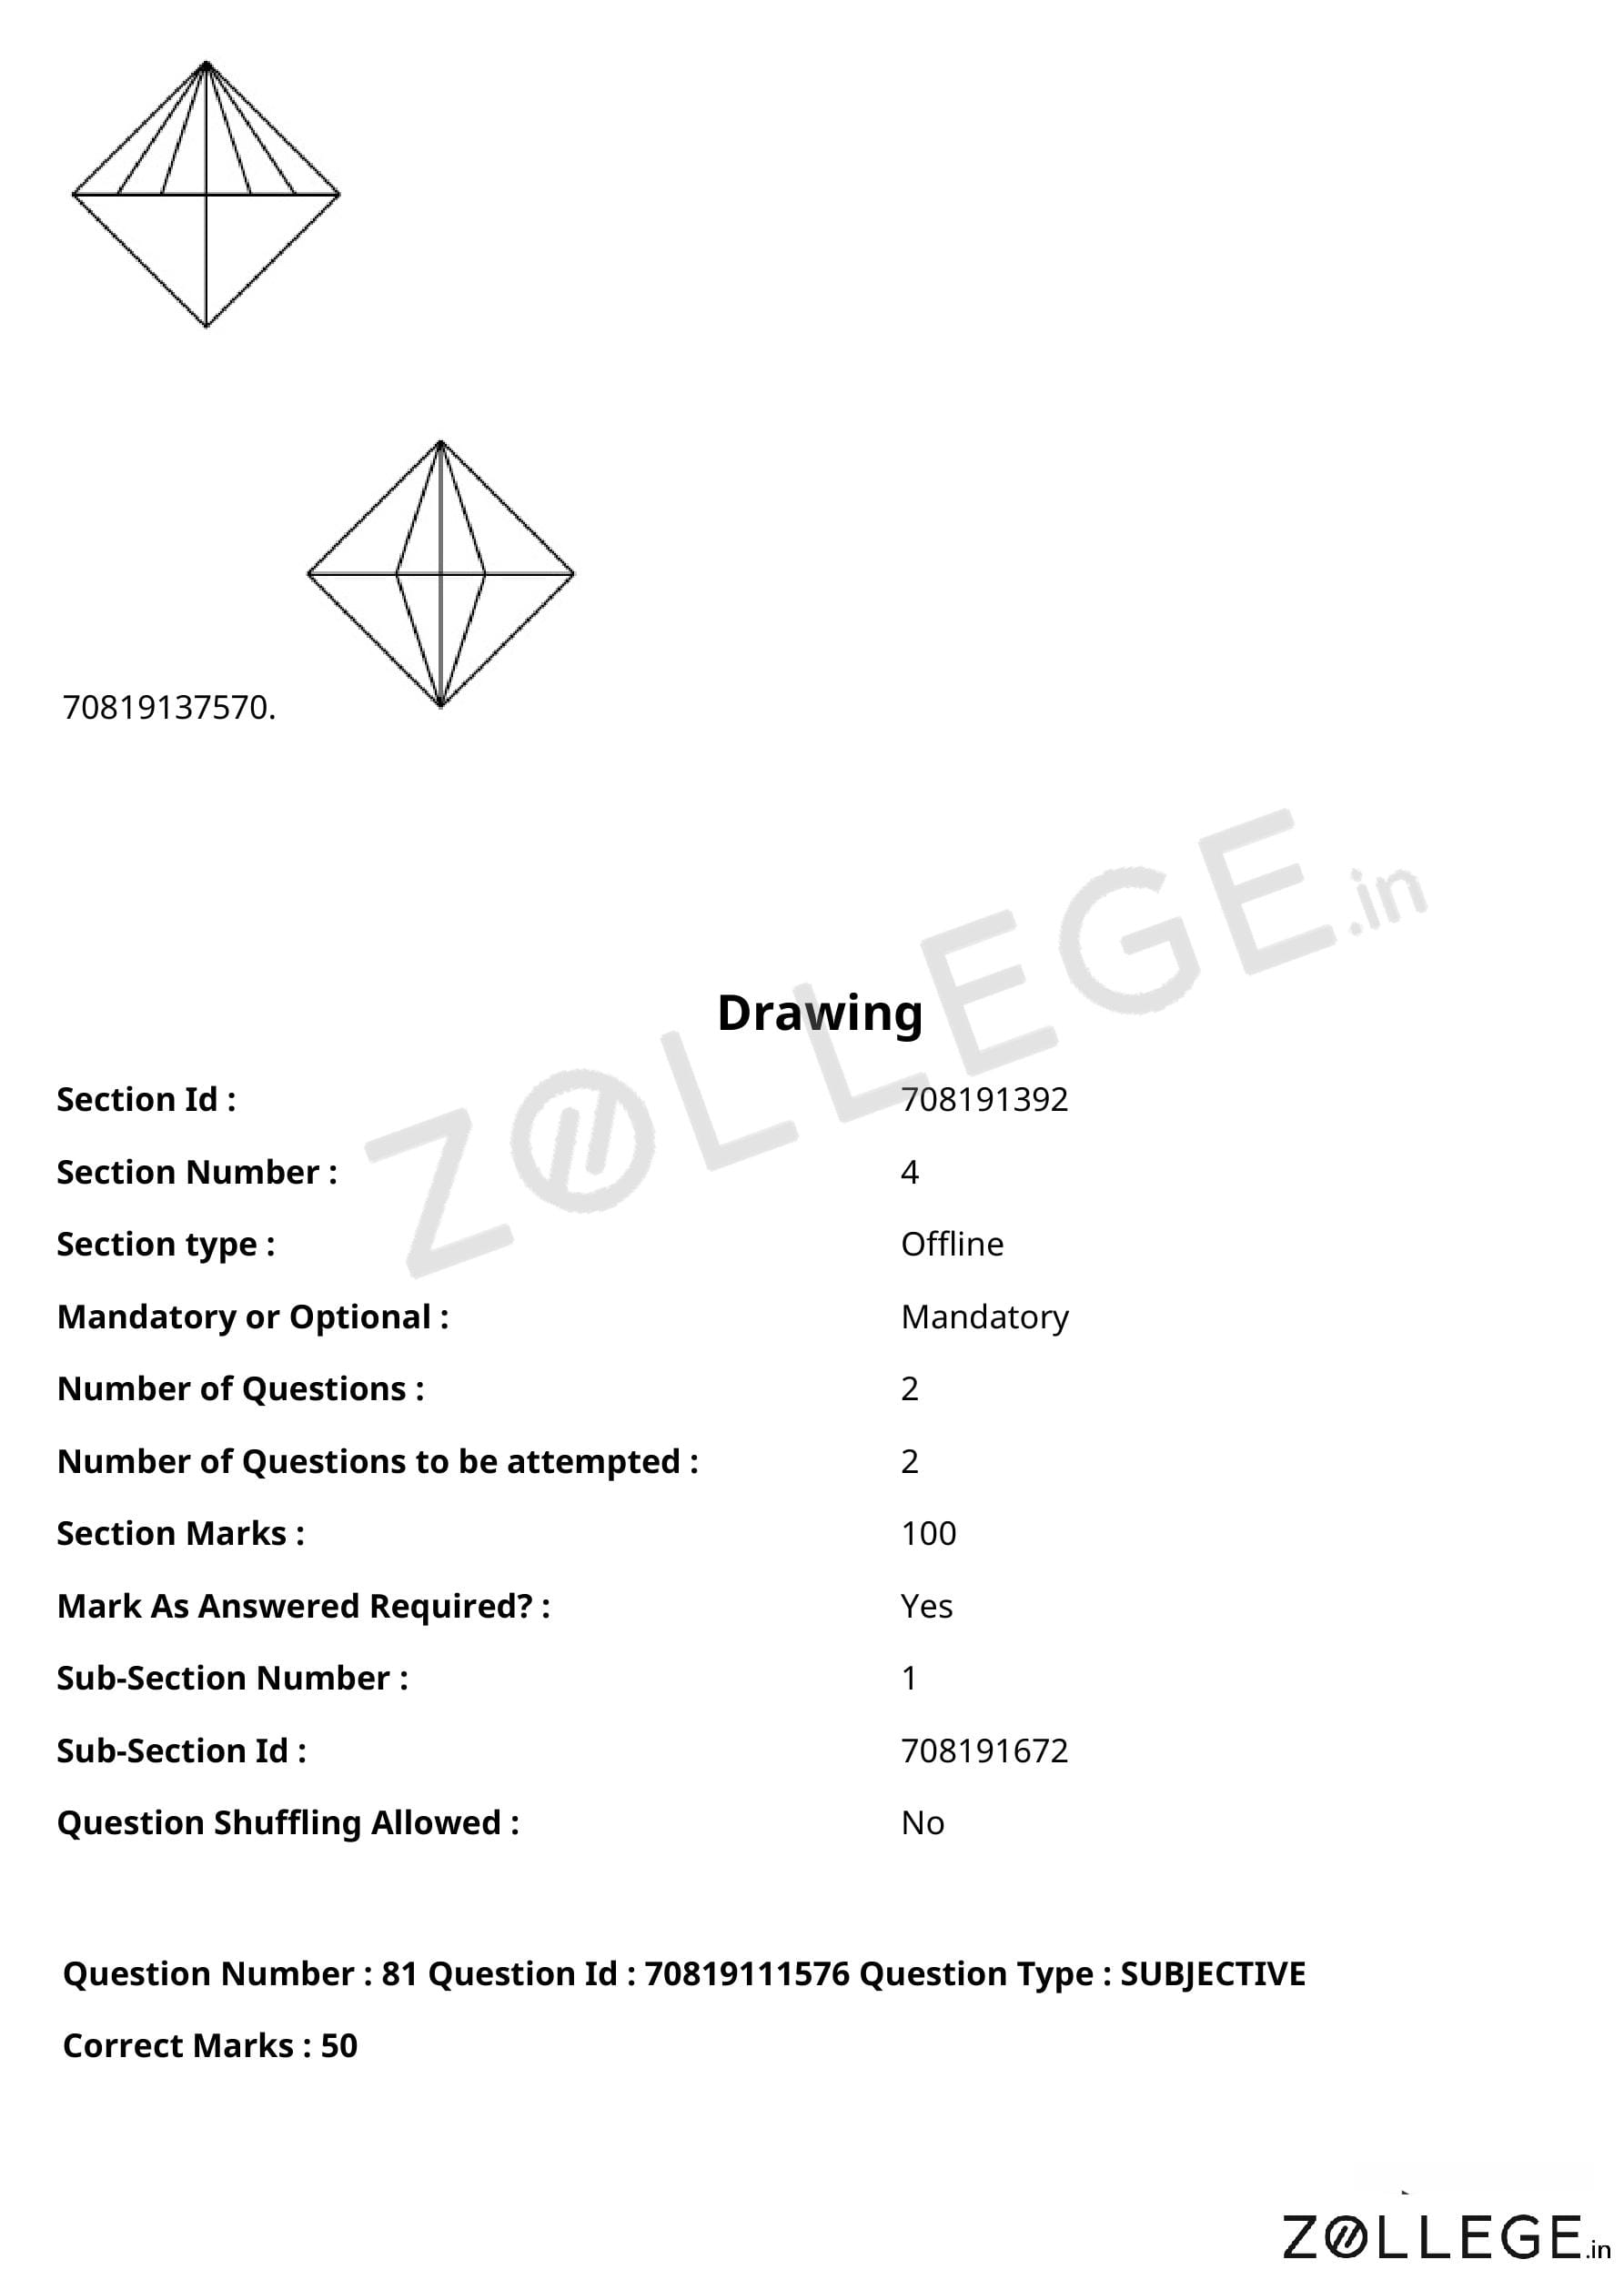
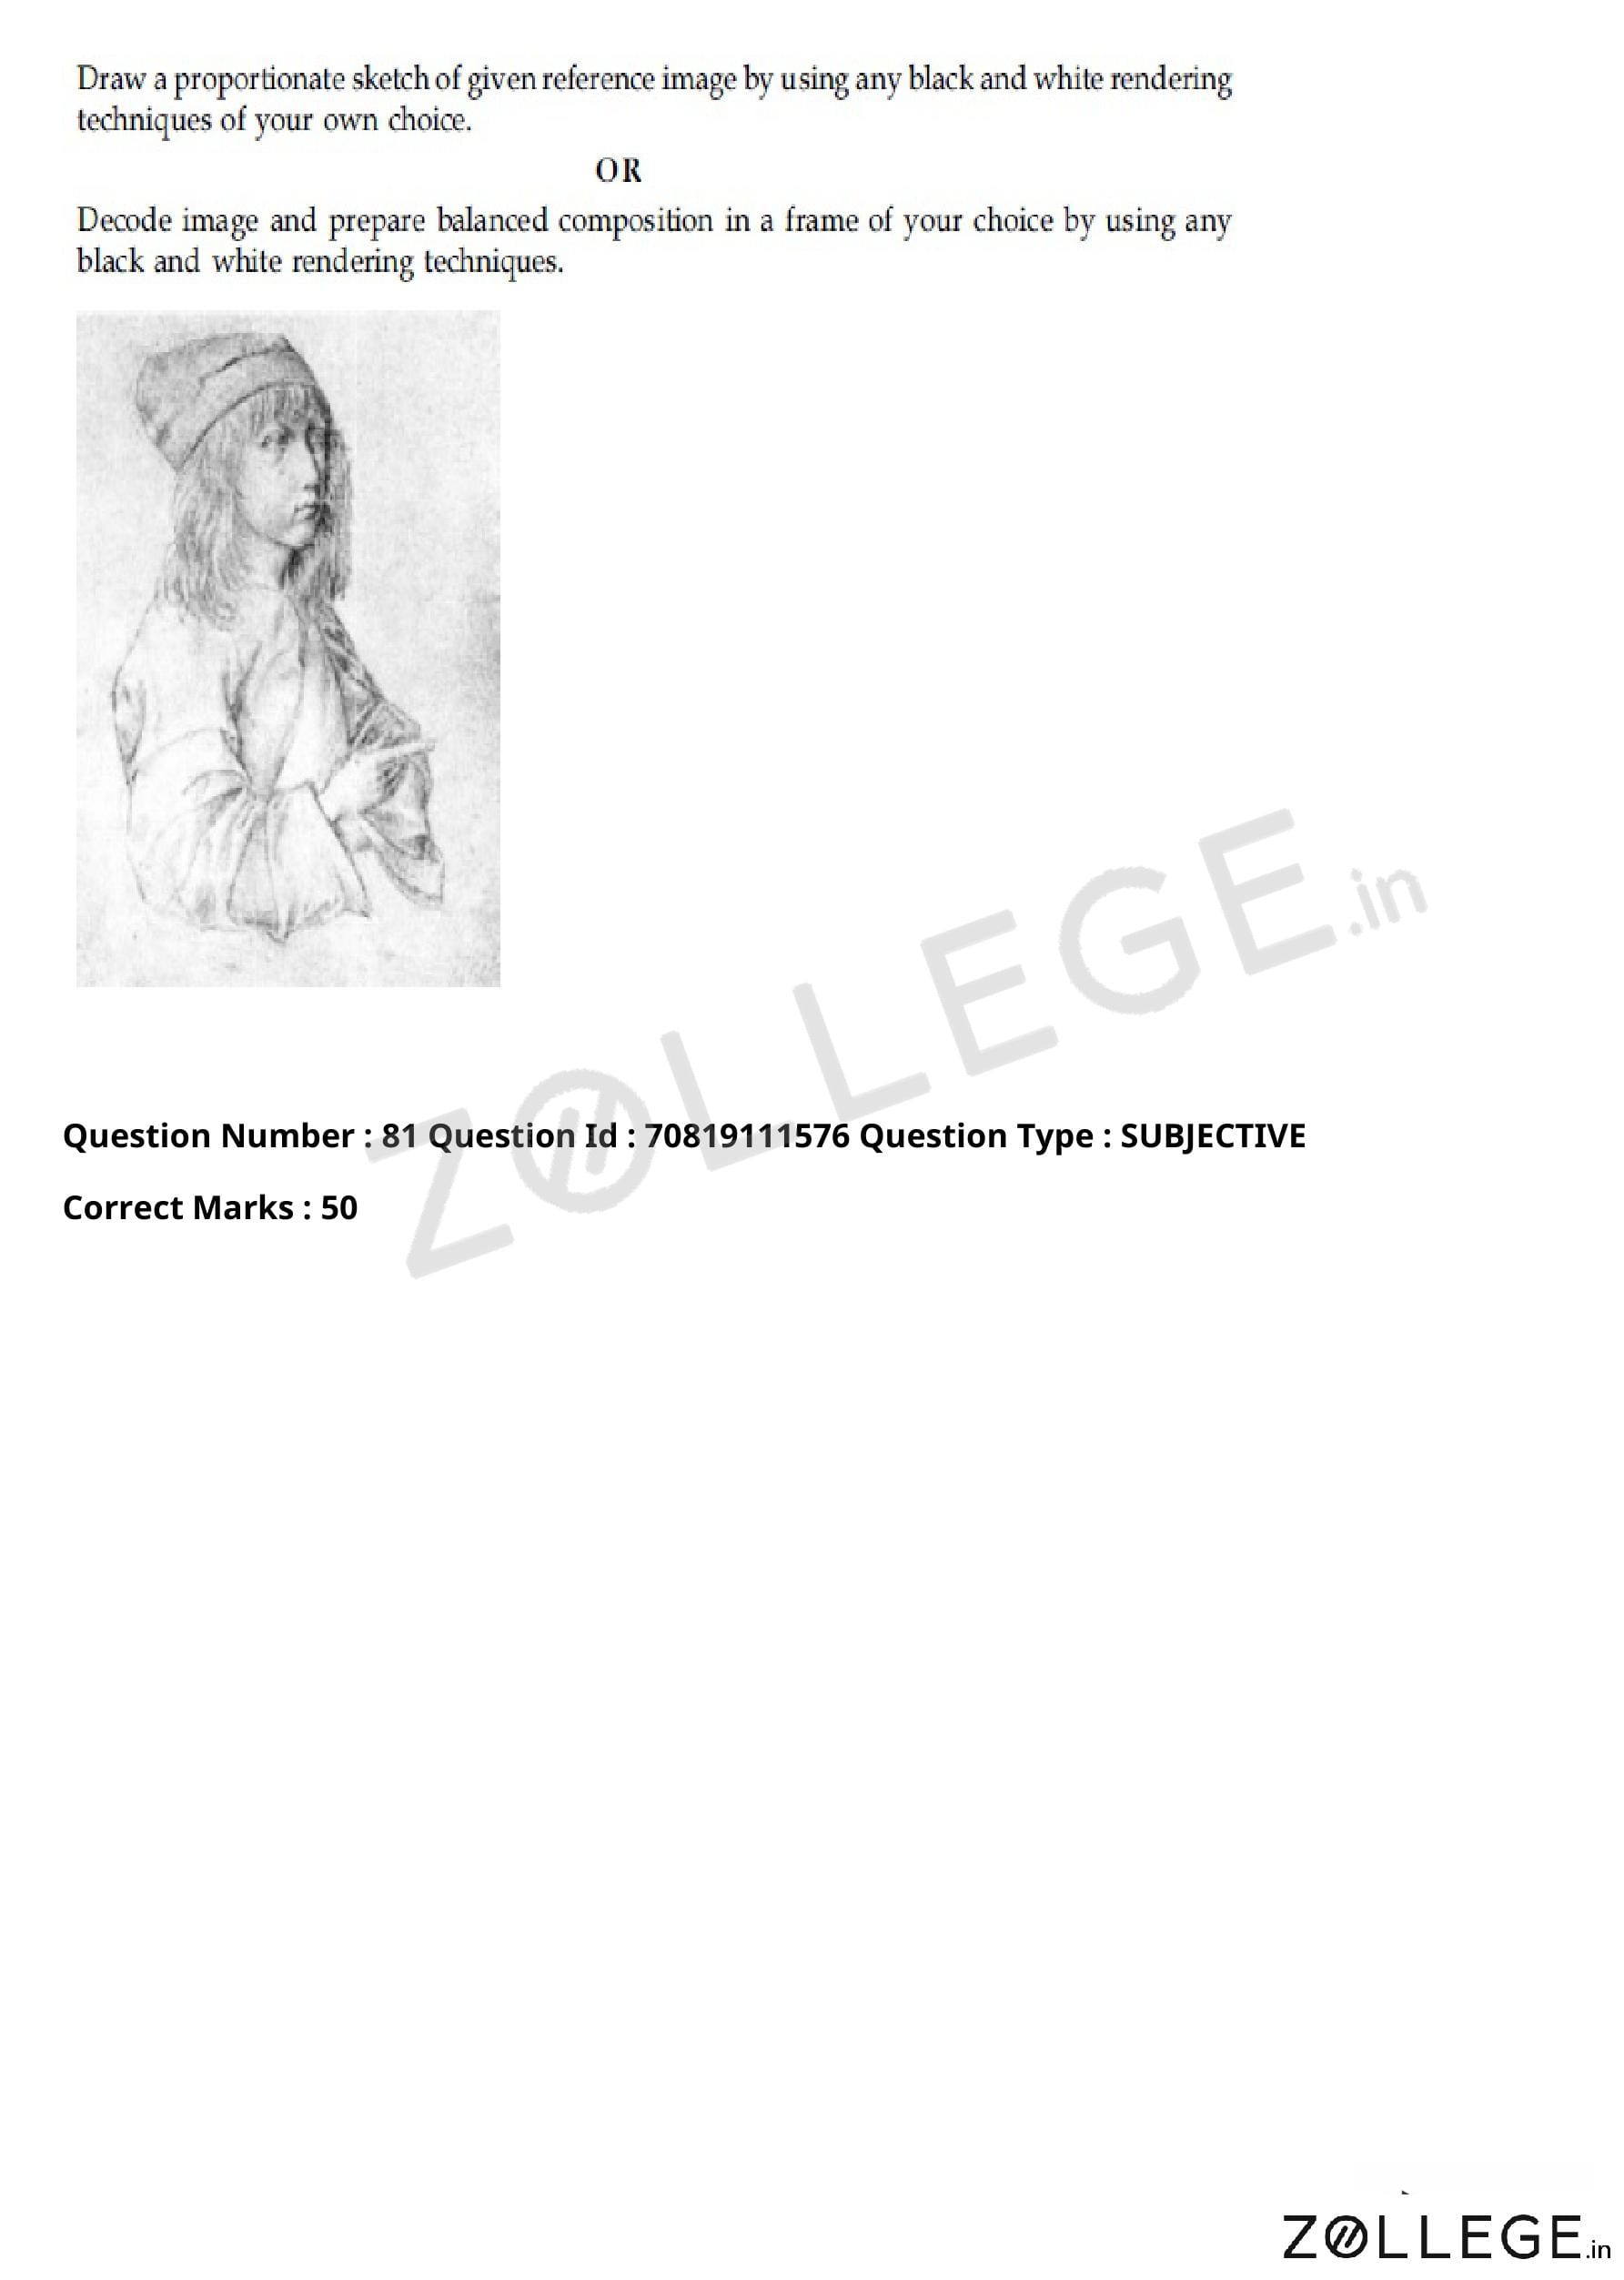
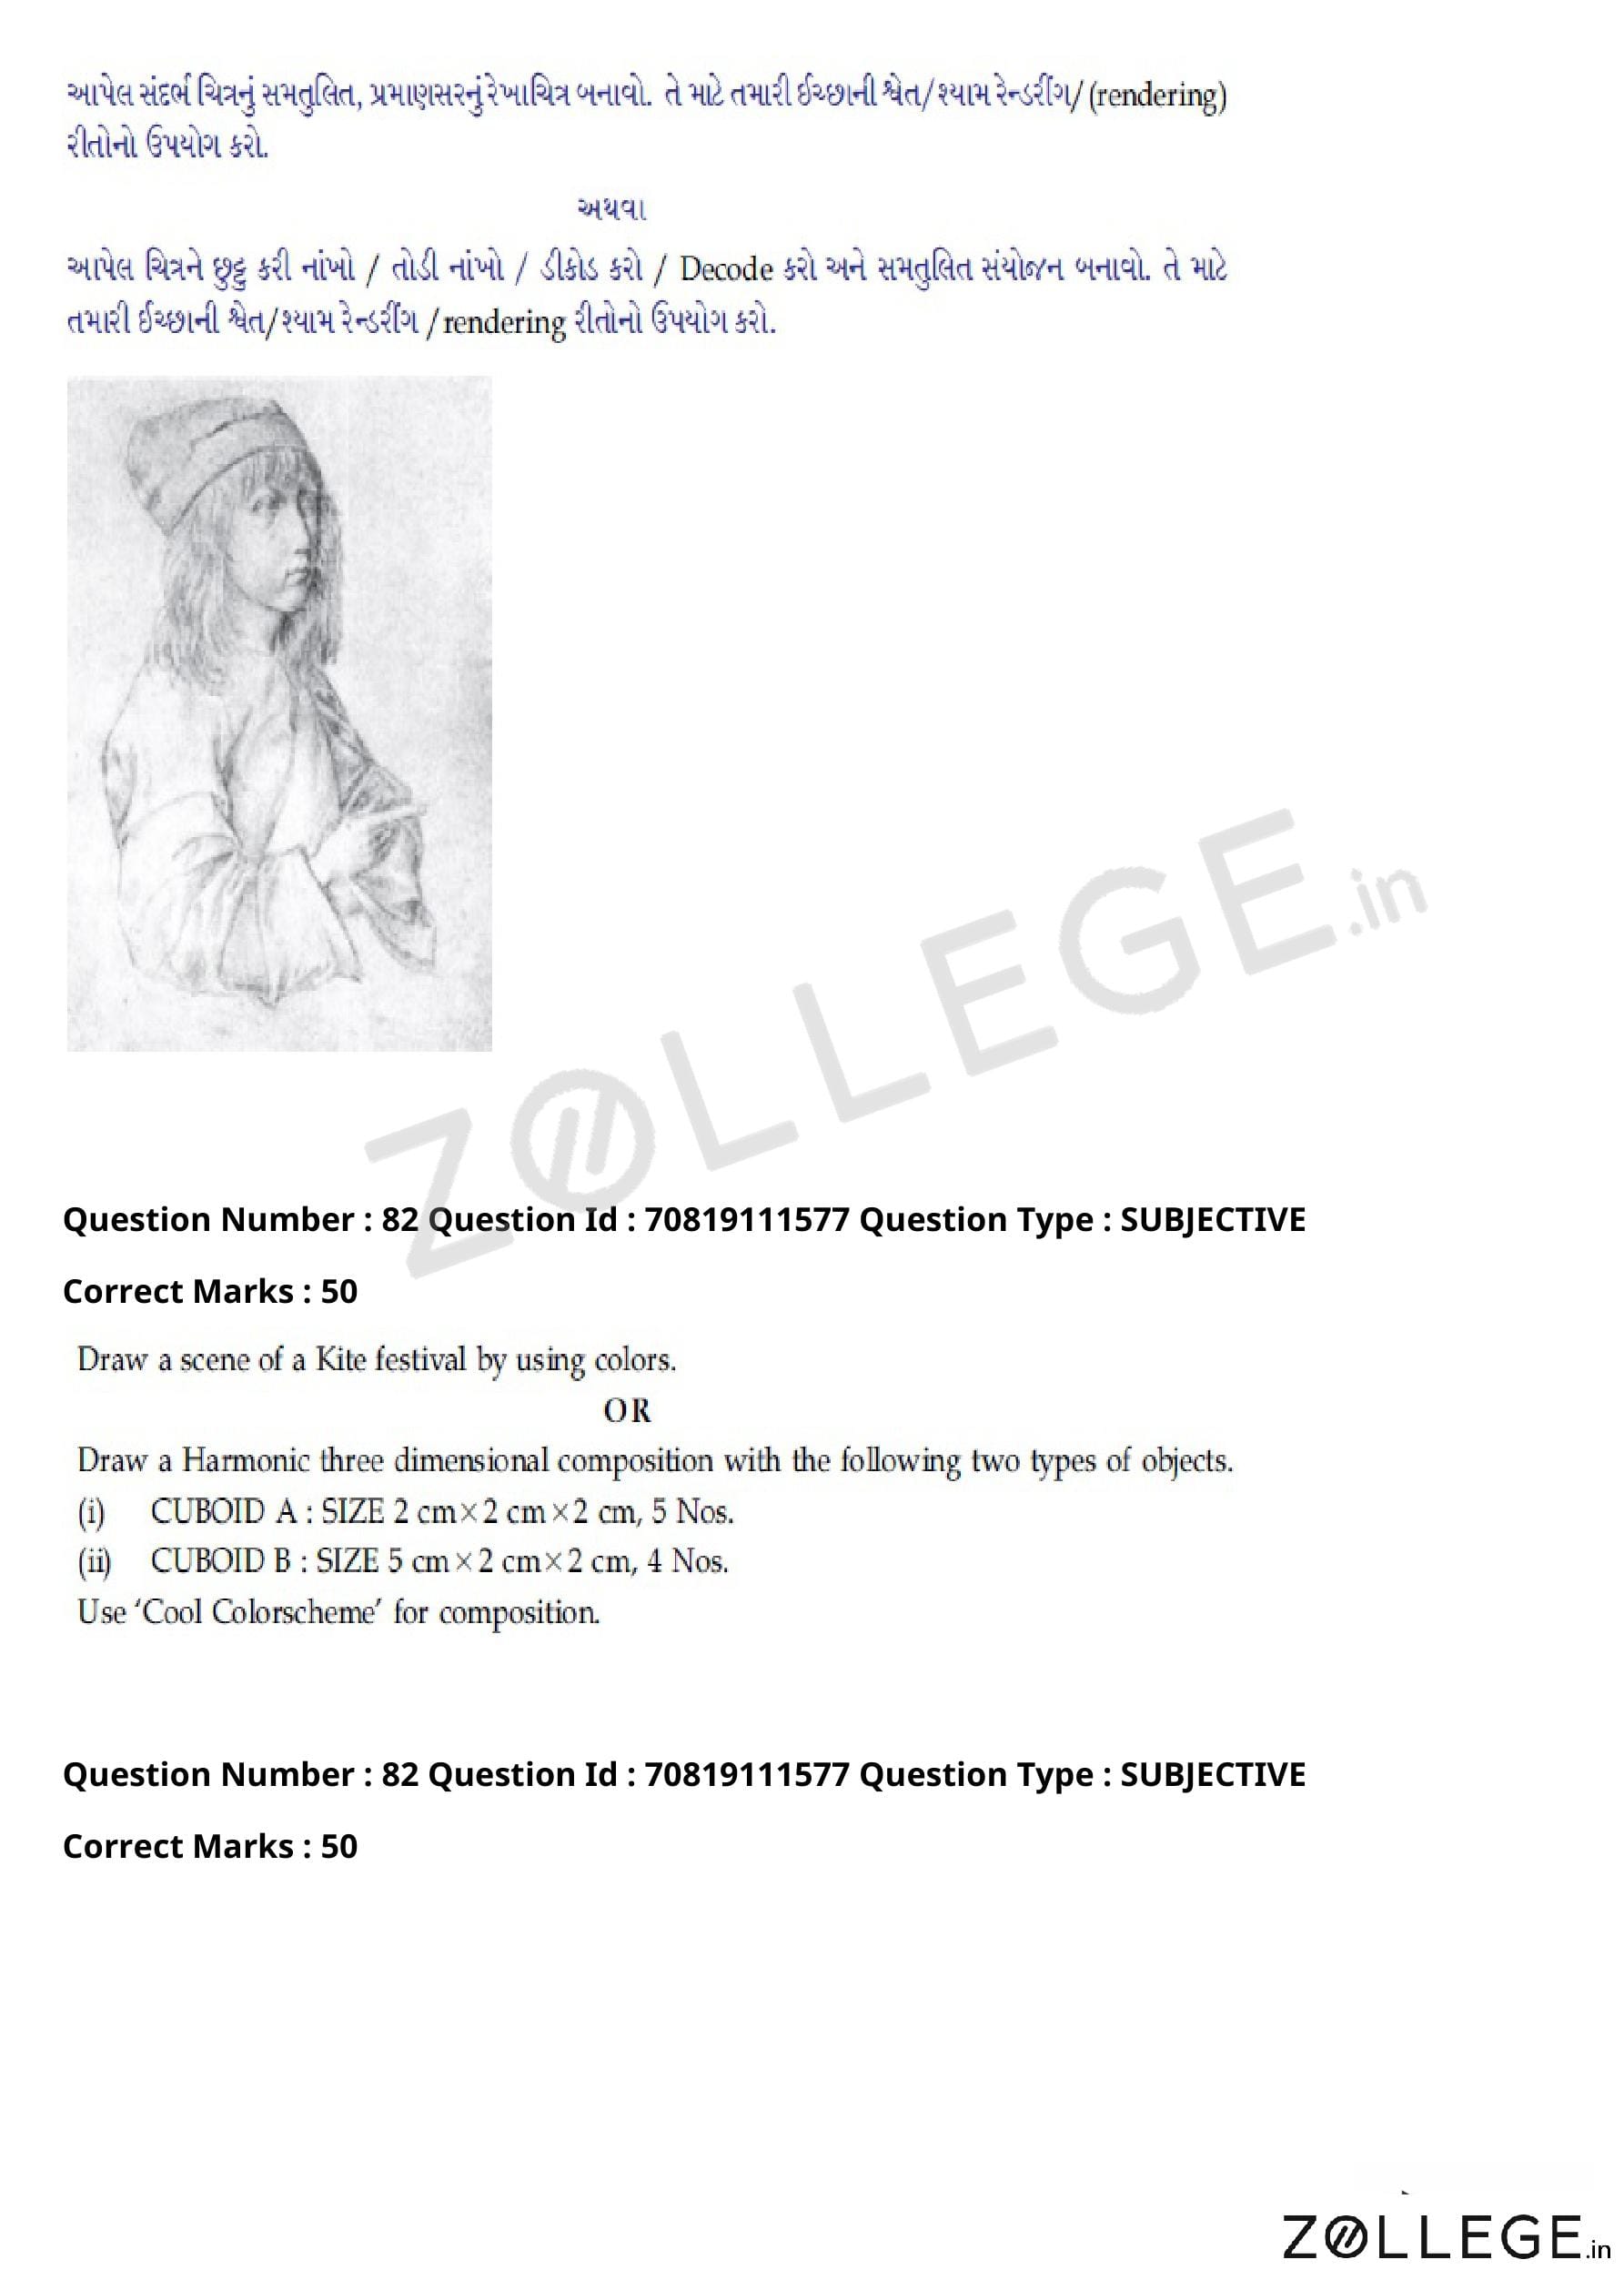

Previous Year JEE Main Question Papers
*The article might have information for the previous academic years, please refer the official website of the exam.