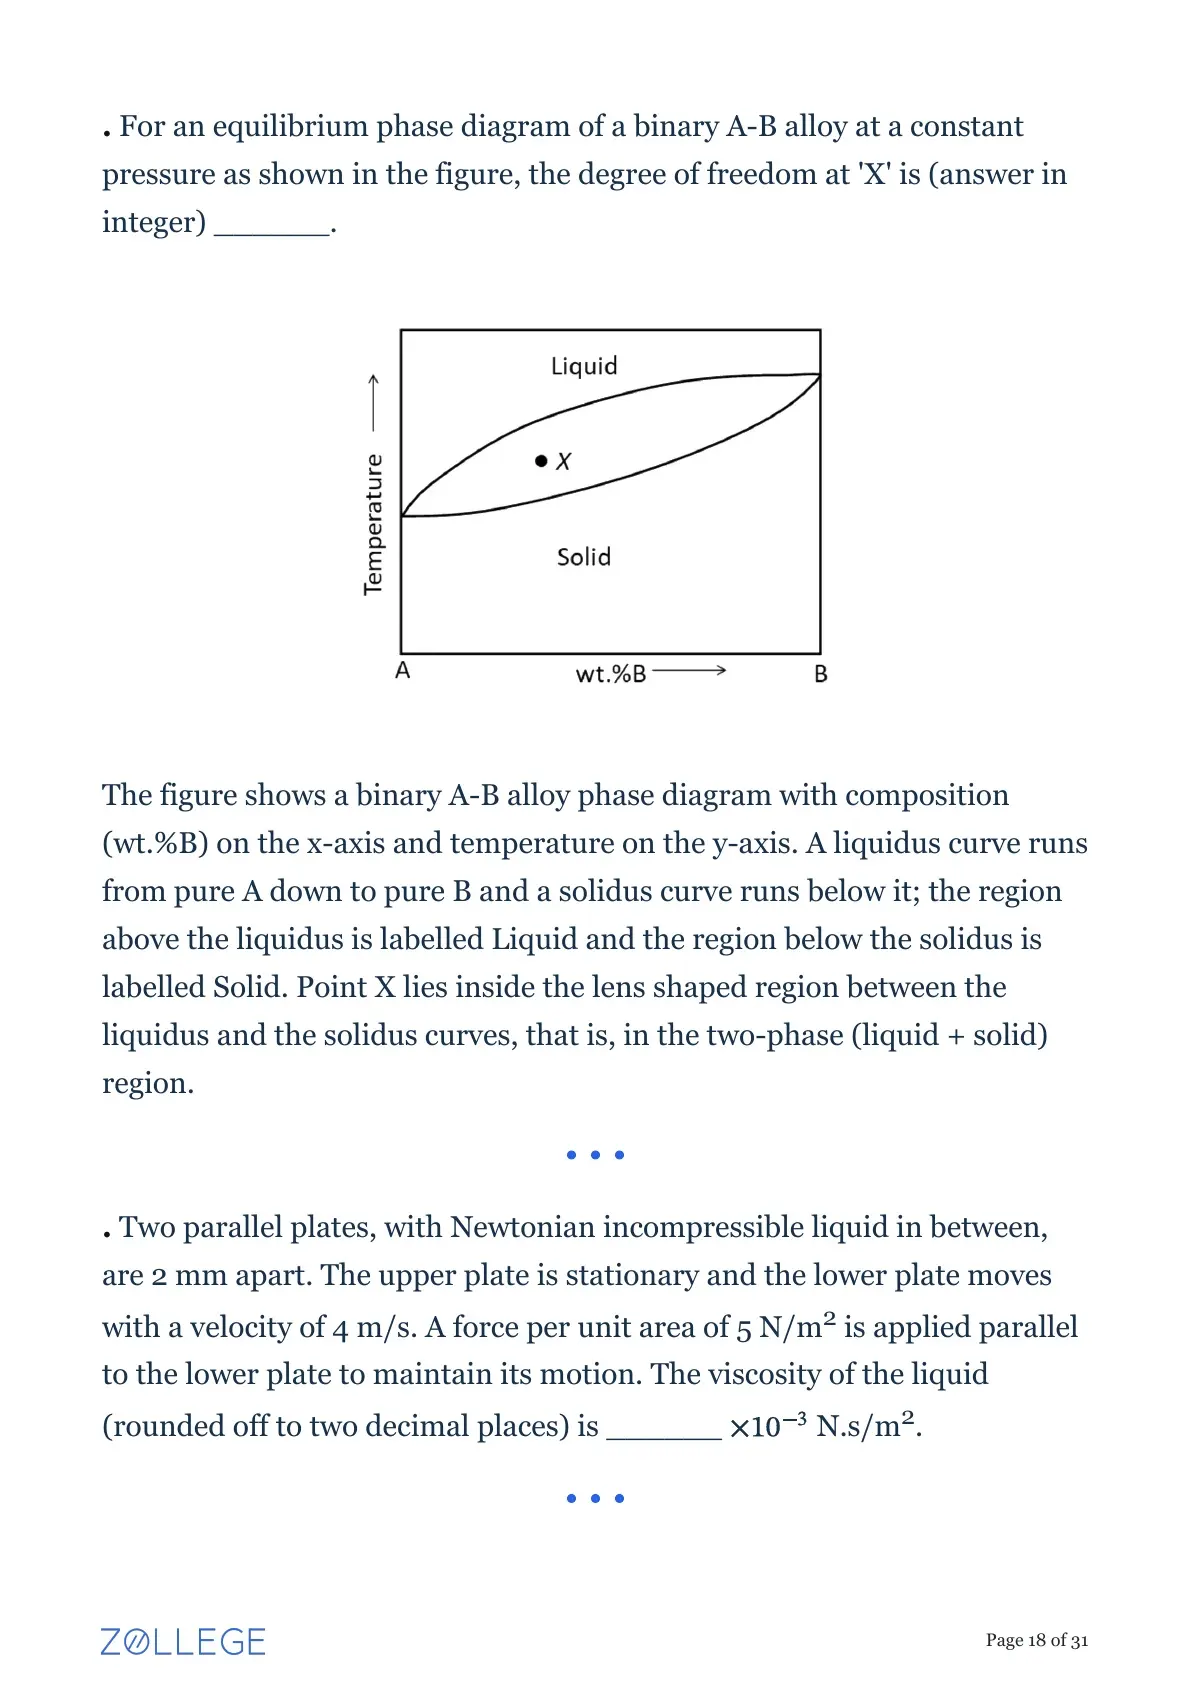
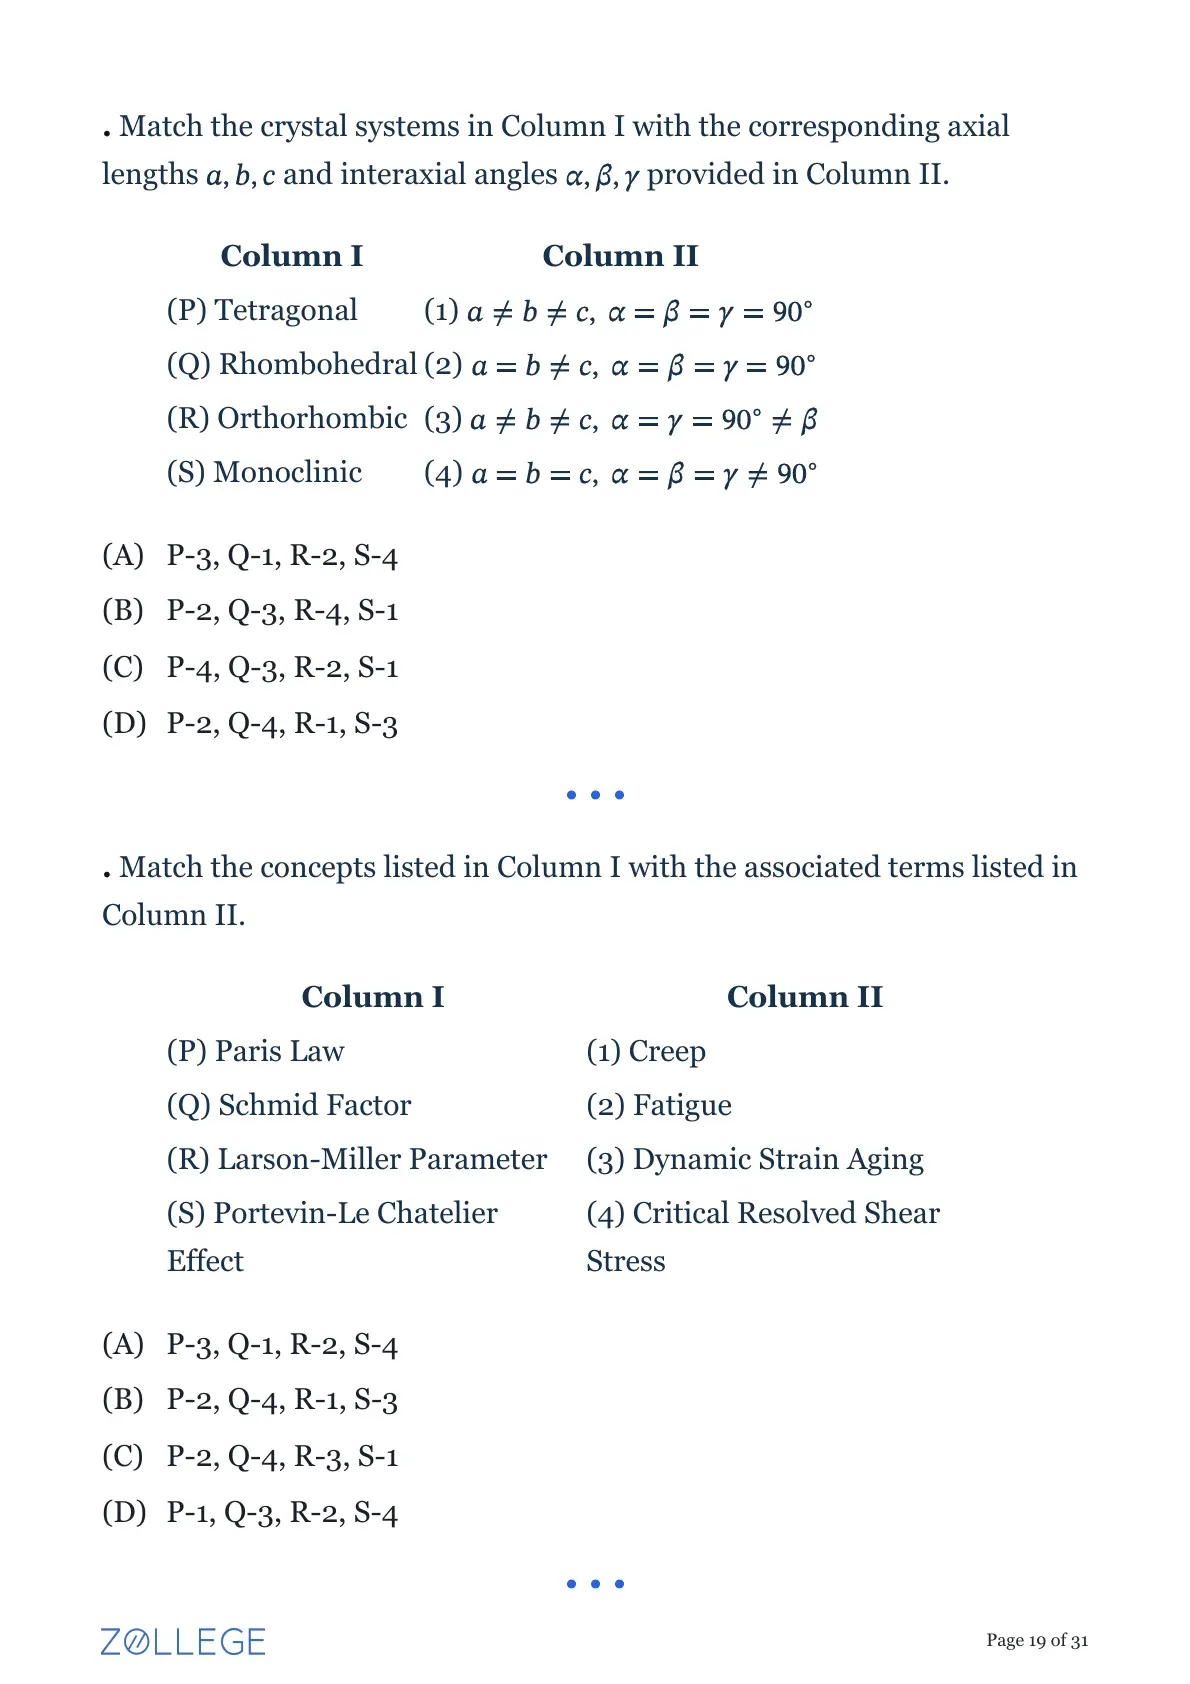
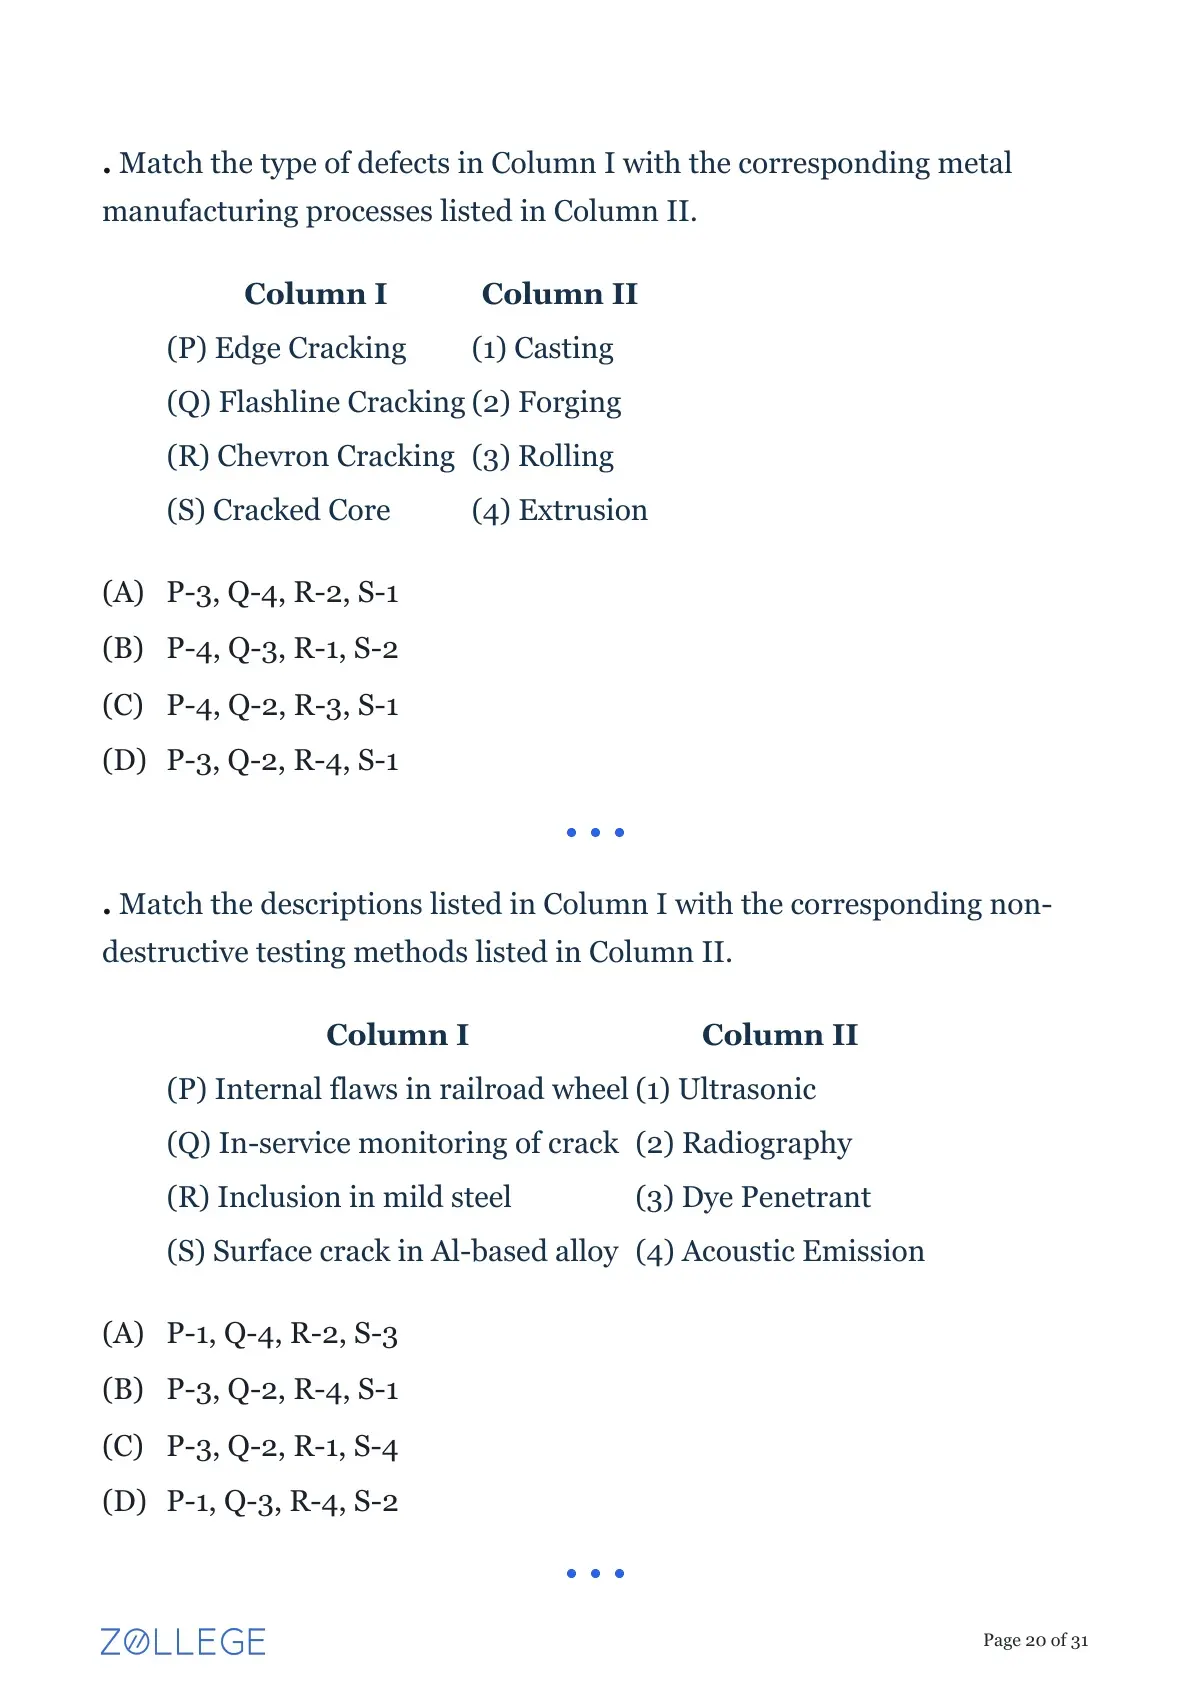
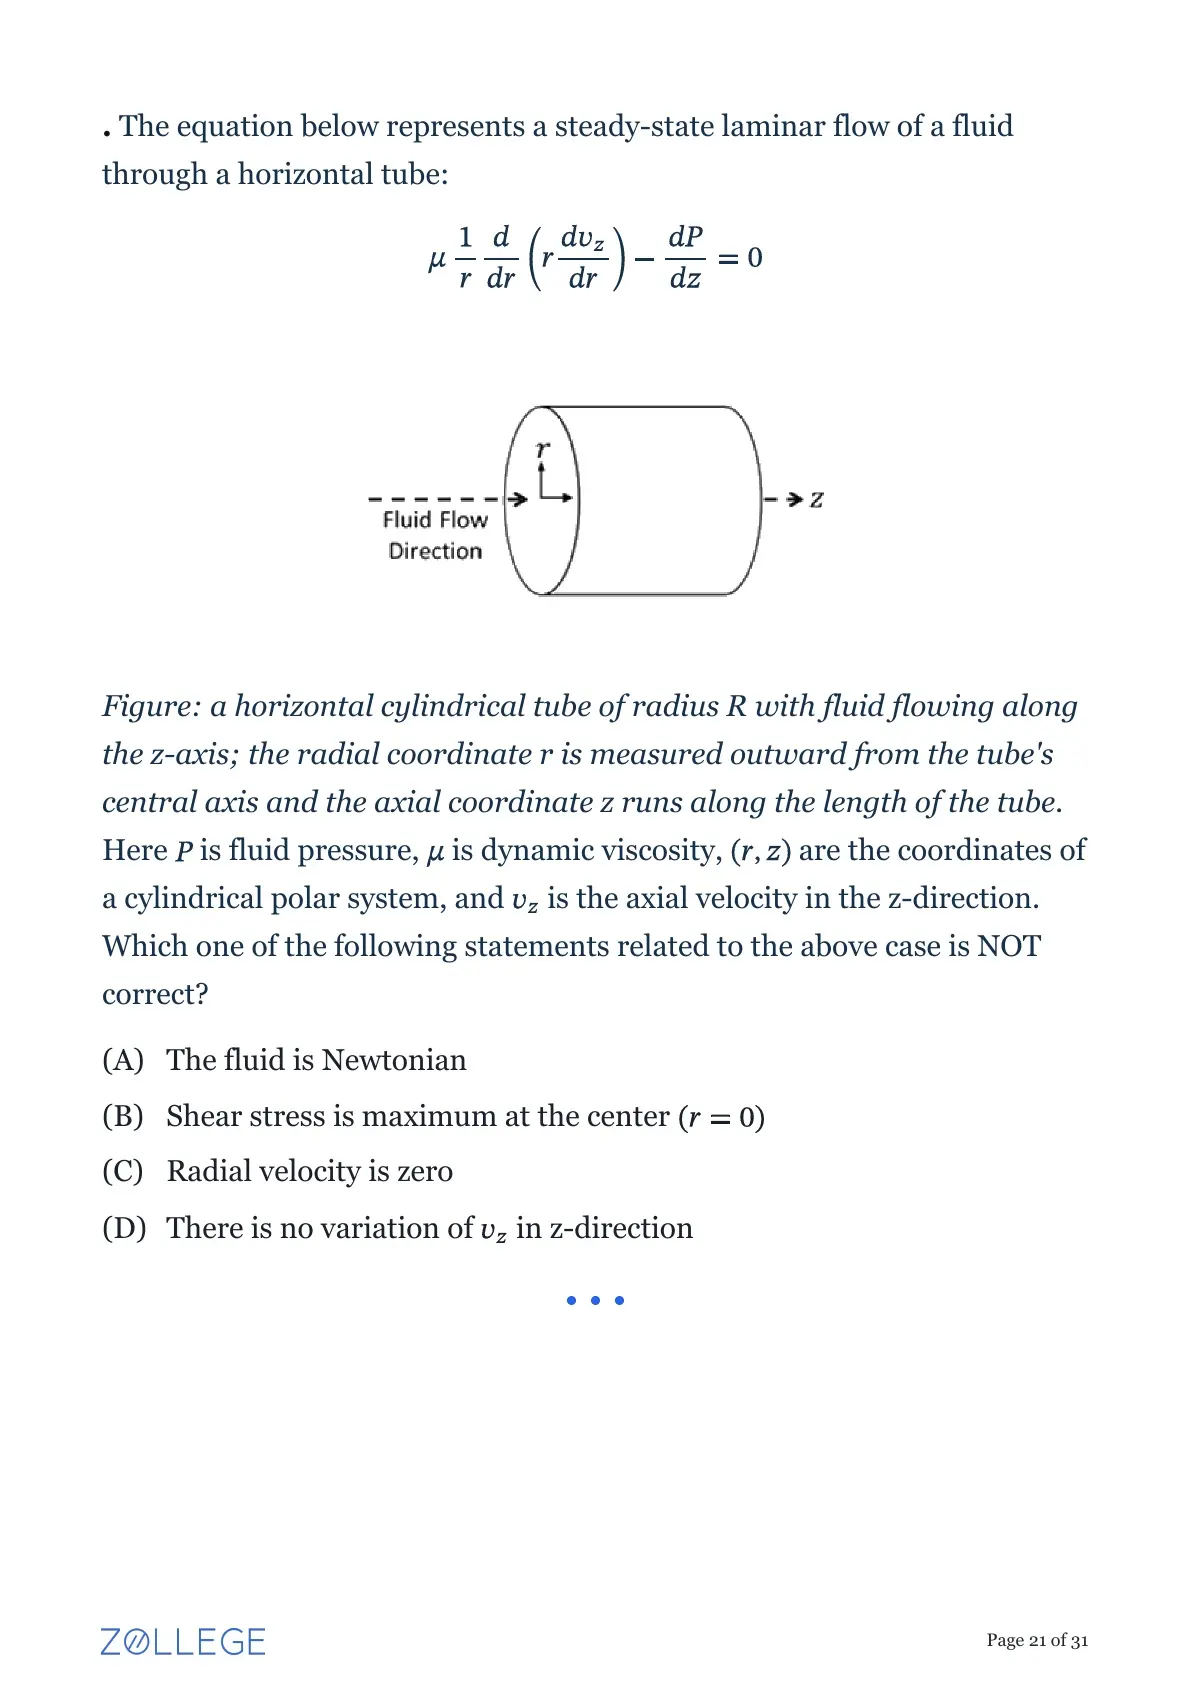
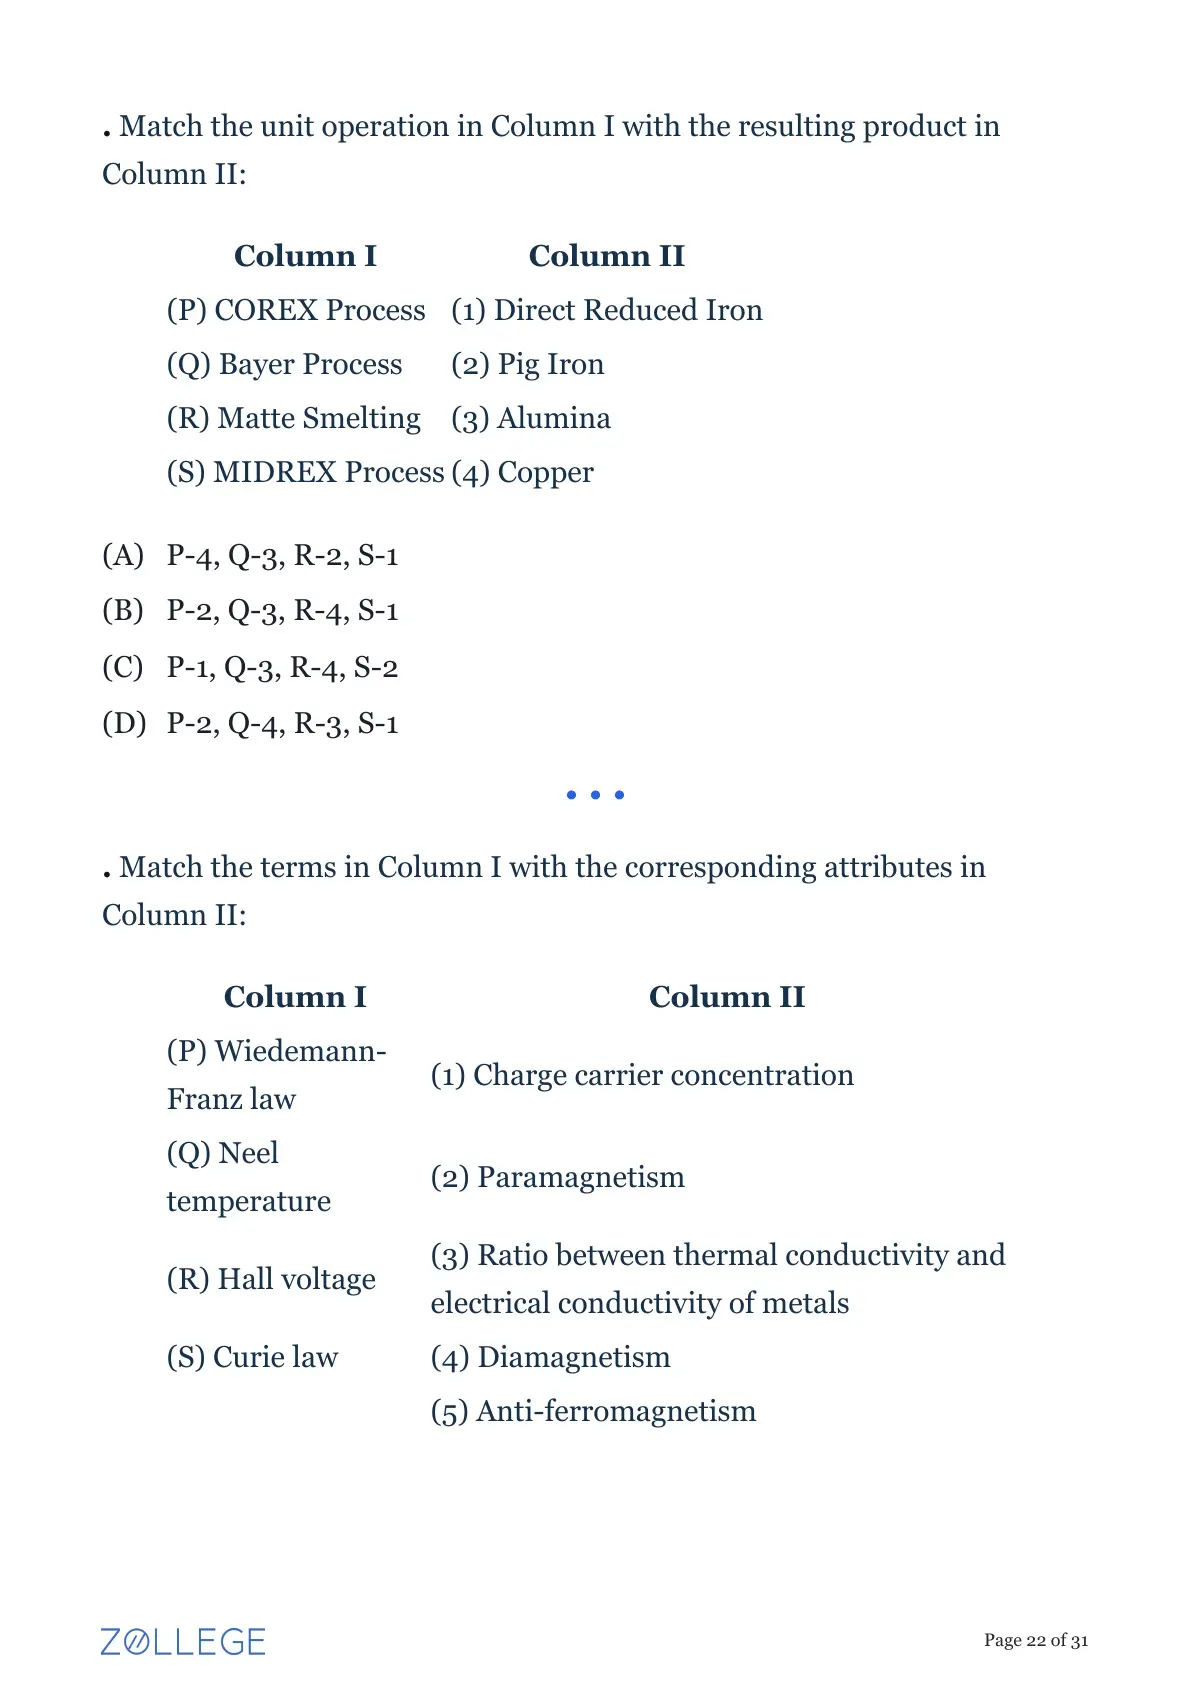
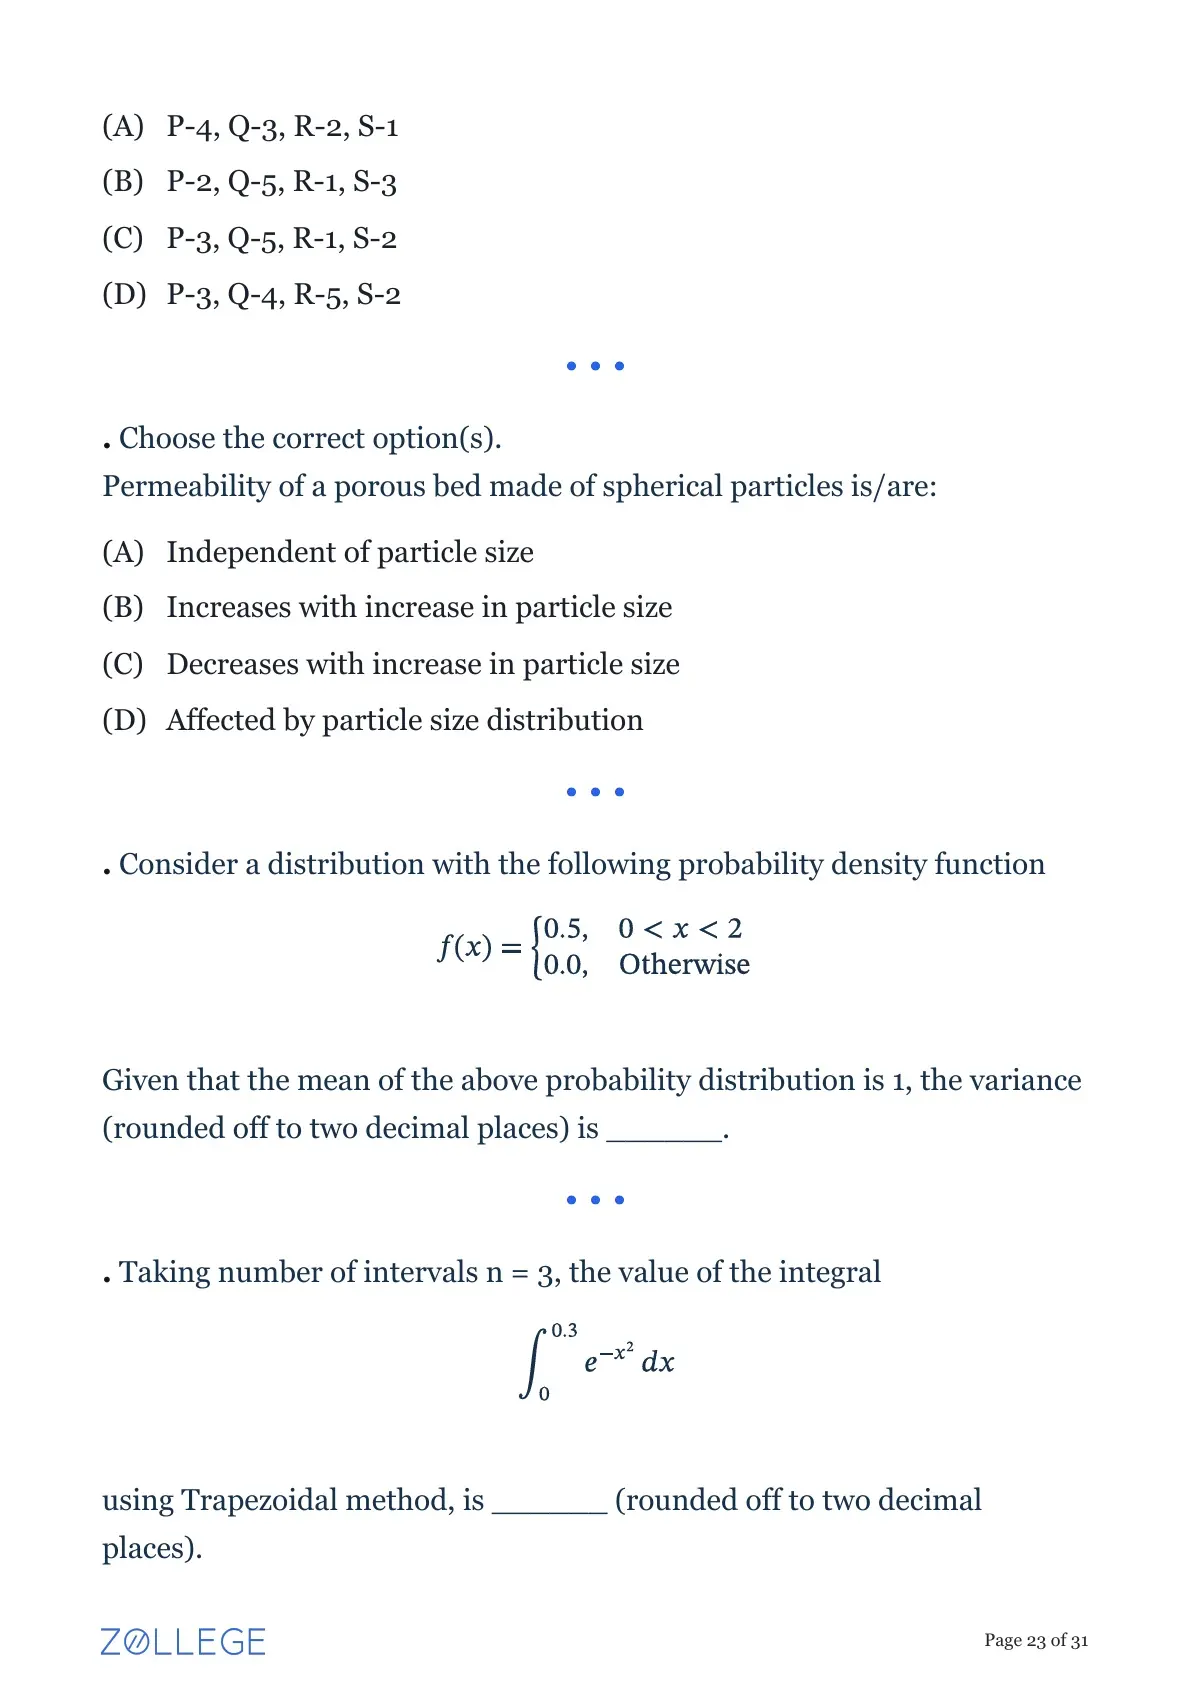
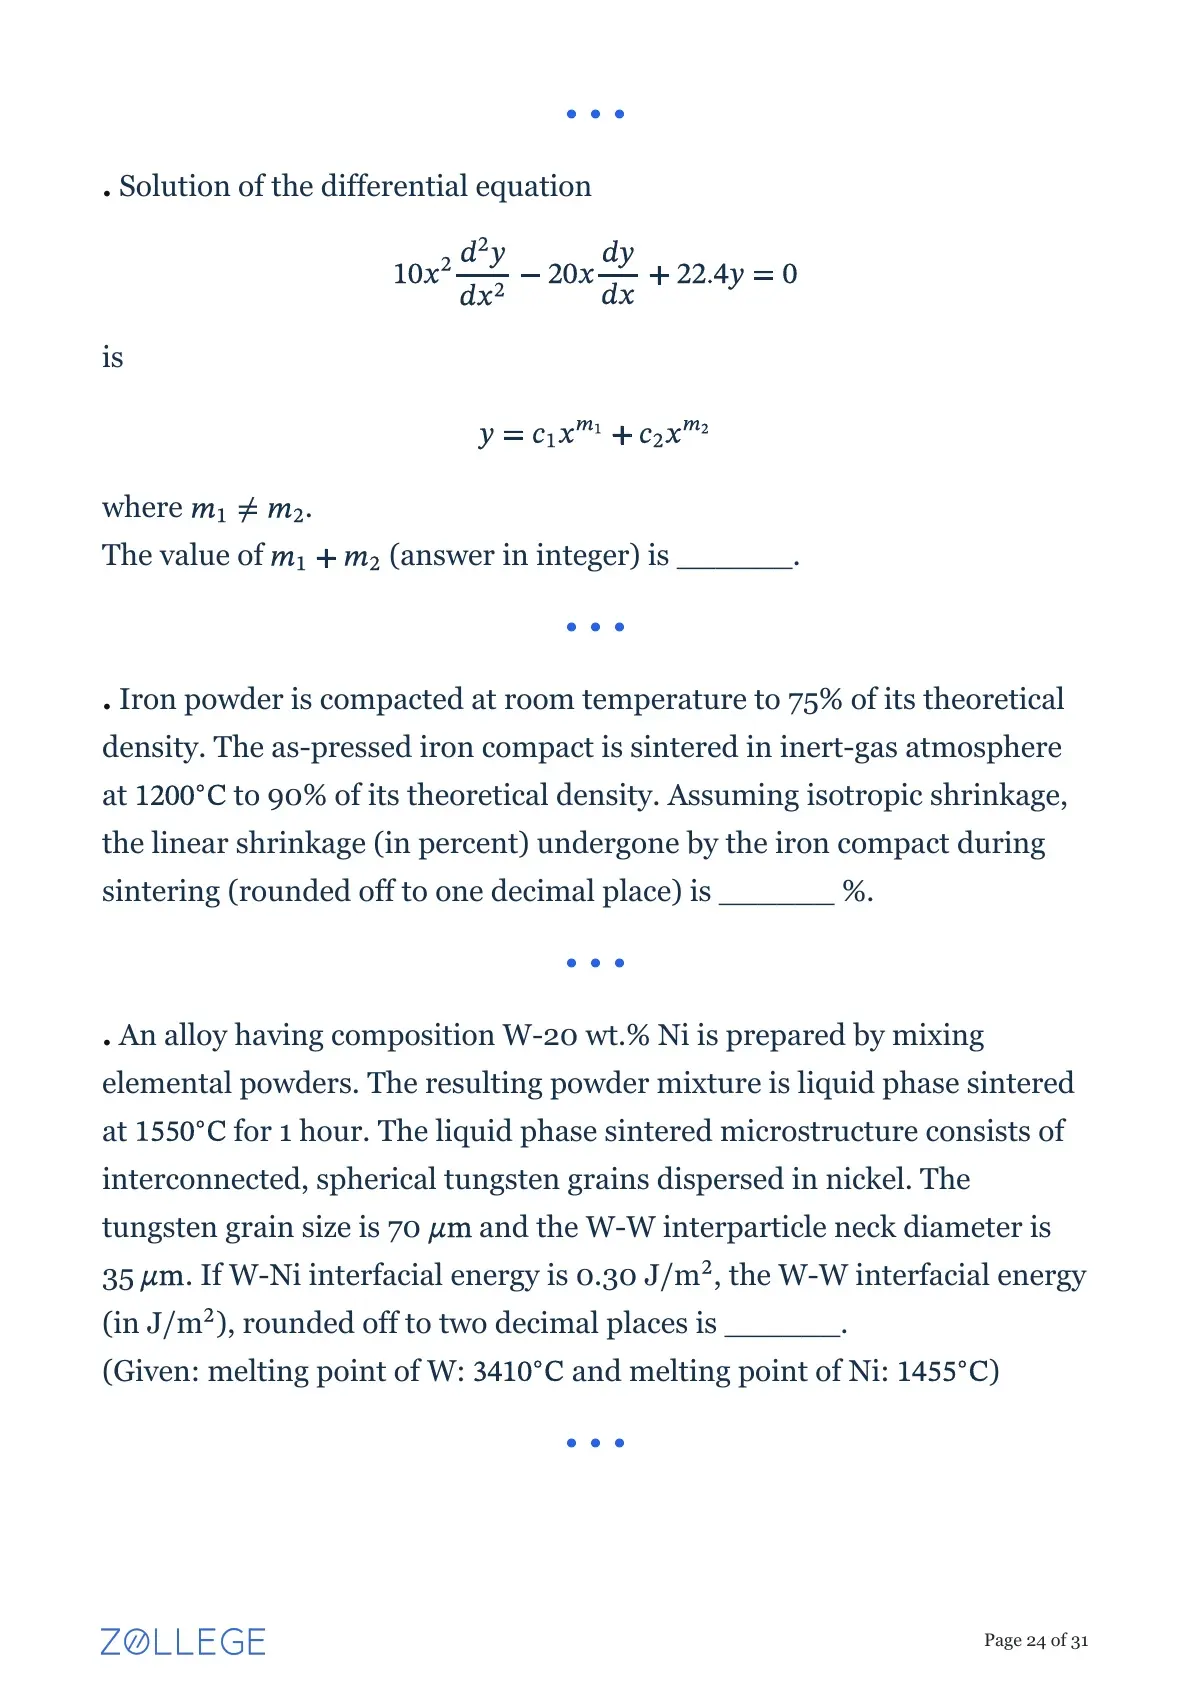
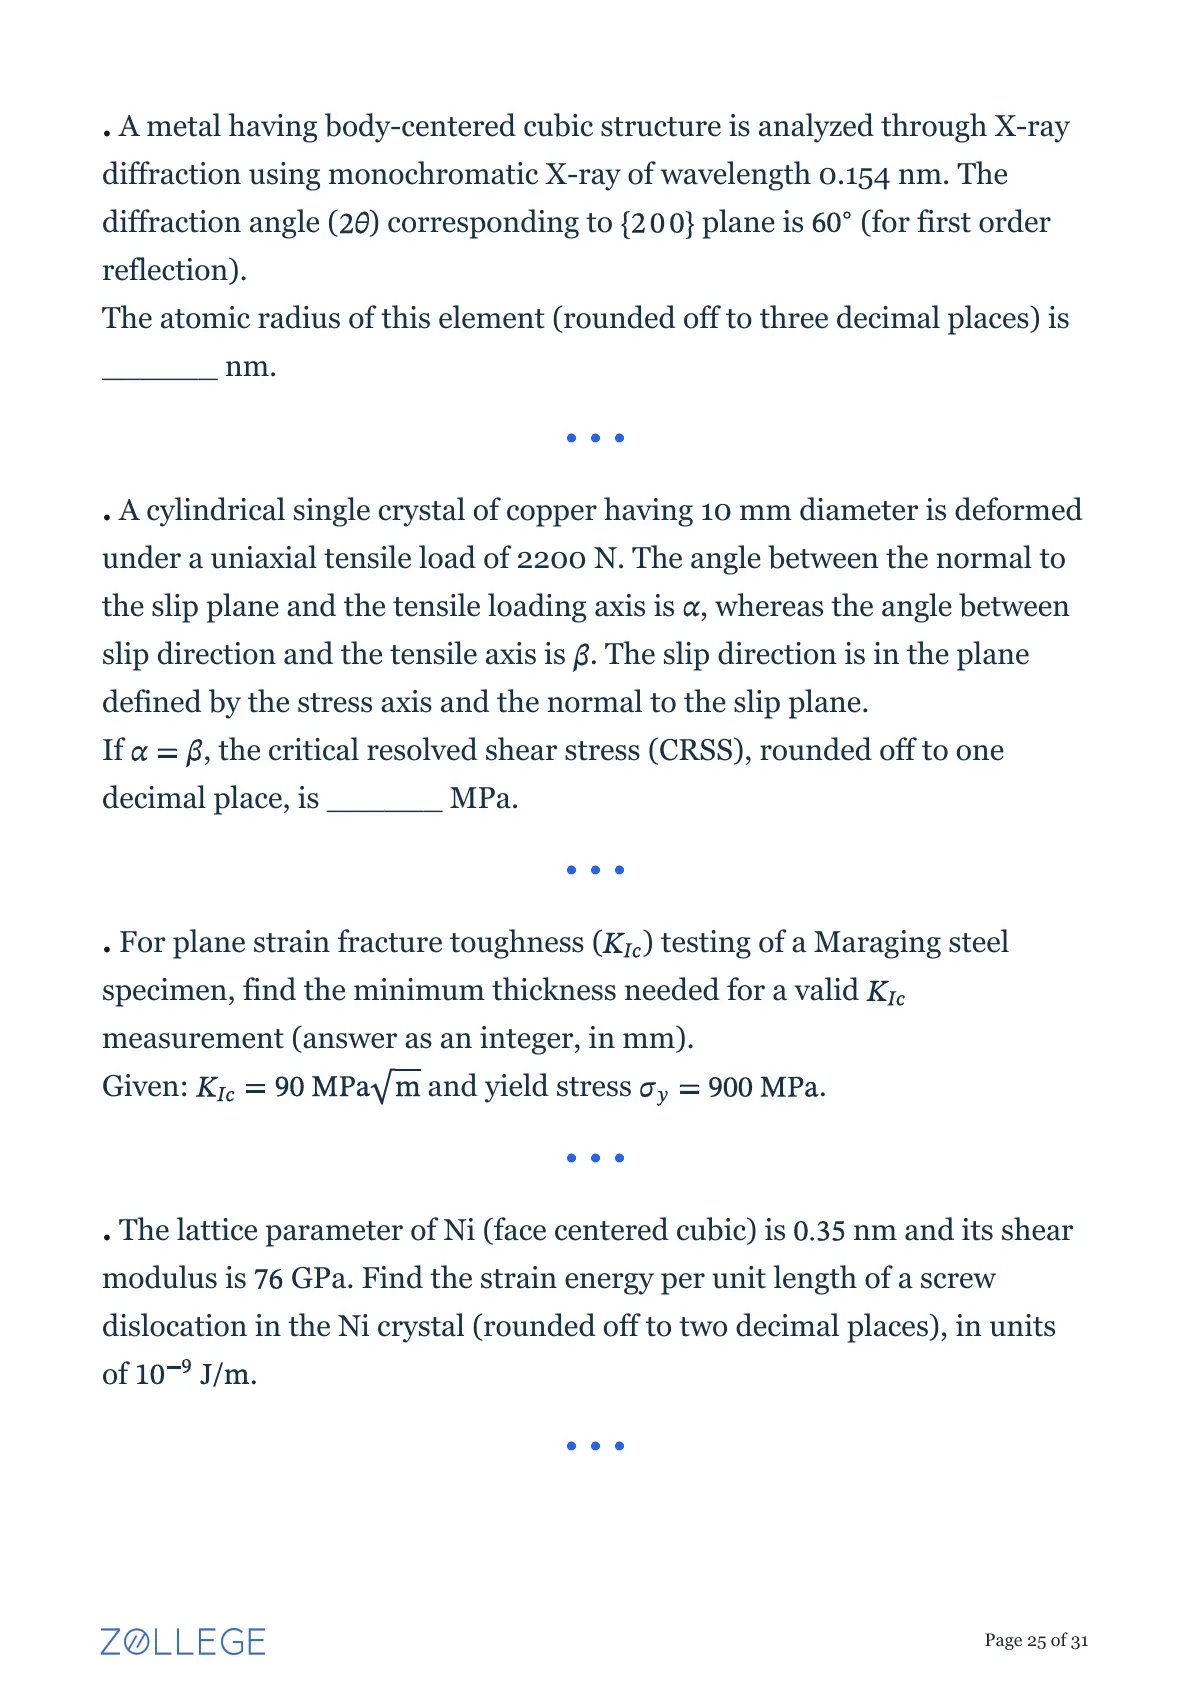
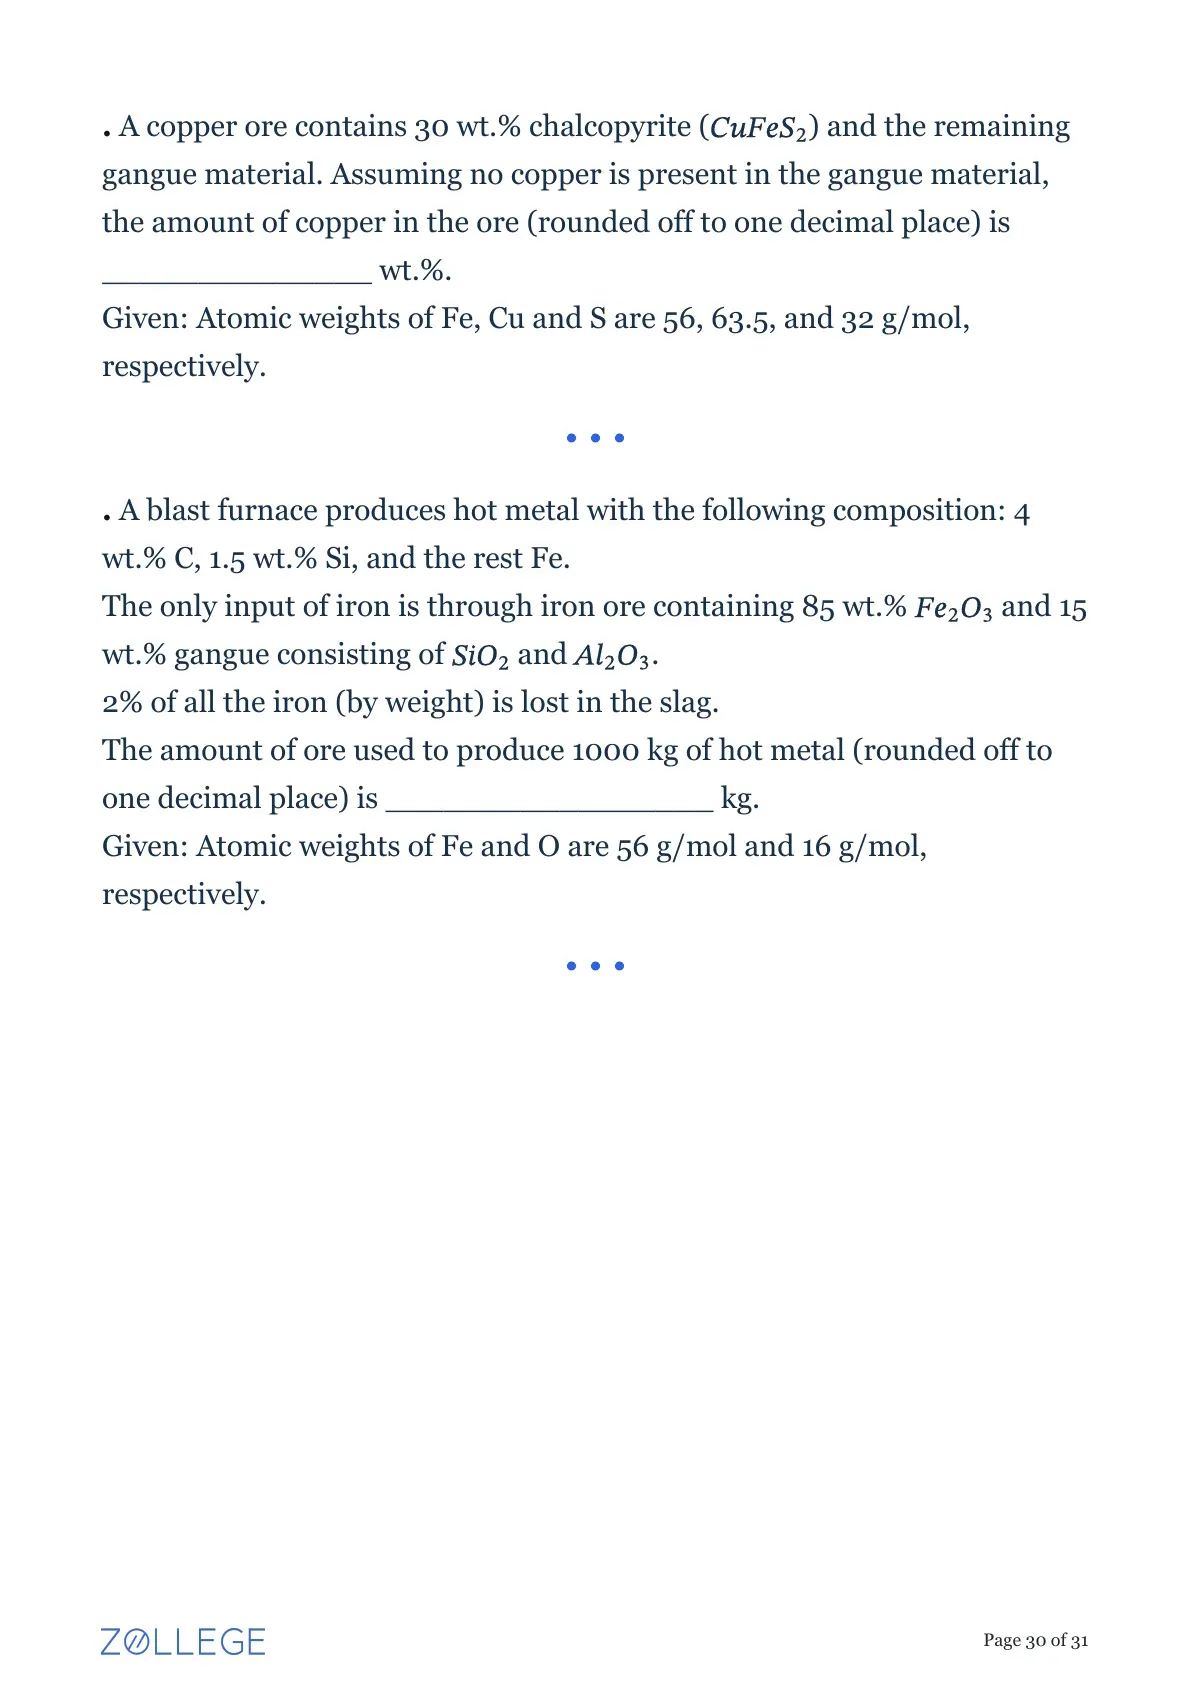
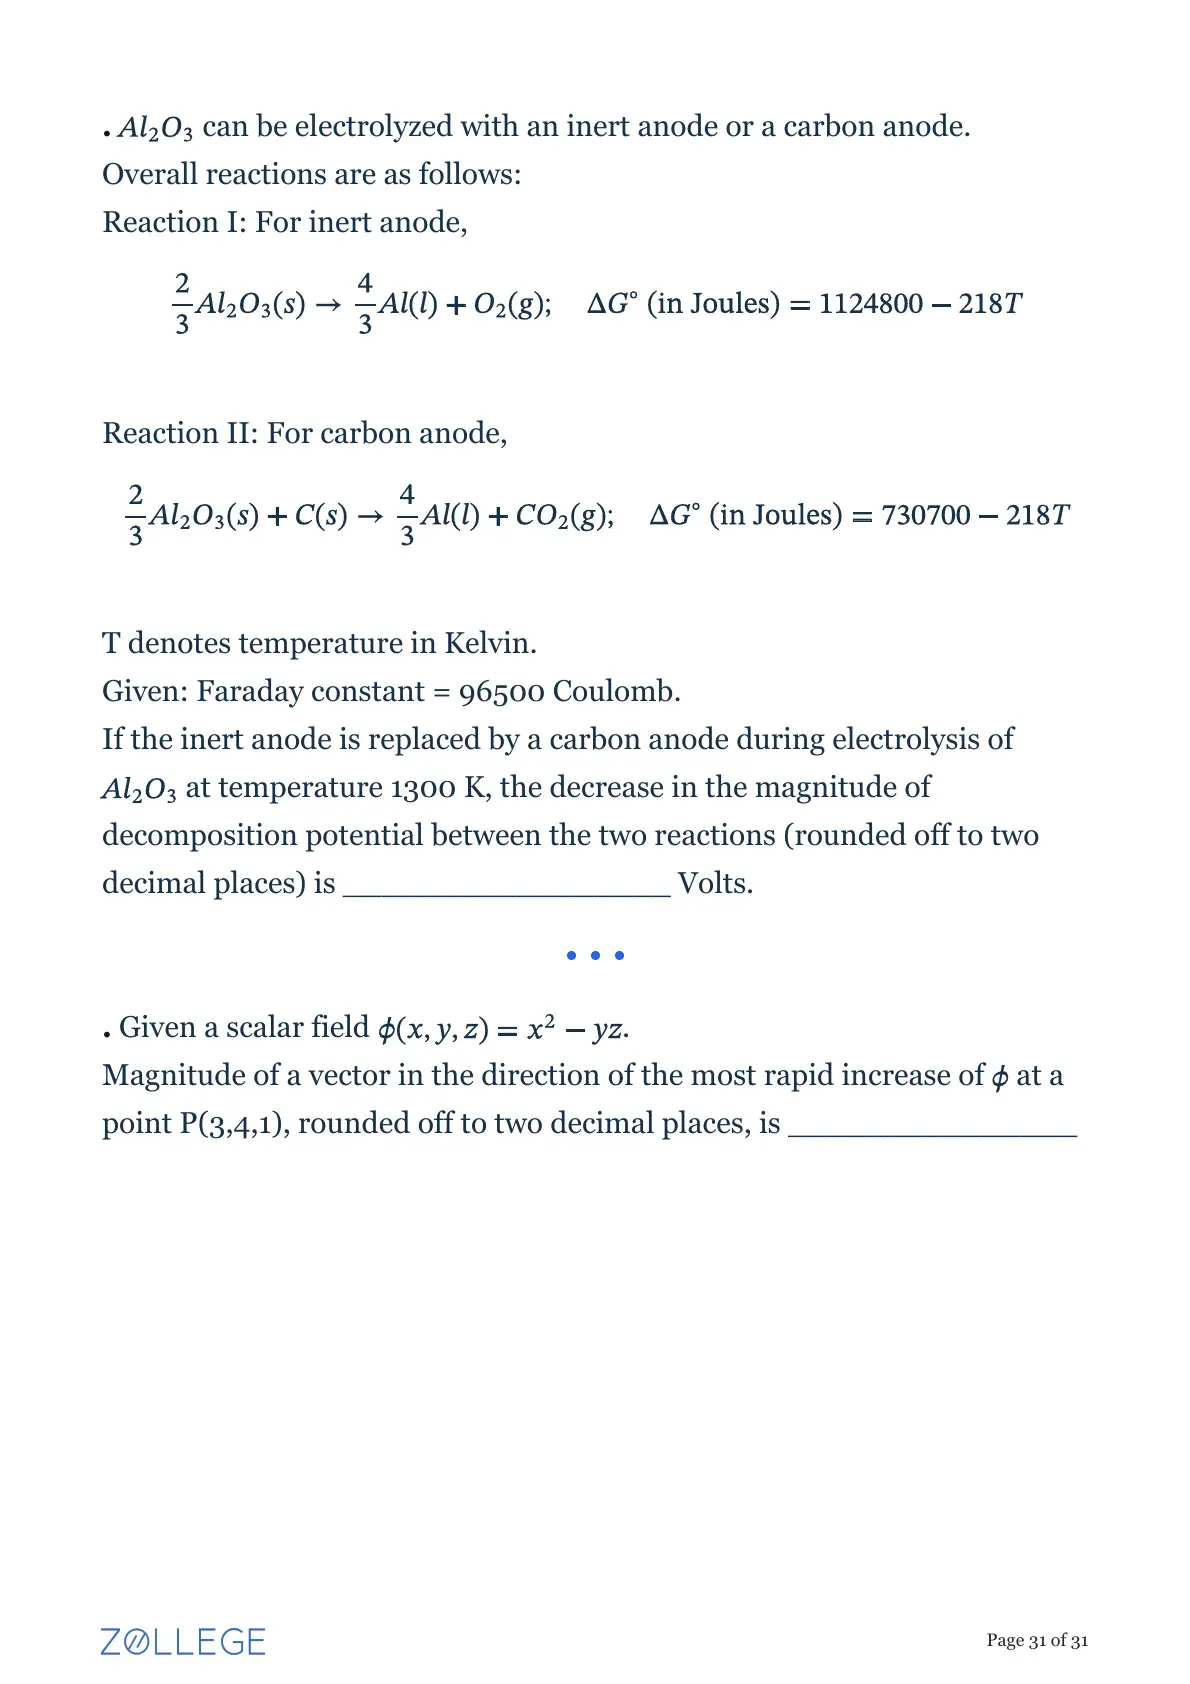
GATE 2026 Metallurgical Engineering (MT) question paper is available for download here. IIT Guwahati conducted GATE 2026 MT exam on February 14, 2026 from 2:30 PM to 5:30 PM. GATE 2026 MT exam was Computer Based Test (CBT). The Question Paper structure consisted of General Aptitude (15 marks), Engineering Mathematics (13 marks) and Core Subject (Metallurgical Engineering).
Download GATE 2026 MT Question Paper with Answer Key and Solution PDF from the links provided below.
| GATE 2026 MT Question Paper | Download PDF | Check Solutions |
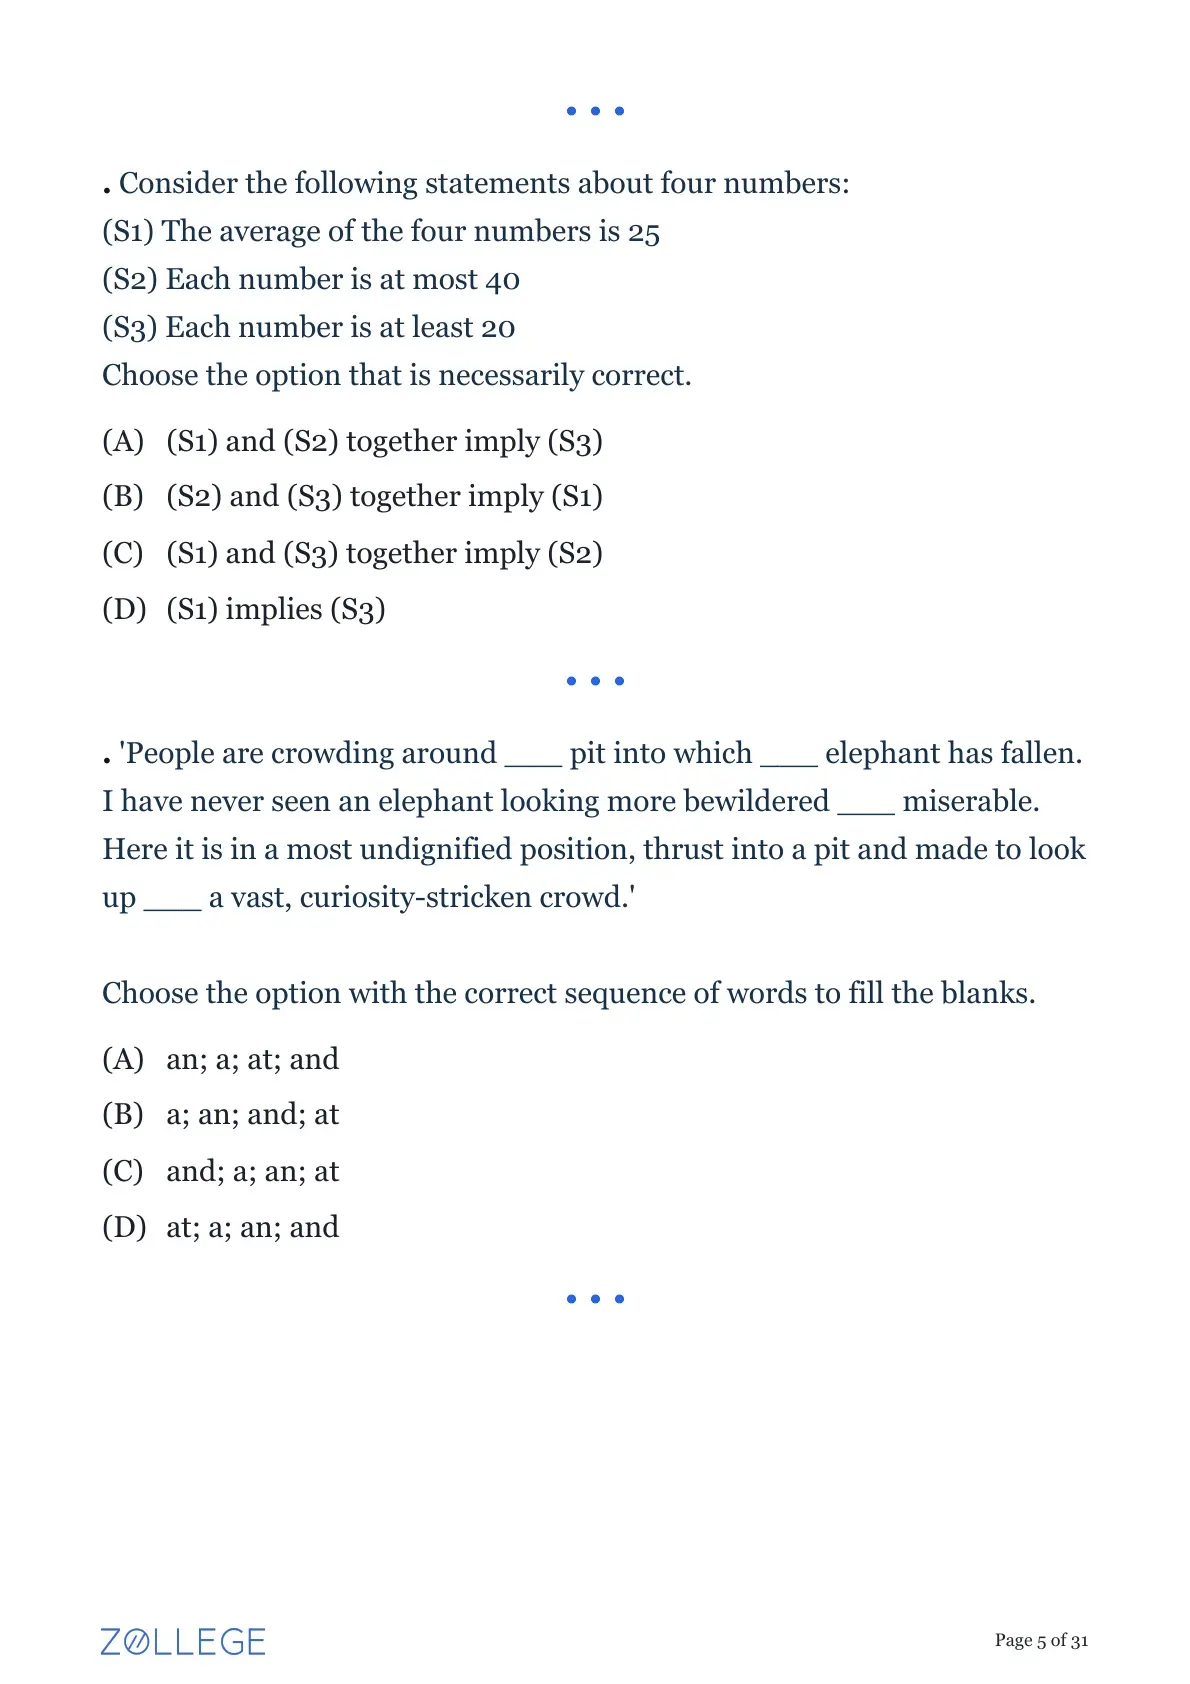
'The team ________ more than 300 runs in 20 overs ________ rains.
However, some players needed to improve their batting skills.'
Choose the option with the correct sequence of words to fill the blanks.
Step 1: Understanding the Question
The question asks us to fill in two blanks in a sentence to make it grammatically correct and logically coherent. We need to choose the right verb form for the first blank and the correct preposition/conjunction for the second blank.
Step 2: Analyzing the First Blank
The sentence describes a completed action that happened in the past (the team made more than 300 runs). Therefore, the past tense of the verb 'score' is required. The past tense form is 'scored'.
This eliminates options (B) and (D), which use the present participle 'scoring'.
Step 3: Analyzing the Second Blank
The sentence presents a contrast: the team scored a high number of runs even though it was raining. The second part of the sentence mentions "rains", which acted as a hurdle. Words like 'despite' or 'in spite of' are used to show such a contrast.
Both 'despite' and 'in spite of' have similar meanings. Let's look at the remaining options (A) and (C).
Option (A) is 'score; despite'. 'score' is the present tense, which is incorrect.
Option (C) is 'scored; despite'. 'scored' is the correct past tense, and 'despite' correctly introduces the contrast with the rain.
Step 4: Final Answer
The correct combination is 'scored' for the first blank and 'despite' for the second blank. The sentence reads: 'The team scored more than 300 runs in 20 overs despite rains.' This is grammatically correct and makes logical sense.
Therefore, option (C) is the correct answer.
Quick Tip: In fill-in-the-blanks questions, first determine the tense of the sentence (past, present, or future) to select the correct verb form. Then, analyze the relationship between the clauses (e.g., contrast, cause-and-effect) to choose the appropriate conjunction or preposition.
If a positive real x satisfies the following equation
\[ \log_2 x + \log_{\sqrt{2}} x = 48, \]
then the value of x is ________
Step 1: Understanding the Question
We are given a logarithmic equation with two terms having different bases (\(2\) and \(\sqrt{2}\)). We need to solve for the value of \(x\).
Step 2: Key Formula or Approach
To solve this equation, we should first convert all logarithmic terms to a common base. The change of base formula for logarithms is: \[ \log_a b = \frac{\log_c b}{\log_c a} \]
We will convert the term \( \log_{\sqrt{2}} x \) to base 2.
Step 3: Detailed Explanation
The given equation is: \[ \log_2 x + \log_{\sqrt{2}} x = 48 \]
Let's convert the second term to base 2. Using the change of base formula with \(c=2\), \(a=\sqrt{2}\), and \(b=x\): \[ \log_{\sqrt{2}} x = \frac{\log_2 x}{\log_2 \sqrt{2}} \]
Now, we evaluate the denominator, \( \log_2 \sqrt{2} \): \[ \log_2 \sqrt{2} = \log_2 (2^{1/2}) = \frac{1}{2} \]
Substituting this back into the expression for \( \log_{\sqrt{2}} x \): \[ \log_{\sqrt{2}} x = \frac{\log_2 x}{1/2} = 2 \log_2 x \]
Now, substitute this simplified term back into the original equation: \[ \log_2 x + 2 \log_2 x = 48 \]
Combine the terms on the left side: \[ 3 \log_2 x = 48 \]
Divide by 3: \[ \log_2 x = 16 \]
To find \(x\), we convert the logarithmic equation to its exponential form: \[ x = 2^{16} \]
Step 4: Final Answer
The value of \(x\) is \(2^{16}\). This matches option (A).
Quick Tip: When solving logarithmic equations with different bases, the first step is always to convert them to a common base. It's usually easiest to choose one of the bases already present in the equation, like base 2 in this case.
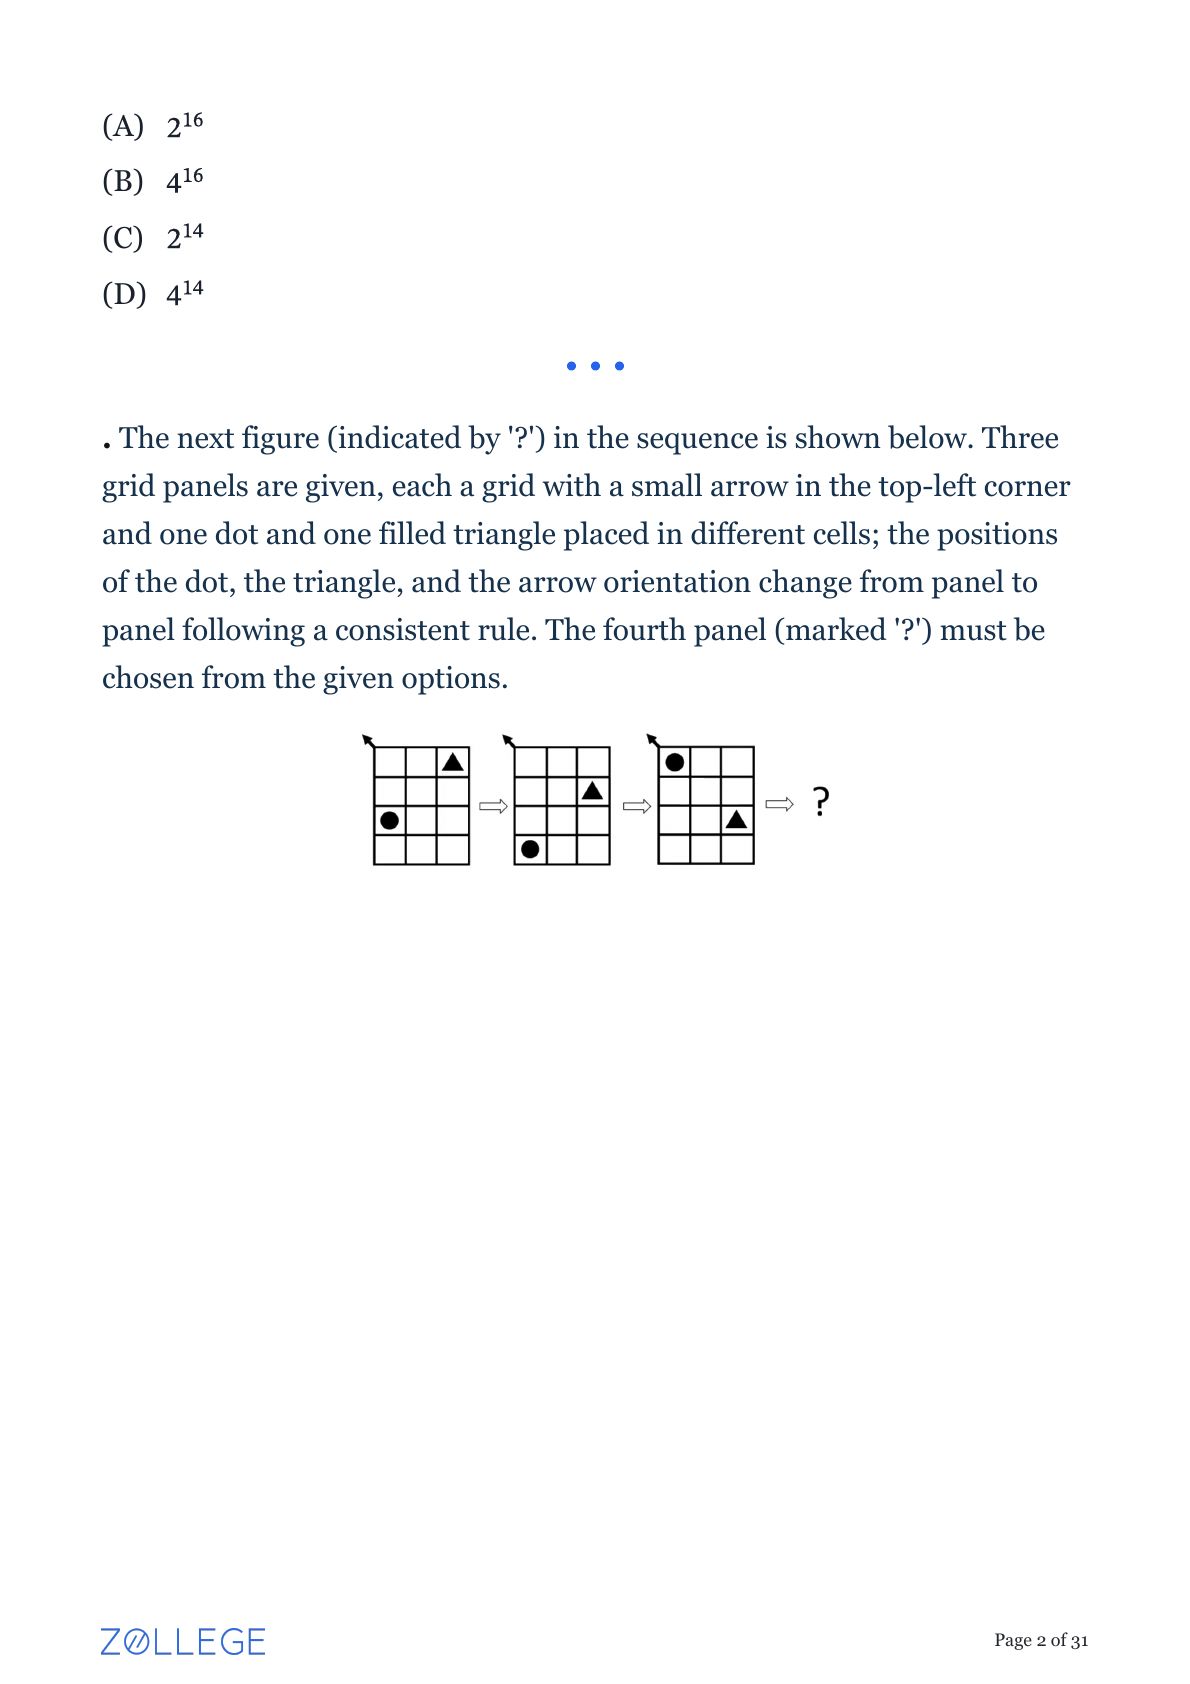
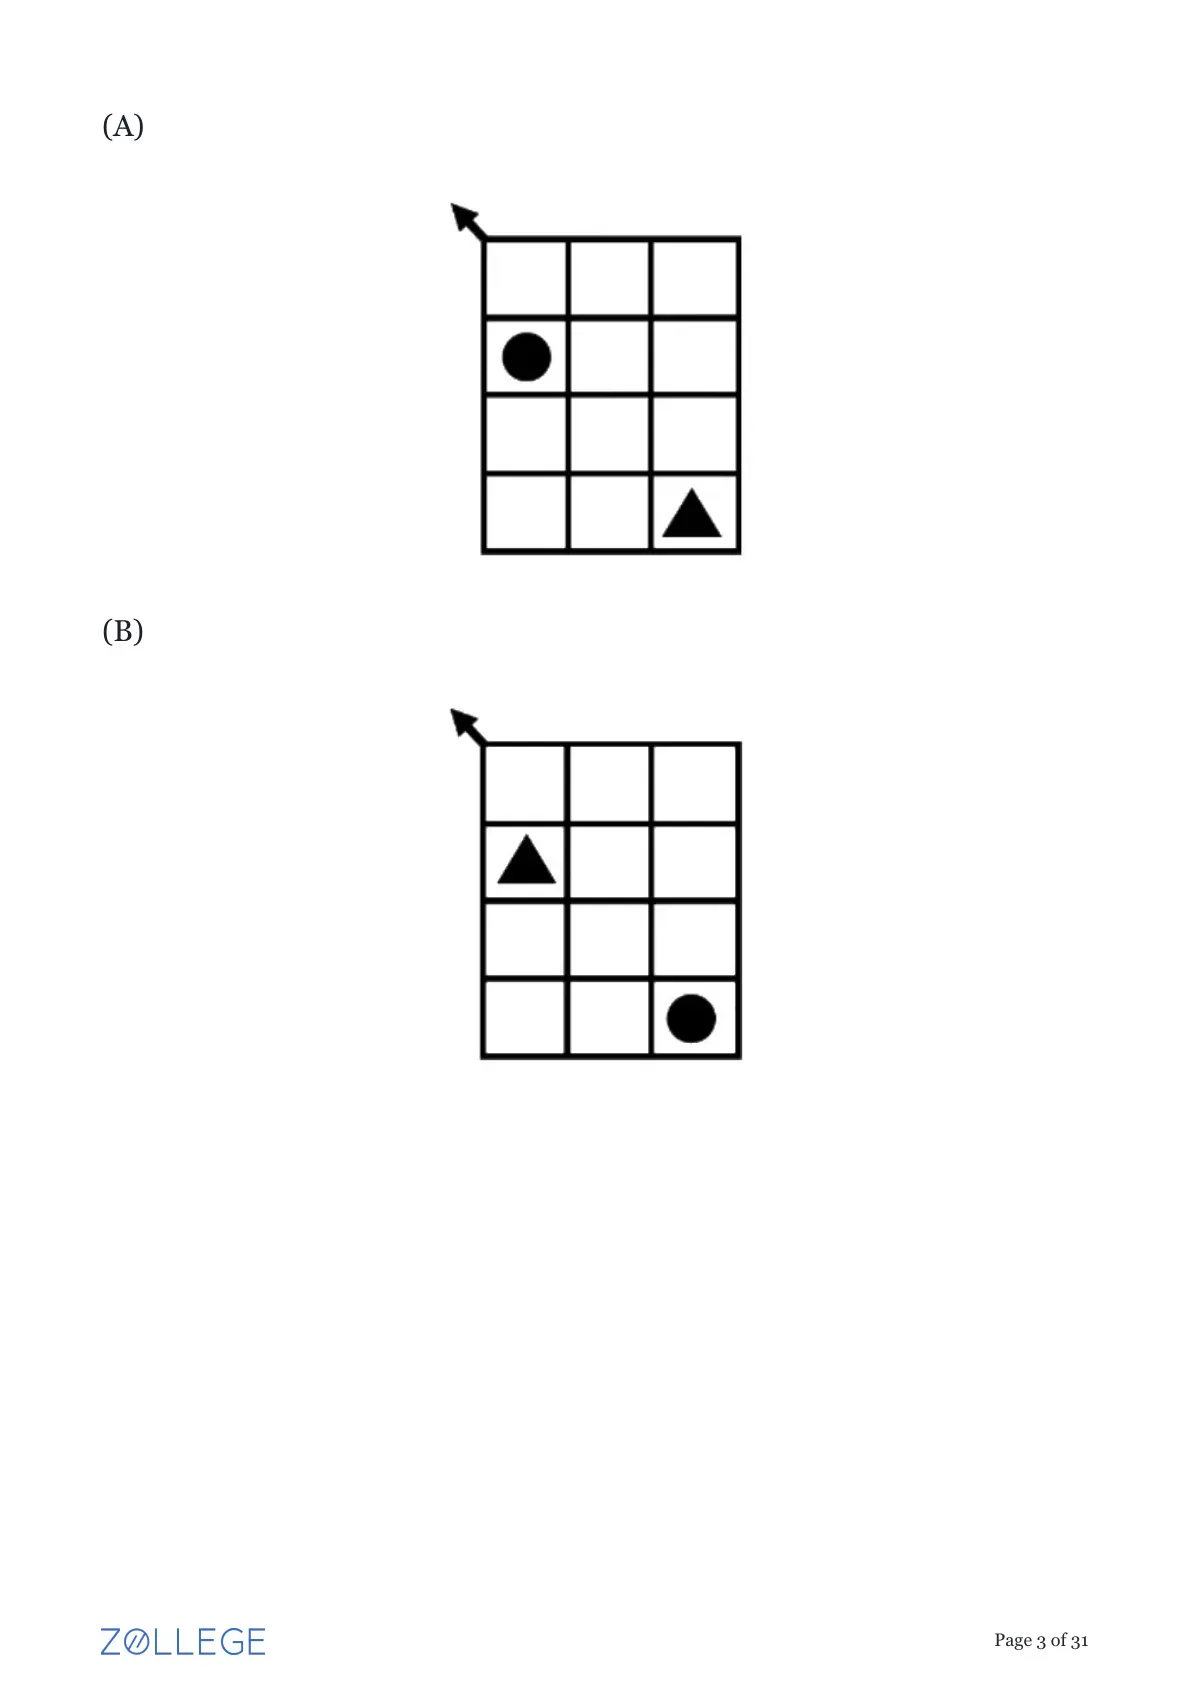
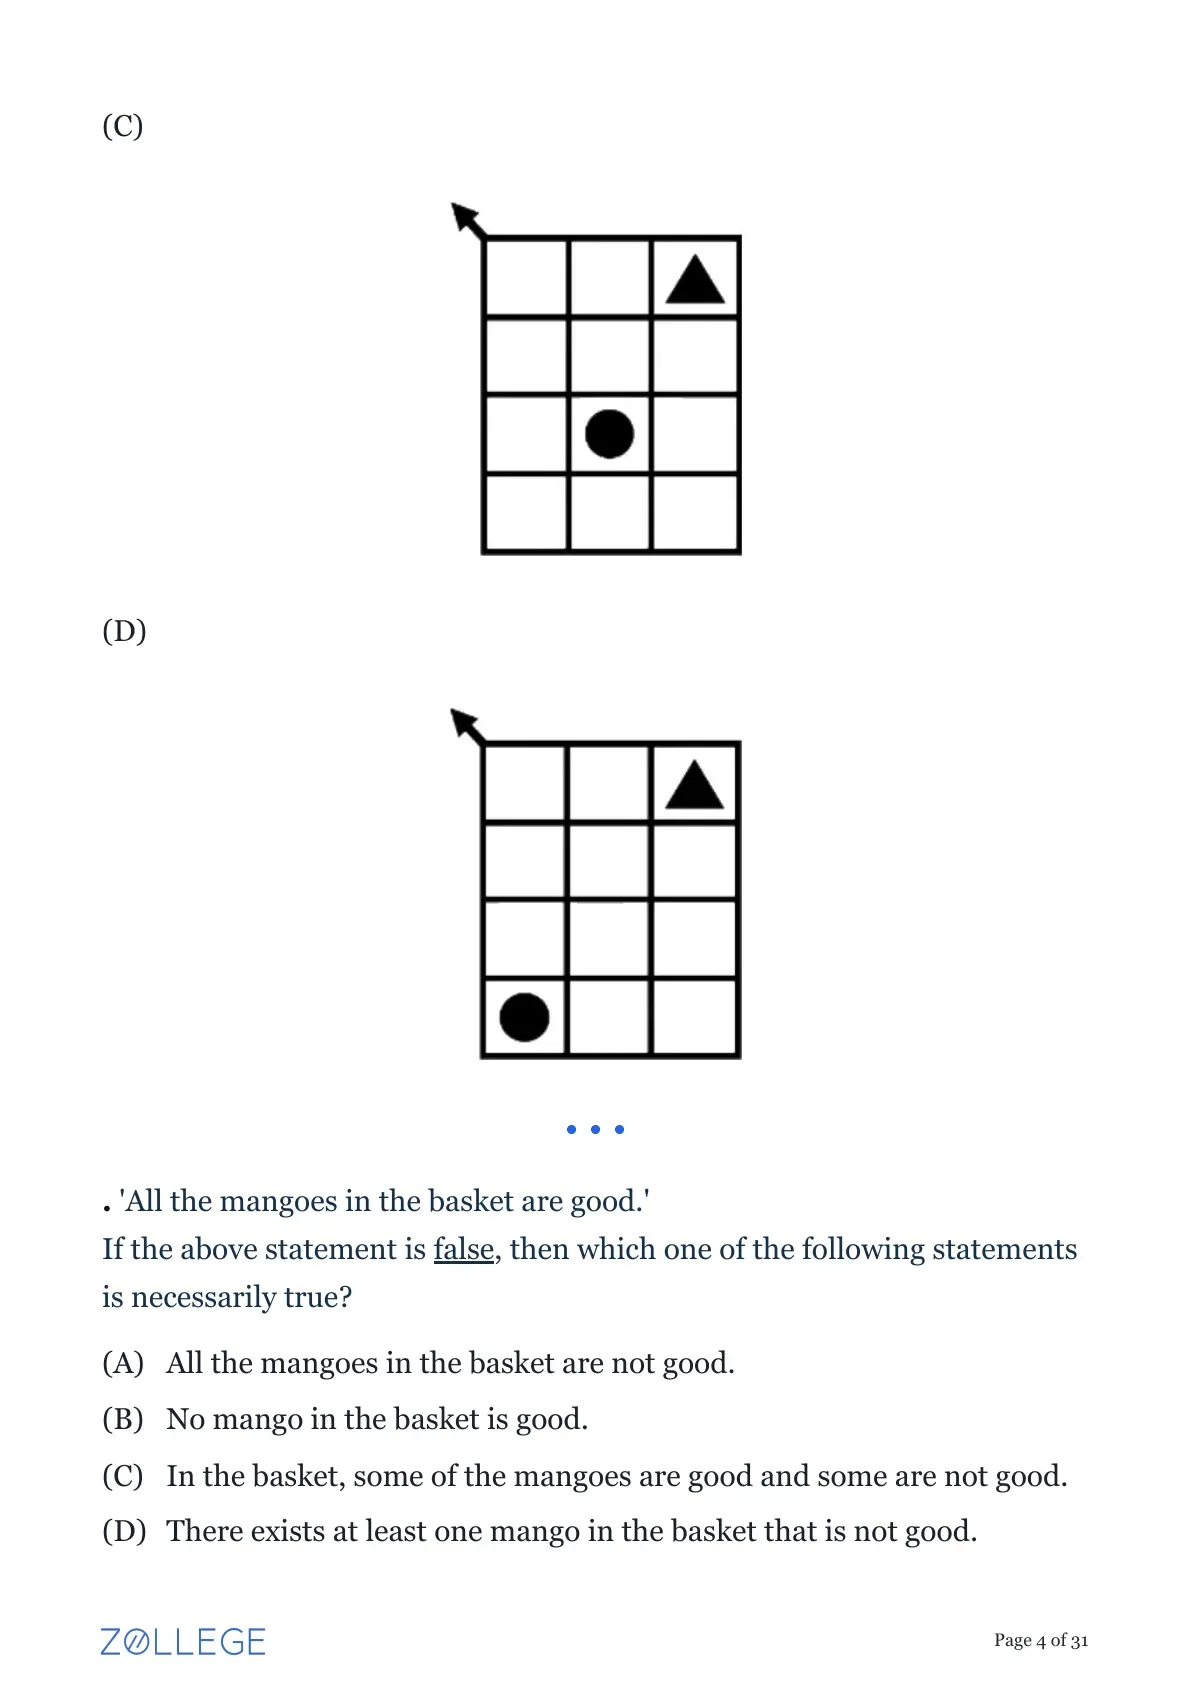
The next figure (indicated by ‘?’) in the sequence is
Step 1: Understanding the Question
The question shows a sequence of three figures and asks us to identify the fourth figure from the given options. We need to find the pattern of movement for each of the three elements: the external arrow, the black circle, and the triangle. We'll use coordinates (row, column) for the grid, with (1,1) at the top-left.
Step 2: Detailed Explanation
Let's analyze the movement of each element separately.
1. The External Arrow:
- In Figure 1, the arrow points North-West.
- In Figure 2, it points North-East.
- In Figure 3, it points South-East.
The arrow is rotating 90 degrees clockwise at each step. The next position in this sequence would be pointing South-West. All four options (A), (B), (C), and (D) show the arrow pointing South-West, so we must analyze the other elements.
2. The Black Circle:
- Position in Figure 1: (3, 1)
- Position in Figure 2: (3, 2) (Moved one step right)
- Position in Figure 3: (2, 2) (Moved one step up)
The movement sequence is Right, then Up. A logical continuation of this pattern would be Left, then Down, which forms a counter-clockwise path. However, this is not the only possible logic. Let's analyze the logic that leads to the correct answer (A). In option (A), the circle is at (2, 2). This means the circle's position repeats from Figure 3.
Rule for Circle: Moves Right, then Up, then stays fixed at position (2,2).
3. The Triangle:
- Position in Figure 1: (2, 2)
- Position in Figure 2: (1, 2) (Moved one step up)
- Position in Figure 3: (1, 1) (Moved one step left)
In option (A), the triangle is at position (3, 1). This is a jump from (1, 1). Let's see if this jump follows a pattern. The position (3, 1) is the initial position of the black circle in Figure 1.
Step 3: Synthesizing the Rules
Based on the analysis to reach the correct answer (A), the rules are as follows:
- Arrow: Rotates 90 degrees clockwise in each step.
- Circle: Follows the path (3,1) \(\rightarrow\) (3,2) \(\rightarrow\) (2,2). Once it reaches (2,2), it stays there.
- Triangle: Follows the path (2,2) \(\rightarrow\) (1,2) \(\rightarrow\) (1,1). In the next step, after the circle's position becomes fixed, the triangle moves to the circle's original starting position, which was (3,1).
Step 4: Final Answer
Applying these rules for the fourth figure:
- The arrow points South-West.
- The circle stays at (2, 2).
- The triangle moves to (3, 1).
This configuration exactly matches option (A).
Quick Tip: For visual sequence problems with multiple moving parts, analyze each part's movement independently. Look for simple patterns like rotation, translation, or reflection. Sometimes, the rule might be more complex, involving interactions between elements or a change in the pattern after a few steps.
‘All the mangoes in the basket are good.’
If the above statement is false, then which one of the following statements is necessarily true?
Step 1: Understanding the Question
The question asks for the logical negation of the statement "All the mangoes in the basket are good." If the original statement is false, its negation must be true.
Step 2: Logical Structure and Negation
The original statement is a universal quantification. In formal logic, it can be written as: \[ \forall x \in M, P(x) \]
where \(M\) is the set of mangoes in the basket, and \(P(x)\) is the property "x is good".
The negation of a universal statement "For all x, P(x) is true" is an existential statement "There exists an x for which P(x) is false". \[ \neg (\forall x, P(x)) \equiv \exists x, \neg P(x) \]
In words, the negation is: "There exists at least one mango in the basket that is not good."
Step 3: Evaluating the Options
Let's check each option against this logical negation.
(A) "All the mangoes in the basket are not good." This is the contrary of the original statement, not its negation. If some are good and one is bad, the original statement is false, but statement (A) is also false. So, (A) is not necessarily true.
(B) "No mango in the basket is good." This is a rephrasing of option (A) and is also incorrect for the same reason.
(C) "In the basket, some of the mangoes are good and some are not good." This statement is not necessarily true. For the original statement to be false, it's possible that *all* mangoes are not good. In that case, statement (C) would be false because there are no good mangoes.
(D) "There exists at least one mango in the basket that is not good." This is the precise logical negation of the original statement. If "All mangoes are good" is false, it must be because we found at least one counterexample - one mango that is not good. This statement is therefore necessarily true.
Step 4: Final Answer
The statement that is necessarily true when "All the mangoes in the basket are good" is false is its logical negation, which is "There exists at least one mango in the basket that is not good." This corresponds to option (D).
Quick Tip: Remember the key rules for negating quantifiers in logic:
- The negation of "All A are B" is "Some A are not B" (or "At least one A is not B").
- The negation of "Some A are B" is "No A are B" (or "All A are not B").
Consider the following statements about four numbers:
(S1) The average of the four numbers is 25
(S2) Each number is at most 40
(S3) Each number is at least 20
Choose the option that is necessarily correct.
Step 1: Understanding the Question
We are given three statements about four numbers. We need to determine which logical implication among the options is always true. Let the four numbers be \(n_1, n_2, n_3, n_4\).
(S1) \(\frac{n_1+n_2+n_3+n_4}{4} = 25 \implies n_1+n_2+n_3+n_4 = 100\).
(S2) \(n_i \le 40\) for \(i = 1, 2, 3, 4\).
(S3) \(n_i \ge 20\) for \(i = 1, 2, 3, 4\).
Step 2: Evaluating Each Option
We will test each option by assuming the premises are true and checking if the conclusion must follow. We can try to find a counterexample to disprove an implication.
(A) (S1) and (S2) together imply (S3):
Assume (S1) and (S2) are true. Sum = 100, and each number \(\le 40\).
Can (S3) be false? This would mean at least one number is \(< 20\).
Consider the numbers: 10, 30, 30, 30.
Sum = \(10+30+30+30 = 100\). Average is 25. (S1 is true).
Each number is \(\le 40\). (S2 is true).
However, one number (10) is less than 20. (S3 is false).
Since we found a case where the premises are true but the conclusion is false, this implication is not necessarily correct.
(B) (S2) and (S3) together imply (S1):
Assume (S2) and (S3) are true. So, \(20 \le n_i \le 40\) for all numbers.
Can (S1) be false? This would mean the average is not 25.
Consider the numbers: 20, 20, 20, 20.
Each number is between 20 and 40. (S2 and S3 are true).
The average is \(80/4 = 20\), which is not 25. (S1 is false).
This implication is not necessarily correct.
(C) (S1) and (S3) together imply (S2):
Assume (S1) and (S3) are true. Sum = 100, and each number \(n_i \ge 20\).
Can (S2) be false? This would mean at least one number is \(> 40\).
Let's try to maximize one number, say \(n_1\), while keeping the sum at 100 and the other numbers at their minimum possible value.
From (S3), the minimum value for \(n_2, n_3, n_4\) is 20.
\(n_1 + n_2 + n_3 + n_4 = 100\)
To maximize \(n_1\), we must minimize \(n_2, n_3, n_4\).
\(n_{1, max} + 20 + 20 + 20 = 100\)
\(n_{1, max} + 60 = 100\)
\(n_{1, max} = 40\)
This shows that the maximum possible value for any single number is 40. Therefore, no number can be greater than 40, which means every number must be at most 40 (\(n_i \le 40\)). This is exactly statement (S2).
This implication is necessarily correct.
(D) (S1) implies (S3):
Assume (S1) is true. Sum = 100.
Can (S3) be false? This would mean at least one number is \(< 20\).
Consider the numbers: 10, 10, 40, 40.
Sum = \(10+10+40+40 = 100\). Average is 25. (S1 is true).
However, two numbers (10, 10) are less than 20. (S3 is false).
This implication is not necessarily correct.
Step 3: Final Answer
Only the implication in option (C) is necessarily correct.
Quick Tip: When testing logical implications, trying to construct a counterexample is a powerful technique. If you can find a single case that satisfies the "if" part but not the "then" part, the implication is false. If you can prove no such counterexample can exist (as in option C), the implication is true.
'People are crowding around \rule{0.5cm}{0.15mm} pit into which \rule{0.5cm}{0.15mm} elephant has fallen. I have never seen an elephant looking more bewildered \rule{0.5cm}{0.15mm} miserable. Here it is in a most undignified position, thrust into a pit and made to look up \rule{0.5cm}{0.15mm} a vast, curiosity-stricken crowd.'
Choose the option with the correct sequence of words to fill the blanks.
Step 1: Understanding the Question
We need to fill four blanks in a short passage with the correct articles ('a', 'an'), conjunction ('and'), and preposition ('at').
Step 2: Detailed Explanation
Let's analyze each blank one by one.
Blank 1: "around ____ pit"
The word 'pit' is a singular countable noun starting with a consonant sound ('p'). This is the first time the pit is mentioned, so we use the indefinite article. The correct article is 'a'.
Sentence part: "People are crowding around a pit..."
Blank 2: "into which ____ elephant has fallen"
The word 'elephant' is a singular countable noun starting with a vowel sound ('e'). This is the first time the elephant is mentioned. The correct indefinite article is 'an'.
Sentence part: "...into which an elephant has fallen."
Blank 3: "more bewildered ____ miserable"
The sentence is describing the elephant's state using two adjectives: 'bewildered' and 'miserable'. To connect these two related ideas, the coordinating conjunction 'and' is appropriate.
Sentence part: "...looking more bewildered and miserable."
Blank 4: "made to look up ____ a vast, curiosity-stricken crowd"
The phrasal verb 'look up' is followed by a preposition to indicate the direction or object of the gaze. When looking towards something, the correct preposition is 'at'.
Sentence part: "...made to look up at a vast, curiosity-stricken crowd."
Step 3: Final Answer
The correct sequence of words is 'a', 'an', 'and', 'at'. This corresponds to option (B).
Quick Tip: Remember the basic rules for articles: 'a' before consonant sounds, 'an' before vowel sounds. For prepositions, consider the context and common phrasal verbs (e.g., 'look at', 'listen to'). Conjunctions like 'and', 'or', 'but' connect words or clauses based on their logical relationship.
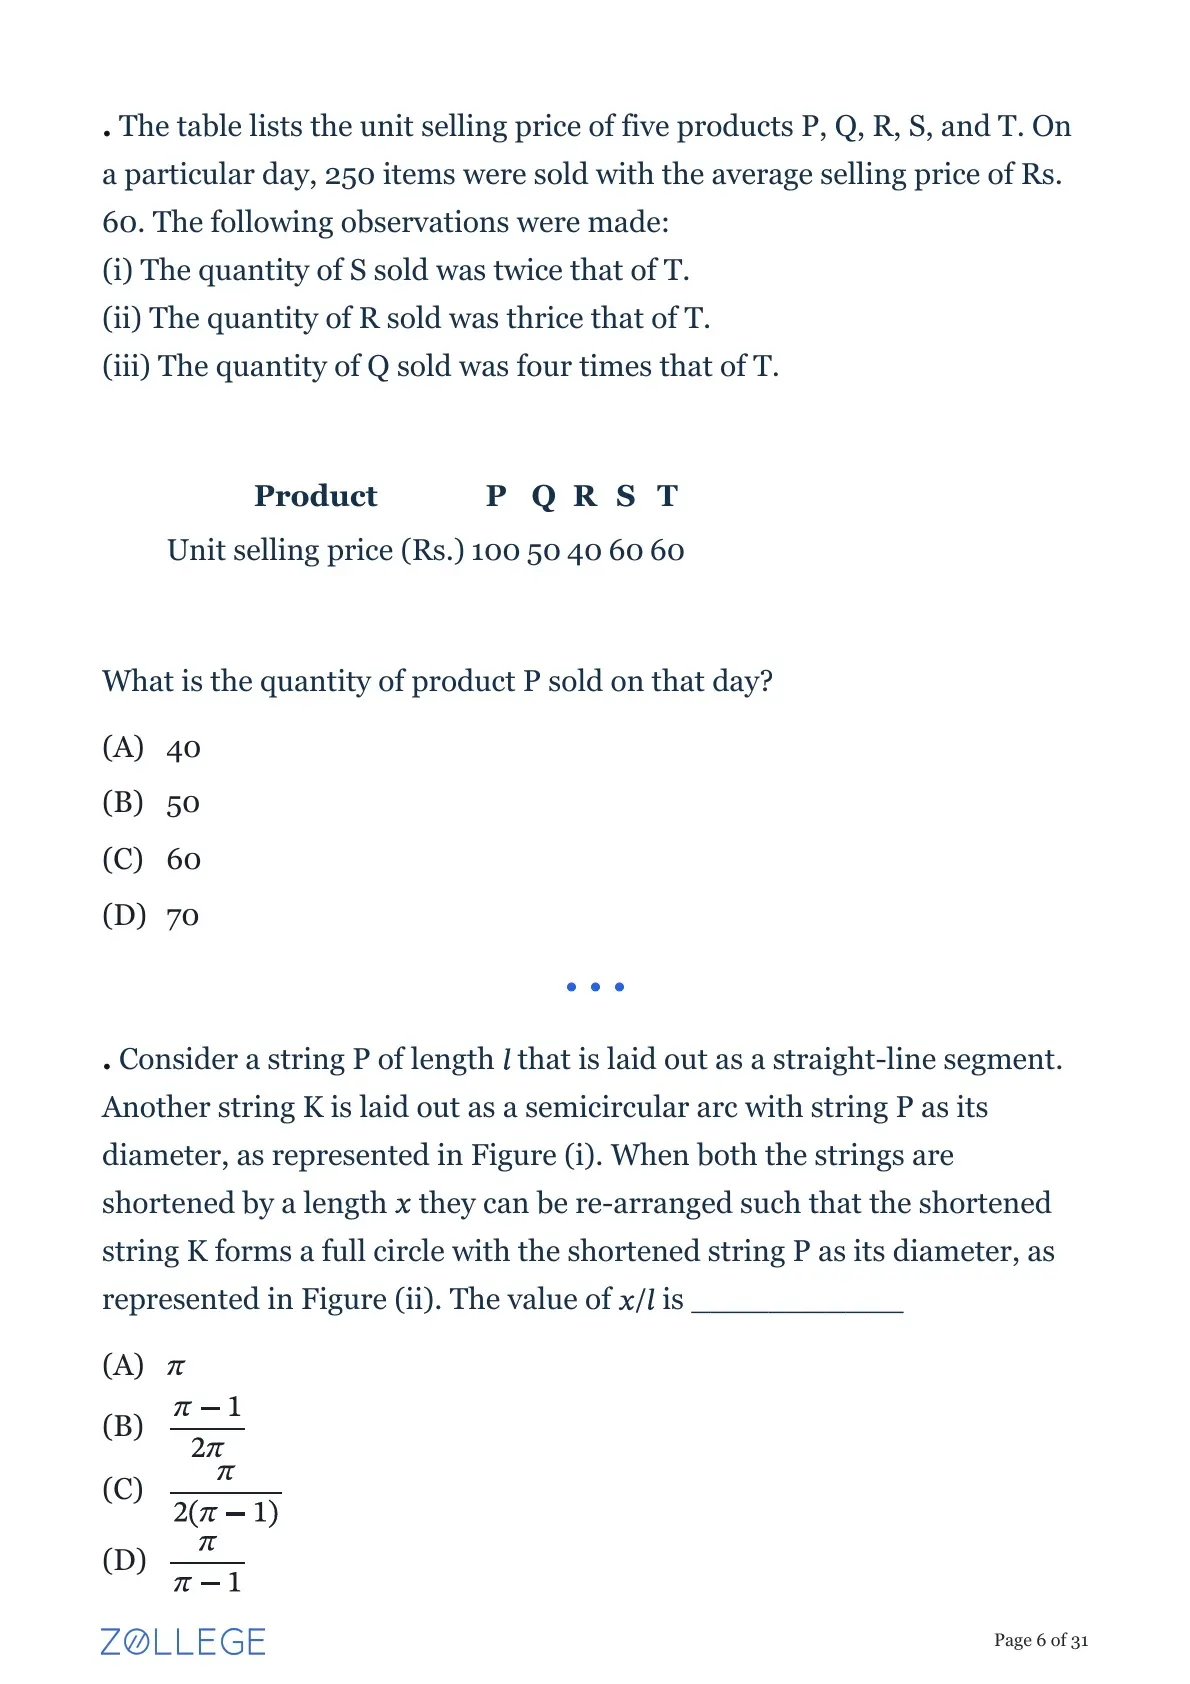
The table lists the unit selling price of five products P, Q, R, S, and T. On a particular day, 250 items were sold with the average selling price of Rs. 60. The following observations were made:
(i) The quantity of S sold was twice that of T.
(ii) The quantity of R sold was thrice that of T.
(iii) The quantity of Q sold was four times that of T.
What is the quantity of product P sold on that day?
Step 1: Understanding the Question
We are given data about the sales of five products. We need to find the quantity of product P sold. We have the unit prices, total items sold, average selling price, and relationships between the quantities of Q, R, S, and T.
Prices: P=100, Q=50, R=40, S=60, T=60.
Step 2: Formulating Equations
Let the quantities sold be \(p, q, r, s, t\) for products P, Q, R, S, T respectively.
Total items sold: \[ p + q + r + s + t = 250 \quad (Equation 1) \]
Total Revenue = Average Price \(\times\) Total Items \[ Total Revenue = 60 \times 250 = 15000 \]
The total revenue can also be expressed as the sum of (price \(\times\) quantity) for each product: \[ 100p + 50q + 40r + 60s + 60t = 15000 \quad (Equation 2) \]
Step 3: Using the Given Relationships
We are given:
(i) \(s = 2t\)
(ii) \(r = 3t\)
(iii) \(q = 4t\)
Now, substitute these relationships into Equation 1: \[ p + (4t) + (3t) + (2t) + t = 250 \] \[ p + 10t = 250 \quad (Equation 3) \]
Next, substitute the relationships into Equation 2: \[ 100p + 50(4t) + 40(3t) + 60(2t) + 60t = 15000 \] \[ 100p + 200t + 120t + 120t + 60t = 15000 \] \[ 100p + 500t = 15000 \]
Divide the entire equation by 100 to simplify: \[ p + 5t = 150 \quad (Equation 4) \]
Step 4: Solving the System of Equations
We now have a simple system of two linear equations with two variables, \(p\) and \(t\):
1. \(p + 10t = 250\)
2. \(p + 5t = 150\)
Subtract Equation 4 from Equation 3: \[ (p + 10t) - (p + 5t) = 250 - 150 \] \[ 5t = 100 \] \[ t = 20 \]
Now substitute the value of \(t\) back into Equation 4 to find \(p\): \[ p + 5(20) = 150 \] \[ p + 100 = 150 \] \[ p = 50 \]
Step 5: Final Answer
The quantity of product P sold is 50. This corresponds to option (B).
Quick Tip: In word problems involving multiple variables, systematically translate each piece of information into a mathematical equation. Use the given relationships to reduce the number of variables, which will lead to a solvable system of equations.
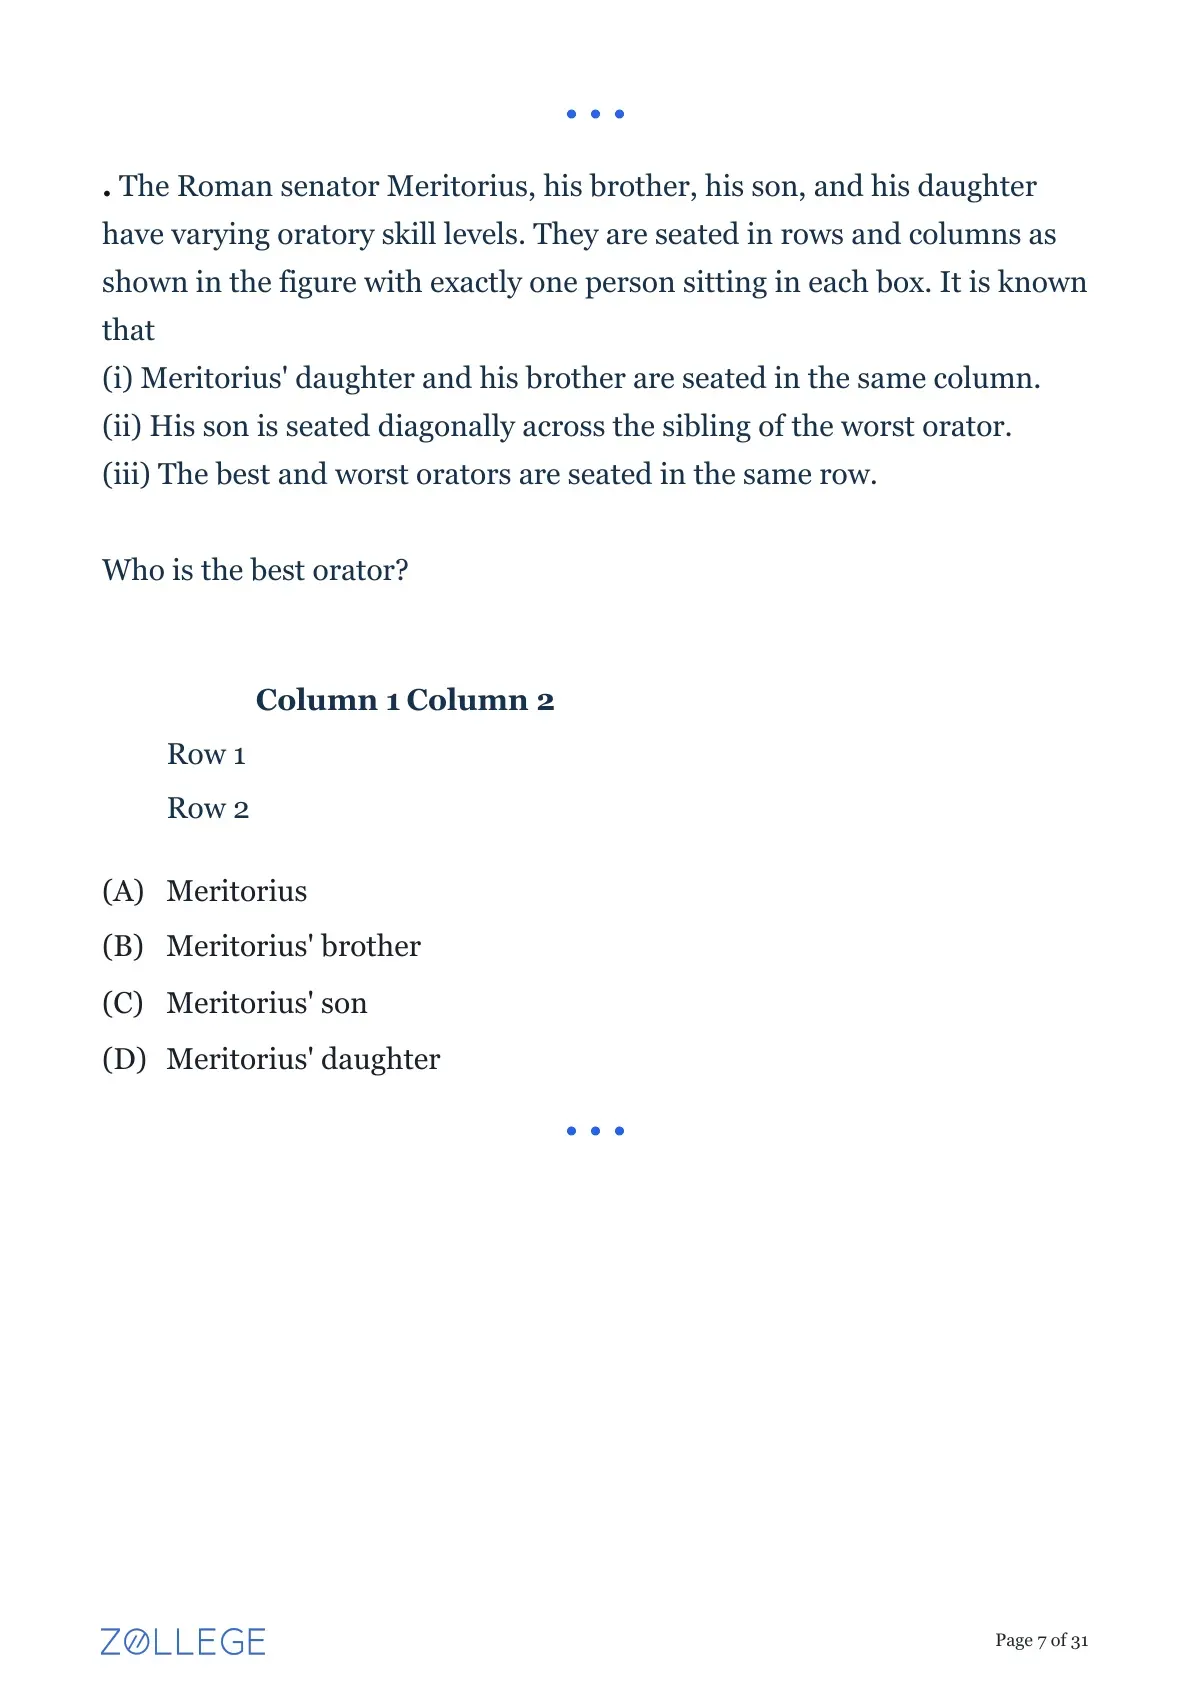
Consider a string P of length \(l\) that is laid out as a straight-line segment. Another string K is laid out as a semicircular arc with string P as its diameter, as represented in Figure (i). When both the strings are shortened by a length \(x\) they can be re-arranged such that the shortened string K forms a full circle with the shortened string P as its diameter, as represented in Figure (ii). The value of \(x/l\) is ________
Step 1: Determine Initial Lengths
- String P is a straight line of length \(l\).
- String K is a semicircular arc with string P as its diameter.
- The diameter of the semicircle is \(l\), so its radius is \(r = l/2\).
- The length of a semicircular arc is given by \(\pi r\).
- Therefore, the initial length of string K is \(\pi \times (l/2) = \frac{\pi l}{2}\).
Step 2: Determine Shortened Lengths
- Both strings are shortened by a length \(x\).
- The new length of string P (let's call it \(P'\)) is \(l - x\).
- The new length of string K (let's call it \(K'\)) is \(\frac{\pi l}{2} - x\).
Step 3: Set up an Equation Based on the Final Arrangement
- In the final arrangement (Figure ii), the shortened string K' forms a full circle. So, \(K'\) is the circumference of this circle.
- The shortened string P' is the diameter of this circle.
- The relationship between the circumference (C) and diameter (d) of a circle is \(C = \pi d\).
- In our case, \(C = K'\) and \(d = P'\).
- So, \(K' = \pi \times P'\).
- Substituting the expressions for the shortened lengths: \[ \frac{\pi l}{2} - x = \pi (l - x) \]
Step 4: Solve for the ratio \(x/l\)
- Now, we solve the equation for \(x\).
\[ \frac{\pi l}{2} - x = \pi l - \pi x \]
- Rearrange the terms to group \(x\) on one side and \(l\) on the other.
\[ \pi x - x = \pi l - \frac{\pi l}{2} \] \[ x(\pi - 1) = \frac{2\pi l - \pi l}{2} \] \[ x(\pi - 1) = \frac{\pi l}{2} \]
- Isolate \(x\): \[ x = \frac{\pi l}{2(\pi - 1)} \]
- The question asks for the value of \(x/l\). Divide both sides by \(l\): \[ \frac{x}{l} = \frac{\pi}{2(\pi - 1)} \]
Step 5: Final Answer
The value of \(x/l\) is \(\frac{\pi}{2(\pi - 1)}\), which matches option (C).
Quick Tip: Always write down the formulas for the geometric shapes involved. For this problem, the key formulas are the length of a semicircle arc (\(\pi r\)) and the circumference of a circle (\(\pi d\)). Carefully track how the lengths change and how they relate to each other in the final configuration.
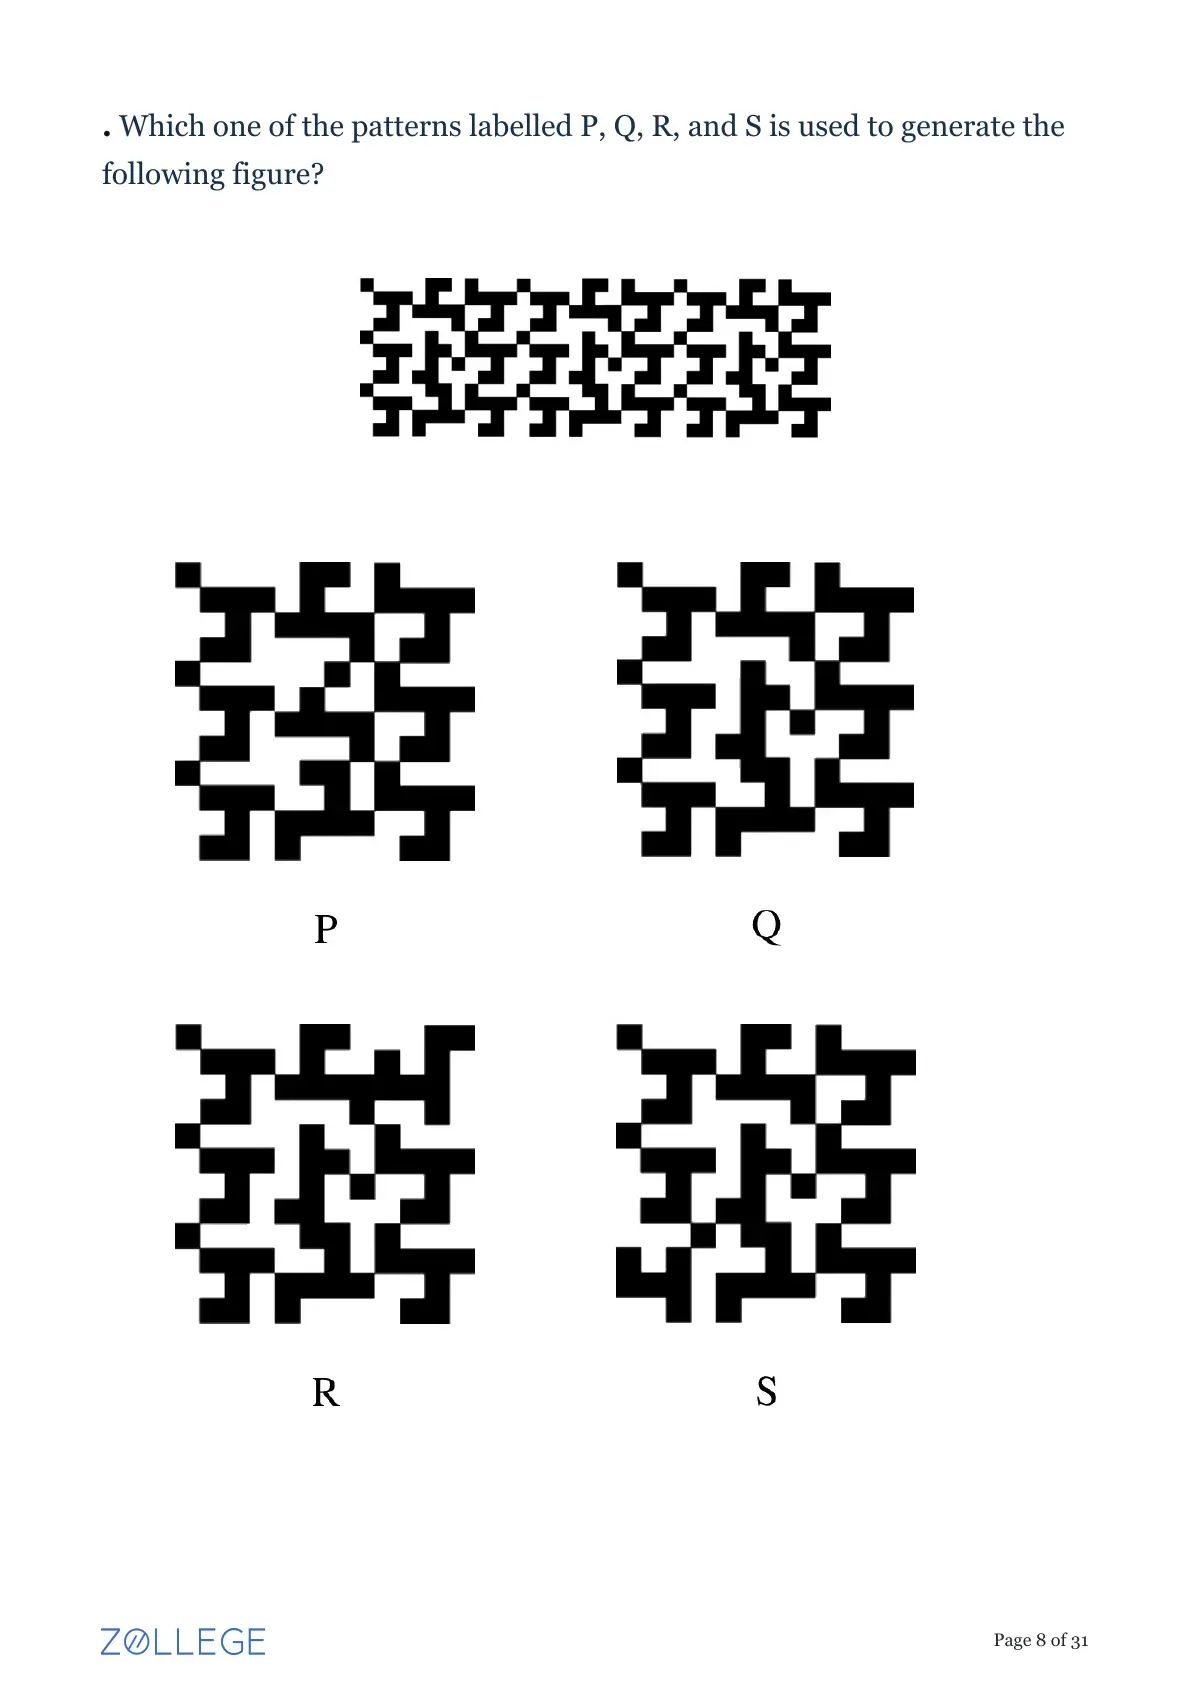
The Roman senator Meritorius, his brother, his son, and his daughter have varying oratory skill levels. They are seated in rows and columns as shown in the figure with exactly one person sitting in each box. It is known that
(i) Meritorius' daughter and his brother are seated in the same column.
(ii) His son is seated diagonally across the sibling of the worst orator.
(iii) The best and worst orators are seated in the same row.
Who is the best orator?
Step 1: Identify Individuals and Constraints
Let the four people be M (Meritorius), B (Brother), S (Son), and D (Daughter). They are seated in a 2x2 grid.
- Clue (i): D and B are in the same column. This means M and S must be in the other column.
- Clue (ii): S is diagonally across the sibling of the worst orator (W). The siblings are (M, B) and (S, D). So, Sibling(W) can be B (if W=M), M (if W=B), D (if W=S), or S (if W=D).
- Clue (iii): The best (G) and worst (W) orators are in the same row.
Step 2: Construct a Possible Arrangement
From Clue (i), let's place B and D in Column 1 and M and S in Column 2. We need to decide their rows. From Clue (iii), G and W are in the same row. This means the other two people are in the other row. This implies that each row must contain one person from the {B, D pair and one from the {M, S pair.
Let's try an arrangement that satisfies this. For example:
\begin{tabular{|c|c|
\hline
D & S
\hline
B & M
\hline
\end{tabular
This arrangement satisfies Clue (i): D and B are in Column 1.
Step 3: Apply the Remaining Clues to the Arrangement
Now, let's use Clue (ii) and (iii).
- From our arrangement, S is at position (Row 1, Col 2). The person diagonally across from S is at (Row 2, Col 1), which is B.
- Clue (ii) states: S is diagonally across the sibling of the worst orator (W).
- So, B must be the sibling of the worst orator.
- Since B's sibling is M, the worst orator (W) must be Meritorius (M).
Step 4: Verify Consistency and Find the Best Orator
We have deduced that W = M. Now let's check for consistency with Clue (iii).
- Clue (iii) states that the best (G) and worst (W) orators are in the same row.
- In our arrangement, M is in Row 2.
- Therefore, the best orator (G) must also be in Row 2.
- The other person in Row 2 is B (the brother).
- So, the best orator (G) must be the Brother (B).
Let's do a final check of all conditions with G=B and W=M:
1. Arrangement: D(1,1), S(1,2), B(2,1), M(2,2).
2. (i) D and B in the same column (Col 1)? Yes.
3. (iii) G (B) and W (M) in the same row (Row 2)? Yes.
4. (ii) S is diagonally across the sibling of W (M)? Sibling of M is B. S is at (1,2), B is at (2,1). They are diagonal. Yes.
All conditions are satisfied.
Step 5: Final Answer
The best orator is Meritorius' brother. This corresponds to option (B).
Quick Tip: In seating arrangement puzzles, start by using the most definitive clue to build a basic structure. Then, use the other clues to test possibilities within that structure. A simple diagram or table is extremely helpful to visualize the arrangement.
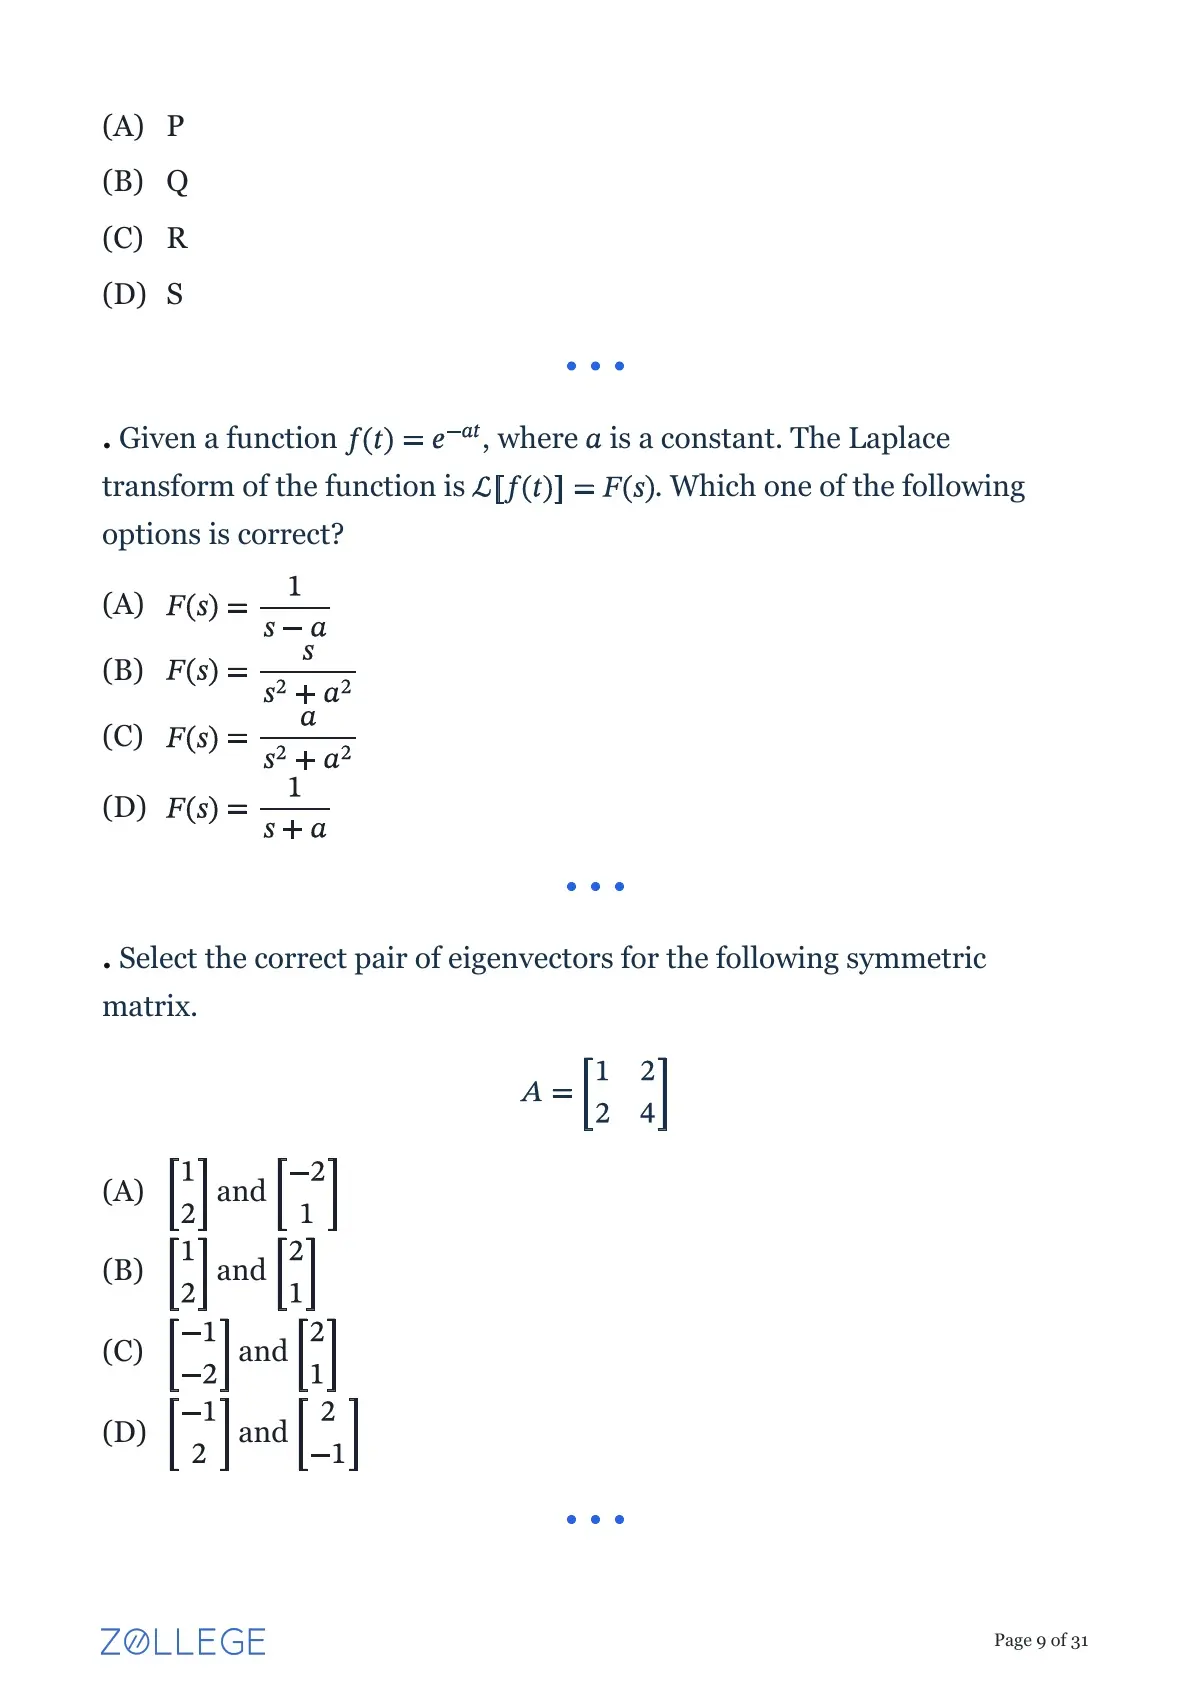
Which one of the patterns labelled P, Q, R, and S is used to generate the following figure?
Step 1: Understanding the Question
The large figure is a repeating pattern, also known as a tessellation. We need to identify which of the smaller 5x5 patterns (P, Q, R, or S) is the fundamental repeating unit, or "tile," that creates the large figure.
Step 2: Isolate a Repeating Unit
To find the tile, we can isolate a 5x5 block from the large pattern and compare it with the given options. Let's choose the 5x5 block from the top-left corner of the large figure. Let 'B' represent a black square and 'W' represent a white square.
The top-left 5x5 block of the large figure is:
Row 1: B W B W B
Row 2: W B B B W
Row 3: B W B W B
Row 4: B W W W B
Row 5: B B B B B
Step 3: Compare the Isolated Unit with the Options
Now, let's compare this isolated block with each of the options.
- Pattern P: The first three rows match, but Row 4 is BWWWB and Row 5 is BWBWB. This does not match.
- Pattern Q: Let's list the pattern for Q.
Row 1: B W B W B (Match)
Row 2: W B B B W (Match)
Row 3: B W B W B (Match)
Row 4: B W W W B (Match)
Row 5: B B B B B (Match)
Pattern Q is an exact match for the isolated block.
- Pattern R: The central cross-like shape is different. It doesn't match the isolated block.
- Pattern S: The bottom half of the pattern is significantly different. It doesn't match.
Step 4: Verify Tessellation
To be certain, we should check if tile Q can be repeated to form the entire pattern.
- Horizontal Repetition: The right edge of Q is (B, W, B, B, B)\textsuperscript{T. The left edge of Q is (B, W, B, B, B)\textsuperscript{T. They are identical, so the pattern will be seamless when placed side-by-side.
- Vertical Repetition: The bottom edge of Q is (B, B, B, B, B). The top edge of Q is (B, W, B, W, B). In the large figure, the row directly below a solid black row is indeed a (B, W, B, W, B) row. This confirms that the pattern also repeats seamlessly vertically.
Step 5: Final Answer
The pattern Q is the repeating unit used to generate the large figure. Therefore, option (B) is the correct answer.
Quick Tip: When solving pattern recognition or tessellation problems, the most effective method is to select a small, clearly defined section of the larger image and meticulously compare it, detail by detail, against each of the provided options.
Given a function \(f(t) = e^{-at}\), where \(a\) is a constant. The Laplace transform of the function is \(L[f(t)] = F(s)\). Which one of the following options is correct?
Step 1: Understanding the Question:
We are asked to find the Laplace transform of the exponential function \(f(t) = e^{-at}\).
Step 2: Key Formula or Approach:
The definition of the Laplace transform of a function \(f(t)\) is given by the integral:
\[ L\{f(t)\} = F(s) = \int_{0}^{\infty} e^{-st} f(t) \,dt \]
This integral is valid for values of \(s\) for which it converges.
Step 3: Detailed Explanation:
Substitute \(f(t) = e^{-at}\) into the Laplace transform definition:
\[ F(s) = \int_{0}^{\infty} e^{-st} e^{-at} \,dt \]
Combine the exponential terms using the property \(e^x e^y = e^{x+y}\):
\[ F(s) = \int_{0}^{\infty} e^{-(s+a)t} \,dt \]
Now, we integrate the exponential function with respect to \(t\):
\[ F(s) = \left[ \frac{e^{-(s+a)t}}{-(s+a)} \right]_{0}^{\infty} \]
Evaluate the integral at the limits of integration (from 0 to \(\infty\)):
\[ F(s) = \lim_{T \to \infty} \left[ \frac{e^{-(s+a)t}}{-(s+a)} \right]_{0}^{T} \] \[ F(s) = \lim_{T \to \infty} \left( \frac{e^{-(s+a)T}}{-(s+a)} \right) - \left( \frac{e^{-(s+a)(0)}}{-(s+a)} \right) \]
For the integral to converge, the term \(e^{-(s+a)T}\) must approach 0 as \(T \to \infty\). This requires that Re(\(s+a\)) > 0. Under this condition, the first term becomes 0.
\[ F(s) = 0 - \left( \frac{e^{0}}{-(s+a)} \right) = - \left( \frac{1}{-(s+a)} \right) \] \[ F(s) = \frac{1}{s+a} \]
Step 4: Final Answer:
The Laplace transform of \(e^{-at}\) is \(1/(s+a)\). This matches option (D).
Quick Tip: Memorizing standard Laplace transform pairs is essential for saving time. The transform for an exponential function is one of the most fundamental ones: \(L\{e^{kt}\} = \frac{1}{s-k}\). In this question, \(k = -a\), so the transform is \(\frac{1}{s-(-a)} = \frac{1}{s+a}\).
Select the correct pair of eigen vectors for the following symmetric matrix.
\[ \begin{bmatrix} 1 & 2
2 & 4 \end{bmatrix} \]
Step 1: Understanding the Question:
We need to find the eigenvalues and their corresponding eigenvectors for the given 2x2 matrix. Then we must match our pair of eigenvectors with the given options.
Step 2: Key Formula or Approach:
1. Find Eigenvalues (\(\lambda\)): Solve the characteristic equation \(\det(A - \lambda I) = 0\), where \(A\) is the given matrix and \(I\) is the identity matrix.
2. Find Eigenvectors (X): For each eigenvalue \(\lambda\), solve the system of linear equations \((A - \lambda I)X = 0\).
Step 3: Detailed Explanation:
Let the given matrix be \(A = \begin{bmatrix} 1 & 2
2 & 4 \end{bmatrix}\).
Part 1: Finding Eigenvalues
The characteristic equation is \(\det(A - \lambda I) = 0\).
\[ \det\left( \begin{bmatrix} 1 & 2
2 & 4 \end{bmatrix} - \lambda \begin{bmatrix} 1 & 0
0 & 1 \end{bmatrix} \right) = 0 \] \[ \det\left( \begin{bmatrix} 1-\lambda & 2
2 & 4-\lambda \end{bmatrix} \right) = 0 \] \[ (1-\lambda)(4-\lambda) - (2)(2) = 0 \] \[ 4 - 5\lambda + \lambda^2 - 4 = 0 \] \[ \lambda^2 - 5\lambda = 0 \] \[ \lambda(\lambda - 5) = 0 \]
The eigenvalues are \(\lambda_1 = 0\) and \(\lambda_2 = 5\).
Part 2: Finding Eigenvector for \(\lambda_1 = 0\)
We solve \((A - 0I)X = 0\), which is \(AX = 0\).
\[ \begin{bmatrix} 1 & 2
2 & 4 \end{bmatrix} \begin{bmatrix} x_1
x_2 \end{bmatrix} = \begin{bmatrix} 0
0 \end{bmatrix} \]
This gives the equation \(x_1 + 2x_2 = 0\). (The second row gives \(2x_1 + 4x_2 = 0\), which is the same equation).
Let \(x_2 = k\). Then \(x_1 = -2k\). The eigenvector is \(X_1 = k \begin{bmatrix} -2
1 \end{bmatrix}\).
For \(k=1\), a possible eigenvector is \(\begin{bmatrix} -2
1 \end{bmatrix}\).
Part 3: Finding Eigenvector for \(\lambda_2 = 5\)
We solve \((A - 5I)X = 0\).
\[ \begin{bmatrix} 1-5 & 2
2 & 4-5 \end{bmatrix} \begin{bmatrix} x_1
x_2 \end{bmatrix} = \begin{bmatrix} 0
0 \end{bmatrix} \] \[ \begin{bmatrix} -4 & 2
2 & -1 \end{bmatrix} \begin{bmatrix} x_1
x_2 \end{bmatrix} = \begin{bmatrix} 0
0 \end{bmatrix} \]
This gives the equation \(2x_1 - x_2 = 0\). (The first row gives \(-4x_1 + 2x_2 = 0\), which is the same).
Let \(x_1 = k\). Then \(x_2 = 2k\). The eigenvector is \(X_2 = k \begin{bmatrix} 1
2 \end{bmatrix}\).
For \(k=1\), a possible eigenvector is \(\begin{bmatrix} 1
2 \end{bmatrix}\).
Step 4: Final Answer:
The pair of eigenvectors are \(\begin{bmatrix} -2
1 \end{bmatrix}\) and \(\begin{bmatrix} 1
2 \end{bmatrix}\). This corresponds to option (A).
Quick Tip: For a symmetric matrix, eigenvectors corresponding to distinct eigenvalues are always orthogonal. You can quickly check this using the dot product. For option (A), let \(v_1 = [1, 2]\) and \(v_2 = [-2, 1]\). Their dot product is \((1)(-2) + (2)(1) = -2 + 2 = 0\). Since they are orthogonal, this is a strong indicator that it's the correct pair. This check can be faster than calculating both eigenvectors from scratch.
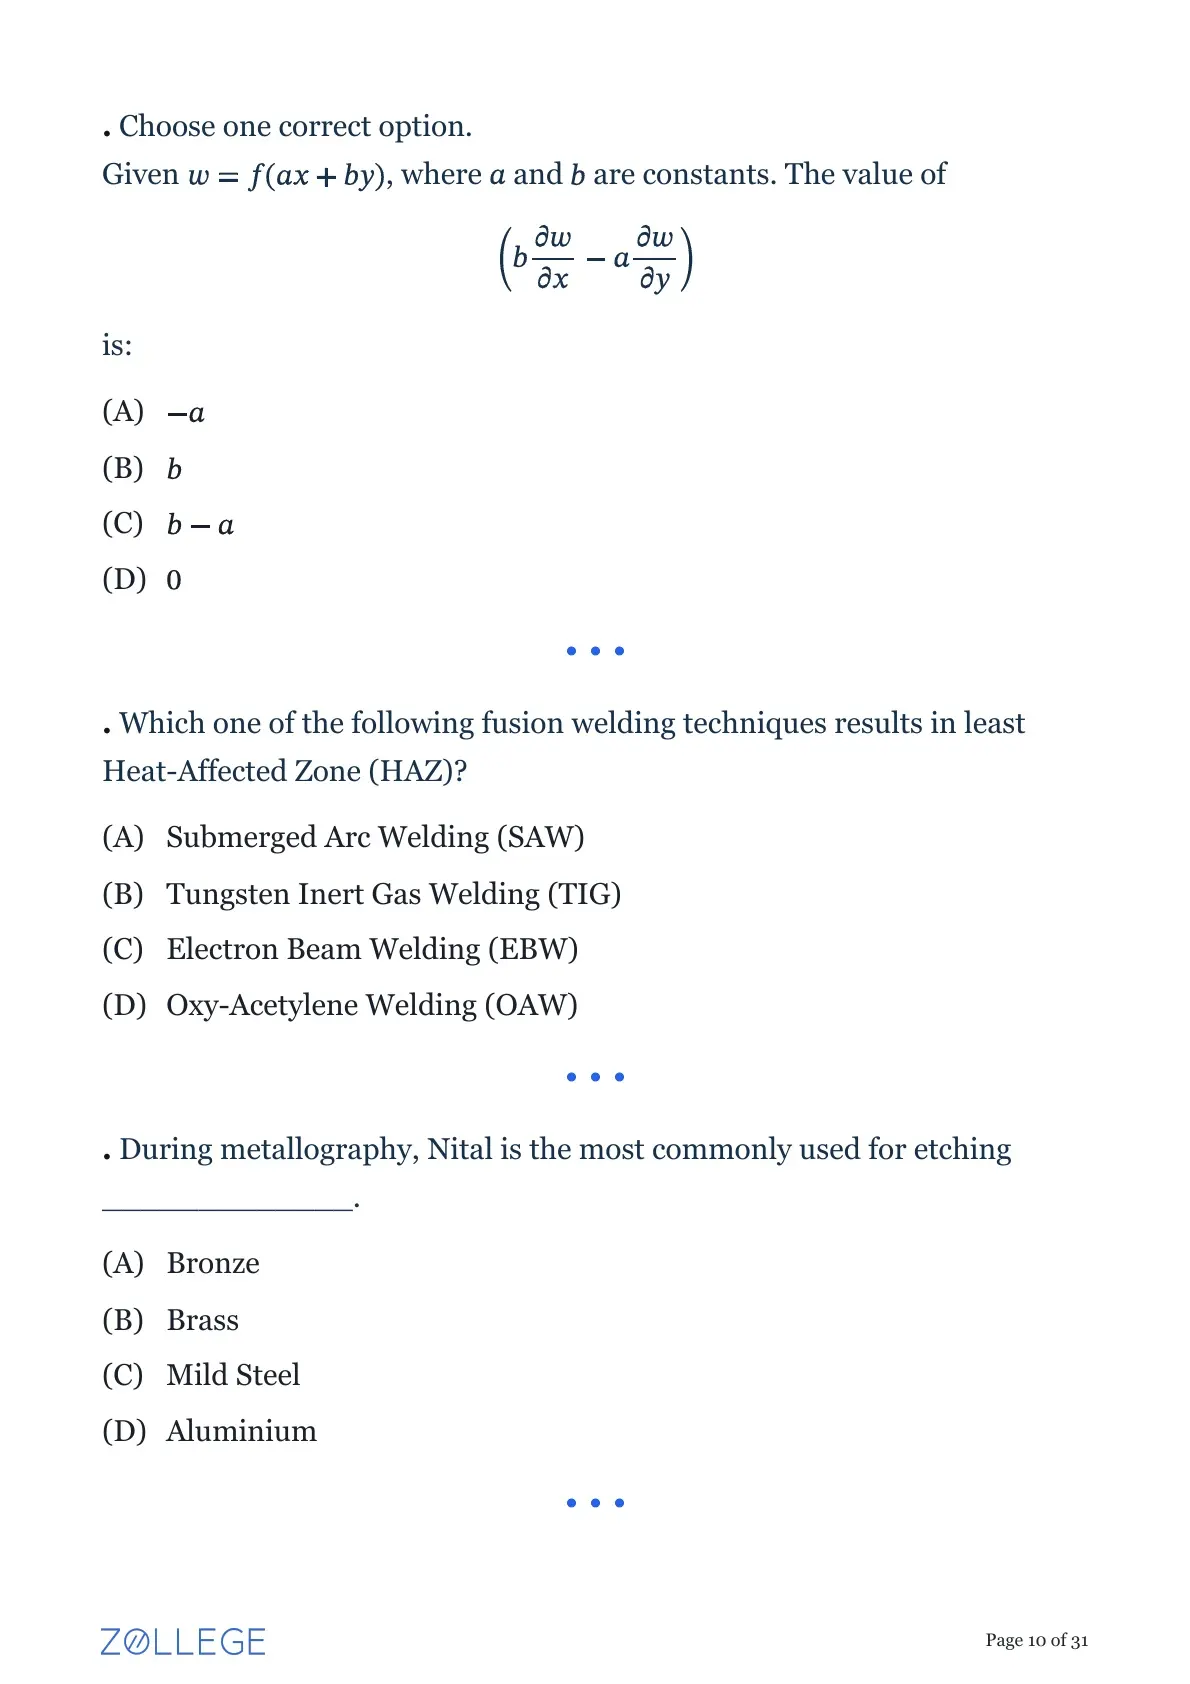
Given \(w = f(ax + by)\) where a and b are constants.
The value of \(\left(b\frac{\partial w}{\partial x} - a\frac{\partial w}{\partial y}\right)\) is:
Step 1: Understanding the Question:
We are given a function \(w\) which is a function of a linear combination of \(x\) and \(y\). We need to calculate the value of a specific expression involving the partial derivatives of \(w\) with respect to \(x\) and \(y\).
Step 2: Key Formula or Approach:
We need to use the chain rule for partial differentiation. Let \(u = ax + by\). Then \(w = f(u)\).
The chain rule states:
\[ \frac{\partial w}{\partial x} = \frac{df}{du} \cdot \frac{\partial u}{\partial x} \] \[ \frac{\partial w}{\partial y} = \frac{df}{du} \cdot \frac{\partial u}{\partial y} \]
Step 3: Detailed Explanation:
Let's define a new variable \(u = ax + by\). So, \(w = f(u)\).
First, find the partial derivatives of \(u\) with respect to \(x\) and \(y\):
\[ \frac{\partial u}{\partial x} = a \] \[ \frac{\partial u}{\partial y} = b \]
Now, apply the chain rule to find the partial derivatives of \(w\):
Let \(f'(u)\) denote \(\frac{df}{du}\).
\[ \frac{\partial w}{\partial x} = \frac{df}{du} \cdot \frac{\partial u}{\partial x} = f'(u) \cdot a = a f'(ax+by) \] \[ \frac{\partial w}{\partial y} = \frac{df}{du} \cdot \frac{\partial u}{\partial y} = f'(u) \cdot b = b f'(ax+by) \]
Now, substitute these expressions into the given equation:
\[ b\frac{\partial w}{\partial x} - a\frac{\partial w}{\partial y} = b(a f'(ax+by)) - a(b f'(ax+by)) \] \[ = ab f'(ax+by) - ab f'(ax+by) \] \[ = 0 \]
Step 4: Final Answer:
The value of the expression is 0. This matches option (D).
Quick Tip: This type of problem is a direct application of the chain rule for multivariable functions. Whenever you see a function of a function, like \(f(g(x,y))\), immediately think of using a substitution (e.g., \(u = g(x,y)\)) to simplify the differentiation process.
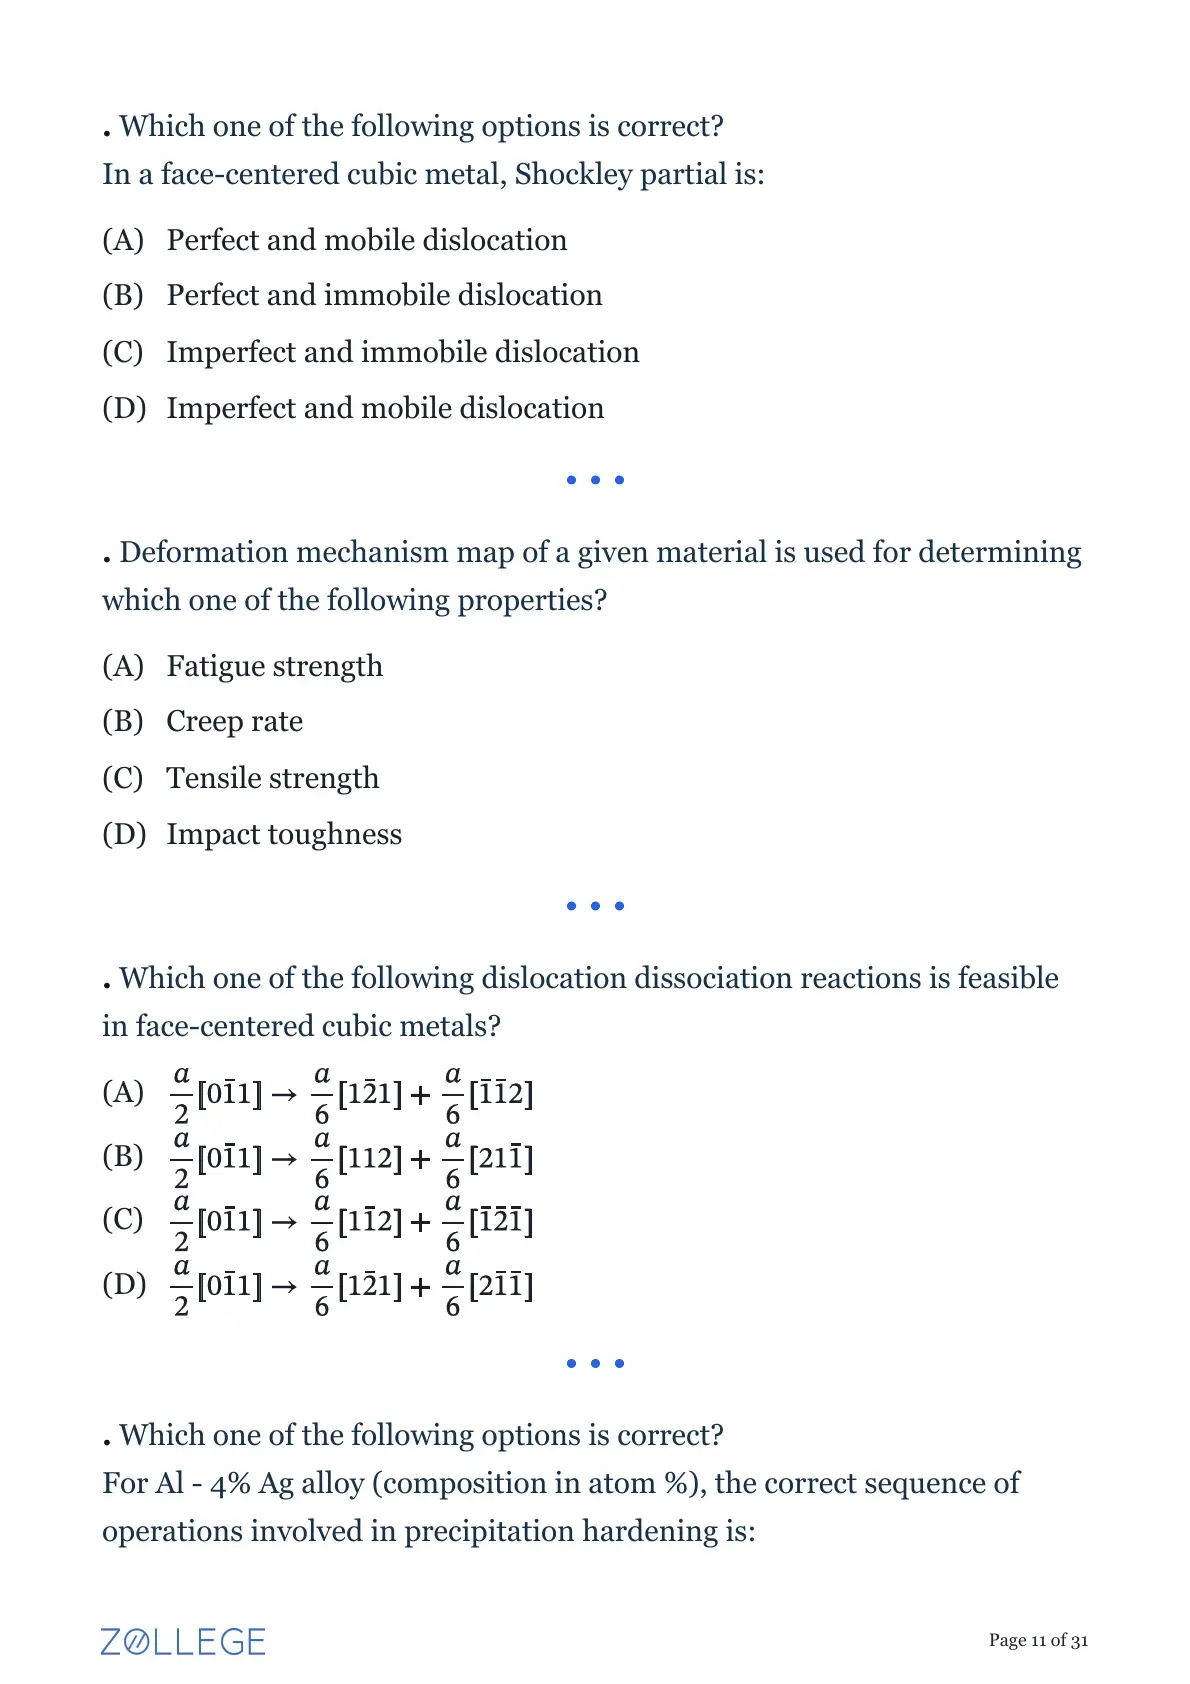
Which one of the following fusion welding techniques results in least Heat-Affected Zone (HAZ)?
Step 1: Understanding the Question:
The question asks to identify the welding process that creates the smallest Heat-Affected Zone (HAZ). The HAZ is the area of base material that is not melted but whose microstructure and properties have been altered by the heat of welding.
Step 2: Key Formula or Approach:
The size of the HAZ is directly related to the heat input per unit length of the weld and inversely related to the power density of the energy source. A welding process with a very high power density will melt the metal very quickly and locally, minimizing the time for heat to conduct into the surrounding material, thus creating a narrow HAZ.
Power Density = (Power delivered) / (Area of the spot).
Step 3: Detailed Explanation:
Let's compare the power densities of the given processes:
Oxy-Acetylene Welding (OAW): Uses a chemical flame. It has a very low power density (\(\sim 10^4\) W/cm\(^2\)). It results in a very large heat input and consequently a very wide HAZ.
Submerged Arc Welding (SAW) and Tungsten Inert Gas Welding (TIG): These are arc welding processes. They have higher power densities than OAW (\(\sim 10^5\) - \(10^6\) W/cm\(^2\)), but the energy is still relatively diffuse, leading to significant HAZs.
Electron Beam Welding (EBW): Uses a focused beam of high-velocity electrons to generate heat. It has an extremely high power density (\(> 10^9\) W/cm\(^2\)). This allows for very deep and narrow welds with extremely low total heat input. The result is a very narrow weld bead and the smallest possible HAZ.
Because EBW has the highest power density, it introduces the least amount of heat into the workpiece to make the weld, resulting in the smallest HAZ.
Step 4: Final Answer:
Electron Beam Welding (EBW) results in the least Heat-Affected Zone. This matches option (C).
Quick Tip: For questions about HAZ size, remember this rule: High power density = small HAZ. The ranking of power density for common processes is generally: Electron Beam / Laser Beam Welding \(>>\) Plasma Arc Welding \(>>\) Arc Welding (MIG/TIG/SAW) \(>>\) Oxy-fuel Welding.
During metallography, Nital is the most commonly used for etching ________.
Step 1: Understanding the Question:
The question asks to identify the material for which Nital is a common etchant in metallography. Metallographic etching is a process used to reveal the microstructure of a material under a microscope.
Step 2: Key Formula or Approach:
This is a knowledge-based question requiring familiarity with standard metallographic practices and etchants for different alloy systems.
Step 3: Detailed Explanation:
Nital: Nital is a solution of nitric acid (\(HNO_3\)) in alcohol (typically ethanol or methanol), with concentrations of nitric acid usually ranging from 1-5%.
Application: It is the most widely used etchant for carbon steels, low-alloy steels, and cast irons. When applied to a polished steel surface, it preferentially attacks the different micro-constituents (like ferrite and pearlite) and grain boundaries at different rates. This creates topographical differences on the surface, which allows the microstructure (e.g., grains, phases like pearlite, bainite, martensite) to be observed under an optical microscope.
Other Materials:
Bronze and Brass (Copper alloys): Common etchants include solutions of ferric chloride, ammonium persulfate, or potassium dichromate.
Aluminium and its alloys: Common etchants include Keller's Reagent (a mixture of hydrofluoric, hydrochloric, and nitric acids) or caustic soda (NaOH) solutions.
Therefore, Nital is most commonly associated with the etching of Mild Steel and other ferrous alloys.
Step 4: Final Answer:
Nital is the most commonly used etchant for Mild Steel. This corresponds to option (C).
Quick Tip: It is useful to memorize a few standard etchant-material pairs for exams:
- \textbf{Steels/Ferrous alloys:} Nital, Picral.
- \textbf{Aluminum alloys:} Keller's Reagent.
- \textbf{Copper alloys (Brass/Bronze):} Ferric Chloride, Ammonium Persulfate.
- \textbf{Stainless Steels:} Glyceregia, Kalling's No. 2.
Which one of the following options is correct?
In a face-centered cubic metal, Shockley partial is:
Step 1: Understanding the Question:
The question asks to classify a Shockley partial dislocation in an FCC metal based on two characteristics: whether it is perfect or imperfect, and whether it is mobile or immobile.
Step 2: Key Formula or Approach:
This question requires understanding the definitions of different types of dislocations in crystalline materials.
- A perfect dislocation has a Burgers vector that is a complete lattice translation vector. Its movement does not disrupt the crystal stacking sequence.
- An imperfect (or partial) dislocation has a Burgers vector that is not a full lattice translation vector. Its movement creates a stacking fault.
- A mobile dislocation (glissile) can glide on a specific crystallographic plane (the slip plane).
- An immobile dislocation (sessile) cannot glide.
Step 3: Detailed Explanation:
In FCC metals, a perfect dislocation with a Burgers vector of type \(a/2 \langle 110 \rangle\) can dissociate into two Shockley partial dislocations to reduce its strain energy. A typical reaction is:
\[ a/2 [1\bar{1}0] \rightarrow a/6 [2\bar{1}\bar{1}] + a/6 [1\bar{2}1] \]
Imperfect/Perfect: The Burgers vectors of the resulting dislocations, \(a/6 \langle 112 \rangle\), are not full lattice translation vectors. Therefore, Shockley partials are imperfect dislocations. A stacking fault is formed between the two partials.
Mobile/Immobile: Both the Burgers vector of a Shockley partial and the slip plane normal in FCC crystals are contained within the {111 slip plane. This allows the Shockley partial to glide easily on the {111 plane. Therefore, they are mobile (or glissile). This is in contrast to another type of partial dislocation in FCC, the Frank partial (\(a/3 \langle 111 \rangle\)), which is sessile or immobile because its Burgers vector is not in the slip plane.
Combining these two characteristics, a Shockley partial is an imperfect and mobile dislocation.
Step 4: Final Answer:
A Shockley partial is an imperfect and mobile dislocation, which corresponds to option (D).
Quick Tip: Remember the two main partials in FCC crystals:
- \textbf{Shockley Partial:} Burgers vector \(a/6 \langle 112 \rangle\), glides on {111} plane \(\Rightarrow\) \textbf{Mobile}.
- \textbf{Frank Partial:} Burgers vector \(a/3 \langle 111 \rangle\), cannot glide on {111} plane \(\Rightarrow\) \textbf{Immobile} (Sessile).
Both are imperfect dislocations.
Deformation mechanism map of a given material is used for determining which one of the following properties?
Step 1: Understanding the Question:
The question asks about the primary application of a deformation mechanism map.
Step 2: Key Formula or Approach:
This is a knowledge-based question about a specific tool used in materials science, the deformation mechanism map (also known as an Ashby map).
Step 3: Detailed Explanation:
A deformation mechanism map is a graphical representation that shows the dominant mechanism of plastic deformation for a material as a function of temperature and stress. The axes are typically normalized stress (\(\sigma/G\) or \(\sigma/E\), where G is shear modulus and E is Young's modulus) and homologous temperature (\(T/T_m\), where \(T_m\) is the melting temperature).
The map is divided into regions where a specific mechanism controls the deformation process, such as:
Dislocation glide (at low temperatures and high stresses)
Dislocation creep (e.g., power-law creep, at high temperatures and intermediate stresses)
Diffusional creep (e.g., Nabarro-Herring or Coble creep, at high temperatures and low stresses)
Often, contours of constant strain rate (\(\dot{\epsilon}\)) are overlaid on these maps. Since creep is time-dependent plastic deformation, the strain rate is equivalent to the creep rate. Therefore, these maps are primarily used to predict the dominant creep mechanism and the corresponding creep rate for a given set of service conditions (stress and temperature). The other properties listed (fatigue strength, tensile strength, impact toughness) are determined through different types of tests and are not the primary output of a deformation mechanism map.
Step 4: Final Answer:
A deformation mechanism map is used for determining the creep rate, which corresponds to option (B).
Quick Tip: Think of deformation mechanism maps (Ashby maps) as "roadmaps" for material behavior at high temperatures. Their main purpose is to tell you *how* and *how fast* a material will deform (creep) under a given load and temperature. The key output is the dominant mechanism and the resulting strain rate (creep rate).
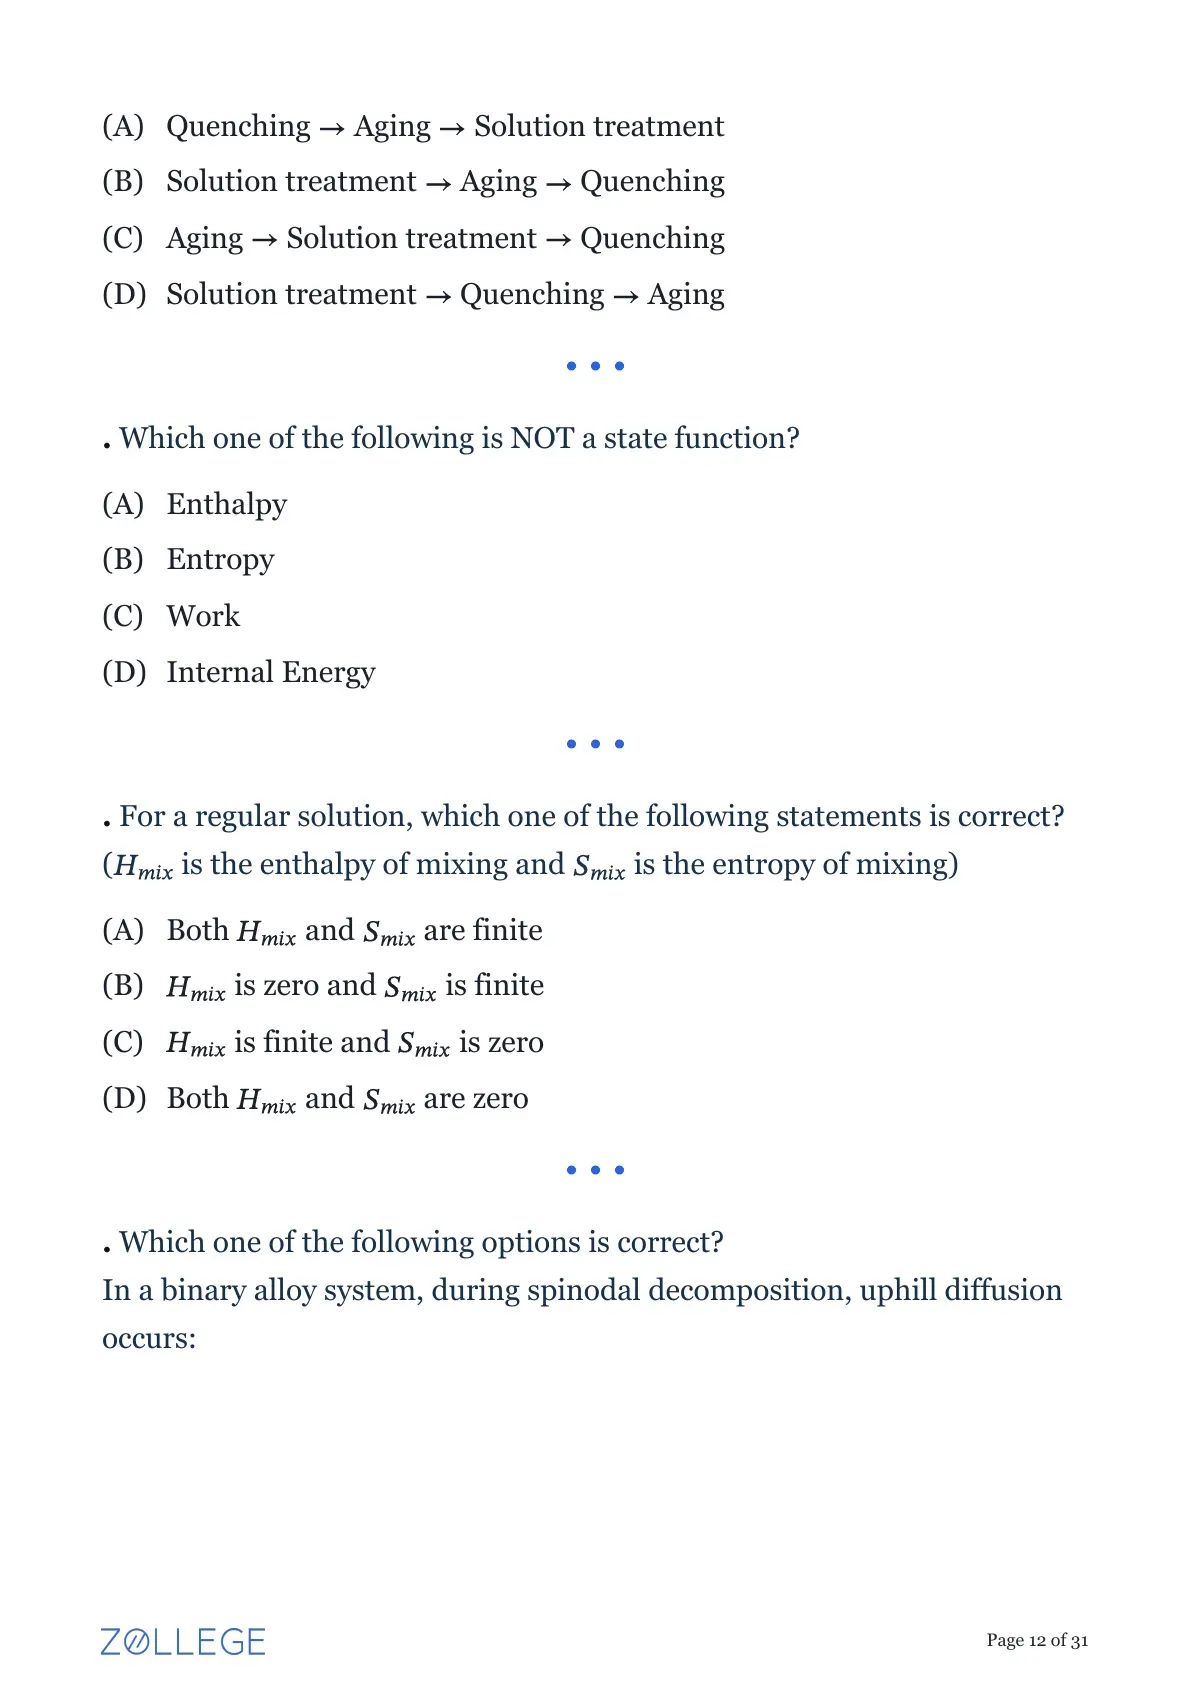
Which one of the following dislocation dissociation reactions is feasible in face-centered cubic metals?
Step 1: Understanding the Question:
We need to identify which of the given dislocation reactions is physically possible (feasible) in an FCC crystal.
Step 2: Key Formula or Approach:
A dislocation reaction is feasible if two conditions are met:
1. Vector Conservation: The sum of the Burgers vectors of the product dislocations must be equal to the Burgers vector of the reactant dislocation.
2. Energy Criterion (Frank's Rule): The reaction must be energetically favorable. The strain energy of a dislocation is proportional to the square of the magnitude of its Burgers vector (\(E \propto |b|^2\)). Therefore, for a reaction \(b_0 \rightarrow b_1 + b_2\) to be feasible, we must have \(|b_0|^2 > |b_1|^2 + |b_2|^2\).
Step 3: Detailed Explanation:
Let's analyze each option. The reactant vector is \(b_0 = a/2 [0 \bar{1} 1]\). Its squared magnitude is:
\[ |b_0|^2 = (a/2)^2 (0^2 + (-1)^2 + 1^2) = (a^2/4)(2) = a^2/2 \]
Analysis of Option (A):
\(b_1 = a/6 [1 \bar{2} 1]\) and \(b_2 = a/6 [\bar{1} \bar{1} 2]\).
1. Vector Check:
\[ b_1 + b_2 = a/6 ([1-1], [-2-1], [1+2]) = a/6 [0, -3, 3] = a/2 [0, -1, 1] = b_0 \]
Vector conservation is satisfied.
2. Energy Check:
\[ |b_1|^2 = (a/6)^2 (1^2 + (-2)^2 + 1^2) = (a^2/36)(1+4+1) = 6a^2/36 = a^2/6 \] \[ |b_2|^2 = (a/6)^2 ((-1)^2 + (-1)^2 + 2^2) = (a^2/36)(1+1+4) = 6a^2/36 = a^2/6 \] \[ |b_1|^2 + |b_2|^2 = a^2/6 + a^2/6 = 2a^2/6 = a^2/3 \]
Is \(|b_0|^2 > |b_1|^2 + |b_2|^2\)? Is \(a^2/2 > a^2/3\)? Yes, because \(1/2 > 1/3\).
Both conditions are met. Thus, reaction (A) is feasible.
Analysis of Other Options (Vector Check is usually sufficient):
Option (B): \(b_1+b_2 = a/6([1+2], [1+1], [2-1]) = a/6[3,2,1] \neq b_0\).
Option (C): \(b_1+b_2 = a/6([1-1], [-1+2], [2-1]) = a/6[0,1,1] \neq b_0\).
Option (D): \(b_1+b_2 = a/6([1+2], [2-1], [-1-1]) = a/6[3,1,-2] \neq b_0\).
Options B, C, and D are not feasible because their Burgers vectors do not sum correctly.
Step 4: Final Answer:
The reaction in option (A) is the only feasible one.
Quick Tip: When checking dislocation reactions, always start with the vector conservation rule. It's a simple addition and can often disqualify most options very quickly without needing to calculate the squared magnitudes for the energy check.
Which one of the following options is correct?
For Al - 4 % Ag alloy (composition in atom %), the correct sequence of operations involved in precipitation hardening is:
Step 1: Understanding the Question:
The question asks for the correct chronological sequence of heat treatment steps for precipitation hardening (also known as age hardening).
Step 2: Key Formula or Approach:
This is a fundamental concept in physical metallurgy. The process is designed to create a fine dispersion of second-phase particles within a ductile matrix to increase strength and hardness. The logic of the sequence is key.
Step 3: Detailed Explanation:
Precipitation hardening involves three main steps performed in a specific order:
1. Solution Treatment (or Solutionizing): The alloy is heated to a temperature within the single-phase solid solution region (e.g., the \(\alpha\) phase field in the Al-Ag phase diagram). It is held at this temperature long enough for all the solute atoms (Ag) to dissolve into the matrix (Al), creating a homogeneous solid solution. The goal is to "erase" the previous microstructure and get all the strengthening elements into solution.
2. Quenching: The alloy is rapidly cooled (e.g., in water) to a low temperature, typically room temperature. The cooling must be fast enough to prevent the solute atoms from precipitating out as coarse, stable phases. This step traps the solute atoms in the matrix, creating a non-equilibrium supersaturated solid solution (SSSS). The material is relatively soft and ductile in this state.
3. Aging (or Precipitation Treatment): The quenched, supersaturated solid solution is heated to an intermediate temperature below the solvus line and held for a period of time (artificial aging), or simply left at room temperature (natural aging). This provides the thermal energy necessary for the solute atoms to diffuse and form a large number of very fine, dispersed precipitate particles. These particles act as obstacles to dislocation motion, which is the primary source of the strengthening.
Thus, the correct sequence is Solution treatment \(\rightarrow\) Quenching \(\rightarrow\) Aging.
Step 4: Final Answer:
The correct sequence is given in option (D).
Quick Tip: A simple way to remember the sequence is the mnemonic \textbf{SQA}: \textbf{S}olutionize, \textbf{Q}uench, \textbf{A}ge. First you dissolve everything, then you trap it by cooling fast, then you let it precipitate out in a controlled way.
Which one of the following is NOT a state function?
Step 1: Understanding the Question:
We need to identify which of the given thermodynamic quantities is a path function, not a state function.
Step 2: Key Formula or Approach:
- A state function (or property of a system) depends only on the current state of the system, not on the path taken to reach that state. Its differential is an exact differential. Examples include Pressure (P), Volume (V), Temperature (T), Internal Energy (U), Enthalpy (H), Entropy (S), and Gibbs Free Energy (G).
- A path function depends on the specific path or process followed between two states. Its differential is an inexact differential. The two most common examples are Work (W) and Heat (Q).
Step 3: Detailed Explanation:
Let's analyze the options:
- Internal Energy (U): This is the total energy contained within a system. It is a fundamental property of the state of the system. The change in internal energy (\(\Delta U\)) between two states is independent of the path. Thus, it is a state function.
- Enthalpy (H): Defined as \(H = U + PV\). Since U, P, and V are all state functions, H is also a state function.
- Entropy (S): A measure of the disorder or randomness of a system. It is a property of the system's state. The change in entropy (\(\Delta S\)) between two states is independent of the path. Thus, it is a state function.
- Work (W): Work is energy transferred by a system due to a change in volume against an external pressure, or other generalized force-displacement interactions. The amount of work done when a system goes from state 1 to state 2 depends entirely on the process path. For example, the work done in expanding a gas from \(V_1\) to \(V_2\) is different for an isothermal process compared to an adiabatic process. Therefore, work is a path function.
Step 4: Final Answer:
Work is not a state function; it is a path function. This corresponds to option (C).
Quick Tip: In thermodynamics, always remember that \textbf{Work (W)} and \textbf{Heat (Q)} are the two primary path functions. Nearly all other named properties you encounter (P, V, T, U, H, S, G, A) are state functions.
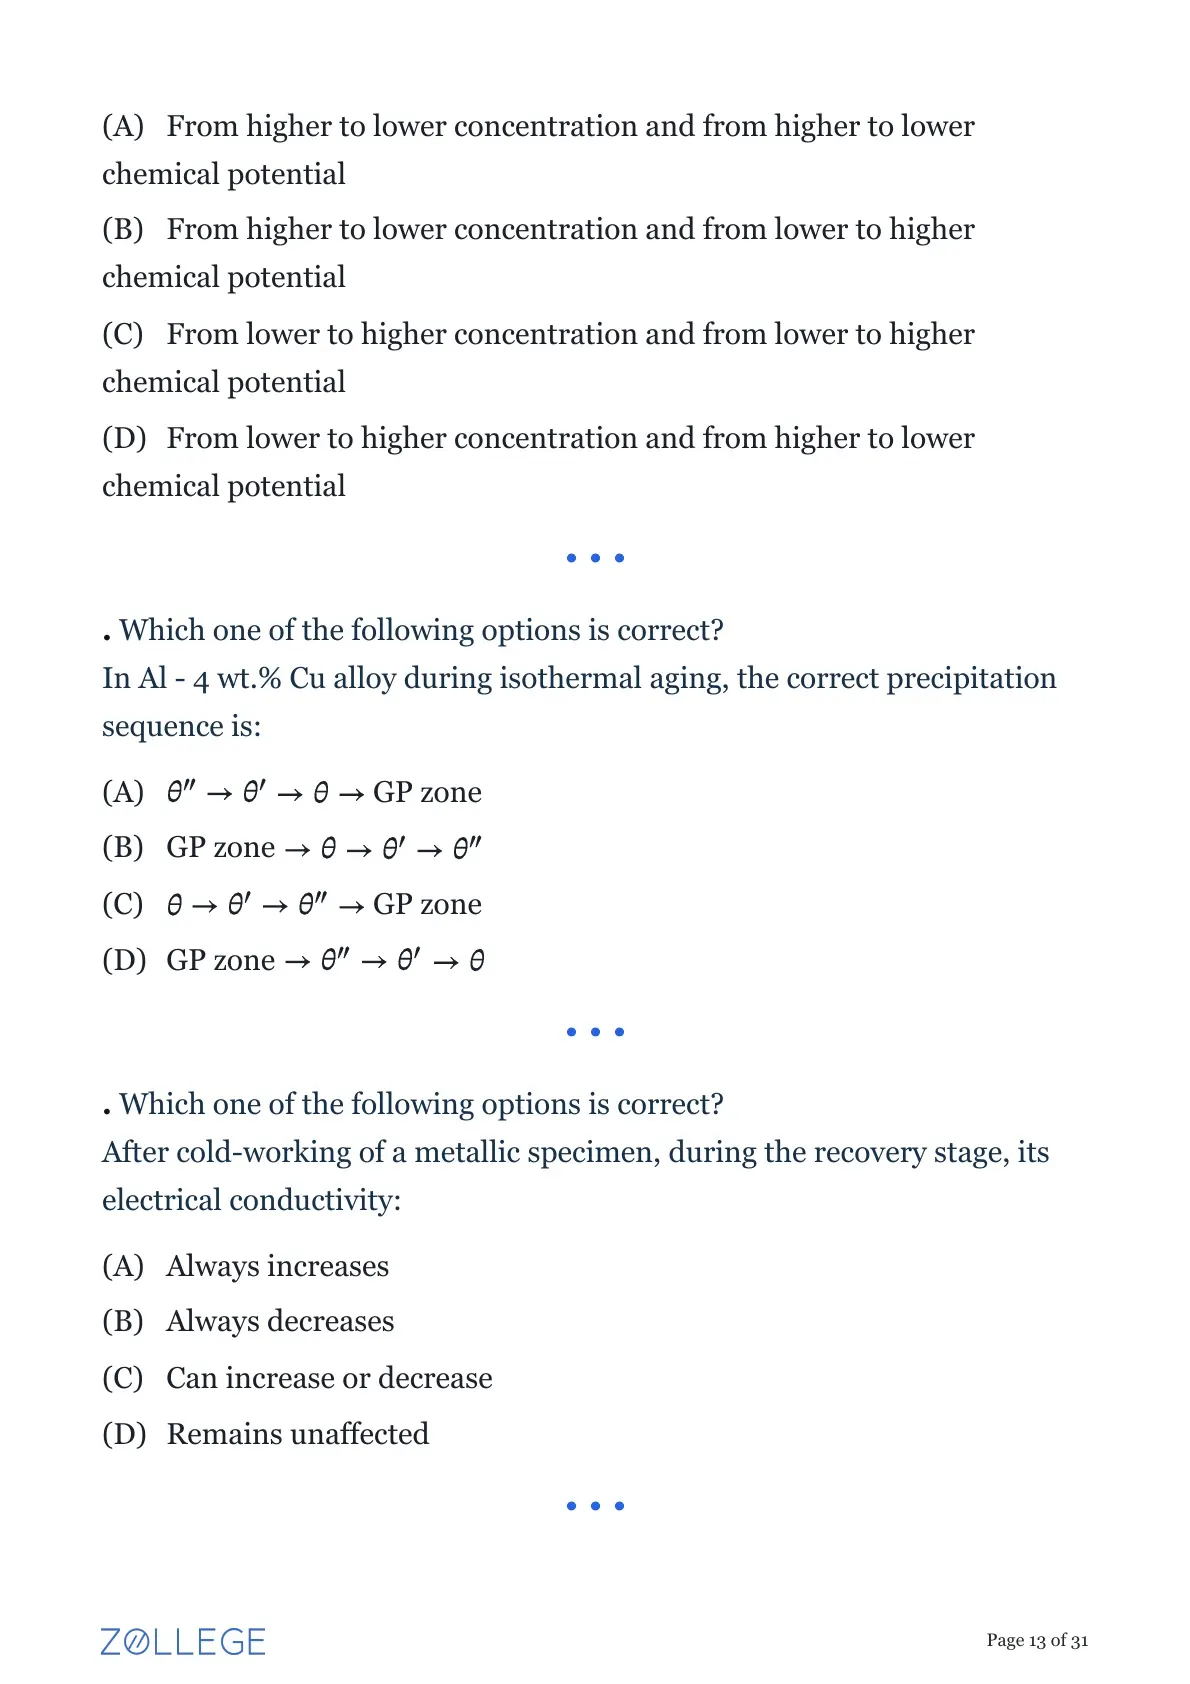
For a regular solution, which one of the following statements is correct?
(\(\Delta H_{mix}\) is the enthalpy of mixing and \(\Delta S_{mix}\) is the entropy of mixing)
Step 1: Understanding the Question:
The question asks for the correct description of the enthalpy of mixing (\(\Delta H_{mix}\)) and entropy of mixing (\(\Delta S_{mix}\)) for a regular solution.
Step 2: Key Formula or Approach:
This requires knowing the definitions of different solution models, specifically the ideal and regular solution models.
- Ideal Solution: Assumes no interaction between atoms. \(\Delta H_{mix} = 0\). The entropy of mixing is purely configurational: \(\Delta S_{mix} = -R(X_A \ln X_A + X_B \ln X_B)\).
- Regular Solution: A modification of the ideal model that accounts for non-zero enthalpy of mixing due to atomic interactions, but retains the ideal entropy of mixing expression.
Step 3: Detailed Explanation:
According to the definition of a regular solution:
1. Enthalpy of Mixing (\(\Delta H_{mix}\)): The model assumes there is an interaction energy between atoms, leading to a non-zero enthalpy of mixing. It is given by the formula \(\Delta H_{mix} = \Omega X_A X_B\), where \(\Omega\) is an interaction parameter and \(X_A, X_B\) are mole fractions. Since \(\Omega\) is generally non-zero for a regular solution, \(\Delta H_{mix}\) is non-zero and therefore finite.
2. Entropy of Mixing (\(\Delta S_{mix}\)): The regular solution model makes a simplifying assumption that the arrangement of atoms is random, just like in an ideal solution. Therefore, it uses the same expression for the entropy of mixing as the ideal solution model:
\[ \Delta S_{mix} = -R(X_A \ln X_A + X_B \ln X_B) \]
For any mixture (\(0 < X_A < 1\) and \(0 < X_B < 1\)), this expression gives a positive, non-zero value. Thus, \(\Delta S_{mix}\) is finite.
Since both quantities are finite (non-zero), option (A) is correct.
Step 4: Final Answer:
For a regular solution, both the enthalpy of mixing and the entropy of mixing are finite. This corresponds to option (A).
Quick Tip: To distinguish solution models:
- \textbf{Ideal:} \(\Delta H_{mix} = 0\), \(\Delta S_{mix} > 0\) (finite).
- \textbf{Regular:} \(\Delta H_{mix} \neq 0\) (finite), \(\Delta S_{mix}\) is the same as ideal (\(>0\), finite).
The key difference is that regular solutions have a non-zero heat of mixing.
Which one of the following options is correct?
In a binary alloy system, during spinodal decomposition, uphill diffusion occurs:
Step 1: Understanding the Question:
The question asks to describe the direction of atomic movement during uphill diffusion (which occurs in spinodal decomposition) with respect to both concentration and chemical potential gradients.
Step 2: Key Formula or Approach:
The fundamental driving force for diffusion is always a gradient in chemical potential (\(\mu\)). Atoms will always diffuse from a region of higher chemical potential to a region of lower chemical potential to minimize the total free energy of the system. The term "uphill diffusion" specifically refers to the direction of diffusion relative to the concentration gradient.
Step 3: Detailed Explanation:
- Normal Diffusion (Downhill): In most situations, a region of higher concentration also has a higher chemical potential. Therefore, atoms move from high concentration to low concentration, which is also from high chemical potential to low chemical potential. This is described by option (A).
- Spinodal Decomposition: This process occurs in a thermodynamically unstable region of a phase diagram, specifically where the second derivative of the free energy of mixing with respect to composition is negative (\(\partial^2 G / \partial X^2 < 0\)). In this region, the relationship between chemical potential and concentration is inverted. Small fluctuations in composition lead to a state of lower free energy, causing these fluctuations to grow.
- Uphill Diffusion: In the spinodal region, atoms spontaneously move from areas where their concentration is lower to areas where it is already higher, amplifying the concentration difference. This is diffusion from lower to higher concentration. However, the fundamental thermodynamic law must still be obeyed: atoms must be moving down the chemical potential gradient. Therefore, this movement must be from higher to lower chemical potential.
This unique situation, where the concentration gradient and chemical potential gradient are in opposite directions, is the definition of uphill diffusion.
Step 4: Final Answer:
Uphill diffusion is the process of atoms moving from a region of lower concentration to a region of higher concentration, driven by a gradient from higher chemical potential to lower chemical potential. This corresponds to option (D).
Quick Tip: The golden rule of diffusion is: \textbf{Flux is ALWAYS down the chemical potential gradient}. "Uphill" diffusion only refers to the concentration gradient and is a special case that occurs inside the spinodal region of a phase diagram.
Which one of the following options is correct?
In Al - 4 wt.% Cu alloy during isothermal aging, the correct precipitation sequence is:
Step 1: Understanding the Question:
The question asks for the correct sequence of precipitate formation during the aging of an Al-Cu alloy, a classic example of a precipitation-hardenable system.
Step 2: Key Formula or Approach:
This is a standard, well-established sequence in physical metallurgy. The sequence progresses from metastable, coherent precipitates to the final, stable, incoherent equilibrium phase. The driving force is the reduction in the free energy of the system.
Step 3: Detailed Explanation:
After solution treatment and quenching, the Al-Cu alloy is a supersaturated solid solution. Upon aging, this unstable solution decomposes by forming a sequence of phases. The sequence is as follows:
Supersaturated Solid Solution (\(\alpha_{SSSS}\)) \(\rightarrow\)
1. GP zones (Guinier-Preston zones): These are not true phases but are coherent clusters of Cu atoms that form on the \{100\ planes of the Al matrix. They are the first to form because they have a low nucleation barrier.
\(\rightarrow\)
2. \(\theta''\) (theta double prime): This is a metastable, coherent precipitate with a tetragonal crystal structure. It provides very effective strengthening.
\(\rightarrow\)
3. \(\theta'\) (theta prime): This is a semi-coherent, metastable precipitate, also with a tetragonal structure. As the precipitates grow, they lose coherency with the matrix.
\(\rightarrow\)
4. \(\theta\) (theta): This is the final, stable, equilibrium phase with the composition CuAl\(_2\). It is incoherent with the Al matrix. Its formation, especially as coarse particles, usually leads to a decrease in hardness (over-aging).
Therefore, the correct chronological sequence of precipitate evolution is GP zone \(\rightarrow\) \(\theta''\) \(\rightarrow\) \(\theta'\) \(\rightarrow\) \(\theta\).
Step 4: Final Answer:
The correct precipitation sequence is given in option (D).
Quick Tip: For Al-Cu alloys, remember the precipitation sequence follows an increase in stability and a decrease in coherency: from coherent GP zones to the incoherent stable \(\theta\) phase. Peak strength is typically achieved when the microstructure contains a fine dispersion of GP zones and/or \(\theta''\) precipitates.
Which one of the following options is correct?
After cold-working of a metallic specimen, during the recovery stage, its electrical conductivity:
Step 1: Understanding the Question:
The question asks how the electrical conductivity of a cold-worked metal changes during the recovery stage of annealing.
Step 2: Key Formula or Approach:
We need to understand how cold work affects the microstructure and how the changes during recovery, in turn, affect electrical conductivity. The key principle is Matthiessen's rule, which states that the total electrical resistivity of a metal is the sum of contributions from different sources of electron scattering.
\[ \rho_{total} = \rho_{thermal} + \rho_{impurities} + \rho_{defects} \]
Electrical conductivity (\(\sigma\)) is the reciprocal of resistivity (\(\rho\)), so \(\sigma = 1/\rho\).
Step 3: Detailed Explanation:
1. Effect of Cold Working: Cold working (plastic deformation at low temperatures) introduces a high density of crystal defects, primarily point defects (vacancies) and line defects (dislocations). These defects disrupt the periodic lattice structure and act as scattering centers for conduction electrons. This scattering impedes the flow of electrons, thereby increasing the electrical resistivity (\(\rho_{defects}\)) and decreasing the electrical conductivity.
2. The Recovery Stage: Recovery is the first stage of annealing, occurring at relatively low temperatures. During recovery, there is no significant change in the grain structure, but there is a reduction in the stored energy of cold work. This happens primarily through the annihilation and rearrangement of defects:
- Point defects (vacancies) are annihilated.
- Dislocations rearrange themselves into lower-energy configurations (e.g., polygonization, forming sub-grain boundaries).
3. Effect on Conductivity: Both the annihilation of point defects and the rearrangement of dislocations reduce the total number of electron scattering centers in the crystal lattice. This decrease in \(\rho_{defects}\) leads to a decrease in the total resistivity (\(\rho_{total}\)). Since conductivity is the inverse of resistivity, a decrease in resistivity results in an increase in electrical conductivity. This effect is a well-established and consistent phenomenon.
Step 4: Final Answer:
During the recovery stage, the density of crystal defects decreases, leading to a consistent increase in electrical conductivity. This corresponds to option (A).
Quick Tip: Remember this chain of effects:
\textbf{Cold Work} \(\rightarrow\) \(\uparrow\) Defects \(\rightarrow\) \(\uparrow\) Electron Scattering \(\rightarrow\) \(\uparrow\) Resistivity \(\rightarrow\) \(\downarrow\) Conductivity.
\textbf{Recovery} \(\rightarrow\) \(\downarrow\) Defects \(\rightarrow\) \(\downarrow\) Electron Scattering \(\rightarrow\) \(\downarrow\) Resistivity \(\rightarrow\) \(\uparrow\) Conductivity.
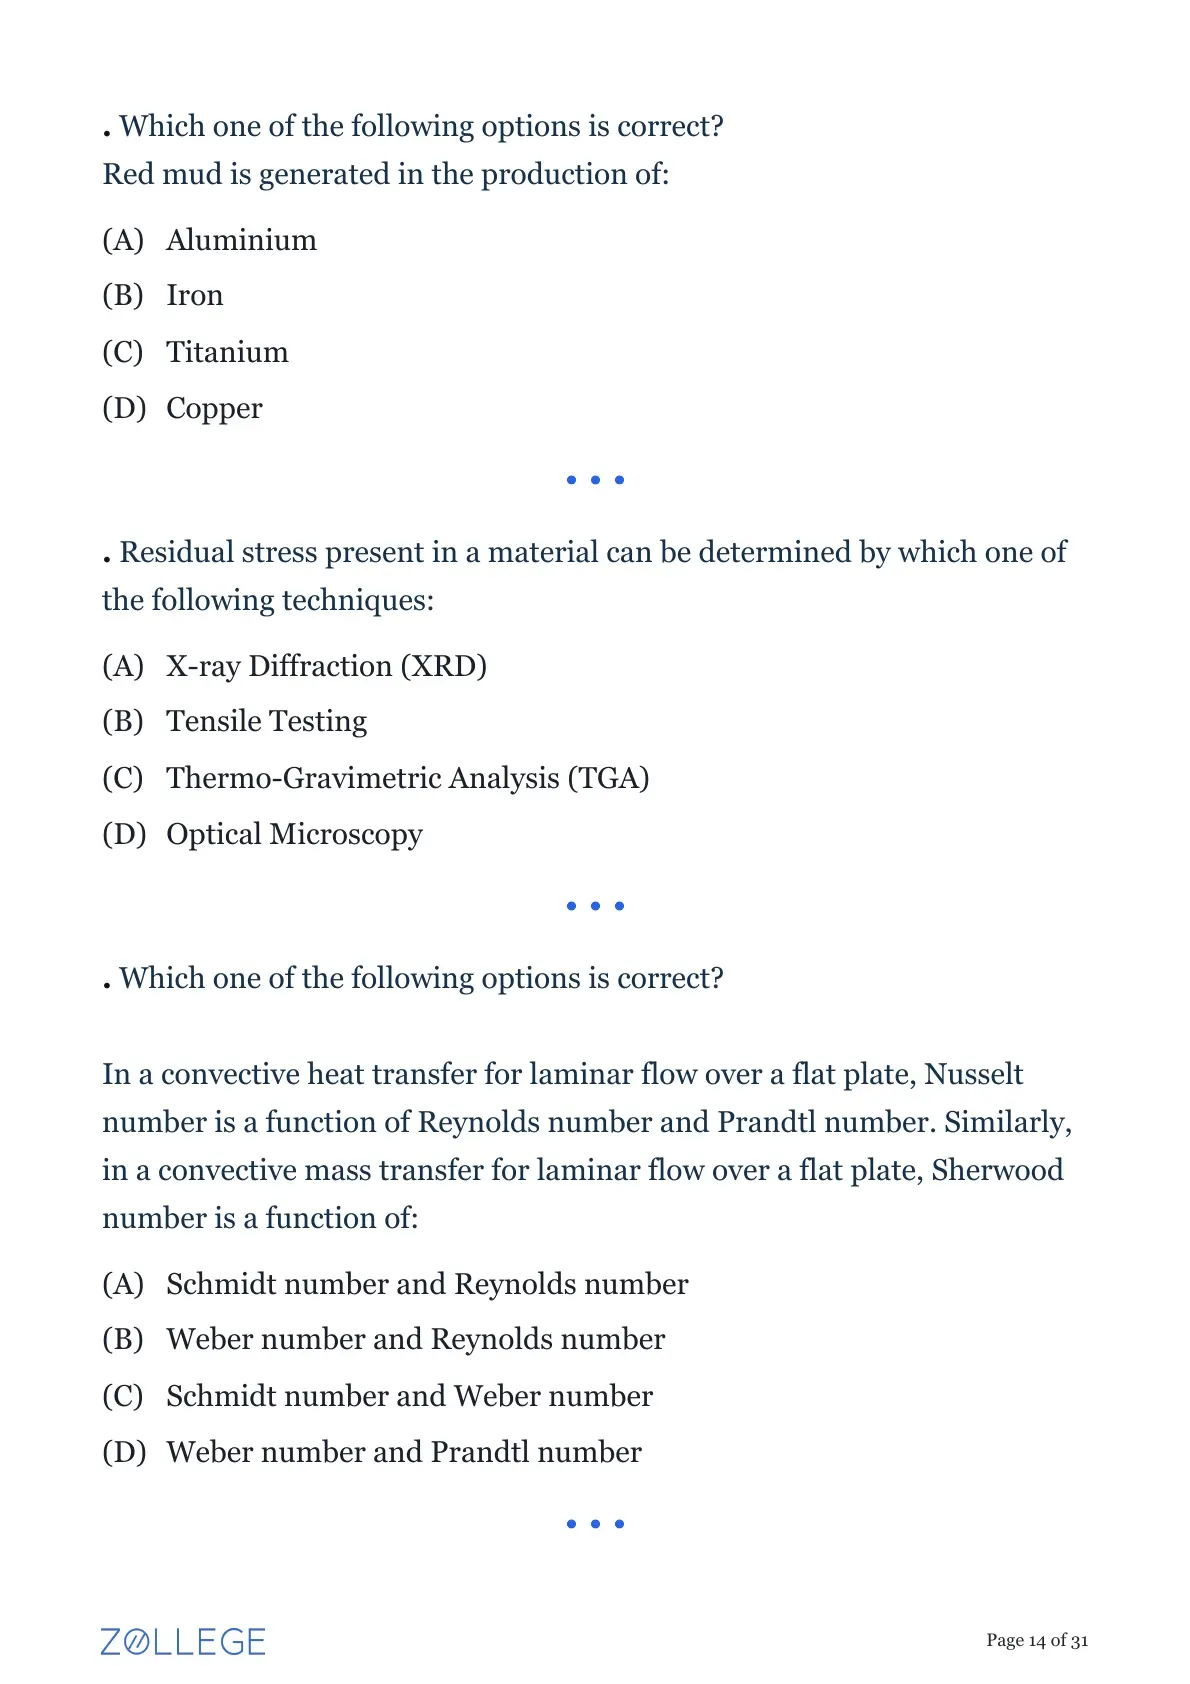
Which one of the following options is correct?
Red mud is generated in the production of:
Step 1: Understanding the Question:
The question asks to identify the metal production process that generates "red mud" as a byproduct.
Step 2: Key Formula or Approach:
This question requires knowledge of major industrial metallurgical extraction routes and their associated waste products.
Step 3: Detailed Explanation:
Red mud is the primary waste product generated during the Bayer process. The Bayer process is the principal industrial method for refining bauxite ore to produce alumina (aluminum oxide, Al\(_2\)O\(_3\)). The alumina is then smelted via the Hall-Héroult process to produce metallic aluminium.
The bauxite ore is digested in a hot solution of sodium hydroxide (caustic soda). The aluminium oxides dissolve to form sodium aluminate, while other impurities, mainly iron oxides, remain undissolved. These insoluble impurities are filtered off, washed, and disposed of as a waste slurry. Due to the high concentration of iron oxides (like Fe\(_2\)O\(_3\)), this waste slurry has a characteristic red color, hence the name "red mud".
The other options are incorrect:
- Iron production in a blast furnace generates slag and flue gases.
- Titanium production (Kroll process) generates magnesium chloride (MgCl\(_2\)).
- Copper production (smelting) generates slag and sulfur dioxide gas.
Step 4: Final Answer:
Red mud is generated in the production of Aluminium. This corresponds to option (A).
Quick Tip: Associate key waste products with their extraction processes:
- \textbf{Red Mud} \(\rightarrow\) Bayer Process \(\rightarrow\) \textbf{Aluminium}.
- \textbf{Slag} \(\rightarrow\) Blast Furnace/Smelting \(\rightarrow\) \textbf{Iron, Copper, Steel}.
- \textbf{Phosphogypsum} \(\rightarrow\) Phosphoric Acid Production.
Residual stress present in a material can be determined by which one of the following techniques:
Step 1: Understanding the Question:
The question asks to identify a technique capable of measuring residual stress within a material. Residual stresses are internal stresses that exist in a material without any external load.
Step 2: Key Formula or Approach:
The principle behind using XRD for stress measurement is based on Bragg's Law (\(n\lambda = 2d \sin\theta\)). Residual stress causes the crystal lattice to be strained, which means the interplanar spacing, \(d\), changes. By measuring this change in \(d\)-spacing, one can calculate the strain and, using the material's elastic constants, determine the stress.
Step 3: Detailed Explanation:
- (A) X-ray Diffraction (XRD): This is a standard and powerful non-destructive technique for measuring residual stress. It measures the angular position (\(2\theta\)) of diffracted X-ray peaks. A shift in the peak position from its stress-free value corresponds to a change in the \(d\)-spacing. By measuring this shift at different angles of incidence, the strain and hence the stress in the material's surface can be accurately calculated.
- (B) Tensile Testing: This technique measures a material's response to an *applied* external load. It determines properties like yield strength, ultimate tensile strength, and ductility, but it does not directly measure pre-existing residual stresses.
- (C) Thermo-Gravimetric Analysis (TGA): This method measures the change in mass of a sample as a function of temperature. It is used to study phenomena like decomposition, oxidation, or dehydration, not stress.
- (D) Optical Microscopy: This technique is used to observe the microstructure of a material, such as grain size, phase distribution, and inclusions. It cannot be used to quantitatively measure internal stresses.
Step 4: Final Answer:
X-ray Diffraction (XRD) is the appropriate technique for determining residual stress. This corresponds to option (A).
Quick Tip: Remember the core purpose of common characterization techniques:
- \textbf{XRD:} Crystal structure, phase identification, lattice parameters, \textbf{residual stress}.
- \textbf{Tensile Test:} Mechanical properties under \textbf{applied} load.
- \textbf{Microscopy (Optical, SEM):} Microstructure, morphology.
- \textbf{Thermal Analysis (TGA, DSC):} Mass/heat flow changes with temperature.
Which one of the following options is correct?
In a convective heat transfer for laminar flow over a flat plate, Nusselt number is a function of Reynolds number and Prandtl number. Similarly, in a convective mass transfer for laminar flow over a flat plate, Sherwood number is a function of:
Step 1: Understanding the Question:
This question is based on the analogy between heat transfer and mass transfer. Given the relationship for heat transfer, we need to find the analogous relationship for mass transfer.
Step 2: Key Formula or Approach:
The Chilton-Colburn J-factor analogy provides a direct relationship between heat, mass, and momentum transfer. This analogy shows that dimensionless numbers describing these phenomena are related.
- Heat Transfer: Governed by the Nusselt number (\(Nu\)), which is a function of the Reynolds number (\(Re\)) for fluid flow and the Prandtl number (\(Pr\)) for fluid properties related to heat. \(Nu = f(Re, Pr)\).
- Mass Transfer: Governed by the Sherwood number (\(Sh\)), which is the mass transfer equivalent of the Nusselt number. It is a function of the Reynolds number (\(Re\)) and the Schmidt number (\(Sc\)). \(Sh = f(Re, Sc)\).
Step 3: Detailed Explanation:
Let's define the analogous numbers:
- Nusselt Number (\(Nu\)): Ratio of convective to conductive heat transfer.
- Sherwood Number (\(Sh\)): Ratio of convective to diffusive mass transfer. (\(Sh\) is analogous to \(Nu\)).
- Prandtl Number (\(Pr\)): Ratio of momentum diffusivity (kinematic viscosity) to thermal diffusivity. \(Pr = \nu / \alpha\).
- Schmidt Number (\(Sc\)): Ratio of momentum diffusivity to mass diffusivity. \(Sc = \nu / D\). (\(Sc\) is analogous to \(Pr\)).
- Reynolds Number (\(Re\)): Ratio of inertial forces to viscous forces. It characterizes the flow regime (laminar/turbulent) and is common to both heat and mass transfer.
Given the heat transfer relationship \(Nu = f(Re, Pr)\), the corresponding mass transfer relationship is obtained by replacing \(Nu\) with \(Sh\) and \(Pr\) with its mass transfer analogue, \(Sc\). Therefore, \(Sh = f(Re, Sc)\). The Sherwood number is a function of the Schmidt number and Reynolds number.
The Weber number is related to surface tension and is not relevant here.
Step 4: Final Answer:
The Sherwood number is a function of the Schmidt number and Reynolds number. This corresponds to option (A).
Quick Tip: Remember the heat-mass transfer analogy pairs:
- Heat Transfer \(\leftrightarrow\) Mass Transfer
- Temperature Gradient \(\leftrightarrow\) Concentration Gradient
- Heat Flux \(\leftrightarrow\) Mass Flux
- \textbf{Nusselt No. (Nu)} \(\leftrightarrow\) \textbf{Sherwood No. (Sh)}
- \textbf{Prandtl No. (Pr)} \(\leftrightarrow\) \textbf{Schmidt No. (Sc)}
The Reynolds number (\(Re\)) is the same for both as it describes the fluid flow.
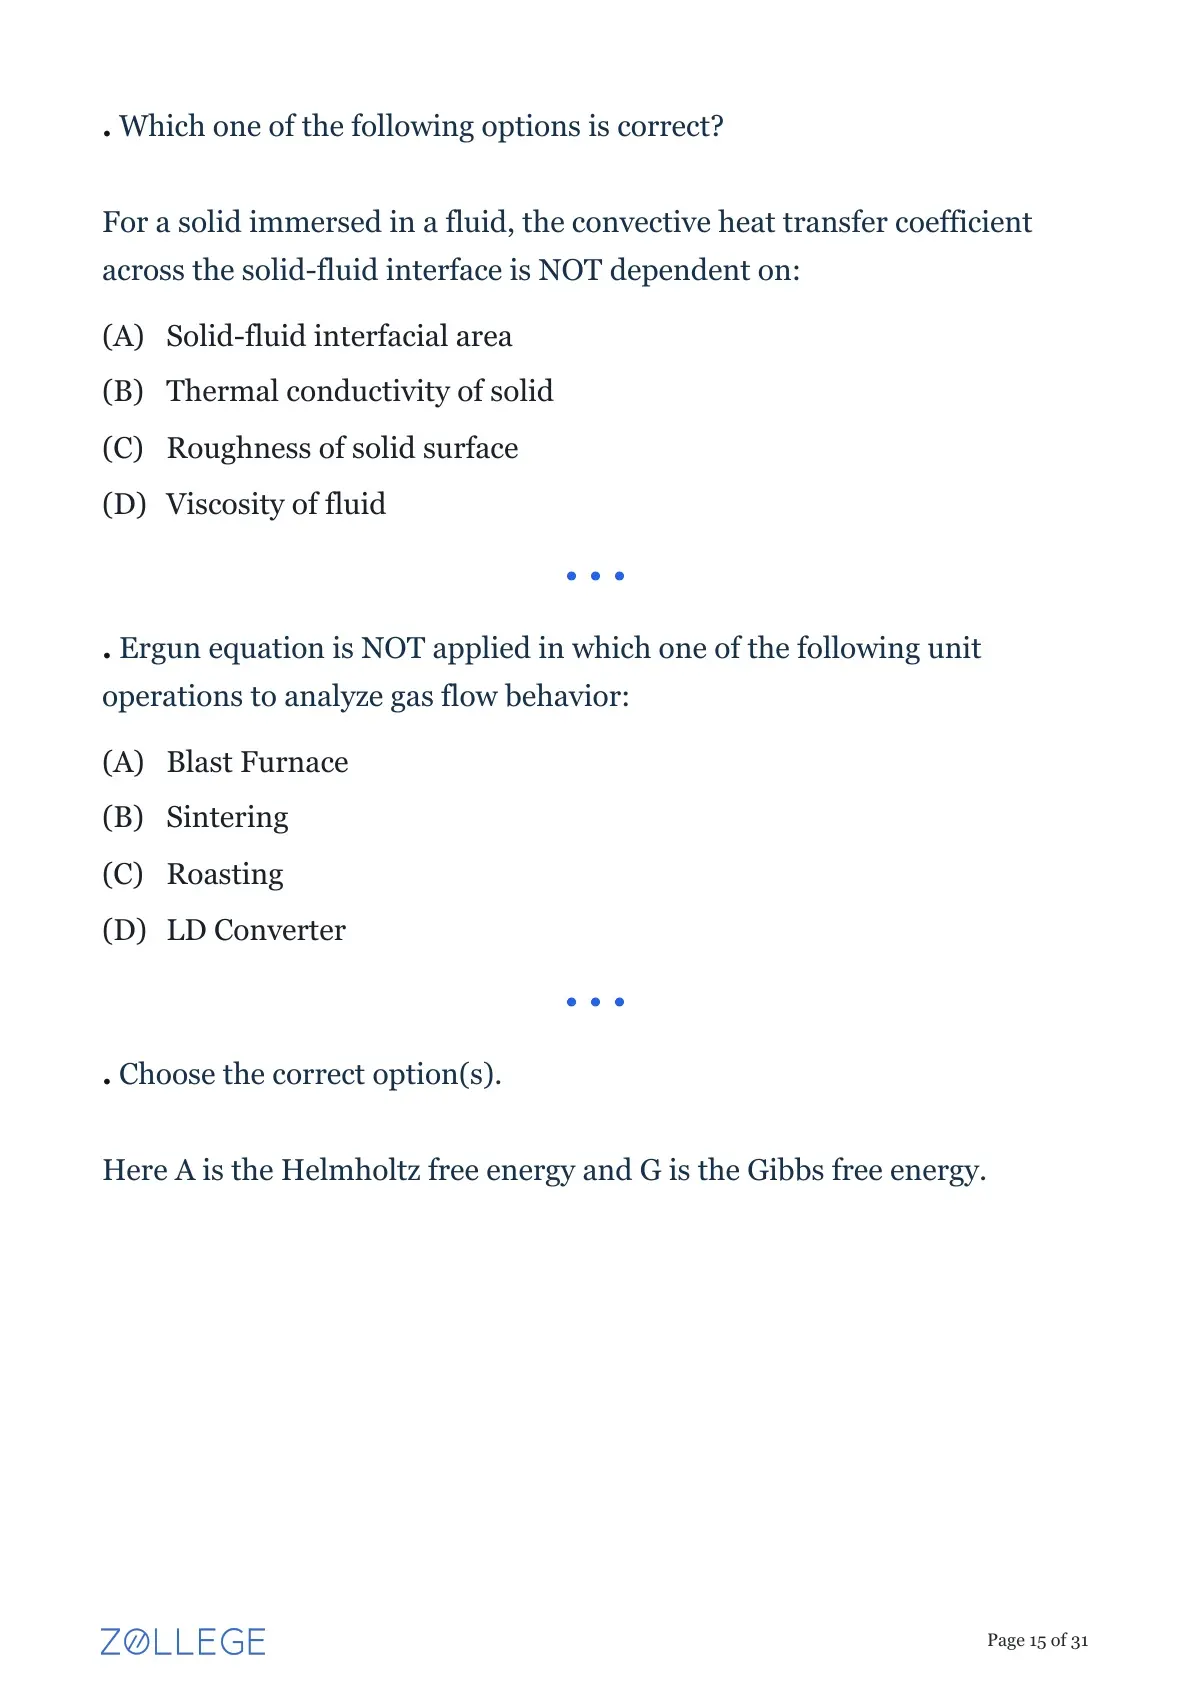
Which one of the following options is correct?
For a solid immersed in a fluid, the convective heat transfer coefficient across the solid-fluid interface is NOT dependent on:
Step 1: Understanding the Question:
We need to identify the factor that does not influence the convective heat transfer coefficient, \(h\).
Step 2: Key Formula or Approach:
The convective heat transfer coefficient (\(h\)) is a property that quantifies the heat transfer at the interface between a solid surface and a moving fluid. It is primarily determined by the properties of the fluid and the nature of the fluid flow, not the properties of the solid. The total heat transfer rate is given by Newton's law of cooling: \(Q = hA(T_s - T_\infty)\).
Step 3: Detailed Explanation:
The value of \(h\) depends on several factors:
- Fluid Properties: Thermal conductivity of the fluid, viscosity, density, and specific heat. Therefore, \(h\) is dependent on the viscosity of the fluid (D).
- Flow Conditions: The velocity of the fluid (whether the flow is laminar or turbulent).
- Surface Geometry and Roughness: The shape of the solid and the roughness of its surface affect the formation and characteristics of the thermal boundary layer. A rougher surface typically promotes turbulence and increases \(h\). Therefore, \(h\) is dependent on the roughness of the solid surface (C).
Now let's analyze the remaining options:
- (A) Solid-fluid interfacial area: The coefficient \(h\) is an intensive property defined per unit area (its units are W/m\(^2\)K). The total heat transfer rate \(Q\) is dependent on the area \(A\), but the coefficient \(h\) itself is not. However, compared to option (B), this is a less definitive answer.
- (B) Thermal conductivity of solid: This property dictates how heat is conducted *within* the solid to its surface. It does not affect the process of how that heat is then transferred from the surface into the fluid via convection. The convection process is entirely governed by the fluid's boundary layer dynamics. Therefore, \(h\) is NOT dependent on the thermal conductivity of the solid.
Comparing (A) and (B), the thermal conductivity of the solid is fundamentally unrelated to the convection process in the fluid, making it the most correct answer.
Step 4: Final Answer:
The convective heat transfer coefficient is not dependent on the thermal conductivity of the solid. This corresponds to option (B).
Quick Tip: Remember that \(h\) (the convective heat transfer coefficient) is all about the fluid's boundary layer. Think of it as a measure of how effectively the *fluid* can carry heat away from the surface. Therefore, it depends on fluid properties and flow conditions, but not on the thermal properties of the solid itself.
Ergun equation is NOT applied in which one of the following unit operations to analyze gas flow behavior:
Step 1: Understanding the Question:
We need to identify which of the listed metallurgical processes does not involve gas flow through a packed bed, as that is the specific scenario where the Ergun equation is applied.
Step 2: Key Formula or Approach:
The Ergun equation is an empirical equation used to calculate the pressure drop (\(\Delta P\)) of a fluid flowing through a porous medium, specifically a packed bed of particles. It combines the viscous energy loss (from the Carman-Kozeny equation for laminar flow) and kinetic energy loss (from the Burke-Plummer equation for turbulent flow). The key application is flow through a bed of solids.
Step 3: Detailed Explanation:
Let's analyze the processes:
- (A) Blast Furnace: A blast furnace is a large counter-current reactor where hot air (blast) is blown upwards through a packed bed of coke, iron ore, and limestone. Analyzing the pressure drop and gas flow distribution is crucial for furnace operation, and the Ergun equation is directly applicable.
- (B) Sintering: In a downdraught sintering machine, air is pulled downwards through a bed of fine ore particles, fuel, and flux placed on a moving grate. This is a classic example of flow through a packed bed, and the Ergun equation is used to determine the required suction pressure.
- (C) Roasting: Many roasting operations, such as fluidized-bed roasting, involve passing gas up through a bed of solid particles. The principles of pressure drop and fluidization are closely related to the Ergun equation.
- (D) LD Converter (Basic Oxygen Furnace): An LD converter is a vessel used for steelmaking. It contains a bath of molten pig iron. A water-cooled lance is lowered from the top and blows high-purity oxygen at supersonic speeds onto the surface of the molten bath. The gas does not flow *through* a packed bed of solids. Therefore, the Ergun equation is not applicable to describe the gas flow behavior in an LD converter.
Step 4: Final Answer:
The Ergun equation is not applied to analyze gas flow in an LD Converter. This corresponds to option (D).
Quick Tip: The keyword for the Ergun equation is \textbf{"packed bed". Simply identify which of the given processes does not operate as a packed bed reactor. A blast furnace is the quintessential example of a packed bed in metallurgy. An LD converter uses a gas jet impinging on a liquid surface, which is a completely different fluid dynamics problem.
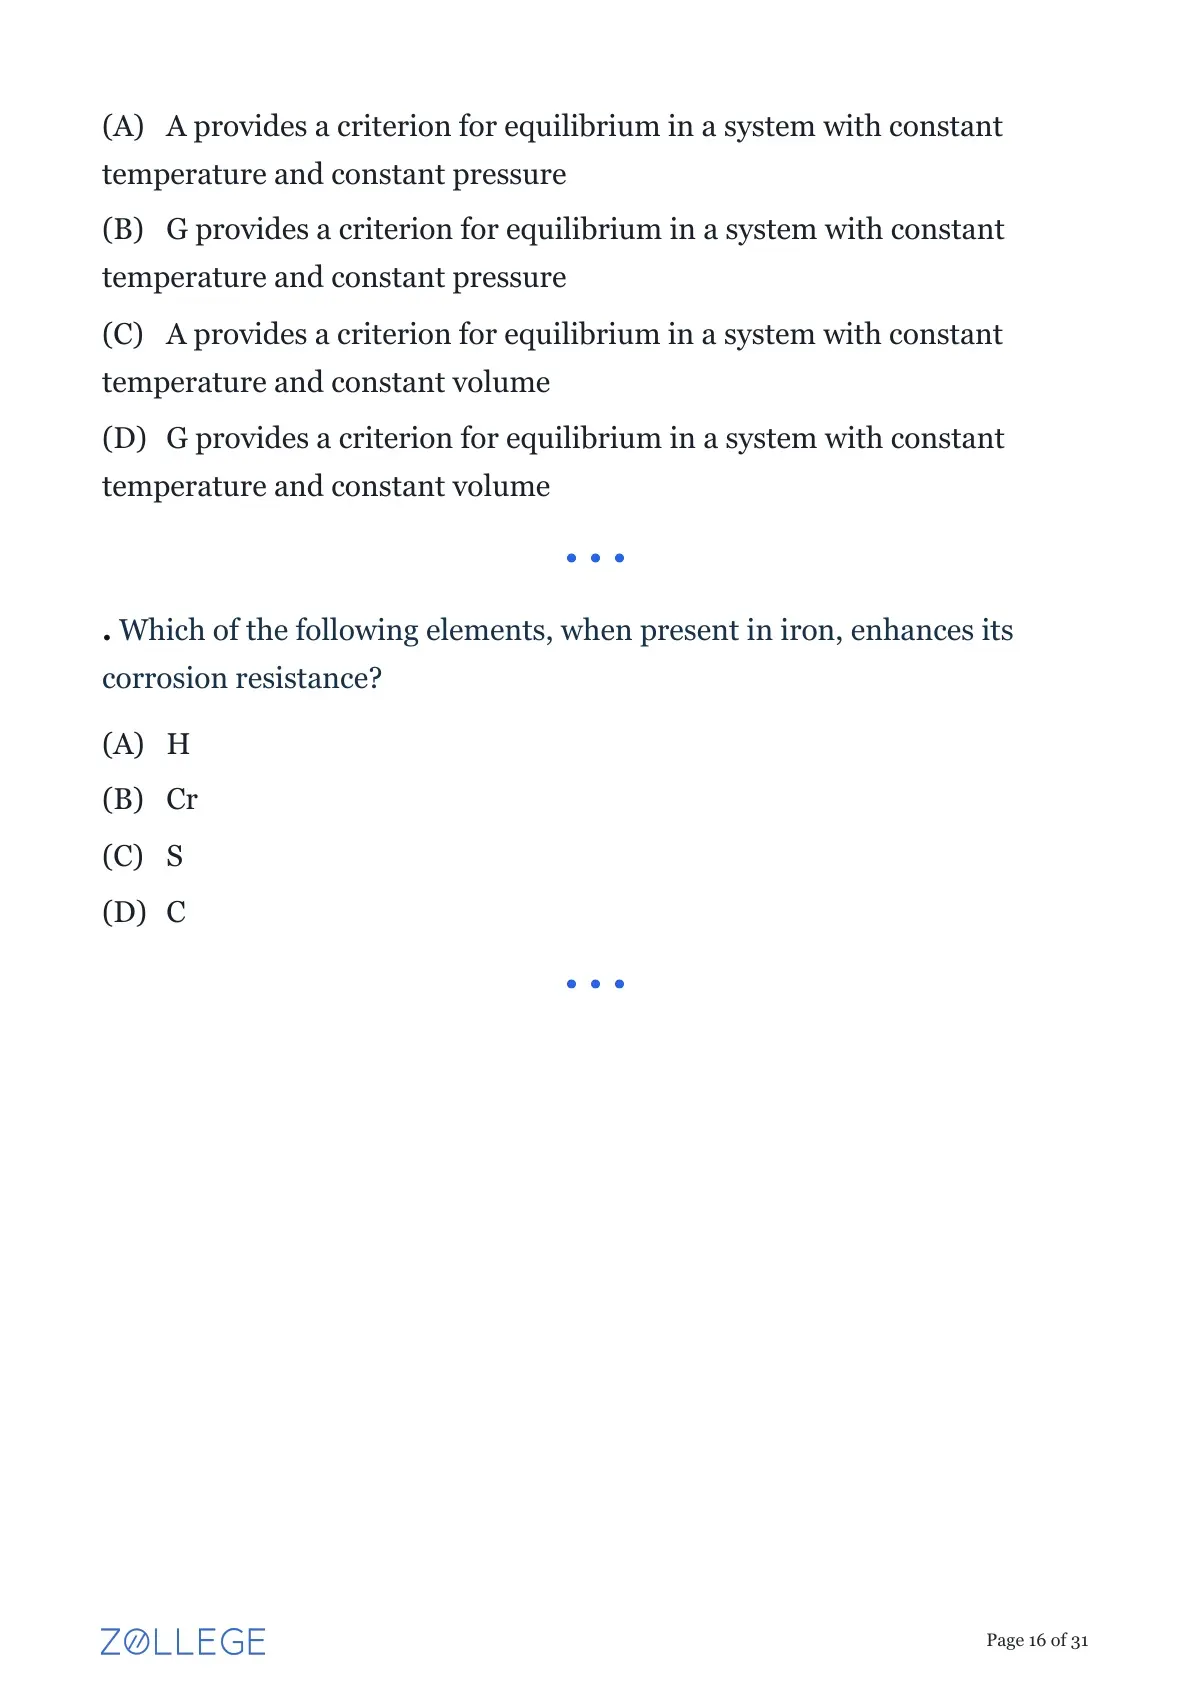
Choose the correct option(s).
Here 'A' is the Helmholtz free energy and 'G' is the Gibbs free energy.
Step 1: Understanding the Question:
The question asks for the correct conditions under which Helmholtz free energy (A) and Gibbs free energy (G) serve as criteria for thermodynamic equilibrium. A process is spontaneous if the relevant free energy decreases, and the system is at equilibrium when this free energy is at a minimum.
Step 2: Key Formula or Approach:
The definitions of G and A and their differentials are key:
- Helmholtz Free Energy: \(A = U - TS\). Its differential is \(dA = dU - TdS - SdT\). Substituting \(dU = TdS - PdV\) (for a reversible process), we get \(dA = -SdT - PdV\).
- Gibbs Free Energy: \(G = H - TS = U + PV - TS\). Its differential is \(dG = dU + PdV + VdP - TdS - SdT\). Substituting \(dU = TdS - PdV\), we get \(dG = VdP - SdT\).
Step 3: Detailed Explanation:
- For Helmholtz Free Energy (A): The differential \(dA = -SdT - PdV\) shows that if Temperature (T) and Volume (V) are held constant, then \(dT = 0\) and \(dV = 0\), which implies \(dA = 0\). Thus, minimizing A is the criterion for equilibrium at constant T and V. Therefore, statement (C) is correct and (A) is incorrect.
- For Gibbs Free Energy (G): The differential \(dG = VdP - SdT\) shows that if Temperature (T) and Pressure (P) are held constant, then \(dT = 0\) and \(dP = 0\), which implies \(dG = 0\). Thus, minimizing G is the criterion for equilibrium at constant T and P. These are the most common conditions for chemical and metallurgical reactions. Therefore, statement (B) is correct and (D) is incorrect.
Step 4: Final Answer:
Statements (B) and (C) are the correct descriptions of the equilibrium criteria.
Quick Tip: Associate the free energies with their natural variables:
- \textbf{G}ibbs (G) is a function of \textbf{P}ressure and Temperature. Equilibrium at constant T, P.
- Helmholtz (A) is a function of \textbf{V}olume and Temperature. Equilibrium at constant T, V.
(Mnemonic: "Good-Person-Talks", G=f(P,T); "All-Volume-Talks", A=f(V,T)).
Which of the following elements, when present in iron, enhance(s) its corrosion resistance?
Step 1: Understanding the Question:
The question asks which of the listed elements improves the corrosion resistance of iron when alloyed with it. This is an MSQ (Multiple Select Question) as indicated by the format "element(s)".
Step 2: Key Formula or Approach:
This is a knowledge-based question about the role of different alloying elements in steels. Enhanced corrosion resistance in iron-based alloys is typically achieved by the formation of a stable, passive oxide layer on the surface.
Step 3: Detailed Explanation:
- (A) H (Hydrogen): Hydrogen in iron and steel is highly detrimental. It does not improve corrosion resistance; instead, it causes phenomena like hydrogen embrittlement and hydrogen-induced cracking, which are forms of material degradation.
- (B) Cr (Chromium): This is the most important element for conferring corrosion resistance to iron. When added in sufficient quantities (typically > 11 wt.%), chromium forms a very thin, continuous, adherent, and self-healing passive film of chromium oxide (Cr\(_2\)O\(_3\)) on the surface. This film protects the underlying iron from the corrosive environment. This is the principle behind stainless steels. Therefore, Cr enhances corrosion resistance.
- (C) S (Sulfur): Sulfur is generally considered an impurity in most steels and is harmful to corrosion resistance. It forms sulfide inclusions (like MnS), which are chemically active and can act as initiation sites for localized corrosion, particularly pitting corrosion.
- (D) C (Carbon): Carbon is the primary strengthening element in steel but does not inherently improve its corrosion resistance in aqueous environments. In fact, it can be detrimental, for example, by forming chromium carbides in stainless steels (sensitization), which depletes chromium from the matrix and reduces corrosion resistance at grain boundaries.
Based on the analysis, only Chromium (Cr) significantly enhances the corrosion resistance of iron.
Step 4: Final Answer:
The only element from the list that enhances iron's corrosion resistance is Cr. Thus, (B) is the correct answer.
Quick Tip: When you see "corrosion resistance" in the context of steel or iron, immediately think of \textbf{Chromium (Cr)}. Other elements like Nickel (Ni) and Molybdenum (Mo) also enhance it (especially in specific environments), but Cr is the foundational element for creating a passive film.
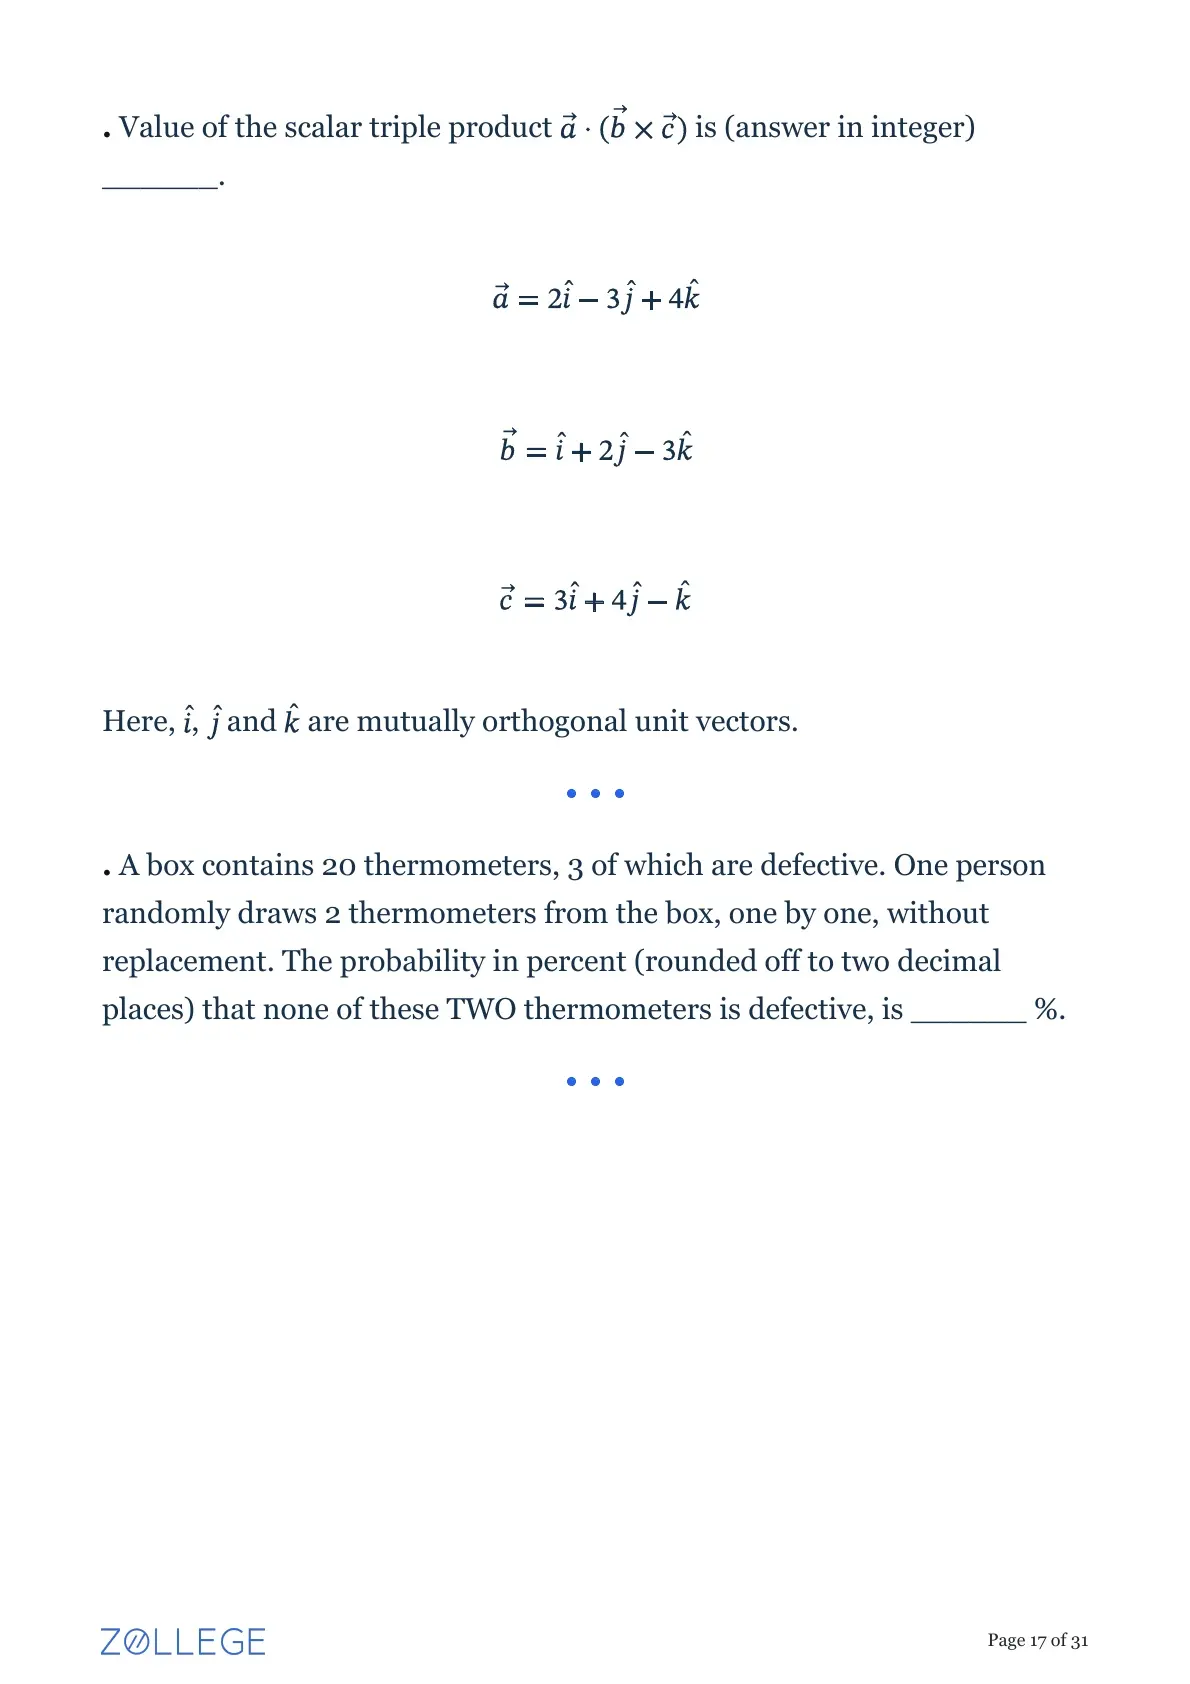
Value of scalar triple product \(\vec{a} \cdot (\vec{b} \times \vec{c})\) is ___________ (answer in integer).
\(\vec{a} = 2\hat{i} - 3\hat{j} + 4\hat{k}\)
\(\vec{b} = \hat{i} + 2\hat{j} - 3\hat{k}\)
\(\vec{c} = 3\hat{i} + 4\hat{j} - \hat{k}\)
Here, \(\hat{i}, \hat{j}\) and \(\hat{k}\) are mutually orthogonal unit vectors.
Step 1: Understanding the Question:
We are asked to calculate the scalar triple product of three given vectors, \(\vec{a}\), \(\vec{b}\), and \(\vec{c}\).
Step 2: Key Formula or Approach:
The scalar triple product \(\vec{a} \cdot (\vec{b} \times \vec{c})\) can be conveniently calculated as the determinant of a 3x3 matrix where the rows are the components of the three vectors.
\[ \vec{a} \cdot (\vec{b} \times \vec{c}) = \begin{vmatrix} a_x & a_y & a_z
b_x & b_y & b_z
c_x & c_y & c_z \end{vmatrix} \]
Step 3: Detailed Explanation:
Substitute the components of the given vectors into the determinant:
\[ \vec{a} \cdot (\vec{b} \times \vec{c}) = \begin{vmatrix} 2 & -3 & 4
1 & 2 & -3
3 & 4 & -1 \end{vmatrix} \]
Now, expand the determinant along the first row:
\[ = 2 \begin{vmatrix} 2 & -3
4 & -1 \end{vmatrix} - (-3) \begin{vmatrix} 1 & -3
3 & -1 \end{vmatrix} + 4 \begin{vmatrix} 1 & 2
3 & 4 \end{vmatrix} \] \[ = 2((2)(-1) - (-3)(4)) + 3((1)(-1) - (-3)(3)) + 4((1)(4) - (2)(3)) \] \[ = 2(-2 + 12) + 3(-1 + 9) + 4(4 - 6) \] \[ = 2(10) + 3(8) + 4(-2) \] \[ = 20 + 24 - 8 \] \[ = 36 \]
Step 4: Final Answer:
The value of the scalar triple product is 36.
Quick Tip: Using the determinant method for the scalar triple product is generally faster and less prone to calculation errors than first computing the cross product \(\vec{b} \times \vec{c}\) and then taking the dot product with \(\vec{a}\). Remember that the value represents the volume of the parallelepiped formed by the three vectors.
A box contains 20 thermometers, 3 of which are defective. One person randomly draws 2 thermometers from the box, one-by-one, without replacement. The probability in percent (rounded-off to two decimal places) that none of these TWO thermometers is defective, is ___________ %.
Step 1: Understanding the Question:
We need to find the probability of drawing two non-defective thermometers in a row from a box, without replacement.
Step 2: Key Formula or Approach:
This is a conditional probability problem. The probability of two events A and B occurring in sequence is \(P(A and B) = P(A) \times P(B|A)\), where \(P(B|A)\) is the probability of B happening given that A has already happened.
Alternatively, we can use combinations: \(P = (Number of ways to choose 2 good thermometers) / (Total number of ways to choose 2 thermometers)\).
Step 3: Detailed Explanation:
Method 1: Sequential Probability
- Total thermometers = 20
- Defective thermometers = 3
- Good (non-defective) thermometers = 20 - 3 = 17
Probability of the first draw being a good thermometer:
\[ P(1st is good) = \frac{Number of good}{Total number} = \frac{17}{20} \]
After drawing one good thermometer, there are 19 thermometers left, of which 16 are good.
Probability of the second draw being a good thermometer, given the first was good:
\[ P(2nd is good | 1st was good) = \frac{16}{19} \]
The total probability of both events happening is the product:
\[ P(both good) = \frac{17}{20} \times \frac{16}{19} = \frac{272}{380} = \frac{68}{95} \approx 0.715789 \]
To express this in percent, multiply by 100:
\[ Probability % = 0.715789 \times 100 \approx 71.58% \]
Method 2: Combinations
Total number of ways to choose 2 thermometers from 20:
\[ ^{20}C_2 = \frac{20!}{2!(20-2)!} = \frac{20 \times 19}{2} = 190 \]
Number of ways to choose 2 good thermometers from the 17 available:
\[ ^{17}C_2 = \frac{17!}{2!(17-2)!} = \frac{17 \times 16}{2} = 136 \]
Probability = (Favorable outcomes) / (Total outcomes)
\[ P = \frac{136}{190} = \frac{68}{95} \approx 0.715789 \] \[ Probability % \approx 71.58% \]
Step 4: Final Answer:
The probability is 71.58 %.
Quick Tip: For problems involving drawing items "without replacement", remember that the total number of items and the number of available desired items both decrease with each subsequent draw. Both the sequential probability and combinations methods will yield the same result.
For an equilibrium phase diagram of a binary A-B alloy at a constant pressure as shown in the figure, the degree of freedom at ‘X’ is ___________ (answer in integer).
Step 1: Understanding the Question:
We need to determine the number of degrees of freedom (F) for a binary alloy at a specific point 'X' located in a two-phase region of its phase diagram, given that pressure is constant.
Step 2: Key Formula or Approach:
We will use the Gibbs Phase Rule. The full rule is \(F = C - P + 2\). However, since pressure is held constant, it is no longer a variable we can change. This reduces the rule to the "condensed phase rule" or "metallurgical phase rule":
\[ F = C - P + 1 \]
where:
- \(F\) = Degrees of freedom
- \(C\) = Number of components
- \(P\) = Number of phases in equilibrium
- The '+1' accounts for temperature being the only non-compositional variable.
Step 3: Detailed Explanation:
1. Identify C (Components): The system is a binary A-B alloy, so there are two independent components. \(C = 2\).
2. Identify P (Phases): The point 'X' is located in the region where both the Liquid and Solid phases coexist in equilibrium. Therefore, the number of phases is two. \(P = 2\).
3. Apply the Condensed Phase Rule:
\[ F = C - P + 1 \] \[ F = 2 - 2 + 1 \] \[ F = 1 \]
The degree of freedom is 1. This means we can independently change only one variable (in this case, temperature) within the two-phase field, and the composition of each phase will be automatically fixed by the endpoints of the tie-line at that temperature.
Step 4: Final Answer:
The degree of freedom at point 'X' is 1.
Quick Tip: For any binary phase diagram at constant pressure:
- In a single-phase region (e.g., Liquid or Solid): \(P=1 \Rightarrow F = 2-1+1 = 2\). (You can change T and composition independently).
- In a two-phase region (e.g., L+S): \(P=2 \Rightarrow F = 2-2+1 = 1\). (If you set T, compositions are fixed).
- On a three-phase line (e.g., eutectic): \(P=3 \Rightarrow F = 2-3+1 = 0\). (Invariant point; T and compositions are all fixed).
Two parallel plates, with Newtonian incompressible liquid in between, are 2 mm apart. The upper plate is stationary and the lower plate moves with a velocity of 4 m/s. A force per unit area of 5 N/m\(^2\) is applied parallel to the lower plate to maintain its motion. The viscosity of the liquid (rounded off to two decimal places) is ___________ \(\times 10^{-3}\) N.s/m\(^2\).
Step 1: Understanding the Question:
We are given a Couette flow scenario and asked to calculate the viscosity of the fluid. We have the shear stress, the relative velocity of the plates, and the distance between them.
Step 2: Key Formula or Approach:
For a Newtonian fluid, the shear stress (\(\tau\)) is directly proportional to the rate of shear strain (velocity gradient). This relationship is given by Newton's law of viscosity:
\[ \tau = \mu \frac{du}{dy} \]
where \(\mu\) is the dynamic viscosity, \(u\) is the velocity, and \(y\) is the distance perpendicular to the flow direction.
Step 3: Detailed Explanation:
Given data:
- Distance between plates, \(\Delta y = 2 mm = 2 \times 10^{-3} m\).
- Velocity of lower plate, \(u_{lower} = 4 m/s\).
- Velocity of upper plate, \(u_{upper} = 0 m/s\).
- Shear stress, \(\tau = Force per unit area = 5 N/m^2\).
Calculate the velocity gradient:
Assuming a linear velocity profile between the plates, the velocity gradient \(\frac{du}{dy}\) can be approximated as:
\[ \frac{du}{dy} \approx \frac{\Delta u}{\Delta y} = \frac{u_{lower} - u_{upper}}{\Delta y} = \frac{4 m/s - 0 m/s}{2 \times 10^{-3} m} = \frac{4}{2 \times 10^{-3}} = 2000 s^{-1} \]
Calculate the viscosity \(\mu\):
Rearrange Newton's law of viscosity to solve for \(\mu\):
\[ \mu = \frac{\tau}{du/dy} = \frac{5 N/m^2}{2000 s^{-1}} = 0.0025 N.s/m^2 \]
Express in the required format:
The question asks for the answer in the form of \(\_\_\_ \times 10^{-3} N.s/m^2\).
\[ 0.0025 = 2.5 \times 10^{-3} \]
So, the value to be filled in is 2.50.
Step 4: Final Answer:
The viscosity of the liquid is \(2.50 \times 10^{-3} N.s/m^2\).
Quick Tip: The key to this type of problem is applying Newton's law of viscosity, \(\tau = \mu \frac{du}{dy}\). Always ensure your units are consistent before performing the calculation. In this case, converting millimeters to meters is the crucial first step.
Match the crystal systems in Column I with the corresponding axial lengths (a, b, c) and interaxial angles (\(\alpha, \beta, \gamma\)) provided in Column II
Step 1: Understanding the Question:
We need to match the names of four of the seven crystal systems with their defining lattice parameters (axial lengths and interaxial angles).
Step 2: Key Formula or Approach:
This is a matter of recalling the definitions of the crystal systems.
Step 3: Detailed Explanation:
Let's go through each system in Column I and find its correct definition in Column II.
- (P) Tetragonal: This system is like a cube stretched or compressed along one axis. This means two axes are equal in length, while the third is different. All angles remain at 90\(^\circ\). This corresponds to \(a = b \neq c, \alpha = \beta = \gamma = 90^\circ\). P matches (2).
- (Q) Rhombohedral: This system can be visualized as a cube that has been skewed. All axial lengths are equal, and all interaxial angles are equal, but they are not 90\(^\circ\). This corresponds to \(a = b = c, \alpha = \beta = \gamma \neq 90^\circ\). Q matches (4).
- (R) Orthorhombic: This system has the shape of a rectangular box or a cuboid. The three axial lengths are unequal, but all interaxial angles are 90\(^\circ\). This corresponds to \(a \neq b \neq c, \alpha = \beta = \gamma = 90^\circ\). R matches (1).
- (S) Monoclinic: This system can be thought of as an orthorhombic box that has been tilted in one direction. The three axial lengths are unequal. By convention, two angles are 90\(^\circ\) and one is not (the \(\beta\) angle). This corresponds to \(a \neq b \neq c, \alpha = \gamma = 90^\circ \neq \beta\). S matches (3).
The correct matching is: P-2, Q-4, R-1, S-3.
Step 4: Final Answer:
This combination corresponds to option (D).
Quick Tip: To remember the crystal systems, start from the most symmetric (cubic) and progressively remove symmetry elements.
- \textbf{Cubic:} \(a=b=c\), \(\alpha=\beta=\gamma=90^\circ\)
- \textbf{Tetragonal:} Stretch one axis \(\rightarrow\) \(a=b\neq c\), angles \(90^\circ\)
- \textbf{Orthorhombic:} Stretch another axis \(\rightarrow\) \(a\neq b\neq c\), angles \(90^\circ\)
- \textbf{Monoclinic:} Tilt one angle \(\rightarrow\) \(a\neq b\neq c\), \(\alpha=\gamma=90^\circ \neq \beta\)
- \textbf{Rhombohedral:} Skew a cube \(\rightarrow\) \(a=b=c\), \(\alpha=\beta=\gamma \neq 90^\circ\)
Match the concepts listed in Column I with the associated terms listed in Column II
Step 1: Understanding the Question:
We need to match metallurgical concepts/laws from Column I with the phenomena or terms they are associated with in Column II.
Step 2: Key Formula or Approach:
This requires knowledge of fundamental concepts in mechanical metallurgy.
Step 3: Detailed Explanation:
- (P) Paris Law: The Paris Law (or Paris-Erdogan law) describes the rate of fatigue crack growth. It relates the crack growth rate per cycle (\(da/dN\)) to the stress intensity factor range (\(\Delta K\)). This is a central concept in the study of Fatigue (2). P matches (2).
- (Q) Schmid Factor: The Schmid factor (\(m\)) is the geometric factor that relates the applied tensile stress (\(\sigma\)) to the resolved shear stress (\(\tau_R\)) on a specific slip system. The relationship is \(\tau_R = \sigma \cdot m\). Slip begins when \(\tau_R\) reaches the Critical Resolved Shear Stress (\(\tau_{CRSS}\)) (4). Q matches (4).
- (R) Larson-Miller Parameter (LMP): The LMP is a time-temperature parameter used to predict the lifetime of a material under Creep conditions (1). It allows for the extrapolation of creep rupture data from short-term tests at high temperatures to long-term service life at lower temperatures. The formula is \(LMP = T(C + \log t_r)\), where T is temperature and \(t_r\) is rupture time. R matches (1).
- (S) Portevin-Le Chatelier (PLC) Effect: This effect is a manifestation of Dynamic Strain Aging (3). It is characterized by serrated yielding (jerky flow) on the stress-strain curve, which occurs when solute atoms are mobile enough to diffuse to and pin moving dislocations during plastic deformation in a certain temperature and strain rate range. S matches (3).
The correct matching is: P-2, Q-4, R-1, S-3.
Step 4: Final Answer:
This combination corresponds to option (B).
Quick Tip: Associate keywords with each concept:
- Paris Law \(\rightarrow\) Crack Growth \(\rightarrow\) \textbf{Fatigue}
- Schmid Factor \(\rightarrow\) Resolved Shear Stress \(\rightarrow\) \textbf{CRSS} / Slip
- Larson-Miller \(\rightarrow\) Time-Temperature \(\rightarrow\) \textbf{Creep}
- Portevin-Le Chatelier \(\rightarrow\) Serrated Yielding \(\rightarrow\) \textbf{Dynamic Strain Aging}
Match the type of defects in Column I with the corresponding metal manufacturing processes listed in Column II:
Step 1: Understanding the Question:
We need to match specific types of manufacturing defects to the processes in which they characteristically occur.
Step 2: Key Formula or Approach:
This question tests knowledge of common defects in different metal forming and manufacturing processes.
Step 3: Detailed Explanation:
- (P) Edge Cracking: This defect is common in flat Rolling (3). It occurs at the edges of the sheet or strip due to the state of tensile stress that develops at the edges as the material spreads laterally. The edges are unconstrained and can elongate more than the center, leading to cracking. P matches (3).
- (Q) Flashline Cracking: Flash is the excess material that is squeezed out into the gap between the dies in closed-die Forging (2). If the flash is too thin and cools too quickly, it can become brittle and crack. These cracks can then propagate back into the forged component, a defect known as flashline cracking. Q matches (2).
- (R) Chevron Cracking: Also known as central burst or arrowhead fracture, this defect consists of internal cracks that form along the centerline of a workpiece during cold Extrusion or drawing (4). It is caused by a state of hydrostatic tension that can develop in the center of the deformation zone under certain die angle and reduction conditions. R matches (4).
- (S) Cracked Core: This is a defect found in some Casting (1) processes, particularly in sand casting of complex shapes. It occurs when the sand core, which forms the internal cavities of the casting, cannot contract sufficiently as the surrounding metal solidifies and shrinks, leading to stresses that crack the core. This term is less common; "hot tears" or "cracks" are more general, but in the context of a core, this is the logical association. S matches (1).
The correct matching is: P-3, Q-2, R-4, S-1.
Step 4: Final Answer:
This combination corresponds to option (D).
Quick Tip: Associate defects with their process features:
- \textbf{Rolling} \(\rightarrow\) Sheet/Strip \(\rightarrow\) Lateral Spread \(\rightarrow\) \textbf{Edge Cracking}.
- \textbf{Forging} \(\rightarrow\) Dies \(\rightarrow\) Excess Material (Flash) \(\rightarrow\) \textbf{Flashline Cracking}.
- \textbf{Extrusion}/Drawing \(\rightarrow\) Centerline Tension \(\rightarrow\) \textbf{Chevron Cracking}.
- \textbf{Casting} \(\rightarrow\) Molds and Cores \(\rightarrow\) Shrinkage vs. Core \(\rightarrow\) \textbf{Cracked Core}.
Match the descriptions listed in Column I with the corresponding non-destructive testing methods listed in Column II:
Step 1: Understanding the Question:
We need to match specific inspection scenarios with the most suitable non-destructive testing (NDT) method.
Step 2: Key Formula or Approach:
This requires understanding the principles, capabilities, and limitations of common NDT methods.
Step 3: Detailed Explanation:
- (P) Internal flaws in railroad wheel: Railroad wheels are thick, metallic components where internal defects like cracks or voids can be critical. Ultrasonic Testing (1) is ideal for this application. High-frequency sound waves are sent into the wheel, and reflections from internal flaws are detected. It can penetrate thick sections and is highly sensitive to planar defects like cracks. P matches (1).
- (Q) In-service monitoring of crack: This implies continuous or periodic monitoring of a component while it is in use. Acoustic Emission (4) is a passive NDT method that "listens" for the high-frequency stress waves released by active crack growth or plastic deformation. This makes it uniquely suited for real-time, in-service monitoring of structural integrity. Q matches (4).
- (R) Inclusion in mild steel: Inclusions are volumetric defects within the material. While ultrasonics can detect them, Radiography (2) (X-ray or gamma-ray) is a very effective method for detecting volumetric flaws like inclusions, porosity, or voids because they show up as differences in density on the radiographic film or detector. R matches (2).
- (S) Surface crack in Al-based alloy: This is a defect that is open to the surface. Dye Penetrant Testing (3) is a simple, cost-effective, and sensitive method specifically designed to detect surface-breaking discontinuities. A colored or fluorescent liquid penetrant is applied to the surface, which seeps into any cracks by capillary action. After cleaning the surface, a developer is applied which draws the penetrant out, making the crack visible. S matches (3).
The correct matching is: P-1, Q-4, R-2, S-3.
Step 4: Final Answer:
This combination corresponds to option (A).
Quick Tip: Match NDT methods to their strengths:
- \textbf{Surface-breaking cracks:} Dye Penetrant, Magnetic Particle (for ferrous).
- \textbf{Internal flaws (volumetric):} Radiography.
- \textbf{Internal flaws (planar/cracks):} Ultrasonic.
- \textbf{Real-time monitoring of active flaws:} Acoustic Emission.
The equation below represents a steady-state laminar flow of a fluid through a horizontal tube:
\[ \frac{1}{\eta r}\frac{d}{dr}\left(r\frac{dv_z}{dr}\right) - \frac{dP}{dz} = 0 \]
(Note: Correcting the equation from the prompt's OCR to the standard Navier-Stokes form used for analysis: \(\frac{\eta}{r}\frac{d}{dr}(r\frac{dv_z}{dr}) = \frac{dP}{dz}\))
P is fluid pressure
\(\eta\) is dynamic viscosity
(r, z): coordinates of cylindrical polar system, and
\(v_z\) is axial velocity in z-direction
Which one of the following statements related to the above case is NOT correct?
The given equation is a simplified form of the Navier-Stokes equation for fully developed, steady, laminar flow in a pipe (Hagen-Poiseuille flow).
Step 1: Understanding the Question:
We are given the governing differential equation for pipe flow and must identify the incorrect statement among the four options.
Step 2: Detailed Explanation of Each Statement:
- (A) The fluid is Newtonian: The equation is derived from the Navier-Stokes equations, which are based on the assumption of a Newtonian fluid, where shear stress is linearly proportional to the rate of shear strain (\(\tau = \eta \frac{dv_z}{dr}\)). The presence of the constant viscosity term \(\eta\) confirms this. So, statement (A) is correct.
- (C) Radial velocity is zero: For fully developed flow in a straight pipe, the flow is purely axial. There is no velocity component in the radial (\(v_r\)) or tangential (\(v_\theta\)) directions. So, \(v_r = 0\). Statement (C) is correct.
- (D) There is no variation of \(v_z\) in z-direction: The term "steady-state" implies no change with time. The term "fully developed flow" means that the velocity profile \(v_z(r)\) does not change along the length of the pipe (in the z-direction). Therefore, \(\frac{\partial v_z}{\partial z} = 0\). Statement (D) is correct.
- (B) Shear stress is maximum at the center (r = 0): Let's find the shear stress profile. The velocity profile for this flow is parabolic: \(v_z(r) = v_{z,max} \left(1 - \frac{r^2}{R^2}\right)\), where R is the pipe radius. The shear stress is \(\tau_{rz} = \eta \frac{dv_z}{dr}\).
\[ \frac{dv_z}{dr} = v_{z,max} \left( - \frac{2r}{R^2} \right) \] \[ \tau_{rz} = \eta \cdot v_{z,max} \left( - \frac{2r}{R^2} \right) \]
This shows that the shear stress \(\tau_{rz}\) is directly proportional to the radial position \(r\).
- At the center of the tube (\(r = 0\)), the shear stress is \(\tau_{rz} = 0\).
- At the wall of the tube (\(r = R\)), the shear stress is maximum.
Therefore, the statement that shear stress is maximum at the center is NOT correct.
Step 4: Final Answer:
The incorrect statement is (B).
Quick Tip: For pipe flow (Hagen-Poiseuille flow), remember the key profiles:
- \textbf{Velocity Profile:} Parabolic, \textbf{maximum at the center} (\(r=0\)), zero at the wall.
- \textbf{Shear Stress Profile:} Linear, \textbf{zero at the center} (\(r=0\)), maximum at the wall.
This is a very common concept in fluid mechanics.
Match the unit operation in Column I with the resulting product in Column II:
Step 1: Understanding the Question:
We need to match metallurgical processes with their primary products.
Step 2: Key Formula or Approach:
This requires knowledge of specific industrial extractive metallurgy processes.
Step 3: Detailed Explanation:
- (P) COREX Process: This is an alternative ironmaking process that is a type of smelting reduction. It uses coal directly instead of coke and produces liquid hot metal, which is chemically equivalent to Pig Iron (2) from a blast furnace. P matches (2).
- (Q) Bayer Process: The Bayer process is the primary method for refining bauxite ore to produce high-purity Alumina (Al\(_2\)O\(_3\)) (3), which is the feedstock for aluminium production. Q matches (3).
- (R) Matte Smelting: This is a key step in the pyrometallurgical extraction of sulfide ores, particularly for copper and nickel. The process involves smelting the ore concentrate to produce a molten mixture of metal sulfides called "matte". This matte is then converted to blister Copper (4) in a converter. R matches (4).
- (S) MIDREX Process: This is the most widely used process for the gas-based direct reduction of iron ore. It uses a reformed natural gas (a mixture of H\(_2\) and CO) to reduce iron ore pellets in a shaft furnace, producing solid Direct Reduced Iron (DRI) (1), also known as sponge iron. S matches (1).
The correct matching is: P-2, Q-3, R-4, S-1.
Step 4: Final Answer:
This combination corresponds to option (B).
Quick Tip: Categorize the ironmaking processes:
- \textbf{Blast Furnace / COREX:} Produce liquid hot metal (\textbf{Pig Iron}).
- \textbf{MIDREX / HYL:} Produce solid sponge iron (\textbf{DRI}).
Also, remember the main extraction routes:
- Bauxite \(\rightarrow\) \textbf{Bayer Process} \(\rightarrow\) Alumina.
- Copper Sulfide Ore \(\rightarrow\) \textbf{Matte Smelting} \(\rightarrow\) Copper.
Match the terms in Column I with the corresponding attributes in Column II:
Step 1: Understanding the Question:
We need to match physical laws and concepts from solid-state physics with their correct definitions or associated phenomena.
Step 2: Key Formula or Approach:
This is a knowledge-based question covering different areas of materials science (electrical, magnetic properties).
Step 3: Detailed Explanation:
- (P) Wiedemann-Franz law: This law states that for metals, the ratio of the thermal conductivity (\(\kappa\)) to the electrical conductivity (\(\sigma\)) is directly proportional to the absolute temperature (T). It describes the Ratio between thermal conductivity and electrical conductivity of metals (3). P matches (3).
- (Q) Neel temperature (\(T_N\)): This is the critical temperature above which an antiferromagnetic material loses its ordered magnetic structure and becomes paramagnetic. It is the defining transition temperature for Anti-ferromagnetism (5). Q matches (5).
- (R) Hall voltage: The Hall effect describes the production of a voltage difference (the Hall voltage) across an electrical conductor, transverse to an electric current in the conductor and an applied magnetic field perpendicular to the current. The magnitude of the Hall voltage is dependent on the Charge carrier concentration (1), their charge, and the material's thickness. R matches (1).
- (S) Curie law: This law states that for many paramagnetic materials, the magnetic susceptibility (\(\chi\)) is inversely proportional to the temperature (\(\chi \propto 1/T\)). This law describes the behavior of Paramagnetism (2). S matches (2).
The correct matching is: P-3, Q-5, R-1, S-2.
Step 4: Final Answer:
This combination corresponds to option (C).
Quick Tip: Associate these key physics concepts:
- \textbf{Wiedemann-Franz} \(\rightarrow\) Thermal/Electrical Conductivity Ratio.
- \textbf{Neel Temp.} \(\rightarrow\) \textbf{A}nti-ferromagnetic to Paramagnetic transition.
- \textbf{Curie Temp.} \(\rightarrow\) \textbf{F}erromagnetic to Paramagnetic transition.
- \textbf{Hall Voltage} \(\rightarrow\) Charge Carrier type and concentration.
- \textbf{Curie Law} \(\rightarrow\) Susceptibility of Paramagnetic materials (\(\chi \propto 1/T\)).
Choose the correct option(s).
Permeability of a porous bed made of spherical particles is/are:
Step 1: Understanding the Question:
The question asks how the permeability of a porous bed is influenced by the size and size distribution of its constituent spherical particles. This is a Multiple Select Question (MSQ).
Step 2: Key Formula or Approach:
The permeability of a porous medium is described by the Carman-Kozeny equation, which relates permeability (\(k\)) to the properties of the porous bed. A simplified form shows the key dependencies:
\[ k = \frac{\epsilon^3 D_p^2}{150(1-\epsilon)^2} \]
where:
- \(k\) is the permeability
- \(\epsilon\) is the porosity (void fraction) of the bed
- \(D_p\) is the average particle diameter
The equation clearly shows the relationship between permeability and particle size. We also need to consider the effect of a distribution of sizes.
Step 3: Detailed Explanation:
- Effect of Particle Size: From the Carman-Kozeny equation, permeability \(k\) is directly proportional to the square of the particle diameter (\(k \propto D_p^2\)). This means that as the particle size increases, the size of the pores between the particles also increases, making it easier for fluid to flow through. Therefore, permeability increases with an increase in particle size. Statement (B) is correct, and statements (A) and (C) are incorrect.
- Effect of Particle Size Distribution: The Carman-Kozeny equation uses an average particle diameter. However, if there is a wide distribution of particle sizes, smaller particles can fill the voids between larger particles. This reduces the effective pore size and the overall porosity (\(\epsilon\)), creating a more tortuous path for the fluid. A reduction in porosity significantly decreases permeability (since \(k \propto \epsilon^3 / (1-\epsilon)^2\)). Therefore, the permeability is strongly affected by the particle size distribution. A wider distribution generally leads to lower permeability for the same average particle size. Statement (D) is correct.
Step 4: Final Answer:
The correct statements are that permeability increases with an increase in particle size and is affected by the particle size distribution. This corresponds to options (B) and (D).
Quick Tip: Think intuitively about permeability: it's a measure of how easily a fluid can flow through a medium. A bed of large gravel is much more permeable than a bed of fine sand. This is because the gravel has larger particles (\(D_p\)) and larger pores. Adding sand (a wide distribution) to the gravel would clog the pores and drastically reduce permeability. The Carman-Kozeny equation (\(k \propto D_p^2\)) quantifies this.
Consider a distribution with the following probability density function
\[ f(x) = \begin{cases} 0.5, & 0 < x < 2
0.0, & Otherwise \end{cases} \]
Given that the mean of the above probability distribution is 1, the variance (rounded off to two decimal places) is ___________.
Step 1: Understanding the Question:
We are given a continuous uniform probability density function (PDF) and its mean. We need to calculate the variance of the distribution.
Step 2: Key Formula or Approach:
The variance (\(\sigma^2\) or Var(X)) of a continuous random variable X is defined as:
\[ Var(X) = E[X^2] - (E[X])^2 \]
where \(E[X]\) is the mean (given as 1) and \(E[X^2]\) is the expectation of \(X^2\), which is calculated by:
\[ E[X^2] = \int_{-\infty}^{\infty} x^2 f(x) \,dx \]
For a uniform distribution on the interval [a, b], the variance has a standard formula: \(Var(X) = \frac{(b-a)^2}{12}\).
Step 3: Detailed Explanation:
Method 1: Using the definition of variance
First, calculate \(E[X^2]\):
\[ E[X^2] = \int_{0}^{2} x^2 (0.5) \,dx = 0.5 \int_{0}^{2} x^2 \,dx \] \[ = 0.5 \left[ \frac{x^3}{3} \right]_{0}^{2} = 0.5 \left( \frac{2^3}{3} - \frac{0^3}{3} \right) = 0.5 \left( \frac{8}{3} \right) = \frac{4}{3} \]
The mean \(E[X]\) is given as \(\mu = 1\).
Now, calculate the variance:
\[ Var(X) = E[X^2] - \mu^2 = \frac{4}{3} - (1)^2 = \frac{4}{3} - 1 = \frac{1}{3} \]
Converting to a decimal and rounding to two decimal places:
\[ Var(X) = \frac{1}{3} \approx 0.3333... \approx 0.33 \]
This value falls in the key range of 0.32 to 0.34.
Method 2: Using the formula for uniform distribution
The given PDF describes a uniform distribution on the interval (0, 2). So, \(a=0\) and \(b=2\).
The formula for the variance of a uniform distribution is:
\[ Var(X) = \frac{(b-a)^2}{12} = \frac{(2-0)^2}{12} = \frac{2^2}{12} = \frac{4}{12} = \frac{1}{3} \approx 0.33 \]
Step 4: Final Answer:
The variance of the distribution is 0.33.
Quick Tip: Recognizing that the given PDF is a uniform distribution can save a lot of time. Memorizing the formulas for the mean (\(\frac{a+b}{2}\)) and variance (\(\frac{(b-a)^2}{12}\)) of a uniform distribution is highly recommended for competitive exams.
Taking number of intervals n = 3, the value of the integral \(\int_{0}^{0.3} e^{-x^2} dx\) using Trapezoidal method, is ___________ (rounded off to two decimal places).
Step 1: Understanding the Question:
We need to evaluate a definite integral using the numerical trapezoidal rule with a specified number of intervals.
Step 2: Key Formula or Approach:
The trapezoidal rule for numerical integration is given by:
\[ \int_{a}^{b} f(x) \,dx \approx \frac{h}{2} [y_0 + 2(y_1 + y_2 + ... + y_{n-1}) + y_n] \]
where:
- \(n\) is the number of intervals.
- \(h = \frac{b-a}{n}\) is the step size.
- \(y_i = f(x_i)\) are the function values at equally spaced points \(x_i\).
Step 3: Detailed Explanation:
Given data:
- Function: \(f(x) = e^{-x^2}\)
- Lower limit, \(a = 0\)
- Upper limit, \(b = 0.3\)
- Number of intervals, \(n = 3\)
Calculate step size (h):
\[ h = \frac{0.3 - 0}{3} = 0.1 \]
Calculate the values of x and y = f(x):
We need to evaluate the function at \(x_0, x_1, x_2, x_3\).
- \(x_0 = 0\); \(y_0 = e^{-(0)^2} = e^0 = 1\)
- \(x_1 = 0.1\); \(y_1 = e^{-(0.1)^2} = e^{-0.01} \approx 0.99005\)
- \(x_2 = 0.2\); \(y_2 = e^{-(0.2)^2} = e^{-0.04} \approx 0.96079\)
- \(x_3 = 0.3\); \(y_3 = e^{-(0.3)^2} = e^{-0.09} \approx 0.91393\)
Apply the Trapezoidal Rule formula:
\[ I \approx \frac{0.1}{2} [y_0 + 2(y_1 + y_2) + y_3] \] \[ I \approx 0.05 [1 + 2(0.99005 + 0.96079) + 0.91393] \] \[ I \approx 0.05 [1 + 2(1.95084) + 0.91393] \] \[ I \approx 0.05 [1 + 3.90168 + 0.91393] \] \[ I \approx 0.05 [5.81561] \] \[ I \approx 0.29078 \]
Rounding to two decimal places, the value is 0.29. This value lies within the official answer key range of 0.27 to 0.31.
Step 4: Final Answer:
The value of the integral is approximately 0.29.
Quick Tip: For numerical integration problems, be systematic. First, calculate the step size \(h\). Then, create a table of \(x_i\) and \(y_i = f(x_i)\) values. Finally, plug these values carefully into the correct formula (Trapezoidal or Simpson's). Double-check your arithmetic, as small errors can lead to an incorrect result.
Solution of the differential equation \(10x^2 \frac{d^2y}{dx^2} - 20x \frac{dy}{dx} + 22.4y = 0\) is
\(y = c_1x^{m_1} + c_2x^{m_2}\) where \(m_1 \neq m_2\).
The value of \(m_1 + m_2\) (answer in integer) is ___________.
Step 1: Understanding the Question:
We are given a second-order homogeneous linear differential equation with variable coefficients, specifically a Cauchy-Euler equation. We are told the form of the solution and asked to find the sum of the exponents \(m_1\) and \(m_2\).
Step 2: Key Formula or Approach:
For a Cauchy-Euler equation of the form \(Ax^2 y'' + Bx y' + Cy = 0\), we assume a solution of the form \(y = x^m\). Substituting this into the equation leads to an auxiliary (or characteristic) equation in \(m\). The roots of this quadratic equation are \(m_1\) and \(m_2\).
Step 3: Detailed Explanation:
First, divide the given equation by 10 to simplify:
\[ x^2 \frac{d^2y}{dx^2} - 2x \frac{dy}{dx} + 2.24y = 0 \]
Let's assume a solution \(y = x^m\). Find its derivatives:
\[ \frac{dy}{dx} = m x^{m-1} \] \[ \frac{d^2y}{dx^2} = m(m-1) x^{m-2} \]
Substitute these into the simplified differential equation:
\[ x^2 [m(m-1) x^{m-2}] - 2x [m x^{m-1}] + 2.24 [x^m] = 0 \] \[ m(m-1) x^m - 2m x^m + 2.24 x^m = 0 \]
Factor out \(x^m\) (since \(x^m \neq 0\)):
\[ m(m-1) - 2m + 2.24 = 0 \]
This is the auxiliary equation. Now, solve for \(m\):
\[ m^2 - m - 2m + 2.24 = 0 \] \[ m^2 - 3m + 2.24 = 0 \]
This is a quadratic equation in the form \(am^2 + bm + c = 0\), where the roots are \(m_1\) and \(m_2\). We do not need to find the roots themselves. According to Vieta's formulas, the sum of the roots of a quadratic equation is given by \(m_1 + m_2 = -b/a\).
In our equation, \(a=1\), \(b=-3\), and \(c=2.24\).
\[ m_1 + m_2 = -(-3)/1 = 3 \]
Step 4: Final Answer:
The value of \(m_1 + m_2\) is 3.
Quick Tip: For any Cauchy-Euler equation \(Ax^2 y'' + Bx y' + Cy = 0\), the auxiliary equation is \(Am(m-1) + Bm + C = 0\). If you are only asked for the sum or product of the roots (\(m_1, m_2\)), you can use Vieta's formulas directly on the resulting quadratic equation without needing to solve for the roots, which can save time. Sum of roots = \(-b/a\).
Iron powder is compacted at room temperature to 75% of its theoretical density. The as-pressed iron compact is sintered in inert-gas atmosphere at 1200 \(^\circ\)C to 90% of its theoretical density. Assuming isotropic shrinkage, the linear shrinkage (in percent) undergone by the iron compact during sintering (rounded off to one decimal place) is ___________ %
Step 1: Understanding the Question:
An iron powder compact increases in density from a green (as-pressed) state to a sintered state. This densification causes the compact to shrink. We need to calculate the linear shrinkage percentage, assuming the shrinkage is isotropic (the same in all directions).
Step 2: Key Formula or Approach:
Density is mass/volume. Since mass is conserved during sintering, the change in density is inversely proportional to the change in volume.
\[ \frac{\rho_s}{\rho_g} = \frac{V_g}{V_s} \]
where \(\rho\) is density, \(V\) is volume, and subscripts \(g\) and \(s\) refer to the green and sintered states, respectively.
Linear shrinkage (\(S_L\)) is defined as:
\[ S_L = \frac{L_g - L_s}{L_g} = 1 - \frac{L_s}{L_g} \]
For isotropic shrinkage, \(V \propto L^3\), so \(\frac{V_s}{V_g} = \left(\frac{L_s}{L_g}\right)^3\).
Step 3: Detailed Explanation:
Given data:
- Green density, \(\rho_g = 0.75 \times \rho_{th}\)
- Sintered density, \(\rho_s = 0.90 \times \rho_{th}\)
where \(\rho_{th}\) is the theoretical density.
Relate volumetric change to density change:
\[ \frac{V_s}{V_g} = \frac{\rho_g}{\rho_s} = \frac{0.75 \times \rho_{th}}{0.90 \times \rho_{th}} = \frac{0.75}{0.90} = \frac{5}{6} \approx 0.8333 \]
Relate linear change to volumetric change:
Since shrinkage is isotropic, we have:
\[ \left(\frac{L_s}{L_g}\right)^3 = \frac{V_s}{V_g} = \frac{5}{6} \] \[ \frac{L_s}{L_g} = \left(\frac{5}{6}\right)^{1/3} \approx (0.8333)^{1/3} \approx 0.9410 \]
Calculate linear shrinkage:
\[ S_L = 1 - \frac{L_s}{L_g} = 1 - 0.9410 = 0.059 \]
To express this as a percentage:
\[ S_L (%) = 0.059 \times 100 = 5.9 % \]
Step 4: Final Answer:
The linear shrinkage is 5.9%. This value is within the specified answer range of 5.8 to 6.1.
Quick Tip: The key to isotropic shrinkage problems is the relationship between volume and linear dimensions: \(V \propto L^3\). This allows you to convert from a volumetric change (which is directly related to the density change) to a linear change. Remember, the mass stays constant, so \(\rho_1 V_1 = \rho_2 V_2\).
An alloy having composition W-20 wt.% Ni is prepared by mixing elemental powders. The resulting powder mixture is liquid phase sintered at 1550 \(^\circ\)C for 1 hour. The liquid phase sintered microstructure consists of interconnected, spherical tungsten grains dispersed in nickel. The tungsten grain size is 70 \(\mu\)m and the W-W interparticle neck diameter is 35 \(\mu\)m. If W-Ni interfacial energy is 0.30 J/m\(^2\), the W-W interfacial energy (in J/m\(^2\)), rounded off to two decimal places is ___________.
(Given: melting point of W: 3410 \(^\circ\)C and melting point of Ni: 1455 \(^\circ\)C)
Step 1: Understanding the Question:
The question asks for the solid-solid (W-W) interfacial energy in a liquid phase sintered W-Ni composite. We are given the solid-liquid (W-Ni) interfacial energy and geometric parameters of the microstructure (grain size and neck size), which are related through the concept of the dihedral angle.
Step 2: Key Formula or Approach:
The solution involves two key relationships:
1. Energy Balance: The equilibrium at the junction where two solid grains meet the liquid phase is governed by the balance of interfacial tension forces. This is described by Young's equation involving the dihedral angle (\(\Psi\)):
\[ \gamma_{SS} = 2 \gamma_{SL} \cos(\Psi/2) \]
Here, \(\gamma_{SS}\) is the solid-solid (W-W) interfacial energy and \(\gamma_{SL}\) is the solid-liquid (W-Ni) interfacial energy.
2. Geometric Relationship: The dihedral angle (\(\Psi\)) can be determined from the observable geometry of the sintered microstructure. For spherical particles of diameter \(G\) forming a neck of diameter \(X\), the relationship is:
\[ \sin(\Psi/2) = \frac{X}{G} \]
Step 3: Detailed Explanation:
Given data:
- Solid-Liquid (W-Ni) interfacial energy, \(\gamma_{SL} = 0.30\) J/m\(^2\).
- Tungsten grain size (diameter), \(G = 70 \, \mu\)m.
- W-W interparticle neck diameter, \(X = 35 \, \mu\)m.
Part 1: Determine the Dihedral Angle (\(\Psi\))
First, we use the geometric relationship to find the value of the half-dihedral angle, \(\Psi/2\). \[ \sin(\Psi/2) = \frac{X}{G} = \frac{35 \, \mum}{70 \, \mum} = 0.5 \]
By taking the inverse sine, we find the angle: \[ \Psi/2 = \arcsin(0.5) = 30^\circ \]
Part 2: Calculate the Solid-Solid Interfacial Energy (\(\gamma_{SS}\))
Now that we have the value of \(\Psi/2\), we can find the value of \(\cos(\Psi/2)\) needed for the energy balance equation. \[ \cos(\Psi/2) = \cos(30^\circ) = \frac{\sqrt{3}}{2} \approx 0.8660 \]
Finally, substitute this value and the given \(\gamma_{SL}\) into Young's equation: \[ \gamma_{SS} = 2 \gamma_{SL} \cos(\Psi/2) \] \[ \gamma_{SS} = 2 \times (0.30 J/m^2) \times \left(\frac{\sqrt{3}}{2}\right) \] \[ \gamma_{SS} = 0.30 \times \sqrt{3} \approx 0.30 \times 1.73205 = 0.519615 J/m^2 \]
Step 4: Final Answer:
Rounding the result to two decimal places, we get: \[ \gamma_{SS} = 0.52 J/m^2 \]
This value falls within the official answer key range of 0.50 to 0.54.
Quick Tip: In liquid phase sintering problems involving dihedral angles, there are two key equations you must use. First, the energy balance at the triple point: \(\gamma_{SS} = 2 \gamma_{SL} \cos(\Psi/2)\). Second, the geometrical relationship between the microstructure and the angle: \(\sin(\Psi/2) = X/G\). Be careful not to mix up the sine and cosine terms in these two distinct relationships.
A metal having body-centered cubic structure is analyzed through X-ray diffraction using monochromatic X-ray of wavelength 0.154 nm. The diffraction angle (2\(\theta\)) corresponding to \{200\ plane is 60\(^\circ\) (for first order reflection).
The atomic radius of this element (rounded off to three decimal places) is ___________ nm.
Step 1: Understanding the Question:
We are given XRD data for a BCC metal and need to find its atomic radius. This requires a two-step calculation: first, find the lattice parameter (\(a\)) from the XRD data using Bragg's law, and second, relate the lattice parameter to the atomic radius (\(R\)) for the BCC structure.
Step 2: Key Formula or Approach:
1. Bragg's Law: \(n\lambda = 2d_{hkl}\sin\theta\)
2. Interplanar Spacing for Cubic Crystals: \(d_{hkl} = \frac{a}{\sqrt{h^2 + k^2 + l^2}}\)
3. Atomic Radius for BCC: \(4R = a\sqrt{3}\)
where \(n\) is the order of reflection, \(\lambda\) is the wavelength, \(d_{hkl}\) is the interplanar spacing, \(\theta\) is the Bragg angle, \((hkl)\) are the Miller indices, \(a\) is the lattice parameter, and \(R\) is the atomic radius.
Step 3: Detailed Explanation:
Given data:
- Crystal structure: BCC
- Wavelength, \(\lambda = 0.154\) nm
- Diffraction angle, \(2\theta = 60^\circ\), which means Bragg angle, \(\theta = 30^\circ\)
- Miller indices, \((hkl) = (200)\)
- Order of reflection, \(n = 1\) (first order)
Part 1: Calculate the lattice parameter (a)
First, use Bragg's Law to find the interplanar spacing \(d_{200}\):
\[ d_{200} = \frac{n\lambda}{2\sin\theta} = \frac{1 \times 0.154 nm}{2 \sin(30^\circ)} \]
Since \(\sin(30^\circ) = 0.5\):
\[ d_{200} = \frac{0.154}{2 \times 0.5} = \frac{0.154}{1} = 0.154 nm \]
Now, use the interplanar spacing formula for cubic crystals to find \(a\):
\[ d_{200} = \frac{a}{\sqrt{2^2 + 0^2 + 0^2}} = \frac{a}{\sqrt{4}} = \frac{a}{2} \]
Equating the two expressions for \(d_{200}\):
\[ 0.154 nm = \frac{a}{2} \implies a = 2 \times 0.154 = 0.308 nm \]
Part 2: Calculate the atomic radius (R)
For a BCC crystal, the atoms touch along the body diagonal. The length of the body diagonal is \(a\sqrt{3}\), which is equal to \(4R\).
\[ 4R = a\sqrt{3} \implies R = \frac{a\sqrt{3}}{4} \]
Substitute the calculated value of \(a\):
\[ R = \frac{0.308 \times \sqrt{3}}{4} = \frac{0.308 \times 1.732}{4} = \frac{0.533456}{4} \approx 0.13336 nm \]
Step 4: Final Answer:
Rounding off to three decimal places, the atomic radius is 0.133 nm. This falls within the answer key range of 0.132 to 0.134 nm.
Quick Tip: This is a standard multi-step problem. Remember the flow: \textbf{XRD data \(\rightarrow\) Bragg's Law \(\rightarrow\) \(d\)-spacing \(\rightarrow\) Lattice Parameter (\(a\)) \(\rightarrow\) Crystal Structure Relation \(\rightarrow\) Atomic Radius (\(R\))}. Also, be careful to use \(\theta\) in Bragg's law, not \(2\theta\).
A cylindrical single crystal of copper having 10 mm diameter is deformed under a uniaxial tensile load of 2200 N. The angle between the normal to the slip plane and the tensile loading axis is \(\alpha\), whereas, the angle between slip direction and the tensile axis is \(\beta\). The slip direction is in the plane defined by the stress axis and the normal to the slip plane.
If \(\alpha = \beta\), the critical resolved shear stress (CRSS), rounded off to one decimal place, is ___________ MPa.
Step 1: Understanding the Question:
We are asked to calculate the Critical Resolved Shear Stress (CRSS) for a copper single crystal. We are given the applied load, crystal diameter, and the geometric relationship between the slip system and the tensile axis. The condition \(\alpha = \beta\) implies a specific orientation that maximizes the Schmid factor.
Step 2: Key Formula or Approach:
1. Calculate the applied tensile stress (\(\sigma\)).
\[ \sigma = \frac{Load (F)}{Area (A)} \]
2. Use Schmid's Law, which relates the applied tensile stress to the resolved shear stress (\(\tau_R\)) on the slip system:
\[ \tau_R = \sigma \cos(\alpha) \cos(\beta) \]
The term \(\cos(\alpha) \cos(\beta)\) is known as the Schmid factor (\(m\)).
3. The CRSS (\(\tau_{CRSS}\)) is the value of \(\tau_R\) at which plastic deformation (slip) begins. The problem implies we are at the point of yielding.
Step 3: Detailed Explanation:
Given data:
- Load, \(F = 2200\) N.
- Diameter, \(d = 10\) mm = 0.01 m.
- Geometric condition, \(\alpha = \beta\).
Part 1: Calculate the applied tensile stress (\(\sigma\))
First, find the cross-sectional area of the crystal:
\[ A = \frac{\pi d^2}{4} = \frac{\pi (10 mm)^2}{4} = 25\pi mm^2 \approx 78.54 mm^2 \]
Now, calculate the stress:
\[ \sigma = \frac{F}{A} = \frac{2200 N}{78.54 mm^2} \approx 28.01 N/mm^2 = 28.01 MPa \]
Part 2: Calculate the Schmid factor (m)
The Schmid factor is \(m = \cos(\alpha) \cos(\beta)\). Since \(\alpha = \beta\), this becomes \(m = \cos^2(\alpha)\).
The Schmid factor is maximized when \(\alpha = \beta = 45^\circ\). The problem statement "The slip direction is in the plane defined by the stress axis and the normal to the slip plane" and the condition \(\alpha=\beta\) forces this orientation. For any orientation, \(\alpha + \beta\) must be greater than or equal to 90\(^\circ\). When the slip direction lies in the plane formed by the tensile axis and slip plane normal, we have \(\alpha+\beta=90^\circ\).
If \(\alpha=\beta\), then \(2\alpha = 90^\circ\), which gives \(\alpha = \beta = 45^\circ\).
So, the Schmid factor is:
\[ m = \cos(45^\circ) \cos(45^\circ) = \left(\frac{1}{\sqrt{2}}\right) \left(\frac{1}{\sqrt{2}}\right) = \frac{1}{2} = 0.5 \]
This is the maximum possible value for the Schmid factor.
Part 3: Calculate the CRSS (\(\tau_{CRSS}\))
Using Schmid's Law at the point of yielding:
\[ \tau_{CRSS} = \sigma \times m = 28.01 MPa \times 0.5 = 14.005 MPa \]
Step 4: Final Answer:
Rounding off to one decimal place, the critical resolved shear stress is 14.0 MPa. This falls within the answer key range of 12.8 to 14.1 MPa.
Quick Tip: The condition \(\alpha = \beta\) for a single crystal under tension typically implies the orientation that gives the maximum Schmid factor, which is \(m=0.5\) when \(\alpha = \beta = 45^\circ\). Recognizing this shortcut can save time in calculating the geometric factor.
For plane strain fracture toughness (\(K_{Ic}\)) testing of Maraging steel, the minimum thickness to achieve valid \(K_{Ic}\) is ___________ mm. (answer in integer)
(Given: \(K_{Ic}\) = 90 MPa\(\sqrt{m}\) and yield stress = 900 MPa)
Step 1: Understanding the Question:
The question asks for the minimum sample thickness required to ensure a valid plane strain fracture toughness (\(K_{Ic}\)) test, according to standard criteria.
Step 2: Key Formula or Approach:
The ASTM standard (e.g., E399) for plane strain fracture toughness testing specifies several size requirements to ensure that a state of plane strain (and not plane stress) dominates at the crack tip. The most important criterion is for the specimen thickness, \(B\):
\[ B \ge 2.5 \left( \frac{K_{Ic}}{\sigma_{ys}} \right)^2 \]
where \(B\) is the thickness, \(K_{Ic}\) is the plane strain fracture toughness, and \(\sigma_{ys}\) is the 0.2% offset yield strength of the material.
Step 3: Detailed Explanation:
Given data:
- \(K_{Ic} = 90\) MPa\(\sqrt{m}\)
- Yield stress, \(\sigma_{ys} = 900\) MPa
Check unit consistency:
The units are consistent (MPa and m), so no conversion is needed before calculation. The resulting thickness \(B\) will be in meters.
Calculate the minimum thickness (B):
\[ B \ge 2.5 \left( \frac{90 MPa\sqrt{m}}{900 MPa} \right)^2 \] \[ B \ge 2.5 \left( \frac{1}{10} \sqrt{m} \right)^2 \] \[ B \ge 2.5 (0.1)^2 (\sqrt{m})^2 \] \[ B \ge 2.5 \times 0.01 m \] \[ B \ge 0.025 m \]
Convert the result to millimeters:
Since the question asks for the answer in mm:
\[ B_{mm} = B_{m} \times 1000 = 0.025 \times 1000 = 25 mm \]
Step 4: Final Answer:
The minimum thickness required for a valid test is 25 mm.
Quick Tip: The plane strain validity criterion \(B \ge 2.5 (K_{Ic}/\sigma_{ys})^2\) is a fundamental and frequently tested concept in fracture mechanics. Memorize this formula. The term inside the parenthesis, \((K_{Ic}/\sigma_{ys})\), has units of \(\sqrt{length}\) and is related to the size of the plastic zone at the crack tip. The criterion ensures the thickness is much larger than this plastic zone.
The lattice parameter of Ni (face-centered cubic) is 0.35 nm and its shear modulus is 76 GPa. The strain energy per unit length of a screw dislocation in Ni crystal (rounded off to two decimal places) is ___________ \(\times 10^{-9}\) J/m.
Step 1: Understanding the Question:
We are asked to calculate the elastic strain energy per unit length for a screw dislocation in an FCC Ni crystal. This requires first determining the Burgers vector for an FCC crystal and then using the formula for dislocation strain energy.
Step 2: Key Formula or Approach:
1. Burgers Vector (b) for FCC: In an FCC lattice, the shortest lattice translation vector, and thus the Burgers vector for a perfect dislocation, is of the type \(a/2\langle110\rangle\). Its magnitude is given by:
\[ b = \frac{a\sqrt{1^2 + 1^2 + 0^2}}{2} = \frac{a\sqrt{2}}{2} = \frac{a}{\sqrt{2}} \]
2. Strain Energy (\(E_L\)): The elastic strain energy per unit length of a dislocation is proportional to \(Gb^2\). A common approximation for the total energy (including core energy) is:
\[ E_L \approx \frac{Gb^2}{2} \]
where G is the shear modulus.
Step 3: Detailed Explanation:
Given data:
- Crystal structure: FCC
- Lattice parameter, \(a = 0.35\) nm = \(0.35 \times 10^{-9}\) m.
- Shear modulus, \(G = 76\) GPa = \(76 \times 10^9\) Pa (or N/m\(^2\)).
Part 1: Calculate the magnitude of the Burgers vector (b)
Using the formula for an FCC crystal:
\[ b = \frac{a}{\sqrt{2}} = \frac{0.35 \times 10^{-9} m}{\sqrt{2}} \approx 0.247487 \times 10^{-9} m \]
Part 2: Calculate the strain energy per unit length (\(E_L\))
Using the strain energy approximation formula:
\[ E_L = \frac{Gb^2}{2} = \frac{(76 \times 10^9 N/m^2) \times (0.247487 \times 10^{-9} m)^2}{2} \] \[ E_L = \frac{(76 \times 10^9) \times (0.06125 \times 10^{-18})}{2} J/m \] \[ E_L = \frac{4.655 \times 10^{-9}}{2} J/m = 2.3275 \times 10^{-9} J/m \]
Step 4: Final Answer:
The strain energy per unit length is \(2.3275 \times 10^{-9}\) J/m.
The value to be filled in the blank is 2.3275.
Rounding to two decimal places, the answer is 2.33.
Quick Tip: The strain energy of a dislocation is a core concept. Remember the formula \(E_L \propto Gb^2\). For specific crystal structures, you must first calculate the Burgers vector magnitude \(b\) from the lattice parameter \(a\). For FCC, \(b = a/\sqrt{2}\). For BCC, \(b = a\sqrt{3}/2\). Be sure to use consistent units (e.g., meters and Pascals) for the calculation.
20 g of gold (Au) and 20 g of silver (Ag) are mixed to form a single-phase solid solution (assume ideal mixing). The atomic weight of Au is 197 g/mol and the atomic weight of Ag is 108 g/mol. The value of universal gas constant R is 8.314 J/mol-K. The total entropy of mixing (rounded off to two decimal places) is ___________ J/K.
Step 1: Understanding the Question:
We need to calculate the total entropy of mixing for an ideal solution formed by mixing given masses of gold and silver.
Step 2: Key Formula or Approach:
1. Calculate the number of moles of each component.
2. Calculate the mole fraction of each component.
3. Use the formula for the molar entropy of mixing for an ideal solution:
\[ \Delta S_{mix}^{molar} = -R(X_A \ln X_A + X_B \ln X_B) \]
4. Calculate the total entropy of mixing by multiplying the molar entropy by the total number of moles:
\[ \Delta S_{mix}^{total} = n_{total} \times \Delta S_{mix}^{molar} = -(n_A + n_B)R(X_A \ln X_A + X_B \ln X_B) \]
A more direct formula is:
\[ \Delta S_{mix}^{total} = -R(n_A \ln X_A + n_B \ln X_B) \]
Step 3: Detailed Explanation:
Given data:
- Mass of Au, \(m_{Au} = 20\) g. Atomic weight of Au, \(M_{Au} = 197\) g/mol.
- Mass of Ag, \(m_{Ag} = 20\) g. Atomic weight of Ag, \(M_{Ag} = 108\) g/mol.
- Gas constant, \(R = 8.314\) J/mol-K.
Part 1: Calculate moles and mole fractions
Number of moles of Au: \(n_{Au} = \frac{m_{Au}}{M_{Au}} = \frac{20}{197} \approx 0.1015\) mol.
Number of moles of Ag: \(n_{Ag} = \frac{m_{Ag}}{M_{Ag}} = \frac{20}{108} \approx 0.1852\) mol.
Total moles: \(n_{total} = n_{Au} + n_{Ag} = 0.1015 + 0.1852 = 0.2867\) mol.
Mole fraction of Au: \(X_{Au} = \frac{n_{Au}}{n_{total}} = \frac{0.1015}{0.2867} \approx 0.3540\)
Mole fraction of Ag: \(X_{Ag} = \frac{n_{Ag}}{n_{total}} = \frac{0.1852}{0.2867} \approx 0.6460\) (or \(1 - 0.3540 = 0.6550\), let's use the direct calculation for better accuracy)
Part 2: Calculate total entropy of mixing
Using the formula \(\Delta S_{mix}^{total} = -R(n_{Au} \ln X_{Au} + n_{Ag} \ln X_{Ag})\):
\[ \ln X_{Au} = \ln(0.3540) \approx -1.0385 \] \[ \ln X_{Ag} = \ln(0.6460) \approx -0.4370 \] \[ \Delta S_{mix}^{total} = -8.314 \times [ (0.1015 \times -1.0385) + (0.1852 \times -0.4370) ] \] \[ \Delta S_{mix}^{total} = -8.314 \times [ -0.1054 - 0.0809 ] \] \[ \Delta S_{mix}^{total} = -8.314 \times [-0.1863] \approx 1.5488 J/K \]
Step 4: Final Answer:
Rounding to two decimal places, the total entropy of mixing is 1.55 J/K. This falls within the answer key range of 1.50 to 1.60 J/K.
Quick Tip: Be careful to distinguish between molar entropy of mixing (\(\Delta S_{mix}\), in J/mol-K) and total entropy of mixing (\(\Delta S_{mix}^{total}\), in J/K). The total entropy is the molar entropy multiplied by the total number of moles. Using the formula \(\Delta S^{total} = -R(n_A \ln X_A + n_B \ln X_B)\) directly can prevent errors.
2 moles of an ideal gas is reversibly expanded from 10 liter to 20 liter at isothermal condition. The value of universal gas constant R is 8.314 J/mol-K. If the temperature of the gas is 27 \(^\circ\)C, the magnitude of work done in the process (rounded off to two decimal places) is ___________ Joules.
Step 1: Understanding the Question:
We need to calculate the work done by an ideal gas during a reversible isothermal expansion process.
Step 2: Key Formula or Approach:
For a reversible process, the work done (\(W\)) by the gas is given by the integral \(W = \int_{V_1}^{V_2} P \,dV\).
For an ideal gas, the equation of state is \(PV = nRT\), so we can substitute \(P = \frac{nRT}{V}\).
For an isothermal process, the temperature \(T\) is constant. Therefore, the formula for work done becomes:
\[ W = \int_{V_1}^{V_2} \frac{nRT}{V} \,dV = nRT \int_{V_1}^{V_2} \frac{1}{V} \,dV = nRT \ln\left(\frac{V_2}{V_1}\right) \]
Step 3: Detailed Explanation:
Given data:
- Number of moles, \(n = 2\) mol.
- Initial volume, \(V_1 = 10\) liters.
- Final volume, \(V_2 = 20\) liters.
- Gas constant, \(R = 8.314\) J/mol-K.
- Temperature, \(T = 27 ^\circC\).
Part 1: Convert Temperature to Kelvin
Thermodynamic calculations require temperature to be in absolute units (Kelvin).
\[ T(K) = T(^\circC) + 273.15 = 27 + 273.15 = 300.15 K \]
For simplicity in many problems, using 273 is acceptable, which gives \(T=300\) K. Let's use the more precise value.
Part 2: Calculate the work done (W)
Using the derived formula:
\[ W = nRT \ln\left(\frac{V_2}{V_1}\right) \] \[ W = (2 mol) \times (8.314 \frac{J}{mol-K}) \times (300.15 K) \times \ln\left(\frac{20 L}{10 L}\right) \] \[ W = (16.628) \times (300.15) \times \ln(2) \] \[ W = 4990.9002 \times 0.693147 \] \[ W = 3459.60 Joules \]
(Using T=300K gives W = 3457.89 Joules. Both values are very close and acceptable).
Step 4: Final Answer:
The magnitude of work done is 3459.60 Joules.
Quick Tip: Always convert temperature to Kelvin for any gas law or thermodynamic calculation. The formula \(W = nRT \ln(V_2/V_1)\) is fundamental for isothermal processes. Note that for expansion (\(V_2 > V_1\)), work done *by* the system is positive. For compression (\(V_2 < V_1\)), it's negative. The question asks for the magnitude.
Specific heat capacity at constant pressure (\(C_p\)) of a solid metal is given by the following expression:
\(C_p\) (in J/mol-K) = \(20 + (5 \times 10^{-3})\cdot T\) (for T=298 K to 1000 K)
At constant pressure, if the temperature (T in K) of 2 moles of metal is increased from 300 K to 600 K, the change in enthalpy of the metal (answer in integer) is ___________ Joules.
Step 1: Understanding the Question:
We need to calculate the total change in enthalpy (\(\Delta H\)) for heating 2 moles of a substance, given its temperature-dependent specific heat capacity (\(C_p\)).
Step 2: Key Formula or Approach:
The change in molar enthalpy (\(\Delta H_{molar}\)) at constant pressure is the integral of the specific heat capacity with respect to temperature:
\[ \Delta H_{molar} = \int_{T_1}^{T_2} C_p \,dT \]
The total change in enthalpy for \(n\) moles is:
\[ \Delta H_{total} = n \times \Delta H_{molar} = n \int_{T_1}^{T_2} C_p \,dT \]
Step 3: Detailed Explanation:
Given data:
- \(C_p(T) = 20 + 0.005T\) J/mol-K
- Number of moles, \(n = 2\) mol.
- Initial temperature, \(T_1 = 300\) K.
- Final temperature, \(T_2 = 600\) K.
Set up and solve the integral for molar enthalpy change:
\[ \Delta H_{molar} = \int_{300}^{600} (20 + 0.005T) \,dT \] \[ \Delta H_{molar} = \left[ 20T + 0.005 \frac{T^2}{2} \right]_{300}^{600} \] \[ \Delta H_{molar} = \left[ 20T + 0.0025 T^2 \right]_{300}^{600} \]
Now, evaluate at the limits:
\[ \Delta H_{molar} = [ (20 \times 600 + 0.0025 \times 600^2) - (20 \times 300 + 0.0025 \times 300^2) ] \] \[ \Delta H_{molar} = [ (12000 + 0.0025 \times 360000) - (6000 + 0.0025 \times 90000) ] \] \[ \Delta H_{molar} = [ (12000 + 900) - (6000 + 225) ] \] \[ \Delta H_{molar} = [ 12900 - 6225 ] = 6675 J/mol \]
Calculate the total enthalpy change for 2 moles:
\[ \Delta H_{total} = n \times \Delta H_{molar} = 2 mol \times 6675 J/mol = 13350 J \]
Step 4: Final Answer:
The change in enthalpy of the metal is 13350 Joules. This value is within the answer key range of 13340 to 13360 Joules.
Quick Tip: When \(C_p\) is a function of temperature, you must integrate it between the initial and final temperatures to find the enthalpy change. Don't forget to multiply by the number of moles at the end if the question asks for the total change, not the molar change.
With reference to the Ellingham diagram, the standard Gibbs free energy change for the oxidation of solid metal M (s) and liquid metal M (l) is given below:
Reaction I: M(s) + O\(_2\)(g) \(\rightarrow\) MO\(_2\)(s)
\(\Delta G^\circ = (-338900 - 15.2T\ln T + 247T)\) Joules; from T = 300 K to melting point.
Reaction II: M(l) + O\(_2\)(g) \(\rightarrow\) MO\(_2\)(s)
\(\Delta G^\circ = (-390800 - 15.2T\ln T + 285.3T)\) Joules; from melting point to T = 1800 K
The melting point of the metal M (rounded off to one decimal place) is ___________ Kelvin.
Step 1: Understanding the Question:
We are given two equations for the Gibbs free energy of formation of an oxide, one for the solid reactant metal and one for the liquid reactant metal. We need to find the melting point of the metal, \(T_m\).
Step 2: Key Formula or Approach:
At the melting point (\(T_m\)), the solid and liquid phases of the metal M are in equilibrium. This means the Gibbs free energy of the solid metal is equal to the Gibbs free energy of the liquid metal.
Consequently, at \(T = T_m\), the Gibbs free energy change for Reaction I must be equal to the Gibbs free energy change for Reaction II, because the reactants and products are thermodynamically equivalent at this specific temperature.
Therefore, we can find \(T_m\) by setting \(\Delta G^\circ_{I} = \Delta G^\circ_{II}\) at \(T = T_m\).
Step 3: Detailed Explanation:
Set the two \(\Delta G^\circ\) expressions equal to each other at \(T = T_m\):
\[ -338900 - 15.2T_m\ln T_m + 247T_m = -390800 - 15.2T_m\ln T_m + 285.3T_m \]
The term \(-15.2T_m\ln T_m\) is present on both sides and can be cancelled out.
\[ -338900 + 247T_m = -390800 + 285.3T_m \]
Now, rearrange the equation to solve for \(T_m\). Group the terms with \(T_m\) on one side and the constant terms on the other.
\[ 390800 - 338900 = 285.3T_m - 247T_m \] \[ 51900 = (285.3 - 247)T_m \] \[ 51900 = 38.3T_m \] \[ T_m = \frac{51900}{38.3} \approx 1355.091... K \]
Step 4: Final Answer:
Rounding off to one decimal place, the melting point of the metal M is 1355.1 K. This falls within the answer key range of 1353.9 to 1356.3 K.
Quick Tip: In an Ellingham diagram, a change in the slope of a line corresponds to a phase change of a reactant or product. When a reactant melts (like M(s) \(\rightarrow\) M(l)), the entropy of the system increases, leading to a steeper slope. The temperature at which this "kink" in the line occurs is the melting point. Algebraically, this point is found by equating the \(\Delta G^\circ\) expressions for the two phases.
A given volume of liquid is undercooled just below the melting temperature to form a spherical solid nucleus (consider homogeneous nucleation). The Gibbs free energy of solidification (\(\Delta G_v\)) is (\(-0.5 \times 10^8\)) J/m\(^3\). The solid-liquid interfacial energy (\(\gamma\)) is isotropic and its value is 0.1 J/m\(^2\).
The critical nucleus size for a stable nucleus is ___________ nm (answer in integer).
Step 1: Understanding the Question:
We are asked to calculate the critical nucleus radius (\(r^*\)) for homogeneous nucleation, given the volumetric free energy change and the solid-liquid interfacial energy.
Step 2: Key Formula or Approach:
The total free energy change (\(\Delta G_{total}\)) for the formation of a spherical nucleus of radius \(r\) is the sum of the bulk free energy released and the surface energy required:
\[ \Delta G_{total} = \frac{4}{3}\pi r^3 \Delta G_v + 4\pi r^2 \gamma \]
The critical nucleus size \(r^*\) is the radius at which this free energy change is maximum. This is found by setting the derivative of \(\Delta G_{total}\) with respect to \(r\) equal to zero. This yields the formula for the critical radius:
\[ r^* = -\frac{2\gamma}{\Delta G_v} \]
Step 3: Detailed Explanation:
Given data:
- Volumetric free energy change, \(\Delta G_v = -0.5 \times 10^8\) J/m\(^3\).
- Solid-liquid interfacial energy, \(\gamma = 0.1\) J/m\(^2\).
Calculate the critical radius (\(r^*\)):
\[ r^* = -\frac{2 \times (0.1 J/m^2)}{-0.5 \times 10^8 J/m^3} \] \[ r^* = \frac{0.2}{0.5 \times 10^8} m \] \[ r^* = \frac{2}{5 \times 10^8} m = 0.4 \times 10^{-8} m = 4 \times 10^{-9} m \]
Convert the result to nanometers:
Since \(1 nm = 10^{-9} m\),
\[ r^* = 4 nm \]
Step 4: Final Answer:
The critical nucleus size is 4 nm.
Quick Tip: Memorize the formula for the critical nucleus radius \(r^* = -2\gamma/\Delta G_v\) and the activation energy for nucleation \(\Delta G^* = \frac{16\pi\gamma^3}{3(\Delta G_v)^2}\). These are fundamental to the classical theory of homogeneous nucleation. Pay close attention to the sign of \(\Delta G_v\), which is negative for solidification.
A 50 mm flat aluminium plate is reduced in thickness to 25 mm in a single pass cold-rolling operation with the rolling diameter of 1250 mm. For this case, the minimum required coefficient of friction between the plate and the roll (rounded off to two decimal places) is ___________.
Step 1: Understanding the Question:
We need to find the minimum coefficient of friction (\(\mu\)) required to perform a given rolling operation. This minimum value corresponds to the case where the reduction is at its maximum possible limit for a given \(\mu\).
Step 2: Key Formula or Approach:
For a rolling operation to be possible, the bite angle (\(\alpha\)) must be less than or equal to the friction angle (\(\phi\)), where \(\tan(\phi) = \mu\). The maximum possible draft (reduction in thickness) is achieved when the bite angle equals the friction angle.
The bite angle \(\alpha\) is related to the roll radius \(R\) and the draft \(\Delta h = h_i - h_f\). For small angles, the relationship is:
\[ \Delta h \approx R \alpha^2 \]
And the condition for biting is \(\tan \alpha = \mu\). For small angles, \(\tan \alpha \approx \alpha\). So, the maximum draft is given by:
\[ \Delta h_{max} = \mu^2 R \]
We can rearrange this to find the minimum \(\mu\) required for a given draft \(\Delta h\):
\[ \mu_{min} = \sqrt{\frac{\Delta h}{R}} \]
Step 3: Detailed Explanation:
Given data:
- Initial thickness, \(h_i = 50\) mm.
- Final thickness, \(h_f = 25\) mm.
- Roll diameter, \(D = 1250\) mm.
Calculate the required parameters:
- Draft, \(\Delta h = h_i - h_f = 50 - 25 = 25\) mm.
- Roll radius, \(R = D/2 = 1250/2 = 625\) mm.
Calculate the minimum coefficient of friction (\(\mu\)):
\[ \mu_{min} = \sqrt{\frac{\Delta h}{R}} = \sqrt{\frac{25 mm}{625 mm}} \] \[ \mu_{min} = \sqrt{\frac{1}{25}} = \frac{1}{5} = 0.2 \]
Step 4: Final Answer:
Rounding to two decimal places, the minimum required coefficient of friction is 0.20. This value falls within the answer key range of 0.19 to 0.21.
Quick Tip: The condition for biting in rolling, \(\Delta h_{max} = \mu^2 R\), is a very important formula in metal forming. It connects the maximum achievable reduction in a single pass to the friction and the roll size. Make sure to use the roll radius, not the diameter, in the formula.
A cylindrical furnace has 0.1 m inner diameter and 0.2 m height. Walls A\(_1\) (inner section of cylindrical surface area) and A\(_2\) (inner section of bottom surface area) are maintained at 1873 K. The sides and bottom are assumed to be black bodies, well insulated and heated electrically. The top area (A\(_3\)) is open to atmosphere maintained at 300 K, resulting in loss of heat 'q'.
Given: View factors F\(_{13}\) = 0.1175 and F\(_{23}\) = 0.06, where F\(_{ij}\) is the fraction of radiation leaving surface 'i' that is intercepted by surface 'j'.
Stefan-Boltzmann constant = \(5.67 \times 10^{-8}\) W/m\(^2\)-K\(^4\).
The power needed to maintain the furnace at 1873 K, is (approximate to the nearest integer) ___________ W.
Step 1: Understanding the Question:
We need to find the total power required to keep the furnace walls at a constant high temperature. Since the side and bottom walls are well-insulated, the electrical power supplied must be equal to the heat lost by radiation through the top opening.
Step 2: Key Formula or Approach:
The net rate of radiation heat transfer from a surface \(i\) to a surface \(j\) is given by \(q_{i \to j} = A_i F_{ij} \sigma (T_i^4 - T_j^4)\).
The total heat loss \(q\) is the sum of the heat lost from surface A\(_1\) to surface A\(_3\) (the opening) and from surface A\(_2\) to surface A\(_3\).
\[ q = q_{1 \to 3} + q_{2 \to 3} = A_1 F_{13} \sigma (T_1^4 - T_3^4) + A_2 F_{23} \sigma (T_2^4 - T_3^4) \]
Since \(T_1 = T_2\), this simplifies to:
\[ q = (A_1 F_{13} + A_2 F_{23}) \sigma (T_1^4 - T_3^4) \]
The power needed is equal to this heat loss, \(P = q\).
Step 3: Detailed Explanation:
Given data:
- Diameter, \(D = 0.1\) m \(\Rightarrow\) Radius, \(r = 0.05\) m.
- Height, \(h = 0.2\) m.
- Temperature of walls 1 and 2, \(T_1 = T_2 = 1873\) K.
- Temperature of opening (atmosphere), \(T_3 = 300\) K.
- View factors: \(F_{13} = 0.1175\), \(F_{23} = 0.06\).
- Stefan-Boltzmann constant, \(\sigma = 5.67 \times 10^{-8}\) W/m\(^2\)K\(^4\).
Part 1: Calculate the surface areas
- Area of the cylindrical side wall, A\(_1\):
\[ A_1 = \pi D h = \pi \times 0.1 \times 0.2 = 0.02\pi \approx 0.06283 m^2 \]
- Area of the bottom circular surface, A\(_2\):
\[ A_2 = \pi r^2 = \pi \times (0.05)^2 = 0.0025\pi \approx 0.00785 m^2 \]
Part 2: Calculate the heat loss (q)
\[ q = (A_1 F_{13} + A_2 F_{23}) \sigma (T_1^4 - T_3^4) \]
First, calculate the geometric term:
\[ A_1 F_{13} + A_2 F_{23} = (0.06283 \times 0.1175) + (0.00785 \times 0.06) \] \[ = 0.007383 + 0.000471 = 0.007854 m^2 \]
Next, calculate the temperature term:
\[ T_1^4 - T_3^4 = (1873)^4 - (300)^4 = (1.23 \times 10^{13}) - (8.1 \times 10^9) \approx 1.23 \times 10^{13} K^4 \] (The \(T_3^4\) term is negligible).
Now, calculate the total heat loss:
\[ q = (0.007854) \times (5.67 \times 10^{-8}) \times (1.23 \times 10^{13}) \] \[ q \approx 5479.5 W \]
Step 4: Final Answer:
The power needed is approximately 5480 W. This is within the answer key range of 5450 to 5510 W.
Quick Tip: In radiation problems, always check if any temperature term can be neglected. When one temperature is much higher than the other, its fourth power will be vastly larger (e.g., \(1873^4 \gg 300^4\)). Neglecting the smaller term can simplify the arithmetic without significant loss of accuracy. Also, remember the reciprocity rule for view factors: \(A_i F_{ij} = A_j F_{ji}\).
During carburizing of a steel, the surface concentration is kept constant at 1.4 wt.% carbon. Diffusivity of carbon for the steel at 950 \(^\circ\)C is \(6.25 \times 10^{-11}\) m\(^2\)/s. At 950 \(^\circ\)C, the time required to carburize the steel with an initial composition of 0.2 wt.% carbon to 0.8859 wt.% carbon at a depth of 0.2 mm is ___________ seconds (approximate to the nearest integer).
Use the nearest value of the error function from the table given below for your calculation.
Step 1: Understanding the Question:
This is a non-steady-state diffusion problem. We have a semi-infinite solid (the steel part) with an initial concentration, and the surface concentration is suddenly raised and held constant. We need to find the time it takes for the concentration at a specific depth to reach a certain value.
Step 2: Key Formula or Approach:
This scenario is described by the solution to Fick's second law for a semi-infinite medium with constant surface concentration. The solution is given in terms of the error function:
\[ \frac{C(x,t) - C_0}{C_s - C_0} = 1 - erf\left(\frac{x}{2\sqrt{Dt}}\right) \]
where:
- \(C(x,t)\) is the concentration at depth \(x\) and time \(t\).
- \(C_0\) is the initial uniform concentration.
- \(C_s\) is the constant surface concentration.
- \(D\) is the diffusion coefficient.
- erf is the Gaussian error function.
Step 3: Detailed Explanation:
Given data:
- Surface concentration, \(C_s = 1.4\) wt.%.
- Initial concentration, \(C_0 = 0.2\) wt.%.
- Target concentration, \(C(x,t) = 0.8859\) wt.%.
- Depth, \(x = 0.2\) mm = \(0.2 \times 10^{-3}\) m.
- Diffusivity, \(D = 6.25 \times 10^{-11}\) m\(^2\)/s.
Part 1: Calculate the argument of the error function
First, plug the concentrations into the left side of the equation:
\[ \frac{0.8859 - 0.2}{1.4 - 0.2} = \frac{0.6859}{1.2} = 0.57158... \]
So, we have:
\[ 0.57158 = 1 - erf(z) \]
where \(z = \frac{x}{2\sqrt{Dt}}\).
Rearranging to find the value of the error function:
\[ erf(z) = 1 - 0.57158 = 0.42842 \]
Part 2: Find z from the table
Looking at the provided table, the value erf(z) = 0.4284 corresponds to \(z = 0.4\).
Part 3: Solve for time (t)
Now we can use the relationship \(z = \frac{x}{2\sqrt{Dt}}\) to solve for \(t\).
\[ 0.4 = \frac{0.2 \times 10^{-3} m}{2\sqrt{(6.25 \times 10^{-11} m^2/s) \times t}} \]
Square both sides of the equation:
\[ (0.4)^2 = \frac{(0.2 \times 10^{-3})^2}{4 \times (6.25 \times 10^{-11}) \times t} \] \[ 0.16 = \frac{0.04 \times 10^{-6}}{25 \times 10^{-11} \times t} \]
Rearrange to solve for \(t\):
\[ t = \frac{0.04 \times 10^{-6}}{0.16 \times 25 \times 10^{-11}} = \frac{0.04 \times 10^{-6}}{4 \times 10^{-11}} \] \[ t = 0.01 \times 10^5 = 1000 s \]
Step 4: Final Answer:
The time required is 1000 seconds. This falls within the answer key range of 990 to 1010 s.
Quick Tip: The equation \(\frac{C(x,t) - C_0}{C_s - C_0} = 1 - erf\left(\frac{x}{2\sqrt{Dt}}\right)\) is the standard solution for carburizing/decarburizing problems. The left side is often called the "dimensionless concentration". The key steps are: calculate this value, find the corresponding \(z\) from the error function table, and then solve for the unknown variable (\(x\), \(t\), or \(D\)).
For the following reaction between methane and stoichiometric air having composition 20 vol.% O\(_2\) and 80 vol.% N\(_2\), the estimated adiabatic flame temperature (rounded off to one decimal place) is ___________ Kelvin.
CH\(_4\) (g) + 2 O\(_2\) (g) \(\rightarrow\) CO\(_2\) (g) + 2 H\(_2\)O (g)
Given: \(\Delta H = -850\) kJ/mol at 298 K
Assume specific heat at constant pressure (C\(_p\)) for each reactant and product is 50 J/mol-K and is independent of temperature.
Step 1: Understanding the Question:
We need to calculate the adiabatic flame temperature (\(T_f\)) for the combustion of methane with stoichiometric air. The key principle is that in an adiabatic process, the heat generated by the reaction is entirely used to heat up the products of combustion.
Step 2: Key Formula or Approach:
The energy balance for an adiabatic combustion process is:
Heat released by reaction at \(T_{initial}\) = Heat absorbed by products to go from \(T_{initial}\) to \(T_f\).
\[ -\Delta H_{rxn} = \int_{T_{initial}}^{T_f} (\sum n_p C_{p,p}) \,dT \]
Since all \(C_p\) values are constant, the equation simplifies to:
\[ -\Delta H_{rxn} = (\sum n_p C_p) (T_f - T_{initial}) \]
Step 3: Detailed Explanation:
Given data:
- Reaction enthalpy, \(\Delta H_{298K} = -850\) kJ/mol = \(-850,000\) J/mol.
- Initial temperature, \(T_{initial} = 298\) K.
- Specific heat for all species, \(C_p = 50\) J/mol-K.
- Air composition: 20% O\(_2\), 80% N\(_2\). This means the ratio N\(_2\)/O\(_2\) = 80/20 = 4.
Part 1: Determine the full reaction including nitrogen
The stoichiometric reaction for methane is CH\(_4\) + 2O\(_2\) \(\rightarrow\) CO\(_2\) + 2H\(_2\)O.
For every 2 moles of O\(_2\) consumed, we also have inert nitrogen from the air passing through.
Moles of N\(_2\) = (Moles of O\(_2\)) \(\times\) (N\(_2\)/O\(_2\) ratio) = \(2 \times 4 = 8\) mol N\(_2\).
The full reaction is: CH\(_4\) + 2O\(_2\) + 8N\(_2\) \(\rightarrow\) CO\(_2\) + 2H\(_2\)O + 8N\(_2\).
Part 2: Identify products and calculate total heat capacity
The products of the combustion are CO\(_2\), H\(_2\)O, and the inert N\(_2\).
- Moles of CO\(_2\), \(n_{CO_2} = 1\) mol.
- Moles of H\(_2\)O, \(n_{H_2O} = 2\) mol.
- Moles of N\(_2\), \(n_{N_2} = 8\) mol.
Total moles of products, \(n_{products} = 1 + 2 + 8 = 11\) mol.
Since \(C_p\) is the same for all species, the total heat capacity of the product mixture is:
\[ \sum n_p C_p = n_{products} \times C_p = 11 mol \times 50 J/mol-K = 550 J/K \]
Part 3: Apply the energy balance
Heat released = \(-\Delta H_{rxn} = -(-850,000 J) = 850,000\) J.
\[ 850,000 J = (550 J/K) \times (T_f - 298 K) \] \[ T_f - 298 = \frac{850,000}{550} \approx 1545.45 K \] \[ T_f = 1545.45 + 298 = 1843.45 K \]
Step 4: Final Answer:
Rounding off to one decimal place, the estimated adiabatic flame temperature is 1843.5 K.
Quick Tip: When calculating adiabatic flame temperature, the most common mistake is forgetting to include inert gases (like Nitrogen from air) in the heat absorption calculation. The inert gases don't react, but they are present in the final product stream and absorb a significant portion of the released heat.
A copper ore contains 30 wt.% chalcopyrite (CuFeS\(_2\)) and remaining gangue material. Assuming no copper in gangue material, the amount of copper in the ore (rounded off to one decimal place) is ___________ wt.%.
Given: Atomic weights of Fe, Cu and S are 56, 63.5, and 32 g/mol, respectively.
Step 1: Understanding the Question:
We are given the weight percentage of the mineral chalcopyrite in an ore. We need to find the weight percentage of the element copper in the same ore. All the copper is contained within the chalcopyrite.
Step 2: Key Formula or Approach:
1. Calculate the molecular weight of chalcopyrite (CuFeS\(_2\)).
2. Calculate the weight fraction of copper within a pure molecule of chalcopyrite.
3. Multiply this weight fraction by the weight fraction of chalcopyrite in the ore to get the final weight fraction of copper in the ore.
Step 3: Detailed Explanation:
Given data:
- wt.% of CuFeS\(_2\) in ore = 30%.
- Atomic weight of Cu = 63.5 g/mol.
- Atomic weight of Fe = 56 g/mol.
- Atomic weight of S = 32 g/mol.
Part 1: Calculate the molecular weight of CuFeS\(_2\)
\[ MW_{CuFeS_2} = AW_{Cu} + AW_{Fe} + 2 \times AW_{S} \] \[ MW_{CuFeS_2} = 63.5 + 56 + 2 \times 32 = 63.5 + 56 + 64 = 183.5 g/mol \]
Part 2: Calculate the weight fraction of Cu in CuFeS\(_2\)
\[ wt. fraction of Cu in CuFeS_2 = \frac{AW_{Cu}}{MW_{CuFeS_2}} = \frac{63.5}{183.5} \approx 0.34605 \]
Part 3: Calculate the weight percentage of Cu in the ore
The ore contains 30 wt.% of the mineral, and the mineral contains 34.605 wt.% of the element copper.
\[ wt.% Cu in ore = (wt. fraction of Cu in CuFeS_2) \times (wt.% of CuFeS_2 in ore) \] \[ wt.% Cu in ore = 0.34605 \times 30% = 10.3815% \]
Step 4: Final Answer:
Rounding off to one decimal place, the amount of copper in the ore is 10.4 wt.%.
Quick Tip: This is a standard stoichiometric calculation. Break it down into parts: find the composition of the pure compound first, then use that to find the composition in the overall mixture (the ore). Always check what basis the percentages are given in (e.g., wt.% or mol.%).
A blast furnace produces hot metal with the following composition: 4 wt.% C, 1.5 wt.% Si, and rest Fe.
Only input of iron is through iron ore containing 85 wt.% Fe\(_2\)O\(_3\) and 15 wt.% gangue consisting of SiO\(_2\) and Al\(_2\)O\(_3\).
2% of all iron (by weight) is lost in slag.
The amount of ore used to produce 1000 kg of hot metal (rounded off to one decimal place) is ___________ kg.
Given: Atomic weights of Fe and O are 56 g/mol and 16 g/mol, respectively.
Step 1: Understanding the Question:
This is a mass balance problem. We need to work backwards from the final product (hot metal) to find the amount of initial raw material (iron ore) required, accounting for losses.
Step 2: Key Formula or Approach:
1. Calculate the mass of iron in 1000 kg of hot metal.
2. Account for the iron lost to slag to find the total amount of iron that must be charged into the furnace.
3. Calculate the mass of iron ore (Fe\(_2\)O\(_3\)) required to supply this total amount of iron.
4. Account for the purity of the ore to find the total mass of ore required.
Step 3: Detailed Explanation:
Basis: 1000 kg of hot metal produced.
Part 1: Mass of Fe in Hot Metal
wt.% of Fe in hot metal = 100% - 4% (C) - 1.5% (Si) = 94.5%.
Mass of Fe in hot metal = \(1000 kg \times 0.945 = 945\) kg.
Part 2: Total Fe Input Required
The 945 kg of Fe recovered in the hot metal represents 98% of the total Fe charged, since 2% was lost.
Total Fe input = \(\frac{Mass of Fe recovered}{1 - fraction lost} = \frac{945 kg}{1 - 0.02} = \frac{945}{0.98} \approx 964.286\) kg.
Part 3: Mass of Fe\(_2\)O\(_3\) Required
The iron is supplied by the Fe\(_2\)O\(_3\) in the ore. We need to find the mass of Fe\(_2\)O\(_3\) that contains 964.286 kg of Fe.
- Molecular weight of Fe\(_2\)O\(_3\) = \(2 \times 56 + 3 \times 16 = 112 + 48 = 160\) g/mol.
- Mass fraction of Fe in Fe\(_2\)O\(_3\) = \(\frac{Mass of Fe}{Mass of Fe_2O_3} = \frac{2 \times 56}{160} = \frac{112}{160} = 0.7\).
Mass of Fe\(_2\)O\(_3\) required = \(\frac{Total Fe input}{Mass fraction of Fe in Fe_2O_3} = \frac{964.286 kg}{0.7} \approx 1377.55\) kg.
Part 4: Total Mass of Ore Required
The iron ore is only 85 wt.% Fe\(_2\)O\(_3\).
Total ore required = \(\frac{Mass of Fe_2O_3 required}{Mass fraction of Fe_2O_3 in ore} = \frac{1377.55 kg}{0.85} \approx 1620.65\) kg.
Step 4: Final Answer:
Rounding off to one decimal place, the amount of ore used is 1620.7 kg.
Quick Tip: Mass balance problems are best solved by working backwards from the product. Set a basis (e.g., 1000 kg of product) and systematically calculate the required inputs, accounting for losses and purities at each step. Drawing a simple process flow diagram can help visualize the inputs and outputs.
Al\(_2\)O\(_3\) can be electrolyzed with an inert anode or a carbon anode.
Overall reactions are as follows:
Reaction I: For inert anode,
\(\frac{2}{3}\) Al\(_2\)O\(_3\) (s) \(\rightarrow\) \(\frac{4}{3}\) Al (l) + O\(_2\) (g) ; \(\Delta G^\circ\) (in Joules) = 1124800 - 218 T
Reaction II: For carbon anode,
\(\frac{2}{3}\) Al\(_2\)O\(_3\) (s) + C (s) \(\rightarrow\) \(\frac{4}{3}\) Al (l) + CO\(_2\) (g) ; \(\Delta G^\circ\) (in Joules) = 730700 - 218 T
T denotes temperature in Kelvin
Given: Faraday constant = 96500 Coulomb
If inert anode is replaced by carbon anode during electrolysis of Al\(_2\)O\(_3\) at temperature 1300 K, the decrease in the magnitude of decomposition potential between the two reactions (rounded off to two decimal places) is ___________ Volts.
Step 1: Understanding the Question:
We need to calculate the decomposition potential for two different electrolysis reactions at a given temperature and find the difference between them.
Step 2: Key Formula or Approach:
The relationship between the standard Gibbs free energy change (\(\Delta G^\circ\)) and the standard cell potential (or decomposition potential, \(E^\circ\)) is:
\[ \Delta G^\circ = -nFE^\circ \]
where:
- \(n\) is the number of moles of electrons transferred in the balanced reaction.
- \(F\) is the Faraday constant (96500 C/mol e\(^-\)).
The decomposition potential is the minimum theoretical voltage required for electrolysis, and its magnitude is equal to \(|E^\circ|\). We need to calculate \(|E_I^\circ|\) and \(|E_{II}^\circ|\) and find the decrease, which is \(|E_I^\circ| - |E_{II}^\circ|\).
Step 3: Detailed Explanation:
Part 1: Determine the number of electrons (n)
Let's analyze the oxidation half-reactions.
- Reaction I (inert anode): 2O\(^{2-}\) \(\rightarrow\) O\(_2\) + 4e\(^-\). The overall reaction produces one mole of O\(_2\), so \(n = 4\).
- Reaction II (carbon anode): C + 2O\(^{2-}\) \(\rightarrow\) CO\(_2\) + 4e\(^-\). The overall reaction produces one mole of CO\(_2\), so \(n = 4\).
For both reactions as written, \(n=4\) moles of electrons are transferred.
Part 2: Calculate \(\Delta G^\circ\) at T = 1300 K
- \(\Delta G^\circ_I = 1124800 - 218 \times 1300 = 1124800 - 283400 = 841400\) J.
- \(\Delta G^\circ_{II} = 730700 - 218 \times 1300 = 730700 - 283400 = 447300\) J.
Part 3: Calculate the decomposition potential for each reaction
The magnitude of the decomposition potential is \(E^\circ = |\frac{-\Delta G^\circ}{nF}| = \frac{\Delta G^\circ}{nF}\) since \(\Delta G^\circ\) is positive.
- \(E^\circ_I = \frac{841400}{4 \times 96500} = \frac{841400}{386000} \approx 2.1798\) V.
- \(E^\circ_{II} = \frac{447300}{4 \times 96500} = \frac{447300}{386000} \approx 1.1588\) V.
Part 4: Calculate the decrease in potential
Decrease = \(E^\circ_I - E^\circ_{II} = 2.1798 - 1.1588 = 1.021\) V.
Step 4: Final Answer:
Rounding off to two decimal places, the decrease in the magnitude of decomposition potential is 1.02 Volts.
Quick Tip: The use of a carbon anode in aluminum electrolysis (the Hall-Héroult process) is crucial because the carbon reacts with the produced oxygen. This reaction (C + O\(_2\) \(\rightarrow\) CO\(_2\)) is highly exothermic (\(\Delta G\) is negative), which effectively reduces the overall \(\Delta G\) of the electrolysis process. As shown by the calculation (\(\Delta G = -nFE\)), a lower \(\Delta G\) means a lower required voltage, which is a major energy saving.
Given a scalar field \(\phi(x,y,z) = x^2 - yz\)
Magnitude of a vector in the direction of the most rapid increase of \(\phi\) at a point P(3,4,1), rounded-off to two decimal places, is ___________.
Step 1: Understanding the Question:
The question asks for two related things: the direction of the most rapid increase of a scalar field \(\phi\), and the magnitude of the vector representing this rate of increase at a specific point.
Step 2: Key Formula or Approach:
The direction of the most rapid increase of a scalar field \(\phi\) is given by its gradient vector, \(\nabla \phi\). The magnitude of this rate of increase is the magnitude of the gradient vector, \(|\nabla \phi|\).
The gradient is calculated as: \[ \nabla \phi = \frac{\partial \phi}{\partial x}\hat{i} + \frac{\partial \phi}{\partial y}\hat{j} + \frac{\partial \phi}{\partial z}\hat{k} \]
Step 3: Detailed Explanation:
Given data:
- Scalar field: \(\phi(x,y,z) = x^2 - yz\)
- Point: P(3,4,1)
Part 1: Calculate the gradient of \(\phi\)
First, find the partial derivatives of \(\phi\):
- \(\frac{\partial \phi}{\partial x} = \frac{\partial}{\partial x}(x^2 - yz) = 2x\)
- \(\frac{\partial \phi}{\partial y} = \frac{\partial}{\partial y}(x^2 - yz) = -z\)
- \(\frac{\partial \phi}{\partial z} = \frac{\partial}{\partial z}(x^2 - yz) = -y\)
The gradient vector is:
\[ \nabla \phi = 2x\hat{i} - z\hat{j} - y\hat{k} \]
Part 2: Evaluate the gradient vector at point P(3,4,1)
Substitute the coordinates \(x=3, y=4, z=1\) into the gradient vector expression:
\[ \nabla \phi|_{(3,4,1)} = 2(3)\hat{i} - (1)\hat{j} - (4)\hat{k} = 6\hat{i} - \hat{j} - 4\hat{k} \]
This vector points in the direction of the most rapid increase of \(\phi\) at P.
Part 3: Calculate the magnitude of this vector
The magnitude is found using the standard formula for vector magnitude:
\[ |\nabla \phi| = \sqrt{(6)^2 + (-1)^2 + (-4)^2} \] \[ |\nabla \phi| = \sqrt{36 + 1 + 16} = \sqrt{53} \] \[ |\nabla \phi| \approx 7.2801... \]
Step 4: Final Answer:
Rounding off to two decimal places, the magnitude is 7.28.
Quick Tip: The gradient (\(\nabla \phi\)) of a scalar field is a vector that always points in the direction of the steepest ascent (most rapid increase) of the field. Its magnitude represents the rate of this increase. This is a fundamental concept in vector calculus and fields theory.
*The article might have information for the previous academic years, please refer the official website of the exam.