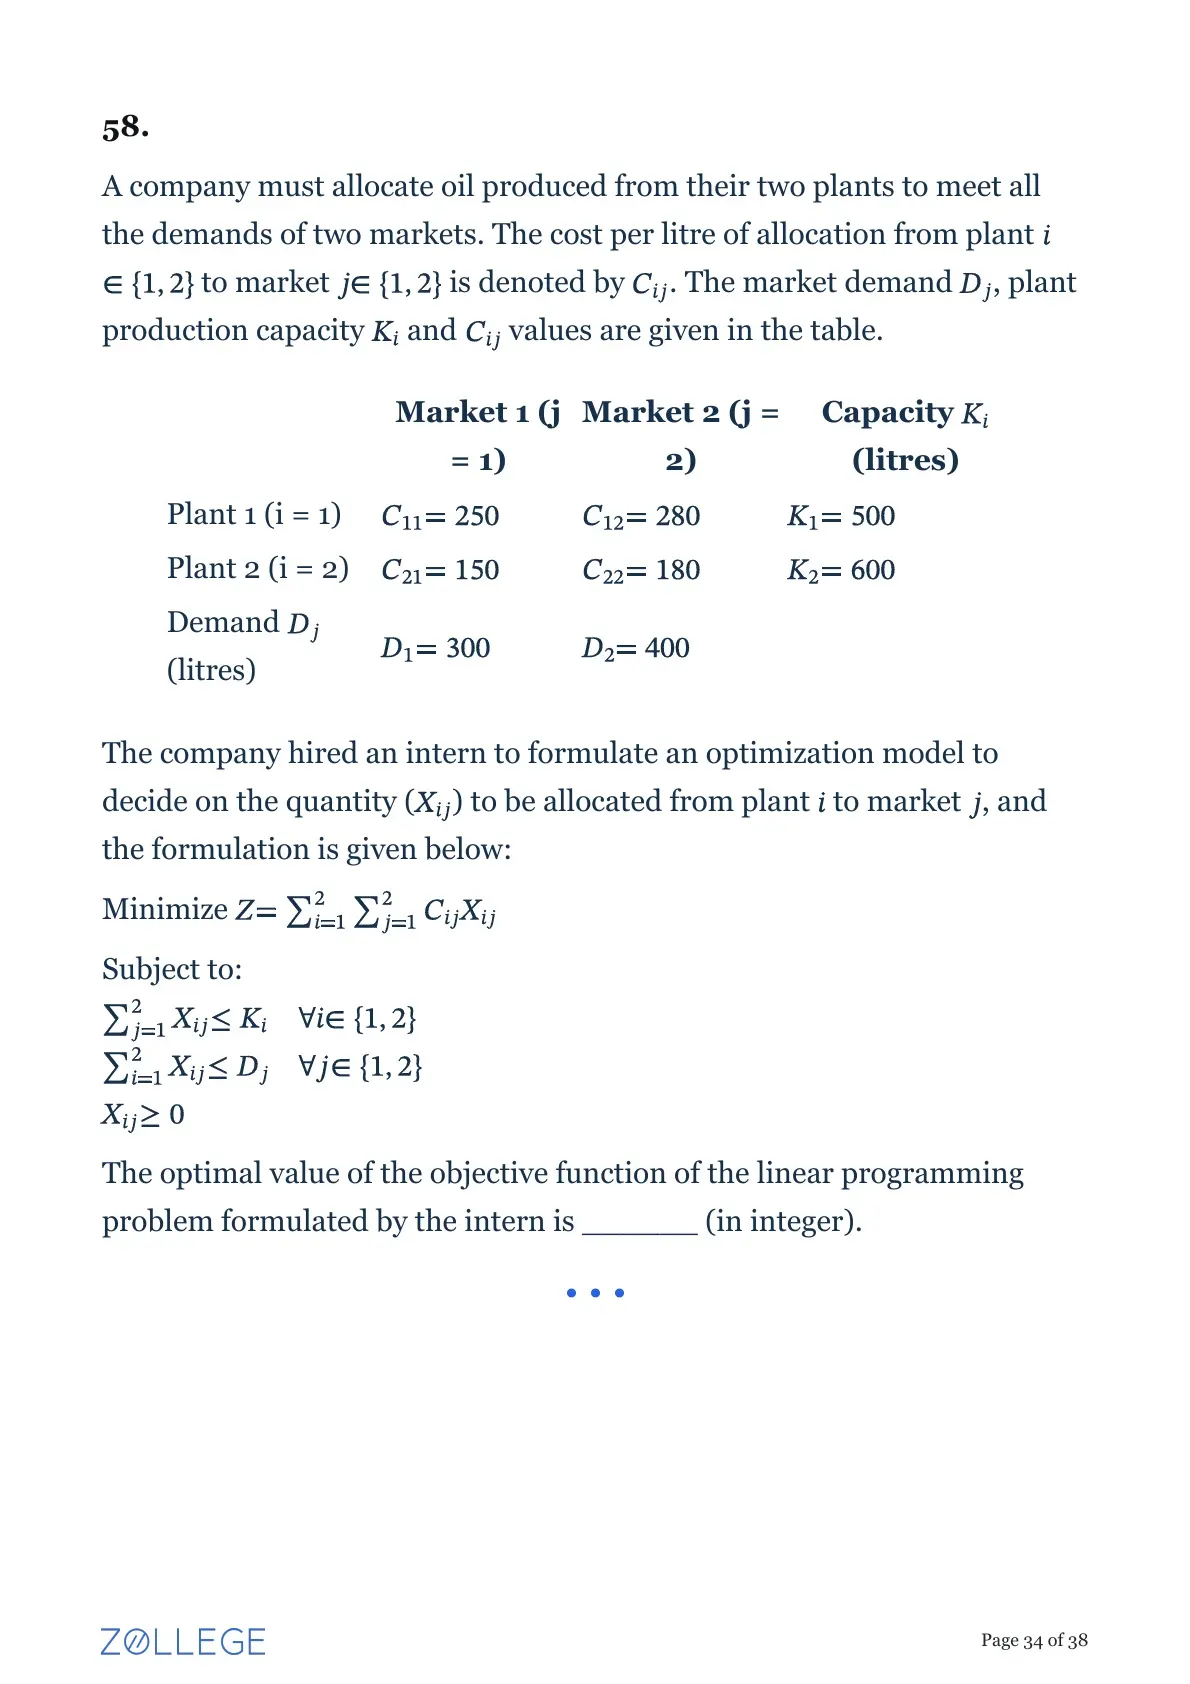
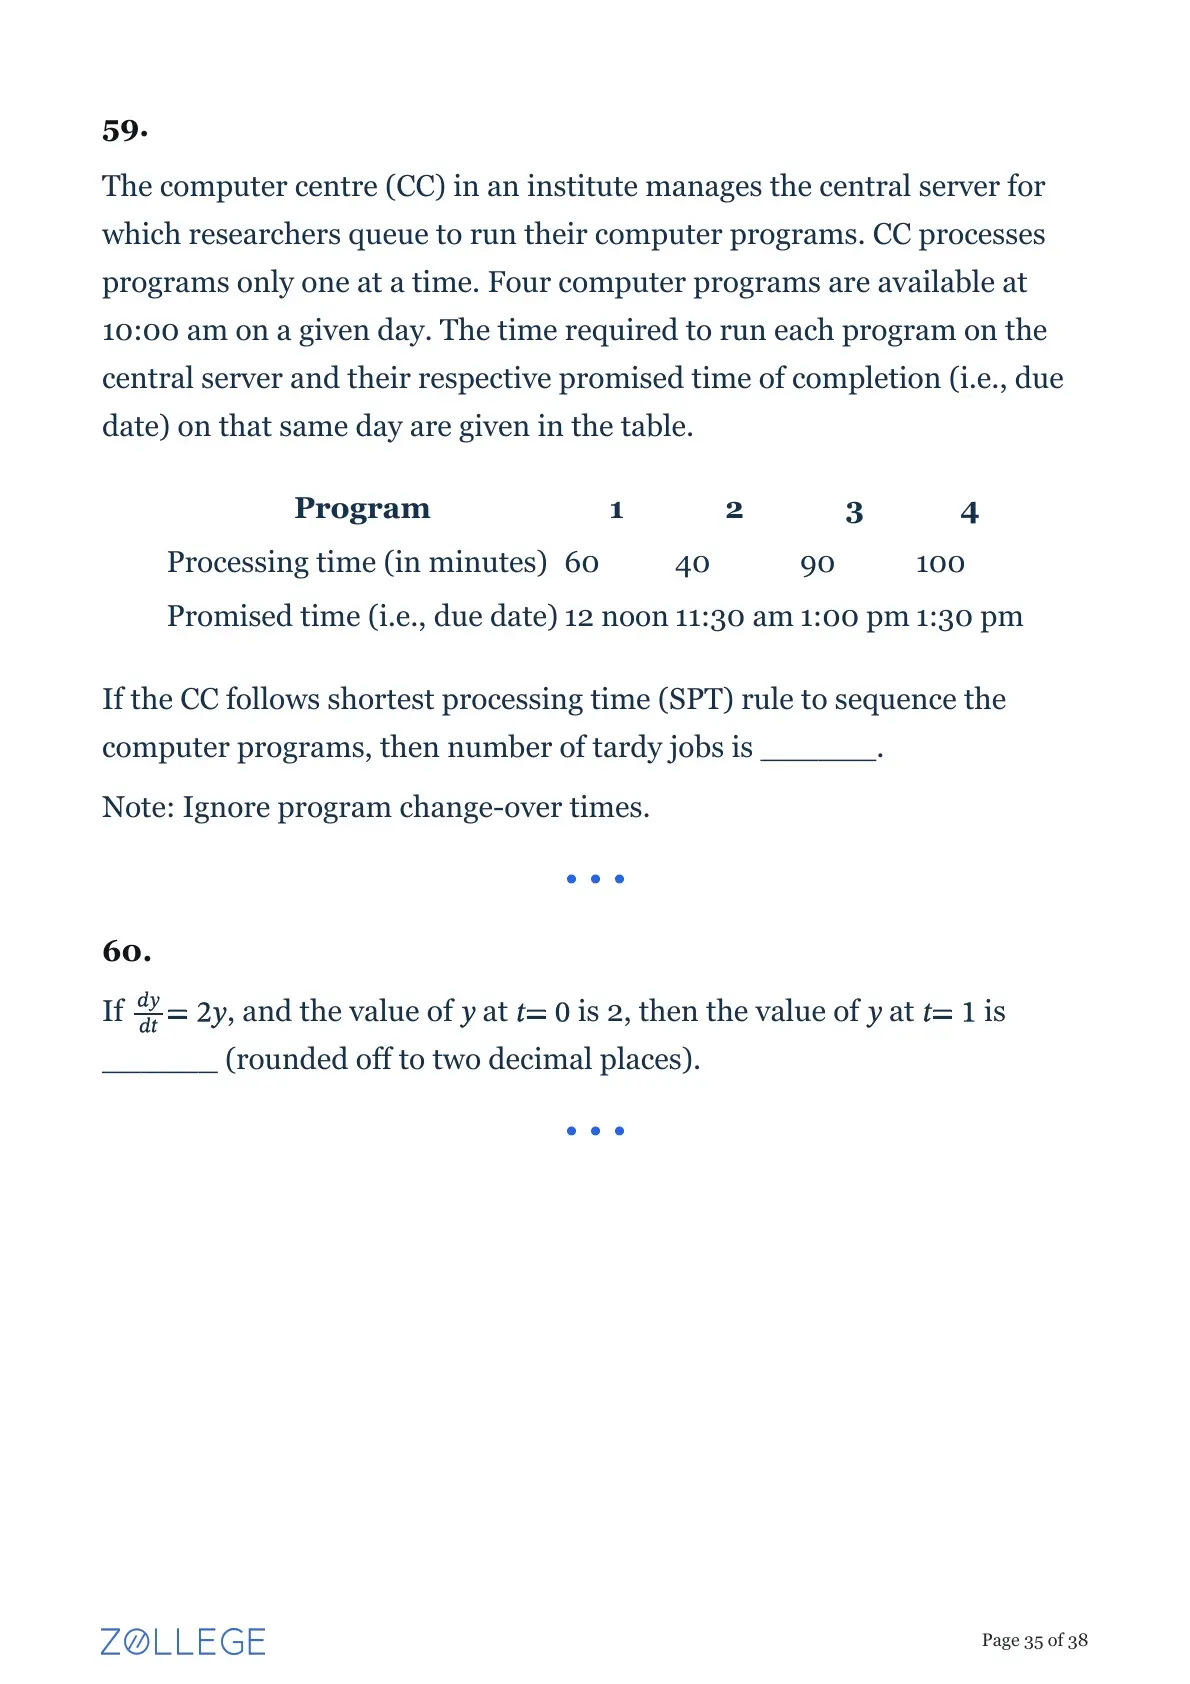
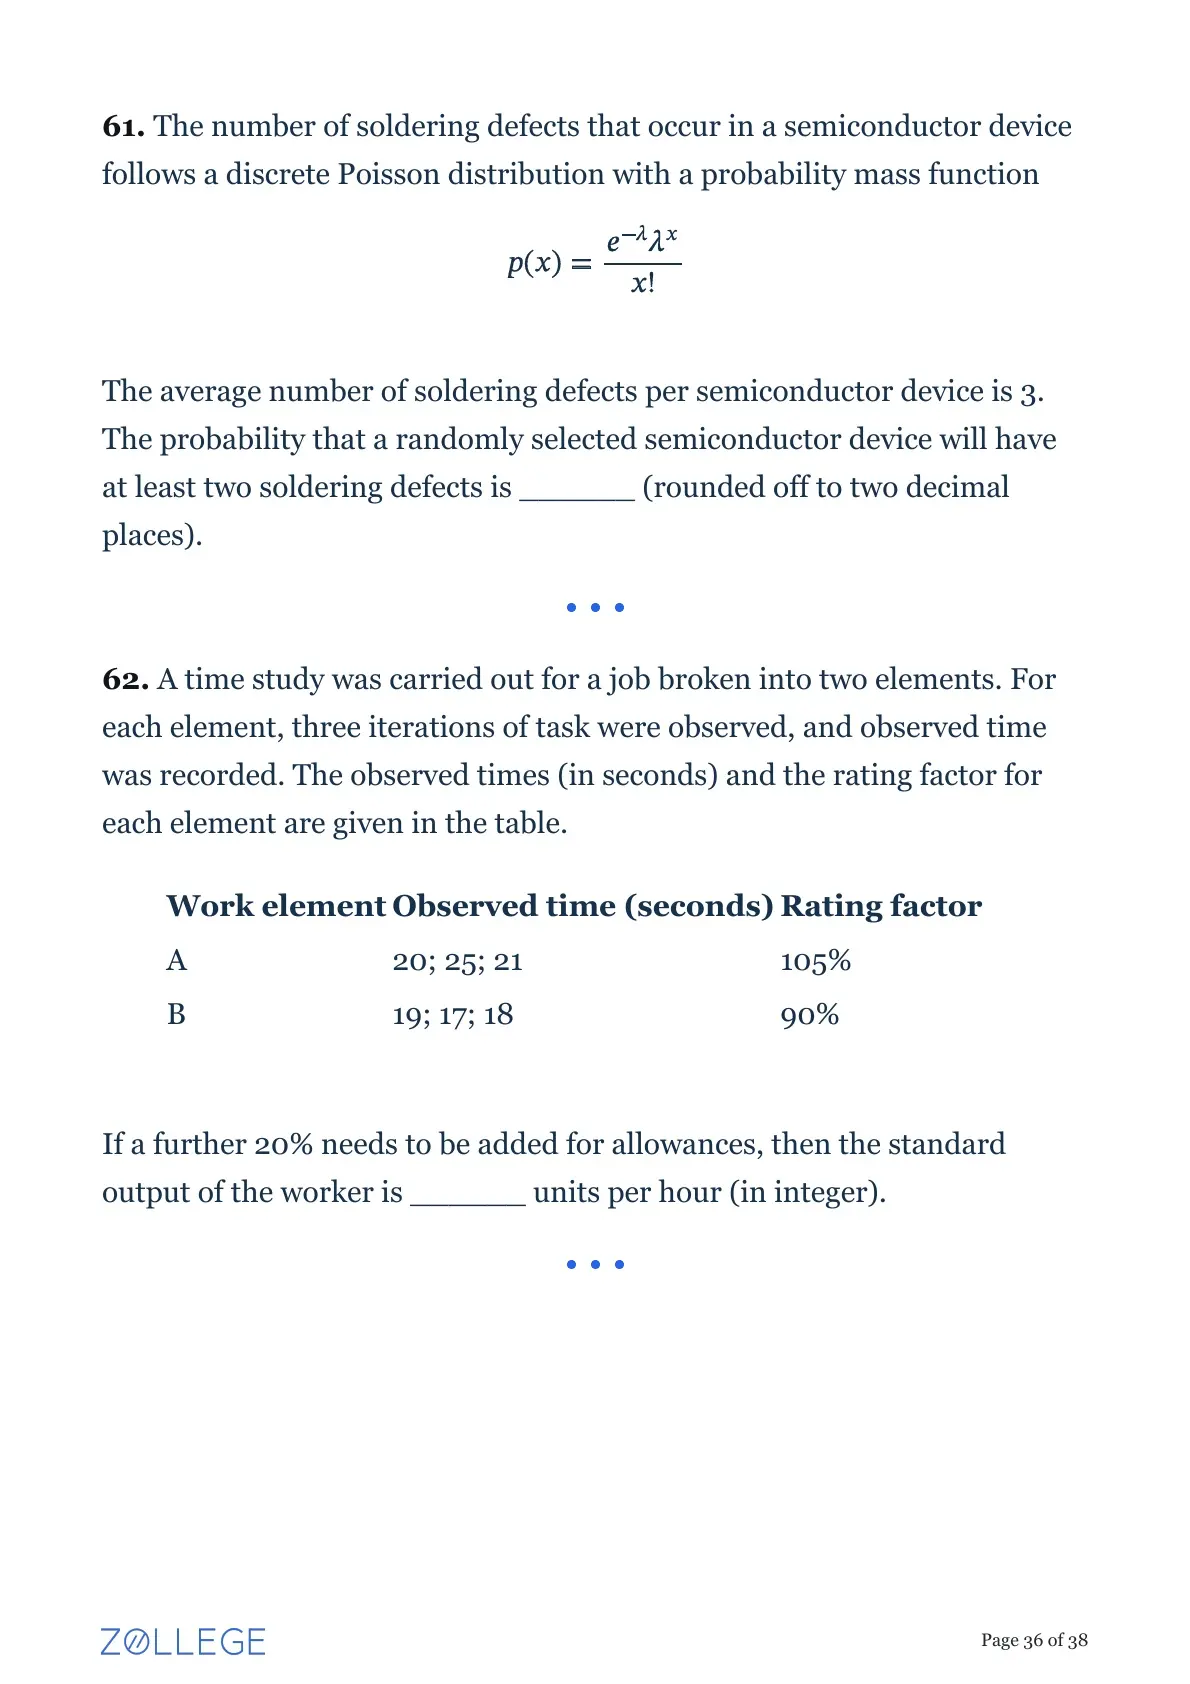
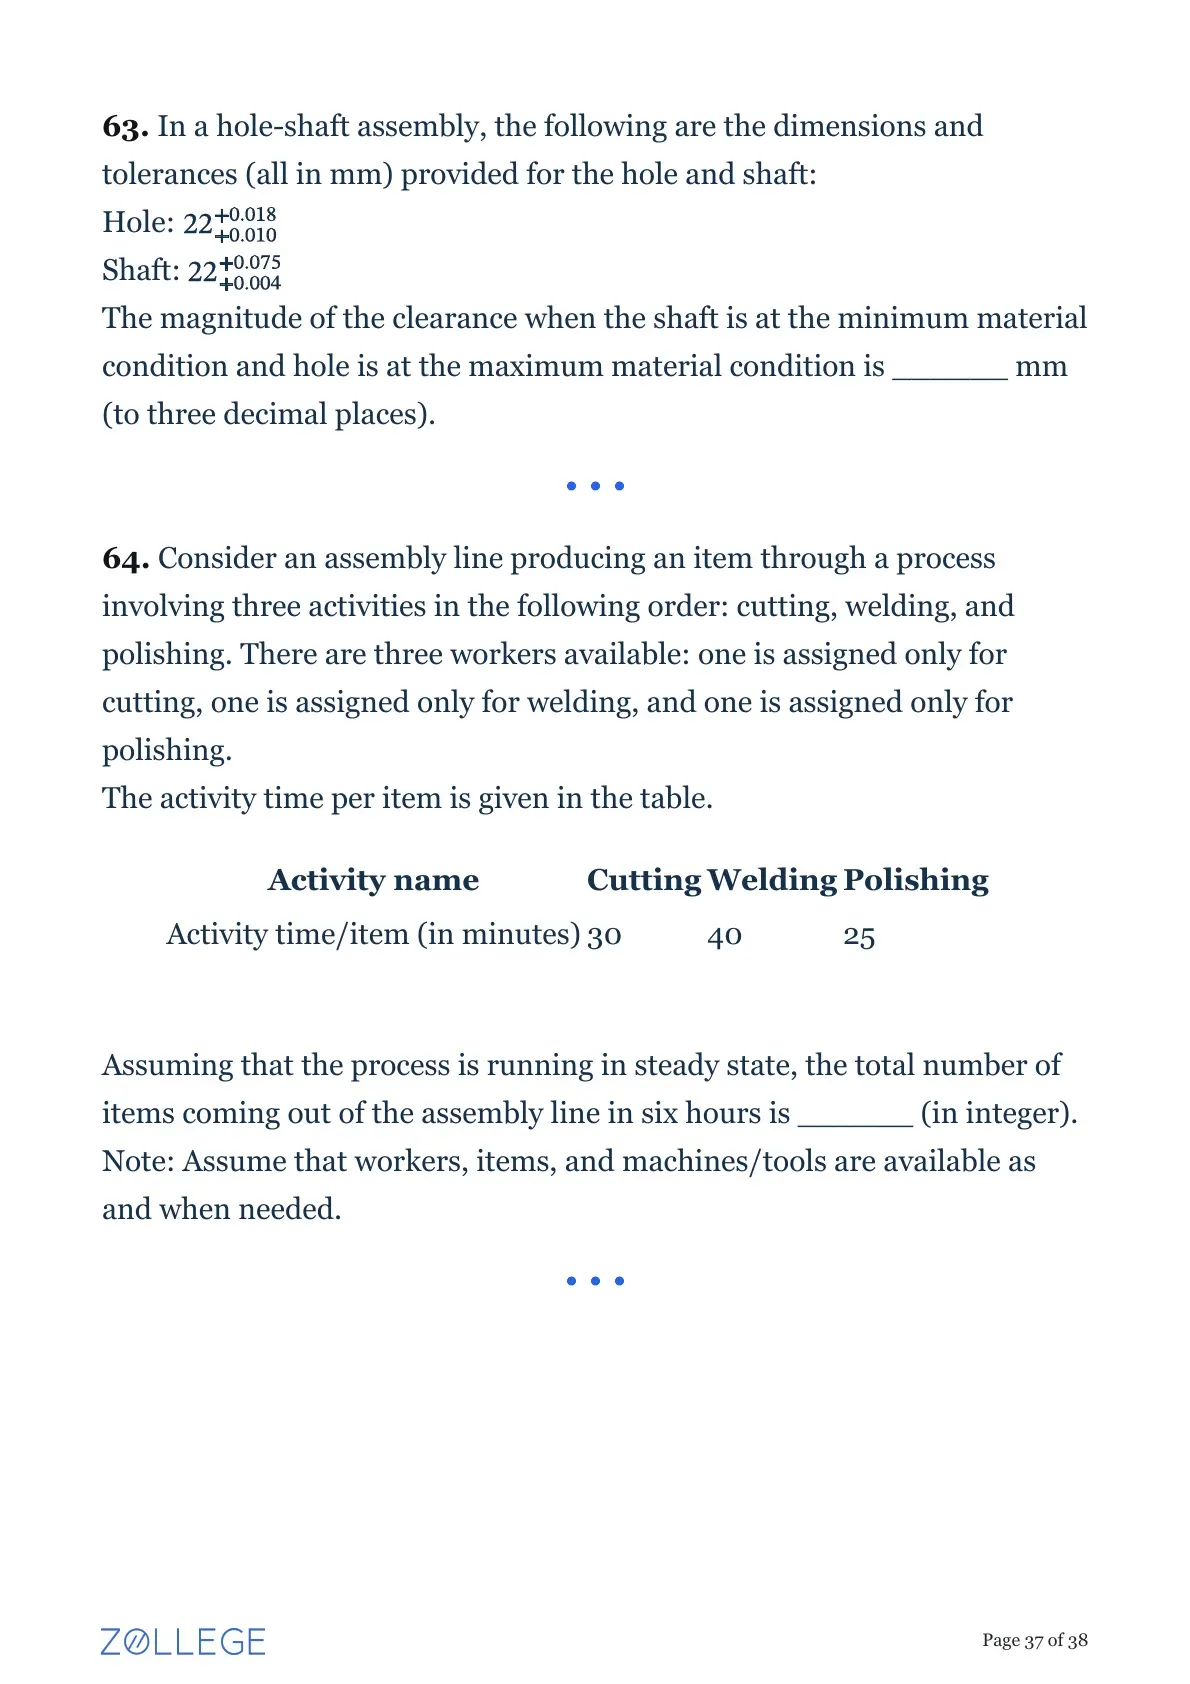
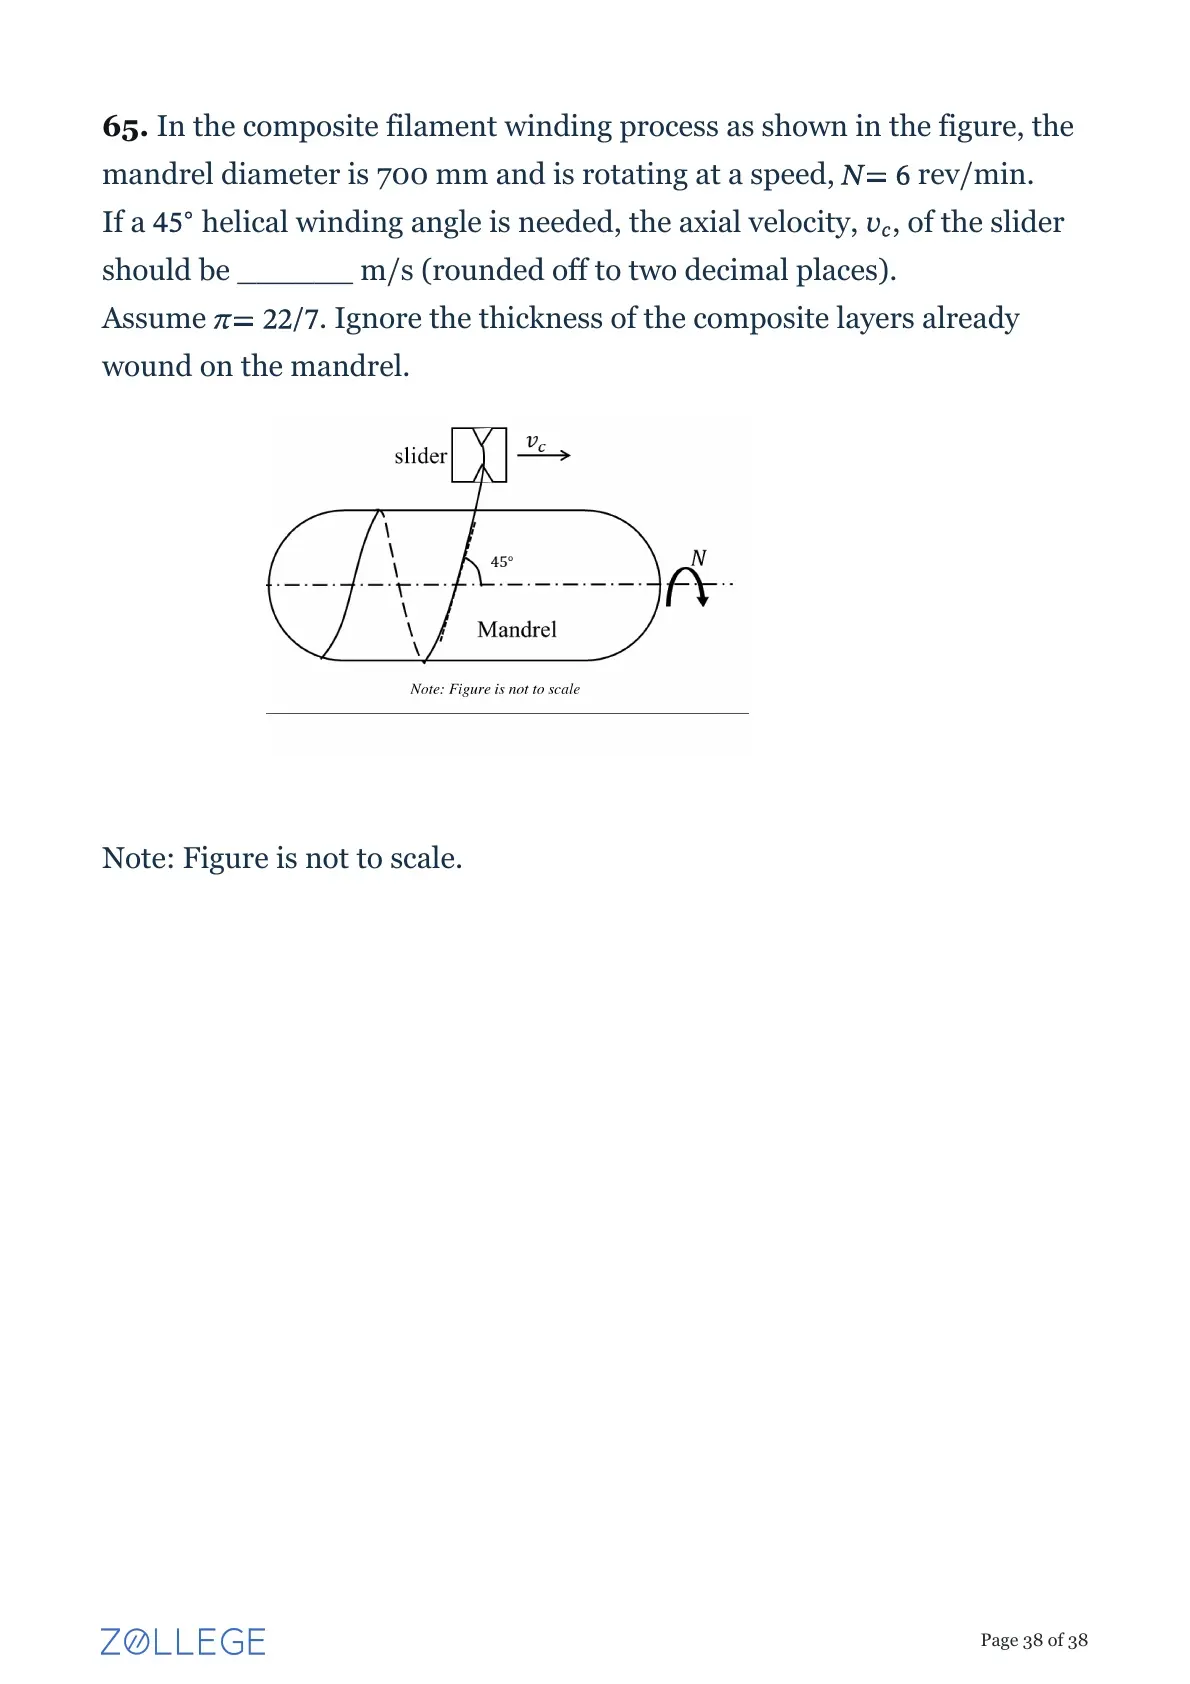
GATE 2026 Production and Industrial Engineering (PI) question paper is available for download here. IIT Guwahati conducted GATE 2026 PI exam on February 14, 2026 from 9:30 AM to 12:30 PM. GATE 2026 PI exam was Computer Based Test (CBT). The Question Paper structure consisted of General Aptitude (15 marks), Engineering Mathematics (13 marks) and Core Subject (Production and Industrial Engineering).
Download GATE 2026 PI Question Paper with Answer Key and Solution PDF from the links provided below.
| GATE 2026 PI Question Paper | Download PDF | Check Solutions |
‘The shopkeeper sells lemons.’
In this sentence, the word ‘lemons’ is the ________.
Step 1: Understanding the Question:
The question asks us to identify the correct grammatical part of speech or role for the word 'lemons' in the given sentence.
Step 2: Grammatical Rule:
In a standard English sentence structure (Subject-Verb-Object), the Subject performs the action, the Verb represents the action itself, and the Object is the receiver of the action.
Step 3: Detailed Explanation:
In the sentence 'The shopkeeper sells lemons.', the word 'shopkeeper' is the one performing the action, hence it is the subject.
The word 'sells' is the action being performed, so it is the verb.
The word 'lemons' receives the action of being sold, making it the direct object of the sentence.
Step 4: Final Answer:
Therefore, the correct classification for the word 'lemons' is 'object'.
Quick Tip: Always identify the main verb first.
Ask "who or what" performs the verb to find the subject, and "whom or what" receives the action to find the direct object.
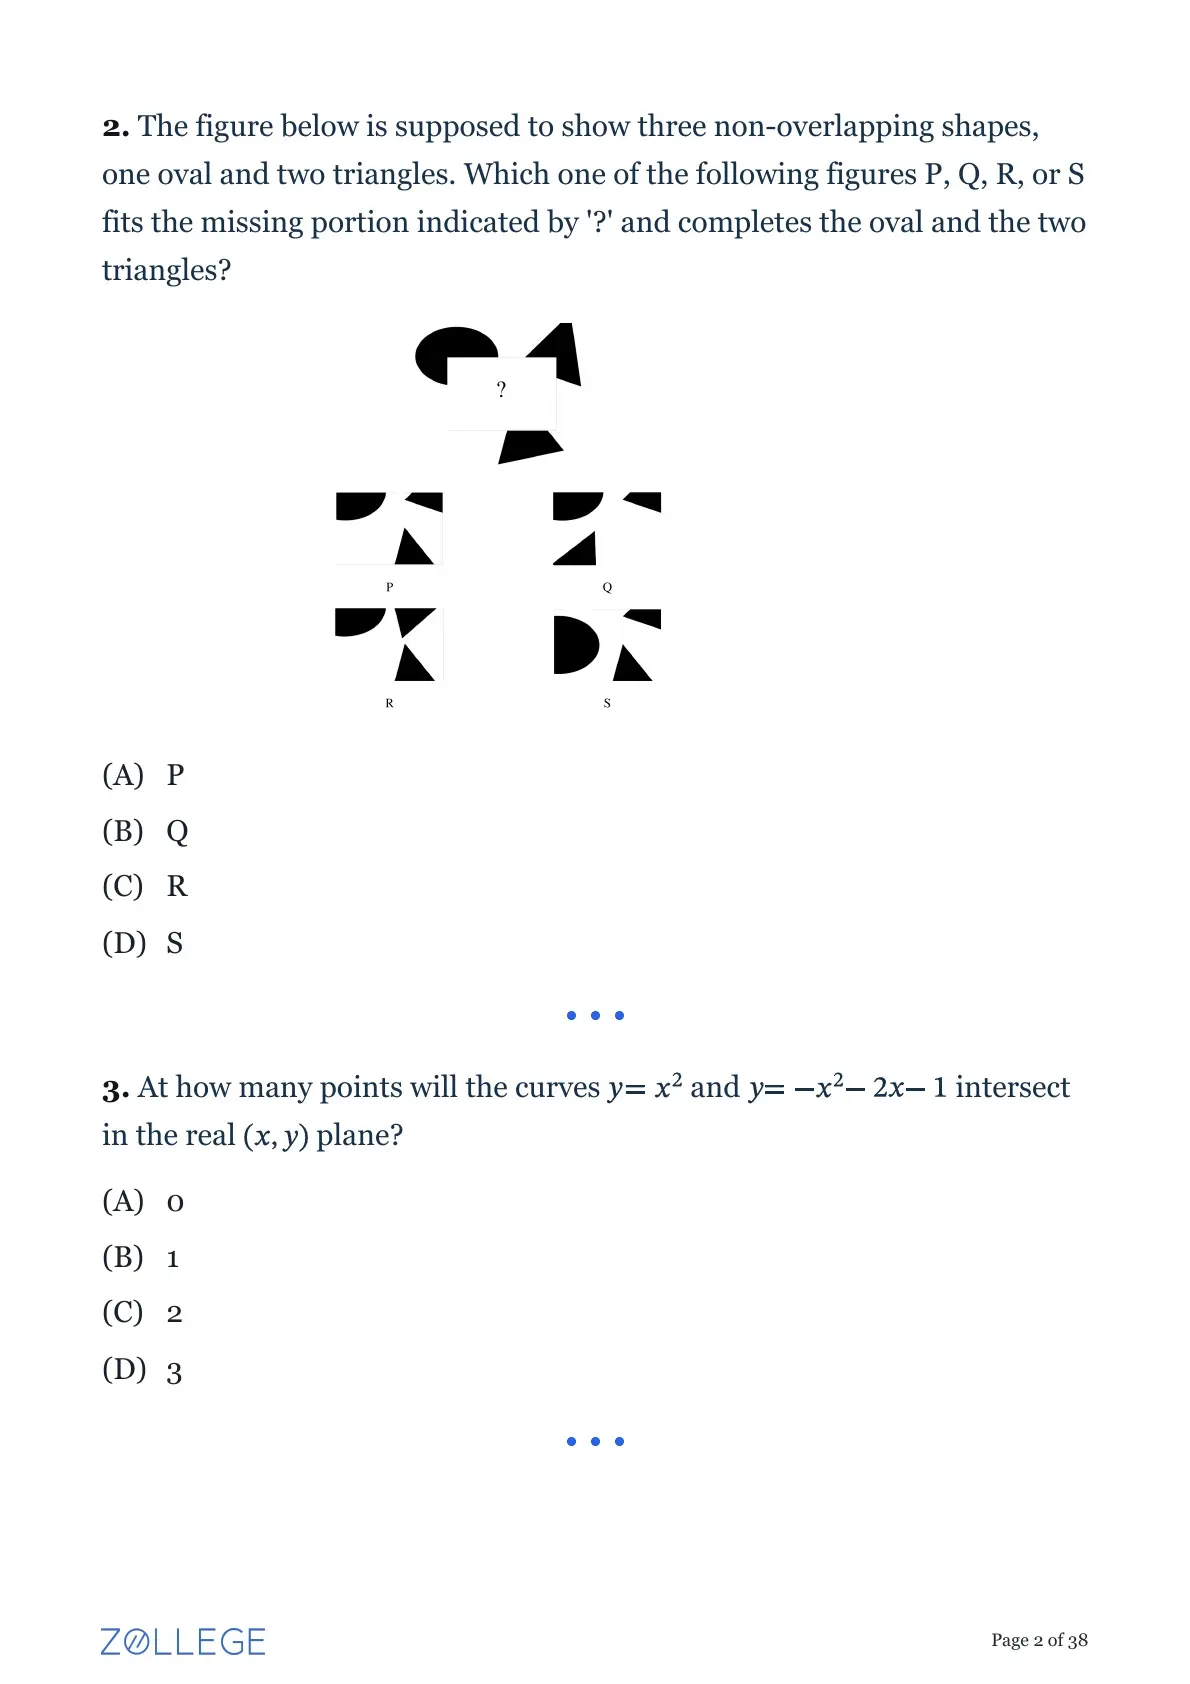
The figure below is supposed to show three non-overlapping shapes – one oval and two triangles. Which one of the following figures P, Q, R, or S fits the missing portion indicated by ‘?’ and completes the oval and the two triangles?
Step 1: Understanding the Question:
We are given a fragmented visual puzzle consisting of parts of an oval and two triangles.
We need to find the missing central piece marked '?' that smoothly completes the boundaries of these specific shapes.
Step 2: Logical Deduction:
Observe the geometry of the missing space in the primary figure.
The top part of the main figure features a large black shape that acts as the top half of an oval.
The '?' region directly cuts into the bottom half of this oval.
Therefore, the missing piece must contain a convex, curved black region at its top or bottom to complete the oval's curve.
Step 3: Detailed Explanation:
Additionally, the surrounding fragments show the corners and edges of two distinct triangles.
The missing piece needs to provide the missing vertex/corner for one of the triangles.
Evaluating the given options, figure R possesses both a curved section (to complete the oval) and a sharp triangular vertex pointing in the correct orientation to complete the triangle's body.
Options P, Q, and S have either mismatched curves (like double semi-circles) or incorrect triangular cuts that do not align with the original figure's remaining parts.
Step 4: Final Answer:
Figure R is the exact matching component.
Quick Tip: For visual completion puzzles, mentally trace the continuous outline of the described shapes (e.g., the smooth curve of an oval or straight edges of a triangle) to eliminate non-matching options.
At how many points will the curves \( y = x^2 \) and \( y = -x^2 - 2x - 1 \) intersect in the real \( (x, y) \) plane?
Step 1: Understanding the Question:
We are given the equations of two parabolas and we need to determine the number of real intersection points.
Intersection points occur where the \( y \)-values of both curves are exactly equal for a given real \( x \).
Step 2: Key Formula or Approach:
To find the intersection points, we equate the two expressions for \( y \):
\[ x^2 = -x^2 - 2x - 1 \]
We then rearrange this into a standard quadratic equation \( ax^2 + bx + c = 0 \) and check its discriminant \( \Delta = b^2 - 4ac \).
Step 3: Detailed Explanation:
Equating the two equations:
\[ x^2 = -x^2 - 2x - 1 \]
Bringing all terms to the left side:
\[ x^2 + x^2 + 2x + 1 = 0 \]
\[ 2x^2 + 2x + 1 = 0 \]
Now, we calculate the discriminant \( \Delta \) of this quadratic equation.
Here, \( a = 2 \), \( b = 2 \), and \( c = 1 \).
\[ \Delta = b^2 - 4ac \]
\[ \Delta = (2)^2 - 4(2)(1) \]
\[ \Delta = 4 - 8 = -4 \]
Since the discriminant \( \Delta < 0 \), the quadratic equation has no real roots.
This means there is no real value of \( x \) for which the two curves intersect.
Step 4: Final Answer:
The number of intersection points in the real plane is 0.
Quick Tip: Whenever finding intersection points of two curves, always equate them to form a single equation and analyze its roots using the discriminant for quadratics.
If \( \Delta < 0 \), there are 0 real intersections; if \( \Delta = 0 \), there is 1 intersection (tangent); if \( \Delta > 0 \), there are 2 intersections.
‘If Anish had scored hundred runs in today’s match, he would have been made the captain of his team. He would have then become the youngest captain in his team’s history. Unfortunately, he got out without scoring any runs. Hence, there won’t be any change in the captaincy for now.’
Based on the paragraph above, which one of the following statements is true?
Step 1: Understanding the Question:
We need to perform logical deduction based purely on the information provided in the paragraph about Anish and the team's captaincy.
Step 2: Logical Deduction:
Let us evaluate each option systematically based on the text.
Option (A): The paragraph clearly states 'he got out without scoring any runs', so he did not make a hundred runs. Thus, (A) is false.
Option (B): The text says 'he would have been made the captain', implying he is not currently the captain. Thus, (B) is false.
Option (D): The text says he would become the 'youngest captain', which is a comparison among all captains in history, not necessarily implying he is the youngest 'player' currently on the team. Thus, (D) is not necessarily true.
Step 3: Detailed Explanation:
Now let us analyze Option (C).
The passage states that if Anish became captain, he would be the 'youngest captain in his team's history'.
This means his current age is less than the age at which any previous or current captain assumed the role.
Since he did not become captain, the current captain remains in charge.
Because Anish's hypothetical captaincy would have set a new record for being the youngest, the current captain must be older than Anish.
Step 4: Final Answer:
Therefore, the statement 'The current captain is older than Anish' is definitively true.
Quick Tip: In reading comprehension and deduction questions, strictly avoid bringing in outside assumptions.
Eliminate options that contradict direct statements (e.g., getting zero runs contradicts scoring a hundred).
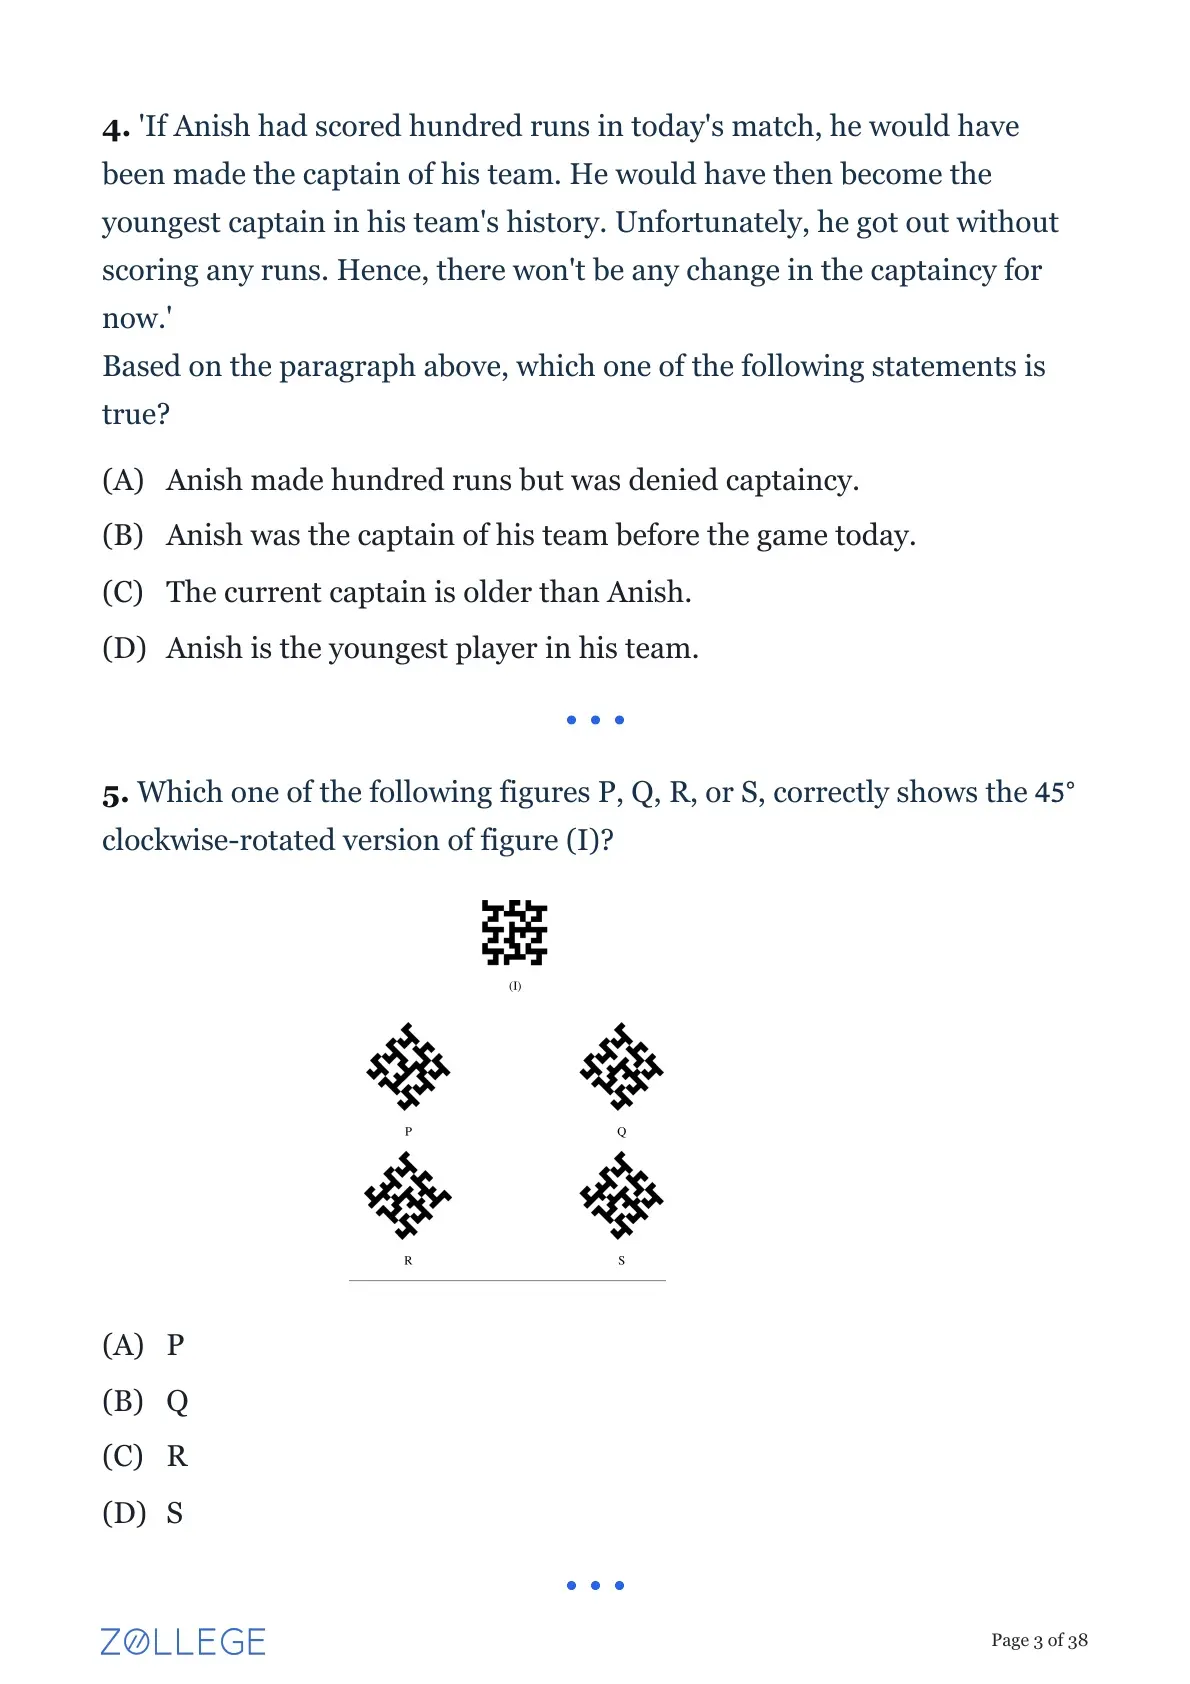
Which one of the following figures P, Q, R, or S, correctly shows the 45° clockwise-rotated version of figure (I)?
Step 1: Understanding the Question:
The problem requires us to visually rotate a given geometric pattern, labeled as figure (I), by exactly 45 degrees in the clockwise direction.
Step 2: Logical Deduction:
Analyze the original figure (I), which consists of a central cross-like structure with perpendicular arms extending horizontally and vertically.
When an object with vertical and horizontal axes is rotated by 45 degrees, its axes transform into diagonals.
Specifically, the vertical axis will now point from top-right to bottom-left, and the horizontal axis will point from top-left to bottom-right.
Step 3: Detailed Explanation:
Let us trace one specific feature, for example, the top-most vertical arm of figure (I).
In the original figure, this arm points straight up and has a specific hook bending towards the right.
Upon a 45-degree clockwise rotation, this 'upward' pointing arm will shift to point towards the 'top-right' diagonal direction.
The hook that was on the right side will now hang downwards relative to that diagonal arm.
By strictly tracking the orientation of these outer hooks and the central diagonal axes, figure R perfectly matches the transformed coordinates.
The other options either show a counter-clockwise rotation, a 90-degree rotation, or mirrored hooks.
Step 4: Final Answer:
Figure R is the correct 45-degree clockwise rotated version.
Quick Tip: To easily solve rotation problems, focus on a single asymmetric feature (like a specific corner or a hook).
Trace only that feature's new position after rotation to quickly eliminate wrong options.
Match the words in Column I with their synonyms in Column II.
Step 1: Understanding the Question:
We need to correctly pair each word from Column I with its closest synonym (a word with the exact or similar meaning) from Column II.
Step 2: Vocabulary Meanings:
Let us define the meaning of each word in Column I to find its match.
(i) Lonely: Sad because one has no friends or company; isolated. The synonym is 'Solitary' (q).
(ii) Literal: Taking words in their usual or most basic sense without metaphor; exact. The synonym is 'Verbatim' (p), which means in exactly the same words.
(iii) Lousy: Very poor or bad; disgusting. The synonym is 'Terrible' (s).
(iv) Lethal: Sufficient to cause death; harmful. The synonym is 'Deadly' (r).
Step 3: Detailed Explanation:
Based on the definitions established above, the correct matching is:
(i) matches with (q).
(ii) matches with (p).
(iii) matches with (s).
(iv) matches with (r).
Looking at the given options, Option (A) presents this exact sequence of matches.
Step 4: Final Answer:
The correct pairing is (i)-(q); (ii)-(p); (iii)-(s); (iv)-(r).
Quick Tip: If you are unsure about all words, match the ones you know perfectly first (e.g., Lethal = Deadly).
Use this single match to eliminate incorrect options from the multiple choices.
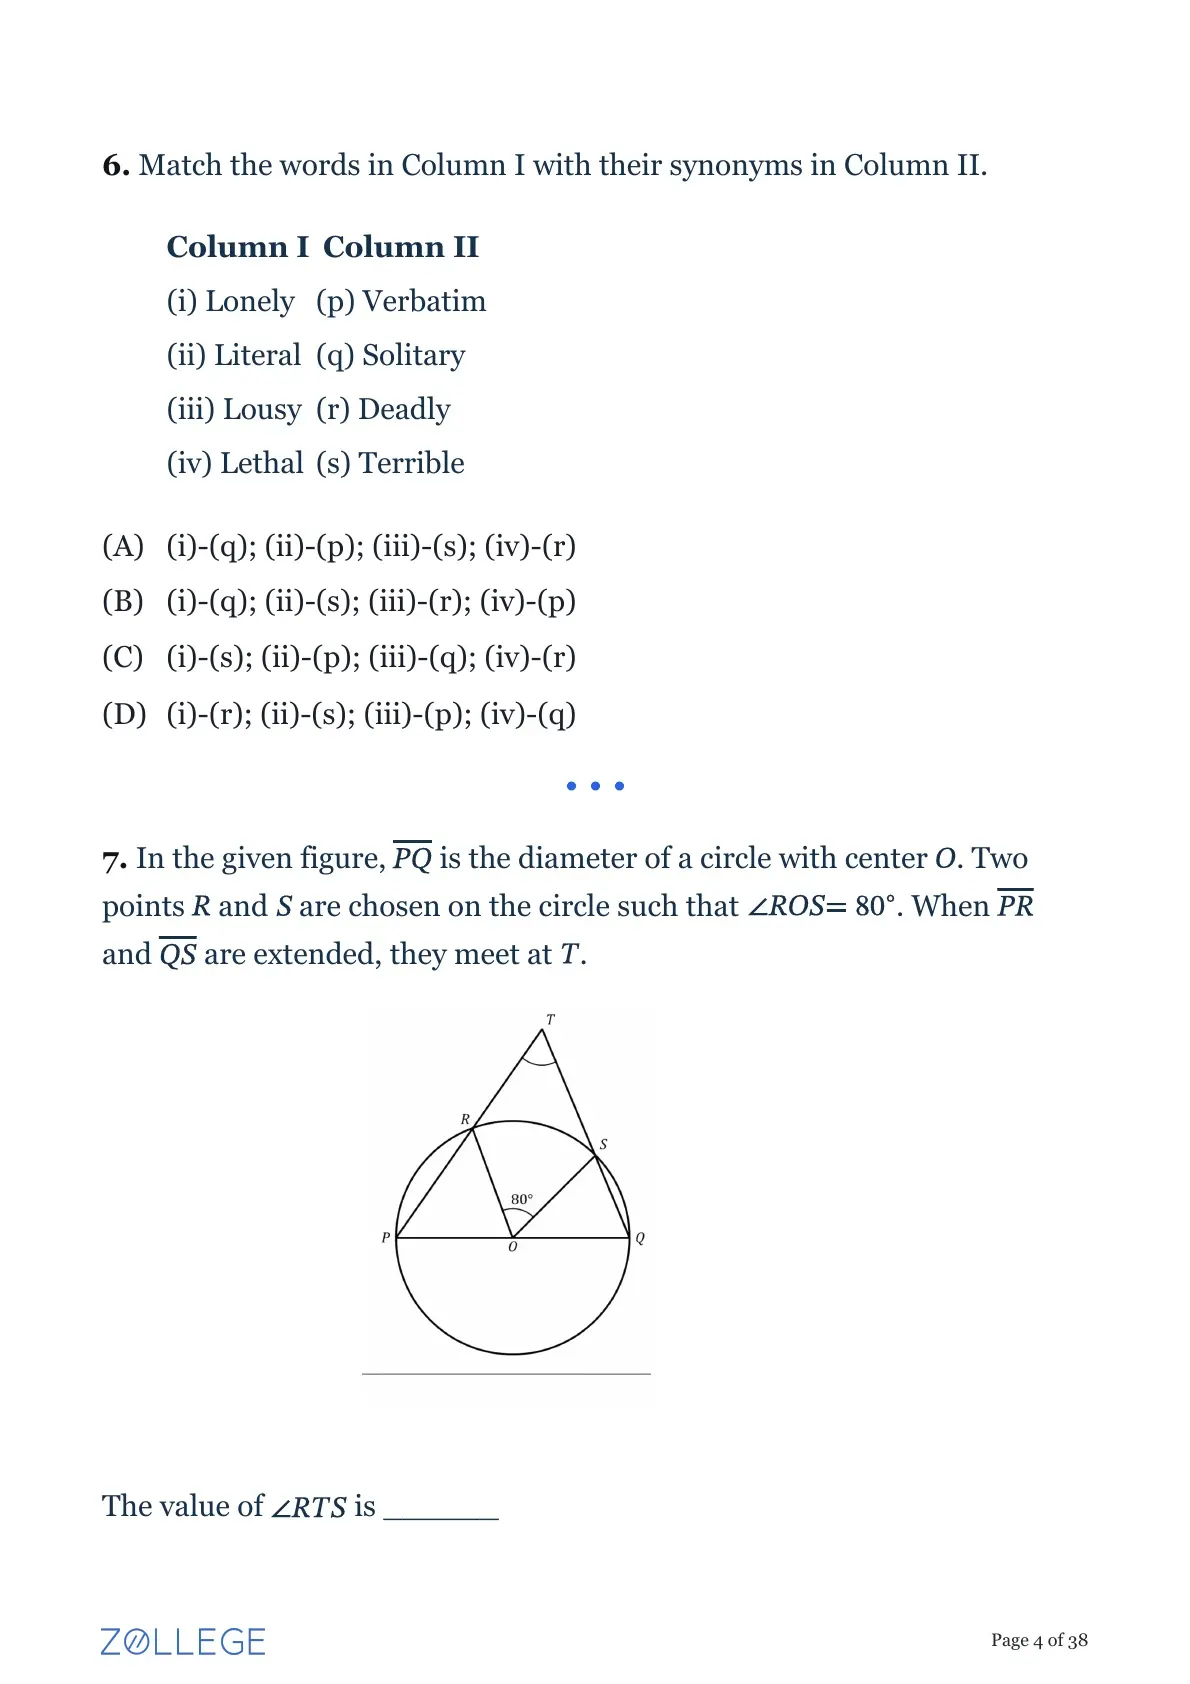
In the given figure, \( \overline{PQ} \) is the diameter of a circle with center \( O \). Two points \( R \) and \( S \) are chosen on the circle such that \( \angle ROS = 80^\circ \). When \( \overline{PR} \) and \( \overline{QS} \) are extended, they meet at \( T \). The value of \( \angle RTS \) is _________________
Step 1: Understanding the Question:
We have a circle with diameter \( PQ \).
Points \( R \) and \( S \) lie on the circle, and the angle subtended by arc \( RS \) at the center \( O \) is \( \angle ROS = 80^\circ \).
We need to find the angle \( \angle RTS \) formed by the intersection of the secant lines \( PR \) and \( QS \) outside the circle at point \( T \).
Step 2: Key Formula or Approach:
There are two primary ways to solve this: using secant angle formulas or basic circle geometry theorems.
Method 1 (Geometry): The angle subtended by an arc at the circumference is half of the angle subtended at the center.
Method 2 (Secant Formula): The angle between two secants intersecting outside a circle is half the difference of the intercepted arcs.
Step 3: Detailed Explanation:
Let's use the basic geometry approach (Method 1).
Join points \( R \) and \( Q \).
The arc \( RS \) subtends \( \angle ROS = 80^\circ \) at the center.
Therefore, the angle subtended by arc \( RS \) at any point on the remaining circumference, such as \( Q \), is \( \angle RQS = \frac{1}{2} \angle ROS = 40^\circ \).
Since \( PQ \) is the diameter, the angle in the semicircle \( \angle PRQ \) is \( 90^\circ \).
Because \( P-R-T \) is a straight line segment extended, angles on the straight line must sum to \( 180^\circ \).
Thus, \( \angle TRQ = 180^\circ - \angle PRQ = 180^\circ - 90^\circ = 90^\circ \).
Now, consider the right-angled triangle \( \triangle TRQ \).
The sum of angles in a triangle is \( 180^\circ \).
Therefore, \( \angle T + \angle TRQ + \angle RQT = 180^\circ \).
Note that \( \angle RQT \) is exactly the same as \( \angle RQS \) because \( Q, S, T \) form a line.
Substituting the known values: \( \angle T + 90^\circ + 40^\circ = 180^\circ \).
\( \angle T + 130^\circ = 180^\circ \).
\( \angle T = 50^\circ \).
Thus, \( \angle RTS = 50^\circ \).
Step 4: Final Answer:
The value of \( \angle RTS \) is 50°.
Quick Tip: An alternative quick method: The angle formed by two secants outside the circle is \( \frac{Far Arc - Near Arc}{2} \).
Here, Far Arc is semicircle \( PQ = 180^\circ \) and Near Arc is \( RS = 80^\circ \), so \( \angle T = \frac{180^\circ - 80^\circ}{2} = 50^\circ \).
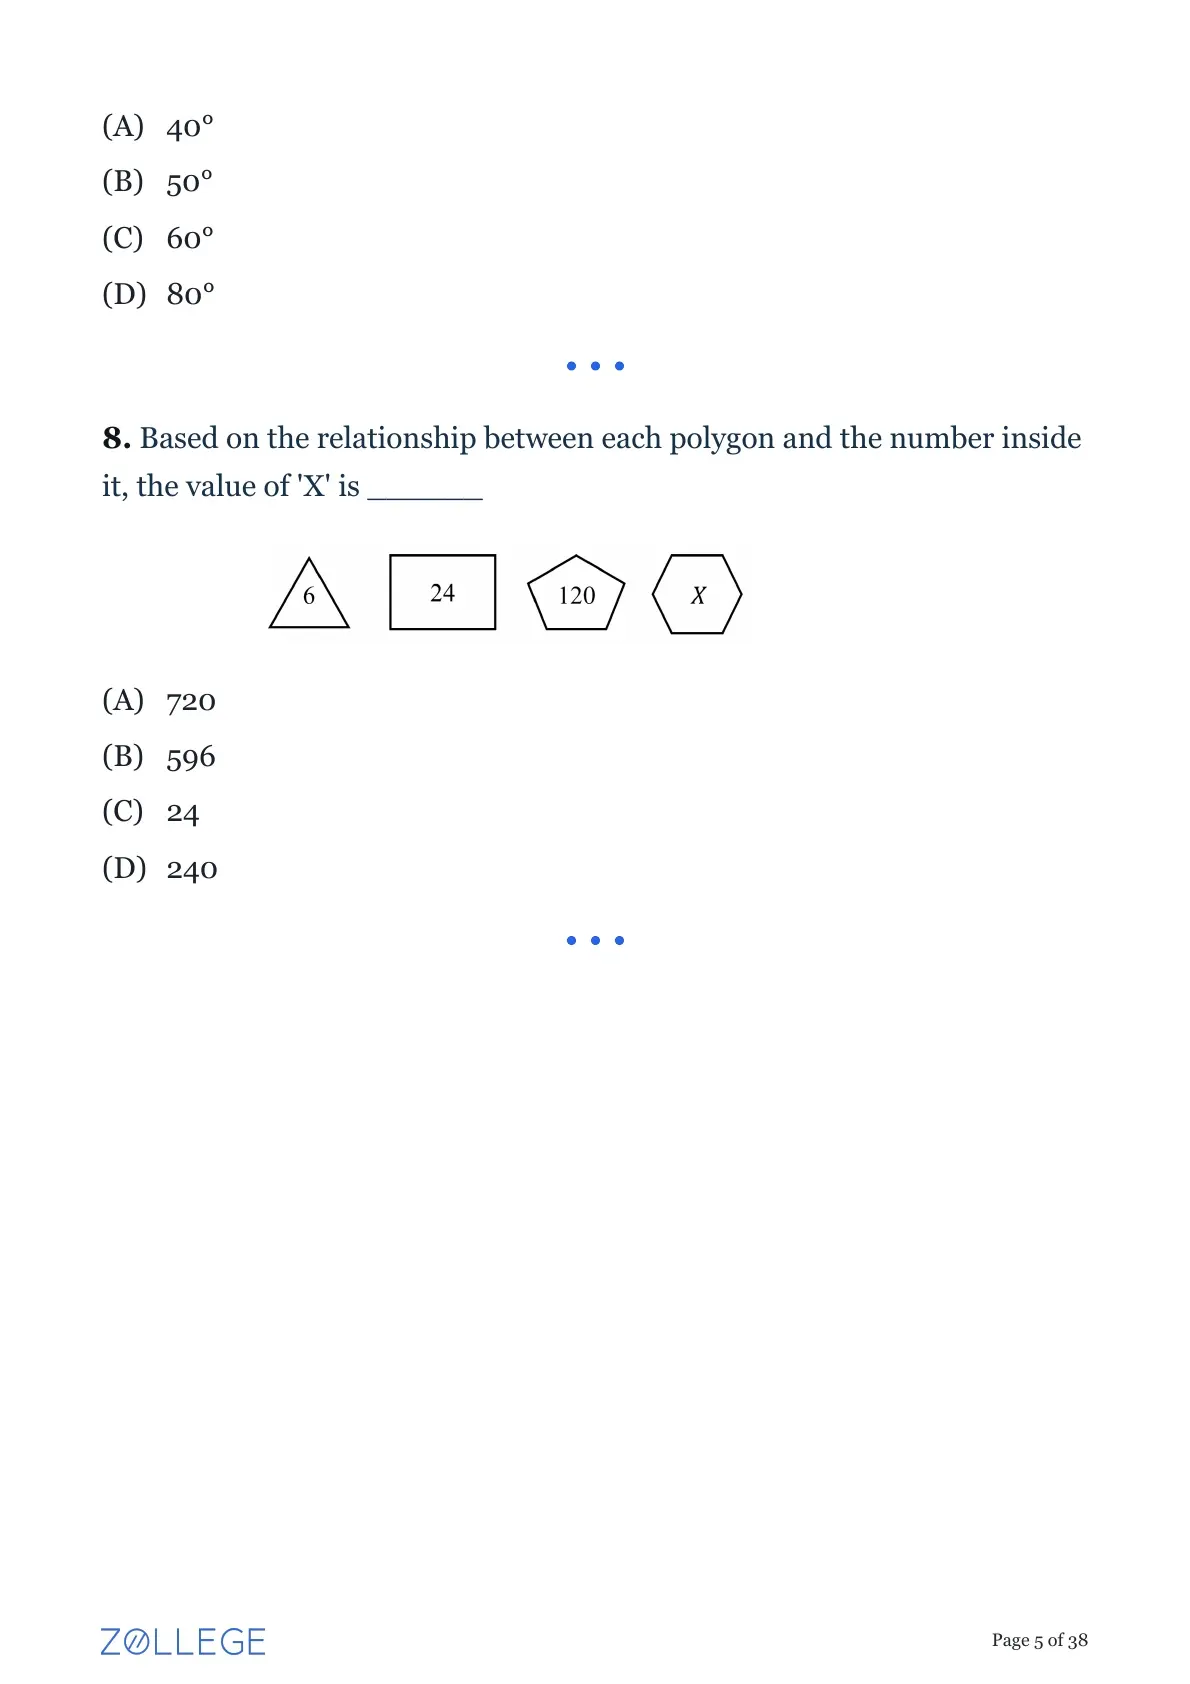
Based on the relationship between each polygon and the number inside it, the value of ‘X’ is ______
Step 1: Understanding the Question:
We are given a sequence of polygons with a number written inside each of them.
We must identify the mathematical relationship between the properties of the polygon and the number to deduce the unknown value 'X' in the final polygon.
Step 2: Key Formula or Approach:
Let's count the number of sides \( n \) for each given polygon and observe its relation to the number inside.
First polygon: Triangle, sides \( n = 3 \). Number inside = 6.
Second polygon: Rectangle/Square, sides \( n = 4 \). Number inside = 24.
Third polygon: Pentagon, sides \( n = 5 \). Number inside = 120.
Fourth polygon: Hexagon, sides \( n = 6 \). Number inside = \( X \).
Step 3: Detailed Explanation:
Let us test common numerical patterns like squares, cubes, and factorials.
Notice that for \( n = 3 \), \( 3! = 3 \times 2 \times 1 = 6 \).
For \( n = 4 \), \( 4! = 4 \times 3 \times 2 \times 1 = 24 \).
For \( n = 5 \), \( 5! = 5 \times 4 \times 3 \times 2 \times 1 = 120 \).
The logical rule governs that the number inside the polygon is exactly \( n! \) (n factorial), where \( n \) is the number of sides.
The final polygon is a hexagon, which has \( n = 6 \) sides.
Applying the established rule: \( X = 6! = 6 \times 5 \times 4 \times 3 \times 2 \times 1 = 720 \).
Step 4: Final Answer:
The value of 'X' is 720.
Quick Tip: Whenever a series grows very rapidly (e.g., 6, 24, 120), check for factorial patterns \( n! \) or exponential patterns \( n^x \).
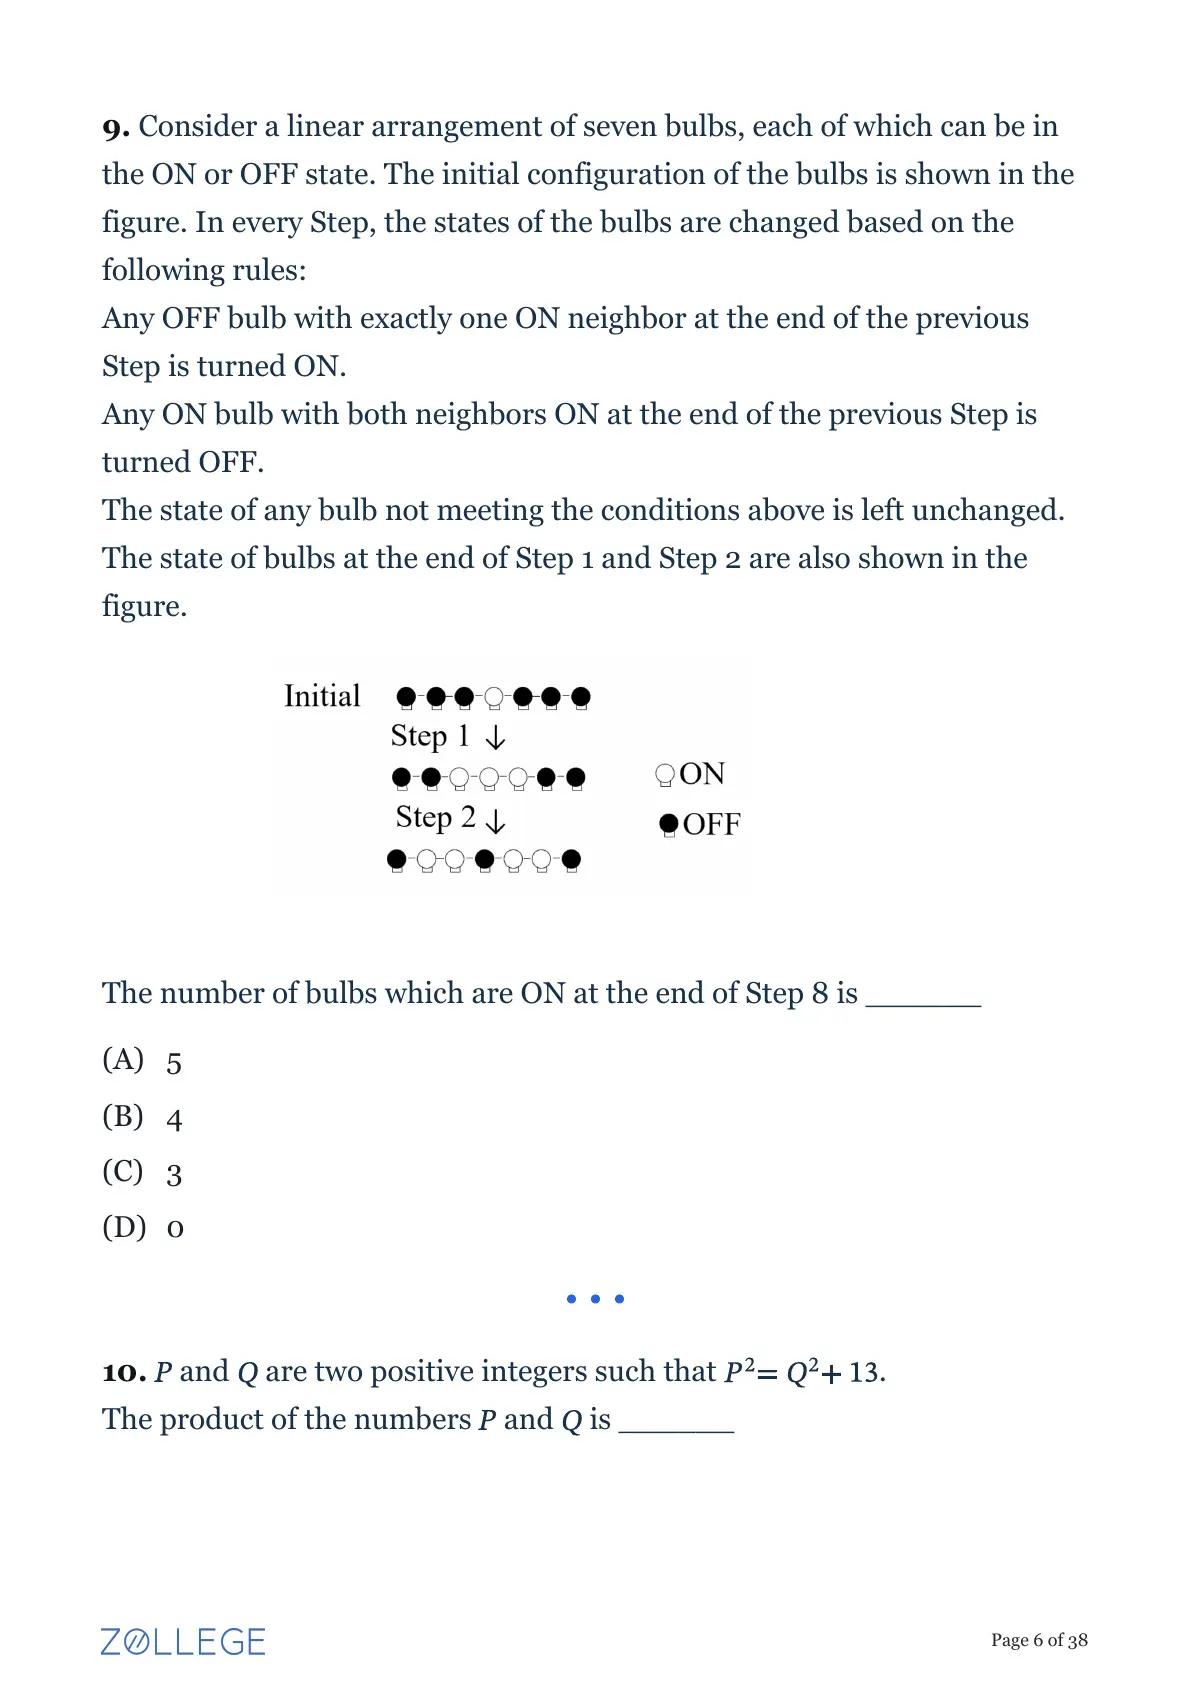
Consider a linear arrangement of seven bulbs, each of which can be in the ON or OFF states. The initial configuration of the bulbs is shown in the figure. In every Step, the states of the bulbs are changed based on the following rules:
\( \bullet \) Any OFF bulb with exactly one ON neighbor at the end of the previous Step is turned ON.
\( \bullet \) Any ON bulb with both neighbors ON at the end of the previous Step is turned OFF.
\( \bullet \) The state of any bulb not meeting the conditions above is left unchanged.
The state of bulbs at the end of Step 1 and Step 2 are also shown in the figure.
The number of bulbs which are ON at the end of Step 8 is ______
Step 1: Understanding the Question:
We are given an automaton-like setup with 7 bulbs changing states in discrete time steps based on specific neighbor-dependent rules.
Let's denote 'ON' as 1 and 'OFF' as 0.
Based on the legend in the image, a white circle represents an ON bulb and a black circle represents an OFF bulb.
Step 2: Key Formula or Approach:
Initial State (Step 0) from the diagram (three black, one white, three black):
0 0 0 1 0 0 0
Rule 1: If current is 0, and sum of neighbors' states is exactly 1, new state becomes 1.
Rule 2: If current is 1, and sum of neighbors' states is exactly 2 (both neighbors ON), new state becomes 0.
Rule 3: Otherwise, state remains unchanged.
Note: End bulbs only have 1 neighbor, so they can never have 'both' (i.e., two) neighbors ON.
Step 3: Detailed Explanation:
Let's trace the states step-by-step applying the rules simultaneously to all bulbs.
Step 0: 0 0 0 1 0 0 0
Step 1:
Bulb 3 (0) has exactly one ON neighbor (Bulb 4 is 1). It turns ON (1).
Bulb 5 (0) has exactly one ON neighbor (Bulb 4 is 1). It turns ON (1).
Bulb 4 (1) has zero ON neighbors. It remains ON (1).
All others remain 0.
Step 1 configuration: 0 0 1 1 1 0 0. (Matches provided figure).
Step 2: (From 0 0 1 1 1 0 0)
Bulbs 2 & 6 (both 0) have exactly one ON neighbor (Bulbs 3 & 5 are 1). They turn ON (1).
Bulb 4 (1) has BOTH neighbors ON (Bulbs 3 & 5 are 1). It turns OFF (0).
Bulbs 3 & 5 (both 1) have only one ON neighbor (Bulb 4 is 1). They remain unchanged (1).
Step 2 configuration: 0 1 1 0 1 1 0. (Matches provided figure).
Step 3: (From 0 1 1 0 1 1 0)
Bulbs 1 & 7 (both 0) have exactly one ON neighbor (Bulbs 2 & 6). They turn ON (1).
Bulb 4 (0) has TWO ON neighbors (Bulbs 3 & 5 are 1). It does not meet "exactly one" rule. Remains OFF (0).
Bulbs 2, 3, 5, 6 (all 1) do not have BOTH neighbors ON. They remain ON (1).
Step 3 configuration: 1 1 1 0 1 1 1.
Step 4: (From 1 1 1 0 1 1 1)
Bulbs 2 & 6 (both 1) have BOTH neighbors ON (1&3, 5&7). They turn OFF (0).
Bulbs 1 & 7 (both 1) are end bulbs, so they only have 1 neighbor. They remain ON (1).
Bulbs 3 & 5 (both 1) have neighbors 1 & 0. They remain ON (1).
Bulb 4 (0) has TWO ON neighbors (3&5). Remains OFF (0).
Step 4 configuration: 1 0 1 0 1 0 1.
Step 5: (From 1 0 1 0 1 0 1)
Bulbs 2, 4, 6 (all 0) have TWO ON neighbors. They remain OFF (0).
Bulbs 1, 3, 5, 7 (all 1) have NO ON neighbors. They remain ON (1).
Step 5 configuration: 1 0 1 0 1 0 1.
The pattern has stabilized. The state will remain 1 0 1 0 1 0 1 for all subsequent steps.
Step 4: Final Answer:
At Step 8, the state is 1 0 1 0 1 0 1, which has exactly 4 ON bulbs.
Quick Tip: In Cellular Automata problems, trace the first few steps carefully.
Such patterns usually reach a stable state or start oscillating in a predictable loop within 4 to 5 steps.
\( P \) and \( Q \) are two positive integers such that \( P^2 = Q^2 + 13 \).
The product of the numbers \( P \) and \( Q \) is _________
Step 1: Understanding the Question:
We are given an algebraic equation relating two positive integers \( P \) and \( Q \).
We need to find their values to compute their product \( P \times Q \).
Step 2: Key Formula or Approach:
We can rearrange the equation \( P^2 = Q^2 + 13 \) by bringing the squared terms to one side.
This gives \( P^2 - Q^2 = 13 \).
We can then apply the difference of squares factorization formula: \( a^2 - b^2 = (a - b)(a + b) \).
Step 3: Detailed Explanation:
Applying the formula, we get:
\[ (P - Q)(P + Q) = 13 \]
Since \( P \) and \( Q \) are given as positive integers, both \( (P - Q) \) and \( (P + Q) \) must be integers.
Furthermore, because \( P \) and \( Q \) are positive, \( (P + Q) \) must be greater than \( (P - Q) \).
The number 13 is a prime number, meaning its only positive integer factors are 1 and 13.
Therefore, we can set up the following system of linear equations based on the factors:
\[ P - Q = 1 \]
\[ P + Q = 13 \]
To solve for \( P \), we add both equations together:
\[ (P - Q) + (P + Q) = 1 + 13 \]
\[ 2P = 14 \implies P = 7 \]
Now, substitute \( P = 7 \) back into the first equation to solve for \( Q \):
\[ 7 - Q = 1 \implies Q = 6 \]
We have found the positive integers: \( P = 7 \) and \( Q = 6 \).
The question asks for their product:
\[ P \times Q = 7 \times 6 = 42 \]
Step 4: Final Answer:
The product of the numbers \( P \) and \( Q \) is 42.
Quick Tip: Whenever you see the difference of two squares equaling a prime number, set the sum of the variables to the prime number and their difference to 1.
This instantly provides a simple system of equations to find the integer values.
Which ONE of the following steps is NOT a part of product concept selection?
Step 1: Understanding the Question:
The question asks to identify which of the given options is not a recognized step in the "product concept selection" phase of product design and development.
Step 2: Detailed Explanation:
Product concept selection is a structured process used to evaluate and narrow down multiple product concepts to one or a few for further development. A widely used method is the Pugh Concept Selection Matrix.
The standard steps in this methodology include:
1. Preparing the selection matrix (Option A).
2. Rating the concepts against a reference concept based on selected criteria.
3. Ranking the concepts (Option B).
4. Combining and improvising the concepts to create better hybrid concepts (Option C).
5. Selecting the final concept(s).
Developing a detailed cost model (Option D) is generally part of the detailed design or system-level design phase, once the primary concept has already been selected and parameterized, rather than during the concept selection phase itself.
Step 4: Final Answer:
Therefore, the development of a cost model is NOT a part of product concept selection.
Quick Tip: Remember the Pugh Matrix methodology steps for concept selection. Cost estimation usually occurs after a concept is finalized and its detailed bill of materials (BOM) begins to take shape.
Which ONE of the following is FALSE with respect to filler material used in brazing?
Step 1: Understanding the Question:
We need to identify the false statement regarding the properties of filler materials used in the brazing process.
Step 2: Detailed Explanation:
Let's evaluate each statement based on the principles of brazing:
Option (A): True. By definition, brazing occurs at a temperature above 450°C but below the melting point of the base metals. The filler metal must melt while the base metal remains solid.
Option (B): False. Brazing relies heavily on capillary action to draw the liquid filler metal into the narrow gap between the base metals. For strong capillary action to occur, the molten filler metal must have a high wettability to spread evenly over the base metal surfaces.
Option (C): True. A low viscosity (high fluidity) allows the molten filler material to easily flow and penetrate deeply into the tight joint interfaces via capillary action.
Option (D): True. While some slight alloying at the interface is necessary for a metallurgical bond, severe chemical reactivity would lead to erosion or undesirable brittle intermetallic compounds, weakening the joint. Hence, it should be kept low compared to welding.
Step 4: Final Answer:
The false statement is that the wettability must be low.
Quick Tip: In any capillary-driven joining process (like brazing and soldering), \textbf{high wettability} and \textbf{low viscosity} are absolute requirements for the filler material to flow into the joint successfully.
An arc welding process is being carried out with a power source of 6 kW to weld two similar metals. The total energy loss is 50%, the area of cross-section of the weld is \( 10 mm^2 \), and the specific energy needed to melt the metal is \( 15 J/mm^3 \).
The speed of welding is ______ mm/s.
Step 1: Understanding the Question:
We are asked to calculate the welding speed given the input power, energy losses, weld cross-sectional area, and specific melting energy.
Step 2: Key Formula or Approach:
The effective power \( P_{net} \) available for melting is given by:
\[ P_{net} = P_{in} \times \eta \]
Where \( P_{in} \) is the input power and \( \eta \) is the efficiency.
The volume melting rate \( V_R \) (mm\(^3\)\text{/s) can be related to the specific energy \( U \) (\text{J/mm\(^3\)) and net power as:
\[ P_{net = V_R \times U \]
The welding speed \( v \) is then derived from the volume melting rate and the cross-sectional area \( A \) of the weld:
\[ V_R = A \times v \implies v = \frac{V_R}{A} \]
Step 3: Detailed Explanation:
Given data:
Input power, \( P_{in} = 6 kW = 6000 J/s \)
Total energy loss = 50%, so efficiency \( \eta = 100% - 50% = 50% = 0.5 \)
Cross-sectional area, \( A = 10 mm^2 \)
Specific energy, \( U = 15 J/mm^3 \)
First, calculate the effective power available for welding:
\[ P_{net} = 6000 \times 0.5 = 3000 J/s \]
Next, calculate the volume melting rate:
\[ V_R = \frac{P_{net}}{U} = \frac{3000 J/s}{15 J/mm^3} = 200 mm^3/s \]
Finally, find the welding speed:
\[ v = \frac{V_R}{A} = \frac{200 mm^3/s}{10 mm^2} = 20 mm/s \]
Step 4: Final Answer:
The speed of welding is 20 mm/s.
Quick Tip: Ensure all units are consistent before calculating. Convert kW to W (J/s) to match the specific energy units of J/mm\(^3\). The relationship \( Power = Area \times Speed \times Specific Energy \) is central to welding speed problems.
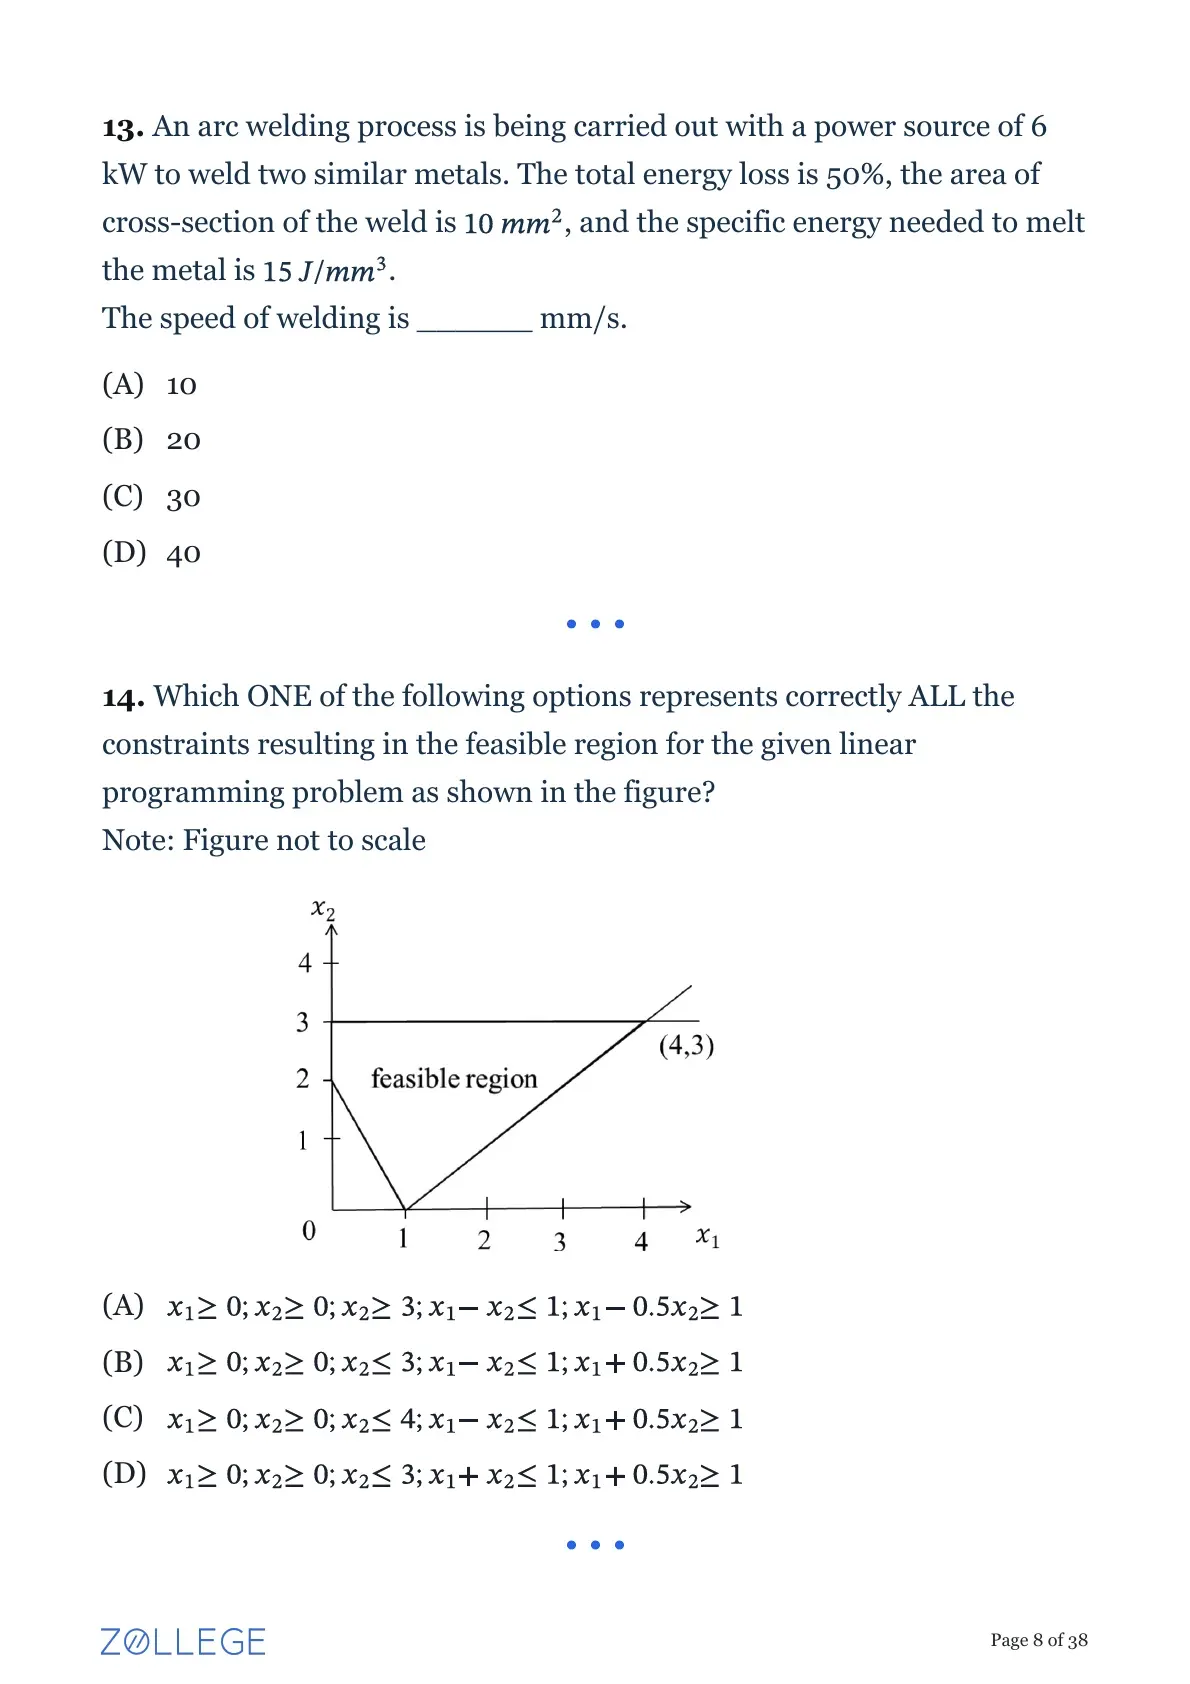
Which ONE of the following options represents correctly ALL the constraints resulting in the feasible region for the given linear programming problem as shown in the figure?
Note: Figure not to scale
Step 1: Understanding the Question:
We need to identify the correct set of linear inequalities that perfectly bound the shaded feasible region in the given graph.
Step 2: Graphical Analysis:
By observing the shaded region, we can identify its boundaries and vertices:
1. Left Boundary: The region is bounded by the \( x_2 \)-axis, which means \( x_1 \ge 0 \).
2. Top Boundary: There is a horizontal line acting as a ceiling for the region. Looking at the \( y \)-axis, it aligns with \( x_2 = 3 \). Thus, \( x_2 \le 3 \).
3. Right Boundary: A slanted line passes through the x-axis at \( (1, 0) \) and through the point \( (4, 3) \).
Let's find its equation: Slope \( m = \frac{3 - 0}{4 - 1} = \frac{3}{3} = 1 \).
Equation: \( x_2 - 0 = 1(x_1 - 1) \implies x_1 - x_2 = 1 \).
Since the shaded region is to the left/above this line, the constraint is \( x_1 - x_2 \le 1 \).
4. Bottom-Left Boundary: Another slanted line passes through \( (1, 0) \) and the y-axis at \( (0, 2) \).
Let's check its equation: Intercepts are \( x_1 = 1 \) and \( x_2 = 2 \).
Using the intercept form: \( \frac{x_1}{1} + \frac{x_2}{2} = 1 \implies x_1 + 0.5x_2 = 1 \).
Since the region is above/right of this line, the constraint is \( x_1 + 0.5x_2 \ge 1 \).
Step 3: Detailed Explanation:
Compiling all the derived constraints, we get:
\( x_1 \ge 0 \)
\( x_2 \ge 0 \) (Standard non-negativity)
\( x_2 \le 3 \)
\( x_1 - x_2 \le 1 \)
\( x_1 + 0.5x_2 \ge 1 \)
Comparing this set to the given options, it perfectly matches Option (B).
Step 4: Final Answer:
The correct constraints are given in Option (B).
Quick Tip: For LP graphical problems, quickly test a known point inside the shaded region (e.g., \( x_1 = 1, x_2 = 2 \)) in the options to eliminate incorrect inequalities without deriving full line equations.
Which ONE of the following options is the closest approximation to the value of the given definite integral?
\[ \int_0^1 e^{-x^2} dx \]
Note: Use numerical integration
Step 1: Understanding the Question:
The integral \( \int e^{-x^2} dx \) does not have an elementary antiderivative. The problem instructs us to use an approximation method (numerical integration) to find the closest value.
Step 2: Key Formula or Approach:
The simplest form of numerical integration over a single interval \( [a, b] \) is the Trapezoidal Rule:
\[ I \approx \frac{h}{2} [f(a) + f(b)] \]
where \( h = b - a \).
Step 3: Detailed Explanation:
Here, the interval is \( [0, 1] \), so \( a = 0 \) and \( b = 1 \).
The single step size \( h = 1 - 0 = 1 \).
Our function is \( f(x) = e^{-x^2} \).
Let's evaluate the function at the boundary points:
\( f(0) = e^{-0^2} = e^0 = 1 \)
\( f(1) = e^{-1^2} = e^{-1} = \frac{1}{e} \)
Applying the Trapezoidal Rule with a single interval:
\[ I \approx \frac{1}{2} \left[ 1 + \frac{1}{e} \right] \]
\[ I \approx \frac{1}{2} \left[ \frac{e + 1}{e} \right] \]
\[ I \approx \frac{e + 1}{2e} \]
This expression exactly matches Option (C).
Step 4: Final Answer:
The closest approximation derived via single-step numerical integration is \( \frac{e+1}{2e} \).
Quick Tip: When an option exactly matches a 1-segment Trapezoidal or Simpson's rule formula in a multiple-choice numerical integration question, it is almost always the intended approximation method.
Which ONE of the following is the value of \( \frac{1}{i^n} \)?
where \( i = \sqrt{-1} \), and \( n \) is an even positive integer.
Step 1: Understanding the Question:
We need to find the possible values of the expression \( \frac{1}{i^n} \) given that \( n \) is an even positive integer and \( i \) is the imaginary unit.
Step 2: Key Formula or Approach:
Recall the powers of \( i \):
\( i^1 = i \)
\( i^2 = -1 \)
\( i^3 = -i \)
\( i^4 = 1 \)
Since \( n \) is an even positive integer, it can be written as \( n = 2k \), where \( k = 1, 2, 3, \dots \)
Step 3: Detailed Explanation:
Let's substitute \( n = 2k \) into our expression:
\[ i^n = i^{2k} = (i^2)^k = (-1)^k \]
This means the denominator \( i^n \) solely depends on whether \( k \) is even or odd:
- If \( k \) is even (which means \( n = 4, 8, 12, \dots \)), then \( i^n = (-1)^{even} = 1 \).
- If \( k \) is odd (which means \( n = 2, 6, 10, \dots \)), then \( i^n = (-1)^{odd} = -1 \).
Therefore, \( i^n \) can only be either \( 1 \) or \( -1 \).
Consequently, the entire expression becomes:
\[ \frac{1}{i^n} = \frac{1}{\pm 1} = \pm 1 \]
So, the value is either +1 or -1.
Step 4: Final Answer:
The possible values are +1 or -1.
Quick Tip: For questions involving powers of \( i \), always remember the repeating cycle of 4: \( i, -1, -i, 1 \). Even powers always result in purely real numbers (\( \pm 1 \)), while odd powers result in purely imaginary numbers (\( \pm i \)).
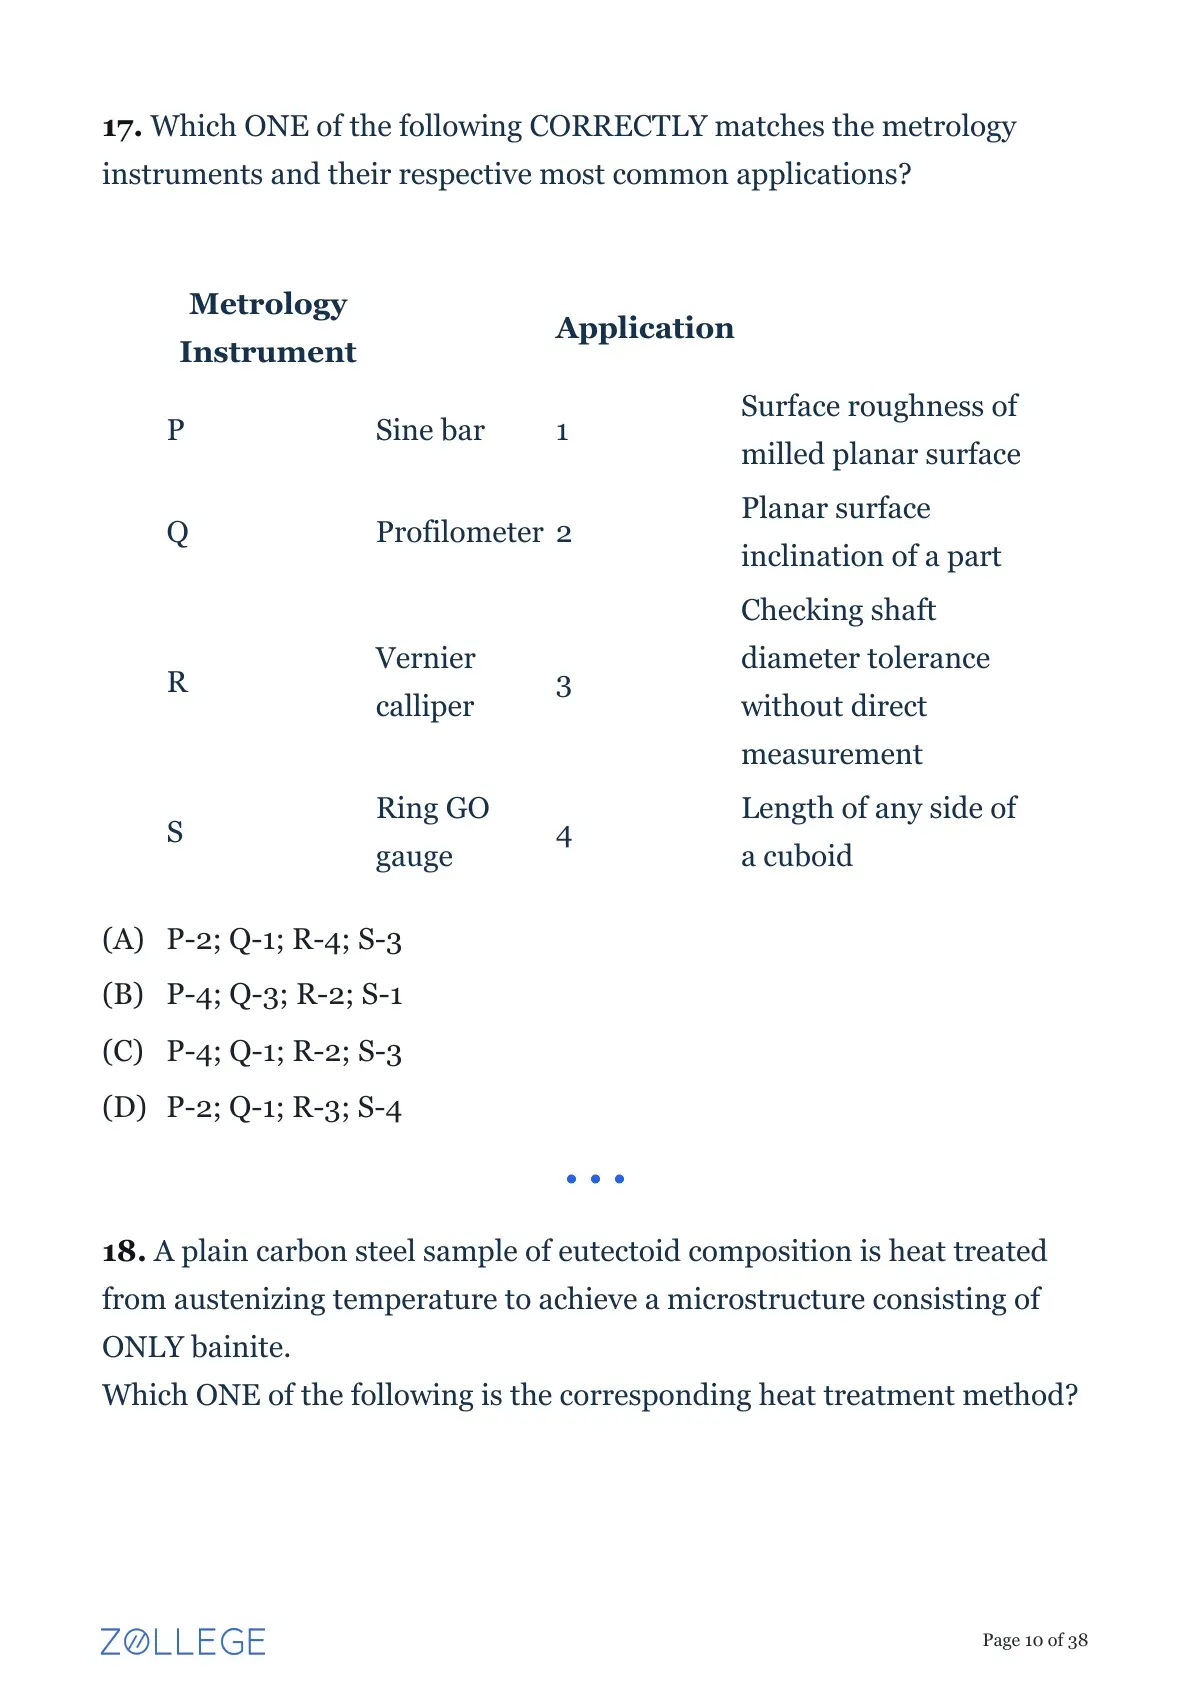
Which ONE of the following CORRECTLY matches the metrology instruments and their respective most common applications?
Step 1: Understanding the Question:
We are given a list of metrology instruments and need to map them to their specific measuring applications.
Step 2: Detailed Explanation:
Let's evaluate each instrument:
- P. Sine bar: A sine bar is used in conjunction with slip gauges to measure angles very precisely. It is used to find the planar surface inclination of a part. (Matches with 2).
- Q. Profilometer: A profilometer is an instrument specifically designed to measure a surface's profile, in order to quantify its surface roughness. (Matches with 1).
- R. Vernier calliper: A Vernier calliper is a versatile measuring tool used to find linear dimensions. It can easily be used to measure the length of any side of a cuboid. (Matches with 4).
- S. Ring GO gauge: A limit gauge is used for inspection to ensure a part fits within tolerances. A Ring GO gauge checks if a shaft's maximum diameter is within limits without taking a direct numerical measurement. (Matches with 3).
Step 3: Final Answer:
The correct pairing is P-2; Q-1; R-4; S-3.
Quick Tip: Limit gauges (like plug and ring gauges) are specifically designed for rapid "go/no-go" inspection on the shop floor without giving an absolute measurement value.
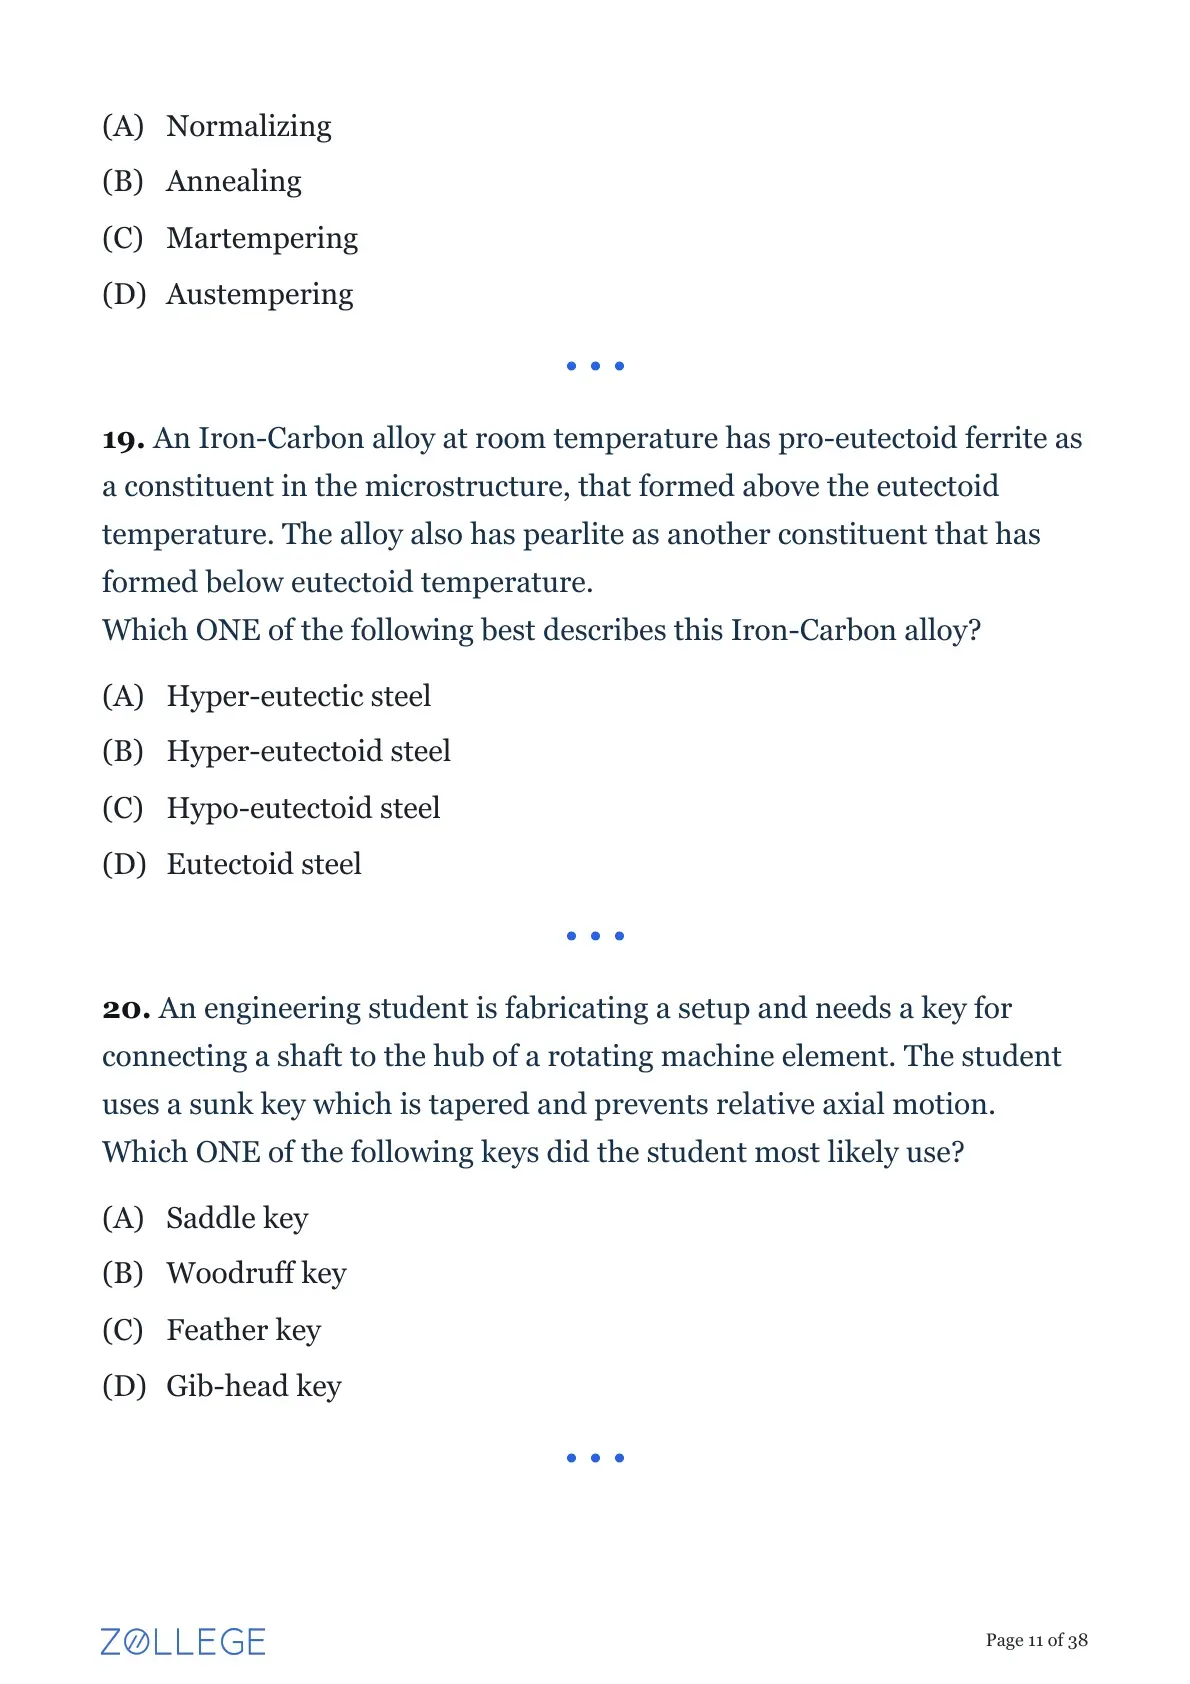
A plain carbon steel sample of eutectoid composition is heat treated from austenizing temperature to achieve a microstructure consisting of ONLY bainite.
Which ONE of the following is the corresponding heat treatment method?
Step 1: Understanding the Question:
We need to identify the specific heat treatment process that results in a 100% bainite microstructure for an eutectoid carbon steel.
Step 2: Detailed Explanation:
Let's review the outcomes of the different heat treatment methods:
- Normalizing: Involves air cooling from the austenitizing temperature. It typically results in a fine pearlite microstructure.
- Annealing: Involves very slow furnace cooling. It results in a coarse pearlite microstructure.
- Martempering: Also known as stepped quenching. The steel is quenched to a temperature just above the Martensite start (Ms) line, held until the temperature is uniform, and then air-cooled to form martensite (which is later tempered to form tempered martensite).
- Austempering: The steel is quenched to a temperature above the Ms line (but below the nose of the TTT diagram) and held there isothermally until the austenite completely transforms into bainite.
Step 3: Final Answer:
Since the goal is to achieve ONLY bainite, the correct process is Austempering.
Quick Tip: A useful memory trick for TTT diagrams: \textbf{A}ustempering produces \textbf{B}ainite. \textbf{M}artempering produces \textbf{M}artensite.
An Iron-Carbon alloy at room temperature has pro-eutectoid ferrite as a constituent in the microstructure, that formed above the eutectoid temperature. The alloy also has pearlite as another constituent that has formed below eutectoid temperature.
Which ONE of the following best describes this Iron-Carbon alloy?
Step 1: Understanding the Question:
The question provides the final room-temperature microstructure of an Iron-Carbon alloy: pro-eutectoid ferrite + pearlite. We must classify the steel based on this phase composition.
Step 2: Detailed Explanation:
Let's relate the microstructure to the carbon content using the Fe-C phase diagram:
- Eutectoid steel (approx. 0.76% C): Upon cooling through the eutectoid temperature, austenite transforms entirely into 100% pearlite.
- Hypo-eutectoid steel (< 0.76% C): When cooling from the austenite region, ferrite starts to precipitate first (before reaching the eutectoid temperature). This is called pro-eutectoid ferrite. The remaining austenite then transforms into pearlite at the eutectoid temperature.
- Hyper-eutectoid steel (> 0.76% C and < 2.14% C): When cooling, cementite precipitates first, forming pro-eutectoid cementite. The remaining austenite then transforms into pearlite.
- Hyper-eutectic alloys have carbon content > 4.3% and are considered cast irons, not steels.
Step 3: Final Answer:
Because the microstructure contains pro-eutectoid ferrite, it is a Hypo-eutectoid steel.
Quick Tip: Pro-eutectoid literally means "before the eutectoid".
Low Carbon \(\to\) Hypo-eutectoid \(\to\) Ferrite forms first.
High Carbon \(\to\) Hyper-eutectoid \(\to\) Cementite forms first.
An engineering student is fabricating a setup and needs a key for connecting a shaft to the hub of a rotating machine element. The student uses a sunk key which is tapered and prevents relative axial motion.
Which ONE of the following keys did the student most likely use?
Step 1: Understanding the Question:
We need to identify a specific type of machine key based on three characteristics: it is a sunk key, it is tapered, and it is designed to prevent relative axial motion.
Step 2: Detailed Explanation:
Let's analyze the given options based on machine design standards:
- Saddle key: This is not a sunk key. It only fits into a keyway in the hub and sits on the curved surface of the shaft, relying entirely on friction.
- Woodruff key: A sunk key shaped like a half-moon. It aligns itself well but is not "tapered" in the traditional sense along its length to create a wedge effect against axial motion.
- Feather key: A sunk key with a uniform cross-section (not tapered). Its primary purpose is to permit relative axial motion (sliding) while transmitting torque.
- Gib-head key: A rectangular sunk key that is tapered on its top surface (usually with a taper of 1:100). When hammered into place, the taper provides a tight friction fit that securely locks the hub and shaft together, effectively preventing relative axial motion. It has a raised head to facilitate easy removal.
Step 3: Final Answer:
The characteristics perfectly describe a Gib-head key.
Quick Tip: Feather keys = Allow axial sliding.
Tapered Sunk keys (like Gib-head) = Prevent axial sliding via wedge action.
The ratio of hydrostatic stress to volumetric strain is known as ______.
Step 1: Understanding the Question:
The question asks for the definition of a specific elastic constant relating hydrostatic stress to volumetric strain.
Step 2: Key Formula or Approach:
By definition in solid mechanics and fluid mechanics:
\[ K = \frac{Hydrostatic Stress}{Volumetric Strain} = \frac{\sigma_v}{\epsilon_v} = \frac{-p}{\Delta V / V_0} \]
This ratio is the measure of a material's resistance to uniform compression.
Step 3: Detailed Explanation:
- Bulk modulus (K): Defined as the ratio of volumetric stress (or hydrostatic stress) to volumetric strain.
- Compressibility: This is the exact inverse of the bulk modulus (\( 1/K \)).
- Poisson’s ratio: The ratio of lateral strain to longitudinal strain.
- Young’s modulus: The ratio of longitudinal stress to longitudinal strain.
Step 4: Final Answer:
The correct term is the Bulk modulus.
Quick Tip: Remember the pairs:
Linear stress/strain \(\to\) Young's Modulus (\( E \))
Shear stress/strain \(\to\) Shear Modulus (\( G \))
Volumetric stress/strain \(\to\) Bulk Modulus (\( K \))
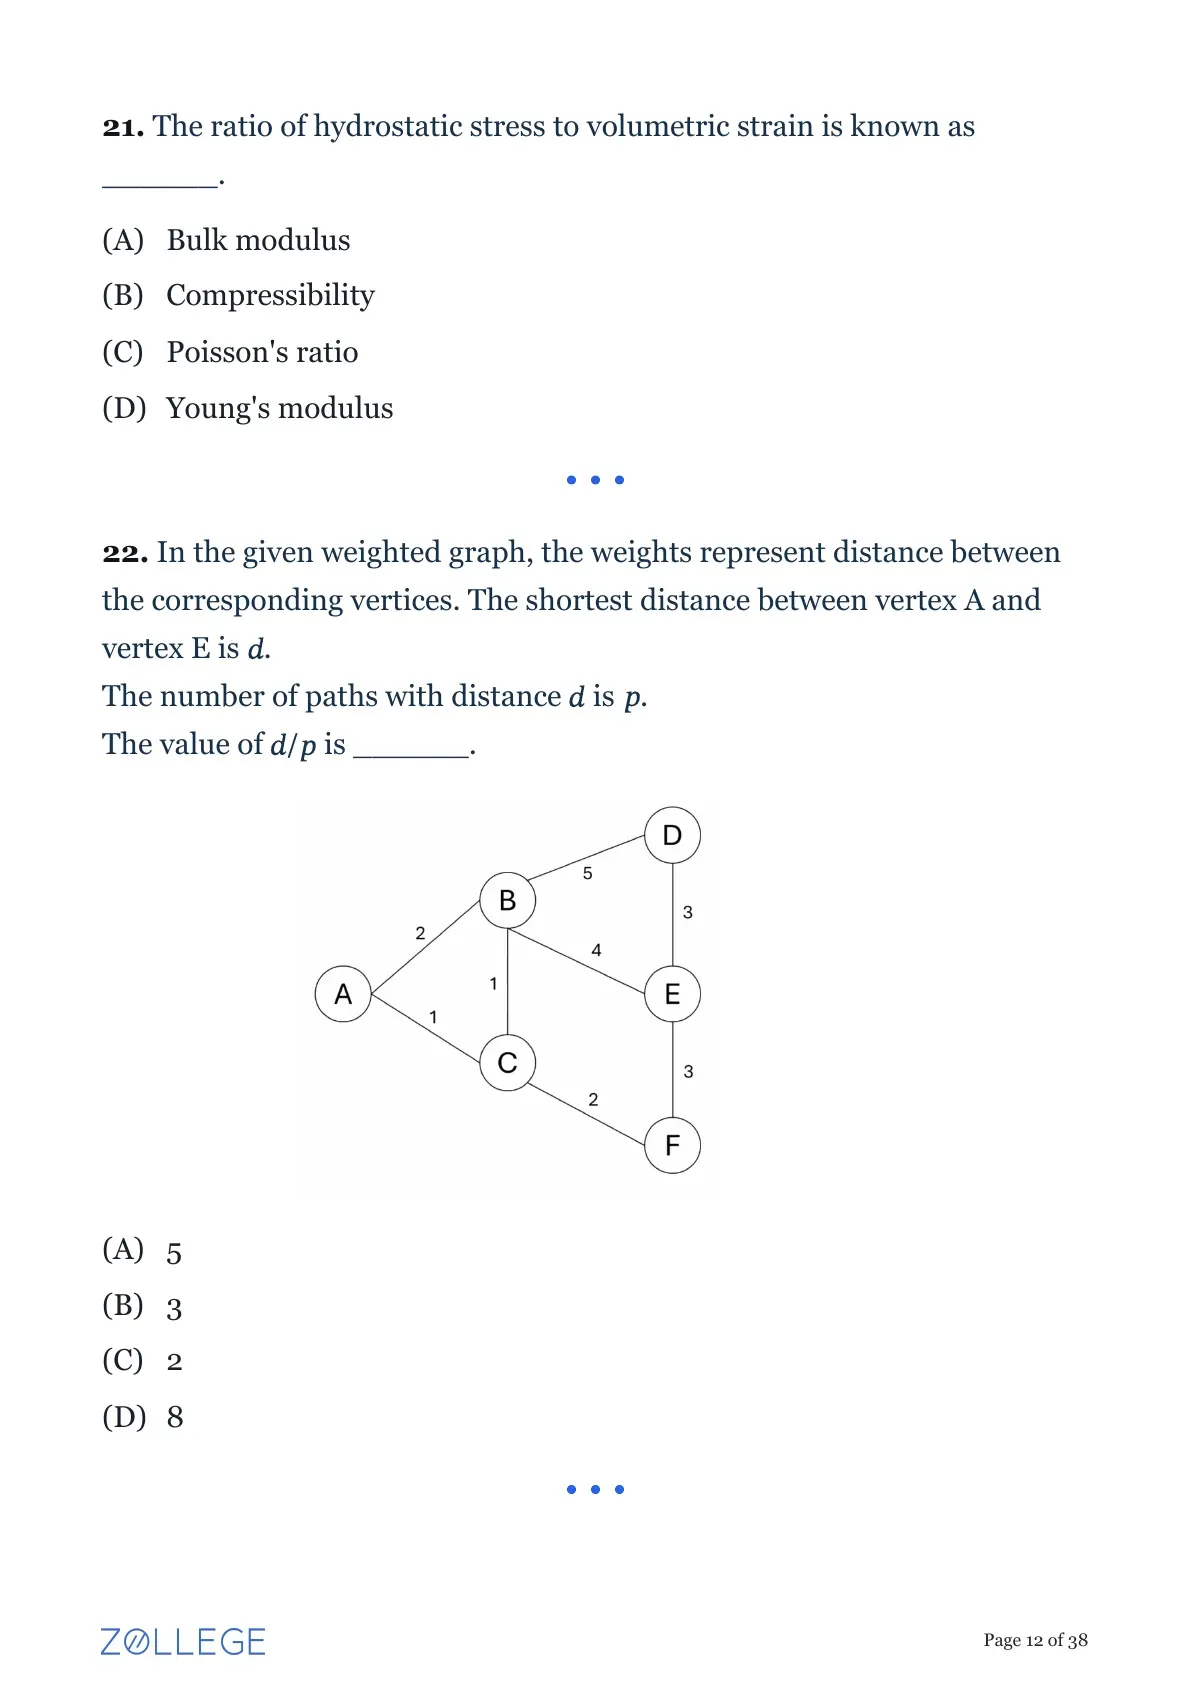
In the given weighted graph, the weights represent distance between the corresponding vertices. The shortest distance between vertex A and vertex E is \( d \).
The number of paths with distance \( d \) is \( p \).
The value of \( d/p \) is ______.
Step 1: Understanding the Question:
We are given a network graph with nodes (A to F) and weighted edges.
We need to find the shortest path distance \( d \) from node A to node E, count how many distinct paths (\( p \)) share this exact minimum distance, and calculate the ratio \( d/p \).
Step 2: Analyzing the Graph:
Let's list all relevant paths originating from A and terminating at E, accumulating the weights along the edges:
Edge weights identified from the figure:
\( A-B = 2 \)
\( A-C = 1 \)
\( B-C = 1 \)
\( B-D = 5 \)
\( B-E = 4 \)
\( C-F = 2 \)
\( D-E = 3 \)
\( F-E = 3 \)
Step 3: Detailed Explanation:
Now, evaluate the total distance of possible simple paths from A to E:
Path 1: \( A \rightarrow B \rightarrow E \)
Distance = \( 2 + 4 = 6 \)
Path 2: \( A \rightarrow C \rightarrow B \rightarrow E \)
Distance = \( 1 + 1 + 4 = 6 \)
Path 3: \( A \rightarrow C \rightarrow F \rightarrow E \)
Distance = \( 1 + 2 + 3 = 6 \)
Path 4: \( A \rightarrow B \rightarrow D \rightarrow E \)
Distance = \( 2 + 5 + 3 = 10 \)
Path 5: \( A \rightarrow C \rightarrow B \rightarrow D \rightarrow E \)
Distance = \( 1 + 1 + 5 + 3 = 10 \)
The shortest distance among all evaluated paths is \( 6 \). Thus, \( d = 6 \).
There are exactly \( 3 \) separate paths that result in this shortest distance. Thus, \( p = 3 \).
We are asked to find the value of \( d/p \):
\[ d/p = \frac{6}{3} = 2 \]
Step 4: Final Answer:
The value of \( d/p \) is 2.
Quick Tip: In small networks, listing all logical forward paths systematically is often faster and less prone to error than fully setting up Dijkstra's algorithm.
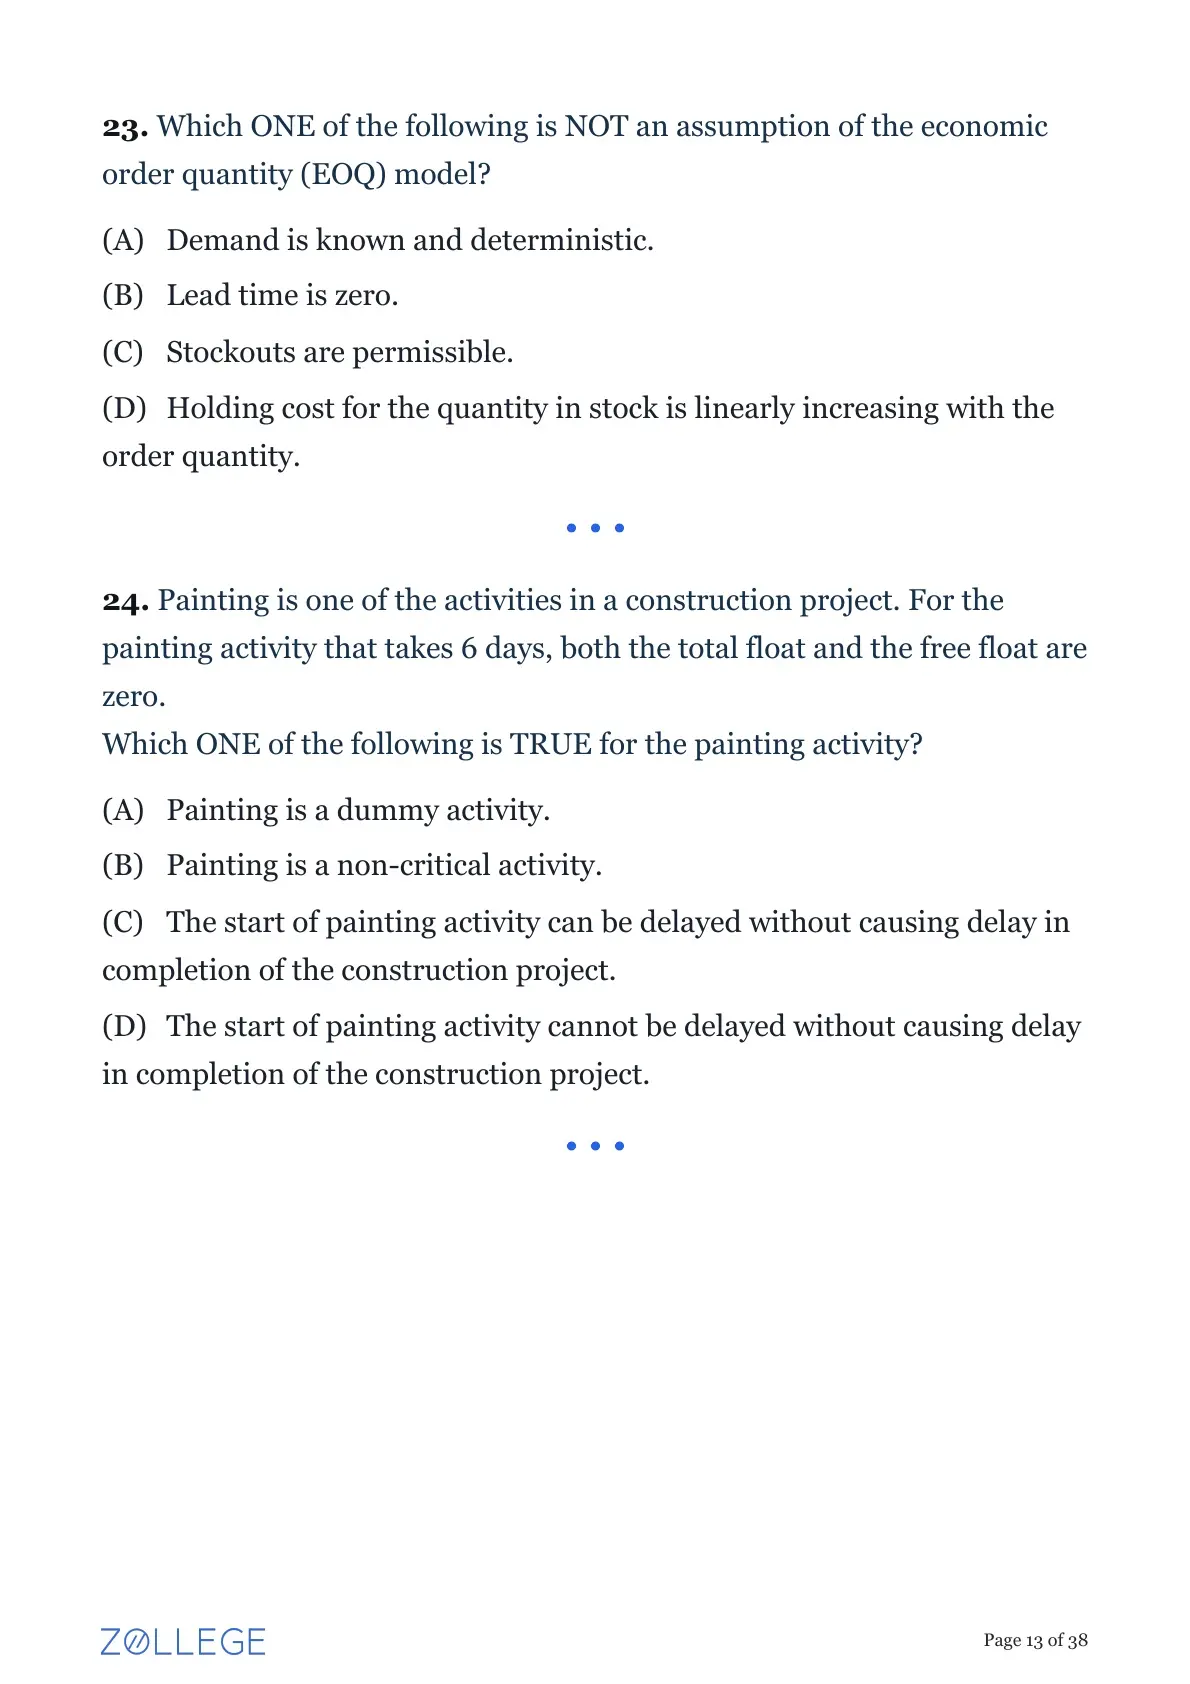
Which ONE of the following is NOT an assumption of the economic order quantity (EOQ) model?
Step 1: Understanding the Question:
We need to identify the statement that contradicts the fundamental assumptions of the basic Wilson Economic Order Quantity (EOQ) model used in inventory management.
Step 2: Detailed Explanation:
Let's evaluate the standard assumptions of the basic EOQ model:
- Demand is known and constant over time. (Supports Option A).
- Replenishment is instantaneous. This essentially means the lead time is either zero or constant and perfectly predictable, allowing orders to arrive exactly when inventory reaches zero. Many textbooks simplify this as "zero lead time". (Supports Option B).
- Holding costs are calculated based on average inventory (\( Q/2 \)), making total holding cost linearly proportional to the order quantity \( Q \). (Supports Option D).
- No shortages or stockouts are allowed. The entire premise of the basic EOQ formula is to balance holding and ordering costs specifically to prevent stockouts. If stockouts are allowed, a different model ("EOQ with planned shortages") must be used.
Step 3: Final Answer:
Therefore, the statement "Stockouts are permissible" is fundamentally NOT an assumption of the standard EOQ model.
Quick Tip: The basic EOQ model explicitly assumes infinite stockout costs, meaning stockouts will never intentionally occur.
Painting is one of the activities in a construction project. For the painting activity that takes 6 days, both the total float and the free float are zero.
Which ONE of the following is TRUE for the painting activity?
Step 1: Understanding the Question:
We are given an activity in a project network with a non-zero duration (6 days) and a Total Float equal to 0. We need to interpret what this means for the project.
Step 2: Key Definitions:
- Total Float: The amount of time an activity can be delayed from its early start date without delaying the overall project finish date.
- Critical Activity: Any activity with a Total Float of zero is strictly on the critical path.
Step 3: Detailed Explanation:
Let's evaluate the options based on these definitions:
- Option (A): Dummy activities have a duration of 0 days. Since painting takes 6 days, it is not a dummy activity.
- Option (B): Since the total float is zero, the activity lies on the critical path, making it a critical activity. Thus, this statement is false.
- Option (C): If total float is zero, there is no buffer time. Any delay in this activity will push back the entire project. Thus, this statement is false.
- Option (D): Because total float is zero, any delay in the start or finish of this activity will directly extend the total project duration. Thus, this statement is perfectly true.
Step 4: Final Answer:
The start of the painting activity cannot be delayed without causing a delay in the completion of the project.
Quick Tip: Total Float = 0 defines the Critical Path. A delay in any critical activity translates 1:1 into a delay for the overall project.
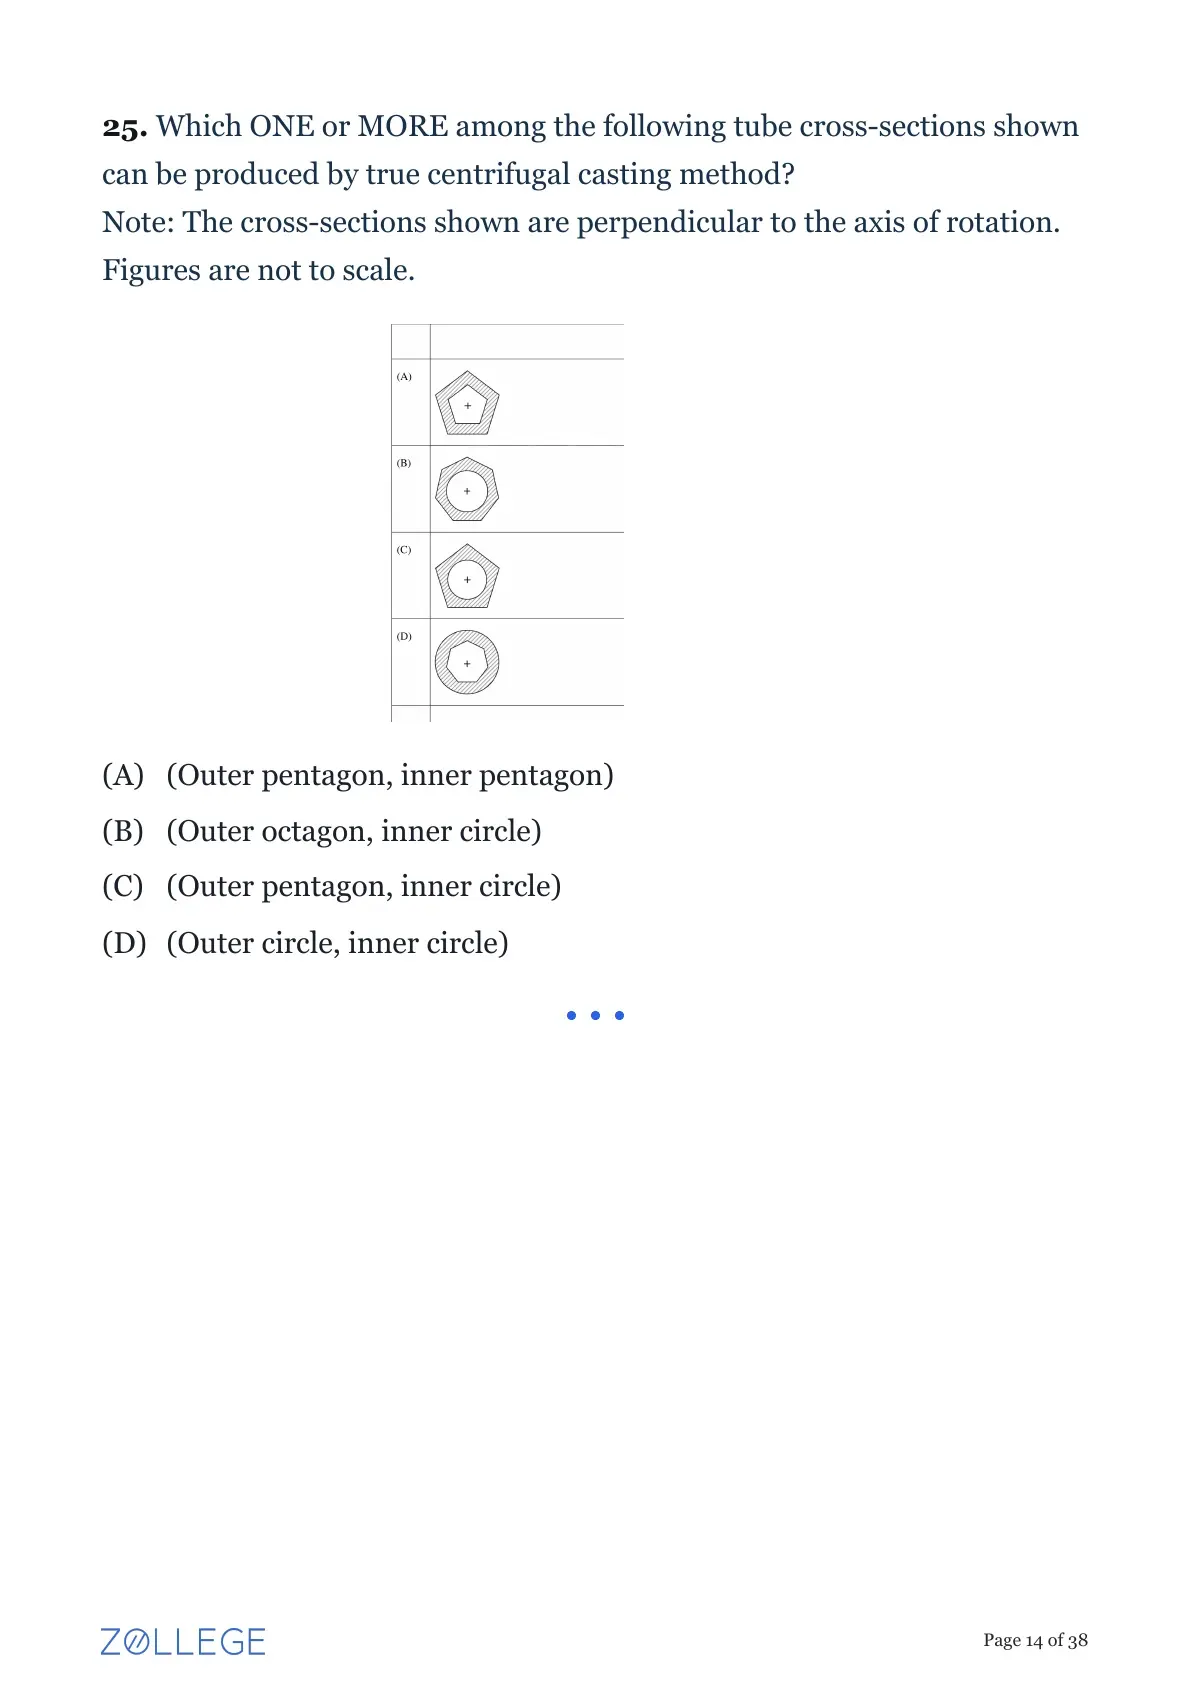
Which ONE or MORE among the following tube cross-sections shown can be produced by true centrifugal casting method?
Note: The cross-sections shown are perpendicular to the axis of rotation. Figures are not to scale.
Step 1: Understanding the Question:
This is a Multiple Select Question (MSQ) asking which of the provided hollow cross-sectional shapes can theoretically be manufactured using the true centrifugal casting process.
Step 2: Process Principles:
In true centrifugal casting, molten metal is poured into a rapidly rotating mold.
1. Outer Shape: The molten metal is thrown outward against the mold walls due to centrifugal force. Therefore, the outer shape of the final cast part is entirely dictated by the internal cavity shape of the mold. The mold can be machined to produce circular, square, hexagonal, octagonal, or any rotationally symmetrical polygonal outer shapes.
2. Inner Shape: The inner surface of the casting remains free (unconstrained by a core). Because the liquid metal seeks a state of uniform pressure under the artificial gravity of centrifugal force, it distributes itself at a constant radius from the axis of rotation. Consequently, the inner bore will always form a perfect cylinder (a circle in cross-section).
Step 3: Detailed Explanation:
Based on these rules, any valid cross-section produced by true centrifugal casting MUST have a perfectly circular inner boundary.
Let's evaluate the options:
- (A) Outer pentagon, inner pentagon: The inner shape is not circular. This cannot be produced without a physical core (which makes it semicentrifugal or a standard sand casting, not true centrifugal).
- (B) Outer octagon, inner circle: The outer shape is rotationally symmetric, and the inner shape is a circle. This can be produced.
- (C) Outer pentagon, inner circle: The outer shape is symmetric, and the inner shape is a circle. This can be produced.
- (D) Outer circle, inner circle: This is the most standard pipe/tube configuration for centrifugal casting. It can definitely be produced.
Step 4: Final Answer:
The valid profiles are those with a circular inner bore, which are options (B), (C), and (D).
Quick Tip: For true centrifugal casting questions, remember the golden rule: The outer shape takes the form of the mold, but the inner shape will \textbf{always} be a perfect cylinder due to rotational physics.
Which ONE or MORE among the following options CORRECTLY match(es) the type of defects with the corresponding metal working processes in which they are likely to occur?
Step 1: Understanding the Question:
This is a Multiple Select Question (MSQ) that requires matching specific manufacturing defects to the metalworking processes where they predominantly occur.
Step 2: Detailed Explanation:
Let's evaluate each defect and its corresponding process:
- P. Centerburst (or Chevron cracking): This defect occurs internally due to tensile stresses generated at the center of the workpiece. It is a common defect in Extrusion and Wire Drawing. So, P matches 3.
- Q. Earing: Earing is the formation of wavy edges at the open end of a drawn cup. It is caused by the planar anisotropy of the sheet metal and happens in Deep Drawing. So, Q matches 1.
- R. Zipper cracks: These are internal cracks formed in the center of the strip during Rolling due to excessive bending or localized stresses. So, R matches 2.
- S. Cold shut: A cold shut occurs when two streams of molten metal meet but fail to fuse completely due to premature cooling (in Casting), or when metal folds over itself without joining during Closed die forging. So, S matches both 4 and 5.
Step 3: Evaluating the Options:
Option (A) suggests S-4 (Closed die forging), which is correct.
Option (D) suggests S-5 (Casting), which is also correct.
Therefore, both options (A) and (D) provide correct matchings.
Step 4: Final Answer:
The correctly matching options are (A) and (D).
Quick Tip: In MSQ questions involving tables, always check if a single item from Column 1 can legitimately map to multiple items in Column 2. Here, Cold Shut is a classic defect shared by both casting and forging.
Which ONE or MORE among the options given is/are well established format(s) of data transfer used in geometrical modelling related to computer aided design (CAD)?
Step 1: Understanding the Question:
The question asks to identify standard file formats used for exchanging 3D geometric models between different Computer Aided Design (CAD) systems.
Step 2: Detailed Explanation:
Let's review the given formats:
- (A) IGES (Initial Graphics Exchange Specification): A widely used neutral data format that allows the digital exchange of information among CAD systems.
- (B) STEP (Standard for the Exchange of Product model data): An ISO standard for computer-interpretable representation and exchange of product manufacturing information.
- (C) NDC (Normalized Device Coordinates): This is a computer graphics concept mapping coordinates to a standard range (usually -1 to 1), not a CAD file format.
- (D) STL (Stereolithography): A standard file format widely used for 3D printing and CAD data transfer, which represents 3D surfaces as triangular meshes.
Step 3: Final Answer:
The established CAD data transfer formats are IGES, STEP, and STL.
Quick Tip: Familiarize yourself with standard neutral CAD formats. STEP and IGES are the most common for solid/surface modelling, while STL is the universal standard for additive manufacturing.
In statistical analysis of numerical data, which ONE or MORE among the options is/are possible value(s) of correlation coefficient?
Step 1: Understanding the Question:
We need to identify the mathematical boundaries for the possible values of a correlation coefficient (specifically Pearson's correlation coefficient, \( r \)).
Step 2: Key Formula or Approach:
The Pearson correlation coefficient is a measure of linear correlation between two sets of data. It is mathematically bounded such that:
\[ -1 \le r \le 1 \]
- A value of 1 implies a perfect positive correlation.
- A value of -1 implies a perfect negative correlation.
- A value of 0 implies no linear correlation.
Step 3: Detailed Explanation:
Evaluating the given options:
(A) 0: Lies within the range \( [-1, 1] \). It is possible.
(B) 10.3: Greater than 1. It is impossible.
(C) -0.9: Lies within the range \( [-1, 1] \). It is possible.
(D) 2: Greater than 1. It is impossible.
Step 4: Final Answer:
The possible values are 0 and -0.9.
Quick Tip: Never forget that the correlation coefficient \( r \) cannot exceed 1 or fall below -1. If a calculation yields a value outside this range, a math error has occurred!
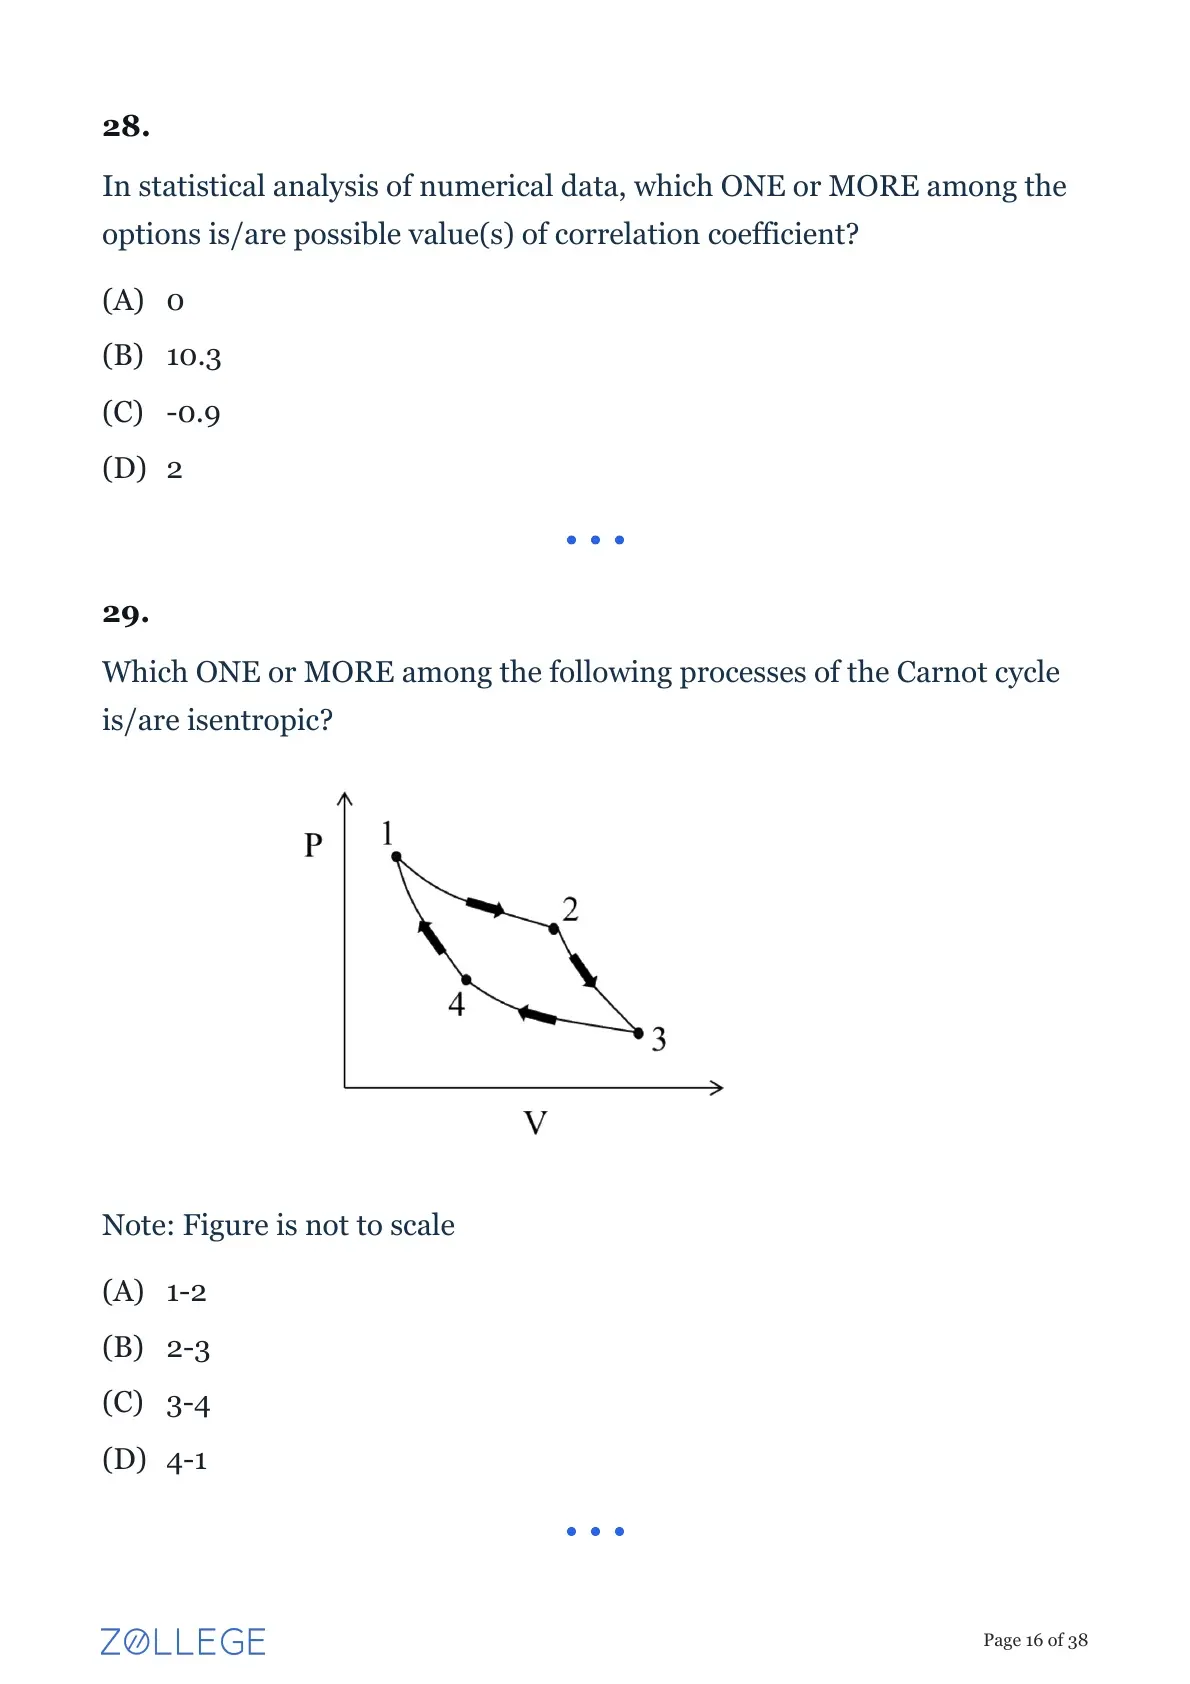
Which ONE or MORE among the following processes of the Carnot cycle is/are isentropic?
Note: Figure is not to scale
Step 1: Understanding the Question:
The question provides a pressure-volume (P-V) diagram of the Carnot cycle and asks to identify the isentropic (reversible adiabatic) processes.
Step 2: Detailed Explanation:
The Carnot cycle consists of four distinct reversible processes:
1. Process 1-2: Isothermal expansion. The working fluid expands at a constant high temperature while heat is added. In a P-V diagram, this curve is flatter.
2. Process 2-3: Reversible adiabatic (isentropic) expansion. The fluid continues to expand without heat transfer, dropping the temperature. In a P-V diagram, adiabatic curves are steeper than isothermal curves because \( P \propto V^{-\gamma} \) (where \( \gamma > 1 \)).
3. Process 3-4: Isothermal compression. The fluid is compressed at a constant low temperature while heat is rejected.
4. Process 4-1: Reversible adiabatic (isentropic) compression. The fluid is compressed back to its initial state without heat transfer, raising the temperature.
Step 3: Final Answer:
The processes 2-3 and 4-1 represent the isentropic steps of the Carnot cycle.
Quick Tip: On a standard P-V diagram for an ideal gas, isentropic curves are always steeper than isothermal curves passing through the same point.
A square of side length 50 mm is to be blanked from a strip of 2 mm thickness. The sheet metal has a shear strength of 200 MPa.
To enable a single step blanking operation, the theoretical minimum blanking force required is ______ \( \times 10^3 \) N (in integer).
Note: Neglect the effect of clearances and friction.
Step 1: Understanding the Question:
We need to calculate the minimum theoretical blanking force required to punch out a square shape from a sheet metal strip.
Step 2: Key Formula or Approach:
The formula for blanking or punching force \( F \) is given by:
\[ F = L \times t \times \tau \]
Where:
- \( L \) is the total perimeter or cutting length of the blank.
- \( t \) is the thickness of the sheet metal.
- \( \tau \) is the shear strength of the material.
Step 3: Detailed Explanation:
Given data:
Side length of the square, \( s = 50 \) mm.
Thickness, \( t = 2 \) mm.
Shear strength, \( \tau = 200 \) MPa = \( 200 N/mm^2 \).
First, calculate the total perimeter \( L \) of the square blank:
\[ L = 4 \times s = 4 \times 50 mm = 200 mm \]
Now, substitute the values into the force formula:
\[ F = 200 mm \times 2 mm \times 200 N/mm^2 \]
\[ F = 80,000 N \]
The question asks for the force in multiples of \( 10^3 \) N (kilonewtons).
\[ F = 80 \times 10^3 N \]
Step 4: Final Answer:
The value to be filled is 80.
Quick Tip: Always ensure unit consistency. 1 MPa perfectly equals 1 N/mm\(^2\), which simplifies force calculations when dimensions are kept in millimeters.
A box in a machine shop consists of 5 coated and 10 uncoated cutting inserts which are of otherwise similar characteristics. The inserts got mixed up randomly in the box. An operator has taken 4 of them at once without noticing the differences to mount on a 4-tooth face milling cutter that uses inserts.
The probability of the milling cutter having all uncoated inserts is ______ (rounded off to two decimal places).
Step 1: Understanding the Question:
We need to find the probability of drawing exactly 4 uncoated inserts from a mixed box containing 15 total inserts (10 uncoated and 5 coated), without replacement.
Step 2: Key Formula or Approach:
This is a hyper-geometric distribution problem which is solved using combinations.
Probability = \( \frac{Favorable Outcomes}{Total Possible Outcomes} \)
Step 3: Detailed Explanation:
Total number of inserts = \( 5 (coated) + 10 (uncoated) = 15 \).
The operator chooses 4 inserts.
Total number of ways to randomly choose any 4 inserts from 15:
\[ {}^{15}C_4 = \frac{15!}{4!(15 - 4)!} = \frac{15 \times 14 \times 13 \times 12}{4 \times 3 \times 2 \times 1} = 1365 \]
Number of favorable ways to choose exactly 4 uncoated inserts from the 10 available uncoated ones:
\[ {}^{10}C_4 = \frac{10!}{4!(10 - 4)!} = \frac{10 \times 9 \times 8 \times 7}{4 \times 3 \times 2 \times 1} = 210 \]
Now, calculate the probability:
\[ P(all 4 are uncoated) = \frac{{}^{10}C_4}{{}^{15}C_4} = \frac{210}{1365} \]
Simplifying the fraction:
\[ \frac{210}{1365} = \frac{14}{91} = \frac{2}{13} \]
Converting to a decimal:
\[ \frac{2}{13} \approx 0.1538 \]
Step 4: Final Answer:
Rounding off to two decimal places, we get 0.15.
Quick Tip: When selecting items "at once" or "without replacement", always use combination formulas (\({}^nC_r\)) rather than multiplying independent probabilities.
A customer has made a lumpsum investment of INR 2,00,000 with a bank. The discount rate is 15% per year. The investment enables the customer to receive a payout of INR 1,00,000 yearly for next three consecutive years.
The net present value (NPV) of his/her investment is INR ______ (rounded off to the nearest integer).
Step 1: Understanding the Question:
We must calculate the Net Present Value (NPV) of an investment. NPV is the sum of the present values of incoming cash flows minus the initial investment outflow.
Step 2: Key Formula or Approach:
The formula for NPV is:
\[ NPV = - C_0 + \sum_{t=1}^{n} \frac{C_t}{(1 + r)^t} \]
Where:
- \( C_0 \) is the initial investment (outflow).
- \( C_t \) is the cash inflow at year \( t \).
- \( r \) is the annual discount rate.
- \( n \) is the total number of periods.
Step 3: Detailed Explanation:
Given data:
\( C_0 = 2,00,000 \)
\( C_1 = C_2 = C_3 = 1,00,000 \)
\( r = 15% = 0.15 \)
Let's calculate the present value (PV) for each year's payout:
Year 1 PV: \( \frac{1,00,000}{(1.15)^1} = 86,956.52 \)
Year 2 PV: \( \frac{1,00,000}{(1.15)^2} = \frac{1,00,000}{1.3225} = 75,614.37 \)
Year 3 PV: \( \frac{1,00,000}{(1.15)^3} = \frac{1,00,000}{1.520875} = 65,751.62 \)
Sum of the Present Values of all payouts:
\[ Total PV = 86,956.52 + 75,614.37 + 65,751.62 = 2,28,322.51 \]
Now, compute the Net Present Value:
\[ NPV = Total PV - Initial Investment \]
\[ NPV = 2,28,322.51 - 2,00,000 = 28,322.51 \]
Step 4: Final Answer:
Rounding to the nearest integer gives 28323.
Quick Tip: To save calculation time for uniform cash flows, use the Present Value of Annuity formula: \( PV = P \times \frac{1 - (1+r)^{-n}}{r} \).
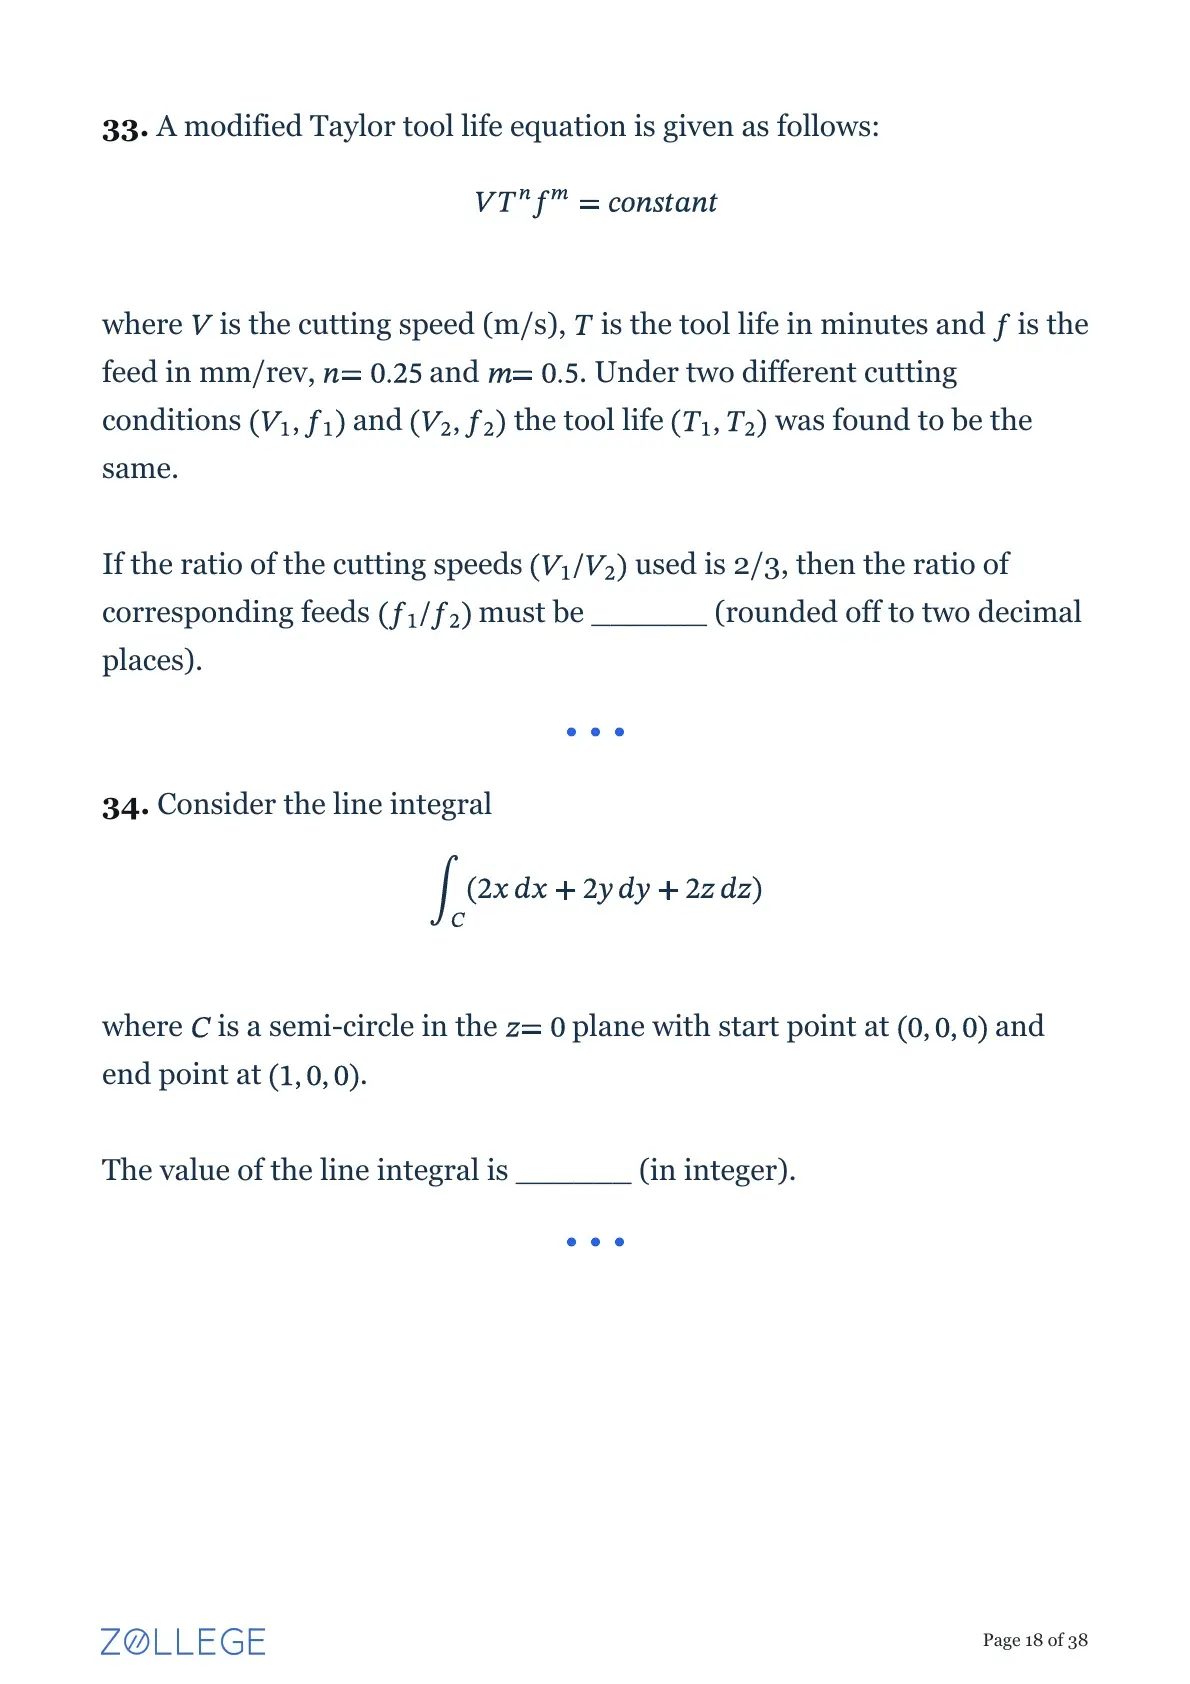
A modified Taylor tool life equation is given as follows:
\[ V T^n f^m = constant \]
where \( V \) is the cutting speed (m/s), \( T \) is the tool life in minutes and \( f \) is the feed in mm/rev, \( n = 0.25 \) and \( m = 0.5 \). Under two different cutting conditions \( (V_1, f_1) \) and \( (V_2, f_2) \) the tool life \( (T_1, T_2) \) was found to be the same.
If the ratio of the cutting speeds \( (V_1/V_2) \) used is \( 2/3 \), then the ratio of corresponding feeds \( (f_1/f_2) \) must be ______ (rounded off to two decimal places).
Step 1: Understanding the Question:
We are given a modified Taylor's tool life equation incorporating feed rate. We must find the ratio of feed rates \( (f_1 / f_2) \) when tool life is kept constant across two different cutting speeds.
Step 2: Key Formula or Approach:
Equating the constant for both conditions:
\[ V_1 T_1^n f_1^m = V_2 T_2^n f_2^m \]
Step 3: Detailed Explanation:
We are given that the tool life is the same in both conditions: \( T_1 = T_2 \).
Therefore, the \( T^n \) terms cancel out from both sides of the equation, simplifying it to:
\[ V_1 f_1^m = V_2 f_2^m \]
We need to solve for the ratio \( (f_1 / f_2) \):
\[ \frac{f_1^m}{f_2^m} = \frac{V_2}{V_1} \]
\[ \left( \frac{f_1}{f_2} \right)^m = \frac{V_2}{V_1} \]
Substitute the known values:
We are given \( m = 0.5 \) and \( \frac{V_1}{V_2} = \frac{2}{3} \).
Therefore, \( \frac{V_2}{V_1} = \frac{3}{2} = 1.5 \).
\[ \left( \frac{f_1}{f_2} \right)^{0.5} = 1.5 \]
To remove the square root (power of 0.5), square both sides:
\[ \frac{f_1}{f_2} = (1.5)^2 \]
\[ \frac{f_1}{f_2} = 2.25 \]
Step 4: Final Answer:
The ratio of corresponding feeds is 2.25.
Quick Tip: If the problem states a parameter remains constant (like Tool Life here), immediately cancel it out of your governing equations to prevent unnecessary complexity.
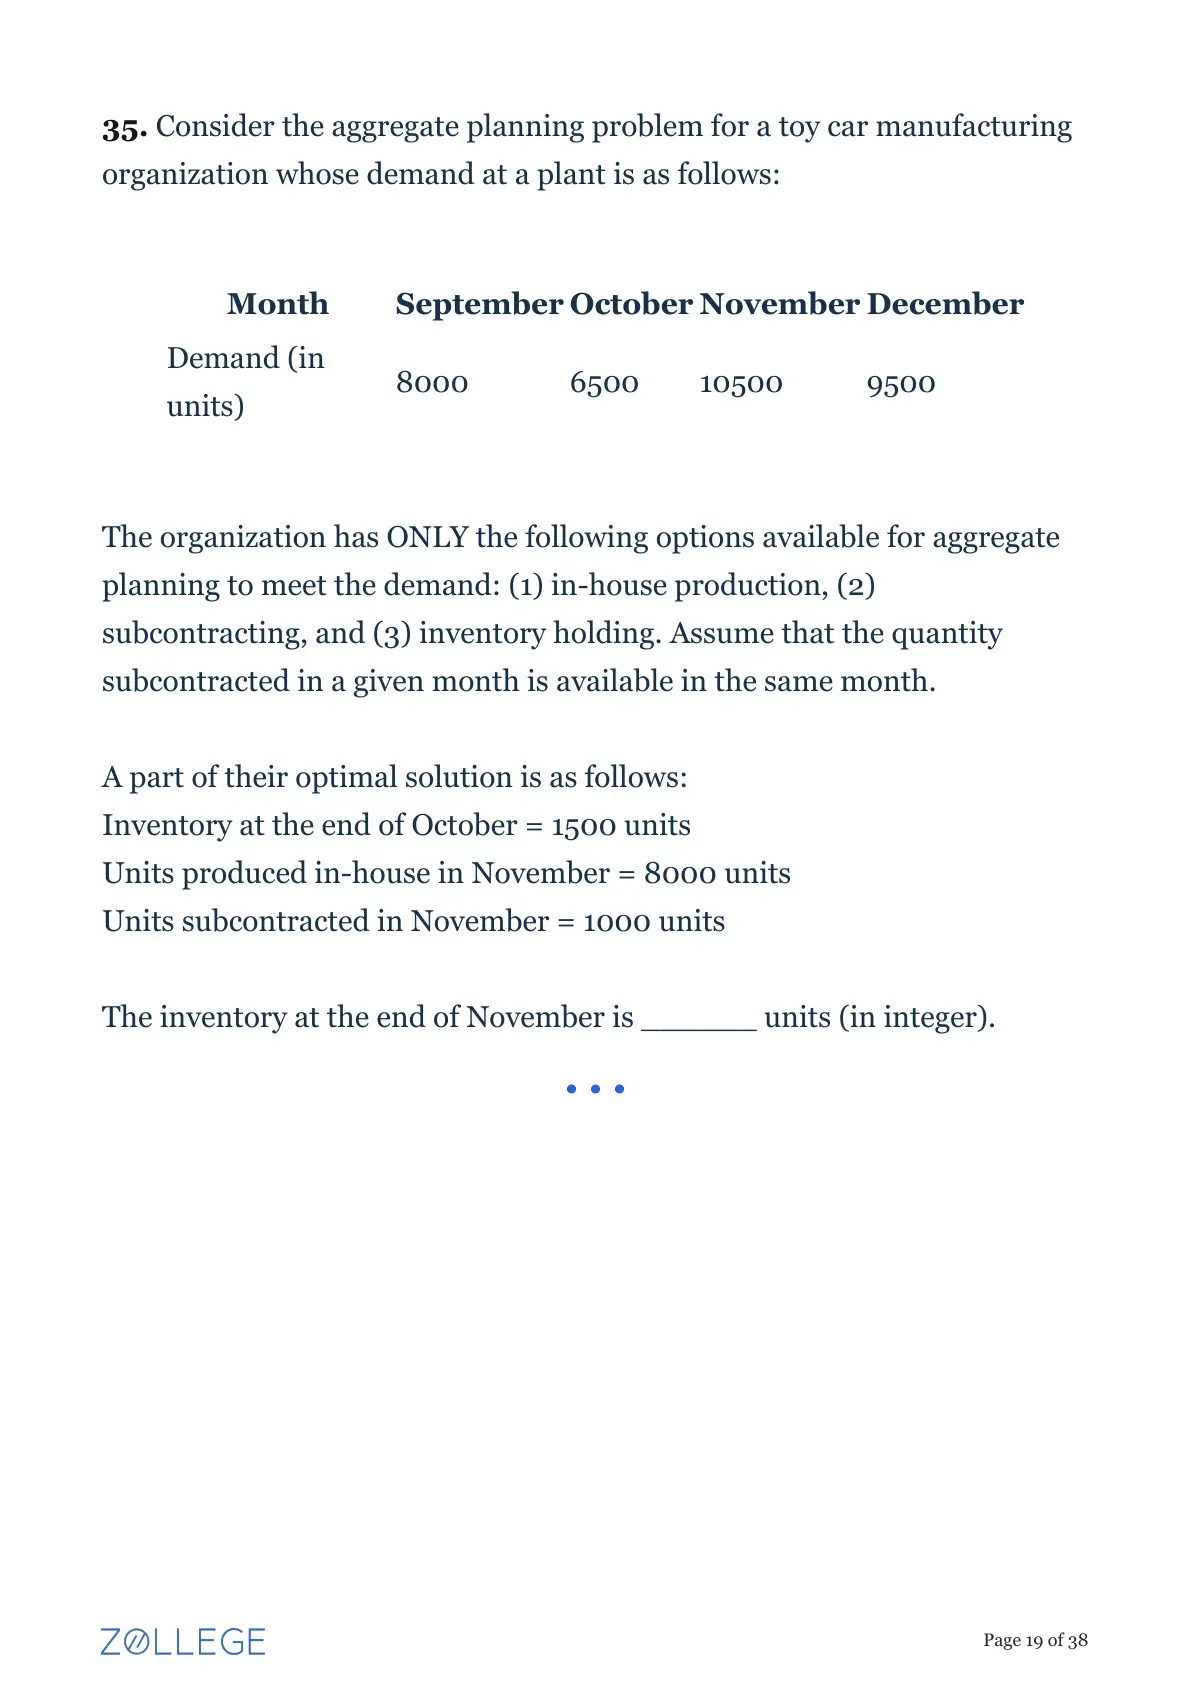
Consider the line integral
\[ \int_C (2x dx + 2y dy + 2z dz) \]
where \( C \) is a semi-circle in the \( z = 0 \) plane with start point at \( (0, 0, 0) \) and end point at \( (1, 0, 0) \).
The value of the line integral is ______ (in integer).
Step 1: Understanding the Question:
We must evaluate a vector line integral along a semi-circular path \( C \).
Step 2: Key Formula or Approach:
First, check if the vector field \( \mathbf{F} = 2x\mathbf{i} + 2y\mathbf{j} + 2z\mathbf{k} \) is conservative.
A field is conservative if it is the gradient of a scalar potential function, \( \mathbf{F} = \nabla \phi \).
For a conservative field, the Fundamental Theorem of Line Integrals states that the line integral is path-independent and depends only on the endpoints:
\[ \int_C \mathbf{F} \cdot d\mathbf{r} = \phi(End point) - \phi(Start point) \]
Step 3: Detailed Explanation:
Let's find the potential function \( \phi(x, y, z) \):
\[ \frac{\partial \phi}{\partial x} = 2x \implies \phi = x^2 + g(y, z) \]
\[ \frac{\partial \phi}{\partial y} = 2y \implies \phi = y^2 + h(x, z) \]
\[ \frac{\partial \phi}{\partial z} = 2z \implies \phi = z^2 + k(x, y) \]
Combining these, the scalar potential function is:
\[ \phi(x, y, z) = x^2 + y^2 + z^2 \]
Since a valid potential function exists, the field is conservative. We do not need to parameterize the semi-circle. We just evaluate \( \phi \) at the given bounds:
Start point \( A = (0, 0, 0) \)
End point \( B = (1, 0, 0) \)
\[ \int_C \mathbf{F} \cdot d\mathbf{r} = \phi(1, 0, 0) - \phi(0, 0, 0) \]
\[ = (1^2 + 0^2 + 0^2) - (0^2 + 0^2 + 0^2) \]
\[ = 1 - 0 = 1 \]
Step 4: Final Answer:
The value of the line integral is 1.
Quick Tip: Before attempting to parameterize complex curves (like semi-circles) for line integrals, always check if the vector field is conservative. It usually turns a 5-minute calculus problem into a 30-second arithmetic problem.
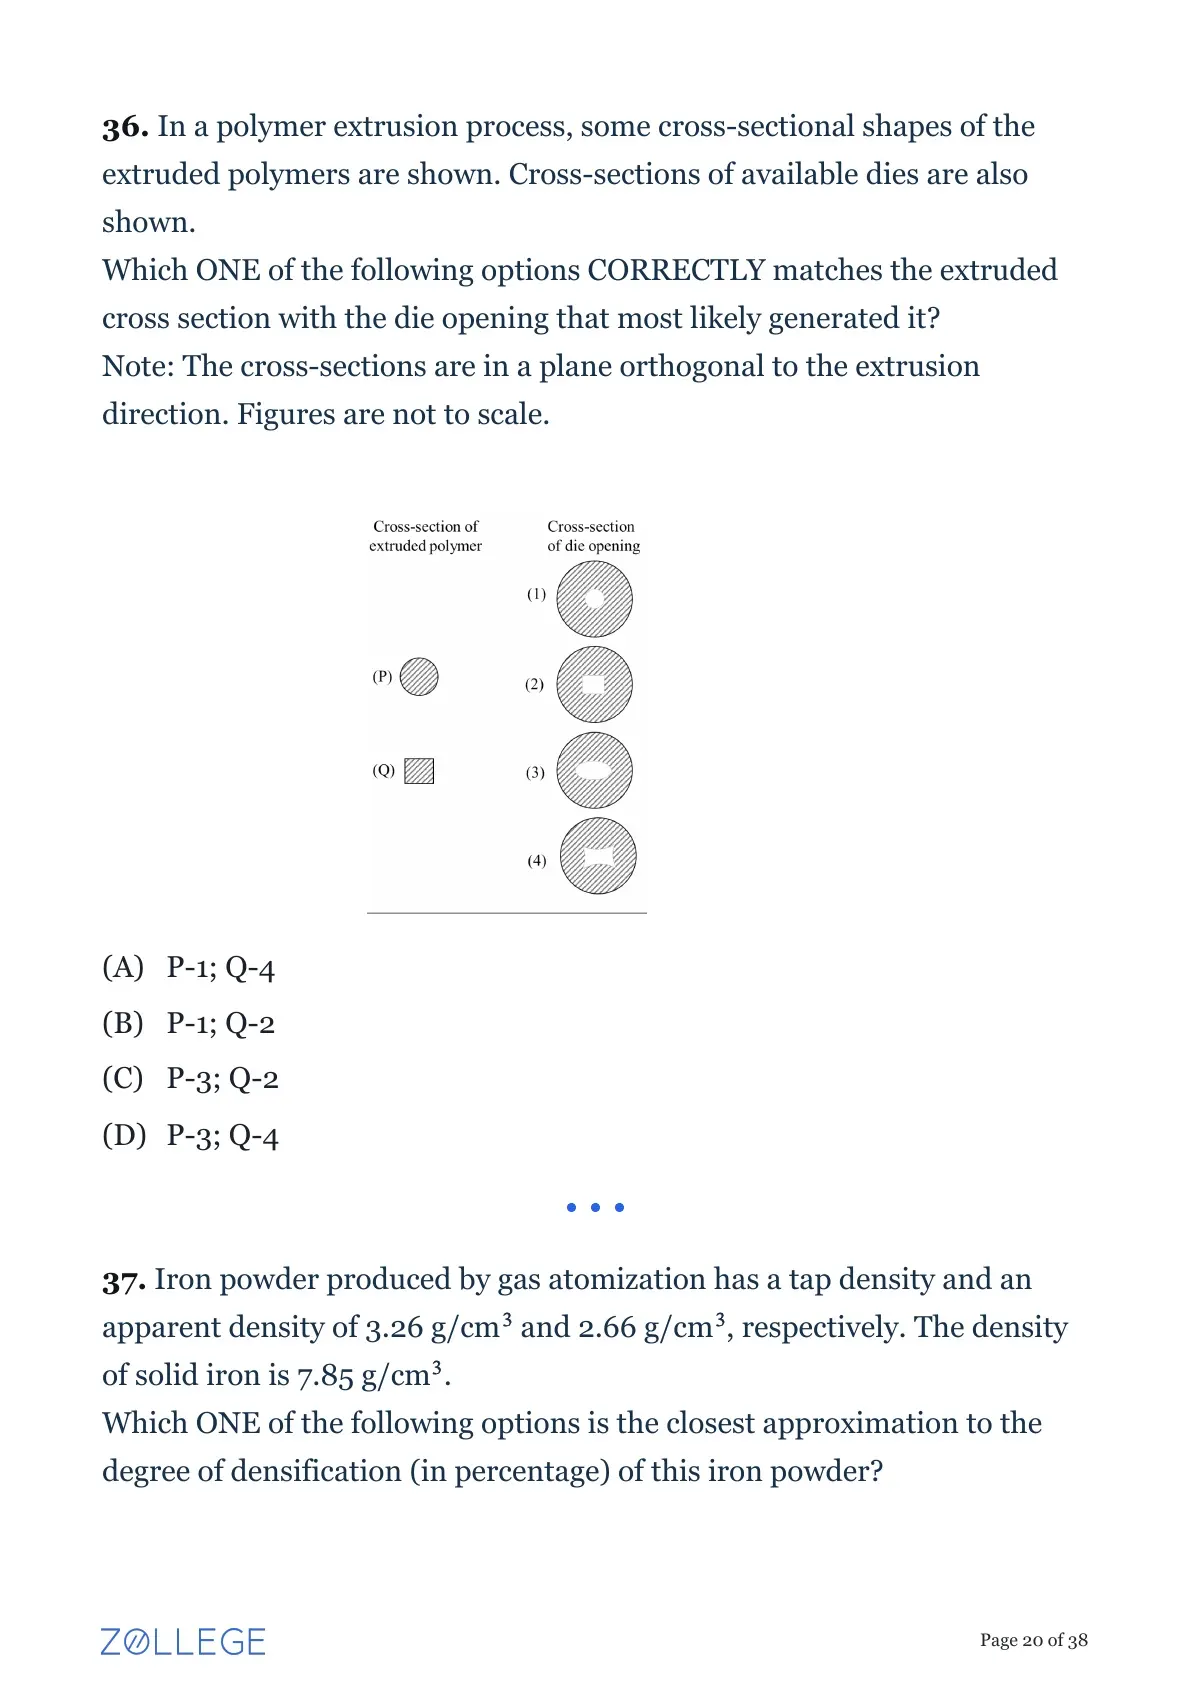
Consider the aggregate planning problem for a toy car manufacturing organization whose demand at a plant is as follows:
The organization has ONLY the following options available for aggregate planning to meet the demand: (1) in-house production, (2) subcontracting, and (3) inventory holding. Assume that the quantity subcontracted in a given month is available in the same month.
A part of their optimal solution is as follows:
Inventory at the end of October = 1500 units
Units produced in-house in November = 8000 units
Units subcontracted in November = 1000 units
The inventory at the end of November is ______ units (in integer).
Step 1: Understanding the Question:
This is an inventory balance problem within aggregate planning. We need to find the final inventory at the end of November based on existing inventory, production, subcontracting, and demand.
Step 2: Key Formula or Approach:
The fundamental inventory balance equation for any time period \( t \) is:
\[ Ending Inventory_t = Beginning Inventory_t + Total Production_t - Demand_t \]
Step 3: Detailed Explanation:
Let's list the knowns for the month of November:
- Beginning Inventory (which is the ending inventory of October) = 1500 units.
- In-house Production in November = 8000 units.
- Subcontracted units in November (available immediately) = 1000 units.
- Total Demand in November (from the table) = 10500 units.
Calculate Total Available Supply for November:
\[ Total Supply = Beginning Inventory + In-house Production + Subcontracting \]
\[ Total Supply = 1500 + 8000 + 1000 = 10500 units \]
Calculate the Ending Inventory for November:
\[ Ending Inventory = Total Supply - Demand \]
\[ Ending Inventory = 10500 - 10500 = 0 units \]
Step 4: Final Answer:
The inventory at the end of November is 0.
Quick Tip: In aggregate planning, the "Beginning Inventory" of the current month is always strictly equal to the "Ending Inventory" of the previous month. Ensure you pull the correct demand data from the table matching the exact month in question.
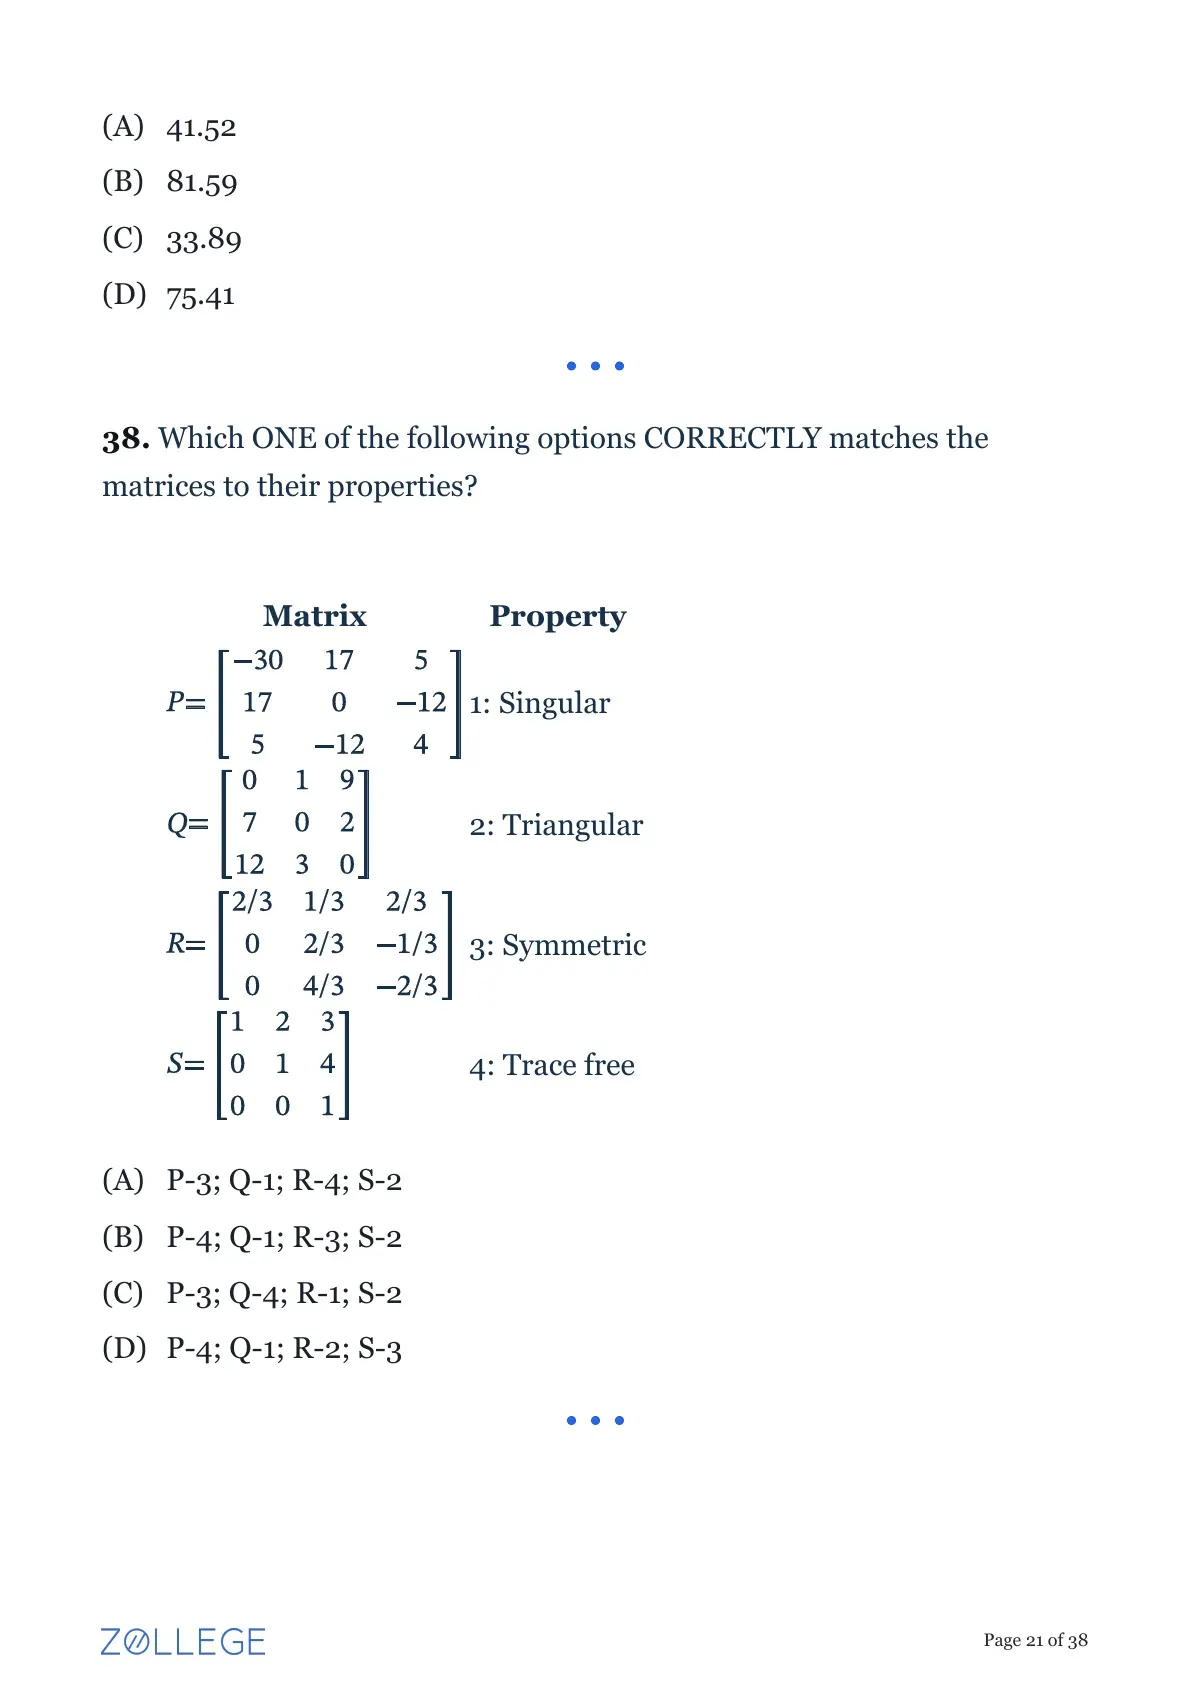
In a polymer extrusion process, some cross-sectional shapes of the extruded polymers are shown. Cross-sections of available dies are also shown.
Which ONE of the following CORRECTLY matches the extruded cross section with the die opening that most likely generated it?
Note: The cross-sections are in a plane orthogonal to the extrusion direction. Figures are not to scale.
Step 1: Understanding the Question:
We need to match the desired extruded polymer shapes (P: Solid Circle, Q: Solid Square) with the shape of the die that produces them, considering the physical phenomenon of die swell.
Step 2: Detailed Explanation:
Polymer melts are viscoelastic fluids, which means they exhibit elastic recovery when exiting a constrained die, a phenomenon known as die swell.
- Profile P (Circular rod): A circular die (1) provides uniform shear stress along its perimeter. Upon exiting, the polymer swells uniformly outward in all directions. The resulting extrudate shape remains perfectly circular, just with a larger diameter. Therefore, P matches with die 1.
- Profile Q (Square rod): If a simple square die (2) were used, the shear rate and elastic recovery would be significantly higher at the midpoints of the flat edges compared to the sharp corners. This uneven swelling causes the extruded polymer to bulge at the sides, forming a "barrel" shape.
To counteract this and achieve a perfectly straight-sided square extrudate (Q), the die itself must have inwardly curved (concave) faces, resembling a pin-cushion. Die (4) has this exact geometry. As the sides swell outward more than the corners, the final shape becomes a true square. Therefore, Q matches with die 4.
Step 3: Final Answer:
The correct pairing is P-1 and Q-4.
Quick Tip: Die swell always pushes flat edges outward. To get sharp, straight corners in an extruded plastic profile, you must design the die with concave compensation.
Iron powder produced by gas atomization has a tap density and an apparent density of 3.26 g/cm\(^3\) and 2.66 g/cm\(^3\), respectively. The density of solid iron is 7.85 g/cm\(^3\).
Which ONE of the following options is the closest approximation to the degree of densification (in percentage) of this iron powder?
Step 1: Understanding the Question:
We are given properties of an iron powder and must determine its "degree of densification". In powder metallurgy, without further mechanical compaction, the densification represents the maximum relative packing efficiency the loose powder can achieve via tapping.
Step 2: Key Formula or Approach:
The relative density (or percentage densification relative to the solid state) is defined as the ratio of the bulk/tap density of the powder to the true theoretical density of the solid metal.
\[ Densification (%) = \left( \frac{Tap Density}{Solid Density} \right) \times 100 \]
Step 3: Detailed Explanation:
Given data:
- Tap density, \( \rho_{tap} = 3.26 g/cm^3 \)
- Apparent density, \( \rho_{app} = 2.66 g/cm^3 \) (Not needed for this particular calculation)
- True solid density, \( \rho_{true} = 7.85 g/cm^3 \)
Calculate the degree of densification:
\[ Densification = \left( \frac{3.26}{7.85} \right) \times 100 \]
\[ Densification = 0.415286 \times 100 = 41.5286% \]
Looking at the options, the truncated value 41.52% precisely matches option (A).
Step 4: Final Answer:
The closest approximation is 41.52.
Quick Tip: Apparent density dictates the loose fill volume, while tap density dictates the best settling without pressure. The term 'relative density' or 'densification' relates these bulk states directly to the pure solid metal's density.
Which ONE of the following options CORRECTLY matches the matrices to their properties?
Step 1: Understanding the Question:
We need to analyze four given \( 3 \times 3 \) matrices and map each one to a mathematical property that best describes it.
Step 2: Detailed Explanation:
Let's evaluate each matrix:
- Matrix P: Notice that the elements across the main diagonal are mirror images. \( P_{12} = P_{21} = 17 \), \( P_{13} = P_{31} = 5 \), \( P_{23} = P_{32} = -12 \). Since \( P = P^T \), it is a Symmetric matrix. (Matches 3).
- Matrix Q: The trace of a matrix is the sum of its main diagonal elements. Here, Trace = \( 0 + 0 + 0 = 0 \). Thus, it is Trace free. (Matches 4).
- Matrix S: All elements below the main diagonal are exactly zero. This defines an Upper Triangular matrix. (Matches 2).
- Matrix R: By elimination, this must be singular. Let's verify by checking its determinant \( |R| \):
Expanding along the first column:
\( |R| = (2/3) \times [ (2/3)(-2/3) - (-1/3)(4/3) ] - 0 + 0 \)
\( |R| = (2/3) \times [ -4/9 + 4/9 ] = (2/3) \times 0 = 0 \).
Since the determinant is zero, it is indeed a Singular matrix. (Matches 1).
Step 3: Final Answer:
The correct pairing is P-3; Q-4; R-1; S-2.
Quick Tip: Always check the easiest visual properties first (like symmetric, triangular, and trace). Calculating the determinant (for singularity) takes the longest, so leave it for last or use process of elimination.
A sheet metal drawing is considered feasible if the following conditions are met:
\( \bullet \) Reduction ratio \( < 0.5 \)
\( \bullet \) Thickness to diameter ratio \( > 1% \)
A sheet metal drawing process is being planned on a sheet metal with a thickness of 2 mm with a punch of diameter 100 mm with various blanks of diameter \( D_b \).
Which ONE of the following blank diameters \( D_b \) (in mm) will result in feasible drawing?
Step 1: Understanding the Question:
We need to evaluate four potential blank diameters (\( D_b \)) to see which one satisfies both given feasibility conditions for deep drawing.
Step 2: Key Formula or Approach:
1. Reduction ratio: Defined as the ratio of the reduction in diameter to the original blank diameter.
\[ Reduction Ratio = \frac{D_b - d_p}{D_b} = 1 - \frac{d_p}{D_b} \]
Where \( d_p \) is the punch diameter.
2. Thickness to diameter ratio:
\[ \frac{t}{D_b} \]
Step 3: Detailed Explanation:
Let's apply the first condition: Reduction Ratio \( < 0.5 \)
\[ \frac{D_b - 100}{D_b} < 0.5 \]
\[ 1 - \frac{100}{D_b} < 0.5 \]
\[ \frac{100}{D_b} > 0.5 \implies D_b < 200 mm \]
Now, apply the second condition: Thickness to diameter ratio \( > 1% \) (\( 0.01 \))
\[ \frac{2}{D_b} > 0.01 \]
\[ D_b < \frac{2}{0.01} \implies D_b < 200 mm \]
Both conditions rigidly dictate that the blank diameter must be strictly less than 200 mm.
Looking at the given options: (A) 150, (B) 250, (C) 350, (D) 450.
Only 150 mm satisfies the requirement \( D_b < 200 \) mm.
Step 4: Final Answer:
A blank diameter of 150 mm will result in a feasible drawing.
Quick Tip: A thickness-to-diameter ratio greater than 1% is a practical industry rule of thumb to prevent the flange from wrinkling without requiring excessive blank holder force.
A student is trying to determine the flatness and parallelism of the top surface of a part whose cross-section, assumed uniform in the Z direction, is shown in the figure.
Which ONE of the following options is CORRECT?
Step 1: Understanding the Question:
The image illustrates concepts of Geometric Dimensioning and Tolerancing (GD\&T). We need to identify which tolerance zones in the figure correspond to 'flatness' and 'parallelism'.
Step 2: Detailed Explanation:
Let's define both geometric controls:
- Flatness: This is a \textit{form tolerance. It controls how much a surface can deviate from being perfectly flat, entirely independent of any other surface or datum. In the diagram, the tolerance zone \( a \) consists of two parallel planes that "wrap" the actual profile of the top surface. It is tilted and aligned strictly to best fit the surface itself, with no reference to the bottom datum.
- Parallelism: This is an \textit{orientation tolerance. It controls how parallel a surface must be in reference to a specific Datum. In the diagram, the tolerance zone \( b \) consists of two parallel planes that are rigidly constructed parallel to the "Datum" bottom surface. The entire top surface must fit within this zone \( b \) to be considered adequately parallel.
Step 3: Final Answer:
Therefore, zone \( a \) represents flatness, and zone \( b \) represents parallelism.
Quick Tip: Form controls (like Flatness, Straightness) never require a Datum reference. Orientation controls (like Parallelism, Perpendicularity) always require a Datum reference to establish alignment.
The function, \( r(t) \), signifies the likelihood that a component has survived up to time \( t \) and fails in the next instant of time.
\[ r(t) = f(t) / (1 - F(t)) \]
where \( f(t) \) denotes the probability density function for time to failure with corresponding cumulative distribution function given by,
\[ F(t) = 1 - e^{-at^b}, \quad a > 0, b > 0 \]
Which ONE of the following represents \( r(t) \)?
Step 1: Understanding the Question:
The question asks us to find the hazard rate function, denoted as \( r(t) \), for a given Cumulative Distribution Function (CDF), \( F(t) \).
Step 2: Key Formula or Approach:
The hazard rate function is given by:
\[ r(t) = \frac{f(t)}{1 - F(t)} \]
where \( f(t) \) is the Probability Density Function (PDF), which is the derivative of the CDF with respect to time:
\[ f(t) = \frac{d}{dt} F(t) \]
Step 3: Detailed Explanation:
Given the CDF:
\[ F(t) = 1 - e^{-at^b} \]
First, find the PDF \( f(t) \) by differentiating \( F(t) \):
\[ f(t) = \frac{d}{dt} \left( 1 - e^{-at^b} \right) \]
Using the chain rule:
\[ f(t) = -e^{-at^b} \times \frac{d}{dt}(-at^b) \]
\[ f(t) = -e^{-at^b} \times (-a \cdot b \cdot t^{b-1}) \]
\[ f(t) = a \cdot b \cdot t^{b-1} \cdot e^{-at^b} \]
Now, evaluate the denominator, \( 1 - F(t) \) (which is the Reliability function):
\[ 1 - F(t) = 1 - (1 - e^{-at^b}) = e^{-at^b} \]
Finally, substitute both into the hazard rate formula:
\[ r(t) = \frac{a \cdot b \cdot t^{b-1} \cdot e^{-at^b}}{e^{-at^b}} \]
The exponential terms cancel out:
\[ r(t) = a \cdot b \cdot t^{b-1} \]
Step 4: Final Answer:
The function \( r(t) \) is \( a \times b \times t^{b-1} \).
Quick Tip: The given CDF represents the Weibull distribution.
For a Weibull distribution with shape parameter \( \beta \) and scale parameter \( \alpha \), the hazard function is always proportional to \( t^{\beta-1} \).
Which ONE of the following options CORRECTLY matches the machining process and associated predominant material removal mechanism?
Step 1: Understanding the Question:
We need to match non-traditional and traditional machining processes with their primary physics of material removal.
Step 2: Detailed Explanation:
Let's analyze each process:
- P. Laser beam machining (LBM): Uses a highly focused, high-energy laser beam to rapidly heat the workpiece, causing material removal primarily through Melting and vaporization. (Matches 3).
- Q. Abrasive waterjet machining (AWJM): Uses a high-velocity stream of water mixed with abrasive particles. The particles mechanically strike the surface, causing Impact based erosion (or micro-cutting). (Matches 1).
- R. Ion beam machining (IBM): Uses a stream of charged ions (like Argon) accelerated in a vacuum to bombard the workpiece. It removes material at the atomic level through physical Sputtering. (Matches 2).
- S. Mechanical milling: A traditional machining process where a rotating multi-point cutter physically cuts the material. The fundamental mechanism of chip formation here is Shearing. (Matches 4).
Step 3: Final Answer:
The correct pairing is P-3; Q-1; R-2; S-4.
Quick Tip: Thermal processes (LBM, EDM, EBM) rely on melting/vaporization. Mechanical non-traditional processes (USM, AWJM, AJM) rely on impact/erosion.
A glass tube of 2.5 mm diameter is immersed vertically in a fluid.
Assume contact angle is zero. The surface tension of the fluid is 0.1 N/m, density of the fluid is \( 1000 kg/m^3 \) and acceleration due to gravity is \( 10 m/s^2 \).
The approximate capillary rise is ______ mm.
Step 1: Understanding the Question:
We need to calculate the height of the capillary rise of a fluid inside a vertical glass tube due to surface tension.
Step 2: Key Formula or Approach:
The formula for capillary rise \( h \) in a circular tube is derived by balancing the upward surface tension force with the downward weight of the fluid column:
\[ h = \frac{4 \sigma \cos(\theta)}{\rho g d} \]
Where:
- \( \sigma \) is the surface tension (N/m).
- \( \theta \) is the contact angle.
- \( \rho \) is the fluid density (kg/m\(^3\)).
- \( g \) is the acceleration due to gravity (m/s\(^2\)).
- \( d \) is the diameter of the tube (m).
Step 3: Detailed Explanation:
Given data:
\( \sigma = 0.1 N/m \)
\( d = 2.5 mm = 2.5 \times 10^{-3} m \)
\( \rho = 1000 kg/m^3 \)
\( g = 10 m/s^2 \)
\( \theta = 0^\circ \implies \cos(0^\circ) = 1 \)
Substitute the values into the formula:
\[ h = \frac{4 \times 0.1 \times 1}{1000 \times 10 \times 2.5 \times 10^{-3}} \]
\[ h = \frac{0.4}{10000 \times 2.5 \times 10^{-3}} \]
\[ h = \frac{0.4}{25} \]
\[ h = 0.016 m \]
Convert the height into millimeters as required:
\[ h = 0.016 \times 1000 mm = 16 mm \]
Step 4: Final Answer:
The capillary rise is 16 mm.
Quick Tip: Pay close attention to whether the formula uses radius \( r \) or diameter \( d \). If using radius, the formula is \( h = (2\sigma \cos\theta)/(\rho g r) \). Using diameter avoids dividing by 2 initially.
In an M/M/1 queuing system, the customers arrive at a rate of 3 per minute, and the average number of customers in the system is \( n \) at steady state. Assume that the server utilization is less than 1.
Which ONE of the following is the average time a customer spends in the system (in minutes) at steady state?
Step 1: Understanding the Question:
We are given an M/M/1 queue with a known arrival rate and average number of customers in the system. We need to find the formula for the average time spent in the system.
Step 2: Key Formula or Approach:
This problem is perfectly suited for Little's Law, which is a universal law in queuing theory that relates the average number of items in a stationary system (\( L \)) to the average arrival rate (\( \lambda \)) and the average time an item spends in the system (\( W \)).
\[ L = \lambda \times W \]
Step 3: Detailed Explanation:
Given data:
- Arrival rate, \( \lambda = 3 \) customers per minute.
- Average number of customers in the system, \( L = n \).
We need to find the average time spent in the system, \( W \).
Using Little's Law:
\[ n = 3 \times W \]
Rearranging to solve for \( W \):
\[ W = \frac{n}{3} \]
Step 4: Final Answer:
The average time a customer spends in the system is \( n/3 \) minutes.
Quick Tip: Little's Law (\( L = \lambda W \)) is independent of the arrival distribution, service distribution, or the number of servers, provided the system is in a steady state.
A steel cube of side 10 cm is made by the sand-casting process. A cylindrical side-riser with diameter, \( d \), and height, \( h \), needs to be used.
Assume:
\( \bullet \) No surface sharing between the riser and casting.
\( \bullet \) \( d = h \).
\( \bullet \) The connecting link between the riser and casting does not freeze before the casting.
\( \bullet \) All the surfaces of the riser and casting are subjected to identical cooling conditions.
In this situation, which ONE or MORE among the following values of \( d \) (in cm) can theoretically fully compensate for shrinkage during casting?
Step 1: Understanding the Question:
To fully compensate for shrinkage, the riser must remain in a liquid state longer than the casting. According to Chvorinov's Rule, the solidification time is proportional to the square of the Cooling Modulus (\( M = Volume / Surface Area \)).
Therefore, the condition for the riser to freeze after the casting is:
\[ M_{riser} \ge M_{casting} \]
Step 2: Key Formula or Approach:
Calculate the Cooling Modulus for both the cube (casting) and the cylinder (riser).
Step 3: Detailed Explanation:
For the Cube (Casting):
Side length, \( a = 10 cm \).
Volume, \( V_c = a^3 = 10^3 = 1000 cm^3 \).
Surface Area, \( A_c = 6a^2 = 6 \times 10^2 = 600 cm^2 \).
Cooling Modulus of casting, \( M_c = \frac{V_c}{A_c} = \frac{1000}{600} = \frac{10}{6} = 1.667 cm \).
For the Cylindrical Riser:
Given \( h = d \).
Volume, \( V_r = \frac{\pi}{4} d^2 h = \frac{\pi}{4} d^3 \).
Because there is no surface sharing with the casting, the riser loses heat from its entire side area, top area, and bottom area.
Surface Area, \( A_r = \pi d h + 2 \left( \frac{\pi}{4} d^2 \right) = \pi d^2 + \frac{\pi}{2} d^2 = \frac{3\pi}{2} d^2 \).
Cooling Modulus of riser, \( M_r = \frac{V_r}{A_r} = \frac{\frac{\pi}{4} d^3}{\frac{3\pi}{2} d^2} = \frac{d}{6} \).
Applying the Condition:
\[ M_r \ge M_c \]
\[ \frac{d}{6} \ge \frac{10}{6} \]
\[ d \ge 10 cm \]
The diameter of the riser must be strictly greater than or equal to 10 cm.
Looking at the options: 5, 8, 15, and 20.
Only 15 cm and 20 cm satisfy \( d \ge 10 \).
Step 4: Final Answer:
The valid values for \( d \) are 15 cm and 20 cm.
Quick Tip: Pay close attention to "surface sharing" conditions. If a side riser shares a bottom/side surface with the casting, that surface area is subtracted from \( A_r \). Since it doesn't here, we use the full surface area of the cylinder.
In a rolling operation, a 200 mm wide strip of 23 mm thickness needs to be reduced to 20 mm in a single pass. The roll diameter is 200 mm. Four lubricants P, Q, R, and S with coefficient of friction 0.05, 0.1, 0.2, and 0.25, respectively, are available for use at the roll-strip interface. Assume that the strip width remains constant throughout the process.
Which ONE or MORE among the following lubricants will enable the rolling process to achieve the desired final thickness of the strip in a single pass?
Step 1: Understanding the Question:
For a rolling process to be successful without the rolls slipping over the workpiece, the required reduction in thickness (draft) must not exceed the maximum possible draft dictated by the coefficient of friction and roll radius.
Step 2: Key Formula or Approach:
The condition for rolling to take place is:
\[ \Delta h \le \Delta h_{max} \]
Where maximum draft is:
\[ \Delta h_{max} = \mu^2 R \]
- \( \Delta h \) is the required draft (\( h_0 - h_f \)).
- \( \mu \) is the coefficient of friction.
- \( R \) is the radius of the rolls.
Step 3: Detailed Explanation:
Given data:
Initial thickness, \( h_0 = 23 mm \)
Final thickness, \( h_f = 20 mm \)
Required draft, \( \Delta h = 23 - 20 = 3 mm \)
Roll diameter, \( D = 200 mm \implies \) Roll radius, \( R = 100 mm \)
We must find the minimum required coefficient of friction \( \mu \):
\[ \Delta h \le \mu^2 R \]
\[ 3 \le \mu^2 \times 100 \]
\[ \mu^2 \ge \frac{3}{100} = 0.03 \]
\[ \mu \ge \sqrt{0.03} \]
\[ \mu \ge 0.1732 \]
Therefore, the lubricant must provide a coefficient of friction of at least 0.1732.
Let's evaluate the given options:
- Lubricant P: \( \mu = 0.05 \) (Too low)
- Lubricant Q: \( \mu = 0.10 \) (Too low)
- Lubricant R: \( \mu = 0.20 \) (Valid, \( \ge 0.1732 \))
- Lubricant S: \( \mu = 0.25 \) (Valid, \( \ge 0.1732 \))
Step 4: Final Answer:
Lubricants R and S will enable the process.
Quick Tip: In rolling, friction is your friend for gripping the material. If the required draft is large, a high coefficient of friction is strictly necessary, even if it requires more power.
In the theory of orthogonal machining, assuming that the shear plane will take up an angle that minimizes energy, the shear angle can be shown to be
\[ \phi = C - \frac{\beta}{2} + \frac{\alpha}{2} \]
where \( \phi \) is the shear angle, \( \alpha \) the rake angle, and \( \beta \) the friction angle.
Which ONE or MORE among the following is/are TRUE?
Step 1: Understanding the Question:
The question asks us to identify the theoretical conditions under which the parameter \( C \) in the generic shear angle relation \( \phi = C - \beta/2 + \alpha/2 \) acts as a universal constant versus a material-dependent variable.
Step 2: Detailed Explanation:
This question explores the difference between Merchant's First and Second (Modified) Theories.
1. Merchant's Original Theory:
Merchant originally assumed that the shear strength (\( \tau_s \)) of the work material on the shear plane is a universal constant, meaning it is independent of the normal stress (\( \sigma_n \)) acting on that plane.
Minimizing the cutting work under this assumption yields:
\[ \phi = \frac{\pi}{4} - \frac{\beta}{2} + \frac{\alpha}{2} \]
Here, \( C = \pi/4 \) (or \( 45^\circ \)), which is a strict mathematical constant. Thus, statement (A) is TRUE, and (C) is FALSE.
2. Merchant's Modified Theory:
Because experimental data deviated from the first theory, Merchant modified his assumption, stating that the shear stress is linearly dependent on the normal stress: \( \tau_s = \tau_0 + k \sigma_n \), where \( k \) is a material-specific constant.
Minimizing the energy under this new assumption yields:
\[ \phi = \frac{\cot^{-1}(k)}{2} - \frac{\beta}{2} + \frac{\alpha}{2} \]
Here, \( C = \frac{\cot^{-1}(k)}{2} \). Since \( k \) represents internal friction/properties of the specific material being cut, \( C \) now depends on material properties. Thus, statement (D) is TRUE, and (B) is FALSE.
Step 3: Final Answer:
Statements (A) and (D) are correct.
Quick Tip: Merchant's 1st Theory: \( 2\phi + \beta - \alpha = 90^\circ \) (Assumes ideal constant shear stress).
Merchant's 2nd Theory: \( 2\phi + \beta - \alpha = C \) (Assumes shear stress varies with normal pressure; \( C \) depends on the material).
Which ONE or MORE among the following homogeneous representations in robotics involve(s) rotation about Y-axis by an angle \( \theta \)?
Step 1: Understanding the Question:
We need to identify which \( 4 \times 4 \) homogeneous transformation matrices encapsulate a rotational component specifically about the Principal Y-axis.
Step 2: Key Formula or Approach:
A standard \( 4 \times 4 \) homogeneous transformation matrix is structured as:
\[ T = \begin{bmatrix} R_{3\times3} & d_{3\times1}
0_{1\times3} & 1 \end{bmatrix} \]
where \( R_{3\times3} \) represents the pure rotation matrix, and \( d_{3\times1} \) represents translation.
The basic 3D rotation matrix for a rotation around the Y-axis by angle \( \theta \) is:
\[ R_y(\theta) = \begin{bmatrix} \cos\theta & 0 & \sin\theta
0 & 1 & 0
-\sin\theta & 0 & \cos\theta \end{bmatrix} \]
Step 3: Detailed Explanation:
Let's evaluate the top-left \( 3 \times 3 \) sub-matrix of each option:
- Option (A): The rotation matrix represents a rotation about the Z-axis (the \( 3\times3 \) identity is in the z-row/column).
- Option (B): The rotation matrix represents a rotation about the X-axis (the \( 3\times3 \) identity is in the x-row/column).
- Option (C): The rotation matrix exactly matches \( R_y(\theta) \). The translation vector is zero. It strictly represents a pure rotation about the Y-axis.
- Option (D): The rotation matrix exactly matches \( R_y(\theta) \). The translation vector is \( [3, 4, 2]^T \). The question asks which matrices "involve" rotation about the Y-axis. Since this matrix consists of a Y-axis rotation coupled with a translation, it definitely involves a rotation about the Y-axis.
Step 4: Final Answer:
Options (C) and (D) involve rotation about the Y-axis.
Quick Tip: To quickly identify principal rotation matrices, look for the row/column with the \( 1 \) and \( 0 \)'s. If the \( 1 \) is in the 1st row/col, it's X-axis. If 2nd, it's Y-axis. If 3rd, it's Z-axis.
Which ONE or MORE among the following options is/are TRUE for the ideal operating characteristics (OC) curve given in the figure?
Note: \( p_0 \) represents the acceptable quality level (AQL) and \( p_1 \) represents the lot tolerance percent defective (LTPD).
Step 1: Understanding the Question:
The graph shows an "Ideal OC curve", which is a perfect step function. We need to evaluate the Producer's Risk (\( \alpha \)) and Consumer's Risk (\( \beta \)) for this specific idealized scenario.
Step 2: Key Definitions:
- Producer’s Risk (\( \alpha \)): The probability of rejecting a lot that is actually "good" (where defect rate \( p \le AQL \)).
- Consumer’s Risk (\( \beta \)): The probability of accepting a lot that is actually "bad" (where defect rate \( p \ge LTPD \)).
Step 3: Detailed Explanation:
Analyzing the provided Ideal OC Curve:
1. Evaluating Producer's Risk:
For any defect proportion \( p \) from 0 up to \( p_0 \) (the acceptable quality level), the probability of accepting the lot on the Y-axis is exactly 1 (100%).
If the probability of acceptance is 100%, the probability of rejection is 0%.
Therefore, the chance of falsely rejecting a good lot (Producer's Risk) is completely eliminated, so it is zero. (Option C is True).
2. Evaluating Consumer's Risk:
For any defect proportion \( p \) greater than \( p_0 \) (including \( p_1 \), the LTPD), the curve drops instantly to 0. The probability of accepting these lots is exactly 0.
Therefore, the chance of falsely accepting a bad lot (Consumer's Risk) is completely eliminated, so it is zero. (Option D is True).
Step 4: Final Answer:
Both Producer's risk and Consumer's risk are zero.
Quick Tip: An ideal OC curve represents a system with 100% perfect inspection, where no sampling errors exist. Thus, all risks to both parties drop to zero. Real-world sampling always produces an "S" shaped curve.
The operation chart of a method of assembling nuts and bolts for a left-handed operator has been illustrated in the figure.
Which ONE or MORE among the following options is/are CORRECT?
Step 1: Understanding the Question:
We are presented with a Two-Handed Process Chart (or Operation Chart) mapping the tasks of the left and right hands during an assembly operation. The operator is specifically stated to be left-handed.
Step 2: Detailed Explanation:
Let's analyze the chart against the principles of motion economy:
1. Work Distribution:
Look at the timeline. The Left hand is mostly "Idle" or merely acting as a static fixture ("Hold the bolt").
Meanwhile, the Right hand is performing many active, sequential operations: reaching bins, picking parts, screwing, and moving assemblies.
Clearly, the work is severely unbalanced. Thus, statement (A) is True and (C) is False.
2. Opposite Motions:
According to motion economy, both hands should move simultaneously in symmetrical and opposite directions to balance momentum and reduce fatigue. Here, the right hand works across the workstation while the left hand stays stationary. They do not follow opposite motions. Thus, statement (B) is True.
3. Dominant Hand Usage:
The operator is left-handed, making the left hand their dominant hand.
However, the chart assigns almost all the complex, high-dexterity work (screwing the nut) to the \textit{right hand. The dominant hand is drastically underutilized. Thus, statement (D) is False.
Step 3: Final Answer:
Options (A) and (B) are correct statements.
Quick Tip: In a well-designed workstation, hands should begin and end motions simultaneously, move symmetrically, and never be used merely as a vise or holding fixture.
Which ONE or MORE among the following work materials is/are NOT commonly machined using diamond cutting tools?
Step 1: Understanding the Question:
We need to identify the materials that are generally considered incompatible with diamond (PCD or monocrystalline) cutting tools.
Step 2: Key Concept (Tool-Material Compatibility):
Diamond is pure carbon. At the high temperatures generated during machining, carbon has a strong chemical affinity to dissolve into certain metals—most notably iron (ferrous metals).
When machining ferrous alloys, the diamond tool undergoes rapid chemical wear (diffusion wear) and transforms into graphite, causing catastrophic tool failure.
Step 3: Detailed Explanation:
Let's evaluate the options based on this chemical constraint:
- (A) Mild steel: A ferrous material (contains iron). Diamond will chemically react and wear rapidly. Not commonly machined.
- (B) Stainless steel: A ferrous alloy. Similar to mild steel, it will cause severe chemical wear on diamond tools. Not commonly machined.
- (C) Silicon: A non-ferrous, brittle, hard material. Diamond is highly suitable and frequently used for slicing/machining silicon wafers.
- (D) Aluminium alloy: A non-ferrous, soft material. Diamond tools (especially PCD) are the industry standard for machining aluminum because they prevent built-up edge (BUE) and leave an excellent surface finish.
Step 4: Final Answer:
Mild steel and Stainless steel are not machined with diamond tools.
Quick Tip: Never use diamond tools to cut iron or steel. For ferrous metals, Cubic Boron Nitride (CBN) is the preferred super-abrasive alternative because it does not react chemically with iron.
A linear slot is to be milled in a single pass from the point (0, 0) to (180, 180) on XY plane by a CNC machine. The actual velocity along the Y-axis is 5% less than the intended value. The programmed feed rate along the intended slot is 150 mm/min.
The magnitude of the positional error along the Y-axis when the X-coordinate reaches 180 mm, is ______ mm (in integer).
Note: All coordinates are in mm.
Step 1: Understanding the Question:
We need to find the positional error in the Y-direction when the X-coordinate of the tool reaches 180 mm, given that the actual Y-velocity is slower than programmed due to a 5% error.
Step 2: Key Formula or Approach:
The programmed feed rate \( V = 150 mm/min \) is directed along the straight line from (0,0) to (180,180).
The angle of this path with the X-axis is \( \theta = 45^\circ \).
The intended velocity components are:
\[ V_x = V \cos(45^\circ) = \frac{150}{\sqrt{2}} mm/min \]
\[ V_y = V \sin(45^\circ) = \frac{150}{\sqrt{2}} mm/min \]
Step 3: Detailed Explanation:
The actual velocity along the Y-axis is 5% less than intended:
\[ V_{y(actual)} = 0.95 \times V_y = 0.95 \times \frac{150}{\sqrt{2}} \]
The actual velocity along the X-axis remains unchanged:
\[ V_{x(actual)} = \frac{150}{\sqrt{2}} \]
Now, find the time \( t \) required for the X-coordinate to reach 180 mm:
\[ t = \frac{Distance_x}{V_{x(actual)}} = \frac{180}{150 / \sqrt{2}} = \frac{180 \sqrt{2}}{150} = 1.2\sqrt{2} minutes \]
During this exact time \( t \), find the actual distance traveled along the Y-axis:
\[ Y_{actual} = V_{y(actual)} \times t \]
\[ Y_{actual} = \left( 0.95 \times \frac{150}{\sqrt{2}} \right) \times (1.2\sqrt{2}) \]
\[ Y_{actual} = 0.95 \times 150 \times 1.2 = 171 mm \]
The intended Y-coordinate when X reaches 180 mm is 180 mm (since the path is a 45-degree line).
The magnitude of positional error along the Y-axis is:
\[ Error = |Y_{intended} - Y_{actual}| = |180 - 171| = 9 mm \]
Step 4: Final Answer:
The positional error is 9 mm.
Quick Tip: In CNC interpolation problems, always break the programmed feed rate into its orthogonal components (\(V_x\) and \(V_y\)). Calculate the time taken to travel along the unaffected axis first, and use that time to find the real position of the affected axis.
In laser beam machining, the time (\( t_m \)) required for the material to attain the melting temperature from a room temperature (\( \theta_0 \)) of 32 °C is expressed by the following expression,
\[ t_m = \frac{\pi}{\alpha} \left( \frac{(\theta_m - \theta_0) k}{2H} \right)^2 \]
where \( \alpha \) is thermal diffusivity, \( \theta_m \) is melting temperature, \( k \) is thermal conductivity, \( H \) is heat flux.
If a uniformly distributed 1 kW power laser beam with a beam diameter of 0.1 mm is used for machining tungsten carbide, and 10% of beam absorption is assumed, the time \( t_m \) is ______ \( \mus \) (rounded off to one decimal place).
Note: Thermal properties of tungsten carbide: melting temperature = 3400 °C; thermal conductivity = 2.15 W/cm-°C; diffusivity = 0.79 cm\(^2\) s\(^{-1}\); assume \( \pi = 3.14 \).
Step 1: Understanding the Question:
We are asked to calculate the time required to heat tungsten carbide to its melting point using a laser beam. The formula and all necessary material constants are provided.
Step 2: Detailed Explanation:
Given data:
Power \( P = 1 kW = 1000 W \)
Absorption = 10%, so Absorbed Power \( P_{abs} = 0.10 \times 1000 = 100 W \)
Beam diameter \( d = 0.1 mm = 0.01 cm \)
Melting temp \( \theta_m = 3400 °C \)
Room temp \( \theta_0 = 32 °C \)
Conductivity \( k = 2.15 W/cm-°C \)
Diffusivity \( \alpha = 0.79 cm^2/s \)
\( \pi = 3.14 \)
First, calculate the cross-sectional area of the laser beam in cm\(^2\):
\[ A = \frac{\pi}{4} d^2 = \frac{3.14}{4} (0.01)^2 = 7.85 \times 10^{-5} cm^2 \]
Next, calculate the heat flux \( H \) (Power per unit area):
\[ H = \frac{P_{abs}}{A} = \frac{100}{7.85 \times 10^{-5}} = 1.273885 \times 10^6 W/cm^2 \]
Now, evaluate the term inside the parenthesis of the given formula:
Numerator: \( (\theta_m - \theta_0) k = (3400 - 32) \times 2.15 = 3368 \times 2.15 = 7241.2 \)
Denominator: \( 2H = 2 \times 1.273885 \times 10^6 = 2.54777 \times 10^6 \)
\[ Ratio = \frac{7241.2}{2.54777 \times 10^6} = 0.00284217 \]
Square the ratio:
\[ (0.00284217)^2 = 8.0779 \times 10^{-6} s \]
Calculate the multiplier outside the parenthesis:
\[ \frac{\pi}{\alpha} = \frac{3.14}{0.79} = 3.97468 \]
Finally, calculate \( t_m \):
\[ t_m = 3.97468 \times 8.0779 \times 10^{-6} = 3.2107 \times 10^{-5} seconds \]
To convert seconds to microseconds (\( \mus \)), multiply by \( 10^6 \):
\[ t_m = 3.2107 \times 10^{-5} \times 10^6 = 32.107 \mus \]
Step 4: Final Answer:
Rounded off to one decimal place, the time is 32.1.
Quick Tip: Ensure strict unit conformity in heat transfer problems. Since thermal properties are given in cm-based units, immediately convert the beam diameter from mm to cm before calculating the heat flux.
In the measurement of surface roughness using a 2D stylus profilometer, a surface profile measured over a length of 0.8 mm was recorded on a graph paper. During recording, vertical magnification of 10,000 and horizontal magnification of 100 were used. The areas in the as-recorded graph above and below the datum line are as follows:
Above (mm\(^2\)): 140, 60, 150, 50
Below (mm\(^2\)): 70, 50, 120, 160
The average surface roughness (\( R_a \)) of the surface is ______ \( \mum \) (rounded off to two decimal places).
Step 1: Understanding the Question:
We need to calculate the Center Line Average roughness (\( R_a \)) based on the areas recorded on an amplified profilometer graph.
Step 2: Key Formula or Approach:
The formula for average surface roughness \( R_a \) from an amplified graph is:
\[ R_a = \frac{\sum A}{L_{actual} \times V_{mag} \times H_{mag}} \]
Where:
- \( \sum A \) is the total sum of areas above and below the datum line on the graph.
- \( L_{actual} \) is the actual sampling length of the surface.
- \( V_{mag} \) is the vertical magnification.
- \( H_{mag} \) is the horizontal magnification.
Step 3: Detailed Explanation:
Calculate the total area on the graph:
\[ \sum A = (140 + 60 + 150 + 50) + (70 + 50 + 120 + 160) \]
\[ \sum A = 400 + 400 = 800 mm^2 \]
Given parameters:
\( L_{actual} = 0.8 mm \)
\( V_{mag} = 10,000 \)
\( H_{mag} = 100 \)
Substitute into the formula:
\[ R_a = \frac{800}{0.8 \times 10,000 \times 100} \]
\[ R_a = \frac{800}{800,000} mm \]
\[ R_a = 0.001 mm \]
Convert the result into micrometers (\( \mum \)):
\[ 0.001 mm = 0.001 \times 1000 \mum = 1 \mum \]
Step 4: Final Answer:
The average surface roughness is 1.00 \( \mum \).
Quick Tip: Alternatively, find the length of the trace on the graph (\( 0.8 \times 100 = 80 mm \)). Divide the total area by this length to get the average height on the graph (\( 800 / 80 = 10 mm \)). Finally, divide by the vertical magnification (\( 10 / 10,000 = 0.001 mm \)). Both approaches yield identical results.
A cylindrical metal component of 10 mm diameter is subjected to uniform uniaxial tension during operation. It was observed that a force of 14 kN produces a uniform reduction of \( 3 \times 10^{-3} \) mm in diameter. Assume that material behaviour is homogeneous, isotropic, and linear elastic.
If its Young’s modulus is 150 GPa, the Poisson’s ratio of the material is ______ (rounded off to two decimal places).
Note: Assume \( \pi = 3.14 \).
Step 1: Understanding the Question:
We are asked to find the Poisson's ratio (\( \nu \)) of a material, which requires both the lateral (diametral) strain and the longitudinal (axial) strain.
Step 2: Key Formula or Approach:
Poisson's ratio is defined as the negative ratio of lateral strain (\( \epsilon_d \)) to longitudinal strain (\( \epsilon_L \)):
\[ \nu = - \frac{\epsilon_d}{\epsilon_L} \]
The strains are given by:
\[ \epsilon_d = \frac{\Delta D}{D} \quad and \quad \epsilon_L = \frac{\sigma}{E} \]
where axial stress \( \sigma = \frac{F}{A} \).
Step 3: Detailed Explanation:
Given data:
Diameter \( D = 10 mm \)
Force \( F = 14 kN = 14000 N \)
Change in diameter \( \Delta D = -3 \times 10^{-3} mm \) (negative because it's a reduction)
Young's Modulus \( E = 150 GPa = 150,000 MPa (or N/mm^2) \)
\( \pi = 3.14 \)
Calculate the cross-sectional area \( A \):
\[ A = \frac{\pi}{4} D^2 = \frac{3.14}{4} (10)^2 = 78.5 mm^2 \]
Calculate the axial stress \( \sigma \):
\[ \sigma = \frac{14000 N}{78.5 mm^2} = 178.3439 MPa \]
Calculate the longitudinal strain \( \epsilon_L \):
\[ \epsilon_L = \frac{\sigma}{E} = \frac{178.3439}{150000} = 0.00118896 \]
Calculate the lateral (diametral) strain \( \epsilon_d \):
\[ \epsilon_d = \frac{-3 \times 10^{-3} mm}{10 mm} = -0.0003 \]
Calculate Poisson's ratio \( \nu \):
\[ \nu = - \frac{-0.0003}{0.00118896} = 0.2523 \]
Step 4: Final Answer:
Rounded off to two decimal places, the Poisson's ratio is 0.25.
Quick Tip: Ensure stress and Young's modulus are in consistent units. 1 GPa = 1000 MPa, and 1 MPa exactly equals 1 N/mm\(^2\). This avoids messy conversions from meters to millimeters.
A custom pinion, with a width equal to 10 times the module, has 20 full depth teeth and a pressure angle of 20° is being designed. It should transmit a torque of 95 N-m to a corresponding spur gear.
Considering the safe bending stress to be 180 MPa and form factor to be 0.342, the module of the pinion is ______ mm (rounded off to one decimal place).
Note: The Lewis equation gives the tangential force as \( F_t = \sigma b Y m \), where \( \sigma \) is the safe bending stress, \( b \) the width, \( Y \) the form factor, and \( m \) the module.
Step 1: Understanding the Question:
We need to calculate the module (\( m \)) of a spur gear pinion using the Lewis equation for bending strength.
Step 2: Key Formula or Approach:
The Lewis bending equation is provided:
\[ F_t = \sigma \cdot b \cdot Y \cdot m \]
The tangential force \( F_t \) transmitted by the gear is related to the applied torque \( T \) and pitch circle diameter \( d \) by:
\[ F_t = \frac{2T}{d} \]
Also, pitch circle diameter \( d = m \cdot z \) (where \( z \) is the number of teeth).
Step 3: Detailed Explanation:
Given data:
Torque \( T = 95 N-m = 95,000 N-mm \)
Number of teeth \( z = 20 \)
Width \( b = 10m \)
Safe bending stress \( \sigma = 180 MPa = 180 N/mm^2 \)
Form factor \( Y = 0.342 \)
Express the pitch circle diameter in terms of module:
\[ d = z \times m = 20m \]
Calculate the tangential force in terms of module:
\[ F_t = \frac{2 \times 95000}{20m} = \frac{9500}{m} \]
Substitute all knowns and expressions into the Lewis equation:
\[ \frac{9500}{m} = (180) \times (10m) \times (0.342) \times (m) \]
\[ \frac{9500}{m} = 1800 \times 0.342 \times m^2 \]
\[ \frac{9500}{m} = 615.6 \times m^2 \]
\[ m^3 = \frac{9500}{615.6} \]
\[ m^3 = 15.432 \]
Take the cube root to find \( m \):
\[ m = \sqrt[3]{15.432} \approx 2.49 mm \]
Step 4: Final Answer:
Rounded off to one decimal place, the module is 2.5.
Quick Tip: When working with gear design formulas, always convert Torque from N-m into N-mm immediately to match the MPa (N/mm\(^2\)) units of stress.
A company has a fixed cost of INR 3,00,000 and a variable cost of INR 150 per unit for manufacturing of a product. The company sells 5,000 units of that product making a profit equivalent to 20 % of the total sales revenue.
The break-even quantity for that product is _____ units (rounded off to the nearest integer).
Step 1: Understanding the Question:
We need to find the Break-Even Point (BEP) in units. To do this, we first need to determine the unknown selling price per unit using the profit condition provided.
Step 2: Key Formula or Approach:
Total Cost (TC) = Fixed Cost (FC) + Variable Cost (\( v \)) \( \times \) Quantity (\( Q \))
Total Revenue (TR) = Selling Price (\( P \)) \( \times \) Quantity (\( Q \))
Profit = Total Revenue - Total Cost
Break-Even Quantity = \( \frac{FC}{P - v} \)
Step 3: Detailed Explanation:
Given data:
Fixed Cost, \( FC = 3,00,000 \)
Variable Cost, \( v = 150 per unit \)
Current Sales Quantity, \( Q = 5000 \)
Profit = 20% of Total Revenue = \( 0.2 \times TR \)
First, calculate the Total Cost at 5000 units:
\[ TC = 3,00,000 + (150 \times 5000) = 3,00,000 + 7,50,000 = 10,50,000 \]
Using the profit relationship:
\[ Profit = TR - TC \]
\[ 0.2 \times TR = TR - 10,50,000 \]
\[ 10,50,000 = TR - 0.2 \times TR \]
\[ 10,50,000 = 0.8 \times TR \]
\[ TR = \frac{10,50,000}{0.8} = 13,12,500 \]
Now, find the selling price per unit (\( P \)):
\[ P = \frac{TR}{Q} = \frac{13,12,500}{5000} = 262.5 \]
Finally, calculate the Break-Even Quantity:
\[ BEP = \frac{FC}{P - v} = \frac{3,00,000}{262.5 - 150} \]
\[ BEP = \frac{3,00,000}{112.5} = 2666.666... \]
Step 4: Final Answer:
Rounding off to the nearest integer gives 2667 units.
Quick Tip: Break-even analysis frequently hides the selling price inside a profit/margin relationship. Always set up the fundamental equation \( Revenue = Fixed Cost + Variable Cost + Profit \) to reliably extract the missing parameters.
A company must allocate oil produced from their two plants to meet all the demands of two markets. The cost per litre of allocation from plant \( i \in \{1,2\} \) to market \( j \in \{1,2\} \) is denoted by \( C_{ij} \). The market demand \( D_j \), plant production capacity \( K_i \) and \( C_{ij} \) values are given in the table.
The company hired an intern to formulate an optimization model to decide on the quantity (\( X_{ij} \)) to be allocated from plant \( i \) to market \( j \) and the formulation is given below:
Minimize \( Z = \sum_{i=1}^{2} \sum_{j=1}^{2} C_{ij}X_{ij} \)
Subject to
\( \sum_{j=1}^{2} X_{ij} \le K_i \quad \forall i \in \{1,2\} \)
\( \sum_{i=1}^{2} X_{ij} \le D_j \quad \forall j \in \{1,2\} \)
\( X_{ij} \ge 0 \)
The optimal value of the objective function of the linear programming problem formulated by the intern is ______ (in integer).
Step 1: Understanding the Question:
The question provides a standard transportation problem but explicitly asks for the optimal value of the specific Linear Programming (LP) model as formulated by the intern. We must solve the mathematical model exactly as written, regardless of whether it correctly models the real-world scenario.
Step 2: Analyzing the Formulation:
The intern's objective function is to Minimize the total cost \( Z \).
Notice the constraint formulated for demand:
\[ \sum_{i=1}^{2} X_{ij} \le D_j \]
In a correct transportation model, this must be an equality (\( = D_j \)) or a greater-than-or-equal-to (\( \ge D_j \)) constraint to ensure the market demands are actually met.
By using the less-than-or-equal-to (\( \le \)) sign, the intern has mathematically stated that delivering zero units is perfectly acceptable.
Step 3: Detailed Explanation:
Since all cost coefficients \( C_{ij} \) are positive (\( 250, 280, 150, 180 \)), sending any oil will increase the objective function \( Z \).
Because the model seeks to minimize \( Z \) subject to \( X_{ij} \ge 0 \) and allows for the total sum of \( X_{ij} \) to be less than the demand, the LP solver will simply choose the absolute minimum possible values for all decision variables.
Setting \( X_{11} = 0, X_{12} = 0, X_{21} = 0, \) and \( X_{22} = 0 \) satisfies all constraints:
- Capacity constraints: \( 0 \le 500 \) and \( 0 \le 600 \) (True)
- Demand constraints: \( 0 \le 300 \) and \( 0 \le 400 \) (True)
- Non-negativity constraints: \( 0 \ge 0 \) (True)
Substituting these values into the objective function yields:
\[ Z = (250 \times 0) + (280 \times 0) + (150 \times 0) + (180 \times 0) = 0 \]
Step 4: Final Answer:
The optimal value of the flawed model formulated by the intern is 0.
Quick Tip: In operations research exams, if a problem explicitly mentions "formulated by an intern/student," always scrutinize the constraint signs (\( \le, \ge, = \)). The question is testing your ability to spot formulation errors rather than your ability to run the simplex method.
The computer centre (CC) in an institute manages the central server for which researchers queue to run their computer programs. CC processes programs only one at a time. Four computer programs are available at 10:00 am on a given day. The time required to run each program on the central server and their respective promised time of completion (i.e., due date) on that same day are given in the table.
If the CC follows shortest processing time (SPT) rule to sequence the computer programs, then number of tardy jobs is ______.
Note: Ignore program change-over times.
Step 1: Understanding the Question:
We need to schedule four jobs using the Shortest Processing Time (SPT) rule, calculate their completion times, and compare them against their promised due dates to count how many are late (tardy).
Step 2: Scheduling Rule (SPT):
The SPT rule sequences jobs in increasing order of their processing times.
Processing times: P2 (40) \(<\) P1 (60) \(<\) P3 (90) \(<\) P4 (100).
Therefore, the sequence is: 2 \( \rightarrow \) 1 \( \rightarrow \) 3 \( \rightarrow \) 4.
Step 3: Detailed Explanation:
The server starts processing at 10:00 am. Let's trace the completion times:
- Job 2:
Processing time = 40 mins.
Completion time = 10:00 am + 40 mins = 10:40 am.
Due date = 11:30 am.
Is it tardy? No.
- Job 1:
Processing time = 60 mins.
Completion time = 10:40 am + 60 mins = 11:40 am.
Due date = 12:00 noon.
Is it tardy? No.
- Job 3:
Processing time = 90 mins.
Completion time = 11:40 am + 90 mins = 13:10 (or 1:10 pm).
Due date = 1:00 pm.
Is it tardy? Yes (Late by 10 mins).
- Job 4:
Processing time = 100 mins.
Completion time = 1:10 pm + 100 mins = 14:50 (or 2:50 pm).
Due date = 1:30 pm.
Is it tardy? Yes (Late by 1 hour 20 mins).
Step 4: Final Answer:
Jobs 3 and 4 are tardy, meaning the total number of tardy jobs is 2.
Quick Tip: While the SPT rule mathematically minimizes the average flow time and average waiting time in a system, it does not guarantee minimizing the number of tardy jobs (Moore's algorithm is used for that). Always trace the timeline manually.
If \( \frac{dy}{dt} = 2y \), and the value of \( y \) at \( t = 0 \) is 2, then the value of \( y \) at \( t = 1 \) is ______ (rounded off to two decimal places).
Step 1: Understanding the Question:
We need to solve a first-order linear ordinary differential equation (ODE) using an initial boundary condition to find the value of the function at a specific time.
Step 2: Key Formula or Approach:
The given differential equation can be solved easily using the separation of variables method:
\[ \frac{dy}{dt} = 2y \]
Step 3: Detailed Explanation:
Separate the variables \( y \) and \( t \):
\[ \frac{dy}{y} = 2 dt \]
Integrate both sides:
\[ \int \frac{1}{y} dy = \int 2 dt \]
\[ \ln(y) = 2t + C \]
Apply the initial condition to find the constant of integration \( C \). We are given that \( y = 2 \) when \( t = 0 \):
\[ \ln(2) = 2(0) + C \implies C = \ln(2) \]
Substitute \( C \) back into the general equation:
\[ \ln(y) = 2t + \ln(2) \]
Solve for \( y \) by taking the exponential of both sides:
\[ y = e^{2t + \ln(2)} \]
\[ y = e^{2t} \cdot e^{\ln(2)} \]
\[ y = 2e^{2t} \]
Now, evaluate \( y \) at \( t = 1 \):
\[ y(1) = 2e^{2(1)} = 2e^2 \]
Given that \( e \approx 2.71828 \), \( e^2 \approx 7.38905 \):
\[ y(1) = 2 \times 7.38905 = 14.7781 \]
Step 4: Final Answer:
Rounded off to two decimal places, the value is 14.78.
Quick Tip: Equations of the form \( dy/dt = ky \) model exponential growth or decay and always yield solutions of the form \( y(t) = y_0 e^{kt} \). You can skip the integration steps and jump straight to this formula to save time.
The number of soldering defects that occur in a semiconductor device follows a discrete Poisson distribution with a probability mass function
\[ p(x) = \frac{e^{-\lambda}\lambda^x}{x!} \]
The average number of soldering defects per semiconductor device is 3.
The probability that a randomly selected semiconductor device will have at least two soldering defects is ______ (rounded off to two decimal places).
Step 1: Understanding the Question:
We need to calculate the probability of finding 2 or more defects (\( X \ge 2 \)) in a device, given that the distribution is Poisson with an average rate (\( \lambda \)) of 3.
Step 2: Key Formula or Approach:
Instead of summing infinite probabilities from 2 to infinity, we use the complementary probability rule:
\[ P(X \ge 2) = 1 - P(X < 2) = 1 - [P(X = 0) + P(X = 1)] \]
Step 3: Detailed Explanation:
Given \( \lambda = 3 \).
Calculate the probability of exactly 0 defects:
\[ P(X = 0) = \frac{e^{-3} \cdot 3^0}{0!} = \frac{e^{-3} \cdot 1}{1} = e^{-3} \]
\[ e^{-3} \approx 0.049787 \]
Calculate the probability of exactly 1 defect:
\[ P(X = 1) = \frac{e^{-3} \cdot 3^1}{1!} = 3e^{-3} \]
\[ 3e^{-3} \approx 3 \times 0.049787 = 0.149361 \]
Sum these probabilities to find \( P(X < 2) \):
\[ P(X < 2) = 0.049787 + 0.149361 = 0.199148 \]
Finally, find the probability of at least two defects:
\[ P(X \ge 2) = 1 - 0.199148 = 0.800852 \]
Step 4: Final Answer:
Rounded off to two decimal places, the probability is 0.80.
Quick Tip: Whenever a question asks for "at least" in a Poisson distribution, calculating the complement (\( 1 - unwanted probabilities \)) is usually the fastest and only practical method.
A time study was carried out for a job broken into two elements. For each element, three iterations of task were observed, and observed time was recorded. The observed times (in seconds) and the rating factor for each element are given in the table.
If a further 20% needs to be added for allowances, then the standard output of the worker is ______ units per hour (in integer).
Step 1: Understanding the Question:
We need to calculate the standard time to complete one full job (comprising elements A and B) and then determine how many jobs (units) the worker can produce in exactly one hour.
Step 2: Key Formula or Approach:
1. Average Observed Time (OT) = Sum of times / Number of observations
2. Normal Time (NT) = OT \( \times \) Rating Factor
3. Standard Time (ST) = Total NT \( \times \) (1 + Allowance Factor)
4. Output per hour = 3600 seconds / ST in seconds
Step 3: Detailed Explanation:
Element A:
Average OT = \( \frac{20 + 25 + 21}{3} = \frac{66}{3} = 22 seconds \)
Normal Time (\( NT_A \)) = \( 22 \times 1.05 = 23.1 seconds \)
Element B:
Average OT = \( \frac{19 + 17 + 18}{3} = \frac{54}{3} = 18 seconds \)
Normal Time (\( NT_B \)) = \( 18 \times 0.90 = 16.2 seconds \)
Total Job:
Total Normal Time = \( 23.1 + 16.2 = 39.3 seconds \)
Adding 20% allowance to the total Normal Time gives the Standard Time:
\[ ST = 39.3 \times (1 + 0.20) = 39.3 \times 1.2 = 47.16 seconds/unit \]
Production Output:
Total time available in an hour = 3600 seconds.
\[ Units per hour = \frac{3600}{47.16} = 76.335 units \]
Step 4: Final Answer:
Since we require the integer value, the output is 76 units per hour.
Quick Tip: Apply the rating factor to the average observed time for each individual element before adding them up. Applying an average rating factor to the total time will yield an incorrect result.
In a hole-shaft assembly, the following are the dimensions and tolerances (all in mm) provided for the hole and shaft:
Hole: \( 22^{+0.018}_{+0.010} \)
Shaft: \( 22^{+0.075}_{+0.004} \)
The magnitude of the clearance when the shaft is at the minimum material condition and hole is at the maximum material condition is ______ mm (to three decimal places).
Step 1: Understanding the Question:
We need to calculate the clearance between a specific mating condition of a hole and a shaft. "Clearance" is the empty space between them, mathematically given by (Hole size - Shaft size).
Step 2: Key Definitions:
- Minimum Material Condition (LMC) is the size limit that contains the least amount of material. For a shaft, this is its smallest allowed diameter.
- Maximum Material Condition (MMC) is the size limit that contains the most amount of material. For a hole, this is its smallest allowed diameter (since adding more material shrinks the hole).
Step 3: Detailed Explanation:
Identify the limits for the shaft:
Maximum Shaft = 22 + 0.075 = 22.075 mm
Minimum Shaft = 22 + 0.004 = 22.004 mm
The Shaft at LMC (Least material) is its smallest size = 22.004 mm.
Identify the limits for the hole:
Maximum Hole = 22 + 0.018 = 22.018 mm
Minimum Hole = 22 + 0.010 = 22.010 mm
The Hole at MMC (Most material) is its smallest size = 22.010 mm.
Calculate the specific clearance under these conditions:
\[ Clearance = Hole Size (MMC) - Shaft Size (LMC) \]
\[ Clearance = 22.010 - 22.004 = 0.006 mm \]
Step 4: Final Answer:
The magnitude of the clearance is 0.006.
Quick Tip: For a hole, MMC is the minimum diameter and LMC is the maximum diameter. For a shaft, it's the opposite: MMC is the maximum diameter and LMC is the minimum diameter.
Consider an assembly line producing an item through a process involving three activities in the following order: cutting, welding, and polishing. There are three workers available: one is assigned only for cutting, one is assigned only for welding, and one is assigned only for polishing.
The activity time per item is given in the table.
Assuming that the process is running in steady state, the total number of items coming out of the assembly line in six hours is ______ (in integer).
Note: Assume that workers, items, and machines/tools are available as and when needed.
Step 1: Understanding the Question:
We have a three-station sequential assembly line operating with dedicated workers. We need to determine the total production output over a 6-hour period running in a "steady state".
Step 2: Key Formula or Approach:
In a sequential assembly line, the overall pace of production is entirely dictated by the slowest activity. This slowest step is known as the bottleneck.
The cycle time (\( C \)) of the entire line equals the activity time of the bottleneck.
\[ Throughput = \frac{Total Available Time}{Cycle Time} \]
Step 3: Detailed Explanation:
Identify the bottleneck activity:
Cutting = 30 mins
Welding = 40 mins
Polishing = 25 mins
The longest activity is Welding (40 minutes). Therefore, the cycle time of the entire assembly line is 40 minutes per item. This means in steady state, a completed item drops off the end of the line exactly every 40 minutes.
Calculate the total available time:
6 hours = 6 \( \times \) 60 = 360 minutes.
Calculate total production:
\[ Total Items = \frac{360 minutes}{40 minutes/item} = 9 items \]
Step 4: Final Answer:
The total number of items coming out of the assembly line is 9.
Quick Tip: The phrase "running in steady state" means you do not need to account for the initial transient fill-up time of the empty assembly line. You simply divide the total time by the bottleneck time.
In the composite filament winding process as shown in the figure, the mandrel diameter is 700 mm and is rotating at a speed, \( N = 6 \) rev/min.
If a 45° helical winding angle is needed, the axial velocity, \( v_c \), of the slider should be ______ m/s (rounded off to two decimal places).
Assume \( \pi = 22/7 \). Ignore the thickness of the composite layers already wound on the mandrel.
Step 1: Understanding the Question:
In a filament winding process, a continuous fibre is wound onto a rotating mandrel. The angle of the fibre (helical angle) is a result of the combined vector velocities of the rotating mandrel surface and the linearly translating slider feeding the fibre.
Step 2: Key Formula or Approach:
If the helical winding angle relative to the axis of rotation is \( \alpha \), the relationship is:
\[ \tan(\alpha) = \frac{Surface velocity of mandrel}{Axial velocity of slider} = \frac{V_m}{v_c} \]
Surface velocity \( V_m = \pi D N \)
Step 3: Detailed Explanation:
Given data:
Mandrel diameter \( D = 700 mm = 0.7 m \)
Rotational speed \( N = 6 rev/min \)
Helical angle \( \alpha = 45^\circ \)
\( \pi = \frac{22}{7} \)
First, calculate the circumferential surface velocity of the mandrel:
\[ V_m = \pi D N = \left( \frac{22}{7} \right) \times 0.7 \times 6 \]
\[ V_m = 22 \times 0.1 \times 6 = 13.2 m/min \]
Now, apply the velocity vector relationship to find \( v_c \):
\[ \tan(45^\circ) = \frac{13.2}{v_c} \]
Since \( \tan(45^\circ) = 1 \):
\[ 1 = \frac{13.2}{v_c} \implies v_c = 13.2 m/min \]
The question requires the velocity in m/s. Convert the units:
\[ v_c = \frac{13.2 m}{60 s} = 0.22 m/s \]
Step 4: Final Answer:
The required axial velocity is 0.22 m/s.
Quick Tip: Be careful with the definition of the winding angle in the diagram. Sometimes it is defined relative to the transverse plane instead of the axial plane. Here, at 45 degrees, the tangent is 1 regardless, making it foolproof, but for other angles like 30 or 60 degrees, verify which axis the angle is drawn against.
*The article might have information for the previous academic years, please refer the official website of the exam.